Orchard CMS: Up and Running
John Zablocki
Orchard CMS: Up and Running by John Zablocki
Copyright © 2012 John Zablocki. All rights reserved. Printed in the United States of America.
Published by O’Reilly Media, Inc., 1005 Gravenstein Highway North, Sebastopol, CA 95472.
O’Reilly books may be purchased for educational, business, or sales promotional use. Online editions are also available for most titles (http://my.safaribooksonline.com). For more information, contact our corporate/institutional sales department: 800-998-9938 or [email protected].
Editor: Rachel Roumeliotis
Production Editor: Melanie Yarbrough Proofreader: Melanie Yarbrough
Cover Designer: Karen Montgomery Interior Designer: David Futato Illustrator: Robert Romano
Revision History for the First Edition: 2012-05-24 First release
See http://oreilly.com/catalog/errata.csp?isbn=9781449320218 for release details.
Nutshell Handbook, the Nutshell Handbook logo, and the O’Reilly logo are registered trademarks of O’Reilly Media, Inc. Orchard CMS: Up and Running, the cover image of a Brush-tailed Bettong, and related trade dress are trademarks of O’Reilly Media, Inc.
Many of the designations used by manufacturers and sellers to distinguish their products are claimed as trademarks. Where those designations appear in this book, and O’Reilly Media, Inc., was aware of a trademark claim, the designations have been printed in caps or initial caps.
While every precaution has been taken in the preparation of this book, the publisher and authors assume no responsibility for errors or omissions, or for damages resulting from the use of the information con-tained herein.
Table of Contents
Preface . . . ix
1. Getting Started with Orchard . . . 1
Prerequisites 1
Development Environment 1
Obtaining the Orchard Solution 2
Packaged Releases 2
Using Source Control 2
The Contents of the Solution 4
Setting Up the Website 4
Configuring Orchard for the First Time 4
The Orchard Dashboard 7
Creating Content 7
Adding Widgets 10
Orchard Modules 12
Orchard Security 13
Summary 14
2. Creating and Managing Content . . . 15
Bio Items 15
Content Types 16
Content Parts 16
Content Fields 18
Projections and Queries 20
Filters 21
Sort Criteria 21
Layouts 21
Event Items 22
Content Types and Fields Continued 22
Projections and Queries Continued 24
Daisy’s Blog 25
The Blog Module 26
About Page 27
Contact Page 28
Home Page 30
Zones and Layers 31
Gallery 32
Summary 34
3. Displaying Content . . . 35
Customizing Biography Content 35
Content Templates 36
Alternate Templates 37
Customizing Events 41
Placement Files 41
Field Templates 42
Shape Tracing 43
Summary 47
4. Creating Themes . . . 49
The Orchard Command-Line Interface 49
Getting Help 49
Code Generation Tools 50
Code Generating a Theme 51
The Structure of a Theme 52
Default Content Templates 53
Working with Views 54
Layouts 55
Zones and Layers 56
Alternate Templates 57
Theme Inheritance 57
Basic Styling 60
Styling Projections 61
Shape Wrapping 62
Theme Metadata 63
Theme Previews 63
Theme Credits 63
Summary 64
5. Creating Modules . . . 65
The Places Field 65
Getting Places Data 66
Module Code Generation 66
Places Field Model 67
Drivers 69
Field Templates 72
Settings 75
Controllers 77
Module Metadata 80
Using the Places Field 80
Creating Content with the Places Field 80
Displaying the Places Field 83
Summary 84
6. Creating Widgets . . . 85
Content Parts 85
The JW Player Widget 85
Creating the Module 86
JW Player Model 87
Database Migrations 88
Handlers and Drivers 90
Placement 91
Enabling Our Module 92
A Second Migration 92
The Widget Views 93
Adding the Widget to a Zone 95
Widget Metadata 96
Summary 98
7. Localization . . . 99
Orchard Site Localization 99
Admin Localization 99
PO Files 101
Content Item Localization 102
Summary 104
8. Maintaining Orchard Sites . . . 105
Packaging Themes and Modules 105
Deploying Orchard Sites 107
Shared Hosting 107
Dedicated Hosting 108
Cloud Hosting 108
Multi-Tenancy 108
Modules and Performance 108
Workflow 109
Upgrading 109
Summary 110
Preface
A few months back, I wanted to create an online presence for my band, Daisy’s Gone. In the past, I would have started from scratch. But I remembered all the domains I’ve accumulated over the years that are now nothing more than parking pages at my reg-istrar. It’s generally not hard to throw together a few simple brochure-ware pages. I certainly could have done just that for my band’s site. However, even simple sites often have content and behavior that needs to be dynamic.
The obvious solution is to use a content management system (CMS). CMS platforms such as WordPress and Drupal offer users prebuilt functionality for everything from creating pages to managing site registration. A full-blown CMS will allow non-technical users to create and manage content and will allow programmers and designers to extend the out-of-the-box functionality by creating themes and modules, respectively. With Daisy’s Gone, I was once again presented with the dilemma of whether to build a site from scratch or to use a CMS. Fortunately, I remembered how I had seen a then just-released Orchard CMS used at the NYC Give Camp a few months earlier. Give Camps match developers and designers with charities who have some unmet technical need, often a web presence. One of the developer groups built its charity a new website using Orchard.
I remember being quite impressed by how much this team accomplished in one week-end using this new CMS. So when it came time to start building the website for my band, I made the choice to use Orchard.
The original Daisy’s Gone website was not much more than a home page. It was pri-marily a sandbox for me to learn Orchard. As I write this book, I’m going to create a new online presence for the band. I’ll walk through the steps of creating a custom look and feel (themes) and extending Orchard with new functionality (modules).
Whether you are building a new corporate site for your company or a site for the local youth soccer league, you are likely to have many of the same needs of your CMS. Building a site for a band is no different. You may need to schedule events, manage user comments, support OAuth, or have a site map. The content will vary by your domain, the features much less so.
About the Orchard Project
Microsoft released Orchard in January 2011, along with ASP.NET MVC 3, IIS Express, SQL CE 4, Web Farm Framework, and WebMatrix. What all of these technologies have in common is that they, in some way, aim to make web development on Windows more accessible. PHP owes its wide adoption to its perceived ease of use. With this new tool chain, Microsoft is courting the community who wants a simplified development experience.
The Orchard Project belongs to the Microsoft supported Outercurve Foundation (for-merly known as the CodePlex Foundation). The Outercurve Foundation is a nonprofit organization whose mission is to foster support for open source projects, such as Or-chard and the popular ASP.NET toolkit, MVC Contrib. Microsoft does not officially support Orchard, but its employees are currently among those leading the development efforts for the project.
There are three stated goals of the Orchard Project. The first is to provide a set of shared components to be used in ASP.NET applications. The second is to create a set of ref-erence applications built using these components. The third is to build a community to support these components and applications. At the time of this writing, Orchard is primarily a platform for creating content-driven websites. Though in Orchard, content is certainly not limited to blog posts or simple text-heavy pages.
Orchard is developed with a full open source stack. It uses ASP.NET MVC 3.0 with the Razor view engine. There are also numerous dependencies on other open source projects, most notably NHibernate for data access and Autofac for dependency injec-tion. Orchard is licensed under the BSD license.
Not much more than a year after its 1.0 release, Orchard has been downloaded nearly 1,000,000 times. More than 300 modules and themes have been created and submitted to the Orchard Gallery. A series of minor releases have taken Orchard to its current 1.4 version. The Orchard community is strong and growing.
Why Another .NET CMS?
developer community will gravitate towards Orchard, because its development stack is more in line with modern ASP.NET development practices.
That said, it is entirely possible to build content and functionality-rich sites using Or-chard without having to write a single line of code. Even though OrOr-chard is a relatively new product, it has a remarkably rich set of extensions. Like other modern CMS prod-ucts, Orchard marries great programmatic extensibility with rich, out-of-the-box functionality.
Audience
This book is being written for web developers who want to create content-heavy web-sites without starting from a blank slate. I assume readers have some familiarity with basic CMS concepts and some level of web development skill. Experience with Orchard is neither assumed nor required. Programming custom modules for Orchard does re-quire knowledge of C# and to a lesser extent ASP.NET MVC. If you are unfamiliar with MVC, I suggest reading 20 Recipes for Programming MVC 3 or Programming ASP.NET MVC 4 (O’Reilly) or Programming Microsoft ASP.NET MVC (Microsoft Press).
Many Orchard users will be able to accomplish their goals without having to write any custom code. This book will fully cover how to get a site up and running with Orchard and will walk readers through customization with existing themes and sites from the Orchard Gallery. However, even users who will not be building custom modules might benefit from the chapters describing module and theme architecture. Knowing how Orchard works will help users debug problems that might arise in production.
Contents of This Book
This book introduces Orchard development by walking a reader through the process of creating a customized Orchard site.
Chapter 1 covers getting an Orchard site set up for development and provides a quick tour of the Orchard experience.
Chapter 2 details the process of creating content from existing types of content and covers how to create new types of content.
Chapter 3 describes how to change the way Orchard displays content by default. Chapter 4 explores the process of customizing an Orchard site’s look and feel by build-ing a theme.
Chapter 5 provides a walkthrough of creating and configuring a custom module. Chapter 6 provides a walkthrough of creating and configuring a custom widget. Chapter 7 explores options for adding multi-language support to an Orchard site.
Chapter 8 discusses considerations for maintaining Orchard sites. Chapter 9 contains the final thoughts on what is covered in this book.
Companion Material
All code samples in this book are available on Bitbucket in my OrchardCMS repository located at https://bitbucket.org/johnzablocki/orchardcms. I use Mercurial for version control. Any general purpose module created in this book will also be available for download in the Orchard Gallery. And of course, you will be able to view the finished project at http://www.daisysgone.com.
Conventions Used in This Book
The following typographical conventions are used in this book:
Italic
Indicates new terms, URLs, email addresses, filenames, and file extensions.
Constant width
Used for program listings, as well as within paragraphs to refer to program elements such as variable or function names, databases, data types, environment variables, statements, and keywords.
Constant width bold
Shows commands or other text that should be typed literally by the user. Constant width italic
Shows text that should be replaced with user-supplied values or by values deter-mined by context.
This icon signifies a tip, suggestion, or general note.
This icon indicates a warning or caution.
Using Code Examples
permission. Selling or distributing a CD-ROM of examples from O’Reilly books does require permission. Answering a question by citing this book and quoting example code does not require permission. Incorporating a significant amount of example code from this book into your product’s documentation does require permission.
We appreciate, but do not require, attribution. An attribution usually includes the title, author, publisher, and ISBN. For example: “Orchard CMS: Up and Running by John Zablocki (O’Reilly). Copyright 2012 John Zablocki, 978-1-449-32021-8.”
If you feel your use of code examples falls outside fair use or the permission given above, feel free to contact us at [email protected].
Safari® Books Online
Safari Books Online (www.safaribooksonline.com) is an on-demand digital library that delivers expert content in both book and video form from the world’s leading authors in technology and business.
Technology professionals, software developers, web designers, and business and cre-ative professionals use Safari Books Online as their primary resource for research, problem solving, learning, and certification training.
Safari Books Online offers a range of product mixes and pricing programs for organi-zations, government agencies, and individuals. Subscribers have access to thousands of books, training videos, and prepublication manuscripts in one fully searchable da-tabase from publishers like O’Reilly Media, Prentice Hall Professional, Addison-Wesley Professional, Microsoft Press, Sams, Que, Peachpit Press, Focal Press, Cisco Press, John Wiley & Sons, Syngress, Morgan Kaufmann, IBM Redbooks, Packt, Adobe Press, FT Press, Apress, Manning, New Riders, McGraw-Hill, Jones & Bartlett, Course Tech-nology, and dozens more. For more information about Safari Books Online, please visit us online.
How to Contact Us
Please address comments and questions concerning this book to the publisher: O’Reilly Media, Inc.
1005 Gravenstein Highway North Sebastopol, CA 95472
800-998-9938 (in the United States or Canada) 707-829-0515 (international or local)
707-829-0104 (fax)
We have a web page for this book, where we list errata, examples, and any additional information. You can access this page at:
http://oreil.ly/orchardcms_upandrunning
To comment or ask technical questions about this book, send email to:
For more information about our books, courses, conferences, and news, see our website at http://www.oreilly.com.
Find us on Facebook: http://facebook.com/oreilly
Follow us on Twitter: http://twitter.com/oreillymedia
Watch us on YouTube: http://www.youtube.com/oreillymedia
Acknowledgments
While a team of developers is able to build Orchard full-time, the rest of the Orchard ecosystem comes from the work of the community. I thank these volunteers who leave blog posts and code for Bing to find and the rest of us to follow. Without their efforts, there would not be an Orchard about which to write this book.
I’d like to thank my editor, Rachel Roumeliotis, for giving me the opportunity to write this book. Rachel has been great to work with from the beginning. She understood when a demanding new job slowed my writing pace and when a new release of Orchard invalidated nearly half of my work. I hope to be able to work again with Rachel. I’d also like to thank O’Reilly Media and its employees who helped get this book pub-lished. I realize I am just one piece of many in the puzzle that is turning a bunch of Word documents in a Dropbox folder into a printed work.
CHAPTER 1
Getting Started with Orchard
We’re about to start building an Orchard website. We’ll create some content. We’ll manage some content. We’ll change the way our site looks and behaves. We’ll write some code to extend the functionality that’s available out of the box. Though we could perform all of these tasks without ever looking at the Orchard source, we’re .NET developers. We’re most comfortable in Visual Studio, so why wouldn’t we start there?
Prerequisites
Though it’s not entirely necessary, it’s my preference to build modules, create themes, and manage my Orchard sites all within the context of the full Visual Studio 2010 Orchard solution. Aside from being able to debug the site with Visual Studio, having the source handy also provides a great reference when creating your own Orchard extensions. We’ll learn how to develop extensions in the chapters ahead.
Development Environment
Orchard extensions are known as modules. Creating a module requires writing code, typically C#, but any .NET language will work. You could write that code in Notepad or any text editor of your choice, but that wouldn’t be the most efficient way to work. In this chapter and those that follow, I assume that you’ll be working with Visual Studio 2010 Professional or higher.
The Orchard documentation contains tutorials on how to perform tasks, such as cre-ating modules, without Visual Studio. While it certainly is possible to do so, it’s im-practical to consider this approach for all but the most basic of Orchard workflows. You could use the Express editions of Visual C# and Visual Web Developer. However, you won’t be able to open the master solution. Express editions don’t support mixed project type (web and class library) solutions.
A $500 IDE might seem to be an expensive barrier to entry for an open source project such as Orchard. To lower the bar, the Orchard team has provided documentation and tooling that supports non-Visual Studio workflows. The open source IDE MonoDevelop is probably the best alternative, as you can work within the master Orchard solution.
Obtaining the Orchard Solution
There are two ways to get the Orchard solution onto your local development environ-ment. The simplest way is to go to the Orchard downloads at CodePlex.com, which is Microsoft’s open source project hosting site. Though I sometimes use the source con-trol option described below for my Orchard development, I’m instead going to use a packaged release for this book. That will guarantee we’re all using the same source. The solution I’m using for this book can be found at http://orchard.codeplex.com/relea ses/view/74491.
Packaged Releases
With each release (major or minor), Orchard zip files are made available on this page. One is a precompiled version of Orchard, which is optimized for users who want to deploy Orchard and won’t be coding extensions for the site. This package is labeled
Orchard.Web.1.4.0.zip. At the time of this writing, 1.4.0 is the current version. This ZIP file appears under the heading “Recommended Download.”
The URL http://orchard.codeplex.com/releases/view/74491 will always point to the 1.4.0 release. Click the “Downloads” tab on the page to find downloads for the latest version as it may have changed by the time this book is published.
A second ZIP file download is a snapshot of the Orchard source code as it existed for the release. This package is labeled Orchard.Source.1.4.0.zip. Download this zip file and extract it to work with the most recent and stable release of Orchard. This ZIP file appears under the heading “Other Available Downloads.” Each release will have dif-ferent zip files available, but the web and source downloads should be consistently available.
Using Source Control
described previously in this chapter. However, I’ll describe how to clone the source later in case you wish to try that option instead.
The Orchard team uses the distributed version control system (DVCS) Mercurial. You don’t need to understand much about Mercurial (Hg) in order to use it to get the Orchard source. I won’t cover anything beyond where to download Mercurial and the two commands you’ll use with Mercurial and Orchard. If you would like more infor-mation on Mercurial, I suggest reading Mercurial: The Definitive Guide by Bryan O’Sullivan (O’Reilly).
Mercurial is an open source project and is freely available at http://mercurial.selenic .com/. There is a Windows shell extension called TortoiseHg, which allows you to access common commands by right-clicking on folders in Windows Explorer. When you download and install TortoiseHg, the command line client is also installed. After running the installer, open up a command prompt and enter the following command:
hg clone https://hg01.codeplex.com/orchard Orchard
The clone command in Mercurial is loosely analogous to a checkout command in Sub-version or Team Foundation Server. One significant difference is that cloning copies the entire repository locally. With a DVCS such as Mercurial, there is no centralized repository.
The first argument passed to the clone command is the URL where the repository may be found. The second is the name of the local directory to where your repository will be copied. This path is relative to the directory from which you ran the hg command. In other words, if the command prompt opened into C:\users\John, you’d have a new folder: C:\users\John\Orchard.
If the hg command was not recognized by Windows, it is likely that the path to hg.exe was not added to your system’s path environment vari-able. By default this path is C:\Program Files (x86)\Mercurial.
If you choose to obtain the source by way of cloning the repository, it’s a good practice to get the latest changesets, or commits, to the repository. Open a command prompt to the directory into which you cloned Orchard and run the following command:
hg pull
The pull command will get the latest version of the Orchard sources. However, Mer-curial doesn’t by default add updates into your working copy. To update your local repository with any changes found during a pull, run the following command:
hg update
The Contents of the Solution
If you navigate to the directory where you either unzipped the source package or cloned the Mercurial repository, you should see two directories src and lib. Open up the src
directory and locate the file Orchard.sln, which is the Orchard solution. Open this solution file and build it.
Setting Up the Website
After you’ve successfully compiled the Orchard source, you’ll need to create a virtual directory in Internet Information Services (IIS). Name this virtual directory “Orchard.” The physical path of the virtual directory should be set to the location of the Orchard web project. If you copied the Orchard source to a directory c:\dev\Orchard, then the physical path would be c:\dev\Orchard\src\Orchard.Web.
Alternatively, you could simply use the ASP.NET Development Server that ships with Visual Studio. In fact, the default settings of the Orchard solution are to run the
Orchard.Web project using this server. While, generally speaking, the development
server should be adequate for the purpose of Orchard site development, I prefer to work with IIS when possible. IIS will be what you use in production, so you’re more likely to catch certain issues in development with a local IIS setup.
After you’ve created the virtual directory, open up a web browser and navigate to http: //localhost/orchard. If you are using the ASP.NET Development Server, simply run the Orchard.Web project using Ctrl+F5 to start the site without debugging (or just F5 to start with debugging). You should see the screen in Figure 1-1.
The very first run of an Orchard site will probably seem slow as some of the dynamic components are compiled and cached.
Configuring Orchard for the First Time
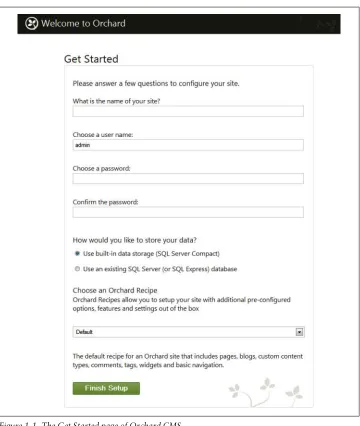
The Get Started page (Figure 1-1) requires you to provide a few quick details to get your Orchard site up and running. The first three questions ask you to name your site and provide an administrative username and password. These values should be straightforward. You then have the option to select a SQL Server Compact or full SQL Server (or SQL Express) database. Typically you’ll choose SQL Server Compact for development only, but a low traffic site might make do with a SQL Server Compact database.
as blog posts or event listings, is added to the site, the name of the author isn’t “admin.” We’ll also opt to use SQL Server Compact for storage since we’re setting up this site for development purposes.
Figure 1-1. The Get Started page of Orchard CMS
An advantage of using SQL Server Compact is that you’re easily able to reset an Orchard site back to its starting state (the Get Started page) by deleting the App_Data folder containing the site’s local database. On my system, this path is C:\dev\Orchard\src\Orchard.Web\App_Data \Sites. Resetting the site is useful when you want to ensure a clean slate for new site development.
The final question on the Get Started page involves selecting an Orchard recipe. Recipes are preset site configurations and are simply XML files stored in a well-known path. It’s also possible to create your own. The default Orchard setup includes three:
Default
Includes frequently used Orchard features. This recipe is suitable as a starting point for most sites.
Blog
Creates an Orchard site to be used as a personal blog.
Core
Configures Orchard to have only the minimum required features. This recipe is much better for Orchard development than for site creation.
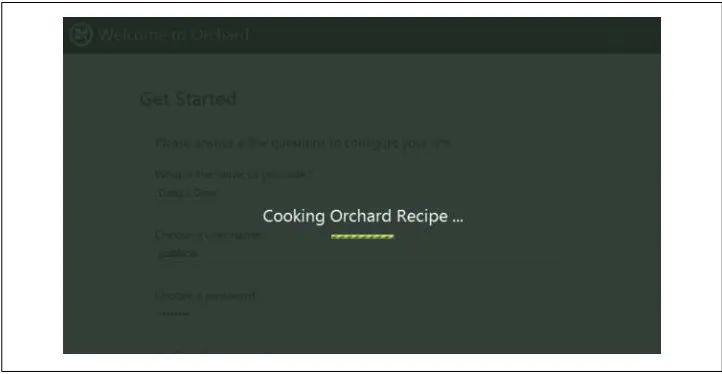
[image:22.504.71.432.353.540.2]Though the “Core” recipe is suitable for module development, we’re going to use “De-fault” since we’re going to be building a fully functional site. After you’ve answered these five questions, click the “Finish Setup” button. You should see a modal progress bar appear with the message “Cooking Orchard Recipe” (see Figure 1-2).
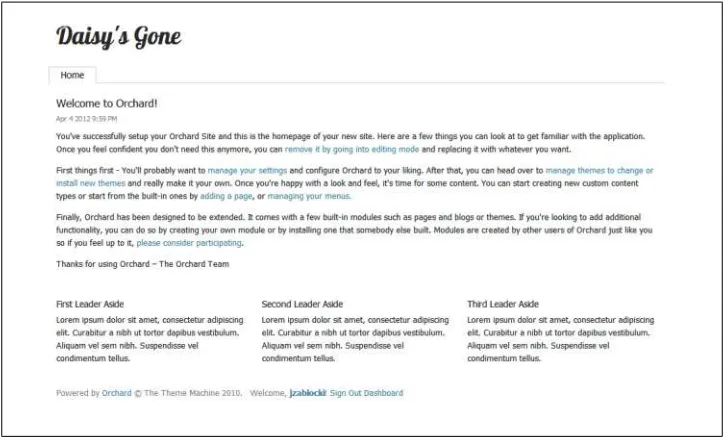
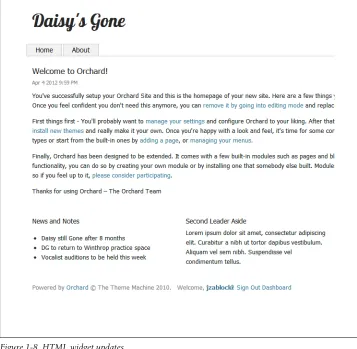
After the recipe has finished cooking, you’ll be redirected to your site’s home page (Figure 1-3). You’ll see the site name that we entered on the “Get Started” page in the upper-left corner and a series of text sections, each with a title and some content.
Figure 1-3. The default Orchard home page
The Orchard Dashboard
At the very bottom of the home page, you’ll see the default template’s footer with a few links. The last link is labeled “Dashboard.” Click that link to get to the admin pages for your site. When you click through, you’ll land on the admin home page. This page simply has links to finding more information on Orchard. The functionality for man-aging content is accessible via the menu on the left side of the screen. We’re going to explore the admin pages in more detail in the chapters ahead. For now, we’ll just take a quick tour of the basics.
Creating Content
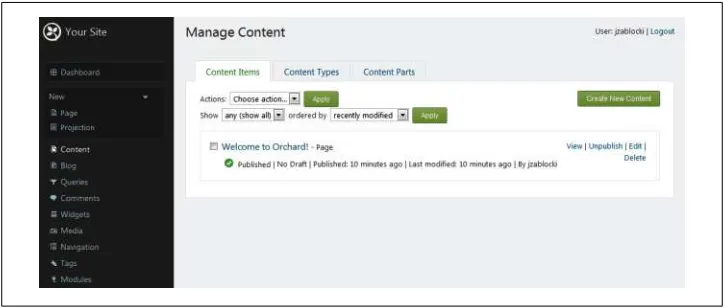
Start by clicking the “Content” link on the menu. This is the admin page where you’ll manage content, such as your site’s home page (Figure 1-4). There are three tabs on this page, which are described here. (Don’t worry about the new terms in this chapter; we’re going to revisit them over the next few chapters.)
Content Items
Single piece of content, such as a blog post or an event listing.
Content Types
Blueprints for content items. Defines the attributes and behavior of the content items that you’ll create using the admin tool.
Content Parts
[image:24.504.71.433.165.319.2]Reusable pieces of functionality that may be used to compose content types.
Figure 1-4. The content management admin page
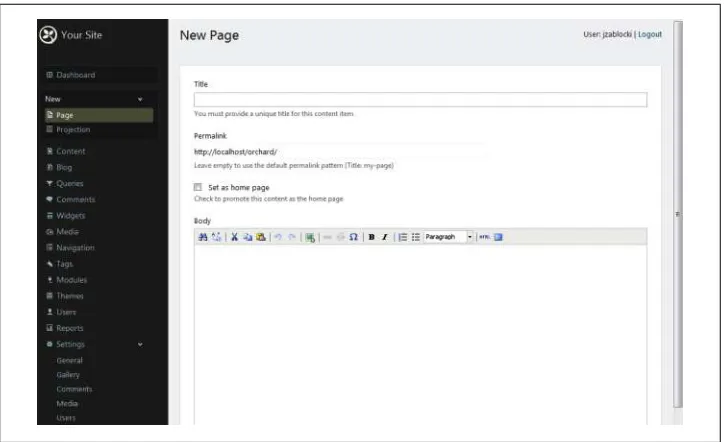
To get a sense of how content is created using these tools, click the Create New Content button in the upper-right corner of the page. You’ll be taken to a page where you are shown two links: Page and Projection. Select Page. You’ll then arrive at the page shown in Figure 1-5.
Right now, our site has only the home page. We’re going to use the New Page form to add an About page. For the title, enter “About Daisy’s Gone.” Then add some content describing the band. We’ll also check the option to “Show on main menu,” which will add a tab to the site’s main navigation. Checking this option enables an additional textbox for setting the menu text. Enter “About.”
You’ll then have the option to set a “Created On” timestamp. We’ll let this default to the current date and time. We’ll also choose to “Publish Now” rather than select a future date via the “Publish Later” option. The Save button will allow you to save your work without having it appear on the site.
When working with a CMS such as Orchard, it’s useful to keep one browser tab open to the Dashboard and a second open to your site. This practice will allow you to Ctrl+Tab between tabs to see your changes on the live site without navigating away from your current admin loca-tion.
Figure 1-5. The new page admin screen
Figure 1-6. The new About page
Adding Widgets
Widgets are UI components that may be added to some or all pages of an Orchard site. Click on the “Widgets” menu item to manage these components. On this page, you’ll see a listing of layers and zones.
Layer
Set of rules that define when widgets will appear.
Zone
A placeholder into which widgets may be inserted.
[image:26.504.72.435.234.532.2]In Chapter 4, we’ll learn about zones, layers, and layouts in detail. For now, know that a theme defines a site’s layout and a layout defines which zones are available. The listing of zones you see on the “Widgets” admin page were defined in the default theme, which is called “The Theme Machine.” Layers define rules for which zones will be active.
Notice that the zones TripelFirst, TripelSecond, and TripelThird have links with the text “First Leader Aside,” “Second Leader Aside,” and “Third Leader Aside,” respec-tively. If you click over to your site’s home page, you’ll see that these are headings on the three zones at the bottom of the page (Figure 1-3). Click through “First Leader Aside” and you’ll find yourself on a page where you can edit the HTML page of this widget. Appropriately, this is called an HTML Widget. If you click the “Add” button next to any zone, you’ll see “HTML Widget” listed as an option for each.
As we learn to create and manage content, we’ll go over these options in more detail. For now we’ll take a quick look at changing widgets. Click on the HTML widget under
[image:27.504.72.429.57.406.2]“TripelFirst.” Enter the title “News and Notes.” Click on the bulleted list in the HTML editor and enter some news or some notes. Save the changes and visit your site’s home page again. You should see your new content reflected on the home page (Figure 1-8). Figure 1-8. HTML widget updates
You might be wondering why the third set of zones are named “Tripel” and not “Triple.” It’s not a misspelling. The zones are a sort of inside joke and a tribute to Tripels, which are a particular style of high alcohol, strong pale ales.
Orchard Modules
A great deal of functionality is available for an Orchard site by downloading and in-stalling Orchard modules. Clicking on the “Modules” admin menu option at first re-veals the set of installed modules under the “Features” tab. The “Default” recipe we chose to setup our site has influenced this listing, as recipes can instruct the Orchard software to include different modules. We’ll explore the “Features” tab in more detail when we write our first custom module.
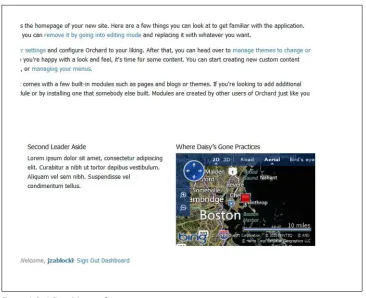
We want visitors to know where to find the band on rehearsal nights, so we’re going to include an embedded Bing map that will display a push pin at this location. We’ll place this map on the home page only. Bing Maps aren’t out of the box Orchard func-tionality, so we’re either going to have to code a solution or find one that’s already coded for us. Fortunately, the work has already been done.
Click on the “Gallery” tab; you’ll see a listing of modules available for download and installation. Search for “Bing Maps.” There will be a few results. The one we want is a module named “Bing.Maps” that was authored by Orchard project lead Bertrand Le Roy. Click “Install” to download and install the module. After it is installed, you’ll be prompted to enable it. After you enable it, you will be able to add it to a zone.
At the time of this writing, there is a bug that might lead to a “Package installation failed” error when installing a theme or module from the Gallery. If you get that message along with a note about permissions errors, click Settings→Gallery and set the gallery feed URL to http:// packages.orchardproject.net/FeedService.svc/.
Orchard Security
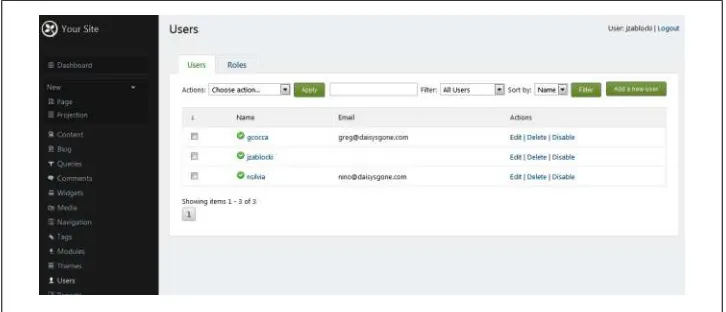
We’ve seen how to manage content. Now we’ll look briefly at who can manage content. The “Users” admin feature contains forms for managing users and roles. Creating a user is a relatively straightforward process. Click “Add New User” and enter a user-name, email, and password. You are also able to add users to roles. There are a number of predefined roles that are part of a standard Orchard installation.
Administrator
Has full control over a site and its content
Editor
Can edit and publish, but not create content
Moderator
Can validate user-generated content, such as comments
Author
Can create and publish content
Contributor
[image:29.504.70.436.49.347.2]Can write, but might not be able to publish content Figure 1-9. A Bing Maps widget
There are also roles defined for Anonymous and Authenticated users, but membership is based on whether a user is logged into the site. These roles are not assignable. New roles with custom permissions may also be created. The “Add a role” button is acces-sible via the “Roles” tab. When creating a new role, you select the permissions you want to be available for users in this role.
[image:30.504.71.434.214.370.2]We’re going to create two users in addition to our administrator, who in my case is named “jzablocki.” Click “Add new user” and enter the username “gcocca.” Check the “Editor” and “Author” roles and save the new user. Create another new user with the username “nsilvia” and check the role “Moderator.” Save this user. Greg—gcocca— will now be able to create, edit and publish content. Nino—nsylvia—will be able to moderate user generated comments.
Figure 1-10. Orchard user management
One additional user setting to be aware of is under the “Settings” section of the admin menu. Click Settings→Users and you’ll find additional user management settings. You can allow users to self-register, reset their own passwords, verify email addresses, and go through an approval process before having authenticated access to the site. We’ll stick with unauthenticated comments for our content and leave all options unchecked.
Summary
CHAPTER 2
Creating and Managing Content
In Chapter 1, we briefly explored how to work with the content management tools of Orchard. In this chapter, we’ll dig a little deeper as we build out a baseline to our site, which will then be extended with custom modules and a custom theme in later chapters. This baseline will include a handful of simple pages as described here. These pages will provide enough variety that we’ll be able to showcase Orchard’s content management capabilities.
Home Page
The same home page from the previous chapter
About
The About page from the previous chapter
Contact
A page with a form to use to contact the band
Events
A page listing upcoming band-related events
Bios
A page with band biographies
Blog
A standard blog
Gallery
A page with images, videos, and audio
Bio Items
In its simplest form, a biography on the Daisy’s Gone Orchard site is just a web page. It could easily be added to the site using the same approach we used to add the “About” page in the previous chapter. However, we’re going to have a bio page for each band member. Though we could cram all bios into a single page, it would be more readable
to have a unique page for each musician (and drummer). That requirement means that I’ll effectively be creating the same page at least three times, just with different content.
An old joke asks, “What do you call the guy who hangs out with the musicians in the band?” and answers “The drummer.”
The process of creating a bio page is somewhat analogous to that of creating a blog post. Each blog post has common attributes, such as a title, a body, tags, and comments. When we manage blogs in a CMS, we typically have a special form for creating posts; we don’t just create a new page and lay it out a certain way. Similarly, each bio will have a musician’s name, a date of birth, and a body. We want to create bio pages just as we create blog posts—with a special admin form.
Content Types
As we saw in the previous chapter, the “Content” admin menu has three tabs. “Content Items” lists the two pages we’ve created so far. “Content Types” lists the different types of content that we can create on our Orchard site. “Content Parts” lists some reusable components that may be added to content types. Click into the “Content Types” tab and click the “Create new type” button.
The new content type is going to be a Bio type. Create the new type with this name and
leave the content type id as “Bio,” which is what Orchard automatically set the value to when we typed in the name. Then click the “Create” button.
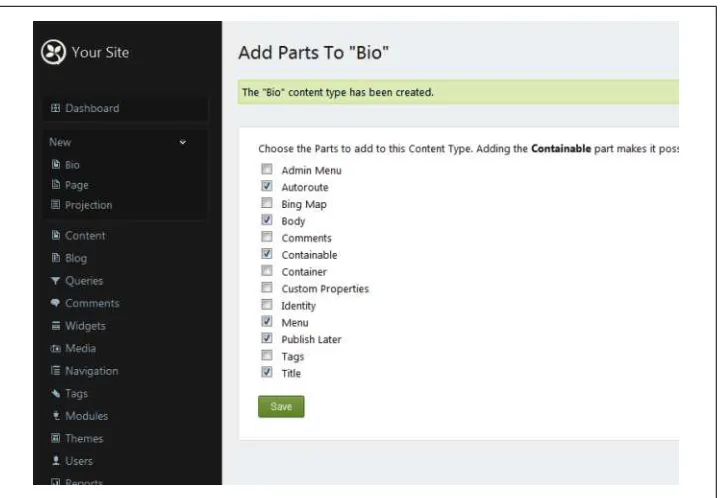
Content Parts
From the screen that followed, we’re going to add content parts to the Bio content type.
By adding these parts, Bio content will automatically gain behavior and attributes. To
the Bio type, add the content parts that follow by checking the appropriate boxes and
clicking “Save.”
Autoroute
Makes a bio item accessible by a URL matching a defined route pattern
Body
Adds an HTML content section to the content item
Containable
Allows a content item to be contained within another content type
Menu
Allows a content item to appear on the main navigation
Publish Later
Title
[image:33.504.74.435.85.334.2]Allows a page title to be captured
Figure 2-1. Adding content parts to a content type
After saving parts to the content type, you’ll be taken to a page where you can choose to add fields or additional parts. For now, just click “Save” at the bottom of the page. We’ll revisit these options later in this chapter. After saving, we now have an option under the “New” menu item called “Bio.”
Clicking this option opens a new form where we’ll create new content items for our
Bio content type. At this point, our Bio type has only title and body fields where we can
enter bio content. We’ll add to these fields shortly. For now, enter the name of the person whose bio is being created for the title and add some biographical content to the body.
Before clicking “Publish Now,” we’ll want to make note of the “Permalink” field that’s displayed after the “Title” field. The permalink contains the URL by which our Bio item
may be reached. Recall that we added the Autoroute content part to our content type,
which will take care of mapping the permalink to the right content item.
We didn’t change the defaults for Autoroute, so the title value will be used to complete
the URL for this item. With the title “John Zablocki,” our Bio item may be reached at
http://localhost/orchard/john-zablocki. Now you can click “Publish Now.” After pub-lishing, browse to the item at the permalink URL.
Note that we also included the Menu part and could have chosen to add the bio page to
our main menu. We’re going to create a few Bio items, so we don’t want to inflate the
[image:34.504.72.433.108.326.2]navigation. But having the part gives us that option in the future.
Figure 2-2. The New Bio admin page
Content Fields
At this point, the Bio template is a little thin in that it’s lacking fields for capturing information such as instruments played and bio pictures. Let’s first add the field for instruments played by editing the Bio template. Click the “Content” menu option and
then click the “Content Types” tab. Clicking the “Edit” option on the “Bio” row opens up the “Edit Content Type” page.
Clicking “Add Field” will open a form for creating a new field for the Bio template.
Several types of fields are available by default. A text field is sufficient for the instru-ments field, so select that value for “Field Type.” Set the “Display Name”—used for labels—of this field to “Instruments.” Let the “Technical Name”—used in code— default to “Instruments.” Click “Save.” Add two additional text fields with display names of “Birthplace” and “Lives In.” Accept the respective technical name defaults of “Birthplace” and “Lives In.”
Clicking New→Bio reveals that the Bio template now has the three additional fields.
Similarly, clicking Content→Edit on the Bio content item also shows that these new
Massachusetts” under “Lives In.” After clicking “Publish Now” return to the page at the permalink we used earlier to view the first version of our Bio item.
[image:35.504.72.431.94.351.2]Remember that “Publish Now,” not “Save” will make a change visible.
Figure 2-3. New fields on the Bio type definition
To add the field for uploading a profile image, an extra step is required. Since a text field obviously isn’t appropriate for an image, we’ll instead need to find a field with the functionality for uploading and inserting an image into our content item. However, Orchard doesn’t provide this field type by default.
Fortunately, the Orchard Gallery offers just such a field. Clicking back to “Modules” and then the “Gallery” tab, we’ll add the image field by first searching for “image field.” From the results, select the Image Field module by Sebastien Ros (of the Orchard team). If you find multiple versions, install the latest version (1.1.3 as of this writing). After installing and enabling this module, we can now use it in our bio template.
Returning back to the “Content Type” tab in the “Content” menu, again edit the Bio
type. Click “Add Field” and select the new “Image Field” option. Set the display name to “Headshot,” accept the default technical name, and click “Save.” Now when we click back on “Content” and then click to edit the existing Bio item, we’ll see the
ad-dition of the new image field. Adding a new image simply involves clicking “Choose File,” selecting a file from your PC, and again publishing the page.
Orchard does include a “Media Picker” field. This field does support uploading new images to content items. However, it won’t automati-cally display the image on the published item.
Figure 2-4. A bio page with a headshot
Projections and Queries
As we’ve seen, we haven’t actually made our first bio page accessible from the site via a link. To do so, we have a couple of options. The simplest case would be to create a standard page (via New→Page) and to add links or a summary section for each bio page that we create. While this approach certainly would work, it has a flaw. Each time we create a bio, we’d have to go update this page and add the new bio links and summary section. Fortunately—as you might have guessed—Orchard has a better approach. A Projection is a content type that will display the results of a query in either grid or
Instead, we’ll use the dashboard to select a filter, sort criteria, and a layout to compose an Orchard query. The items that match the conditions of our filter will be displayed in the projection page that we create.
Since our projection page will be uninteresting with only a single bio, let’s take a quick detour to create two more Bio items. Return to New→Bio and create an item for
drum-mer Greg Cocca and guitarist Nino Silvia. The specific content for these items isn’t as important as having content.
We’ll start by creating a new query. In the admin menu on the dashboard, click “Quer-ies.” On the “Manage Queries” page, click “Add new query.” Set the title to “All Bios” and save the query. When you’re redirected to the “Manage Queries” page, click “All Bios” and you’ll see three options for our query. Click “Add a new filter” to set the data source for our new query.
Filters
We have several filter options from which to choose. For example, we could select “Body Part Text” to show only Bio items that have certain content (which we’d specify).
We could select content with a certain title value or creation date. For our purposes though, keeping things simple is sufficient.
We’ll just include all items that are Bio types. Under the “Content” section (of the filter page, not admin menu) click “Content Types” and select “Bio” from the next screen and save the form. If you click “Preview” after saving, you’ll see a preview page with the single Bio we’ve created so far.
Sort Criteria
Next, on the “Edit Query” page, click “Add a new Sort Criteria.” If you clicked to preview, just click “Back” in your browser as there’s no navigation out of the preview page. We’ll sort our query by name, which in our case is found in the Title part. Under
“Title Part Record” click “Title Part Title” and select ascending from the next screen and save.
Layouts
The Layout option includes options for rendering our Bio items in a grid or an HTML
list. In either case, we have a great deal of flexibility for managing the layout of these items. In fact, we are able to create multiple layouts so that we can have different views for the same query. Since we won’t be displaying our bio list in more than one place, a single layout will be sufficient.
Click “Add a new layout” and select “Grid.” The HTML List offers similar options, but the grid has a little more flexibility, so we’ll choose that. The description section is used
to disambiguate our layout when we’re creating projection pages. We’re creating only the one layout, so we can leave that blank. The “Display Mode” allows us to choose from all item values or individual properties. Select “Content” to accept the default rendering.
Leave the alignment as “Horizontal” and set the “Number of Columns” to 1 (we’ll just stack our Bio items). If we wanted to be able to use CSS or JavaScript with these items, we could specify an ID for the grid, along with CSS class names for the grid and rows. We won’t be doing anything with the grid other than rendering it as is, so we can leave those fields blank for now. Save the layout.
Now that we have a query, we are able to create our actual projection page. Click New→Projection from the dashboard menu. Add a title of “Bios” and let the Permalink default to the title. Under “For Query,” select the new query we just created—“All Bios (1 columns grid).”
Leave the other defaults in place, except for “Show on main menu.” Check that option, and specify the “Menu Text” of “Bios.” We want “Bios” to appear alongside “Home” and “About.” If you save the projection and return to the live site, you’ll see the new “Bios” option on the menu. Click on it to see the queried item.
Event Items
Adding events to the Daisy’s Gone site will require a process similar to adding bio pages.
Event will be a new content type that will be contained in a page that has a list of events
(by way of a query and projection).
Content Types and Fields Continued
Let’s start by navigating to Content→Content Types and selecting “Create new type.” Name the new type “Event,” and like our Bio type, select the Autoroute, Body, Contain able, Menu, Publish Later, and Title parts. Also include the Comments part to allow users
to add comments to the events. Click “Save” on the confirmation after saving the parts. Events will also need locations and dates. For location, add a text field named “Loca-tion” to the fields on the Event content type (click “Add Field”). For the event date,
we’ll add a new date time field with a display name of “Event Date.” Accept the default technical name of “EventDate.” Click “Save” to make our new content type available with the fields we just added.
To see the other possible URL routing patterns we could select, click Content→Content Types and then click “Edit” on the Event type listing. Click on the greater than sign (>)
next to the Autoroute part. Notice the “Default” pattern in the list. Its value is
“{Con-tent.Slug}.” This pattern will simply create a slug (URL pattern) from the title you enter (basically, spaces are replaced by dashes).
We’re not going to deviate from this pattern in this book, but you should click on the box in the “Pattern” field to see some of the other options you could use to create a route for custom content types. Also note that the previously created bio pages that we navigated to by adding names to the root site URL also worked via Autoroute (i.e., http:
[image:39.504.76.431.56.440.2]//localhost/orchard/john-zablocki). Figure 2-5. The Bio projection page
Since we just abandoned the content type that we were creating, return to New→Event. Again, add the title “Unplugged in Cambridge.” Next add a brief description and the location “Cambridge, Massachusetts.” Also select a date for the event and check to allow comments to be added (this should be checked by default). Publishing the event makes it available to the site, but we still need to create a projection page before it will be visible via a menu item.
Projections and Queries Continued
Before we can create a new projection page for our events listing, we’re going to need to create a query (as we did for our Bio projection). Click “Queries,” then click “Add
new query.” Enter the title “All Events” and save the query. Click into the query from the list that shows after saving. We’ll start this query simply by adding a new filter that contains all events. On the “Add a Filter” screen, click “Content Types” and select “Event” from the list that appears. After saving, click “Preview” to see that the query does in fact return our single Event item.
We’re going to want to limit the events to only those that are in the future. Click again to add a new filter, but this time select “Event Date:Value” under “Event Content Fields.” We want only events that are occurring today or in the future, so select “Is greater than” in the “Operator” list. Since our source date will change daily, select “An offset from the current time” and enter “-1” for a value and “Day” for a unit. This combination will limit the query to events that are greater than yesterday.
Since we’re going to want to see the next event at the top of the list, add sort criteria to sort on the “Event Date” field ascending. For the layout, add a simple one-column grid as we did when we created the layout for our Bio items. See the “All Bios” query earlier
in this chapter for details. After adding the layout, save the query.
We haven’t used the “Properties” display mode for our queries. This mode is far more powerful than the “Content” mode we’ve been using. However, “Content” is sufficient for our needs.
Though we won’t cover “Properties” mode in any detail, it certainly merits a brief discussion as to when it would be useful. We would use “Properties” mode if we wanted to be able to customize everything from date formatting (for date time fields) to wrap-ping HTML elements around content item property values. You can also specify func-tionality, such as what to do when there are no results for a field and how to handle HTML tags and whitespace for a value. Most of the options you can choose from are straightforward.
Now that we’ve created the “All Events” query, we’re able to create a new projection page that will display a list of our Event pages. Navigate to New→Projection. Enter the
Select the “All Events (1 columns grid)” query and check the “Show on main menu” option. Set the “Menu Title” to “Events.” Otherwise, leave the defaults in place. Save the projection and return to the live site to see the Event listing on our new projection
[image:41.504.71.434.113.455.2]page. Click the event title to see the details with user comments enabled (Figure 2-6).
Figure 2-6. An event page with commenting
Daisy’s Blog
Perhaps one of the most common use cases for a CMS such as Orchard is to create a blog. Blogging clearly helped WordPress to become what is arguably the most popular CMS on the market. For blog support, Orchard includes the Orchard.Blogs module,
which provides standard blogging functionality, such as creating and maintaining posts and allowing authenticated comments.
Many blogs are built as standalone websites. Like the site we’re building, these blogs have About and Contact pages. They also often include widgets for tag clouds and blog
rolls (links to other blogs). Creating such a standalone blog in Orchard is as simple as creating a new Orchard site and selecting the “Blog” recipe from the “Get Started” page. We’re instead going to include a blog as another section of our site.
The Blog Module
Click “Blog” to get to the “New Blog” form. Enter the title “Daisy’s Blog” and set the permalink to “blog.” If we had plans to create another blog for our site, we would leave the default permalink behavior of using the Title part’s value. Check the “Show on
main menu” option and provide the “Menu text” value of “Blog.”
Save the form and revisit the site to see the new “Blog” tab has been added to the main navigation. After saving, you’ll also notice that the “Blog” admin menu has been up-dated to include new options. “Manage Blog” is where you’ll edit existing blog posts and find the link to update a blog’s properties. “New Post” and “New Blog” should be self-explanatory.
Before we create our first post, we’re going to update the permalink defaults used when blog posts are created. As was the case with the other content types we’ve seen, the default is simply to create a slug from the Title part of our post. We’re going to set our
blog to use a traditional blog permalink format, which includes the date as pieces of the path. An example of such a URL is http://daisysgone.com/blog/2012/4/1/welcome-to -daisys-blog.
Navigate to Content→Content Type and click “Edit” in the row for the Blog Post type.
Click the greater than symbol (“>”) next to “Autoroute.” Change the “Name” field from “Blog and Title” to “Date and Title”; change the pattern to “{Content.Con-tainer}/{Content.Date.Format:yyyy/MM/dd}/{Content.Slug}”; and change the de-scription to “published-date/my-post.” The value “Content.Container” in this pattern will be replaced with “blog,” which was the permalink value we set for this blog. It’s important to understand that the Autoroute part won’t recreate the permalink as
you update your posts (or any other content types that use the Autoroute part). If you
want that behavior, then you need to check the option to “Automatically regenerate when editing content,” which appears right above the “Patterns” section of the Auto route part settings for a particular content type.
Keep in mind that if you update a permalink that has been previously published, incoming links at the old URL will no longer be valid.
comments. Click “Publish Now” and then click the “Blog” tab on the site to see that this post is now listed (Figure 2-7). You can also see that its URL uses the pattern for its permalink.
Figure 2-7. A blog post
About Page
The About page is pretty straightforward and doesn’t necessarily require any special Orchard functionality or custom content types. However, we’ll take this opportunity to upgrade the HTML and text editor that comes standard with Orchard, which is the
TinyMce editor.
TinyMce is probably sufficient for a most users, but I prefer CKEditor, which has richer
editing capabilities. In the module gallery (Modules→Gallery) search for “editor” to find the “CKEditor” module, which we’ll install to add this popular web-based HTML and text editor.
After enabling the CKEditor module, it’s necessary to disable the standard HTML and
text editor, which takes precedence. Disable the default editor by clicking Mod-ules→Features, navigating to the “Input Editor” section, and disabling the TinyMce
ed-itor. If you don’t disable the default editor, you’ll still be able to edit, just not with our updated HTML editor.
After disabling TinyMce, we can click New→Page to see that the CKEditor is now the
HTML and text editor for all content items that have a Body content part. Clicking
Content→Content Items and then clicking on “About Daisy’s Gone” also shows the new CKEditor is used for existing content items (Figure 2-8).
Contact Page
The easiest way to add a contact page to an Orchard site is to install one of the contact modules from the Orchard gallery. A search for “contact” in the gallery will yield a few different options. We’ll install “Contact Form” by CyberStride. After enabling this module, a new content type of Contact Page is automatically added to our site. Clicking
New→Contact Page will open a form for creating Contact Page items.
One field that is noticeably absent from this form is the ability to add a contact page to the site’s main menu. Fortunately, as we saw when creating the Bio and Event content
types, this functionality is easy to add. By clicking Content→Content Type→Edit, we can add the content part.
Click “Add Parts” and check off the Autoroute, Menu, and Title parts and click “Save.”
Return to New→Contact Page. Creating the contact page involves inputting some straightforward values for title and body. The “Email notification to” field needs to be set to the username of a valid user in the system. After saving the form and refreshing the site, we can click over to the “Contact” tab on the main navigation to see the new page (Figure 2-10).
[image:44.504.72.434.52.303.2]admin pages, we can browse to “Contact Requests” and see a listing of attempted contact form submissions, both successful and failed (validation failures).
For an email to be sent when a contact request is made, we need to enable the Email Messaging module in the “Modules” admin page. When we enable the Email module,
Orchard will display a yellow warning message that we need to configure SMTP set-tings. To set these, we can either click the link in the warning or navigate to Set-tings→Email. You’ll need a valid SMTP server through which you can relay messages in order to send email in Orchard.
[image:45.504.71.435.62.321.2]If you get an error while clicking the “Contact Requests” page in the admin dashboard, you’ll need to edit the view file index.cshtml in the Admin views directory of the module. At the time of this writing, this page uses the DateTime HtmlHelper extension method, which is no longer present in the current version of Orchard. Simply remove the method call and set the line to <td>@contact.ContactDateUtc.GetVa lueOrDefault()</td>.
Figure 2-9. The new contact page form
Home Page
For the home page, we’ll start by making a couple of minor content changes. Under
[image:46.504.75.432.59.452.2]“Content” we’ll click on the listing currently titled “Welcome to Orchard!” and update its title to “Daisy’s Online.” Clicking “Publish Now” makes these changes available on the live site. Note that because this page has been set to the home page by way of the “Set as home page” field, we can get to this page at the root site URL http://localhost/ orchard.
Zones and Layers
At this point, our home page hasn’t been customized much beyond the small tweaks we made in the previous chapter. To add additional customization, we’re now going to add a couple of new modules from the Gallery that we’ll then add to the TripelSecond zone.
We want to give visitors the ability to “Like” the band on Facebook right from the home page. Searching for “Facebook” in the Gallery yields more than a handful of results. We’re going to install the Facebook.Like module by David Fekke. After installing and enabling this module, we’ll add it to the home page. We’ll also add a Twitter follow button by installing the Twitter Follow Button module by Nicholas Mayne (search for
“twitter”).
To add the Facebook widget to the home page, click over to “Widgets” and set the current layer to “TheHomepage.” Remove the “Second Leader Aside” widget from the
TripelSecond zone. Then click “Add” on “TripelSecond” and select the Facebook Like widget. In the form for this widget, enter the title “Like Daisy’s Gone on Face-book.” Leave the other defaults and save.
Repeat these steps to add the Twitter Follow widget also to the TripelSecond zone. Use
[image:47.504.73.434.320.574.2]the title “Follow” and provide the Twitter username “@daisysgone”. After saving both widgets, refresh the home page to see that both widgets have been added.
Figure 2-11. Social widgets on the home page
Clicking to other pages on the site, you’ll notice that these widgets don’t appear any-where but the home page. The reason for this behavior is that the rule that determines whether to display these widgets is defined in the layer “TheHomepage.” Clicking on “Widgets,” selecting the layer “TheHomepage,” and clicking “Edit” displays a form for editing the layer.
The “Layer Rule” field defines a Boolean expression that determines whether a widget is displayed. “TheHomepage” has a rule url '~/’ that is true when the URL is the root
site URL.
Layer rules have a terse syntax, using the logical operators not, and, and or along with
the url and authenticated functions. To demonstrate how to use layers, we’re going to add a new Projection widget to the zone AsideSecond on all pages except the events
page.
On the Widgets admin page, you probably noticed the image that shows where zones are placed in the layout. Note that this image was created by the theme designer and will only be accurate if the CSS rules render zones in a way that matches the zones as shown in the image. If you modify the theme’s CSS rules, there’s no guarantee this image will re-main accurate.
Click Widgets→Add a new layer. Name this layer “NotTheEventsPage”. Add a rule not url '~/events’ and then save. After saving, Orchard returns to the “Widgets” admin page with the new layer selected. Click “Add” on AsideSecond and select “Projection
Widget.” Enter a title of “Upcoming Events.” Select the query “All Events (1 columns grid)”, and limit the number of items to display to 3. After saving and refreshing the site, we can see that the new events projection widget appears on all pages except for the events page.
Gallery
For the gallery page, we’re going to install and use the Image Gallery module by Gabriel Eduardo Chites de Mello. After installing and enabling this module, a new admin menu option is added. Click Image Gallery→Add new Image Gallery. Name the new gallery “Gallery Page.” After saving, click the new gallery’s name in the listing and then upload new images by clicking “Add Images” and using the upload form.
Again, click Widgets→Add New Layer... and name that layer “Gallery.” Set the rule to
url '~/gallery’ so that we can add the Image Gallery widget to a page at this URL
We’ll next create the actual gallery page via New→Page. Add some content, add the title “Daisy’s Gallery,” set the permalink to “gallery” to match our rule, add the page to the main menu with the text “Gallery,” and publish. After publishing, you can browse to this page by clicking the “Gallery” tab on the main menu (Figure 2-13).
[image:49.504.74.432.52.351.2]I originally planned to name the “Gallery” page “Media.” However, Media is already a special directory in Orchard and the URL route col-lided resulting in a 404 Not Found error by IIS.
Figure 2-12. The new NotTheEvents layer
Figure 2-13. The Image Gallery
Summary
CHAPTER 3
Displaying Content
As we saw in the previous chapter, getting a basic Orchard site up and running is a pretty low friction process. Without having to write a single line of code, we were able to create new pages with dynamic content and reasonably advanced functionality. However, we also saw that the content we displayed has a default rendering, which we can’t fully customize through the admin tools.
Fortunately, Orchard does provide functionality to allow us to alter this rendering. In fact, with minimal effort Orchard gives us great control over how we display content. Virtually every piece of data that gets rendered by Orchard (collectively known as shapes) may be customized by overriding its default template. In this chapter, we’ll learn about the conventions and tools that make this process relatively straightforward.
Customizing Biography Content
As it exists now, the bio projection page simply takes each field in our Bio content type
and renders its label and value one after the other with each on its own line (see Fig-ure 3-1). It would be better if our content read a little more naturally, such as “John Zablocki was born in Wethersfield, Connecticut, and plays guitar for Daisy’s Gone.” The label-value rendering might be sufficient for a product listing, but is less suited for our biography listing.
Ultimately, we’ll create a template for rendering Bio content items in a projection page
(or any other container). However, to demonstrate how Orchard alternates work, we’ll start at a higher level and change the way all content is displayed when it’s rendered in a container (a projection in our case).
Orchard content is rendered differently based on its usage. For example, when content items such as those created from our Bio type are added to a projection page, their
summary display type is used. When a full content item is rendered (i.e., an individual biography), then the detail display type is used.
Content Templates
If you open up the Themes project in your Orchard solution (in the “Themes” solution
folder) you’ll find a directory named TheThemeMachine, which is the default Orchard theme. The styles associated with this theme are kept intentionally simple, because this theme is generally used as a starting point for building new themes. In the next chapter, we’ll create a new theme from scratch, but for now we’re going to work within this one. The first thing to do is expand the Views directory. There you’ll see six Razor (.cshtml) files already in this folder. These files are all used by the “TheThemeMachine” theme. We won’t explore these files now as we’ll discuss them in the next chapter. Add a file to this directory, named Content.Summary.cshtml. If you clear the contents of this new Razor file, save it and then refresh the “Bios” projection page, what you’ll see (Figure 3-2) is that the Bio item summaries have disappeared. Also notice that the
[image:52.504.73.437.53.381.2]“Upcoming Events” are no longer appearing in the projection widget that we added to the AsideSecond zone.
The Themes project was not created using an ASP.NET MVC Visual Studio project template, therefore the usual MVC context menu short-cuts are absent from this project (i.e., “Add View”). Instead, I use Add→New Item and select “HTML Page” from the list of web templates. This action requires manually setting the .cshtml extension.
As you might suspect, Orchard found our new alternate template and used that file to render the summary display for our Bio items. You might also have realized that like
our “Upcoming Events,” the Event and Blog Post items have also disappeared. You can
[image:53.504.73.435.212.333.2]verify this by clicking on the “Events” or “Blog” tabs. What this change is starting to demonstrate is how Orchard performs the task of “shape rendering.”
Figure 3-2. The effects of a blank Content.Summary.cshtm