•
•
•
•
Install, configure, run, and repair software
•
•
•
•
•
•
Consultant
Windows
Server 2012
William R. Stanek
Author and Series Editor
PUBLISHED BY Microsoft Press
A Division of Microsoft Corporation One Microsoft Way
Redmond, Washington 98052-6399 Copyright © 2012 by William R. Stanek
All rights reserved. No part of the contents of this book may be reproduced or transmitted in any form or by any means without the written permission of the publisher.
Library of Congress Control Number: 2012944749 ISBN: 978-0-7356-6633-7
Printed and bound in the United States of America.
First Printing
Microsoft Press books are available through booksellers and distributors worldwide. If you need support related to this book, email Microsoft Press Book Support at mspinput@ microsoft.com. Please tell us what you think of this book at http://www.microsoft.com/ learning/booksurvey.
Microsoft and the trademarks listed at http://www.microsoft.com/about/legal/en/us/ IntellectualProperty/Trademarks/EN-US.aspx are trademarks of the Microsoft group of companies. All other marks are property of their respective owners.
The example companies, organizations, products, domain names, email addresses, logos, people, places, and events depicted herein are fictitious. No association with any real company, organization, product, domain name, email address, logo, person, place, or event is intended or should be inferred.
This book expresses the author’s views and opinions. The information contained in this book is provided without any express, statutory, or implied warranties. Neither the author, Microsoft Corporation, nor its resellers or distributors will be held liable for any damages caused or alleged to be caused either directly or indirectly by this book.
Acquisitions Editor: Anne Hamilton
Developmental Editor: Karen Szall
Project Editor: Karen Szall
Editorial Production: Curtis Philips
Technical Reviewer: Bob Hogan; Technical Review services provided by Content Master, a member of CM Group, Ltd.
Copyeditor: Roger LeBlanc
Indexer: William P. Meyers
To my wife—for many years, through many books, many millions of words, and many thousands of pages, she's been there, providing support and encouragement and making every place we’ve lived a home.
To my kids—for helping me see the world in new ways, for having exceptional patience and boundless love, and for making every day an adventure.
To Karen, Martin, Lucinda, Juliana, and many others who’ve helped out in ways both large and small.
Contents at a Glance
Introduction xxv
PART I WINDOWS SERVER 2012 ADMINISTRATION
FUNDAMENTALS
CHAPTER 1 Windows Server 2012 Administration Overview 3
CHAPTER 2 Managing Servers Running Windows Server 2012 31
CHAPTER 3 Monitoring Processes, Services, and Events 87
CHAPTER 4 Automating Administrative Tasks, Policies, and
Procedures 135
CHAPTER 5 Enhancing Computer Security 191
PART II WINDOWS SERVER 2012 DIRECTORY SERVICES
ADMINISTRATION
CHAPTER 6 Using Active Directory 217
CHAPTER 7 Core Active Directory Administration 249
CHAPTER 8 Creating User and Group Accounts 295
CHAPTER 9 Managing User and Group Accounts 347
PART III WINDOWS SERVER 2012 DATA ADMINISTRATION
CHAPTER 10 Managing File Systems and Drives 385
CHAPTER 11 Configuring Volumes and RAID Arrays 419 CHAPTER 12 Data Sharing, Security, and Auditing 457
CHAPTER 13 Data Backup and Recovery 519
PART IV WINDOWS SERVER 2012 NETWORK ADMINISTRATION
CHAPTER 14 Managing TCP/IP Networking 559 CHAPTER 15 Running DHCP Clients and Servers 573
CHAPTER 16 Optimizing DNS 615
What do you think of this book? We want to hear from you!
Microsoft is interested in hearing your feedback so we can continually improve our books and learning resources for you. To participate in a brief online survey, please visit:
microsoft.com/learning/booksurvey
Contents
Introduction xxv
PART I
WINDOWS SERVER 2012 ADMINISTRATION
FUNDAMENTALS
Chapter 1 Windows Server 2012 Administration Overview 3
Windows Server 2012 and Windows 8 . . . .4
Getting to Know Windows Server 2012 . . . .6
Power Management Options . . . .8
Networking Tools and Protocols . . . .11
Understanding Networking Options 11 Working with Networking Protocols 12 Domain Controllers, Member Servers, and Domain Services . . .14
Working with Active Directory 14 Using Read-Only Domain Controllers 16 Using Restartable Active Directory Domain Services 16 Name-Resolution Services . . . .17
Using Domain Name System 18 Using Windows Internet Name Service 20 Using Link-Local Multicast Name Resolution 22 Frequently Used Tools . . . .23
Windows PowerShell 3.0 24
Chapter 2 Managing Servers Running Windows Server 2012 31
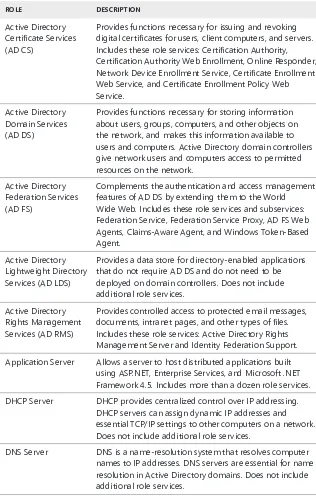
Server Roles, Role Services, and Features for Windows
Server 2012 . . . .32
Full-Server, Minimal-Interface, and Server Core Installations . . .40
Navigating Server Core 40
Installing Windows Server 2012. . . 43
Performing a Clean Installation 44
Performing an Upgrade Installation 47
Performing Additional Administration Tasks
During Installation 48
Changing the Installation Type 55
Managing Roles, Role Services, and Features . . . .57
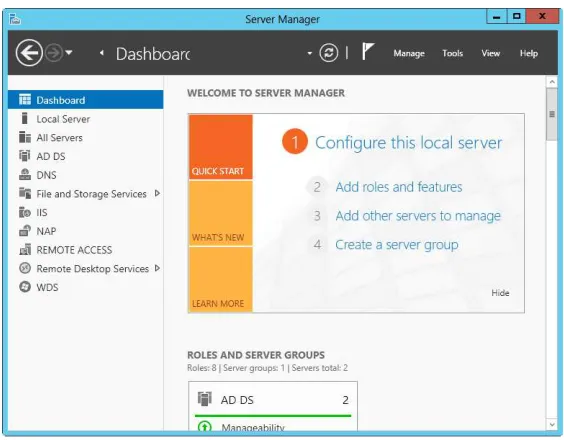
Performing Initial Configuration Tasks 58
Server Manager Essentials and Binaries 62
Managing Your Servers Remotely 65
Connecting to and Working with Remote Servers 67
Adding and Removing Roles, Role Services,
and Features 70
Managing System Properties . . . .73
The Computer Name Tab 75
The Hardware Tab 75
The Advanced Tab 76
The Remote Tab 85
Chapter 3 Monitoring Processes, Services, and Events 87
Managing Applications, Processes, and Performance . . . .87
Task Manager 88
Viewing and Working with Processes 88
Administering Processes 91
Viewing System Services 94
Viewing and Managing System Performance 95
Viewing and Managing Remote User Sessions 99
Managing System Services . . . .100
Navigating Services in Server Manager 100
Starting, Stopping, and Pausing Services 103
Configuring Service Startup 103
Configuring Service Logon 104
Configuring Service Recovery 106
Disabling Unnecessary Services 107
Event Logging and Viewing . . . .108
Accessing Events in Server Manager 109
Accessing Events in Event Viewer 110
Filtering Event Logs 112
Setting Event Log Options 115
Clearing Event Logs 116
Archiving Event Logs 116
Monitoring Server Performance and Activity . . . .118
Why Monitor Your Server? 118
Getting Ready to Monitor 119
Using the Monitoring Consoles 119
Choosing Counters to Monitor 122
Performance Logging 124
Viewing Data Collector Reports 128
Configuring Performance Counter Alerts 129
Tuning System Performance . . . .130
Monitoring and Tuning Memory Usage 130
Monitoring and Tuning Processor Usage 132
Monitoring and Tuning Disk I/O 133
Monitoring and Tuning Network Bandwidth
and Connectivity 134
Chapter 4 Automating Administrative Tasks, Policies, and Procedures 135
Understanding Group Policies . . . .138
Group Policy Essentials 138
In What Order Are Multiple Policies Applied? 139
When Are Group Policies Applied? 139
Group Policy Requirements and Version Compatibility 140
Managing Local Group Policies . . . .143
Local Group Policy Objects 143
Accessing the Top-Level Local Policy Settings 144
Local Group Policy Object Settings 145
Accessing Administrator, Non-Administrator, and
User-Specific Local Group Policy 146
Managing Site, Domain, and Organizational Unit Policies . . . . .147
Understanding Domain and Default Policies 147
Using the Group Policy Management Console 148
Getting to Know the Policy Editor 149
Using Administrative Templates to Set Policies 151
Creating and Linking GPOs 152
Creating and Using Starter GPOs 153
Delegating Privileges for Group Policy Management 154
Blocking, Overriding, and Disabling Policies 155
Maintaining and Troubleshooting Group Policy . . . .158
Refreshing Group Policy 158
Configuring the Refresh Interval 159
Modeling Group Policy for Planning Purposes 161
Copying, Pasting, and Importing Policy Objects 164
Backing Up and Restoring Policy Objects 165
Determining Current Group Policy Settings and
Refresh Status 166
Disabling an Unused Part of Group Policy 166
Changing Policy Processing Preferences 167
Configuring Slow-Link Detection 167
Removing Links and Deleting GPOs 170
Troubleshooting Group Policy 171
Fixing Default Group Policy Objects 172
Managing Users and Computers with Group Policy . . . .173
Centrally Managing Special Folders 173
User and Computer Script Management 178
Deploying Software Through Group Policy 181
Automatically Enrolling Computer and
User Certificates 186
Chapter 5 Enhancing Computer Security 191
Using Security Templates . . . .191
Using the Security Templates and Security
Configuration And Analysis Snap-ins 193
Reviewing and Changing Template Settings 193
Analyzing, Reviewing, and Applying Security
Templates 201
Deploying Security Templates to Multiple Computers 204
Using the Security Configuration Wizard . . . .206
Creating Security Policies 206
Editing Security Policies 211
Applying Security Policies 211
Rolling Back the Last-Applied Security Policy 211
Deploying a Security Policy to Multiple Computers 212
PART II
WINDOWS SERVER 2012 DIRECTORY SERVICES
ADMINISTRATION
Chapter 6 Using Active Directory 217
Introducing Active Directory . . . .217
Active Directory and DNS 217
Read-Only Domain Controller Deployment 219
Active Directory Features for Windows
Server 2008 R2 220
Active Directory Features for Windows Server 2012 221
Working with Domain Structures . . . .223
Understanding Domains 224
Understanding Domain Forests and Domain Trees 225
Understanding Organizational Units 227
Understanding Sites and Subnets 229
Working with Active Directory Domains . . . .230
Using Computers with Active Directory 230
Working with Domain Functional Levels 231
Understanding the Directory Structure . . . .237
Exploring the Data Store 238
Exploring Global Catalogs 239
Universal Group Membership Caching 240
Replication and Active Directory 241
Active Directory and LDAP 242
Understanding Operations Master Roles 242
Using the Active Directory Recycle Bin . . . .244
Preparing Schema for the Recycle Bin 244
Recovering Deleted Objects 245
Chapter 7 Core Active Directory Administration 249
Tools for Managing Active Directory . . . .249
Active Directory Administration Tools 249
Active Directory Command-Line Tools 250
Active Directory Support Tools 251
Using Active Directory Users And Computers 252
Active Directory Administrative Center and
Windows PowerShell 256
Managing Computer Accounts . . . .259
Creating Computer Accounts on a Workstation
or Server 259
Creating Computer Accounts in Active Directory
Administrative Center 260
Creating Computer Accounts in Active Directory
Users And Computers 261
Viewing and Editing Computer Account Properties 263
Deleting, Disabling, and Enabling Computer Accounts 264
Resetting Locked Computer Accounts 264
Moving Computer Accounts 266
Managing Computers 267
Joining a Computer to a Domain or Workgroup 267
Using Offline Domain Join 268
Managing Domain Controllers, Roles, and Catalogs . . . .270
Installing and Demoting Domain Controllers 270
Viewing and Transferring the Domain Naming
Master Role 275
Viewing and Transferring Schema Master Roles 275
Transferring Roles Using the Command Line 276
Seizing Roles Using the Command Line 276
Configuring Global Catalogs 280
Configuring Universal Group Membership Caching 281
Managing Organizational Units . . . .281
Creating Organizational Units 281
Viewing and Editing Organizational Unit Properties 282
Renaming and Deleting Organizational Units 282
Moving Organizational Units 282
Managing Sites . . . .282
Creating Sites 283
Creating Subnets 284
Associating Domain Controllers with Sites 285
Configuring Site Links 285
Configuring Site Link Bridges 288
Maintaining Active Directory . . . .289
Using ADSI Edit 289
Examining Intersite Topology 291
Troubleshooting Active Directory . . . .292
Chapter 8 Creating User and Group Accounts 295
The Windows Server Security Model . . . .296
Authentication Protocols 296
Access Controls 297
Claims-Based Access Controls 297
Central Access Policies 299
Differences Between User and Group Accounts. . . .300
User Accounts 301
Group Accounts 302
Default User Accounts and Groups . . . .306
Built-in User Accounts 307
Built-in and Predefined Groups 308
Implicit Groups and Special Identities 309
Account Capabilities . . . .309
Privileges 310
Logon Rights 312
Built-in Capabilities for Groups in Active Directory 313
Using Default Group Accounts . . . .315
Groups Used by Administrators 316
Implicit Groups and Identities 317
User Account Setup and Organization . . . .318
Account Naming Policies 319
Password and Account Policies 320
Configuring Account Policies . . . .322
Configuring Password Policies 323
Configuring Account Lockout Policies 325
Configuring Kerberos Policies 326
Configuring User Rights Policies . . . .327
Configuring Global User Rights 328
Configuring Local User Rights 330
Adding a User Account . . . .330
Creating Domain User Accounts 330
Creating Local User Accounts 334
Adding a Group Account . . . .335
Creating a Global Group 336
Creating a Local Group and Assigning Members 337
Handling Global Group Membership . . . .338
Managing Individual Membership 339
Managing Multiple Memberships in a Group 340
Setting the Primary Group for Users and Computers 340
Implementing Managed Accounts . . . .341
Creating and Using Managed Service Accounts 342
Configuring Services to Use Managed Service
Accounts 344
Moving Managed Service Accounts 345
Using Virtual Accounts 346
Chapter 9 Managing User and Group Accounts 347
Managing User Contact Information . . . .347
Setting Contact Information 347
Searching for Users and Groups in Active Directory 350
Configuring the User’s Environment Settings . . . .351
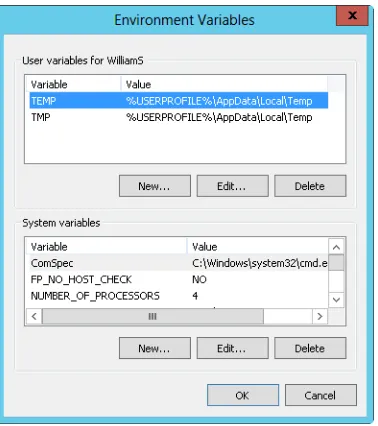
System Environment Variables 352
Logon Scripts 353
Assigning Home Directories 354
Setting Account Options and Restrictions . . . .355
Managing Logon Hours 355
Setting Permitted Logon Workstations 357
Setting Dial-in and VPN Privileges 358
Setting Account Security Options 360
Managing User Profiles . . . .361
Local, Roaming, and Mandatory Profiles 362
Using the System Utility to Manage Local Profiles 365
Updating User and Group Accounts . . . .368
Renaming User and Group Accounts 369
Copying Domain User Accounts 371
Importing and Exporting Accounts 372
Deleting User and Group Accounts 373
Changing and Resetting Passwords 373
Enabling User Accounts 374
Managing Multiple User Accounts . . . .375
Setting Profiles for Multiple Accounts 376
Setting Logon Hours for Multiple Accounts 377
Setting Permitted Logon Workstations for Multiple
Accounts 378
Setting Logon, Password, and Expiration Properties
for Multiple Accounts 378
Troubleshooting Logon Problems . . . .378
PART III
WINDOWS SERVER 2012 DATA ADMINISTRATION
Chapter 10 Managing File Systems and Drives 385
Managing the File Services Role . . . .385
Adding Hard Disk Drives . . . .389
Physical Drives 389
Preparing a Physical Drive for Use 392
Using Disk Management 394
Removable Storage Devices 396
Installing and Checking for a New Drive 398
Understanding Drive Status 399
Working with Basic, Dynamic, and Virtual Disks . . . .401
Using Basic and Dynamic Disks 401
Special Considerations for Basic and Dynamic Disks 402
Changing Drive Types 402
Reactivating Dynamic Disks 404
Rescanning Disks 404
Moving a Dynamic Disk to a New System 404
Managing Virtual Hard Disks 405
Using Basic Disks and Partitions . . . .406
Partitioning Basics 406
Creating Partitions and Simple Volumes 407
Formatting Partitions 410
Compressing Drives and Data . . . .411
Compressing Drives 412
Compressing Directories and Files 412
Expanding Compressed Drives 412
Expanding Compressed Directories and Files 413
Encrypting Drives and Data . . . .413
Understanding Encryption and the Encrypting
File System 414
Encrypting Directories and Files 415
Working with Encrypted Files and Folders 416
Configuring Recovery Policy 417
Chapter 11 Configuring Volumes and RAID Arrays 419
Using Volumes and Volume Sets . . . .420
Understanding Volume Basics 420
Understanding Volume Sets 422
Creating Volumes and Volume Sets 424
Deleting Volumes and Volume Sets 426
Managing Volumes 426
Improving Performance and Fault Tolerance with RAID . . . .426
Implementing RAID on Windows Server 2012 . . . .427
Implementing RAID-0: Disk Striping 427
Implementing RAID-1: Disk Mirroring 428
Implementing RAID-5: Disk Striping with Parity 431
Managing RAID and Recovering from Failures . . . .432
Breaking a Mirrored Set 432
Resynchronizing and Repairing a Mirrored Set 432
Repairing a Mirrored System Volume to Enable Boot 433
Removing a Mirrored Set 434
Repairing a Striped Set Without Parity 434
Regenerating a Striped Set with Parity 434
Standards-Based Storage Management . . . .435
Getting Started with Standards-Based Storage 435
Working with Standards-Based Storage 436
Creating Storage Pools and Allocating Space 438
Creating a Storage Space 439
Creating a Virtual Disk in a Storage Space 440
Creating a Standard Volume 441
Managing Existing Partitions and Drives . . . .443
Assigning Drive Letters and Paths 443
Changing or Deleting the Volume Label 444
Deleting Partitions and Drives 445
Converting a Volume to NTFS 445
Resizing Partitions and Volumes 447
Repairing Disk Errors and Inconsistencies
Automatically 449
Chapter 12 Data Sharing, Security, and Auditing 457
Using and Enabling File Sharing . . . .458
Configuring Standard File Sharing . . . .461
Viewing Existing Shares 461
Creating Shared Folders in Computer Management 463
Creating Shared Folders in Server Manager 466
Changing Shared Folder Settings 468
Managing Share Permissions . . . .469
Various Share Permissions 469
Viewing and Configuring Share Permissions 470
Managing Existing Shares . . . .474
Understanding Special Shares 474
Connecting to Special Shares 475
Viewing User and Computer Sessions 476
Stopping File and Folder Sharing 478
Configuring NFS Sharing . . . .479
Using Shadow Copies . . . .481
Understanding Shadow Copies 481
Creating Shadow Copies 482
Restoring a Shadow Copy 482
Reverting an Entire Volume to a Previous
Shadow Copy 483
Deleting Shadow Copies 483
Disabling Shadow Copies 483
Connecting to Network Drives . . . .484
Mapping a Network Drive 484
Disconnecting a Network Drive 485
Object Management, Ownership, and Inheritance . . . .485
Objects and Object Managers 485
Object Ownership and Transfer 486
File and Folder Permissions . . . .488
Understanding File and Folder Permissions 489
Setting Basic File and Folder Permissions 491
Setting Special Permissions on Files and Folders 493
Setting Claims-Based Permissions 496
Auditing System Resources . . . .498
Setting Auditing Policies 498
Auditing Files and Folders 500
Auditing the Registry 502
Auditing Active Directory Objects 502
Using, Configuring, and Managing NTFS Disk Quotas . . . .503
Understanding NTFS Disk Quotas and How NTFS
Quotas Are Used 504
Setting NTFS Disk Quota Policies 506
Enabling NTFS Disk Quotas on NTFS Volumes 508
Viewing Disk Quota Entries 510
Creating Disk Quota Entries 510
Deleting Disk Quota Entries 512
Exporting and Importing NTFS Disk Quota Settings 512
Disabling NTFS Disk Quotas 513
Using, Configuring, and Managing Resource Manager
Disk Quotas . . . .513
Understanding Resource Manager Disk Quotas 514
Managing Disk Quota Templates 515
Creating Resource Manager Disk Quotas 518
Chapter 13 Data Backup and Recovery 519
Creating a Backup and Recovery Plan . . . .519
Figuring Out a Backup Plan 519
The Basic Types of Backup 521
Differential and Incremental Backups 522
Selecting Backup Devices and Media 522
Common Backup Solutions 523
Buying and Using Backup Media 524
Backing Up Your Data: The Essentials . . . .526
Installing the Windows Backup and Recovery Utilities 526
Getting Started with Windows Server Backup 527
Getting Started with the Backup Command-Line Utility 529
Working with Wbadmin Commands 531
Using General-Purpose Commands 531
Using Backup Management Commands 532
Using Recovery Management Commands 533
Performing Server Backups . . . .534
Configuring Scheduled Backups 535
Modifying or Stopping Scheduled Backups 538
Creating and Scheduling Backups with Wbadmin 538
Running Manual Backups 540
Recovering Your Server from Hardware or
Startup Failure 541
Recovering from a Failed Start 544
Starting a Server in Safe Mode 544
Backing Up and Restoring the System State 546
Restoring Active Directory 547
Restoring the Operating System and the Full System 547
Restoring Applications, Nonsystem Volumes,
and Files and Folders 550
Managing Encryption Recovery Policy . . . .551
Understanding Encryption Certificates and Recovery
Policy 551
Configuring the EFS Recovery Policy 553
Backing Up and Restoring Encrypted Data and Certificates . . .554
Backing Up Encryption Certificates 554
PART IV
WINDOWS SERVER 2012 NETWORK
ADMINISTRATION
Chapter 14 Managing TCP/IP Networking 559
Navigating Networking in Windows Server 2012 . . . .559
Managing Networking in Windows 8 and
Windows Server 2012 . . . .562
Installing TCP/IP Networking . . . .565
Configuring TCP/IP Networking . . . .566
Configuring Static IP Addresses 566
Configuring Dynamic IP Addresses and Alternate
IP Addressing 568
Configuring Multiple Gateways 569
Configuring Networking for Hyper-V 570
Managing Network Connections . . . .571
Checking the Status, Speed, and Activity for Network
Connections 571
Enabling and Disabling Network Connections 572
Renaming Network Connections 572
Chapter 15 Running DHCP Clients and Servers 573
Understanding DHCP . . . .573
Using Dynamic IPv4 Addressing and Configuration 573
Using Dynamic IPv6 Addressing and Configuration 575
Checking IP Address Assignment 578
Understanding Scopes 578
Installing a DHCP Server . . . .579
Installing DHCP Components 579
Starting and Using the DHCP Console 581
Connecting to Remote DHCP Servers 582
Starting and Stopping a DHCP Server 583
Configuring DHCP Servers . . . .584
Configuring Server Bindings 584
Updating DHCP Statistics 584
DHCP Auditing and Troubleshooting 585
Integrating DHCP and DNS 586
Integrating DHCP and NAP 588
Avoiding IP Address Conflicts 591
Saving and Restoring the DHCP Configuration 591
Managing DHCP Scopes . . . .592
Creating and Managing Superscopes 592
Creating and Managing Scopes 593
Creating and Managing Failover Scopes 602
Managing the Address Pool, Leases, and Reservations. . . .605
Viewing Scope Statistics 605
Enabling and Configuring MAC Address Filtering 606
Setting a New Exclusion Range 607
Reserving DHCP Addresses 608
Modifying Reservation Properties 609
Deleting Leases and Reservations 610
Backing Up and Restoring the DHCP Database . . . .610
Backing Up the DHCP Database 610
Restoring the DHCP Database from Backup 611
Using Backup and Restore to Move the DHCP
Database to a New Server 611
Forcing the DHCP Server Service to Regenerate the
DHCP Database 612
Chapter 16 Optimizing DNS 615
Understanding DNS . . . .615
Integrating Active Directory and DNS 616
Enabling DNS on the Network 617
Configuring Name Resolution on DNS Clients . . . .620
Installing DNS Servers . . . .621
Installing and Configuring the DNS Server Service 622
Configuring a Primary DNS Server 624
Configuring a Secondary DNS Server 627
Configuring Reverse Lookups 628
Configuring Global Names 629
Managing DNS Servers . . . .631
Adding and Removing Servers to Manage 631
Starting and Stopping a DNS Server 632
Using DNSSEC and Signing Zones 632
Creating Child Domains Within Zones 634
Creating Child Domains in Separate Zones 635
Deleting a Domain or Subnet 636
Managing DNS Records . . . .636
Adding Address and Pointer Records 637
Adding DNS Aliases with CNAME 638
Adding Mail Exchange Servers 638
Adding Name Servers 639
Viewing and Updating DNS Records 640
Updating Zone Properties and the SOA Record . . . .641
Modifying the SOA Record 641
Allowing and Restricting Zone Transfers 643
Notifying Secondaries of Changes 644
Setting the Zone Type 645
Managing DNS Server Configuration and Security . . . .645
Enabling and Disabling IP Addresses for a DNS
Server 646
Controlling Access to DNS Servers Outside the
Organization 646
Enabling and Disabling Event Logging 648
Using Debug Logging to Track DNS Activity 648
Monitoring a DNS Server 649
Index 651
What do you think of this book? We want to hear from you!
Microsoft is interested in hearing your feedback so we can continually improve our books and learning resources for you. To participate in a brief online survey, please visit:
Introduction
W
elcome to Windows Server 2012 Pocket Consultant. Over the years, I’ve writ-ten about many different server technologies and products, but the one product I like writing about the most is Microsoft Windows Server. For anyone tran-sitioning to Windows Server 2012 from an earlier release of Windows Server, I’ll let you know right up front that I believe this is the most significant update to Windows Server since the introduction of Windows 2000 Server. While the extensive UI changes are a key part of the revisions to the operating system, the deeper changes are below the surface, in the underlying architecture.The good news is Windows Server 2012 builds off the same code base as Microsoft Windows 8. This means that you can apply much of what you know about Windows 8 to Windows Server 2012, including how Windows works with touch-based user interfaces. Although you might not install Windows Server 2012 on touch UI–capable computers, you can manage Windows Server 2012 from your touch UI–capable computers. If you do end up managing it this way, understanding the touch UI as well as the revised interface options will be crucial to your success. For this reason, I discuss both the touch UI and the traditional mouse and keyboard techniques throughout this book.
When you are working with touch UI–enabled computers, you can manipulate onscreen elements in ways that weren’t possible previously. You can enter text using the onscreen keyboard and interact with screen elements in the following ways:
■ Tap Tap an item by touching it with your finger. A tap or double-tap of elements on the screen generally is the equivalent of a mouse click or double-click.
■ Press and hold Press your finger down and leave it there for a few sec-onds. Pressing and holding elements on the screen generally is the equiva-lent of a right-click.
■ Swipe to select Slide an item a short distance in the opposite direction compared to how the page scrolls. This selects the items and also might bring up related commands. If pressing and holding doesn’t display com-mands and options for an item, try using swipe to select instead.
■ Swipe from edge (slide in from edge) Starting from the edge of the screen, swipe or slide in. Sliding in from the right edge opens the Charms panel. Sliding in from the left edge shows open apps and allows you to easily switch between them. Sliding in from the top or bottom edge shows com-mands for the active element.
■ Pinch Touch an item with two or more fingers and then move the fingers toward each other. Pinching zooms in or shows less information.
Because I’ve written many top-selling Windows Server books, I was able to bring a unique perspective to this book—the kind of perspective you gain only after working with technologies for many years. Long before there was a product called Windows Server 2012, I was working with the beta product. From these early begin-nings, the final version of Windows Server 2012 evolved until it became the finished product that is available today.
As you’ve probably noticed, a great deal of information about Windows Server 2012 is available on the web and in other printed books. You can find tutorials, reference sites, discussion groups, and more to make using Windows Server 2012 easier. However, the advantage of reading this book is that much of the informa-tion you need to learn about Windows Server 2012 is organized in one place and presented in a straightforward and orderly fashion. This book has everything you need to customize Windows Server 2012 installations, master Windows Server 2012 configurations, and maintain Windows Server 2012 servers.
In this book, I teach you how features work, why they work the way they do, and how to customize them to meet your needs. I also offer specific examples of how certain features can meet your needs, and how you can use other features to troubleshoot and resolve issues you might have. In addition, this book provides tips, best practices, and examples of how to optimize Windows Server 2012. This book won’t just teach you how to configure Windows Server 2012, it will teach you how to squeeze every last bit of power out of it and make the most of the features and options it includes.
Unlike many other books about administering Windows Server 2012, this book doesn’t focus on a specific user level. This isn’t a lightweight beginner book. Regard-less of whether you are a beginning administrator or a seasoned professional, many of the concepts in this book will be valuable to you, and you can apply them to your Windows Server 2012 installations.
Who Is This Book For?
Windows Server 2012 Pocket Consultant covers all editions of Windows Server 2012. The book is designed for the following readers:
■ Current Windows system administrators
■ Accomplished users who have some administrator responsibilities ■ Administrators upgrading to Windows Server 2012 from previous versions ■ Administrators transferring from other platforms
I also assume that you are fairly familiar with Windows commands and proce-dures as well as the Windows user interface. If you need help learning Windows basics, you should read other resources (many of which are available from Microsoft Press).
How This Book Is Organized
Rome wasn’t built in a day, and this book wasn’t intended to be read in a day, in a week, or even in a month. Ideally, you’ll read this book at your own pace, a little each day as you work your way through all the features Windows Server 2012 has to offer. This book is organized into 16 chapters. The chapters are arranged in a logical order, taking you from planning and deployment tasks to configuration and maintenance tasks.
Ease of reference is an essential part of this hands-on guide. This book has an expanded table of contents and an extensive index for finding answers to problems quickly. Many other quick-reference features have been added to the book as well, including quick step-by-step procedures, lists, tables with fast facts, and extensive cross references.
As with all Pocket Consultants, Windows Server 2012 Pocket Consultant is designed to be a concise and easy-to-use resource for managing Windows servers. This is the readable resource guide that you’ll want on your desktop at all times. The book covers everything you need to perform the core administrative tasks for Windows servers. Because the focus is on giving you maximum value in a pocket-size guide, you don’t have to wade through hundreds of pages of extraneous infor-mation to find what you’re looking for. Instead, you’ll find exactly what you need to get the job done, and you’ll find it quickly.
In short, the book is designed to be the one resource you turn to whenever you have questions regarding Windows Server administration. To this end, the book zeroes in on daily administration procedures, frequently performed tasks, documented examples, and options that are representative while not necessarily inclusive. One of my goals is to keep the content so concise that the book remains compact and easy to navigate while at the same time ensuring that it is packed with as much information as possible.
Conventions Used in This Book
I’ve used a variety of elements to help keep the text clear and easy to follow. You’ll find code listings in monospace type. When I tell you to actually type a command, the command appears in bold type. When I introduce and define a new term or use
NOTE Group Policy now includes both policies and preferences. Under the Com-puter Configuration and User Configuration nodes, you find two nodes: Policies and
Preferences. Settings for general policies are listed under the Policies node. Settings for general preferences are listed under the Preferences node. When referencing
settings under the Policies node, I sometimes use shortcut references, such as User Configuration\Administrative Templates\Windows Components, or specify that the policies are found in the Administrative Templates for User Configuration under
Windows Components. Both references tell you that the policy setting being discussed
is under User Configuration rather than Computer Configuration and can be found under Administrative Templates\Windows Components.
Other conventions include the following:
■ Best Practices To examine the best technique to use when working with advanced configuration and maintenance concepts
■ Caution To warn you about potential problems you should look out for ■ More Info To provide more information on a subject
■ Note To provide additional details on a particular point that needs emphasis
■ Real World To provide real-world advice when discussing advanced topics ■ Security Alert To point out important security issues
■ Tip To offer helpful hints or additional information
I truly hope you find that Windows Server 2012 Pocket Consultant provides every thing you need to perform the essential administrative tasks on Windows servers as quickly and efficiently as possible. You are welcome to send your thoughts to me at [email protected]. Follow me on Twitter at WilliamStanek and on Facebook at www.facebook.com/William.Stanek.Author.
Other Resources
No single magic bullet for learning everything you’ll ever need to know about Windows Server 2012 exists. While some books are offered as all-in-one guides, there’s simply no way one book can do it all. With this in mind, I hope you use this book as it is intended to be used—as a concise and easy-to-use resource. It covers everything you need to perform core administration tasks for Windows servers, but it is by no means exhaustive.
Your current knowledge will largely determine your success with this or any other Windows resource or book. As you encounter new topics, take the time to practice what you’ve learned and read about. Seek out further information as necessary to get the practical hands-on know-how and knowledge you need.
Errata & Book Support
We’ve made every effort to ensure the accuracy of this book and its companion content. Any errors that have been reported since this book was published are listed on our Microsoft Press site at oreilly.com:
http://go.microsoft.com/FWLink/?Linkid=258651
If you find an error that is not already listed, you can report it to us through the same page.
If you need additional support, email Microsoft Press Book Support at: [email protected].
Please note that product support for Microsoft software is not offered through the addresses above.
We Want to Hear from You
At Microsoft Press, your satisfaction is our top priority, and your feedback our most valuable asset. Please tell us what you think of this book at:
http://www.microsoft.com/learning/booksurvey
The survey is short, and we read every one of your comments and ideas. Thanks in advance for your input!
Stay in Touch
PAR T I
Windows Server
2012 Administration
Fundamentals
CHAPTER 1 Windows Server 2012 Administration Overview 3
CHAPTER 2 Managing Servers Running Windows Server 2012 31
CHAPTER 3 Monitoring Processes, Services, and Events 87
CHAPTER 4 Automating Administrative Tasks, Policies, and Procedures 135
C H A P T E R 1
Windows Server 2012
Administration Overview
■ Windows Server 2012 and Windows 8 4
■ Getting to Know Windows Server 2012 6
■ Power Management Options 8
■ Networking Tools and Protocols 11
■ Domain Controllers, Member Servers, and Domain Services 14
■ Name-Resolution Services 17
■ Frequently Used Tools 23
M
icrosoft Windows Server 2012 is a powerful, versatile, full-featured server operating system that builds on the enhancements that Microsoft provided in Windows Server 2008 Release 2. Windows Server 2012 and Windows 8 share a number of common features because they were part of a single development project. These features share a common code base and extend across many areas of the operating systems, including management, security, networking, and stor-age. Because of this, you can apply much of what you know about Windows 8 to Windows Server 2012.Windows Server 2012 and Windows 8
Before you deploy Windows Server 2012, you should carefully plan the server archi-tecture. As part of your implementation planning, you need to look closely at the software configuration that will be used and modify the hardware configuration on a per-server basis to meet related requirements. For additional flexibility in server deployments, you can deploy servers using one of three installation types:
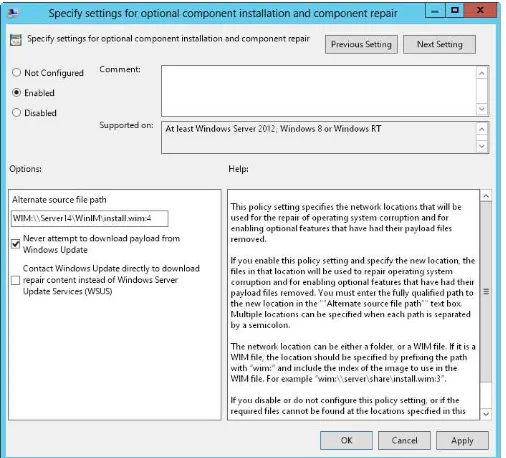
■ Server With A GUI installation An installation option that provides full functionality—also referred to as a full-server installation. You can configure a server to have any allowed combination of roles, role services, and features, and a full user interface is provided for managing the server. This installation option provides the most dynamic solution and is recommended for deploy-ments of Windows Server 2012 in which the server role might change over time.
■ Server Core installation A minimal installation option that provides a fixed subset of roles but does not include the Server Graphical Shell, Microsoft Management Console, or Desktop Experience. You can configure a Server Core installation with a limited set of roles. A limited user interface is provided for managing the server, and most management is done locally at a command prompt or remotely using management tools. This installation op-tion is ideally suited to situaop-tions in which you want to dedicate servers to a specific server role or combination of roles. Because additional functionality is not installed, the overhead caused by other services is reduced, providing more resources for the dedicated role or roles.
■ Server With Minimal Interface installation An intermediate installation option where you perform a full-server installation and then remove the Server Graphical Shell. This leaves a minimal user interface, Microsoft Man-agement Console, Server Manager, and a subset of Control Panel for local management. This installation option is ideally suited to situations in which you want to carefully control the tasks that can be performed on a server, as well as the roles and features installed, but still want the convenience of the graphical interface.
You choose the installation type during installation of the operating system. In a significant change from earlier releases of Windows Server, you can change the installation type once you’ve installed a server. A key difference between the instal-lation types relates to the presence of the graphical management tools and the graphical shell. A Server Core installation has neither; a full-server installation has both; and a minimal-interface installation has only the graphical management tools.
MORE INFO Several server features and roles require the graphical shell. They include Fax Server, Remote Desktop Session Host, Windows Deployment Services,
and the Internet Printing user interface. Additionally, in Event Viewer, the Details view
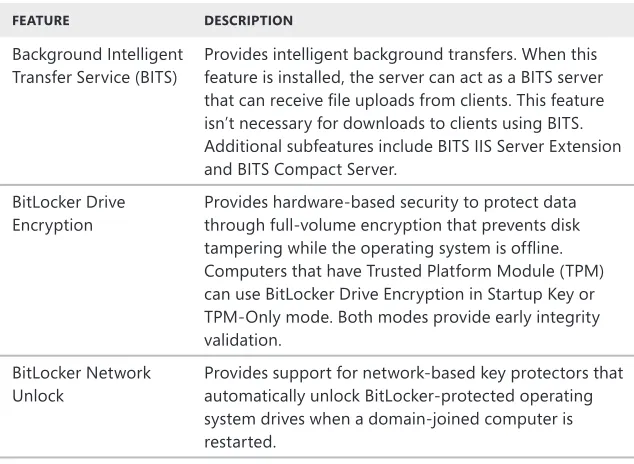
Like Windows 8, Windows Server 2012 has the following features:
■ Modularization for language independence and disk imaging for
hard-ware independence Each component of the operating system is designed as an independent module you can easily add or remove. This functionality provides the basis for the configuration architecture in Windows Server 2012. Microsoft distributes Windows Server 2012 on media with Windows Imaging Format (WIM) disk images that use compression and single-instance storage to dramatically reduce the size of image files.
■ Preinstallation and preboot environments The Windows Preinstallation Environment 4.0 (Windows PE 4.0) replaces MS-DOS as the preinstallation environment and provides a bootable startup environment for installation, deployment, recovery, and troubleshooting. The Windows Preboot Environ-ment provides a startup environEnviron-ment with a boot manager that lets you choose which boot application to run to load the operating system. On sys-tems with multiple operating syssys-tems, you access pre–Windows 7 operating systems in the boot environment by using the legacy operating system entry. ■ User account controls and elevation of privileges User Account Control (UAC) enhances computer security by ensuring true separation of standard user and administrator user accounts. Through UAC, all applications run using either standard user or administrator user privileges, and you see a security prompt by default whenever you run an application that requires administrator privileges. The way the security prompt works depends on Group Policy settings. Additionally, if you log on using the built-in Adminis-trator account, you typically do not see elevation prompts.
In Windows 8 and Windows Server 2012, features with common code bases have identical management interfaces. In fact, just about every Control Panel utility that is available in Windows Server 2012 is identical to or nearly identical to its Windows 8 counterpart. Of course, exceptions exist in some cases for standard default set-tings. Because Windows Server 2012 does not use performance ratings, Windows servers do not have Windows Experience Index scores. Because Windows Server 2012 does not use Sleep or related states, Windows servers do not have sleep, hi-bernate, or resume functionality. Because you typically do not want to use extended power management options on Windows servers, Windows Server 2012 has a limited set of power options.
Windows Server 2012 does not include the Windows Aero enhancements, Windows Sidebar, Windows Gadgets, or other user-interface enhancements because Windows Server 2012 is designed to provide optimal performance for server-related tasks and is not designed for extensive personalization of the desktop appear-ance. That said, when you are working with a full-server installation, you can add the Desktop Experience feature and then enable some Windows 8 features on your server.
Recorder, Character Map, and Snipping Tool. Although these features allow a server to be used like a desktop computer, they can reduce the server’s overall performance.
Because the common features of Windows 8 and Windows Server 2012 have so many similarities, I will not cover changes in the interface from previous operating system releases, discuss how UAC works, and so on. You can find extensive coverage of these features in Windows 8 Administration Pocket Consultant (Microsoft Press, 2012), which I encourage you to use in conjunction with this book. In addition to its coverage of broad administration tasks, Windows 8 Administration Pocket Consul-tant examines how to customize the operating system and Windows environment, configure hardware and network devices, manage user access and global settings, configure laptops and mobile networking, use remote management and remote as-sistance capabilities, troubleshoot system problems, and much more. This book, on the other hand, zeroes in on directory services administration, data administration, and network administration.
Getting to Know Windows Server 2012
The Windows Server 2012 operating system includes several different editions. All Windows Server 2012 editions support multiple processor cores. It is important to point out that although an edition might support only one discrete-socketed pro-cessor (also referred to as a physical processor), that one processor could have eight processor cores (also referred to as logical processors).
Windows Server 2012 is a 64-bit-only operating system. In this book, I refer to 64-bit systems designed for the x64 architecture as 64-bit systems. Because the various server editions support the same core features and administration tools, you can use the techniques discussed in this book regardless of which Windows Server 2012 edition you’re using.
When you install a Windows Server 2012 system, you configure the system ac-cording to its role on the network, as the following guidelines describe:
■ Servers are generally assigned to be part of a workgroup or a domain. ■ Workgroups are loose associations of computers in which each individual
computer is managed separately.
■ Domains are collections of computers you can manage collectively by means of domain controllers, which are Windows Server 2012 systems that manage access to the network, to the directory database, and to shared resources.
NOTE In this book, Windows Server 2012 and Windows Server 2012 family refer to all editions of Windows Server 2012. The various server editions support the same core features and administration tools.
from the right side of the screen. With a mouse and keyboard, you can display the charms by moving the mouse pointer over the hidden button in the upper-right or lower-right corner of the Start, Desktop, or PC Settings screen; or by pressing Windows key+C.
Tap or click the Search charm to display the Search panel. Any text typed while on the Start screen is entered into the Search box in the Search panel. The Search box can be focused on Apps, Settings, or Files. When focused on Apps, you can use Search to quickly find installed programs. When focused on Settings, you can use Search to quickly find settings and options in Control Panel. When focused on Files, you can use Search to quickly find files.
One way to quickly open a program is by pressing the Windows key, typing the file name of the program, and then pressing Enter. This shortcut works as long as the Apps Search box is in focus (which it typically is by default).
Pressing the Windows key toggles between the Start screen and the desktop (or, if you are working with PC Settings, between Start and PC Settings). On Start, there’s a Desktop tile that you can tap or click to display the desktop. You also can display the desktop by pressing Windows key+D or, to peek at the desktop, press and hold Windows key+Comma. From Start, you access Control Panel by tapping or clicking the Control Panel tile. From the desktop, you can display Control Panel by accessing the charms, tapping or clicking Settings, and then tapping or clicking Control Panel. Additionally, because File Explorer is pinned to the desktop taskbar by default you typically can access Control Panel on the desktop by following these steps:
1. Open File Explorer by tapping or clicking the taskbar icon.
2. Tap or click the leftmost option button (down arrow) in the address list. 3. Tap or click Control Panel.
Start and Desktop have a handy menu that you can display by pressing and holding or right-clicking the lower-left corner of the Start screen or the desktop. Options on the menu include Command Prompt, Command Prompt (Admin), Device Manager, Event Viewer, System, and Task Manager. On Start, the hidden button in the lower-left corner shows a thumbnail view of the desktop when activated, and tapping or clicking the thumbnail opens the desktop. On the desktop, the hidden button in the lower-left corner shows a thumbnail view of Start when activated and tapping or clicking the thumbnail opens Start. Pressing and holding or right-clicking the thumbnail is what displays the shortcut menu.
Shutdown and Restart are options of Power settings now. This means to shut down or restart a server, you follow these steps:
1. Display Start options by sliding in from the right side of the screen or moving the mouse pointer to the bottom right or upper right corner of the screen. 2. Tap or click Settings and then tap or click Power.
3. Tap or click Shut Down or Restart as appropriate.
as are closing the lid options for portable computers. Additionally, servers are con-figured to turn off the display after 10 minutes of inactivity.
Windows 8 and Windows Server 2012 support the Advanced Configuration and Power Interface (ACPI) 5.0 specification. Windows uses ACPI to control system and device power state transitions, putting devices in and out of full-power (working), low-power, and off states to reduce power consumption.
The power settings for a computer come from the active power plan. You can access power plans in Control Panel by tapping or clicking System And Security and then tapping or clicking Power Options. Windows Server 2012 includes the Power Configuration (Powercfg.exe) utility for managing power options from the command line. At a command prompt, you can view the configured power plans by typing
powercfg /l. The active power plan is marked with an asterisk.
The default, active power plan in Windows Server 2012 is called Balanced. The Balanced plan is configured to do the following:
■ Never turn off hard disks (as opposed to turning off hard disks after a speci-fied amount of idle time)
■ Disable timed events to wake the computer (as opposed to enabling wake on timed events)
■ Enable USB selective suspend (as opposed to disabling selective suspend) ■ Use moderate power savings for idle PCI Express links (as opposed to
maxi-mum power savings being on or off)
■ Use active system cooling by increasing the fan speed before slowing proces-sors (as opposed to using passive system cooling to slow the procesproces-sors before increasing fan speed)
■ Use minimum processor and maximum processor states if supported (as op-posed to using a fixed state)
NOTE Power consumption is an important issue, especially as organizations try to become more earth friendly. Saving power also can save your organization money
and, in some cases, allow you to install more servers in your data centers. If you install
Windows Server 2012 on a laptop—for testing or for your personal computer, for example—your power settings will be slightly different, and you’ll also have settings for when the laptop is running on battery.
Power Management Options
When working with power management, important characteristics to focus on include the following:
■ Cooling modes ■ Device states ■ Processor states
ACPI defines active and passive cooling modes. These cooling modes are in-versely related to each other:
reduce the operating temperature of the computer but at the cost of system performance. Here, Windows reduces the processor speed in an attempt to cool the computer before increasing fan speed, which would increase power consumption.
■ Active cooling allows maximum system performance. With active cooling, Windows increases power consumption to reduce the temperature of the machine. Here, Windows increases fan speed to cool the computer before attempting to reduce processor speed.
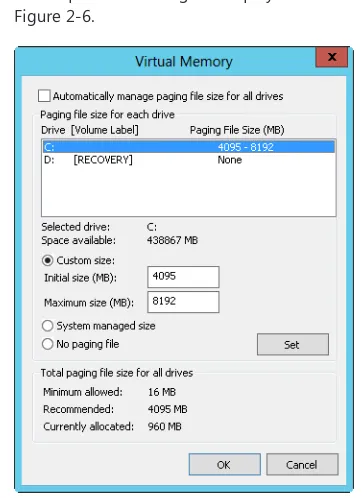
Power policy includes an upper and lower limit for the processor state, referred to as the maximum processor state and the minimum processor state, respectively. These states are implemented by making use of a feature of ACPI 3.0 and later ver-sions called processor throttling, and they determine the range of currently available processor performance states that Windows can use. By setting the maximum and minimum values, you define the bounds for the allowed performance states, or you can use the same value for each to force the system to remain in a specific per-formance state. Windows reduces power consumption by throttling the processor speed. For example, if the upper bound is 100 percent and the lower bound is 5 per-cent, Windows can throttle the processor within this range as workloads permit to reduce power consumption. In a computer with a 3-GHz processor, Windows would adjust the operating frequency of the processor between .15 GHz and 3.0 GHz.
Processor throttling and related performance states were introduced with Windows XP and are not new, but these early implementations were designed for computers with discrete-socketed processors and not for computers with proces-sor cores. As a result, they are not effective in reducing the power consumption of computers with logical processors. Windows 7 and later releases of Windows reduce power consumption in computers with multicore processors by leveraging a feature of ACPI 4.0 called logical processor idling and by updating processor throttling fea-tures to work with processor cores.
Logical processor idling is designed to ensure that Windows uses the fewest number of processor cores for a given workload. Windows accomplishes this by con-solidating workloads onto the fewest cores possible and suspending inactive proces-sor cores. As additional processing power is required, Windows activates inactive processor cores. This idling functionality works in conjunction with management of process performance states at the core level.
ACPI defines processor performance states, referred to as p-states, and proces-sor idle sleep states, referred to as c-states. Processor performance states include P0 (the processor/core uses its maximum performance capability and can consume maximum power), P1 (the processor/core is limited below its maximum and con-sumes less than maximum power), and Pn (where state n is a maximum number that is processor dependent, and the processor/core is at its minimal level and consumes minimal power while remaining in an active state).
MORE INFO ACPI 4.0 was finalized in June 2009 and ACPI 5.0 was finalized in December 2011. Computers manufactured prior to this time will likely not have firm
-ware that is fully compliant, and you will probably need to update the firm-ware when a compatible revision becomes available. In some cases, and especially with older hardware, you might not be able to update a computer’s firmware to make it fully compliant with ACPI 4.0 or ACPI 5.0. For example, if you are configuring the power
options and you don’t have minimum and maximum processor state options, the
computer’s firmware isn’t fully compatible with ACPI 3.0 and likely will not fully sup
-port ACPI 4.0 or ACPI 5.0 either. Still, you should check the hardware manufacturer’s website for firmware updates.
Windows switches processors/cores between any p-state and from the C1 state to the C0 state nearly instantaneously (fractions of milliseconds) and tends not to use the deep sleep states, so you don’t need to worry about performance impact to throttle or wake up processors/cores. The processors/cores are available when they are needed. That said, the easiest way to limit processor power management is to modify the ac-tive power plan and set the minimum and maximum processor states to 100 percent. Logical processor idling is used to reduce power consumption by removing a logical
processor from the operating system’s list of nonprocessor-affinitized work. However, because processor-affinitized work reduces the effectiveness of this feature, you’ll want to plan carefully prior to configuring processing affinity settings for applica -tions. Windows System Resource Manager allows you to manage processor resources
through percent processor usage targets and processor affinity rules. Both techniques
reduce the effectiveness of logical processor idling.
Windows saves power by putting processor cores in and out of appropriate p-states and c-states. On a computer with four logical processors, Windows might use p-states 0 to 5, where P0 allows 100 percent usage, P1 allows 90 percent usage, P2 allows 80 percent usage, P3 allows 70 percent usage, P4 allows 60 percent usage, and P5 allows 50 percent usage. When the computer is active, logical processor 0 would likely be active with a p-state of 0 to 5, and the other processors would likely be at an appropriate p-state or in a sleep state. Figure 1-1 shows an example. Here, logical pro-cessor 1 is running at 90 percent, logical propro-cessor 2 is running at 80 percent, logical processor 3 is running at 50 percent, and logical processor 4 is in the sleep state.
Processor core 1 Utilization
Processor core 4 Utilization Processor core 2 Utilization
Processor core 3 Utilization
REAL WORLD ACPI 4.0 and ACPI 5.0 define four global power states. In G0, the
working state in which software runs, power consumption is at its highest and latency
is at its lowest. In G1, the sleeping state, in which software doesn’t run, latency varies with sleep state and power consumption is less than the G0 state. In G2 (also referred
to as S5 sleep state), the soft off state where the operating system doesn’t run, latency
is long and power consumption is very near zero. In G3, the mechanical off state,
where the operating system doesn’t run, latency is long, and power consumption is zero. There’s also a special global state, known as S4 nonvolatile sleep, in which the
operating system writes all system context to a file on nonvolatile storage media, al -lowing system context to be saved and restored.
Within the global sleeping state, G1, are sleep-state variations. S1 is a sleeping state where all system context is maintained. S2 is a sleeping state similar to S1 except that the CPU and system-cache contexts are lost and control starts from a reset. S3 is a sleeping state where all CPU, cache, and chip-set context are lost and hardware
main-tains memory context and restores some CPU and L2 cache configuration context. S4
is a sleeping state in which it is assumed that the hardware has powered off all devices to reduce power usage to a minimum and only the platform context is maintained. S5 is a sleeping state in which it is assumed that the hardware is in a soft off state, where no context is maintained and a complete boot is required when the system wakes. Devices have power states as well. D0, the fully on state, consumes the highest level of power. D1 and D2 are intermediate states that many devices do not use. D3hot is a power-saving state, where the device is software enumerable and can optionally preserve device context. D3 is the off state, where the device context is lost and the operating system must reinitialize the device to turn it back on.
Networking Tools and Protocols
Windows Server 2012 has a suite of networking tools that includes Network Explorer, Network And Sharing Center, and Network Diagnostics. Figure 1-2 shows Network And Sharing Center.
Understanding Networking Options
The sharing and discovery configuration in Network And Sharing Center controls basic network settings. When network discovery settings are turned on and a server is connected to a network, the server can see other network computers and devices and is visible on the network. When sharing settings are turned on or off, the vari-ous sharing options are allowed or restricted. As discussed in Chapter 12, “Data Sharing, Security, and Auditing,” sharing options include file sharing, public folder sharing, printer sharing, and password-protected sharing.
In Windows 8 and Windows Server 2012, networks are identified as one of the following network types:
■ Domain A network in which computers are connected to the corporate domain to which they are joined.
■ Work A private network in which computers are configured as members of a workgroup and are not connected directly to the public Internet.
■ Home A private network in which computers are configured as members of a homegroup and are not connected directly to the public Internet. ■ Public A public network in which computers are connected to a network
in a public place, such as a coffee shop or an airport, rather than an internal network.
These network types are organized into three categories: home or work, domain, and public. Each network category has an associated network profile. Because a computer saves sharing and firewall settings separately for each network category, you can use different block and allow settings for each network category. When you connect to a network, you see a dialog box that allows you to specify the network category. If you select Private, and the computer determines that it is connected to the corporate domain to which it is joined, the network category is set as Domain Network.
Based on the network category, Windows Server configures settings that turn discovery on or off. The On (enabled) state means that the computer can discover other computers and devices on the network and that other computers on the network can discover the computer. The Off (disabled) state means that the com-puter cannot discover other comcom-puters and devices on the network and that other computers on the network cannot discover the computer.
Using either the Network window or Advanced Sharing Settings in Network And Sharing Center, you can enable discovery and file sharing. However, discovery and file sharing are blocked by default on a public network, which enhances security by preventing computers on the public network from discovering other computers and devices on that network. When discovery and file sharing are disabled, files and printers you have shared from a computer cannot be accessed from the network. Additionally, some programs might not be able to access the network.