For your convenience Apress has placed some of the front
matter material after the index. Please use the Bookmarks
and Contents at a Glance links to access them.
Contents at a Glance
About the Author ...
xvii
About the Technical Reviewer ...
xix
Acknowledgments ...
xxi
Introduction ...
xxiii
Chapter 1: Streamlining the Authoring Process
■
...
1
Chapter 2: Customizing Joomla with Widgets
■
...
25
Chapter 3: Constructing a Dynamic Template
■
...
45
Chapter 4: Using Template Overrides
■
...
97
Chapter 5: Using JavaScript and Ajax to Dynamically Load Page Elements
■
...
111
Chapter 6: Joomla and Web Services
■
...
131
Chapter 7: Joomla Security Administration
■
...
159
Chapter 8: Joomla Database Administration and Configuration
■
...
185
Chapter 9: Testing a Site with ApacheBench, JMeter, and Selenium
■
...
211
Chapter 10: Using Development Tools
■
...
249
Chapter 11: Creating Joomla Menus, Articles, and Categories with PHP
■
...
273
Chapter 12: Creating Core Extensions
■
...
293
Chapter 13: Connecting Joomla and Facebook
■
...
337
Chapter 14: Development and Deployment
■
...
355
If you’ve opened this book, I imagine you already appreciate how easy Joomla! makes it for you to run your web site or blog. Like me, you may be astonished that the excellent Joomla! developers have created such a solid, professional content management system and then made it free for all the world to use. Similar to its open-source cousin
WordPress, Joomla! has grown from being used on a few hundred rudimentary web sites to literally having millions of advanced site deployments.
Joomla! has evolved to become such a comprehensive system that you can literally do anything on a Joomla! site that is possible on an expensive, custom web site. And most of the time, there is a free extension available that augments the Joomla! core to do exactly what you want—with your only investment being the time it takes to install and configure.
If you’ve read my other book, Beginning Joomla!, you have already seen the possibilities available to you if you go beyond the basic features of Joomla!. This book will take you up to the next levels. Whether you’ve created a small Joomla! site that you want to polish into a gem or you run a huge site that is straining to make that next growth step, this book will show you how to push Joomla! to its limits and beyond.
I have written the book so you can add tremendous capabilities to your Joomla! site whether you have any development training or not. It will cover everything from advanced server deployment to using sophisticated extensions to creating world-class templates. If you have a development background, the information and source code presented here will provide you with an advanced understanding of how the Joomla! system operates from a foundation level all the way up to using some of its cooler bells and whistles. If you’ve never written a line of code, as long as you can use a text editor as simple as Notepad, you can take advantage of most of the technology presented in this book.
I included all the source code in the text of the book because I find my learning experience frustrated if I have to leave the text to go look for some repository to examine the actual code. I like the code to be right where I can see it in context. That said, I wouldn’t want you to have to tediously enter the numerous lines of source to get the various projects working. All the source code is available on the Apress web site and I have also created a project on Github at
Streamlining the Authoring Process
If you have been using Joomla to create and manage a web site, you’ve probably been amazed by the power and flexibility that it gives you. You’ve created an attractive and robust web site in the time it would have taken you to manually create a simple page. Now you’re ready to turbo-charge your site with advanced configuration and custom extensions. You want to add new content quickly and skirt some of the potholes on the road to Joomla mastery. For this expertise, you’ve come to the right place.
The new features available in the Joomla line have made it possible to run a professional, high-traffic web site without forcing you to learn to program. You get literally tens of thousands of man-hours of development—all for free download. Even better, Joomla was written by programmers who have a keen understanding of the best ways to allow developers to extend the existing system without compromising the fundamentals and the security of the core framework. So you can do as much or as little customization to your site as you want.
This may be preaching to the choir, but here are some of the awesome Joomla features that we will build upon in this book:
• Templating system that is both robust and easy to use: The template system is in some sense the core of Joomla in that the wide variety of fantastic templates (both free and commercial) have allowed any web master to simply install Joomla and add a template to make a completely professional and elegant site. The templating system has been augmented in many ways to allow a Joomla site to have all of the variety and flexibility of a custom developed site (more of this will be covered in Chapter 3).
• Content management: Joomla has some superior ways of managing content, including the ability to move hundreds of articles at a time or set the URL for one specific article. You can share content editing responsibilities by setting up an authorization system. Joomla also includes the more basic capabilities such as rich text editing, metadata entry, pagination, and more (advanced content administration will be covered in Chapter 8).
• Extension system that allows all manner of customization: Joomla has one of the most robust and well-developed extension systems allowing modules, components, and plug-ins to extend the functionality of the web site. You may already know how to create your own simple extensions, but in this book, I’ll take you to the next level where you can create almost any functionality that you might need to add to your site (and for the non-programmer, you'll learn how to use third-party widgets in the next chapter).
CHAPTER 1 ■ STREAMLINING THE AUTHORING PROCESS
• Search Engine Optimization (SEO)features: The developers of Joomla have spent a great deal of effort to “bake-in” job SEO features so a Joomla web master receives optimizations that companies usually have to pay an expert to detail for them. Most of the common problems that plague custom-built sites are never an issue for sites built on Joomla. Joomla makes sure every page has a title, that the URLs are search-engine friendly (if the option is switched on), includes 301 redirect support to manage page rank, and a slew of other features (you’ll learn how to configure these features in Chapter 7).
Although Joomla is a fantastic product, there is rarely any formal training to configure and use Joomla. That means that some of the most powerful features go unused or are used improperly. For many Joomla content creators, sometimes creating and adjusting the presentation of that content can be a challenging process.
In this chapter, I’ll help you resolve some of these common problems and make the life of a Joomla site administrator much easier and more satisfying. More productivity with the system will increase both the quality and quantity of the site content because time won’t be consumed dealing with these obstacles.
Once you gain a fundamental understanding of the basic technology underlying the Joomla system—knowledge that is difficult to obtain without routine examination of the actual Joomla code—you will go a long way toward mastering Joomla. Taking advantage of new Joomla features and adopting auxiliary technology (such as the Search-Engine-Friendly technology or installing an alternate third-party WYSIWYG editor) can mean the difference between effective content maintenance and daily frustration.
This chapter will describe the causes of some of these problems and various remedies or workarounds. Most often solutions come from rethinking how a desired outcome needs to be accomplished. Joomla was designed to be used in specific ways and sometimes forcing it into an unsuitable process of operation can be counterproductive.
Setting the Editor Style Sheets
Have you noticed that often the appearance of an article in the editor doesn’t match the one shown on the final page? Fonts change, sizes get bigger and smaller, and sometimes despite exacting formats set in the editor, the appearance is completely different. This situation can be frustrating for a Joomla web master, but it serves as a useful case to learn how to track down and correct a problem using the Joomla Administrator interface. Let’s take a look at an example.
In Figure 1-1, you’ll see a side-by-side display of an article in the TinyMCE Editor and another on the display of the main page. The font in the case of the editor is a sans-serif font (such as Arial or Helvetica) but the page shows a serif font (such as Times New Roman). The sizes look completely different, too. When the editor and the final display differ so greatly, it is hard for any site author to have confidence in the display of his or her work.
How can we resolve this issue? The first place to try and resolve the problem is the configuration settings of the editor plug-in. In this case, you can easily access the TinyMCE editor settings under the Extensions ➤Plug-in Manager menu. Once the plug-ins are displayed, you’ll find TinyMCE listed under Editor - TinyMCE. Click on the link provided by the title.
In the Basic Options pane, you’ll see two options relevant to the display of the editor. The first, Template CSS classes, is set to Yes. The second, Custom CSS Classes, is left blank. We could go ahead and set the style sheet to a custom one, but first let’s take a look at why, in many cases, the first option does not work automatically.
Because the default setting of the Template CSS is set to Yes, it stands to reason that the editor display should already match the one shown on the main page. However, the problem lies not with the TinyMCE editor, but most templates—including some of the default templates that ship with the Joomla system.
The TinyMCE editor looks specifically for a CSS file with the name editor.css in the /SELECTEDTEMPLATE/css directory. Many template creators don’t include this file in the /css directory. That means that the editor reverts to default styles for display. To see how this works in action, select the Beez template as the default display template for your Joomla installation. Then create an editor.css file in the CSS directory of the template. On my local Windows machine, the path of the new file was:
C:\Apache22\htdocs\joomla\templates\beez_20\css\editor.css
To make the demonstration somewhat outrageous, let’s make the main paragraph font 300% larger than the default and set it to italics. To do this, add the following definition to the editor.css file:
p {
font-size:500%; font-style: italic; }
CHAPTER 1 ■ STREAMLINING THE AUTHORING PROCESS
If you don't want to explicitly set the editor styles, you could use the Custom CSS Classes setting to specify the main template.css of the selected template. On the Administrator interface, select the Plug-in Manager from the Extensions menu. Click on the Editor - TinyMCE plug-in, which will display the options for TinyMCE. In the Custom CSS Classes text box, enter the name of the file in the template’s css folder you want to use for the editor and TinyMCE will load those styles.
This places all of the styles that are available to the template in the Styles menu, as you can see in Figure 1-3. The presentation of the editor also instantly adopts the style that will be used for the general display of content on your site.
I prefer to duplicate the main CSS of the template and rename it editor.css. That way I can control exactly the styles that are available to my contributors. By creating the editor style sheet file, you also don’t have to use custom settings if you are managing multiple sites. Simply installing a template with the editor.css will activate the appropriate styles in the editor.
Whatever your preference for configuration, the TinyMCE editor can now display the content in exactly the same manner as will be posted to the site. With final styling available directly in the editor, the display will actually become What-You-See-Is-What-You-Get.
Figure 1-3. The styles from the template.css will be displayed in the drop-down menu of the editor
Tip
■
In the past, getting this feature working has frustrated many Joomla administrators. While I am not certain of the
source of the difficulty, many of the admins finally resolved the problem by making sure Joomla was looking in the right
place for the
editor.cssfile. If you know a little PHP, you can open the Joomla file that initializes the TinyMCE (located at
/plugins/editors/tinymce/tinymce.php). In this file, you’ll find a line something like
if (!file_exists($templates_ path . '/' . $template . '/css/editor.css'))and you can simply add a PHP echo like
echo $templates_path . '/' . $template . '/css/editor.css';on the line before it. When you refresh the editor page and perform a View
Source in your browser, you should see the exact path where Joomla is looking for the template CSS file.
Setting Up an Article “Staging” Category
On most live sites (commonly referred to as “production sites”), you won’t want in-progress edits to appear on the site. Because Joomla doesn’t distinguish between versions of an article as some other CMSs do, you will need a workaround to make sure that content that is not ready for world publication is not seen prematurely. The easiest method of solving this problem is the creation of a “staging” category.
CHAPTER 1 ■ STREAMLINING THE AUTHORING PROCESS
In addition to holding new content, a staging category can contain articles that are meant to replace other articles. If the article is new content, simply setting the publication date in the future may be good enough to keep the article unavailable, so placing it in the staging category is not necessary. However, with editing existing content, you probably don’t want to unpublish the article while it is being revised and you also don’t want the public seeing an in-process editing job. You will need to make a copy of the existing article and place it somewhere where it won’t be confused with the existing version.
For example, if you open the article in the Article Manager, clicking the Save as Copy button will create a copy in the same category where the original resides. However, the difference between the two is not very obvious, as shown in Figure 1-4.
Figure 1-4. The only difference between the currently published article and the in-process update is the article ID
While you can check the right column for the higher article ID (the new article will always have a higher number), there is a substantial possibility that the wrong article will get updated. A much better method is creating a category where updated articles can be copied from—the staging category. There should never be any confusion because the category will clearly declare that the article is not in a category that will be displayed on the site. Set up your staging category like this:
1. Select the Content ➤Category Manager ➤Add New Category option to display the manager.
2. Set the title of the new category to Staging Category.
3. Set the Status to Unpublished.
4. Set the permissions as desired. Generally, you will reserve the Delete and Edit Own properties for Editors, Publishers, and Administrators.
5. Click the Save & Close button to create the new category.
6. Select the Content ➤Article Manager to show all current articles.
7. Open a live articles that need to be edited by clicking on the title.
8. In the Category drop-down menu, select the Staging Category.
You can now edit the copy in the Staging Category without any danger to the original article or an in-progress document being exposed to the public. When you’re ready to publish the revised version, take the current version offline by opening the original article, changing the alias to include a suffix such as “-old” (two documents can’t have the same alias in the same category), and then changing the state to Unpublished. For the new article, set the state to Published and set the category to the location of the original article and the new version will be live.
If you want to make your staging environment even closer to production, you can set up a menu item that references this category and makes it available only to those behind the scenes (such as editors and administrators). This technique will allow you to see the articles in a published setting such as a Category Blog layout for tuning of “read more” links and other aspects of the article display.
Such a system also provides a convenient place for site editors to go to see all article updates that are being worked on. Creating a category named “staging” in all of the major sections of your site can greatly simplify the management process for updates.
Note
■
In professional software development, the term “staging” refers to a server (for example, “push the code to the
staging server”) or designation where code or data is kept right before it is pushed to production. It comes from the
building trade where it refers to a temporary structure used in the building process such as the horizontal platforms that
allow workers to stand on the scaffolding. For software development, it is a holding area or special server where things
can be modified and tested in a near-production environment.
Anatomy of the Article Display Process
After using Joomla for any length of time, you’ve probably experienced some confusing results when you try to get articles to display in a certain way. There are dozens of problems that may have you shaking your head in frustration.
A font, size, and style choice may have exactly the right appearance in the editor, yet when rendered by the site it looks completely different (as you saw in the previous section). Perhaps a setting that you’ve used dozens of times may not work the way you expect. For example, you may turn off the Show Title option for an article, only to find the title display persists. Other times, changes to global preferences seem to have no effect at all. You may waste hours trying to track down the source of the problem.
Rarely are these types of configuration puzzles caused by an actual bug in Joomla. Because Joomla is designed for maximum control, it has many interwoven and interlocking settings that can affect when, where, and how the items of an article are displayed. This means that a display setting in one place may be ignored in another. Unfortunately, when several of the settings come into play for a single article, it is sometimes difficult to determine which setting in the chain is the dominant one that is used.
The number of locations for various settings can even confound an experienced user. The next section will help you untangle the relations of the various settings and provide a map so you can quickly achieve the presentation you desire. Learning where and how to configure various pieces of metadata used by the presentation system will let you achieve the look you desire on your site. It will also streamline your efforts to provide your site with a consistent persona and give your site visitors a coherent brand experience.
We’ll progress through each of these areas and demonstrate the various situations where a setting that seems like it should directly affect the display does not. Then the setting that actually will make the change is demonstrated.
Configuring Article Display
CHAPTER 1 ■STREAMLINING THE AUTHORING PROCESS
When an article is displayed by a system component (whether it is com_content or another extension), there is a great deal of metadata (or information about information) related to the article. Metadata determines how the Joomla code will render the article and its various pieces (such as title, header, and so on). Because an extension manages most aspects of the actual presentation of the article, the extension needs to reference the metadata to choose what may be used or ignored.
Figure 1-5. Article settings start at the top and progress from the global settings down to the local article settings
In this example, you’ll create a new article and modify settings related to it. Starting with the parameter settings on the article itself, you’ll progress to the menu settings, and finally to the global settings in the Parameters pane.
Start by creating a new article:
1. From the select the Content ➤ Article Manager option and click the New button to create a new article.
2. Add an article title and fill the body edit box with some dummy content. I created an article called Article Anatomy 1 and entered some general text.
3. Set the Status setting to Published.
4. Set the Featured setting to Yes.
5. Set the Category (I selected a category called Advanced Joomla! that I’d created earlier).
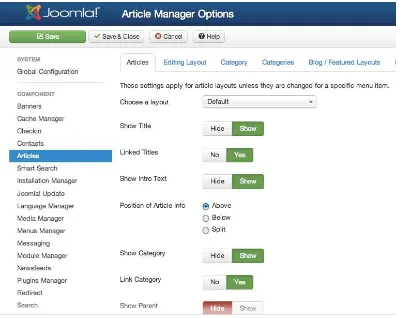
6. Click on the Article Options tab and set: • Show Title to Use Global
• Show Category to Show Show
• Voting to Show
• Show Author to Hide
• Show Create Date to Use Global
7. Click the Save & Close button.
Note
■
In computer terminology, the term “metadata” means information about information. I’m properly (but broadly)
using that term here to indicate information such as settings, properties, or parameters that provide information and have
an effect on the presentation of the article content. In the Joomla Article Manager, the Metadata Options panel contains
metadata narrowly specific to SEO properties about a particular article. Therefore, when you read the term metadata in
this chapter, please think of it in the broader sense.
Article Settings
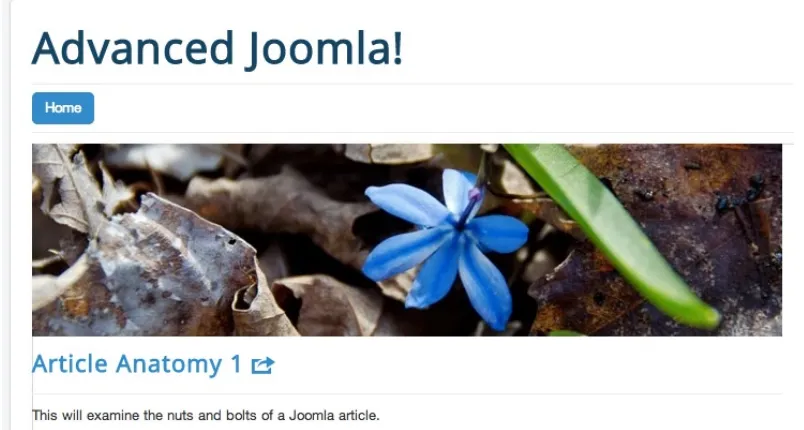
Once the article is saved, you have an item that uses several of the available settings (Show, Hide, and Use Global). This will allow you to see how other settings in different places affect the article display. Open the home page of your web site in a browser and you should see an article like the one in Figure 1-6.
Figure 1-6. The article as it is displayed on the home page of the web site
You will notice that some of the settings worked as expected, while others didn’t. At the top of the column there is no category title (in my case, Advanced Joomla) that was set on the article to Show. The Article Voting was set to Show, but it doesn’t appear on the page, either. The Show Author was set to hide and it hasn’t been displayed, so that setting worked. Show Title was set to Use Global and because the article title is shown, it appears that the global setting was set to show it.
Global Settings
CHAPTER 1 ■ STREAMLINING THE AUTHORING PROCESS
Figure 1-7. The Options button of the Article Manager displays the Global options
Surprisingly, the Show Category shows Show, yet the category title didn’t appear. Choose the following Global options:
Set
• Show Title to Hide
Set Show
• Category to Show
Set Show
• Author to Show
Set Show
• Create Date to Hide
Set Show
• Modify Date to Hide
Set
• Article Voting to Show
Click the Save & Close button to store these settings and refresh the home page. As you can see in Figure 1-8, the Advanced Joomla! category text is still missing! Also, the article title is still there. The author name, although set to Show, does not appear. It shouldn’t because the article was set to hide the author and the global setting should not override the individual article settings. The create date doesn’t appear. However, the Article Voting
Figure 1-8. After saving the new global settings, the article display has changed slightly
You’ve now covered the two primary settings levels, but haven’t resolved the extra unwanted title and the missing category. After the article and global settings, the next level up in the display process is the menu that renders the display. In this case, it is the menu that displays the “featured” or Home menu.
Menu Settings
Even if you’ve dramatically changed your Joomla configuration, you can find the Home menu like this:
1. Select the Menus menu in the Administrator interface.
2. In the drop-down menu, look for the item with the gold star following the menu title.
3. Select that item to display the Menu Item Manager.
4. One of the items should have a gold star in the Default column (likely it is named Home). Once again, the gold star next to one of the entries indicates the home page. Click on the title of that menu item.
Once you have the Home menu open, you can make selections that determine how content displayed by that menu will be handled. To make a few more demands on our simple article, select these options:
5. Click on the Advanced Options tab and you should see the traditional options again.
6. Set the Show Title to Hide.
7. Set the Show Category menu to Use Global.
8. Click the Save & Close button.
CHAPTER 1 ■ STREAMLINING THE AUTHORING PROCESS
9. Click the New button to create a new menu.
10. For the Menu Item Type, select Articles and then the Article ➤Single Article option.
11. Set the Menu Title to Setting Tester.
12. Select Menu Item Root in the Parent Item list that will make it easy for you to find the article.
13. In the Required Settings pane, click on the Select button to select the article you just created.
14. Click the Save & Close button.
Once again refresh your browser window. Again some things change, but some stay the same. Now it’s time to re-evaluate our assumptions about where the article is being displayed and what is being presented.
In this case, my category title happens to match the name of the site: Advanced Joomla!. What I had thought was a category title was in fact the page title inserted by the component. How did I figure this out? When I did a View Source in the browser window and performed a Find for my target text, I saw that the HTML code to display the text read like this:
<div class="componentheading">Advanced Joomla!</div>
That made me realize that the component considered this text the matching title of the component. Because this component was displaying home page content, it seemed possible that this page was displaying the title of that page. I went to the Page Display Options pane of the article’s menu and checked for the page title. It was actually blank!
However, when I went to the Global Configuration of the site, it was indeed set to Advanced Joomla!. When I made a slight modification to the site title and performed a refresh, I was rewarded with the text shown in Figure 1-9.
Figure 1-9. Changes to the site name were displayed in the title at the top of the column
Title of the Home Page
A problem that frustrates many Joomla users is determining the place where the title is set for the main index page. Setting this title properly is critical to optimizing your web page for the search engines. Because it is the lead page to your site, it will weigh most heavily in the search engine spider’s attempt to categorize your site. By default, Joomla sets the title of this page to the name of your site.
Because the entire structure of a Joomla site is determined by the menus configuration, each menu provides a place to explicitly override the page title so it won’t just contain the title of the site. If the Browser Page Title parameter for the Home menu items is set, this title will override the default site name setting for the home page. So to set the name of the home page, you only need to modify the home menu.
In the Administrator interface, drop-down the Menus menu and look for the item with the gold star as you did earlier. As shown in Figure 1-10, the star is a visual marker that tells you the menu that contains the default home page.
Figure 1-10. The star shows which menu contains the ‘home’ page menu
CHAPTER 1 ■ STREAMLINING THE AUTHORING PROCESS
Figure 1-11. Expanding the Page Display Options pane for the menu item with the star will display the title of the home page
Change the page title to something that will help maximize your search engine ranking. Remember that a page title that matches the content of the page will greatly increase your chances of being properly categorized. For example, a site title of ‘Tall Ships’ that has a menu titled ‘Tall Ships of the Atlantic’ is likely to be recognized as a site focusing on this topic.
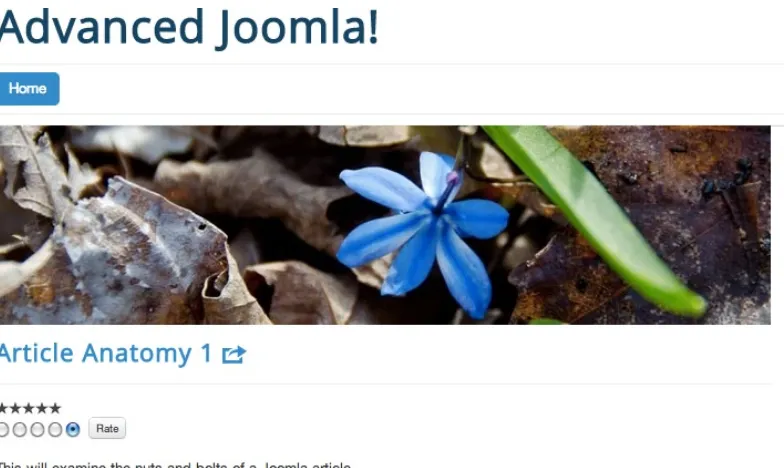
Article Voting
The final piece of the puzzle is the missing article voting. First restore the global setting of Yes to the Show Title option that you changed in the previous exercise in the Article Options of the Home menu and in the global Options of the Article Manager. Let’s make the article title a link to the article, click on it, and see the article when it isn’t displayed on the home page. When troubleshooting a Joomla problem, it is often a good idea to move the targeted item off the home page because specialized settings might be involved, as you have just seen.
The article rating doesn’t appear until a user has clicked on the rating and applied one. Once it has been rated once, the voting will appear even on the front page.
Summary of Article Presentation
Understanding when each setting will actually affect the article display will help you properly configure your web site. Let’s begin the process by creating an article and leaving the default settings and watching where settings NOT on the article will change.
The three main locations of article settings in order of precedence are:
1. Settings on the article itself
2. Settings on the menu that displays the article
3. Settings in the global settings of the Options for the site
Now that the menu for the home page is displayed in the title, notice anything? Well, if in the case of the home page, the menu title were displayed as the page title. What would happen if you turned off the page title? In the Parameters (System) pane, set the Show Page Title to No and refresh the home page in your browser. Jackpot! The Advanced Joomla! text is finally missing.
In this process, sometimes figuring out proper Joomla settings is a bit like detective work. It can take some time to track down these things, but very often there is a configurable solution to your problem. Now let’s take a look at some other configurations that are not obvious and learning to use them can dramatically increase your control over the look and feel of your site.
CHAPTER 1 ■ STREAMLINING THE AUTHORING PROCESS
URLs and Their Challenges
When you activate the Search-Engine-Friendly (SEF) URLs on a Joomla site, understanding how they are created can be puzzling given the context. Is the alias of the article used or the menu alias? How are articles referenced within categories? Can multiple URLs lead to the same page? Answering these questions can help you understand how Joomla approaches site organization. It can also help you to optimize your site so the search engine spiders can more effectively understand your content and surface it to visitors.
In this section, I’ll try to dispel some of the mysteries surrounding the system of routing that Joomla uses to generate the URLs that are presented to the user. You’ll also see how you can manually display content by article ID, which can be useful when you’re testing particular articles with extensions that you are developing.
Puzzling Out a URL
The best place to start looking at the Joomla URLs is a standard, non-SEF URL that is generated for a Joomla menu. In the Administrator interface, select the Site ➤Global Configuration menu item. In the SEO Settings pane, change the Search Engine Friendly URLs setting to No. Then use your browser to go to the site home page (or refresh the page if you are already there). If you hover over menus, you can see the actual structure of each link now.
From the Administrator interface, you can always examine the URL to any menu by checking the Link field for a menu, as shown in Figure 1-13.
Figure 1-13. The link for any menu is displayed in the Link text box of the menu editor
For a single article layout menu, the displayed link will be something like this:
index.php?option=com_content&view=article&id=1
This link, however, is incomplete. If you move to the browser and click on this menu link, you’ll see that the URL actually has an additional parameter:
The Itemid parameter is very important in controlling an advanced Joomla site, because it determines the menu
and thereby the menu settings to be displayed for this article. By customizing this parameter, you can make an article display in almost any manner you want. Most often, you will want to use this feature to create custom links to content that uses one template or another. In other words, by creating a custom link in an article or on a page, you can have the same piece of content displayed in more than one way.
For example, perhaps there is a single article that you want to be shared between the customer side of the site and the developer side of the site. However, depending on the location of the link, you need it to display with the proper template or different left side menus.
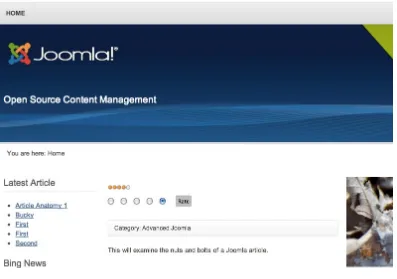
If an article was left to the default template, such as Atomic, the article would display using that template. However, another menu might be set to use the Beez template. You can select templates for individual menus by opening the template entry in the Extensions ➤ Template Manager and then using the Menu Assignment pane and selecting individual menus, as shown in Figure 1-14.
Figure 1-14. You can assign a template to display on specific menus
If you attempt to select multiple templates for the same menu item, when the template entry is saved, Joomla will simply de-select it from the previous template. For this example, however, I’m going to set up a menu called Developer Section and set it to use the Beez template using the Extensions ➤ Template Manager. Once I have the menu set up, I’ll open the Menu Item Manager and look at the far right column labeled ItemID of the menu item list. I’ll make a note of that menu ID to use in my URL. Now I can set up a custom link that reads like this:
index.php?option=com_content&view=article&id=1&Itemid=4
CHAPTER 1 ■STREAMLINING THE AUTHORING PROCESS
Even if your site uses SEF URLs, the basic URL is a good place to start when trying to diagnose routing problems. This is especially true as the SEF routing follows essentially the same patterns with regard to article IDs.
Examining the SEF URL
Once the SEF options in Joomla are activated, it can become difficult to know exactly how a URL will be routed. If the SEF option (non-mod rewrite) is activated on the example URL used earlier (index.php?option=com_ content&view=article&id=1), when the menu URL is examined, it appears like this:
index.php/component/content/article/3
The router breaks down the original link string into the following parts:
host: The base url, such as
• www.example.com, but it will also include the subdirectory if the host is not at the root (www.example.com/myjoomla).
port: If the port is 80 (the standard web port), this variable on the server side is empty. •
path: The path of the page requested that is in the form of SEF setup, so it may appear in one •
of those forms (for example, /index.php, /index.php/mymenu, or /mymenu).
query: The options of the request. For a site with no SEF mapping activated, this field would •
contain a value like option=com_content&view=article&id=173.
The path itself is the most important variable when trying to determine your URL. It is parsed by the system to determine the SEF URL. The path will always be based upon the menu that is used to reach it.
Tip
■
If you’re interested in examining the code Joomla uses to encode and decode URLs, you can look at the
router.phpfile in the
/libraries/joomla/application/directory of your Joomla installation. In the file, the
build()function is called to create the URLs for the menus and other items in the presentation of the page and the
parse()function receives the URL (such as a SEF URL) and converts it to an internal URL. Note that the actual SEF parsing is
performed by the
_parseSefRoute()in the
router.phpfile in the
/includes/directory.
For example, if you have a hierarchical menu like the one shown in Figure 1-16, the URL will include the menu alias of each level. If the Page Heading parameter of the menu is empty, the article title is used. Otherwise, the Page Heading becomes the title of the window.
Figure 1-16. Hierarchical menus create the different levels of the URL
In the example shown in the figure, the hierarchy of the titles means that the final menu will have a URL like this:
/using-joomla/using_extensions/components
If the final menu is a component such as the Category Blog layout, then the individual IDs of the articles will be the final number in the URL. That means that an article in a blog would have a URL like this:
/mytopmenu/mysubmenu/81-article-anatomy
In later chapters, you’ll see how you may want to create a master menu for you site with all of the required hierarchical organization so the SEF URLs will be exactly as you need them. Then you will create various menu aliases to reference the master menu to put the necessary menus where you want them in the template display.
Configuring the Search Results Page
CHAPTER 1 ■ STREAMLINING THE AUTHORING PROCESS
For example, perhaps the site you are building features two different visitor types: customers and developers. The menus that are displayed for a customer are not the same as those displayed for a developer and vice versa. Perhaps you want the search functionality only available to the developers because the search is customized for the technical notes stored in your article database.
When you set up your site, you can use the module configuration list box like the one shown in Figure 1-17 to specify where modules are displayed. In this case, you only want the search module displayed on the developer pages. Next, you can use the Template Manager to specify which menus will use which templates for presentation. In our example, a developer template (with small fonts and a minimalist style) is on the developer pages. On the customer pages, a much warmer and user-friendly accessibility-oriented template is desired.
Figure 1-17. The listbox is used to specify where a module will be displayed
This system of custom module and menu display works perfectly until you reach the search results page. On that page, the template reverts to the default (customer template) and the menus that are displayed are only those available on all pages. This will appear unprofessional to your developers and ruins the consistency of the design of your site. Despite searching, you can’t find any setting that allows you to determine the display of the search results page. To solve this problem, you will need to create a new menu specifically for search results. Following a process to figure out what the search results page currently displays can help you debug some of your own problems with Joomla, so that’s what we’ll do in this section.
Under the Extensions ➤ Module Manager option of the Administrator interface, you’ll see a list of module items. There will be one module for each menu of the system. The module renders the actual display of the menu. You should see one row with a module name titled Main Menu and the type column should hold the text Menu. This is the menu you want to test.
Click on the Main Menu item and you should see the display of the various menu parameters. In the Menu Assignment pane, the default setting should be set to On all pages so the menu appears on all pages.
Click on the No pages setting and click the Save button to save the change. Go back to the Search Results page and refresh it in your browser. The Main Menu should now be gone from the page (as well as all the others). Excellent! You’ve established that the Menu Assignment settings do have an effect on the search results just like other pages.
Return to the Menu Assignments pane and this time you’ll do a custom select of all the individual menus that are available. Click on the Select All button to add the menu to all of the pages. Click Save to save the changes.
When you refresh the search results, you’ll see something odd. The Main Menu DOES NOT appear on the search results page. However, if you navigate to any other page in the site, the Main Menu module does appear as expected. Therefore, there is an invisible page that Joomla must keep for the search results that is handled by the On all pages
menu selection, but is not shown in the menu list.
For these types of menus, you need to create a placeholder menu for the component (see Figure 1-18). You can configure this placeholder to display as you want it to and will be used by the system as the touchstone for the particular component. You can hide the page under any other menu. As long as it exists, the system will pick it up and use the configured settings.
CHAPTER 1 ■ STREAMLINING THE AUTHORING PROCESS
In order to set what does and doesn’t appear on the search page, you must first create a search placeholder menu:
Create a new menu called
• Search Placeholder in the Menu Manager.
Unpublish the menu. The system will still recognize the menu, but it won’t be displayed •
anywhere.
Create a new menu item on the Search Placeholder menu and set the type to Search Form or •
Search Results.
Note the ItemID of the menu (in Figure
• 1-18, it’s 467) because you’ll need it in a moment. Go to the Module Manager and click on the Search module.
•
Select the Basic Options tab and put the ItemID of your placeholder menu item in the
• Set
ItemID text box, as show in Figure 1-19. This setting will make Joomla use the specified menu item for module display settings and template selection.
In the Module Manager, enable the Footer module in the list of modules. •
Click on the Footer module and on the Menu Assignment tab, set it to only appear on the •
Search Placeholder menu from the list box that specifies where the module will appear.
The Footer should be configured to only appear on the Search Results page. Go to the browser window and execute a search and the search results are now displayed with the footer module.
Conclusion
In this chapter, you learned a few techniques for customizing the presentation and usability of your Joomla site to match your needs. Whenever you work through tough problems in Joomla, put on your detective’s hat and test your assumptions. You’ll find that taking problems step-by-step and doing things such as putting in marker text will lead you to the source of the setting that you need to change.
You can configure each piece of information displayed for a Joomla article in several different places. Configuring the article title, authorship display, and other items can occur in the settings of the article itself, the Global
CHAPTER 2
Customizing Joomla with Widgets
Joomla is famous for its extensibility—everything from custom templates to the broad array of available third-party extensions. Beyond that, the built-in Custom HTML module provides a blank canvas through which Joomla can host a variety of web services, widgets, and APIs without the need for custom programming or extension installation. In this chapter, you’ll see how to use this module to augment your Joomla web site with no additional installation. Widgets can provide everything from chat to event calendars to maps to online virtual storefronts. You will see examples of all of these widgets in this chapter and learn how you can add them to your site.
There are many advantages to using widget code on your site. The most important include:
• No additional server resources needed: Some of these widgets use large databases or advanced serving technology to provide their functionality. Because the code for the widgets is executing on a remote server, your web server doesn’t need to provide any of the resources to enable the features they provide.
• No slowdown in page load speed: Most of these widgets display in an iFrame or use
asynchronous JavaScript calls, which means they don’t prevent your page from loading while they are being retrieved. The widget loads in parallel with the rest of your page content, so your visitors can see the rest of your page in their browser and the widgets will populate as they become available. This is supported in all modern browsers.
• Code for the widgets is stored in the Joomla database: The HTML or JavaScript code in the Custom HTML module, unlike Joomla extensions (which are a mixture of code files and database entries), is stored in the Joomla database. That means every database backup will also archive all the widgets on the site. It also means that transferring them to other sites or other servers is much easier than relocating installed extensions.
• Upgrades are automatic: Since the actual widget is stored on the servers of the vendor that is making them available, when they upgrade their code, the upgraded version of the widget automatically appears on your site without requiring you to do any change or installation. Of course this can be a disadvantage if you don’t like the new features or changes in advertisement policy, but this auto-upgrade is generally a benefit.
This chapter will take you through the implementation of the following widgets to your Joomla site:
Google Calendar •
Google Map •
Google Translate •
Live Chat box •
Related Content Module
To use the widgets, you will need to include iFrame or JavaScript code within the pages where you want the widget to display. This code could be added to the template that is being used for the site, but that requires custom modification of the site template—whether you’ve constructed the template yourself or purchased from a third-party template vendor.
Modifying the template also makes using the widget less flexible and more difficult to manage through the Joomla Administrator interface. In contrast, Joomla supplies a wrapper module called the Custom HTML module that can be used just like any other module. It essentially allows any HTML- or JavaScript-based widget to be embedded in the module code and it will appear on any page and position specified for that module.
Creating a Custom HTML Module
Using the Custom HTML module allows you to customize a Joomla site quickly and painlessly. The module enables you to encapsulate custom HTML, CSS, and JavaScript code into a module with all of the functionality afforded normal modules including menu-selectable display, security features, administrative positioning of the module within the template, and control over the user level who can see the module.
Creating a Custom HTML module is extremely simple—let’s take a look at the process now. Before we start, we need to configure the editor settings because the default editor settings will corrupt or delete any widget code pasted into the HTML field of the module. The Custom HTML module was created to enable users to add HTML code to a page—not the JavaScript needed by most widgets. For general security reasons, WYSIWYG text editors have built-in functionality to either delete JavaScript code outright or process the JavaScript code in an attempt to protect the site from a malicious scripting attack. To allow you to paste un-corrupted custom HTML or JavaScript code into the module, you need to select the “No editor” option in Joomla for your user so the code added to the HTML module is saved as-is.
Unfortunately, the Toggle Editor button at the bottom of the editor window, which lets you paste HTML code directly into the window, still processes the code in the text field through the editor (deleting or corrupting the widget code). Since I want to make sure that my widget code stays intact, I create a second administrator account called
widgetadmin that has the simple text editor (or no editor) selected as the user’s default editor. I then use that account to add or edit any of my widget modules. To create the widgetadmin, follow these steps:
1. From the Administrator interface, select the Users ➤User Manager menu option.
2. Click the New button to create a new user account.
3. Set the username as widgetadmin and set the password to the same password as your admin account.
4. Select the Editor - None option in the Basic Settings pane.
5. Set the account type to Administrator or Super Users so you can easily edit any module from this account.
6. Click the Save and Close button to save the account.
Log in as the widgetadmin and create an example module by following these steps:
1. From the Administrator interface, select the Extensions ➤ Module Manager menu option.
2. Click on the New button.
CHAPTER 2 ■ CUSTOMIZING JOOMLA WITH WIDGETS
4. Enter “Hello Joomla World” as the module title.
5. Enter the following text in the body: <script>document.write("Hello Joomla World!")</script>
6. Set the position to the Footer position (depending on your selected template, this will vary). I selected “position-14” that is the last footer position in the Beez templates.
7. Click the Save and Close button.
When you view your site with a browser, you should see the module in the footer as shown in Figure 2-1.
Figure 2-1. The hello message should appear on the web page in whatever position was selected for the module
This demonstration used simple JavaScript to write text into the document, although you could have made it a little more advanced and used HTML tags such as <b> or <h1>. For widgets, you will use a combination of iFrames, JavaScript, or HTML code to inject the custom module code into the Joomla page.
Adding Custom Widgets to Your Site
Using the Joomla Custom HTML module, you can often add a great widget to your site in less than five minutes. Although the widgets demonstrated in this chapter are only a very small sampling of the large number available on the Internet, you can download most widgets that are available and activate them using the same steps as you will follow here.
Implementing the Google Calendar
There are numerous excellent Joomla extensions that offer event calendars, but most are only local to your site. The Google Calendar widget, in contrast, can feed all types of events directly onto your site calendar and allows your events to be published into a networked calendar. Since the calendar can both publish events to the broader world as well as import other events into it, it is often the perfect solution for a public-facing event calendar.
To set up a calendar, go to the Google Calendar page (www.google.com/calendar), log into your Google account, and click the Create button. Fill in the details of your calendar and set the privacy to Make this calendar public, as shown in Figure 2-2. Clicking the Save button will generate the calendar and create an accessible URL.
Figure 2-2. Select Make this calendar public to share entries on the calendar with the Web
Create a few events on the calendar by clicking on a day or time slot depending on the display mode that you are using. The calendar even lets you create recurring events that can be especially useful for relevant holidays that fall on the same day every year.
CHAPTER 2 ■CUSTOMIZING JOOMLA WITH WIDGETS
Click on the Calendars tab and then click on the link for the Calendar you just created. If you scroll down in the window, you’ll find the section titled EmbedThis Calendar that has a text box with HTML code in it as shown in Figure 2-4. If you want the default viewing options, you can select and copy this code now. To make modifications in the display, click on the Customize the color, size, and other options link and you’ll be presented with a screen that allows you to customize the display of: the title, the date, the Print icon, the tabs, the calendar list, the time zone, display type (week, month, or agenda), size (width and height), day starting the week, language (select among 40 languages), colors, and the inclusion of other calendars.
Figure 2-3. Open the Calendar settings to access the iFrame code for the calendar
If you make some of the customizations to the various aspects of the calendar, you will get iFrame code that resembles something like this:
<iframe src="https://www.google.com/calendar/embed
?showTitle=0&height=600&wkst=1& bgcolor=%23FFFFFF&
src=6hn0i7d426fl7j78995mj6c174%40group.calendar.google.com
&color=%23856508&
src=en.usa%23holiday%40group.v.calendar.google.com& color=%23182C57&ctz=America%2FLos_Angeles"
style=" border-width:0 " width="800" height="600" frameborder="0" scrolling="no">
</iframe>
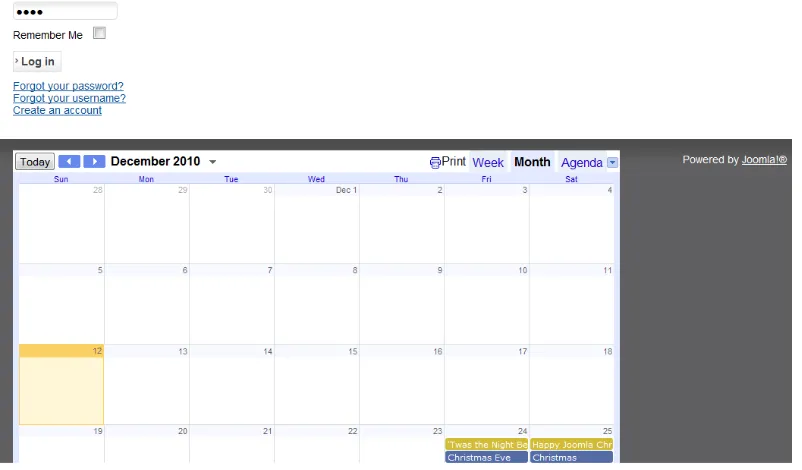
You can now paste this code into a Custom HTML module and put the calendar at an appropriate location on your Joomla site. Follow the instructions from the earlier section and paste the custom iFrame code into the HTML text area instead of the JavaScript “hello world” code used earlier. In Figure 2-5, I’ve placed the calendar at the bottom of my front page.
CHAPTER 2 ■ CUSTOMIZING JOOMLA WITH WIDGETS
You can have different calendars for different pages or combine the calendars in the Google Calendar admin to all appear on a single calendar. Events may have reminders applied to them and you can even a link a geographic location to the entry. The calendar is one of the simplest of many widgets available for free from Google. One example of a powerful web widget is the Google Map widget that lets you embed a custom map directly into your Joomla site.
Adding a Google Map to Your Joomla Site
Google has a whole set of widgets, including Google checkout, custom search, groups, news, translate, cloud print, presentations, YouTube news, and, of course Google Maps. Maps are extremely easy and convenient to add to your web site and they can provide a lot of visual interest. If you have information that can be represented geographically, such as store locations, convention locations, special historical sites, the locations of relevant bargains, or even the geolocations of some of your users, you should consider adding a Google Map to your Joomla site.
Note
■
Google changes the URLs of Google Maps APIs and wizard frustratingly often—usually without redirection to
the new location. Therefore, if you go to a URL specified in this chapter and it doesn’t show the item mentioned here,
please perform a Google search for the relevant feature and you should be able to locate the specified resource.
To add a map to your site, start by registering for an API key here:
https://code.google.com/apis/console
Then follow these steps:
1. Click on the Services link in the left column.
2. Find the “Google Maps API v3” entry and switch it on.
3. Click on the “API Access” link in the left column
4. Copy the API key in the Simple API Access pane to the clipboard
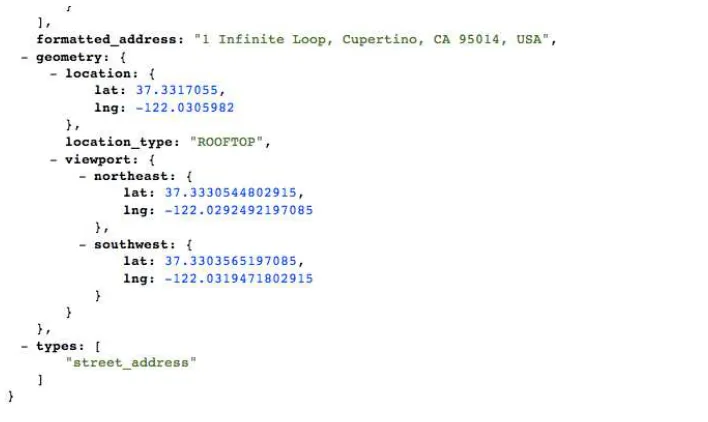
Once you have the API key, you’re almost ready to get started. To map anything, you need coordinates. The Google Map interface expects the coordinates in longitude and latitude values. You can use the Google Geocoding API to obtain coordinates from a street address. For example, to find the location of Apple’s headquarters, you can use a query like this (either from the browser address bar or a CURL request):
http://maps.googleapis.com/maps/api/geocode/json
?address=1+Infinite+Loop,+Cupertino,+CA&sensor=false
Create a new Custom HTML module as you have in the last sections and enter the following code in the text field:
<meta name="viewport" content="initial-scale=1.0, user-scalable=no" /> <style type="text/css">
html { height: 100% }
body { height: 100%; margin: 0; padding: 0 } #map_canvas { height: 100% }
</style>
<script type="text/javascript"> function init () {
var mapOptions = { zoom: 15,
center: new google.maps.LatLng(37.3308525, -122.0296837), mapTypeId: google.maps.MapTypeId.ROADMAP
}
var map = new google.maps.Map(document.getElementById("map_canvas"), mapOptions); }
function load_map() {
var script = document.createElement("script"); script.type = "text/javascript";
script.src = "http://maps.googleapis.com/maps/api/js?key=APIKEY&sensor=false&callback=initialize"; document.body.appendChild(script);
}
window.onload = load_map; </script>
</head>
<div id="map_canvas" style="border:2px solid red;min-height:300px;width:100%; height:100%"></div>
CHAPTER 2 ■ CUSTOMIZING JOOMLA WITH WIDGETS
In the load_map() function, replace the text that reads APIKEY with the key you generated earlier. If you have selected a different location for the center of the map, alter the coordinates specified in the init() function.
Pasting this code into a Custom HTML editing window will let you display the Google map on your site. It is very common to add multiple maps to a single site to show various points of interest. You can easily use the map control to show specific locations that you want to highlight (such as store locations), regions of interest (places for good biking routes, scenic campgrounds), visitor locations to show a geographic user map, and many other points of geographic information.
You can find more information about the map API here:
http://code.google.com/apis/maps/documentation/javascript/
Maps can provide information and a nice visual element to your site. However, perhaps more compelling is the ability to extend the global reach of your site through the Google Translate web element that can dynamically translate the entire contents of a page into the language selected by the site visitor.
Adding a Google Translate Web Element
Joomla provides fantastic language services with site translations into dozens of languages. The international pedigree of Joomla makes it the CMS for world communication. Despite the fact that the user interface itself is available in many native languages, the articles on a site are generally written in a single language—that of the primary site author(s). This can restrict the international reach of the site. Additionally, all languages that the site wants to support must be individually downloaded and installed into the Joomla system—and this can be a long and tedious process.
Google, however, provides a widget that can help overcome these limitations. The Google Translate web element will dynamically translate the text of a site page from any language available from the translator to any other language. While the translation is performed by a machine and therefore far from perfect, it can allow a visitor to read an article and gain a general understanding of the information it communicates, even if that visitor doesn’t read a single word of the language in which it was written.
Note
■
While the Google Translate web element or widget is free, the more powerful Google Translate API that allows
a REST query to actually obtain a translation of specified text has become a paid service. Although extremely affordable,
it requires billing information to be set up for all accounts before you can use it.
To obtain the code for the translate module, go to this page:
https://translate.google.com/manager/
The translation wizard lets you select options such as whether to translate the whole page or specific sections (specified using a CSS class), translation background color, whether to allow translations to all languages or specific targeted languages, display mode for the translation selector, and whether you want to track the translations in Google Analytics. Once you’ve made your selections, you’ll be presented with JavaScript code like this that you can add to a Custom HTML module:
<!-- Google Translate Element -->
function googleTranslateElementInit() {
new google.translate.TranslateElement({pageLanguage: 'en', layout: google.translate.TranslateElement.InlineLayout.SIMPLE}, 'google_translate_element');
}
</script><script type="text/javascript"
src="//translate.google.com/translate_a/element.js
?cb=googleTranslateElementInit"> </script>
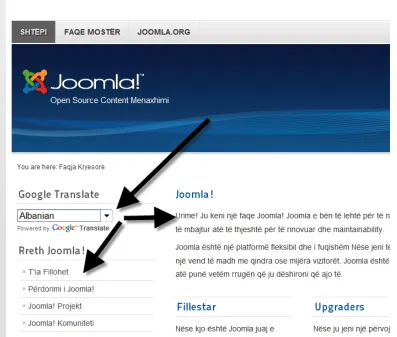
This simple code will put a drop-down menu on the page like the one shown in Figure 2-7. If the visitor selects a different language from the menu, the entire page will be translated and re-rendered in the selected language. Navigating to other pages that contain the widget will retain the selected translation setting and render those pages in that language.
CHAPTER 2 ■ CUSTOMIZING JOOMLA WITH WIDGETS
The Translate widget makes worldwide communication possible since your site can now be read by almost anyone without requiring them to speak the source language of the site. While this is powerful for English language sites, it can be potentially even more powerful for non-English sites. Considering the widespread adoption of English as a second language, a site can be authored in a native language and the Google Translate module can make it accessible to millions of English speakers.
Sites always broaden their reach when they facilitate communication. The Translate web element can increase the audience for a site in almost any language. By adding widgets to increase interaction, such as a live chat widget, a Joomla site can become the nexus for live communication as well.
Adding Chat to Your Site with Chatango
Many sites would like to offer chat services, but the overhead of hosting it yourself can make this prohibitive. Further, the administrator tools included with many of the free extensions are not very robust or easy to use. However, there are a number of online chat widgets that you can easily incorporate into a Joomla site.
In this section, you’ll use the Chatango widget (www.chatango.com) to provide chat functionality on your Joomla site. Before you begin, you need to go to the Chatango web site and register a new group. All you need is a group name and e-mail address to get started. You can pick a color scheme and introductory message that will be displayed as users log into the system.
When you complete the registration process, you will be given a snippet of HTML code like this:
<object width="250" height="360" id="obj_1292120911398">
Add this code to your site using the Custom HTML module as described earlier. You should be able to paste the code supplied by the Chatango web site directly into the body of the new Custom HTML module for use on your site. Make sure you locate the module in a module position that has enough room to properly show a chat conversation or users will likely not use an abbreviated display.
Note
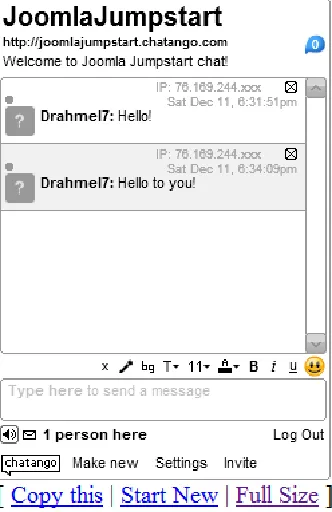
When you reload the Joomla site page, you should see a chat box like the one shown in Figure 2-8. Since the chat window displays in an iFrame, the rest of your page should load properly even if Chatango is slow to load. Also if Chatango would ever go offline, it won’t prevent your page from loading normally. That’s all you need to do.
Figure 2-8. The Chatango chat box will appear within the module frame and allow live chat on your Joomla site
Visitors to your site need only register an email account with Chatango and they can chat with one another. There is also a full moderator interface where you can manage the chat clients and review past chat sessions. Chatango provides a number of online tools that you can use to manage your chat group. You can also allow other moderators of the discussions if you have volunteers that can take on that extra work.
A live chat system can really increase the interaction with your site. However, many site owners don’t want to provide unfettered communication between individuals in the wake of cyber stalking incidents and other problems. Some organizations only allow chat during specific working hours or during special events so it can be effectively moderated. Joomla’s ability to easily publish and unpublish modules makes this convenient. If chat isn’t the right fit for your site, another method of interaction that is extremely controlled and yet offers active feedback is the use of surveys. Survey Monkey provides a very easy-to-implement widget that you can add to your site in minutes.
Adding the Survey Monkey Widget to Your Site
Survey Monkey lets anyone quickly and easily create web surveys or forms and stores the data generated from these forms in a management interface that allows the host of the form to see statistics of the responses. You can display the survey on your site using a variety of methods: as a JavaScript widget, as a link that the visitor clicks to go to the Survey Monkey site where they can fill out the survey, or as a shared survey on Facebook.
CHAPTER 2 ■ CUSTOMIZING JOOMLA WITH WIDGETS
Let’s create an example survey by following these steps:
Select the Create a new survey option. •
Enter a survey name. •
Select a category such as Market Research and click the Continue button. •
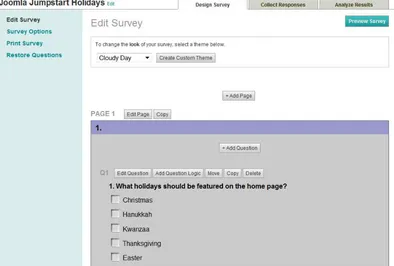
Select a survey theme or create a custom theme that matches your site. •
Click the Add Question button. •
Add some question text and select the type of question (such as multiple choice, ranking, etc.). •
Click the Send Survey button when you’ve selected all of the options that you’d like. •
Once you’ve completed your survey construction, you can add it to your Joomla site as a link that takes the visitor to the Survey Monkey site. To allow the survey to appear on your site instead, simply add a Custom HTML module and the JavaScript code for the survey on the Survey Monkey site. The code should appear something like this:
<div id="surveyMonkeyInfo"> <div>
<script src="http://www.surveymonkey.com/jsEmbed.aspx?sm=JKAJD"> </script>
</div>Create your
<a href="http://www.surveymonkey.com/">free online surveys</a> with SurveyMonkey, the world's leading questionnaire tool. </div>
Note
■
The Survey Monkey code is JavaScript, so unlike the previous widgets that primarily used iFrames or
asynchronous JavaScript, loading this JavaScript code blocks the rest of your page load. Because Survey Monkey is a
large company, this probably won’t cause any issues for your web site. However, you may consider putting the module on
its own page on your site so if the Survey Monkey servers were to go down, only that page on your site would be taken
offline. If you want it to appear as a module on your page, try locating it in the right column so even if the survey is slow
to load, all of the content in the header, left, and center columns will not be blocked from loading.
Creating effective surveys is as much of an art as a science. Here are a few guidelines to help make your surveys more effective and increase your response rate:
Ask questions where the user can understand the relevance. Asking for the birthplace of a user •
taking a survey on shoe fashion will seem out of place and intrusive. This will make many of your visitors abandon the survey. Try to make all questions on a survey directly relevant to each other and the topic of the survey.
Don’t include too many pages or too many options per page. It will hurt your survey results if •
your visitors suffer from survey fatigue and don’t complete the form. It’s nearly always better to have fully completed forms so the data is not skewed to the first few pages of the survey before the user has quit and left the page. Stating up front the number of questions that the survey will ask helps make the survey more palatable.
Be sure to include some of the results of the survey on your site after the conclusion of survey •
time period. There is seldom any benefit to the user for filling out these types of forms except that their voices are heard. Displaying summaries of the results of the survey on your site, they
Figure 2-10. A Survey Monkey survey as it appears placed in the Joomla footer with a Custom HTML module