For your convenience Apress has placed some of the front
matter material after the index. Please use the Bookmarks
Contents at a Glance
About the Authors ...
xiii
About the Technical Reviewer ...
xv
Acknowledgments ...
xvii
Introduction ...
xix
Chapter 1: The Windows 8 Ethos and Environment
■
...
1
Chapter 2: Getting the Basics Right
■
...
.35
Chapter 3: Incorporating Layout and Controls
■
...
59
Chapter 4: Navigating the Media Maze
■
...
123
Chapter 5: Making the Most Out of Charms and Contracts
■
...
147
Chapter 6: Solving the Printing Problem
■
...
175
Chapter 7: Providing Clear Notifications
■
...
189
Chapter 8: Keeping Apps Running in the Background
■
...
209
Chapter 9: Monetizing Your App: The Lowdown
■
...
223
Chapter 10: Getting Your App on the Windows Store
■
...
245
Introduction
Welcome to Real World App Development for Windows 8 with JavaScript. From a technical side, this book provides a step-by-step process for creating Windows 8 apps using JavaScript. From a functional side, this book seeks to inform you about the guidelines, process, and interfaces specific to the Windows 8 OS. Through this book, we hope you’ll learn everything you seek for creating as well as publishing your own Windows 8 apps.
Who This Book Is For
You’ve already picked up the book; so, like us, you’ve got a passion for cutting-edge technology. We didn’t choose to write this book simply based on subject-matter knowledge. We’re excited about application development as well as the newest Microsoft user interface, Windows 8—and we’re excited about the possibilities, expansion, and impact inherent in both these technological movements.
We should clarify that this is not a beginner’s book. To grasp the knowledge and information in this book, you should possess basic skills and a sound understanding of HTML and JavaScript. If you would like to put these skills to work by learning how to program in Windows 8, then this book is for you. In the following chapters, we systematically lay out the tools and tricks of the trade so you can forge ahead with your very own one-of-a-kind app concept and turn it into something real, usable, and out there in the Windows Store—and, more to the point, on peoples’ devices, integrated into their lives.
This book’s topic is something new and exciting in technology, and you get to be part of this expedition. Microsoft is deeply integrated into the daily lives of millions of individuals and businesses. Windows 8 specifically is Windows reimagined, liberated from the desktop analogy and rooted in the concept of interfacing in a dedicated fashion with whatever the user may be doing. Because of this reimagined concept of Windows, there is a breadth of new information to learn, and there are new ways of looking at the possibilities. In this book, we hope to expand and enrich the opportunities for your own creative and professional endeavors.
What This Book Covers
As the title implies, we use JavaScript and HTML for the development of Windows 8 applications. We rely heavily on samples and examples in this book. The purpose of this approach is to take you by the hand with concrete
showing-not-telling instruction.
This book doesn’t begin and end with the development of applications. Being a successful app developer goes far beyond a good idea and the ability to develop and write code. This is why we spend significant time on the ins and outs of what it takes to create a final product. We guide you through the process of getting your app into the Windows Store, with instructions on topics such as claiming and naming your app, passing certification, making sure your app meets the technological and appropriateness guidelines, and how to get set up to be a Microsoft vendor.
This book will work for you whether you read it through and learn incrementally, or use it as a reference volume. With clearly laid out chapters and topics, you should feel comfortable turning to this book as a guide along the way as you create your Windows 8 app.
The Windows 8 Ethos and
Environment
Welcome to the brave new world of Windows 8. In this introductory chapter, you take a walk through the new, drastically different UI. You grab a glimpse into the meaning of “Windows reimagined.” You begin the exploration of what it means to a Windows app developer when you take away the iconic desktop concept and replace it with full application integration. Technological and social impacts are considered as you, the developer, prep through explanations, examples, and an examination of where the technology melds with the business of life.
Presently, Windows 8 is essentially the only OS out there that can run on anything from a phone all the way up to a personal computer with the diverse reach of languages that are supported natively for Windows 8 development. This book is about one such language—JavaScript—and how you, as a JavaScript developer, can use your knowledge of the language (and of HTML and CSS as a UI layout engine) to build Windows 8 applications that feel to the user as real as applications using .NET or even native C++.
A Not-So-Brief Introduction
To begin, allow us to shed some light on who we are so that you, dear reader, might understand the unique perspective of this book. This is not a book by Microsoft fan-boys, but rather by commonsense, get-the-job-done technology lovers. We also love an opportunity to make money while doing something cool, cutting edge, and meaningful, so when we say that Windows 8 is the most significant opportunity for developers since … well, ever, take notice. Although this might sound like regurgitated MS marketing spin, we’ve been on the front API lines, and we boldly claim that everything in Windows 8 is reimagined from the ground up, examined, and innovated upon.
Before diving in, it’s important to provide an introduction to Windows 8 from a developer’s perspective, specifically focusing on how applications work and are managed by the system. The discussion isn’t exhaustive, because the subject could probably span multiple books, but it should provide you with a baseline of information in order to understand the basics of Windows 8 and Windows 8 app development using the Windows Runtime.
For the purpose of explanation, let’s walk through the Windows 8 UI artifacts—not because you don’t already understand how Windows works, but for those of you who may not yet have access to the operating system.
CHAPTER 1 ■ THE WINDOWS 8 ETHOS AND ENVIRONMENT
The Windows 8 Start screen is the new—or rather, reimagined—Launchpad for applications. It replaces the Windows Start menu. This means there is no Start menu on Windows 8. So don’t expect to find some registry hack or setting that will enable it: there is none.
Note
■
There are some third-party applications that can be purchased to enhance the Windows 8 experience with a
Start menu: Start8 from Stardock, for example.
A lot has been made of the omission of the standard Windows Start menu from Windows 8. The truth is that this is just a semantic removal. If people would calm down, they would realize that every feature you’ve come to love about the Start menu exists in the Start screen, with one difference: the old Start menu doesn’t take up the whole screen. In every sense of the word, the new Start screen is a superset and natural evolution of its predecessor, and once people start using it, they quickly recognize this.
Note
■
Microsoft published a comprehensive blog outlining the details or the rationale behind many of the
Windows 8 features. One such blog posts highlights the complex research that led Microsoft to using the Start screen
in Windows 8 in favor of the old Start menu. If you would like to find out more about this, head to the Building Windows
8 blog at
http://blogs.msdn.com/b/b8/. The specific blog post that walks through the evolution of the Windows Start
Screen can be found at
http://blogs.msdn.com/b/b8/archive/2011/10/03/evolving-the-start-menu.aspx.
In Figure 1-1, the colored rectangles with images in them are a sort of combo launch-point for applications. These magical rectangular surfaces are commonly referred to as live tiles and combine the application shortcut (particularly the version of the shortcut you might find on your Windows desktop), the representation of the running
state of your application typically found on the taskbar (when your app is running), and the representation of the notification mechanism of your applications found in the system tray area. Figure 1-2 shows two states of the Calendar application live tile. The image to the left is the default state; when a meeting is approaching, the tile takes on a different appearance (right).
Figure 1-2. A Windows 8 app tile
An application like Windows Essentials (Windows Live for those of you who still have the earlier version of the application) may have a system tray icon that changes appearance when the application switches from online to offline; it may have a large, beautiful shortcut on the Windows desktop and flash yellow (on Windows 7) when an instant message is sent your way when the application isn’t an active window. The Windows 8 live tile encapsulates those three functions in one. Through the live tile, you can of course launch the application; but as shown in Figure 1-2, tiles can also display notifications based on things happening in the application or even on things happening while the application isn’t running.
Note that not all tiles on the Start screen are live tiles. Legacy applications such as Visual Studio, Microsoft Word, and Adobe Photoshop can also appear on the Start screen as tiles, but these tiles aren’t “live”—they don’t possess the ability to present dynamic content on their surface. Legacy Windows application tiles function more or less like the application icons of old (we say “more or less” because Windows 8 exposes some shortcut features to these sorts of tiles that follow patterns similar to their live alternatives, such as being able to launch in administrator mode). Applications built using the new paradigm, which can express themselves through live tiles, are referred to by Microsoft as
CHAPTER 1 ■ THE WINDOWS 8 ETHOS AND ENVIRONMENT
Notice something missing? It’s the ubiquitous close, minimize, and maximize/restore buttons. Windows 8 apps take up the entire screen at all times. There is no exception to this rule: even if the plan is to build a simple utility window, you as the developer must consider how you intend to lay things out in a manner that reduces negative space. It’s a tough problem, compounded by the variety of screen resolutions your application must support. Later chapters delve more into this as we start to talk about style guidelines and how to pass certification.
Another question that might arise while looking at a launched application is, how do you close it? Traditional Windows development typically delegated application lifecycle management to the user, meaning the user had to explicitly click the close button at upper right. If they didn’t, the application continued running. Applications such as Windows Essentials rely on this. Because the system provides no mechanism for automatically closing an application that is no longer in use (or has not been in use for some time), applications like Windows Essentials and Skype can treat a user’s close request as a hide request and continue to run with an invisible window in the background. This wouldn’t be a problem if everyone acted with honor and compassion, but it does create security concerns as well as consume system resources—if not unnecessarily, then at least without the user’s consent.
Windows 8 strives to reimagine this situation by introducing an application lifecycle management model that takes both the user and system resources into account (see Figure 1-4).
In Windows 8’s “party side,” only the presently running application and, potentially, an application that has been chosen by the user to run in the background are active at any given time. All other applications are suspended, meaning their memory is intact and in the specified order, but no active threads are running that are owned by the applications. As with a saved file, a suspended application is intact just as it was left. And also like a saved file, which can be opened at any time and continues right where it left off, switching back to a Windows 8 app (or launching it again from the Start screen) takes you right back into it. Between those two states, the Windows 8 system also provides for closing an application if it determines the app needs to be closed. Future chapters talk more about the Windows 8 app lifecycle.
Note
■
You might have seen this in a demo of Windows 8 (or in a tutorial that we hope is included in a future version), but
a modern application can be forcibly closed by dragging from the top of the application screen to the bottom of the screen
(“throwing it away”) or by using Alt+F4. An advanced user can also use good old Control Panel to stop a modern app.
One more thing missing from the application—something that is perhaps not as ubiquitous as the close and minimize/maximize buttons, but certainly a well-known Windows application feature—is the menu bar. Given that the application takes up the full screen, how commands are represented is probably a concern to any developer. The obvious choice is to put it onscreen, and to be sure, many applications do just that. But this pattern is against the style guidelines prescribed by Microsoft for Windows 8 apps. Instead, the Windows 8 system provides two areas, the bottom app bar and the top app bar, from which application commands can be launched.
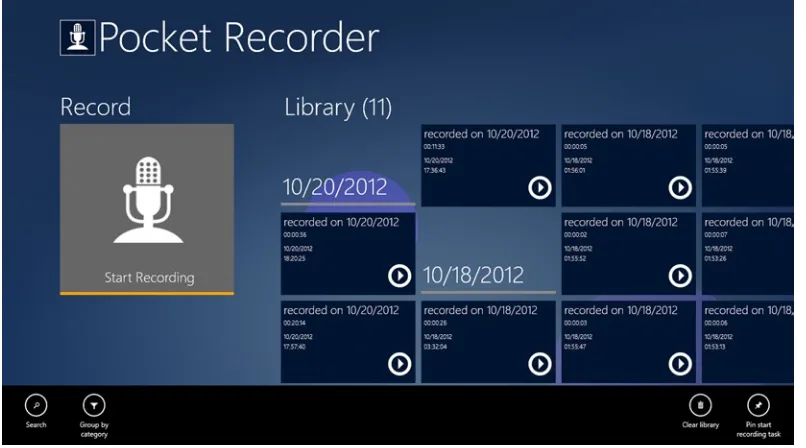
Figure 1-5 shows how applications can use the app bar concept to segregate command functionality in a central location within the application. From here, an end user can launch searches, group recordings by category, clear their entire library, or pin the activity of starting a recording directly to the Windows Start screen. (Pinning and the concept of secondary tiles are discussed in more details in Chapter 6.)
CHAPTER 1 ■ THE WINDOWS 8 ETHOS AND ENVIRONMENT
In any Windows 8 app, the bottom/top app bar can be activated (made visible) by swiping from either the bottom or the top of the device screen upward or downward, respectively, if touch is enabled.
Note
■
Not all Windows 8 devices come touch enabled—or have a mouse, for that matter—so it was important that
legacy devices continue to be usable when they upgrade to Windows 8. For this reason, Windows 8 provides mouse and
keyboard support for all touch-related functions. To activate the app bar of any application using the mouse, right-click in
the application. Using the keyboard, press Windows logo key + Z.
Regardless of the direction from which you swipe, both application bars are displayed. In all cases, the top and bottom of the device screen (and right-clicking, if you’re using a mouse and keyboard) belong to the application. The left and right of the screen belong to Windows.
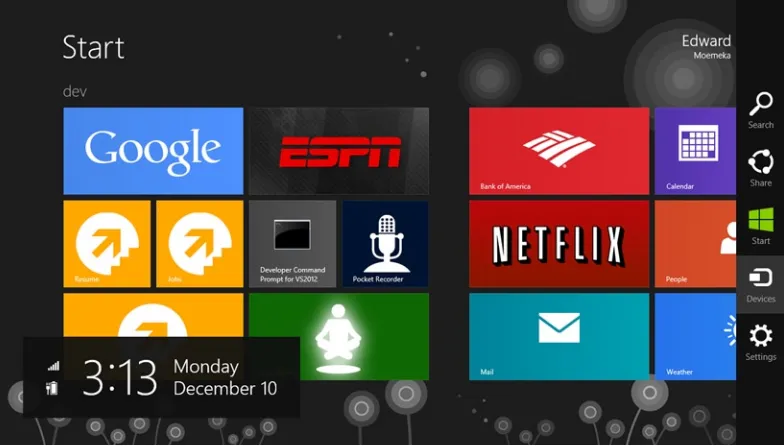
Swiping from the left (Windows logo key + Tab) gives the user access to suspended applications that currently aren’t being viewed. Swiping from the right (Windows logo key + C) reveals the charms. In Figure 1-6, you can see the Windows 8 charms revealed. Note the information box to the left of the screen, which displays date-time information as well as network and battery status.
The Windows charms feature is an extremely important innovation. It provides users with the ability to search across all applications on the system (and even within them), share data between applications easily, access devices, and manage settings. Each charm has an exposed programming interface that you, as the Windows 8 developer, can use.
In addition, a developer building modern Windows 8 apps must contend with various system environment changes that applications developed using older frameworks simply don’t have to worry about. This is because applications built using the Windows 8 APIs have a level of connectivity to the native OS that hasn’t previously existed by default.
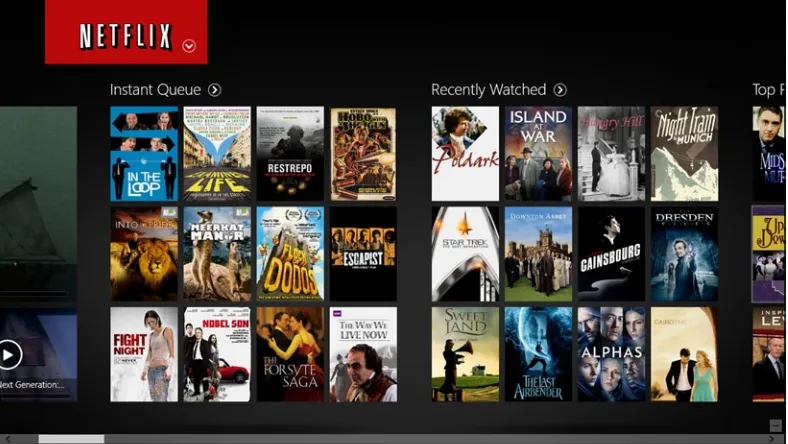
One instance of this is with the application view state. On devices that support rotation, Windows 8 apps can query the current layout of the system and adjust their UI accordingly. This way, an application can use vertical space that might not be available in landscape mode and horizontal space that might not be available in portrait mode. Examine the Netflix application shown in Figure 1-7 while running on a system where the view is locked in landscape mode.
CHAPTER 1 ■THE WINDOWS 8 ETHOS AND ENVIRONMENT
The same application on the same system, with the only change being a shift from landscape to portrait mode, alters the UI as shown in Figure 1-8.
CHAPTER 1 ■ THE WINDOWS 8 ETHOS AND ENVIRONMENT
Building Windows 8 Apps
Windows 8 apps can be built using HTML/JavaScript, .NET languages (C# and VB), or native C/C++ through an extension of C++ called C++/Cx. Regardless of the technology used to develop the application, the Windows team has done a good job of providing a core set of APIs that are projected into each of the target languages. Figure 1-9 provides a layered view of the Windows 8 modern application programming interface.
Figure 1-9. Window 8 app API landscape
Have you seen another platform that provides this kind power to its developers with that much flexibility? We don’t think so. Applications built using these projected APIs end up in a package containing an application’s code (in binary or text format); resources; libraries; and a manifest that describes the app (names, logos, and so on), its capabilities
(such as areas of the file system or specific devices like cameras), and everything else that’s needed to make the app work (such as file associations, declaration of background tasks, and so forth). The manifest describes the application to the Windows Store and also to potential Windows clients that download it from the store. The exact workings of the app manifest (as it relates to publishing your application and setting up its permissions) are discussed in Chapter 2.
who might not be aware, Win32 is the previous programming platform for building Windows applications. Programs like Adobe Photoshop, Microsoft Word, and Internet Explorer 10 are built using this technology, and it’s still available for building Windows 8 apps that run on the desktop (the business side) view of Windows 8.
Windows 8 vs. Win32
The focus of this book is the use of HTML to develop Windows 8 apps, so it’s prudent that we highlight some differences between the technologies at this point.
First, it’s important to note that both .NET-based and native C++/Cx applications are compiled at build time.
Compilation is a process to convert the code portion of a given program into an intermediate format that can be easily read by a machine’s processor. C++/Cx is compiled directly into processor-specific native code. (This means that choosing to build an application using this technology requires the developer to compile a version for every platform they intend to support. Windows 8 presently supports 64-bit (x64), 32-bit (x86), and ARM-based processors.) .NET compiles the code into a sort of pseudo-binary format referred to as bytecode. Bytecode is an intermediate state that allows the application code to be far more portable than native code. This is because the bytecode is processor-architecture agnostic, so the same bytecode can be used on x64, x86, and ARM processors without issue. (Bytecode can accomplish this because it’s compiled into native code on the fly at runtime on the target platform in which it’s run.)
Windows 8 apps built using JavaScript follow a pattern similar to those built using .NET, but without the intermediate step. The HTML, CSS, and JavaScript code in a Windows 8 JavaScript application is always parsed, compiled, and rendered at runtime, so your application code is always transported in its entirety to every client it runs on. Furthermore, because these file types aren’t directly executable, the Windows system must provide a hosting process in which to run them (similar to how these file types are usually run in the context of a web browser).
Because of this distinction between the two (native/.NET and JavaScript), and because the designers wanted to build a Windows developer experience for the targeted platforms that is as real and natural to the given platform developer as any other activities they might do in that space, many of the APIs and controls you’re exposed to as a JavaScript developer building Windows 8 apps are provided through a complementary library tailored specifically to JavaScript development: the Windows Library for JavaScript (WinJS). For example, developers using C# or C++/Cx lay out their UIs and build or access system controls using a technology called Extensible Application Markup Language (XAML) as shown in Listing 1-1.
Listing 1-1. XAML Markup
<Page x:Class="AllLearnings.Samples.ApplicationBars.AppBarSamples" xmlns="http://schemas.microsoft.com/winfx/2006/xaml/presentation" xmlns:x="http://schemas.microsoft.com/winfx/2006/xaml"
xmlns:d="http://schemas.microsoft.com/expression/blend/2008"
xmlns:mc="http://schemas.openxmlformats.org/markup-compatibility/2006" mc:Ignorable="d"
>
<Page.BottomAppBar>
CHAPTER 1 ■ THE WINDOWS 8 ETHOS AND ENVIRONMENT
<TextBlock>This sample tests the app bar functionality, right click or swipe from the bottom to open the bottom app bar.</TextBlock>
</Grid> </Page>
On the other hand, you, as a HTML/JavaScript developer, can use HTML/CSS as the layout engine to design your UI and JavaScript to manipulate it in the same manner you would a web application (see Listing 1-2)!
Listing 1-2. HTML Markup
<!DOCTYPE html> <html>
<head>
<meta charset="utf-8" /> <title>TestAppBars</title>
<!-- WinJS references -->
<link href="//Microsoft.WinJS.1.0/css/ui-dark.css" rel="stylesheet" /> <script src="//Microsoft.WinJS.1.0/js/base.js"></script>
<script src="//Microsoft.WinJS.1.0/js/ui.js"></script> <link href="TestAppBars.css" rel="stylesheet" /> <script src="TestAppBars.js"></script>
</head> <body>
<section aria-label="Main content" role="main" style="margin-left: 100px;"> <p>This sample tests the app bar functionality, right click or
swipe from the bottom to open the bottom app bar.</p> </section>
<div data-win-control="WinJS.UI.AppBar" >
<button id="btn_bottomone" data-win-control="WinJS.UI.AppBarCommand" data-win-options="{id:'cmdAdd',label:'Add',icon:'add',
Additionally, you as the developer are free to use whatever third-party modules you want (again in the same manner as is customary to an HTML CSS/ JavaScript developer). The example in Listing 1-3 selects and colorizes a specified class of element using the ever-popular and near-ubiquitous jQuery.
Listing 1-3. Using jQuery with HTML in a Web Application
<!DOCTYPE html>
<html xmlns="http://www.w3.org/1999/xhtml"> <head>
<title></title>
<script type="text/javascript" src="/Scripts/jquery-1.7.2.js"></script> <script type="text/javascript">
CHAPTER 1 ■ THE WINDOWS 8 ETHOS AND ENVIRONMENT
Notice that if you place your mouse over the Click Me button, the button changes colors. This is enabled by the jQuery instructions in Listing 1-4.
Listing 1-4. jQuery Handling Events on Elements That It Selects
.mouseenter(function (e) {
$(this).css("background-color", "lightblue"); })
.mouseout(function (e) {
$(this).css("background-color", "slategray"); })
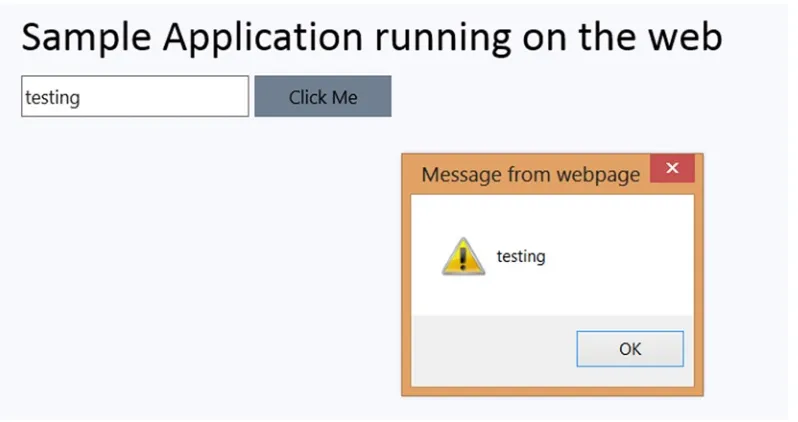
jQuery simply listens for the user’s mouse to enter the bounds of the target element, in this case the button with the identifier #btn_clickme. When the mouse has entered, the button’s background color changes to lightblue; when the mouse exits, the color changes back to slategray. The jQuery code also listens for the button to be clicked and, when it is, presents a dialog box with the text entered in the text box. Figure 1-11 shows how the UI looks when this happens.
CHAPTER 1 ■ THE WINDOWS 8 ETHOS AND ENVIRONMENT
The code in Listing 1-3 can be copied verbatim (for the most part) into a Windows 8 app that targets JavaScript and, with very few changes, made to work. Listing 1-5 illustrates this, with bolded text indicating areas where changes have been made.
Listing 1-5. Windows 8 App Using jQuery
<!DOCTYPE html>
<html xmlns="http://www.w3.org/1999/xhtml"> <head>
<title></title>
<script type="text/javascript" src="/Scripts/jquery-1.7.2.js"></script> <script type="text/javascript">
$(document).ready(function () {
$("#btn_clickme") .mouseenter(function (e) {
$(this).css("background-color", "lightblue"); })
.mouseout(function (e) {
$(this).css("background-color", "slategray"); })
.click(function (e) {
var txt_alerttext = document.getElementById("txt_alerttext"); if (txt_alerttext != null)
CHAPTER 1 ■THE WINDOWS 8 ETHOS AND ENVIRONMENT
</head> <body>
<div class="canvas"> <div class="dtable"> <div class="drow"> <div class="dcell"> </div>
<div class="dcell">
<div style="font-size: 24pt; font-family: Calibri;"> Sample Application running on Windows 8
</div>
<div style="height: 10px"></div> <div>
<input id="txt_alerttext" type="text" style="height: 25px" /> <button id="btn_clickme">Click Me</button>
</div> </div> </div> </div> </div> </body> </html>
From the example, you can see that there are very few items you need to change in order to get the code running. You explicitly set the background color of the application title (and change the text). Also, because the Windows 8 APIs don’t support the HTML alert feature, you have to comment out that line and instead use a similar API designed specifically for Windows 8. Running this sample produces the behavior in Figures 1-12 and 1-13. The two figures represent an application before (Figure 1-12) and after (Figure 1-13) the Click Me button is clicked.
Figure 1-12. Windows 8 app using jQuery
Developing for Windows 8 Apps
Now that you have a basic introduction to Windows 8, what Windows 8 apps look like, what technologies are out there to build Windows 8 apps, and where JavaScript fits into the equation, you’re ready to start building samples and getting on your way to being the next Instagram.
Setting Up Your Environment
Before you begin, you need a couple of things. First, to build Windows applications and work through the samples in this book, you need a copy of Windows 8. You also need the Windows 8 SDK and, at the very least, a copy of Visual Studio Express 2012. The download links for the required tools are listed in Table 1-1. Please note that installing Visual Studio Express installs everything you need (including the necessary jQuery libraries). The other items are included in the table in case you ever need a specific component.
Figure 1-13. Windows 8 app using a jQuery MessageDialog alert
Table 1-1. Windows 8 Development Environment Setup
Tool
Location
JQuery http://jquery.com/download/
Windows 8 http://windows.microsoft.com/en-US/windows-8/release-preview
Visual Studio Express www.microsoft.com/visualstudio/eng/products/visual-studio-express-products
Windows 8 SDK http://msdn.microsoft.com/en-us/windows/hardware/hh852363.aspx
CHAPTER 1 ■ THE WINDOWS 8 ETHOS AND ENVIRONMENT
Getting Started with HTML
We have no doubt that many of you reading this book have some working knowledge of HTML, CSS, and JavaScript coming into Windows 8 app development. This is a primary reason for JavaScript being included as one of the development paradigms on which Windows 8 apps can be built. HTML/CSS and JavaScript are simply too popular at this point, with too many proponents and day-to-day users, for them to be ignored anymore as they have been by major players in the platform game previously. As technologists who have been in this game for years, we continue to be amazed by the resilience and sheer elegance of JavaScript. If you asked anyone in the late 1990s if JavaScript would be the king of the hill at this point, the answer would have been a resounding no.
Working knowledge and preexisting skill notwithstanding, it’s important for the sake of completeness to present a brief refresher course on HTML/CSS here. Already know the subject and don’t need the refresher? Great: you can skip ahead two sections to “Extending HTML5 for Windows 8” and continue reading. For the rest of you, welcome!
HTML5 is a general umbrella term that describes a set of related technologies used to make modern, rich web content. These technologies are numerous, but this discussion focuses on three core components:
HTML5 itself, which defines the actual elements used to markup content
•
Cascading Style Sheets 3 (CSS 3.0), which allows for discrete control of the appearance of
•
marked-up elements
JavaScript, which serves as a programming interface with which to build interactivity and
•
program logic into an HTML document
HTML allows for the application of markup of some sort to content. In this definition, markup is typically an element (we go into what an element is shortly), and content can be text. You’ve already seen two examples of HTML in the previous section. The excerpt from Listing 1-3 shown in Listing 1-6 illustrates the basic features of a simple HTML document.
Listing 1-6. Two HTML Elements
<input id="txt_alerttext" type="text" style="height: 25px" /> <button id="btn_clickme">Click Me</button>
<title class="site-heading">Sample Document Title</title>
Elements in HTML have three primary parts: the start tag, the content, and the end tag. As is evident from this example, the start tag always begins with the less-than angle bracket followed by the element name. (See Listing 1-7 for the start tag on its own. You can find a list of element names at www.w3.org/TR/html-markup/elements.html.) The end tag begins the same as the start tag but has a forward slash before the tag name (see Listing 1-8). In the first line of Listing 1-6, input is an empty HTML element type, so it has no end tag. Such HTML elements end with a forward slash and the greater-than sign.
Listing 1-7. Start Tag for an HTML Element
<title class="site-heading">
Listing 1-8. End Tag for an HTML Element
</title>
Table 1-2. Elements and Their Meanings
Element Name
Description
html Outermost tag indicating that text is HTML
head Provides information about the document
title Provides the title of the document
script Inline script ensuring upward compatibility
style Style information ensuring upward compatibility
body Document body containing the contents of the document
input Generates buttons, input fields, and check boxes
a Anchor tag for hypertext documents
hr Draws horizontal rules across the browser window
Elements can be void (meaning the tag doesn’t need to be closed). A perfect example is the hr tag, which can be used to represent a horizontal line the width of its container. These days, many developers write void elements as self-closing empty elements. So, <hr> becomes <hr />. Closing void element tags allows HTML documents to be processed as XML documents (a superset of HTML) by XML parsers (a document type referred to as XHTML).
Elements can be further tailored by using attributes in the start tag to configure them. An attribute is essentially a name-value pair represented in a name=value syntax in an element’s start tag. The input tag uses the type element to specify the kind of input expected. An input type of button draws a button, and an input type of text draws a text box. Listing 1-9 illustrates this point.
Listing 1-9. Changing the type Attribute of the input Element
<input type="text" value="input is text" /> <input type="button" value="input is button" />
Listing 1-9 presents two input elements, one with the type attribute set to text and the other with type set to
button. If you run this in a browser or on Windows 8, the application displays as shown in Figure 1-14.
CHAPTER 1 ■ THE WINDOWS 8 ETHOS AND ENVIRONMENT
Provided the element supports them, you can add any number of attributes to achieve the desired effect. In general, attributes added to an element are of two varieties. Global attributes can be added to every element. These include the id attribute, the Style tag, and the Class tag. You saw all three of these global attribute types in Listing 1-3.
Elements may also define individual attributes that are specific to them. The image element, for instance, has the src attribute, which is used to indicate the location, relative to the root, of the image to be displayed (src can also point to an absolute location).
HTML also provides for the creation of author-defined attributes in scenarios where you would like to add more metadata to an element than is defined by the HTML standard. Author-defined attributes are ignored by the browser but serve as great waypoints for JavaScript injections because they’re discoverable through the browser DOM. This technique is commonly used to inject HTML into the DOM at a specific place in the document. You can indicate that an attribute is author defined by prepending data- to it (see Listing 1-10).
Listing 1-10. Using Author-Defined Attributes as Placeholders for Controls
window.onload = function () {
username_panel.appendChild(username_label);
The pattern applied in Listing 1-10 is a simplified but common approach to using author-defined attributes to attach composite controls to an HTML page. Composite controls are wonderful tool for increasing development efficiency because they encapsulate multiple simple controls and associated canned behaviors into a single controllable entity that can configured through a centralized mechanism. For instance, if an application you’re developing requires username and password text fields with identifying labels, you can instead create a Login control. This control can encapsulate all the necessary functionality for logging in to your site into one code base that can then be reused everywhere you need this functionality.
This is the power of controls, and expando controls enabled through the use of author-defined attributes allow JavaScript developers to do just this. The example in Listing 1-10 searches the DOM tree for div controls. The call to document.getElementsByTagName("div") does this and returns a list of each element that matches the tag name specified in the parameter (in this case div). Once returned, you simply loop through the list, querying each element to see if it defines the attribute data-controls. If that attribute is defined on the control, you read its value to determine which type of control to generate. When the control type is logincontrol, you generate a text box, a password box, and two spans—username and password—associated with them, respectively. When the control type is labeledinput you generate a text box and span combination. In the case of labeledinput, you expect another attribute to be defined, data-labelname, and you use its value as the innerText of the span that labels the text box. (Note that for the purpose of brevity, not all checks have been applied to the example code. In a real-world scenario, you would want to check to see if data-labelname is defined and not just expect it to be there.)
Listing 1-11 shows how the HTML for this application might look.
Listing 1-11. Using Author-Defined Attributes to Create Composite Controls
<!DOCTYPE html>
<html xmlns="http://www.w3.org/1999/xhtml"> <head>
<title></title>
CHAPTER 1 ■ THE WINDOWS 8 ETHOS AND ENVIRONMENT
Right-click the web page and open the source for this file, and you should notice something interesting: the source for this HTML document doesn’t contain any of the elements or content that you see in the browser view. This is because that content is created dynamically and injected into the DOM.
Getting Started with CSS
One architectural philosophy on which HTML has prided itself since … maybe day two, is the separation of semantic markup from the appearance of that markup (with exceptions to that rule, of course). In the world of HTML, CSS provides you with the ability to perform this separation of semantic markup from the appearance of that markup initially or later. You’ve already seen what style sheets can do, as early as Listing 1-3 and as recently as Listing 1-11. If you remove the inline style sheet associated with the HTML page from Figure 1-15, it looks like Figure 1-16.
Figure 1-15. Custom controls injected onto a page dynamically
Figure 1-16. Application without styles
This sample of what HTML looks like without styles only scratches the surface. Consider the site
CHAPTER 1 ■ THE WINDOWS 8 ETHOS AND ENVIRONMENT
Figure 1-17. CSS Zen garden default style
Figure 1-18. CSS Zen garden Under the Sea! template
Extending HTML5 for Windows 8
Recall the discussion in the section “Getting Started with HTML” about author-created attributes. HTML5 hosts generally ignore attributes they don’t understand, and this can be used as an insertion point for new content added to the DOM. In the example scenario, a login control and labeled text box were added to a div in a document based on searching the entire DOM tree for that special attribute and injecting the new HTML into any element that defined that attribute. As mentioned, this is an age-old technique for building UI functionality into HTML as custom controls.
Now, remember when we said that the HTML/CSS/JavaScript implementation of Windows 8 app development was designed specifically to tailor the development process to HTML/CSS/JavaScript developers? We talked about WinJS and how it’s a natural bridge between JavaScript and the Windows Runtime (WinRT), injecting itself where necessary but only in a JavaScript-compliant way. This convergence of JavaScript and WinRT is never more evident than in the choice for implementing controls in the technology space.
In the HTML approach to Windows 8 development, extensions to the language used to support HTML development like the controls you built are implemented using author created attributes applied to preexisting controls like divs much like the example from Listing 1-11. This is achieved through two attributes: data-win-control, which indicates to the runtime what control you want expanded into the identified div area; and data-win-options, which lets you pass individual configuration parameters (much like attributes) into the selected control. More specifically, in the data-win-control attribute, you must specify the fully qualified name of a public constructor function that creates the actual control; and in the data-win-options attribute, you must specify a JSON string that can be used to configure that control object.
Additionally, in your actual JavaScript code you must call either WinJS.UI.process or WinJS.UI.processAll() to initiate the process of expanding the control into its container (in this case, a div). The Windows 8 app bar provides a basic yet clear example of using controls. Figure 1-5 showed the app bar for an application, and Listing 1-12 provides the HTML for creating one.
Listing 1-12. AppBar Control Added to the Bottom of the Page
<!DOCTYPE html> <html>
<head>
<meta charset="utf-8" /> <title>TestAppBars</title>
<!-- WinJS references -->
<link href="//Microsoft.WinJS.1.0/css/ui-dark.css" rel="stylesheet" /> <script src="//Microsoft.WinJS.1.0/js/base.js"></script>
<script src="//Microsoft.WinJS.1.0/js/ui.js"></script>
<link href="TestAppBars.css" rel="stylesheet" /> <script src="TestAppBars.js"></script>
</head> <body>
<section aria-label="Main content" role="main" style="margin-left: 100px;"> <p>This sample tests the app bar functionality</p>
</section>
<div data-win-control="WinJS.UI.AppBar" style="height:300px">
<button id="btn_add" data-win-control="WinJS.UI.AppBarCommand" data-win- options= "{id:'cmdAdd',label:'Add',icon:'add',section:'global',tooltip:'Add item'}"> </button>
CHAPTER 1 ■THE WINDOWS 8 ETHOS AND ENVIRONMENT
Page/Navigation Model
The previous section talked about how the HTML used in Windows 8 development can be extended through author-generated attributes to include powerful new functionality that targets Windows 8. One of the primary (and most recognizable) features of HTML is the ability to link documents by using links in a given document or by having JavaScript call out to APIs that allow it to change the location the browser is currently pointing to. In web applications, application context is commonly managed on the server side, with the HTML/JavaScript presentation layer mainly as a thin stateless skin the user can use to initiate interaction. Windows 8 apps, at least their local parts, aren’t server based. Rather, as stated earlier, all the display and code needed to execute and manage execution are downloaded and interpreted at runtime. This includes whatever state-management mechanism is baked into the code. Unlike our cousins on the .NET and native side, there is no sense of a consistent, in-memory, global application state inherently built into HTML. It collects variables, it renders views, and it computes values, but once you leave the current page and move to another, all that state, all content, and, worse yet, your entire script context are lost. The next page has to rebuild that context (even if it had previously already JITed it). Using some of the built-in features of Windows 8, like access to the file system or your application’s settings container, you can create an IO bound version of that global context (from the standpoint of variables not context sharing). But that would be too complicated for the little bit of functionality it provides.
The Windows runtime for JavaScript introduces a new navigation paradigm to help resolve this issue. Using it, you’re guaranteed the notion of a shared in-memory context across pages and a maintained visual fidelity as your application switches between views. The runtime achieves this by abandoning the notion of the full screen re-rendering in favor of DOM injection. If you recall, Listing 1-10 showed how new elements can be injected into a preexisting HTML document based at some insertion point determined by your function. The previous section showed how this is used to extend HTML with powerful new controls when running in Windows 8. Listing 1-13 illustrates how you can achieve navigation using the WinJS.Navigation object (it uses similar techniques under the hood).
Listing 1-13. Navigation Using Partial Documents
<!DOCTYPE html> <html>
<head>
<meta charset="utf-8" />
<title>AllLearnings_html</title>
<!-- WinJS references -->
<link href="//Microsoft.WinJS.1.0/css/ui-dark.css" rel="stylesheet" /> <script src="//Microsoft.WinJS.1.0/js/base.js"></script>
<script src="//Microsoft.WinJS.1.0/js/ui.js"></script>
<!-- AllLearnings_html references -->
<link href="/css/default.css" rel="stylesheet" /> <script src="/js/default.js"></script>
</head> <body>
<div class="TestAppBars fragment" style="height: 150px; background-color: #6E1313;"> <div style="height: 50px;"></div>
style="margin-left: 0px; margin-right: 20px;
<div id="frame" style="margin-top: 10px;"> </div>
</body> </html>
The first part of the example creates the general layout for the application. Notice the div with the id of frame. This is the target for the HTML injection you perform. Navigating with the WinJS Navigation class uses a callback model based on calls to the navigate command. Let’s look at the JavaScript code for this in Listing 1-14.
Listing 1-14. Code-Behind for Navigation
(function () {
"use strict";
WinJS.Binding.optimizeBindingReferences = true;
var app = WinJS.Application;
var activation = Windows.ApplicationModel.Activation; var stack = new Stack();
app.onactivated = function (args) {
if (args.detail.kind === activation.ActivationKind.launch) {
args.setPromise(WinJS.UI.processAll().then(function () {
WinJS.Navigation.navigate("samplelist.html"); }));
}
var btn_back = document.getElementById("btn_back"); btn_back.onclick = function ()
{
WinJS.Navigation.back(); };
};
WinJS.Navigation.addEventListener("navigated", function (args) {
//find the frame
var frame = document.getElementById("frame");
//clear the frame
CHAPTER 1 ■ THE WINDOWS 8 ETHOS AND ENVIRONMENT
//stack.Push(args.detail.location); if (WinJS.Navigation.canGoBack)
args.detail.setPromise(WinJS.UI.Pages.render(args.detail.location, frame, args.detail.state));
});
app.start(); })();
There are two components to navigating between pages using the WinJS framework. First is the call to the
navigate() function of the WinJS.Navigation class—passing in the name of the target page to which you want to navigated. This call is just one part of the equation, though. Before this call is made, the application should provide a handler for the navigated event. This handler lets your application receive any navigation requests and load the appropriate content onto the target div specified in listing 1-13. Another piece of the navigation puzzle is the WinJS. UI.Pages class. The Pages class has a render function that takes arbitrary HTML “pages” (essentially, loosely coupled HTML files) and inserts them into the DOM, giving the illusion of navigation. The process of executing the navigation is relatively straightforward:
1. Find the insertion point (in this case, the div name’s frame).
2. Clear the insertion point of any child content from a previous navigation.
3. Pass the page name (through the args.detail.location property, which is retrieved from the event arguments passed into the navigated function), frame instance name, and any navigation state through the args.detail.state property. args.detail.state is accessed through the same event argument object, navigated. (Chapter 2 goes over navigation in greater detail.)
Listing 1-15 illustrates the pattern for handling navigation in JavaScript.
Promises and the New Asynchronous Programming Model
Traditionally, calling functions in JavaScript happens in a synchronous manner, meaning the caller waits while the called function completes before continuing. In scenarios where the called function is long-running—for instance, if it needs to download additional HTML to inject into the DOM from a server—the entire application may appear unresponsive. This is because JavaScript is single threaded, meaning, among other things, that the UI, UI events, and code share the same thread. If this thread is frozen while waiting for a response from some long-running function call, the user can’t interact with any UI elements on the screen.
Callbacks are a popular approach to addressing this limitation. This approach is used across multiple
applications to solve this very problem, and it works well. In fact, if technical implementation was the only concern, there would be no need to innovate further in this space.
The issue with callbacks is that they can drastically alter program flow because of the inherent non-deterministic nature of their execution. Examine the application in Listing 1-16. An asynchronous, long-running function is called, which accepts two callbacks. Each callback performs its own long-running operations as well.
Listing 1-16. Long-Running Asynchronous Process Test
function LongRunning(callback_one, callback_two) {
//perform long-running process var response = callback_one();
Even if, as in the example, callback_one is called before callback_two, there is no guarantee what order the callbacks will be executed in, so there is no way to resynchronize the results in a serial manner. This is the fundamental problem with asynchrony: it must be programmed in a synchronous manner to maintain meaningfulness to the programmer, because it exists within a synchronous logic stream and programming construct. Callbacks disconnect the programmer from the synchronous constructs of the underlying language. In small cases it may have no impact, but once you start moving to scenarios where the asynchronicity must be synchronized (as in the example), you run into issues.
WinJS uses the concept of promises to reduce the complexity of asynchronous programing. Promises create a construct on which asynchronous callback execution can be synchronized in a sequential manner. Let’s look at how the example from Listing 1-16 would work using promises. First, the LongRunning function must be changed to return a generic promise on completion rather than requiring all callbacks to be defined and passed in up front. See Listing 1-17.
Listing 1-17. Long-Running Function That Returns a Promise
function LongRunning() {
//perform long-running process
CHAPTER 1 ■ THE WINDOWS 8 ETHOS AND ENVIRONMENT
//return of a promise instance return promise();
}
Now that you no longer need to explicitly pass in the callbacks that execute when the LongRunning function is completed, you’re free to chain as many of them as necessary to complete the task. Let’s look at how this function is called in Listing 1-18.
Listing 1-18. Consuming a Long-Running Function That Returns a Promise
LongRunning().then(function (args)
As you can see, the explicit definitions of the callbacks have been removed from the function argument. They’re now executed only when the previous execution completes. In Listing 1-18 it’s easy to see how sequentially oriented the code is. Not only is the code much easier to read and understand, but it also presents itself in a deterministic manner. The use of the then method attaches callbacks in a controlled way to the LongRunning function. When the function completes, the then callback is executed (with the results of the previous execution passed into it). This continues recursively until there are no more callbacks to execute. Using then guarantees several things:
That you can specify a callback function to handle
• then when the target asynchronous
operation completes
That this callback provides in its parameter list a value that represents the result of the
•
previously completed asynchronous operation
That the
• then operation is also an asynchronous operation that returns a promise
Because then returns a promise that expects a callback containing the result of the previously executed then, you can chain dependent asynchronous calls by calling then on the result of any then call (as in the example). Needless to say nesting promises within each other returns everything to the old days, so you should avoid doing so if possible.
Here are a couple of operations for which you can use promises in certain situations:
• setPromise: You may find occasion to use promises within event handlers in your JavaScript code, particularly because many of the Microsoft APIs have been rewritten to be asynchronous in order to improve overall system performance. Due to the way the system treats event handlers, you need to tell it that your promise is still running. The WinJS implementation of system event handlers provides a function for doing this: setPromise. You saw an example in Listing 1-14. Chapter 2 dives further into the workings of this method.
Summary
No doubt Windows 8 is a departure from anything you’re used to. Developing for it is also somewhat so. The broad review of Windows 8 in this chapter should prepare you for the basics covered in the next chapter and give you the foundational knowledge you need for Windows 8 app development. You learned
The traits, features, and properties of interacting with the Windows 8 UI
•
How HTML is used in Windows 8 development
•
The various technologies that can be used in Windows 8 development
CHAPTER 2
Getting the Basics Right
There are certain basic developer workflows to which you have to become accustomed if you intend to build Windows 8 apps, regardless of the technology stack you choose to use. At a fundamental level, having a good understanding of how to access the exposed file system is, if not critical, quite important to development in a given system. This chapter introduces you to these key areas by exposing you to the APIs used to work with them. Detailed examples are provided to help you work through how these APIs function. In this chapter you explore file-system access as well as some important elements of Windows 8 development new to the ecosystem. By the end of this chapter, you should understand how to do file access, how to interact with the lock screen, how to prompt the user with file dialogs, and how to use splash screens to keep the user engaged while the application continues to load in the background, and subsequently notify the user.
File I/O
Developers who have built server-side style code or even desktop clients are probably very familiar with the general patterns of file access. If you’ve been building HTML user experiences, you might be at a slight disadvantage, but only a minor one. The truth is, we’ve all worked with files while working with computers, and we all certainly understand their nature. They can be opened, edited, closed, deleted, listed, searched, copied, and moved.
Although logically similar (if not the same), this discussion is broken into three core areas. First, the chapter talks about storage locations (meaning the places where files are stored). This conversation is important because it has a huge impact on how your app is built, delivered, and ultimately deployed to the Windows Store. You then go into the nitty-gritty of actually working with files. This is done second because the approach to accessing files through the Windows Runtime for JavaScript requires you to understand the meaning of storage locations first. Without that core understanding, you’ll most likely be pulling your hair out wondering why a given piece of functionality seems to be inexplicably failing with a completely useless and cryptic error.
Storage Folders
The StorageFolder class encompasses the general sense of a storage location. As stated earlier, a Windows 8 file can be resident in any number of places. An application you develop has access to these files either intrinsically or by declaring permissions in the application’s manifest. Some storage locations to which your application has intrinsic access include the application’s package-install location and isolated storage area. These storage locations are discussed in more detail in the following sections.
The Isolated Storage Area
application. This is the principle difference between this and the package-install location discussed in the next section. Listing 2-1 shows how to create, edit, delete, and read files that are in an application’s isolated store.
Listing 2-1. File Access from the Isolated Storage Area
CHAPTER 2 ■ GETTING THE BASICS RIGHT
Listing 2-1 shows how to create a file in isolated storage using the
Windows.Storage.ApplicationData.current.localFolder.createFileAsync function. The version of this function that you call expects two parameters: one that represents the file name (in this case testfile.txt), and one—called
Windows.Storage.CreationCollisionOption—that determines what to do when the file you want created has the same name as a file already present in the target folder (in this case, the isolated storage folder). There are two versions of this function: one expects a single parameter passed in (the file name), and the other also expects CreationCollisionOption to be included. When you use the first version, the failIfExists CreationCollisionOption is automatically used. Table 2-1 shows all the possible options of Windows.Storage.CreationCollisionOption.
Table 2-1. Windows.Storage.CreationCollisionOption Members
Member
Value
Description
generateUniqueName 0 Creates the new file or folder with the desired name, and automatically appends a number if a file or folder already exists with that name
replaceExisting 1 Creates the new file or folder with the desired name, and replaces any file or folder that already exists with that name
failIfExists 2 Creates the new file or folder with the desired name, or returns an error if a file or folder already exists with that name
Continuing with the discussion of Listing 2-1, notice the use of the then promise discussed in Chapter 1. As stated, many of the Windows Library for JavaScript (WinJS) functions use an asynchronous programming model that requires the use of promises.
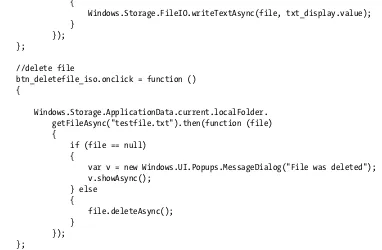
The rest of the example is straightforward. Listing 2-2 is a snippet of Listing 2-1 focusing in on the process of reading a file.
Listing 2-2. Reading a File from Isolated Storage
btn_readfile_iso.onclick = function () {
Windows.Storage.ApplicationData.current.localFolder. getFileAsync("testfile.txt").then(function (file)
From Listing 2-2 you can see that file access is a two-step process. You first need to get the file, and then, once you have an object that represents the file you want to access (a StorageFile object), you can use that handle in subsequent calls (in this case, you use it as an argument in the readTextAsync function). You learn about
StorageFile later in this chapter.
The Package-Install Location
Unlike files in the isolated storage location, modifications made to the application’s package-install location, which you access using the Windows.ApplicationModel.Package class, are wiped away when a new update to your application is installed. Package contains a property, InstalledLocation, which returns a reference to a
StorageFolder that represents the location on the end user’s computer where the application was unpacked. As stated earlier, StorageFolder is the abstract container for storage locations and, specifically because it is an abstraction, you can use the same instance type to represent both locations (even if the underlying mechanisms for accessing the files are different). For instance, an application’s installation location may be a folder on the user’s system, but the isolated storage location may be a compressed and encrypted structure. The same programming interface will nonetheless work for both.
Let’s rework the example in Listing 2-1 so it’s generalized enough that any StorageFolder can work with it. First, let’s create generalized versions of the create, read, edit, and delete functionality illustrated in Listing 2-1 (see Listing 2-3).
Listing 2-3. Generic Reading and Writing to a Storage Location
var createFileAsync = function (store, file_name, file_content) {
return store.createFileAsync(file_name,
CHAPTER 2 ■GETTING THE BASICS RIGHT
.then(function (file) {
Windows.Storage.FileIO.writeTextAsync(file, file_content); });
};
//write the file to isolated storage
var readFileAsync = function (store, file_name, completeFunction) { return store.getFileAsync(file_name)
var editFileAsync = function (store, file_name, new_content) { return store.getFileAsync(file_name)
var deleteFileAsync = function (store, file_name) { return store.getFileAsync(file_name)
The preceding example generalizes the activity of manipulating files in a target storage location. You allow the user to pass in the storage location, file name, and, in the case of editing or creating the file, the content they want added to the file. You create four private functions: createFileAsync, editFileAsync, readFileAsync, and
deleteFileAsync. (Notice the use of Async in the function names. You do this because each of these functions returns the promise returned by its internal file-access method call. Asynchronous functions like this don’t need to have Async in their names, but it helps developers downstream quickly identify which functions are async and which ones aren’t.) The file-access pattern in each of the button click events is encapsulated into these four functions and generalized so that any storage location can be passed in as an argument and the behavior will remain the same (provided the application has access to that storage location).
Listing 2-4. File Access Using the Application’s Install Location
//read file in package
btn_readfile_iso.onclick = function () {
readFileAsync(Windows.ApplicationModel.Package.current. installedLocation, "testfile.txt", function (text) {
txt_diplay.value = text; });
};
The takeaway is that regardless of the underlying implementation, you can program against StorageFolder in the same manner. Because of this, the chapter doesn’t focus on any more examples and instead gives an overview of the various locations available to you as a developer and which properties on which classes expose them.
More on Storage: the ApplicationData Class
Accessing an application’s package-install location is great if you want a read-only cache of data to load and read from. But because it’s so volatile (it’s deleted when the application is updated), you should probably never write to it (or at least you should expect whatever is written there to be gone after each application update). The better solution, shown earlier in Listing 2-1, is to work with the classes in the Windows.Storage namespace, specifically the ApplicationData class. ApplicationData provides direct access to your application’s virtual file stores. It can be used to access storage locations that are local, roaming, or temporary. Table 2-2 provides a view of the notable
ApplicationData class members.
Table 2-2. ApplicationData Notable Members
Property
Description
current Provides access to the app data store associated with the app’s package. This is static and the only way to get access to an instance of the current ApplicationData object.
localFolder Gets the root folder in the local app data store.
localSettings Gets the application settings container in the local app data store.
roamingFolder Gets the root folder in the roaming app data store.
roamingSettings Gets the application settings container in the roaming app data store.
roamingStorageQuota Gets the maximum size of the data that can be synchronized to the cloud from the roaming app data store.
CHAPTER 2 ■ GETTING THE BASICS RIGHT
If you want to create and manage files and folders that are tied to the currently logged-on user and not a specific machine the user is on, then the roamingFolder property is the appropriate choice. Roaming folders are synced across all devices the user is logged in to. (Note that there are restrictions on the total storage quota that can be roamed and also on the naming convention used for files in order for them to roam.) The great thing about this approach is that it allows users of your app to flow seamlessly across devices without needing to explicitly synchronize back to a server. Store content in the folder, and let Windows 8 take care of the rest.
The temporary store for your application is even more volatile than package storage. Items stored in this location are only guaranteed to last as long as the currently running session of the app. Files here can be deleted by the system at any time and may even be manually removed by the user using the Disk Cleanup tool. Hence, the ideal usage of this location is as an in-application session cache.
The User’s Known Folders
Your application isn’t limited to working with files in the application’s isolated data store, package-install location, or local/roaming/temporary locations just discussed. Applications built using the Windows Runtime (WinRT) for JavaScript can also access folders through the Windows.Storage.KnownFolders class. Table 2-3 lists the KnownFolders
properties defined for accessing the underlying folders they represent.
Table 2-3. KnownFolders Properties
Property
Description
documentsLibrary Gets the Documents Library
homeGroup Gets the HomeGroup folder
mediaServerDevices Gets the Media Server Devices (Digital Living Network Alliance [DLNA]) folder
musicLibrary Gets the Music Library
picturesLibrary Gets the Pictures Library
removableDevices Gets the Removable Devices folder
videosLibrary Gets the Videos Library
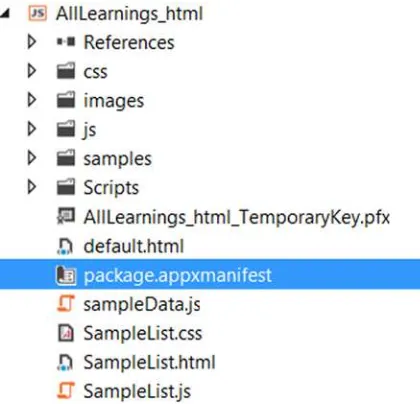
In order for an application to access these folders, it needs to ask the user by declaratively indicating that it intends to use a storage location other than the private ones automatically accessible to it. In Windows 8, this is a two-step process. First you enable the target Windows 8 library that you want access to as a capability your application is declaring that it uses. You can do this via the Capabilities section of the application manifest. In a standard WinRT for JavaScript Windows 8 app, the app’s manifest is located in the project’s root folder with the name
When you open this file, you should see five tabs. Selecting the Capabilities tab opens a screen like the one shown in Figure 2-2.
Figure 2-2. Capabilities tab
CHAPTER 2 ■ GETTING THE BASICS RIGHT
Selecting any one of the library capabilities (Documents Library, Music Library, Pictures Library, or Videos Library) enables access to the associated storage location through the appropriate ApplicationData property. The section “External Known Folders” discusses how to enable capabilities for the other three KnownFolders properties (homeGroup, mediaServerDevices, and removableDevices).
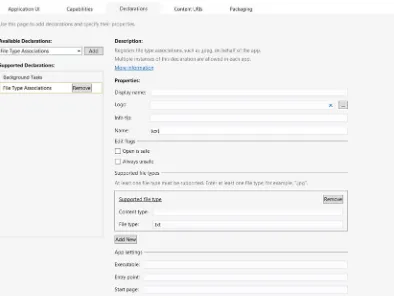
Next, you must explicitly declare which file types your application reads from and writes to. You do so through the Declarations tab of the app’s manifest (see Figure 2-3).
Figure 2-3. Declarations tab
You need to add a new file-type association to your application. An association must include the file extension (with the extension dot preceding it) and can optionally provide a MIME type. Figure 2-3 shows adding a file