matter material after the index. Please use the Bookmarks
and Contents at a Glance links to access them.
Contents at a Glance
About the Authors ...
xv
About the Technical Reviewer ...
xvii
Acknowledgments ...
xix
Introduction ...
xxi
Chapter 1: Getting Started with JavaScript
■
...
1
Chapter 2: Data and Decisions
■
...
13
Chapter 3: From DHTML to DOM Scripting
■
...
49
Chapter 4: HTML and JavaScript
■
...
69
Chapter 5: Presentation and Behavior (CSS and Event Handling)
■
...
101
Chapter 6: Common Uses of JavaScript: Images and Windows
■
...
149
Chapter 7: JavaScript and User Interaction: Navigation and Forms
■
...
199
Chapter 8: Back-End Interaction with Ajax and Node.js
■
...
247
Chapter 9: Data Validation Techniques
■
...
279
Chapter 10: Modern JavaScript Case Study: A Dynamic Gallery
■
...
297
Chapter 11: Using Third-Party JavaScript
■
...
321
Appendix A: Debugging JavaScript
■
...
343
Introduction
JavaScript has gone though a huge transformation, from being something that was nice to know to being essential to developing web sites that are fully featured and take full advantage of the new capabilities built into browsers. The amount of attention given to JavaScript though libraries and frameworks has grown at an accelerated rate.
This was not always the case. JavaScript was first introduced as LiveScript in 1995 by Netscape. Over time, Microsoft’s Internet Explorer adopted it and Netscape changed the name to JavaScript with the release of Netscape Navigator 2. As the two companies continued to compete, support was not that good. At worst, developers had to make two different versions of a site to support the most popular browsers (which, at the time, were Netscape 4 and Internet Explorer 4).
Browser support has improved greatly. The World Wide Web Consortium (W3C), working with browser makers, developed a standard way of representing and interacting with HTML documents, called the Document Objet Model (DOM), and a scripting language, called ECMAScript. Over the years, compliance with these standards has improved.
This book starts with the basics and gives you a good foundation on how to write JavaScript in an unobtrusive way, keeping your structure (HTML), presentation (CSS), and behavior (JavaScript) separate. There are also examples of how to keep your sites accessible for visitors using screen readers, as well as examples of how to develop your site if JavaScript is not available. We also cover subjects like objected detection versus browser detection, AJAX, HTML 5 Form validation, and an introduction to jQuery.
The goal of this book is to help you understand JavaScipt. If you haven’t looked at JavaScript in a while, you’ll be glad to know a lot has changed for the better. You can use this book as a guide to update your skills. If you are new to JavaScript, this book helps you from the beginning. We start with explaining what a variable is and later move on to how to add Google Maps to your site.
Getting Started with JavaScript
This book will teach you about JavaScript and how to use it in a practical manner. After you read it, you’ll be able to
Understand JavaScript syntax and structures.
•
Create scripts that are easy to understand and maintain.
•
Write scripts that do not interfere with others.
•
Write scripts that make web sites easier to use without blocking out non-JavaScript users.
•
Write scripts that are independent of the browser or user agent trying to understand
•
them—which means that in some years they will still be usable and won’t rely on obsolete technology.
Enhance a web site with JavaScript, and allow developers without any scripting knowledge to
•
change the look and feel.
Enhance a web document with JavaScript, and allow HTML developers to use your
•
functionality by simply adding a CSS class to an element.
Use progressive enhancement to make a web document nicer only when and if the user agent
•
allows for it.
Use Ajax to bridge the gap between the back end and client side, thus creating sites that are
•
easier to maintain and appear much slicker to the user.
Use JavaScript as part of a web methodology that enables you to maintain it independently
•
without interfering with the other development streams.
What you will not find here are
JavaScript applications that are browser specific
•
JavaScript that is only there to prove that it can be used and does not enhance the visitor’s
•
experience
JavaScript that promotes unwanted content, such as pop-up windows or other flashy
•
techniques like tickers or animation for animation’s sake
Other visitors might be dependent on hearing our sites rather than seeing them (via screen readers) and might not be notified of changes achieved via JavaScript. Last but not least, there are users who just cannot have JavaScript enabled—for example, in high-security environments like banks. Therefore, you need to back up a lot of the things you do in JavaScript with solutions on the server side.
Note
■
Web design has matured over the years—long ago we stopped using
FONTtags, and we deprecated visual
attributes like
bgcolorand started moving all the formatting and presentational attributes to a CSS file. The same
cleaning process has also happened to JavaScript. Now the content, structure, presentation, and behavior of web sites
are all separated from each other. Web development now is done for business and for helping the user rather than done
for the sake of putting something out there and hoping it works in most environments.
JavaScript is now part of an overall development methodology, which means that you develop it not to interfere with other technologies like HTML or CSS, but to interact with them or complement them.
Web development has come quite a way since the 1990s, and there is not much sense in creating web sites that are static and fixed in size. Any modern web design should allow for growth as needed. It should also be accessible to everyone (which does not mean that everybody gets the same appearance—a nice multicolumn layout, for example, might make sense on a high-resolution monitor but is hard to use on a mobile phone or a tablet)—and ready for internationalization. You cannot afford any longer to build something and think it’ll last forever. Because the Web is about content and change, it’ll become obsolete if we don’t upgrade our web products constantly and allow other data sources to feed into it or get information from it.
Enough introductions—you got this book to learn about JavaScript, so let’s start by talking quickly about JavaScript’s history and assets before diving right into it.
In this chapter, you’ll learn
What JavaScript is, and what it can do for you
•
The advantages and disadvantages of JavaScript
•
How to add JavaScript to a web document, and what its essential syntax is
•
Object-oriented programming (OOP) in relation to JavaScript
•
How to write and run a simple JavaScript program
•
Chances are that you have already come across JavaScript and already have an idea of what it is and what it can do, so we’ll move quite swiftly through some basics of the language and its capabilities first. If you know JavaScript well already, and you simply want to know more about the newer and more accessible features and concepts, you might skip to Chapter 3. However, there might be some information you’ve forgotten, and a bit of a review doesn’t hurt, either.
The Why of JavaScript
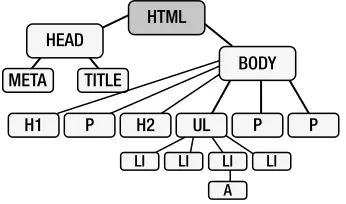
In the beginning of the Web, there was HTML and the Common Gateway Interface (CGI). HTML defines the parts of a text document and instructs the user agent (usually the web browser) how to show it—for example, text surrounded by the tags <p></p> becomes a paragraph. Within that paragraph, you might have <h1></h1> tags that define the main page heading. Notice that for most opening tags, there is a corresponding closing tag that begins with </.
The problem with that is it means every time there is a change, the entire process must be repeated (and the page reloaded). This is cumbersome and slow. It is true that at least the Western world has the benefit of fast Internet connections these days, but displaying a page still means a reload, which could be a slow process that frequently fails. (Ever get an Error 404?)
Some information, such as the results of performing calculations and verifying the information on a form, might not need to come from the server. JavaScript is executed by the user agent (normally a browser) on the visitor’s computer. We call this client-side code. This could result in fewer trips to the server and faster-running web sites.
What Is JavaScript?
JavaScript started life as LiveScript, but Netscape changed the name—possibly because of the excitement being generated by Java—to JavaScript. The name is confusing, though, because there is no real connection between Java and JavaScript—although some of the syntax looks similar.
Java is to JavaScript what Car is to Carpet
—From a JavaScript discussion group on Usenet
Netscape created the JavaScript language in 1996 and included it in their Netscape Navigator (NN) 2.0 browser via an interpreter that read and executed the JavaScript added to .html pages. The language has steadily grown in popularity since then, and it is now supported by all browsers and some applications as a way to customize them. The good news is that this means JavaScript can be used in web pages for all browsers. The not-quite-so-good news is that there are differences in the way the different browsers implement JavaScript, although the core JavaScript language is much the same. However, JavaScript can be turned off by the user. I will discuss this further shortly, as well as throughout this book.
The great thing about JavaScript is that once you’ve learned how to use it for browser programming, you can move on to use it in other areas. Microsoft Windows 8 and Surface tablets both let you use JavaScript to develop applications, PDF files use JavaScript, and applications such as Dreamweaver and Photoshop are scriptable with JavaScript. Now mobile applications can be developed with JavaScript and converted to native code. JavaScript can even be used on the server side using things like Node.js.
A lot of large companies also offer software development kits (SDKs) that let you access data or integrate services on your site. For example, if you want your visitors to log in with their Facebook ID, you can use Facebook’s JavaScript SDK located at http://developers.facebook.com/web/.
Even better is the fact that JavaScript is a lot easier to develop than higher programming languages or server-side scripting languages. It does not need any compilation like Java or C++, and it doesn’t need to be run on a server or command line like Perl, PHP, or Ruby. All you need to write, execute, debug, and apply JavaScript is a text editor and a browser—both of which are supplied with any operating system. There are, of course, tools that make it a lot easier for you—for example, JavaScript debuggers like Firebug, Opera Dragonfly, and Chrome Developer tools.
Problems and Merits of JavaScript
The term user agent and the lack of understanding of what a user agent is can also be a problem. Normally, the user agent is a browser like Microsoft Internet Explorer (IE), Chrome, Firefox (Fx), Opera, or Safari. However, browsers are not the only user agents on the Web. Others include
Assistive technology that helps users to overcome the limitations of a
•
disability—like text-to-speech software or Braille displays
Text-only agents like Lynx
Interactive TV and set-top boxes
•
Search engines and other indexing programs
•
And many more
•
This large variety of user agents, of different levels of technical finesse (and old user agents that don’t get updated), is also a great danger for JavaScript.
Not all visitors to your web site will experience the JavaScript enhancements you applied to it. A lot of them will also have JavaScript turned off—for security reasons. JavaScript can be used for good and for evil. If the operating system—like unpatched Windows—allows you to, you can install viruses or Trojan Horses on a computer via JavaScript or read out user information and send it to another server.
Note
■
There is no way of knowing what the visitor uses or what his computer is capable of. Furthermore, you never
know what the visitor’s experience and ability are. This is one of the beautiful aspects of the Web—everyone can
participate. However, this can introduce a lot of unexpected consequences for the JavaScript programmer.
In many cases, you might want to have a server-side backup plan. It would test to see whether the user agent supports the functionality desired and, if it doesn’t, the server takes over.
Independence of scripting languages is a legal requirement for web sites, as defined in the Digital Discrimination Act for the UK, section 508 in the US law, and many more local legal requirements throughout the world. This means that if the site you developed cannot be used without JavaScript, or your JavaScript enhancements are expecting a certain ability of the users or their user agent without a fallback, your client could be sued for discrimination.
However, JavaScript is not evil or useless, and it is a great tool to help your visitors to surf web sites that are a lot slicker and less time-consuming.
The merits of using JavaScript are
• Less server interaction You can validate user input before sending the page off to the server. This saves server traffic, which means saving money.
• Immediate feedback to the visitors They don’t have to wait for a page reload to see if they forgot to enter something
• Increased usability by allowing visitors to change and interact with the user interface without reloading the page For example, by collapsing and expanding sections of the page or offering extra options for visitors with JavaScript. A classic example of this is selection boxes that allow immediate filtering, such as only showing the available destinations for a certain airport, without making you reload the page and wait for the result.
• Increased interactivity You can create interfaces that react when the user hovers the pointer over them or activates them via the keyboard. This is partly possible with cascading style sheets (CSS) and HTML as well, but JavaScript offers you a lot wider—and more widely supported— range of options.
• Richer interfaces If your users allow for it, you can use JavaScript to include such items as drag-and-drop components and sliders—something that originally was possible only in thick client applications your users had to install, such as Java applets or browser plug-ins like Flash.
• Lightweight environment Unlike Java applets or Flash movies, which are large files that must be downloaded, scripts are small in file size and get cached (temporary storage) once they have been loaded. JavaScript also uses the browser controls for functionality rather than its own user interfaces like Flash or Java applets do. This makes it easier for users, because they already know these controls and how to use them. Modern Flash and Apache Flex applications do have the option to stream media and—being vector based—are visually scalable, something JavaScript and HTML controls aren’t. On the other hand, SVG (Scalable Vector Graphics) is something native to the browser and can be controlled by JavaScript.
JavaScript in a Web Page and Essential Syntax
Applying JavaScript to a web document is very easy; all you need to do is use the script tag. The type attribute is optional in HTML5 but required in HTML4:
<script type="text/javascript"> // Your code here
</script>
For older browsers, you’ll need to comment out the code to make sure the user agent does not display it inside the page or try to render it as HTML markup. There are two different syntaxes for commenting out code but we are showing one. For HTML documents, you use the normal HTML comments:
<script type="text/javascript">
// Your code here -->
</script>
Note
■
There is also an “opposite” to the
scripttag—
noscript—which allows you to add content that will be
displayed only when JavaScript is not available. However,
noscriptis deprecated in XHTML and strict HTML, and there is
no need for it—if you create JavaScript that is unobtrusive.
JavaScript Syntax
Before we go any further, we should discuss some JavaScript syntax essentials:
// indicates that the rest of the current line is a comment and not code to be executed, so the
•
interpreter doesn’t try to run it. Comments are a handy way of putting notes in the code to remind you what the code is intended to do, or to help anyone else reading the code see what’s going on.
/* indicates the beginning of a multiline comment.
•
*/ indicates the end of a comment that covers more than one line. Multiline comments are
•
also useful if you want to stop a certain section of code from being executed but don’t want to delete it permanently. If you are having problems with a block of code, for example, and you aren’t sure which lines are causing the problem, you can comment one portion of it at a time to isolate the problem.
Curly braces ({ and }) are used to indicate a block of code. They ensure that all the lines inside
•
the braces are treated as one block. You will see more of these when I discuss structures such as if or for, as well as functions.
A semicolon or a newline defines the end of a statement, and a statement is a single
•
command. Semicolons are in fact optional, but it’s still a good idea to use them to make clear where statements end, because doing so makes your code easier to read and debug. (Although you can put many statements on one line, it’s best to put them on separate lines to make the code easier to read.)
Let’s put this syntax into a working block of code:
<!DOCTYPE html> <html>
<head> <body>
<script type="text/JavaScript">
// One-line comments are useful for reminding us what the code is doing
/*
This is a multiline comment. It's useful for longer comments and also to block out segments of code when you're testing
*/
/*
Script starts here. We're declaring a variable myName, and assigning to it the value of whatever the user puts in the prompt box (more on that in Chapter 2), finishing the instruction with a semicolon because it is a statement */
// If the name the user enters is Chris Heilmann if (myName == "Chris Heilmann")
{
// then a new window pops up saying hello alert("Hello Me");
}
// If the name entered isn't Chris Heilmann else
{
// say hello to someone else alert("hello someone else"); }
</script> </body> </html>
Some of the code might not make sense yet, depending on your previous JavaScript experience. All that matters for now is that it’s clear how comments are used, what a code block is, and why there are semicolons at the end of some of the statements. You can run this script if you like—just copy it into an HTML page, save the document with the file extension .html, and open it in your browser.
Although statements like if and else span more than one line and contain other statements, they are considered single statements and don’t need a semicolon after them. The JavaScript interpreter knows that the lines linked with an if statement should be treated as one block because of the curly braces, {}. Although it’s not mandatory, you should indent the code within the curly braces. This makes reading and debugging much easier. We’ll be looking at variables and conditional statements (if and else) in the next chapter.
Code Execution
The browser reads the page from top to bottom, so the order in which code executes depends on the order of the script blocks. A script block is the code between the <script> and </script> tags. (Also note that it’s not just the browser that can read your code; the user of a web site can view your code, too, so you shouldn’t put anything secret or sensitive in there.) There are three script blocks in this next example:
<!DOCTYPE html> <html>
<head>
<script type="text/javascript"> alert( 'First script Block ');
alert( 'First script Block - Second Line '); </script>
</head> <body>
<h1>Test Page</h1>
<script type="text/javascript"> alert( 'Second script Block' ); </script>
<p>Some more HTML</p>
alert( 'Third script Block' ); function doSomething() {
alert( 'Function in Third script Block' ); }
</script> </body> </html>
If you try it out, you’ll see that the alert() dialog in the first script block appears and displays the message
First script Block
That’s followed by the next alert() dialog in the second line displaying the message
First script Block - Second Line.
The interpreter continues down the page and comes to the second script block, where the alert() function displays this dialog:
Second script Block
And the third script block follows it with an alert() statement that displays
Third script Block
Although there’s another alert statement inside the function a few lines down, it doesn’t execute and display the message. This is because it’s inside a function definition (function doSomething()) and code inside a function executes only when the function is called.
An Aside About Functions
I’ll be talking about functions in much more depth in Chapter 3, but I introduce them here because you can’t get very far in JavaScript without an understanding of functions. A function is a named, reusable block of code, surrounded by curly braces, that you create to perform a task. JavaScript contains functions that are available for you to use and perform tasks like displaying a message to the user. The proper use of functions can save a programmer from writing a lot of repetitive code.
You can also create our own functions, which is what we did in the previous code block. Let’s say you create some code that writes out a message to a page in a certain element. You’d probably want to use it again and again in different situations. Although you could cut and paste code blocks wherever you wanted to use them, this approach can make the code excessively long; if you want the same piece of code three or four times within one page, it’ll also get pretty hard to decipher and debug. Instead, you can wrap the messaging code into a function and then pass in any information that the function needs in order to work using parameters. A function can also return a value to the code that called the function into action originally.
call the function, as you might expect, until the script has created it. You can call it in this script by adding it to the third script block like this:
<script type="text/javascript"> alert( 'Third script Block '); function doSomething(){
alert( 'Function in Third script Block '); }
// Call the function doSomething doSomething();
</script> </body> </html>
So far in this chapter, you’ve looked at the pros and cons of the JavaScript language, seen some of the syntax rules, learned about some of the main components of the language (albeit briefly), and run a few JavaScript scripts. You’ve covered quite a lot of distance. Before we move on to a more detailed examination of the JavaScript language in the next chapter, let’s talk about something key to successful JavaScript development: objects.
Objects
Objects are central to the way you use JavaScript. Objects in JavaScript, in many ways, are like objects in the world outside of programming. (It does exist, I just had a look.) In the real world, an object is just a “thing” (many books about object-oriented programming compare objects to nouns): a car, a table, a chair, and the keyboard I’m typing on. Objects have
• Properties (analogous to adjectives) The car is red.
• Methods (like verbs in a sentence) The method for starting the car might be turn ignition key.
• Events Turning the ignition key results in the car starting event.
Object-oriented programming (OOP) tries to make programming easier by modeling real- world objects. Let’s say you were creating a car simulator. First, you create a car object, giving it properties like color and current speed. Then you need to create methods: perhaps a start method to start the car, and a brake method to slow the car, into which you need to pass information about how hard the brakes should be pressed so that you can determine the slowing effect. Finally, you would want to know when something happens with your car. In OOP, this is called an event. For example, when the gas tank is low, the car sends a notification (that light on the dashboard) letting you know it’s time to fill up. In this code, you would want to listen for such an event so that you can do something about it.
Object-oriented programming works with these concepts. This way of designing software is now very
commonplace and influences many areas of programming—but most importantly to you, it’s central to JavaScript and web browser programming.
you’d find that the server hosting JavaScript exposes a very different set of host objects, because their functionality is related to things you want to do on a web server.
You’ll also see in Chapter 3 that you can use JavaScript to create your own objects. This is a powerful feature that allows you to model real-world problems using JavaScript. To create a new object, you need to specify the properties and methods it should have, using a template called a class. A class is a bit like an architect’s drawing in that it specifies what should go where and do what, but it doesn’t actually create the object.
Note
■
There is some debate as to whether JavaScript is an object-based language or an object-oriented language.
The difference is that an object-based language uses objects for doing programming but doesn’t allow the coder to use
object-oriented programming in her code design. An object-oriented programming language not only uses objects, but
also makes it easy to develop and design code in line with object-oriented design methodology. JavaScript allows you
to create your own objects, but this is not accomplished in the same way as in class-based languages like Java or C#.
However, we’ll be concentrating not on debates about what is or isn’t object oriented here, but on how objects are useful
in practical terms in this book, and we’ll look at some basic object-oriented coding where it helps make life easier for us.
As you progress through the book, you’ll get a more in-depth look at objects: the objects central to the JavaScript language, the objects that the browser makes available for access and manipulation using JavaScript, and your own custom objects. For now, though, all you need to know is that objects in JavaScript are entities you can use to add functionality to web pages, and that they can have properties and methods. The Math object, for example, has among its properties one that represents the value of pi and among its methods one that generates a random number.
Simple JavaScript Example
I’ll finish the chapter with a simple script that determines first the width of the visitor’s screen and then applies a suitable style sheet. (It does this by adding an extra LINK element to the page. Something like this would now be done using CCS media queries, but this is still a good example of how to use objects.) You’ll do this using the Screen object, which is a representation of the user’s screen. This object has an availWidth property that you’ll retrieve and use to decide which style sheet to load.
Here’s the code:
<!doctype html> <html>
<head>
<meta charset="UTF-8">
<title>CSS Resolution Demo</title> <!-- Basic style with all settings -->
<link rel="StyleSheet" href="basic.css" type="text/css" />
Extra style (applied via JavaScript) to override default settings according to the screen resolution
-->
<script type="text/javascript">
// Define a variable called cssName and a message // called resolutionInfo
var cssName; var resolutionInfo;
if( screen.availWidth < 650 ) {
// define the style Variable as the low-resolution style cssName = 'lowres.css';
resolutionInfo = 'low resolution';
// Or if the width of the screen is less than 1000 pixels } else {
if( screen.availWidth > 1000 ) {
// define the style Variable as the high-resolution style cssName = 'highres.css';
resolutionInfo = 'high resolution'; // Otherwise
} else {
// define the style Variable as the mid-resolution style cssName = 'lowres.css';
resolutionInfo = 'medium resolution'; }
}
document.write( '<link rel="StyleSheet" href="' + cssName + '" type="text/css" />' ); </script>
</head> <body>
<script type="text/javascript">
document.write( '<p>Applied Style:' + resolutionInfo + '</p>' ); </script>
</body> </html>
Although we’ll be looking at the details of if statements and loops in the next chapter, you can probably see how this is working already. The if statement on the first line asks whether the screen.availWidth is less than 650:
if ( screen.availWidth < 650 )
If the user’s screen is 640×480, the width is less than 650, so the code within the curly braces is executed and the low-resolution style and message get defined.
if ( screen.availWidth < 650 ) {
// define the style Variable as the low-resolution style cssName = 'lowres.css';
resolutionInfo = 'low resolution'; }
The code carries on checking the screen size using the else statement. The final else occurs only if neither of the other evaluations have resulted in code being executed, so you assume that the screen is 800×600 and define the medium style and message accordingly:
else {
// define the style Variable as the mid-resolution style cssName = 'lowres.css';
Note that you’re measuring the screen size here, and the user might have a 800×600 screen, but that doesn’t mean his browser window is maximized. You might be applying a style that is not appropriate.
You’re using another object, the document object, to write to the page (an HTML document). The document
object’s write() method allows you to insert HTML into the page. Note that document.write() doesn’t actually change the source HTML page, just the page the user sees on his computer.
Note
■
In fact, you’ll find
document.write()very useful as you work through the first few chapters of the book. It’s
good for small examples that show how a script is working, for communicating with the user, and even for debugging an
area of a program that you’re not sure is doing what you think it should be doing. It also works on all browsers that support
JavaScript. More modern browsers have better tools and methods for debugging, but I’ll say more on that later in the book.
You use document.write() to write out the appropriate link element with your defined style in the head:
document.write( '<link rel="StyleSheet" href="' + cssName + '" type="text/css" />' );
And in the document’s body, you write out the message explaining which resolution style was applied:
<script type="text/javascript">
document.write( '<p>Applied Style: '+ resolutionInfo + '</p>' ); </script>
Later on, we’ll work with more complex examples that use JavaScript to test capabilities of the user’s agent and interface. For now, though, I hope this simple example gives you an inkling of the kind of flexibility you can add to your web pages using JavaScript.
Summary
In this chapter, we took a look at what JavaScript is, how it works, and what its advantages and disadvantages are. I noted that the biggest disadvantage is that you cannot rely on it as a given. However, I also mentioned that using JavaScript can make web sites a nicer and slicker experience for your users.
You ran some JavaScript code, saw how to add comments to the code, and saw how to separate JavaScript statements using semicolons. You also saw that you can tell JavaScript to treat a group of lines of code as a single block using curly braces, following an if statement, for example. You learned that JavaScript execution generally runs from top to bottom, and from the first script block to the last, with the exception of functions that execute only when you tell them to.
You also looked at objects, which are central to writing JavaScript. Not only is JavaScript itself very much dependent on objects, but the browser also uses objects and methods to make itself and the document available for scripting. Finally, you looked at a simple example that reads out the user’s screen resolution and applies a suitable style sheet.
Data and Decisions
Data and decision making are fundamental to every intelligent program. We’ll begin this chapter by looking at how JavaScript understands, or represents, data. This is important because JavaScript works with a number of data types and manipulates data according to its data type. You can generate unexpected results by mismatching data of different types. We’ll look at some of the more common data type problems, and you’ll see how to convert one type of data to another.
We’ll also be working with conditional statements and loops: two of the most valuable tools for decision making. To make decisions in a computer language, you need to let the program know what should happen in response to certain conditions, which is where conditional statements come in. Loops, on the other hand, simply allow you to repeat an action until a specified circumstance is met. For example, you might want to loop through each input box in a form and check that the information it contains is valid.
I’ll be covering a lot of different facets of JavaScript in this chapter:
Classifying and manipulating information in JavaScript: data types and data operators
•
Variables
•
Converting data types
•
Introducing data objects:
• String, Date, and Math objects
Arrays: storing ordered sets of data, like the items in a shopping basket
•
Decision making with conditional statements, loops, and data evaluation
•
Note
■
The examples in this chapter are kept as simple as possible and therefore use
document.write()as a
feedback mechanism for you to see the results. You’ll learn in later chapters about other methods for doing this that are
more modern and versatile.
Data, Data Types, and Data Operators
Data is used to store information, and to do that more effectively, JavaScript needs to have each piece of data assigned a type. This type stipulates what can or cannot be done with the data. For example, one of the JavaScript data types is number, which you can use to perform certain calculations on the data that it holds.
The three most basic data types that store data in JavaScript are
• String: A series of characters—for example, "some characters"
• Number: A number, including floating point numbers
These are sometimes referred to as primitive data types, because they store only single values. There are two slightly different primitive data types as well. These don’t store information, but instead warn you about a particular situation:
• Null: Indicates that even though a variable has been created, its current value is null or nothing.
• Undefined: Indicates that something has not been defined and given a value. This is important when you’re working with variables.
We’ll be working extensively with these data types throughout the chapter.
The String Data Type
The JavaScript interpreter expects string data to be enclosed within single or double quotation marks (known as delimiters). The following script, for example, will write some characters on the page:
<html> <body>
<script type="text/javascript">
document.write("some characters"); </script>
</body> </html>
The quotation marks won’t be written to the page because they are not part of the string; they simply tell JavaScript where the string starts and ends. You could just as easily use single quotation marks:
<html> <body>
<script type='text/javascript'>
document.write('some characters'); </script>
</body> </html>
Both methods are fine, as long as you close the string the same way you opened it and don’t try to delimit it like this:
document.write('some characters"); document.write("some characters');
Of course, you might want to use a single or double quotation mark inside the string itself—in which case, you need to use a distinct delimiter. If you use double quotation marks, the instructions will be interpreted as you intended:
document.write("Paul' s characters");
But if you used single quotations marks, they won’t be:
document.write('Paul' s characters');
Note
■
JavaScript syntax, like English syntax, is a set of rules that makes the language intelligible. Just as a syntax
error in English can render a sentence meaningless, a syntax error in JavaScript can render the instruction meaningless.
You can avoid creating JavaScript syntax errors like the following one by using single quotation marks to delimit any string containing double quotes and vice versa:
document.write("Paul' s numbers are 123"); document.write('some "characters"');
If, on the other hand, you wanted to use both single and double quotation marks in your string, you need to use something called an escape sequence. In fact, it’s better coding practice to use escape sequences instead of the quotation marks we’ve been using so far, because they make your code easier to read.
Escape Sequences
Escape sequences are also useful for situations where you want to use characters that can’t betyped using a keyboard (like the symbol for the Japanese yen, ¥, on a Western keyboard). Table 2-1 lists some of the most commonly used escape sequences.
Table 2-1. Common Escape Sequences
Escape Sequences
Character Represented
\b Backspace.
\f Form feed.
\n Newline.
\r Carriage return.
\t Tab.
\' Single quote.
\" Double quote.
\\ Backslash.
\xNN NN is a hexadecimal number that identifies a character in the Latin-1 character set. (The Latin-1 character is the norm for English-speaking countries.)
\uDDDD DDDD is a hexadecimal number identifying a Unicode character.
Let’s amend the following string, which causes a syntax error
document.write( 'Paul' s characters' );
so that it uses the escape sequence (\’) and is correctly interpreted:
The escape sequence tells the JavaScript interpreter that the single quotation mark belongs to the string itself and isn’t a delimiter.
ASCII is a character-encoding method that uses values from 0 to 254. As an alternative, you can specify characters using the ASCII value in hexadecimal with the \xNN escape sequence. The letter C is 67 in decimal and 43 in hex, so you could write that to the page using the escape sequence like this:
document.write( "\x43" );
The \uDDDD escape sequence works in much the same way but uses the Unicode character-encoding method, which has 65,535 characters. Because the first few hundred ASCII and Unicode character sets are similar, you can write the letter C using this escape sequence as follows:
document.write( '\u0043' );
ASCII and Unicode information can get quite detailed, so the best place to look for information is on the Web. For Unicode, try http://www.unicode.org.
Operators
JavaScript has a number of operators you can use to manipulate the data in your programs; you’ll probably recognize them from math. Table 2-2 presents some of the most commonly used operators.
Table 2-2. JavaScript Operators
Operator
What It Does
+ Adds two numbers together or concatenates two strings.
- Subtracts the second number from the first.
* Multiplies two numbers.
/ Divides the first number by the second.
% Finds the modulus—the remainder of a division—for example, 98 % 10 = 8.
-- Decreases the number by 1; only useful with variables, which you’ll see at work later.
++ Increases the number by 1; only useful with variables, which you’ll see at work later.
Here they are in use:
<html> <body>
document.write( 1 + 2 * 3 ); document.write("<br>" ); document.write( 98 % 10 ); </script>
</body> </html>
You should get this output:
0 2 4 6 7 8
JavaScript, just like math, gives some operators precedence. Multiplication takes a higher precedence than addition, so the calculation 1 + 2 * 3 is carried out like this:
2 * 3 = 6 6 + 1 = 7
All operators have an order of precedence. Multiplication, division, and modulus have equal precedence, so when they all appear in an equation, the sum is calculated from left to right. Try this calculation:
2 * 10 / 5%3
The result is 1, because the calculation simply reads from left to right:
2 * 10 = 20 20 / 5 = 4
4%3 = 1
Addition and subtraction also have equal precedence.
You can use parentheses to give part of a calculation higher precedence. For example, you could add 1 to 1 and then multiply by 5 like this:
(1 + 1) * 5
The result will then be 10, but without the parentheses it would have been 6. In fact, you should use parentheses even when they’re not essential because they help make the order of the execution clear.
If you use more than one set of parentheses, JavaScript simply works from left to right or, if you have inner parentheses, from the inside out:
document.write( ( 1 + 1 ) * 5 * ( 2 + 3 ) );
This is how the calculations for the preceding formula are performed:
(1 + 1) = 2
(2 + 3) = 5
As you’ve seen, JavaScript’s addition operator adds the values. What it actually does with the two values depends on the data type you’re using. For example, if you’re working with two numbers that have been stored as the number data type, the + operator will add them together. However, if one of the data types you’re working with is a string (as indicated by the delimiters), the two values will be concatenated. Try this:
<html> <body>
<script type="text/javascript">
document.write( 'Java' + 'Script' ); document.write( 1 + 1 );
document.write( 1 + '1' ); </script>
</body> </html>
Being able to use the addition operator with strings can be handy (and is called the concatenation operator in this case), but it can also generate unexpected results if one of the values you’re working with happens to be of a different data type from the one you were expecting. We’ll be looking at some examples like this, and resolving them, later on.
It’s less of a problem if you’re working with literal values as you have been doing so far. However, much of the data you’ll be working with in your programs will be entered by the user or generated by the script, so you won’t know in advance exactly what values you’re going to be working with. This is where variables come in. Variables are placeholders for data in your script, and they’re central to JavaScript.
JavaScript Variables
JavaScript is probably the most forgiving language when it comes to variables. You don’t need to define what a variable is before you can use it, and you can change the type of a variable any time in the script. However, having variables be created implicitly (not defined first) will not work if your code is running in Strict Mode. For more information about this, the Mozilla Developer Network has a full description of how Strict Mode is different at: https://developer.mozilla.org/en-US/docs/JavaScript/Reference/Functions_and_function_scope/Strict_mode.
You declare a variable by giving it a unique name and using the var keyword. Variable names have to start with a letter of the alphabet or with an underscore, while the rest of the name can be made up only of numbers, letters, the dollar sign ($), and underscore characters. Do not use any other characters.
Note
■
Like most things in JavaScript, variable names are case sensitive—for example,
thisVariableand
ThisVariable
are different variables. Be very careful about naming your variables; you can run into all sorts of trouble
if you don’t name them consistently. To that end, most programmers use
camel notation
, where the name of the
variable begins with a lowercase letter while subsequent words are capitalized and run in without spaces. Thus, the
name
thisVariable.
Note
■
Although it is not technically necessary, variable declarations should begin with the keyword
var. Not using it
could have implications, which you will see as you progress.
With all that said, let’s start declaring variables. You can declare a variable without initializing it (giving it a value):
var myVariable;
Then it’s ready and waiting for when you have a value. This is useful for variables that will hold user input. You can also declare and initialize the variable at the same time:
var myVariable = "A String"; var anotherVariable = 123;
Or you can declare and initialize a variable by assigning it the return value of the prompt() function or the sum of a calculation:
var eurosToConvert = prompt("How many Euros do you wish toconvert", ""); var dollars = eurosToConvert * euroToDollarRate;
The prompt() function is a JavaScript function that asks the user to enter a value and then returns it to the code. Here you’re assigning the value entered to the variable eurosToConvert.
Initializing your variables is a very good idea, especially if you can give them a default value that’s useful to the application. Even initializing a variable to an empty string can be a good idea, because you can check back on it without bringing up the error messages that would have popped up if it didn’t have a value.
Let’s look at how variables can improve both the readability of your code and its functionality. Here’s a block of code without any variables:
<html> <body>
<script type="text/javascript">
document.write( 0.872 * prompt( "How many Euros do you wish to convert", "" ) ); </script>
</body> </html>
It’s not immediately obvious that this code is converting euros to dollars, because there’s nothing to tell you that 0.872 is the exchange rate. The code works fine though; if you try it out with the number 10, you should get the following result:
8.72
We are using the prompt() method of the window object to get user feedback in this example. (The window is optional in this instance; to keep the code shorter, you can omit it.) This method has two parameters: one label displayed above an entry field and an initial value for the field. You’ll learn more about prompt() and how to use it in Chapter 4. Suppose that you want to make the result a little more informative, like this:
Without variables, the only way to do it is to ask users to enter the amount of euros they want to convert twice, and that really isn’t user friendly. Using variables, though, you can store the data temporarily and then call it up as many times as you need to:
<html> <body>
<script type="text/javascript">
// Declare a variable holding the conversion rate var euroToDollarRate = 0.872;
// Declare a new variable and use it to store the // number of euros
var eurosToConvert = prompt( "How many Euros do you wish to convert", "" ); // Declare a variable to hold the result of the euros
// multiplied by the conversion
var dollars = eurosToConvert * euroToDollarRate; // Write the result to the page
document.write( eurosToConvert + " euros is " + dollars + " dollars" ); </script>
</body> </html>
You’ve used three variables: one to store the exchange rate from euros to dollars, another to store the number of euros that will be converted, and the final one to hold the result of the conversion into dollars. Then all you need to do is write the result using both variables. Not only is this script more functional, it’s also much easier to read.
Converting Different Types of Data
For the most part, the JavaScript interpreter can work out what data types you want to be used. In the following code, for example, the interpreter understands the numbers 1 and 2 to be of the number data type and treats them accordingly:
<html> <body>
<script type="text/javascript"> var myCalc = 1 + 2;
document.write( "The calculated number is " + myCalc ); </script>
</body> </html>
This will be written to your page:
The calculated number is 3
However, if you rewrite the code to allow the user to enter his own number using the prompt() function, you’ll get a different calculation altogether:
<html> <body>
<script type="text/javascript">
var myCalc = 1 + userEnteredNumber;
var myResponse = "The number you entered + 1 = " + myCalc; document.write( myResponse );
</script> </body> </html>
If you enter 2 at the prompt, you’ll be told that
The number you entered + 1 = 12
Rather than adding the two numbers, the JavaScript interpreter concatenated them. This is because the prompt()
function actually returns the value entered by the user as a string data type, even though the string contains number characters. The concatenation happens in this line:
var myCalc = 1 + userEnteredNumber;
In effect, it’s the same as if you’d written
var myCalc = 1 + "2";
If, however, you use the subtraction operator instead, as shown here:
var myCalc = 1 - userEnteredNumber;
userEnteredNumber is subtracted from 1. The subtraction operator isn’t applicable to string data, so JavaScript works out that you wanted the data to be treated as a number, converts the string to a number, and does the calculation. The same applies to the * and / operators. The typeof() operator returns the type of data that has been passed to it, so you can use that to see which data types the JavaScript interpreter is working with:
<html> <body>
<script type="text/javascript">
var userEnteredNumber = prompt( "Please enter a number","" ); document.write( typeof( userEnteredNumber ) );
</script> </body> </html>
This will write the string into the page. The way to ensure that the interpreter is using the desired number data type is to explicitly declare that the data is a number. There are three functions you can use to do this:
• Number(): Tries to convert the value of the variable inside the parentheses into a number.
• parseFloat(): Tries to convert the value to a floating point. It parses the string character by character from left to right, until it encounters a character that can’t be used in a number. It then stops at that point and evaluates this string as a number. If the first character can’t be used in a number, the result is NaN (which stands for Not a Number).
Let’s see how these functions work in practice:
<html> <body>
<script type="text/javascript">
var userEnteredNumber = prompt( "Please enter a number", "" ); document.write( typeof( userEnteredNumber ) );
document.write( "<br>" );
document.write( parseFloat( userEnteredNumber ) ); document.write( "<br>" );
document.write( parseInt( userEnteredNumber ) ); userEnteredNumber = Number( userEnteredNumber ) document.write( "<br>" );
document.write( userEnteredNumber ); document.write( "<br>" );
document.write( typeof( userEnteredNumber ) ); </script>
</body> </html>
Try entering the value 23.50. You should get this output:
string 23.5 23 23.5 number
The data entered is read as a string in the first line. Then parseFloat() converts 23.50 from a string to a floating point number, and in the next line, parseInt() strips out the fractional part (without rounding up or down). The variable is then converted to a number using the Number() function and stored in the userEnteredNumber variable itself (overwriting the string held there). On the final line, you see that userEnteredNumber’s data type is indeed number.
Try entering 23.50abc at the user prompt:
string 23.5 23 NaN number
If you try entering abc, you’ll just get
string NaN NaN NaN number
None of the functions can find a valid number, and so they all return NaN, which you can see is a number data type, but not a valid number. This is a good way of checking user input for validity, and you’ll use it to do exactly that later on.
So let’s get back to the problem we started with: using prompt() to retrieve a number. All you need to do is tell the interpreter the data entered by the user should be converted to a number data type, using one of the functions discussed with the prompt()function:
<html> <body>
<script type="text/javascript">
var userEnteredNumber = Number( prompt( "Please entera number", "" ) ); var myCalc = 1 + userEnteredNumber;
var myResponse = "The number you entered + 1 = " + myCalc; document.write( myResponse );
</script> </body> </html>
This will not throw any error, but it does not help the visitor much, because the meaning of NaN is not common knowledge. Later on, you will deal with conditions, and you’ll see how you could prevent an output that does not make much sense to the non-JavaScript-savvy user.
And that’s all you need to know about primitive data types and variables for now. Primitive data types, as you have seen, simply hold a value. However, JavaScript can also deal with complex data, and it does this using composite data types.
The Composite Data Types: Array and Object
Composite data types are different from simple data types, because they can hold more than one value. There are two composite data types:
• Object: Contains a reference to any object, including the objects that the browser makes available
• Array: Contains one or more of other data types
Objects JavaScript Supplies You with: String, Date, and Math
This is not a complete list of built-in objects, but you will start to get a feel for how objects work by looking at the following ones:
• String object: Stores a string, and provides properties and methods for working with strings
• Date object: Stores a date, and provides methods for working with it
• Math object: Doesn’t store data, but provides properties and methods for manipulating mathematical data
Let’s start with the String object.
The
String
Object
Earlier, you created string primitives by giving them some characters to hold, like this:
var myPrimitiveString = "ABC123";
A String object does things slightly differently, not only allowing you to store characters, but also providing a way to manipulate and change those characters. You can create String objects explicitly or implicitly.
Creating a
String
Object
Let’s work with the implicit method first: we’ll begin by declaring a new variable and assigning it a new string primitive to initialize it. Try that now using typeof() to make sure that the data in the variable myStringPrimitive is a string primitive:
<html> <body>
<script type="text/javascript"> var myStringPrimitive= "abc";
document.write( typeof( myStringPrimitive ) ); </script>
</body> </html>
You can still use the String object’s methods on it, though. JavaScript will simply convert the string primitive to a temporary String object, use the method on it, and then change the data type back to string. You can try that out using the length property of the String object:
<html> <body>
<script type="text/javascript"> var myStringPrimitive= "abc";
document.write( typeof( myStringPrimitive ) ); document.write( "<br>" );
document.write( myStringPrimitive.length ); document.write( "<br>" );
document.write( typeof( myStringPrimitive ) ); </script>
This is what you should see in the browser window:
string 3 String
So myStringPrimitive is still holding a string primitive after the temporary conversion. You can also create
String objects explicitly, using the new keyword together with the String() constructor:
<html> <body>
<script type="text/javascript">
var myStringObject = new String( "abc" ); document.write( typeof( myStringObject ) ); document.write( "<br>" );
document.write( myStringObject.length ); document.write( "<br>" );
document.write( typeof( myStringObject ) ); </script>
</body> </html>
Loading this page displays the following:
object 3 object
The only difference between this script and the previous one is in the first line, where you create the new object and supply some characters for the String object to store:
var myStringObject = new String( "abc" );
The result of checking the length property is the same whether you create the String object implicitly or explicitly. The only real difference between creating String objects explicitly or implicitly is that creating them explicitly is marginally more efficient if you’re going to be using the same String object again and again. Explicitly creating String objects also helps prevent the JavaScript interpreter getting confused between numbers and strings, as it can do.
Using the
String
Object’s Methods
The String object has a lot of methods, so I’ll limit this discussion to two of them here, the indexOf() and
substring() methods.
Let’s do that next, using the prompt()method to obtain the user’s e-mail address and then check the input for the
@ symbol, returning the index of the symbol using indexOf():
<html> <body>
<script type="text/javascript">
var userEmail= prompt("Please enter your emailaddress ", "" ); document.write( userEmail.indexOf( "@" ) );
</script> </body> </html>
If the @ is not found, –1 is written to the page. As long as the character is there in the string somewhere, its position in the index—in other words, something greater than –1,will be returned.
The substring() method carves one string from another string, taking the indexes of the start and end positions of the substring as parameters. You can return everything from the first index to the end of the string by leaving off the second parameter.
So, to extract all the characters from the third character (at index 2) to the sixth character (index 5), you’d write
<html>
You should see llo written out to the browser. Note that the substring() method copies the substring that it returns, and it doesn’t alter the original string.
The substring() method really comes into its own when you’re working with unknown values. Here’s another example that uses both the indexOf() and substring() methods:
<html> <body>
<script type="text/javascript">
var characterName = "my name is Simpson, Homer";
var firstNameIndex = characterName.indexOf( "Simpson," ) + 9; var firstName = characterName.substring( firstNameIndex ); document.write( firstName );
</script> </body> </html>
You’re extracting Homer from the string in the variable characterName, using indexOf() to find the start of the last name and adding 9 to it to get the index of the start of the first name (because "Simpson, " is 9 characters long), and storing it in firstNameIndex. This is used by the substring() method to extract everything from the start of the first name—you haven’t specified the final index, so the rest of the characters in the string will be returned.
The
Date
Object
JavaScript doesn’t have a primitive date data type, so you can create Date objects only explicitly. You create new Date
objects the same way as you create String objects, using the new keyword together with the Date() constructor. This line creates a Date object containing the current date and time:
var todaysDate = new Date();
To create a Date object that stores a specific date or time, you simply put the date, or date and time, inside the parentheses:
var newMillennium = new Date( "1 Jan 2000 10:24:00" );
Different countries describe dates in a different order. For example, in the US dates are specified in MM/DD/YY, while in Europe they are DD/MM/YY, and in China they are YY/MM/DD. If you specify the month using the
abbreviated name, then you can use any order:
var someDate = new Date( "10 Jan 2013" ); var someDate = new Date( "Jan 10 2013" ); var someDate = new Date( "2013 10 Jan" );
In fact, the Date object can take a number of parameters:
var someDate = new Date( aYear, aMonth, aDate, anHour, aMinute, aSecond, aMillisecond )
To use these parameters, you first need to specify year and month, and then use the parameters you want— although you do have to run through them in order and can’t select among them. For example, you can specify year, month, date, and hour:
var someDate = new Date( 2013, 9, 22, 17 );
You can’t specify year, month, and then hours, though:
var someDate = new Date( 2013, 9, , 17 );
Note
■
Although you usually think of month 9 as September, JavaScript starts counting months from 0 (January), so
September is represented as month 8.
Using the
Date
Object
Let’s look at an example that demonstrates some of the methods:
document.write( "Minutes = " + someDate.getMinutes() + "<br>" ); document.write( "Year = " + someDate.getFullYear() + "<br>" ); document.write( "Month = " + someDate.getMonth() + "<br>" ); document.write( "Date = " + someDate.getDate() + "<br>" ); // Set the minutes to 34
someDate.setMinutes( 34 );
document.write( "Minutes = " + someDate.getMinutes() + "<br>" ); // Reset the date
someDate.setDate( 32 );
document.write( "Date = " + someDate.getDate() + "<br>" ); document.write( "Month = " + someDate.getMonth() + "<br>" ); </script>
</body> </html>
Here’s what you should get:
Minutes = 59
This line of code might look a bit counterintuitive at first:
someDate.setDate( 32 );
JavaScript knows that there aren’t 32 days in January, so instead of trying to set the date to the January 32, the interpreter counts 32 days beginning with January 1, which gives us February 1.
This can be a handy feature if you need to add days onto a date. Usually, you’d have to take into account the number of days in the different months, and whether it’s a leap year, if you wanted to add a number of days to a date, but it’s much easier to use JavaScript’s understanding of dates instead:
<html> <body>
<script type="text/javascript">
// Ask the user to enter a date string
var originalDate = prompt("Enter a date (Day, Name of the Month, Year"), "31 Dec 2013" ); // Overwrite the originalDate variable with a new Date
var originalDate = new Date( originalDate ); // Ask the user to enter the number of days to be // added, and convert to number
var addDays = Number( prompt( "Enter number of daysto be added", "1" ) ) // Set a new value for originalDate of originalDate
// plus the days to be added
originalDate.setDate( originalDate.getDate( ) + addDays ) // Write out the date held by the originalDate
// object using the toString( ) method document.write( originalDate.toString( ) ) </script>
</body> </html>
If you enter 31 Dec 2013 when prompted, and 1 for the number of days to be added, the answer you’ll get is
Thu Jan 1 00:00:00 UTC 2014.
Note
■
Notice that you’re using the
Number()method of the
Mathobject on the third line of the script. The program
will still run if you don’t, but the result won’t be the same. If you don’t want to use the method, there is a trick to
convert different data types: if you subtract
0from a string that could be converted to a number using
parseInt(),
parseFloat()
, or
Number(), you convert it to a number, and if you add an empty string,
"", to a number, you convert it to
a string, something you normally do with
toString().
On the fourth line, you set the date to the current day of the month, which is the value returned by
originalDate.getDate() plus the number of days to be added; then comes the calculation, and the final line outputs the date contained in the Date object as a string using the toString() method. In addition, toDateString() produces a nicely formatted string using the date alone. You can use the same methods for get and set if you’re working with UTC time—all you need to do is add UTC to the method name. So getHours() becomes getUTCHours(), setMonth()
becomes setUTCMonth(), and so on. You can also use the getTimezoneOffset() method to return the difference, in hours, between the computer’s local time and UTC time. (You’ll have to rely on users having set their time zones correctly and be aware of the differences in daylight saving time between different countries.)
Note
■
For crucial date manipulation, JavaScript might not be the correct technology, becauseyou cannot trust the
client computer to be properly set up. You could, however, populate the initial date of your JavaScript via a server-side
language and go from there.
The
Math
Object
The Math object provides you with lots of mathematical functionality, like finding the square of a number or producing a random number. The Math object is different from the Date and String objects in two ways:
You can’t create a
• Math object explicitly, you just go ahead and use it. The
You call the methods of the Math object using the following format:
Math.methodOfMathObject( aNumber ): alert( "The value of pi is " + Math.PI );
We’ll look at a few of the commonly used methods next. (You can find a complete reference by running a search at https://developer.mozilla.org/en-US/docs/Web_Development.) We’ll look at the methods for rounding numbers and generating random numbers here.
Rounding Numbers
You saw earlier that the parseInt() function will make a fractional number whole by removing everything after the decimal point (so 24.999 becomes 24). Pretty often, you’ll want more mathematically accurate calculations—if you’re working with financial calculations, for example—and for these, you can use one of the Math object’s three rounding functions: round(), ceil(), and floor(). This is how they work:
• round(): Rounds a number up when the decimal is . 5 or greater
• ceil()(as in ceiling): Always rounds up, so 23.75 becomes 24, as does 23.25
• floor(): Always rounds down, so 23.75 becomes 23, as does 23.25
Here they are at work in a simple example:
<html> <body>
<script type="text/javascript">
var numberToRound = prompt( "Please enter a number", "" ) document.write( "round( ) = " + Math.round( numberToRound ) ); document.write( "<br>" );
document.write( "floor( ) = " + Math.floor( numberToRound ) ); document.write( "<br>" );
document.write( "ceil( ) = " + Math.ceil( numberToRound ) ); </script>
</body> </html>
Even though you used prompt() to obtain a value from the user, which as you saw earlier returns a string, the number returned is still treated as a number. This is because the rounding methods do the conversion for you as long as the string contains something that can be converted to a number.
If you enter 23.75, you get the following result:
round() = 24 floor() = 23 ceil() = 24
If you enter –23.75, you get