Swing Hacks
By Chris Adamson, Joshua Marinacci
... Publisher: O'Reilly
Pub Date: June 2005 ISBN: 0-596-00907-0 Pages: 542
Table of Contents | Index
Swing Hacks helps Java developers move beyond the basics of Swing, the graphical user interface (GUI) standard since Java 2. If you're a Java developer looking to build
enterprise applications with a first-class look and feel, Swing is definitely one skill you need to master. This latest title from O'Reilly is a reference to the cool stuff in Swing. It's about the interesting things you learn over the years--creative, original, even weird hacks--the things that make you say, "I didn't know you could even do that with Swing!"
Swing Hacks will show you how to extend Swing's rich component set in advanced and sometimes non-obvious ways. The book touches upon the entire Swing gamut-tables, trees, sliders, spinners, progress bars, internal frames, and text components. Detail is also provided on JTable/JTree, threaded component models, and translucent windows. You'll learn how to filter lists, power-up trees and tables, and add drag-and-drop support.
Swing Hacks will show you how to do fun things that will directly enhance your own applications. Some are visual enhancements to make your software look better. Some are functional improvements to make your software do something it couldn't do before. Some are even just plain silly, in print only to prove it could be done. The book will also give you give you a small glimpse of the applications coming in the future. New technology is streaming into the Java community at a blistering rate, and it gives application developers a whole new set of blocks to play with.
Swing Hacks
By Chris Adamson, Joshua Marinacci
... Publisher: O'Reilly
Pub Date: June 2005 ISBN: 0-596-00907-0 Pages: 542
Table of Contents | Index
Credits
About the Authors
Contributors
Acknowledgments
Preface
Why Swing Hacks?
How to Use This Book
How This Book Is Organized
Conventions Used in This Book
Using Code Examples
How to Contact Us
Got a Hack?
Safari Enabled
Chapter 1. Basic JComponents
Section 1.1. Hacks 112: Introduction
Hack 1. Create Image-Themed Components
Hack 2. Don't Settle for Boring Text Labels
Hack 3. Fill Your Borders with Pretty Pictures
Hack 4. Display Dates in a Custom Calendar
Hack 5. Add a Watermark to a Text Component
Hack 6. Watermark Your Scroll Panes
Hack 7. Put a NASA Photo into the Background of a Text Area
Hack 8. Animate Transitions Between Tabs
Hack 9. Blur Disabled Components
Hack 11. Create Menus with Drop Shadows
Hack 12. Add Translucence to Menus
Chapter 2. Lists and Combos
Section 2.1. Hacks 1320: Introduction
Hack 13. Filter JLists
Hack 14. Add a Filter History
Hack 15. Make JLists Checkable
Hack 16. Make Different List Items Look Different
Hack 17. Reorder a JList with Drag-and-Drop
Hack 18. Animate Your JList Selections
Hack 19. Turn Methods into List Renderers
Hack 20. Create a Collections-Aware JComboBox
Chapter 3. Tables and Trees
Section 3.1. Hacks 2127: Introduction
Hack 21. Size Your Columns to Suit Your JTable's Contents
Hack 22. Add Column Selection to JTables
Hack 23. Let Your JTables Do the Sorting
Hack 24. Create a JDBC Table Model
Hack 25. Export Table Data to an Excel Spreadsheet
Hack 26. Search Through JTables Easily
Hack 27. Animate JTree Drops
Chapter 4. File Choosers
Section 4.1. Hacks 2832: Introduction
Hack 28. Add a Right-Click Context Menu to the JFileChooser
Hack 29. Display Shortcuts in the JFileChooser
Hack 30. Real Windows Shortcut Support
Hack 31. Add Image Preview to File Choosers
Hack 32. Preview ZIP and JAR Files
Chapter 5. Windows, Dialogs, and Frames
Section 5.1. Hacks 3340: Introduction
Hack 33. Window Snapping
Hack 34. Make a Draggable Window
Hack 35. Add Windows Resize Icons
Hack 36. Add Status Bars to Windows
Hack 37. Save Window Settings
Hack 38. Earthquake Dialog
Hack 39. Spin Open a Detail Pane
Hack 40. Minimize to a Mini-Frame
Section 6.1. Hacks 4147: Introduction
Hack 41. Transparent Windows
Hack 42. Make Your Frame Dissolve
Hack 43. Create Custom Tool Tips
Hack 44. Turn Dialogs into Frame-Anchored Sheets
Hack 45. Animating a Sheet Dialog
Hack 46. Slide Notes Out from the Taskbar
Hack 47. Indefinite Progress Indicator
Chapter 7. Text
Section 7.1. Hacks 4855: Introduction
Hack 48. Make Text Components Searchable
Hack 49. Force Text Input into Specific Formats
Hack 50. Auto-Completing Text Fields
Hack 51. Write Backward Text
Hack 52. Use HTML and CSS in Text Components
Hack 53. Use Global Anti-Aliased Fonts
Hack 54. Anti-Aliased Text Without Code
Hack 55. Anti-Aliased Text with a Custom Look and Feel
Chapter 8. Rendering
Section 8.1. Hacks 5664: Introduction
Hack 56. Create a Magnifying Glass Component
Hack 57. Create a Global Right-Click
Hack 58. Block a Window Without a Modal Dialog
Hack 59. Create a Color Eyedropper
Hack 60. Changing Fonts Throughout Your Application
Hack 61. Load New Fonts at Runtime
Hack 62. Build a Colorful Vector-Based Button
Hack 63. Add a Third Dimension to Swing
Hack 64. Turn the Spotlight on Swing
Chapter 9. Drag-and-Drop
Section 9.1. Hacks 6569: Introduction
Hack 65. Drag-and-Drop with Files
Hack 66. Handle Dropped URLs
Hack 67. Handle Dropped Images
Hack 68. Handling Dropped Picts on Mac OS X
Hack 69. Translucent Drag-and-Drop
Chapter 10. Audio
Section 10.1. Hacks 7078: Introduction
Hack 71. Play a Sound with JavaSound
Hack 72. Play a Sound with Java Media Framework
Hack 73. Play a Sound with QuickTime for Java
Hack 74. Add MP3 Support to JMF
Hack 75. Build an Audio Waveform Display
Hack 76. Play Non-Trivial Audio
Hack 77. Show Audio Information While Playing SoundHack
Hack 78. Provide Audio Controls During Playback
Chapter 11. Native Integration and Packaging
Section 11.1. Hacks 7987: Introduction
Hack 79. Launch External Programs on Windows
Hack 80. Open Files, Directories, and URLs on Mac OS X
Hack 81. Make Mac Applications Behave Normally
Hack 82. Control iTunes on Mac OS X
Hack 83. Control iTunes Under Windows
Hack 84. Construct Single-Launch Applications
Hack 85. Stuff Stuff in JARs
Hack 86. Make Quick Look and Feel Changes
Hack 87. Create an Inverse Black-and-White Theme
Chapter 12. Miscellany
Section 12.1. Hacks 88100: Introduction
Hack 88. Display a Busy Cursor
Hack 89. Fun with Keyboard Lights
Hack 90. Create Demonstrations with the Robot Class
Hack 91. Check Your Mail with Swing
Hack 92. Don't Block the GUI
Hack 93. Code Models That Don't Block
Hack 94. Fire Events and Stay Bug Free
Hack 95. Debug Your GUI
Hack 96. Debug Components with a Custom Glass Pane
Hack 97. Mirror an Application
Hack 98. Add Velocity for Dynamic HTML
Hack 99. Get Large File Icons
Hack 100. Make Frames Resize Dynamically
Colophon
Credits
About the Authors
Contributors
About the Authors
Joshua Marinacci started playing with Java in the summer of '95 at the request of his favorite TA and has never looked back. Since then he has built all manner of Java software for clients ranging from large Fortune 500 companies to small Internet startups. He quickly discovered his passion for user interfaces and client software, building a reputation in the desktop Java world and finally joining the Swing Team at Sun in the spring of 2005. In his spare time, Joshua writes articles and weblogs for Java.net while contributing to the JDIC, JDNC, and WinLAF open source projects. He also heads up Flying Saucer, an open
source, all-Java XHTML renderer. This is his first book, but hopefully not his last. He lives in historic East Atlanta with his girlfriend Kim and their yellow labrador Eliza.
Chris Adamson is the Editor of O'Reilly's ONJava site and the Associate Online Editor for Java.net, a collaboration of O'Reilly, Sun Microsystems, and CollabNet. He also writes about Java and Mac topics online and speaks at conferences such as ADHOC/MacHack and the O'Reilly Mac OS X Conference. He develops media applications under the guise of his consulting company, Subsequently & Furthermore, Inc. He has an M.A. in Telecommunications from Michigan State University and a B.A. in English and B.S. in Symbolic Systems from Stanford
Contributors
Swing is big enough that surely everyone who works with it takes away some new ideas for how to hack it. Our contributors helped flesh this book out with hacks that blew us away and that we're sure you'll like, too.
Romain Guy is a French student currently working as an intern with the Swing Team at Sun Microsystems in
California. He discovered Java in 1998 and contributed to the Open Source/Free Software community with Jext, a Java source code editor he developed over five years. He is also a freelance journalist for Login:, a French computing magazine. Never short for ideas, he also wrote for
Javalobby, the Java developer's journal, and a couple of French magazines. Romain seeks for other experiences whenever he can: he works as a translator for O'Reilly France, he taught Java in a French university, he fulfilled several missions as a freelance Java developer, and he even worked as a video game programmer. Today, Romain
focuses on UI design and humane interaction. He shares his work on his weblog: www.jroller.com/page/gfx.
Jonathan Simon is a comprehensive client-side expert, designing and developing mission-critical financial trading clients for Wall Street investment banks. This requires a fluid combination of business and task analysis and
interaction design with the intricacies of Java rich-client development to create content rich, ergonomic trading applications. He has written extensively about his
Acknowledgments
Joshua
This book has gone faster that I ever imagined, from original concept to final draft in less than a year. Writing Swing Hacks
was harder than I ever thought, giving me great respect for those who write complete novels. I have had the utmost fun, however, and wouldn't trade the experience for the world.
I would first like to thank Kimi, my loving partner who
convinced me to pursue writing as a serious endeavor. She has always believed that I could be more than just a contract coder. I couldn't have done it without you, Sweetie.
Many thanks to my family and friends who always said that I was never living up to my potential. Thank you for raising, loving, and teaching me. I promise to live up to my potential now, starting next week.
Thanks to the great team at O'Reilly, especially Brett, who
tirelessly read through my drafts, dotted the ts, crossed the is, and made my prose readable.
Thanks go out to the readers of Java.net and Daniel Steinberg, my Java.net editor, who have always provided encouragement, feedback, and constructive criticism. Without the Java
community's ecology of code and fresh ideas, this book wouldn't have been possible.
Special thanks to Jonathan and Romain who gave us the boost we needed to get the book finished. They've put in some great stuff. I've even learned a few things.
this was a great idea for a book. He guided me through the proposal process, shaped our draft, and always kept the book on track. Maybe we can finally get that Okama GameSphere.
And, finally, my unending thanks to all of the Swing Team developers who put in 10 years of blood and sweat, making Swing the powerful toolkit it is today. I hope we can keep pushing it forward.
Chris
Credit for this book needs to begin with JoshuaI'm still tempted to type "Joshy" because that's his username everywherewho started this book as an informal series on his popular Java.net weblog and had the wherewithal to push through a book
proposal.
Also, all the really cool hacks are his. But I think that's what everyone involved with this book has been saying when they read what the others have contributed.
And speaking of them, thanks also to our contributors, Romain and Jonathan, who came in at just the right time to get this book over the hump and make it real. Their inventiveness and responsiveness helped us pull through.
Thanks to Brett McLaughlin, who was on the receiving end of a pretty wild brain-dump, with two authors and two contributors going on wildly different tangents. He helped shape this book into something readable and fun.
Lots of other people in O'Reilly production will handle this book after I finish writing this acknowledgment, and I thank them in advance for everything they do.
fort at home while daddy was in the office working on this book. Quinn also contributed, sleeping on my lap while I banged out parts of Chapters 10 and 11.
Obligatory O'Reilly tune check: this time it was Delgados, The Tubes, Green Day, L'Arc~en~Ciel, David Bowie, Frank Zappa, Puffy AmiYumi, Little Feat, the Gundam Wing Endless Waltz
Preface
Hi, welcome to Swing Hacks! This book is a reference, but not a complete reference of the Swing API. We already have that. It's called Java Swing, is published by O'Reilly, and weighs in at over 1,200 pages. It's available for purchase at fine bookstores and Russian black market web sites everywhere. We're not saying that it isn't a great book. It's fantastic! We've owned many weathered copies over the years. The problem is…it's huge! This isn't really the book's fault: Swing itself is huge. I once saw an API diagram that took an entire 30-inch poster. Swing is powerful, but it takes a long time to explore fully, simply because it is so big. That's not what this book is about.
This book is a reference to the cool stuff. It's about the
interesting things you learn over the years. The weird hacks that make you say, "I didn't know you could even do that!" After years of working with Swing, you start to learn what the API is good at and what it lacks. Some days you learn
something that makes your life as a developer easier, a way to do something quicker than the standard route. That's what we put into this book. Some days you learn a workaround for a long-standing bug or a missing feature that you've been dying to have. We put that stuff in the book, too. Sometimes it's something funan interesting API that makes us think, "Well, if we were evil what could we do with it?" This is usually followed by the pinkie up to the mouth and cackling that can be heard outside our underground lair. After much consultation with
Why Swing Hacks?
The term hacking has a bad reputation in the press. They use it to refer to people who break into systems or wreak havoc with computers as their weapon. Among people who write code, though, the term hack refers to a quick-and-dirty solution to a problem, or a clever way to get something done. And the term
hacker is taken very much as a compliment, referring to
someone as being creative, having the technical chops to get things done. The Hacks series is an attempt to reclaim the word, document the good ways people are hacking, and pass the hacker ethic of creative participation on to the uninitiated. Seeing how others approach systems and problems is often the quickest way to learn about a new technology.
In the short term, we hope this book will show you how to do fun things that will enhance your own applications directly. Some are visual enhancements to make your software look better. Some are functional improvements to make your
software do something it couldn't do before. Some are even just plain silly, in print only to prove it could be done. Whatever your interest, we hope you will find both better ways of doing old things and learn something new about techniques you never even thought of.
In the long term, we hope this book will give you a small glimpse of the applications coming in the future. This year (2005) we hope will be a watershed year for Java on the
desktop. Users are demanding more advanced user interfaces than the Web can provide, and Java is poised to provide them. New technology is streaming into the Java community at a blistering rate, and it gives application developers a whole new set of blocks to play with. This is important because we are going to need these new technologies.
Web, external devices, and software sitting right on your
How to Use This Book
You can read this book from cover to cover if you like, but each hack stands on its own, so feel free to browse and jump to the different sections that interest you most. If there's a
prerequisite you need to know about, a crossreference will
guide you to the right hack. The code all works (we tried it) but in case you can't get a hack to work, let us know at the book's web site: http://www.oreilly.com/catalog/swinghks. You can also download the book's code online, or contribute your own tips and tricks. If we collect enough new material, and this book sells more than 10 copies, then the publishers might let us
make Swing Hacks 2: The Endless Repaint.
With few exceptions, the hacks in this book were written for Java 2 Standard Edition (J2SE), version 1.4, which you can get from http://java.sun.com/j2se/. A few hacks depend on open source packages, which are freely downloadable from their
home pages, as described in the hack itself. The only exceptions are two hacks that use QuickTime for Javathis is freely available from Apple (and installed by default on Mac OS X), but it is
proprietary and available for Mac and Windows only.
Because this is a book about Swing, the program listings will be using the classes from the Swing and AWT packages, so we've skipped import javax. swing.* and import java.awt.* statements for
space. You can also assume that any listing involving event handling will import java.awt.event.* and probably import javax.swing.event.* as well. Java2D hacks implicitly import
java.awt.image.*. In short, we'll include import statements only
How This Book Is Organized
The book is divided into several chapters, organized by subject:
Chapter 1, Basic JComponents
Here you'll find simple hacks for the basic components like labels, buttons, and text fields. This chapter contains a lot of bang for the buck, and it illustrates some of the
techniques that we will explore more fully later on. From fancy JLabels to translucent menus, this is a great place to start.
Chapter 2, Lists and Combos
This chapter features complicated Swing components that are used everywhere. Bend them to your will! Make them look good with polymorphic renderers and animated
selections. Make them perform well with filtering and Collections support.
Chapter 3, Tables and Trees
This chapter revelas the secrets of these mystic
componentsfrom Excel exporting to proper JTree drop targets. Make the JTree and JTable dance.
One of Swing's most maligned components, the
JFileChooser, actually has a lot of power hiding inside some murky APIs. This chapter will let you use custom icons, detect Windows shortcuts, and even navigate ZIP files.
Chapter 5, Windows, Dialogs, and Frames
This is where the fun begins. Every application needs a container, so why not make it pretty and powerful? Make your windows drag and snap. Build custom windows like the earthquake login and spin open dialog. You can even save your window settings automatically with almost no code changes.
Chapter 6, Transparent and Animated Windows
If you went through the previous chapter and still want more, then this chapter is for you. We push windows to the limit with transparency, animations, slide-in OS X
stylesheets, and some of the coolest special effects you've ever seen.
Chapter 7, Text
Text components seem boring, but there's a lot of power hiding in there. This chapter will show you how to do regular expression searching, dot completion, backward text, and even three different ways to give your application the bright sheen of anti-aliasing.
This chapter has the meat of the graphics hacks. Custom fonts, a magnifying glass, vector buttons, and even some work with Java3D. We've got some great things to make your application pop.
Chapter 9, Drag-and-Drop
When your users want two pieces of software to work together the first thing they want to do is drag-and-drop data from their other programs to yours. This chapter covers how to do robust and attractive drag-and-drop entirely within Java.
Chapter 10, Audio
What would be a cool modern application without some media support? This chapter covers four different ways to play sound, how to display waveforms, and how to embed MP3 support in your own programs.
Chapter 11, Native Integration and Packaging
The best software works well with the native operating
system. Here you'll learn how to launch web browsers, hack the Windows registry, customize your program for specific platforms, and even control iTunes.
Chapter 12, Miscellany
This chapter offers a grab bag of things that didn't fit
Conventions Used in This Book
The following is a list of the typographical conventions used in this book:
Italics
Used to indicate URLs, filenames, filename extensions, and directory/ folder names. A path in the filesystem will appear as /Developer/Applications, for example.
Constant width
Used to show code examples, the contents of files, and console output, as well as the names of variables,
commands, and other code excerpts.
Constant width bold
Used to highlight portions of code, typically new additions to old code.
Constant width italic
Used in code examples and tables to show sample text to be replaced with your own values.
The second color is used to indicate a cross-reference within the text.
You should pay special attention to notes set apart from the text with the following icons:
This is a tip, suggestion, or general note. It contains useful supplementary information about the topic at hand.
This is a warning or note of caution, often indicating that your money or your privacy might be at risk.
The thermometer icons, found next to each hack, indicate the relative complexity of the hack:
Using Code Examples
This book is here to help you get your job done. In general, you may use the code in this book in your programs and
documentation. You do not need to contact us for permission unless you're reproducing a significant portion of the code. For example, writing a program that uses several chunks of code from this book does not require permission. Selling or
distributing a CD-ROM of examples from O'Reilly books does
require permission. Answering a question by citing this book and quoting example code does not require permission.
Incorporating a significant amount of example code from this book into your product's documentation does require
permission.
We appreciate, but do not require, attribution. An attribution usually includes the title, author, publisher, and ISBN. For example: "Swing Hacks by Joshua Marinacci and Chris
Adamson. Copyright 2005 O'Reilly Media, Inc., 0-596-00907-0."
If you feel your use of code examples falls outside fair use or the permission given above, feel free to contact us at
How to Contact Us
We have tested and verified the information in this book to the best of our ability, but you may find that features have changed (or even that we have made mistakes!). As a reader of this book, you can help us to improve future editions by sending us your feedback. Please let us know about any errors,
inaccuracies, bugs, misleading or confusing statements, and typos that you find anywhere in this book.
Please also let us know what we can do to make this book more useful to you. We take your comments seriously and will try to incorporate reasonable suggestions into future editions. You can write to us at:
O'Reilly Media, Inc.
1005 Gravenstein Highway North Sebastopol, CA 95472
(800) 998-9938 (in the U.S. or Canada) (707) 829-0515 (international/local) (707) 829-0104 (fax)
To ask technical questions or to comment on the book, send email to:
The web site for Swing Hacks lists examples, errata, and plans for future editions. You can find this page at:
http://www.oreilly.com/catalog/swinghks
For more information about this book and others, see the O'Reilly web site:
Got a Hack?
To explore Hacks books online or to contribute a hack for future titles, visit:
Safari Enabled
When you see a Safari® Enabled icon on the cover of your favorite technology book, that means the book is available online through the O'Reilly Network Safari Bookshelf.
Chapter 1. Basic JComponents
Section 1.1. Hacks 112: Introduction
Hack 1. Create Image-Themed Components
Hack 2. Don't Settle for Boring Text Labels
Hack 3. Fill Your Borders with Pretty Pictures
Hack 4. Display Dates in a Custom Calendar
Hack 5. Add a Watermark to a Text Component
Hack 6. Watermark Your Scroll Panes
Hack 7. Put a NASA Photo into the Background of a Text Area
Hack 8. Animate Transitions Between Tabs
Hack 9. Blur Disabled Components
Hack 10. Building a Drop-Down Menu Button
Hack 11. Create Menus with Drop Shadows
1.1. Hacks 112: Introduction
Swing is a powerful toolkit, filled to the brim with complicated components, extension APIs, and large Model-View-Controller (MVC) systems. It can be quite daunting. The current edition of O'Reilly's Java Swing book now stretches over 1,200 pages! Swing now extends from the simplest JButton to the full Look
and Feel API. I am still amazed at the power and flexibility of Swing, and quite aware of its complexity. Some of the more esoteric parts can take years to master. However, you don't need to go straight into the JTRee or Look and Feel APIs just to
do something cool. There are still a lot of fun things waiting in the standard components we don't always think about.
This chapter covers some of the basic components that every Swing developer uses: buttons, labels, menus, and the
Hack 1. Create Image-Themed Components
This hack shows how to use Swing's built-in image
support to create a completely custom image-based user interface.
Most Swing applications get their look from a Look and Feel (L&F)either a standard one provided by the VM or a custom one. L&Fs are a whole lot of work to build and still aren't
completely custom. You can redefine a button to look like red stoplights, but then all buttons throughout your application will look like red stoplights. Sometimes all you really want is a look built entirely out of images, much like image-based web
navigation.
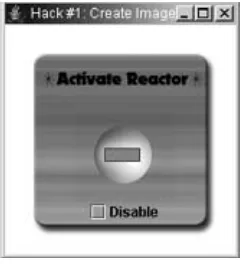
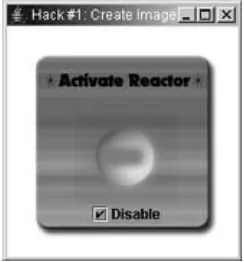
To give you an idea of where this hack is going, Figure 1-1
shows our target: a frame with a panel containing a label, a button, and a checkbox. The panel, label, and button will be completely drawn with images, using none of the standard L&F. The checkbox will be a standard checkbox, but it should be transparent to fit in with the image background.
The first step toward image nirvana is the background. Because this type of component is quite reusable, I built a subclass of
JPanel called ImagePanel, shown in Example 1-1.
Example 1-1. A Custom subclass of JPanel
public class ImagePanel extends JPanel { private Image img;
public ImagePanel(Image img) { this.img = img;
Dimension size = new Dimension(img.getWidth(null),
img.getHeight(null)); setSize(size);
setPreferredSize(size); setMinimumSize(size); setMaximumSize(size); setLayout(null);
}
}
The constructor takes the image to draw and saves it for later use in the img variable. Then it calls setSize( ) and
setPreferredSize() with the size of the image. This ensures that
the panel will be the size of the image exactly. I had to set the preferred, maximum, and minimum sizes as wellthis is because the panel's parent and children may not be using absolute
layouts.
components appropriately (which can be set by calling setLayout(null)).
In this case, the explicit size and position will be used (via
setSize( ) and setLocation( )). When a layout manager is set, the
preferred, minimum, and maximum sizes may be used. To cover all of the bases, simply set all four values to the image size.
Now that the panel is sized appropriately, you can paint the image by overriding paintComponent():
public void paintComponent(Graphics g) { g.drawImage(img,0,0,null);
}
It's important to override paintComponent( ) instead of paint( ), or else the
child components won't get drawn.
To test it, Example 1-2 uses an ImagePanel and the usual JFrame.
Example 1-2. Testing out image-based panels
public class ImageTest {
public static void main(String[] args) {
ImageIcon("images/background.png").getImage());
JFrame frame = new JFrame("Hack #1
frame.getContentPane().add(panel); frame.pack();
frame.setVisible(true);
} }
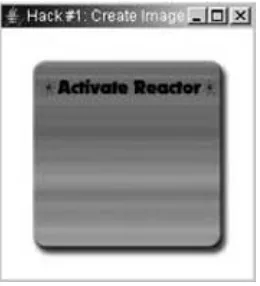
When run, the ImageTest program looks like Figure 1-2.
Now that the background is done, it's time to focus on the label, Activate Reactor. This is just a static image that sits at a certain position on the background. You could use another ImagePanel,
but since the Activate Reactor text is logically a JLabel, you can
just create an ImageLabel subclass, as shown in Example 1-3.
Figure 1-2. Background only
public class ImageLabel extends JLabel {
public ImageLabel(ImageIcon icon) {
setSize(icon.getImage().getWidth(null),
icon.getImage().getHeight(null)); setIcon(icon);
setIconTextGap(0); setBorder(null); setText(null); setOpaque(false); }
}
As with the ImagePanel, set the size of the label to match the size
of the image. The rest of the sizing isn't needed because the
JLabel will take care of that itself. Next, set the icon to your
image, which lets the JLabel take care of the image drawing.
Setting the icon text gap to zero and the border and text to null
will remove any extra space around my image, resulting in a perfect mesh with the background. The final setOpaque(false) tells
the label not to draw its own background. If your image fills the label then this won't matter, but if the image has transparent areas (as PNG files often do), then this will let the background shine through the transparent parts.
Add this code to ImageTest's main() method:
ImageLabel label = new ImageLabel(new ImageIcon("images/reactor.png")); label.setLocation(29,37);
panel.add(label);
Figure 1-3. A custom JLabel
Next comes the button. Because buttons have rollovers and states, they are a bit trickier. Again, start with a JButton
subclass, as in Example 1-4.
Example 1-4. Creating an image-based button
public class ImageButton extends JButton { public ImageButton(ImageIcon icon) {
setSize(icon.getImage().getWidth(null), icon.getImage().getHeight(null)); setIcon(icon);
setMargin(new Insets(0,0,0,0)); setIconTextGap(0);
setBorderPainted(false); setBorder(null);
setText(null);
The code is almost the same as JLabel. The only difference is the
addition of the setMargin() and setBorder() calls. Most Look and
Feels use a border and margin to indicate when the button has been selected. Labels aren't selectable so they don't have those methods. In any case, these are two more properties you can simply turn off.
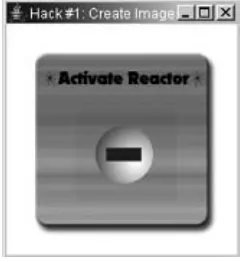
Add this code to ImageTest's main() method:
final ImageButton button = new ImageButton("images/button.png"); button.setLocation(60,74);
panel.add(button);
The result is shown in Figure 1-4.
Figure 1-4. Image button
Now that the button is visible, you only have to add the
rollovers and other states. Fortunately, this doesn't require any new coding in the subclassJButton already provides support for
button.setPressedIcon(new ImageIcon("images/button-down.png")); button.setRolloverIcon(new ImageIcon("images/button-over.png")); button.setSelectedIcon(new ImageIcon("images/button-sel.png"));
button.setRolloverSelectedIcon(new ImageIcon("images/button-sel-over.png")); button.setDisabledIcon(new ImageIcon("images/button-disabled.png"));
button.setDisabledSelectedIcon(
new ImageIcon("images/button-disabled-selected.png"));
Figures 1-5 and 1-6 are the images I used to represent each
state. The rollover effect is done with an outer glow, and I used a blur for the disabled state. The red rectangle in the middle represents the selected state, and it includes its own color change and red glow mimicking a real glowing lightbulb.
Figure 1-5. Unselected button with rollover
On Image Creation
I created these images by drawing everything in a separate layer in Photoshop. Keeping it all separate means I could save any section of the image as it's own file, with or without effects and backgrounds. Photoshop has a great feature called slices that lets you divide the image up into malleable sections.
Photoshop's companion program, ImageReady, takes slices a step further by managing slice states for you. This lets you create rollovers, in and out images, and disabled states. When you Save Optimized, ImageReady automatically saves each slice state to a different file with the appropriate name (e.g.,
buttondisabled-selected.png). Slices were originally created for web design, but they can be put to great use in Swing applications as well.
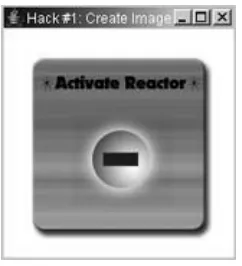
To fully demonstrate all of the states, I have added a standard
JCheckBox. Normally, it would draw a gray background (or striped
on the Mac) but a simple setOpaque(false) fixes that. The call to checkbox.setSize(checkbox. getPreferredSize( )) is needed to make
the checkbox size itself properly when there is no layout manager in the parent, which is the case for this panel:
final JCheckBox checkbox = new JCheckBox("Disable"); checkbox.setLocation(70,150);
checkbox.setOpaque(false);
checkbox.setSize(checkbox.getPreferredSize()); panel.add(checkbox);
checkbox.addActionListener(new ActionListener() {
public void actionPerformed(ActionEvent evt) {
button.setEnabled(!checkbox.isSelected()); }
});
With the addition of this code to ImageTest's main() method, the
what the running program looks like in the selected but disabled state.
Hack 2. Don't Settle for Boring Text Labels
JLabel is a Swing staple; but it's easy to spruce up boring labels with drop shadows, outlines, and even 3D text.
When you want to draw non-editable text, Swing provides only the JLabel. You can change the font, size, color, and even add an
icon. By using HTML in your components [Hack #52], you can even add things like underline and bullets. This is fine for most jobs, but sometimes you need more. What if you want a drop shadow or an embossed effect? The JLabel is simply inadequate
for richer interfaces. Fortunately, the Swing Team made it very easy to extend the JLabel and add these features yourself.
A great many text effects can be achieved with two simple features. First, you can draw text multiple times, with each iteration slightly offset or in a different color, to create effects like drop shadows and embossing. Second, you can adjust the spacing between letters in a word (a feature known as tracking
in text-processing circles). Tracking is always specified in addition to the default tracking specified by a font. Thus, a
tracking of +1 would be drawn as one extra pixel between each letter. A tracking of 0 would have the same spacing as no extra tracking at all.
To implement all of this, you must override both the sizing and the painting code in JLabel, which of course calls for a subclass;
see Example 1-5 for details.
Example 1-5. Defining a richer JLabel
private int tracking;
public RichJLabel(String text, int tracking) { super(text);
this.tracking = tracking; }
private int left_x, left_y, right_x, right_y; private Color left_color, right_color;
public void setLeftShadow(int x, int y, Color color) { left_x = x;
left_y = y;
left_color = color; }
public void setRightShadow(int x, int y, Color color) { right_x = x;
right_y = y;
right_color = color; }
RichJLabel extends the standard javax.swing.JLabel and adds a
tracking argument to the constructor. Next, it adds two methods for the right and left shadow. These are called shadows because they will be drawn below the main text, but whether they
actually look like shadows depends on the color, as well as the x- and y-offsets passed into each method.
With the boilerplate out of the way, you need to handle sizing issues. The JLabel automatically tells layout managers its
Every Swing component returns its desired size using the
getPreferredSize() method. By adjusting the returned size to be a
bit bigger, layout controls using this component will give the label the extra room it needs:
public Dimension getPreferredSize() { String text = getText();
FontMetrics fm = this.getFontMetrics(getFont());
int w = fm.stringWidth(text); w += (text.length()-1)*tracking; w += left_x + right_x;
int h = fm.getHeight();
h += left_y + right_y;
return new Dimension(w,h); }
This implementation of getPreferredSize() calculates the size
based on the font metrics of the currently set text. The
FontMetrics object contains methods to get the width and height
of the font for the current text. Because the tracking variable adds to the existing tracking of the font, you can expand the width by adding a tracking width between each letterone per letter, except the last letter. The line w += (text.length(
)-1)*tracking does just that. The shadows will be drawn the same
size as the base text, but they will be offset by the left_x and right_x values, so you need to add those in as well. Tracking
only affects the horizontal space between letters, so height can be calculated normally via the fontmetrics.getHeight() method.
With the sizing handled, the only thing left is actually drawing the text on screen. As with all Swing components, override the
paintComponent() method (and not paint()) so that the child
components will be handled properly.
Here's the first bit of the paintComponent() method:
public void paintComponent(Graphics g) { ((Graphics2D)g).setRenderingHint(
RenderingHints.KEY_TEXT_ANTIALIASING, RenderingHints.VALUE_TEXT_ANTIALIAS_ON); char[] chars = getText().toCharArray();
FontMetrics fm = this.getFontMetrics(getFont());
int h = fm.getAscent(); int x = 0;
First, paintComponent() turns on the graphics object's anti-aliasing
hint. Because the RichJLabel class will typically be used for large
font sizes that need to be attractive, it's probably a safe bet that the developer wants smooth text.
Next, the method grabs the font and line metrics for the current text in the current font. The graphics object always draws text from the bottom of the letter, rather than from the top, as you would expect with a rectangle or line.
**pg#11*To account for this, you need to know how far down a letter goes (its ascent), which is retrieved from fm.getAscent().
stop at the baseline but some, like lowercase ys and gs extend further down. The ascent only includes the part of the letters above the baseline, which is what you want.
After setting up the variables, you can start drawing each letter (this code is still in the paintComponent() method):
for(int i=0; i<chars.length; i++) { char ch = chars[i];
int w = fm.charWidth(ch) + tracking;
g.setColor(left_color);
g.drawString(""+chars[i],x-left_x,h-left_y);
g.setColor(right_color);
g.drawString(""+chars[i],x+right_x,h+right_y);
g.setColor(getForeground()); g.drawString(""+chars[i],x,h);
x+=w; }
((Graphics2D)g).setRenderingHint(
RenderingHints.KEY_TEXT_ANTIALIASING,
RenderingHints.VALUE_TEXT_ANTIALIAS_DEFAULT);
} // end paintComponent()
to the next letter. The rendering hint line at the bottom returns the graphics object to its original anti-aliasing state.
With the class completed, it's time to try some effects. This code will draw large (140 pt) text in gray with a black drop shadow and a slight, white highlight:
public static void main(String[] args) {
RichJLabel label = new RichJLabel("76", -40); // drop shadow w/ highlight
label.setLeftShadow(1,1,Color.white); label.setRightShadow(2,3,Color.black); label.setForeground(Color.gray);
label.setFont(label.getFont().deriveFont(14of));
JFrame frame = new JFrame("RichJLabel hack"); frame.getContentPane().add(label);
frame.pack();
frame.setVisible(true); }
Figure 1-8 shows what the code looks like running.
If you change the shadows to be only one pixel offset from their normal position and to share the same color, then you can
create a subtle outline effect. Setting the tracking to -30 pulls
the letters close enough to overlap for a nice logo effect (as seen in Figure 1-9):
RichJLabel label = new RichJLabel("76", -30);
// subtle outline
label.setLeftShadow(1,1,Color.white); label.setRightShadow(1,1,Color.white); label.setForeground(Color.blue);
label.setFont(label.getFont().deriveFont(140f));
Figure 1-9. Outlined text
The shadow offsets let you effectively rearrange the letters to create a faded 3D effect (shown in Figure 1-10):
// 3d letters
label.setLeftShadow(5,5,Color.white);
label.setRightShadow(-3,-3, new Color(0xccccff)); label.setForeground(new Color(0x8888ff));
Figure 1-10. 3D faded letters
You could expand on this hack by combining it with images and nice gradients like the Christmas Countdown counter in Figure 1-11. Simple graphical effects like the ones shown in the
RichJLabel are easy to create with Swing thanks to the power of
Java2D, and they can really make your interfaces pop.
Hack 3. Fill Your Borders with Pretty Pictures
Swing comes with a set of customizable borders, but sometimes you want more than they provide. This hack shows how to create a completely imagebased border that can be resized.
Swing has a prefabricated border, called the MatteBorder, which
can accept an image in its constructor. For simple tiled
backgrounds, such as a checkerboard pattern, this works fine. However, if you want to have particular images in each corner, creating a fully resizable image border, then you'll need
something more powerful. Fortunately, Swing makes it very easy to create custom border classes. The image border in this hack will produce a border that looks like Figure 1-12.
Figure 1-12. An image-based border
The first step to any custom border is to subclass AbstractBorder
and implement the paintBorder() method. The class will take
eight images in the constructor, one for each corner and each side; all the code is shown in Example 1-6.
public class ImageBorder extends AbstractBorder {
Image top_center, top_left, top_right; Image left_center, right_center;
Image bottom_center, bottom_left, bottom_right; Insets insets;
public ImageBorder(Image top_left, Image top_center, Image top_right, Image left_center, Image right_center,
Image bottom_left, Image bottom_center, Image bottom_right) {
this.top_left = top_left;
this.top_center = top_center; this.top_right = top_right;
this.left_center = left_center; this.right_center = right_center; this.bottom_left = bottom_left;
this.bottom_center = bottom_center; this.bottom_right = bottom_right; }
public void setInsets(Insets insets) {
this.insets = insets; }
public Insets getBorderInsets(Component c) { if(insets != null) {
return insets; } else {
return new Insets(top_center.getHeight(null), left_center.getWidth(null),
bottom_center.getHeight(null), right_center.getWidth(null)); }
The two methods after the constructor control the border
insets. These are the gaps between the panel's outer edge (and its parent) and the inner edge of the panel where the panel's children are drawn. setInsets() lets you set any size insets, but
most of the time you want the insets to be based on the actual images that make up the border. The implementation of
getBorderInsets() returns the insets variable if it's not null.
However, if the developer didn't set the insets, then they will be derived from the widths and heights of the images that make up each side of the border (top, bottom, left, and right).
To actually draw the border, align the corner images to the appropriate corners and then tile the side images along each border side. Doing this will require using the TexturePaint class,
which is an implementation of the Paint interface. Unfortunately, TexturePaint takes only BufferedImages, not regular ones, so you've
got to convert your images before use.
BufferedImages are a special form of image that the Java2D
framework can read and write at a pixel level. The standard
Image is controlled by the operating system and is very difficult
to access at the pixel level. Java doesn't let you do a straight conversion between the two kinds of images, but you can just draw one image on top of another, which is what this method in the ImageBorder class does:
public BufferedImage createBufferedImage(Image img) {
BufferedImage buff = new BufferedImage(img.getWidth(null),
img.getHeight(null), BufferedImage.TYPE_INT_ARGB); Graphics gfx = buff.createGraphics();
gfx.drawImage(img, 0, 0, null); gfx.dispose();
createBufferedImage() first creates an empty buffered image with
the same size as the original image. The image type is
TYPE_INT_ARGB, which makes the image have full 24-bit color with
an alpha channel (transparency). Next, it draws the original image on top of the buffered image. The dispose() call releases
any extra resources so that the code won't waste any memory, and then it returns the newly minted BufferedImage.
With buffered images in hand, the stage is set for actually filling areas of the border with images. The next ImageBorder method, fillTexture(), creates a TexturePaint using the appropriate image
and then fills in the requested area:
public void fillTexture(Graphics2D g2, Image img, int x, int y, int w, int h) { BufferedImage buff = createBufferedImage(img);
Rectangle anchor = new Rectangle(x,y,img.getWidth(null),img. getHeight(null));
TexturePaint paint = new TexturePaint(buff,anchor); g2.setPaint(paint);
g2.fillRect(x,y,w,h); }
The second line of this code creates an anchor rectangle. The image will be tiled to fill the entire border area, but the anchor rectangle is needed to specify where the image will be
anchored. We normally think of images being anchored to (0,0), which works fine for the upper-left corner of the border but
wouldn't work for the other sides. The right corners would need to be right aligned instead of left aligned, as would happen with (0,0). By setting the anchor to be the location and dimensions of the image itself, you take care of anchoring altogether. The tiling will start wherever the single image would have been drawn.
you are ready for the paintBorder() method, shown in Example
1-7.
Example 1-7. Painting the border
public void paintBorder(Component c, Graphics g, int x, int y, int width, int height) {
g.setColor(Color.white);
g.fillRect(x,y,width,height);
Graphics2D g2 = (Graphics2D)g;
int tlw = top_left.getWidth(null); int tlh = top_left.getHeight(null); int tcw = top_center.getWidth(null); int tch = top_center.getHeight(null); int trw = top_right.getWidth(null); int trh = top_right.getHeight(null);
int lcw = left_center.getWidth(null);
int lch = left_center.getHeight(null); int rcw = right_center.getWidth(null); int rch = right_center.getHeight(null); int blw = bottom_left.getWidth(null); int blh = bottom_left.getHeight(null); int bcw = bottom_center.getWidth(null); int bch = bottom_center.getHeight(null); int brw = bottom_right.getWidth(null); int brh = bottom_right.getHeight(null);
fillTexture(g2,top_left,x,y,tlw,tlh);
fillTexture(g2,top_center,x+tlw,y,width-tlw-trw,tch); fillTexture(g2,top_right,x+width-trw,y,trw,trh);
fillTexture(g2,left_center,x,y+tlh,lcw,height-tlh-blh);
fillTexture(g2,bottom_center,x+blw,y+height-bch,width-blw-brw,bch); fillTexture(g2,bottom_right,x+width-brw,y+height-brh,brw,brh);
}
The first two lines fill the entire border area with white. Then you have to cast the Graphics to a Graphics2D object because you
will be doing some advanced painting later on. Next, save a reference to the width and height of each image (the top left, top center, top right, etc.). Finally, call fillTexture() on each
section of the border to fill it in.
The test program shown in Example 1-8 creates a panel that uses the ImageBorder. It creates a nested frame, panel, and
button, and then it creates an ImageBorder for the panel using
eight images.
Example 1-8. Testing out an image-based border
public class ImageBorderHack {
public static void main(String[] args) { JFrame frame = new JFrame("Hack #3
Pictures");
frame.setDefaultCloseOperation(JFrame.EXIT_ON_CLOSE); JPanel panel = new JPanel();
JButton button = new JButton("Image Border Test"); panel.add(button);
ImageBorder image_border = new ImageBorder(
new ImageIcon("images/upper_left.png").getImage(), new ImageIcon("images/upper.png").getImage(),
new ImageIcon("images/upper_right.png").getImage(),
new ImageIcon("images/right_center.png").getImage(), new ImageIcon("images/bottom_left.png").getImage(),
new ImageIcon("images/bottom_center.png").getImage(), new ImageIcon("images/bottom_right.png").getImage() );
panel.setBorder(image_border);
frame.getContentPane().add(panel); frame.pack();
frame.setVisible(true); }
}
The sample border is made out of a single image sliced into eight pieces using Photoshop (the center image is discarded). You can see these slices in Figure 1-13.
The completed ImageBorder class will take the Photoshop slices
and tile them to create the finished border, as seen in Figure 1-14.
Figure 1-14. Completed image border
Hack 4. Display Dates in a Custom Calendar
You can download calendar components from third
parties, but real hackers can use Swing to build a custom calendar widget on their own.
When you design an application, you'll often want to use
standard widgets to display information. Swing doesn't always give you what you need, though. Consider the calendar
component: Swing doesn't come with one, so most users have to download widgets to integrate into their application.
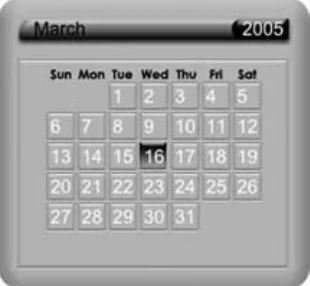
However, why not go with a cool and hip teen-friendly application with an attractive, image-based component, as shown in Figure 1-15?
Figure 1-15. Custom calendar component
First, consider what you'll need. You've got to have pretty
images, a component to paint them on, and then some logic to handle the different parts of the date, including what day of the week starts off the current month. You should also provide a
setDate() method, so that MVC frameworks can play well with
your calendar. Let's get started.
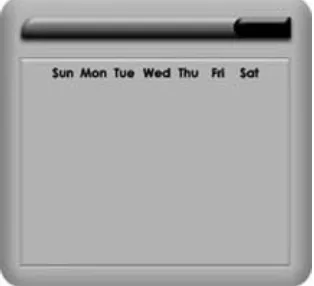
1.5.1. Create the Images
I created three images in Photoshop: one for the background, one for each day, and one for the current day. These are shown in Figures 1-16, 1-17, and 1-18.
Figure 1-16. calendar.png for the general
background
Figure 1-18. highlight.png for the current day
I could have separated the day names and the title, but since they don't change, it was simpler to make them part of the image.
1.5.2. A Component to Paint
The easiest way to create a custom component with fancy drawing is to start off with a JPanel and override the
paintComponent() method, as shown in Example 1-9.
Example 1-9. A Calendar base component
public class CalendarHack extends JPanel {
protected Image background, highlight, day_img;
protected SimpleDateFormat month = new SimpleDateFormat("MMMM"); protected SimpleDateFormat year = new SimpleDateFormat("yyyy");
protected SimpleDateFormat day = new SimpleDateFormat("d"); protected Date date = new Date();
}
public CalendarHack() {
background = new ImageIcon("calendar.png").getImage(); highlight = new ImageIcon("highlight.png").getImage(); day_img = new ImageIcon("day.png").getImage();
this.setPreferredSize(new Dimension(300,280));
}
public void paintComponent(Graphics g) {
((Graphics2D)g).setRenderingHint(RenderingHints.KEY_ANTIALIASING, RenderingHints.VALUE_ANTIALIAS_ON);
g.drawImage(background,0,0,null); g.setColor(Color.black);
g.setFont(new Font("SansSerif",Font.PLAIN,18)); g.drawString(month.format(date),34,36);
g.setColor(Color.white);
g.drawString(year.format(date),235,36);
} }
This loads the images in the constructor and sets up date formatters for the month, year, and day. Override the
paintComponent() method to turn on anti-aliasing, draw the
background, and then draw the month and year for the current date.
1.5.3. Draw the Days of the Month
The java.util.Calendar object handles all date calculations, so let's
start there. You'll need two calendars: one to represent the current date (today) and one that you update as you loop
through the grid of dates (cal). Here's what that looks like in
code:
Calendar today = Calendar.getInstance(); today.setTime(date);
Calendar cal = Calendar.getInstance(); cal.setTime(date);
cal.set(Calendar.DATE,1);
cal.add(Calendar.DATE,-cal.get(Calendar.DAY_OF_WEEK)+1); for(int week = 0; week < 6; week++) {
for(int d = 0; d < 7; d++) { Image img = day_img;
Color col = Color.black;
// only draw if it's actually in this month
if(cal.get(Calendar.MONTH) == today.get(Calendar.MONTH)) { if(cal.equals(today)) {
img = highlight; col = Color.white; }
g.drawImage(img,d*30+46,week*29+81,null); g.drawString(day.format(cal.getTime()), d*30+46+4,week*29+81+20);
}
cal.add(Calendar.DATE,+1); }
You'll notice that both calendars are initialized to date, but then the code resets cal's date to the first of the month and
subtracts the current day of the week. This has the effect of setting cal to the last Sunday before (or equal to) the real
current date. You have to perform this calculation because you need to start drawing in the upper-lefthand corner of the
calendar grid, which will almost always include a few days from the previous month. Once all of that is done, the code loops through each week and draws each day.
Now, here's the tricky part: cal goes back seven days, which is
almost certainly going to run back into the previous month. Because the calendar is month-based, those days in the
previous month shouldn't be drawn. That's why there is a check to see if cal's month is equal to today's month. If they are
equal, then you can draw the day safely; if not, skip drawing and just increment the date.
The last thing to check is if the current day in cal is equal to the
real current date. If it is, you want to use a different color and background image (highlight). Finally, the image and day
numbers are drawn, with the position determined by the current day of the week and week number. You can adjust the
multipliers and offsets (30, 46, 29, 81) to suit your taste. The drawString() method has a few extra pixels of padding to make
the day number appear more centered in the day image.
Hack 5. Add a Watermark to a Text Component
This hack will show how to create a custom image
background for the JTextField, a complex Swing component
that does not already support backgrounds or icons by default.
One of Swing's most underused features is the ability to partially override drawing code. Most programs enhance
widgets by using renderers or completely overriding the paint code. By only partially overriding the drawing, however, you can create some very interesting effects that blend both new and existing drawing commands.
Some components, like JList and JTable, use renderers to
customize their look. To put a background in a JTextField,
however, requires more. The plan is to subclass JTextField,
prepare the resources for drawing a background (loading the image, etc.), and then draw a new background while preserving the normal JTextField drawing code for the text and cursor.
The actual drawing will be done with a TexturePaint. Java2D
allows you to fill any area with instances of the Paint interface.
Typically you use a color, which is an implementation of Paint,
but it is possible to use something else, such as a texture or gradient. This class will use a TexturePaint to tile an image across
the component's background.
The first step is to create a JTextField subclass (shown in
Example 1-10).
public class WatermarkTextField extends JTextField { BufferedImage img;
TexturePaint texture;
public WatermarkTextField(File file) throws IOException { super();
img = ImageIO.read(file);
Rectangle rect = new Rectangle(0,0,
img.getWidth(null),img.getHeight(null)); texture = new TexturePaint(img, rect);
setOpaque(false); }
}
Example 1-10 creates a class called WatermarkTextField. It is a
subclass of JTextField with a custom constructor that accepts a File object containing an image. It also defines two member
variables: img and texture. After the obligatory call to super(), the
constructor reads the file into the BufferedImage variable, img. If
the file isn't a valid imageor can't be read for some other reasonthe method will throw an exception (hence the tHRows IOException clause on the constructor definition).
After the image is loaded successfully, the constructor creates a
TexturePaint. TexturePaints must be created with a source image
and a rectangle. The rectangle defines the portion of the source to be tiled. In this case, you want the entire image to be used, so the rectangle is the same size as the image.
The last thing the WatermarkTextField constructor does before
returning is call setOpaque(false). As you have seen earlier in this
chapter (and will see again), the setOpaque() method is one of the
core tools for hacking Swing. In this case, it is used to turn off the default background of the TextField, allowing you to
substitute your own.
With the subclass created, you can add a method to do the actual drawing:
public void paintComponent(Graphics g) { Graphics2D g2 = (Graphics2D)g; g2.setPaint(texture);
g.fillRect(0,0,getWidth(),getHeight()); super.paintComponent(g);
}
WatermarkTextField overrides the parent class's paintComponent()
method with its own version. The actual drawing is pretty simple: cast to a Graphics2D object (which understands how to
work with Paint classes), then fill in the background with the
texture paint and call super().
Earlier, I said that you will override the parent class partially
rather than completely. This is because the code still calls the parent class's paintComponent() method, but it does it after
painting the new background. Because the opaque property is set
to false, the parent class will not draw its own background,
allowing your custom one to show through. The component will draw the text, selections, and cursors as normal on top of the custom background.
exampleExample 1-11.
Example 1-11. Trying out the watermarked text
field
public static void main(String[] args) throws Exception {
JFrame frame = new JFrame("Watermark JTextField Hack");
JTextField textfield = new WatermarkTextField(new File("red.png")); textfield.setText("A Text Field");
frame.getContentPane().add(textfield); frame.pack();
frame.show(); }
The main() method creates a JFrame with one child: the custom
text field. It creates a new WatermarkTextField with an image file in
the constructor, then it packs and shows the frame. The text field is every bit a normal JTextField except for the constructor,
so you can use a variable of type JTextField with no problem.
The image, red.png, looks like Figure 1-19.
Figure 1-19. red.png, the background image
Going Further
Overriding a component's background with custom drawing code is a simple technique that can be used in some surprising ways. The next hack will reuse the watermark code to create a JTextPane with light clouds in the background and a
Hack 6. Watermark Your Scroll Panes
This hack creates a text area with a tiled background image that is fixed, even when the text area scrolls, and also a fixed foreground image that appears above the text, much like the station badges now affixed to the lower-righthand corner of most TV broadcasts.
The Swing framework was designed to let developers override portions of every component, both the visual appearance (the view) and the behavior (the model and controller). This design gives developers great flexibility. One of my favorites is the
JScrollPane. Its nested composite design allows developers to
create some stunning effects.
Once again, the idea is to override the drawing code of a standard component to create the visual effects [Hack #5]. The difference here is that you must deal with a composite object, the JScrollPane. A JScrollPane is not a single Swing
componentit's actually a wrapper around two scrollbars and the component that does the real scrolling is a JViewport. This
viewport is the actual target component; you will subclass it to draw both above and below the View component (as seen in
Example 1-12). The View is the Swing widget being scrolled; in
this case, it is a JTextArea.
Example 1-12. Modifying the viewport for
watermarking
public class ScrollPaneWatermark extends JViewport { BufferedImage fgimage, bgimage;
public void setBackgroundTexture(URL url) throws IOException { bgimage = ImageIO.read(url);
Rectangle rect = new Rectangle(0,0,
bgimage.getWidth(null),bgimage.getHeight(null)); texture = new TexturePaint(bgimage, rect);
}
public void setForegroundBadge(URL url) throws IOException { fgimage = ImageIO.read(url);
}
The ScrollPaneWatermark class inherits from JViewport, adding two
methods: setBackgroundTexture( ) and setForegroundBadge( ). Each
takes a URL instead of a File to allow for images loaded from
places other than the local disk, such as a web server or JAR file.
setBackgroundTexture( ) does the same thing that the
WatermarkTextField did in the previous hack. It loads the image,
creates a same-size rectangle, then initializes a TexturePaint for later use. setForegroundBadge() is even simpler, only loading the
image and storing it in the fgimage variable.
With the class set up, it's time to draw. The code below calls
super. paintComponent() first, and then draws the texture on top of
the component. This is because the existing background might need to show through in case the texture has translucent
sections. This would be especially important if the standard view background isn't just a solid color. Under Mac OS X, for example, the background is often a striped, light blue pattern. Here's the code to handle texturing:
// paint the texture if(texture != null) {
Graphics2D g2 = (Graphics2D)g; g2.setPaint(texture);
g.fillRect(0,0,getWidth(),getHeight());
} }
ScrollPaneWatermark draws the foreground image badge by
overriding the paintChildren( ) method, calling the superclass,
and then drawing the image. This ensures that the badge is always on top of the children or view:
public void paintChildren(Graphics g) { super.paintChildren(g);
if(fgimage != null) {
g.drawImage(fgimage,
getWidth()-fgimage.getWidth(null), 0, null);
} }
The view (a text area in this example) will usually draw its own background. Because, by definition, the view is as big as the viewport (if not bigger), its background will cover up the viewport's nice texture completely. To stop that, you need to call setOpaque( ) on the view:
super.setView(view);
}
The setView( ) method overrides the existing version (from JViewport) to call setOpaque(false) on the view before calling the super( ) method. By putting this call here, instead of calling setOpaque() from the normal setup routines, it frees the
developer using the ScrollPaneWatermark class from having to call setOpaque( ) manually, making the class more reusable.
With all of the pieces in place, you can now create a text area inside the custom scroll pane. The main( ) method in Example
1-13 tests it out.
Example 1-13. Testing the scroll pane watermark
public static void main(String[] args) throws Exception {
JFrame frame = new JFrame("Scroll Pane Watermark Hack"); JTextArea ta = new JTextArea();
ta.setText(fileToString(new File("alice.txt"))); ta.setLineWrap(true);
ta.setWrapStyleWord(true);
ScrollPaneWatermark watermark = new ScrollPaneWatermark();
watermark.setBackgroundTexture(new File("clouds.jpg").toURL());
watermark.setForegroundBadge(new File("flyingsaucer.png").toURL()); watermark.setView(ta);
JScrollPane scroll = new JScrollPane(); scroll.setViewport(watermark);
frame.getContentPane().add(scroll); frame.pack();
}
The main( ) method in Example 1-13 creates a frame containing
a scroll pane that contains a text area. fileToString() is a utility
function that loads a text file into the text area.
For brevity, the code for fileToString() is not printed here, but you can
see it in the full source on the book's web site:
http://www.oreilly.com/catalog/swinghks.
After setting up a standard JTextArea, the code creates a new ScrollPaneWatermark viewport and loads up the images (clouds.jpg
is a tileable image of pale, fluffy clouds, and flyingsaucer.jpg is a small image of a flying saucer with a translucent drop shadow that will blend nicely over the text). Finally, the main( ) method
sets the text area as the viewport's view, creates a new scroll pane, and then sets the watermark as the scroll pane's
viewport.
Figure 1-21 shows what it looks like when it's all put together.
Hack 7. Put a NASA Photo into the Background
of a Text Area
This hack will repurpose an existing web page, one of NASA's photo sites, by pulling their "Astronomy Picture of the Day" into the background of a text area.
You've already learned how to draw a watermark image in the background of a text area [Hack #6] using a ScrollPaneWatermark.
This hack will pull a photo down from the Web and reuse that class to put the photo in the background. The photo itself comes from NASA's "Astronomy Picture of the Day" page