Dreamweaver MX/ Fireworks MX Savvy
Christian Crumlish
Associate Publisher: Dan Brodnitz
Acquisitions and Developmental Editor: Willem Knibbe
Editor: Rebecca Rider
Production Editor: Liz Burke
Technical Editor: Scott Onstott
Production Manager: Amy Changar
Cover and Interior Designer: Caryl Gorska
Technical Illustrator: Caryl Gorska
Icon Illustrator: Tina Healey Illustrations
Compositors: Maureen Forys, Kate Kaminski, Happenstance Type-O-Rama
Proofreaders: Emily Hsuan, Dave Nash, Laurie O'Connell, Nancy Riddiough, Nelson Kim
Indexer: Ted Laux
CD Coordinator: Dan Mummert
CD Technician: Kevin Ly
Cover Photographer: Monty Fresco, Hulton Archive
Copyright © 2002 Christian Crumlish. World rights reserved. The author(s) created reusable code in this publication expressly for reuse by readers. Sybex grants readers limited
permission to reuse the code found in this publication or its accompanying CD-ROM so long as the author(s) are attributed in any application containing the reusable code and the code itself is never distributed, posted online by electronic transmission, sold, or commercially exploited as a stand-alone product. Aside from this specific exception concerning reusable code,] No part of this publication may be stored in a retrieval system, transmitted, or reproduced in any way, including but not limited to photocopy, photograph, magnetic, or other record, without the prior agreement and written permission of the publisher.
Library of Congress Card Number: 2002101986
SYBEX and the SYBEX logo are either registered trademarks or trademarks of SYBEX Inc. in the United States and/or other countries.
Screen reproductions produced with FullShot 99. FullShot 99 © 1991-1999 Inbit Incorporated. All rights reserved. FullShot is a trademark of Inbit Incorporated.
The CD interface was created using Macromedia Director, COPYRIGHT 1994, 1997-1999 Macromedia Inc. For more information on Macromedia and Macromedia Director, visit http://www.macromedia.com.
Internet screen shot(s) using Microsoft Internet Explorer 5.0 reprinted by permission from Microsoft Corporation.
TRADEMARKS: SYBEX has attempted throughout this book to distinguish proprietary trademarks from descriptive terms by following the capitalization style used by the manufacturer.
The author and publisher have made their best efforts to prepare this book, and the content is based upon final release software whenever possible. Portions of the manuscript may be based upon pre-release versions supplied by software manufacturer(s). The author and the publisher make no representation or warranties of any kind with regard to the completeness or accuracy of the contents herein and accept no liability of any kind including but not limited to
performance, merchantability, fitness for any particular purpose, or any losses or damages of any kind caused or alleged to be caused directly or indirectly from this book.
Manufactured in the United States of America
10 9 8 7 6 5 4 3 2 1
Dear Reader,
Thank you for choosing Dreamweaver MX / Fireworks MX Savvy. This book is part of a new line of Sybex web publishing and graphics books that features beautiful designs, great quality throughout, and above all, outstanding authors who really know their stuff. Christian
Crumlish and a team of experts deliver one of the most comprehensive and truly useful Dreamweaver books ever published, continuing the trend for top-notch quality established with our Flash MX Savvy and Photoshop 7 Savvy books.
With each book, we're working hard to set a new standard, both for the industry and for ourselves. From the quality of the contents to the paper it's printed on, from the cover to the interior design, our goal is to publish the best graphics and Web design books available.
I hope you see all that reflected in this book. I'd be very interested in hearing your feedback on how we're doing. To let us know what you think about Dreamweaver MX / Fireworks MX Savvy, please visit us at www.sybex.com. Once there, go to the book's page, click Submit a Review, and fill out the questionnaire. Your input is greatly appreciated.
Associate Publisher Sybex Inc.
Software License Agreement: Terms and Conditions
The media and/or any online materials accompanying this book that are available now or in the future contain programs and/or text files (the 'Software' to be used in connection with the book. SYBEX hereby grants to you a license to use the Software, subject to the terms that follow. Your purchase, acceptance, or use of the Software will constitute your acceptance of such terms. * The Software compilation is the property of SYBEX unless otherwise indicated and is protected by copyright to SYBEX or other copyright owner(s) as indicated in the media files (the 'Owner(s)'). You are hereby granted a single-user license to use the Software for your personal, noncommercial use only. You may not reproduce, sell, distribute, publish, circulate, or commercially exploit the Software, or any portion thereof, without the written consent of SYBEX and the specific copyright owner(s) of any component software included on this media. * In the event that the Software or components include specific license requirements or end-user agreements, statements of condition, disclaimers, limitations or warranties ('End- User License'), those End-User Licenses supersede the terms and conditions herein as to that particular Software component. Your purchase, acceptance, or use of the Software will constitute your acceptance of such End-User Licenses. * By purchase, use or acceptance of the Software you further agree to comply with all export laws and regulations of the United States as such laws and regulations may exist from time to time.
Software Support Components of the supplemental Software and any offers associated with them may be supported by the specific Owner(s) of that material, but they are not supported by SYBEX. Information regarding any available support may be obtained from the Owner(s) using the information provided in the appropriate read.me files or listed elsewhere on the media. * Should the manufacturer(s) or other Owner(s) cease to offer support or decline to honor any offer, SYBEX bears no responsibility. This notice concerning support for the Software is provided for your information only. SYBEX is not the agent or principal of the Owner(s), and SYBEX is in no way responsible for providing any support for the Software, nor is it liable or responsible for any support provided, or not provided, by the Owner(s).
Warranty SYBEX warrants the enclosed media to be free of physical defects for a period of ninety (90) days after purchase. The Software is not available from SYBEX in any other form or media than that enclosed herein or posted to www.sybex.com. If you discover a defect in the media during this warranty period, you may obtain a replacement of identical format at no charge by sending the defective media, postage prepaid, with proof of purchase to:
SYBEX Inc.
Product Support Department 1151 Marina Village Parkway Alameda, CA 94501
Web: http://www.sybex.com
After the 90-day period, you can obtain replacement media of identical format by sending us the defective disk, proof of purchase, and a check or money order for $10, payable to
Disclaimer SYBEX makes no warranty or representation, either expressed or implied, with respect to the Software or its contents, quality, performance, merchantability, or fitness for a particular purpose. In no event will SYBEX, its distributors, or dealers be liable to you or any other party for direct, indirect, special, incidental, consequential, or other damages arising out of the use of or inability to use the Software or its contents even if advised of the possibility of such damage. In the event that the Software includes an online update feature, SYBEX further disclaims any obligation to provide this feature for any specific duration other than the initial posting. * The exclusion of implied warranties is not permitted by some states. Therefore, the above exclusion may not apply to you. This warranty provides you with specific legal rights; there may be other rights that you may have that vary from state to state. The pricing of the book with the Software by SYBEX reflects the allocation of risk and limitations on liability contained in this agreement of Terms and Conditions.
Shareware Distribution This Software may contain various programs that are distributed as shareware. Copyright laws apply to both shareware and ordinary commercial software, and the copyright Owner(s) retains all rights. If you try a shareware program and continue using it, you are expected to register it. Individual programs differ on details of trial periods,
registration, and payment. Please observe the requirements stated in appropriate files.
Copy Protection The Software in whole or in part may or may not be copy-protected or encrypted. However, in all cases, reselling or redistributing these files without authorization is expressly forbidden except as specifically provided for by the Owner(s) therein.
About the Authors
Born in a log cabin on the Missouri river… no wait, wrong bio. Born and raised on the mean streets of New York City, Christian Crumlish matriculated at the school of hard knocks (OK, and Princeton) and has since pursued a number of exciting career options, including typist, gopher, editor, and small-business owner. Since the early '90s Christian has been writing about technology, music, popular culture, and the media. He co-founded a webzine,
Enterzone, in 1994, and a web-solutions consultancy in 1996. He has registered far too many domain names, most of which will probably never see the light of day. Christian has packaged books and e-books, consulted on matters of information architecture and content-management strategy with Fortune 500 companies, represented other authors as a literary agent, and written nearly 20 books on technology, the Internet, and web development. He maintains the website for this book at http://dreamweaversavvy.com/.
Christian is the lead author of Dreamweaver MX/Fireworks MX Savvy and he recruited the other writers (collectively known as the 'Dream Team') to contribute their specialized expertise and help make this book as well-rounded and packed with useful information as possible.
The Dream Team
written outright by the contributor while others contain incorporated examples, suggestions, or sections prepared by the contributors.
Joyce J. Evans Joyce J. Evans has over 10 years of experience in educational teaching, tutorial development, and web design. For additional tutorials and updated information, visit http://www.JoyceJEvans.com. She has received Editors Choice Awards for her Fireworks 4 f/x & Design book (Coriolis Group, 2001), and has authored numerous graphic design titles including Dreamweaver MX Complete Course (Hungry Minds, Inc., 2002). She has also contributed to several books, such as Dreamweaver MX Magic (New Riders Publishing, 2002), Fireworks MX Magic (New Riders Publishing, 2002), and Dreamweaver 4: The
Complete Reference (Osborne McGraw-Hill, 2001). Joyce actively writes reviews and articles for several graphic design magazines.
Lucinda Dykes Lucinda Dykes has been writing code and developing websites since 1994, and she teaches web-related classes at Santa Fe Community College in Santa Fe, New Mexico. Her students claim her most-used phrase is 'Show me the code!' She is the coauthor of XML Schemas (Sybex, 2002) and Mastering XHTML (Sybex, 2002).
Heather Williamson Heather Williamson manages a small Internet and Web Design consulting firm in northeast Oregon, where she uses Dreamweaver and Fireworks every day in the process of completing her client's requests. She has written numerous books on Internet technology, and she was the compilation editor for XHTML Complete (Sybex, 2002).
Greg Holden Greg Holden has written about Dreamweaver and other web software in the course of producing 16 books on computer- and Internet-related subjects. He's also the author of Literary Chicago: A Book Lover's Tour of the Windy City (http://www.literarychicago.com ), which includes walking and driving tours of the city where he lives with his two daughters and an assortment of fish.
Guy Rish Guy Rish is an independent consultant specializing in Web technologies and object-oriented design. He holds instructor certifications from Rational Software and Macromedia and has taught both in corporate and academic settings. Guy has recently contributed work to books from Sybex and New Riders on ColdFusion MX, Flash MX, and Dreamweaver MX.
Michele Davis Michele Davis is a technical consultant for companies implementing new documentation for .pdf manuals, websites, marketing brochures, training, and online help. She is savvy in Oracle, Retek, as well as numerous other applications, and she has written and co-authored several trade publications and works of fiction. She can be found on the Web at http://www.krautgrrl.com.
Rita Lewis Rita helped me develop the original outline for this book and helped with some early drafts of the chapters in Part I. Rita's website is http://lewiswrite.com/.
Rick Tracewell Rick writes an excellent Dreamweaver column for Mac Design Magazine and helped with the development of Chapters 13 and 18.
Writing a book this long, this detailed, and this timely is a labor of many hands and minds. I'd like to try to thank and acknowledge the contributions of those who helped in many different ways. If I have forgotten to mention any names, please forgive me.
First, I have to thank Briggs Nisbet for her forbearance during a very difficult and challenging writing schedule. Without her love and support, none of this would have been possible.
Next, I would like to acknowledge the work of Macromedia's developers, especially those involved in running the beta test, which was a model of how you'd like beta tests to work. I'm not allowed to go into much detail about that, but I think it's safe to say that they endeavored mightily to address and accommodate the assiduous suggestions made by the dedicated (sometimes to the point of being fanatic) beta testers.
I'd like to thank Jacques Vigeant of Enterpulse, whose timely loan of a mostly functioning Dell enabled me to test the Windows version of Dreamweaver MX and capture the lion's share of the screenshots in this book.
This book would not have been at all possible in its present form without the contributions of my 'Dream Team' of other writers who stepped in to cover some of the more specialized and tricky features of web development for me, enabling me to put together a better book than I could have done by myself, and on a shorter timeline. Please see the introduction for a full listing about each writer's contribution.
I'd also like to thank contributors to the book's CD, namely Alien Skin, Rabi S. Raj, David G. Miles, and Nathan Pitman. For more information about these contributors please see the Introduction.
Richard Frankel and Scot Hacker are always available to me with advice and suggestions, and I've benefited from their greater experience countless times. Thanks, guys!
Since I am not myself a graphic designer, no matter how hard I try, I'd like to thank Sarah Murgel, Josh Rose, and Dan Shearer, who've taught me a lot about how to read and understand design, and how to solve problems with design. I'd recommend their work to anybody.
I'd like to thank people on the Antiweb mailing list who encouraged me and who are always ready with advice when web conundra present themselves. Speaking of mailing lists, I'd also like to thank the Merry Punsters who helped keep my spirits up when the hours were ticking by faster than the pages. Similarly, I'd like to thank the members of the Web conference on the Well, whose lively debates informed a number of the insights I've passed off here in this book as my own!
For Smee
People I don't know personally but whose work and ideas have inspired me include Jeffrey Zeldman and Eric Costello.
At Sybex, I'd like to thank Associate Publisher Dan Brodnitz and Acquisitions and Developmental Editor Willem Knibbe, who convinced me to do this book. Willem's
Production Editor Liz Burke handled a nearly impossible schedule with aplomb, juggling like mad and still somehow keeping the trains running (mostly) on time. Copyeditor Rebecca Rider read each line with an attentive eye, posing well informed queries and bringing about a degree of consistency I find unattainable on my own. Scott Onstott, the technical editor for this book, gently corrected my wildly unsustainable assertions and added real gold from time to time where additional nuance was welcome. Caryl Gorska created the beautiful book design. Rarely does an author of technical books get to see his or her work looking this good in print. Maureen Forys and Kate Kaminski of Happenstance Type-O-Rama did the actual page makeup, which is tricky in a design as complicated and yet elegant as this book's-I appreciate their skillful work. A lot of other people at Sybex helped on this project without interacting with me directly, and I'd like to acknowledge their contributions (most are listed on the copyright page) as well. Thank you all!
I'd like to thank my agent, Danielle Jatlow of Waterside Productions, Inc., for dealing with the paperwork, and Maureen Maloney, also of Waterside, for processing my checks so efficiently.
I learned a lot doing web consulting with the now defunct Groundswell. The Groundswell 'hogs went through a lot together, in the trenches of the dotcom boom-and-bust, and I know I'll be working with people I met there on and off for the rest of my life. Before Groundswell, I knew how to throw together a one-person site, but from my colleagues there, I learned how to collaborate on large-scale production-ready sites. It was quite thrilling. Thanks also to clients at Sprint, Visa USA, Executive Greetings, and All Charities, whose real-world projects gave me all kinds of work to sink my teeth into. Similarly, I'd like to thank the people I've worked with at Enterpulse (another consultancy) which has survived the worst part of the crash and will probably be around for a long time. Lastly, I'd like to thank the people at Open Publishing, for supporting all of my writing work.
Introduction
In the old days, we made websites by typing one tag at a time, uphill both ways, in the snow, against the wind. You've heard this story before haven't you? Well, we've come a long way baby, and Macromedia's Dreamweaver MX and Fireworks MX now make the process of developing robust, production-ready websites almost easy. This is a book by and for
professionals working in any of the fields now affected by the Web, which is to say, the entire global economy. You can work your way through this book from Chapter 1 to Chapter 32, or you might find it more productive to jump around, especially if you are already experienced with web development, or with earlier versions of Dreamweaver or Fireworks.
Who Needs This Book
Most early users of Dreamweaver (and Fireworks) were designers. Interactive designers, perhaps, but still graphic or visual designers trained at art schools and used to working in the agency model (based on the structure of advertising agencies). Today, designers are one of many different job types and backgrounds involved in the development of sites. To get the benefits of working with Dreamweaver, you don't necessarily have to be a designer (although it helps). Other specialties that might make up a collaborative team that could use
Dreamweaver and Fireworks as a common development environment include the following:
• Information architects
All should get something of value from this book.
Conventions Used in This Book
In a technical book such as this one, we try to make it as easy as possible for you to pick out the information you need. (Even our parents don't read these books from cover to cover.) To help you find your way through the book as effectively as possible, we've incorporated a number of design elements to call out material that may (or may not) be of interest to you.
New Feature New features in Dreamweaver or Fireworks MX are marked with this margin icon.
Reference website http://dreamweaversavvy.com References to the book's website are singled out with this icon. We didn't use this one too often, but we hope you will visit the site
(http://dreamweaversavvy.com). We think you'll find it a useful
complement to the book and a valuable resource as you learn Dreamweaver and Fireworks. On the CD References to the accompanying CD are indicated with this margin icon.
In addition, many procedures are broken down into numbered steps, and many chapters also include tutorials that enable you to try out what you've learned with a specific project.
Sidebars
Because there are many different ways of working on the Web and you may not need to make use of every possible feature of Dreamweaver, you should feel free to skip around from chapter to chapter as necessary. To minimize redundancy and pack as much fresh information as possible into this book, we've liberally included cross-references throughout to suggest when you might profit from looking at another chapter.
How This Book Is Organized
This book has six parts composed of 32 chapters and one appendix. Here's a quick rundown of what you'll find inside:
Part I
* Planning Your project and Setting up Dreamweaver
This part is all about getting your project started and your site set up to optimize the
development process. Chapter 1 covers what to do before you even take Dreamweaver out of the box, including the essentials of website planning and preparation. Chapter 2 breaks down web pages into their component parts, based on how Dreamweaver works with HTML files and other web documents. Chapter 3 shows you how to get the Dreamweaver workspace set up for efficiency and comfort, and how to set up a website for the first time. Chapter 4 explains how to use sitewide components-templates, assets, and library items-to save effort and maintain consistency.
Part II
* Using Fireworks
This part is all about helping you get your graphical design work done with Fireworks. Chapter 5 gets you started with Fireworks. Chapter 6 covers the elements of a Fireworks file (strokes, fills, and live effects). Chapters 7 and 8 cover vector and bitmap images and tools; Fireworks enables you to use both types of effects together. Chapter 9 shows you how to design menu bars and other navigation objects. Chapter 10 explains how to prepare images for exporting into Dreamweaver by cutting them into slices (when necessary) and how to
optimize them for rapid download. (Joyce J. Evans handled this entire part.)
Part III
* Building a Web Page
This part is the heart of the matter: how to assemble the essential elements needed to construct a web page. Chapter 11 covers layout with tables or layers. Chapter 12 is all about working with text. Chapter 13 shows you how to apply what you learned in Part II by adding graphics to your pages in Dreamweaver. Chapter 14 explains how to set up framesets and work with frames. Chapter 15 discusses how to use Dreamweaver's CSS 2.0 (Cascading Style Sheets) features to develop cutting-edge standards-compliant designs. Chapter 16 covers how to insert local and external hyperlinks into your pages. (Greg Holden did the heavy lifting for Chapters 11 and 14.)
Part IV
* Inserting Dynamic Content
Chapter 18 shows you how to incorporate 'rollovers,' dynamic navigation bars, and jump menus. Chapter 19 introduces Dreamweaver's behaviors-pre-made JavaScript routines you can add to your pages without learning how to code. Chapter 20 covers everything you need to know about web forms. Chapter 21 is a little bonus that walks you through developing an e-commerce site. (Lucinda Dykes handled Chapters 17 and 19, Michele Davis contributed to Chapter 18, Heather Williamson put together Chapter 20, and Greg Holden wrote Chapter 21.)
Part V
* Developing Web Applications
This part takes you into the world of dynamic, database-backed websites, also known as web applications. At this point, you are developing software that happens to run over web
protocols. Chapter 22 gets you started setting up web applications with Dreamweaver. Chapter 23 helps you customize your coding environment. Chapter 24 is a crash course in database development for the Web. Chapter 25 shows you how to use Dreamweaver with ColdFusion sites. Chapters 26 and 27 get you up to speed with some of the most recently emerged web standards: using XML, XHTML, .NET, and the concept of web services in general. (Michele Davis did Chapter 24, Guy Rish pinch-hit for Chapter 25, and Lucinda Dykes stepped in to handle Chapters 26 and 27.)
Part VI
* Site Administration from Start to Finish
This part is about wrapping up your development project and handing over a site that doesn't just look cool but actually works! Chapter 28 explains how to set up administration modules for managing a new site. Chapter 29 shows how to verify browser compatibility before going live. Chapter 30 discusses the issues involved with launching a site or turning it over to a client. Chapter 31 covers maintaining a site long after the hoopla of opening day has passed. And Chapter 32 is a bonus, explaining how to customize and extend Dreamweaver to get the maximum use out of it as your primary web development tool. (Michele Davis put together Chapter 28, Lucinda Dykes handled Chapter 29, Greg Holden composed Chapter 31, and Heather Williamson took care of Chapter 32.)
Appendices * Web Resources
The Appendix includes a set of useful Dreamweaver resources that are available on the Web. We'll update this information and add to it from time to time at the book's website (see 'Visit Our Website,' later in this introduction). Appendix B includes a comprehensive list of keyboard shortcuts for Dreamweaver MX.
Note to Macintosh (and PC) Users
I wish we could have done two editions of this book, one just for Windows users and one just for Mac users. Although I work on both systems myself, out of necessity, my 'home base' computer is a titanium PowerBook G4 (a 'tiBook'), running OS X, and that should tell you where my aesthetic preferences lie. Unfortunately for me, the majority of users of
Rest assured, though, this book is perfectly designed for use with a Mac. I've personally tested every command sequence on my PowerBook, and where necessary, I've included separate instructions or screen shots to illustrate when the Macintosh version of Dreamweaver looks or functions differently in some way from the PC version. As a nod to the cutting-edge nature of many Mac designers and developers, I've also done all the screen shots in Chapter 15
('Cascading Style Sheets') on the Mac. For PC users, this chapter again is perfectly
serviceable, but the minor inconvenience of viewing the look-and-feel of another OS is on the other foot this time.
About the CD
The accompanying CD includes demos, extensions, tutorial files, and example files:
Demos We've included demo versions of the MX Studio programs, including Dreamweaver MX, Fireworks MX, Flash MX, and ColdFusion MX, so that you can try out any of the programs you don't currently own. We've also included Alien Skin's Splat! Demo, which is referred to in Part II. An all-new, user-requested, Photoshop filter set, Splat! delivers frames, textures, edges, borders, mosaics, and more in Eye Candy's easy-to-use interface. Add impact to your images with Splat!
Extensions As a bonus, we've included some extensions for both Dreamweaver and
Fireworks. Chapter 32 explains how to install extensions. In most of these cases, we've also included links to the developers' websites, so that you can find updated and additional new extensions online.
Extension contributors include
Rabi S. Raj (http://www.dreamweaver-extensions.com), David G. Miles, (http://www.z3roadster.net), and Nathan Pitman (http://www.dovelop.com).
Rabi Raj says, 'I created all these extensions during my free time at home. My intention is to help creative people who do not have programming background and web designers who want to save time on routine coding.'
David Miles is a web developer based in the United Kingdom. In addition to a passion for web application development and for Dreamweaver, David is often found to be helping others on the Macromedia Newsgroups. In his spare time fast cars and developing his own web site are high on the list of priorities. David has produced a number of frequently downloaded and used extensions.
Four years of training in 3-dimensional design equipped Nathan Pitman for a career in new media. After diving in at the deep end with his first commercial project; the official Virgin Global Challenger web site, he's not looked back. Nathan is currently working as a Creative Developer for a UK-based agency and investing much of his spare time in developing extensions for Dreamweaver and Fireworks.
Visit Our Website
This book has a website that can be reached at http://dreamweaverfireworkssavvy.com/ or http://dreamweaversavvy.com/. (I suggested that we register both the long form and the shortened domain name, not to leave out Fireworks users but just to save us all some typing!) The site includes copies of the tutorial and example files; news and developments about Dreamweaver, Fireworks, web design, and information architecture; corrections and updates for the book; and a way to suggest improvements for the next edition.
Join the Discussion
There's a Yahoo!Groups discussion list for this book. Any reader of the book is welcome to join in on the discussion. To visit the group's web page, go to http://groups.yahoo.com/ . (To join the list, go directly to http://groups.yahoo.com/group/dreamweaversavvy/join/ -you'll need to set up a Yahoo! ID to participate.)
Contact the Author
To contact the author directly by e-mail, you can send me mail at <[email protected]>. I will respond when possible.
Part I: Planning Your Project and Setting
Up Dreamweaver
Chapter 1: Planning and Preparing for a Web Project Chapter 2: Web Pages Deconstructed
Chapter 3: Setting Up Your Workspace and Your Site Chapter 4: Saving Labor with Templates and Libraries
Although it might be more exhilarating to start designing web pages on the first day of your project, experience has taught us that a successful web development project starts with some strategy. First you want to take a step back and look at the big picture. What is your site or application going to do? Who's going to use it? How does it have to work? How should it be organized?
Next, to make the most of Dreamweaver, take a little time to understand how the software creates, interprets, and displays web pages. Get the software set up in a way that suits your workflow, and then finally start developing your site.
Even then, before you get into the process of building actual pages, you're going to need to spend some time setting up your site in Dreamweaver, and creating the shared templates, library items, and other assets that will enable a rapid, efficient development process.
Overview
Dreamweaver and Fireworks can help your project run more smoothly whether you are building a website from scratch all by yourself for yourself, collaborating with a
multidisciplinary team to deliver a web application for a client, or anything in between. Regardless of the scope of your project, take some time in advance to think through the architecture of your site (fundamentally, its site map), develop a look-and-feel (graphic design and interface); and gather the content. When this preliminary work is done, you can plunge into the development, staging, launching, and maintenance of the site.
This chapter assists you in sorting through the elements of your preferred methodology before you get down to brass tacks with Dreamweaver and Fireworks. Topics addressed in this chapter include:
• When to use Dreamweaver and Fireworks • Nailing down your process
• Gathering requirements for your web project • Designing the project's information architecture
When to Use Dreamweaver and Fireworks
When we're grandparents, the little kids are going to roll their eyes whenever we start reminiscing about 'the dawn of the Web' when we had to hand-code our websites. We'll say, 'That's right, kids, we typed all those little angle brackets into text processors with no validation or nothing! We didn't have these fancy-schmancy what-you-see-is-what-you-get, self-correcting, self-updating, automated whatchamacallits.' And they'll be right to roll their eyes. Who cares about how these things used to be done? It was ridiculous that we ever had to work that way. 'Why, if we moved one page, we had to find all the links referring to that page and then manually change them. Why, one time....'
OK, there we go again. Anyway, the point is, Dreamweaver is a really cool way to keep an entire web project in the palm of your hand (or at least on the hard drive of your laptop), and Fireworks is a unique tool expressly designed for the development and optimization of web graphics. Dreamweaver goes beyond enabling you to design web pages visually-it helps you manage your entire site from the top down. Best of all, it enables a team of people to work together on the same project without accidentally munging each other's work.
Note Munging means over-writing or otherwise erasing or corrupting an existing file. Use this around your techy-er colleagues and they'll give you a jot more respect.
With Dreamweaver, though, you can keep your part of the project all in one place, and there's no reason not to do all of your work inside the application (at least after you're done doodling on cocktail napkins).
Fireworks is where you'll develop and refine the graphical look-and-feel for the site-the site's logo, the graphical elements, the navigational hoo-ha's, and so on. The entire site won't live inside Fireworks the way it will in Dreamweaver, but because they're both Macromedia products designed to work together, any graphics you develop or import into Fireworks will flow easily into your site templates and pages over on the Dreamweaver side.
When to Use Flash and Shockwave
Other web-oriented Macromedia products that play well with Dreamweaver and Fireworks include Flash and Shockwave. Both of these products are descendents of Macromedia Director, an application used to design interactive, well, applications. Chances are, last time you stuck a CD in your drive and watched a little promo or clicked on a bulbous shiny set of interface buttons, they were developed in Director. When the Web came along, Macromedia rolled out Shockwave as a way of adapting Director-like material to the vicissitudes of the Web (bandwidth limitations, mainly, as well as the nasty habit of web users who click away when you want them to sit still-something people developing for CD-ROM never had to worry about).
But Flash is every designer's favorite tool for developing interactive movies, animations, and every other kind of beast that slithers, crawls, runs, or flies across your screen. Optimized for streaming over the Web, and widely accepted as a format, Flash is the first choice when you need that level of production values, or when you want your users to be able to, say, play a video game at your website. Artists love Flash too (see http://www.snarg.net/ for a hypnotic example of what we're talking about).
And clients love Flash too, or at least they usually do when you demo the little bugger for them running on your laptop. They don't necessarily love it quite so much when users decide that the site is too slow or too Flash-y and fail to stick around to register for the great bargain or stock their shopping cart with whatever widgets your client is trying to e-commercially sell.
So, having sung the praises of Flash, let us now warn you to use it sparingly and when it is called for by the project's requirements, and not just because you finished a course on interactive design and need something 'rilly kewl' for your portfolio.
Needless to say, Shockwave and Flash are sold separately, but also play well with
Dreamweaver. See Chapter 20 for more on such dynamic, animatronic, interactive magic.
Getting Your Process Squared Away
what part of the project depends on other parts being completed first (sometimes referred to, for short, as dependencies), and what your timeline and milestones are going to need to be...unless maybe you're building a website for your cat and there's no deadline.
In most situations, you've got a 'someone' to answer to, whether it's your boss, your client, or simply your audience. That's right, web design requires you to anticipate and meet your audience's needs; that is, if you expect them to come to your site, use your interactive
application, register with your enterprise, or come back again after the first visit. As the bard once said, 'You're gonna have to serve somebody.' Furthermore, in most commercial projects, you're going to have to collaborate with somebody, or with a whole team of somebodies. There might be a branding expert, a writer (perhaps called a content developer), some
developers (technical architects, front-end scripters, back-end coders, middleware specialists, and so on), and possibly a project manager. Oh, yes, and a visual designer or graphic designer. But maybe that's you?
You may be working with people who cut their teeth in the field of professional services, interactive or advertising agencies, publishing, and software development. You're going to discover that everyone has a different name for the same thing (is it a storyboard or a
wireframe, a site map or thumbnail series, use cases or process flows?), and most people see the project revolving around their discipline. In any collaborative project, some time-at least an hour-should be spent up front hashing out the division of labor, the dependencies (such as, 'I can't develop the content inventory until you finish the site map'), the points of handoff or turnover, and the milestones and deliverables expected by the client (even if the client is just your boss).
For more ideas and discussion about various web-development methodologies (and there are a number of equally valid approaches), check out the author-created website for this book, at http://dreamweaversavvy.com/.
Gathering Requirements
How are you going to know what to put into your site or application unless you spend some time and effort learning the needs of your website's or application's eventual users?
(Consultants call this stage of a project discovery-not to be confused with lawyers pawing through your files.) This discovery phase should involve interviewing representatives of every audience type or anyone else with a stake in the usefulness and success of the site. This means not just your boss or client, your client's boss or team members, and other obvious
stakeholders, but also, if at all possible, some potential users of the site-often customers, partners, or vendors. Find out what they want. Your client may not always know what their users want as well as they think they do. Also, it makes a killer argument when the client has gotten attached to some horrible idea to be able to say, 'But your site's users don't want that. See, here in these interview notes, they say they'd never come back if you had that as part of your site.'
This leads to the first commandment of web design (perhaps the only commandment, we're not sure).
What if they built a web site and nobody came? They did. And nobody did. It was called the dotcom bubble. Maybe you missed it? Just because you can sell your boss, or your client, or a venture capitalist (VC) on an idea doesn't mean that people are going to come and pay you to keep executing that idea. Understand your audience. Go meet them if possible. Interview them, but also watch them as they work. Study what they like and dislike. Learn as much as you can about usability. If your ultimate product isn't usable, guess what? People won't use it. If your site doesn't meet a need, then no one will need it. This sounds simple, but a lot of VC money went down the drain because people wearing the right shade of blue shirts who knew consultantspeak put together some really hep-looking Powerpoints and 10-page business plans with no revenue model.
OK, that's not really fair. When tulips are the rage, everybody buys tulips. But don't end up like the dotcommers taking their one-way U-Hauls back out of the San Francisco Bay Area even as we type this. Think about the needs and desires of your audience. Understand them. What are they reaching out for? How can you satisfy those needs? Get that straight and the rest of the project will practically take care of itself.
Getting the Information Architecture Right
Information architecture is a $10 word that means how your site's information is organized. What do people see first when they come in the front door? How many levels down is certain information buried? How many clicks does it take to get to crucial information? What is the structure of the navigation? Dreamweaver won't figure any of this out for you. (And
Fireworks? Fuggedaboudit). Sure, once you've sorted it out, Dreamweaver is an awesome tool for maintaining the site map, navigation links, and so on. But you have to do the hard thinking first.
Ensuring That Your Site Is Accessible
One of the most important changes to the specifications for HTML in Version 4.0 is the inclusion of requirements that your site be accessible to people with disabilities. This means that your work can be used and appreciated by the estimated 10 percent of the world's population with some sort of physical disability that makes it difficult to access most websites. The World Wide Web Consortium (W3C) has set up a special organization and website that provides helpful checklists, guidelines, and ideas in support of the Web
Accessibility Initiative (WAI). Check out http://www.w3.org/WAI/ to find out how to insert accessibility into your website relatively painlessly. Another very useful site that serves as both an example of a well designed, accessible website and as a tutorial is the Web
Accessibility In Mind (WebAIM) site (http://www.webaim.org/).
Fortunately, because Dreamweaver is so flexible and easy to use, you can make mistakes when you start and still correct them later on in the project. That's right, no matter how carefully you gather your requirements, know thy audience, or massage your client, guess what? New requirements will emerge at the 11th hour. Projects you've never heard of will suddenly demand to be integrated into your pristine site map. Entire divisions will be
a few points and clicks, subsections can be promoted to top-level categories, and entire site areas can be snipped out and placed in limbo. I'd like to see a 'real' architect try to rearrange a real building once the contractors are in the house!
Still, just because things are inevitably going to change, that's no excuse for not trying to get it right at first. (That's what our editor told us when we said we didn't need to do an outline for this book. 'It's all going to change!' we whined. He was having none of it....) In fact, getting your architecture clarified at the beginning makes it that much easier to track the changes as they emerge. Think about it. It's a lot easier to see what's changed if you know what it changed from!
Also, remember those other people on the team (or your cat). They need to know where you're planning on putting stuff. They may be writing scripts and have to know what directory (a.k.a. folder) a certain piece of content is going to live in. They may need to know how many levels down their funky little application is going to be running. Sorting out the site's architecture is step one of designing any substantial web project.
Developing a Site Map (or Thumbnails, or Process Flows)
A great way to get an overview of a website at a glance is to create and maintain a site map. Ultimately, Dreamweaver can generate or show you a site-map type view of your site, but that's once you've actually created all the pages. When you're just getting started, you can literally just draw it by hand or use any illustration software to put it together. A site map looks something like a family tree (except without the male and female figures). Pages are represented as boxes and labeled. You can indicate the name of a page or-if you really want to get into it at this stage-what the page will contain. Navigational links are represented as lines between boxes. Then, like a family tree, child and sibling pages all stem from a parent page, and you can take this organization down as many levels as you like. Some people make the boxes smaller as they go down in levels. Often the third level of links is represented as a simple text list. The level of detail depends on your own needs or those of your client.
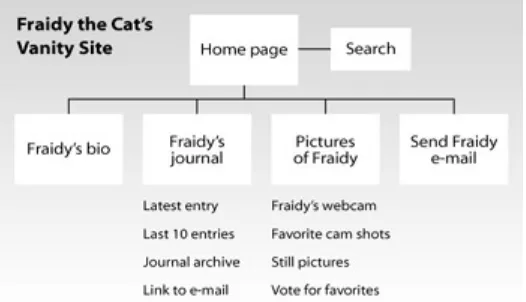
Figure 1.1 shows a scrawny little site map we just whipped up for an imaginary vanity site for a cat named Fraidy.
Site maps are also sometimes referred to as thumbnails because they represent each page of the site (or each major page) as a tiny thumbnail version of the actual page. (If your bosses are fans of Spinal Tap, they may wonder if you are actually going to deliver teeny-Stonehenge-sized pages. Reassure them that this will not be so.)
When you are developing an interactive application (as opposed to a series of static, linked pages), the site map might be referred to as a process flow, because it shows how the user might flow through the various pages or screens to accomplish some task. (For example, let's say you developed a new search engine for a site, and they already had a site map. You could create a process-flow diagram showing how users can go from the basic search box to the advanced search page or to the search tips, and then ultimately to the search results.)
You can create whatever codes or symbols you'd like to indicate different types of pages. Use dotted lines for dynamic pages (pages that are created from a database), or use rounded edges for new pages. Have fun with it. This is information design without that tedious 'making it work' part.
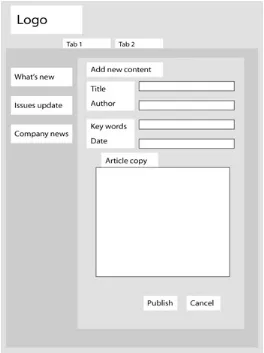
Creating Wireframes (or Storyboards, or Process Flows)
At least as useful as a site map is a set of wireframes for your project. Wireframes are
analogous to what people in the movie, television, and advertising business call storyboards. Except storyboards usually show pictures of people saying stuff and indicate a flow of action. Wireframes indicate a desired progression through the website's pages. You can think of them as being drilled down to one further level of detail from the site map.
Note Wireframes are usually done without color. They don't show the actual design of the pages, and in fact, they are presented denuded of as many design elements as possible so that your client doesn't get the idea that you are presenting the actual, final design. Instead, you are just showing the functional elements and content areas for each page and trying to get some signoff on that so that you can go ahead and develop a real look-and-feel.
Each page in your site map can be represented as a wireframe, usually a full page showing roughly where the navigation, content areas, and any interactive elements (such as forms or image maps) will go. The exact placement of these elements is not the point. The point is that the wireframes indicate a list of the elements that will eventually populate each page. They should also indicate where any of the links will lead so that anyone reviewing the wireframes can easily see how the user would step through the site. This is much easier to do with barebones wireframes than with a complete site mockup-if you use one of these, you risk having to listen to the marketing department representative ask, 'Why did you put that purple color under the logo?'
Figure 1.2: Without looking like an actual web page, this wireframe shows that the interface will include a logo; tabs at the top; options along the left side; text boxes; and buttons for publishing the content or canceling the process.
Ready, Set, Rumble!
This chapter explained some of the planning and organizational work you'll need to do before you launch a serious web-development project. This includes determining when it's
appropriate to use Dreamweaver, Fireworks, and other Macromedia products during this development process; hashing out a process or methodology for developing your site or application; figuring out how to collaborate with other team members (if necessary); gathering requirements for your site; and developing an information architecture.
This information is useful no matter what tools you were going to use to assist you as a web designer. Don't ignore these steps because they involve thought processes and decisions that your software applications can't do for you. Once you know how you're going to design your project, what you're going to do it with, how and when you are going to use your tools, who the product is for, and how the information at the site will be organized, you're ready to start cranking away in Dreamweaver and Fireworks. The next chapter will take you through the elements of a web page and a website and will even show you some actual Dreamweaver screens! Remember, have fun.
Overview
As you know, the basic unit of display on the Web is commonly called a page. Like all metaphors in the electronic world, this one only partly conveys the idea. In a book, the pages are all the same length. On the Web, a page can be any length. In a book or magazine, the elements on each page are static (unchanging). On the Web, the elements of a page may be dynamic (changeable). In this chapter we discuss the components of a typical web page and explain how you'll use Dreamweaver to manage these different types of web page elements. Web pages consisting of content, design, and navigation.
• Text, graphical, and other content • Design, layout, and style sheets • Navigation elements
The Elements of a Web Page
From a human point of view, a web page consists of content (information in all its forms), design (how the content is displayed), and navigation (how users move around the site). Of course, from the point of view of server and browser software, web pages consist of text and code, which is made up of HTML tags and other coding that represents embedded files and scripting elements. So content can be text, data, images, and other forms of information. Text is also called writing, copy, or just content. Other types of content appear on web pages in the form of embedded graphics files or other media.
The design of a page is the way text formatting, graphical elements, and other style standards are used to produce the site's look-and-feel. Navigation, is the system of interactive elements that lets the user move from page to page. Navigation can be in the form of text, though it is usually handled with graphical elements and sometimes script objects that enable actions (as with a rollover, an animation activated by the mouse hovering over an available navigation graphic).
Figure 2.1: Dreamweaver enables you to manipulate text and objects on a web page.
Working with Content
Before you can construct your web pages from the basic elements Dreamweaver recognizes (text and objects), you'll need to collect assets, meaning any prepared material or 'ingredients' needed to build your pages. For example, you will insert the text on your web pages either by importing it from a word processing program or by typing it directly onto the page-either way, you need the text to be ready when the time comes to build the page.
You'll need to have your artwork ready, and you may also need to collect Java applets or scripts as well as Macromedia extensions to include any interactivity you wish to incorporate into the site.
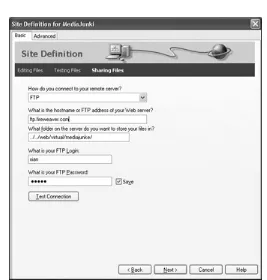
Before you begin to work, you need to do one other thing: set up your directories or folders to receive the assets you collect. Chapter 3 discusses how to set up the structure of your site on your computer or on a local network and how to manage files using the Site panel.
Staying on the Right Side of Copyright Law
Make sure you have the right to use any written content you intend to include at your site. The general rule of thumb about copying material from another person's website, by the way, is don't do it without proper permission. For more information, visit the Friends of Active Copyright Education (FA©E) website
(http://www.law.duke.edu/copyright/face/softint/index.htm).
Working With Text
Note There are many websites that discuss web design theory. One of the best is The Site Wizard at http://www.thesitewizard.com. These materials are practical and extremely easy to understand and implement. Another classic site for insight into web design theory and human interface design is Jakob Nielsen's http://www.useit.com.
Working with Graphics
How are web graphics different from any other electronic images (computer graphics)? They have to make it over your user's Internet connection, whether it is a 'fat' broadband connection such as a T1, cable, or DSL link, or a connection with much less bandwidth, such as a dial-up modem. In every case, an optimized graphic (one that has been compressed in size as
much as possible without sacrificing too much quality) is preferable. Similarly, unless you can be sure that your readers have monitors that display a sufficiently large number of colors, you're safer off using graphics with only 256 colors (or, really, the 216 web-safe colors out of the standard 256).
The standard web file formats are JPEG (JPG), GIF, and PNG, which combines the best features of the other two formats. PNG is Fireworks' native format, but not all browsers currently handle PNG files, so you'll probably have to stick to JPEGs and GIFs for most projects.
Note Use the JPEG file format for images with smooth gradations of color, such as most photographs. Use the GIF file format for images that use large patterns of single colors. (You also use the GIF89a format for a type of animated graphical file.)
Designing for the Web
When you are designing for the Web, you must be cognizant not only of your local computer and software restraints, but your viewer's constraints as well (which, as you remember, you usually don't know). You can guess at what your viewers will be using to visit your website and base your designs on these suppositions. Your guess must address several factors.
You must design for the computer screen and not for the printed page. This means that you do not necessarily know the size of a page on your visitor's computer or the quality of the color displayed there, and you don't even have control over where on that screen the image is placed. For example, some people view web pages using a portable computer with a very small monitor that supports only 256 colors. In fact, monitors can get even more limited. Nowadays, portable digital assistants (PDAs), such as the Palm Connected Organizer and its competitors, are often used to view websites, and they have itty-bitty screens. Others might view your pages using a 21-inch super VGA monitor that supports millions of colors.
640 x 480-pixel screens, and 24- or 32-bit monitors, which support 16 million colors on 1024 x 768-pixel screens.
People do not use the same tools to view the Web. The software used to view websites is called the browser. There are currently several browsers on the market. The 'big guys' are Microsoft Internet Explorer and AOL's Netscape Communicator (though some say that an independent browser, Opera, may eclipse Netscape in users soon). There are alternative browsers available. For example, Mac users may be using a new beta browser called iCab that cannot currently support JavaScript. Others who wish to avoid mainstream products prefer Opera. Linux users also have their own browsers.
There are many different versions of each of these browsers still being used, each with its own support of a selection of the entire HTML standard as well as proprietary HTML tags not supported on other browsers. Each browser displays web pages differently. Also, the web medium is constantly 'oozing' onto new devices, such as Web TV boxes, handheld organizers such as Palms, cell phones, and who knows what will be next? Our game-loving editor sez 'Oooh, ooh, I do, I do: videogame consoles, digital TV recorders.…' Usually these newer devices have severe limitations on what they can display. For example, the Wireless
Application Protocol (WAP) format, used for wireless devices like cell phones, displays only text and links-no graphics.
Not everyone has a fat pipe. Your web graphics (and page sizes) must be made very small so that users connecting to the Internet at speeds as slow as 2400 bits per second (and less) can access your information quickly. To support users with slow connections, web images are compressed (using the three file formats we just discussed: GIF, JPEG, and PNG).
Compression can mean degradation of the image, so you must design your graphics to work with this loss of detail.
Not everyone is using the same operating system. Designers most often have Macs, but their users are more often running Windows on a PC. Some people use a flavor of Unix, such as Linux. Different operating platforms display graphics differently. In fact, even the same operating system running on different hardware configurations of video cards, audio cards, or drivers displays graphics differently. For example, a Sun running Solaris will display an image completely differently than a Silicon Graphics computer running Irix. Macs and PCs use completely different color management methods to display images, as well. You must be aware of these differences and test your graphics on as many platforms as you can to ensure their quality translates as well as possible across computer platforms.
Having considered some of the cross-platform and accessibility issues involved in planning a web project, you'll then also need to think about some of the specific design approaches available to you in the web medium, such as text-based design, use of style sheets, and methods of page layout based on the use of tables or layers.
Designing with Text
Better yet, use Cascading Style Sheets (described next) to gain better control over the presentation of text in the body of your pages.
To overcome this constraint on the types of fonts, designers tend to rely on objects, in this case graphical files, to display more sophisticated treatments of text. For instance, if they wish to use more typographically interesting fonts, they often create graphical text in Fireworks and import it into Dreamweaver as an object.
This practice is especially useful when you need complete control of the appearance of text. Any text that you wish to format with other fonts, colors, graphics, and so forth (as you would with banners, logos, navigation buttons, and headlines), should be inserted as an object onto your page. In this case, the object is a graphic.
Note Here is where Fireworks fits into the scheme of things. Note that Fireworks is described in detail in Part II.
Cascading Style Sheets
As shown in Figure 2.2, there is another way to format-by using Cascading Style Sheets (CSS). Recently accepted into the HTML 4.0 standard, Cascading Style Sheets originated with Internet Explorer 4.5 and are now also supported by Netscape Communicator 4.x and above. Style sheets allow you to define how you want page elements that you define, such as paragraphs, table cells, text boxes, and headings, to appear every time you use them. You just associate one or more formatting attributes with a style and give that style a name. All such style definitions can be stored in a single style sheet file. Once you associate that style sheet with a page, you can use any defined style by applying the name to the element. Best of all, if you revise your design specifications, you can make the change in one place (in the style sheet), instead of hunting through every page and making the change over and over and over.
Figure 2.2: Text formatting can be managed using Cascading Style Sheets.
Laying Out Pages with Tables or Layers
Dreamweaver's layout mode enables you to lay out pages visually without having to manage the coding of the nested table cells. Figure 2.3 presents a table and its HTML code. Tables are discussed in Chapter 11.
Figure 2.3: Dreamweaver supports the use of tables for achieving traditional page-layout effects
In addition, the most current version of HTML (Version 4.0) offers a new way to create side-by-side and overlapping layouts through the use of layers. Layers are transparent areas that can be hidden, overlapped, or displayed at will. (You can use layers instead of tables if you know that your readers will be using up-to-date browsers that can parse layers. Dreamweaver can also convert a page designed with a table-based layout to one with a layer-based layout, and vice versa.)
Dreamweaver supports the use of layers in a way that makes web layout more natural and more like desktop publishing. You can use your mouse to size and place any layer to fit your requirements directly on the worksheet. The downside of layers is that no browsers older than Version 4.0 can interpret them. Layers and their uses are discussed in more detail in Chapter 11.
Note You can also use a concept called frames to allow portions of your page to serve as the repository for other pages pulled into your page based on navigation buttons you create (see Chapter 14).
Along with Cascading Style Sheets, layers let you control the placement of content, the look-and-feel, and the navigation throughout a site.
Setting Up a Navigation Scheme
One factor that distinguishes the Web from traditional print media is interactivity. Users experience this when they navigate from one page to another through a variety of means. In order to help your users understand their web experience and your website, you must provide them with an easy-to-grasp navigation scheme.
Sites are usually organized hierarchically, with a series of top-level pages that have their own subhierarchies. A good navigation scheme should make it clear what level the user is on and what related pages are available. We'll explore navigation objects thoroughly in Chapter 9 and the chapters of Part IV.)
Designing Navigation with Hypertext
Before you can design an appropriate scheme, you need to understand how hypertext works. Here is a little background for you.
The original purpose of the World Wide Web, as devised by Tim Berners-Lee, was to enable the visual linking of disparate types of information. This concept was revolutionized with the development of the Hypertext Transfer Protocol (HTTP). HTTP enabled information to be presented graphically and allowed links to other information to be created using graphics.
Without hypertext there would be no Web. The more links you can build into your site, the more useful it becomes to your readers. The Web grows from these serendipitous
interconnections that are built into each web page. Sometimes the most difficult part of designing a site is locating possible links to build into your site. You should always think ahead to possible places you can take your readers (but always build ways to return to your site, of course).
Hypertext Links and Hotspots
There are two ways to link information on web pages: by using hypertext links, or by using hot spots.
Hypertext Links
The easiest way to create a connection between two pieces of information is by using a
hypertext link. For example, if you wished to place a link to a page called contactus.html from a selection of text, your HTML code might look like this: <a href="contactus.html">Contact Us</a>. (We see a lot of references to this "Contactus" fellow in URLs-must have been an important ancient Roman.) By the way, Dreamweaver automatically generates this type of code when you select the graphic or text and type the target address into the Link text box or point to the target file from the Property Inspector, but we'll get to that in Chapter 16.
Hotspots
Another very powerful way of linking areas of your page to related information elsewhere is by identifying an area of a graphic as a hotspot and then creating a link from this area.
Hotspots are areas of an image on a browser screen that, if clicked, jump the viewer to another Universal Resource Locator (URL) on the Internet. Hotspots can be created by slicing up a graphic image in Fireworks and then designating certain areas of the image as linkable; slices are discussed in more detail in the next section. (Also see Chapter 9 for a discussion of slicing and linking hotspots in Fireworks.)
graphic image. Server-side image maps are an older way of creating graphical links; they require special software, called the Common Gateway Interface (CGI), to initiate the connection between the hotspot and the list of locations. You can also create hotspots in Dreamweaver by drawing the spots onto the designated graphic using the Map tool in the Property Inspector. Chapters 9 and 16 describe how to create linked graphics and how to build links in Dreamweaver.
Graphical Menus
Though pages can be hyperlinked together with a perfectly adequate navigation scheme using only text links (we'll explain how to create and insert these links in Chapter 16), the most elegant navigation interfaces use graphical menus. For these, you need to first use a graphics program, such as Fireworks, to develop the images to be used in the menus (as described in Chapter 9).
Note Graphical menus may work using either hyperlinks or hotspots. If each of the menu options is a separate image, then each one will be a hyperlink as well. If the entire menu bar is a single image, then the options will all be hotspots.
Fireworks automates the difficult process of using graphics to create multiple hypertext links through the use of slices and behaviors. Slices are cut-up pieces of a graphic, with each piece functioning as a hotspot. Behaviors are scripted actions that can be triggered by pointing to or clicking part of a graphic. They can be as simple as blinking text or as complex as pulling in pictures for a slide show.
With slices and behaviors, images may appear to change shape or appearance when you roll over or click them with your mouse.
Jump Menus and Hierarchical Menus
There are several other specialized ways to navigate. Dreamweaver, for instance, can assist you in building a pop-up menu (also called a jump menu) containing linked items. This functions like the typical drop-down menus of choices that you see in dialog boxes in most common applications.
Another type of navigation tool is the hierarchical menu. These menus use JavaScript and layers to display and hide hotspots, and they also give the user the experience of pulling down a menu and selecting an item. Although hierarchical menus are difficult to build, they can add a professional sheen to your site. See Chapter 18 for instructions on how to construct these types of menus.
The Whole Enchilada
Chapter 3: Setting Up Your Workspace and
Your Site
Overview
So, you've worked out a site development plan and thought about what you're going to be putting on your pages. This must mean you're ready to actually work in Dreamweaver! In this chapter, we're going to start by giving you the cook's tour of the Dreamweaver workspace because you need to understand what assumptions the software makes about your
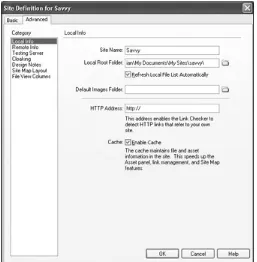
development process. Most of the time the primary focus of your workspace will be a page, but tools for working at the site level, with files, links, styles, templates, assets, and so on, are never out of reach. When you're moderately comfortable with the interface, we'll show you how to set up a new site, telling Dreamweaver where to store the local files and where to publish the remote files.
Here are some of the topics that will be addressed:
• Choosing a workspace style
• Understanding the Dreamweaver workspace • Customizing your workspace
• Setting up a new site • Importing an existing site • Planning ahead for accessibility
The Integrated Workspace versus the Floating Layout
New Feature
Previous versions of Dreamweaver on both Windows and Macintosh platforms featured a 'floating palette' not unlike other design software. For this version, Macromedia has developed an integrated workspace (they call it the Dreamweaver MX Workspace, to differentiate it from the Dreamweaver 4 Workspace), but only for Windows users. The integrated style is how most Windows applications (such as the exemplars in the Office suite) work now. The issue has always been how to organize all the floating panels used to provide shortcuts and efficient workflows. With either style, Dreamweaver now offers a Hide Panels command that instantly removes most of the clutter from the workspace.
Figure 3.1: Quick, choose… a-la-cartridge or floating free?
Note Macintosh users don't have the same workspace choice (yet), and the new interface for Mac users is similar to that of earlier versions, although the Insert bar (formerly the Objects Palette) is now by default docked horizontally below the Mac's title bar instead of vertically along the left edge of the screen. More on the Insert bar momentarily.
Dreamweaver MX's New Integrated Workspace
New Feature
The new workspace is designed to ease clutter while retaining the availability of numerous shortcuts (see Figure 3.2).
Figure 3.2: Dreamweaver recommends this all-in-one format (for Windows users only)
What's different:
• Everything's docked. It's the Windows style (Word) versus the Mac style (Photoshop). • The old Site window is now the first tab in the Files panel.
• Macromedia says this style is not as good for some accessibility features, meaning that if you use tools to assist you in reading or navigating the screen, then you should probably use the floating layout.
New Feature
In Figure 3.1, you may have noticed that there's a check box on the integrated side of the divide for something called the HomeSite/Coder Style layout. This choice exists primarily to offer compatibility to former HomeSite users or other hand-coders who are migrating to Dreamweaver. Besides putting the panels on the left side of the screen, this style also defaults to a code-only view of the page (I'll explain about Design and Code views in the next section). Figure 3.3 shows a new page in the HomeSite/Coder style for a dynamic site. See Chapter 23 for more about setting up your coding environment.
Figure 3.3: For former HomeSite users and other coders who like their panels on the left side, Dreamweaver offers this variant (also Windows only)
The Classic Floating Layout
Macromedia recommends the MX layout but doesn't insist upon it (yet), giving you the option of choosing the Dreamweaver 4 Workspace… more or less. This is the only choice of
Figure 3.4: The 'classic' look, and the only choice for Macintosh users
The Windows version of the Dreamweaver 4 Workspace is a little different. The Insert bar reverts to the old position of the Objects Palette (along the left side of the screen) and can't easily be dragged into the other position. Also, in Windows, each open window gets a button on the Windows Taskbar. As with the Mac, the Site panel does not function as a dockable panel in this workspace (see Figure 3.5).
Figure 3.5: The floating look for Windows users, primarily those who've used earlier versions of Dreamweaver and prefer the old ways
![Wiley Publishing Adobe Acrobat 6 For Dummies [2003]](data:image/gif;base64,R0lGODlhAQABAIAAAP///wAAACH5BAEAAAAALAAAAAABAAEAAAICRAEAOw==)