POSITIONING IN TIME AND SPACE
–
COST-EFFECTIVE EXTERIOR ORIENTATION
FOR AIRBORNE ARCHAEOLOGICAL PHOTOGRAPHS
Geert Verhoevena,b, Martin Wieserc, Christian Brieseb,c, Michael Doneusa,b
a VIAS – Vienna Institute for Archaeological Science, University of Vienna, Franz-Klein-Gasse 1, 1190 Vienna, Austria (geert.verhoeven, michael.doneus)@univie.ac.at
b LBI for Archaeological Prospection and Virtual Archaeology, Franz-Klein-Gasse 1, 1190 Vienna, Austria
c Department of Geodesy and Geoinformation, Vienna University of Technology, Gusshausstrasse 27-29, 1040 Wien, Austria
KEY WORDS: Aerial image, Archaeology, Direct georeferencing, Exterior orientation, Geocoding, GNSS/INS
ABSTRACT:
Since manned, airborne aerial reconnaissance for archaeological purposes is often characterised by more-or-less random photographing of archaeological features on the Earth, the exact position and orientation of the camera during image acquisition becomes very important in an effective inventorying and interpretation workflow of these aerial photographs. Although the positioning is generally achieved by simultaneously logging the flight path or directly recording the camera’s position with a GNSS receiver, this approach does not allow to record the necessary roll, pitch and yaw angles of the camera. The latter are essential elements for the complete exterior orientation of the camera, which allows – together with the inner orientation of the camera – to accurately define the portion of the Earth recorded in the photograph. This paper proposes a cost-effective, accurate and precise GNSS/IMU solution (image position: 2.5 m and orientation: 2°, both at 1 ) to record all essential exterior orientation parameters for the direct georeferencing of the images. After the introduction of the utilised hardware, this paper presents the developed software that allows recording and estimating these parameters. Furthermore, this direct georeferencing information can be embedded into the image’s metadata. Subsequently, the first results of the estimation of the mounting calibration (i.e. the misalignment between the camera and GNSS/IMU coordinate frame) are provided. Furthermore, a comparison with a dedicated commercial photographic GNSS/IMU solution will prove the superiority of the introduced solution. Finally, an outlook on future tests and improvements finalises this article.
1. INTRODUCTION 1.1 Oblique archaeological reconnaissance
To date, the common practise of archaeological aerial photographic reconnaissance is quite straightforward and seems not to have significantly changed over the past century. In general, images are acquired from the cabin of a low-flying aircraft (preferably a high-wing aeroplane) using a small- or medium-format hand-held photographic/still frame camera equipped with a lens that is typically uncalibrated (Wilson, 1975). Once airborne, the archaeologist flies over targeted areas and tries to detect possible archaeologically-induced crop and soil marks. Once an archaeological feature is detected, it is orbited and documented from various positions (generally from an oblique point of view). This type of aerial photographic reconnaissance has been the workhorse of all archaeological remote sensing techniques since it is one of the most cost-effective methods for site discovery and the non-invasive approach yields easily interpretable imagery with abundant spatial detail (Wilson, 2000).
Due to the fact that flying paths and photo locations are never predefined in this oblique reconnaissance approach and accurate mapping and photo interpretation necessitates knowledge about the part of the Earth’s surface covered by the aerial image, the latter information should ideally be recorded during photo acquisition. If not, the subsequent image management and interpretation workflow becomes very time-consuming and certain questions are difficult to answer (e.g. “Where was this photograph taken?” or “Which pictures cover that area?”). In
the worst case scenario, retrieving the exact location of a specific aerial image might even prove impossible.
1.2 Geocoding
Finally, hardware-based geocoding is also possible. This is a very straightforward approach, since the camera’s software (i.e. firmware) takes care of all the rest. Several compacts (e.g. Sony Cyber-shot DSC-HX30V and Canon PowerShot S100), bridge (e.g. Nikon Coolpix P510 and Sony Cyber-shot DSC-HX100V) or Single-Lens Reflex (SLR) cameras (e.g. Sony SLT-A99 and Canon EOS 6D) already feature a built-in GNSS receiver. More common is the option to physically link a separate GNSS receiver onto a digital camera. Until a few years ago, only the high-end Nikon digital SLR cameras such as the D2X(s), D2Hs, D1X, D1H and D200 together with the Fuji S5 Pro supported this flexible way of geocoding. Currently, several Canon and Pentax SLR models also offer this as an option, while Samsung, Canon, Leica and Nikon even included the option to attach a manufacturer-specific GNSS receiver onto one or more of their mirrorless cameras.
Using any of the hardware, software or hybrid workflows, the end result is a so-called geocoded image: an image that was assigned a geographic identifier in its metadata (a geocode) to pinpoint its location somewhere on the Earth. Since this is generally done by writing geographical coordinates into some pre-defined Exif metadata tags of that particular photograph, location stamping or geotagging are often used synonyms for this type of image geocoding.
1.3 Exterior orientation
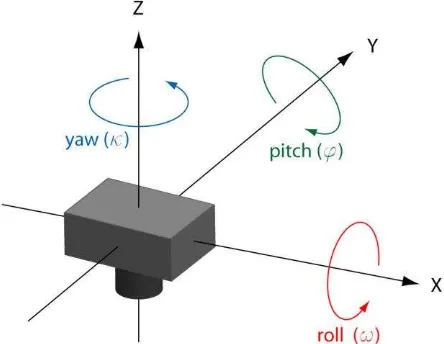
When applying any of the aforementioned geocoding methods, the Exif tags will only represent the position of the camera/photographer at the moment of image creation. This is by no means an accurate way of describing the specific spot on Earth that is captured in the aerial image. To achieve this, additional information is needed. An airborne camera is always placed at a certain location in the air, but it is also pointed into a specific direction and has a particular diagonal Field of View (FOV: the angle in object space over which objects are recorded in a camera). The camera location is defined by the projection centre O with three coordinates (XO, YO, ZO), while the direction is defined by three rotation angles roll (ω), pitch (φ) and yaw (κ) around X, Y, and Z (Figure 1). Together, these six parameters establish the so-called exterior/outer orientation (Kraus, 2007). Synonyms, often used in the field of computer vision, are camera extrinsics or camera pose. When φ and ω equal zero (or maximally deviate by 3° from the vertical to the Earth’s surface), the result is a perfect nadir/vertical photo. When the optical axis of the imager intentionally deviates more than 3° from the vertical, the images are said to be oblique in nature (Schneider, 1974).
Figure 1. Three axes and rotations of a digital still camera
The rotation angles of the camera can be obtained by a so-called Inertial Measurement Unit (IMU) or Inertial Reference Unit (IRU), which consists of accelerometers and gyroscopes. Accelerometers measure acceleration in m/s² or G-force (g), which can be static (e.g. gravity) and dynamic (i.e. suddenly slowing down or speeding up). Since an accelerometer can measure the amount of static acceleration due to gravity, its orientation toward the Earth's surface can be computed. Hence, accelerometers are often used for tilt-sensing (SparkFun Electronics, 2012a). This fact is exploited by all modern digital photo cameras to inform the user if the image was shot in portrait or landscape mode. Gyroscopes measure angular velocity (i.e. the speed by which something is spinning around its axis) in rotations per minute (rpm) or degrees per second (°/s). Since gyros are not affected by gravity, they perfectly complement accelerometers. The IMU’s gyros and accelerometers, which are rigidly mounted to a common base to maintain the same relative orientation, are often complemented by a magnetometer to know the exact direction with respect to magnetic North. Often, the term Inertial Navigation System (INS) is coined as it consists of an IMU supplemented with supporting electronics and one or more navigational computers.
Combining all exterior orientation parameters from the GNSS/IMU solution with the focal length f of the lens (in more general terms the inner camera orientation) unequivocally defines the position and orientation of the aerial image. Finally, the complete FOV can be calculated from the combined play between both the physical size of the camera’s sensor and the focal length of the lens attached (Verhoeven, 2008). More exactly, one should say principal distance instead of focal length, as it is the distance measured along the optical axis from the perspective centre of the lens to the image plane (Mikhail et al., 2001). However, since the lens is typically focused at infinity in aerial imaging, the principal distance equals the focal length of the lens (Wolf and Dewitt, 2000).
2. HARD- AND SOFTWARE SOLUTION 2.1 Digital still camera
The aim of our research was to link a digital camera with a cost-effective GNSS/IMU solution to achieve all exterior orientation parameters at the moment of image acquisition. So far, only (semi-) professional Nikon digital SLR cameras have been used. Although this choice was determined by the availability of the Nikon cameras, they also offer several other advantages.
photography that requires exact synchronisation with GNSS and IMU data. As expected, testing showed that the recorded date and time by the Nikon cameras were those of data acquisition, irrespective of the moment the image file was written onto the memory card. However, photographic sequences with disabled automatic exposure and autofocus indicated that there was no identically digitised sub-second interval between subsequent frames, which brings up the question on the final accuracy of this sub-second digitisation (although this can also be due to the inaccurate frames per second feature). This issue will be studied in the near future.
2.2 GNSS/IMU hardware
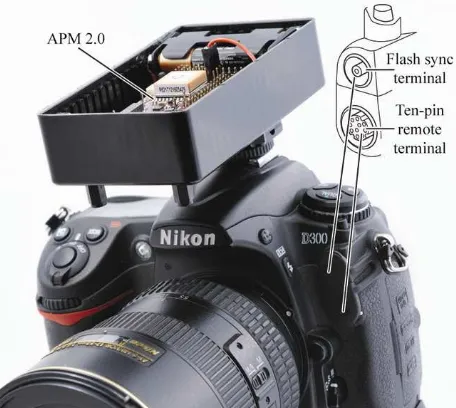
A cost-effective GNSS/IMU solution is provided by the ArduPilot Mega 2.0 (APM 2.0 - Creative Commons 3.0, 2012), an open source autopilot system featuring an integrated MediaTek MT3329 GNSS chipset (MediaTek Incorporated, 2010), a three-axis magnetometer and the InvenSense’s MPU -6000: a six-axis gyro and accelerometer device (InvenSense, 2012). In a first stage, the synchronisation between the APM 2.0 and the camera had to be established using a hardware-based solution. The idea was to connect the APM 2.0 directly to the Nikon ten-pin remote terminal (Figure 2). After testing various Nikon ten-pin cables, we found that the Nikon N10 cable of the Phottix GPS provided all the necessary ports. Using this cable, we can now power the APM 2.0 board with the camera battery (so we do not need to rely on additional batteries, although it is always possible – see Figure 2). Moreover, the camera cable transfers a signal which indicates whether the camera button is pressed or not.
Figure 2. APM 2.0 mounted on top of a Nikon D300 (with indication of the two terminals used; cables are not connected)
Besides the Nikon ten-pin cable, a standard flash sync cord with a coaxial PC (Prontor/Compur) 3.5 mm connector is also implemented for synchronisation. Similar to the ten-pin connector, this PC sync cord features a locking thread for a reliable and sturdy connection. Every time a photograph is taken, a perfect 0.5 V square pulse can be detected. This pulse lasts for the complete duration of the exposure and can be observed by an interrupt handle of the microcontroller (APM 2.0). Since this sync terminal provides a highly accurate time stamp and the generated pulse is very clear, it allows to distinguish every individual photograph. The PC cord functions thus as the primary connection for data synchronisation, while
the ten-pin cable is used to power the APM 2.0 and additionally serves as a synchronisation back-up.
However, all this would be useless if it remained impossible to log the GNSS/IMU data that are needed for the estimation of the external orientation of the acquired images. To this end, the standard software on the APM 2.0 was replaced and just a part of the software modules of the ArduPilot (Creative Commons 3.0, 2012) are used to log all parameters of interest. These are the moment of photo acquisition as well as the GNSS and IMU values over the entire time span of the image acquisition, all with accurate time relations. The IMU data are recorded with 200 Hz while the GNSS receiver features a 5 Hz update rate (upgradable to 10 Hz). Saving the entire data stream is enabled by a small logger which is more extensive than the default 4 MB logging capability of the APM 2.0 board. The new serial data logger – called OpenLog – holds up to 16 GB microSD cards (SparkFun Electronics, 2012b). As a result, we have ample of space to log all necessary data for hours. Moreover, the data access is straightforward (only a simple MicroSD card reader is needed). This whole sensor package is housed in a simple plastic box and mounted on the hot shoe on top of the camera (see Figure 2). To establish the accurate position and orientation of this box and its contained GNSS and IMU components, a mounting calibration was performed (section 3).
2.3 GNSS/IMU post-processing
Although the hardware solution was at this stage more or less fixed, some further software issues had to be solved before a working solution was achieved that acquired the correct positional and orientation values. The time dependent position is directly obtained from the GNSS receiver. To this end, the small displacement of around 10 cm between the perspective centre of the lens and the GNSS receiver is neglected since the observed precision of the MT3329 GNSS chipset is approximately 2.5 meter at 1 when using a Satellite-Based Augmentation System such as WAAS (Wide Area Augmentation System) or EGNOS (European Geostationary Navigation Overlay Service)(MediaTek Incorporated, 2010).
The actual orientation parameters are calculated from the IMU data stream. The InvenSense’s MPU-6000 is built with three accelerometers and three gyroscopes which are placed orthogonal on three axes. Both sensor types are based on MEMS (Micro Electro Mechanical Systems) technology (InvenSense, 2012). To get the correct orientation values, a strap-down calculation is performed as described by Wendel (Wendel, 2007). Therefore just the gyroscopes’ data are used. Due to the high bias-drift of MEMS-IMUs, the orientation has to be updated with pitch and roll angle values which are estimated by the accelerometers and the yaw angle given by the magnetometer and GNSS receiver. These updates are just allowed under certain circumstances. Accelerometers, for example, can only be used to update pitch and roll angle in conditions without acceleration (e.g. static or with a constant movement). In such a condition, the Earth gravity vector is the only remaining acceleration and therefore can be used to calculate roll and pitch angle of the IMU (Glira, 2012; Pfeifer et al., 2012). On the other hand, the GNSS heading information can only support the yaw angle when the user is in motion.
2.4 Combination of data streams
(Harvey, 2013) to write the complete exterior orientation information directly into the image’s metadata. Because the Exif 2.3 specification supports GPSImageDirection (i.e. yaw), the values for pitch and roll are also written in metadata tags of the GNSS attribute section, although they are provided by the IMU (APM 2.0) or a magnetic-based compass (Solmeta Geotagger Pro 2 – see section 4) and have nothing to do with the GNSS signal. The second method creates an additional XMP sidecar file with the same name as the image file and the .xmp extension. Both methods have pros and cons (e.g. the first method does not create additional files but only a small number of software packages can read all embedded and non-standard metadata tags). Since both approaches are implemented in the presented post-processing software, different image processing workflows can be accommodated.
3. MOUNTING CALIBRATION
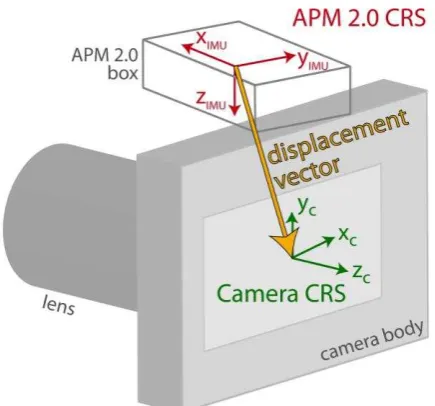
Due to the fact that the APM 2.0 is mounted on the camera’s hot shoe, the exact position and orientation of its sensors is not the same as for the camera (Figure 3). Additionally, the attitude relationship between the APM 2.0 and the camera will most likely slightly change every time the sensors are mounted on top of the camera. A camera mounting calibration (also called boresight calibration) mathematically describes the translation and rotation between the camera’s coordinate reference system (CRS) and the APM 2.0 CRS (often also called misalignment, see Figure 3), hereby enabling a reliable coordinate transformation between both systems. In other words: a mounting calibration is essential if one wants to transfer the APM 2.0 observed exterior orientation values to the aerial image. Since the GNSS positional accuracy is many times bigger than the displacement between the APM 2.0 and the camera, the translation component is negligible. Being the only remaining parameter, the rotation between APM 2.0 and camera can be computed when both their exterior orientation is known (not all six parameters have to be known, but only the three rotation angles). The camera’s rotation angles can be extracted by means of control points measured in the image, while the APM 2.0’s exterior orientation (again, limited to only the three rotation angles) is given by its IMU and magnetometer measurements. The final mounting matrix can be computed once the rotation angles of both CRSs are known.
Figure 3. Misalignment between the digital still camera CRS
(xc, yc, zc) and the CRS of the APM 2.0 (xIMU, yIMU, zIMU)
In order to calculate the mounting calibration of the test setup (a Nikon D300 and the APM 2.0), a dense network of accurately measured control points (fixed on a façade of the Vienna University of Technology) was imaged (the complete test procedure is described in more detail in section 4, as the acquisition of the mounting calibration images was part of a more encompassing comparison test). As soon as the images are acquired (33 in this calibration procedure), they were automatically oriented using the Structure from Motion (SfM) algorithm embedded in PhotoScan Professional from Agisoft LLC (Agisoft LLC 2012). Since an SfM approach computes the exterior orientations of the images by default in a local CRS and equivalent to the real-world scene up to a global scaling, rotation and translation (Verhoeven et al., 2012), the façade control points were inserted as constraints in the SfM solution. This way, the real-world orientation vales of all images were obtained and described by the rotation matrix .
The rotation matrix of the APM 2.0 at the moment of image acquisition is denoted and computed using the aforementioned strap-down calculation. At this stage, both resulting orientation matrices are expressed in the same local horizontal CRS (which is mathematically defined by equations 1 and 2, while the final rotation matrices are denoted and ). Since the CRS of the APM 2.0 and the camera are initially not defined in the same direction (see Figure 3), equation 2 features an additional flip matrix.
To generate the rotational difference between and , equation 3 was applied. The result is , a mounting rotation matrix computed for every individual image. By averaging the rotation angles of all 33 matrices, a final mounting rotation matrix was obtained. Finally, an image-wise multiplication of the estimated mounting matrix with the rotation matrix from the APM 2.0 at the moment of image acquisition yields the orientation angles of the image itself (equation 4).
(1) (2) (3) (4)
where
APM 2.0 in the local horizontal CRS Rotation matrix from APM 2.0 to the local horizontal CRS
Point in the CRS of the APM 2.0 Flipped camera in the local horizontal CRS
Rotation matrix from camera to the local horizontal CRS
Flip matrix which rotates the camera’s CRS to the APM 2.0 CRS (see Figure 3)
Point in the CRS of the camera
Mounting matrix based on an individual image
Transposed version of Final mounting matrix Transposed version of
calculate the yaw values from the APM 2.0, it is at this stage not possible to properly determine the yaw difference between the camera and APM 2.0 CRS.
4. PRACTICAL EXAMPLE
Since it was the aim to compare a standard geocoding approach (in terms of accurate orientation values as well as post-processing workflow) with the solution presented here, a rig was built with a Nikon D300 and a Nikon D300s. The former was equipped with the APM 2.0-based solution, while a commercially available geocoding solution – the Solmeta Geotagger Pro 2 – was mounted on the D300s. Using the built-in timer, both cameras were synchronised and programmed to take an image every ten seconds. While alternatingly walking around and standing still, 33 photographs were obtained from the previously mentioned network of control points located on a building’s outer facade. Besides the comparison of both GNSS/IMU solutions, the images also allowed to calculate the mounting calibration of the APM 2.0-based solution described in section 3.
4.1 Solmeta Geotagger Pro 2 solution
Based on the same chipset as the APM 2.0 (i.e. MediaTek MT3329), the latest product from Solmeta is a very small and light (50 g) WAAS/EGNOS-enabled GNSS receiver (Solmeta Technology, 2012). The Geotagger Pro 2 features a three-axis electronic compass, enabling the recording of a more or less accurate heading (2° is quoted) while also the roll and the pitch can be stored (both accurate to circa 5° in a range of ± 80°) (Solmeta Technology, 2012). The unit delivers an NMEA 0183 stream (a communication standard set by the National Marine Electronics Association) which, thanks to the physical connection with a ten-pin connector, enables direct geocoding of the images by embedding image direction as well as geographical latitude, longitude and altitude in the appropriate Exif tags. Besides the standard hardware-based geotagging, the Geotagger Pro 2 can log about 5 million waypoints at 1 Hz. This log file does not only enable the aforementioned hybrid geocoding approach, but is also essential when the user needs the camera’s pitch and roll values, since these cannot be directly embedded into the image metadata.
Figure 4. Pitch and roll angles obtained from the Solmeta Geotagger Pro 2 (orange), APM 2.0 (blue) and photographs
(green dots)
4.2 First test results
Figure 4 depicts the roll and pitch angles that were acquired by the APM 2.0 (after mounting calibration) and Geotagger as well as those estimated for the photographs using the imaged control points, while Figure 5 displays a zoom of the roll angle graph of Figure 4. It is clearly visible that there is not a big difference in the angles obtained from the photograph with PhotoScan (green dots) and the angles computed by the strap-down algorithm using the continuously logged APM 2.0 raw sensor data. The standard deviations of those differences equal 1.3° for pitch and 0.8° for roll angle, with maximum deviations of 3° and 1.5° respectively. The mean difference between both measurements was 0, as one would expect after a mounting calibration. Even though the algorithm for the strap-down calculations is rather simple and stable, different filter lengths applied on the raw data can cause changes in the calculated orientation exceeding half a degree. Consequently, highly accurate orientation results necessitate access to the raw data output of the GNSS/IMU sensors. As the Solmeta Geotagger Pro 2 is a black box, there is no access to the raw sensor data, while the update rate is limited to 1 Hz. This resulted in standard deviations of 7.4° for pitch and 12.5° for roll angle between the Geotagger output and the images from the camera on which it was mounted (after the estimation of the mounting calibration for the Solmeta device). Quantifying standard deviations by a more robust metric such as the median absolute deviation yields much lower values (2.9° for pitch and 2.0° for roll angle), pointing to rather big outliers which are almost absent in the APM 2.0-based solution. Just as the APM 2.0-based solution, the provided yaw angles are much less accurate (sometimes standard deviations up to 12° were observed). In contrast to the here presented solution, the commercial Geotagger does not allow to achieve higher accuracy of these rotational values in post-processing.
Figure 5. Detailed view on the roll angles (orange: Solmeta Geotagger Pro 2; blue: APM 2.0; green dot: photograph)
5. SUMMARY AND OUTLOOK
quite accurate and high frequent (several hundred hertz) estimation of the 3D-orientation of the sensing platform. Combining a GNSS and IMU also allows for the direct georeferencing of aerial photographs, which means image georeferencing can be executed without the need for ground control points. However, the low-cost IMU that has been applied here is certainly not the most accurate and stable one (in terms of drift rate). Further developments of the post-processing workflow should partly remedy this. Besides the straightforward strap-down processing of IMU data, it might be necessary to use a more advanced approach that combines all the sensor measurements (GNSS, IMU, magnetometer). An example could be the procedure described by Wendel, in which a Kalman-filter is developed for a GNSS/IMU combination of a MEMS-IMU and code-based GNSS receiver to calculate accurate position, velocity, orientation and IMU drift/bias values (Wendel, 2007). In addition to the improved post-processing algorithms, future tests will also incorporate a far more expensive (and accurate) IMU. Comparing the processed output and drift of the sensors will subsequently allow to decide if archaeologists should select the cost-effective option presented here or if the advantages of the more expensive solution are essential for the subsequent image management and georeferencing workflows.
So far, this solution has only been used for terrestrial applications in which the camera operator is walking around. Even in such a low dynamic situation, the achieved accuracy is already reported to be better than 2° in roll and pitch. Once the post-processing of the yaw angle is optimised, airborne tests will be executed and enable a true assessment of this APM 2.0-solution in a real aerial survey environment. Finally, the development of a small tool that calculates the exact footprint of the aerial image out of the acquired exterior orientation values and the given inner orientation is also in progress. This footprint can afterwards automatically be stored in a GIS system for an improved spatial management of aerial archaeological images.
6. REFERENCES
Adobe Systems Incorporated, 2013. Extensible Metadata Plat-form (XMP). http://www.adobe.com/products/xmp/ (14 April 2013).
Agisoft LLC, 2012. Agisoft PhotoScan User Manual. Profes-sional Edition, Version 0.9.0.
http://downloads.agisoft.ru/pdf/photoscan-pro_0_9_0_en.pdf (13 February 2013).
Camera & Imaging Products Association, 2010-2012. Ex-changeable image file format for digital still cameras: Exif Version 2.3. CIPA-JEITA, Tokyo, 185 pp.
http://www.cipa.jp/english/hyoujunka/kikaku/pdf/DC-008-2012_E.pdf (6 April 2013).
Creative Commons 3.0, 2012. ardupilot-mega.
https://code.google.com/p/ardupilot-mega/ (6 April 2013). Glira, P., 2012. Direkte georeferenzierung von bildern eines
un-bemannten luftfahrzeuges mit lowcost-sensoren. Diplo-marbeit.
Harvey, P., 2013. ExifTool - Read, Write and Edit Meta Infor-mation! http://www.sno.phy.queensu.ca/~phil/exiftool/ (6 February 2013).
InvenSense, 2012. MPU-6000 and MPU-6050 Product Specifi-cation Revision 3.3, Sunnyvale, 54 pp.
http://www.invensense.com/mems/gyro/documents/PS-MPU-6000A.pdf (18 March 2013).
Kraus, K., 2007. Photogrammetry: Geometry from images and laser scans, 2nd [English] ed. Walter de Gruyter, Berlin - New York, 459 pp.
MediaTek Incorporated, 2010. MEDIATEK-3329 Datasheet. Rev.A03. 66-channel GPS Engine Board Antenna Module with MTK Chipset.
http://inmotion.pt/documentation/diydrones/MediaTek_MT 3329/mediatek_3329.pdf (14 April 2013).
Mikhail, E.M., Bethel, J.S., McGlone, J.C., 2001. Introduction to modern photogrammetry. Wiley, New York, ix, 479 + CD-ROM.
Pfeifer, N., Glira, P., Briese, C., 2012. Direct georeferencing with on board navigation components of light weight UAV platforms, in: M.R. Shortis, W. Wagner, J. Hyyppä (Eds.), Proceedings of the XXII ISPRS Congress. Technical Commission VII. ISPRS, pp. 487–492.
Schneider, S., 1974. Luftbild und Luftbildinterpretation. Lehr-buch der allgemeinen Geographie 11. Walter de Gruyter, Berlin-New York, 530 pp.
Solmeta Technology, 2012. Geotagger Pro 2. Solmeta Technol-ogy. http://www.solmeta.com/Product/show/id/14 (18 March 2013).
SparkFun Electronics, 2012b. Accelerometer, Gyro and IMU Buying Guide. SparkFun Electronics.
https://www.sparkfun.com/pages/accel_gyro_guide (15 October 2012).
SparkFun Electronics, 2012. OpenLog.
https://www.sparkfun.com/products/9530 (14 April 2013). Verhoeven, G., 2008. Digitally Cropping the Aerial View. On
the Interplay between Focal Length and Sensor Size. Ar-cheologia Aerea. Studi di Aerotopografia Archeologica 3, pp. 195–210.
Verhoeven, G., Doneus, M., Briese, C., Vermeulen, F., 2012. Mapping by matching: a computer vision-based approach to fast and accurate georeferencing of archaeological aerial photographs. Journal of Archaeological Science 39 (7), pp. 2060–2070.
Wendel, J., 2007. Integrierte Navigationssysteme: Sensordaten-fusion, GPS und Inertiale Navigation. Oldenbourg, Mün-chen, x, 336.
Wilson, D., 1975. Photographic Techniques in the Air, in: Wilson, D.R. (Ed.), Aerial reconnaissance for archaeol-ogy. Research Report Series 12. The Council for British Archaeology, London, pp. 12–31.
Wilson, D., 2000. Air photo interpretation for archaeologists, 2nd ed. Tempus, Stroud, 256 pp.
Wolf, P., Dewitt, B., 2000. Elements of photogrammetry with applications in GIS, 3rd ed. McGraw-Hill, Boston, XIII, 624.
7. ACKNOWLEDGEMENTS
This research is being carried out with the financial support of the Austrian Science Fund (FWF): P24116-N23.