Early Praise for
RubyMotion
Looking for the best way to get started with RubyMotion? Read this book.
➤ Laurent Sansonetti, lead developer of RubyMotion and founder of HipByte
RubyMotion was a joy to read, and after zipping through the book, I found myself full of motivation to write some code! RubyMotion is a great way for longtime Ruby programmers to quickly get up to speed on many practical aspects of writing native iOS applications.
➤ Ethan Sherbondy, creator of Listenr for iPhone
The book is rich enough that, even though I have written many iOS apps in Objective-C and RubyMotion, with several in the App Store, I learned a few tricks. RubyMotion makes writing iOS apps faster, easier, and more enjoyable. This book gives you a jumpstart on that.
iOS Development with Ruby
Clay Allsopp
The Pragmatic Bookshelf
Many of the designations used by manufacturers and sellers to distinguish their products are claimed as trademarks. Where those designations appear in this book, and The Pragmatic Programmers, LLC was aware of a trademark claim, the designations have been printed in initial capital letters or in all capitals. The Pragmatic Starter Kit, The Pragmatic Programmer, Pragmatic Programming, Pragmatic Bookshelf, PragProg and the linking g device are trade-marks of The Pragmatic Programmers, LLC.
Every precaution was taken in the preparation of this book. However, the publisher assumes no responsibility for errors or omissions, or for damages that may result from the use of information (including program listings) contained herein.
Our Pragmatic courses, workshops, and other products can help you and your team create better software and have more fun. For more information, as well as the latest Pragmatic titles, please visit us at http://pragprog.com.
The team that produced this book includes: Fahmida Y. Rashid (editor)
Kim Wimpsett (copyeditor) David J. Kelly (typesetter) Janet Furlow (producer) Juliet Benda (rights) Ellie Callahan (support)
Copyright © 2012 The Pragmatic Programmers, LLC. All rights reserved.
No part of this publication may be reproduced, stored in a retrieval system, or transmitted, in any form, or by any means, electronic, mechanical, photocopying, recording, or otherwise, without the prior consent of the publisher.
Printed in the United States of America. ISBN-13: 978-1-937785-28-4
Contents
Foreword . . . vii
Ruby on iOS . . . ix
1. Creating a New App . . . 1
Creating a New App 2
1.1
1.2 Where It Begins: AppDelegate 5
1.3 Showing a Message with UIAlertView 6
1.4 Interactive Debugging 7
2. Filling the Screen with Views . . . 11
All About Views and UIView 11
2.1
2.2 Making Shapes and Colors 12
2.3 Adding Interaction with UIButton 14
2.4 Animating Views 16
2.5 Adding Static Text with UILabel 18
2.6 Making Text Dynamic with UITextField 20
2.7 Exploring RubyMotion Libraries 24
3. Organizing Apps with Controllers . . . 27
Adding a New UIViewController 27
3.1
3.2 Using Multiple Controllers with UINavigationController 30 3.3 Separating Controllers with UITabBarController 34
3.4 Presenting Modal UIViewControllers 36
4. Representing Data with Models . . . 41
Writing Basic Models 41
4.1
4.2 Preparing Scalable Models 44
5. Showing Data with Table Views . . . 51
Starting with Simple Rows 52
5.1
5.2 Interacting with UITableViews 56
5.3 Sections and Indexing Tables 58
5.4 Swiping-to-Delete Table Rows 61
5.5 Grouped-Style UITableViews 63
6. Testing Your Apps . . . 65
6.1 Constructing Basic Tests 65
6.2 Testing App UI and Controllers 68
7. Example: Writing an API-Driven App . . . 71
Setting Up the Project 71
7.1
7.2 Adding Hash-Friendly Models 72
7.3 Making GET Requests and SearchController 74
7.4 POST Requests and ColorController 78
8. Uploading to the App Store . . . 85
8.1 Including App Resources 85
8.2 Archiving for Release 87
8.3 What’s Next? 90
A1. Bibliography. . . 93
Foreword
A long time ago, Ruby replaced Perl as my favorite high-level language. I have always been a low-level programmer, writing C code on a daily basis, but I was convinced from the beginning that high-level languages such as Ruby were better suited for application development.
For a long time, application development meant desktop applications. I spent a good amount of time trying to make Ruby a first-class citizen for desktop development, working on the Ruby-GNOME, RubyCocoa, and MacRuby projects. While I can’t say I achieved the success I expected, at least I tried, and it made Ruby programmers happy.
In March 2008, Apple released the first version of the iOS SDK, allowing developers to finally write custom iPhone applications in Objective-C. That day, as an Apple employee, I dreamt of the day when developers would be able to use Ruby to write iOS apps.
You are holding this book, so you know the story. I left Apple and created RubyMotion. But why on Earth would you want to use Ruby for app develop-ment?
There are many practical reasons that make Ruby a much better alternative to lower-level languages for app development, but for me, the main advantage of Ruby is that it triggers creativity.
Ruby as a language allows the creation of layered abstractions, often called
domain-specific languages, within the language itself. This feature is definitely not unique to Ruby (I say this as a huge fan of Lisp), but Ruby programmers really seem to like creating abstractions for some reason.
Ruby programmers often call themselves code artists because they can feel the process of creativity when they program in Ruby. If you have programmed in Ruby, you know what I mean, because you have felt it too.
This is why Ruby matters. And this is why writing iOS apps in Ruby matters.
Laurent Sansonetti
Liege, Belgium, December 2012
Ruby on iOS
The iPhone and iOS exceeded everyone’s initial expectations. Over the past five years, independent developers and companies have published more than
half a million products to the App Store that have been downloaded more than
two billion times. But despite the huge influx of new developers and program-ming resources, the process of building iOS apps has remained fundamentally unchanged.
The iOS SDK was first announced in early 2008, nearly a year after the first iPhone debuted. Mac developers felt right at home since it used the same Objective-C/Xcode workflow that had existed on OS X for years. For everyone else, that day was probably the first time they heard the term Objective-C. Objective-C is a robust language, but its verbosity and compiled nature are a bit out of step with the dynamic languages embraced by many of today’s developers. Since Objective-C’s inception in the 1980s, programmers have shifted toward Perl, PHP, Python, Ruby, and JavaScript. These “scripting”
languages allowed some of the biggest websites in the world to grow and iterate with unparalleled speed by empowering flexibility and reducing complexity.
So, why haven’t we seen these languages prosper on mobile yet? I mean, that is why you’re here, right? The answer is that there have been no alternatives to Objective-C that allow for that signature iOS user experience while still providing comparable performance...well, no alternatives until now.
Hello, RubyMotion
and classes exactly as intended by Apple, so all existing Objective-C code examples and tutorials are perfectly translatable.
Why Ruby instead of Python or some other language? For one, Ruby is already incredibly popular among web developers because of frameworks like Ruby on Rails; for new developers, coding in a familiar language means an easier transition from the Web to mobile. But most importantly, Ruby is a friendlier and more forgiving language for developers at any experience level. Whether you’re a Rails veteran or just getting your feet wet with Ruby, this book will give you the foundations to create gorgeous iOS apps with no compromise in performance or developer happiness.
Why RubyMotion?
There are other alternatives to iOS development with Objective-C. HTML-based solutions like PhoneGap (http://phonegap.com) and Trigger (https://trigger.io/) are often attractive because they allow apps to be changed without additional Apple approval. However, this flexibility comes at a cost: the non-native interface elements embedded in the markup often create a jarring experience for users. Notably, Facebook is moving away from HTML5 in its iOS app and migrating to a native version.
Nu (https://github.com/timburks/nu) is the closest counterpart to RubyMotion: instead of using Ruby, it is a Lisp-like language you can use to write truly native iOS applications with Apple’s frameworks. If you’re a fan of Lisp or other functional languages, then it could be a good fit; however, RubyMotion offers more than a different language.
Unlike these other alternatives, RubyMotion is a complete tool chain that handles the entire process of creating, testing, and deploying iOS apps. Unlike the Xcode-centric Objective-C and Nu, RubyMotion development uses com-mand-line tools like Rake and Cocoapods (a popular iOS library manager) to increase the familiarity and ease with which developers can pick up coding for iOS. It also includes an interactive console to debug your apps and a robust, RSpec-like testing framework. No other tool or framework possesses this level of end-to-end integration for iOS development.
Reading This Book
The best programming books hit the ground running, and that’s just what we’ll do. Each chapter will introduce one concept and build a sample applica-tion around it. This book is intended to be read sequentially: every subsequent chapter builds on what we covered in the previous. We’ll start off with the basics, such as how to draw boxes on the screen, but in just a handful of
chapters we’ll be interacting with an HTTP API. That means we move fast and cover just the essentials.
This isn’t a reference manual for iOS development; there are many other great and extensive resources on iOS development, including Apple’s official docu-mentation. Instead, this book will get your feet just wet enough in the major topics of native iOS development so you can understand and research new information on your own. Sound good?
Before we begin, you should be aware of some requirements. Since we plan on moving fast, this book assumes you’re familiar with Ruby. If you haven’t played around with Ruby, check out a book like Learn to Program [Pin06]
before diving into RubyMotion. RubyMotion is currently a commercial product from HipByte; that means if you want to play, you have to pay for a license. Additionally, the RubyMotion tools work only on OS X 10.7 or newer. The iOS SDK ships with a fast desktop simulator, so you won’t need a physical iOS device to test your projects on.
Online Resources
What would a modern programming book be if we didn’t help you outside of the text? You should check out this book’s web page (http://pragprog.com/book/
carubym/rubymotion) for updates and a discussion board; you also will find all of the source code for the examples used in this book. If you’re reading this book electronically, you can click the little gray box above each code sample to download it immediately.
Additionally, RubyMotion has a very vibrant community that can provide guidance. The RubyMotion Developer Center1 has more in-depth articles on many aspects of RubyMotion that we may cover only briefly. There’s also the RubyMotion user group,2 a great place to ask specific questions and get involved.
Acknowledgments
This book was definitely not a one-man effort. First, a big thanks to the whole team at HipByte for providing support and creating the great product that is RubyMotion. I’d also like to give several high-fives to Laurent Sansonetti, Christopher Adams, David Astels, Joel Clermont, Jeff Holland, Ethan Sher-bondy, Mattt Thompson, Justin de Vesine, Colin Thomas-Arnold, and Mike Clark for reviewing drafts of this book and making sure all the technical
aspects were kosher. Additionally, I believe I owe Fahmida Y. Rashid a few cups of coffee for making this whole thing happen. And finally, a warm hug to my mom and dad for letting me do all that crazy computer stuff when I was younger.
So, what are we waiting for? Let’s start making our first iOS app in Ruby!
Creating a New App
It’s time to dive into RubyMotion. We will go over what we need to install, how to create a project, and how to run and debug our apps. That might sound like a lot, but I promise you’ll be surprised at just how fast we can get some-thing up and running. Since we plan on moving fast, this book assumes you’re familiar with Ruby; we won’t be doing anything too tricky with the language, but you should be comfortable with the common syntax for things like blocks and instance variables.
RubyMotion is a commercial product from HipByte and can be purchased from the RubyMotion website (http://rubymotion.com/). The RubyMotion tools work only on OS X 10.7 or newer, so make sure your operating system is up-to-date. When you purchase a license for RubyMotion, you will receive a key and a graphical installer, which will take care of everything.1 You also need to download Xcode, Apple’s IDE, from the Mac App Store. Installing Xcode also installs some developer tools RubyMotion relies on (such as the iOS Simulator), but you don’t have to work on RubyMotion projects inside it or any other IDE.
Instead, RubyMotion uses command-line tools, and you can use any text editor you want. There are add-ons for many popular editors that help with things like code completion and build integration.2 RubyMotion also builds on top of existing Ruby tools such as RubyGems and Rake, so Ruby developers will feel right at home.
Once everything is installed, you’re ready to take the dive. Read on!
1. For detailed installation instructions, visit the RubyMotion documentation at http://www.rubymotion.com/developer-center/guides/getting-started/.
1.1
Creating a New App
RubyMotion exists on the command line, so you should know the basics of navigating around a shell. The motion command is installed when you run the RubyMotion installer. It’s equivalent to the rails command in the Ruby realm.
motion manages individual projects in addition to the core RubyMotion tools. For example, you may be reminded to run motion update from time to time. Let’s open a terminal and navigate to where you want to create your Ruby-Motion projects. We’re going to create a few projects over the course of this book, so your work area should preferably be somewhere without any other files or folders. Once you’ve picked that out, run motion create HelloMotion.
MyProjects> motion create HelloMotion
Create HelloMotion
Create HelloMotion/.gitignore Create HelloMotion/Rakefile Create HelloMotion/app
Create HelloMotion/app/app_delegate.rb Create HelloMotion/resources
Create HelloMotion/spec
Create HelloMotion/spec/main_spec.rb
motion create makes a HelloMotion folder in the current directory and adds some more files inside. These generated files and folders form the essential skeleton of a RubyMotion project. Go ahead and cd into it (cd ./HelloMotion) so that we can take a look. You’ll run all of our subsequent RubyMotion commands from within this folder, so definitely keep a terminal window or tab open pointing to the directory.
For now, we’ll just talk about two of the files it created: Rakefile and
./app/app_delegate.rb.
The Rakefile is created at the root of a project. It’s where we configure apps and include settings such as the app’s name, icon, resources, and source code locations. Before we get too far ahead of ourselves, let’s start with the basics. The Rakefile gets its name from the rake command. rake is a command that allows you to execute arbitrary Ruby code via the command line. These chains (known as tasks) are loaded from the directory’s Rakefile and become executable in the form rake {task name}. For example, RubyMotion uses the rake device tasks to build an app to a device.
As of RubyMotion 1.11, the Rakefile will be generated to look like this:
first_app/HelloMotion/Rakefile # coding: utf-8
-*-$:.unshift("/Library/RubyMotion/lib") require 'motion/project'
Motion::Project::App.setup do |app|
# Use `rake config' to see complete project settings.
app.name = 'HelloMotion' end
The first two lines import necessary RubyMotion libraries into our project. Next, we call Motion::Project::App.setup. This is what actually sets up the Rakefile to build a RubyMotion app. We pass it a block where we configure the app object. By default, RubyMotion sets the app’s name to correspond to what we passed in motion create.
$.:unshift
Who?
If you’re not intimately familiar with Ruby, the first thing you may think when reading the Rakefile is “Wait...$:.unshift()?” Strange-looking indeed. What that line does is tell Ruby this: “When we use require(), also look in the /Library/RubyMotion/lib directory to search for what we’re requiring.”motion/project resides there, and without that initial $:.unshift(), no RubyMotion code would be found!
Earlier we mentioned rake device, but that’s nowhere in the Rakefile. It and the other RubyMotion tasks are defined when we require() motion/project. To list all the tasks, let’s run rake --tasks in a terminal.
HelloMotion> rake --tasks
rake archive # Create archives for everything
rake archive:development # Create an .ipa archive for development rake archive:release # Create an .ipa for release (AppStore)
rake build # Build everything
rake build:device # Build the device version rake build:simulator # Build the simulator version
rake clean # Clear build objects
rake config # Show project config
rake ctags # Generate ctags
rake default # Build the project, then run the simulator
rake device # Deploy on the device
rake simulator # Run the simulator
rake spec # Run the test/spec suite
rake static # Create a .a static library
Let’s take a look at the simulator by running rake in a terminal.
HelloMotion> rake
Build ./build/iPhoneSimulator-5.1-Development Compile ./app/app_delegate.rb
Create ./build/iPhoneSimulator-5.1-Development/HelloMotion.app
Link ./build/iPhoneSimulator-5.1-Development/HelloMotion.app/HelloMotion Create ./build/iPhoneSimulator-5.1-Development/HelloMotion.app/Info.plist Create ./build/iPhoneSimulator-5.1-Development/HelloMotion.app/PkgInfo Create ./build/iPhoneSimulator-5.1-Development/HelloMotion.dSYM Simulate ./build/iPhoneSimulator-5.1-Development/HelloMotion.app (main)> _
Give it a second to finish its business and...you’ll see an iPhone simulator pop up with our app running. Congratulations! You’ve just created your first iOS app in Ruby.
Additionally, your terminal should be displaying a new prompt. We can enter new Ruby code in the terminal and watch it execute on the fly; this is just like the rails console and irb commands in the Ruby and Rails world. Altogether, your screen should look like this:
Hooray! But how did that really happen? How did we get from app.name = 'HelloMotion' to an iPhone emulator popping up? To find the answer, we must leave rake and explore the app’s actual code.
1.2
Where It Begins: AppDelegate
Before we even setup() the app in the Rakefile, our app comes with some sensible defaults. Most importantly, it automatically compiles all Ruby files in the app
directory of our project. Remember that app_delegate.rb we mentioned earlier? It so happens that code was compiled with the app. In fact, it was the only
code compiled with our app, so it’s probably a good idea to see what it does.
first_app/HelloMotion/app/app_delegate.rb
class AppDelegate
def application(application, didFinishLaunchingWithOptions:launchOptions) true
end end
Hmm, all that did was define an AppDelegate class with one method. There’s not even a superclass, so how does this do anything at all?
Well, there’s a comment in our Rakefile on page 3 that tells us to run the rake config command to see all project settings. Let’s run that.
HelloMotion> rake config
background_modes : [] build_dir : "./build"
.. ..
delegate_class : "AppDelegate" ➤
.. ..
xcode_dir : "/Applications/Xcode.app/Contents/Developer"
There’s that AppDelegate class, and it’s assigned as the delegate_class. What’s that do? Well, RubyMotion actually looks for a class with the name we assign as
delegate_class and uses that as the application delegate when launching our app. We could’ve called our class SuperAppDelegate and changed our Rakefile to have the same result:
Motion::Project::App.setup do |app| app.name = 'HelloMotion'
app.delegate_class = "SuperAppDelegate" end
all sorts of application-level events, such as when the app starts, ends, goes to the background, gets a push notification, and does all that other good stuff. In the code generated by motion create, AppDelegate implements only the method
application:didFinishLaunchingWithOptions:. This method and notation look a little different from normal Ruby code because of the named argument didFinishLaunch-ingWithOptions: shoved in the middle. For more information about named arguments, check out Why Are There Colons in My Ruby?, on page 6.
application:didFinishLaunchingWithOptions: is called when the system finishes setting up the app and is ready for us to do our own setup. For now, just assume it will always return true. Some apps may want to use the launchOptions argument to determine whether the app should be started, but most of the time you won’t need that.
But aside from returning true and allowing the app to launch, our AppDelegate
doesn’t do anything. Let’s change that by showing a quick UIAlertView.
Why Are There Colons in My Ruby?
In many languages, functions look like this: obj.makeBox(origin, size). This can be a bit of a pain because now you need to look up the implementation of that function and figure out the order of the arguments. Objective-C uses named parameters to make this easier. In Objective-C, that same function looks like this: [obj makeBoxWithOrigin: origin andSize: size]. See how each variable directly follows the part of the function name that refers to it, removing ambiguity? Pretty clever. We refer to those functions by putting colons in place of variable names, like so: makeBoxWithOrigin:andSize:.
In Ruby, named arguments don’t exist;a instead, it has traditional methods like
obj.make_box(origin, size). RubyMotion decided to add named arguments to its implemen-tation of Ruby so the original Apple APIs were compatible, like so: obj.makeBox(origin, andSize: size). That andSize isn’t just an extra variable; it’s a real part of the method name.
obj.call_method(var1, withParam: var2) is totally different from obj.call_method(var1, withMagic: var2), despite having the same obj.call_method() form.
a. In the latest beta version of Ruby 2.0, named arguments like those in Ruby-Motion are available.
1.3
Showing a Message with UIAlertView
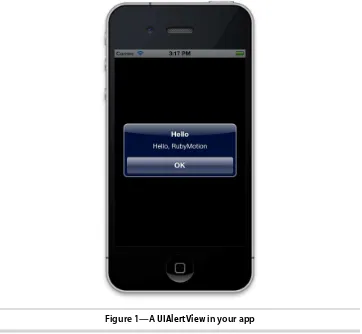
Now that we understand how our app boots up and we have our entry point, let’s try something. We’re going to show a UIAlertView, which is the standard blue pop-up you see when you get an error message or push notifications pre-iOS5. Let’s change application:didFinishLaunchingWithOptions: to add an alert right before returning.
first_app/HelloMotion_alert/app/app_delegate.rb
class AppDelegate
def application(application, didFinishLaunchingWithOptions:launchOptions) @alert =
➤
UIAlertView.alloc.initWithTitle("Hello", ➤
message: "Hello, RubyMotion", ➤
delegate: nil, ➤
cancelButtonTitle: "OK", ➤ otherButtonTitles: nil) ➤ @alert.show ➤ ➤
puts "Hello from the console!" ➤
true
end end
We create our alert using UIAlertView.alloc.initWith..., which is a prime example of the verbose Objective-C syntax used in the iOS SDK. The initializer here takes many arguments, but the only ones we care about are title, message, and cancel-ButtonTitle. Once those are set, all we need to do is call show(), and the alert will appear.
We also added a call to the logging statement puts(). You can pass it a normal string to print verbatim, or you can pass it any normal object that you want some information about. This will be the output visible in the debugging console while our app runs.
Speaking of which, let’s run rake one more time and check out our blue pop-up! (See Figure 1, A UIAlertView in your app, on page 8.)
In your terminal window, you should see (main)> Hello from the console! output in the emulator. While we’re looking here, let’s take a deeper look into the RubyMotion debugger.
1.4
Interactive Debugging
Earlier we mentioned that RubyMotion ships with an interactive debugger. This is what appeared in our terminal after running our first app in Section 1.2, Where It Begins: AppDelegate, on page 5. Any code entered in the debugger is executed line by line, and the changes you make are reflected immediately in the simulator.
Figure 1—A UIAlertView in your app
the console effectively. Let’s play with our app in the console and see if we can have some fun.
Let’s rake our app one more time. After compilation and setup, the terminal should display a prompt while the simulator is open. Because of our puts() in
AppDelegate, the Hello from the console! should be above the highlighted prompt. Don’t close the UIAlertView yet because we’re going to play with it.
Let’s find the instance of our AppDelegate. Remember that it’s set as our appli-cation delegate, so first we probably need to grab information about our application. Luckily, the UIApplication class represents an application, and we access our application’s instance using UIApplication.sharedApplication().
(main)> app = UIApplication.sharedApplication => #<UIApplication>
Care to take a guess how we get our AppDelegate out of that? Probably a delegate()
method, right?
(main)> delegate = app.delegate => #<AppDelegate>
Excellent; now we can grab our UIAlertView using Ruby’s instance_variable_get(). We can change the alert’s message and title and run the commands in the relevant code:
(main)> alert = delegate.instance_variable_get("@alert") => #<UIAlertView>
(main)> alert.title = "Goodbye" => "Goodbye"
(main)> alert.message = "You say yes?" => "You say yes?"
The results show immediately:
Finally, we can programmatically hide our alert with alert.dismiss. Even though we used only this one alert object, we were able to interact with and change our app’s UI with a few easy commands.
See, getting up and running with RubyMotion wasn’t so terrible. With just
motion create and rake, we started a new project and were able to run and debug our app. And if you ask me, that’s a sight easier than booting up Xcode and going through its many project creation wizards and configuration screens. Plus, the RubyMotion debugging workflow is miles more intuitive than using the low-level gdb and lldb tools in Xcode. In all, RubyMotion makes for a buttery-smooth transition into mobile development rather than jumping into the jarring world of Xcode and Objective-C.
CHAPTER 2
Filling the Screen with Views
As shown by everything from reviews to lawsuits, iOS apps are recognized for their visual design. Designers can craft the most beautiful (or crazy) graphics for an app, but it’s the developer’s job to bring them to life. But before we can make apps like Square, we need to start with the basics: putting simple shapes and objects on the screen.
2.1
All About Views and UIView
All of the “stuff” you see and interact with in an app are called views. Each distinct screen is made of dozens of views, from tiny icons to buttons and text entry fields. The base view of an app is called the window, and all other views exist within it. Apps can even have multiple windows, but that’s a little bit beyond our scope.
In code, views are UIView objects; all graphics on the screen are descendants of UIView. The window is a subclass of UIView called UIWindow. When our app starts, we set up a window and then begin adding new views to it. These additional views are known as subviews.
Subviews are visually stacked on top of each other within the parent view. Every view, not just the window, can have subviews. When you move a view, you also move its subviews. Programmatically, UIViews use a subviews property. This returns an array of the subviews sorted by back-to-front visibility (so a subview at index 0 is behind a subview at index 1).
Views have a rectangular shape and 2D location coordinates. The origin
location (0, 0) is the top-left corner of a view, so its bottom-right point corre-sponds to (view’s width, view’s height). In code, UIView uses the frame property to describe these properties. frames have a origin with which you can access the x and y coordinates, and they have a size property that defines the view’s
That’s a lot to take in, so for help refer to the following:
We can do a whole lot using just subviews and frame. Eventually we want to build the next GarageBand, but first we need to start with a lone colored box.
2.2
Making Shapes and Colors
Let’s get to some code. Create a new app called Boxey (remember how? motion create Boxey). Now we need to add a window to our app.
Adding a UIWindow should be one of the first things your app does, so we need to add it in AppDelegate’s application:didFinishLaunching:, like this:
views/Boxey_shape/app/app_delegate.rb
class AppDelegate
def application(application, didFinishLaunchingWithOptions:launchOptions) @window = UIWindow.alloc.initWithFrame(UIScreen.mainScreen.applicationFrame) @window.makeKeyAndVisible
There are a couple of new classes in there, so let’s walk through it. We created our UIWindow using initWithFrame:. We use this method to create all UIViews, not just windows. It takes a CGRect object, but for windows we usually want a frame that fills the display. This is why we use UIScreen instead of specifying our own size.
UIScreen is an object that contains information about the displays our app is running on (chiefly the mainScreen). Its applicationFrame() returns the CGRect that describes the size and location of our application. Applications need not only a size but a location because they might be offset by things like the status bar or the green “Call In Progress” bar at the top of the screen.
So, we create our window with the appropriate frame and call makeKeyAndVisible(). This is a special method for UIWindow that tells the system it will be the window receiving touch events and should be drawn to the screen.
views/Boxey_shape/app/app_delegate.rb
@blue_view = UIView.alloc.initWithFrame(CGRect.new([10, 10], [100, 100])) @blue_view.backgroundColor = UIColor.blueColor
@window.addSubview(@blue_view)
true
end end
Again, we use initWithFrame:, except now we create a new CGRect object with the initializer new([x, y], [width, height]). The two arrays correspond to the origin and
size subproperties of CGRect, as in rect.origin.x and rect.size.width. In some code, you might see CGRects created using the CGRectMake(x, y, width, height) method. RubyMotion also supports this style, which is how it works in the Objective-C iOS SDK, but CGRect.new is more idiomatic in Ruby.
Next we set the background color with a UIColor. It has some obvious defaults such as blueColor() and redColor(), but we can also create arbitrary hues. And lastly we use addSubview: to add the view to our window. Even though we can access the subviews() property of UIView, we can’t append or insert to it directly. Instead, we use specific methods like addSubview for those tasks. Go ahead and run our app (just rake, remember?) and observe our blue box. Even though it looks like the following, at least we have something on the screen!
We’ll start to make it more useful with buttons in Section 2.3, Adding Interac-tion with UIButton, on page 14.
Don
’
t Add Views to Windows
Adding lone UIViews directly to the window is frowned upon and generally not a great idea, but it’s a nice way to learn the basics. It’s OK while you’re still learning, but don’t do it in production code. We’ll get to the proper way of adding views in the next chapter, Organizing Apps with Controllers.
2.3
Adding Interaction with UIButton
The iOS APIs include many standard UIView subclasses. Some add intricate functionality, while others are merely ornamental. UIButton is one such view, and it does exactly what it sounds like. Let’s add it to our app and see how it works.
UIButtons are created differently than normal UIViews. Instead of using alloc.initWith
-Frame, UIButtons are initialized using the static method UIButton.buttonWithType:. We pass an integer option, usually UIButtonTypeRoundedRect or UIButtonTypeCustom, and get a new button. Many iOS APIs use verbose integer constants like these because more idiomatic Ruby Symbols don’t exist in the original Objective-C. Anyhow, take a look at how we add our button in AppDelegate.
views/Boxey_buttons/app/app_delegate.rb
@window.addSubview(@blue_view)
@add_button = UIButton.buttonWithType(UIButtonTypeRoundedRect) @add_button.setTitle("Add", forState:UIControlStateNormal) @add_button.sizeToFit
@add_button.frame = CGRect.new(
[10, @window.frame.size.height - 10 - @add_button.frame.size.height], @add_button.frame.size)
@window.addSubview(@add_button)
UIButtonTypeRoundedRect gives us a white button with rounded corners and blue text. Usually apps will customize their button’s image or backgroundImage with custom designs, but the rounded rectangle doesn’t look bad either. Next we assign the button a title using setTitle:forState:; the title part is obvious, but what the heck is a control state?
UIButton is actually a subclass of UIControl, which is a direct subclass of UIView.
UIControl provides common behaviors for interactive elements like buttons and switches, and each control has a state that describes how it can be interacted with. Depending on how we want the user to interact with them, controls can have states like UIControlStateNormal or UIControlStateDisabled.1UIButton uses the state
it inherited from UIControl to change the text depending on its current state. Many control elements follow this pattern, so it’s good to be familiar with it. After setting the title, we call sizeToFit(). This is another method every UIView
has, but how it works will change from subclass to subclass. In UIButton’s case, it will resize itself to fit its title with appropriate padding.
After that, we set the frame with some customized alignments and add the button as another subview to the window. We rake again and see our under-stated button at the bottom of the screen. Unfortunately, it doesn’t do more than render a pleasant blue gradient when you tap it:
Naturally, there’s a way to change that.
UIControls allow us to intercept events such as touching and dragging using
addTarget:action:forControlEvents:. This method will call the action method on the
target object when the control event(s) occur; again, this un-Ruby pattern is another component rooted in the original Objective-C APIs. The event passed in this method is actually a bitmask of UIControlEvents,2 so if you want to register
the action for multiple events, it looks like this: forControlEvents:
(UIControlEvent-TouchDown | UIControlEventTouchUpInside).
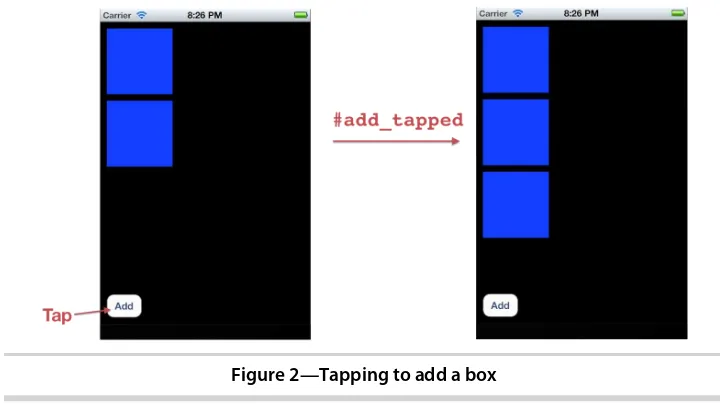
When our button is tapped, we’ll add a new blue box to the screen, like so:
views/Boxey_buttons/app/app_delegate.rb
@window.addSubview(@add_button) @add_button.addTarget(
self, action:"add_tapped", forControlEvents:UIControlEventTouchUpInside) true
end
def add_tapped
new_view = UIView.alloc.initWithFrame(CGRect.new([0, 0], [100, 100])) new_view.backgroundColor = UIColor.blueColor
last_view = @window.subviews[0] new_view.frame = CGRect.new(
[last_view.frame.origin.x,
last_view.frame.origin.y + last_view.frame.size.height + 10], last_view.frame.size)
@window.insertSubview(new_view, atIndex:0)
end
Aside from the button callback, we’ve talked about all these methods before.
UIControlEventTouchUpInside triggers when the user lifts their touch up, inside of the button’s frame, so it acts as an event to track taps. You can decide to be clever and arrange the boxes into multiple columns, but I’ll leave the details of the implementation up to you. Here, run our app, hit the button a few times, and admire our fine work (Figure 2, Tapping to add a box, on page 16).
2. Find a complete list of control events at http://developer.apple.com/library/ios/#a/uikit/reference/ UIControl_Class/Reference/Reference.html#//apple_ref/occ/cl/UIControl.
Figure 2—Tapping to add a box
2.4
Animating Views
We talked about how important views are on iOS, but apps are also known for their smooth animations. Perhaps one reason slick transitions and niceties are so pervasive in iOS apps is that they’re so darn easy to implement. And we’re going to add that to our little box app right now.
Let’s add another button, Remove, which will fade out the most recently added view and slide all others to new positions in its place. That might sound complicated, and on other platforms or frameworks it might be, but the iOS animation APIs make it painless. All we do is tell the system what properties of our views to animate and how long that animation should take.
We will add yet another button to our AppDelegate and wire its target/action
callbacks for removing a view.
views/Boxey_animations/app/app_delegate.rb
@add_button.addTarget(
self, action:"add_tapped", forControlEvents:UIControlEventTouchUpInside) @remove_button = UIButton.buttonWithType(UIButtonTypeRoundedRect)
@remove_button.setTitle("Remove", forState:UIControlStateNormal) @remove_button.sizeToFit
@remove_button.frame = CGRect.new(
[@add_button.frame.origin.x + @add_button.frame.size.width + 10, @add_button.frame.origin.y],
@remove_button.frame.size) @window.addSubview(@remove_button) @remove_button.addTarget(
self, action:"remove_tapped",
Pretty easy, right? Basically, all we did was set a frame and add a subview; that’s nothing new. Now we need to implement that remove_tapped() callback. It’s going to be longer than our add_tapped() method, so we’ll take it slow. First, we need to find the objects we’re interested in.
views/Boxey_animations/app/app_delegate.rb def remove_tapped
other_views = @window.subviews.select do |view|
not view.is_a? UIButton
end
@last_view = other_views.last
Because our buttons are also subviews of the window, we need to prune them and make sure we deal only with the blue boxes. There are better ways to architect this (such as storing the boxes in some independent array), but this works with what we have. Next, we do the actual animations!
views/Boxey_animations/app/app_delegate.rb
if @last_view and other_views.count > 1 UIView.animateWithDuration(0.5,
animations:lambda { @last_view.alpha = 0
@last_view.backgroundColor = UIColor.redColor other_views.each do |view|
next if view == @last_view
view.frame = CGRect.new( [view.frame.origin.x,
view.frame.origin.y - (@last_view.frame.size.height + 10)], view.frame.size)
end
},
completion:lambda { |finished| @last_view.removeFromSuperview })
end end
Animations revolve around the UIView.animateWithDuration:animations: group of methods (you can also use animateWithDuration:delay:options:animations:completions: if you need to fine-tune things). Any alterations to your views made in the lambda we pass for animations will animate if possible. Beyond the basics like
frame and opacity, most sensible properties of UIView will work as expected.3 In
our case, we fade out the box by setting the floating-point alpha to zero. Then we enumerate through all the other views and adjust their frames.
3. You can find a full list of animatable properties at:
We use the optional completion: argument to get a callback when the animation finishes. This block takes one boolean argument, which tells us if the callback has been fired when the animation actually completed (the callback may fire prematurely if the animation has been canceled elsewhere). This is a good place to clean up our views, which we do here by invoking removeFromSuperview(). This will remove the view from its parent’s subviews and be erased from the screen.
The animation function looks a bit strange because of the multiple lambdas, but it’s no different from changing those properties of a view when they’re static. Give it a rake, add some boxes, and then watch them float away with the Remove button:
2.5
Adding Static Text with UILabel
Animations are fun, but we also need to display information long enough for the user to actually read it. In most cases, we can use UILabel to display static text. Labels can be very flexible, allowing you to change everything from the font to minute adjustments with the text baseline, and are really easy to get up and running. Let’s add one to our little app.
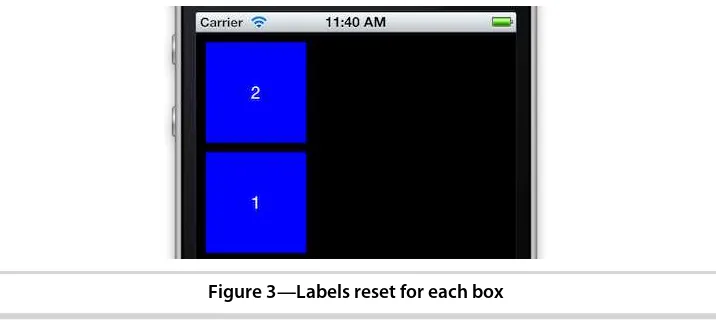
We’re going to add a UILabel to each box, displaying its index in subviews. We probably wouldn’t ship that sort of feature, but it’s really handy for debugging and might give us a better idea of what’s going on in our animation. UILabel is really lightweight, so it won’t be a pain to add.
to give it a box elsewhere in our code, and it will work. This is the important part of the code, so let’s take a look at it first.
views/Boxey_label/app/app_delegate.rb def add_label_to_box(box)
box.subviews.each do |subview| subview.removeFromSuperview
end
index_of_box = @window.subviews.index(box) label = UILabel.alloc.initWithFrame(CGRectZero) label.text = "#{index_of_box}"
label.textColor = UIColor.whiteColor label.backgroundColor = UIColor.clearColor label.sizeToFit
label.center = [box.frame.size.width / 2, box.frame.size.height / 2] box.addSubview(label)
end
We start by removing all subviews from box, which handles the case where we call this method multiple times on the same view (which we will). Our label is initialized with CGRectZero, which is shorthand for a rectangle at the origin and no size. After we set the text appropriately, we call sizeToFit() just like
UIButton. The UILabel implementation of sizeToFit() will precisely fill the frame to fit the text, leaving no padding. Then we use the center property of UIView, which is shorthand for putting the center of a view at a point (as opposed to the upper-left corner).
Remember how we said subviews are positioned within their parent? Even though we set the label to be centered at a coordinate like (50, 50), it can exist at a different point within the window. As our animation slides the box, its label will move too.
Not too bad, right? The only UILabel-exclusive properties in this example are
text and textColor; everything else is inherited from UIView. Now we need to actually call this method.
We usually want to go through all the boxes each time we update the labels so we can be absolutely sure our labels are in sync with subviews. To make our lives easier, we’re going to refactor the logic for picking out boxes from @win-dow.subviews into one method that simply returns only the boxes.
views/Boxey_label/app/app_delegate.rb def boxes
@window.subviews.select do |view|
not (view.is_a?(UIButton) or view.is_a?(UILabel))
end end
We can combine our two new methods into one really great helper method that takes care of everything.
views/Boxey_label/app/app_delegate.rb def add_labels_to_boxes
self.boxes.each do |box| add_label_to_box(box)
end end
Finally, we can put these to some use, first in application:didFinishLaunchingWithOp-tions:
views/Boxey_label/app/app_delegate.rb
add_labels_to_boxes
@window.addSubview(@blue_view) ➤
and then down in add_tapped().
views/Boxey_label/app/app_delegate.rb
add_labels_to_boxes
@window.insertSubview(new_view, atIndex:0) ➤
Lastly, we need to reset the labels for each box after we run the removal ani-mation. We’re going to change our other_views to use self.boxes instead of its own array construction. Then we’re going to use our handy add_labels_to_boxes() to sync all the labels again.
views/Boxey_label/app/app_delegate.rb def remove_tapped
➤ other_views = self.boxes @last_view = other_views.last
views/Boxey_label/app/app_delegate.rb
completion:lambda { |finished| @last_view.removeFromSuperview ➤ add_labels_to_boxes
})
Whew. Our UILabel was only a small part of our changes, but now we can clearly see how our view hierarchy behaves at runtime. Run the app, and you should see labels appear as in Figure 3, Labels reset for each box, on page 21.
2.6
Making Text Dynamic with UITextField
Figure 3—Labels reset for each box
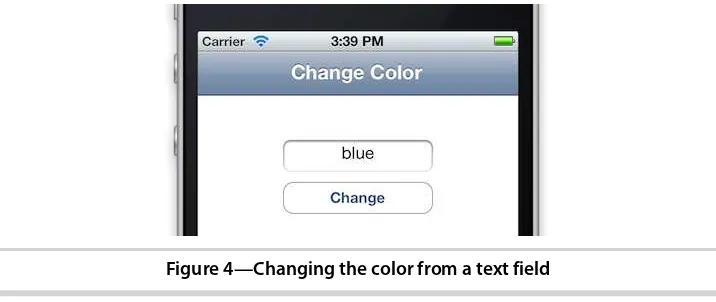
box app. It will let the user pick the UIColor of our boxes using simple commands like “red” and “blue.” Let’s get started.
First we need to add the field to the view hierarchy. UITextField puts many configuration options at our disposal, from fonts to the look of the Return key. We won’t be using all of its properties today, but you can consult Apple’s documentation on the class for more information.4 Our field should be added in app_delegate.rb like so:
views/Boxey_textfield/app/app_delegate.rb
@remove_button.addTarget( self, action:"remove_tapped",
forControlEvents:UIControlEventTouchUpInside)
@color_field = UITextField.alloc.initWithFrame(CGRectZero) @color_field.borderStyle = UITextBorderStyleRoundedRect @color_field.text = "Blue"
@color_field.enablesReturnKeyAutomatically = true @color_field.returnKeyType = UIReturnKeyDone
@color_field.autocapitalizationType = UITextAutocapitalizationTypeNone @color_field.sizeToFit
@color_field.frame = CGRect.new(
[@blue_view.frame.origin.x + @blue_view.frame.size.width + 10, @blue_view.frame.origin.y + @color_field.frame.size.height], @color_field.frame.size)
@window.addSubview(@color_field)
@color_field.delegate = self ➤
4. You can find the UITextField reference at http://developer.apple.com/library/ios/#documentation/uikit/ reference/UITextField_Class/Reference/UITextField.html.
Like every other view in the window, we spend some time setting up the frame and positioning it exactly where we want it. returnKeyType() and similar properties control exactly what they say; the only cryptic property we use is
UITextBorder-StyleRoundedRect, which adds a nice border and inner shadow to our field. By default, UITextFields have empty backgrounds and no default styling.
The most important part of our addition is setting @color_field’s delegate. Much like our application uses AppDelegate as its delegate, other objects use the del-egation pattern as a way of sending callback events. The UITextFieldDelegate specification lists all of the methods the delegate object can implement.5 We aren’t required to implement any of them, but we will implement textFieldShould
-Return: to intercept when the Return/Done key is pressed.
views/Boxey_textfield/app/app_delegate.rb def textFieldShouldReturn(textField)
color_tapped
textField.resignFirstResponder false
end
resignFirstResponder looks a little cryptic, but in reality it simply hides the key-board. In iOS, there’s a concept of a responder chain that determines how events such as taps are propagated among our objects. We won’t deal with the responder chain in this book, but the important thing to remember is that the first responder of a text field is almost always the virtual keyboard. You also may notice that we explicitly return false from textFieldShouldReturn:, but why is that? Whatever you return from this method decides whether the
UITextField carries out the default behavior of its Return key; in our case, we’re hiding the keyboard, and the normal action should be avoided.
Finally, we need to implement the color_tapped() method we called in textFieldShoul-dReturn:. We’re going to read the text property of the text field and use the Ruby metaprogramming send() method to create a UIColor from that string.
views/Boxey_textfield/app/app_delegate.rb def color_tapped
color_prefix = @color_field.text
color_method = "#{color_prefix.downcase}Color" if UIColor.respond_to?(color_method)
@box_color = UIColor.send(color_method) self.boxes.each do |box|
box.backgroundColor = @box_color
end
else
UIAlertView.alloc.initWithTitle("Invalid Color", message: "#{color_prefix} is not a valid color", delegate: nil,
cancelButtonTitle: "OK", otherButtonTitles: nil).show
end end
Since we’re feeling friendly, we alert the user if there is no such UIColor for their input. But if we do succeed in creating a color object, we assign it to a @box_color instance variable. We need to go back to other parts of the code to make sure they also use @box_color; that way, events like adding a new box work as expected.
views/Boxey_textfield/app/app_delegate.rb
@window.makeKeyAndVisible ➤@box_color = UIColor.blueColor
@blue_view = UIView.alloc.initWithFrame(CGRect.new([10, 10], [100, 100])) ➤@blue_view.backgroundColor = @box_color
@window.addSubview(@blue_view)
views/Boxey_textfield/app/app_delegate.rb
new_view.backgroundColor = @box_color
def add_tapped
new_view = UIView.alloc.initWithFrame(CGRect.new([0, 0], [100, 100])) ➤
All we’re doing here is changing the hard-coded use of blueColor to our new instance variable. And there’s one more thing: we need to fix our boxes() method to ignore the new UITextField.
views/Boxey_textfield/app/app_delegate.rb def boxes
@window.subviews.select do |view|
not (view.is_a?(UIButton) or view.is_a?(UILabel) or view.is_a?(UITextField)) ➤
end end
Fantastic; let’s run rake again and play with the text field. Be sure to try more exotic colors like “teal” and “magenta,” too.
2.7
Exploring RubyMotion Libraries
We whipped up a pretty interesting app using a relatively small amount of code; however, we also used some vestigial Objective-C patterns that look obviously out of place. This is one area where the RubyMotion community is stepping up and wrapping un-Ruby code into more idiomatic structures. Several libraries and RubyGems6 are available that could have helped us
manage our views.
For example, Sugarcube (https://github.com/rubymotion/sugarcube) would have allowed us to replace those long animation method names with very concise functions such as fade_out() and move_to().
@last_view.fade_out { |view| @last_view.removeFromSuperview }
other_views.each do |view|
view.move_to [view.frame.origin.x, view.frame.origin.y - (@last_view.frame.size)]
end
Much better, right? And for more complex apps, the Teacup library7 allows
you to construct views using CSS-esque style sheets. Our blue boxes might have Teacup style sheets defined like this:
Teacup::Stylesheet.new :app do
style :blue_box,
backgroundColor: UIColor.blueColor, width: 100,
height: 100
end
Third-party libraries like these are helping RubyMotion become more than just an Objective-C/Ruby mashup. As you can see in the previous examples, they can dramatically change how we express what we are trying to accomplish in code. Later in Representing Data with Modelsand Example: Writing an API-Driven App, we’ll actually use some third-party RubyMotion frameworks to simplify otherwise complex elements of our apps.
But even without those niceties, we’ve gone from an empty app to an interac-tive, animated UI in the span of a few quick examples. There are far more included UIView subclasses than we have time for, but the ones we’ve covered should make those a cinch to learn when the time comes.
6. For a full explanation of RubyGems and RubyMotion, check out Third-Party Libraries and RubyMotion, on page 47.
By making a slightly more ambitious app, we have also gotten a chance to see how the Ruby language can make our iOS development lives a little easier. Take my word for it, RubyMotion methods such as Array#select and string formatting ("#{ruby_code_here}") are more concise than their Objective-C coun-terparts. Then again, we still have some very non-Ruby practices that leave much to be desired, such as UITextField’s delegate pattern.
In the course of working on views, our AppDelegate got pretty crowded with all kinds of code: helper functions, button callbacks, view creation...the works. Real apps have much more robust organization in the form of controllers, which we’ll cover now in Organizing Apps with Controllers.
Organizing Apps with Controllers
iOS apps usually consist of more than simple rectangles and buttons. We can easily build complex interfaces using the SDK; however, we need to first learn about controllers in order to create them.
Views are only one leg of the Model-View-Controller (MVC) programming paradigm adopted by the iOS SDK. A “programming paradigm” sounds intimidating, but MVC is actually fairly simple. The basic idea is that your code should have three types of objects: models to represent data, views to display those models, and controllers to process user input.
You can think of controllers as a layer between the user and the rest of your code. Their role is to interpret events and forward the changes to the relevant models and views. For example, tapping a button should be detected by a controller, which then increments a data property (model) and updates a label to reflect the change (view).
Controllers are instances of UIViewController in iOS. The SDK comes with several
UIViewController subclasses with custom views and behavior to give every app the same look and feel. Controllers are absolutely central to iOS development, so we’re going to take a look at how we use them.
3.1
Adding a New UIViewController
Let’s get started with a small project to see how UIViewController works, and you’ll see what I mean. We’ll create an app showing different ways to explore colors, specifically, motion create ColorViewer.
First we make the ./app/controllers directory (mkdir ./app/controllers). This is where we’ll keep all of our controller classes. When building production-level apps, you should also add views and models subdirectories, but we won’t be needing those right now.
Then we add a colors_controller.rb file in controllers. This will be our custom
UIView-Controller subclass that’s presented to the user. We’ll start by setting its superclass and adding one short method.
controllers/ColorViewer/app/controllers/colors_controller.rb
class ColorsController < UIViewController
def viewDidLoad
super
self.view.backgroundColor = UIColor.whiteColor
@label = UILabel.alloc.initWithFrame(CGRectZero) @label.text = "Colors"
@label.sizeToFit @label.center =
[self.view.frame.size.width / 2, self.view.frame.size.height / 2] @label.autoresizingMask =
UIViewAutoresizingFlexibleBottomMargin | UIViewAutoresizingFlexibleTopMargin self.view.addSubview(@label)
end end
Subclassing UIViewController always involves overriding viewDidLoad(). This method is called right after our controller’s view has been created and is where we do whatever custom setup is necessary. For now, we just set the view’s back-ground color, add a label, and call it a day.
viewDidLoad() is one of the view life-cycle methods. Every controller’s view goes through several stages: creation, appearance, disappearance, and destruction. You can add custom behaviors at each point using the corresponding life-cycle methods, but the most common is viewDidLoad().
Now that we have our controller, open our AppDelegate. We’re going to create a UIWindow just like we did in the previous chapter, except we’re now going to use the rootViewController=() method instead of addSubview:.
controllers/ColorViewer/app/app_delegate.rb
class AppDelegate
def application(application, didFinishLaunchingWithOptions:launchOptions) @window = UIWindow.alloc.initWithFrame(UIScreen.mainScreen.bounds) @window.makeKeyAndVisible
@window.rootViewController =
ColorsController.alloc.initWithNibName(nil, bundle: nil)
true
end end
rootViewController=() will take the UIViewController and adjust the view’s frame to fit the window. This lets us write our controller without hard-coding its size, making our controller reusable to other containers. As we said earlier, methods in which you pass a UIViewController are very common, as we’ll soon see. We instantiate UIViewControllers with initWithNibName:bundle:. This method can be used to load a controller from a .NIB/.XIB file created using Xcode’s Interface Builder, but in this case, we passed nil, meaning the controller will be created programatically.1
initWithNibName:bundle: is the designated initializer of UIViewController. Whenever you want to create a controller, you must call this method at some point, either directly or inside the definitions of your custom initializers (such as
controller.initWithSome:property:).
Let’s run our app and check it out:
As we saw in Section 2.2, Making Shapes and Colors, on page 12, a few
addSubview:s could have given us the same result, but using controllers creates a view that can easily fit into different containers. In fact, we’re going to do just that with UINavigationController in Section 3.2, Using Multiple Controllers with UINavigationController, on page 30.
super and the Life-Cycle Methods
It’s a good habit to call super() in viewDidLoad() and the other life-cycle methods. The default implementations of UIViewController can have important setup details, and you may experience some unexpected and hard-to-debug behavior if you don’t call them; this is particularly true if you start subclassing UINavigationController or UITableViewController. In some cases, notably viewDidAppear, Apple explicitly says you need to call the super-class method in any UIViewController subclass. Refer to Apple’s documentationa for more details.
a. http://developer.apple.com/library/ios/#documentation/uikit/reference/UIViewController_Class/Reference/ Reference.html
3.2
Using Multiple Controllers with UINavigationController
Although some iOS apps are famous for their unique visuals, most apps share a common set of interface elements and interactions included with the SDK. Typical apps will have a persistent top bar (usually blue) with a title and some buttons; these apps use an instance of UINavigationController, one of the standard
container controllers in iOS.
Containers are UIViewController subclasses that manage many other child UIView-Controllers. Kind of wild, right? Containers have a view just like normal con-trollers, to which their children controllers’ views are added as subviews. Containers add their own UI around their children and resize their subviews accordingly. UINavigationController adds a navigation bar and fits the children controllers below, like this:
UINavigationController manages its children in a stack, pushing and popping views on and off the screen. Visually, new views are pushed in from the right, while old views are popped to the left. For example, Mail.app uses this to dig down from an inbox to an individual message. UINavigationController also automatically
handles adding the back button and title for you; all you need to worry about is pushing and popping the controller objects you’re using. Check out the following to see how Settings.app uses navigation controllers.
UINavigationController is pretty easy to integrate. In AppDelegate, we change our
rootViewController() assignment to use a new UINavigationController.
controllers/ColorViewer_nav/app/app_delegate.rb
class AppDelegate
def application(application, didFinishLaunchingWithOptions:launchOptions) @window = UIWindow.alloc.initWithFrame(UIScreen.mainScreen.bounds) @window.makeKeyAndVisible
controller = ColorsController.alloc.initWithNibName(nil, bundle: nil) ➤
nav_controller = ➤
UINavigationController.alloc.initWithRootViewController(controller) ➤
@window.rootViewController = nav_controller ➤
true
end end
initWithRootViewController: will take the given controller and start the navigation stack with it. As we said earlier, the UINavigationController will handle adding and resizing this controller’s view to fit to the appropriate size.
Before we run the app, we should make one more change in ColorsController. Every UIViewController has a title(), which UINavigationController uses to set the top bar’s title.
controllers/ColorViewer_nav/app/controllers/colors_controller.rb
Run and check out our slightly prettier app:
Excellent, let’s make it do something. We’ll add a few buttons to our view, each representing a color. When a button is tapped, we’ll push a detail con-troller with its color as the background. Visually, a new concon-troller will slide in from the right while the old ColorsController fades to the left.
First we need to add those buttons to the view at the end of viewDidLoad(). We’re going to use some of Ruby’s dynamic features to get this done, primarily the
send() method. You can use any of the default UIColor helper methods like purple-Color() or yellowColor(), but we’re going to stick with the basics.
controllers/ColorViewer_nav/app/controllers/colors_controller.rb
["red", "green", "blue"].each_with_index do |color_text, index| color = UIColor.send("#{color_text}Color")
button_width = 80
button = UIButton.buttonWithType(UIButtonTypeRoundedRect) button.setTitle(color_text, forState:UIControlStateNormal) button.setTitleColor(color, forState:UIControlStateNormal) button.sizeToFit
button.frame = [
[30 + index*(button_width + 10),
@label.frame.origin.y + button.frame.size.height + 30], [80, button.frame.size.height]
]
button.autoresizingMask =
UIViewAutoresizingFlexibleBottomMargin | UIViewAutoresizingFlexibleTopMargin button.addTarget(self,
action:"tap_#{color_text}",
forControlEvents:UIControlEventTouchUpInside) self.view.addSubview(button)
end
See the color = UIColor.send("#{color_text}Color") trick? This lets us create the UIColor, button text, and button callback all with a single color_text variable. If you run our app now, you should see the three buttons just like this:
Now on to implementing those button callbacks. For each of these, we’ll need to push a new view controller onto our UINavigationController’s stack. UIViewControllers happens to have a navigationController() property, which lets us access the parent
UINavigationController. This navigationController() is automatically set whenever we add a view controller to a navigation stack, which we did with initWithRootView-Controller:. With that in mind, our button callbacks look something like this:
controllers/ColorViewer_nav/app/controllers/colors_controller.rb def tap_red
controller = ColorDetailController.alloc.initWithColor(UIColor.redColor) self.navigationController.pushViewController(controller, animated: true)
end
def tap_green
controller = ColorDetailController.alloc.initWithColor(UIColor.greenColor) self.navigationController.pushViewController(controller, animated: true)
end
def tap_blue
controller = ColorDetailController.alloc.initWithColor(UIColor.blueColor) self.navigationController.pushViewController(controller, animated: true)
end
We call pushViewController:animated: on the navigation controller, which pushes the passed controller onto the stack. By default, the navigation controller will also create a back button that will handle popping the frontmost child controller for us. If you need to do that programmatically, just call popViewCon-trollerAnimated:() on UINavigationController.
We referenced a new ColorDetailController class, so let’s implement that. First we create color_detail_controller.rb in ./app/controllers. We’ll keep it simple and just set the title and background color.
controllers/ColorViewer_nav/app/controllers/color_detail_controller.rb
class ColorDetailController < UIViewController
def initWithColor(color)
self.initWithNibName(nil, bundle:nil) @color = color
self
end
def viewDidLoad
super
self.view.backgroundColor = @color self.title = "Detail"
end end
initializer initWithNibName:bundle:(), which is required for any controller initializer we write. You also need to return self from these functions, which should make sense given all the times we assign a variable from these methods (such as
controller = UIViewController.alloc.initWithNibName(nil, bundle: nil)).
It’s time to rake and play with our navigation stack. It should look like this:
Check out the slick animations on the navigation bar, where the title simul-taneously fades and slides as a new controller is pushed.
Many apps structure their interface using UINavigationController, where each pushed controller gradually reveals more detailed data. As you saw, there are only a couple of methods we need to implement that user interface. However, some apps need more than this kind of hierarchal layout. UITabBarController is another widely used container controller, and in Section 3.3, Separating Controllers with UITabBarController, on page 34 we’re going to add it to our app.
3.3
Separating Controllers with UITabBarController
UITabBarController functions an awful lot like UINavigationController. The children controllers’ views fit above the black tab bar, where each tab corresponds to one child. The iPod app shows a tab with room for four controllers:
The fact that the More tab appears here indicates there are more than five children.
Unlike other containers, UITabBarControllers are only to be used as the rootViewCon-troller() of a UIWindow. You cannot push an instance of UITabBarController in
pushViewController:animated:. From a user-experience perspective, this means you should use a tab bar only if contains very distinct and globally applicable controllers.
Just like UINavigationController, tab bars are easy to add. It just takes a small change to AppDelegate.
controllers/ColorViewer_tab/app/app_delegate.rb
controller = ColorsController.alloc.initWithNibName(nil, bundle: nil) nav_controller =
UINavigationController.alloc.initWithRootViewController(controller) tab_controller =
UITabBarController.alloc.initWithNibName(nil, bundle: nil) tab_controller.viewControllers = [nav_controller]
@window.rootViewController = tab_controller
We create a UITabBarController like a normal UIViewController and set its viewControllers()
to an array containing our navigation controller. The order of viewControllers() corresponds to the left-to-right order of the tabs.
When you run our app, you can see the top and bottom bars typical to most iOS apps implemented with a pretty small amount of code. Since it’s not very helpful to have just one unstyled tab, let’s fix that.
Every UIViewController has a tabBarItem() property, which accepts UITabBarItem, an object containing information about how to draw the view for the controller in the bottom tab bar. It is not a UIView but rather a plain object that the system uses to construct a view. We use the UITabBarItem to customize the icon, title, and other appearance options for the controller’s tab.
The first step is to override initWithNibName:bundle: in ColorsController, and then we can create our UITabBarItem.
controllers/ColorViewer_tab/app/controllers/colors_controller.rb def initWithNibName(name, bundle: bundle)
super
self.tabBarItem =
UITabBarItem.alloc.initWithTitle( "Colors",
image: nil, tag: 1) self
end
You can also use the initWithTabBarSystemItem:tag: initializer to automatically set the title and image, assuming your tab corresponds to one of the default styles (such as Favorites or Contacts).
Why did we create our tab item in initWithNibName:bundle:? We want to create the
tabBarItem() as soon as the controller exists, regardless of whether its view has been created yet. UITabBarController will load the views only when absolutely necessary, so if you wait to create the tab item in viewDidLoad(), then some controllers’ items might not be set when the app is done launching.
One more thing! We should probably add another tab, right? We’ll pretend this is the Top Color section, where we can view the most popular color. This way we can reuse our ColorDetailController.
controllers/ColorViewer_tab/app/app_delegate.rb
top_controller = ColorDetailController.alloc.initWithColor(UIColor.purpleColor) top_controller.title = "Top Color"
top_nav_controller =
UINavigationController.alloc.initWithRootViewController(top_controller) tab_controller.viewControllers = [nav_controller, top_nav_controller]
Run the rake command once again, and voila