BEGINNING IOS PROGRAMMING
INTRODUCTION . . . xix
CHAPTER 1 Building a Real-World iOS App: Bands . . . 1
CHAPTER 2 Introduction to Objective-C . . . 9
CHAPTER 3 Starting a New App . . . 51
CHAPTER 4 Creating a User Input Form . . . 75
CHAPTER 5 Using Table Views . . . 103
CHAPTER 6 Integrating the Camera and Photo Library in iOS Apps . . . 133
CHAPTER 7 Integrating Social Media . . . 153
CHAPTER 8 Using Web Views . . . 175
CHAPTER 9 Exploring Maps and Local Search . . . 195
CHAPTER 10 Getting Started with Web Services . . . 219
CHAPTER 11 Creating a Universal App . . . 243
CHAPTER 12 Deploying Your iOS App . . . 267
APPENDIX Answers to Exercises . . . 287
BEGINNING
BEGINNING
iOS Programming
BUILDING AND DEPLOYING iOS APPLICATIONS
www.wiley.com
Copyright © 2014 by John Wiley & Sons, Inc., Indianapolis, Indiana Published simultaneously in Canada
ISBN: 978-1-118-84147-1 ISBN: 978-1-118-84160-0 (ebk) ISBN: 978-1-118-84144-0 (ebk)
Manufactured in the United States of America 10 9 8 7 6 5 4 3 2 1
No part of this publication may be reproduced, stored in a retrieval system or transmitted in any form or by any means, electronic, mechanical, photocopying, recording, scanning or otherwise, except as permitted under Sections 107 or 108 of the 1976 United States Copyright Act, without either the prior written permission of the Publisher, or authorization through payment of the appropriate per-copy fee to the Copyright Clearance Center, 222 Rosewood Drive, Danvers, MA 01923, (978) 750-8400, fax (978) 646-8600. Requests to the Publisher for permission should be addressed to the Permissions Department, John Wiley & Sons, Inc., 111 River Street, Hoboken, NJ 07030, (201) 748-6011, fax (201) 748-6008, or online at http://www.wiley.com/go/permissions.
Limit of Liability/Disclaimer of Warranty: The publisher and the author make no representations or warranties with respect to the accuracy or completeness of the contents of this work and specifically disclaim all warranties, including without limitation warranties of fitness for a particular purpose. No warranty may be created or extended by sales or pro-motional materials. The advice and strategies contained herein may not be suitable for every situation. This work is sold with the understanding that the publisher is not engaged in rendering legal, accounting, or other professional services. If professional assistance is required, the services of a competent professional person should be sought. Neither the pub-lisher nor the author shall be liable for damages arising herefrom. The fact that an organization or Web site is referred to in this work as a citation and/or a potential source of further information does not mean that the author or the publisher endorses the information the organization or Web site may provide or recommendations it may make. Further, readers should be aware that Internet Web sites listed in this work may have changed or disappeared between when this work was written and when it is read.
For general information on our other products and services please contact our Customer Care Department within the United States at (877) 762-2974, outside the United States at (317) 572-3993 or fax (317) 572-4002.
Wiley publishes in a variety of print and electronic formats and by print-on-demand. Some material included with standard print versions of this book may not be included in e-books or in print-on-demand. If this book refers to media such as a CD or DVD that is not included in the version you purchased, you may download this material at http:// booksupport.wiley.com. For more information about Wiley products, visit www.wiley.com.
Library of Congress Control Number: 2013958293
ABOUT THE AUTHOR
Acquisitions Editor
Mary James
Project Editor
Ami Sullivan
Technical Editor
Kyle Richter
Production Editor
Daniel Scribner
Copy Editor
San Dee Phillips
Editorial Manager
Mary Beth Wakefield
Freelancer Editorial Manager
Rosemarie Graham
Associate Director of Marketing
David Mayhew
Marketing Manager
Ashley Zurcher
Business Manager
Amy Knies
Vice President and Executive Group Publisher
Richard Swadley
Associate Publisher
Jim Minatel
Project Coordinator, Cover
Todd Klemme
Proofreader
Mark Steven Long
Indexer
Robert Swanson
Cover Designer
Wiley
Cover Image
ACKNOWLEDGMENTS
WHEN THE ORIGINAL IPHONE was first released, I thought my friends who lined up and waited hours to buy one were crazy. Who would spend that much money on a phone? It wasn’t until Apple announced the iPhone SDK that my mind began to change. Finally, I decided to take the plunge and headed to the local AT&T store. I felt guilty for spending so much money until I got home and started to actually use my new iPhone. I was amazed! I had to learn how to write my own apps.
Five years later I’m still amazed at the developer community that grew up around what has become iOS development. I have met so many great people who taught me not only how to create iOS apps but also how important it is to give back to the community. This book is partially to teach the next crop of iOS developers as well as to thank and honor all those who helped me along the way. There are too many to name individually and I would hate to miss someone, but you all know who you are.
I would also like to thank my acquisition editor, Mary James. I had always wanted to write a book but didn’t know where to start. Mary was instrumental in getting the ball rolling and making this book a reality. Ami Sullivan, who was my project editor, also deserves a huge thank-you. Being a first-time author, I really had no idea what to expect. Ami has been a great coach, helping me get everything done well and on time while also helping encourage me to keep going when the work seemed overwhelming. Next, I’d like to thank my copy editor, San Dee Phillips, for catching all my grammatical errors and making sure the ideas I’ve tried to explain make sense.
I owe a big thank you to my technical editor, Kyle Richter, for finding all my technical errors and pointing out ways to make the code for this book easy to understand for all readers. Kyle also helped me put the original book proposal together and has given me extremely valuable advice. Many thanks.
CONTENTS
INTRODUCTION xix
CHAPTER 1: BUILDING A REAL-WORLD IOS APP: BANDS 1
Introducing Bands
2
Getting Started
3
Scoping the App 4
Defining the Features 5
Creating a Development Plan 6
Summary 6
CHAPTER 2: INTRODUCTION TO OBJECTIVE-C 9
Exploring the History of Objective-C
9
Explaining the Basics
10
Learning About Objects and Classes 12
Instantiating Objects 16
Managing Memory 22
Introducing Automatic Reference Counting 26
Adding Properties to a Class 27
Explaining Strings 32
Using Basic Data Structures 35
Discussing Advanced Concepts
39
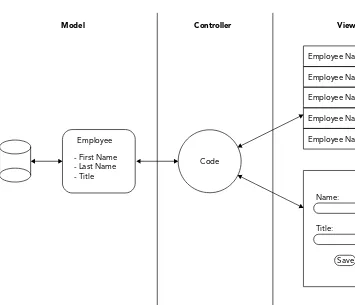
Explaining the Model-View-Controller Design Pattern 39
Learning About Protocols and Delegates 41
Using Blocks 44
Handling Errors 44
Summary 47
CHAPTER 3: STARTING A NEW APP 51
Creating a New App in Xcode
51
Discussing Xcode Templates 54
Learning About Bundle Identifiers 54
Exploring the Xcode Project Layout 55
Discussing the UIKit Framework 56
Discussing the Main Storyboard 56
xiv
Setting Attributes 58
Exploring the Inspectors 59
Aligning UI Objects 59
Running in the Simulator
59
Choosing a Device 60
Learning to Test on All Device Sizes 61
Learning About Auto Layout
62
Discussing Auto Layout Basics 64
Testing Rotation 64
Exploring Application Settings
66
Setting Version and Build Numbers 66
Setting Supported Rotation Orientations 67
Setting the App Icon 68
Setting Launch Images 70
Running on a Device
71
Summary 72
CHAPTER 4: CREATING A USER INPUT FORM 75
Introducing the Band Model Object
75
Creating the Band Model Object 76
Creating Enumerations 77
Adding Properties to the Band Model Object 78
Building an Interactive User Interface
79
Learning About IBOutlet 79
Using UITextField and UITextFieldDelegate 81
Using UITextView and UITextViewDelegate 84
Using UIButton and IBAction 85
Using UIStepper 87
Using UISegmentedControl 89
Using UISwitch 90
Saving and Retrieving Data
91
Implementing the NSCoding Protocol 91
Saving Data 93
Retrieving Saved Data 95
Deleting Saved Data 97
CONTENTS
CHAPTER 5: USING TABLE VIEWS 103
Exploring Table Views
104
Learning About Tables 104
Learning About Cells 107
Implementing the Bands Data Source
110
Creating the Band Storage 110
Adding Bands 113
Displaying Bands 119
Implementing Sections and Index
121
Adding Section Headers 122
Showing the Section Index 122
Editing Table Data
123
Enabling Edit Mode 124
Deleting Cells and Data 125
Modifying Data 126
Summary 130
CHAPTER 6: INTEGRATING THE CAMERA AND PHOTO
LIBRARY IN IOS APPS 133
Adding an Image View and Gesture Recognizer
134
Enabling User Interactions with a UIImageView 134
Learning About Gesture Recognizers 136
Selecting a Picture from the Photo Library
139
Learning About UIImagePickerController 140
Determining Device Capabilities 140
Allowing Picture Editing 141
Saving Band Images 143
Deleting Band Images 145
Taking a Picture with the Camera
147
Summary 150
CHAPTER 7: INTEGRATING SOCIAL MEDIA 153
Sending E-mails and Text Messages
154
Using the E-mail Composer 154
Using the Message Composer 160
Simplifying Social Network Integration
163
xvi
Learning About Facebook Integration 168
Learning About Flickr Integration 169
Limiting Sharing Options 170
Summary 172
CHAPTER 8: USING WEB VIEWS 175
Learning About Web Views
175
Loading a URL 180
Loading a URL That Contains Special Characters 182
Showing User Feedback 183
Adding Navigation
186
Creating a Toolbar 186
Opening Safari 191
Summary 193
CHAPTER 9: EXPLORING MAPS AND LOCAL SEARCH 195
Learning About Map Views
196
Getting the User’s Location 198
Changing the Map Type 201
Performing a Local Search
203
Animating Annotations 209
Interacting with Annotations 211
Summary 215
CHAPTER 10: GETTING STARTED WITH WEB SERVICES 219
Learning About Web Services
220
Exploring the iTunes Search API 220
Discussing JSON 221
Adding the Search View 223
Introducing NSURLSession
227
Creating and Scheduling a Data Task 227
Parsing JSON 231
Displaying Search Results
233
Previewing Tracks 236
Showing Tracks in iTunes 239
CONTENTS
CHAPTER 11: CREATING A UNIVERSAL APP 243
Transitioning to a Universal App
244
Supporting Rotation Using Auto Layout 249
Learning About Popovers
250
Presenting Action Sheets in Popovers 250
Using the UIPopoverController 252
Finishing the iPad Implementation
258
Summary 265
CHAPTER 12: DEPLOYING YOUR IOS APP 267
Deploying the App to Beta Testers
268
Registering Beta Devices 269
Generating Digital Certificates 271
Creating an App ID and Ad Hoc Provisioning Profile 274
Signing and Deploying an Ad Hoc Build 276
Submitting the App to Apple
280
Exploring iTunes Connect 280
Creating an App Store Provisioning Profile 283
Validating and Submitting an App 284
Summary 285
APPENDIX: ANSWERS TO EXERCISES 287
INTRODUCTION
WHEN APPLE RELEASED THE ORIGINAL IPHONE IN 2007, it was instantly an iconic device. No one had created such a fluid user experience based solely on touch. Using an iPhone didn’t feel like you were touching a flat piece of glass but instead felt as if you were touching and interacting with physical objects. Flipping through the albums felt like you were actually flipping through albums. Panning around a map felt like you were actually touching and moving a real map. It was truly inspiring.
At the time I was writing Windows desktop applications and had just taken over a Windows Mobile project. I was still skeptical of the iPhone and its price tag. After Apple announced the SDK and the idea of the App Store, I decided to take the plunge and teach myself how to write an iPhone app. But where would I start?
Luckily, I had friends who had been building OS X desktop applications for years. They organized and hosted the first iPhoneDevCamp Colorado, which was my first exposure to Objective-C and Xcode. I was a bit overwhelmed, and because everyone was new to the platform, there were no code examples around to help. Eventually, through asking many questions and learning alongside more experienced developers, I released my first iPhone app in January 2009. I believe in giving back to the community that helped me get started, which is why I decided to write this book.
Through high school, college, and my professional career, I’ve had the privilege to learn how to build software for many different platforms. In my experience I’ve found the best way for me to understand the big picture is not through individual lessons but instead to create something I could actually use. That’s the approach this book takes. You will learn how to build iOS apps by building an iOS app. The app is called Bands. It’s a fairly simple app, but it will introduce you to the key con-cepts of Objective-C and Cocoa Touch while implementing features that are found in many popular iOS apps. When you are done you will have a real app you can actually use. By no means does it teach you all the things you can do with the iOS SDK. Those possibilities are almost endless. But it does give you a solid foundation you can use to begin creating your own amazing iOS apps.
WHO THIS BOOK IS FOR
xx
WHAT THIS BOOK COVERS
This book walks you through creating an iOS app from an idea all the way to submitting it to Apple for sale in the App Store. It’s broken into 12 chapters.
Chapter 1, “Building a Real-World iOS App: Bands” introduces the app you will build throughout the book. All apps start as an idea that gets fleshed out into features and eventually into a develop-ment plan to get it built.
Chapter 2, “Introduction to Objective-C” takes a unique approach to explaining Objective-C by comparing it to Java and C#. It also details the Model-View-Controller design pattern used to build an iOS app.
Chapter 3, “Starting a New App” walks you through creating a new project in Xcode. It describes the various editors and windows in Xcode you use to manage files, edit code, and build a user interface.
Chapter 4, “Creating a User Input Form” shows you how to create a basic user interface to input data. You learn how to show and hide the software keyboard as well as how to save data to disk.
Chapter 5, “Using Table Views” explains how to build a data model and display it using tables. It also introduces the idea of segues to transition between different views in an iOS app.
Chapter 6, “Integrating the Camera and Photo Library in iOS Apps” details how to use the image picker to either take a picture using the camera on an iOS device or to choose a picture in the photo library. You also learn how to use gestures to make your user interface more interactive.
Chapter 7, “Integrating Social Media” explores how to send e-mails and text messages or post messages and updates to Twitter, Facebook, and Flickr using the same user experience found in Apple apps.
Chapter 8, “Using Web Views” builds a lightweight browser to allow users to search for bands. You learn how the iOS SDK creates and loads URLs as well as how to call C functions from Objective-C.
Chapter 9, “Exploring Maps and Local Search” explains how to use maps in an iOS app by searching for record stores around a user’s current location and displaying them.
Chapter 10, “Getting Started with Web Services” looks at the new networking classes introduced with iOS 7 to connect with a web service. You learn how to use the iTunes Search web service API to find tracks and preview them as well as opening the iTunes Store to purchase them.
Chapter 11, “Creating a Universal App” walks you through transitioning an iPhone-only app to also support iPad. It details the iPad-specific user interface features as well as how to effectively use auto layout to support device rotation.
INTRODUCTION
HOW THIS BOOK IS STRUCTURED
This book teaches how to build a simple iOS app in iOS 7 from concept to release. Its approach is based on my personal experience of creating my first iOS app. You start with an idea for an app called Bands that gets fleshed out into a set of features. You then learn about Objective-C and the design concepts that are the foundation of Cocoa Touch and the iOS SDK. From there you start to build the Bands app by progressively building the project from what is essentially a “Hello World” app to a final app that includes all features you can find in many popular iOS apps.
If you are new to Objective-C and Cocoa Touch, I recommend taking the time to understand the key concepts and design patterns explained in Chapter 2 before starting on the Bands app in Chapter 3. If you have used Xcode before and have created a “Hello World” app or more complicated apps but would like to learn how to use Storyboard scenes and segues, you can skip ahead to Chapter 4. The more advanced features of the Bands app begin with Chapter 7. Because this book builds on a single project, it is recommended beginners read the book from beginning to end. However, the features are tackled in single chapters and can be applied to any iOS project on which you may be working. If you’re comfortable you can use the example code in those chapters to implement those features in your own project.
WHAT YOU NEED TO USE THIS BOOK
All iOS apps are built using Xcode, which is available free from the Mac App Store. You need a Mac to run Xcode, because there is no Windows version. Xcode includes the iOS simulator, which you can use to test almost all the code you write throughout the book. There are some features such as taking a picture with the camera that you need a physical iOS device to try. To run an app that is in development on a physical device, you need to be enrolled in the iOS Developer Program, which costs $99/year. Though it’s not required, I would recommend enrolling as early on as possible.
The source code for the samples is available for download from the Wrox website at
www.wrox.com/go/begiosprogramming
CONVENTIONS
To help you get the most from the text and keep track of what’s happening, we’ve used a number of conventions throughout the book.
TRY IT OUT
The Try It Out is an exercise you should work through, following the text in the book.
1.
They usually consist of a set of steps.2.
Each step has a number.xxii
How It Works
After each Try It Out, the code you’ve typed will be explained in detail.
WARNING Warnings hold important, not-to-be-forgotten information that is directly relevant to the surrounding text.
NOTE Notes indicate notes, tips, hints, tricks, or asides to the current discussion.
As for styles in the text:
➤ We italicize new terms and important words when we introduce them.
➤ We show keyboard strokes like this: Ctrl-A.
➤ We show filenames, URLs, and code within the text like so: persistence.properties.
➤ We present code in two different ways:
We use a monofont type with no highlighting for most code examples.
We use bold to emphasize code that is particularly important in the present context or to show changes from a previous code snippet.
SOURCE CODE
As you work through the examples in this book, you may choose either to type in all the code man-ually, or to use the source code files that accompany the book. All the source code used in this book is available for download at www.wrox.com. Specifically for this book, the code download is on the Download Code tab at
www.wrox.com/go/begiosprogramming
You can also search for the book at www.wrox.com by ISBN (the ISBN for this book is 978-1-118-84147-1) to find the code. And a complete list of code downloads for all current Wrox books is available at www.wrox.com/dynamic/books/download.aspx.
At the beginning of each chapter, you can find a list of the major code files for the chapter. Throughout each chapter, you’ll also find references to the names of code files as needed in listing titles and text.
INTRODUCTION
NOTE Because many books have similar titles, you may find it easiest to search
by ISBN; this book’s ISBN is 978-1-118-84147-1.
After you download the code, just decompress it with your favorite compression tool. Alternatively, you can go to the main Wrox code download page at www.wrox.com/dynamic/books/download .aspx to see the code available for this book and all other Wrox books.
ERRATA
We make every effort to ensure that there are no errors in the text or in the code. However, no one is perfect, and mistakes do occur. If you find an error in one of our books, like a spelling mistake or faulty piece of code, we would be grateful for your feedback. By sending in errata, you may save another reader hours of frustration, and at the same time, you can help us provide even higher qual-ity information.
To find the errata page for this book, go to
www.wrox.com/go/begiosprogramming
And click the Errata link. On this page you can view all errata that has been submitted for this book and posted by Wrox editors.
If you don’t spot “your” error on the Book Errata page, go to www.wrox.com/contact/
techsupport.shtml and complete the form there to send us the error you have found. We’ll check the information and, if appropriate, post a message to the book’s errata page and fix the problem in subsequent editions of the book.
P2P.WROX.COM
For author and peer discussion, join the P2P forums at http://p2p.wrox.com. The forums are a web-based system for you to post messages relating to Wrox books and related technologies, and interact with other readers and technology users. The forums offer a subscription feature to e-mail you topics of interest of your choosing when new posts are made to the forums. Wrox authors, edi-tors, other industry experts, and your fellow readers are present on these forums.
At http://p2p.wrox.com, you can find a number of different forums that can help you, not only as you read this book, but also as you develop your own applications. To join the forums, just follow these steps:
1.
Go to http://p2p.wrox.com and click the Register link.xxiv
3.
Complete the required information to join, as well as any optional information you want to provide, and click Submit.4.
You will receive an e-mail with information describing how to verify your account and com-plete the joining process.NOTE You can read messages in the forums without joining P2P, but to post your own messages, you must join.
After you join, you can post new messages and respond to messages other users post. You can read messages at any time on the web. If you would like to have new messages from a particular forum e-mailed to you, click the Subscribe to this Forum icon by the forum name in the forum listing.
Building a Real-World iOS
App: Bands
WHAT YOU WILL LEARN IN THIS CHAPTER:
➤ A brief history of the iPhone SDK
➤ An introduction to the Bands app
➤ How to scope an app and define features
The idea of mobile computing has been around since the late 1970s. The first real mobile computer was the Psion Organiser, which was released in 1984, followed by the Psion Organiser II in 1986. For the most part these early mobile computers looked like calculators. Mobile computing began to pick up speed in the 1990s. That was when the Personal Digital Assistant, or PDA, began to catch on. The phrase Personal Digital Assistant was first used by the CEO of Apple, but not the one you may be thinking of. John Sculley became the CEO of Apple after Steve Jobs was forced out. He made the remark while talking about the Apple Newton, Apple’s first attempt at mobile computing. By most accounts it was not a success and was discontinued in 1998.
Through the rest of the 1990s and early 2000s, mobile computing continued to evolve. There were many popular PDAs such as the Palm Pilot as well as devices running Windows Mobile. They had their users, but they didn’t have an excited developer base.
Smartphones were also coming into their own during this time. They combined the features of a PDA with the capability to make phone calls. Palm and Windows Mobile along with the BlackBerry dominated these early days. That changed in 2007 when Apple announced the iPhone.
The original iPhone went on sale June 2007. It was instantly an iconic device. Using an iPhone felt like you were using the future. Though touch screens had been around for more than a decade, the iPhone made you feel like you were interacting with real objects, not just
touching buttons on a screen. The original release of the iPhone had one big limitation, though; there was no software SDK developers could use to write native applications for it. Steve Jobs instead recommended developers write web applications that would feel like native applications. At the time the tech world was in the middle of the Web 2.0 craze, so the idea wasn’t that far-fetched, but it just didn’t fly with developers.
By September 2007, the idea of “jail breaking” your iPhone began to catch on. Hackers had not only figured out how to unlock the digital security Apple had in place but had also figured out how to write and run their own applications on the device. You had to be pretty brave to do this, though, because jail breaking voided the warranty of an expensive phone, and writing bad software could easily render the device useless.
In October 2007, Apple reversed course and announced that an SDK to write native third-party applications for the iPhone was in development. In March 2008, it was released to developers along with an innovative new way to distribute these new applications called the App Store. That’s when the term app becomes the preferred term for these third-party applications. It is also when the rush to this new development platform, now called the iPhone OS, begins.
The App Store officially launched July 10, 2008. According to Apple, since then there have been more than 1 million apps written and made available in the App Store with more than 10 billion downloads. Having an app is like having a web page in the 1990s: Everyone wants one.
The developer industry around building apps has exploded. That’s probably why you are reading this book. You want to know how to build an app. The best way to learn how to build an app is to actually build an app.
INTRODUCING BANDS
The app you build throughout the course of this book is named Bands. It’s a simple app that you can use to take quick notes about bands you like or want to remember. It won’t win an Apple Design Award, but that’s not its purpose. It is meant to be a conduit to teach you what it’s like to take an idea for an app and make it into a reality, teaching you skills along the way that you can apply when building your own apps. The figures in this section show what the Bands app will look like when you’re done.
Figure 1-1 shows the first screen of the Bands app. It’s a list of all the bands a user adds to the app, sorted alphabetically and indexed.
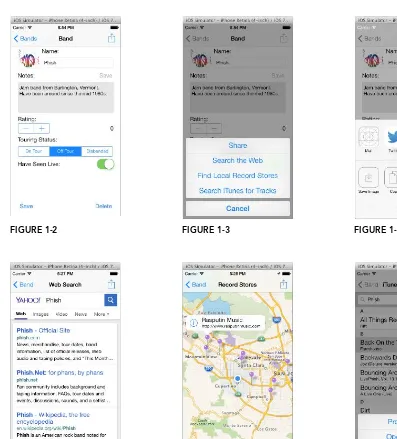
When a user taps on a band, they see the details of the band, as shown in Figure 1-2. Here they can take notes, add a picture, and set a few other properties about each band.
From the band details, users have the option to do a few different things, as shown in Figure 1-3. They can tell their friends about the band in various ways, as shown in Figure 1-4, search the web for more info about the band, as shown in Figure 1-5, find local record stores, as shown in Figure 1-6, and even search and preview tracks from the band, as shown in Figure 1-7.
Getting Started
❘
3FIGURE 1-2 FIGURE 1-3 FIGURE 1-4
FIGURE 1-5 FIGURE 1-6 FIGURE 1-7
Now that you see what the Bands app can become, it’s time to start.
GETTING STARTED
another band you would like to remember. It would be great to have a place where you could keep all these bands together so that you can go back later when you have time to learn more about them. You could use a note-taking app or send yourself an e-mail, but having a dedicated app you could pull up and have them all together would be ideal.
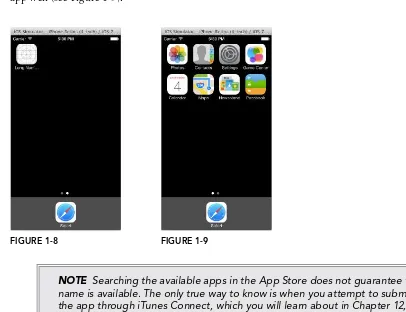
Naming your app may be one of the hardest parts of app development. It needs to be catchy and memorable yet adequately describe what the app does. The name has to be unique within the App Store. You can search the App Store for names you like and see if there is already an app with that name. You also need to keep in mind how the app name will look on an actual iPhone or iPad. Typically, you have about 12 characters before the app name is truncated. Figure 1-8 shows what a long name looks like. Apple apps, in contrast, are a great example of short names that describe the app well (see Figure 1-9).
FIGURE 1-8 FIGURE 1-9
NOTE Searching the available apps in the App Store does not guarantee the
name is available. The only true way to know is when you attempt to submit the app through iTunes Connect, which you will learn about in Chapter 12, “Deploying Your iOS App.”
Scoping the App
You now have an idea for an app that has a name. The next step is scoping what the app will do. You want your app to be useful, but you also need to keep in mind what is realistic. Too many features can make it hard when the first-time users open your app. Too many features also mean much more development time. Too few features and your app won’t be useful. Finding the balance is the key.
Getting Started
❘
5➤ Add any number of bands.
➤ Take notes about a band.
➤ Take pictures of a band.
➤ Tell your friends about a band.
➤ Search the web for a band.
➤ Find places to buy merchandise from a band.
➤ Plot all the tour dates of a band.
➤ Have reviews from publications and critics of a band.
➤ Have a multimedia library associated with each band.
➤ Preview tracks of a band.
There are many more ideas that could be added to the list, but these will do. Now you need to look at the ideas and decide which ones are valuable and which ones are too complicated for the app. You also need to keep in mind functions and features that are used in Apple’s native apps. Duplicating them can cause your app to be rejected when you submit it for approval. It’s better to cut those out right away.
With that in mind, the multimedia library for all the music of a band can be tossed first, because Apple’s Music app does this. Plotting all the tour dates of a band sounds great, but where would you get the information? Having a user manually enter them would be burdensome and probably seldom used, so that idea can be cut as well. Having reviews from publications and critics has the same issue of where you would get the data. There are also copyright issues. That idea can also be dismissed. The rest are all great ideas that can make a useful app.
Defining the Features
With a manageable and useful list of ideas, you can now define the features of the app. Defining the features and what it takes to create them helps you get a good idea of how much time and effort the entire app will take. It also helps you wrap your mind around the final goal, which, of course, is a fully functional app. The features you build into the Bands app in this book are chosen more for the lessons they can teach you to apply when building your own apps, so some of the features may not make the most sense. The following is the list of features you will implement in the Bands app.
Adding a band—The app needs a way to add a band. A band needs to have a name, and you need a way to take notes as well as add an optional picture. A rating would help users remember how much they enjoyed the band. A way to record if the band is on tour, off tour, or disbanded is useful as well as a way for users to mark if they have seen the band live. A simple user interface that lists all these in one place and allows the users to edit them seems like the logical choice. Having access to the camera or photo library is needed for the band picture.
Sharing bands—When users find a band they like, they will want to tell others. The app should be able to send e-mails and text messages preformatted with information the users add about a band. Having the ability to share a band through Facebook, Twitter, and Flickr would be useful as well.
Searching for a band on the web—Searching the web for a band a user just learned about will be helpful. This needs a lightweight browser to be included in the app so that users don’t need to use Mobile Safari. It should also be user-friendly and do the initial search for the users.
Finding local record stores—If users want to buy tickets to a local show or buy a poster for a band they like, they may need to find a record store. This feature needs to show a map with pins marking all the record stores close to the user’s location.
Search for tracks—Finding new tracks of a band and previewing them is a fun feature to add to the Bands app. Users can sample new tracks, and if they like them, they can purchase them through the iTunes Store.
Creating a Development Plan
The development plan for the Bands app is laid out in the rest of the chapters of this book. As a beginning developer your first task is to learn about Objective-C and Cocoa Touch, the language and frameworks used to create all iOS apps. Next, you need to learn about Xcode, the integrated development environment you will use to build the Bands app. From there you will implement each feature of the app from the easiest to the most complicated. Finally, when the app’s features are complete, you learn how to get your app in the hands of beta testers before the ultimate goal of getting your app into the App Store.
SUMMARY
All apps start with an idea. The idea for the Bands app is an app that allows users to keep track of bands they hear about from a friend or at a local bar. The next step is coming up with a concrete set of features that are well defined. The Bands app will store information about multiple bands to persistent storage as well as sharing the bands with friends, searching the web for band information, finding local record stores, and previewing and purchasing tracks from the iTunes Store. To start you first need to learn about Objective-C, which you do in the next chapter.
EXERCISES
1.
What do you need to keep in mind when naming an app?2.
Why is it important to scope your app before starting?Summary
❘
7➤
WHAT YOU LEARNED IN THIS CHAPTER
TOPIC KEY CONCEPTS
iPhone SDK The iPhone SDK was first announced October 2007, and initially introduced to developers March 2008. Since then it has been used to create more than 1 million apps.
The Bands app
The Bands app is an app that users can use to remember bands they’ve seen live or have been introduced to by a friend. Instead of keeping them in notes or sending an e-mail, the users can have them all in one place. You learn how to build an iOS app by building the Bands app.
Scope and Features
Scoping an app and defining its features is important before beginning
Introduction to Objective-C
WHAT YOU WILL LEARN IN THIS CHAPTER:
➤ An overview of Objective-C
➤ Declaring classes and instancing objects
➤ Memory management in Objective-C
➤ The Model-View-Controller design pattern
➤ Delegates and protocols in Objective-C
➤ Overview of blocks
➤ Error handling patterns in Objective-C
The first step to creating the Bands app is to learn about the language it will be written in, Objective-C. Objective-C is the programming language used to develop both Mac and iOS applications. It’s a compiled language, meaning that it gets compiled down to raw machine code as opposed to being interpreted at runtime. As its name implies, it’s based on the C pro-gramming language. It’s actually a superset of C that adds object-oriented propro-gramming meth-odologies. Because it’s a descendant of C, its syntax and concepts are similar to other C-based languages. In this chapter you learn the basics of Objective-C by comparing it to Java and C#.
EXPLORING THE HISTORY OF OBJECTIVE-C
Objective-C was developed in the early 1980s by a company called Stepstone. It was work-ing on a legacy system built uswork-ing C but wanted to add reusability to the code base by uswork-ing objects and messaging. The concept of object-oriented programming (OOP) had been around for a while. The Smalltalk language developed by Xerox was the most prominent object- oriented language in use at the time. Objective-C got its start by taking some of the concepts and syntax of Smalltalk and adding it to C. This can be seen in the syntax of message passing in Objective-C and Smalltalk.
Message passing is another way of saying method calling. In OOP languages an object can send a message to or call a method of another object. All object-oriented languages include this. Listing 2-1 shows how message passing is done in Smalltalk, Objective-C, Java, and C#.
LISTING 2-1: Message Passing in Different Languages
Smalltalk: anObject aMessage: aParameter secondParameter: bParameter Objective-C: [anObject aMessage:aParameter secondParameter:bParameter]; Java and C#: anObject.aMessage(aParameter, bParameter);
Objective-C got its foothold in mainstream programming when it was licensed by NeXT in the late 1980s. NeXT was a computer company founded by Steve Jobs after he was forced from Apple. It manufactured workstations for universities and big businesses. The workstations ran its proprietary operating system called NeXTSTEP, which used Objective-C as its programming language and runtime. This was different than other workstations sold at the time that ran the UNIX operating system based on the C language. NeXT was eventually acquired by Apple, bringing Steve Jobs back to the original company he founded. The acquisition also brought the NeXTSTEP operating system, which became the basis for OS X and the Cocoa API used to create Mac applications. The Cocoa API was then expanded to Cocoa Touch, which is the API, frameworks, and user interface libraries used to create iOS applications.
EXPLAINING THE BASICS
Primitive types in every programming language are the basic types used to build more complex objects and data structures. They are typically the same from language to language. The primitive types in Objective-C are the same as those in C and most C variants. Table 2-1 lists these types.
TABLE 2-1: Primitive Data Types in Objective-C
DATA T YPE DESCRIPTION
bool Single byte representing TRUE/FALSE or YES/NO
char Integer value the size of 1 byte
short Integer value the size of 2 bytes
int Integer value the size of 4 bytes
long Integer value the size of 8 bytes
float Single precision floating-point type the size of 4 bytes
Explaining the Basics
❘
11As with C and C++, Objective-C includes the typedef keyword. If you are coming from C# or Java and have never programmed using C or C++, you may not be familiar with typedef. It gives you a way of creating and naming a new data type using primitive data types. You can then refer to this new data type by the name you assigned it anywhere in your code. Listing 2-2 shows a simple yet silly example of typedef that creates a new data type called myInt, which is the same as the primi-tive int data type that can then be used the same as int throughout the code.
LISTING 2-2: typedef Example in Objective-C
// Objective C typedef int myInt;
myInt variableOne = 5; myInt variableTwo = 10;
myInt variableThree = variableOne + variableTwo;
// variableThree == 15;
A typical use of typedef in Objective-C is naming a declared enumerated type. An enumerated type, or enum, is a primitive type that is made up of a set of constants. Each constant is represented by an integer. They are used in pretty much every OOP language, including Java and C#. They give you a way to declare a variable with the enumerations name and assign its value using the constant names. It helps to make your code easier to read. The four cardinal directions are often declared as an enumeration. To use an enum in C, you would need to add the enum keyword before its name. Instead of this you can typedef it, so you no longer need the enum keyword. You don’t have to do this, but it’s a common practice. Another common practice in Objective-C is to prepend the con-stants with the name of the enumeration. Again, you don’t have to do, this but it helps the readabil-ity of your code. Listing 2-3 demonstrates how you declare and typedef an enum in Objective-C as well as Java and C# (their syntax is identical) and how you would use it later in code.
LISTING 2-3: Declaring Enumerations
// Objective C typedef enum {
CardinalDirectionNorth, CardinalDirectionSouth, CardinalDirectionEast, CardinalDirectionWest } CardinalDirection;
CardinalDirection windDirection = CardinalDirectionNorth; if(windDirection == CardinalDirectionNorth)
// the wind is blowing north
// Java and C#
public enum CardinalDirection { NORTH,
SOUTH, EAST, WEST }
CardinalDirection windDirection = CardinalDirectionNorth; if(windDirection == NORTH)
// the wind is blowing north
In C, C++, C#, and Objective-C, you can also create a struct. Java does not have this because every-thing is a class. A struct is not a class. A struct is a compound data type made up of primitive data types. It’s a way of encapsulating similar data. Similar to enums, they often use typedef to avoid having to use the keyword structs when using them in code. There are three common structs you use in Objective-C: CGPoint, CGSize, and CGRect. Listing 2-4 shows how these structs are defined.
LISTING 2-4: Common Structs in Objective-C
struct CGPoint { CGFloat x; CGFloat y; };
typedef struct CGPoint CGPoint;
struct CGSize { CGFloat width; CGFloat height; };
typedef struct CGSize CGSize;
struct CGRect { CGPoint origin; CGSize size; };
typedef struct CGRect CGRect;
Learning About Objects and Classes
Objects in Objective-C, as in any other object-oriented language, are the building blocks of the application. They have member variables that describe the object and methods that can manipulate the member variables, as well as any parameters that may be passed to them. Member variables can be public or private.
Objects are defined in a class. The class acts as the template for how an object is created and behaves. A class in Objective-C consists of two files much like classes in C++. The header file (.h) contains the interface of the class. This is where you declare the member variables and the method signatures. The implementation file (.m) is where you write the code for the actual methods. Listings 2-5 and 2-6 show how to define a class and its implementation in Java and C#, respectively. Listing 2-7 shows
Explaining the Basics
❘
13how you declare a header file in Objective-C, while Listing 2-8 show how you define the implementa-tion file. If you are an expert developer of either language, forgive some of the bad practices in these examples.
listing 2-5: Defining a Class in Java
package SamplePackage; public class SimpleClass { public int firstInt; public int secondInt;
public int sum() {
return firstInt + secondInt; }
public int sum(int thirdInt, int fourthInt) {
return firstInt + secondInt + thirdInt + fourthInt; }
private int sub() {
return firstInt – secondInt; }
}
listing 2-6: Defining a Class in C#
namespace SampleNameSpace {
public class SimpleClass {
public int FirstInt; public int SecondInt;
public int Sum() {
return FirstInt + SecondInt; }
public in Sum(int thirdInt, int fourthInt) {
return FirstInt + SecondInt + thirdInt + fourthInt; }
private int Sub() {
return FirstInt – SecondInt; }
listing 2-7: Defining a Class Interface in Objective-C
@interface SimpleClass : NSObject {
@public int firstInt; int secondInt; }
- (int)sum;
- (int)sumWithThirdInt:(int)thirdInt fourthInt:(int)fourthInt;
@end
listing 2-8: Defining a Class Implementation in Objective-C
#import "SimpleClass.h"
@implementation SimpleClass
- (int)sum {
return firstInt + secondInt; }
- (int)sumWithThirdInt:(int)thirdInt fourthInt:(int)fourthInt {
return firstInt + secondInt + thirdInt + fourthInt; }
- (int)sub {
return firstInt – secondInt; }
@end
NOTE The @ symbol is special in Objective-C. It has no meaning in C. Because
Objective-C is a superset of C, a C compiler can be modified to also compile Objective-C. The @ symbol tells the compiler when to start and stop using the Objective-C compiler versus the straight C compiler.
Explaining the Basics
❘
15that subtracts Y from X. The following sections discuss the key differences between classes in Java and C# compared to Objective-C.
There Are No Namespaces in Objective-C
The first difference is the package and namespace keywords in the Java and C# code that do not cor-respond to anything in the Objective-C code. This is because Objective-C does not have the concept of namespaces. A namespace is a way of grouping related classes together. C# uses namespace as the keyword for this concept, whereas Java uses packages to accomplish the same thing.
If a class in a different namespace wants to use a class in another, it needs to link to the namespace or package the other class is in. In Java this is done using the import keyword followed by the name of the package. In C# this is done with the using keyword. The class must also be declared as public, which you should note the SampleClass in both the Java and C# examples are. In Objective-C a class is made visible to another class simply by importing the header file in which the classes interface is declared.
The public keyword is also used to declare if member variables are visible to other classes. All three examples declare their member variables to be public; however, this is not a common prac-tice in modern Objective-C, as you will learn in the Adding Properties to a Class section of this chapter.
In Objective-C, Methods Are Visible to Other Classes
Methods in a Java or C# class can also be declared public, making them visible to other objects. This is not the case with Objective-C. In Objective-C all methods that are declared in the interface are vis-ible to other classes. If a class needs a private method, it just adds the method to the implementation. All code within the implementation can call that method, but it will not be visible to any classes that import the header file.
In Objective-C, Most Classes Inherit from NSObject
Another key concept of object-oriented languages is the capability of one class to inherit from another. In Java all classes inherit from the Object class. C# is similar with the System.Object class. In Objective-C virtually every class inherits from NSObject. The reason all three languages have a common root class is to provide methods and behaviors that can be assumed as members. In Objective-C the code for managing the memory of an object is all defined in NSObject. The dif-ference in the syntax is that in Java and C# classes that do not explicitly define their superclass, the root class is assumed. In Objective-C you must always declare the superclass by following the name of the class with a colon and then the name of the superclass, as shown in the example @interface SimpleClass : NSObject.
Objective-C Uses Long and Explicit Signatures
and then by any parameters and their type listed within parentheses. They also use method over-loading where the same method name is used but is distinguished as different by the list of param-eters. In Objective-C the signature is a bit different, which reflects its roots in Smalltalk.
Objective-C method signatures tend to be very long and explicit. Many developers coming from other languages may dislike this at first but learn to love it as it enhances the readability of the code. Instead of needing to know which method of “Sum” to use when you want to pass in two parameters, you know by just looking that the sumWithThirdInt:fourthInt: method is the one you want. Actually that is the full name of that method. The colons in the method name denote the number of parameters the method takes. By having the parameters listed inline with the method name, you can create signatures that are easier to understand. As you proceed through this book, you will see how this type of method signature is used throughout Objective-C and Cocoa Touch.
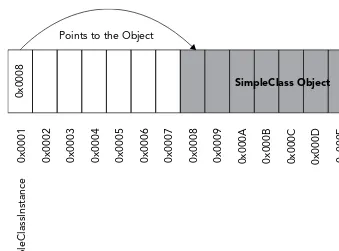
instantiating objects
Classes are only the template for creating objects. To use an object it needs to be instantiated and created in memory. In Java and C# you use the new keyword and a constructor. Both languages have a default constructor that is part of their base object class. Listing 2-9 shows how you do this in either Java or C#.
listing 2-9: Instantiating an Object in Java or C#
SimpleClass simpleClassInstance = new SimpleClass();
In Objective-C the NSObject class has something similar to a default constructor but slightly differ-ent. Instead of one step to instantiate an object, you do it in two steps. The first step uses the static method alloc, which finds enough available memory to hold the object and assign it. The second step uses the init method to set the memory. Listing 2-10 shows an example.
listing 2-10: Instantiating an Object in Objective-C
SimpleClass *simpleClassInstance = [[SimpleClass alloc] init];
If you have ever written code in C or C++, you should recognize the * operator. This is the pointer dereference operator. It acts the same in Objective-C by dereferencing the pointer and getting or set-ting the object in memory.
Explaining the Basics
❘
17In Java and C# you can also declare your own constructors that can take a list of parameters and set the member variables of the object. Listings 2-11 and 2-12 add these constructors to the Java and C# example classes with sample code of how they are called.
listing 2-11: Defining a Constructor in Java
package SamplePackage; public class SimpleClass { public int firstInt; public int secondInt;
public SimpleClass(int initialFirstInt, int initialSecondInt) {
firstInt = initialFirstInt; secondInt = initialSecondInt; }
// other methods discussed eariler }
// sample code to create a new instance
SimpleClass aSimpleClassInstance = new SimpleClass(1, 2);
figure 2-1 0x0001 0x0002 0x0003
Points to the Object
0x0004 0x0005 0x0006 0x0007 0x0008 0x0009 0x000A 0x000B 0x000C 0x000D 0x000E 0x000F
0x0008
simpleClassInstanc
e
listing 2-12: Defining a Constructor in C#
namespace SampleNameSpace {
public class SimpleClass {
public int FirstInt; public int SecondInt;
public SimpleClass(int firstInt, int secondInt) {
FirstInt = firstInt; SecondInt = secondInt; }
// other methods discussed earlier }
}
// sample code to create a new instance
SimpleClass aSimpleClassInstance = new SimpleClass(1, 2);
To implement the same type of constructor in Objective-C, you would add your own init method, as shown in Listing 2-13.
listing 2-13: Instantiating Objects in Objective-C
// in the SimpleClass.h file @interface SimpleClass : NSObject {
@public int firstInt; int secondInt; }
- (id)initWithFirstInt:(int)firstIntValue secondInt:(int)secondIntValue;
// other methods discussed earlier
@end
// in the SimpleClass.m file @implementation SimpleClass
- (id)initWithFirstInt:(int)firstIntValue secondInt:(int)secondIntValue {
self = [super init]; if(!self)
return nil;
firstInt = firstIntValue; secondInt = secondIntValue;
Explaining the Basics
❘
19}
// other methods discussed earlier
@end
// sample code to create a new instance SimpleClass *aSimpleClassInstance =
[[SimpleClass alloc] initWithFirstInt:1 secondInt:2];
There are a few things to discuss in this code sample. The first is the use of id type. Objective-C is a dynamic language, meaning that you do not have to give a specific type to an object at compile time. The id type can hold a pointer to any object. It is similar to the dynamic type in C#. Java does not have anything similar. When you use the id type, its actual type is determined at runtime. Returning id from an init method is part of a Cocoa convention, which you should always follow.
The next is the use of self. The self variable is the same in Java or this in C#. It refers to the instance of the object that is receiving the message. When you are initializing an object, you first want to call init on its parent class. This ensures that objects are created correctly through their hierarchy.
The if statement, if(!self), introduces another concept that is prevalent throughout Objective-C. If a variable does not point to anything, it has a value of nil. The nil value is essentially 0. Figure 2-2 illustrates how this works.
figure 2-2
0x0001 0x0002 0x0003 0x0004 0x0005 0x0006 0x0007 0x0008 0x0009 0x000A 0x000B 0x000C 0x000D 0x000E 0x000F
0x0000
simpleClassInstanc
e
The rest of the init method works the same as the constructors in Java and C#. The member vari-ables are set using the values passed in before returning the pointer.
NOTE The NSObject class also has a new method. It performs both the alloc and init method calls and then returns the pointer. Using it means any over-ridden init methods that take parameters will not be called. Instead you need to set the values of the member variables after the object is instantiated.
Another approach to instantiating objects is to use a factory method. These methods are static meth-ods. A static method does not need an instance of the class to call it. It also does not have access to any of the member variables of a class. If you have written code in Java or C#, you are familiar with static methods and factory methods. In Objective-C they are more of a convenience method than anything else, which is different from their use in Java and C#. The basic idea remains the same, though. Listings 2-14 and 2-15 show how you would implement a factory constructor in Java or C#, whereas Listing 2-16 demonstrates the same in Objective-C. These types of convenience methods are used often in many of the basic data structures of Objective-C, which are discussed in the Using Basic Data Structures section of this chapter.
listing 2-14: Defining a Factory Method in Java
package SamplePackage; public class SimpleClass { public int firstInt; public int secondInt;
public static SimpleClass Create(int initialFirstInt, int initialSecondInt) {
SimpleClass simpleClass = new SimpleClass(); simpleClass.firstInt = initialFirstInt; simpleClass.secondInt = initialSecondInt;
return simpleClass; }
// other methods discussed eariler }
// sample code to create a new instance
SimpleClass aSimpleClassInstance = SimpleClass.Create(1, 2);
listing 2-15: Defining a Factory Method in C#
namespace SampleNameSpace {
public class SimpleClass {
Explaining the Basics
❘
21public int SecondInt;
public static SimpleClass Create(int firstInt, int secondInt) {
SimpleClass simpleClass = new SimpleClass(); simpleClass.FirstInt = firstInt;
simpleClass.SecondInt = secondInt;
return simpleClass; }
// other methods discussed earlier }
}
// sample code to create a new instance
SimpleClass aSimpleClassInstance = SimpleClass.Create(1, 2);
listing 2-16: Defining a Factory Method in Objective-C
// in the SimpleClass.h file @interface SimpleClass : NSObject {
@public int firstInt; int secondInt; }
+ (id)simpleClassWithFirstInt:(int)firstIntValue secondInt:(int)secondIntValue;
// other methods discussed earlier
@end
// in the SimpleClass.m file @implementation SimpleClass
+ (id)simpleClassWithFirstInt:(int)firstIntValue secondInt:(int)secondIntValue {
SimpleClass *simpleClass = [[SimpleClass alloc] init]; simpleClass->firstInt = firstIntValue;
simpleClass->secondInt = secondIntValue;
return simpleClass; }
// other methods discussed earlier
@end
// sample code to create a new instance SimpleClass *aSimpleClassInstance =
The Java and C# implementations rely on the default constructors defined in their respective root classes to insatiate a new object. This is the same as the init method defined in the NSObject class. They next set the member variables of the new instance before returning it. Syntactically, the dif-ference is how a method is declared as static. In Java and C# the static keyword is added to the method signature. In Objective-C a static method is declared by using the + (plus) symbol instead of the – (minus) symbol that would define it as an instance method.
Managing Memory
Memory management is important in Objective-C. Memory is a finite resource, meaning there is only so much of it that can be used. This is particularly true on mobile devices. When a system runs out of memory, it can no longer perform any more instructions, which is obviously a bad thing. Running low on memory will also have a dramatic impact on performance. The system has to spend a lot more time finding available memory to use, which slows down every process. Memory manage-ment is controlling what objects need to remain in memory and which ones are no longer in use, so their memory can be reused.
Memory leaks are a classic problem in computer programming. A memory leak, in the most basic of definitions, is when memory is allocated but never deallocated. The opposite of a leak is when memory is deallocated before it is done being used. This is what has been historically referred to as a dangling pointer. In Objective-C it’s common to refer to these as zombie objects. These types of memory issues are usually easier to find because the program will most likely crash if it tries to use a deallocated object.
Languages and runtimes handle memory management in two difference ways. Java and C# use garbage collection. It was first introduced in Lisp in the late 1950s. The implementation of garbage collection is detailed and different depending on the runtime, but the idea is basically the same. As a program executes it allocates objects in memory that it needs to continue. Periodically another pro-cess runs that looks for objects that are no longer reachable, meaning they have no references left to them in any code that is executing. This type of system works very well; though contrary to popular belief your code can still leak memory by creating objects and keeping a reference to them but never using them again. This system also has a bit of overhead associated with it. The system needs to continue executing the program being used while running the garbage collection process in parallel. This can create performance problems on systems that have limited computational power.
Objective-C on iOS does not use garbage collection. Instead it uses manual reference counting. Each object that is allocated has a reference or retain count. If a piece of code requires that the object be available, it increases its retain count. When it is done and no longer needs the object, it decrements the retain count. When an object’s retain count reaches 0, it can be deallocated and the memory is returned to the system.
Explaining the Basics
❘
23The first thing to understand is how retain counts work and how they can lead to memory leaks and zombie objects. Listing 2-17 shows one way a memory leak can occur using the SimpleClass described previously in this chapter.
listing 2-17 Memory Leak Example in Objective-C
- (void)simpleMethod {
SimpleClass *simpleClassInstance = [[SimpleClass alloc] init];
simpleClassInstance->firstInt = 5; simpleClassInstance->secondInt = 5;
[simpleClassInstance sum]; }
A Java or C# developer would not see anything wrong with this code. To them there is a method that creates an instance of the SimpleClass. When the method is done executing, the
simpleClassInstance no longer has a reference to it and is eventually deallocated by the garbage collector. This is not the case in Objective-C.
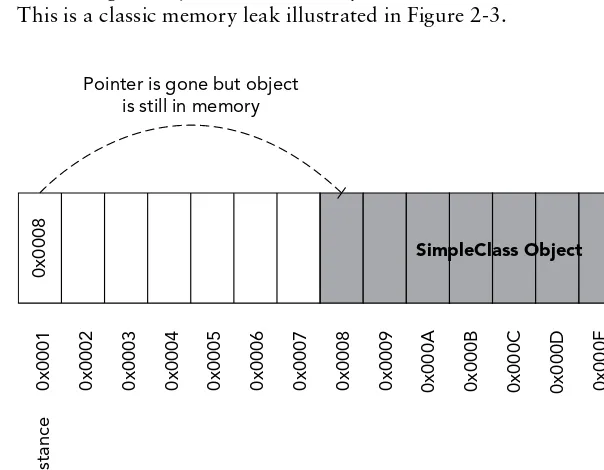
When the simpleClassInstance is instantiated using alloc, it has a retain count of one. When the method is done executing, its pointer goes out of scope but keeps a retain count of one. Because the retain count stays above zero, the object is never deallocated. With no pointer still
referencing the object, there is no way to decrement its retain count so that it can be deallocated. This is a classic memory leak illustrated in Figure 2-3.
0x0001 0x0002 0x0003
Pointer is gone but object is still in memory
0x0004 0x0005 0x0006 0x0007 0x0008 0x0009 0x000A 0x000B 0x000C 0x000D 0x000E 0x000F
0x0008
simpleClassInstanc
e
To fix this in Objective-C, you need to explicitly decrement the retain count before leaving the method. You do this by calling the release method of the NSObject class, as shown in Listing 2-18. Release decrements the count by one, which in this example sets the count to zero, which in turn means the object can be deallocated.
listing 2-18: Using Release in Objective-C
- (void)simpleMethod {
SimpleClass *simpleClassInstance = [[SimpleClass alloc] init];
simpleClassInstance->firstInt = 5; simpleClassInstance->secondInt = 5;
[simpleClass sum];
[simpleClass release]; }
Another way to fix this is to use the autorelease pool. Instead of explicitly releasing the object when you are done with it, you can call autorelease on it. This puts the object into the autorelease pool, that keeps track of objects within a particular scope of the program. When the program has exited that scope, all the objects in the autorelease pool are released. This is referred to as draining the pool. Listing 2-19 shows how you would implement this.
listing 2-19: Using Autorelease in Objective-C
- (void)simpleMethod {
SimpleClass *simpleClassInstance = [[SimpleClass alloc] init];
[simpleClassInstance autorelease];
simpleClassInstance->firstInt = 5; simpleClassInstance->secondInt = 5;
[simpleClass sum]; }
Using alloc generally means that the code creating the object is its owner, which is why it gets a retain count of one. There are other times in your code where an object was created elsewhere but the code using needs to take ownership. The most common example of this is using factory methods to create the object. Factory methods of Objective-C core classes always return an object that has autorelease called on it before it is returned. Listing 2-20 shows how the SimpleClass would gener-ally be implemented now that you understand the autorelease method.
listing 2-20: Defining a Factory Method Using Autorelease
Explaining the Basics
❘
25SimpleClass *simpleClass = [[SimpleClass alloc] init]; simpleClass.firstInt = firstIntValue;
simpleClass.secondInt = secondIntValue;
[simpleClass autorelease]; return simpleClass; }
In a piece of code that creates a simpleClass using the factory method, it may want that object to stay in memory even after the autorelease pool has been drained. To increase its retain count and make sure it stays in memory, you would call retain on the instance. Its very important to always call release sometime later in your code if you explicitly retain an object, or else it will cause a memory leak. Listing 2-21 shows a simple example of this; though in a real program, you would probably call release in some other place.
listing 2-21: Explicitly Retaining an Object
- (void)simpleMethod {
SimpleClass *simpleClass =
[SimpleClass simpleClassWithFirstInt:1 secondInt:5];
[simpleClass retain];
// do things with the simple class knowing it will not be deallocated
[simpleClass release]; }
The other memory management issue you can run into is referencing an object that has already been deallocated. This is called a zombie object. Figure 2-4 illustrates this.
0x0001 0x0002 0x0003
Points to deallocated memory
0x0004 0x0005 0x0006 0x0007 0x0008 0x0009 0x000A 0x000B 0x000C 0x000D 0x000E 0x000F
0x0008
simpleClassInstanc
If this happens during runtime, the execution of your app can become unpredictable or just simply crash. It depends on if the memory address is still part of the memory allocated to your program or if it has been overwritten with a new object. Its conceivable that the memory is still there and your code would execute just fine even though the memory has been marked for reuse. Listing 2-22 dem-onstrates how a zombie object could occur.
listing 2-22: Dangling Pointer Example in Objective-C
- (void)simpleMethod {
SimpleClass *simpleClassInstance = [[SimpleClass alloc] init]; [simpleClassInstance release];
simpleClass.firstInt = 5; simpleClass.secondInt = 5;
int sum = [simpleClass sum]; }
WARNING The NSObject class has a property called retainCount. You should never trust this value nor should you ever use it. It may be tempting to look at this value to try and determine when an object will be released or to find a memory leak. You should instead use the debugging instruments included in Xcode, in this case the Leaks instrument. You can learn more about the Leaks instrument at https://developer.apple.com/library/ios/documentation/ AnalysisTools/Reference/Instruments_User_Reference/LeaksInstrument/ LeaksInstrument.html.
introducing automatic reference counting
Manual reference counting differs from garbage collection by setting when objects are allocated and deallocated at compile time instead of runtime. The compiler that Apple uses in its development tools is part of the LLVM Project (llvm.org) and is called Clang (clang.llvm.org). Developers using manual memory management can follow a strict set of rules to ensure that memory is neither leaked nor deallocated prematurely. The developers working on the Clang compiler recognized this and set out to build a tool that could analyze a code base and find where objects could potentially be leaked or be used after they have been released. The tool they released is called the Clang Static Analyzer (clang-analyzer.llvm.org).