Adobe Creative Suite All-in-One Desk
Reference For Dummies
by Jennifer Smith and Jen
deHaan
ISBN:0764556010
John Wiley & Sons
© 2004If you're responsible for producing quality
printed materials or creating great looking Web
pages for your organization, this guide is just
what you need. The book includes coverage of
InDesign, Illustrator, Photoshop, Acrobat, and
GoLive.
Table of Contents
Adobe Creative Suite All-In-One Desk Reference For
Dummies
Introduction
Book I - Adobe Creative Suite Basics
Chapter 1
- Introducing the Adobe Creative Suite
Chapter 2
- Using Common Menus and Commands
Chapter 3
- Using Common Palettes
Chapter 4
- Using Common Plug-Ins
Chapter 5
- Importing and Exporting
Chapter 6
- Handling Graphics, Paths, Text, and Fonts
Chapter 7
- Using Color
Chapter 8
- Printing Documents
Book II - InDesign CS
Chapter 11
- Working with Text and Text Frames
Chapter 12
- Understanding Page Layout
Chapter 13
- Clipping Paths, Transforming Objects, and
Alignment
Chapter 14
- Understanding Color and Printing
Chapter 15
- Exporting Your Work
Chapter 16
- Integrating InDesign
Book III - Illustrator CS
Chapter 17
- Discovering the Basics of Illustrator CS
Chapter 18
- Using the Selection Tools
Chapter 19
- Creating Basic Shapes
Chapter 20
- Creating with the Pen Tool
Chapter 21
- Using Type in Illustrator
Chapter 22
- Organizing Your Illustrations
Chapter 23
- Using Layers
Chapter 24
- Livening Up Illustrations with Color
Chapter 25
- The Transform and Distortions Tools
Chapter 26
- Transparency and Special Effects Tools
Chapter 27
- Using Filters and Effects
Chapter 28
- Using Your Illustrator Image
Book IV - Photoshop CS
Chapter 29
- Photoshop CS Basics
Chapter 30
- Mode Matters
Chapter 31
- Creating a Selection
Chapter 32
- Using the Photoshop Pen Tool
Chapter 33
- Resolution Basics
Chapter 34
- Creating a Good Image
Chapter 37
- Saving Photoshop Images for Print and
the Web
Book V - Acrobat 6.0
Chapter 38
- Discovering Essential Acrobat Information
Chapter 39
- Creating PDF Files
Chapter 40
- Adding Interactivity to PDF Files
Chapter 41
- Editing and Extracting Text and Graphics
Chapter 42
- Using Commenting and Annotation Tools
Chapter 43
- Securing Your PDF Files
Book VI - GoLive CS
Chapter 44
- Introducing GoLive CS
Chapter 45
- Creating a Web Site
Chapter 46
- Working with Images
Chapter 47
- Text and CSS
Chapter 48
- Tables and Frames
Chapter 49
- Links
Chapter 50
- Layers
Chapter 51
- Forms
Chapter 52
- Multimedia
Chapter 53
- Publishing Your Web Site
Index
Back Cover
The Adobe Creative Suite is a high-tech team with all
the tools you need to publish professional-looking print
materials and Web sites. Team up with this friendly
guide, and you’ll have the scoop on all five programs
and how they work together. Fix up photos, design
great pages, pack ‘em up in PDFs, and more!
Discover how to:
Use palettes and filters common to all programs
Manipulate fonts and text
Create your own illustrations
Retouch photos
Discover interactive Acrobat forms
Work with media in GoLive
About the Authors
Jennifer Smith is a professional designer and founder
of AGI Training, a leading training company devoted to
graphic arts instruction.
Adobe Creative Suite All-In-One Desk Reference
For Dummies
by Jennifer Smith and Jen deHaan
Adobe® Creative Suite All-in-One Desk Reference For Dummies® Published by
Wiley Publishing, Inc. 111 River Street
Hoboken, NJ 07030-5774
Copyright © 2004 by Wiley Publishing, Inc., Indianapolis, Indiana Published by Wiley Publishing, Inc., Indianapolis, Indiana
Published simultaneously in Canada
No part of this publication may be reproduced, stored in a retrieval system or transmitted in any form or by any means, electronic,
mechanical, photocopying, recording, scanning or otherwise, except as permitted under Sections 107 or 108 of the 1976 United States Copyright Act, without either the prior written permission of the Publisher, or
authorization through payment of the appropriate per-copy fee to the Copyright Clearance Center, 222 Rosewood Drive, Danvers, MA 01923, (978) 750-8400, fax (978) 646-8600. Requests to the Publisher for
permission should be addressed to the Legal Department, Wiley
Publishing, Inc., 10475 Crosspoint Blvd., Indianapolis, IN 46256, (317) 572-3447, fax (317) 572-4447, e-mail: [email protected]. Trademarks: Wiley, the Wiley Publishing logo, For Dummies, the
Dummies Man logo, A Reference for the Rest of Us!, The Dummies Way, Dummies Daily, The Fun and Easy Way, Dummies.com, and related trade dress are trademarks or registered trademarks of John Wiley & Sons, Inc. and/or its affiliates in the United States and other countries, and may not be used without written permission. Adobe is a trademark of Adobe Systems, Inc. All other trademarks are the property of their
product or vendor mentioned in this book.
General Disclaimer: The publisher and the author make no representations or warranties with respect to the accuracy or
completeness of the contents of this work and specifically disclaim all warranties, including without limitation warranties of fitness for a
particular purpose. No warranty may be created or extended by sales or promotional materials. The advice and strategies contained herein may not be suitable for every situation. This work is sold with the
understanding that the publisher is not engaged in rendering legal, accounting, or other professional services. If professional assistance is required, the services of a competent professional person should be sought. Neither the publisher nor the author shall be liable for damages arising herefrom. The fact that an organization or Website is referred to in this work as a citation and/or a potential source of further information does not mean that the author or the publisher endorses the information the organization or Website may provide or recommendations it may make. Further, readers should be aware that Internet Websites listed in this work may have changed or disappeared between when this work was written and when it is read. For general information on our other products and services or to obtain technical support, please contact our Customer Care Department within the U.S. at 800-762-2974, outside the U.S. at 317-572-3993, or fax 317-572-4002.
Wiley also publishes its books in a variety of electronic formats. Some content that appears in print may not be available in electronic books. Library of Congress Control Number available from publisher.
ISBN: 0-7645-5601-0
Manufactured in the United States of America 10 9 8 7 6 5 4 3 2 1
1B/SW/QS/QU/IN About the Authors
series. Jennifer has worked in all aspects of graphic design and
production, including as an art director for an advertising agency. Ten years ago, Jennifer took her experience and applied it to teaching. Under her leadership, AGI has grown into the largest training organization
focused on print, Internet, video, and PDF publishing. Her teaching and writing style show a clear direction that can only be achieved by someone who knows the industry and has experienced the Adobe applications in a professional workflow. Jennifer’s clients include Adobe, Hasbro, Harvard, MIT, Reebok, New Balance, and Ratheon, as well as numerous other large and small corporations. She lives in the Boston area with her husband and four children.
Jen deHaan is a Calgary-based “deseloper” (designer/developer) who writes books and makes things mostly for the Web. Jen has been
involved in 15 books on various products since 2002 for publishers such as Macromedia Press, Wiley Publishing, Inc., and Sybex. She is currently working on her next book and entering the wonderful world of video
tutorials with VTC. When not developing, Jen pickles her liver in
caffeinated beverages and teaches Web design at the local university. Jen is the mostly friendly Web person skippering many marginally successful sites, including www.flash-mx.com and
www.flashmx2004.com. You can find her personal portfolio and rants at www.ejepo.com, and she one day plans to begin and finish
www.deseloper.com. She is the manager of the Calgary Flash Users Group, thus having the opportunity to promote things for other people’s financial gain. Jen enjoys the following: rainbows, unicorns, and walks on the beach. Jen likes to unwind with her Chef Tony Ultimate Chopper (you can make powdered sugar from regular sugar!) and hopes one day a reader will buy her a G5. She is currently negotiating with a broadcast network to develop her own reality TV series based on her life of authoring, nocturnal living, and eating copious amounts of processed cheese products.
Dedication
memory of my father, Joseph Kelly, the best teacher of all! —Jennifer Smith
To the guy who pioneered blogging: the lovely Wil Wheaton. —Jen deHaan
Authors’ Acknowledgments
Jennifer Smith: Thanks to all at Wiley Publishing, Inc. This book involves a lot of detail and information, and it was up to Acquisitions Editor Melody Lane and her “tough love” to make sure it got to the state it’s in now. Thanks also to Nicole Sholly and Jean Rogers for the great insight.
Thanks to my family, Chris, Kelly, Alex, Grant, and Elizabeth, as they had to deal with Mom holed up in her room typing.
Special thanks to Amanda McGibbon who played “Mom” for me while I typed furiously away.
Jen deHaan: I would like to thank Melody, Nicole, and Jean (all at Wiley Publishing, Inc.) for their friendly and helpful support, and not to mention knowledgeable editing. Nicole definitely made all of my chapters
complete, and Jean certainly saved me from a bunch of silly errors. You guys did such a terrific job, and you were all so nice to work with: Thanks so much. Special thank-yous to Jennifer Smith for being a great
co-author, and to the technical editors of my chapters, Allen Wyatt and David Herman, who helped make the book accurate and complete. Sincere thanks to Kala Schrager at Wiley for her recommendation. I’d also like to acknowledge and thank Carole McClendon at Waterside for her help and assistance in this project, which is much appreciated as always.
TV around 2:00–5:00 a.m., thus ensuring there is nothing exciting to watch, which makes me get back to work promptly. Thanks go to Adobe for continually improving upon its already-great programs—writing about Adobe software is a pleasure.
Publisher’s Acknowledgments
We’re proud of this book; please send us your comments through our online registration form located at www.dummies.com/register/. Some of the people who helped bring this book to market include the following:
Acquisitions, Editorial, and Media Development
Associate Project Editor: Nicole Sholly Acquisitions Editor: Melody Layne Copy Editor: Jean Rogers
Technical Editors: Dennis R. Cohen; David Herman; Jim Kelly; Allen Wyatt, Discovery Computing, Inc.
Editorial Manager: Kevin Kirschner
Media Development Manager: Laura VanWinkle Media Development Supervisor: Richard Graves Editorial Assistant: Amanda Foxworth
Cartoons: Rich Tennant (www.the5thwave.com)
Production
Project Coordinator: Courtney MacIntyre
Proofreaders: Laura Albert, Andy Hollandbeck, Carl William Pierce, Christine Pingleton, Charles Spencer
Indexer: Johnna VanHoose
Publishing and Editorial for Technology Dummies
Richard Swadley, Vice President and Executive Group Publisher Andy Cummings, Vice President and Publisher
Mary C. Corder, Editorial Director Publishing for Consumer Dummies
Diane Graves Steele, Vice President and Publisher Joyce Pepple, Acquisitions Director
Composition Services
Introduction
Adobe software has always been highly respected for creative design and development. Adobe creates programs that allow you to produce amazing designs and creations with ease. The Adobe Creative Suite is the company’s latest release of sophisticated and professional-level software that bundles many formerly separate programs together as a suite. Each program in the suite works individually, or the programs can be integrated together using Version Cue, Adobe’s work management software that helps keep track of revisions and edits.
You can use the Adobe Creative Suite to create a wide range of productions, from illustrations, page layouts, and professional
About This Book
The Adobe Creative Suite All-in-One Desk Reference For Dummies is written in a thorough and fun way to show you the basics on how to use each of the programs included in the suite. You find out how to use each program individually and also how to work with the programs together, letting you extend your projects even further. You find out just how easy it is to use the programs through simple and easy-to-follow steps so that you can discover the power of the Adobe software. You’ll be up and running in no time!
Here are some of the things you can do with this book:
Create page layouts using text, drawings, and images in InDesign.
Make illustrations using drawing tools with Illustrator. Manipulate photographs using filters and drawing or color correction tools with Photoshop.
Create PDF documents using Adobe Acrobat or other programs. Create Web pages and put them online with GoLive.
Foolish Assumptions
There isn’t much that you have to know before picking up this book and getting started with the Adobe Creative Suite. All you have to know is how to use a computer in a very basic way. If you can turn on the computer and use a mouse, you’re ready for this book. A bit of
Conventions Used in This Book
We use a few different conventions in this book. Conventions refer to particular formatting that is applied to some of the text you find in the chapters that follow.
The Adobe Creative Suite is available for both Windows and the
Macintosh. We cover both platforms in this book. Where the keys you need to press or the menu choice you need to make differs between Windows and the Mac, we let you know by including instructions for both platforms. For example:
Press the Alt (Windows) or Option (Mac) key.
Choose Edit Preferences General (Windows) or InDesign Preferences General (Mac).
The programs in the Adobe Creative Suite often require you to press and hold down a key (or keys) on the keyboard and then click or drag with the mouse. For brevity’s sake, we shorten this action by naming the key you need to hold down and adding click or drag, as follows:
Shift+click to select multiple files.
Move the object by Ctrl+dragging (Windows) or z+dragging (Mac).
The formatting conventions used in this book are listed here:
Bold: We use bold to indicate when you should type something, or to highlight an action in a step list. For example, the action required to open a dialog box would appear in bold in a step list.
Code font: We use this computerese font to show you Web addresses (URLs), e-mail addresses, or bits of HTML code. For example, you would type a URL into a browser window to access a Web page such as www.google.com.
What You Don’t Have to Read
This book is such a large text, you might wonder if you have to read it from cover to cover. You don’t have to read every page of this book to discover how to use the Adobe Creative Suite. Luckily, you can choose the bits and pieces that mean the most to you and will help you finish a project you might be working on. Perhaps you’re interested in creating a technical drawing and putting it online. You can choose to read a couple chapters in Book III on Illustrator, and then skip ahead to Book VI on GoLive, and just read the relevant chapters or sections on each subject. Later, you might want to place some associated PDF documents online, so then you can read a few chapters in Book V on Acrobat or Book II on exporting InDesign documents.
How This Book Is Organized
The Adobe Creative Suite All-in-One Desk Reference For Dummies is split into six different quick-reference guides or minibooks. You don’t have to read these minibooks sequentially, and you don’t even have to read all the sections in any particular chapter. You can use the Table of Contents and the index to find the information you need and quickly get your
answer. In this section, we briefly describe what you find in each minibook.
Book I: Adobe Creative Suite Basics
Book I shows you how to use the features in the Adobe Creative Suite that are similar across all the programs described in this book. You
discover the menus, palettes, and tools that are similar or work the same way in most of the Adobe Creative Suite’s programs. You also find out how to import, export, and use common commands in each program. If you’re wondering about what shortcuts and common tools you can use in the programs to speed up your workflow, then this part has tips and tricks you’ll probably find quite useful. The similarities in all of the programs are helpful because they make using the programs that much easier.
Book II: InDesign CS
Book II describes how to use InDesign to create simple page layouts using text, images, and drawings. Hands-on steps show you how to use the drawing tools in InDesign to create simple illustrations, and also use other menus and tools to add text and pictures. Importing stories and illustrations into InDesign is an important part of the process, so you find out how this is done effectively as well. Book II shows you how easy it is to create effective page layouts using this powerful and professional design program.
Book III: Illustrator CS
minibook to discover how to take advantage of features that have been around for many versions of Illustrator, such as the Pen tool, as well as new and exciting features, such as the 3D Effect. See how to take
advantage of the Appearance palette and save time by creating graphics styles, templates, and symbols. Pick up hard-to-find keyboard shortcuts that can help reduce the time spent mousing around for menu items and tools.
Book IV: Photoshop CS
Book IV on Photoshop is aimed to help you achieve good imagery, starting with basics that even advanced users may have missed along the way. In this minibook, you find out how to color correct images like a pro and use tools to keep images at the right resolution and size, no matter whether the image is intended for print or the Web.
This minibook also shows you how to integrate new features in
Photoshop, such as an improved Browse window, layer management, and a dynamic Histogram, into your workflow. By the time you’re finished with this minibook, you’ll feel like you can perform magic on just about any image.
Book V: Acrobat 6.0
Adobe Acrobat 6 is a powerful viewing and editing application that allows you to share documents with colleagues, clients, and production
personnel, such as printers and Web page designers. Book V shows you how you can save time and money previously spent on couriers and overnight shipping by taking advantage of annotation capabilities.
Discover features that even advanced users may have missed along the way, and see how you can feel comfortable about using PDF as a file format of choice.
Book VI: GoLive CS
maintain a very clean and useable site. After the fundamentals are covered, discover how to take advantage of improved CSS (Cascading Style Sheets) capabilities, as well as exciting rollover and action features that add interactivity to your site. In the past, these functions would
Icons Used in This Book
What’s a Dummies book without icons pointing you in the direction of really great information that’s sure to help you along your way. In this section, we briefly describe each icon we use in this book.
Tip The Tip icon points out helpful information that is likely to make your job easier.
Remember This icon marks a generally interesting and useful fact— something that you might want to remember for later use.
Warning The Warning icon highlights lurking danger. With this icon, we’re telling you to pay attention and proceed with caution.
Integration You can use the Adobe Creative Suite programs all
together in many different and helpful ways to make your workflow more efficient. Throughout this book, we
explain just how you can implement integration wherever it’s pertinent to the discussion at hand. We highlight
these tidbits with the Integration icon—you won’t want to miss this information.
Technical
Where to Go from Here
If you want to find out how to make page layouts for brochures, advertisements, books, and more, then skip ahead to Book II on
InDesign. If you really want to start with drawings and illustrations, then go to Book III on Illustrator. Book IV on Photoshop is the first stop for you if you have images you want to manipulate by cropping or modifying, or by using color correction.
Photoshop is also great for painting and drawing, so start here if you have creative ideas you want to express. If you want to create PDF documents, then you can skip ahead to Book V on Acrobat; however, if you want to create a page layout for your document and then export it as a PDF, you should start with Book II on InDesign instead. If designing for the Web is what you’re most excited about, you should begin reading
Book VI on GoLive. Book I is a great place to start reading if you have never used Adobe products before, or if you’re new to design-based software. Discovering some of the common terminology, menus, and palettes can be very helpful for the later chapters that use the terms and commands regularly!
If you want to, you could start with Book I, Chapter 1 and progress
through the book all the way to the end! The Adobe Creative Suite All-in-One Desk Reference For Dummies is designed so you can read a
Chapter List
Chapter 1: Introducing the Adobe Creative Suite
Chapter 2: Using Common Menus and Commands
Chapter 3: Using Common Palettes
Chapter 4: Using Common Plug-Ins
Chapter 5: Importing and Exporting
Chapter 6: Handling Graphics, Paths, Text, and Fonts
Chapter 7: Using Color
Chapter 1:
Introducing the Adobe Creative Suite
The diverse software in the Adobe Creative Suite enables you to create everything from an e-commerce Web site to a printed book of many hundred pages. Each piece of software in the Creative Suite works on its own as a robust tool. However, when you use different programs when working on a single project, it means that you have more room for
creativity and exploration, and you have a wider toolset to work with. The Adobe Creative suite unites leading-edge software for Web and print production and allows you to integrate these tools to create powerful and engaging presentations.
Introducing InDesign
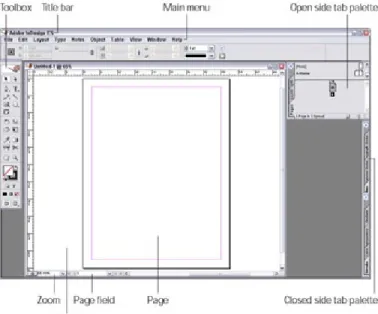
InDesign is a diverse and feature-rich page layout program. Using InDesign, you can create documents with rich typography, unique page layout and design, and execute complete control over your images and text. InDesign has many great features, including excellent integration with several other products in the Adobe Creative Suite.
InDesign, shown in Figure 1-1, allows you to accomplish the following:
Figure 1-1: Use InDesign to lay out pages or spreads.
Use images, text, and even rich media to create unique layouts and designs.
Export layouts for use in GoLive to create interactive Web sites. Import native files from Photoshop and Illustrator to help build rich layouts in InDesign.
Create interactive PDF documents.
Create drawings using the basic drawing tools included in the software.
InDesign caters to the layout professional, but it’s easy enough for even novices to use. You can import tables (say from Microsoft Excel) into your documents alongside existing artwork and images to create a layout. You can even easily import text from Microsoft Word, Adobe InCopy, or simply Notepad (Windows) or TextEdit (Mac). In a nutshell, importing, arranging, and exporting work is a common process when working with InDesign. Throughout this entire process, you have a huge amount of control over your work, whether you’re working on a simple one-page brochure or an entire book of 800 pages.
Using Illustrator for Drawing
Adobe Illustrator is the industry’s leading vector-based graphics software. Aimed at everyone from graphics professionals to Web users, Illustrator allows you to design layouts, logos for print, or vector-based images that can be imported into other programs such as Photoshop, InDesign, or Macromedia Flash. Adobe has also made it much easier to create files quickly by allowing you to save Illustrator documents as templates (so that you can efficiently reuse designs) and by allowing you to have a predefined library and document size.
Illustrator CS even has support for 3D effects that allow you to create 3D shapes and wrap custom bitmap or vector artwork around those shapes. Or you can add three-dimensional bevels to shapes in an Illustrator
document. You can add advanced lighting effects to shapes by adding multiple light sources; the brightness of each light source can be
individually controlled.
Figure 1-2: Create drawings or detailed layouts in Illustrator.
Here are some of the things you can create and do when using Illustrator: Create technical drawings (floor plans, architectural sketches, and so on), logos, illustrations, posters, packaging, and Web graphics.
Add effects like drop shadows and Gaussian blurs to vector images.
Enhance artwork by creating your own custom brushes. Align text along a path so that it bends in an interesting way. Lay out text into multicolumn brochures—text automatically flows from one column to the next.
Create charts and graphs using graphing tools.
Create gradients that can be imported and edited in other programs, such as InDesign.
Create documents quickly and easily using the existing templates and included stock graphics in Illustrator.
Distort images in exciting ways by creating warp and liquefy effects.
Save a drawing in almost any graphic format, including Adobe’s PDF, PSD, EPS, TIFF, GIF, JPEG, and SVG formats.
Save your Illustrator files for the Web by using the Save for Web dialog box, which allows you to output HTML, GIF, JPEG, and even Macromedia Flash SWF files.
Save Illustrator files as secure PDF files with 128-bit encryption.
Getting Started with Photoshop
Photoshop, shown in Figure 1-3, is the industry-standard software for Web designers, video professionals, and photographers who need to manipulate bitmap images. Photoshop allows you to manage and edit images by correcting color, editing photos by hand, and even combining several photos together to create interesting and unique effects.
Alternatively, you can use Photoshop as a painting program, where you can artistically create images and graphics by hand. Photoshop even includes a file browser that lets you easily manage your images by assigning keywords or allowing you to search the images based on metadata.
Figure 1-3: Manipulate and correct photos or create graphics with Photoshop.
Photoshop also allows you to create complex text layouts by placing text along a path or within shapes. The text can be edited after it has been placed along a path, and can even be edited in other programs (such as Illustrator cs). Join text and images together into unique designs or page layouts.
Web with a few clicks of the mouse, or upload images to an online photo service. You can preview multiple filters (effects) at once without having to apply each filter separately. Photoshop CS also supports various
artistic brush styles, such as wet and dry brush type effects and charcoal and pastel effects.
You can even create Macromedia Flash vector animations by using ImageReady cs, which is used for Web production and is part of
Photoshop cs. If you’re accustomed to using Macromedia Flash, you will find basic functionality built into ImageReady that can help speed up your workflow between the two programs.
Photoshop also has some great features for scanning. You can scan multiple images at once, and Photoshop is able to straighten each photo and save it as an individual file.
Technical
Stuff If you have purchased a copy of Photoshop cs, youneed to activate the software before you can use it. That means your serial number will have to be verified by Adobe online or by telephone. Photoshop is the only program in the Creative Suite that requires activation. Activation might sound daunting, but it’s actually a very simple and quick process. You can always use Photoshop CS as a free trial for 30 days before activating the software. For more information, visit www.adobe.com/activation/main.html.
Working with Acrobat
Acrobat is the only product in the Adobe Creative Suite, apart from Version Cue, that doesn’t sport the CS moniker. Only bundled in the Premium edition of the Creative Suite, Acrobat 6.0 Professional is aimed at business and creative professionals.
PDF is the file format of Acrobat; a PDF is typically used for saving documents such as books, invoices, documentation, and pamphlets. PDFs are searchable, you can select and copy text in them, and they’re a great format for sharing documents. PDFs have a full commenting
system where a person reviewing the document can add comments, mark text for editing, or highlight, strikethrough, and underline text selections.
If you have Acrobat, you can “print” PDF files from many other pieces of software, such as Microsoft Word or Excel. This makes it easy to make PDF files from all sorts of programs of all kinds of content. Even though you must have Adobe Acrobat, Illustrator, InDesign, or selected other programs to create Portable Document Format (PDF) files, anybody with the free Acrobat Reader can view the PDFs.
Figure 1-4: Create, modify, and comment on PDF documents using Acrobat.
Create interactive forms that can be filled out online.
Allow users to embed comments within the PDF files to provide feedback. Comments can then be compiled from multiple
reviewers and viewed in a single summary.
Create PDF files that can include MP3 audio, video, or SWF files. Combine multiple files into a single PDF and include headers and footers, as well as watermarks.
Create secure documents with encryption.
Introducing GoLive
GoLive is used to create professional Web sites quickly and efficiently, without the need to know or understand HTML (HyperText Markup
Language). You can work with a visual authoring workspace (commonly known as a Design view), or you can work in an environment where you work with the code. You can also work with both modes side by side. GoLive enables you to set up entire Web sites of multiple pages on your hard drive, and then upload them to a Web server. It also allows you to create a bunch of formatting settings, such as CSS styles. GoLive streamlines the Web site creation process, and makes it a lot quicker than writing HTML code by hand.
GoLive has built-in support for CSS (Cascading Style Sheets). CSS is a language that allows you to format parts of your Web pages, such as the color and style of text. CSS can also help you control the layout of the elements on your Web pages and offers a much more efficient way of controlling styles than other ways using HTML. GoLive supports other Web standards, such as Section 501, XHTML, and SVG, enabling you to build Web sites for mobile devices and sites that must be standards-compliant and/or accessible.
You can use guides and grids to lay out the elements on your pages in a visual and hands-on way. A very simple Web page layout is shown in
Figure 1-5: Laying out Web pages using GoLive makes Web authoring easy.
GoLive allows you to incorporate layouts and elements for your Web sites that were created in other programs such as InDesign or
Photoshop. The process of moving between the programs in the Adobe Creative Suite is quick and seamless. You can package up a page or series of pages from InDesign and move to GoLive to prepare the work for the Web. You can even import layered Photoshop files into GoLive. Finally, GoLive introduces a new tool called Co-Author. Co-Author enables you to design Web sites with templates, which allows your
clients or Web site contributors to upload new content to the site without anyone having to actually build new pages.
Technical
Integrating Software and Version Cue
With so many great pieces of software in a single package, it’s only natural that you will want to start using the programs together to build exciting projects. You might want to design a book using InDesign, and then create a Web presence for that content in GoLive. Similarly, you might want to take a complex PDF file and make it into something that everyone can view online. Or you might create a layout design in
Illustrator and integrate it into a page layout that you continue building in InDesign. All the tools in the Creative Suite are built to work together, and achieving the tasks described previously suddenly becomes much easier to do.
Benefiting from Integration
Integrating software is typically very advantageous to anyone. Integration allows you to streamline the workflow between programs and sometimes team members. If you wanted to create a Web site from an InDesign document, you would need to do a lot of preparation to get the file(s) ready to work with GoLive. However, tools exist that package up the files for you and prepare them for GoLive. If you wanted to prepare Photoshop files for the Web, you would also have to do a lot of manual work in order to prepare the documents. However, when you import a PSD file into GoLive, the layers are automatically translated into code and prepared for the Web.
Therefore, the integration features included in the Creative Suite do a lot of the work for you. Tools exist so that you can import native files (such as Photoshop PSD files or Illustrator AI files) and take advantage of the better quality or more detailed information these file formats offer.
Using Version Cue
team, because it helps you make sure that you’re working with the most recent version of the file. Version Cue also allows you to add comments and notes about the files you’re working on.
Chapter 2:
Using Common Menus and
Commands
When you work with all the different programs in the Adobe Creative Suite, you might notice that many menus, commands, and options are extremely similar between each piece of software. Discovering how to use menus and dialog boxes is essential to using the programs in the Adobe Creative Suite.
You might already be familiar with using dialog boxes and menus from other software packages. You will quickly discover that the way you use these elements is pretty much the same for any program. Some of the specific keyboard shortcuts are the same across programs, even ones made by different software companies! This makes finding out how to use the commands and options very easy. This chapter provides an overview of some of the common menus, dialog boxes, options,
Discovering Common Menus
When you’re working with programs in the Adobe Creative Suite, you probably notice that many of the menus in the main menu bar are the same. And then you probably see that these menus often contain many of the same commands across each program. These menus are
somewhat similar to other graphics programs you might have used
before. Similar functionality makes it very easy to find certain commands even when you’re completely new to the software you’re using!
Menus contain options and commands that control particular parts of or functions of each program. You might have the option of opening up a dialog box, which is used to input settings or preferences or to add something to a document. A menu might also contain commands that perform a particular action. For example, you might save the file as a result of selecting a particular command in a menu. Menus that
commonly appear in the Creative Suite programs are
File: Contains many commands that control the overall document, such as creating, opening, saving, printing, and
setting general properties for the document. The File menu might also include options for importing or exporting data into or from the current document.
Edit: Contains options and commands for editing the current document. Commands include copying, pasting, selecting, and options for opening preferences and setting dialog boxes that are used to control parts of the document. Spell checking and
transforming objects are also common parts of the Edit menu. View: Contains options for changing the level of magnification of the document. The View menu also sometimes includes options for viewing the workspace in different ways, showing rules, grids or guides, and turning on and off snapping.
also choose how to view the workspace, and save a favorite arrangement of the workspace as well.
Help: Contains the option to open the Help documentation that’s included with the program. This menu might also include
information about updating the software, registration, and tutorials.
The Creative Suite on the Mac also has an additional menu that bears the name of the program itself. This menu includes options for showing or hiding the program on the screen, opening preferences, and opening documents that provide information about the software.
Figure 2-1 shows a menu in GoLive that contains many common options to control the program. Notice that more menus are available in the
Using Dialog Boxes
A dialog box is a small window that might contain drop-down lists, panes, lists, text fields, option buttons, check boxes, and buttons that enable you to make settings and enter information or data as necessary. The dialog boxes enable you to control the software or your document in various ways. For example, when you open a new file, you typically use the Open dialog box to select a file to open. When you save a file, you use a Save As dialog box to select a location to save the file in, name it, and execute the Save command.
Some dialog boxes also include tabs. These dialog boxes might need to contain many settings of different types that are organized into several sections using tabs. Dialog boxes typically have a button that executes the particular command and one that cancels and closes the dialog box without doing anything. A common dialog box is shown in Figure 2-2.
Figure 2-2: An example of a dialog box in Photoshop
CS.
A dialog box in Windows is a lot like a dialog box you might find on the Mac. They perform similar functions and include the same elements to enter or select information. For example, some of the functions dialog boxes perform include the following:
Save a new version of a file.
Set up the preferences for the software you’re using. Check spelling of text in a document.
Open a new document.
Encountering Alerts
Alerts are common on any operating system and in most programs. Alerts are similar to dialog boxes, in that they are small windows that contain information. However, alerts are different from dialog boxes because you cannot edit the information in an alert. Alerts are designed to simply tell you something, and give you one or more options made by clicking a button. For example, you might have an alert that tells you that you can’t select a particular option. Usually there is an OK button to click to acknowledge and close the alert. You might have other buttons on the alert that will cancel what you were doing or a button that opens a dialog box. Figure 2-3 shows a typical alert.
Figure 2-3: An Illustrator alert.
Tip Alerts are also sometimes used to confirm actions before executing them. Sometimes these alert windows also offer the option (typically in the form of a check box) of not showing the alert or warning again. You might want to do this if you
Using Common Menu Options
Various menu options are typically available in each of the Creative Suite programs. However, with each of these menus, several other options are available. Some of the options open dialog boxes. This is typically
indicated by an ellipsis that follows the menu option, as shown in Figure 2-4.
Figure 2-4: If an ellipsis follows a menu option, a dialog box opens.
The following menu options are found in several of the Adobe Creative Suite programs, and these commands either perform similar (or the same) functions, or they open similar dialog boxes:
New: Creates a brand new document in the native file format. For example, in InDesign a new INDD file is created by choosing File New Document. You can sometimes choose what type of new file you want to create.
Open: Opens a dialog box where you can choose a (supported) file on your hard drive or a disk to open.
Save: Saves the changes you have made to the current document.
Save As: Saves a new copy of the current document.
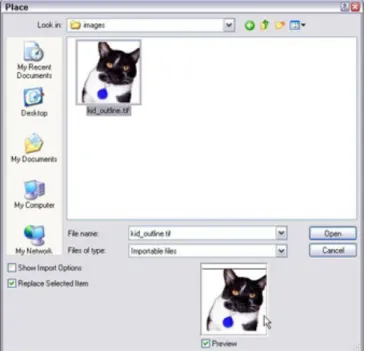
Import: Imports a file into the current document, such as an image or sound file.
Export: Exports the current data to a specified file format. You can sometimes select several different kinds of file formats to save the current data in.
Copy: Copies the currently selected data onto the computer’s clipboard.
Paste: Pastes the data from the clipboard into the current document.
Undo: Undoes the most recent thing you did in the program. For example, if you just created a rectangle, the rectangle is removed from the document.
Redo: Redoes the steps that you applied the Undo command to. For example, if you removed that rectangle you created, the redo command adds it back to the document.
Zoom In: Magnifies the document so that you can view and edit the contents closely.
Zoom Out: Scales the view smaller so that you can see more of the document at once.
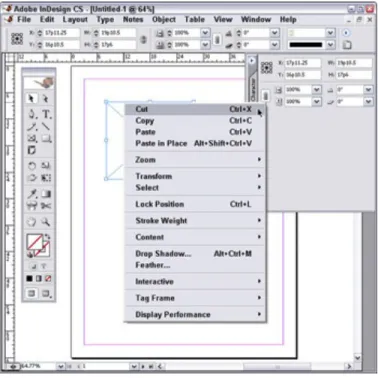
About Contextual Menus
Contextual menus are available in all kinds of programs; they’re an incredibly useful, quick way to make selections or issue commands. Contextual menus include some of the most useful commands you might choose over and over again. A contextual menu is similar to the menus that we describe in the previous sections; however, it’s context sensitive and opens when you right-click (Windows) or Control+click (Mac)
something in the program. Context sensitive means that what options appear in the menu depends on what object or item you right-click
(Windows) or Control+click (Mac). For example, if you open a contextual menu when the cursor is over an image, commands involving the image are listed in the menu. However, if you right-click (Windows) or
Control+click (Mac) the document’s background, you typically see options that affect the entire document instead of just a particular element within it. This means that you can select common commands specifically for the item that you’ve selected. Figure 2-5 shows a contextual menu that
appears when you right-click (Windows) or Control+click (Mac) an object in InDesign.
Remember Keep in mind that what tool you have selected in the toolbox might affect what contextual menus you can access in a document. You might have to select the Selection tool first to access some menus. If you want to access a contextual menu for a particular item in the document, make sure that the object is selected first before you right-click (Windows) or Control+click (Mac).
Tip If you’re using a Mac, you can right-click to open a contextual menu if you have a two-button mouse hooked up to your Mac. Otherwise, you would Control+click to open a contextual menu, as shown in Figure 2-6.
Using Common Shortcuts
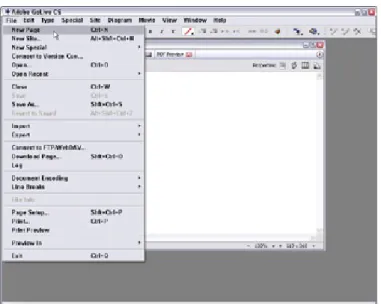
Shortcuts are key combinations that enable you to quickly and efficiently execute commands such as saving, opening, or copying and pasting objects. Many of these shortcuts are listed in the menus discussed in the previous sections. If the menu option has a key combination listed next to it, you can press that key combination to access the command instead of using the menu to select it. Figure 2-7 shows a menu with many
keyboard shortcuts listed.
Figure 2-7: Shortcuts are shown next to their associated command, such as in the View menu in GoLive.
For example, if you open the File menu, next to the Save option is Ctrl+S (Windows) or z+S (Mac). Instead of choosing File Save, you can simply press the shortcut keys and save your file. This is a very quick way to execute a particular command.
Tip Some of the most common shortcuts in the Adobe Creative Suite are listed in Table 2-1.
Table 2-1: Common Keyboard Shortcuts
New Ctrl+N z+N
Open Ctrl+O z+O
Save Ctrl+S z+S
Undo Ctrl+Z z+Z
Redo Shift+Ctrl+Z Shift+ z+Z
Copy Ctrl+C z+C
Paste Ctrl+V z+V
Print Ctrl+P z+P
Preferences (General) Ctrl+K z+K
Help F1 or sometimesCtrl+? F1 or sometimes z+?
Changing Your Preferences
Setting your preferences is important to do when you’re working with new software. Understanding what the preferences can do for you gives you a good idea about what the software does as well. All the programs in the Adobe Creative Suite have different preferences; however, the way that the Preferences dialog box works in each program is the same.
The Preferences dialog box for each program can be opened by choosing Edit Preferences (Windows) or Program
Name Preferences General (Mac). The Preferences dialog box opens, as shown in Figure 2-8.
Figure 2-8: Click an item in the list on the left side of the InDesign Preferences dialog box to navigate between each
section.
description of that control appears in the Description area.
In some Preferences dialog boxes, the left side of the dialog box has a list box containing the different categories of preferences that you can change. Alternatively, a Preferences dialog box might have a drop-down list, like the one from Photoshop shown in Figure 2-9. When you select an item in the list box or from the drop-down list, the dialog box jumps to that area containing different setting controls that you can modify.
Figure 2-9: Use the drop-down list in Photoshop’s Preferences dialog box to navigate between each section.
When you’re finished changing the settings in that area, select a new area from the list box or drop-down list to change the settings for a different part of the program.
In some programs, not all the settings you can modify are in the
Preferences dialog box. For example, in Illustrator, you can change your color settings by choosing Edit Color Settings to open the Color
Figure 2-10: Change the color settings in Illustrator.
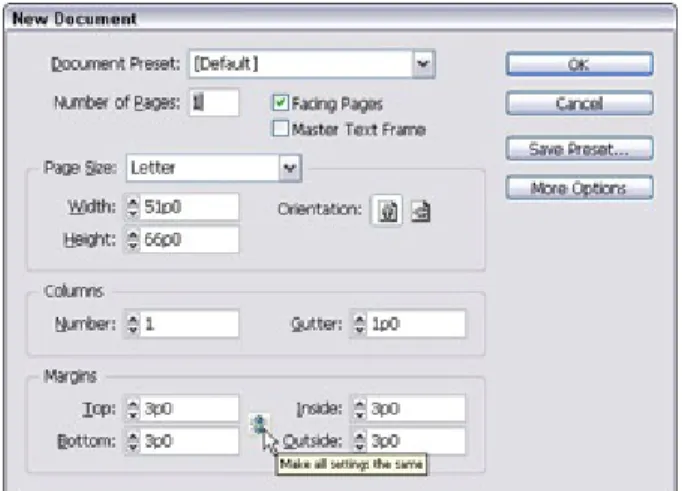
In many Adobe Creative Suite programs, you have an option for setting up the main preferences for the overall document, such as setting up the page dimensions, number of pages in the document, or the orientation (landscape or portrait) of the pages. In GoLive and Photoshop, these kinds of options are available by choosing File Page Setup; in InDesign, Acrobat, and Illustrator, you choose File Document Setup. A Page
Setup dialog box is shown in Figure 2-11.
Chapter 3:
Using Common Palettes
Using Palettes in the Workspace
Palettes are small windows in a program that contain controls such as sliders, menus, buttons, and text fields that you can use to change the settings or attributes of a selection or of the entire document. Palettes might also include information about a section or about the document itself. You can use this information or change the settings in a palette to modify the selected object or the document you’re working on.
Whether you’re working on a Windows machine or on a Mac, palettes are very similar in the way they look and work. Here are the basics of working with palettes:
Opening: Open a palette in one of the Creative Suite programs by using the Window menu; choose Window and then select the name of a palette. For example, to open the Swatches palette (which is similar in many programs in the suite) shown in Figure 3-1, you would choose Window Swatches.
Figure 3-1: This palette allows you to choose a color.
Accessing the palette menu: Palettes have a flyout menu called the palette menu, as shown in Figure 3-2. The palette menu
opens when you click the arrow in the upper-right corner of the palette. The palette menu contains a bunch of options that you can select that relate to the tab that is currently selected when you click the palette menu. When you select one of the options in the menu, it might execute an action or open a dialog box.
Sometimes there are very few options in a palette menu, but particular palettes may have a whole bunch of related
Figure 3-2: The name of a palette is located within the tab at the top of palettes (or to the left of the palette if you’re using side tabs).
Closing: If you need to open or close a palette’s tab or palette altogether, just choose Window Name of Palette’s Tab. You can close a palette the same way: All you need to do is select an open palette in the Window menu, and it will close. Sometimes a palette contains a close button (an X button in Windows or the red button on a Mac), which you can click to close the palette. Minimizing/maximizing: All you need to do to minimize a selected palette is to click the minimize button in the title bar of the palette (if it’s available). You can also double-click the tab itself (of an active tab) in the palette. This will either partially or fully minimize the palette. If it only partially minimizes, double-clicking the tab again will fully minimize the palette. Double-clicking the active tab when it’s minimized will maximize the palette again.
Tip You might also see what’s called the cycle widget when a palette can be partially minimized and maximized. This is a small double-sided arrow that appears to the left of the palette’s name on the tab. If you click this arrow, it
progressively expands or collapses the palette.
Most palettes contain tabs, which help organize information and controls in a program into groupings. Palette tabs contain a particular kind of information about a part of the program; a single palette may contain several tabs. The name on the tab usually gives you a hint about the type of function it controls or displays information about, and it is located at the top of the palette (or to the left of the palette when you’re using side
tabs), as shown in Figure 3-2.
To minimize a side tab (which we discuss further in the following section), you need to click in the gray area that surrounds the tab(s) in a palette. This collapses the side tab into the side of the workspace. To maximize a minimized side tab, click one of the tabs in the palette.
Working with Different Kinds of Palettes
The most common kind of palette contains tabs along the top of the palette (refer to Figure 3-1). A different way of arranging a palette is by changing it so that the tabs are arranged on the side (refer to Figure 3-2). InDesign allows you to either use top or side tab orientation. When you first open InDesign, you see palettes with the tab names to the left side of the palette. These palettes minimize and maximize into the side of the authoring environment. Also note that the palette menu button is located at the upper-left side of the palette, above the tabs.
Technical
Stuff Not all the palettes can be turned into side tabs in aprogram that enables side tabs like InDesign. For example, the Tools palette (or toolbox) in InDesign cannot be changed into a side tab. However, most palettes in InDesign can be changed into a side tab if you want. You can also change the orientation of side tabs as well. You can change a side tab into a regular tab and palette by dragging it away from the palette it’s in. This changes the orientation of the side tab, which you can see because the outline of the palette
changes orientation before you even release the
mouse button. You can change the palette back into a side tab by dragging it into an existing side tab palette. Alternatively, you change a palette into a side tab by following these steps:
1. Drag the tab to the far right of the InDesign workspace and keep the mouse button depressed.
You can see the outline of the tab when you drag it.
2. Wait for the tab’s outline to change into a vertical side tab orientation, and then release the mouse button.
You can also find and arrange palettes above the workspace in
Photoshop in the palette well. Only the tab portion of the palette is seen in Photoshop, without the actual palette window containing the tabs: It’s actually part of the workspace itself, as shown in Figure 3-3.
Figure 3-3: The tab resides above the palette well in Photoshop, and is not contained within a palette window.
Tip If you’re using a lower resolution or have a small monitor, you might not be able to see or use the palette well.
When you click the tab in the palette well, a menu-like palette opens that contains options for you to choose from or view. This is also shown in
Figure 3-3. You can move other palettes into this palette well by clicking the tab and dragging the palette into this area. You will see a black outline around the palette well when you drag the tab over this region. If you release the mouse button while the area is highlighted, then the palette is added.
Figure 3-4: To move a palette, just drag it to a new location.
You can separate tabs from a palette by clicking the tab and then
dragging it outside the palette. You can also move a tab from one palette to another by dragging the tab from the original palette to the new palette; release the mouse button when you see a black outline around the new palette. Grouping similar tabs by moving them into a single grouped palette is a good idea—it makes accessing the different functions in your document a lot easier because you have less searching to do to find related functions for a task if similar palettes are grouped together. You can also move side tabs in exactly the same way. Simply drag the tab to a new location or into a new palette. When you see a black outline around the new palette, release the mouse button and the tab is added to the new palette.
You can hide all palettes by pressing the Tab key. Press the Tab key again to reveal all the palettes you have hidden.
Technical
Looking at Common Palettes
Many palettes are similar across programs in the Creative Suite. While each palette does not have exactly the same contents in each of the programs it is included in, many are extremely similar in what each contains. Figure 3-5 shows some of the most common palettes you find in the Adobe Creative Suite. You use these palettes in very similar ways, no matter what program or operating system you’re using.
Figure 3-5: These palettes appear in most of the Adobe Creative Suite programs.
Remember Acrobat does not contain numerous palettes like the other programs in the Creative Suite. Instead, Acrobat relies mainly (but not entirely) on a system of menus and toolbars filled with buttons and drop-down lists. In
Acrobat, you can open dialog boxes that contain a
bunch of settings that you can enter for your documents.
The following palettes are not available in all of the programs in the Creative Suite, however, you find them in most of the programs:
color modes and several ways of mixing or choosing colors in the Colors palette.
Info: The Info palette shows you information about the document itself or a particular selection you have made. The Info palette includes information on size, positioning, and rotation of selected objects. You can’t enter data into the Info palette. It only displays information instead of accepting it, so you would have to use the Transform palette to make these modifications if necessary. Swatches: The Swatches palette can be used to create a library of swatches, which can be saved and imported into other
documents or other programs. You can store colors and gradients that you use repeatedly in the Swatches palette.
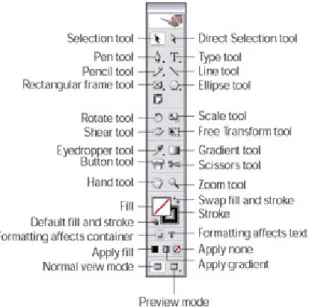
Tools: The Tools palette (commonly called the toolbox) is not available in all the Creative Suite programs, but it is a very
important palette in the programs it does exist in. The toolbox is used to select tools such as the Pencil, Brush, or Pen tool that you use to create objects in a document.
Layers: The Layers palette is used to display and select layers. The Layers palette also enables you to change layer order and helps you select items on a particular layer.
Align: The Align palette enables you to align selected objects to each other or align them in relation to the document itself. This enables you to arrange objects in a precise way.
Stroke: The Stroke palette allows you to select strokes and change the attributes of those strokes, such as the color, width/weight, style, and cap. The program you’re using determines what attributes you can change.
Chapter 4:
Using Common Plug-Ins
In This Chapter
Discovering what filters and plug-ins are used for
Using common plug-ins and filters in the Adobe Creative Suite Many programs in the Adobe Creative Suite enable you to use plug-ins, filters, or extensions to change parts of the document. Even if you haven’t used Photoshop, you’re probably already familiar with some of the
Looking at Common Plug-Ins and Filters
Plug-ins are sometimes used for very similar tasks in several programs in the Adobe Creative Suite. Plug-ins are designed to enable a program to do extra things that it wouldn’t otherwise be able to do. Or, if you are capable of replicating the task that the plug-in does, there is another advantage: Plug-ins and filters dramatically speed up the creative
process. At the mere click of a button, you can add an amazing effect to your project that might have taken many hours to accomplish without the plug-in!
Additional filters and plug-ins for the programs in the Adobe Creative Suite are available or linked from the Adobe Web site. It’s also very easy to find plug-ins on the Web for download as well. A search yields many results for these packages. A good place to start is at the Adobe Studio Exchange, located at http://share.studio.adobe.com, as shown in Figure 4-1. This site includes a wealth of tools that you can download and install for the Adobe Creative Suite.
Tip Filters for Photoshop are probably the most common kind of add-on you will find add-online. Many filters do cost madd-oney; however, some filters are offered for free.
Plugging into InDesign
InDesign offers many filters for importing and exporting text. Plug-ins are available that enable you to work with PageMaker and for helping to import and paste in other content. Many plug-ins for InDesign are designed to help you with the following functions:
Lay out spreads correctly for a printer.
Create complicated indexes and tables of contents. Create cross-references within your documents.
Create page previews and thumbnails of your documents.
Installing plug-ins
Plug-ins can be installed in a few different ways. Sometimes they are installed using an executable file: You double-click the file on your hard drive and it automatically installs the software. This is a lot like installing any other program on your computer, such as the programs in the Adobe Creative Suite itself. Sometimes you’re given individual files that need to be placed in a folder first. In this case, you need to find the Plug-Ins folder on your computer in the install directory of the program the plug-in or filter is for. For example, if your plug-in was for InDesign on Windows, you would need to find this directory:
C:\Program Files\Adobe\InDesign CS\Plug-Ins
You would then copy and paste or move the plug-in file you downloaded into this directory on your hard drive. If your plug-in was for Photoshop on the Mac, you would need to find this folder on your hard drive:
Applications\Adobe Photoshop CS\Plug-Ins
it is not clear how to install a plug-in, then the best thing to do is locate instructions for the software that explain how to install it on your
computer. This might be found on the company’s Web site, perhaps where you downloaded the software from. Or instructions might be bundled with the plug-in file itself.
Other filters created for InDesign can help you import certain content, such as text. A lot of the time, you will find that text formatting is lost when you import content into InDesign. Filters can help you retain this original formatting when you’re importing text. These plug-ins and filters are just a small sample of what is available for InDesign. In all likelihood, many more plug-ins will be created for the software.
Adding on to Photoshop
Photoshop has a lot of plug-ins and filters already included with the program when you install it that give more functionality to the program. Not only can you find additional filters, but you can also find plug-ins to add new features that can inevitably add some interesting effects to your documents. You might also find a plug-in that installs a great number of filters into Photoshop. The kinds of filters and plug-ins you can find for Photoshop create the following effects:
Remove blemishes and scratches from photos using special tools.
Create 3D text, objects, and effects using several different plug-ins. Effects include drop shadows, bevels, and embosses that go beyond what is already available in Photoshop.
Use special masking tools to create amazing effects.
Liquefy an image, colorize an image, and other great image modification effects.
Add a frame from a library to place around your favorite images. These are only some of the many plug-ins (which are commonly a set of many filters bundled together) available on the market for Photoshop. One of these plug-ins has been used to make changes to an image, as shown in Figure 4-2.
Figiure 4-2: A free plug-in was used to make some changes to an image.
As you will quickly find out, many plug-ins have custom interfaces that you can use to make your settings. These interfaces include sliders, text fields, and buttons, and usually a thumbnail preview of how the filter is affecting the image. These interfaces vary greatly in style and features, but you’ll discover that they are usually fairly intuitive and easy to use.
Using Illustrator plug-ins
You can find many tools to extend the capabilities of Illustrator. Plug-ins are available that enable you to create 3D forms from your drawings, while other programs take your 3D files and turn them into line drawings instead. Other plug-ins, ranging from simple to very complex, allow you to
Add common symbols (such as road signage) to use in your
documents. The symbols are organized into libraries that you can use right in the Illustrator workspace.
Import CAD files into a document. Create interactive documents.
Handle patterns geared at creating textures and backgrounds. The capabilities of Illustrator can be dramatically enhanced after you download and install a few plug-ins. Simple projects can become much more interesting or complex by merely entering a value and clicking a button, as shown in Figure 4-3.
Figiure 4-3: Illustrator filters speed up your workflow.
Tip Some fun things to download and install into Illustrator are
custom brushes. This means that you can have a wider array of brushes available to work with when you create drawings and illustrations. “Styles” can also be installed into Illustrator, and usually obtained for free. You can also download and install custom brushes for Photoshop.
Acrobat has several plug-ins available that help speed up and diversify your project workflow. Some of the plug-ins available for Acrobat are designed to help you
Add stamps and watermarks to the documents.
Add features such as page numbering and watermarks.
Streamline productivity by offering solutions for batch processing. Convert file formats to diversify what kinds of documents you can create from Acrobat.
Secure your PDF files with forms of encryption.
Work with and fix the PDF in prepress quickly and efficiently. Many of the plug-ins available for Acrobat enable you to batch process the pages in a document. This means that all the pages are processed at one time. Many plug-ins for Acrobat help save you a lot of time when you’re creating PDF files. Plug-ins are usually designed to be very easy to use, and can thus save you from having to perform a tedious and repetitive task.
Plug-ins for Acrobat are available from the Adobe Web site, as well as numerous third-party Web sites.
Extending GoLive
GoLive offers you a quick and easy way to make Web pages, but you can add more tools to GoLive to diversify what the program can do. These extensions (essentially, plug-ins) also speed up the process of creating Web sites as well. Some of the available plug-ins are described in the following list. Extensions in GoLive can
Add e-commerce modules to a Web site automatically using GoLive.
Clean up the ugly HTML generated for a site designed and created using FrontPage.
Create menus for your Web pages. Add PayPal to your Web site.
Use a PHP and JavaScript editor and/or tools right within GoLive to build dynamic Web sites.
GoLive also allows you to use actions in the program. Actions are premade JavaScript scripts that can be added to your Web sites for additional interactivity or interest. You can also use premade templates for your sites, many of which are available at
http://share.studio.adobe.com. You can also find Actions for other programs such as Photoshop and Illustrator.
Templates, as shown in Figure 4-4, can be customized in GoLive so they are original and unique when you put the pages online. Actions and
templates (as well as tutorials and more plug-ins) are available from the Adobe Studio Exchange. Go to
http://share.studio.adobe.com/axBrowseProductType.asp? t=2 to check out what’s available for you to download.
How to Use Filters
You might have a few plug-ins or filters installed into your Adobe Creative Suite programs. A filter can enhance an existing photo in a very exciting way. After you have installed a plug-in into Photoshop or Illustrator that includes a bunch of additional filters, you will want to check out what it can do to your photos. An example of this follows.
Install some filters for Photoshop (or Illustrator). After you have
completed the installation and restarted your computer if necessary, open Photoshop and locate the Filter menu option (the new filters are available in this menu). To use a filter, follow these steps:
1. Choose an interesting photo that you want to apply an affect to and open the file in Photoshop.
Choose a photo that has many colors or a lot of contrast to work with.
2. Choose a filter from the Filter menu.