Andr
oid G
ames
Pro
Android Games
Pro Android Games
■ ■ ■
All rights reserved. No part of this work may be reproduced or transmitted in any form or by any means, electronic or mechanical, including photocopying, recording, or by any information storage or retrieval system, without the prior written permission of the copyright owner and the publisher.
ISBN-13 (pbk): 978-1-4302-2647-5 ISBN-13 (electronic): 978-1-4302-2648-2
Printed and bound in the United States of America 9 8 7 6 5 4 3 2 1
Trademarked names may appear in this book. Rather than use a trademark symbol with every occurrence of a trademarked name, we use the names only in an editorial fashion and to the benefit of the trademark owner, with no intention of infringement of the trademark.
President and Publisher: Paul Manning Lead Editor: Steve Anglin, Douglas Pundick
Technical Reviewer: Kunal Mittal and Vikram Goyal
Editorial Board: Clay Andres, Steve Anglin, Mark Beckner, Ewan Buckingham, Gary Cornell, Jonathan Gennick, Jonathan Hassell, Michelle Lowman, Matthew Moodie, Duncan Parkes, Jeffrey Pepper, Frank Pohlmann, Douglas Pundick, Ben Renow-Clarke, Dominic
Shakeshaft, Matt Wade, Tom Welsh Coordinating Editor: Fran Parnell
Copy Editors: Heather Lang and Marilyn Smith Formatter: Nancy Wright
Compositor: LaurelTech
Indexer: BIM Indexing and Proofreading Services Artist: April Milne
Cover Designer: Anna Ishchenko
Distributed to the book trade worldwide by Springer-Verlag New York, Inc., 233 Spring Street, 6th Floor, New York, NY 10013. Phone 1-800-SPRINGER, fax 201-348-4505, e-mail
orders-ny@springer-sbm.com, or visit http://www.springeronline.com.
For information on translations, please e-mail info@apress.com, or visit http://www.apress.com. Apress and friends of ED books may be purchased in bulk for academic, corporate, or promotional use. eBook versions and licenses are also available for most titles. For more information, reference
our Special Bulk Sales–eBook Licensing web page at http://www.apress.com/info/bulksales.
The information in this book is distributed on an “as is” basis, without warranty. Although every precaution has been taken in the preparation of this work, neither the author(s) nor Apress shall have any liability to any person or entity with respect to any loss or damage caused or alleged to be caused directly or indirectly by the information contained in this work.
iii
Contents at a Glance
Contents... iv
About the Author ... x
About the Technical Reviewer ... xi
Introduction ... xii
■
Chapter 1: Welcome to Android Gaming...1
■
Chapter 2: Compiling Native Code in Android ...27
■
Chapter 3: Building a Java Game from Scratch ...55
■
Chapter 4: Java Games Continued: Fun with Polygons ...81
■
Chapter 5: Hybrid 3D Graphics with OpenGL and JNI ...117
■
Chapter 6: 3D Shooters Episode I: Wolfenstein 3D for Android ...161
■
Chapter 7: 3D Shooters Episode II: Doom for Android...221
■
Appendix: Deployment and Compilation Tips ...271
iv
Contents
Contents at a Glance...iii
About the Author ... x
About the Technical Reviewer ... xi
Introduction ... xii
■
Chapter 1: Welcome to Android Gaming...1
What Skills Do You Need? ...1
A Solid Foundation of Android ... 1
A Basic Knowledge of Linux and Shell Scripting ... 3
What Software Tools Do You Need? ...4
Setting Up Your Machine ...4
Getting the Android Source ... 5
Extracting Native Android Libraries ... 7
Installing the GNU Toolchain for ARM Processors ... 8
Writing Custom Compilation Scripts... 11
Setting Up Your Development Environment...18
You Have Taken the First Step...26
■
Chapter 2: Compiling Native Code in Android ...27
Your First Native Android App...27
v
Creating the Android Project ... 30
Application Architecture ... 32
Compiling and Testing the Shared Library...45
Troubleshooting Missing Symbols... 48
Testing the Dynamic Library on the Device ... 49
Debugging with strace ... 50
Compiling Statically... 51
Testing the Native Application ...52
What’s Next?...54
■
Chapter 3: Building a Java Game from Scratch ...55
Android Gaming vs. Java ME Gaming ...55
Creating Space Blaster, Your First Java Game ...56
Understanding Game Architecture ... 57
Creating the Project... 59
Creating the Game’s Activity Class... 60
Creating the Game Layout ... 61
Implementing the Game ... 66
Handling Key and Touch Events ... 76
Testing on the Emulator...79
What’s Next?...80
■
Chapter 4: Java Games Continued: Fun with Polygons ...81
About the Chapter Layout ...81
Understanding the Caveats of Drawing Polygons in Android...81
Understanding the Caveats of Drawing Rectangles ...83
Creating a Polygon Class for Asteroids...85
vi
Understanding the Game’s Architecture...95
Creating the Project ...95
Creating the Game Layout ... 97
Looking at the Resources ... 97
Understanding the Game Life Cycle ... 99
Responding to Key Press and Touch Events... 110
Testing Asteroids on the Emulator...113
What’s Next?...115
■
Chapter 5: Hybrid 3D Graphics with OpenGL and JNI ...117
The Power of Mobile Devices ...118
OpenGL the Java Way ...119
Java Main Activity ... 123
Surface View ... 124
GL Thread ... 127
Cube Renderer... 130
Cube Class... 134
OpenGL the Native Way ...136
Main Activity ... 138
Native Interface Class... 140
Changes to the Original Sample ... 142
Native Cube Renderer... 143
Native Cube ... 151
Compiling and Running the Sample ... 152
Caveats of Porting OpenGL Games to Android...158
vii
■
Chapter 6: 3D Shooters Episode I: Wolfenstein 3D for Android ...161
Gathering Your Tools ...161
Downloading the Chapter Source Code... 161
Introducing Wolf 3D ...162
Understanding the Game Architecture...165
Understanding the Java Classes for Wolf 3D...167
Creating the Main WolfLauncher Class... 168
Creating the Wolf 3D Main Menu... 172
Handling Key and Touch Events ... 174
Creating the Game Loop ... 175
Making Native Callbacks ... 177
Creating Sound and Music Handlers ... 179
Creating Movement Controller Handlers ... 180
Creating the Movement Controller... 182
Sound Classes ... 190
Native Interface Class... 200
Coding the Native Layer...203
Initializing the Game Loop ... 204
Cascading Messages with C to Java Callbacks... 206
Compiling the Native Library ...213
Writing the Makefile ... 213
Generating JNI Headers... 215
Testing Wolf 3D in the Emulator ...215
What’s Next?...218
■
Chapter 7: 3D Shooters Episode II: Doom for Android...221
The Sky Is the Limit with the Java/C Power Combo ...221
viii
Game Architecture for Doom ...225
Java Main Activity...227
Creation Handler... 227
Game Layout... 228
Menu and Selection Handlers... 231
Key and Touch Event Handlers ... 233
Native Callback Handlers... 234
Navigation Controls ... 238
Audio Classes ...240
Native Interface Class...241
Callback Listener ... 241
Native Methods... 242
C to Java Callbacks ... 243
Native Layer...245
Native Method Implementations... 246
Original Game Changes ... 258
Doom Library (DSO) Compilation ...264
Testing Doom for Android in the Emulator...266
You Have Done It...269
■
Appendix: Deployment and Compilation Tips ...271
Signing Your Application...271
Creating a Key Store... 271
Signing the Application... 272
Using the Android NDK to Compile Libraries from Chapters 6 and 7...276
Compiling Wolf 3D with the NDK 1.5 ... 277
ix
Adding Support for OpenGL to the NDK 1.5 ... 280
Compiling Doom with NDK 1.6 ... 282
Final Thoughts ...284
x
About the Author
xi
About the Technical Reviewer
■ Kunal Mittal serves as executive director of technology at Sony Pictures Entertainment, where he is responsible for the SOA and Identity Management programs. He provides a centralized engineering service to different lines of business and consults on the open-source technologies, content management, collaboration, and mobile strategies.
Kunal is an entrepreneur who helps startups define their technology strategy, product roadmap and development plans. With strong relations with several development partners worldwide, he is able to help startups and even large companies to build appropriate development partnerships. He generally works in an advisor or consulting CTO capacity, and serves actively in the project
management and technical architect functions.
xii
Introduction
Pro Android Games will help you to create the best games for the Android platform. There are plenty of books out there that tackle this subject, but only this book gives you a unique perspective by showing you how easy it is to bring native PC games to the platform with minimum effort. This is done using real-world examples and source code on each chapter. Keep in mind that, before you dig into this book, you will need a solid foundation in Java and ANSI C. I have made a great effort to explain the most
complicated concepts as clearly and as simply as possible with a combination of graphics and sample code. The source code provided for each chapter will help you understand the concepts in detail and make the most of your time as a mobile game developer.
What Software Will You Need?
To make the most of this book, you will need the following tools:
A Windows or Linux PC with a Java SDK Properly Installed
I guess this is kind of obvious, as most development for Android is done in Java. Note that I mentioned a Java SDK, not JRE. The SDK is required because of the JNI header files and command line tools used throughout the latter chapters.
Eclipse IDE and Android SDK Properly Installed
Eclipse is the de facto IDE for Android development. I have used Eclipse Galileo to create the workspace for the book; nevertheless, Eclipse Ganymede should work as well.
Need a Development IDE?
Even though Eclipse Galileo has been used to create the code workspace, you can use your favorite IDE. Of
course, that will require a bit of extra setup. You can get Eclipse Galileo from
xiii
For instructions on how to set up the Android SDK with other IDEs, such as IntelliJ or a basic editor, see
http://developer.android.com/guide/developing/other-ide.html.
Android SDK properly installed means two things:
1. You must install the Android SDK plug-ins for Eclipse:
a. From the IDE main menu click Help Install New Software.
b. Click the Add button to add a new Site and enter:
• A name: Android SDK
• A location: https://dl-ssl.google.com/android/eclipse/. Click OK.
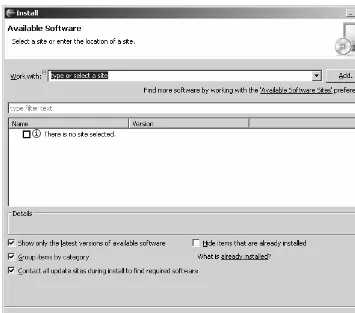
c. Select the Android SK from the Available Software dialog and follow the easy installation instructions from the wizard.
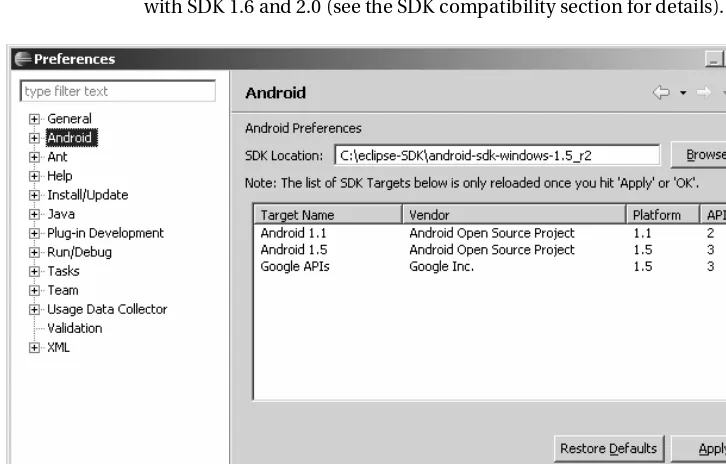
2. You must install the Android SDK: It can be downloaded from the Android site above. Keep in mind that Eclipse must be told about the location of the Android SDK. From the main IDE menu click Window Preferences. On the left navigation menu select Android and enter the SDK location (see Figure 1). I have used SDK 1.5 because that was the latest available by the time of this writing; however, the code in this book has been tested with SDK 1.6 and 2.0 (see the SDK compatibility section for details).
xiv
GNU C Compiler for ARM Processors
A GNU C compiler is required for the hybrid games in the book. These games combine Java code with a native core library, hence the need for a C compiler that targets the mobile ARM processor. The compiler used in this book and detailed in Chapter 1 is the Code Sourcery GNU G++ Toolkit. You are not bound, however, to use this compiler; as a matter of fact, you can use any C compiler capable of generating ARM code, including the Android Native Development Kit (NDK).
Chapter Source
This is an optional tool but it will help you greatly to understand the concepts as you move along. I have made my best effort to describe each chapter as simply as possible. Nevertheless, some of the games (especially Wolf 3D and Doom) have very large core engines written in C (100K lines for Doom), which are poorly commented and very hard to understand. All in all you will see how easily these great languages (Java and C) can be combined with minimal effort. Get the companion source for the book from the publisher at http://www.apress.com. It was built using Eclipse Galileo.
What Makes This Book Unique?
I think it is important for the reader to understand my goal with this manuscript and what I believe sets this book apart. Even though Java is the primary development language for Android, Google has realized the need for hybrid Java/C development if Android is to succeed as a gaming platform, so much so that they released the Native Development Kit (NDK). Google is realizing the need to support C development to catch up with the overwhelming number of native games written for other mobile platforms like the iPhone. PC games have been around for decades (mostly written in C), and by using a simple ARM C compiler, you could potentially bring thousands of PC games to the Android Platform. This is what makes this book unique. Why translate 100k lines of painfully complicated code from C to Java if you can just combine both languages in an elegant manner with significant savings on time and money? My book will help you to do just that. This is my goal and what makes this book stand out. In the other hand, this book also includes chapters of pure Java games in a well-balanced layout to satisfy both the Java purist and the C lover in you.
Android SDK Compatibility
As a developer you may ask yourself about the SDK compatibility of the code in this book. This is an important question as new versions of the Android SDK come out frequently. By the time of this writing, Google released the Android SDK version 2.0. The code in this chapter has been tested with the following versions of the Android SDK:
xv
The bottom line is that the code in this book will run in any version of the SDK from 2.0 to 1.0, and that was my intention all along.
SDK Changes for Version 1.6
Virtually nothing has changed from versions 1.5 to 1.6 of the platform when it comes to game
development. For a detailed list of API changes in version 1.6, see
http://developer.android.com/sdk/RELEASENOTES.html.
This book has a well-balanced layout of pure Java and hybrid games, divided as follows:
Chapter 1
This chapter provides the first step to set up a Linux system for hybrid game compilation, including fetching the Android source, extracting device system libraries, setting up a custom compilation toolchain, custom compilation scripts, plus details on setting up the Eclipse IDE for use throughout the rest of the book.
Chapter 2
In this chapter you will learn how to combine Java and C code in an elegant manner by building a simple Java application on top of a native library. You will learn exciting concepts about the Java Native
Interface (JNI) and the API used to combine Java and C in a single unit, including how to load native libraries, how to use the native keyword, how to generate the JNI headers, plus all about method signatures, Java arrays vs. C arrays, invoking Java methods, compiling and packing the product, and more.
Chapter 3
This chapter is the first in a series to explore pure Java gaming with a real-world game dubbed Space Blaster. The goal of this game is to maneuver (using your finger tips or the keyboard) a space ship through a field of meteors. This chapter will teach you how to build custom XML-based linear layout, how to use an abstract class and timer tasks to simulate a simple game loop, how to invalidate views within a non-UI thread, how to load sprites and sounds from the project resources, plus drawing techniques such as sprite animations, drawing simple objects, and setting style and color using the Paint object.
Chapter 4
Pure Java games continue in Chapter 4 with the arcade classic Asteroids. This chapter will teach you all about drawing polygon sprites on the Android canvas. This is a somewhat difficult technique due to the lack of polygon support in the Android API. The chapter relies on the high portability of the Java
xvi
you may have noticed, this is a mostly Polygon-based game. Other interesting topics include game life cycle steps, initialization, draw, and update physics, responding to key and touch events, plus testing on the device emulator.
Chapter 5
This chapter deals with 3D graphics with OpenGL. It presents a neat trick I stumbled on by coincidence that allows for mixing OpenGL API calls in both Java and C. This concept is illustrated by using the 3D cubes sample provided by Google to demonstrate OpenGL in pure Java and hybrid modes. This trick could open a new frontier of 3D development for Android with the potential to bring a large number of 3D PC games to the platform with enormous savings in development costs and time.
Chapter 6
This is the first chapter in a series of two, which are my personal favorites of this book. Here it brings the godfather of all PC 3D shooters to the Android platform—Wolfenstein 3D. Who would have thought that a PC game like this one could be brought to an Android mobile device with minimal effort? This chapter demonstrates how Java and C can coexist harmoniously and includes topics such as the basic game architecture (showing how the Java and C components fit together), resource handlers for sound, music, key and touch events, how to use JNI to cascade graphics information, video buffers, and sound/music requests back to Java, plus compilation and testing.
Chapter 7
■ ■ ■
1
Welcome to Android Gaming
Welcome to the world of Android Games! The goal of this book is to help you build the best games for the platform. As you work your way through the chapters, you will learn how to create two kinds of games: pure Java, and perhaps most interestingly, hybrid games that combine the elegant design of Java with the raw power of C for maximum performance. The ability to combine both Java and C in this way is what makes the games in this book unique, as Google does not support this kind of development. But you may ask, “Why even bother with hybrid games?” After all, Java provides all the APIs you need to build any kind of game. This is certainly true. However, there are thousands of games out there written in C that can be brought to Android by compiling the C core and wrapping a Java graphical user interface (GUI) using the Java Native Interface (JNI). In this book, you’ll learn how to bring to the platform two of the great 3D shooter games for the PC: Wolfenstein 3D and Doom.
The bottom line? My goal is to bring to you the latest documented and undocumented secrets to building games for Android. Furthermore, if your plan is to port a PC game, this book will provide you with invaluable expertise to do so. But before we get started, there are some things you need to know to get the most from this book.
What Skills Do You Need?
In this book, I am targeting seasoned game developers, not only in Java, but also in C. This makes sense, as performance is critical in game development. Java provides elegant object-oriented capabilities, but only C gives you the power boost that game development needs. This is the best of both worlds in the palm of your hand. This book assumes you are familiar with Android, as well as Linux and shell scripting.
A Solid Foundation of Android
This book assumes that you already know the basics of Android development. For example, you need to know what activities, views, and layouts are. Consider the following fragment. If you understand what it does just by looking at it, then you are in good shape.
public class MainActivity extends Activity {
public void onCreate(Bundle savedInstanceState) { super.onCreate(savedInstanceState);
2
} }
This fragment defines the main activity or class that controls the life cycle of the application. The
onCreate method will be called once when the application starts, and its job is to set the content layout or GUI for the application.
You should also have a basic understanding of how GUIs are created using XML. Look at the next fragment. Can you tell what it does?
<?xml version="1.0" encoding="utf-8"?> <RelativeLayout
xmlns:android="http://schemas.android.com/apk/res/android" android:layout_width="fill_parent"
android:layout_height="fill_parent"> <ImageView android:id="@+id/doom_iv" android:layout_width="fill_parent" android:layout_height="fill_parent" android:background="@drawable/doom"
android:focusableInTouchMode="true" android:focusable="true"/> <ImageButton android:id="@+id/btn_upleft"
android:layout_width="wrap_content" android:layout_height="wrap_content" android:layout_alignParentBottom="true" android:layout_alignParentLeft="true" android:src="@drawable/img1" /> </RelativeLayout>
This code defines a relative layout. In a relative layout, widgets are placed relative to each other (sometimes overlapping). In this case, there is an image view that fills the entire screen. This image will display as the background the file called doom.png stored in the res/drawable folder of the project, and receive key and touch events. In the lower left of the screen, overlapping the image view, an image button with the ID btn_upleft will be displayed.
Need an Android Tutorial?
There are a lot of concepts related to Android development, and it is impossible to remember every detail
about activities, views, and layouts. A handy place to access this information quickly is the Android tutorial:
http://developer.android.com/
The ultimate guide for Android developers—the latest releases, downloads, SDK Quick Start, version
notes, native development tools, and previous releases—can be found here:
http://developer.android.com/sdk/1.6_r1/index.html
3
you should have a clear understanding of these tools, especially the Android Debug Bridge (adb). You should know how to do the following:
• Create an Android Virtual Device (AVD). An AVD encapsulates settings for a
specific device configuration, such as firmware version and SD card path. Creating an AVD is really simple and can be done from the integrated development
environment (IDE) by using the AVD Manager (accessed by clicking the black phone icon in the toolbar).
• Create an SD card file. Some of the games in later chapters have big files (5MB or
more). To save space, the code stores all game files in the device SD card, and you should know how to create one. For example, to create a 100MB SD card file called
sdcard.iso in your home directory, use this command:
$ mksdcard 100M $HOME/sdcard.iso
• Connect to the emulator. You need to do this for miscellaneous system
administration, such as library extraction. To open a shell to the device, use this command:
$ adb shell
• Upload and pull files from the emulator. These tasks are helpful for storing and
extracting game files to and from the device. Use these commands:
$ adb push <LOCAL_FILE> <DEVICE_FILE> $ adb pull <DEVICE_FILE> <LOCAL_FILE>
■
Note
Make sure the
SDK_HOME/toolsdirectory is added to your system
PATHvariable before running the
commands to create an SD card file, connect to the emulator, or upload and pull files.
A Basic Knowledge of Linux and Shell Scripting
For the chapters dealing with the hybrid games, you will do the work within Ubuntu Linux, so dust off all those old Unix skills.
You should know the basic shell commands, such as those for listing files, installing software components (this can be tricky, depending on your Linux distribution), and basic system administration.
There are a few very simple shell scripts in this book. A basic knowledge of the bash shell is always helpful.
■
Tip
If you need a refresher on your Linux and shell scripting, check out the following tutorial by Ashley J.S Mills:
4
What Software Tools Do You Need?
This chapter kicks things off by explaining how to set up your environment to compile hybrid (C/Java) games. This includes the development IDE (Eclipse) and the Android SDK, which are the tools required to build any basic Android application. This information is critical if you wish to learn how to combine the elegant object-oriented features of Java with the raw power of C for maximum performance, and it is required when we build Doom and Wolfenstein 3D in later chapters.
The following software is assumed to be already installed on your desktop:
• VMware Player or Workstation: This is required to run a Linux virtual machine
(VM). VMware is available for free from the VMware download site (http://www.vmware.com/products/player/).
• Ubuntu Linux VMware appliance: This is the actual Linux operating system (OS),
where all development will take place. If you don’t have it, appliances are available for download for free from the VMware Virtual Appliance Marketplace
(http://www.vmware.com/appliances/). Note that the appliance can be quite large (600+MB).
• Eclipse: This is the development IDE used to create your projects. Version 3.3
(Europa), 3.4 (Ganymende), or 3.5 (Galileo) will do.
• Android SDK, properly configured: At the time of this writing, the latest version of
the SDK is 1.6. You’ll use the Android Debug Bridge to connect to the device. Unzip the SDK to your favorite folder. Make sure you add the command-line tools to the PATH of your system. Edit the file .bashrc in your home directory, and modify the PATH environment variable: PATH=[PATH_TO_SDK]/tools:$PATH. Now you should be able to start and connect to the emulator from the command line. For a simple test, open a terminal and type adb. You should see the tool’s help text on your screen.
• Java JDK 5.0 or later: This is required to run Eclipse and the Android SDK itself.
We’ll begin by setting up the Ubuntu VM with the required software. Log in, and let’s get started.
Setting Up Your Machine
To set up for building Android games, you need to install three software components on your Linux desktop:
• Android source: This contains the entire Android source code, plus C/C++/JNI
header files used to build custom shared libraries.
• Android native libraries: These include things like the C runtime, math, XML,
sound, and other libraries.
5
You will also write two custom shell scripts that will save you a lot of headaches in the process of compiling a hybrid game.
Getting the Android Source
To store the source, Google uses a software versioning tool dubbed Gittool (available from
http://git-scm.com/). Depending on your Ubuntu version, you may need to install some required packages to use it. To make sure everything is present, open a console and type the following command (all on one line):
$ sudo apt-get install git-core gnupg sun-java5-jdk flex bison gperf
libsdl-dev libesd0-dev libwxgtk2.6-dev
build-essential zip curl libncurses5-dev zlib1g-dev
This command will install the required packages to run Git. It requires system administrator (sysadmin) access.
■
Tip
For more details on setting the Android source, see the Android Open Source Project at
http://source.android.com/download
.
You also need to install and configure a tool called repo, which is provided by Google to facilitate working with Git. Create a folder called bin in your home directory and download repo:
$ cd ~ $ mkdir bin
$ curl http://android.git.kernel.org/repo >~/bin/repo $ chmod a+x ~/bin/repo
Add the bin folder to your search path with the following command:
$ export PATH=$HOME/bin:$PATH
Add this command to the file $HOME/.bashrc if you want to make it available every time you log in to your system.
Next, create a folder called mydroid in your home directory to store the source, and then change to it:
$ mkdir mydroid $ cd mydroid
Finally, download the code:
6
■
Tip
The
repo initcommand will download the master branch. To download other branches, use
repo init -u git://android.git.kernel.org/platform/manifest.git -b [BRANCH_NAME].
Now fetch some coffee, sit down, and wait. Depending on your network speed, the download can take up to one hour.
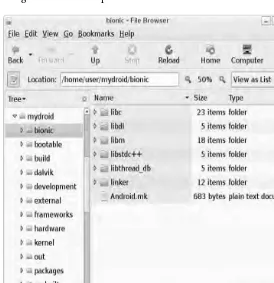
Once the source download completes, the folder tree should look as shown in Figure 1-1. The most important folder is called bionic. Bionic is the C library that supports the ARM and x86 instruction sets, and it is meant to run on an Android device. Bionic is part BSD and part Linux—its source code is a mix of BSD C library with custom Linux-specific bits used to deal with threads, processes, signals, and other things. This folder will provide most of the C header files used to build your shared libraries.
7
Extracting Native Android Libraries
The header libraries from the previous section provide the required files to compile the code. However, you also need the system image shared libraries for the linking process; that is, you need the *.so files stored in /system/lib in your device. For example, using the emulator shell, you can take a look at device file systems and some of the system libraries. Using the Android Debug Bridge (adb), connect to the device, and then run the df command to inspect the device file systems, as shown in the next fragment:
user@ubuntu:~$ adb shell # df
/dev: 47284K total, 0K used, 47284K available (block size 4096)
/sqlite_stmt_journals: 4096K total, 0K used, 4096K available (block size 4096) /system: 65536K total, 43496K used, 22040K available (block size 4096)
/data: 65536K total, 43004K used, 22532K available (block size 4096) /cache: 65536K total, 1156K used, 64380K available (block size 4096) /sdcard: 40309K total, 34114K used, 6195K available (block size 512) # ls -l /system/lib
-rw-r--r-- root root 9076 2008-11-20 00:10 libdl.so -rw-r--r-- root root 227480 2008-11-20 00:10 libc.so
-rw-r--r-- root root 13368 2008-11-20 00:10 libthread_db.so -rw-r--r-- root root 9220 2008-11-20 00:10 libstdc++.so -rw-r--r-- root root 140244 2008-11-20 00:10 libm.so -rw-r--r-- root root 79192 2008-11-20 00:10 libz.so -rw-r--r-- root root 92572 2008-11-20 00:10 libexpat.so -rw-r--r-- root root 767020 2008-11-20 00:10 libcrypto.so -rw-r--r-- root root 155760 2008-11-20 00:10 libssl.so [Other files...]
The df command displays information about the device file systems. From there, you can inspect the libraries stored in the device /system/lib folder. The ls command shows the most important libraries: C runtime (libc.so), Math runtime (libm.so), Gzip (libz.so), XML (libexpat.so), and others. These are the files you need to extract to the local system for the linking step. To extract them, you can create a simple script and use the emulator tool adb pull command to pull a file from the device to the local file system.
First, create a folder in your home directory to store these libraries:
$ mkdir -p $HOME/tmp/android/system/lib $ cd $HOME/tmp/android/system/lib
Next, create a simple script to fetch the files from the device to the $HOME/tmp/android/system/lib
8
Listing 1-1. Script to Fetch Device Libraries from /system/lib into the Local File System
#!/bin/bash
# Device libraries for Emulator 1.5+ # These are located in/system/lib
libs="browsertestplugin.so libEGL.so libFFTEm.so
libGLESv1_CM.so libaes.so libagl.so libandroid_runtime.so libandroid_servers.so libaudioflinger.so libc.so libc_debug.so libcameraservice.so libcorecg.so libcrypto.so
libctest.so libcutils.so libdl.so libdrm1.so libdrm1_jni.so libdvm.so libemoji.so
libexif.so libexpat.so libhardware.so libhardware_legacy.so libicudata.so libicui18n.so libicuuc.so libjni_latinime.so libjni_pinyinime.so liblog.so libm.so libmedia.so libmedia_jni.so libmediaplayerservice.so libnativehelper.so libnetutils.so libopencoreauthor.so libopencorecommon.so libopencoredownload.so libopencoredownloadreg.so libopencoremp4.so libopencoremp4reg.so libopencorenet_support.so libopencoreplayer.so libopencorertsp.so libopencorertspreg.so libpagemap.so libpixelflinger.so
libpvasf.so libpvasfreg.so libreference-ril.so libril.so libsgl.so libskiagl.so libsonivox.so libsoundpool.so libsqlite.so
libsrec_jni.so libssl.so libstdc++.so libsurfaceflinger.so libsystem_server.so libthread_db.so libui.so
libutils.so libvorbisidec.so libwbxml.so libwbxml_jni.so libwebcore.so libwpa_client.so libxml2wbxml.so libz.so" # Loop thru lib names
for lib in $libs do
# Pull the library into the local file system adb pull /system/lib/$lib ./
done
Installing the GNU Toolchain for ARM Processors
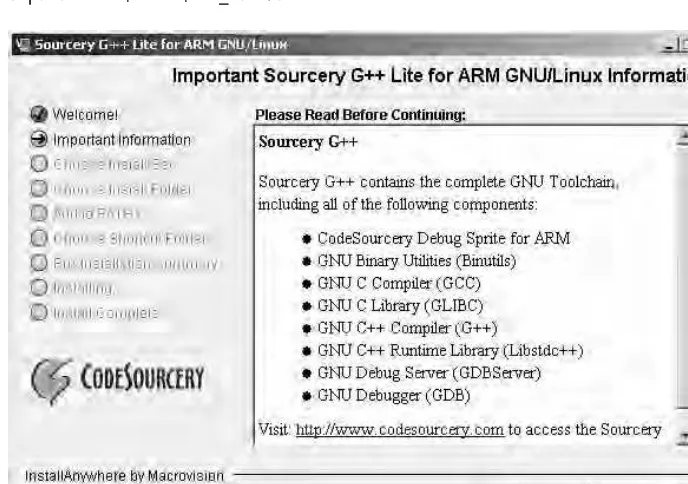
So far, so good. You have the Android source and the libraries for the device. The final software you need is a C compiler. This tool provides the C library, binary utilities, preprocessor, compiler, debugger, profiler, and linker required to build software for the ARM hardware used by the Android device. You will use the toolchain provided by the Sourcery G++ Lite Edition for ARM (http://www.codesourcery.com/ sgpp/lite/arm/portal/subscription?@template=lite).
You have two choices:
• Download the easy installer (see Figure 1-2).
• Get the tool in tar format and simply unzip it in your system. (I prefer to do it this
way, as it is much faster).
9
$ cd $HOME/Desktop
$ tar zxvf arm-2008q3-72-arm-none-linux-gnueabi.tar.gz
Either way you choose to install the toolchain, you must add the bin folder to your system path so the toolchain can be invoked from the console. Add the following text to your $HOME/.bashrc file:
ARM_HOME=$HOME/Desktop/arm-2008q3 export PATH=$PATH:$ARM_HOME/bin
Figure 1-2. Sourcery G++ Lite installer
Now you should have the toolchain ready for use. Perform a quick test by typing the following:
user@ubuntu:~$ arm-none-linux-gnueabi-gcc --version
arm-none-linux-gnueabi-gcc (Sourcery G++ Lite 2008q3-72) 4.3.2 Copyright (C) 2008 Free Software Foundation, Inc.
This is free software; see the source for copying conditions.
10
Let’s take a quick look at some of the most useful commands provided by the toolchain:
• arm-none-linux-gnueabi-gcc: This is the C compiler and is equivalent to the Linux
gcc command. Most of the options are very close to those provided by its Linux counterpart.
• arm-none-linux-gnueabi-g++: This is the C++ compiler, which wraps the gcc
command with extra options for C++.
• arm-none-linux-gnueabi-ld: This is the linker used to build a final binary, either as
a monolithic file (statically) or as a shared library (dynamically).
• arm-none-linux-gnueabi-objdump: This displays information about binary files. • arm-none-linux-gnueabi-strip: This removes symbols and sections from binary
files, including symbol and relocation information, debugging symbols and sections, nonglobal symbols, and others. This can help to reduce the size of the final executable.
For example, arm-none-linux-gnueabi-objdump is a very useful tool for peeking into your binaries. It shows you information such as the following:
• Archive header information • Contents of the overall file header
• Assembler contents of executable sections • Intermix source code with disassembly • Contents of the dynamic symbol table • Relocation entries in the file
So, to display symbol table information about the device C runtime (libc.so) pulled from the device into $HOME/tmp/android/system/lib, use this command:
$ arm-none-linux-gnueabi-objdump -T ~/tmp/android/system/lib/libc.so DYNAMIC SYMBOL TABLE:
00008560 l d .text 00000000 .text 0002c638 l d .rodata 00000000 .rodata 00032264 l d .ARM.extab 00000000 .ARM.extab 00035004 l d .data.rel.ro 00000000 .data.rel.ro 00035e58 l d .data 00000000 .data
000370e4 l d .bss 00000000 .bss 000195ec g DF .text 00000034 getwchar 0000d134 g DF .text 00000000 longjmp ...
11
As you can see, the toolchain mirrors the GNU GCC toolchain. In fact, the only noticeable difference is that all the commands start with the prefix arm-none-linux-gnueabi.
With the toolchain in place, the last piece is a set of custom scripts to invoke the preceding commands.
Writing Custom Compilation Scripts
Why do you need a set of custom compilation scripts? Because they will make the original Linux compilation process as painless and transparent as possible when moving from the x86 to the ARM platform. Ideally, you shouldn’t need to change anything in the original Makefile to compile code for ARM. However, as you’ll see, this step can be incredibly painful, even for the seasoned C/C++ Linux developer.
This section presents two custom compilation scripts:
• agcc: This is a bash script meant to replace the GNU GCC compiler and wrap all
dependencies for an Android device.
• ald: This is a bash script used in the linking process to create a final executable.
These scripts are critical and must be fully understood. But before we look at them, let’s take a look at the x86 compilation process and how it differs for an ARM device.
The Traditional Linux Compilation Process
In the traditional x86 Linux compilation process, a developer has a set of C/C++ programs and a Makefile to build a final executable. The basic skeleton of a Makefile looks like this:
# Makefile Skeleton # Object files
OBJS = file1.o file2.o.... # Header files
INC = -Ifolder1 –Ifolder2 ...
# Libraries and paths (used when linking) LIB = -lc -lm -Lpath1 -Lpath2 ...
# Main target all: $(OBJS)
@echo Linking..
gcc -o myapp $(OBJ) $(LIB) # Compile C files
%o:%.c
@echo Compiling $<... gcc -c $< $(INC)
12
Targets have dependencies separated by a colon (:). Below each target is a list of commands, preceded by a tab character.
To compile the application, type the command $ make. This will trigger the execution of the main target all (this is a built-in name). The target is followed by a colon, then a series of dependencies—in this case, all: $(OBJ). Thus, when the main target kicks in, it will trigger the execution of the $(OBJ)
dependencies, which define the application object files. These object files will, in turn, start the compilation process, defined by the target %o:%c, which essentially says, “process all .c files whenever an .o dependency is found.” So. when a .c source file is read from the current directory, the following will be displayed in the console:
Compiling file1.c ...
gcc -c file1.c -Ifolder1 -Ifolder2 ... Compiling file2c ...
gcc -c file2c -Ifolder1 -Ifolder2 ...
Note the following lines in the Makefile:
@echo Compiling $<... gcc -c $< $(INC)
The instruction @echo tells GNU make to display a message to the console, and the value $< is a built-in variable that tells make to use the second argument from the target %o:%c as an argument to the command (in this case, a .c file read from the file system). Note that the % character is equivalent to the DOS * character, thus %.c means “all .c files in the current directory,” The next line, gcc -c $< $(INC), will expand to gcc -c file1.c -Ifolder1 -Ifolder2 ... .
The process will continue for all object files defined in the variable OBJ. Execution will then resume for the all target (provided there are no errors in the compilation process) with the linking step, and with the following line displayed on the console:
Linking...
The line gcc -o myapp $(OBJ) $(LIB) will be expanded as follows:
gcc -o myapp file1.o file2.o ... -lc -lm -Lpath1 -Lpath2
This will produce the final binary myapp, which can then be run from the console.
This works fine for a x86 PC system. However, it will not work in an Android device for several reasons. One is that the GCC produces binary files for an x86 architecture; desktop binaries will not run in an ARM processor. (This could be easily fixed by replacing gcc with arm-none-linux-gnueabi-gcc.)
Another problem is that commands such as armnonelinuxgnueabigcc c file1.c Ifolder1 -Ifolder2 ... will compile the source code using standard header files (for the C runtime and others) bundled with the toolchain. Depending on the version you are using, this could cause undesired side effects, such as missing symbols at linkage time. For example, the following error is thrown when trying to compile a file from the 3D game Doom for ARM:
13
-g -Wall -DX11 -fpic -o sys_linux.o -c
/home/user/workspace/Android.Quake/native/Doom/sys_linux.c cc1: warnings being treated as errors
/home/user/workspace/Android.Quake.Preview/native/Quake/sys_linux.c: In function 'floating_point_exception_handler':
/home/user/workspace/Android.Quake.Preview/native/Quake/sys_linux.c:350: error: implicit declaration of function 'sysv_signal'
This error is thrown because of a difference in the naming convention of the C system call signal (used to bind a user-defined function to an OS signal) between the toolchain (which implements the system call as signal), and the Android implementation (sysv_signal).
Regarding missing symbols, if you build a shared library, the compiler will not choke when there are missing subroutines or variables within your code. This will ultimately cause the library not to load once the program starts. I found this difficult to deal with, as the tools to work with native code are
cumbersome and difficult to use, especially for the newcomer. I have used a simple solution, which is to build a mini main program to invoke the shared library, as demonstrated in Chapter 2.
An Android Compilation Script
Listing 1-2 shows the bash script to aid in Android compilation, called agcc.
Listing 1-2. Compilation Helper Script (agcc)
#!/bin/bash
############################################# # Android Compilation helper script
# Uses the CodeSourcery G++ Toolchain for ARM ############################################# ############################################# # Root folder where files are installed # Update this to match your system
############################################# HOME=/home/user
# JVM location. Set to your location JAVA_HOME=/usr/lib/jvm/java-6-sun # Device system image
SYS_ROOT=$HOME/tmp/android/system # Android source code
SYS_DEV=$HOME/mydroid
# Code Sourcery Toolchain location
14
############################################# # Include locations
# No need to change this
############################################# BASE=$SYS_DEV/frameworks/base
# C - Runtime
LIBC=$SYS_DEV/bionic/libc # Math library
LIBM=${SYS_DEV}/bionic/libm
# Location of some required GCC compiler libraries
TC=${SYS_DEV}/prebuilt/linux-x86/toolchain/arm-eabi-4.3.1/lib/gcc/arm-eabi/4.3.1 # Kernel headers
KERNEL=${SYS_DEV}/kernel # GNU GZIP
LIBZ=${SYS_DEV}/external/zlib # XML Expat parser
EXPAT=${SYS_DEV}/external/expat/lib # Includes
AND_INC="-I$JAVA_HOME/include"
AND_INC+=" -I${JAVA_HOME}/include/linux" AND_INC+=" -I${LIBC}/include "
AND_INC+=" -I${LIBC}/arch-arm/include"
AND_INC+=" -I${LIBC}/kernel/arch-arm/include " AND_INC+=" -I${LIBM}/include"
AND_INC+=" -I${BASE}/include" AND_INC+=" -I${TC}/include" AND_INC+=" -I${KERNEL}/include"
AND_INC+=" -I${KERNEL}/arch/arm/include -I${KERNEL}/arch/arm/mach-ebsa110/include" AND_INC+=" -I${SYS_DEV}/system/core/include"
AND_INC+=" -I${LIBZ}" AND_INC+=" -I${EXPAT}"
############################################# # Toolchain compiler command
############################################# CROSS=arm-none-linux-gnueabi-
GCC=${CROSS}gcc
# Uncomment for debugging
# echo ${GCC} -nostdinc $AND_INC $@ # Go!
15
The agcc script defines a series of variables that can be adjusted to match your system (if you choose to install the G++ toolchain and Android source in different locations):
• HOME: This is the root location where all the software components reside (in this
case, /user/home). This variable is used within other variables.
• JAVA_HOME: This is the location of the Java SDK. You need a Java SDK for building
the hybrid games that mix Java and C code, which talk to each other using JNI. From the SDK, you’ll use JNI header files and JNI libraries.
• SYS_ROOT: This is the location of the device’s system libraries extracted from the
device in the previous section. The default value is $HOME/tmp/android/system.
• SYS_DEV: This is the location of the Android source you downloaded earlier. From
this code, you will use header files and shared libraries. The default value is
$HOME/mydroid.
• TOOLCHAIN_ROOT: This is the location where the CodeSourcery toolchain is installed
($HOME/Desktop/android/arm-2008q3 in this case).
Next, the script defines the locations of the basic libraries used in the compilation step. The following are the most important:
• C runtime (LIBC): This is the location of the C runtime header files, located under
$SYS_DEV/bionic/libc.
• Math library (LIBM): This is a commonly used library. It contains system functions
such as pow, trigonometric functions, and others. It is located under
${SYS_DEV}/bionic/libm.
• Kernel headers (KERNEL): Kernel headers are likely to be used by your games,
especially high-performance 3D games. It is located under ${SYS_DEV}/kernel.
• GNU Gzip (LIBZ): If your game manipulates zip files, you’ll need this library. It is
located under ${SYS_DEV}/external/zlib.
• XML parser (EXPAT): Most of today’s modern games use XML files to store game
and configuration information. Thus, this library is required. By default, it is located under ${SYS_DEV}/external/expat/lib.
The following are other variables that are used to include extra compile-time dependencies:
BASE=$SYS_DEV/frameworks/base
TC=${SYS_DEV}/prebuilt/linux-x86/toolchain/arm-eabi-4.3.1/lib/gcc/arm-eabi/4.3.1
Next, the script defines the paths to the required header locations (with AND_INC) as a sequence of includes: -Ipath1, -Ipath2, and so on. And, finally, the critical step is to call the toolchain gcc command, as follows:
${GCC} -nostdinc ${AND_INC} "$@"
16
include files (that is, the header files bundled with the toolchain itself). You do not wish to use the toolchain’s headers, but instead use the headers provided by the Android source, as you will be linking against Android’s system libraries as well.
That takes care of the compilation step, but you also need to link against the device system libraries, which is the purpose of the next script.
An Android Linker Script
Listing 1-3 shows the Android linker helper script, called ald.
Listing 1-3. Linker Helper Script (ald)
#!/bin/bash
############################################# # Android Linker helper script
# Set these values to match your system ############################################# HOME=/home/user
JAVA_HOME=/usr/lib/jvm/java-6-sun # System image location
SYS_ROOT=$HOME/tmp/android/system # Toolchain location
TOOLCHAIN_ROOT=$HOME/Desktop/android/arm-2008q3 # Android Toolchain libgcc.a
LIBGCC=${SYS_DEV}/prebuilt/darwin-x86/toolchain/arm-eabi-4.2.1/lib/gcc/«
arm-eabi/4.2.1/libgcc.a # CodeSourcery libgcc.a
#LIBGCC=${TOOLCHAIN_ROOT}/lib/gcc/arm-none-linux-gnueabi/4.3.2/libgcc.a # Linker libraries: C runtime, Math, and extra symbols
LIBRARIES="-lc -lm ${LIBGCC}" # Library locations
LIB_PATHS="-rpath /system/lib \ -rpath ${SYS_ROOT}/lib \ -L${SYS_ROOT}/lib \
-L${JAVA_HOME}/jre/lib/i386 -L." # Linker flags
LD_FLAGS="--dynamic-linker=/system/bin/linker -nostdlib" #############################################
# Linker command
17
CROSS=arm-none-linux-gnueabi- GCC=${CROSS}ld
# Uncomment for debugging
#echo "${GCC} $LD_FLAGS $LIB_PATHS $@ $LIBRARIES" # Go!
${GCC} $LD_FLAGS $LIB_PATHS $@ $LIBRARIES
The ald script defines variables similar to those use used by the agcc script, which specify the location of the required software components, plus some extra linker variables:
• LIBRARIES: This variable defines the basic libraries against which the final binary
should be linked. These are the C runtime (-lc), the Math library (-lm), and
libgcc.a, which contains extra symbols required at link time. Note that the linker will expand -lc to the name libc.so when reading the library from the file system.
• LIB_PATHS: Besides the library names defined in the previous step, the linker needs
to be able to find the libraries on the file system. Thus, you need to tell it where to look. The -Lpath1, -Lpath2, and so on tell the compiler where to look for libraries. Also, -rpath sets the runtime shared library search path. You need to define two runtime search paths:
• -rpath /system/lib is the location of the runtime libraries in the device. It
must be defined so the program will be able to run properly in the device itself.
• -rpath ${SYS_ROOT}/lib is the location of the same libraries on the desktop
system. It is required so the binary can compile properly.
• LD_FLAGS: This variable defines linker flags. Two flags are used by the script: • --dynamic-linker=/system/bin/linker sets a program to use as the dynamic
linker. In this case, /system/bin/linker is the device.
• -nostdlib tells the linker not to use the standard libraries (C runtime, Math
library, and so on) defined by the toolchain, but instead use the libraries defined by the user at link time.
And, finally, the command ${GCC} $LD_FLAGS $LIB_PATHS $@ $LIBRARIES will expand to the following:
$ arm-none-linux-gnueabi-ld --dynamic-linker=/system/bin/linker –nostdlib -rpath /system/lib
-rpath /user/home/tmp/android/system/lib -L/user/home/tmp/android/system /lib -L/usr/lib/jvm/java-6-sun/jre/lib/i386 -L. [USER_ARGUMENTS] -lc -lm
/user/home/Desktop/android/arm-2008q3/lib/gcc/ arm-none-linux-gnueabi/4.3.2${LIBDIR}/libgcc.a
18
Testing the Scripts
Save the scripts in Listings 1-2 and 1-3 as agcc and ald in your $HOME/bin directory. Then issue the following commands to test them:
user@ubuntu:~$ agcc --version
arm-none-linux-gnueabi-gcc (Sourcery G++ Lite 2008q3-72) 4.3.2 Copyright (C) 2008 Free Software Foundation, Inc.
This is free software; see the source for copying conditions. There is NO warranty; not even for MERCHANTABILITY or FITNESS FOR A PARTICULAR PURPOSE. user@ubuntu:~$ ald --version
arm-none-linux-gnueabi-ld: warning: library search path "/usr/lib/jvm/java-6-sun/jre/lib/i386" is unsafe for cross-compilation
GNU ld (Sourcery G++ Lite 2008q3-72) 2.18.50.20080215 Copyright 2007 Free Software Foundation, Inc.
This program is free software; you may redistribute it under the terms of the GNU General Public License version 3 or (at your option) a later version. This program has absolutely no warranty.
■
Caution
Do not edit the scripts with your Windows host using Notepad or WordPad. That will insert invalid
characters in the file and give strange results when you run the script. I made the mistake of doing just that, and
wasted a lot of time when the compiler started giving some funky output.
Setting Up Your Development Environment
Now you are ready to get your IDE up and running with the Android development kit. Let’s go through the installation of the latest available Android SDK (1.6 at the time of this writing; available from
http://developer.android.com/sdk/index.html) over Eclipse 3.5 (Galileo, available from
19
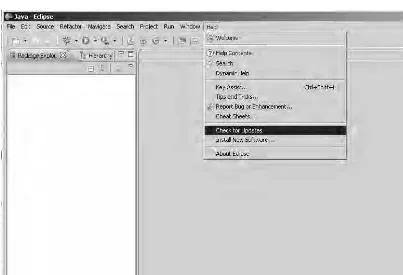
1. Start Eclipse Galileo and select Help ➤ Check for Updates, as shown in Figure 1-3.
Figure 1-3. Choosing Check for Updates from the Eclipse 3.5 (Galileo) workbench’s Help menu
20
Figure 1-4. Choosing to add software
3. In the Add Site dialog box, enter Android for the name and https://dl-ssl. google.com/android/eclipse for the location, as shown in Figure 1-5.
21
4. From the Available Software window (Figure 1-4), select the Android site you just added from the Work with combo box. If the name is not shown in the list, click the Available Software Sites preferences link, and then click Add to insert the site into the list (see Figure 1-6).
Figure 1-6. The Available Software Sites Preferences window shows the recently added Android site.
22
Figure 1-7. Available Software window with the Android plug-in selected
23
Figure 1-8. Software license agreement from the installation wizard24
Figure 1-9. Workbench Preferences window showing Android options
25
Figure 1-10. New Project wizard showing the Android options after final configurationAt this point, your environment should be configured and ready for development.
About the Android Native Development Kit
With version 1.5 of the SDK, Google has released a new tool called the Native Development Kit (NDK),
available from
http://developer.android.com/sdk/ndk/1.5_r1/index.html. According to Google, this
is a companion tool to the SDK for building native portions of your code. It provides a set of system
headers, such as the following:
26
•
libz(Zlib compression) headers
•
liblog(Android logging) header
•
Headers for C++ support
The NDK also includes cross-toolchains to generate native ARM binaries, documentation, and samples.
Unfortunately, Google claims that the NDK can be used only on devices running the Android 1.5 platform
version or later, due to toolchain changes that make the native libraries incompatible with SDK versions
1.0 and 1.1. This makes the NDK hard to use for the goal of this book, which is to support all versions of
the platform. However, the appendix will show you how to compile the examples in Chapters 6 and 7 with
the NDK.
You Have Taken the First Step
Congratulations! You have taken the first step toward your mastery of Android game development. In this chapter, you learned how to set up your Linux system to compile hybrid games, which included the following tasks:
• Obtaining the Android source
• Extracting device system libraries for compilation • Setting up the CodeSourcery G++ toolchain
• Writing custom compilation scripts
• Setting up your Eclipse IDE
■ ■ ■
27
Compiling Native Code in Android
In this chapter, we will explore the basics of a simple native program, also known as static binary, to be run in the device. You will also learn how to build a shared library (dynamic binary), and finally how to call that shared library within a simple Android project. Let’s get started.
Your First Native Android App
You will need an Android project to host your native application, but before you create that, you must create an Android Virtual Device (AVD).
Creating an AVD
With version 1.5 of the SDK, Google introduced the concept of virtual devices (AVDs). An AVD is simply a set of configuration attributes applied to an emulator image that allows the developer to target a specific version of the SDK. The following are the basic versions of the SDK targeted by AVDs:
• Android 1.1: This target maps to the Android SDK version 1.1 R2. • Android 1.5: This target maps to the Android SDK version 1.5 R2. • Android 1.6: This target maps to the Android SDK versions 1.6 and 2.0.
• Google APIs - 1.5 or 1.6: This target must be used if you are building an application
that uses Google APIs such as Maps and Search.
■
Caution
In Android 1.5 and later, an AVD does not include the Google Maps API. Keep this in mind if you are
building a maps-enabled app. Your map application will not start in an Android 1.5 AVD.
Let’s create an AVD to target an SDK 1.5 for the sample application.
28
Figure 2-1. Android toolbar within Eclipse
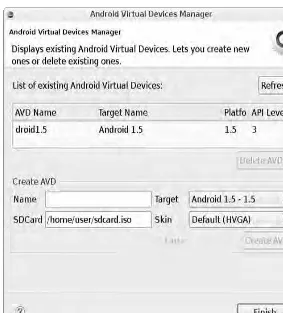
2. In the dialog box, enter a name for the AVD (droid1.5 in this example). 3. Select a target SDK (Android 1.5 in this example).
4. Optionally, enter an SD card absolute path (if you already have one), such as
/home/user/sdcard.iso, or a size, such as 128MB. Figure 2-2 shows the Android Virtual Devices Manager dialog box for this example.
5. Click Create AVD.
■
Tip
You should create an SD card for the AVD, and use it for the examples in later chapters to store large game
files (for Doom and Wolfenstein 3D). Game files should not be saved in the device main file system, unless you
want to run out of space after installing one game.
29
Figure 2-2. Android Virtual Device Manager dialog box settings for SDK 1.530
Figure 2-3. Creating a new AVD in Android SDK 1.6
Creating the Android Project
With the AVD in place, the next task is to create the project for this chapter, as follows:
31
2. In the dialog box, enter a project name (ch02.Project in this example). 3. Enter an application name (Chapter2 in this example).
4. Enter a package name (ch02.project in this example). 5. Enter an activity name (MainActivity in this example).
6. Specify a minimum SDK version (3 in this example). Figure 2-4 shows the completed New Android Project dialog box for this example.
7. Click Finish.
32
Application Architecture
Let’s consider what we wish to accomplish with this application:
• We want to create the basic Android application. When run in the emulator, the
app will create a default view with the text “Hello Chapter2!”.
• Within the project, we will create a native folder with files to accomplish the following:
• Create a native library with a main subroutine that will be called from the
Android main activity using JNI.
• The main library subroutine will invoke a Java method (using JNI) within the
Android project, sending a text message back to the Android Java layer.
• The library will be loaded at runtime within Java using a System.load(path).
Figure 2-5 shows the file system layout of the project.
■
Tip
It would be helpful to import the project source (
ch02.Project) into your workspace to go along with this
chapter.
The following Java files describe the project:
• ch02.project.MainActivity.java: This file is created by the wizard and should
already exist in the project.
• jni.Natives.java: This is a new file that contains native methods to be invoked
33
Figure 2-5. Project layoutYou must create the following files within the native folder (see Figure 2-5):
• lib.c: This is the main library code. It contains all the necessary JNI system calls
to cascade information back and forth between Android and C.
• testlib.c: This is a test program for the library. Its main function is to make sure
there are no symbols missing from the native library.
• main.c: This is a static program used to demonstrate how to compile a static native
program that can be run in the device.
• Makefile: This is the project’s native build file. It has targets for the following: • Build the native library
34
• Generate JNI header files required to cascade information back and forth
between Java and C
• Build the static test program
• Deploy the files to the device for testing
Let’s look at the files in more detail to understand what they do. We’ll start with the Java layer.
Main Activity
The 8.70ch02.project.MainActivity.java file is created by the wizard, and it is the entry point to the phone application. Listing 2-1 shows the code for this file. There are some remarkable things to note about this file.
As you should know, when the application starts, the method onCreate(Bundle savedInstanceState) will be invoked by Android. This method performs three critical steps:
• It installs (simply copies) the native library (libch02.so) from the assets folder of
the application package to the project’s files folder (located in /data/data/ PACKAGE_NAME/files; the name of the package is ch02.project). This step is required before the library can be loaded by JNI.
• It loads the native library using System.load(path).
• Finally, it runs the main library sub by invoking the native method
Natives.LibMain(String[] argv).
Native libraries cannot be loaded within the application package; thus, they must be copied somewhere in the file system before invoking System.load(). The obvious place would be the application’s file folder (located in /data/data/Package_Name/files), but the library can be saved anywhere where permissions allow it.
■
Caution
Shared libraries should not be saved on the SD card, as Android does not allow you to run executable
code from the SD card. Developers that have large shared libraries might be tempted to do so to save some space.
Save yourself some trouble and don’t do it.
Note the way the library is installed:
writeToStream(
getAssets().open(LIB), openFileOutput(LIB, 0) );
The getAssets().open() method will open a stream from the package assets folder (where the library will be stored). The writeToStream method will then write the stream using openFileOutput(LIB, 0), which will open an output stream to the default application folder (/data/data/ch02.project/files).
35
(libch02.so). The second argument to openFileOutput (zero) tells Android to assign private permissions to the file (that means it can be read by only the application itself).
Listing 2-1. Main Activity for This Chapter’s Example
package ch02.project; import java.io.IOException; import java.io.InputStream; import java.io.OutputStream; import jni.Natives;
import android.app.Activity; import android.os.Bundle;
public class MainActivity extends Activity { private static final String LIB = "libch02.so"; private static final String LIB_PATH =
"/data/data/ch02.project/files/" + LIB; /** Called when the activity is first created. */ @Override
public void onCreate(Bundle savedInstanceState) { super.onCreate(savedInstanceState);
setContentView(R.layout.main); try {
// Install lib
System.out.println("Installing LIB: " + LIB); // Copy lib from assests folder to files folder: // /data/data/PKG_NAME/files
writeToStream(getAssets().open(LIB), openFileOutput(LIB, 0)); // Load Lib
System.load(LIB_PATH); // Run it
String[] argv = { "MyLib", "arg1", "arg2" }; Natives.LibMain(argv);
} catch (Exception e) { e.printStackTrace(); }
} /**
36
* @param in * @param out
* @throws IOException */
public static void writeToStream(InputStream in, OutputStream out) throws IOException {
byte[] bytes = new byte[2048];
for (int c = in.read(bytes); c != -1; c = in.read(bytes)) { out.write(bytes, 0, c);
}
in.close(); out.close(); }
}
In Android 1.5 and later, native libraries can be stored within the project under a folder named
libs/armeabi, then loaded using the system call System.loadLibrary(LIB_NAME). Thus, Listing 2-1 can be simplified by removing the library installation step:
public class MainActivity extends Activity {
private static final String LIB = "ch02";
// Load library: Note that the prefix (lib) and the extension (.so) must be stripped. static {
System.loadLibrary(LIB); }
public void onCreate(Bundle savedInstanceState) { // ...
Natives.LibMain(argv); }
}
Native Interface
The native interface is defined in the Java class jni.Natives.java. It has two important methods that deal with the C library (see Listing 2-2):
• static native int LibMain(Strin