An operating system, sometimes called an “OS”, is the main program the computer uses to function properly. Operating systems act as a link between you, the user, and the programs you use on a computer. Different types of computers use different types of operating systems. The majority of computers used at BGSU either run Microsoft Windows or the Mac OS. While files can be shared between these two types of systems, they are generally incompatible.
The tutorial on this page will explain how to use a PC, which (on campus) will soon use the Windows 7 operating system. To understand how to use a computer running Windows 7, follow these step-by-step lessons.
01: Windows Features Pg. 3
02: Start Up, Shut Down Pg. 4
03: Opening and Closing an Application Pg. 5
04: Manipulating Windows Pg. 6
14. Windows Keyboard Shortcuts Pg. 15
15. The Right-Click Menu Pg. 16
GETTING STARTED
Most PCs run on an operating system called Windows. These particular tutorial deals with the Windows 7 professional version of the Windows operating system. The operating system is what allows you as the user to access the information in the computer. To understand how to use a computer, it is important to know several features of the Windows system.
Desktop
The desktop is the area you see when the computer is not running applications. It consists of the icons on top of it, as well as the Start button and other features. The desktop can be used to temporarily store information or to move around documents and windows.
Icon
Icons are little pictures that represent different programs or saved items. Double-clicking on the icon accesses the information icons represent.
Window
Each application opened will appear in its own window, or its own little section of the screen. Windows can be moved and resized so that you can operate many different applications at the same time. To learn how to manipulate windows, refer to the Manipulating Windows portion of Level.
Dialogue Box
When you ask the computer to do certain commands, such as to save your work, the computer will need more information from you, and this will appear in a dialogue box. These boxes contain options and commands for the computer to execute.
Start Menu
In the lower left-hand corner of the Windows screen is the Start button. When you click on the button a menu will appear, which we will call the Start menu. This menu gives you access to all the different parts and functions of the computer.
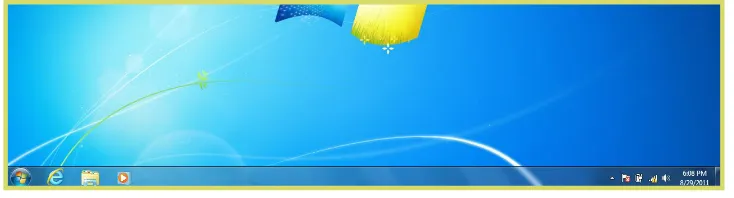
Task Bar
At the very bottom of the screen is a horizontal bar called the task bar (Figure 1). This bar contains (from left to right) the Start button, shortcuts to various programs, minimized programs, and another section of shortcuts that includes sound volume, printers and the time.
Figure 1. Task Bar.
Tab Menu
Tab menus, which are often present in dialogue boxes, are menus that represent many different “pages” of information. To access each “page,” click on the tab at the top of the dialogue box.
Once you understand what all of the different parts of the computer do, you can begin to use it.
Start Up
First of all, you will need to turn the computer on. Do this by pushing the power button on the front of the computer unit. The computer takes a few minutes to start up, so be patient.
Shut Down
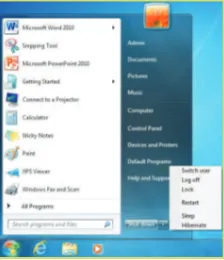
To shut down, click with your mouse on the button in the lower left-hand corner of the screen labeled Start. On the menu that pops up, you have multiple options for exiting your windows computer.
Options are Shut Down, Switch User, Log Off, Lock, Restart, Sleep and Hibernate. Choose the Shut down button in the lower right hand corner to turn the computer off. To switch to another user, press the arrow next to the Shut down button and click Switch user. To Log off of the computer, click the arrow next to the Shut down button and click Log Off. If you would rather just lock the computer, blocking anyone else from using the computer with out your password, choose Lock.
Figure 2. Shut Down Menu.
Stand By
When a computer is left alone for a while, it goes into “sleep” or “stand by” mode to save energy. In stand by mode, the computer slows down its inner processes because they are not being used. The computer also blacks out the monitor. If you wish to use a computer and the monitor is dark, check to see if it is in stand by before you try to start it up. Usually, the computer has a green light on or near the power button that signifies that it is on, but in stand by mode. To “wake it up,” move the mouse or hit a key on the keyboard. In about 8-10 seconds the computer will wake up and be fully functional. If you do not realize that the computer is in stand by and you try to turn it on with the power button, the computer will wake up and a dialogue box will appear, but it will not damage the computer.
3. Opening and Closing an Application
To Open an Application you have two options:
1. Open the Start Menu and click on the name of the application.
2. Find the icon for the application and either double click it or right click and choose Open.
Figure 3. Open Applications.
To Close an Application:
1. Most applications can be closed by going under File menu and selecting Quit or Exit.
If no file menu is available, click on the “X” button in the upper right-hand corner of the application’s window.
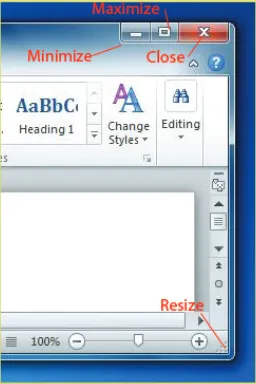
4. Manipulating Windows
The sizes of the windows on your screen can be changed so that more windows are visible. Following is a list of common features that can be implemented on all windows.
Maximize
This function allows you to concentrate on one application by making its window cover the entire screen.
Minimize
This function allows you to keep an application running, but remove it from the desktop area so that other applications can be accessed. The minimized program becomes a bar at the bottom of the screen, and can be accessed by clicking on the bar.
Resize
If an application window is not maximized, it can be resized so that more or less of the content can be seen. If you move your mouse pointer to one of the edges of the window, it will become a two-way arrow. At this point, hold down the left mouse button and drag the perimeter of the window in or out. When you release the mouse button, the window will resize to your specifications.
Close
This function closes and exits the application you are running. However, if you are running an applica-tion such as Microsoft Word, the window of each document will have a close button, and clicking this button will only close that particular document, and not the entire program. It is important to always save your work before using the close feature, as any unsaved changes will be lost.
5. Saving
Saving material onto a disk stores that material so that it can be accessed again. Any work you do on the computer should be saved, including papers and other assignments. Although you may be working in different applications, the saving procedure is generally the same.
1. Insert a disk into the correct disk drive.
2. Go under the File menu in the application, and choose “Save As.”
3. When the Save As dialogue box appears, click the arrow button next to the Save In box. This will cause a menu of save options to appear.
4. To save on your removable disk, choose either the Zip Drive.
5. Type in a filename that will identify your document at the bottom of the box.
6. Click the Save button located in the lower right-hand corner of the box.
7. To resave work as you continue, you only need to click on the save icon or go under File > Save.
Figure 6. Save Dialog Box
Tips For Saving
• Save often. This is by far the most important step in the saving procedure. The more you save, the less chance you have of losing any of your hard work. Errors and freeze-ups can occur, and unsaved work will be lost. Also, always save before printing because this is the time when many errors occur.
• Use specific filenames. When naming your saved works, label them with detailed names so for easier identification when you go to find them again.
6. Printing
Most labs have one or two printers that are shared by many computers in the lab. As with saving, most applications print in a similar fashion. Follow these steps to print your work.
1. Save your work. Computers sometimes freeze when you ask them to print, and all of your work may be lost.
2. Go under the File menu to Print.
3. When the dialogue box appears, check to make sure that the printer listed is the printer in the lab you are in. If it is not, click on the arrow to the right of the printer name and choose the correct
printer.
4. Choose how many copies you would like printed.
5. Decide if you only want a portion of the work to be printed and choose the number of pages to print.
6. Click OK.
Figure 7. Print Dialog Box
Printing from Your Dorm Room At BGSU, it is possible to print documents from a PC in your dorm room to the printer in the lab of your building. If you are interested in having this option, call to schedule an
7. Deleting Files
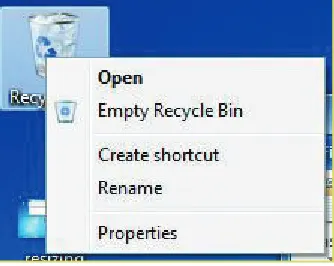
If you choose to delete an item from your disk or from the computer’s hard drive, you will need to access the Recycle Bin. It is important to remember that you may only delete items from the hard drive that you have created. To delete an item from a disk or the hard drive, use the following steps.
1. If it is on a removable disk, first insert the disk into the correct drive. Next double-click on the My Computer icon on the Desktop. Choose the drive that the item is located on by double clicking the
appropriate drive icon. Open the file that the item is located in.
2. Left-click on the item that you wish to delete and hold the button down.
3. Drag the item out of the window it is in and place it over the Recycle Bin located on the Desktop. 4. When the Recycle Bin is highlighted, release the button. The item should disappear from the drive. 5. When the dialogue box appears asking you if you are sure you want to delete this item, click Yes.
Figure 8. Delete Files
When you deposit items in the Recycle Bin, they will not be permanently removed from the computers memory without you telling it to do so. If you decide you still want to keep something, double-click on the Recycle Bin and drag the item back out. To permanently erase an item from the computer, right-click on the Recycle Bin and choose Empty Recycle Bin. Remember, once you empty the Recycle Bin, the items inside will be permanently erased from the computer’s memory.
8. Help Option
Located in the Start menu is the Windows Help and Support option. If you have any problems with the Windows systems or have questions about how to do something, the Help option may have the answer. If the computer does have the Help option, follow these steps to use it.
1. Select Help and Support from the Start menu.
Figure 10. Help and Support
2. Choose to view Help and Support by one of the following categories: Index, Support, History, Favorites, or Options. Select the category that you would like by clicking the appropriate button.
3. Click on the heading of your choice in the list located on the left side of the screen, or if you are in the Index category, click on Locate in Contents to type in a keyword.
9. Common Do’s and Don’ts
Computers are powerful machines that can aid us in many of our everyday tasks. Computers are, however, rather fragile and should be treated in a respectful manner. Following is a list of dos and don’ts that will preserve the life of the computer while letting you get the most out of the machine.
DO:
• Save your work often. This prevents the loss of hours of work.
• Back up your work in case of disk malfunction.
• Ask lab staff for help at any time.
• Shut down the computer when you are finished. This means do not press the power button, but go through the shut down procedure under the Start menu.
DON’T:
• Eat or drink around a computer. Spilled drinks and food can harm a computer’s hardware. Food and drinks are not allowed in on-campus labs, but if for some reason you do spill something on a computer, report it to the staff on duty immediately.
• Strike the computer or physically abuse it.
• Print more than one copy of your work in the computer labs. The printers are for printing work, and not to do the job of a copy machine.
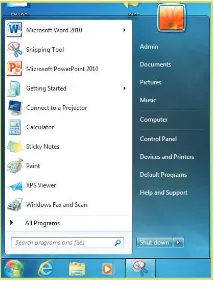
10. The Start Menu
In the bottom left-hand corner of the Windows screen is a button with the windows icon. This button displays a menu that gives you access to many of the computer’s features. Once the Start menu is opened, all you have to do is highlight what you want and more options will appear. Here we will discuss the many features and uses of the Start menu from top to bottom.
Figure 12. The Start Menu
New Office Document
This feature acts as a shortcut for opening a new document in Microsoft Office. You can choose from a variety of document formats.
Open Office Document
This feature acts as a shortcut for accessing a saved document or file.
Windows Catalog
This item opens Internet Explorer to a site in which you can purchase products built for Windows systems.
Windows Update
This item opens Internet Explorer to a site in which you can download updates for your Windows operating system.
Programs
This prompt will open another menu filled with more options. These options are all programs that the com-puter can run. To see what the Programs menu has to offer, refer to the Programs page.
Documents
This item allows you to temporarily store saved works.
Settings
This menu contains access to the Control Panel as well as your Network Connections; Printers and Faxes; and Taskbar and Start Menu. Through these options you can customize the appearance and functions of your computer.
Search
This menu allows you to find anything on the computer or the internet.
Help and Support
Run
This item allows you to run programs located on a disk, CD, or on the internet.
Log Off
This allows you to log off the computer. (It is not important for use in your own home or in a computer lab).
Turn Off Computer
When this phrase is clicked, the Shut Down menu will appear, allowing you to hibernate, shut down, or restart the computer. To use this feature, refer to the Start Up and Shut Down portion of Level 1.
There are often times when you are working on a computer and it “freezes”-that is the mouse and keyboard no longer affect the computer. No matter what you click on, nothing happens. Sometimes the mouse cursor won’t even move on the screen. This may happen for a number of reasons including memory fill-up or glitches in the system. This problem, however, can often be fixed. If your screen freezes (this is sometimes referred to as crashing) and nothing seems to be happening, use these steps to unfreeze it. It is important to remember, however, that these steps will not always fix the situation, and sometimes the only thing left to do is turn the computer off by pushing the power button.
1. Press Ctrl+Alt+Del. This will cause the computer to show a dialogue box that lists the current applications that are running on the computer. Most likely, the application you are using will be listed here at the top, often with the phrase “not responding” behind it. This means that the particular application you are running has frozen and you need to shut this application down.
2. Click on the application causing the problem, and then click the End Task button.
3. Another dialogue box will appear and ask you to confirm your decision. Click End Task again. Under normal circumstances this process will shut down the problematic application and the computer will be restored to its previous running state. It will also give you the option to shut the computer down if you choose to do so.
4. Sometimes, however, clicking on a particular task and trying to end it will not always do the trick. The only option left is to press Ctrl+Alt+Del again, which will cause the computer to restart. Any unsaved work will be lost in this instance, so make sure you save often to avoid redoing work.
There are a number of things you can do to prevent and avoid freezes and crashes.
• Only open the applications you will be using-extra applications take up more memory and can cause freeze-ups.
• When you sit down at the computer, check to see that no applications were left running by the previous user. These running applications will often be minimized at the bottom of the screen.
• If you are using an application that requires a lot of memory, such as PowerPoint or PhotoShop, do not attempt to open other programs, as a freeze-up may occur when memory fills up.
To access the Internet from a computer, you need to open a web browser. A web browser is a program such as Firefox or Internet Explorer that allows you to surf the net. Computers here at BGSU normally have both web browsers, and you may use either on a PC. Web browsers function similar to most other applications, so they are opened and closed in the same general manner as regular applications. If you are interested in acquiring the latest version of Firefox or Internet Explorer, download them free of charge at Download.com, or check out the CD Rom at the Library Circulation Desk. There are basically three ways to access the Internet from a PC. 1. Double-click the web browser icon on the desktop.
2. Click Start Menu > Programs >Internet, and then click on the web browser of your choice. 3. Click the web browser shortcut on the task bar located at the bottom of the screen.
Each computer here at BGSU is preloaded with various applications that you may use during your stay. Al-though each computer contains different software, most of them contain the same basic applications that you will use frequently. We list some of the most widely used applications here.
Microsoft Word - Use to type a paper. Microsoft Word is a word processing application that allows you to format your text as well as add graphics, tables and charts. Found in Start menu > Programs > Microsoft Word. Netscape or Internet Explorer - Use to access the Internet. Found in Start menu > Programs > Internet Explorer (firefox).
Windows Media Player - Use to listen to a CD. This program allows you to listen to your favorite CDs while you work. It includes programming features and volume controls. You will need to bring your headphones to listen while you work in the BGSU computer labs. Found in Start menu > Programs > Accessories > Entertain-ment > Windows Media Player.
Calculator - Use to do math on the computer. The Windows Calculator can be used by pointing and clicking the calculator on the screen, or by typing in the numbers on the keyboard. Found in Start Menu > Programs > Accessories > Calculator.
12. Internet Access
Keyboard shortcuts are key commands that allow you to accomplish various tasks. Instead of using your mouse to go through menus and sub-menus, you can use keyboard shortcuts to do common tasks like saving, copying, or pasting. Most people find using key shortcuts to be a faster and easier way to type. Listed below are some of the most common keyboard shortcuts in alphabetical order.
Close CTRL+W
* Not all keyboards have the Windows key. CTRL is the abbreviation for the Control key. DEL is the abbreviation for the Delete key.
When you right-click your mouse, a small menu will appear. This is the right-click menu, and it contains a list of the common tasks for whatever program you’re currently using. If you use the right-click menu you can leave your cursor in roughly the same spot, which makes resuming your task easier.
Each program’s right-click menu will be unique and look slightly different from others, but most follow the same general format. As an example, the following picture is what a menu would look like if you right-clicked on the desktop.
Arrows along the right side of the menu signal that there is a menu for that particular item. These sub-menus contain even more shortcuts that are grouped together in a category.
To exit the right-click menu, left-click on any part of the screen that isn’t the menu.
If you are familiar with Internet Explorer, you know that it helps you find web pages and information on the Internet. There is another kind of explorer on your computer: Windows Explorer. The basic idea behind Windows Explorer is very similar to Internet Explorer. The program lets you look through all of the files and folders on your computer. You can even open, copy, cut, and paste your files from inside Windows Explorer.