Creating
Jet database and vario us o bjec ts, suc h as tables and indexes, inside it. I’ll also c o ver ho w to c reate users and gro ups, and ho w to grant them permissio n to ac c ess database o bjec ts.Introducing the Visual
Data M anager
The Visual Data Manager ( also c alled VisData) is a Visual Basic add-in that was written to make it easier to design a Jet datab ase witho ut b uilding yo ur o wn applic atio n o r using Mic ro so ft Ac c ess. To run the Visual Data Manager, c ho o se Add-Ins➪Visual Data Manager fro m the main menu. This will start the applic atio n.
You got it:The Visual Data Manager utility w as w ritten in Visual Basic 5 and show s w hat you can do w ith a little bit of w ork. The com plete source code to the Visual Data Manager is included in the Samples\VisData directory of Visual Basic.
Opening an existing database
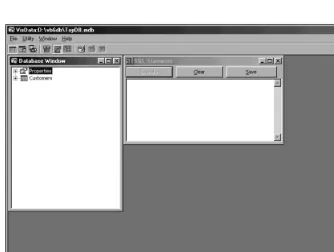
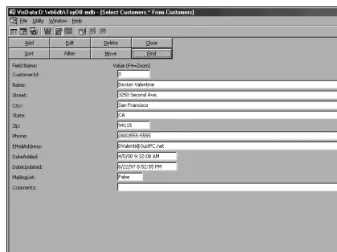
To o pen an existing database, c ho o se File➪Open DataBase➪Mic ro so ft Ac c ess fro m the Visual Data Manager main menu. This will display a File Open dialo g bo x. Simply c ho o se the file c o ntaining yo ur database and press the Open butto n. After yo u’ve o pened yo ur database, yo u’ll see a fo rm like the o ne sho wn in Figure 30-1. By default, the Visual Data Manager o pens yo ur database and displays two multiple do c ument interfac e ( MDI) windo ws. The first windo w ( Database Windo w) displays yo ur database’s struc ture, while the sec o nd windo w ( SQL Statement) allo ws yo u to enter and run an SQL statement.
665
Chapter 30
✦
Creating Database Objects with M icrosoft JetViewing Database Information
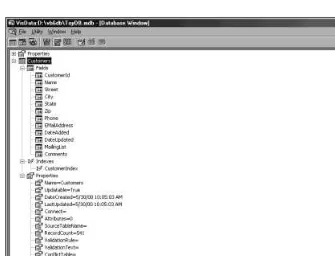
The Visual Data Manager allo ws yo u to see the struc ture o f yo ur database ( see Figure 30-2) . The tree view displays eac h table and its attributes, inc luding c o lumns and indexes. As yo u expand eac h entry in the table, yo u will eventually reac h the details that wo uld no rmally sho w up in the Propertiesc o llec tio n asso c iated with the o bjec t.
Figure 30-2: View ing the structure of your database.
Running an SQL query
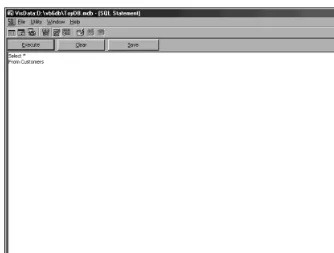
Figure 30-3: Entering an SQL statem ent in the SQL statem ent w indow.
Using the Query Builder
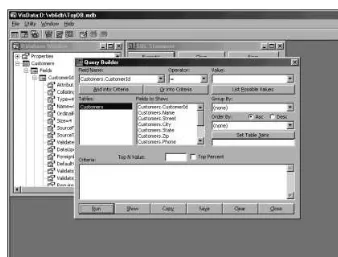
Cho o sing Utility➪Query Builder fro m the Visual Data Manager main menu starts the Query Builder ( see Figure 30-4) . This utility assists yo u with building a Se le ct
statement. Yo u begin building the Se le ctstatement by c ho o sing the table yo u wish to start with in the Tables sec tio n o f the fo rm, and the c o lumns yo u want to display in the Fields to Sho w sec tio n o f the fo rm. If yo u do n’t selec t any c o lumns, all o f the c o lumns will be returned.
By default, all o f the ro ws in the table will be returned. Ho wever, yo u c an use the Field Name, Operato r, and Value fields to selec t a value o r range o f values fo r a spe-c ifispe-c spe-c o lumn. List Po ssible Values will po pulate the Value dro p-do wn bo x with all o f the values fo r that spec ific c o lumn in the table.
667
Chapter 30
✦
Creating Database Objects with M icrosoft JetFigure 30-4: Building a query using the Query Builder.
Yo u c an c ho o se to inc lude Group Byand Orde r Byc lauses by using the Gro up By and Order By dro p-do wn bo xes. If yo u have selec ted multiple tables, pressing the Set Table Jo ins butto n will display a dialo g bo x that helps yo u selec t the jo in c o lumns. The To p N Value field allo ws yo u to limit the number o f ro ws retrieved by spec ifying an abso lute number o f ro ws o r a relative perc entage value.
When all o f the info rmatio n is entered into the fo rm, yo u c an press the Sho w butto n to see the Se le ctstatement yo u just built. Pressing Save will save the Se le ct state-ment as a QueryDef in the database fo r use with Ac c ess, while pressing Co py will save a c o py o f the Se le ctstatement to the c lipbo ard so that yo u may paste it into a different applic atio n. Pressing Clo se will c lo se the Query Builder windo w and plac e the query yo u built in the SQL Statement windo w.
Getting your results
Figure 30-5: Seeing the results from running your query.
669
Chapter 30
✦
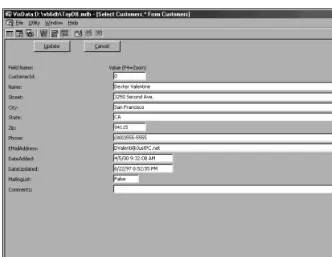
Creating Database Objects with M icrosoft JetFigure 30-6: Editing a row in your database.
Constructing Databases, Tables, and Indexes
Pro bably the mo st c o mmo n use fo r the Visual Data Manager utility is to c reate Jet database o bjec ts witho ut using Ac c ess and witho ut building yo ur o wn applic atio n pro gram.Creating a new database
The fo llo wing steps will sho w yo u ho w to use the Visual Data Manager to c reate a new database:
1.Start the Visual Data Manager and c ho o se File➪New➪Mic ro so ft Ac c ess➪
Figure 30-7: Choosing the nam e of your new database.
2.Using the Selec t Mic ro so ft Ac c ess Database to Create dialo g bo x, c ho o se a name fo r yo ur database and press Save to c reate it.
An empty database is a good thing: Because your database file is really just another disk file, I find it useful to keep an em pty copy of the database file around w hen I’m developing an application. I can just copy the .MDBfile to another file and use that to test m y application, w ithout having to go through the process of re-creating the database. Also, you m ay w ant to keep a populated database around w ith a set of know n values. You can create a new copy of this file to test your application, w hile leaving the original populated file untouched for the next tim e you w ant to do som e testing.
Creating a table
After c reating a new database o r o pening an existing database, yo u c an easily c re-ate a new table by fo llo wing these steps:
1.While in the Visual Data Manager, selec t the Datab ase windo w. Right c lic k anywhere in the windo w and c ho o se New Tab le. This will display the Tab le Struc ture windo w, as sho wn in Figure 30-8. No te that yo u c an use the same windo w to display info rmatio n ab o ut an existing tab le b y right c lic king o n the tab le’s name in the Datab ase windo w and c ho o sing Design fro m the po p-up menu.
2.Enter the name o f the table in the Table Name field. No te that yo ur table name sho uld no t duplic ate any tables already defined in yo ur database.
671
Chapter 30
✦
Creating Database Objects with M icrosoft JetFigure 30-8: Creating a new table w ith the Table Structure w indow.
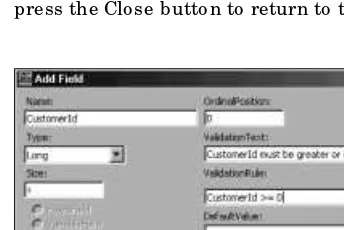
3.To add fields to the table, press the Add Field butto n. This will display the Add Field dialo g bo x, as sho wn in Figure 30-9. Enter the name o f the c o lumn in the Name field and selec t its data type in the Type dro p-do wn bo x. Yo u c an igno re the OrdinalPo sitio n bo x, sinc e this value will be c o mputed when the field is added. Yo u may also spec ify a validatio n rule in the Validatio nRule bo x. If yo u do so , yo u may also indic ate the text that will be displayed when the validatio n rule fails in the Validatio nText bo x. The value yo u enter in the DefaultValue text bo x will be used, instead o f a Nullvalue, whenever a new rec o rd is c reated. When yo u have entered the info rmatio n fo r a field, press the OK butto n. The fo rm will be c leared and yo u c an enter the next field. When yo u have finished entering all o f the fields, press the OK butto n to save the last field and then press the Clo se butto n to return to the Table Struc ture windo w.
Creating an index
In o rder to c reate an index, yo u must have an existing table. Yo u c an c reate an index at the same time yo u c reate the table, o r yo u c an add an index to an existing table by right c lic king o n the table name in the Database windo w and selec ting design fro m the po p-up menu to display the Table Struc ture windo w sho wn in Figure 30-9. Then fo llo w these steps:
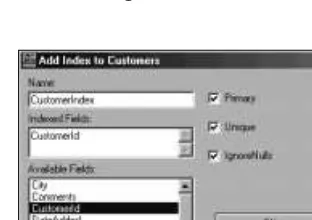
1.Press the Add Index butto n. This will display the Add Index dialo g bo x, as sho wn in Figure 30-10.
Figure 30-10: Adding an index to a table.
2.Enter the name o f the index in the Name field. Cho o se Primary, Unique, and Igno reNulls as appro priate. Just remember that yo u may have o nly o ne Primary index, and it sho uld always be unique.
3.Add fields to the index by do uble-c lic king o n the field name in Available Fields. The field name will be added to the list o f field names in the Indexed Fields field. If yo u make a mistake, yo u c an delete the field by simply selec ting the text in the Indexed Fields bo x and pressing the Delete key o n the key-bo ard.
673
Chapter 30
✦
Creating Database Objects with M icrosoft JetUsing the DAO and ADOX alternatives
Yo u c an also c reate database o bjec ts in a Jet database by using either DAO o r ADOX ( the ADO Extensio ns fo r Data Definitio n Language and Sec urity) . While the c o de to do this is very straightfo rward, it c an be lo ng and repetitive and no t easily updated if yo ur database design is still in a state o f flux. Ho wever, having the ability to c reate a new, empty database fro m within yo ur applic atio n c an be useful in a sin-gle user applic atio n. This allo ws a user to easily c reate multiple, independent data files c o ntaining different sets o f data.
See Chapters 6 and 11 for m ore inform ation about the DAO and ADOX object m odels, respectively.
M anaging Security
Every database system needs sec urity, even if yo u plan to allo w o nly o ne user to ac c ess it. If yo u have Ac c ess installed, managing sec urity isn’t very diffic ult, and this sec tio n disc usses ho w to use Ac c ess 2000 to manage sec urity fo r yo ur Jet 4.0 database. Similar features exist in Ac c ess 97 in o rder to manage yo ur Jet 3.5 database.
The security definition file
The first step in implementing sec urity o n a Jet datab ase is to ensure that yo u have a wo rkgro up datab ase (SYSTEM.MDWfile) . This file c o ntains info rmatio n o n the users and gro ups that sec ure a Jet datab ase. By default, the SYSTEM.MDWfile is c reated when yo u install Ac c ess 97 o r Ac c ess 2000. Typic ally, this file is lo c ated in the \Windows\Systemdirec to ry; ho wever, it c an b e lo c ated anywhere o n yo ur sys-tem, sinc e a value in the Windo ws registry is used to lo c ate the file.
If yo ur applic atio n is running in a netwo rked enviro nment, where the database is shared amo ng multiple users, yo u sho uld make sure that the c lient systems po int to a shared c o py o f the SYSTEM.MDWfile. Yo u c an do this in DAO by spec ifying the SystemDBpro perty in the DBEngineo bjec t, o r by adjusting the windo ws registry key to po int to the file.
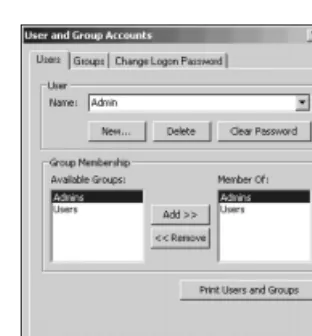
M anaging users and groups
Sinc e the wo rkgro up file is independent o f any database file, yo u c an manage the users and gro ups in Ac c ess witho ut o pening a database. Yo u simply use the User and Gro up Ac c o unts dialo g bo x, whic h has the ability to view and c hange info rma-tio n abo ut existing users and gro ups, as well as c reate new users and gro ups.
Hidden secrets: While you can’t see the passw ord for a user, you can press the Clear Passw ord button to rem ove the passw ord from the user if you are a m em ber of the Adm ins group, or you can sw itch to the Change Logon Passw ord tab to change the passw ord to a new value.
Yo u c an add a new user by pressing the New butto n in the User frame. This will dis-play the New User/ Gro up dialo g bo x ( see Figure 30-12) . Enter the name o f the user and a c o de phrase that will make the user name unique.
Figure 30-12: Creating a new user or group.
675
Chapter 30
✦
Creating Database Objects with M icrosoft JetM ake personal ids personal:Given that you can easily substitute one w orkgroup file for another, it is im portant that user ids and groups be m ade universally unique. The key is supplying a value for the personal id that w ould not be easily guessed.
M anaging groups
By switc hing to the Gro ups tab in the User and Gro up Ac c o unts dialo g bo x, yo u c an see the list o f sec urity gro ups defined in the wo rkgro up file ( see Figure 30-13) . Yo u c an c reate a new gro up by pressing the New butto n and entering the gro up and per-so nal id as yo u did when yo u c reated a new user.
Figure 30-13: View ing the groups in your w orkgroup file.
Note
Ousting Admin
will display the User and Gro up Permissio ns dialo g bo x sho wn in Figure 30-14.
Figure 30-14: Editing a user or group’s perm issions.
Changing ownership
Yo u c an switc h to the Change Owner tab o f the User and Gro up Permissio ns dialo g bo x to c hange the o wner o f a database o bjec t to a different user id o r gro up ( see Figure 30-15) . The Objec t and Current Owner lists sho w all o f the o bjec ts in yo ur database that matc h the o bjec t selec ted in the Objec t Type dro p-do wn bo x.
677
Chapter 30
✦
Creating Database Objects with M icrosoft JetDon’t forget the database:The database itself is an object that is ow ned by a user id or a group. By default, Adm in ow ns the database. You should change this to the Adm ins group. Otherw ise, the Adm in user id is still all-pow erful.
Figure 30-15: Changing the ow nership of a database object.
Caution
Thoughts on Creating Jet Databases
Jet based Visual Basic applications are usually targeted at either individuals or sm all organi-zations w ith only a handful of users. This m eans that m any of the approaches that I have discussed throughout the book m ay not apply. For instance, security in a sm all application is not nearly the problem it is in a larger application. For a single user application, the pri-m ary aipri-m of security is to prevent the user fropri-m accidentally deleting inforpri-m ation needed to run the application. Even w ith a handful of users, you are m ore concerned w ith identifying the actions of individual users rather than protecting the database from m alicious actions. Because of these differences, you m ight w ant to add som e features that you w ouldn’t con-sider in larger applications. For instance, you m ay w ant to add a feature in your application to create a new copy of the database. This w ould let the user create m ultiple databases for different projects.