Chapter 36. Shell Programming for the Initiated
36.1 Beyond the Basics
36.2 The Story of : # #!
36.3 Don't Need a Shell for Your Script? Don't Use One
36.5 The exec Command
36.6 The Unappreciated Bourne Shell ":" Operator
36.7 Parameter Substitution
36.8 Save Disk Space and Programming: Multiple Names for a
Program
36.9 Finding the Last Command-Line Argument
36.10 How to Unset All Command-Line Parameters
36.11 Standard Input to a for Loop
36.12 Making a for Loop with Multiple Variables
36.13 Using basename and dirname
36.14 A while Loop with Several Loop Control Commands
36.15 Overview: Open Files and File Descriptors
36.16 n>&m: Swap Standard Output and Standard Error
36.17 A Shell Can Read a Script from Its Standard Input, but...
36.18 Shell Scripts On-the-Fly from Standard Input
36.19 Quoted hereis Document Terminators: sh Versus csh
36.20 Turn Off echo for "Secret" Answers
36.21 Quick Reference: expr
36.22 Testing Characters in a String with expr
36.23 Grabbing Parts of a String
36.24 Nested Command Substitution
36.25 Testing Two Strings with One case Statement
36.26 Outputting Text to an X Window
36.27 Shell Lockfile
This chapter has a bunch of tricks and techniques for programming with the Bourne shell. Some of them are documented but hard to find; others aren't documented at all. Here is a summary of this chapter's articles:
The first group of articles is about making a file directly executable with #! on the first line. On many versions of Unix, an executable file can start with a first line like this:
#!
/path/to/interpreter
The kernel will start the program named in that line and give it the file to read. Chris Torek's Usenet classic, Section 36.2, explains how
#!
started.Section 36.3 explains that your "shell scripts" may not need a shell at all.
The next bunch of articles are about processes and commands. The exec
command, Section 36.5, replaces the shell with another process; it can also be used to change input/output redirection (see below). The : (colon)
operator evaluates its arguments and returns a zero status — Section 36.6
explains why you should care.
Next are techniques for handling variables and parameters. Parameter substitution, explained in Section 36.7, is a compact way to test, set, and give default values for variables. You can use the
$0
parameter and Unix links to give the same script multiple names and make it do multiple things; see Section 36.8. Section 36.9 shows the easy way to get the last command-line argument. Section 36.10 has an easy way to remove all the command-line arguments.Four articles cover sh loops. A for loop usually reads a list of single
arguments into a single shell variable. Section 36.11 shows how to make the
for loop read from standard input. Section 36.12 has techniques for making a for loop set more than one variable. The dirname and basename
commands can be used to split pathnames with a loop; see Section 36.13. A
while loop can have more than one command line at the start; see Section 36.14.
introduces open files and file descriptors — there's more to know about standard input/output/error than you might have realized! Section 36.16 has a look at file-descriptor handling in the Bourne shell, swapping standard output and standard error.
The shell can read commands directly from a shell script file. As Section 36.17 points out, a shell can also read commands from its standard input, but that can cause some problems. Section 36.18 shows one place scripts from stdin are useful: writing a script that creates another script as it goes. Next are two articles about miscellaneous I/O. One gotcha with the here-document operator (for redirecting input from a script file) is that the
terminators are different in the Bourne and C shells; Section 36.19 explains.
Section 36.20 shows how to turn off echoing while your script reads a "secret" answer such as a password.
Two articles — Section 36.22 and Section 36.23 — show uses for the versatile expr expression-handling command. Section 36.21 is a quick reference to expr. Section 36.24 covers multiple command substitution (Section 28.14).
Section 36.25 shows a trick for making one case statement (Section 35.10) test two things at once. Finally, Section 36.27 has a simple technique for getting exclusive access to a file or other system resource.
— JP
36.2 The Story of : # #!
Once upon a time, there was the Bourne shell. Since there was only "the" shell, there was no trouble deciding how to run a script: run it with the shell. It worked, and everyone was happy.
and alas! it bombed spectacularly. The people wailed and called upon their Guru for help.
"Well," said the Guru, "I see the problem. The one shell and the other are not compatible. We need to make sure that the shells know which other shell to use to run each script. And lo! the one shell has a `comment' called :, and the other a true comment called
#
. I hereby decree that henceforth, the one shell will run scripts that start with :, and the other those that start with#
." And it was so, and the people were happy.But progress was not finished. This time he noticed that only shells ran scripts and thought that if the kernel too could run scripts, this would be good, and the people would be happy. So he wrote more code, and now the kernel could run scripts but only if they began with the magic incantation
#!
, and if they told the kernel which shell ran the script. And it was so, and the people were confused. For the#!
looked like a "comment." Though the kernel could see the#!
and run a shell, it would not do so unless certain magic bits were set. And if the incantation were mispronounced, that too could stop the kernel, which, after all, was not omniscient. And so the people wailed, but alas! the Guru did notrespond. And so it was, and still it is today. Anyway, you will get best results from a 4BSD machine by using
#! /bin/sh
or:
#! /bin/csh
as the first line of your script.
#!
/bin/csh -f
is also helpful on occasion, and it's usually faster because csh won't read your .cshrc file (Section 3.3).— CT
If your Unix understands files that start with:
#!
/interpreter/program
(and nearly all of them do by now) you don't have to use those lines to start a shell, such as
#!/bin/sh
. If your script is just starting a program like awk, Unix can start the program directly and save execution time. This is especially useful on small or overloaded computers, or when your script has to be called over and over (such as in a loop).First, here are two scripts. Both scripts print the second word from each line of text files. One uses a shell; the other runs awk directly:
%
cat with_sh
#!/bin/sh
awk '
{ print $2 }
' $*
%
cat no_sh
#!/usr/bin/awk -f
{ print $2 }
%
cat afile
one two three four five
Let's run both commands and time (Section 26.2) them. (This is running on a very slow machine. On faster systems, this difference may be harder to measure — though the difference can still add up over time.)
%
time with_sh afile
two
0.1u 0.2s 0:00 26%
%
time no_sh afile
two
One of the things that's really important to understand here is that when the kernel runs the program on the interpreter line, it is given the script's filename as an argument. If the intepreter program understands a file directly, like /bin/sh
does, nothing special needs to be done. But a program like awk or sed requires the -f option to read its script from a file. This leads to the seemingly odd syntax in the example above, with a call to
awk -f
with no following filename. The script itself is the input file!One implication of this usage is that the interpreter program needs to understand
#
as a comment, or the first interpreter-selection line itself will be acted upon (and probably rejected by) the interpreter. (Fortunately, the shells, Perl, sed, andawk, among other programs, do recognize this comment character.)
[One last comment: if you have GNU time or some other version that has a
verbose mode, you can see that the major difference between the two invocations is in terms of the page faults each requires. On a relatively speedy Pentium
III/450 running RedHat Linux, the version using a shell as the interpreter required more than twice the major page faults and more than three times as many minor page faults as the version calling awk directly. On a system, no matter how fast, that is using a large amount of virtual memory, these differences can be crucial. So opt for performance, and skip the shell when it's not needed. — SJC]
—JP and SJC
As Section 36.3 explains, you can use
#!
/path/name to run a script with
the interpreter located at /path/name in the filesystem. The problem comes if a new version of the interpreter is installed somewhere else or if you run the script on another system that has a different location. It's usually not a problem for Bourne shell programmers: /bin/sh exists on every Unix-type system I've seen. But some newer shells — and interpreters like Perl — may be lurking almost anywhere (although this is becoming more and more standardized as Perl and other tools like it become part of standard Linux distributions and the like). If the interpreter isn't found, you'll probably get a cryptic message likescriptname:
Command not found
, where scriptname is the nameThe env command will search your PATH (Section 35.6) for an interpreter, then execute (exec (Section 24.2), replace itself) with the interpreter. If you want to try this, type
env
ls
; env will find and run ls for you. This is pretty useless when you have a shell around to interpret your commands — because the shell can do the same thing without getting env involved. But when the kernelinterprets an executable file that starts with
#!
, there's no shell (yet!). That's where you can use env. For instance, to run your script with zsh, you could start its file with:#!/usr/bin/env zsh
...zsh script here...
The kernel execs /usr/bin/env, then env finds and execs the zsh it found. Nice trick, eh? What do you think the problem is? (You have ten seconds... tick, tick, tick...) The catch is: if the env command isn't in /usr/bin on your system, this trick won't work. So it's not as portable as it might be, but it's still handy and probably still better than trying to specify the pathname of a less common interpreter like zsh.
Running an interpreter this way can also be a security problem. Someone's PATH
might be wrong; for instance, it might execute some random command named
zsh in the user's bin directory. An intruder could change the PATH to make the script use a completely different interpreter with the same name.
One more problem worth mentioning: you can't specify any options for the interpreter on the first line. Some shell options can be set later, as the script starts, with a command like set, shopt, and so on — check the shell's manual page.
Finally, understand that using env like this pretty much erases any performance gains you may have achieved using the trick in the previous article.
—JP and SJC
36.5 The exec Command
terminates the current shell and starts a new process (Section 24.3) in its place. Historically, exec was often used to execute the last command of a shell script. This would kill the shell slightly earlier; otherwise, the shell would wait until the last command was finished. This practice saved a process and some memory. (Aren't you glad you're using a modern system? This sort of conservation usually isn't necessary any longer unless your system limits the number of processes each user can have.)
exec can be used to replace one shell with another shell:
%
exec ksh
$
without incurring the additional overhead of having an unused shell waiting for the new shell to finish.
exec also manipulates file descriptors (Section 36.16) in the Bourne shell. When you use exec to manage file descriptors, it does not replace the current process. For example, the following command makes the standard input of all commands come from the file formfile instead of the default place (usually, your terminal):
exec < formfile
—ML and JP
36.6 The Unappreciated Bourne Shell ":"
Operator
Some people think that the Bourne shell's : is a comment character. It isn't, really. It evaluates its arguments and returns a zero exit status (Section 35.12). Here are a few places to use it:
process each time around the loop (as it does when you use
while
true
):while :
do
commands
done
(Of course, one of the commands will probably be break, to end the loop eventually. This presumes that it is actually a savings to have the break test inside the loop body rather than at the top, but it may well be clearer under certain circumstances to do it that way.)
When you want to use the else in an if ( Section 35.13) but leave the then
empty, the : makes a nice "do-nothing" place filler:
if
something
then :
else
commands
fi
If your Bourne shell doesn't have a true
#
comment character (but nearly all of them do nowadays), you can use : to "fake it." It's safest to use quotes so the shell won't try to interpret characters like>
or|
in your "comment":: 'read answer and branch if < 3 or > 6'
Finally, it's useful with parameter substitution (Section 35.7) like
${
var
?}
or${
var
=
default
}
. For instance, using this line in your script will print an error and exit if either the USER or HOME variables aren't set:— JP
36.7 Parameter Substitution
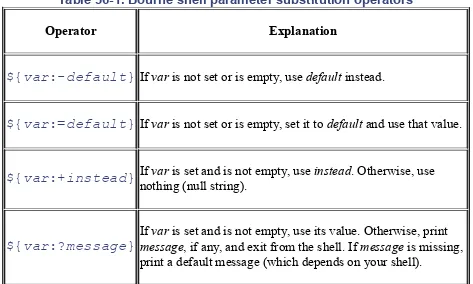
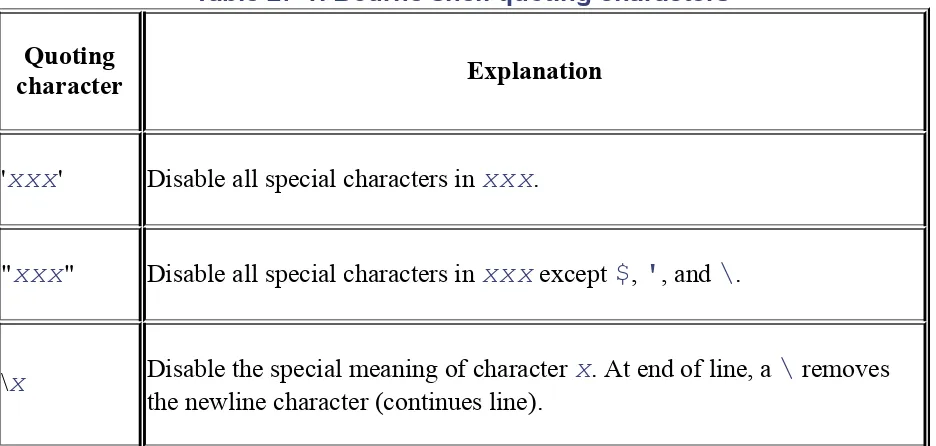
The Bourne shell has a handy set of operators for testing and setting shell variables. They're listed in Table 36-1.
Table 36-1. Bourne shell parameter substitution operators
Operator Explanation
${var:-default} If var is not set or is empty, use default instead.
${var:=default} If var is not set or is empty, set it to default and use that value.
${var:+instead} If nothing (null string).var is set and is not empty, use instead. Otherwise, use
${var:?message} If messagevar is set and is not empty, use its value. Otherwise, print, if any, and exit from the shell. If message is missing, print a default message (which depends on your shell).
If you omit the colon (:) from the expressions in Table 36-1, the shell doesn't check for an empty parameter. In other words, the substitution happens
whenever the parameter is set. (That's how some early Bourne shells work: they don't understand a colon in parameter substitution.)
To see how parameter substitution works, here's another version of the bkedit script (Section 35.13, Section 35.16):
+#!/bin/sh
${VISUAL:-/usr/ucb/vi} "$1"
exit # Use status from editor
else
echo "`basename $0` quitting: can't make backup?" 1>&2
exit 1
fi
If the VISUAL (Section 35.5) environment variable is set and is not empty, its value (such as /usr/local/bin/emacs) is used and the command line becomes
/usr/local/bin/emacs "$1"
. If VISUAL isn't set, the command line defaults to/usr/ucb/vi "$1"
.You can use parameter substitution operators in any command line. You'll see them used with the colon (:) operator (Section 36.6), checking or setting default values. There's an example below. The first substitution
(
${nothing=default}
) leaves$nothing
empty because thevariable has been set. The second substitution sets
$nothing
to defaultbecause the variable has been set but is empty. The third substitution leaves
$something
set to stuff:+nothing=
something=stuff
: ${nothing=default}
: ${nothing:=default}
: ${something:=default}
Several Bourne-type shells have similar string editing operators, such as
${
var##pattern
}
. They're useful in shell programs, as well as on the command line and in shell setup files. See your shell's manual page for more details.— JP
Multiple Names for a Program
If you're writing:
several programs that do the same kinds of things,
programs that use a lot of the same code (as you're writing the second, third, etc., programs, you copy a lot of lines from the first program), or
a program with several options that make big changes in the way it works,
you might want to write just one program and make links (Section 10.4, Section 10.3) to it instead. The program can find the name you called it with and,
through case or test commands, work in different ways. For instance, the Berkeley Unix commands ex, vi, view, edit, and others are all links to the same executable file. This takes less disk space and makes maintenance easier. It's usually sensible only when most of the code is the same in each program. If the program is full of name tests and lots of separate code, this technique may be more trouble than it's worth.
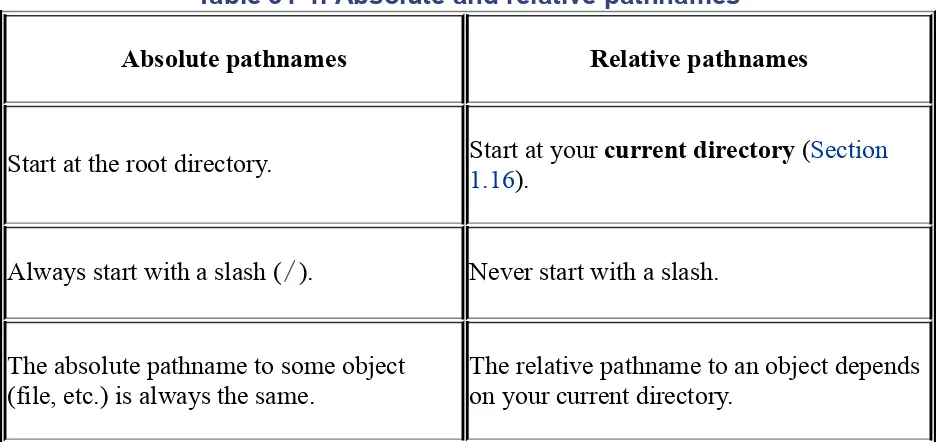
Depending on how the script program is called, this name can be a simple relative pathname like
prog
or./prog
— it can also be an absolutepathname like
/usr/joe/bin/prog
(Section 31.2 explains pathnames). There are a couple of ways to handle this in a shell script. If there's just one main piece of code in the script, as in the lf script, a case that tests$0
might be best. The asterisk (*
) wildcard at the start of each case (see Section 35.11) handles the different pathnames that might be used to call the script:case "$0" in
*
name1
)
...do this when called as name1...
;;
*
name2
)
...do this when called as name2...
...
*)
...print error and exit if $0 doesn't match...
;;
esac
You might also want to use basename (Section 36.13) to strip off any leading pathname and store the cleaned-up
$0
in a variable called myname. You can test$myname
anywhere in the script and also use it for error messages:myname=`basename $0`
...
case "$myname" in
...
echo "$myname: aborting; error in xxxxxx" 1>&2
...
— JP
36.9 Finding the Last Command-Line Argument
Do you need to pick up the last parameter
$1
,$2
...
from the parameter list on the command line? It looks likeeval \$$#
would do it:eval
Section 27.8$
set foo bar baz
$
eval echo \$$#
baz
except for a small problem with sh argument syntax:
$
set m n o p q r s t u v w x
m1
$11
means${1}1
, not${11}
. Trying${11}
directly givesbad
substitution
. (More recent shells, such as bash, do support the${11}
syntax, however, to arbitrary lengths. Our copy of bash, for example, allowed at least 10240 command line arguments toset
with recall of the last via${10240}
). Your mileage may vary.The only reliable way to get at the last parameter in the Bourne shell is to use something like this:
for i do last="$i"; done
The for loop assigns each parameter to the shell variable named last; after the loop ends,
$last
will have the last parameter. Also, note that you won't need this trick on all sh-like shells. The Korn shell, zsh, and bash understand${11}
.— CT
36.10 How to Unset All Command-Line
Parameters
The shift (Section 35.22) command "shifts away" one command-line parameter. You can shift three times if there are three command-line parameters. Many shells also can take an argument, like shift 3, that tells how many times to shift; on those shells, you can shift $# (Section 35.20) to unset all parameters.
The portable way to unset all command-line parameters is probably to set (Section 35.25) a single dummy parameter, then shift it away:
+set x
shift
— JP
36.11 Standard Input to a for Loop
An obvious place to use a Bourne shell for loop (Section 35.21) is to step
through a list of arguments — from the command line or a variable. But combine the loop with backquotes (Section 28.14) and cat (Section 12.2), and the loop will step through the words on standard input.
Here's an example:
for x in `cat`
do
...handle $x
done
Because this method splits the input into separate words, no matter how many words are on each input line, it can be more convenient than a while loop running the read command. When you use this script interactively, though, the loop won't start running until you've typed all of the input; using while read will run the loop after each line of input.
— JP
36.12 Making a for Loop with Multiple Variables
The normal Bourne shell for loop (Section 35.21) lets you take a list of items, store the items one by one in a shell variable, and loop through a set of
commands once for each item:
for file in prog1 prog2 prog3
do
...process $file
I wanted a for loop that stores several different shell variables and makes one pass through the loop for each set of variables (instead of one pass for each item, as a regular for loop does). This loop does the job:
set
Section 35.25for bunch in "ellie file16" "donna file23" "steve file34"
do
# PUT FIRST WORD (USER) IN $1, SECOND (FILE) IN $2...
set $bunch
mail $1 < $2
done
If you have any command-line arguments and still need them, store them in another variable before you use the set command. Or you can make the loop this way:
for bunch in "u=ellie f=file16 s='your files'" \
"u=donna f=file23 s='a memo'" "u=steve f=file34 s=report"
do
# SET $u (USER), $f (FILENAME), $s (SUBJECT):
eval $bunch
mail -s "$s" $u < $f
done
This script uses the shell's eval (Section 27.8) command to rescan the contents of the bunch variable and store it in separate variables. Notice the single quotes, as in
s='your files'
; this groups the words for eval. The shell removes the single quotes before it stores the value into the s variable.— JP
36.13 Using basename and dirname
(Section 31.2) to find a file or directory. There are times you'll need part of a pathname — the head (everything before the last slash) or the tail (the name after the last slash). The utilities basename and dirname, available on most Unix
systems, handle that.
36.13.1 Introduction to basename and dirname
The basename command strips any "path" name components from a filename, leaving you with a "pure" filename. For example:
%
basename /usr/bin/gigiplot
gigiplot
%
basename /home/mikel/bin/bvurns.sh
bvurns.sh
basename can also strip a suffix from a filename. For example:
%
basename /home/mikel/bin/bvurns.sh .sh
bvurns
The dirname command strips the filename itself, giving you the "directory" part of the pathname:
%
dirname /usr/bin/screenblank
/usr/bin
%
dirname local
.
If you give dirname a "pure" filename (i.e., a filename with no path, as in the second example), it tells you that the directory is . (the current directory).
% basename 0.foo .foo
If the result is 0, your basename implementation is good. If the answer is 0.foo, the implementation is bad. If basename doesn't work, dirname won't, either.
36.13.2 Use with Loops
Here's an example of basename and dirname. There's a directory tree with some very large files — over 100,000 characters. You want to find those files, run split (Section 21.9) on them, and add huge. to the start of the original filename. By default, split names the file chunks xaa, xab, xac, and so on; you want to use the original filename and a dot (.) instead of x:
||
Section 35.14,exit
Section 35.16for path in `find /home/you -type f -size +100000c -print`
do
cd `dirname $path` || exit
filename=`basename $path`
split $filename $filename.
mv -i $filename huge.$filename
done
The find command will output pathnames like these:
/home/you/somefile
/home/you/subdir/anotherfile
If the previous code results in the error
command line too long
, replace the first lines with the two lines below. This makes a redirected-input loop:find /home/you -type f -size +100000c -print |
while read path
—JP and ML
36.14 A while Loop with Several Loop Control
Commands
I used to think that the Bourne shell's while loop (Section 35.15) looked like this, with a single command controlling the loop:
while
command
do
...whatever
done
But command can actually be a list of commands. The exit status of the last command controls the loop. This is handy for prompting users and reading answers. When the user types an empty answer, the read command returns "false" and the loop ends:
while echo -e "Enter command or CTRL-d to quit: \c"
read command
do
...process
$command
done
You may need a -e option to make echo treat escaped characters like
\c
the way you want. In this case, the character rings the terminal bell, however yourHere's a loop that runs who and does a quick search on its output. If the grep
returns nonzero status (because it doesn't find
$who
in$tempfile
), the loop quits — otherwise, the loop does lots of processing:while
who > $tempfile
grep "$who" $tempfile >/dev/null
do
...process $tempfile...
done
—JP and SJC
36.15 Overview: Open Files and File Descriptors
This introduction is general and simplified. If you're a technical person who needs a complete and exact description, read a book on Unix programming. Unix shells let you redirect the input and output of programs with operators such as
>
and|
. How does that work? How can you use it better? Here's an overview. When the Unix kernel starts any process (Section 24.3) — for example, grep, ls, or a shell — it sets up several places for that process to read from and write to, as shown in Figure 36-1.These places are called open files. The kernel gives each file a number called a
file descriptor. But people usually use names for these places instead of the numbers:
The standard input or stdin (File Descriptor (F.D.) number 0) is the place where the process can read text. This might be text from other programs (through a pipe, on the command line) or from your keyboard.
The standard output or stdout (F.D. 1) is a place for the process to write its results.
The standard error or stderr (F.D. 2) is where the process can send error messages.
By default, as Figure 36-1 shows, the file that's opened for stdin, stdout, and
stderr is /dev/tty — a name for your terminal. This makes life easier for users — and programmers, too. The user doesn't have to tell a program where to read or write because the default is your terminal. A programmer doesn't have to open files to read or write from (in many cases); the programs can just read from
stdin, write to stdout, and send errors to stderr.
It gets better. When the shell starts a process (when you type a command at a prompt), you can tell the shell what file to "connect to" any of those file
descriptors. For example, Figure 36-2 shows what happens when you run grep
and make the shell redirect grep's standard output away from the terminal to a file named grepout.
Programs can read and write files besides the ones on stdin, stdout, and stderr. For instance, in Figure 36-2, grep opened the file somefile itself — it didn't use any of the standard file descriptors for somefile. A Unix convention is that if you don't name any files on the command line, a program will read from its standard input. Programs that work that way are called filters.
All shells can do basic redirection with stdin, stdout, and stderr. But as you'll see in Section 36.16, the Bourne shell also handles file descriptors 3 through 9 (and
bash and the other newer shells can handle arbitrary numbers of file descriptiors, up to whatever
ulimit
-n
happens to be set). That's useful sometimes:Maybe you have a few data files that you want to keep reading from or writing to. Instead of giving their names, you can use the file descriptor numbers.
Once you open a file, the kernel remembers what place in the file you last read from or wrote to. Each time you use that file descriptor number while the file is open, you'll be at the same place in the file. That's especially nice when you want to read from or write to the same file with more than one program. For example, the line command on some Unix systems reads one line from a file — you can call line over and over, whenever you want to read the next line from a file. Once the file has been opened, you can remove its link (name) from the directory; the process can access the file through its descriptor without using the name.
descriptors are given to that process. A subprocess can read or write from file descriptors opened by its parent process. A redirected-I/O loop, as discussed in Section 43.6, takes advantage of this.
— JP
36.16 n>&m: Swap Standard Output and
Standard Error
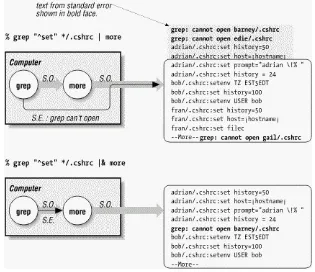
By default, a command's standard error goes to your terminal. The standard output goes to the terminal or is redirected somewhere (to a file, down a pipe, into backquotes).
Sometimes you want the opposite. For instance, you may need to send a
command's standard output to the screen and grab the error messages (standard error) with backquotes. Or you might want to send a command's standard output to a file and the standard error down a pipe to an error-processing command. Here's how to do that in the Bourne shell. (The C shell can't do this, although
tcsh can.)
File descriptors 0, 1, and 2 are, respectively, the standard input, standard output, and standard error (Section 36.15 explains). Without redirection, they're all
associated with the terminal file /dev/tty (Section 36.15). It's easy to redirect any descriptor to any file — if you know the filename. For instance, to redirect file descriptor 2 to errfile, type:
$
command
2>errfile
You know that a pipe and backquotes also redirect the standard output:
$
command
| ...
$
var=`
command
`
useful to run this short Perl script, which simply prints "stdout" to standard output, and "stderr" to standard error:
#!/usr/bin/perl
print STDOUT "stdout\n";
print STDERR "stderr\n";
Let's start slowly. We will combine both standard output and standard error, sending them both as output, to be used as the input to a pipe or as the output of backquotes. The Bourne shell operator n
>&
m rearranges the files and file
descriptors. It says, "Make file descriptor n point to the same file as file descriptor m." Let's use that operator on the previous example. We'll send standard error to the same place standard output is going:$
command
2>&1 | ...
$
var=`
command
2>&1`
In both those examples,
2>&1
means "send standard error (file descriptor 2) to the same place standard output (file descriptor 1) is going." Simple, eh?You can use more than one n
>&
m operator. The shell reads them left-to-right
before it executes the command."Oh!" you might say. "To swap standard output and standard error — make
stderr go down a pipe and stdout go to the screen — I could do this!"
$
command
2>&1 1>&2 | ...
wrong...
Sorry, Charlie. When the shell sees
2>&1 1>&2
, the shell first does2>&1
. You've seen that before — it makes file descriptor 2 (stderr) go the same place as file descriptor 1 (stdout). Then the shell does1>&2
. It makes stdout (1
) go the same place as stderr (2
)... but stderr is already going the same place asstdout, down the pipe.
come in handy. They normally aren't used. You can use one of them as a "holding place," to remember where another file descriptor "pointed." For example, one way to read the operator
3>&2
is "make3
point the same place as2
." After you use3>&2
to grab the location of2
, you can make2
point somewhere else. Then make1
point where2
used to (where3
points now). We'll take that step-by-step below. The command line you want is one of these:$
command
3>&2 2>&1 1>&3 | ...
$
var=`
command
3>&2 2>&1 1>&3`
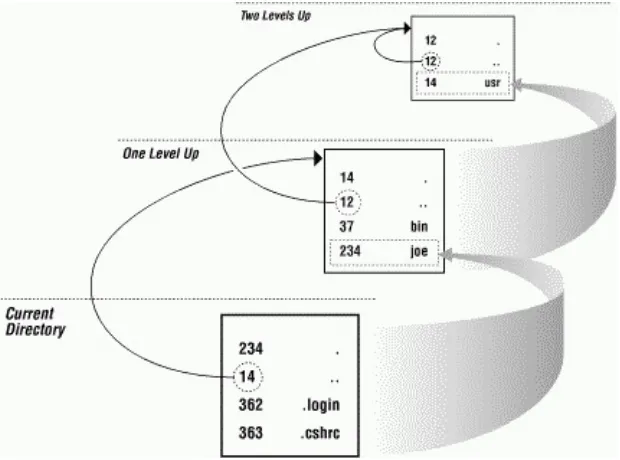
How does it work? Figure 36-3 through Figure 36-6 break the second command line (with the backquotes) into the same steps the shell follows as it rearranges the file descriptors. You can try these on your terminal, if you'd like. Each figure adds another n
>&
m operator and shows the location of each file descriptor after
that operator.Figure 36-3. File descriptors before redirection
The figures use a grep command reading two files. afone is readable, and grep
finds one matching line in it; the line is written to the standard output. bfoen is misspelled and so is not readable; grep writes an error message to the standard error. In each figure, you'll see the terminal output (if any) just after the variable-setting command with the backquotes. The text grabbed by the backquotes goes into the shell variable; the echo command shows that text.
Figure 36-5. File descriptors after 3>&2 2>&1 redirection
By Figure 36-6 the redirection is correct. Standard output goes to the screen, and standard error is captured by the backquotes.
Open files are automatically closed when a process exits, but it's safer to close the files yourself as soon as you're done with them. That way, if you forget and use the same descriptor later for something else (for instance, use F.D. 3 to redirect some other command, or a subprocess uses F.D. 3), you won't run into conflicts. Use m
<&-
to close input file descriptor m and m>&-
to close output file descriptor m. If you need to, you can close standard input with<&-
and standard output with>&-
.— JP
36.17 A Shell Can Read a Script from Its
Standard Input, but...
Q: What is the difference between
sh < file
andsh file
?A:The first way keeps the script from reading anything else from its input. Consider the stdin-demo script:
while read word
do
echo $word | sed s/foo/bar/
done
reading the script, there's no input left.
— CT
36.18 Shell Scripts On-the-Fly from Standard
Input
Section 36.17
The shell can read commands from its standard input or from a file. To run a series of commands that can change, you may want to use one program to create the command lines automatically — and pipe that program's output to a shell, which will run those "automatic" commands.
Here's an example.[1] You want to copy files from a subdirectory and all its subdirectories into a single directory. The filenames in the destination directory can't conflict; no two files can have the same name. An easy way to name the copies is to replace each slash (
/
) in the file's relative pathname with a minus sign (-
).[2] For instance, the file named lib/glob/aprog.c would be copied to a file named lib-glob-aprog.c. You can use sed (Section 34.2) to convert the filenames and output cp commands like these:cp
from
/lib/glob/aprog.c
to
/lib-glob-aprog.c
cp
from
/lib/glob/aprog.h
to
/lib-glob-aprog.h
...
However, an even better solution can be developed using nawk (Section 20.11). The following example uses find (Section 9.1) to make a list of pathnames, one per line, in and below the copyfrom directory. Next it runs nawk to create the destination file pathnames (like to
/lib-glob-aprog.c
) and write the completed command lines to the standard output. The shell reads the command lines from its standard input, through the pipe.#!/bin/sh
find copyfrom -type f -print |
awk '{
out = $0
gsub("/", "-", out)
sub("^copyfrom-", "copyto/", out)
print "cp", $0, out
}' |
sh
If you change the last line to
sh -v
, the shell's verbose option (Section 37.1) will show each command line before executing it. If the last line hassh -e
, the shell will quit immediately after any command returns a nonzero exit status (Section 35.12) — that might happen, for instance, if the disk fills up and cpcan't make the copy. Finally, you may need to use nawk rather than awk, depending on your system.
— JP
36.19 Quoted hereis Document Terminators: sh
Versus csh
When you need to quote your hereis document (Section 27.16) terminators, there's an annoying problem: sh and csh demand different conventions. If you are using sh, you must not quote the terminator. For example,
+#! /bin/sh
cat << 'eof'
Hi there.
eof
+#! /bin/csh
cat << \eof
Hi. You might expect this to be the only line, but it's not.
eof
'e'of
\eof
— CT
36.20 Turn Off echo for "Secret" Answers
When you type your password, Unix turns off echoing so what you type won't show on the screen. You can do the same thing in shell scripts with
stty
-echo
.stty
Section 5.7,read
Section 35.18+#!/bin/sh
...
trap 'stty echo; exit' 0 1 2 3 15
# use the right echo for your Unix:
echo "Enter code name: \c"
#echo -n "Enter code name: "
stty -echo
read ans
stty echo
...
The response is stored in
$ans
. The trap (Section 35.17) helps to make sure that, if the user presses CTRL-c to abort the script, characters will be echoed again.36.21 Quick Reference: expr
expr is a very handy tool in shell programming, since it provides the ability to evaluate a wide range of arithmetic, logical, and relational expressions. It evaluates its arguments as expressions and prints the result.
36.21.1 Syntax
Here's the syntax. The [brackets] mean "optional"; don't type the brackets:
expr
arg1 operator arg2[
operator arg3... ]
Arguments and operators must be separated by spaces. In many cases, an argument is an integer, typed literally or represented by a shell variable. There are three types of operators: arithmetic, relational, and logical.Exit status (Section 35.12) values for expr are 0 if the expression evaluates nonzero and non-null, 1 if the expression evaluates to 0 or null, and 2 if the expression is invalid.
Arithmetic operators
Use these to produce mathematical expressions whose results are printed:
+
Add arg2 to arg1.
-Subtract
arg2 from arg1.*
Multiply the arguments.
Divide arg1 by arg2.
%
Take the remainder when arg1 is divided by arg2 (modulus).
Addition and subtraction are evaluated last, unless they are grouped inside parentheses. The symbols
*
,(
, and)
have meaning to the shell, so they must be escaped (preceded by a backslash or enclosed in quotes).Relational operators
Use these to compare two arguments. Arguments can also be words, in which case comparisons assume a
<
z and A<
Z. If the comparisonstatement is true, expr writes 1 to standard output (Section 43.1); if false, it writes 0. The symbols
>
and<
must be escaped.=
Are the arguments equal?
!=
Are the arguments different?
>
Is arg1 greater than arg2?
>=
Is arg1 greater than or equal to arg2?
<
Is arg1 less than arg2?
Is arg1 less than or equal to arg2?
Logical operators
Use these to compare two arguments. Depending on the values, the result written to standard output can be arg1 (or some portion of it), arg2, or 0. The symbols
|
and&
must be escaped.|
Logical OR; if arg1 has a nonzero (and non-null) value, the output is
arg1; otherwise, the output is arg2.
&
Logical AND; if both arg1 and arg2 have a nonzero (and non-null) value, the output is arg1; otherwise, the output is 0.
:
Sort of like grep (Section 13.1); arg2 is a regular expression
(Section 32.4) to search for in arg1. If the arg2 pattern is enclosed
in
\( \)
, the output is the portion of arg1 that matches;otherwise, the output is simply the number of characters that match. A pattern match always applies to the beginning of the argument (the ^ symbol (Section 32.5) is assumed by default).
36.21.2 Examples
Division happens first; output is 10:
$
expr 5 + 10 / 2
Addition happens first; output is 7 (truncated from 7.5):
Add 1 to variable i; this is how variables are incremented in Bourne shell scripts:
i=`expr "$i" + 1`
Output 1 (true) if variable a is the string "hello":
$
expr "$a" = hello
Output 1 (true) if variable b plus 5 equals 10 or more:
$
expr "$b" + 5 \>= 10
In the examples below, variable p is the string "version.100". This command returns the number of characters in p:
$
expr "$p" : '.*'
Output is 11
Match all characters and print them:$
expr "$p" : '\(.*\)'
Output is "version.100"
Output the number of lowercase letters matched:$
expr "$p" : '[a-z]*'
Output is 7
Match a string of lowercase letters:$
expr "$p" : '\([a-z]*\)'
Output is "version"
Truncate$x
if it contains five or more characters; if not, just output$x
.(Logical OR uses the second argument when the first one is 0 or null, i.e., when the match fails.)
$
expr "$x" : '\(...\)' "$x"
36.22 Testing Characters in a String with expr
The expr (Section 36.21) command does a lot of different things with expressions. One expression it handles has three arguments: first, a string; second, a colon (:); third, a regular expression (Section 32.4). The string and regular expression usually need quotes.
expr can count the number of characters that match the regular expression. The regular expression is automatically anchored to the start of the string you're matching, as if you'd typed a
^
at the start of it in grep, sed, and so on. expr is usually run with backquotes (Section 28.14) to save its output:$
part="resistor 321-1234-00"
$
name="Ellen Smith"
...
$
expr "$part" : '[a-z ]*[0-9]'
...character position of first number
10
$
len=`expr "$name" : '[a-zA-Z]*'`
$
echo first name has $len characters
first name has 5 characters
When a regular expression matches some character(s), expr returns a zero ("true") exit status (Section 35.12). If you want a true/false test like this, throw away the number that expr prints and test its exit status:
/dev/null
Section 43.12$
if expr "$part" : '.*[0-9]' > /dev/null
>
then echo \$part has a number in it.
>
else echo "it doesn't"
>
fi
$part has a number in it.
36.23 Grabbing Parts of a String
How can you parse (split, search) a string of text to find the last word, the second column, and so on? There are a lot of different ways. Pick the one that works best for you — or invent another one! (Unix has lots of ways to work with strings of text.)
36.23.1 Matching with expr
The expr command (Section 36.21) can grab part of a string with a regular expression. The example below is from a shell script whose last command-line argument is a filename. The two commands below use expr to grab the last argument and all arguments except the last one. The
"$*"
gives expr a list of all command-line arguments in a single word. (Using "$@" (Section 35.20) here wouldn't work because it gives individually quoted arguments. expr needs all arguments in one word.)last=`expr "$*" : '.* \(.*\)'` # LAST ARGUMENT
first=`expr "$*" : '\(.*\) .*'` # ALL BUT LAST ARGUMENT
Let's look at the regular expression that gets the last word. The leading part of the expression,
.*
, matches as many characters as it can, followed by a space. This includes all words up to and including the last space. After that, the end of the expression,\(.*\)
, matches the last word.The regular expression that grabs the first words is the same as the previous one — but I've moved the
\( \)
pair. Now it grabs all words up to but notincluding the last space. The end of the regular expression,
.*
, matches the last space and last word — and expr ignores them. So the final.*
really isn't needed here (though the space is). I've included the final.*
because it follows from the first example.word in a string. And it's almost useless for handling more than one line of text at a time.
36.23.2 Using echo with awk or cut
awk can split lines into words, but it has a lot of overhead and can take some time to execute, especially on a busy system. The cut (Section 21.14) command starts more quickly than awk but it can't do as much.
Both those utilities are designed to handle multiple lines of text. You can tell awk
to handle a single line with its pattern-matching operators and its NR variable. You can also run those utilities with a single line of text, fed to the standard input through a pipe from echo. For example, to get the third field from a
colon-separated string:
string="this:is:just:a:dummy:string"
field3_awk=`echo "$string" | awk -F: '{print $3}'`
field3_cut=`echo "$string" | cut -d: -f3`
Let's combine two echo commands. One sends text to awk or cut through a pipe; the utility ignores all the text from columns 1-24, then prints columns 25 to the end of the variable text. The outer echo prints The answer is and that answer. Notice that the inner double quotes are escaped with backslashes to keep the Bourne shell from interpreting them before the inner echo runs:
echo "The answer is `echo \"$text\" | awk '{print substr($0,25)}'`"
echo "The answer is `echo \"$text\" | cut -c25-`"
36.23.3 Using set and IFS
The Bourne shell set (Section 35.25) command can be used to parse a single-line string and store it in the command-line parameters (Section 35.20)
"$@"
,control how the shell splits the string.
The formats used by stty and the behavior of IFS may vary from platform to platform.
By default, the IFS (internal field separator) shell variable holds three characters: SPACE, TAB, and NEWLINE. These are the places that the shell parses
command lines.
If you have a line of text — say, from a database — and you want to split it into fields, you can put the field separator into IFS temporarily, use the shell's set (Section 35.25) command to store the fields in command-line parameters, then restore the old IFS.
For example, the chunk of a shell script below gets current terminal settings from stty -g, which looks like this:
2506:5:bf:8a3b:3:1c:8:15:4:0:0:0:11:13:1a:19:12:f:17:16:0:0
In the next example, the shell parses the line returned from stty by the
backquotes (Section 28.14). It stores x in
$1
, which stops errors if stty fails for some reason. (Without the x, if stty made no standard output, the shell's setcommand would print a list of all shell variables.) Then 2506 goes into
$2
, 5into
$3
, and so on. The original Bourne shell can handle only nine parameters (through$9
); if your input lines may have more than nine fields, this isn't a good technique. But this script uses the Korn shell, which (along with most other Bourne-type shells) doesn't have that limit.#!/bin/ksh
oldifs="$IFS"
# Change IFS to a colon:
IFS=:
# Put x in $1, stty -g output in $2 thru ${23}:
set x `stty -g`
# Window size is in 16th field (not counting the first "x"):
echo "Your window has ${17} rows."
Because you don't need a subprocess to parse the output of stty, this can be faster than using an external command like cut (Section 21.14) or awk (Section
20.10).
There are places where IFS can't be used because the shell separates command lines at spaces before it splits at IFS. It doesn't split the results of variable
substitution or command substitution (Section 28.14) at spaces, though. Here's an example — three different ways to parse a line from /etc/passwd:
%
cat splitter
#!/bin/sh
IFS=:
line='larry:Vk9skS323kd4q:985:100:Larry Smith:/u/larry:/bin/tcsh'
set x $line
echo "case 1: \$6 is '$6'"
set x `grep larry /etc/passwd`
echo "case 2: \$6 is '$6'"
set x larry:Vk9skS323kd4q:985:100:Larry Smith:/u/larry:/bin/tcsh
echo "case 3: \$6 is '$6'"
%
./splitter
case 1: $6 is 'Larry Smith'
case 2: $6 is 'Larry Smith'
case 3: $6 is 'Larry'
Case 1 used variable substitution and case 2 used command substitution; the sixth field contained the space. In case 3, though, with the colons on the command line, the sixth field was split:
$6
became Larry and$7
was Smith. Another problem would have come up if any of the fields had been empty (as in36.23.4 Using sed
The Unix sed (Section 34.1) utility is good at parsing input that you may or may not otherwise be able to split into words, at finding a single line of text in a group and outputting it, and many other things. In this example, I want to get the percentage-used of the filesystem mounted on /home. That information is buried in the output of the df (Section 15.8) command. On my system,[3] df output looks like:
+%
df
Filesystem kbytes used avail capacity Mounted on
...
/dev/sd3c 1294854 914230 251139 78% /work
/dev/sd4c 597759 534123 3861 99% /home
...
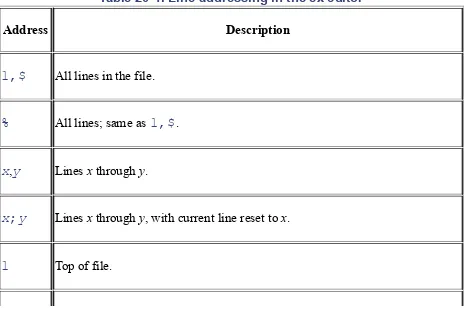
I want the number 99 from the line ending with /home. The sed address
/
\/home$/
will find that line (including a space before the /home makes sure the address doesn't match a line ending with /something/home). The -n option keeps sed from printing any lines except the line we ask it to print (with its pcommand). I know that the "capacity" is the only word on the line that ends with a percent sign (
%
). A space after the first.*
makes sure that.*
doesn't "eat" the first digit of the number that we want to match by[0-9]
. The sedescaped-parenthesis operators (Section 34.11) grab that number:
usage=`df | sed -n '/ \/home$/s/.* \([0-9][0-9]*\)%.*/\1/p'`
Combining sed with eval (Section 27.8) lets you set several shell variables at once from parts of the same line. Here's a command line that sets two shell variables from the df output:
eval `df |
sed -n '/ \/home$/s/^[^ ]* *\([0-9]*\) *\([0-9]*\).*/kb=\1 u=\2/p'`
uses sed's escaped parenthesis operators. They grab the "kbytes" and "used" columns from the df output. The right-hand side outputs the two df values with Bourne shell variable-assignment commands to set the kb and u variables. After
sed finishes, the resulting command line looks like this:
eval kb=597759 u=534123
Now
$kb
gives you 597759, and$u
contains 534123.— JP
36.24 Nested Command Substitution
Section 28.14 introduced command substitution with a pair of backquotes (
''
). Let's review. The shell runs a backquoted string as a command, then replaces the string with its output. Sometimes — though not as often — you'll want to use the results from one backquoted string as arguments to another command, itself also inside backquotes. To do that, you need to nest the backquotes to tell the shell which command (which set of backquotes) should be done first, with its output given to the second command. This is tricky with backquotes; the Korn shell introduced an easier way that you'll see below. Here's a simple example — the first command line uses nested backquotes, and the next two commands show its parts:[4]$
echo "Next year will be 200`expr \`date +%y\` + 1`."
Next year will be 2002.
$
date +%y
01
$
expr 01 + 1
2
The command to run first has escaped backquotes (
\'\'
) around it. In the example above, that's thedate +%y
command.date +%y
outputs the year — in this case,01
— and that value is passed to the expr command. exprecho, on its command line, and echo prints the message.
Why does the inner command, inside the escaped backquotes (
\'\'
), run first? It's because the backslash before the backquote turns off the special meaning (Section 27.12) of the backquote. When the shell first evaluates the command line, which backquotes does it see? It sees the unescaped backquotes, the ones around theexpr
command, and the shell runs the command:expr `date +%y` + 1
But when the shell evaluates that command line, it sees the backquotes in it (now unescaped) and runs that command —
date +%y
. Thedate +%y
command outputs
01
. Next, the shell can finish the commandexpr 01 +
1
. It outputs 2. Then the echo command can print its message.Whew. Most newer Bourne-type shells have an easier way: the
$(
command
)
operators. Use$(
before the command, where you would use an openingbackquote. Put the
)
after the command, in place of a closing backquote. You don't have to escape these operators when you nest them.Here's the previous example with
$( )
, then a more real-life example:2>&1
Section 36.16$
echo "Next year will be 200$(expr $(date +%y) + 1)."
Next year will be 2002.
$
tarout=$(tar cf /dev/rst1 $(find . -type f -mtime -1 -print) 2>&1)
time passes...
$
echo "$tarout"
tar: ./files/145923: Permission denied
Beginners (and some long-time programmers too) might argue that you should never nest command substitution because it's too confusing. I think there are times nesting is clearer. It's more compact and doesn't need temporary storage. And it's not that hard to understand once you see what's happening. There's another nice example in Section 24.16.
— JP
36.25 Testing Two Strings with One case
Statement
The shell's case statement (Section 35.10) has some advantages over the test command (Section 35.26) — for instance, case can do pattern matching. But
test has the -a and -o "and" and "or" operators; those don't seem easy to do with
case. And test isn't built in to some older shells, so using case may be faster. Here's a way to test two things with one case statement. It won't solve all your problems. If you think carefully about the possible values the variables you're testing can have, though, this might do the trick. Use a separator (delimiter) character between the two variables.
In the example below, I've picked a slash (
/
). You could use almost anycharacter that isn't used in case pattern matching (Section 35.11) and that won't be stored in either
$#
or$1
. The case below tests the command-line arguments of a script:case "$#/$1" in
1/-f) redodb=yes ;;
0/) ;;
*) echo "Usage: $0 [-f]" 1>&2; exit 1 ;;
esac
something is wrong; the third pattern matches, the script prints an error and exits.
Of course, you can do a lot more this way than just testing command-line arguments.
— JP
36.26 Outputting Text to an X Window
Unix has a lot of ways to output text from the command line into the terminal (or window) where a script is running. But there are times you'd like to pop open a new window (under the X Window System (Section 1.22)), give the user a message — and maybe let the user reply too. X comes with a standard client named xmessage that does this. It pops open a window like Figure 36-7 with a message, then waits for the user to click a button (possibly one of many) or press RETURN. For details, you can read the xmessage manual page. I'll show how I integrated xmessage into a shell script.
Figure 36-7. An xmessage window from xwrist
periodic breaks. The xwrist script uses xmessage to remind me (every 10 minutes) to take a break — and prints a fortune for me to read while I do. Let's look at two parts of the script. First, the script checks to see if the X
Window System DISPLAY environment variable (Section 35.5) is set; if not, it complains (with a message like
xwrist: DISPLAY: unset? I
only work under the X Window System
) and exits::
Section 36.6,${..?..}
Section 36.7: ${DISPLAY?"unset? I only work under the X Window System"}
After checking the command-line arguments and setting some shell variables, the script does its main work with an endless loop:
`
...
`Section 28.14while sleep $delay
do
if xmessage -nearmouse -geometry $geometry -title "$title" \
-buttons okay:1,quit:0 -default okay \
"`/usr/games/fortune | fmt $fmtarg`"
then exit 0
fi
done
The while loop (Section 35.15) is endless because sleep normally returns 0 (Section 35.12). As long as the user keeps clicking the okay button, a new
xmessage window will pop up again
$delay
seconds after the previous one. The xmessage command line is split into three pieces. It's run by an if statement (Section 35.13). On the second line,-buttons okay:1,quit:0
tellsxmessage to make the two buttons. If the user clicks the quit button, xmessage
returns 0 status and the if runs
exit 0
to end the script. Otherwise, xmessagereturns 1 (because the user clicked okay or pressed RETURN; the
-default
(Here's a fun enhancement, left as an exercise for you. Add a third button labeled
mail this that uses mail(1) to send you ($USER) an email copy of the current fortune. You'll need to change the if to a case statement (Section 35.10) that tests $? (Section 35.12).)
The last xmessage argument is the text to put on the screen. fmt (Section 21.2) reformats the output of fortune roughly to fit the window. (There's no fancy coding here to be sure that the text fits the window exactly; I just tweak the output width, set in the fmtarg variable, to match the window geometry, which is set in the geometry variable.) If you set the geometry to make a fairly wide
window, you may not need fmt at all.
— JP
36.27 Shell Lockfile
Here's an efficient and portable way to create a lockfile from a shell script.[5] It's also an interesting demonstration of the way that Unix umasks and file
permissions (Section 50.2) are handled.
A lockfile can be used when a particular program might be run more than once at the same time and you need to be sure that only one instance of the program can do something (modify some file, access a printer, etc.). To really do this right, the program needs to both test for the lockfile and create it (if it doesn't exist) in one atomic operation. If the test-and-set operation isn't atomic — for instance, if a program tests for the lock file in one command and then creates the lock file in the next command — there's a chance that another user's program could do its
test at the precise moment between the first program's (non-atomic) test and set operations. The technique in this article lets you make a lockfile atomically from a shell script.
Let's say you have a script called edmaster; it edits a master configuration file named config. To be sure that two users can't modify the config file at the same time, the first edmaster checks whether the lockfile exists. If the lockfile doesn't exist, edmaster creates it and modifies the config file. When it's done editing, it removes the lockfile. If someone tries to run a second edmaster process, it sees the lockfile from the first edmaster, waits, and checks every few seconds to see if the lockfile is gone. Once the first edmaster removes the lockfile, the second
edmaster can create the lockfile and do its editing of config. (Note that some editors — for instance, nvi-1.79 under Linux — automatically get a write and/or read lock before you to edit a file.)
Here are pieces of a script that check the lock, create it, and (later) remove it:
2>
Section 36.16,/dev/null
Section 43.12,set
Section 35.25# set name of this program's lockfile:
myname=`basename $0`
LOCKFILE=/tmp/lock.$myname
...
# Loop until we get a lock:
until (umask 222; echo $$ >$LOCKFILE) 2>/dev/null # test & set
do
# Optional message - show lockfile owner and creation time:
set x `ls -l $LOCKFILE`
echo "Waiting for user $4 (working since $7 $8 $9)..."
sleep 5
done
# Do whatever we need exclusive access to do...
...
If another user tried to run edconfig, and jpeek had run edconfig first, she might see:
%
edconfig
Waiting for user jpeek (working since Aug 23 14:05)...
...a 5-second pause
Waiting for user jpeek (working since Aug 23 14:05)...
another 5-second pause...
...then jpeek finishes and she can edit the file.
How does it work? Almost all the action is in the first line of the loop. A umask of 222 creates files that are read-only (mode
r--r--r--
). Because theumask 222 command is run in a subshell (Section 24.4), it affects only the lockfile that's created in the subshell at the top of the loop. The rest of the shell script keeps its normal umask. And if the redirection fails (because the lock file exists), only the subshell will abort — not the parent shell running the script. If the lockfile already exists (because another process has created it), the loop executes
sleep 5
; five seconds later, it tries to create the lock. If the lockfile exists, it will be read-only — so the commandecho $$ >$LOCKFILE
will return a nonzero status. A nonzero status is what keeps an until loop (Section 35.15) running. Once the other process (which has the lock) removes the lockfile, the echo command in the subshell writes the shell's process ID number into the lockfile, and the until loop terminates.But if the lockfile is read-only, how can it ever be created? That's the other interesting part of this technique. The umask applies to the file only as it's created; if the file doesn't exist, the umask doesn't apply to it (yet) and the file can be created. In fact, you can create a file with mode 000 by typing: