iOS 4 Programming Cookbook
iOS 4 Programming Cookbook by Vandad Nahavandipoor
Copyright © 2011 Vandad Nahavandipoor. All rights reserved. Printed in the United States of America.
Published by O’Reilly Media, Inc., 1005 Gravenstein Highway North, Sebastopol, CA 95472.
O’Reilly books may be purchased for educational, business, or sales promotional use. Online editions are also available for most titles (http://my.safaribooksonline.com). For more information, contact our corporate/institutional sales department: (800) 998-9938 or [email protected].
Editors: Andy Oram and Brian Jepson Production Editor: Kristen Borg Copyeditor: Audrey Doyle Proofreader: Andrea Fox Production Services: Molly Sharp
Indexer: Fred Brown
Cover Designer: Karen Montgomery Interior Designer: David Futato Illustrator: Robert Romano
Printing History:
January 2011: First Edition.
Nutshell Handbook, the Nutshell Handbook logo, and the O’Reilly logo are registered trademarks of O’Reilly Media, Inc. iOS 4 Programming Cookbook, the image of an Egyptian mongoose, and related trade dress are trademarks of O’Reilly Media, Inc.
Many of the designations used by manufacturers and sellers to distinguish their products are claimed as trademarks. Where those designations appear in this book, and O’Reilly Media, Inc., was aware of a trademark claim, the designations have been printed in caps or initial caps.
While every precaution has been taken in the preparation of this book, the publisher and author assume no responsibility for errors or omissions, or for damages resulting from the use of the information con-tained herein.
TM
This book uses RepKover™, a durable and flexible lay-flat binding.
Table of Contents
Preface . . . xi
1. Working with Objects . . . 1
1.1 Implementing and Using Custom Objects 2
1.2 Allocating and Initializing Objects 6
1.3 Defining Two or More Methods with the Same Name
in an Object 8
1.4 Defining and Accessing Properties 11
1.5 Managing Properties Manually 13
1.6 Reusing a Block of Code 16
1.7 Communicating with Objects 19
1.8 Invoking the Selectors of an Object Dynamically 25
1.9 Managing Memory with the iOS SDK 27
1.10 Managing Untyped Objects 29
2. Implementing Controllers and Views . . . 31
2.1 Getting and Using the Application Delegate 31
2.2 Managing the Views in Your Application 33
2.3 Creating Your Application’s GUI 35
2.4 Making Your View Controller Available at Runtime 37
2.5 Using a View in Your Application’s GUI 39
2.6 Managing Master-Detail Views 41
2.7 Managing Multiple Views 48
2.8 Incorporating and Using Models in the GUI 50
2.9 Implementing Navigation Bars 54
2.10 Switching from One View to Another 61
2.11 Setting the Title on a Navigation Bar 62
2.12 Displaying an Image for the Title of the Navigation Bar 63
2.13 Creating and Managing Buttons on a Navigation Bar 64
2.15 Manipulating a Navigation Controller’s Array of
View Controllers 70
2.16 Incorporating a Tab Bar into Your Application 71
2.17 Pop Up Additional Information over iPad UI Elements 74
3. Constructing and Using Table Views . . . 87
3.1 Creating a Table View Using Interface Builder 87
3.2 Creating a Table View Using Code 89
3.3 Assigning an Event Handler to a Table View Using
Interface Builder 90
3.4 Assigning an Event Handler to a Table View Using Xcode 92
3.5 Populating a Table View with Data 94
3.6 Receiving and Handling Table View Events 99
3.7 Using Different Types of Accessories in a Table View 100
3.8 Creating Custom Table View Accessories 103
3.9 Customizing the Appearance of a Table View’s Contents 105
3.10 Displaying Hierarchical Data 110
3.11 Effectively Managing Memory with Table Views 112
3.12 Editing and Moving Data in a Table View 115
3.13 Enabling Swipe Deletion 124
3.14 Grouping Data 127
4. Core Location and Maps . . . 141
4.1 Creating a Map Using Interface Builder 142
4.2 Creating a Map Using Code 143
4.3 Handling the Events of a Map 146
4.4 Pinpointing a Device’s Location 147
4.5 Displaying Built-in Pins on a Map View 151
4.6 Displaying Pins with Different Colors on a Map View 154
4.7 Creating and Displaying Custom Pins on a Map View 160
4.8 Retrieving Meaningful Addresses Using Spatial Coordinates 163
4.9 Retrieving Spatial Coordinates Using Meaningful Addresses 165
5. Implementing Gesture Recognizers . . . 173
5.1 Detecting Swipe Gestures 175
5.2 Reacting to Rotation Gestures 177
5.3 Detecting Panning and Dragging Gestures 185
5.4 Detecting Long Press Gestures 188
5.5 Responding to Tap Gestures 191
5.6 Responding to Pinch Gestures 194
6. Networking and XML . . . 197
6.2 Parsing an XML File into Objects 204
6.3 Downloading Files Synchronously 213
6.4 Downloading Files Asynchronously 215
6.5 Reading and Parsing Remote XML Files 218
6.6 Caching Files in Memory 228
6.7 Caching Files on Disk 233
7. Operations, Threads, and Timers . . . 251
7.1 Running Tasks Synchronously 253
7.2 Running Tasks Asynchronously 261
7.3 Creating a Dependency Between Tasks 269
7.4 Performing a Task After a Delay 272
7.5 Performing Periodic Tasks 273
7.6 Performing Periodic Tasks Efficiently 278
7.7 Initializing Threads Implicitly 284
7.8 Exiting Threads and Timers 285
7.9 Avoiding Memory Leaks in Threads 288
8. Audio and Video . . . 293
8.1 Playing Audio Files 293
8.2 Handling Interruptions While Playing Audio Files 297
8.3 Recording Audio Files 298
8.4 Handling Interruptions While Recording Audio Files 305
8.5 Playing Audio over Other Sounds That Are Playing 307
8.6 Playing Video Files 311
8.7 Capturing Thumbnails from a Video File Asynchronously 315
8.8 Accessing the iPod Library in Response to a User Request 319
9. Address Book . . . 327
9.1 Accessing the Address Book 328
9.2 Retrieving All the People in the Address Book 331
9.3 Retrieving Properties of Address Book Entries 332
9.4 Inserting a Person Entry in the User’s Address Book 336
9.5 Inserting a Group Entry in the User’s Address Book 339
9.6 Adding Persons to Groups 341
9.7 Searching in the Address Book 344
9.8 Retrieving and Setting a Person’s Address Book Image 350
10. Camera and the Photo Library . . . 357
10.1 Detecting and Probing the Camera 359
10.2 Taking Photos with the Camera 364
10.3 Taking Videos with the Camera 368
10.5 Storing Videos in the Photo Library 375
10.6 Retrieving Photos and Videos from the Photo Library 378
10.7 Retrieving Assets from the Assets Library 380
10.8 Editing Videos on an iOS Device 388
11. Multitasking . . . 399
11.1 Detecting the Availability of Multitasking 401
11.2 Completing a Long-Running Task in the Background 402
11.3 Receiving Local Notifications in the Background 407
11.4 Playing Audio in the Background 415
11.5 Handling Location Changes in the Background 419
11.6 Saving and Loading the State of a Multitasking iOS Application 424
11.7 Handling Network Connections in the Background 430
11.8 Handling Notifications Delivered to a Waking Application 435
11.9 Handling Locale Changes in the Background 438
11.10 Responding to Changes in an Application’s Settings 440
11.11 Opting Out of Background Execution 442
12. Core Data . . . 445
12.1 Creating a Core Data Model with Xcode 447
12.2 Creating and Using Core Data Model Classes 451
12.3 Creating and Saving Data Using Core Data 453
12.4 Loading Data Using Core Data 456
12.5 Deleting Data Using Core Data 458
12.6 Sorting Data Using Core Data 477
12.7 Boosting Data Access in Table Views 480
12.8 Implementing Relationships with Core Data 492
13. Event Kit . . . 499
13.1 Retrieving the List of Calendars 502
13.2 Adding Events to Calendars 504
13.3 Accessing the Contents of Calendars 507
13.4 Removing Events from Calendars 512
13.5 Adding Recurring Events to Calendars 523
13.6 Retrieving the Attendees of an Event 528
13.7 Adding Alarms to Calendars 534
13.8 Handling Event Changed Notifications 537
13.9 Presenting Event View Controllers 540
13.10 Presenting Event Edit View Controllers 546
14. Graphics . . . 551
14.1 Drawing Basic Shapes on a Graphics Context 552
14.3 Drawing Images on a Graphics Context 561
14.4 Capturing the Screen Contents into an Image 563
14.5 Drawing Text with Core Graphics 568
15. Core Motion . . . 573
15.1 Detecting the Availability of an Accelerometer 574
15.2 Detecting the Availability of a Gyroscope 577
15.3 Retrieving Accelerometer Data 578
15.4 Detecting a Shake on an iOS Device 584
15.5 Retrieving Gyroscope Data 590
Preface
I started developing iPhone applications in late 2007. Between then and now, I have worked on various iPhone OS applications for different companies across the globe. As you might have already guessed, iOS is my favorite platform and Objective-C is my favorite programming language. I find that Objective-C helps programmers write clean code and iOS helps developers write user-friendly and useful applications.
I have coded in other programming languages such as Assembly (using NASM and TASM) and Delphi/Pascal for many years, and I still find myself going through disas-sembled Objective-C code to find out which method of doing a certain thing or accomplishing a certain result in Objective-C is better optimized on a certain device and/or operating system.
After becoming comfortable with the iOS SDK, I gradually built up a thirst to write a book about the iOS SDK, and with the help of wonderful people at O’Reilly, you are now reading the result of the several hundred hours that have been put into writing new material for iOS 3 and iOS 4, editing, reviewing, revising, and publishing. So, please go ahead and start exploring the recipes. I hope you’ll find that they are easy to cook and digest!
Audience
I assume you are comfortable with the iOS development environment and know how to create an app for the iPhone or iPad. This book does not get novice programmers started, but presents useful ways to get things done for iOS programmers ranging from novices to experts.
Organization of This Book
Here is a concise breakdown of the material each chapter covers:
Chapter 1, Working with Objects
Explains how Objective-C classes are structured and how objects can be instanti-ated. The chapter talks about properties and delegates as well as memory man-agement in Objective-C. Even if you are competent in Objective-C, I strongly suggest that you go through this chapter, even if you are skimming through it, to understand the basic material that is used in the rest of the chapters.
Chapter 2, Implementing Controllers and Views
Describes various approaches to constructing your iOS application’s user interface by taking advantage of different tools the SDK provides. This chapter also intro-duces you to features that are only available on the iPad, such as the popover and split view controllers.
Chapter 3, Constructing and Using Table Views
Shows how you can work with table views to create professional-looking iOS applications. Table views are very dynamic in nature, and as a result, programmers sometimes have difficulty understanding how they should work with them. By reading this chapter and having a look at and trying out the example code, you will gain the knowledge that is required to comfortably work with table views.
Chapter 4, Core Location and Maps
Describes how you should use Map Kit and Core Location APIs to develop location-aware iOS applications. First you will learn about maps, and then you will learn how to detect a device’s location and tailor your maps with custom annota-tions. You will also learn about geocoding and reverse geocoding, as well as some of the methods of the Core Location framework, which are only available in the iOS 4 SDK and later.
Chapter 5, Implementing Gesture Recognizers
Demonstrates how to use gesture recognizers, which enable your users to easily and intuitively manipulate the graphical interface of your iOS applications. In this chapter, you will learn how to use all available gesture recognizers in the iOS SDK, with working examples tested on iOS 3 and iOS 4 on different devices such as the iPhone 3GS, iPhone 4, and iPad.
Chapter 6, Networking and XML
Demonstrates how to download data from a URL and parse XML files. You will learn about synchronous and asynchronous connections and their pros and cons. You will also learn about caching files in memory and on disk to avoid consuming the possibly limited bandwidth of an iOS device on which your application could be running.
Chapter 7, Operations, Threads, and Timers
you will learn about operations and operation queues, and how to avoid imple-menting your own threads and instead let iOS do it for you.
Chapter 8, Audio and Video
Discusses the AV Foundation and Media Player frameworks that are available on the iOS SDK. You will learn how to play audio and video files and how to handle interruptions, such as a phone call, while the audio or video is being played on both iOS 3 and iOS 4. This chapter also explains how to record audio using an iOS device’s built-in microphone(s). At the end of the chapter, you will learn how to access the iPod Library and play its media content, all from inside your application.
Chapter 9, Address Book
Explains the Address Book framework and how to retrieve contacts, groups, and their information from the Address Book database on an iOS device. The Address Book framework is composed entirely of C APIs. Because of this, many Objective-C developers find it difficult to use this framework compared to frameworks that provide an Objective-C interface. After reading this chapter and trying the exam-ples for yourself, you will feel much more confident using the Address Book framework.
Chapter 10, Camera and the Photo Library
Demonstrates how you can determine the availability of front- and back-facing cameras on an iOS device. Some of the recipes in this chapter are specific to iOS 4, with the rest working on both iOS 3 and iOS 4. You will also learn how to access the Photo Library using the Assets Library framework which is available in iOS 4 and later. At the end of the chapter, you will learn about editing videos right on an iOS device using a built-in view controller.
Chapter 11, Multitasking
Explains, with examples, how to create multitasking-aware applications that run beautifully on iOS 4. You will learn about background processing, from playing audio and retrieving users’ locations in the background, to downloading content from a URL while your application is running in the background.
Chapter 12, Core Data
Describes how to maintain persistent storage for your iOS applications using Core Data. You will learn how to add to, delete from, and edit Core Data objects and how to boost access to data in a table view. In addition, you will learn how to manage relationships between Core Data objects.
Chapter 13, Event Kit
Chapter 14, Graphics
Introduces the Core Graphics framework. You will learn how to draw images and text on a graphics context, grab the contents of a graphics context and save it as an image, and much more.
Chapter 15, Core Motion
Explains the Core Motion framework, which is new in iOS 4. Using Core Motion, you will access the accelerometer and the gyroscope on an iOS device. You will also learn how to detect shakes on a device. Of course, not all iOS devices are equipped with an accelerometer and a gyroscope, so you will also learn how to detect the availability of the required hardware.
Additional Resources
From time to time, I refer to official Apple documentation. Some of Apple’s descriptions are right on the mark, and there is no point in trying to restate them. Throughout this book, I have listed the most important documents and guides in the official Apple documentation that every professional iOS developer should read.
For starters, I suggest that you have a look at the “iPhone Human Interface Guidelines” and the “iPad Human Interface Guidelines.” These two documents will tell you every-thing you should know about developing engaging and intuitive user interfaces for the iPhone/iPod and the iPad. Every iOS programmer must read these documents. In fact, I believe these documents must be read by the product design and development teams of any company that develops iOS applications.
iPhone Human Interface Guidelines
http://developer.apple.com/library/ios/#documentation/userexperience/conceptual/ mobilehig/Introduction/Introduction.html
iPad Human Interface Guidelines
https://developer.apple.com/library/ios/#documentation/General/Conceptual/iPad HIG/Introduction/Introduction.html
I also suggest that you skim through the “iOS Application Programming Guide” in the iOS Reference Library for some tips and advice on how to make great iOS applications:
https://developer.apple.com/library/ios/#documentation/iPhone/Conceptual/iPho neOSProgrammingGuide/Introduction/Introduction.html
One of the things you will notice when reading Chapter 11 is the use of block objects. This book concisely explains block objects, but if you require further details on the subject, I suggest you read “A Short Practical Guide to Blocks,” available at this URL:
In Chapter 7, you will learn about operations. To be able to implement custom oper-ations, as you will see later, you must have a basic knowledge of key-value coding (KVC). If you require more information about KVC, I recommend that you read the “Key-Value Coding Programming Guide,” available at the following URL:
https://developer.apple.com/library/ios/#documentation/Cocoa/Conceptual/KeyVa lueCoding/KeyValueCoding.html
Throughout this book, you will see references to “bundles” and loading images and data from bundles. You will read a concise overview about bundles in this book, but if you require further information, head over to the “Bundle Programming Guide,” avail-able at this URL:
https://developer.apple.com/library/ios/#documentation/CoreFoundation/Conceptu al/CFBundles/Introduction/Introduction.html
Conventions Used in This Book
The following typographical conventions are used in this book:
Italic
Indicates new terms, URLs, filenames, file extensions, and directories
Constant width
Indicates variables and other code elements, the contents of files, and the output from commands
Constant width bold
Highlights text in examples that is new or particularly significant in a recipe
Constant width italic
Shows text that should be replaced with user-supplied values
This icon signifies a tip, suggestion, or general note.
Using Code Examples
This book is here to help you get your job done. In general, you may use the code in this book in your programs and documentation. You do not need to contact us for permission unless you’re reproducing a significant portion of the code. For example, writing a program that uses several chunks of code from this book does not require
permission. Selling or distributing a CD-ROM of examples from O’Reilly books does
code does not require permission. Incorporating a significant amount of example code
from this book into your product’s documentation does require permission.
We appreciate, but do not require, attribution. An attribution usually includes the
title, author, publisher, and ISBN. For example: “iOS 4 Programming Cookbook, by
Vandad Nahavandipoor (O’Reilly). Copyright 2011 Vandad Nahavandipoor, 978-1-449-38822-5.”
If you feel your use of code examples falls outside fair use or the permission given here, feel free to contact us at [email protected].
We’d Like to Hear from You
Every example and code snippet in this book has been tested on the iPhone 4, iPad, iPhone 3GS, and iPhone/iPad Simulator, but occasionally you may encounter problems—for example, if you have a different version of the SDK than the version on which the example code was compiled and tested. The information in this book has also been verified at each step of the production process. However, mistakes and over-sights can occur, and we will gratefully receive details of any you find, as well as any suggestions you would like to make for future editions. You can contact the author and editors at:
O’Reilly Media, Inc.
1005 Gravenstein Highway North Sebastopol, CA 95472
(800) 998-9938 (in the United States or Canada) (707) 829-0515 (international or local)
(707) 829-0104 (fax)
We have a web page for this book, where we list errata, examples, and any additional information. You can access this page at:
http://oreilly.com/catalog/9781449388225
There is also a companion website to this book where you can see all the examples with color-highlighted syntax:
http://www.ios4cookbook.com
To comment or ask technical questions about this book, send email to the following address, mentioning the book’s ISBN number (9781449388225):
For more information about our books, conferences, Resource Centers, and the O’Reilly Network, see our website at:
Safari® Books Online
Safari Books Online is an on-demand digital library that lets you easily search more than 7,500 technology and creative reference books and vid-eos to find the answers you need quickly.
With a subscription, you can read any page and watch any video from our library online. Read books on your cell phone and mobile devices. Access new titles before they are available for print, and get exclusive access to manuscripts in development and post feedback for the authors. Copy and paste code samples, organize your favorites, down-load chapters, bookmark key sections, create notes, print out pages, and benefit from tons of other time-saving features.
O’Reilly Media has uploaded this book to the Safari Books Online service. To have full digital access to this book and others on similar topics from O’Reilly and other pub-lishers, sign up for free at http://my.safaribooksonline.com.
Acknowledgments
I have always loved writing and running my programs on computers. I look at pro-gramming as a way to speak to whatever computer the program runs on. To me, programming is a way to actually connect with the computer and give it instructions and listen to what it says in return.
I have been exceptionally lucky to have almost always found the right people to help me find the right path in whatever journey I’ve started in my life. First and foremost, I would like to thank my beloved fiancée, Agnieszka Marta Dybowska, for her uncon-ditional love and support throughout the years and for the many hours she had to spend without me while I was working on this book. Your strong enthusiasm for writing and journalism has greatly moved me, and I sincerely hope that one day you will gather enough material to be able to write your book.
I also want to thank Brian Jepson (whose many hidden talents are yet to be discovered!) for giving me a chance to work on this book. This book would have been impossible if it wasn’t for Brian’s consistent urge to improve the outline and the table of contents that I originally sent him. This reminds me to thank Andy Oram, whom I would like to call the virtual second writer of this book. Andy’s perfectionism and his undeniable desire to finely form every single sentence you read in this book are absolutely impres-sive. I must also thank Sarah Kim and Rachel James for helping me update my profile page on O’Reilly’s website. I also appreciate Meghan Blanchette’s help in doing the initial paperwork for this book.
support. Thanks to Kirk for believing that I was up to the challenge of working on some high-profile iOS applications. Thank you to Gary for his support while I worked on this project, and for being a wonderful mentor.
CHAPTER 1
Working with Objects
1.0 Introduction
Objective-C, the language in which you program the iOS SDK, is an object-oriented programming language. We create, use, work with, and extend objects; we construct them, customize them to our specific needs, and destroy them when they are no longer needed. Object-oriented programming languages also work with primary data types such as integers, strings, and enumerations. However, the distinctive feature of such languages is their ability to create and manage the lifetime of objects during execution.
Objects are defined in classes, and therefore these two terms are commonly used inter-changeably. But actually, a class is just a specification for defining objects; each object is said to be an instance of its class. Each class—and therefore the objects that are created from that class—is a set of properties, tasks and methods, enumerations, and much more. In an object-oriented programming language, objects can inherit from each other much like a person can inherit certain traits and characteristics from his parents.
Objective-C does not allow multiple inheritance. Therefore, every object is the direct descendant of, at most, one other object.
The root class of most Objective-C objects is the NSObject class. This class manages the
runtime capabilities offered by iOS; as a result, any class that directly or indirectly inherits from NSObject will inherit these capabilities as well. As we will see later in this chapter, objects that inherit from NSObject can take advantage of Objective-C’s
1.1 Implementing and Using Custom Objects
Problem
You want to create a unique Objective-C class because none of the classes in the frame-works shipped with the iOS SDK offers the methods and properties you need.
Solution
Follow these steps:
1. In Xcode, while your project is open, choose the group (on the lefthand side of the screen) where you would like to create a new Objective-C class. This is normally the Classes group.
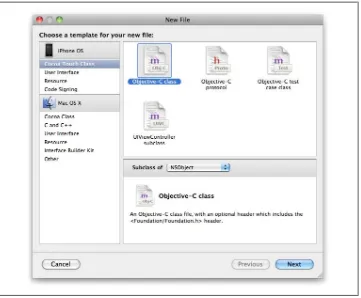
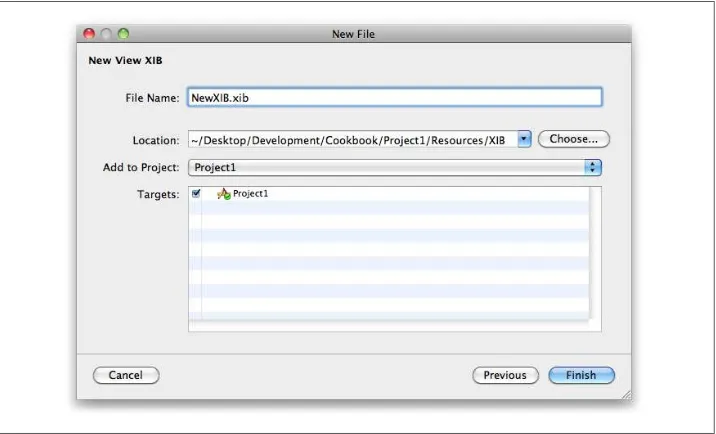
2. Select File→New File in Xcode. You will be presented with a dialog similar to that shown in Figure 1-1.
3. In the New File dialog, make sure Cocoa Touch Class is chosen on the lefthand side of the screen. Choose the Objective-C Class item on the righthand side of the New File dialog, and make sure NSObject is selected in the “Subclass of” drop-down
menu. Click Next, as shown in Figure 1-1.
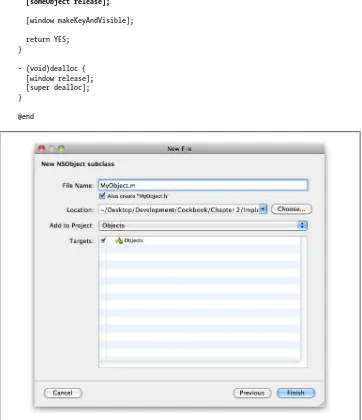
4. Choose the name of the new class you are about to create and where it has to be
stored. Make sure you enter MyObject.m in the File Name box and that the “Also
create ‘MyObject.h’” checkbox is checked, as shown in Figure 1-2. In this dialog, you can also manage which project target your new class file will be added to. 5. Click Finish in the New File dialog.
Discussion
Figure 1-1. The New File dialog
After you click Finish, Xcode will create the new class in the currently selected location in the project hierarchy:
#import <Foundation/Foundation.h>
@interface MyObject : NSObject {
}
@end
As you can see, the MyObject object inside the MyObject class file inherits from NSObject. Now you can import this class into your other class files and instantiate an
object of type MyObject:
#import "ObjectsAppDelegate.h" #import "MyObject.h"
@implementation ObjectsAppDelegate
- (BOOL) application:(UIApplication *)application didFinishLaunchingWithOptions:(NSDictionary *)launchOptions {
MyObject *someObject = [[MyObject alloc] init];
/* Do something with the object, call some methods, etc. */
[someObject release];
[window makeKeyAndVisible];
return YES; }
- (void)dealloc { [window release]; [super dealloc]; }
@end
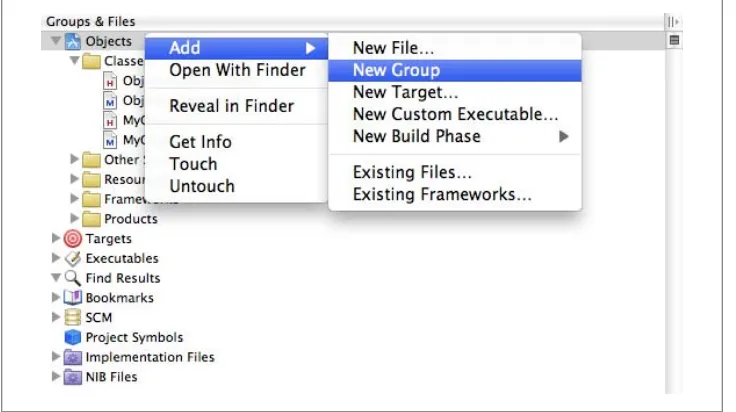
I am a big supporter of writing reusable code. In other words, I try to avoid writing the same line of code twice, if possible. Sometimes you have to write code here and there that feels like repeated code. But if you believe a block of code can be reused, you can put it in an object and keep it in a separate project. After you have built up a library of reusable code, you will want to, at some point, reuse that code in your new projects. In such cases, it’s best to keep your reusable code in one place and refer to it in your Xcode project instead of duplicating that code by copying it into your new project. To reuse that code, you can create a new group in Xcode by right-clicking on your
project in Xcode and choosing Add→New Group, as shown in Figure 1-3. You can then
give this new virtual folder or group a name, such as “Shared Libraries” or “Shared Code.” Once you are done, locate your reusable code in the Finder and drag and drop it into the Shared Libraries group in Xcode. This way, Xcode will create the required paths so that you can instantiate new objects of your reusable classes.
Figure 1-3. Creating a new group or virtual folder in Xcode
Creating a new group does not create the corresponding folder in the filesystem.
See Also
1.2 Allocating and Initializing Objects
Problem
You want to create an instance of a new object, but you don’t understand the difference
between allocation and initialization and why you should have to both allocate and
initialize an object before you can use it.
Solution
You must both allocate and initialize an object before using it. An object must be
al-located using the alloc instance method. This class method will allocate memory to
hold the object and its instance variables and methods. Each object must have one designated initializer, which is normally the initialization method with the most pa-rameters. For instance, the initWithFrame: method is the designated initializer of
objects of type UIView. Always allocate and initialize your objects, in that order, before
using them.
When implementing a new object, do not override the alloc method. This method is
declared in NSObject. Instead, override the init method and create custom initialization
methods that handle required parameters for the specific object you are working on.
Discussion
An object that inherits from NSObject must be prepared for use in two steps: 1. Allocation
2. Initialization
The allocation is done by invoking the alloc method, which is implemented in the
NSObject class. This method creates the internal structure of a new object and sets all instance variables’ values to zero. After this step is done, the init method takes care of
setting up the default values of variables and performing other tasks, such as instanti-ating other internal objects.
Let’s look at an example. We are creating a class named MyObject. Here is the .h file:
#import <Foundation/Foundation.h>
@interface MyObject : NSObject {
}
- (void) doSomething;
The implementation of this class is as follows (the .m file):
#import "MyObject.h"
@implementation MyObject
- (void) doSomething{
/* Perform a task here */ NSLog(@"%s", __FUNCTION__);
}
@end
The doSomething instance method of the MyObject object will attempt to print the name
of the current function to the console window. Now let’s go ahead and invoke this method by instantiating an object of type MyObject:
MyObject *someObject = [[MyObject alloc] init];
/* Do something with the object, call some methods, etc. */ [someObject doSomething];
[someObject release];
This code will work absolutely fine. Now try to skip initializing your object:
MyObject *someObject = [MyObject alloc];
/* Do something with the object, call some methods, etc. */
[someObject doSomething]; [someObject release];
If you run this code now, you will realize that it works absolutely fine, too. So, what has happened here? We thought we had to initialize the object before we could use it. Perhaps Apple can explain this behavior better:
An object isn’t ready to be used until it has been initialized. The init method defined in the NSObject class does no initialization; it simply returns self.
Simply put, this means the init method is a placeholder for tasks that some classes
need to perform before they are used, such as setting up extra data structures or opening
files. NSObject itself—along with many of the classes you will use—does not have to
initialize anything in particular. However, it is a good programming practice to always run the init method of an object after allocating it in case the parent of your class has
overridden this method to provide a custom initialization. Please bear in mind that the return value for initializer methods of an object is of type id, so the initializer method might even return an object that is not the same object that the alloc method returned
to you. This technique is called Two-Stage Creation and is extremely handy. However,
discussing this technique is outside the scope of this book. For more information about
Two-Stage Creation, please refer to Cocoa Design Patterns by Erik M. Buck and Donald
1.3 Defining Two or More Methods with the Same Name
in an Object
Problem
You would like to implement two or more methods with the same name in one object. In object-oriented programming, this is called method overloading. However, in Objective-C, method overloading does not exist in the same way as it does in other programming languages such as C++.
The techniques used and explained in this recipe’s Solution and Dis-cussion are merely ways to create methods that have different numbers of parameters or have parameters with different names, just to give you an idea of how you can have methods whose first name segments are the same.
Solution
Use the same name for your method, but keep the number and/or the names of your
parameters different in every method:
- (void) drawRectangle{
[self drawRectangleInRect:CGRectMake(0.0f, 0.0f, 4.0f, 4.0f)];
}
- (void) drawRectangleInRect:(CGRect)paramInRect{
[self drawRectangleInRect:paramInRect
withColor:[UIColor blueColor]];
}
- (void) drawRectangleInRect:(CGRect)paramInRect withColor:(UIColor*)paramColor{
[self drawRectangleInRect:paramInRect withColor:paramColor andFilled:YES];
}
/* Draw the rectangle here */
}
Discussion
Method overloading is a programming language feature supported by Objective-C, C++, Java, and a few other languages. Using this feature, programmers can create different methods with the same name, in the same object. However, method over-loading in Objective-C differs from that which can be used in C++. For instance, in C++, to overload a method the programmer needs to assign a different number of parameters to the same method and/or change a parameter’s data type.
In Objective-C, however, you simply change the name of at least one parameter. Changing the type of parameters will not work:
- (void) method1:(NSInteger)param1{
/* We have one parameter only */
}
- (void) method1:(NSString *)param1{
/* This will not compile as we already have a
method called [method1] with one parameter */
}
Changing the return value of these methods will not work either:
- (int) method1:(NSInteger)param1{
/* We have one parameter only */ return(param1);
}
- (NSString *) method1:(NSString *)param1{
/* This will not compile as we already have a method called [method1] with one parameter */ return(param1);
}
As a result, you need to change the number of parameters or the name of (at least) one parameter that each method accepts. Here is an example where we have changed the number of parameters:
- (int) method1:(NSInteger)param1{
return(param1);
- (NSString*) method1:(NSString *)param1 andParam2:(NSString *)param2{
NSString *result = param1;
if (param1 != nil && param2 != nil){
result = [result stringByAppendingString:param2]; }
return(result);
}
Here is an example of changing the name of a parameter:
- (void) drawCircleWithCenter:(CGPoint)paramCenter radius:(CGFloat)paramRadius{
/* Draw the circle here */
}
- (void) drawCircleWithCenter:(CGPoint)paramCenter Radius:(CGFloat)paramRadius{
/* Draw the circle here */
}
Can you spot the difference between the declarations of these two methods? The first method’s second parameter is called radius (with a lowercase r) whereas the second
method’s second parameter is called Radius (with an uppercase R). This will set these two methods apart and allows your program to get compiled. However, Apple has guidelines for choosing method names as well as what to do and what not to do when constructing methods. For more information, please refer to the “Coding Guidelines for Cocoa” Apple documentation available at this URL:
http://developer.apple.com/iphone/library/documentation/Cocoa/Conceptual/Co dingGuidelines/CodingGuidelines.html
Here is a concise extract of the things to look out for when constructing and working with methods:
• Have your method names describe what the method does clearly, without using too much jargon and abbreviations. A list of acceptable abbreviations is in the Coding Guidelines.
• Have each parameter name describe the parameter and its purpose. On a method
with exactly three parameters, you can use the word and to start the name of the
• Start method names with a lowercase letter.
• For delegate methods, start the method name with the name of the class that in-vokes that delegate method. For more information about delegates, please refer to
Recipe 1.7.
See Also
Recipe 1.61.4 Defining and Accessing Properties
Problem
You would like to create an object that has properties of different data types.
Solution
Use the @property directive in the .h file of your object:
#import <Foundation/Foundation.h>
@interface MyObject : NSObject { @public
NSString *stringValue; @private
NSUInteger integerValue; }
@property (nonatomic, copy) NSString *stringValue;
@property (nonatomic, assign) NSUInteger integerValue;
@end
Only properties that are objects can be of type copy or retain. Usually only properties
that are scalars (such as NSUInteger, NSInteger, CGRect, and CGFloat) can have the assign setter attributes. For more information about this, please refer to the “Declared
Properties” section of Apple’s “The Objective-C Programming Language” guide, avail-able at the following URL:
http://developer.apple.com/iphone/library/documentation/cocoa/conceptual/objecti vec/Introduction/introObjectiveC.html
Now use the @synthesize directive in the .m file of your object, like so:
#import "MyObject.h"
@implementation MyObject
- (id) init {
self = [super init];
if (self != nil){
stringValue = [@"Some Value" copy];
integerValue = 123;
}
return(self); }
- (void) dealloc{
[stringValue release];
[super dealloc];
}
@end
Discussion
In Objective-C, you can create and access variable data within an object in two ways: • Declaring properties
• Declaring variables
It is important to note that properties are not simply variables. They are in fact, de-pending on their declaration (whether they are synthesized or not), methods. Simple variables can also be defined in Objective-C for an object, but they need to be managed and accessed in a different way. A property can be created, managed, and released in much more flexible ways than a mere instance variable. For example, a synthesized and
retained property of type NSObject will retain its new value and release the previous
value whenever we assign a new value to it with dot notation, whereas an instance variable that is being managed by the programmer (not synthesized and not defined as an @property) will not be accessible with dot notation and will not have a getter or a
setter method created for it. So, let’s focus on properties for now. You should declare a property in three steps:
1. Declare the variable. 2. Declare the property.
3. Declare the implementation method of that property. After step 2, our variable becomes a property.
By synthesizing our properties, Objective-C will create the setter and getter methods (depending on whether the property being synthesized is read/write or read-only).
Whenever the program writes to the property using dot notation (object.property),
1.5 Managing Properties Manually
Problem
You want to be able to control the values that are set for and returned by your properties. This can be particularly useful, for instance, when you decide to save the values of your properties to disk as soon as they are modified.
Solution
Declare your property in the .h file of your object and implement the setter and getter methods in the .m file manually:
#import <Foundation/Foundation.h>
@interface MyObject : NSObject { @public
NSString *addressLine; }
@property (nonatomic, copy) NSString *addressLine;
@end
In your .m file, implement your getter and setter methods:
#import "MyObject.h"
@implementation MyObject
@synthesize addressLine;
- (void) setAddressLine:(NSString *)paramValue{
if (paramValue != addressLine){ [addressLine release];
addressLine = [paramValue copy]; }
}
- (void) dealloc { [addressLine release]; [super dealloc]; }
@end
Discussion
The @synthesize directive creates setter and getter methods for a property. A property,
readonly directive, only its getter method will be generated. Assigning a value to a
property without a setter method will throw an error.
This means that, by referring to a property in Objective-C using dot notation, you are accessing the setter/getter methods of that property. For instance, if you attempt to assign a string to a property called myString of type NSString in an object using dot
notation, you are eventually calling the setMyString: method in that object. Also,
whenever you read the value of the myString property, you are implicitly calling the
myString method in that object. This method must have a return value of type NSString; in other words, the return value of the getter method of this property (called myString) must return a value of the same data type as the property that it represents.
This method must not have any parameters.
Instead of using the @synthesize directive to generate getter and setter methods for your
properties automatically, you can create the getter and setter methods manually as explained before. This directive will generate the getter and setter methods of a property if they don’t already exist. So, you can synthesize a property but still specify its getter, its setter, or both manually.
You might be asking: why should I create my own getter and setter methods? The answer is that you may want to carry out custom operations during the read or write. A good way to explain this is through an example.
Imagine you have an object with a property called addressLine of type NSString. You
want this address to accept only strings that are 20 characters or less in length. You can define the setter method in this way:
#import <Foundation/Foundation.h>
@interface MyObject : NSObject { @public
NSString *addressLine; }
@property (nonatomic, copy) NSString *addressLine;
@end
Here is the implementation of the validation rule on our property’s setter method:
#import "MyObject.h"
@implementation MyObject
@synthesize addressLine;
- (void) setAddressLine:(NSString *)paramValue{
if ([paramValue length] > 20){ return;
if (paramValue != addressLine){ [addressLine release];
addressLine = [paramValue copy]; }
}
- (void) dealloc { [addressLine release]; [super dealloc]; }
@end
Now we will attempt to set the value of this property to one string that is 20 characters and another string that is 21 characters in length:
MyObject *someObject = [[MyObject alloc] init];
someObject.addressLine = @"12345678901234567890";
NSLog(@"%@", someObject.addressLine);
someObject.addressLine = @"123456789012345678901";
NSLog(@"%@", someObject.addressLine);
[someObject release];
What we can see in the console window proves that our validation rule is working on our custom setter method (see Figure 1-4).
As you can see, the value of our property stayed intact after we tried to change that property’s value to a string of 21 characters.
See Also
Recipe 1.41.6 Reusing a Block of Code
Problem
You want to be able to reuse a block of code you’ve written or call another reusable block of code somewhere else in your application.
Solution
Create instance or class methods for your classes in order to create reusable blocks of code, or simply call a method in your program.
Discussion
In programming languages such as C, we create procedures and functions. A procedure is a block of code with a name and an optional set of parameters. A procedure does not have a return value. A function is a procedure with a return value. Here is a simple procedure (with an empty body) written in C:
void sendEmailTo(const char *paramTo, const char *paramSubject, const char *paramEmailMessage){
/* send the email here ... */ }
This procedure is named sendEmailTo and has three parameters, namely paramTo, paramSubject, and paramEmailMessage. We can then call this procedure in this way:
sendEmailTo("[email protected]", "My Subject",
"Please read my email");
Turning this procedure into a function that returns a Boolean value, we will have code similar to this:
BOOL sendEmailTo(const char *paramTo, const char *paramSubject, const char *paramEmailMessage){
if (paramTo == nil || paramSubject == nil || paramEmailMessage == nil){
/* One or some of the parameters are nil */ NSLog(@"Nil parameter(s) is/are provided."); return(NO);
}
return(YES); }
Calling this function is similar to calling the sendEmailTo procedure except that with a
function, we can retrieve the return value, like so:
BOOL isSuccessful = sendEmailTo("[email protected]", "My Subject",
"Please read my email");
if (isSuccessful == YES){
/* Successfully sent the email */ } else {
/* Failed to send the email. Perhaps we should display an error message to the user */
}
In Objective-C, we create methods for classes. Creating Objective-C methods is quite different from writing procedures and functions in a programming language such as C. As mentioned before, we can have either instance or class methods. Instance methods are methods that can be called on an instance of the class, and class methods are meth-ods that get called on the class itself and do not require an instance of the class to be created by the programmer. To create a method in Objective-C, follow these steps in the .m file of your target class:
1. Type − if you want an instance method or + if you want a class method.
2. Choose the return type of your method and enclose it within parentheses—for instance, (void) for no return value, (BOOL) for a Boolean value, (NSObject *) to
return an instance of NSObject, and so on.
3. Choose a name for your method. Start the name with a lowercase letter. It is com-mon in Objective-C to start method names with a lowercase letter—for instance,
sendEmailTo instead of SendEmailTo.
4. If you do not want any parameters for your method, jump to step 9.
6. Once you are done choosing the name for your parameter, choose the data type of the method and enclose this within parentheses.
7. Put a colon after your parameter’s first chosen name (if any), and put the paren-theses that carry the data type of your method followed by the second name for your parameter.
8. Repeat steps 5 through 7 for any other parameters that you might have.
9. Insert an open curly brace ({) after the method name and parameter names (if you
have parameters) and a closing curly brace (}) at the end.
Going back to the sendEmailTo procedure example that we saw earlier, let’s attempt to
create the same procedure as a method in Objective-C:
- (BOOL) sendEmailTo:(NSString *)paramTo withSubject:(NSString *)paramSubject andEmailMessage:(NSString *)paramEmailMessage{
/* Send the email and return an appropriate value */
if (paramTo == nil || paramSubject == nil || paramEmailMessage == nil){
/* One or some of the parameters are nil */ NSLog(@"Nil parameter(s) is/are provided."); return(NO);
}
return(YES);
}
This is an instance method (-) that returns a Boolean value (BOOL). The name of this
method is sendEmailTo:withSubject:andEmailMessage: and it has three parameters. We
can then call this method in this way:
[self sendEmailTo:@"[email protected]" withSubject:@"My Subject"
andEmailMessage:@"Please read my email."];
As mentioned previously, the first name of every parameter (except the first parameter)
is optional. In other words, we can construct the sendEmailTo:withSubject:andEmail
Message: method in another way with a different name:
- (BOOL) sendEmailTo:(NSString *)paramTo :(NSString *)paramSubject :(NSString *)paramEmailMessage{
/* Send the email and return an appropriate value */
/* One or some of the parameters are nil */ NSLog(@"Nil parameter(s) is/are provided."); return(NO);
}
return(YES);
}
We can call this method like so:
[self sendEmailTo:@"[email protected]" :@"My Subject"
:@"Please read my email."];
As you can see, the first implementation is easier to understand when you look at the invocation calls since you can see the name of each parameter in the call itself. Declaring and implementing a class method is similar to declaring and implementing an instance method. Here are a couple of things you have to keep in mind when de-claring and implementing a class method:
• The method type identifier of a class method is + instead of the - type identifier for
instance methods.
• You can access self in a class method. However, the class methods of self can be
accessed only inside a class method’s implementation.
• Class methods are useful when you want to provide new methods of instantiation
for your classes. For example, a class method named allocAndInit could both
al-locate and initialize an object and return the object to its caller.
1.7 Communicating with Objects
Problem
You want to pass values from one object to another without introducing tightly coupled objects.
Solution
Define a protocol using the @protocol directive, like so: @protocol TrayProtocol <NSObject>
@required
- (void) trayHasRunoutofPaper:(Tray *)paramSender; @end
Discussion
The more experienced programmers become, the better they understand the value of
decoupling in their code. Decoupling simply means making two or more objects
“un-derstand” each other without needing each another in particular; in other words, if Object A has to talk to Object B, in a decoupled design, Object A won’t know if it is Object B that it is talking to. All it knows is that whatever object is listening understands the language in which it is speaking. Enter protocols!
The best way to describe the value of protocols is to go through a real-life example. Let’s imagine we have a printer and we intend to print a 200-page essay. Our printer has a paper tray that, when empty, tells the printer to ask us to insert more paper. The application, in effect, passes a message from the tray to the printer.
Let’s go ahead and create a printer and a tray object. The printer owns the tray, so the printer object, upon initialization, must create an instance of the tray object. We will define our printer class and object in this way:
#import <Foundation/Foundation.h> #import "Tray.h"
@interface Printer : NSObject { @public
Tray *paperTray; }
@property (nonatomic, retain) Tray *paperTray;
@end
We will also implement the printer object in this way:
#import "Printer.h"
@implementation Printer
@synthesize paperTray;
- (id) init {
self = [super init];
if (self != nil){
Tray *newTray = [[Tray alloc] initWithPrinter:self]; paperTray = [newTray retain];
[newTray release]; }
- (void) dealloc { [paperTray release]; [super dealloc];
}
@end
We have not yet written any code for the paper tray object. The printer and paper tray objects inherit from NSObject. The printer object can speak to the tray object by directly invoking its various selectors. However, when the tray object is created, it has no way of finding its corresponding printer and has no way of speaking to this printer because no communication protocol is defined for these two objects.
This is when protocols play a major role. A protocol is a set of rules that an object that
conforms to that protocol must agree with. For instance, humans conform to various protocols such as eating, sleeping, and breathing. In the eating protocol, there is a rule that governs the input of food. In sleeping, there is a rule that governs going to bed or finding a comfortable place to sleep.
Now, going back to our example, there are two things that we want our paper tray object to do:
1. Contain 10 pieces of paper by default.
2. Let the printer know when it runs out of paper.
To meet the second requirement, we must give the paper tray access to the printer. Our first step will be to give the paper tray a reference to the printer. Then we will make sure the paper tray talks to the printer, in a well-defined manner, using a protocol. For this, our paper tray must define the protocol since it is the object that wants to talk to the printer in its own way. The printer, in turn, must conform to that protocol. This is how we will define the header for our paper tray object:
#import <Foundation/Foundation.h>
@class Tray;
@protocol TrayProtocol <NSObject> @required
- (void) trayHasRunoutofPaper:(Tray *)paramSender;
@end
@interface Tray : NSObject { @public
id<TrayProtocol> ownerDevice;
@private
NSUInteger paperCount; }
- (BOOL) givePapertoPrinter; /* Designated Initializer */
- (id) initWithOwnerDevice:(id<TrayProtocol>)paramOwnerDevice;
@end
The trayHasRunoutofPaper: method defined in the TrayProtocol proto-col is a required method and the printer object must implement it.
Now we will implement the paper tray:
#import "Tray.h"
@implementation Tray
@synthesize paperCount; @synthesize ownerDevice;
- (id) init {
/* Call the designated initializer */ return([self initWithOwnerDevice:nil]);
}
- (id) initWithOwnerDevice:(id<TrayProtocol>)paramOwnerDevice {
self = [super init];
if (self != nil){
ownerDevice = [paramOwnerDevice retain]; /* Initially we have only 10 sheets of paper */ paperCount = 10;
}
return(self); }
- (BOOL) givePapertoPrinter{
BOOL result = NO;
if (self.paperCount > 0){ /* We have some paper left */ result = YES;
self.paperCount--; } else {
/* We have run out of paper */
[self.ownerDevice trayHasRunoutofPaper:self];
return(result);
}
- (void) dealloc { [ownerDevice release]; [super dealloc]; }
@end
The givePapertoPrinter instance method is the only method in the paper tray’s
im-plementation that needs a description. Whenever the printer wants to print on a piece of paper, it calls this method in the paper tray to ask for a sheet of paper. If the paper
tray doesn’t have enough paper, it will call the trayHasRunoutofPaper: method in the
printer. This is the important bit indeed. The trayHasRunoutofPaper: method is defined
in the TrayProtocol protocol and the printer object is expected to conform to this
pro-tocol. Simply said, the tray object is telling the printer what methods the printer object needs to implement in order to let the paper tray speak to the printer.
The paper tray has 10 sheets of paper initially. Whenever the printer asks for a sheet of paper, the tray will reduce this number by one. Eventually, when there is no paper left, the tray lets the printer know.
Now it is time to define the printer object (the .h file):
#import <Foundation/Foundation.h> #import "Tray.h"
@interface Printer : NSObject <TrayProtocol> { @public
Tray *paperTray;
}
@property (nonatomic, retain) Tray *paperTray;
- (BOOL) printPaperWithText:(NSString *)paramText
numberofCopies:(NSUInteger)paramNumberOfCopies;
@end
Finally, we will implement the printer object (the .m file):
#import "Printer.h"
@implementation Printer
@synthesize paperTray;
- (void) trayHasRunoutofPaper:(Tray *)Sender{
NSLog(@"No paper in the paper tray. Please load more paper."); }
/* Do the actual printing here after we have a sheet of paper */
}
- (BOOL) printPaperWithText:(NSString *)paramText
numberofCopies:(NSUInteger)paramNumberOfCopies{
BOOL result = NO;
if (paramNumberOfCopies > 0){
NSUInteger copyCounter = 0; for (copyCounter = 0;
copyCounter < paramNumberOfCopies; copyCounter++){
/* First get a sheet of paper from the tray */ if ([self.paperTray givePapertoPrinter] == YES){
NSLog(@"Print Job #%lu", (unsigned long)copyCounter+1);
[self print];
} else {
/* No more paper in the tray */
return(NO);
}
}
result = YES;
} /* if (paramNumberOfCopies > 0){ */
return(result);
}
- (id) init {
self = [super init];
if (self != nil){
Tray *newTray = [[Tray alloc] initWithOwnerDevice:self]; paperTray = [newTray retain];
[newTray release]; }
return(self); }
- (void) dealloc { [paperTray release]; [super dealloc];
}
The printPaperWithText:numberofCopies: method gets called with a number of pieces
of paper to print. Every time a page needs to be printed, the printer object will perform the following tasks:
1. Ask the tray to provide one sheet of paper to the printer. 2. If the tray has run out of paper, it will return from this method.
3. If the paper tray can give the printer a sheet of paper, the printer will call its
print method.
Now let’s go ahead and instantiate an object of type Printer and attempt to print a
couple of sheets of paper:
Printer *myPrinter = [[Printer alloc] init];
[myPrinter printPaperWithText:@"My Text" numberofCopies:100];
[myPrinter release];
Figure 1-5 shows the output we will get in the console window.
Figure 1-5. A paper tray object communicating with its parent through a protocol
The 11th page cannot be printed because the paper tray has reported to the printer that it has run out of paper. Great, isn’t it?
1.8 Invoking the Selectors of an Object Dynamically
Problem
Solution
Use the NSInvocation class, like so:
- (NSString *) myMethod:(NSString *)param1
withParam2:(NSNumber *)param2{
NSString *result = @"Objective-C";
NSLog(@"Param 1 = %@", param1); NSLog(@"Param 2 = %@", param2);
return(result); }
- (void) invokeMyMethodDynamically {
SEL selector = @selector(myMethod:withParam2:);
NSMethodSignature *methodSignature =
[[self class] instanceMethodSignatureForSelector:selector];
NSInvocation *invocation =
[NSInvocation invocationWithMethodSignature:methodSignature];
[invocation setTarget:self]; [invocation setSelector:selector];
NSString *returnValue = nil;
NSString *argument1 = @"First Parameter";
NSNumber *argument2 = [NSNumber numberWithInt:102];
[invocation setArgument:&argument1
atIndex:2];
[invocation setArgument:&argument2
atIndex:3];
[invocation retainArguments]; [invocation invoke];
[invocation getReturnValue:&returnValue];
NSLog(@"Return Value = %@", returnValue);
}
Discussion
Objective-C is so dynamic that you can invoke a method in another object just by knowing the name of that object, the name of the method, and its parameters. Then you can form a selector out of the method name and parameters, form a method sig-nature, and assign parameters to that invocation. Eventually you can, depending on how your method is defined, attempt to fetch the return value of that method as well.
object. This technique is usually used when you want to forward a method invocation to another object. NSInvocation is also useful if you are constructing and calling
selec-tors dynamically and on the fly for dynamic methods. However, for an average iOS application, you probably will not need to use such a dynamic mechanism to call methods on an object.
To do this, you need to follow these steps:
1. Form a SEL value using the name of the method and its parameter names (as
explained in Recipe 1.7).
2. Form a method signature of type NSMethodSignature out of your SEL value.
3. Form an invocation of type NSInvocation out of your method signature.
4. Tell the invocation what object you are targeting.
5. Tell the invocation what selector in that object you want to invoke. 6. Assign any arguments, one by one, to the invocation.
7. Invoke the method using the invocation object and demand a return value (if any). After calling the invokeMyMethodDynamically method, as seen in this recipe’s Solution,
we will observe the following values printed in the console window:
Param 1 = First Parameter Param 2 = 102
Return Value = Objective-C
See Also
Recipe 1.6; Recipe 1.7
1.9 Managing Memory with the iOS SDK
Problem
You want to allocate, deallocate, and use autorelase objects in Objective-C without
causing memory leaks.
Solution
Each object allocated in the Objective-C runtime has a retain count. The retain count can be thought of as the number of references that have been made to the current object. Once the retain count is zero, the object will be deallocated.
/* After this line: foo's retain count is 1 */
/* After this line: foo's retain count = 2 bar is equal to foo */ NSObject *bar = [foo retain];
NSLog(@"%lu", (unsigned long)[foo retainCount]);
/* After this line: foo's retain count = 2 bar is equal to foo
baz is equal to bar and foo */ NSObject *baz = bar;
NSLog(@"%lu", (unsigned long)[foo retainCount]);
/* After this line:
foo, bar and baz are deallocated here and should not be referenced */
[bar release];
Autorelease objects get deallocated at the end of the current run loop’s cycle (when the autorelease pool gets released). If you create autorelease objects in a thread, you must provide your own autorelease pool object in order to deallocate the autorelease objects at the end of the thread’s life. Autorelease objects are similar to the foo object in the previous example, with one difference: as long as there is an autorelease pool around, the autorelease object should not be released directly in code.
Discussion
When an object is allocated using the alloc method, its retain count is set to 1. For
every time an object is retained, it must be released using the release method. An object
will never get deallocated if the retain count of that object is greater than or equal to 1. Therefore, to prevent memory leaks, you must release the objects that you allocate for as many times as they are retained.
You usually don’t need to call the retainCount method of objects directly. You might
do it as a part of your logging or debugging process. Just keep in mind the rule in Objective-C that you must issue a release on an object for every time that it is retained. In the case of autorelease objects, they are sent a release message by the autorelease
pool that contains them.