tmux
Productive Mouse-Free Development
Brian P. Hogan
Many of the designations used by manufacturers and sellers to distinguish their products are claimed as trademarks. Where those designations appear in this book, and The Pragmatic Programmers, LLC was aware of a trademark claim, the designations have been printed in initial capital letters or in all capitals. The Pragmatic Starter Kit, The Pragmatic Programmer, Pragmatic Programming, Pragmatic Bookshelf, PragProg and the linking g device are trade-marks of The Pragmatic Programmers, LLC.
Every precaution was taken in the preparation of this book. However, the publisher assumes no responsibility for errors or omissions, or for damages that may result from the use of information (including program listings) contained herein.
Our Pragmatic courses, workshops, and other products can help you and your team create better software and have more fun. For more information, as well as the latest Pragmatic titles, please visit us at http://pragprog.com.
The team that produced this book includes:
Susannah Pfalzer (editor) David J Kelly (typesetter) Janet Furlow (producer) Juliet Benda (rights) Ellie Callahan (support)
Copyright © 2012 The Pragmatic Programmers, LLC.
All rights reserved.
No part of this publication may be reproduced, stored in a retrieval system, or transmitted, in any form, or by any means, electronic, mechanical, photocopying, recording, or otherwise, without the prior consent of the publisher. Printed in the United States of America.
ISBN-13: 978-1-934356-96-8
Contents
Acknowledgments . . . i
Preface . . . iii
1. Learning The Basics . . . 1
Installing tmux 1
1.1
1.2 Starting tmux 3
1.3 Detaching and Attaching Sessions 4
1.4 Working with Windows 7
1.5 Working with Panes 9
1.6 Working with Command Mode 11
1.7 What’s Next? 12
2. Configuring tmux . . . 15
Introducing the .tmux.conf File 15
2.1
2.2 Customizing Keys, Commands, and User Input 17
2.3 Visual Styling 22
2.4 Customizing the Status Bar 27
2.5 What’s Next? 30
3. Scripting Customized tmux Environments . . . 33
Creating a Custom Setup with tmux Commands 33 3.1
3.2 Using tmux Configuration for Setup 37
3.3 Managing Configuration with tmuxinator 39
3.4 What’s Next? 42
4. Working With Text and Buffers . . . 45
Scrolling Through Output with Copy Mode 45
4.1
4.2 Copying and Pasting Text 46
4.3 Working with the Clipboard on Linux 49
4.4 Using OS X Clipboard Commands 50
5. Pair Programming with tmux. . . 53
Pairing with a Shared Account 54
5.1
5.2 Using a Shared Account and Grouped Sessions 55 5.3 Pairing with Separate Accounts and Sockets 56
5.4 What’s Next? 57
6. Workflows . . . 59
Working Effectively with Panes and Windows 59 6.1
6.2 Managing Sessions 63
6.3 tmux and Your Operating System 64
6.4 What’s Next? 67
A1. Our Configuration . . . 69
Acknowledgments
This book started out as something I’d planned to self-publish, but working
with the fine folks at the Pragmatic Bookshelf has always been such a great experience that I decided to see if they would work with me again. I’m so
grateful to Dave and Andy for letting me work with them again.
Thanks to my awesome editor, Susannah Pfalzer, the book you’re reading is
in much better shape. Her guidance was essential in keeping things focused, on track, and readable.
The folks that volunteered their time to review this book provided some of the
most interesting and thoughtful comments I’ve seen. Thanks to them, this
book has a bunch of wonderful ideas, too. Thanks so much to Jeff Holland, Austen Ott, Kevin Gisi, Tony Collen, Charley Stran, Chris Johnson, Drew Neil, Darcy Laycock, Luke Chadwick, Jeff Carley, Marc Harter, and Nick LaMuro for the great suggestions.
Special thanks to Chris Warren, Mike Weber, Aaron Godin, Emma Smith, Erich Tesky, and the rest of my business associates for their support, and to Chris Johnson for getting me hooked on using tmux in the first place.
Finally, I’m extremely grateful for the continued support of my wife Carissa,
Preface
Your mouse is slowing you down.
The mouse, when introduced, created a new way for us to interact with our computers. We could click, double-click, triple-click, and now even swipe to interact with our applications. The mouse, along with graphical interfaces, made computers just a little easier to use for average users. But there’s a
downside to the mouse, especially for programmers.
As we build software, we work with multiple programs throughout the course of our day. A web developer, for example, might have a database console, web server, and a text editor running at the same time. Switching between these with the mouse eats up valuable time and can break your focus. It may not seem like much, but moving your hand off of the keyboard’s home row,
placing it on the mouse, locating the pointer, and performing the task can be pretty distracting.
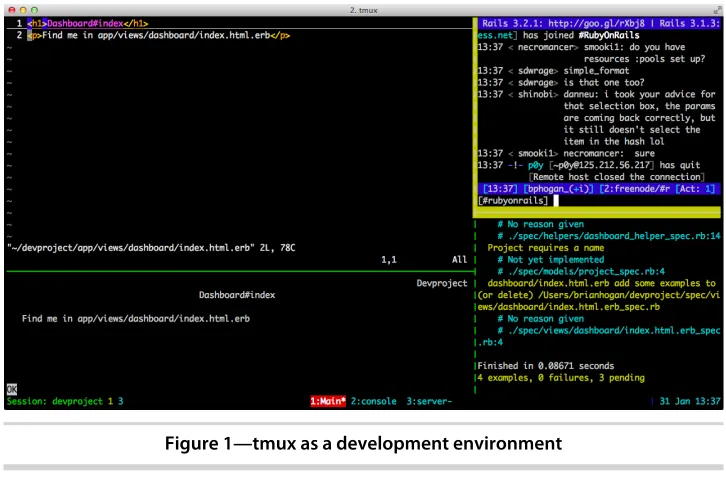
Using tmux, you can create an environment like the one shown in Figure 1,
tmux as a development environment, on page iv. Using tmux’s windows, you
can easily manage the text editor, the database console, and the local web server within a single environment. And you can split tmux windows into sections, so multiple apps can run side by side. This means you can run a text-based browser, IRC client, or your automated tests in the same window as your main editor.
Best of all, you can quickly move between these windows and panes using only the keyboard, which will greatly increase both your concentration and your productivity.
In this book, you’ll learn how to configure, use, and customize tmux. You’ll
Figure 1—tmux as a development environment
What Is tmux?
tmux is a terminal multiplexer. It lets us use a single environment to launch multiple terminals, or windows, each running its own process or program. For example, we can launch tmux and load up the Vim text editor. We can then create a new window, load up a database console, and switch back and forth between these programs all within a single session.
If you use a modern operating system and a terminal that has tabs, this doesn’t sound like anything new. But running multiple programs
simultane-ously is only one of tmux’s features. We can divide windows into horizontal
or vertical panes, which means we can run two or more programs on the same screen side by side. And we can do it all without using the mouse.
We can also detach from a session, meaning we can leave our environment
running in the background. If you’ve used GNU-Screen before, you’re familiar
with this feature. In many ways, tmux is like GNU-Screen with a lot of extra features, and a much simpler configuration system. And since tmux uses a client-server model, we can control windows and panes from a central location, or even jump between multiple sessions from a single terminal window. This client-server model also lets us create scripts and interact with tmux from other windows or applications.
Who Should Read This Book
This book aims to help application developers who work on OS X or Linux operating systems and spend a good part of their time using the terminal.
If you’re a software developer, you’ll see how to use tmux to build a
develop-ment environdevelop-ment that can make working with multiple terminal sessions a breeze. And if you’re already comfortable using Vim or Emacs, you’ll see how
tmux can accelerate your workflow even more.
If you’re a system administrator or a developer who spends some time working
with remote servers, you’ll be interested in how you can leverage tmux to
create a persistent dashboard for monitoring servers.
What
’
s In This Book
This book will show you how to incorporate tmux into your work by taking you through its basic features and showing you how you might apply them to everyday situations.
In Chapter 1, Learning The Basics, on page 1, you’ll learn about the basic
features of tmux as you create sessions, panes, and windows and learn how to perform basic navigation.
In Chapter 2, Configuring tmux, on page 15, you’ll learn how to redefine many
of the default keybindings and the appearance of tmux.
In Chapter 3, Scripting Customized tmux Environments, on page 33, you’ll see
how to script your own development environment using the command-line interface, configuration files, and the tmuxinator program.
After that, you’ll work with text in Chapter 4, Working With Text and Buffers, on page 45. You’ll see how to use keyboard keys to move backwards through
the buffer, how to select and copy text, and how to work with multiple paste buffers.
Next, in Chapter 5, Pair Programming with tmux, on page 53, you’ll learn how
to set up tmux so that you and a coworker can work together on the same codebase from different computers using tmux.
Finally, Chapter 6, Workflows, on page 59 covers more advanced ways to manage windows, panes, and sessions, and shows you how to be even more productive with tmux.
What You Need
In order to use tmux, you’ll need a computer that runs Mac OS X or a flavor
of UNIX or Linux. Unfortunately, tmux does not run under Windows, but it will run great on a virtual machine, VPS, or shared hosting environment running Linux.
While not required, experience with text editors such as Vim or Emacs will be helpful. tmux works very much the same way, and it has some predefined keyboard shortcuts that users of these editors will find familiar.
Conventions
tmux is a tool that’s driven by the keyboard. You’ll encounter many keyboard
shortcuts throughout the book. Since tmux supports both lower- and upper-case keyboard shortcuts, it may sometimes be unclear which key the book is referencing.
To keep it simple, these are the conventions I’ve used.
• CTRL-b means “press the CTRL and b keys simultaneously.”
• CTRL-R means the same thing, except that you’ll need to use the SHIFT key
to produce the capital “R.” I won’t explicitly show the SHIFT key in any of
these keystrokes.
• CTRL-b d means “press the CONTROL and b keys simultaneously, then release,
and then press d.” In Chapter 1, Learning The Basics, on page 1, you’ll
learn about the command prefix, which will use this notation, but short-ened to PREFIX d.
• Finally, I’ll show some terminal commands throughout the book, like
$ tmux new-session
The dollar sign is simply the prompt from the shell session and you won’t
need to type it when you type the command.
Online Resources
The book’s web site1 has links to an interactive discussion forum as well as
a place to submit errata for the book. You’ll also find the source code for the
configuration files and scripts we build in this book. You can click the box above the code excerpts to download that source code directly.
Working with tmux has made me much more productive, and I’m excited to
share my experiences with you. Let’s get started by installing tmux and
working with its basic features.
CHAPTER
1
Learning The Basics
tmux can be an incredible productivity booster once you get the hang of it. In this chapter you’ll get acquainted with tmux’s basic features as you manage
applications within sessions, windows, and panes. These simple concepts make up the foundation of what makes tmux an amazing environment for developers and system administrators alike.
But before you can learn how to use these basic features, you need to get tmux installed.
1.1
Installing tmux
You can install tmux in one of two ways: using a package manager for your operating system, or building tmux from source.
Whichever method you choose, you’ll want to ensure you install tmux version
1.6 or higher, which is the version this book will use. Earlier versions don’t
support some of the features we’re going to cover.
Installing Via a Package Manager
tmux is available in many package managers. On OS X, you can get tmux using Homebrew1 or Macports.2 Installation of these package managers is beyond the scope of this book; consult the web page for the manager of your choice. For either one, you’ll need Xcode, which you can find on the DVD that
came with your Mac, or through the Mac App Store.
If you use Homebrew, you can install tmux like this:
$ brew install tmux
If you use MacPorts, you can install tmux with this command:
$ sudo port install tmux
On Ubuntu, you can grab tmux with
$ sudo apt-get install tmux
To ensure that tmux is installed properly, and to check that you have the correct version, execute this command from your terminal:
$ tmux -V
tmux 1.6
Depending on your package manager, you may not be able to get the most recent version of tmux, which means you’ll need to compile and install tmux
from source. Let’s explore what it takes to do that.
Installing from Source
The process of installing tmux is the same on both Mac OS X and Linux. You’ll need the GCC compiler in either case.
For Mac users, that means installing Xcode, found either on the DVD that came with the computer or by installing it through the Mac App Store.
For Linux users, the package management tools usually have the GCC com-pilers. On Ubuntu, you simply type
$ sudo apt-get install build-essential
to get all the compilers you need.
tmux also depends on libevent and ncurses, and you’ll need the prerequisites
for these as well. On Ubuntu, you can install these using the package man-ager like this:
$ sudo apt-get install libevent-dev libncurses5-dev
Once you have the compilers and prerequisites installed, grab the tmux source code and download it.3 Untar the downloaded version and install it like this:
$ tar -zxvf tmux-1.6.tar.gz
$ cd tmux-1.6
$ ./configure
$ make
You can test out the installation by executing this from the terminal, which returns the currently installed version of tmux:
$ tmux -V
tmux 1.6
Now that we have tmux properly installed, we can explore the core features of tmux, starting with a basic session.
1.2
Starting tmux
Starting tmux is as easy as typing
$ tmux
from a terminal window. You’ll see something that looks like Figure 2, New tmux session, on page 4 appear on your screen. This is a tmux “session,”
and it works just like your normal terminal session. You can issue any termi-nal command you’d like and everything will work as expected.
To close the tmux session, simply type
$ exit
in the session itself. This closes tmux and returns back to the standard terminal.
But, unless you’re only using tmux for a very brief period, this isn’t the best
way to work with sessions in tmux. We can instead create “named sessions”
that we can then identify later.
Creating Named Sessions
We can actually have multiple sessions on a single computer, and we’ll want
to be able to keep them organized. We can do that by giving each session we create its own unique name. Let’s create a named session called “basic” right
now:
$ tmux new-session -s basic
We can shorten this command to
$ tmux new -s basic
which is the convention you’ll see throughout the rest of the book.
When we enter this command, we’ll be brought into a brand new tmux session,
but we won’t really notice anything special or different than if we started
Figure 2—New tmux session
But named sessions come in handy when we want to leave tmux running in the background, which we’ll discuss next. But before we continue, type
$ exit
to exit tmux.
1.3
Detaching and Attaching Sessions
One of tmux’s biggest advantages is that we can fire it up, start up programs
or processes inside the tmux environment, and then leave it running in the background by “detaching” from the session.
If we close a regular terminal session, all the programs we have running in that session are killed off. But when we detach from a tmux session, we’re
not actually closing tmux. Any programs we started up in that session will stay running. We can then “attach” to the session and pick up where we left
off. To demonstrate, let’s create a new named tmux session, start up a
pro-gram, and detach from the session. First, we create the session:
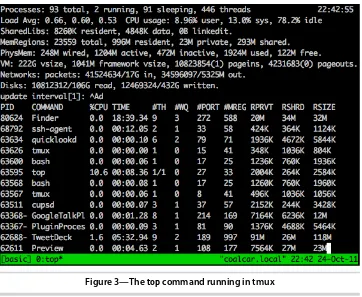
Then, within the tmux session, we start an application called top, which monitors our memory and CPU usage, like this:
$ top
We now have something that looks like Figure 3, The top command running
in tmux, on page 6 running in our terminal. We can now detach from the tmux session by pressing CTRL-b followed by d. This returns us to our regular terminal prompt. We’ll learn how to get back into that session shortly, but
first, let’s talk about the command prefix.
The Command Prefix
Since our programs are running inside tmux, we need a way to tell tmux that the command we’re typing is for tmux and not for the underlying application.
The CTRL-b combination does just that.
When we wanted to detach from our tmux session, we pressed CTRL-b, followed by d for “detach.” We have to prefix each tmux command with this key
com-bination, and it’s important to note that we don’t hold all these keys down
together, but we instead first press CTRL-b simultaneously, release those keys, and then immediately press the key for the command we want to send to tmux.
Throughout the rest of this book, we’ll simply use the notation PREFIX, followed
by the shortcut key for our commands, like PREFIX d for detaching from a ses-sion. In Chapter 2, Configuring tmux, on page 15, we’ll remap the prefix to an
easier combination, but until then, we’ll use the defaults.
Now, let’s learn how to get back in to that tmux session we left running. But
before we do, close your terminal window.
Reattaching to Existing Sessions
We’ve set up a tmux session, fired up a program inside the session, detached
from it, and closed our terminal session, but the tmux session is still chugging along, along with the top application we launched.
We can list existing tmux sessions using the command
$ tmux list-sessions
in a new terminal window. We can shorten this command to this:
$ tmux ls
The command shows that we have one session currently running:
Figure 3—The top command running in tmux
To attach to the session, we use the attach keyword. If we only have one session running, we can simply attach to it with
$ tmux attach
and we’ll be attached to the session again. Things get a little more tricky if
we have more than one session running. Let’s detach from the basic session
with PREFIX d.
Now, if we create a new tmux instance in the background using the command
$ tmux new -s second_session -d
and list the sessions again, we’ll see this:
$ tmux ls
basic: 1 windows (created Mon Jan 30 16:58:26 2012) [105x25]
second_session: 1 windows (created Mon Jan 30 17:49:21 2012) [105x25]
We can attach to the session we want by using the -t flag:
This puts us in the second_session tmux session. We can detach from this session just as we did previously, and then attach to a different session. In Moving Between Sessions, on page 63 you’ll see some other ways to move between
active sessions. But for now, let’s remove the active sessions.
Killing Sessions
We can type exit within a session to destroy the session, but we can also kill off sessions with the kill-session command.
$ tmux kill-session -t basic
$ tmux kill-session -t second_session
This is useful for situations where a program in a session is hanging.
If we list the sessions again, we’ll get this message:
$ tmux ls
failed to connect to server: Connection refused
Since there are no tmux sessions running, tmux itself isn’t running, so it isn’t
able to handle the request.
Now that you know the basics of creating and working with sessions, let’s
look at how we can work with multiple programs within a single session.
1.4
Working with Windows
It’s possible, and very common, to run multiple, simultaneous commands
within a tmux session. We can keep these organized with windows, which are similar to tabs in modern graphical terminal emulators or web browsers.
When we create a new tmux session, the environment sets up an initial window for us. We can create as many as we’d like, and they will persist when we
detach and reattach.
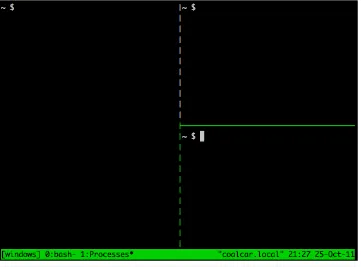
Let’s create a new session that has two windows. The first window will have
our normal prompt, and the second window will run the top command. We’ll
create a named session called “windows,” like this:
$ tmux new -s windows -n shell
By using the -n flag, we tell tmux to name the first window so we can identify it easily.
Now let’s add a window to this session.
Creating and Naming Windows
To create a window in a current session, we simply press PREFIX c. Creating a window like this automatically brings the new window into focus. From here, we can start up another application. Let’s start top in this new window.
$ top
Our first window has a name we defined, called “shell,” but our second window
now appears to have the name “top.” This window’s name changes based on
the app that’s currently running because we never gave it a default name
when we created it. Let’s give this window a proper name.
To rename a window, we press PREFIX followed by , (a comma) and the status bar changes, letting us rename the current window. Go ahead and rename the window to “Processes.”
We can create as many windows in a tmux session as we’d like. But once we
have more than one, we need to be able to move between them.
Moving Between Windows
We’ve created two windows in our environment, and we can navigate around
our windows in several ways. When we only have two windows, we can quickly move between the windows with PREFIX n, or “next window.” This simply
cycles through the windows we have open. Since we only have two windows right now, this just toggles between them.
We can use PREFIX p to go to the previous window.
By default, windows in tmux each have a number, starting at 0. We can quickly jump to the first window with PREFIX 0, and the second window with
PREFIX 1. This zero-based array of windows isn’t always intuitive, and in Chapter 2, Configuring tmux, on page 15, you’ll see how we can make the list
of windows start at one instead of zero.
If we end up with more than nine windows, we can simply use PREFIX f to find a window by name (if we named our windows), or PREFIX w to display a visual menu of our windows so we can select the one we’d like.
From here, we can continue creating new windows and launching programs. When we detach from our session and reattach later, our windows will all be where we left them.
To close a window, we can either type “exit” into the prompt in the window,
into focus. To completely close out the tmux session, we have to close all the windows.
Creating windows is great, but we can make tmux even more useful by splitting a window into panes.
1.5
Working with Panes
Having programs in separate windows is fine for stuff we don’t mind having
out of the way. But with tmux, we can take a single session and divide it into panes.
Let’s create a new tmux session called “panes” so we can experiment with
how panes work.
$ tmux new -s panes
We can split windows vertically or horizontally. Let’s split the window in half
vertically first, and then horizontally, giving us one large pane on the left and two smaller panes on the right, just like Figure 4, A tmux session divided into panes, on page 10.
In the tmux session, press PREFIX %, and the window will divide down the mid-dle and start up a second session in the new pane. In addition, the focus will move to this new pane. Pressing PREFIX " (double quote) will split this new pane in half horizontally. By default, new panes split the existing pane in half evenly.
To cycle through the panes, press PREFIX o. We can also use PREFIX, followed by the UP, DOWN, LEFT, or RIGHT keys to move around the panes.
With just a couple keystrokes, we’ve divided one window into a workspace
with three panes. Let’s look at how we can rearrange these panes with layouts.
Pane Layouts
We can resize a pane, either using incremental resizing or by using templates. Resizing panes incrementally using the default keybindings is quite awkward. In Chapter 2, Configuring tmux, on page 15, we’ll define some shortcuts to
make resizing panes easier. For now, we’ll use one of tmux’s several default
pane layouts:
• even-horizontal stacks all panes horizontally, left to right.
• even-vertical stacks all panes vertically, top to bottom.
Figure 4—A tmux session divided into panes
• main-horizontal creates one larger pane on the top and smaller panes
underneath.
• main-vertical creates one large pane on the left side of the screen, and stacks
the rest of the panes vertically on the right.
• tiled arranges all panes evenly on the screen.
We can cycle through these layouts by pressing PREFIX SPACEBAR.
Closing Panes
We can close a pane the same way we exit a terminal session or a tmux win-dow: we simply type “exit” in the pane. You can also kill a pane with PREFIX X,
which also closes the window if there’s only one pane in that window.
You’ll be asked to confirm if you want to kill the specified pane. Killing a pane
like this is great for situations where the pane has gotten stuck, or you can’t
So far, we’ve been able to create new sessions, create windows and panes,
and move around a bit. Before we move on to more advanced topics, let’s
explore some tmux commands.
1.6
Working with Command Mode
So far, we’ve used key combinations to create windows and panes, but those
keybindings are actually just shortcuts for tmux commands with some preset options. We can execute tmux commands two ways: from the terminal itself or from the “command area” in the tmux status bar. You’ll learn about using
tmux commands from the terminal in Chapter 3, Scripting Customized tmux
Environments, on page 33, but for now, let’s explore tmux’s Command mode
by using it to create some new windows and panes in our workspace.
To enter Command mode, press PREFIX : (the colon) from within a running tmux session. The status bar changes color and we get a command prompt that indicates that we can type our command. Let’s create a new window by
using the new-window command, like this:
new-window -n console
By using a command rather than the shortcut, we were able to create a new window and give it a name at the same time, by using the -n flag. Let’s take
this a step further and launch a new window that starts the top program. To do that, we enter Command mode and type this command:
new-window -n processes "top"
When we press ENTER, our new window appears and we see the top application running, showing our running processes.
Specifying an initial command for a window is extremely handy for short-term tasks, but if we exit the top app by pressing q, the tmux window we created will also close. You can use configuration settings to get around this, but if you want the window to persist, simply create it without specifying an initial command, and then execute your own command in the new window.
We can use Command mode to create new windows, new panes, or new ses-sions, or even set other environmental options. In Chapter 2, Configuring tmux, on page 15, we’ll create a few custom keybindings to make some of
these commands easier to use.
1.7
What
’
s Next?
In this chapter, we covered the very basic usage of tmux sessions, panes, windows, and commands, but there’s a lot more we can explore.
By pressing PREFIX ?, you can get a list of all predefined tmux keybindings and the associated commands these trigger.
As you work with tmux, think about how you can create different environments for your work. If you’re monitoring servers, you could use tmux panes to
create a dashboard that shows your various monitoring scripts and log files.
With the basics under our belt, let’s put together a custom configuration we
can use for the rest of our work.
For Future Reference
Creating Sessions
Description Command
Creates a new session without a name. Can be shortened to tmux new or simply tmux.
tmux new-session
Creates a new session called “development.”
tmux new -s development
Creates a session named “development” and
names the first window “editor.”
tmux new -s development -n editor
Attaches to a session named “development.”
tmux attach -t development
Default Commands for Sessions, Windows, and Panes
Description Command
Detaches from the session, leaving the session running in the background.
PREFIX d
Enters Command mode.
PREFIX :
Creates a new window from within an existing tmux session. Shortcut for new-window.
PREFIX c
Selects windows by number.
PREFIX 0…9
Displays a selectable list of windows in the current session.
PREFIX w
Displays a prompt to rename a window.
PREFIX ,
Closes the current window after prompting for confirmation.
PREFIX &
Divides the current window in half vertically.
PREFIX %
Divides the current window in half horizontally.
PREFIX "
Description Command
Cycles through open panes.
PREFIX o
Momentarily displays pane numbers in each pane.
PREFIX q
Closes the current pane after prompting for confirmation.
PREFIX x
Cycles through the various pane layouts.
PREFIX SPACE
CHAPTER
2
Configuring tmux
tmux, by default, doesn’t have the most friendly commands. Many of the most
important and useful features are assigned to hard-to-reach keystrokes or consist of long, verbose command strings. And tmux’s default color scheme
isn’t very easy on the eyes. In this chapter, we’re going to build a basic
con-figuration file for our tmux installation that we’ll then use for the rest of this
book. We’ll start out by customizing how we navigate around the screen and
how we create and resize panes, and then we’ll discuss how we can tackle
some more advanced settings. We’ll also make sure your Terminal is properly
configured so that some of the settings we make to tmux’s appearance look
good on your screen. When we’re done, you’ll have a better understanding of
how flexible tmux is, and you can start making it your own. Let’s start by
talking about how we actually configure tmux in the first place.
2.1
Introducing the .tmux.conf File
By default, tmux looks for configuration settings in two places. It first looks in /etc/tmux.conf for a system-wide configuration. It then looks for a file called
.tmux.conf in the current user’s home directory. If these files don’t exist, tmux
simply uses its default settings. We don’t need to create a system-wide
con-figuration, so let’s create a brand new configuration file in our home directory.
$ touch ~/.tmux.conf
In this file we can do everything from defining new key shortcuts to setting up a default environment with multiple windows, panes, and running pro-grams. Let’s start by setting a couple basic options that will make working
Remapping the Caps Lock Key
On many keyboards, the CAPSLOCK key sits right next to the a key on the home row of the keyboard. By remapping this key to CTRL, you can make triggering commands more comfortable.
On OS X, you can remap the CAPSLOCK key under the Keyboard preference pane, under System Preferences. Just press the Modifier Keys button and change the action for CAPSLOCK to “Control.”
Under Linux, the process can be a little more tricky depending on your operating system, but you can find several methods described on the Emacs wiki.a
This small change to your configuration can save you a surprising amount of time over the course of a day.
a. http://www.emacswiki.org/emacs/MovingTheCtrlKey
Defining an Easier Prefix
As you saw earlier, tmux uses CTRL-b as its command prefix. Many tmux users started out using GNU-Screen, which uses CTRL-a for its command prefix.
CTRL-a is an excellent choice for a prefix because it’s easier to trigger, especially
if you’ve remapped your computer’s CAPS LOCK key to CTRL as explained in Remapping the Caps Lock Key, on page 16. This keeps your hands on the home row of your keyboard.
To set options in the .tmux.conf file, we use the set-option command, which we can shorten to set. Let’s redefine our tmux prefix by adding this code to our
.tmux.conf file:
config/tmux.conf
set -g prefix C-a
In this example, we’re using the -g switch, for “global,” which sets the option
for all tmux sessions we create.
While not necessary, we can use the unbind-key, or unbind command to remove a keybinding that’s been defined, so we can assign a different command to
this key later. Let’s free up CTRL-b like this:
unbind C-b
Changes to the file aren’t read by tmux automatically. So if you’re editing
your .tmux.conf file while tmux is running you’ll either need to completely close all tmux sessions, or enter tmux’s Command mode with PREFIX : and type this
source-file ~/.tmux.conf
We can now use CTRL-a for our prefix. We’ll still continue to refer to it as PREFIX
in the rest of the examples in the book.
Changing the Default Delay
tmux adds a very small delay when sending commands, and this delay can interfere with other programs such as the Vim text editor. We can set this delay so it’s much more responsive:
set -sg escape-time 1
Once we reload our configuration file, we can issue keystrokes without delay.
Setting the Window and Panes Index
In Chapter 1, Learning The Basics, on page 1, we discussed windows, and how when we create more than one window in a session, we reference windows by their index. This index starts at zero, which can be a little awkward. By adding this line to our configuration file:
set -g base-index 1
the window index will start at 1. This also means we can use PREFIX 1 to jump to the first window, instead of PREFIX 0.
We can also set the starting index for panes using the pane-base-index option. Let’s add this line to our configuration so we have some consistency between
our pane and window numbering.
setw -g pane-base-index 1
Up until now, we’ve used the set command, which sets options for the tmux
session. In order to configure options that affect how we interact with windows, we have to use another command, called set-window-option, which we can short-en to setw. In this book, I’ve used the shortened versions of commands to
make the configuration examples fit on one line, but you’ll need to pay special
attention, because set and setw are easy to mix up.
Now let’s build some useful shortcuts that will increase our productivity.
2.2
Customizing Keys, Commands, and User Input
holding three keys, but without looking at the command reference, there’s
no easy way to remember what it does.
In this section, we’ll define, or redefine, some of the most-used tmux
com-mands. Let’s start by creating a custom keybinding to reload our tmux
configuration.
Creating a Shortcut to Reload the Configuration
Every time we make a change to our configuration file, we either have to shut down all sessions and then restart tmux, or issue a command to reload our configuration from within the running instances. Let’s create a custom
key-binding to reload the configuration file.
We use the bind command to define a new keybinding. We specify the key we want to use, followed by the command we want to perform.
For our first keybinding, we’ll set PREFIX r so it reloads our main .tmux.conf file
in the current session.
bind r source-file ~/.tmux.conf
When we define keybindings using bind, we still have to push the PREFIX key before we can press the newly defined key. And while we just defined a new
command to make reloading the tmux configuration easier, we can’t use it
until we reload the configuration file. So be sure to enter Command mode with PREFIX : and type
source-file ~/.tmux.conf
one more time.
When we reload the file, we won’t always be able to tell that anything changed,
but we can use the display command to put a message in the status line. Let’s
modify our reload command to display “Reloaded!” when the configuration
file loads:
config/tmux.conf
bind r source-file ~/.tmux.conf \; display "Reloaded!"
We can bind a key to a series of commands by separating the commands with the \; character combination.
With this keybinding in place, we can make additional changes to the config-uration file and then immediately activate them by pressing PREFIX r.
Joe asks:
Can I Define Keybindings That Don
’
t Require a
Prefix?
Absolutely. Using the bind command with the -n prefix tells tmux that the keybinding doesn’t require pressing the prefix. For example,
bind-key -n C-r source-file~/.tmux.conf
would make CTRL-r reload the configuration file. Unfortunately this would completely disable that key combination in any application that’s running in a tmux session, so
you’ll want to use this with care.
Sending the Prefix to Other Applications
We’ve remapped CTRL-a as our Prefix, but programs such as Vim, Emacs, and
even the regular Bash shell also use that combination. We need to configure tmux to let us send that command through when we need it. We can do that by binding the send-prefix command to a keystroke, like this:
bind C-a send-prefix
After reloading the configuration file, we can send CTRL-a to an application running within tmux simply by pressing CTRL-a twice.
Splitting Panes
The default keys for splitting panes can be difficult to remember, so let’s set
our own keys that we won’t be able to forget. We’ll set the horizontal split to PREFIX | and the vertical split to PREFIX -.
bind | split-window -h
bind - split-window -v
At first glance, this may look backwards. The -v and -h flags on split-window
stand for “vertical” and “horizontal” splits, but to tmux, a vertical split means
creating a new pane below the existing pane so the panes are stacked verti-cally on top of each other. A horizontal split means creating a new pane next
to the existing one so the panes are stacked horizontally across the screen. So, in order to divide the window vertically, we use a “horizontal” split, and
to divide it horizontally, we use a “vertical” split.
These new shortcuts give us a nice visual association. If we want our windows split, we simply press the key that looks like the split we want to create.
Remapping Movement Keys
Moving from pane to pane with PREFIX o is a little cumbersome, and using the arrow keys means we have to take our fingers off the home row. If you use the Vim text editor, you’re probably familiar with its use of h, j, k, and l for
movement keys. We can remap the movement keys in tmux to these same keys.
config/tmux.conf
bind h select-pane -L
bind j select-pane -D
bind k select-pane -U
bind l select-pane -R
In addition, we can use PREFIX CTRL-h and PREFIX CTRL-l to cycle through the windows by binding those keystrokes to the respective commands:
bind -r C-h select-window -t
:-bind -r C-l select-window -t :+
Provided you’ve mapped your CAPSLOCK key to the CTRL key, you can now move
between panes without moving your hands off the home row.
Resizing Panes
To resize a pane, we can enter Command mode and type resize-pane -D to resize a pane downward one row at a time. We can increase the resizing increment by passing a number after the direction, such as resize-pane -D 5, but the com-mand itself is pretty verbose. Let’s make some keybindings to make resizing
panes easier.
Let’s use a variation of the Vim movement keys to resize windows. We’ll use PREFIX H, PREFIX J, PREFIX K, and PREFIX L to change the size of the panes:
bind H resize-pane -L 5
bind J resize-pane -D 5
bind K resize-pane -U 5
bind L resize-pane -R 5
Notice that we’re using uppercase letters in the configuration file. tmux allows
both lowercase and uppercase letters for keystrokes. You’ll need to use the SHIFT key to trigger the uppercase keystroke.
Using these movement keys will help us keep track of which way we want the window size to change. For example, if we have a window divided into two panes stacked horizontally, like this:
---| |
| Pane 1 |
| |
---| |
| Pane 2 |
| |
---and we want to increase the size of Pane 1, then we’d place our cursor inside
Pane 1 and then press PREFIX J, which will move the horizontal divider down-ward. If we pressed PREFIX K, we would move the horizontal divider up. We resize panes in increments, so that means that each time we want to resize the pane, we need to use the prefix. But if we use the -r flag, we can specify that we want the key to be repeatable, meaning we can press the prefix key only once and then continuously press the defined key within the repeat limit.
bind -r H resize-pane -L 5
bind -r J resize-pane -D 5
bind -r K resize-pane -U 5
bind -r L resize-pane -R 5
The default repeat limit is 500 milliseconds, and we can change that by setting the repeat-time option to a higher value.
Now let’s turn our attention to how tmux can work with the mouse.
Handling the Mouse
While tmux is meant to be completely keyboard-driven, there are times when you may find it easier to use the mouse. If your Terminal is set up to forward mouse clicks and movement through to programs in the terminal, then you can tell tmux how to handle certain mouse events.
Sometimes it’s nice to be able to scroll up through the Terminal buffer with
the mouse wheel, or to select windows and panes, especially when you’re just
getting started with tmux. To configure tmux so we can use the mouse, we need to enable mouse mode.
setw -g mode-mouse on
We could also configure tmux so it will let us use the mouse to select a pane, resize a pane, or even let us click on the window list to select a window. We would do that by setting the corresponding options, like this:
set -g mouse-select-pane on
set -g mouse-resize-pane on
set -g mouse-select-window on
These can be handy additions to your configuration, but remember that using the mouse with tmux will slow you down. Even though being able to scroll and click might seem like a neat idea, you should learn the keyboard equiva-lents for switching panes and moving forward and backward through the buffers. So, for our configuration file, we’re going to disable all the mouse
options. We can do that explicitly like this:
setw -g mode-mouse off
set -g mouse-select-pane off
set -g mouse-resize-pane off
set -g mouse-select-window off
or by simply disabling the mouse entirely:
config/tmux.conf
setw -g mode-mouse off
Setting this option prevents us from accidentally doing things when we select the Terminal window with our mouse, and it forces us to get more comfortable with the keyboard.
The flexible configuration system tmux provides lets us completely customize the way we interact with the interface, but we can also configure its appear-ance to make its interface easier to see, and in some cases, more informative.
2.3
Visual Styling
tmux gives us quite a few ways to customize our environment’s appearance.
In this section, we’ll walk through configuring some of these options, as we
customize the status line and other components. We’ll start by configuring
the colors for various elements, then we’ll turn our bland status bar into
something that will provide us with some vital information about our environment.
Configuring Colors
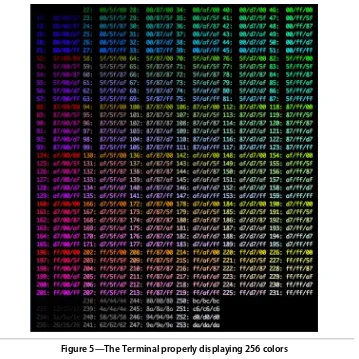
To get the best visual experience out of tmux, we have to make sure that both our Terminal and tmux are configured for 256 colors. Let’s start by configuring
our Terminal first.
Figure 5—The Terminal properly displaying 256 colors
$ wget http://www.vim.org/scripts/download_script.php?src_id=4568 -O
colortest
$ perl colortest -w
You should see something like Figure 5, The Terminal properly displaying 256 colors, on page 23 in your Terminal if you’re configured properly.
If you’re using Linux, you might need to add
[ -z "$TMUX" ] && export TERM=xterm-256color
to your .bashrc file to enable a 256-color Terminal. This conditional statement ensures that the TERM variable is only set outside of tmux, since tmux sets its own terminal.
Figure 6—iTerm 2 settings for tmux
If you’re using a Mac, you should know that the Terminal app in Snow
Leopard only displays 16 colors. You’ll need to install an alternative terminal
such as iTerm22 to get full color support.
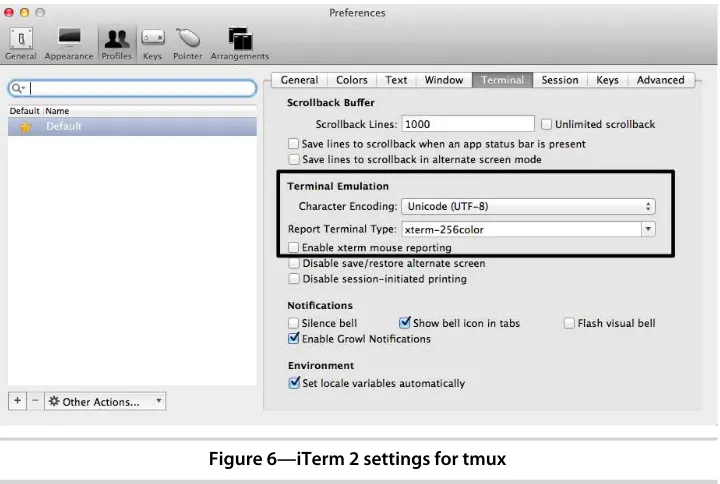
If you don’t see the correct number of colors, configure your Terminal to use
xterm’s 256 mode. In iTerm2, you can find this by editing the default profile
and changing the Terminal mode to xterm-256color as shown in Figure 6, iTerm 2 settings for tmux, on page 24.
Also, ensure that your Terminal emulator supports displaying UTF-8 charac-ters so that visual elements such as the pane dividers appear as dashed lines.
In order to make tmux display things in 256 colors, we add this line to our
.tmux.conf file:
config/tmux.conf
set -g default-terminal "screen-256color"
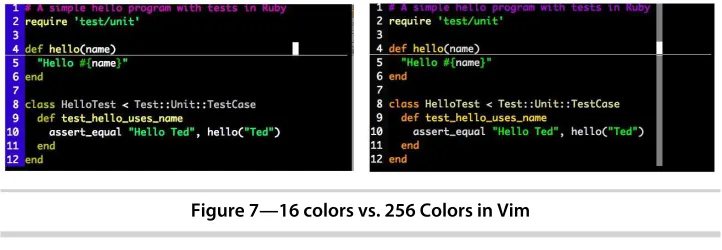
Once the right color mode is set, you’ll find it much easier to use programs
such as Vim from within tmux, especially when you are using more complex color schemes for syntax highlighting. Just take a look at Figure 7, 16 colors vs. 256 Colors in Vim, on page 25 to see the difference. Now let’s configure
the appearance of tmux’s components, starting with colors.
Figure 7—16 colors vs. 256 Colors in Vim
Changing Colors
We can change the colors of several parts of the tmux interface, including the status bar, window list, command area, and even the pane dividers.
tmux provides variables we can use to specify colors, including black, red, green,
yellow, blue, magenta, cyan, or white. We can use colour0 to colour255 on the 256 color palette. If you look at the output of the colortest program, you can see the color codes available to you. You can also run this simple shell script to get the color variable you’d like to use:3
for i in {0..255} ; do
printf "\x1b[38;5;${i}mcolour${i}\n" done
tmux has specific configuration options to change foreground and background colors for each of its components. Let’s start exploring these by customizing
the colors of our status bar.
Changing the Status Bar Colors
The default status bar has black text on a bright green background. It’s
pretty bland. Let’s make it have white text on a black background by default.
We use the status-bg and status-fg options to set the foreground and background colors of the status bar, so our settings would be like this:
set -g status-fg white
set -g status-bg black
Later we’ll customize the colors of the items within the sidebar. Right now
let’s customize the window list.
Changing the Window List Colors
We want to make it more apparent which window is active, so we’ll style the
active window red and the inactive windows cyan. To style the regular win-dows, we use set-window-option, like this:
config/tmux.conf
setw -g window-status-fg cyan
setw -g window-status-bg default
setw -g window-status-attr dim
We can use default for a value so it inherits from the color of the status bar. To style the active window, we use a similar set of options:
setw -g window-status-current-fg white
setw -g window-status-current-bg red
setw -g window-status-current-attr bright
This takes care of the window list, but we can also customize the colors of the pane dividers.
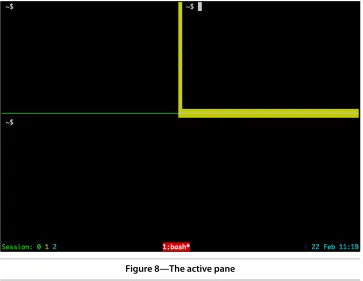
Changing Pane Divider Colors
We can color the pane dividers, which is nice, but we can also define colors to make the active pane more apparent, as in Figure 8, The active pane, on page 27.
Panes have both foreground and background colors, so we need to set the variables accordingly:
set -g pane-border-fg color
set -g pane-border-bg color
set -g pane-active-border-fg color
set -g pane-active-border-bg color
The foreground color of a pane is the actual dashed line that makes up the border. The background color, by default, is black, but if we color it in when the pane is active, we can make the active pane extremely noticeable.
set -g pane-border-fg green
set -g pane-border-bg black
set -g pane-active-border-fg white
set -g pane-active-border-bg yellow
Before we move on to the status bar, let’s touch up the tmux command line.
Figure 8—The active pane
Customizing the Command Line
We can also customize the command line, where we enter tmux commands and see alert messages. The approach is almost identical to the way we styled the status line itself.
Let’s change the background color to black and the text color to white. We’ll
use a bright white so the message stands out in more detail.
set -g message-fg white
set -g message-bg black
set -g message-attr bright
That was easy. Now let’s change the areas of the status bar on both sides of
the window list.
2.4
Customizing the Status Bar
The tmux status bar can display pretty much any information we want. We can use some predefined components or create our own by executing shell commands.
The status bar, by default, looks like this:
[development] 0:bash* "example.local" 00:44 02-Nov-1
On the left side, we have the name of the tmux session followed by the list of windows. The list of windows shows the numerical index of the current window and its name. On the right side, we have the hostname of our server followed by the date and time. Let’s customize the content of our status bar.
Configuring Status Bar Items
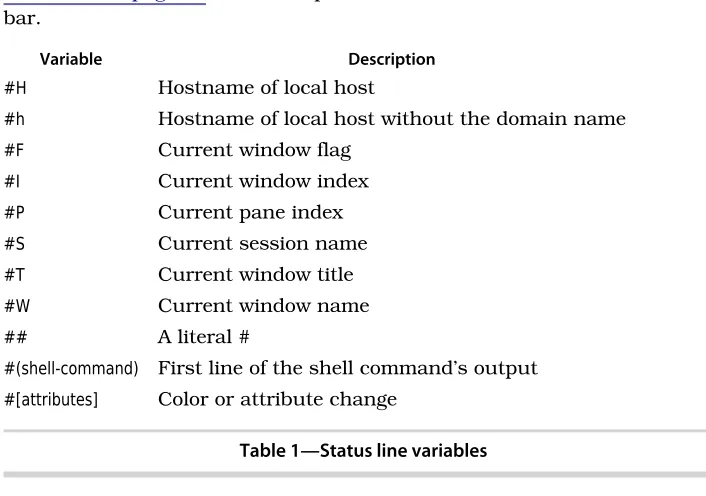
The status bar consists of three components: a left panel, the window list, and a right panel. We can change the content in the left or right panels of the status bar using a combination of text and variables. Table 1, Status line variables, on page 28 shows the possible variables we can use in our status bar.
Description Variable
Hostname of local host
#H
Hostname of local host without the domain name
#h
Current window flag
#F
Current window index
#I
Current pane index
#P
Current session name
#S
Current window title
#T
Current window name
#W
A literal #
##
First line of the shell command’s output
#(shell-command)
Color or attribute change
#[attributes]
Table 1—Status line variables
For example, if we wanted to show just the name of the current tmux session on the left side, we’d use the set-option -g status-left option with the #S value, like
this:
set -g status-left "#S"
But we can also make it stand out more by using an attribute to set the foreground color, like this:
We can add as many attributes and items to the status bar as we want. To demonstrate, let’s alter the left side of the status bar so it shows the session
name in green, the current window number in yellow, and the current pane in cyan.
set -g status-left "#[fg=green]#S #[fg=yellow]#I #[fg=cyan]#P"
We can add any arbitrary text into the status bar, too. Let’s add text to make
the session, window, and pane more noticeable, like this:
config/tmux.conf
set -g status-left-length 40
set -g status-left "#[fg=green]Session: #S #[fg=yellow]#I #[fg=cyan]#P"
We set the status-left-length option because the output we’ve specified is too long
for the default length, so we have to make that region wider.
We can also configure the right side of the status bar. Let’s add the current
date and time.
set -g status-right "#[fg=cyan]%d %b %R"
This formats the date as “13-Jan 13:45,” but you can format it however you’d
like, using the standard strftime() time formatting mechanism used in many
programming languages.4
It’s a good idea to turn on UTF-8 support in the status bar, especially if you’re
interested in using those characters.
set -g status-utf8 on
We can take things a step further by incorporating shell commands into the mix by using the #(shell-command) variable to return the result of any external command-line program into the status bar. We’ll go into this in detail in Adding Battery Life to the Status Line, on page 66.
Keeping Status Bar Info Up to Date
We’ve added the current time and some other dynamic information to our
status bar, but we need to tell tmux how often to refresh that information periodically. By default, tmux refreshes the status bar every 15 seconds. We can specify exactly how quickly tmux refreshes its status bar with set-option -g status-interval followed by the refresh interval in seconds, like this:
set -g status-interval 60
This would refresh the status bar every 60 seconds. Keep in mind that if you’re firing off shell commands, those will be executed once per interval, so
be careful not to load too many resource-intensive scripts.
Centering the Window List
We can also control the placement of the window list. By default, the window list is left-aligned, but we can center the window list in between the left and right status areas with a single configuration change:
config/tmux.conf
set -g status-justify centre
With this in place, the window list appears centered. As we create new win-dows, the window list shifts accordingly, staying in the center of the status bar.
Identifying Activity in Other Windows
In the same way, we want to be notified when something happens in one of the other windows in our session so we can react to it. We’ll do that by adding
a visual notification, like this:
setw -g monitor-activity on
set -g visual-activity on
Now when one of the other windows has some activity, it’ll stand out with a
cyan background, like the “webserver” window shown here:
2.5
What
’
s Next?
We’ve built up a pretty solid configuration file throughout this chapter. Look
at Appendix 1, Our Configuration, on page 69 to see the whole .tmux.conf file.
We can define many additional options in our .tmux.conf file. For example, in
Chapter 3, Scripting Customized tmux Environments, on page 33, we’ll discuss
how to set up a custom default work environment using project-specific configuration files.
In addition, you can configure a default configuration for your system in
/etc/tmux.conf. This is great for situations where you’ve set up a shared server
so members of your team can collaborate, or if you just want to ensure that every user on the system has some sensible defaults.
Now that we have a configuration defined, let’s look at how we can create our
own custom development environments with scripts so we can more easily take advantage of these panes and windows without having to set them up each time we start our day.
For Future Reference
Description Command
Sets the key combination for the Prefix key.
set -g prefix C-a
Sets the amount of time (in milliseconds) tmux waits for a keystroke after pressing PREFIX.
set -sg escape-time n
Loads a configuration file. Use this to reload the existing configuration or bring in additional configuration options later.
source-file [file]
Configures tmux to send the prefix when pressing the
PREFIX combination twice consecutively.
bind C-a send-prefix
Creates a keybinding that executes the specified
command. Can be shortened to bind
bind-key [key] [com-mand]
Creates a keybinding that is repeatable, meaning you only need to press the PREFIX key once, and you can press
bind-key -r [key] [com-mand]
the assigned key repeatedly afterwards. This is useful for commands where you want to cycle through elements or resize panes. Can be shortened to bind.
Removes a defined keybinding so it can be bound to a different command. Can be shortened to unbind.
unbind-key [key]
Displays the given text in the status message.
display-message or dis-play
Sets options for sessions. Using the -g flag sets the option for all sessions.
set-option [flags] [option] [value]
Sets options for windows, such as activity notifications, cursor movement, or other elements related to windows and panes.
set-window-option [option] [value]
Appends values onto existing options rather than replacing the option’s value.
set -a
CHAPTER
3
Scripting Customized tmux Environments
You probably run a wide collection of tools and programs as you work on your projects. If you’re working on a web application, you most likely need to
have a command shell, a text editor, a database console, and another window dedicated to running your automated test suite for your application. That’s
a lot of windows to manage, and a lot of commands to type to get it all fired up.
Imagine being able to come to your workstation, ready to tackle that new feature, and being able to bring every one of those programs up, each in its own pane or window in a single tmux session, using a single command. We can use tmux’s client-server model to create custom scripts that build up our
development environments, splitting windows and launching programs for us automatically. We’ll explore how to do this manually first, and then we’ll
look at more advanced automatic tools.
3.1
Creating a Custom Setup with tmux Commands
We’ve already explored how we use the tmux command to create new tmux
sessions, but the tmux command takes many other options. We can take an
existing session and split its windows into panes, change layouts, or even start up applications within the session.
The key to this is the -t switch, or the “target.” When we have a named tmux
session, we can attach to it like this:
$ tmux attach -t [session_name]
We use this target switch to direct the command to the appropriate tmux session. So, if we create a new tmux session called “development,” like this:
and we then detach from the session with PREFIX d, then we could split that window horizontally by issuing this command:
$ tmux split-window -h -t development
When we attach to the window again, we’ll have our window split into two
panes.
$ tmux attach -t development
In fact, we don’t even have to detach from a tmux session to send commands.
We can open another terminal and split the window again, but this time with a vertical split:
$ tmux split-window -v -t development
Using this approach, we can customize existing environments easily. Let’s
explore the various commands by creating our own development environment.
Scripting a Project Configuration
In Chapter 1, Learning The Basics, on page 1, we discussed tmux commands such as new-session and new-window. Let’s write a simple script using these and
similar commands that creates a new tmux session and creates a window with a couple panes and a couple windows. To top it off, we’ll launch
applica-tions in each of the panes.
Let’s start by creating a new script called development in our home directory.
We’ll make this script executable too, so we can run it like a regular command.
$ touch ~/development
$ chmod +x ~/development
Inside this new file, we’ll first create a new tmux session called “development.”
scripting/development
tmux new-session -s development -n editor -d
We’re passing a couple additional parameters when we create this new session.
First, we’re creating this session and naming it with the -s flag like we’ve done
before. Then we’re giving the initial window a name of “editor,” and
immedi-ately detaching from this new session with the -d flag.
When we start up our session, we want to change to the directory for our project. We’ll call that devproject. And before we can change to that folder, we’d
better create it first.
$ mkdir ~/devproject
With the folder created, we add a line to our configuration that uses tmux’s
send-keys command to change the directory.
tmux send-keys -t development 'cd ~/devproject' C-m
We place C-m at the end of the line to send the Carriage Return sequence,
represented by Control-M.1 We can then repeat this command to open the
Vim text editor in that window, like this:
tmux send-keys -t development 'vim' C-m
With these three commands, we’ve created a new session, changed to a
directory, and opened a text editor, but our environment isn’t yet complete.
Let’s split the main editor window so we have a small terminal window on the
bottom. We do this with the split-window command. In our script, add this line:
tmux split-window -v -t development
This splits the main window in half horizontally. We could have specified a percentage using something like
tmux split-window -v -p 10 -t development
but instead, we’ll just leave the split-window command as is and then select one
of the default tmux layouts—the main-horizontal one—by adding this to our
configuration:
tmux select-layout -t development main-horizontal
We’ve created our first window and split it into two panes, but the bottom
pane needs to open in the project folder. We already know how we send commands to tmux instances, but now we have to target those commands at specific panes and windows.
Targeting Specific Panes and Windows
With commands such as send-keys, we can specify not only the target session, but also the target window and pane. In our configuration file back in Chapter 2, Configuring tmux, on page 15, we specified a base-index of 1, meaning that our window numbering starts at 1. This base index doesn’t affect the panes,
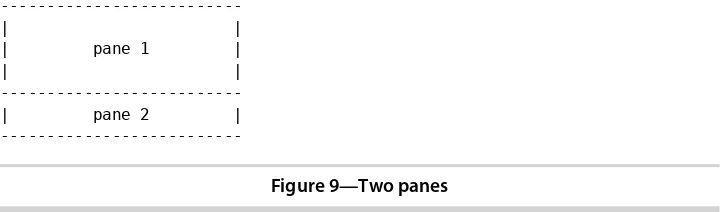
though, which is why we also set the pane-base-index to 1. In our case, we have two panes in our current setup, as in Figure 9, Two panes, on page 36
---| |
| pane 1 |
| |
---| pane 2 |
---Figure 9—Two panes
format [session]:[window].[pane]—in our case, development:1.2. So, we add this line
to our configuration script, and we get exactly what we want.
tmux send-keys -t development:1.2 'cd ~/devproject' C-m
We’re almost there. We can use what we’ve learned to finish up our
configu-ration by adding a couple additional windows to the session.
Creating and Selecting Windows
We want a second window in our session that will be a full-screen console.
We can create that new window using the new-window command.
tmux new-window -n console -t development
tmux send-keys -t development:2 'cd ~/devproject' C-m
After we create the window, we use send-keys to once again change into our project directory. We only have one pane in our new window, so we only have to specify the window number in the target.
When we start up our session, we want our first window to be displayed, and we do that with the select-window command:
tmux select-window -t development:1 tmux attach -t development
We could continue to add to this script, creating additional