CakePHP Application
Development
Step-by-step introduction to rapid web
development using the open-source MVC
CakePHP framework
Ahsanul Bari
Anupom Syam
CakePHP Application Development
Step-by-step introduction to rapid web development using the
open-source MVC CakePHP framework
Copyright © 2008 Packt Publishing
All rights reserved. No part of this book may be reproduced, stored in a retrieval system, or transmitted in any form or by any means, without the prior written permission of the publisher, except in the case of brief quotations embedded in critical articles or reviews.
Every effort has been made in the preparation of this book to ensure the accuracy of the information presented. However, the information contained in this book is sold without warranty, either express or implied. Neither the authors, Packt Publishing, nor its dealers or distributors will be held liable for any damages caused or alleged to be caused directly or indirectly by this book.
Packt Publishing has endeavored to provide trademark information about all the companies and products mentioned in this book by the appropriate use of capitals. However, Packt Publishing cannot guarantee the accuracy of this information.
First published: July 2008
Production Reference: 1080708
Published by Packt Publishing Ltd. 32 Lincoln Road
Olton
Birmingham, B27 6PA, UK. ISBN 978-1-847193-89-6 www.packtpub.com
Credits
Authors
Ahsanul Bari
Anupom Syam
Reviewers
John Mark Diaz
Junal Rahman
Senior Acquisition Editor
David Barnes
Development Editor
Nikhil Bangera
Technical Editors
Ajay Shanker
Rasika Ramesh Sathe
Editorial Team Leader
Mithil Kulkarni
Project Manager
Abhijeet Deobhakta
Project Coordinator
Lata Basantani
Indexer
Rekha Nair
Proofreader
Camille Guy
Production Coordinator
Aparna Bhagat
Cover Work
About the Authors
Ahsanul Bari
is a web application developer from Dhaka, Bangladesh. After graduating from North South University with a bachelor's degree in Computer Science, he has been involved in developing various web applications for local businesses. At a very early stage of his career, he felt the need for tools andtechniques to build structured and maintainable web applications. That is when he
found out about CakePHP. It was love at first sight and he decided to use CakePHP
for his future projects. He never had to look back, and from then on, he has been heavily using CakePHP for all kinds of projects. Most notably, using CakePHP, he developed an ERP solution for companies involved in urban and land development. Apart from that, he has also 'irregularly' contributed to the CakePHP Documentation Team. He is also an 'irregular' blogger (http://ahsanity.com and http://
ahsanity.wordpress.com). Just when people start to think that he has given up blogging, he is known to write a post from nowhere! Among his friends and colleagues, he is known as a fanboy for CakePHP.
This book could not have been possible without the help and support of many people. I would like to thank Hasin Hyder for encouraging us to write this book. Thanks go to David Barnes, our acquisition editor, for always being the best critic, and giving us the push when we needed one. A special thanks to the hardworking people of PacktPub who made this book a reality. Thanks go to all my colleagues at TrippertLabs, who are eagerly waiting for a treat when the book is out. I would also like to thank all my friends for always encouraging me to carry on writing. I would also like to thank the CakePHP community for developing and maintaining such a wonderful framework. But, I will not thank Anupom, the co-author of this book, because I never thank him for anything.
Lastly, I would like to apologize to the three most dearest persons in my life: my mom, my sister, and my jaan Simin. I have written this book during the time that I was supposed to spend with them.
Anupom Syam
is a web application developer from Dhaka, Bangladesh. He started programming back in 1998 in C when he was a high school kid. In his early university years, he met Java and fell in love immediately. Through the years, he hasbecome proficient in various aspects of Java (ME, SE, and EE). Early in his career,
he was engaged mainly in building localized mobile applications. Over time, his interest in web technologies grew and he did not hesitate to jump onto the Web 2.0
bandwagon. Over the last five years, he has been working with different startups and
building web/mobile applications. He currently works as a Development Engineer at Trippert, Inc. where he has been involved in developing a travel-based blogging system http://www.trippert.com (which is developed using CakePHP) as the lead back-end programmer.
He loves to build rich-client web apps with JavaScript/AJAX in the front end and CakePHP/RoR/MySQL in the back end. He still uses Java heavily for his personal fun-time projects. He also maintains blogs: http://anupom.wordpress.com and http://syamantics.com. Besides programming, he is interested in many things,
First of all, thanks to my parents and my sweet little sister Antara, who stood by patiently while my weekends were occupied with writing inexplicable technical minutiae! A very special thanks to Hasin Hayder, without his inspiration and encouragement I
would never find myself writing a book! Thanks to my colleagues,
coworkers, and friends— your endless support kept me going. David Barnes, our acquisition editor at Packt, has my deepest respect and gratitude for his patience, understanding, perseverance and suggestions that had really taught me how to write computer books! Not to mention, the heart and soul effort from people of Packt Publication—Abhijeet Deobhakta, Lata Basantani and Nikhil Bangera who made this book (at last) a reality. Also, thanks to our vigorous and veteran technical editors and reviewers: Rasika, Felix, and Junal, without whom this book would be much less accurate.
And finally, I wish to give my sincerest thanks to the developers of
About the Reviewer
Junal Rahman
is a Computer Science graduate from Independent University of Bangladesh. His areas of expertise include programming with PHP framework and Facebook applications. He has worked for several software companies as a Web Application Developer. During his undergraduate studies, Junal fell in love with .NET programming, but as soon as he started his internship, he fell in love with PHP. He currently works as a Development Engineer at Trippert Labs. At Trippert, Junal collaboratively works to create Facebook applications. He also maintains a blog that can be found at http://junal.wordpress.com. Apart from keeping up with theever changing field of information technology, he spends much of his private life
pursing his interests in screenplay and script writing. In the future, Junal hopes to
create films and short dramas, and eventually make his very own movies.
We dedicate this book to all the amazing people of the vibrant CakePHP community,
Table of Contents
Preface
1
What This Book Covers 1
Who is This Book for 2
Conventions 2
Reader Feedback 3
Customer Support 3
Downloading the Example Code for the Book 3
Errata 4
Questions 4
Introduction to CakePHP
5
What is CakePHP? 5
A PHP Framework 6
Common Design Patterns 6
Rapid Web Development 6
Works with PHP4 and PHP5 7
CakePHP is Free and Open Source 7
Improved Code Structure 7
Understanding the MVC Pattern 8
Models 8
Controllers 8
Views 9
How It Works 9
Faster Development 10
Less Configuration, More Convention 10
Auto Code Generation 10
Quick Access to Related Data 10
Built-in Commonly Used Functionalities 11
Versions of CakePHP: 1.1 and 1.2 12
A Quick Installation
13
Downloading CakePHP 13
Platform Requirements 17
Configuring Apache 17
AllowOverwrite is Set to All 17
Mod_rewrite Module is Loaded 18
Setting Up Cake in Web Root 18
Running Cake for the First Time 20
Summary 20
A Quick App
21
Making Sure the Oven is Ready 22
CakeTooDoo: a Simple To-do List Application 22
Configuring Cake to Work with a Database 23
Writing our First Model 25
Writing our First Controller 27
Viewing All Tasks in CakeTooDoo 29
Adding a New Task 32
Editing a Task 36
Adding Data Validation 39
Deleting a Task from CakeTooDoo 40
Viewing Completed Tasks and Pending Tasks 42
Formatting Date and Time 44
Creating the CakeTooDoo Homepage 45
Summary 47
Controllers: Programming Application Logic
49
Interacting with Model 50
Attaching Models and Controllers 50
Action, Parameters, and Views 52
Interacting with View 53
Actions and Parameters 55
Getting Post Data from the View 61
Redirecting 63
AppController: The Parent Controller 65
Working with Components 68
Summary 71
Models: Accessing Data
73
Setting Up Database and Models 74
More on Data Retrieval 82
Saving and Updating Data 91
Saving Data 91
Updating a Record 95
More on the save() Method 101
Updating a Single Field 102
Batch Update 102
Deleting Data 103
Deleting a Single Record 103
Placing Your Own Logic Inside Model 106
Create and Use Your Own Model Method 107
Validating Your Data 112
Adding Validation to Our Model 112
Summary 118
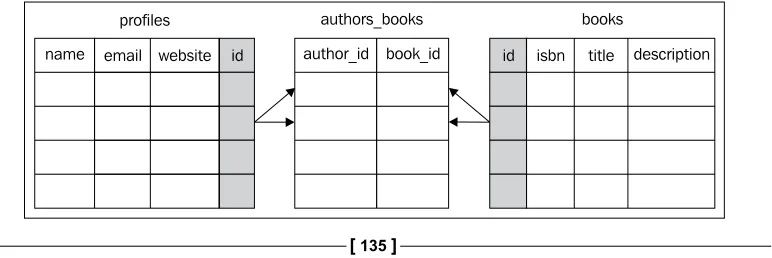
ORM: Modelling the Table Relationship
119
Working with Simple Associations 120
Defining One-To-Many Relationship in Models 120
Retrieving Related Model Data in One-To-Many Relation 123 Saving Related Model Data in One-To-Many Relation 128 Adding More than One Association of the Same Type 131
One-To-One Relation 132
Customizing Association Characteristics 133
Working with Complex Associations 134
Defining Many-To-Many Relationship in Models 134
Retrieving Related Model Data in Many-To-Many Relation 137 Saving Related Model Data in Many-To-Many Relation 140
Deleting Associated Data 141
Changing Association On The Fly 142
Summary 143
Views: Creating User Interfaces
145
Working with Layouts 146
Creating Custom Layouts 146
Using Elements 152
Creating and Using Element 152
Working with Helpers 156
Creating and Using Your Own Helper 157
Creating Forms to Take User Input
160
Using Shells: Get Further, Faster
165
Setting Up the Cake Shell 166
Setting Up the Cake Shell in Windows 166
Setting Up the Cake Shell in *nix 168
Baking an Application 170
Creating and Configuring the Database 170
Baking Models 174
Baking Controllers 181
Baking Views 186
Summary 191
Making Quickwall: The Basics
193
What is This Quickwall All About? 194
Setting Up Cake 194
Creating and Connecting the Database 196
Creating and Defining Relationships between Models 199
Creating the Basic Controller Actions and Their Views 201
Adding Custom Layout 207
Adding Forms to Add New Questions and Answers 215
Summary 223
Quickwall: User Authentication
225
Creating the User Model and the Users Controller 226
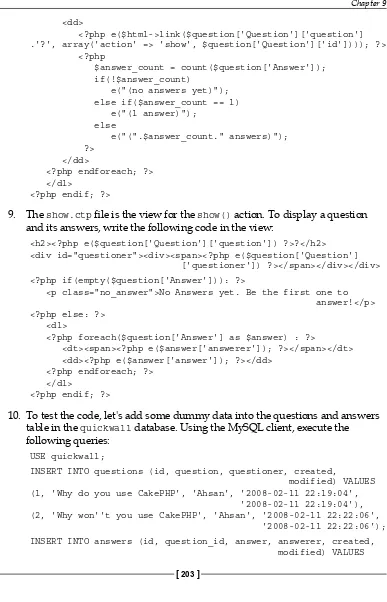
Making the User Sign Up Process 229
Adding Email Confirmation to Sign Up 238
Integrating Authentication: Database and Models 245
Integrating Authentication: Controllers 249
Integrating Authentication: Views 254
Remembering User with Cookie 259
Summary 264
Quickwall: JavaScript and AJAX
265
Adding JavaScript Validation 265
AJAX Link to Show Own Questions 270
AJAX AutoComplete to Search Users 276
AJAX Form Submit to View Questions of a User 281
In-Line Editing to Edit Own Answers 284
Summary 287
Quickwall: Making It Better
289
Making Dates More Readable 289
Adding Pagination 299
Adding RSS Feeds 302
Summary 306
Preface
Cake is a rapid development framework for PHP that uses well-known design patterns and provides a structured framework that enables PHP users at all levels to
rapidly develop robust web applications, without any loss of flexibility. It means you
can code faster, your code is better, and it makes writing Web 2.0-style apps a snap.
This book builds on your knowledge as a PHP developer to provide a fast-paced, step-by-step tutorial in building CakePHP applications. The book is packed with example code and demo applications, so that you can see techniques in action.
What This Book Covers
Chapter 1 will take a look at: what CakePHP is, how CakePHP helps in structuring and maintaining the code, how CakePHP helps in reducing the development time and effort, and which version of Cake should be used.
Chapter 2 will take a quick look at setting up Cake in our local machine.
Chapter 3 will cover how to develop a small application that we'll call the
"CakeTooDoo". It will be a simple to-do-list application, which will keep record of the things that we need to do—a shopping list, chapters to study for an exam, etc.
Chapter 4 will cover the nuts and bolts of the CakePHP controller.
Chapter 5 will be a thorough experience of some of the model basics.
Chapter 6 will take an in-depth look at various types of associations and their uses.
Chapter 7 will closely look at the different view components in CakePHP.
Chapter 9 will look at creating a new web application called 'Quickwall'.
Chapter 10 will cover adding user authentication to our web application—Quickwall.
Chapter 11 will take a look at how to use JavaScript and AJAX with CakePHP.
Chapter 12 will take a look at adding more features to the Quickwall application.
Who is This Book for
If you already know PHP and want to develop cutting-edge Web 2.0 applications, or see how to write code in a faster, more productive way, then this book is ideal for you.
Conventions
In this book, you will find a number of styles of text that distinguish between
different kinds of information. Here are some examples of these styles, and an explanation of their meaning.
There are three styles for code. Code words in text are shown as follows: "We can include other contexts through the use of the include directive."
A block of code will be set as follows:
<?php else: ?> <dl>
<?php foreach($question['Answer'] as $answer) : ?>
<dt><span><?php e($answer['User']['username']); ?></span></dt> <dd>
When we wish to draw your attention to a particular part of a code block, the relevant lines or items will be made bold:
<?php if($loggedIn): ?>
<?php e($html->link('Your Questions', array('controller' => 'users', 'action' => 'show', $loggedIn))); ?>|
<?php e($html->link('Search', array('controller' =>
Any command-line input and output is written as follows:
New terms and important words are introduced in a bold-type font. Words that you see on the screen, in menus or dialog boxes for example, appear in our text like this: "clicking the Next button moves you to the next screen".
Important notes appear in a box like this.
Tips and tricks appear like this.
Reader Feedback
Feedback from our readers is always welcome. Let us know what you think about this book, what you liked or may have disliked. Reader feedback is important for us to develop titles that you really get the most out of.
To send us general feedback, simply drop an email to [email protected], making sure to mention the book title in the subject of your message.
If there is a book that you need and would like to see us publish, please send us a note in the SUGGEST A TITLE form on www.packtpub.com or email
If there is a topic that you have expertise in and you are interested in either writing or contributing to a book, see our author guide on www.packtpub.com/authors.
Customer Support
Now that you are the proud owner of a Packt book, we have a number of things to help you to get the most from your purchase.
Downloading the Example Code for the Book
Visit http://www.packtpub.com/files/code/3896_Code.zip to directly download the example code.
Errata
Although we have taken every care to ensure the accuracy of our contents, mistakes
do happen. If you find a mistake in one of our books—maybe a mistake in text or
code—we would be grateful if you would report this to us. By doing this you can save other readers from frustration, and help to improve subsequent versions of
this book. If you find any errata, report them by visiting http://www.packtpub. com/support, selecting your book, clicking on the Submit Errata link, and entering
the details of your errata. Once your errata are verified, your submission will be
accepted and the errata are added to the list of existing errata. The existing errata can be viewed by selecting your title from http://www.packtpub.com/support.
Questions
Introduction to CakePHP
Most technical books start by outlining the good features of the concerned
technology, so that the reader is convinced that the technology is worth learning, and the book is worth reading. But unlike those books, this one starts with a warning:
"Once readers have gone through the book, there will be no turning back! Web development will never be the same again. Developing a web application will become so easy, that it might make the readers very lazy. As a matter of fact, readers might even forget the basic syntaxes of PHP! And the word Cake will have a completely new meaning to them"
If you are still determined to read along, you are welcome! But do not blame us later; you have been warned!
We are going to start our journey into CakePHP by trying to understand what
CakePHP is and how it will help us develop web applications faster, that are also easy
to manage and maintain. To be more specific, in this chapter, we are going to see:
What is CakePHP�is CakePHP�
How CakePHP helps in structuring and maintaining the code� How CakePHP helps in reducing the development time and effort�ps in reducing the development time and effort� And, which version of Cake should be used�
What is CakePHP?
According to the official CakePHP website (http://cakephp.org):
"Cake is a rapid development framework for PHP which uses commonlyCake is a rapid development framework for PHP which uses commonly known design patterns like Active Record, Association Data Mapping,
Front Controller and MVC. Our primary goal is to provide a structured
framework that enables PHP users at all levels to rapidly develop robust
web applications, without any loss to flexibility.�"
Someone who is new to frameworks might not understand parts of the definition.
But understanding a few key terms will make the job much easier.
A PHP Framework
A PHP framework is a collection of code, libraries, classes, and run-time environment that helps developers build web applications faster. The main idea behind using frameworks is to provide the developers with commonly used functionalities and a basic structure that they can build their application on. Most PHP developers, who have some experience, have their own set of libraries and structure to help them develop faster, as they can use their code base (and experience) from one project to another. But, building a web application on an open-source framework like
CakePHP has its obvious benefits. By doing so, the developers not only use their own
experience, but also the experiences of many other developers who have used and developed the framework. Also, the framework is much more reliable as it is used and tested by many application developers. Besides, using a framework like CakePHP has the advantage that all the developers involved in a project have to follow the same conventions and rules to structure the application. It makes it very easy for new developers to settle down if they are familiar with the conventions of the framework.
Common Design Patterns
A design pattern is a general solution to a commonly occurring problem in web development. A design pattern is not a complete code, rather it is a description for how to solve a problem that can be used in many different situations. In web development, there are many common design patterns that are used to solve repeating and common problems. CakePHP has many of these design patterns
integrated into it. Some of them are mentioned in the above definition: Active Record, Association Data Mapping, Front Controller and MVC. Among them, MVC, which stands for Model View Controller, is at the core of CakePHP. We will soon discuss MVC, and other important design patterns, in this chapter. The other design
patterns will be discussed throughout the book.
Rapid Web Development
The integration of common design patterns into CakePHP means that developers need not waste time in trying to solve problems that are commonly present in almost all web projects. These are already solved in CakePHP! As a result, the
developer can focus on the specific business logic of the application, rather than
Works with PHP4 and PHP5
Though it is not mentioned in the definition, CakePHP works out of the box with
both PHP4 and PHP5. So, as long the developer follows the CakePHP convention, their application will be easily portable between the two versions of PHP. Unlike many PHP frameworks, the developer need not worry about compatibility issues. Web servers with either PHP4 or PHP5 will gladly run CakePHP-based applications. But having said that, it is always a better idea to use PHP5 if compatibility is not an issue for the project. Since most CakePHP apps are custom applications, PHP4 compatibility is normally not an important factor. So, using PHP5 for CakePHP
application is definitely recommended.
CakePHP is Free and Open Source
Yes, that is right: CakePHP is an open-source project and it is free for anyone who wants to use it. It is distributed under the MIT License. That means that not only will people be able to use it free of charge, but they will also be able to look at the source
code of CakePHP, and find out how the magic works.
Now, that we have a better understanding of the main concepts behind CakePHP, do
have a second look at the definition! It should be much easier to understand. More
importantly, we now have a good understanding of what to expect from CakePHP, as we now know what it is!
Improved Code Structure
PHP is a wonderful programming language for server-side web development.
One of its benefits is that PHP is very easy to learn. Any person with some basic
programming skills (even without it) can start making dynamic web pages. PHP
gives developers a lot of flexibility in the way that they code. In other words, it does
not restrict the developer to follow a certain structure. This is also one of its major drawbacks. As inexperienced programmers start to built bigger applications, most of the time, the code becomes so unstructured that it becomes very hard to debug or modify even a small change. The same situation also occurs with experienced PHP developers, when the application becomes complex. The situation gets even worse, when multiple developers work in a single project, each following their own way of coding. The main reason for this problem is that PHP does not restrict the developers to follow a certain structure.
The most important design pattern that CakePHP uses to maintain a structured code
is the MVC (Model View Controller) pattern
Understanding the MVC Pattern
The MVC (Model View Controller) pattern is a commonly used design pattern
in software development, where the code is separated into three major parts: models, views, and controllers. The exact purpose of each part depends on the implementation, as it may vary from one framework to another. Here, we are going
to describe the way CakePHP implements the MVC pattern. So, this is not a general discussion on MVC pattern, rather we are only going to see Cake's own MVC
implementation. As we have already mentioned, CakePHP separates the code into three separate parts: models, views, and controllers.
Models
In CakePHP, a model represents a particular database table. Each database table should have a model representing it. So, in CakePHP, every database table has its own model. All PHP code related to accessing, adding, modifying or deleting records from the table are situated in the model. The model also contains code that
defines its relationship with other models. Other than that, the model also defines
the data validation rules when adding or updating data for that model. Model can be thought of as the data layer of the application. The model is also the place where
the business logic related to the model should be defined. For example, if we have
a model to represent cars, all actions related to it like buy car, sell car etc. should be
defined in the model. Models should be the place where the core business logic of an application are defined.
Controllers
Controllers, in CakePHP, control the application flow or logic of the application.
Views
Views are the outputs or responses that are sent back to the user once a request is
processed. They basically consists of markup (like HTML) code with embedded PHP code, but they can also be other forms of output like XML, PDF document etc.
depending on the situation. Views can be thought as the presentation layer of
the application.
How It Works
So now that we have a better understanding of all the three components of CakePHP
MVC, let's see how these three components work together to handle a request.
Request
Controller View
Model
1 5
4
3
2
The diagram above shows how it all works together:
1. The request is dispatched to the controller, with user data (POST and GET data).
2. The controller processes the request, and calls the model to access the data. 3. The model responses to the controller's call, by sending or storing data. 4. The controller then sends the output data to the view.
5. The view outputs the data in the proper format.
As we have already seen earlier, using the MVC pattern helps to structure the code into modular segments. This allows the developer to quickly make any changes if
required and as a result, debugging and modification becomes a much easier job. Using MVC also has the added benefit of reusing code. For example, a single model
code can be used in any controller that needs to access the data in that model.
Another benefit of MVC is that it results in a shorter development time. But MVC
Faster Development
One of the main reasons that most of the modern web applications are built on a framework is for faster development. Using frameworks, like CakePHP, it is possible to develop web applications much faster than it would have been possible using
raw PHP. Other than the MVC pattern, CakePHP comes with many other tricks and
magic that aids in faster web development.
Less Configuration, More Convention
One of the main philosophies of the CakePHP design is to have minimum number
of configurations. Configurations are normally required to make sure that the
system is properly set up, and behaving the way we want it. But with CakePHP,
these configurations are kept to minimum. In fact, the only thing that we need to get CakePHP running is to let it know the name of the database to use, and nothing else
need to be specified!
CakePHP was designed in a way that it relied more on conventions than on
configurations. Conventions are stuffs like the name of the database fields, name
and locations of models, controllers and views. If these are named and placed
according to the CakePHP conventions, Cake will automatically find and use them
properly. That is why it is important to understand the naming conventions that CakePHP uses. Once we are familiar with that, we will never have to worry about
configuration again.
Auto Code Generation
Just imagine how much easier it would be if we have a working code base that is
specific to the application we want to develop, even before we have started to write
a single line of code. Well, with CakePHP, we do not need to imagine anymore, because it is a reality. CakePHP built-in code generator is more commonly known as the baking script. All we need to do is to specify the database tables for the project, and start baking! It will automatically create the models, controllers, and views that we need. Using this generated code, we will have a running application that can insert, edit, list, and delete data from all the database tables.
Quick Access to Related Data
With Cake's data abstraction layer,, we will never need to write SQL queries again, to retrieve or modify data. By calling appropriate model functions, we will be able to access the data very easily. All data will be returned in nicely formatted associated arrays without any hassle.
Association data mapping is a technique by which CakePHP is able to fetch data from not only a single table, but if necessary, all (or selected) related data from other database tables as well. For example, suppose we have a posts table that contains blog posts, and another table named comments that contain all the comments. Now, if we want to fetch a single post along with all the comments of that post, all we need to do is to call a single model function that will not only return the post, but also all the related comments. CakePHP will automatically fetch all the related data from other tables, and send them along with the desired data. We no longer need to write complex or multiple SQL statements to do it.
Built-in Commonly Used Functionalities
Other than the above mentioned features, CakePHP has loads of other functionalities so that the developers do not have to waste time coding solutions to commonly found features in web applications. Some of them are mentioned below:
Built-in Data Validation: CakePHP has a very extensive data validation mechanism, where we just need to specify the valid data type, and CakePHPanism, where we just need to specify the valid data type, and CakePHP will handle the rest.
Custom Page Layout: Most of the time, an application has a common
look-and-feel for all the pages. Using CakePHP's layout functionality, we justes. Using CakePHP's layout functionality, we just
need to put the layout file in the proper location, and all the pages will use it.
Access Control: If we are building an application where we need to control the access of different parts of the application, depending on the user type, we can easily accomplish this by using the Access Control List.
AJAX Helper: Adding AJAX functionalities using the built-in AJAX helper (that uses Prototype and Scriptaculous) is very easy. This can be accomplished without writing a single line of JavaScript.
Other than these, there are other many useful features that help in developing an application in record time, using CakePHP.
•
•
•
Versions of CakePHP: 1.1 and 1.2
Now that we know all the exciting features of CakePHP, the next thing is to decide on which CakePHP version to use. There are two major versions present at the moment: the more stable 1.1, and the exciting new 1.2. Though 1.2 has been around for quite sometime, it is still in beta stage. But having said that, the Cake community
is very confident of this version, and proudly declares that 1.2 is one of the most
stable beta software out there. There are many production quality web applications that are running on 1.2. And, the new features and enhancements made to this version are too good to not use it. As a result, we will be using the 1.2 version in this book. Hopefully, by the time this book is out, the stable version of 1.2 will be out too. So, without any delay, download the latest CakePHP 1.2, and move to the next
chapter to find out how to install it.
Summary
In this chapter, we saw what CakePHP is, and how it can help us to develop web applications that are well structured, and that are also fast to develop. We also discussed what we understand by a PHP framework and what design patterns are.
We looked closely into the MVC pattern, which is an important part of CakePHP
A Quick Installation
In the first chapter, we learned how CakePHP can help us build web applications
that are well structured, and that can be developed rapidly. The next logical step for us is to install Cake, so that we can start baking delicious and yummy
Cake applications.
In this chapter, we take a quick look at setting up Cake in our local machine. As we
will see, installing and setting up Cake in the local machine is not a very difficult
task. If we are already familiar with developing web applications in Apache, MySQL, and PHP-based environments, this chapter should be a simple walk through.
In this chapter, we will:
Download the latest version of CakePHP 1.2 latest version of CakePHP 1.2 Other software that we need to run Cake
Configure Apache to run Cake
Place Cake in the web root of Apachepache
Run Cake for the first time
Downloading CakePHP
In this section, we will see how to download the latest version of CakePHP 1.2. Though this is a simple task, this section has another objective. You will see that this section is divided into two parts: Time for Action and What Just Happened. Throughout the rest of the book, we will be using this format to accomplish different tasks. In the
Time for Action segment, we will show the steps involved in completing the task. In other words, the Time for Action segment will take you through the
step-by-step process of what needs to be done. In the What Just Happened segment, we are going to discuss in detail about why we did take the steps. So, without any
delay, here is the first of many Time for Actions to come:
Time for Action
1. Open up a web browser, and point to http://cakephp.org/. We will land in the homepage of CakePHP:
In the Get it now! tab, click on the 1.2.x.xxx link (x's will be numbers, depending on the latest 1.2 release). This link is located just below the Download button, on the right of the page.
2. This will take you to a page that will have a list of links, as shown in the following screenshot. The latest version of CakePHP 1.2 will be highlighted.
4. This will finally take you to the download page (shown in the following screenshot), that will have a link at the bottom Download Latest Release. Clicking on the link will open up a dialog box that will ask you to either save
it or open it. Choose to save, and point to a suitable location to save the file.
Lastly, press OK. Your cake should be on its way!
What Just Happened?
In this section, we saw the steps needed to download Cake from the official
CakePHP site. The steps are all self explained. So, we do not need to really describe anything more here.
Platform Requirements
In this quick installation, it will be assumed that we are using Apache as our web server, MySQL as our database server, and of course PHP. To run Cake, the minimum version of PHP that we will need is PHP 4.3.2. All later versions of PHP,
including 4.3.2, should work fine with CakePHP. CakePHP is also known to work
with other web servers and database servers as well. Before you proceed further,
please make sure that your local machine fulfils the requirements.
Configuring Apache
There is some tweaking that we need to perform in order to make sure that Apache runs CakePHP applications smoothly. Many Apache installations may not require the following tweaking, as they might be set as default, but it is always a good idea to check if the following settings are present.
AllowOverwrite is Set to All
We need to make sure that the web root directory, or the directory in which we plan to keep CakePHP has AllowOverwrite set to all. We can do this by checking
Apache's main configuration file http.conf. This file should be located in the directory called conf, where we have installed Apache. In this file, there should be <Directory> option for the web root directory. As the following configuration shows, the web root (which is L:/wamp/www for this particular installation) has a Directory entry in which the AllowOverwrite option is set to all. If the directory under web root, in which we plan to keep Cake, has a directory entry, we need to check that one too.
<Directory "L:/wamp/www">
Options Indexes FollowSymLinks
AllowOverride all
Order Deny,Allow Deny from all
Allow from 127.0.0.1
Mod_rewrite Module is Loaded
We also need to make sure that the Apache is loading the mod_rewrite module. To do this, we again have to check the http.conf file. There should be a section in the http.conf file named Dynamic Shared Object (DSO) Support, where all the different modules that are loaded by Apache are listed. The modules that are not being loaded are commented out with # in the beginning of the line. So, we need to make sure that the mod_rewrite module line is not commented out. If it is, we just need to remove the # from the beginning of the line:
LoadModule rewrite_module modules/mod_rewrite.so
Make sure to restart Apache once you have made the above changes.
As long as the above configurations are set accordingly, Apache should be running
CakePHP applications without any issues at all.
Setting Up Cake in Web Root
In this section, we will be placing the cake files into our web server. This is again a very easy process, if you are already familiar with Apache, PHP, extracting
compressed files, and renaming directories.
Time for Action
1. Copy the newly downloaded compressed file to the web root of Apache. 2. Extract the compressed file using your favorite tool in the web root directory.
3. This will create a new directory inside the web root directory. The directory will have a name similar to cake_1.2.x.xxxx (depending on the latest version). Rename this directory to myfirstcake.
What Just Happened?
In this section, we extracted the compressed Cake file, and placed it in the web root of the Apache.
In the first step, we copied the compressed file into the web root. If you are not sure
where your web root is located, you can take a look in the http.conf file. It should have an entry, called DocumentRoot that should point to the Web Root. It should be noted that http.conf has another entry named ServerRoot, which should not be confused with the Web Root.
In step 2, we extracted the file. There are many different extracting/decompressing
software out there. I am sure we all are familiar with some. I do not want to
underestimate your intelligence by describing how to use it! Once the file is
extracted, we will get a new directory in the web root.
The next step, we renamed the extracted directory. By default, it will have the name similar to cake_1.2.x.xxxx. We named it to myfirstcake. Of course, we can name it to anything we want. It is a good practice to name it similar to the name of the project we are using it for.
Running Cake for the First Time
Now, we are ready to check if Cake is running properly in our localhost. Let us open our web browser and point it to http://localhost/myfirstcake/. We should get a screen like the following:
If you have got the above screen, you have successfully installed CakePHP. The important thing to notice in the above screen is to see whether the tmp directory is writable. This is important if you are on a UNIX-based system. Make sure Apache has write access to the tmp directory found inside the location …/myfirstcake/app. If everything is all right, and you followed the instructions in this chapter correctly, you should have a CakePHP installation that is ready to bake some fresh cakes! And, that is exactly what we are going to do in the next chapter.
Summary
In this chapter, we saw how to install CakePHP in a local machine. We started by discussing how to download the correct version of CakePHP, and what are the other
A Quick App
The ingredients are fresh, sliced up, and in place. The oven is switched on, heated, and burning red. It is time for us to put on the cooking hat, and start making some delicious cake recipes. So, are you ready, baker�
In the first chapter, we understood the CakePHP basics, and learnt how it can make
our life easier. Then, in the second chapter, we installed CakePHP in our local machine,
and configured Apache to handle the heat. Now, it's time for some real action!
In this chapter, we are going to develop a small application that we'll call the "CakeTooDoo". It will be a simple to-do-list application, which will keep record of the things that we need to do. A shopping list, chapters to study for an exam, list of people you hate, and list of girls you had a crush on are all examples of lists. CakeTooDoo will allow us to keep an updated list. We will be able to view all the tasks, add new tasks, and tick the tasks that are done and much more. Here's another example of a to-do list, things that we are going to cover in this chapter:
Make sure Cake is properly installed for CakeTooDoo Understand the features of CakeTooDoo
Create and configure the CakeTooDoo database Write our first Cake model
Write our first Cake controller
Build a list that shows all the tasks in CakeTooDoo Create a form to add new tasks to CakeTooDoo Create another form to edit tasks in the to-do list
Have a data validation rule to make sure users do not enter empty task title Add functionality to delete a task from the list
Make separate lists for completed and pending Tasks
Make the creation and modification time of a task look nicer
Making Sure the Oven is Ready
Before we start with CakeTooDoo, let's make sure that our oven is ready. If we have followed the instructions in chapter 2, we should have everything in place. But just to make sure that we do not run into any problem later, here is a check list of things that should already be in place:
1. Apache is properly installed and running in the local machine. 2. MySQL database server is installed and running in the local machine. 3. PHP, version 4.3.2 or higher, is installed and working with Apache. 4. The latest 1.2 version of CakePHP is being used.
5. Apache mod_rewrite module is switched on.
6. AllowOverride is set to all for the web root directory in the Apache
configuration file httpd.conf.
7. CakePHP is extracted and placed in the web root directory of Apache. 8. Apache has write access for the tmp directory of CakePHP.
If anything is not as mentioned above, please read chapter 2 to find out how to get
them in place. Also, in chapter 2, we renamed the Cake directory to myfirstcake. In this case, we are going to name it CakeTooDoo.
CakeTooDoo: a Simple To-do List
Application
As we already know, CakeTooDoo will be a simple to-do list. The list will consist of many tasks that we want to do. Each task will consist of a title and a status. The title will indicate the thing that we need to do, and the status will keep record of whether the task has been completed or not. Along with the title and the status, each task will
also record the time when the task has been created and last modified.
Using CakeTooDoo, we will be able to add new tasks, change the status of a task,
delete a task, and view all the tasks. Specifically, CakeTooDoo will allow us to do the
following things:
1. View all tasks in the list View all tasks in the list
2. Add a new task to the list 3. Edit a task to change its status
6. Delete a task
7. A homepage that will allow access to all the features.
You may think that there is a huge gap between knowing what to make and actually making it. But wait! With Cake, that's not true at all! We are just 10 minutes away from the fully functional and working CakeTooDoo. Don't believe me� Just keep
reading and you will find it out yourself.
Configuring Cake to Work with a Database
The first thing we need to do is to create the database that our application will use.
Creating database for Cake applications are no different than any other database that you may have created before. But, we just need to follow a few simple naming rules or conventions while creating tables for our database. Once the database is in place, the next step is to tell Cake to use the database.
Time for Action: Creating and Configuring the Database
1. Create a database named caketoodoo in the local machine's MySQL server.In your favourite MySQL client, execute the following code:
CREATE DATABASE caketoodoo;
2. In our newly created database, create a table named tasks, by running the following code in your MySQL client:
USE caketoodoo; CREATE TABLE tasks (
id int(10) unsigned NOT NULL auto_increment, title varchar(255) NOT NULL,
done tinyint(1) default NULL, created datetime default NULL, modified datetime default NULL, PRIMARY KEY (id)
);
3. Rename the main cake directory to CakeTooDoo, if you haven't done that yet. 4. Move inside the directory CakeTooDoo/app/config. In the config
5. Open the database.php file with your favourite editor, and move to line
number 73, where we will find an array named $default. This array
contains database connection options. Assign login to the database user you will be using and password to the password of that user. Assign database to caketoodoo. If we are using the database user ahsan with password sims,
the configuration will look like this:
var $default = array( 'driver' => 'mysql', 'persistent' => false, 'host' => 'localhost', 'port' => '',
'login' => 'ahsan', 'password' => 'sims', 'database' => 'caketoodoo', 'schema' => '',
'prefix' => '', 'encoding' => '' );
6. Now, let us check if Cake is being able to connect to the database. Fire up a browser, and point to http://localhost/CakeTooDoo/. We should get the default Cake page that will have the following two lines: Your database configuration file is present and Cake is able to connect to the database, as shown in the following screen shot. If you get the lines, we have successfully
What Just Happened?
We just created our first database, following Cake convention, and configured Cake
to use that database.
Our database, which we named caketoodoo, has only one table named task. It is a convention in Cake to have plural words for table names. Tasks, users, posts, and comments are all valid names for database tables in Cake. Our table tasks has a primary key named id. All tables in Cake applications' database must have id as the primary key for the table.
Conventions in CakePHP
Database tables used with CakePHP should have plural names.
All database tables should have a field named id as the primary key of the table.
We then configured Cake to use the caketoodoo database. This was achieved by
having a file named database.php in the configuration directory of the application. In database.php, we set the default database to caketoodoo. We also set the database username and password that Cake will use to connect to the database server.
Lastly, we made sure that Cake was able to connect to our database, by checking the default Cake page.
Conventions in Cake are what make the magic happen. By favoring convention over configuration, Cake makes productivity increase to a scary level without any loss to flexibility. We do not need to spend hours setting configuration values to just make the application run. Setting the database name is the only configuration that we will need, everything else will be figured out �automagically� by Cake. Throughout this chapter, we will get to know more conventions that Cake follows.
Writing our First Model
Now that Cake is configured to work with the caketoodoo database, it's time to
write our first model. In Cake, each database table should have a corresponding
model. The model will be responsible for accessing and modifying data in the table. As we know, our database has only one table named tasks. So, we will need to
Time for Action: Creating the Task Model
1. Move into the directory CakeTooDoo/app/models. Here, create a file named task.php.
2. In the file task.php, write the following code: <?php
class Task extends AppModel {
var $name = 'Task';
}
?>
3. Make sure there are no white spaces or tabs before the <?php tag and after the ?> tag. Then save the file.
What Just Happened?
We just created our first Cake model for the database table tasks. All the models in a CakePHP application are placed in the directory named models in the app directory.
Conventions in CakePHP:
All model files are kept in the directory named models under the app directory.
Normally, each database table will have a corresponding file (model) in this
directory. The file name for a model has to be singular of the corresponding database
table name followed by the .php extension. The model file for the tasks database table is therefore named task.php.
Conventions in CakePHP:
The model filename should be singular of the corresponding database table name.
Models basically contain a PHP class. The name of the class is also singular of the database table name, but this time it is CamelCased. The name of our model is therefore Task.
Conventions in CakePHP:
A model class name is also singular of the name of the database table that it represents.
The AppModel class inherits another class called Model. Model is a core CakePHP class that has all the basic functions to add, modify, delete, and access data from the database. By inheriting this class, all the models will also be able to call these functions, thus we do not need to define them separately each time we have a new model. All we need to do is to inherit the AppModel class for all our models.
We then defined a variable named $name in the Task'model, and assigned the name
of the model to it. This is not mandatory, as Cake can figure out the name of the
model automatically. But, it is a good practice to name it manually.
Writing our First Controller
With our Task Model in place, it is time to write our first controller. When a request is made to the web application, the controllers are where it is decided what should
be done. In other words, controllers are where the application flow is controlled. If
data needs to be accessed, the controller calls the models and fetches the data. The controller then sends the output to the views to be displayed. For CakeTooDoo, we will only need one controller called the Tasks Controller.
Time for Action: Creating the Tasks Controller
1. Move into the directory CakeTooDoo/app/controllers. Create a file named tasks_controller.php.
2. In the file tasks_controller.php, write the following code:
<?php
class TasksController extends AppController {
var $name = 'Tasks';
} ?>
3. Make sure there are no white spaces or tabs before the <?php tag and after the ?> tag. Then, save the file.
What Just Happened?
Like models, controllers in Cake are placed in a separate directory called
Conventions in CakePHP:
All controller class files are kept in the directory name controllers under the app directory.
Each model in the application has a corresponding controller in Cake. So, for our Task model, the corresponding controller is Tasks Controller.
It is not a must that all models have a corresponding controller, or vice versa. When we make more complicated applications in later chapters, we will see that a controller may use more than one model if required.
The file name of the tasks controller is tasks_controller.php. It is a convention
in Cake that controller file names are the plural of the model name followed by an
underscore and the word controller, with .php extension.
Conventions in CakePHP:
Controller filenames are plural of their model names, followed by an underscore and the word controller.
Like the model class, the controller class name is also CamelCased. In this case it is TasksController. Notice that 'Tasks' is plural for the controller class name as in the
controller file name. All Cake controllers must inherit from the AppController class.
Conventions in CakePHP:
Controller class names should be CamelCased and plural.
AppController inherits the Controller class, which is a core class of CakePHP. The Controller class has all the basic functionalities that a controller needs to perform. As a result, by extending the
AppController class, all controllers will have these functionalities and we do not need to define them again in our controllers.
Lastly, we defined the variable $name in the Tasks controller and assigned the name of the controller to it. Again, like models, Cake will be able to identify the name of the controller automatically, but it is always a good practice to add the $name variable in controllers.
Viewing All Tasks in CakeTooDoo
Now that the Task model and the Tasks controller are in place, let us add some
functionality to our application. The first thing that we would like to do is to view a
list of all the tasks. To do this, we will need to add a function to the Tasks controller, and also add a view to show us the list of tasks.
Time for Action: Viewing All Tasks
1. Open the file tasks_controller.php and add a method named index to the TasksController class with the following code. Any public functions inside controller classes are called actions. So, after adding the index action code to the TasksController class, our tasks_controller.php file will look like this:
<?php
class TasksController extends AppController { var $name = 'Tasks';
2. Move into the directory CakeTooDoo/app/views. Create a directory named tasks inside the view directory.
3. Inside the tasks directory that we just created, create a new file named index.ctp and add the following code to it:
<td> <?php
if($task['Task']['done']) echo "Done"; else echo "Pending";
?> </td> <td>
<?php echo $task['Task']['created'] ?> </td>
<td>
<?php echo $task['Task']['modified'] ?> </td>
<td>
<!-- actions on tasks will be added later --> </td>
</tr>
<?php endforeach; ?> </table>
<?php endif; ?>
What Just Happened?
We created a controller method named index. Methods in controllers are called 'actions'. The index action, that we just added, handles a request whenever a request is made with the URL http://localhost/CakeTooDoo/tasks/index.
All Cake URLs have the following form: http://domainName/ cakeApplicationFolder/controllerName/actionName
When a request is made to the index action, the following line is executed:
$this->set('tasks', $this->Task->find('all'));. This line calls the function find() of the Task model that returns all the tasks stored in the tasks table.
All models in CakePHP have the find() function. It is actually defined in the Model Class. This function is used to fetch records from the table of the model. By passing parameters to this function, we can control which records we want to fetch. In the above code, all was passed to fetch all the records in the task table.
Then, using the set() function of the Tasks controller, it sends this data to the view in an array named tasks. We can access this array in the view through the $tasks variable.
The set() function is used to pass data from the controller action to the view. Two parameters are normally passed to it. The first is the name of the variable that the data will have in the view, and the second is the actual data that needs to be passed. The set() function is actually defined in the Controller class that is inherited by AppController, which again is inherited by all CakePHP controllers.
Like models and controllers, Cake also has a separate directory to place views. In the views directory, we created a directory named tasks that will hold all the views of the Tasks controller. As a controller can have many actions, and each action can have a view, a controller can have many views. Cake keeps all the views of a controller in its separate directory (with the same name as the controller) inside the views directory.
Conventions in CakePHP:
Inside the tasks directory in views, we created a file named index.ctp. This is
the view file of the index action of our Tasks controller. The action name and its
corresponding view file name are always the same. Views always have the .ctp extension, which stands for Cake Template Pages.
Conventions in CakePHP
The controller action and its corresponding view file have the same name. In the index.ctp file, we placed the HTML code with embedded PHP code as well. Here, we have a HTML table to display all the tasks present in CakeTooDoo. Remember, that we sent an array named tasks to the view using the set() function in the index action� This array is accessible from the view, and using simple PHP codes, we display all the tasks that CakeTooDoo stored.
Adding a New Task
With the help of the index action and its view, we were able to display all the tasks in CakeTooDoo. But, because we did not add any task yet, the list displayed no tasks at all. So, let us add a form that will allow us to add tasks to CakeTooDoo. For this, we will need another action in our tasks controller and its corresponding view.
Time for Action: Creating the Add Task Form
1. Open the file tasks_controller.php and add a new action named add as shown in the following code:
function add() {
if (!empty($this->data)) { $this->Task->create();
if ($this->Task->save($this->data)) {
$this->Session->setFlash('The Task has been saved'); $this->redirect(array('action'=>'index'), null, true); } else {
$this->Session->setFlash('Task not saved. Try again.'); }
} }
2. In the same file(tasks_controller.php) add an array $helpers with the values as shown below:
<?php
function index() { ...
}
function add() { ...
}
} ?>
3. Inside the directory /CakeTooDoo/app/views/tasks, create a new file named add.ctp and add the following code to it:
<?php echo $form->create('Task');?> <fieldset>
<legend>Add New Task</legend> <?php
echo $form->input('title'); echo $form->input('done'); ?>
</fieldset>
<?php echo $form->end('Add Task');?>
4. Now point the browser to http://localhost/CakeTooDoo/tasks/add to view the add task form. We should see a form as shown in the
5. Use the form to add the first task to CakeTooDoo and click on the submit
button. This will redirect to the list all tasks page where you can view the added task.
6. Now let us link the Task List and the Add Task Page. In the index.ctp file in /CakeTooDoo/app/views, add the following line at the end of the file:
<?php echo $html->link('Add Task', array('action'=>'add')); ?>
7. To link the Add Task page to the View All Task page, add the following at the end of add.ctp file, found in /CakeTooDoo/app/views/:
<?php
echo $html->link('List All Tasks', array('action'=>'index')); ?>
8. Now, go on to add more tasks to the list using the Add Task form we just created.
What Just Happened?
We added another action to the Tasks controller named add. This action can be accessed by pointing to the URL: http://localhost/tasks/add.
When a request is made to this action, it first checks whether any data has been sent
via the POST method. Any data sent by POST method is automatically stored by Cake in the array $this->data of the controller. If no POST data is present, the add action does nothing, and the view is rendered showing the empty 'Add Task' form.
The view is automatically rendered when the action has finished executing.
When a filled up form is submitted, the submitted data is sent via POST, and stored in
$this->data..When this happens, it calls the create() function of the Task model in the line: $this->Task->create();. The create() function prepares the Task model to add or edit data. Then, it calls the save() function of the Task model to save the data into our database using the code: $this->Task->save($this->data).
The functions create() and save() are two very useful model functions that are used frequently.
We also added the HTML and Form helpers to the Tasks controller by adding the following line: var $helpers = array('Html', 'Form');.
Helpers are special modules of CakePHP that provide functions that arethat are commonly needed in views to format and present data in useful ways.
Next, we create the view for the add action by adding the file add.ctp in the /CakeTooDoo/apps/views/tasks directory. In add.ctp, we first use the CakePHP Form helper to create a HTML form to accept data for the Tasks model using the code:
echo $form->create('Task');
The Form Helper has useful functions that help in creating HTML forms that can easily show or insert data using a Cake Model.
The HTML Input tags for entering the Title and Status of a task is created using echo $form->input('title'); and echo $form->input('done');. Lastly, we add echo $form->end('Add Task'); to close the form and add the submit button with the label 'Add Task'.
You will notice that the creation and modification times are not sent by the add form. This is because CakePHP automatically adds the time to fields that are of the type datetime and are named 'created' or 'modified'. Each time a task is added, Cake saves the time to the field 'created'. And whenever, a task is edited, it saves the time to the field 'modified'. Lastly, we link the index (List All Tasks) and the add page (Add New Task) by using the HTML helper. Adding $html->link('Add Task', array('action'=>'add')); to index.ctp creates a hyperlink to the Add Task page. And adding $html->link('List All Tasks', array('action'=>' index')); to add.ctp adds a HTML hyperlink to the List All Task page.
Editing a Task
Now that we can add tasks to CakeTooDoo, the next thing that we will be doing is to have the ability to edit tasks. This is necessary because the users should be able to tick on a task when it has been completed. Also, if the users are not happy with the title of the task, they can change it. To have these features in CakeTooDoo, we will need to add another action to our Tasks Controller and also add a view for this action.
Time for Action: Creating the Edit Task Form
1. Open the file tasks_controller.php and add a new action named edit as shown in the following code:
function edit($id = null) { if (!$id) {
$this->Session->setFlash('Invalid Task');
$this->redirect(array('action'=>'index'), null, true); }
2. Inside the directory /CakeTooDoo/app/views/tasks, create a new file
named "edit.ctp" and add the following code to it:
<?php echo $form->create('Task');?> <fieldset>
3. We will be accessing the Task Edit Form from the List All Task page. So, let's add a link from the List All Tasks page to the Edit Task page. Open the index.ctp file in /CakeTooDoo/app/views directory, and replace the HTML comment <!-- different actions on tasks will be added here later --> with the following code:
<?php echo $html->link('Edit', array('action'=>'edit', $task['Task']['id'])); ?>
4. Now open the List All Tasks page in the browser by pointing it to
http://localhost/CakeTooDoo/tasks/index and we will see an edit link beside all the tasks. Click on the edit link of the task you want to edit, and this will take you to do the Edit Task form, as shown below:
5. Now let us add links in the Edit Task Form page to the List All Tasks and Add New Task page. Add the following code to the end of edit.ctp in /CakeTooDoo/app/views:
<?php echo $html->link('List All Tasks', array('action'=>'