For your convenience Apress has placed some of the front
matter material after the index. Please use the Bookmarks
and Contents at a Glance links to access them.
Contents at a Glance
About the Author ...
xiii
About the Technical Reviewers ...
xv
Acknowledgments ...
xvii
Introduction ...
xix
Chapter 1: Terminal Multiplexer
■
...
1
Chapter 2: Fundamentals
■
...
19
Chapter 3: Modifications
■
...
31
Chapter 4: Copy and Paste
■
...
37
Chapter 5: Pane/Window Management
■
...
43
Chapter 6: Scripting and Automation
■
...
51
Chapter 7: Pair Programming
■
...
59
Chapter 8: Workflow Management
■
...
67
Introduction
The standard terminal that comes installed as part of your operating system (whether it be Mac, Linux, or Windows based) is seen by most users to be a harsh and barren wasteland, devoid of emotion and color. Respected by many a neckbeard for its power in all but a few areas where it falls short.
If you’re unfamiliar with the (joke) term “neckbeard”, it roughly refers to a Unix system administrator type user. You know, the type of person who has an intimate knowledge of the internals of the Linux kernel and could probably write an OS over a weekend – the sort of hardened engineer who fears no terminal environment. Even they
have experienced times where their terminal fails to do the advanced tasks required to ease their workload; and this is where a terminal multiplexer steps in. The focus of this book being one particularly popular multiplexer: tmux.
At this stage I won’t divulge any further details, as I cover the majority of “why use a multiplexer?” thoughts in the opening chapter of this book. But suffice to say that the information contained in this book should help you not only understand what tmux is and how to use its basic features, but it also covers customizations and abstractions; automation via a scripted interface; resolving notorious copy and paste issues; pair programming (using a tool such as Vagrant to emulate a remote server environment), as well as looking at the best ways to manage your workflow with tmux.
CHAPTER 1
Terminal Multiplexer
The terminal emulators we use on a day-to-day basis do their job admirably. Having direct access to the shell environment is a fundamental way of life for most software engineers, as it gives us a sense of power and efficiency that cannot be matched by GUI-based applications and mouse interactions.
But even a reasonably modern terminal application can fall short in many areas (such as the Terminal.app on Mac OS X). As an example, imagine your terminal window is busy with a long-running process, and you want to interact with another part of your application or project (but you want to keep an eye on the current process, so that you know when it’s finished). One way you could do this is to create a new terminal tab and simply switch back and forth. This isn’t a very elegant solution or efficient, but it would work.
But some terminal emulators don’t let you create tabs, so if you’re one of those unfortunate souls, you’ll have a worse option ahead of you, which is to use your mouse to reduce the size of your terminal and then open a new instance of your terminal application and resize that new instance so you can see both terminal windows at once (that is, if you even have a GUI; if you don’t, then . . . well, you’re almost out of luck).
Imagine a similar (but much more typical) example: you’re a software engineer and you’re writing new (or modifying existing) tests for your application. Ideally, you want to be able to make changes to your tests and application code while getting immediate feedback as to whether any of those changes have broken your test suite. You want a fast feedback loop. This is where being able to split your terminal window becomes a very useful tool.
But just being able to split a window into one or more screens isn’t the only problem that has to be solved. Software engineers open many different types of files during a typical workday, and sometimes, you may find yourself in a situation in which the files you have open would be easier to read and modify if they were placed in a different layout that just wasn’t possible using a standard terminal emulator.
CHAPTER 1 ■ TERMINAL MULTIPLEXER
We also want to be able to manipulate these windows very easily, through shorthand key bindings, and change their dimensions (and even change the layout of the windows, so that they are rearranged into a different format, to fit with the work we do later on in the day).
Humans are also creatures of habit, meaning that there will be a particular layout of windows that we find works best for us 90% of the time, and, so, being able to automate the creation of a particular layout is another feature that would be useful.
Finally, a tool that has the capability to allow me to share my screen seamlessly, so that I can pair program with another individual and have him/her take over the typing on my machine, is incredibly useful when you’re a remote worker.
Having complete control over our terminal environment—how it looks and behaves—is a very powerful idea, and one that is possible through the use of an application called tmux. In the next section, I’ll explain a little about what tmux is and means, as well as how to install and configure it.
Note
■
Some readers may have heard of a recent terminal emulator called iTerm2
(
http://iterm2.com
[for Mac OS X only]), which allows you to make split windows
(among other features) but suffers from much less ubiquity than my tool of choice: tmux.
For example, if I’m on a remote Linux server, I can quickly download and install tmux and be
up and running. I can’t do that with a program that is limited to a single operating system.
As with Vim, a popular terminal based text editor, ubiquity is the key.
tmux
tmux is short for [t]erminal [mu]ltiple[x]er. A multiplexer is simply a fancy way of describing an application that lets you easily manage multiple terminal windows within one screen.
tmux runs a server/client architecture, meaning that when you start the application, it will fire up a single server, and every tmux instance you create on your machine will ultimately connect to that single tmux server. The benefit of this design is that while
---| A ---| B | ---| C ---| ---| D | E | F | ---| G ---| H ---|
CHAPTER 1 ■ TERMINAL MULTIPLEXER
your machine is running, you can detach a tmux “session” (i.e., close tmux but keep the details of that session open, as it’ll be stored on the tmux server running in a background process), so you can then reattach to the session at another time.
Note
■
Visit
http://tmux.sourceforge.net/
for frequently asked questions and
helpful information (such as documentation, IRC, and mailing list details), as well as to
download binaries of the software.
tmux provides a lot of powerful features (most of which were described indirectly via the introduction of this chapter), which I’ve summarized into a few categories following:
Ability to connect to existing local and remote sessions •
Advanced window and pane management •
Ability to move windows between different sessions •
Scripted automation •
The usefulness of tmux truly reveals itself once you start utilizing it on a day-to-day basis and incorporating it firmly into your workflow. By the time we’re finished, you should have a much better understanding of the power and flexibility tmux provides and will wonder how you ever managed without it.
Terminology
Let’s take a brief detour to consider the terminology we’ll be using to describe tmux’s functionality. This will help to understand different tmux concepts as we move through the following chapters.
Prefix Command
The purpose of a multiplexer is to help you load multiple programs within a single window. Because you are effectively loading a program within a program (e.g., loading Vim inside a tmux window), tmux must avoid command conflicts with the subprograms being loaded. To do this, it introduces the concept of a prefix command, which helps to differentiate tmux commands from other programs you use.
Note
CHAPTER 1 ■ TERMINAL MULTIPLEXER
Let’s take a look at a quick example, to clarify what the prefix command does and why. I appreciate that we have yet to even open tmux, but the concept of a prefix key is fundamental to using tmux in the first place, and so I’m hoping you’ll indulge me for just a moment longer, while I attempt to explain it.
Imagine we have tmux running, and for those who have never seen tmux before, you’ll likely not notice much difference in your terminal’s appearance (other than a bar at the foot of your screen, but I’ll come back to this and describe what the bar is and what it means later), because visually, tmux should act as a container around your terminal.
Now, let’s say we want to open a text file within the popular Vim text editor (e.g., vim ~/foo.txt) and modify the content by deleting a specific selection. Chances are you would open the file in Vim, find the content you want to delete, select it, and execute the d command (which is Vim’s delete command). The problem with this process is that tmux assigns its own functionality to the d key (a command for detaching from a session; again, if this doesn’t make sense, don’t worry too much for now, as I’ll cover sessions in due time). This is a perfect example of why tmux commands have a prefix: to avoid conflicts with other programs loaded within a tmux screen.
Due to tmux commands having a prefix, we can safely use Vim (or any other program) and not have to worry that executing a command within our subprograms will cause a side effect in tmux. In the previous scenario, we would detach from our tmux session using the command <C-b>d (where <C-b> is the prefix, followed by the d to indicate we wish to detach from the session).
Throughout the rest of the book, I’ll refer to the prefix key <C-b> as just <P> (for [P]refix). This means the structure of all tmux commands in this book will take the form <P>{key-binding|:command-prompt}. In the preceding example, in which we detached from the tmux session using the key binding <C-b>d, we would represent this using <P>d (see the following note regarding the “command prompt”).
Note
■
tmux provides a “command prompt” (similar in ways to Vim’s COMMAND-LINE/Ex
modes), which you can access by using
<P>:
, followed by a command. For example,
<P>:{command}
.
The reason for shortening the prefix command in the following chapters is, first, to make the commands shorter and easier to read, but more important, I’ll be showing you how you can change the prefix key to be any key combination you like. So if you end up using this book as a reference, and you happen to have changed the prefix to be something else (let’s say <C-a>), it would be easier to mentally replace <C-b> with your own prefix.
Help?
CHAPTER 1 ■ TERMINAL MULTIPLEXER
Command and Key Binding References
tmux provides a quick reference list of all available key bindings, which you can access either via a key binding or the command-line prompt (or even from outside tmux itself ).
To access the key binding reference via a key binding, you would use <P>?. To access this reference via the command prompt, you would use <P>:list-keys. Finally, you can also access this list from outside of tmux, using tmux list-keys (allowing you to utilize this information in some form of scripted automation, which I’ll cover in more detail in Chapter 6).
The list-keys command will only display a list of available tmux key bindings. This does not include all commands that are executable within the tmux command prompt. For that list, you would use <P>:list-commands (or tmux list-commands, if you’re outside of tmux); there is no key binding variation.
If you would like to see some extra information regarding each of the tmux sessions you have open, the following command will display this information for you: <P>:info (or tmux info, if you’re outside of tmux).
Manual
Although the Internet has lots of useful information about how to do certain things in tmux, ultimately, the best resource of documentation is the official manual, which is linked to from the tmux web site and is directly accessible at www.openbsd.org/cgi-bin/ man.cgi/OpenBSD-current/man1/tmux.1.
Alternatively, and more usefully, you can access this documentation via your terminal, using the command man tmux (which also makes it much easier to filter and search through).
Message Feedback
One annoyance with tmux is when you execute a command incorrectly. What you’ll notice happen is that tmux tries to be helpful by displaying a message telling you the correct format of the command it thinks you were trying to execute. But, unfortunately, that message only displays for a fraction of a second and then disappears, not leaving you enough time to see what the requirements of the command actually are.
Luckily, tmux provides a key binding that shows us the complete list of messages tmux has passed to us during our current session (the list of messages is displayed in ascending order, so the oldest messages are at the top, and the most recent at the bottom): <P>~. (You can also access this feature via the command prompt
<P>:show-messages.)
Installation and Configuration
CHAPTER 1 ■ TERMINAL MULTIPLEXER
Mac
To install tmux on Mac OS X, the simplest option is to use the popular Homebrew package manager (http://brew.sh/):
brew install tmux
Linux
If you’re working from a Linux machine, then use your package manager of choice (e.g. Apt, Yum etc). For example, if you’re using Apt then you would run the following command:
sudo apt-get install tmux
Note
■
At the time of writing, the majority of package managers only have version 1.8
available. If you wish to install a more recent version of tmux then you’ll need to modify your
package manager to point to another registry where tmux can be acquired. As an example,
for Apt you would first execute
add-apt-repository ppa:pi-rho/dev
followed by
apt-get update
and finally execute the install command
apt-get install tmux
Windows
If you’re on a Windows machine, you can install tmux as a Cygwin package.
Note
CHAPTER 1 ■ TERMINAL MULTIPLEXER
Configuring tmux
tmux can be configured to work however you require it to. You can change the way it looks, the key bindings it uses, and many different additional optional settings. This configuration is primarily handled by a .tmux.conf file, usually placed within your $HOME directory (e.g., ~/ but can be moved using a symlink).
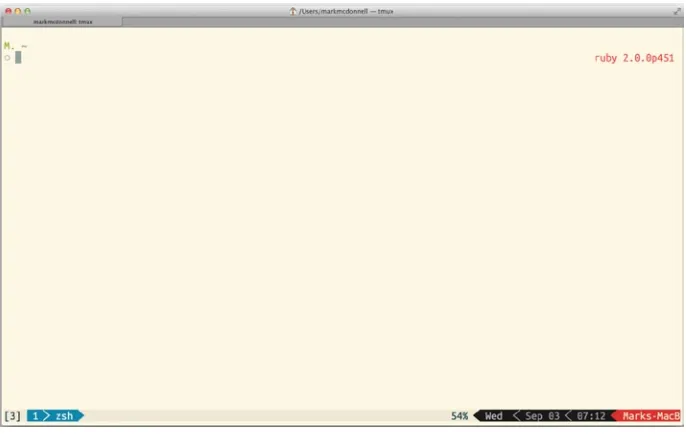
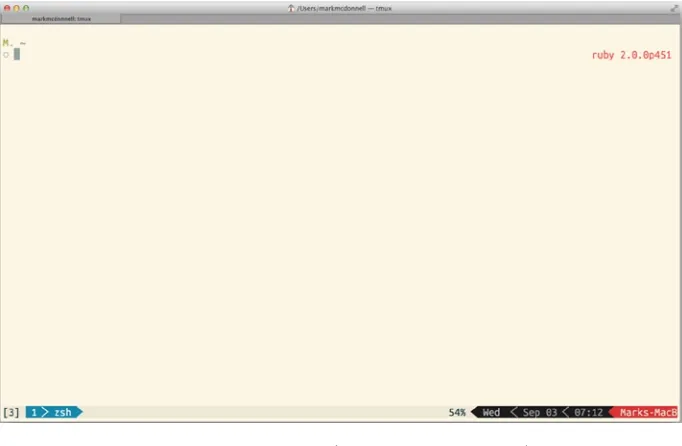
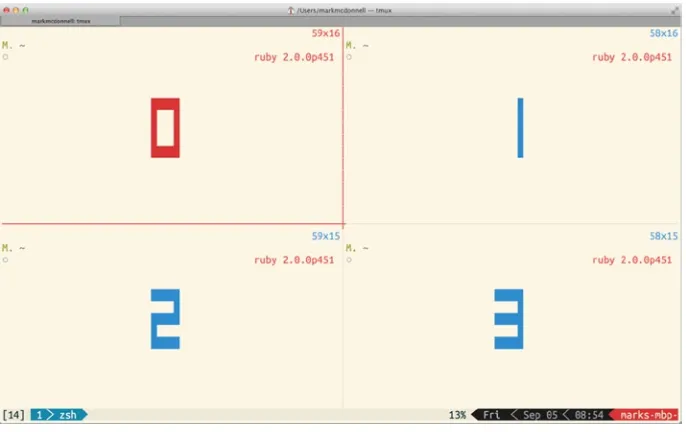
By the time we’re finished in this chapter, and you have tmux open for the first time, you should see something similar to Figure 1-2.
Figure 1-2. Expected tmux view, if using the configuration file described in this chapter
In the following section I’ll show you the contents of my own .tmux.conf file (and I’ll assume you’re using it too). After I show you the file contents, I’ll break down each part of it, so that you can decide if you would like to use/keep the specific settings or not.
Note
CHAPTER 1 ■ TERMINAL MULTIPLEXER
unbind C-b
set -g prefix C-Space
bind-key L last-window
bind-key -r h select-pane -L bind-key -r j select-pane -D bind-key -r k select-pane -U bind-key -r l select-pane -R
bind-key Up select-pane -U bind-key Down select-pane -D bind-key Left select-pane -L bind-key Right select-pane -R
bind-key v split-window -h bind-key s split-window -v
bind-key r source-file ~/.tmux.conf
bind-key -n C-k clear-history
bind-key < resize-pane -L 5 bind-key > resize-pane -R 5 bind-key + resize-pane -U 5 bind-key - resize-pane -D 5
bind-key = select-layout even-vertical bind-key | select-layout even-horizontal
set -g default-terminal "screen-256color"
set-window-option -g utf8 on set -g status on
set -g status-utf8 on
set-option -g status-keys vi
setw -g mode-keys vi
set -sg escape-time 0
set-option -g allow-rename off
set-option -g default-shell /bin/zsh
CHAPTER 1 ■ TERMINAL MULTIPLEXER
set -g history-limit 30000
set-option -g renumber-windows on
set -g status-right '#[fg=colour234,bg=white,nobold,nounderscore,
noitalics]#[fg=colour250,bg=colour234] %a #[fg=colour247,bg=colour234]
#[fg=colour247,bg=colour234] %b %d %R #[fg=colour252,bg=colour234,nobold, nounderscore,noitalics]#[fg=red,bg=colour234]#[fg=white,bg=red] #H' set -g status-bg white
set -g status-justify 'left' set -g pane-border-fg white set -g pane-active-border-fg red set -g message-bg red
set -g message-fg white
setw -g window-status-separator ' '
setw -g window-status-current-format '#[fg=colour231,bg=colour31,bold] #I #W #[fg=colour31,bg=white,nobold,nounderscore,noitalics]'
Note
■
In the preceding code snippet you’ll notice some some symbols that we use to
help improve the design of our tmux status bar, such as
and
. If you were to look at
the
.tmux.conf
file on GitHub (
https://github.com/Integralist/ProVim/blob/
master/.tmux.conf
) you’ll likely see a different symbol. This is because the display of
the icon will depend on whether you have UTF-8 enabled and the relevant font installed. The
font you need is
Ubuntu Mono derivative Powerline.ttf
and you can download this
font from the above GitHub repository as well. The repository also includes a Mac OS based
terminal theme file I use. Once you install that theme you’ll need to change the font setting
to the font mentioned above.
Change the Default Prefix
In the following code snippet, we’re changing the default prefix command to <C-Space>. This is an important setting that I personally find makes a positive difference in my use of tmux.
I typically find that on a laptop (and certain external keyboards), the default prefix of <C-b> is too awkward to use on a day-to-day basis. I’ve tried many variations, such as <C-a>, and even just `, as my prefix key, but none of them was as comfortable as <C-Space>. (This also means, as I’m a heavy Vim user, that my little finger is conveniently placed on the <Ctrl> key ready for a <C-w> command to be fired off.)
unbind C-b
CHAPTER 1 ■ TERMINAL MULTIPLEXER
As you can see, we’re first unbinding the default prefix <C-b>, then we’re resetting the prefix globally (-g) to <C-Space>.
Quick Access to Last Window
If you find yourself jumping around different tmux windows a lot, you’ll realize the benefit of a simple binding, such as the following code snippet demonstrates, which lets you quickly jump back to the last window you were just in (saving you from having to remember the identifier number of the window).
I’ll cover what “windows” and “panes” mean in the context of tmux (and how they work), in the following chapters, so don’t worry too much about them now. If it helps, just think of windows as equivalent to tabs you use in your web browser, and panes as dividing your visible screen up into individual pieces (each piece is its own terminal).
bind-key L last-window
Vim Style Movements
The following code snippet allows me to use similar bindings to those found in the Vim text editor (i.e. Vim’s home row keys) when moving to and from different panes. I actually don’t use these bindings that much, as I prefer to use the arrow keys (see the following section).
bind-key -r h select-pane -L bind-key -r j select-pane -D bind-key -r k select-pane -U bind-key -r l select-pane -R
Again, we’re using tmux’s bind-key function to create the custom binding of <P>{h|j|k|l}, and those bindings end up running tmux’s select-pane function, with its corresponding flag to indicate the direction of the pane to be selected.
The –r flag tells tmux that the command is allowed to be recursive. This simply means that when the prefix command is hit, and the user then presses one of the keys h, j, k, or l, he/she can press one of those keys again, to cause the action to be triggered one more time.
Note
■
The amount of times you can press on a custom key binding that has been set to
“recursive” depends on the
repeat-time
configuration (default value is
500ms
). See the
tmux manual for more information.
CHAPTER 1 ■ TERMINAL MULTIPLEXER
Arrow Movements
The following bindings I use a lot! I find these much more useful and efficient than executing the relevant select-pane commands within tmux’s command prompt (that would become hideously tedious).
bind-key Up select-pane -U bind-key Down select-pane -D bind-key Left select-pane -L bind-key Right select-pane -R
Simpler Pane Creation
I don’t use the following key bindings any more. I used to use them a lot, but I found myself getting caught out when working from a tmux configuration that wasn’t my own (e.g., remote server work or pair programming with a colleague), and so I decided it was just easier to memorize the default <P>" and <P>% command (we’ll see these bindings again in later chapters).
bind-key v split-window -h bind-key s split-window -v
Source .tmux.conf
I don’t use the following binding very often, but it is handy to have included in your configuration, as it makes it very quick and easy to reload your .tmux.conf file, if you’ve made a change to it.
bind-key r source-file ~/.tmux.conf
Clear Pane History
I would say that I’ve probably used this feature once in my entire tmux career! I’ve included it here simply for the sake of completeness (as you may find the need for it that I never did). The binding does exactly what you might expect: the current pane has its command history removed.
bind-key -n C-k clear-history
Easier Pane Management
CHAPTER 1 ■ TERMINAL MULTIPLEXER
bind-key < resize-pane -L 5 bind-key > resize-pane -R 5 bind-key + resize-pane -U 5 bind-key - resize-pane -D 5
bind-key = select-layout even-vertical bind-key | select-layout even-horizontal
The last two bindings use tmux’s even-vertical and even-horizontal layout feature, to help balance the many panes you might have open, so that they have equal distribution (i.e., each pane is made the same size).
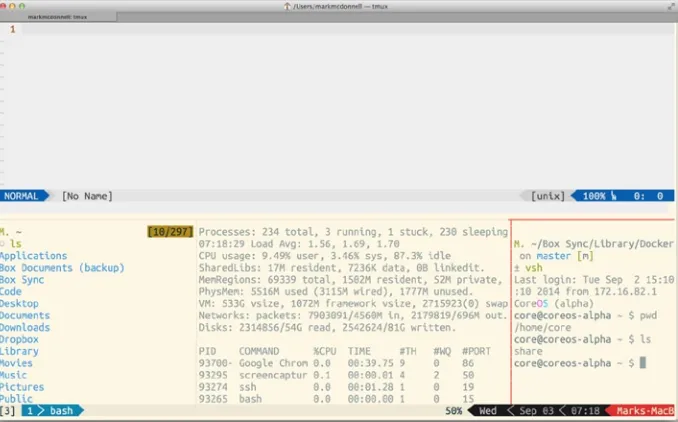
For example, take a look at Figure 1-3, which demonstrates what a typical tmux session might look like (many different sized panes open), then take a look at Figure 1-4, to see what the even-vertical command does to that layout. Finally, take a look at Figure 1-5, to see what the even-horizontal command does to the layout.
Figure 1-3. A typical tmux session, with multiple panes open
CHAPTER 1 ■ TERMINAL MULTIPLEXER
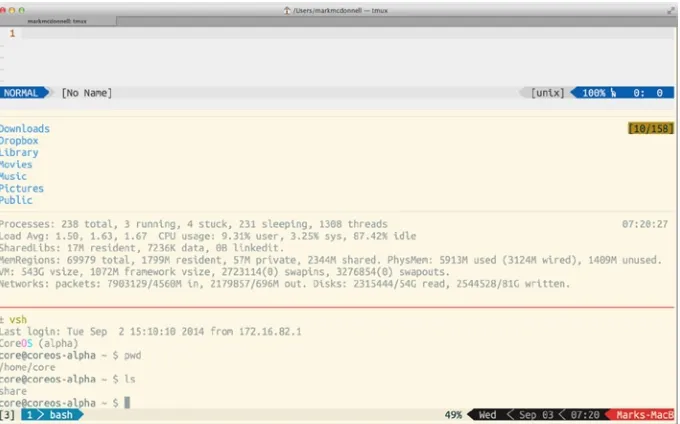
In Figure 1-4, we can see the result of the key binding <P>=, which actually triggers tmux’s select-layout function, and we pass it the value of even-vertical. You should also notice that the result is panes that are vertically stacked evenly on top of each other (as even-vertical suggests).
Note
■
I chose the
=
character for this custom key binding, as it adequately represents
the result of the
even-vertical
option.
Figure 1-4. The same tmux session with even-vertical applied
CHAPTER 1 ■ TERMINAL MULTIPLEXER
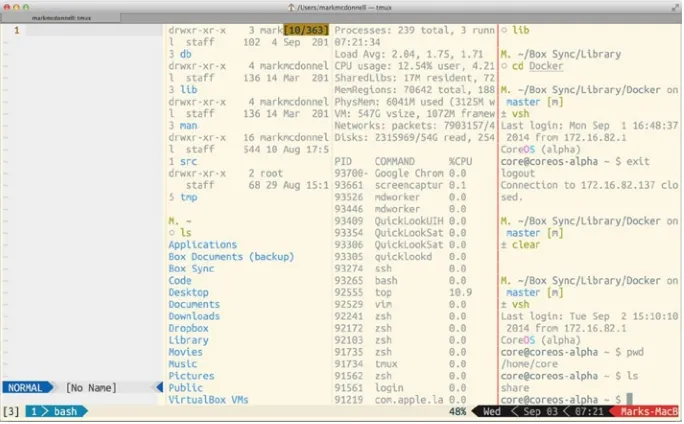
In Figure 1-5, we can see the result of the key binding <P>|, which actually triggers tmux’s select-layout function, and we pass it the value of even-horizontal. You should also notice that the result is panes that are horizontally stacked evenly next to each other (as even-horizontal suggests).
Note
■
I chose the
|
character for this custom key binding, as it adequately represents
the result of the
even-horizontal
option.
Color Correction
To ensure that tmux uses the correct color profile, we can inform tmux what the color support is for our terminal emulator application, by changing the value of the default-terminal option to be a derivative of “screen,” in this case, that our terminal supports 256 colors.
Although I have this setting in place, it’s strictly not needed, as the default value for the TERM environment variable will ensure that tmux loads the right color profile (but only certain versions of Mac OS X have 256-color support, so you may have to tweak this value to suit your OS requirements).
set -g default-terminal "screen-256color"
CHAPTER 1 ■ TERMINAL MULTIPLEXER
Enable utf8
We use a specific font (Ubuntu Mono derivative Powerline.ttf, downloadable from
https://github.com/Integralist/ProVim/) to control the look of our tmux status bar (see the “Change the Status Bar Appearing” section, following), and because of this, if we don’t enable utf8 support in tmux, those characters won’t display properly in the tmux status bar.
set-window-option -g utf8 on set -g status on
set -g status-utf8 on
Command Prompt Movements
The status-key option lets us modify how we move our cursor around while typing within the tmux command prompt (e.g., the command prompt is accessed using <P>:), meaning, if we set the value to vi, we can utilize some basic Vi motions.
If we enter the command prompt and type some text (or, more appropriately, some tmux commands), we can press <Esc> and then use some basic Vi style motions, such as w, e, and b, to move around, and i, to start typing again.
set-option -g status-keys vi
Cancel Immediately
I like to set the escape-time setting to zero, so that anytime I press <Esc>, that action is triggered immediately. If I don’t have this setting, tmux will wait a fraction of a second to make sure that <Esc> isn’t being executed as part of a sequence of commands.
set -sg escape-time 0
Prevent Program Window Renaming Trigger
tmux tries to be helpful by renaming the window tab to represent the process that is currently running. I don’t like that behavior, as I prefer to manually rename my window tabs (I’ll cover how to do this in an upcoming chapter).
As an example, if I were in a normal directory, the window tab would be renamed to Zsh, to represent that I’m in a shell environment. If I were to start up a Pry session (Pry is a Ruby CLI REPL tool), because I use JRuby (a Java implementation of the Ruby programming language), then the underlying process would be Java, and so my window tab would be renamed java.
After disabling this setting, if I manually rename my window tab to Foo, then no matter what I do or open in that window, the window tab will continue using the same name that I gave to it.
CHAPTER 1 ■ TERMINAL MULTIPLEXER
Change the Default Shell
This is a setting I don’t necessarily need to have, but I like to be explicit and keep it in. The default value is determined by the SHELL environment variable, which for me is set to /bin/zsh and means that for all new windows you open in tmux, it will use that shell as its default.
set-option -g default-shell /bin/zsh
Human Numbering
All tmux windows (by default) are indexed from zero, which I find highly irritating, as there is no reason for it to be that way. This setting fixes this problem, by forcing tmux to index windows by starting from the number one.
set -g base-index 1
Increase Scroll-back
When scrolling tmux’s screen buffer (don’t worry if you don’t understand what that means right now, as I’ll cover it in the next chapter), we can’t keep scrolling forever. There is a limit of 2000 buffer lines that tmux will store in its history. Certain processes can easily produce output that exceeds this limit, meaning we will find ourselves scrolling through a large stack trace error, and we’ll stop halfway through the output, as we can’t scroll back any further in the buffer’s history. To resolve this issue, we can increase this limit, using the history-limit option.
set -g history-limit 30000
Automatic Window Renumbering
You’ll see in an upcoming chapter how to create new windows, and in doing so, you’ll notice that tmux automatically numbers each window (starting from the base-index). If we had three windows open, then the windows would be numbered 1, 2, and 3 (with the assumption that the base-index option was set to 1).
If we removed the second window, the default result would be two remaining windows, numbered 1 and 3. But with the renumber-windows option turned on, this would mean tmux could automatically renumber the windows to 1 and 2.
CHAPTER 1 ■ TERMINAL MULTIPLEXER
Change the Status Bar Appearing
It seems the first thing most tmux users want to do is to configure the appearance of their tmux status bar. It is the source of a lot of information, and so I can appreciate that users are passionate about getting it to look perfect for their needs.
In Figure 1-6, we can see what the tmux status bar will look like when using the preceding .tmux.conf configuration. Let’s take a moment to review the different parts of the status bar that we’ve styled.
• [test]: This is the name of the tmux session.
• 1 > zsh: This indicates there is one window running a Zsh shell. • 83%: This is my battery percentage.
• Wed < Sep 03 < 17:54: This is the current date and time. • Marks-MacB: This is the name of my computer.
Figure 1-6. The tmux status bar redesigned by our .tmux.conf configuration
Following is the relevant code inside the .tmux.conf file that creates this status bar:
set -g status-right '#[fg=colour234,bg=white,nobold,nounderscore, noitalics]#[fg=colour250,bg=colour234] %a #[fg=colour247,bg=colour234]
#[fg=colour247,bg=colour234] %b %d %R #[fg=colour252,bg=colour234,nobold, nounderscore,noitalics]#[fg=red,bg=colour234]#[fg=white,bg=red] #H' set -g status-bg white
set -g status-justify 'left' set -g pane-border-fg white set -g pane-active-border-fg red set -g message-bg red
set -g message-fg white
setw -g window-status-separator ' '
setw -g window-status-current-format '#[fg=colour231,bg=colour31,bold] #I #W #[fg=colour31,bg=white,nobold,nounderscore,noitalics]'
Note
CHAPTER 1 ■ TERMINAL MULTIPLEXER
Summary
So, this introduction to tmux has been quite fast-paced. I hope you’re now even more excited to reach the upcoming chapters and discover more about how to use tmux. With your custom configuration in place, you can move on to learning some of the more practical uses of tmux. Let’s quickly recap some of the things we’ve seen so far.
We began by considering some of the failures of standard •
terminal emulators and how tmux can help solve those issues.
I explained the meaning behind the name
• tmux and what the
architecture pattern is (i.e., a server/client model), including the ability to attach, detach, and reattach to preexisting sessions.
Next, I covered the tmux terminology (such as the prefix •
command), so you have a clear language to help you understand the upcoming chapters.
I also briefly covered the different ways you can get help with •
tmux.
Last, we looked at installing and configuring tmux, followed by a •
CHAPTER 2
Fundamentals
In the previous chapter, we became acquainted with the concept of tmux and what this program could offer us in the way of resolving some standard terminal emulator annoyances. In this chapter, we’re going to start using tmux and investigate some of its different constructs and terminology, such as the following:
Sessions •
Buffers •
Panes •
Windows •
By the end of this chapter, you’ll know enough about tmux to be a confident user and start integrating it into your workflow. There will still be much more to learn (and after this chapter, we’ll start to investigate tmux’s other features), but for now, consider what you learn here to be an essential and solid foundation upon which we’ll be building.
Sessions
tmux is designed around the idea of a “client-server” model (this introduces three new terminologies: client, server, and session), and this means that when we start tmux (from our terminal application), we’re effectively using the tmux client. The client will attempt to create a new session on the tmux server, and if a server doesn’t exist, one will be started up in a background process to which our client can connect.
Within a session, we can do anything we could do normally within the terminal environment. The only difference is that, now, all our activity is recorded within a tmux session.
CHAPTER 2 ■ FUNDAMENTALS
environment in place, so that we can move on to this other project, and then when done with “A,” we can come back and reinstate the entire “X” environment exactly as we left it. This type of scenario occurs more often than you probably realize, and although there are ways to work around it without the use of tmux, they’re not as elegant (as you’ll see). The reason we have this power to detach and attach sessions at our leisure is because of tmux’s client-server model, which means that while our computer is running, the tmux server will stay alive (thus keeping open all the different sessions we’ve created).
Creating a Session
To create a new tmux session, we run the tmux command from our terminal application. Doing this will create and connect to a new session that is automatically named by tmux (unless you provide a name; see Figure 2-1).
Figure 2-1. Example of a new tmux session (automatically numbered)
Note
■
tmux sessions are named numerically by default. So if you run
tmux
, it will
create a session whose identifier is
0
. If you were to run the
tmux
command again in
another terminal, the next session would be identified as session
1
(and so forth).
To help distinguish between different sessions you have running, you can give them a descriptive name. To do this, you can run the following command:
CHAPTER 2 ■ FUNDAMENTALS
In the preceding example, we use the -s flag to indicate that we want to give the session we’re about to create the name “my_session.” When you start a new session, you are automatically connected to it, but you can start new sessions and not connect, by adding the -d flag, which indicates a “detached” state, as follows:
tmux new -s my_session -d
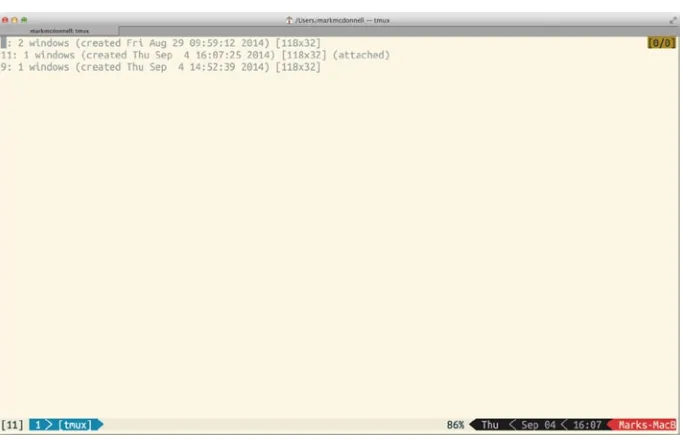
Listing Sessions
When you have multiple sessions open, it can be hard to remember them all, so tmux provides a complete list of every session you have created. To view the session list (Figure 2-2), you can run one of the following commands:
• tmux ls (from outside tmux)
• <P>:list-sessions (from inside a current tmux session)
Figure 2-2. Example of listing current sessions (inside tmux)
CHAPTER 2 ■ FUNDAMENTALS
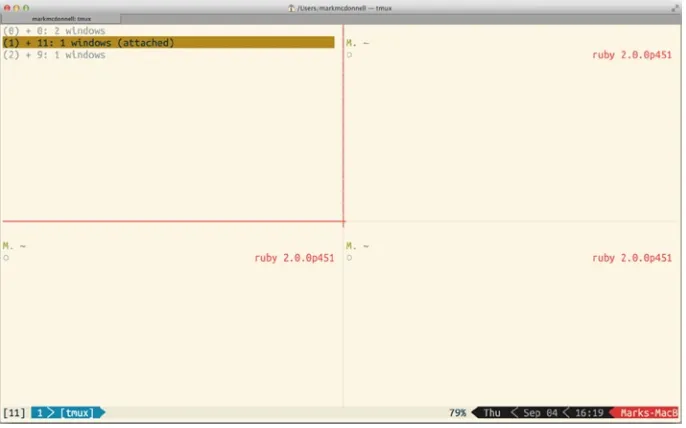
Selecting a Session
If you have multiple sessions open and you want to jump around the different sessions currently available, tmux makes this very easy, by providing not only commands that can be executed via the command prompt but also custom key bindings. (Admittedly, I personally don’t have much need for this type of feature, but, hey, it’s interesting nonetheless, I think).
The following command will list all available sessions and allow you to use the arrow keys to navigate the list and select the session you wish to move to, by pressing <CR> when your cursor is placed on the relevant session you want to open (see Figure 2-3 for the output):
:choose-session
Figure 2-3. Example of running :choose-session inside a single pane
Note
■
The current session is automatically highlighted.
The following key bindings will also allow you to move through all sessions sequentially:
CHAPTER 2 ■ FUNDAMENTALS
Renaming Sessions
Most of the time, when I create a new session, I’m being lazy (and/or forgetful), and I won't specify a name for my session. When I come back to look at what sessions I have open (so I know what session I want to go back to), it can be tricky to determine what session holds what project, if they’re all just numerically identified.
In such instances, it can be helpful to rename your sessions, so that they become more descriptive of what they hold. This can be done while inside of tmux, using the <P>$ command. Doing so will drop you into tmux’s command prompt, allowing you to enter a new name.
Note
■
You can access this feature from the command prompt by using
<P>
and then
typing
:rename-session -t {current_id} {new_id}
. You can also access this
feature (as with other command prompt-based commands) from outside tmux, using
tmux
rename-session –t {current_id} {new_id}
.
Closing vs. Detaching
Because tmux uses a client-server model, we can close our client but still keep the session open and running. There are a couple of commands that are easily mixed up (a command to detach from the session and another for actually closing the session). They may be similar, but they do have subtle but very important differences that you need to be aware of.
If you have multiple panes open, executing
• exit or <C-d> within
the terminal shell (for that pane) will cause the pane to be closed. (If you have multiple panes open, then the remaining panes will stay open until you run the same command within those panes).
If you only have one pane open within a window, executing
• exit
or <C-d> within the terminal shell (for that pane) will cause the pane/window to be closed. If you have only one window, the entire session will be closed. (If you have multiple windows open, only that window will be closed).
Executing
• <P>d from any pane or window will cause the tmux client to detach from the current session.
Application Bootstrap
tmux also allows us to create a new session and have it start up automatically inside a program of our choosing. The following command demonstrates how we can start a new session that automatically opens the Vim text editor program:
CHAPTER 2 ■ FUNDAMENTALS
Note
■
This only works with a single application. This means you can’t specify multiple
programs to be opened, without using more advanced automation commands (which we’ll
see in Chapter 6) as tmux doesn’t know how to handle multiple programs. For example, if
there were two programs specified –
tmux new vim top
– then tmux won’t know how to
load both of them (
vim
and
top
).
Buffers
When you establish a tmux session, you’re presented with a viewport to the standard terminal screen. Effectively, it doesn’t look like much has changed (if it weren’t for the tmux status bar now appearing at the bottom of the screen). This viewport is referred to as a buffer
(specifically an “output buffer”). What this means is that any information presented to you is actually farmed off to stdout, which, in this case, is your terminal screen.
Scrolling the Buffer
Because this is just a viewport, if there was too much information to display and it didn’t fit in your current screen, it would appear “off screen,” and you would have to scroll back up the screen to see the content you missed. For us to scroll the buffer so that we can see the additional content that didn’t fit our screen, we have to execute a command that puts us into tmux’s “copy mode,” as follows:
<P>[
Note
■
Just to reiterate, as all key binding commands can also be accessed via the
command prompt, so copy mode can be accessed by executing
<P>:
, followed by typing
copy-mode
.
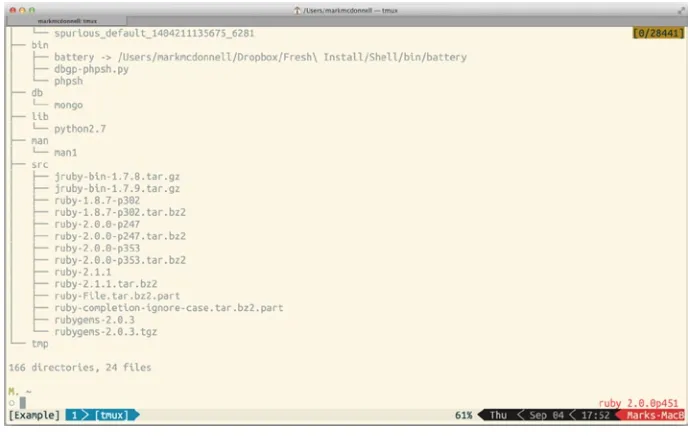
CHAPTER 2 ■ FUNDAMENTALS
To explain what the counter represents, let’s consider the preceding example. In the example, I ran the command tree, to display the tree structure of all files and folders within my $HOME directory. This means there is lots of content that is impossible to fit onto a single screen, and so it appears outside the screen viewport. When I entered into copy mode, it displays the counter [0/28441], which tells us that there are currently 28441 buffer lines that have scrolled off the screen. The first number (0 in this case) is the current offscreen line.
That might not make much sense, so let’s demonstrate what I mean by that explanation. At the moment, while in copy mode, I’m at the bottom of the visible buffer. There are 28441 lines of the buffer currently offscreen. If I use the up arrow key to move up the buffer, the first number will stay set to 0, until I reach the top of the viewport. Once my cursor moves one line beyond the viewport, you’ll see that the number zero changes to 1, and then for every line after that I go upward, it increases, until I reach the top of the buffer itself, where the number will stop at 28441 (as I’ve reached the top of the offscreen buffer content).
Navigating Copy Mode
You can navigate the copy mode by using both arrow keys, as well as the standard Vim key bindings hjkl. If you want to jump directly to a specific offscreen line, use the following command: :{line_number}. So if you wanted to jump to the 50th line outside the viewport, you would execute :50.
CHAPTER 2 ■ FUNDAMENTALS
Note
■
This command doesn’t require the prefix, so it’s not
<P>:50
but, literally, consists
of pressing
:
, followed by the line number (while in copy mode).
You can also use familiar Vim bindings such as gg and G to move to the top and bottom, respectively, of the buffer content. The tmux copy mode also provides both a forward and backward search facility similar to Vim, as follows:
• /{search_phrase} = search forward through the buffer • ?{search_phrase} = search backward through the buffer To exit copy mode you can press either one of the following keys:
• <CR> • q
Panes
In tmux, the “panes” feature effectively splits the current viewport into subsections. Each split of the screen is referred to as its own pane and contains a new shell instance for us to work from.
When tmux connects to a session, you will note that you begin with a single window (and, thus, a single pane inside that window). The window is also referred to as the
viewport.
To split the window into separate panes, you’ll need to decide whether you want to split it into either a horizontal or vertical pane. To split the viewport into two panes that sit horizontally to each other, you would execute one of the following commands:
• <P>:split-window –h • <P>%
To split the viewport into two panes that sit vertically to each other, you would execute one of the following commands:
• <P>:split-window -v • <P>"
Note
■
Remember to check the
.tmux.conf
file from the previous chapter
CHAPTER 2 ■ FUNDAMENTALS
Closing
As I mentioned earlier, to close a pane, you just have to run the command <C-d> or type exit; but these only work when any programs in the pane are closed, and we’re back in the terminal shell. What happens, though, if we have to force-close a pane? I have had this problem quite a few times when running certain applications that have hit a fatal error and can’t use either <C-c> or <C-d> to stop them.
In those instances, running the <P>x command will act as a “force quit.” It’ll display a message (within the command prompt) asking if we would like to “kill-pane {pane_number}? (y/n),” to which the response would be y, for yes.
Navigating
tmux makes splitting the current window viewport into multiple panes very easy and inexpensive, but it does offer a few different ways to navigate your pane layout. There is a simple sequential command that effectively rotates you through each pane in a sequence (e.g., moving in one direction), until you reach the pane you want to work inside. Using the <P>o command does this.
There is also a command prompt variation that allows you to move in any direction. The following list demonstrates moving left, right, up, and down:
• <P>:select-pane -L • <P>:select-pane -R • <P>:select-pane -U • <P>:select-pane -D
The command prompt version of a command can be quite tedious to execute, so it’s best to create a set of custom key bindings to help make this task a little quicker and easier. If you have the .tmux.conf configuration file from the previous chapter, then you’ll find that includes the following custom bindings:
# Vim style
bind-key -r h select-pane -L bind-key -r j select-pane -D bind-key -r k select-pane -U bind-key -r l select-pane –R
# Arrow keys
bind-key Up select-pane -U bind-key Down select-pane -D bind-key Left select-pane -L bind-key Right select-pane -R
CHAPTER 2 ■ FUNDAMENTALS
Note
■
The numeric identifiers for each pane only appear for a brief moment, and
jumping to a pane only works while they are visible. So, act quickly and press the number of
the pane you want to jump to while the identifiers are on screen.
The <P>q command is again a key binding built into tmux that simply executes the command prompt variation :display-panes (see Figure 2-5). So, if you’re looking to do some kind of scripted automation of tmux (which I’ll cover in a later chapter), being aware of the command prompt versions can be useful.
Resizing
To resize a pane in tmux, you’ll need the :resize-pane command. The following is an example of its syntax structure:
<P>:resize-pane -t {pane_id} -D {amount}
In the preceding example, we’re telling tmux to target (-t) the pane we want to resize (replace {pane_id} with a numeric id value), and then we tell it what direction (-d) to resize and what amount to resize by (replace {amount} with a numeric value).
CHAPTER 2 ■ FUNDAMENTALS
For all details of this command, see the documentation, but for the majority of users, the following flags/options are what they need to know:
• -U: Resize window upward. • -D: Resize window downward. • -L: Resize window to the left. • -R: Resize window to the right.
There is also a slightly simpler form, in which you can leave off the target, and tmux will assume you want to resize the current pane, as follows:
<P>:resizep -D {amount}
If you’re using the .tmux.conf file (covered in the previous chapter), then you’ll already have a set of custom key bindings that make it easier to resize the current pane, as shown following:
• bind-key < resize-pane -L 5 • bind-key > resize-pane -R 5 • bind-key + resize-pane -U 5 • bind-key - resize-pane -D 5
Balancing
When creating a new split pane, tmux will try to keep them evenly balanced (i.e., of equal size), but after a while, you can find they shift out of balance. This can happen by chance but more often when you manually resize your panes to give more focus on a particular file.
For example, if you’re doing test-driven development, you’ll likely have two panes open: one holding your code under test, and the other displaying the results of your tests. Chances are, you want your test-results pane to be quite small and take up less space than the other pane holding the code being tested. To do this, you’ll end up manually resizing the panes.
If you want to evenly distribute the space of yours panes (i.e., have them use an equal amount of space), use one of the following commands:
• <P>:select-layout even-horizontal • <P>:select-layout even-vertical
Note
CHAPTER 2 ■ FUNDAMENTALS
Windows
In tmux, windows work in a similar way to how “tabs” work within your web browser. To create a new window, run the <P>c command (or :new-window, if you’re using the command prompt).
You’ll notice when creating a new window that tmux will automatically name it after the process that’s running. For example, it will name the window zsh, as that binary is the default terminal shell running.
At any point, if you have to rename the current window, you can do this very simply, using the <P>, command. At this point, tmux will ask you to enter a new name for the window. If you’re using the command prompt, the following example demonstrates the syntax structure:
:rename-window -t {window_id|window_name} {new_name}
Summary
In this chapter, we’ve covered the majority of the fundamental concepts that tmux is composed of. Let’s take a quick look at what was covered so far.
We discussed how tmux sessions work, such as how to create/ •
list/select/rename and attach/detach a session, as well as what benefits they provide.
We then moved on to the concept of buffers and the screen •
viewport. I explained how overflowing content is displayed outside of the viewport and is still available within the current buffer, as well as how we can navigate the buffer, using tmux’s copy mode.
After that, we looked at how panes work and at their relationship •
to tmux windows, how we can create/manipulate and navigate panes, and how we can trigger a window or entire session to be closed, by removing all available panes.
Finally, we covered the concept of tmux windows and how to •
CHAPTER 3
Modifications
Using tmux “out of the box” is useful enough as it is, but most of the time, we’ll want to make our lives a little easier, by adding some additional customizations (such as we did in Chapter 23, when we added custom configuration to our .tmux.conf file).
The modifications we’ll be making this chapter aren’t all strictly tmux configurations. For example, the following section contains modifications aimed at workarounds for reducing complexity and duplication through the use of shell alias’ and functions. Other sections are aimed at further modifications to the .tmux.conf file itself.
The number of modifications you make will be down to what it is you’re trying to simplify for yourself. For myself, I find I only require a small number of modifications that revolve around minor abstractions and fixing issues that I’ve stumbled across while using tmux.
Abstractions
There is a vast amount of tmux specific commands (each with varying options), which can be difficult to memorize. I find that the easiest way to resolve that particular problem is to abstract away the commands for something more palatable.
For example, I would find myself constantly having to look up the documentation for how to create named sessions, or attach to an existing session. No matter how often I would run those commands, I could not commit them to memory.
I decided that the simplest solution was to abstract the relevant commands that I found myself having the most difficulty with into some simple wrapper functions. These functions would be added into my .zshrc shell configuration file.
Note
■
If you’re not using the Zsh shell then simply add these to your
.bashrc
file or
similar shell configuration file.
CHAPTER 3 ■ MODIFICATIONS
Creating New Sessions
The first abstraction I made was to the command I probably use the most: creating a new “named” tmux session (as seen in the following code snippet):
function tmuxnew() { tmux new -s $1 }
Now this isn’t necessarily a difficult command to remember, but if we’re going to be abstracting other tmux commands, there is no harm in keeping things consistent. To execute this command, all I have to do is type tmuxnew {my_session_name} (you can shorten the name, if you prefer, to tn or tnew; whatever works for you) into my terminal shell, and if I forget to provide a name, the command will fail to run and remind me that I’ve not specified a session name.
But this in itself can be a bit long-winded, because we have to think up a unique name for each session we create. It would be better if we could create a new session that was named after the project directory in which we are currently residing. That’s what the following alias does for us. We simply run tat, and it’ll pick up the name of the current folder and use that, as in the following:
alias tat="tmux new-session -As $(basename $PWD | tr . -)"
The way it works is by utilizing the –A flag for the new-session command. The –A flag makes new-session behave like attach-session, if the specified session name already exists. From there, instead of hard-coding in a session name (which wouldn’t be very useful), we use the shell’s $() command substitution feature, which evaluates the commands specified within the parentheses before the main/containing command is run. The returned value from the subshell commands is what is used for the session name.
To get the folder name, we use the basename command and pass it the current working directory name ($PWD). So if $PWD returned /Users/markmcdonnell, the basename for that path would be markmcdonnell.
Finally, we pipe (|) the folder name through to the translate (tr) command, which converts any dots (.) into hyphens, to ensure the session name is valid. This avoids issues wherein the folder name is x.y.z, by converting it into a valid name, such as x-y-z, before passing it to the new-session command.
Note
CHAPTER 3 ■ MODIFICATIONS
Attaching to Sessions
As you can probably imagine, there are similar abstractions that we can make at this point, such as the following code snippet, which indicates that I want to connect to a specific named session:
function tmuxopen() { tmux attach -t $1 }
Typically, I’ll execute tmux ls to get a list of open sessions, and then once I have that list of sessions and I know what session names I have already, I can run tmuxopen {my_session_name} to reattach to the specified session.
Destroying Sessions
When I want to kill a specific session completely, I use the following function:
function tmuxkill() { tmux kill-session -t $1 }
For me, to use this function, I have to know the name of the session I want to kill, so I’ll execute tmux ls first, to get a list of open sessions, and then once I have that list of sessions, I’ll know which sessions I have already. Then I can run tmuxkill {my_session_name} to destroy the specified session. But what happens when we want to destroy all our tmux sessions?
Note
■
In the following example, I will demonstrate a manual solution to the problem
of destroying multiple tmux sessions at once, by using a collection of Unix commands.
There is a simpler solution using tmux’s built-in command
tmux kill-server
. The
reasoning behind showing readers a more manual process is to encourage you to become
more comfortable working from the command line and to take advantage of tools that can
help you resolve issues for which there are no built-in commands.
OK, so we could execute the tmuxkill function multiple times, but that’s just slow and very tedious. Instead, we can use some Unix wizardry to help make killing all our tmux sessions much easier:
alias tmuxkillall="tmux ls | cut -d : -f 1 | xargs
CHAPTER 3 ■ MODIFICATIONS
This might seem long and confusing, but with a little background information on the individual commands, it can start to make a little more sense. I’m not going to get into the nitty-gritty of how each of the commands works, as this isn’t a book about Unix, but I will try and break it down as simply as I can.
A top-level view of the alias shows us that we have three commands in place (tmux ls, cut, and xargs), and each command is separated by a pipe (|), which means the result from the previous command is passed through to the next command.
The tmux ls command displays into stdout (i.e., the terminal screen) a list of open tmux sessions that looks something like the following output, which highlights that I have three separate sessions running on my machine (one called my_session, another called work, and the last called side project):
my_session: 1 windows (created Thur Aug 28 17:01:34 2014) [118x32] work: 4 windows (created Fri Aug 29 09:59:12 2014) [118x32]
side project: 2 windows (created Mon Aug 25 08:29:05 2014) [118x32]
From this output, we can see that the part we need is before the colon (:), as that is the session name. For us to be able to parse the session name from the output, we have to use the cut command. We tell the command to use the colon as a “field” delimiter (-d :), which means it’ll split each line of output into chunks, using the colon as its indicator of where to make a split. Then we tell the command to return us the first chunk or field (-f 1).
Now that we have the session name, we pass that through to xargs to handle. We first tell xargs to hold the value we’re passing to it, so we can reference it using the syntax {} (we do this via the -I {} flag). We then tell xargs what command we want it to execute (in this case, tmux kill-session -t {}), and where we typically would use the session name, we place a {}.
Because we’ve used the cut command (which processes multiple lines of data), each listed tmux session will be processed and parsed for its session name and passed to xargs to handle triggering the kill-session command.
Extending the Message Display Time
By default, tmux sets the length of time a message is displayed onscreen to 750 milliseconds. This is a remarkably short amount of time for you to decipher the message that’s being highlighted to you by tmux. Typically, I’ll misuse a tmux function, whereupon tmux will notify me of the correct syntax (or the error), by utilizing its own display-message command.
Inevitably, I always miss what the message said (or didn’t get enough time to read the entire message, or the commands correct options), and so I have to resort to executing <P>~ to display all messages that have recently been sent, just so I can get a longer glimpse at the message I missed.
Instead of opening a list of old messages, a better solution is to extend the display message time, using the display-time command. Let’s extend to two seconds the message display time for all currently open windows (using the -g flag), by adding the following setting to our .tmux.conf file:
CHAPTER 3 ■ MODIFICATIONS
Repeatable Keys
When creating your own key bindings, tmux provides an additional flag (–r), which lets you control how the key is repeated. In Chapter 1, I demonstrated a basic usage of the bind-key command’s -r flag, but in this section, I want to cover another example of how it is useful. Specifically, I would like to demonstrate how this flag can help to improve tmux’s ability to switch panes.
To begin, let’s imagine we have two panes open horizontally next to each other. The left pane has a text document open in the Vim text editor, and the right pane (the currently focused pane) is a terminal shell. Now imagine we want to move to the left pane (which has Vim open) and then start moving the cursor to the right (while within Vim).
To do this, you would first execute <P><Left-Arrow> to move the cursor into the left tmux pane, and then once inside the left pane (and subsequently within Vim), you would press <Right-Arrow> to start navigating through the Vim buffer.
What you would typically find is that the cursor would not move to the right of the buffer (inside of Vim); instead, the cursor would move back to the right tmux pane. But why? The cause of this is to do with the use of tmux’s default configuration and the –r flag when defining our custom key bindings.
A naive workaround to this problem would be to simply wait a fraction of a second before we pressed the <Right-Arrow> key. But a better solution is to prevent the problem altogether, by re-creating the default bindings ourselves to not use the –r flag, as shown in the following code sample:
bind-key Up select-pane -U bind-key Down select-pane -D bind-key Left select-pane -L bind-key Right select-pane -R
The -r flag indicates that the key binding can be “repeated.” What this means in a practical sense is that when you execute the key binding, you can press another tmux binding key without having to include the prefix. This helps to chain lots of tmux commands together more efficiently.
Hence, when you execute the <P><Left-Arrow> (to move to the pane holding Vim), followed by <Right-Arrow> (which you’d expect to move the cursor within Vim to the right), it, in fact, moves the cursor back over to the right pane, as if you had pressed
<P><Right-Arrow>.
Restoring Broken Commands
Along with adding your own abstractions and working around subtle nuisances in how tmux interacts with other programs, you may also notice some problems with your terminal shell environment.
CHAPTER 3 ■ MODIFICATIONS
The reason for some of this was owing to my rebinding <C-r> to dynamically source the .tmux.conf file, whereas other machines I would be working on would have all kinds of different custom settings that could cause conflicts.
I found the easiest solution was to add the following snippets, which helped resolve these issues by redefining the key bindings to do exactly what I expected them to:
bindkey '^R' history-incremental-search-backward bindkey '^A' beginning-of-line
bindkey '^E' end-of-line
Summary
This was a relatively short chapter, but I trust you found the topics covered interesting and helpful in resolving some practical concerns when using tmux in your day-to-day workflow. Let’s have a quick recap.
We started by looking at some abstractions for creating and •
attaching to new sessions and automating the session naming process by utilizing some basic Unix commands to parse out the current folder name.
Similarly, we looked at how we can kill individual sessions and, •
again using some basic Unix scripting, kill all open tmux sessions.
We looked at how best to resolve an issue of the short amount of •
time a message is displayed onscreen, using the display-time command.
We moved on to resolving an issue with the default tmux •
configuration, whereby interacting with Vim was made problematic, due to the bind-key and its -r repeat flag.
Finally, we looked at resolving issues with standard terminal •
CHAPTER 4
Copy and Paste
One of the most arduous tasks within tmux is the need to be able to copy and paste content from a buffer. The problem isn’t so much copying content from our buffer (although that isn’t the simplest of tasks, as we’ll see in the first few sections of this chapter), but more so that there is no native capability to paste content that has been copied from a tmux buffer into other external programs.
In this chapter, we’ll look at how copy and paste works in general (for all platforms) and then review some workarounds for the issue of copying content from tmux into another program for both Mac and Linux.
Note
■
Some of the solutions provided in this chapter are dependent on the use
of tmux 1.8+.
Copy Mode
In tmux, all content is placed inside a buffer, and if there is not enough screen space to hold all of the buffer content, it will effectively be scrolled “off screen.” So for us to be able to go back and view the offscreen buffer content, we first have to get tmux into “copy mode.”
I briefly covered copy mode in Chapter 2, but just to quickly recap: to enter copy mode, either execute the key binding <P>[ or the command <P>:copy-mode, which routes through tmux’s command prompt.
Once you’re inside copy mode, you can navigate around, using the arrow keys and quit copy mode, by pressing either q or <Enter> when you’re done.
Note
■
The Linux keys to quit copy mode are
<Esc>
and
q
but not
<Enter>
.
CHAPTER 4 ■ COPY AND PASTE
Note
■
The Linux key for selection is
<C-Space>
, and the key to copy the selection to
the paste buffer is
<Esc-w>
(or, more accurately, whatever your “modifier” key is set to on
your keyboard:
<M-w>
).
Paste Buffer
Once you have content in the paste buffer, you can then paste it into any other tmux buffer you have open, which includes buffers that are open within a completely different tmux session (see Figure 4-1)!
Figure 4-1. Example of tmux’s paste buffer
The paste buffer keeps a history of all copied content, so you can copy multiple items and then keep track of them within the paste buffer. To list the current items stored within the paste buffer, you can either execute the key binding <P># or the command <P>:list-buffers, which routes through tmux’s command prompt.
CHAPTER 4 ■ COPY AND PASTE
The show-buffer screen is only a temporary visual aid. The content is not taken out of the paste buffer, and it is not placed inside your current buffer. If you would like to paste the latest item within the paste buffer into your current buffer, you can use the <P>] key binding or the command <P>:paste-buffer, which routes through tmux’s command prompt.
You can also capture the current pane in its entirety, using the command <P>:capture-pane, and from there, you can even save the latest paste buffer directly into a file, if you want, using the command <P>:save-buffer ~/Desktop/foo.txt. (See Figure 4-2).
Figure 4-2. Output from capturing a pane and saving it to a file
If you have lots of items within your paste buffer and you need a specific item to paste into your current buffer, you can select the item you require by executing either the key binding <P>= or the command <P>:choose-buffer, which routes through tmux’s command prompt. For example, you could open the Vim text editor within your current buffer and then run <P>=, to begin navigating the list of items within the paste buffer, and then select one to have its content pasted directly into Vim.
Note
CHAPTER 4 ■ COPY AND PASTE
Pasting Between Programs
The problem that confuses most tmux users is the inability to paste what has been copied from the tmux paste buffer into a different program (because the paste buffer is not the same thing as the operating system’s clipboard). We’ll take a look at how to resolve this in both the Mac and Linux operating systems.
Plug-in Solution
Before I jump into the manual process, there is a more automated solution, involving installing a tmux plug-in called tmux-yank (https://github.com/tmux-plugins/tmux-yank), which works for both Mac AND Linux operating systems and is very simple to install by either following the manual installation steps or using a tmux plug-in manager (https://github.com/tmux-plugins/tpm)