16
Managing Backup, Recover y,
and Replication
Despite the steps you take to secure your databases or optimize the performance of SQL statements issued against those databases, disasters can occur that cause the loss or corruption of data. As a result, one of the most important steps that you can take to protect your data is to make certain that you maintain copies of your databases. One method that you can use to copy your databases is to create backup files that contain the database and table definitions necessary to re-create your database structure as well as the statements and data necessary to repopulate your tables after theyâve been created. Once you create backup files, you can immediately re-create your database environment if the need arises, returning your database to the state it was in at the time you performed the last backup. You can then use the binary log files to update your database to a current state.
In addition to performing regular backups of your databases, you can also replicate your databases so that you always have at least one up-to-date copy of each one. Replicating a database means that you maintain a copy of the database that is kept synchronized with the original database. If disaster should occur on the original database, you can then use the replicated database to provide services to applications and users. In addition, replication is also useful in facilitating the backup process and in load balancing queries. This chapter describes how to back up your databases, restore the databases from the backup, and replicate your databases to another server. Specifically, the chapter covers the following topics:
â Using the mysqldump client utility to back up tables in a single database and back up multiple databases
â Using the mysql client utility in batch mode and interactive mode to reload databases from backup files and then using binary log files to update the databases after theyâve been reloaded
Backing Up Your Database
Ensuring that your MySQL databases are backed up regularly should be part of any maintenance routine. Despite your best efforts to protect your databases, events such as power failures, natural disasters, and equipment failure can lead to the corruption and loss of data. Consequently, you should ensure that your databases have been safely copied to safe and reliable systems.
The primary method that MySQL provides for backing up all types of tables in your database is the mysql-dump client utility. The utility allows you to back up individual databases, tables in those databases, or multiple databases. When you run mysqldump, the utility creates a text file that contains the SQL state-ments necessary to create your database and tables safely and add data to those tables. This file is referred to as a backup fileor dump file.
The way in which you use the utility and the type of information contained in the file depends on the type of backup youâre performing (whether youâre backing up individual databases, individual tables, or multiple databases). This section describes how you use the mysqldump client utility to perform the various types of backups.
You can also back up your databases simply by copying the data directory to a backup location. This method has several limitations, though. For example, if data is being updated when you copy the tables, you might be copying tables that are in an inconsistent state. In addition, copying InnoDBtables can be more complicated than simply using the mysqldump utility. The utility also saves data to text files, which makes your backups more portable than copying the data directory.
Backing Up a Single Database
MySQL allows you to back up all tables in a database or only specific tables in that database. In both cases, you use the mysqldump client utility and you specify the name of the database. When backing up only specific tables, you must specify those table names as well. In this section, you learn how to perform both types of backups.
Backing Up the Entire Database
The first form of the mysqldump command that you examine backs up all the tables in a database. The database is backed up to a backup file that includes the table definitions and the INSERTstatements necessary to repopulate the tables. To use this form of the command, you must specify the name of the database and the path and filename of the backup file, as shown in the following syntax:
mysqldump <database> > <path and filename>
As you can see, your command includes the mysqldump utility name, followed by the database name. The path and filename are then introduced by a right arrow (>) that tells the mysqldump utility to send the backed-up definitions and data to the specified file. If you do not include the right arrow and path and filename, the backup output would merely be displayed in your command line.
So that you better understand how the mysqldump utility works, this chapter includes a number of examples. The examples are based on the following database and table definitions as well as the INSERT
statements used to populate the tables in the database:
CREATE DATABASE BooksDB; use BooksDB;
CREATE TABLE Books (
BookID SMALLINT NOT NULL PRIMARY KEY, BookTitle VARCHAR(60) NOT NULL, Copyright YEAR NOT NULL
)
ENGINE=INNODB;
INSERT INTO Books
VALUES (12786, âLetters to a Young Poetâ, 1934), (13331, âWinesburg, Ohioâ, 1919),
(14356, âHell\âs Angelsâ, 1966), (15729, âBlack Elk Speaksâ, 1932), (16284, âNoncomformityâ, 1996),
(17695, âA Confederacy of Duncesâ, 1980), (19264, âPostcardsâ, 1992),
(19354, âThe Shipping Newsâ, 1993);
CREATE TABLE Authors (
AuthID SMALLINT NOT NULL PRIMARY KEY, AuthFN VARCHAR(20),
AuthMN VARCHAR(20), AuthLN VARCHAR(20) )
ENGINE=INNODB;
INSERT INTO Authors
VALUES (1006, âHunterâ, âS.â, âThompsonâ), (1007, âJoyceâ, âCarolâ, âOatesâ),
(1008, âBlackâ, NULL, âElkâ), (1009, âRainerâ, âMariaâ, âRilkeâ), (1010, âJohnâ, âKennedyâ, âTooleâ), (1011, âJohnâ, âG.â, âNeihardtâ), (1012, âAnnieâ, NULL, âProulxâ), (1013, âAlanâ, NULL, âWattsâ), (1014, âNelsonâ, NULL, âAlgrenâ);
CREATE TABLE AuthorBook (
AuthID SMALLINT NOT NULL, BookID SMALLINT NOT NULL, PRIMARY KEY (AuthID, BookID),
ENGINE=INNODB;
INSERT INTO AuthorBook
VALUES (1006, 14356), (1008, 15729), (1009, 12786), (1010, 17695), (1011, 15729), (1012, 19264), (1012, 19354), (1014, 16284);
As you can see, the statements shown here create the BooksDB database and three tables: Books, Authors, and AuthorBook. The code also includes the INSERTstatements necessary to add data to each table. Now suppose that, once the database has been set up, you want to back up the data to a file. To do so, you can issue a mysqldump command from your operating systemâs command prompt, as shown in the following example:
mysqldump BooksDB > c:\backup\booksdb_041031.sql
In this command, you specify the BooksDB database, which means that all tables in the database will be backed up. This includes both the CREATE TABLEand INSERTstatements. The mysqldump command also includes the path and filename (c:\backup\booksdb_041031.sql) of the backup file. Notice that the filename includes 040131, which is the date that the file is created. Itâs a good idea to use some sort of consistent naming convention for your backup files so that you can easily distinguish one from another and find the most recent one when you need it.
Once the file has been created, you can view its contents by using a text editor such as Notepad or Vim. The contents of the booksdb_041031.sql file should be similar to the following:
-- MySQL dump 10.8
---- Host: localhost Database: BooksDB
-- --- Server version 4.1.6-gamma-nt-log
/*!40101 SET @OLD_CHARACTER_SET_CLIENT=@@CHARACTER_SET_CLIENT */; /*!40101 SET @OLD_CHARACTER_SET_RESULTS=@@CHARACTER_SET_RESULTS */; /*!40101 SET @OLD_COLLATION_CONNECTION=@@COLLATION_CONNECTION */; /*!40101 SET NAMES utf8 */;
/*!40014 SET @OLD_UNIQUE_CHECKS=@@UNIQUE_CHECKS, UNIQUE_CHECKS=0 */;
/*!40014 SET @OLD_FOREIGN_KEY_CHECKS=@@FOREIGN_KEY_CHECKS, FOREIGN_KEY_CHECKS=0 */; /*!40101 SET @OLD_SQL_MODE= L_MODE, SQL_MODE=âNO_AUTO_VALUE_ON_ZEROâ */;
---- Table structure for table âauthorbookâ
--DROP TABLE IF EXISTS âauthorbookâ; CREATE TABLE âauthorbookâ (
âAuthIDâ smallint(6) NOT NULL default â0â, âBookIDâ smallint(6) NOT NULL default â0â, PRIMARY KEY (âAuthIDâ,âBookIDâ),
KEY âBookIDâ (âBookIDâ),
CONSTRAINT âauthorbook_ibfk_2â FOREIGN KEY (âBookIDâ) REFERENCES âbooksâ (âBookIDâ)
)ENGINE=InnoDB DEFAULT CHARSET=latin1;
---- Dumping data for table âauthorbookâ
--/*!40000 ALTER TABLE âauthorbookâ DISABLE KEYS */; LOCK TABLES âauthorbookâ WRITE;
INSERT INTO âauthorbookâ VALUES
(1009,12786),(1006,14356),(1008,15729),(1011,15729),(1014,16284),(1010,17695),(1012, 19264),(1012,19354);
UNLOCK TABLES;
/*!40000 ALTER TABLE âauthorbookâ ENABLE KEYS */;
<Authors table and Books table>
/*!40101 SET SQL_MODE=@OLD_SQL_MODE */;
/*!40014 SET FOREIGN_KEY_CHECKS=@OLD_FOREIGN_KEY_CHECKS */; /*!40014 SET UNIQUE_CHECKS=@OLD_UNIQUE_CHECKS */;
/*!40101 SET CHARACTER_SET_CLIENT=@OLD_CHARACTER_SET_CLIENT */; /*!40101 SET CHARACTER_SET_RESULTS=@OLD_CHARACTER_SET_RESULTS */; /*!40101 SET COLLATION_CONNECTION=@OLD_COLLATION_CONNECTION */;
As you can see, the file includes a number of elements. It first begins with information that identifies the version of the mysqldump utility that youâre using, the name of the host where the server resides, the name of the database, and the version of the MySQL server that is running. If the version is followed by -log, that indicates that logging was enabled at the time the backup file was created. Notice that each line of information is preceded by double dashes (--), which indicates that these are comments and that MySQL should ignore this information when executing the statements in the file.
The next part of the backup file is a series of SETstatements that assign values to a number of user-defined vari-ables. For example, the first of these statements defines a variable named @old_character_set_client:
/*!40101 SET @OLD_CHARACTER_SET_CLIENT=@@CHARACTER_SET_CLIENT */;
As discussed in Chapter 7, MySQL allows you to define a variable (either by using a SELECTstatement or a SETstatement) that stores a value in memory for the duration of a session. In this case, the SET
statement assigns the current value associated with the character_set_clientsystem variable to the
@old_character_set_clientuser-defined variable. The following table describes the system vari-ables that are used to assign values to user-defined varivari-ables in the backup file.
System variable Description
character_set_client The character set that MySQL uses to process SQL statements sent by a client application. By default, MySQL uses the latin1 charac-ter set.
character_set_results The character set that MySQL uses to return query results to a client application. By default, MySQL uses the latin1character set.
System variable Description
collation_connection The collation associated with the character set used for the connection. By default, MySQL uses the latin1_swedish_cicollation.
unique_checks Specifies whether MySQL checks for uniqueness in a column configured with a unique index. By default, MySQL checks for uniqueness.
foreign_key_checks Specifies whether MySQL checks foreign key constraints in a column configured as a foreign key. By default, MySQL checks foreign key constraints.
sql_mode Specifies the SQL mode in which MySQL should operate. The mode determines what SQL syntax is supported and how data should be validated. By default, no mode is set.
MySQL assigns these values to the user-defined variables to ensure that the original system variable values can be reinstated should they be changed by any of the statements in the backup file. This guarantees that your environment is left in the same state after the execution of the statements as it was before the execution of the statements. At the end of the backup file, MySQL adds the necessary SETstatements to set the system variables back to their original value. For example, the following SETstatement uses the
@old_character_set_clientuser-defined variable to assign the value to the actual
character_set_clientsystem variable, which is where that value originated:
/*!40101 SET CHARACTER_SET_CLIENT=@OLD_CHARACTER_SET_CLIENT */;
One thing to notice about the SETstatements is that they begin with the /*!symbols and end with the
*/symbols. The statements are enclosed in these symbols so that they are executed by MySQL but ignored if they are executed in another database management system. This allows your basic SQL state-ments in the backup file to be used by other systems, while ensuring that the statestate-ments unique to MySQL can be executed.
Also notice that the symbols at the beginning of the statements are followed by a number. This number represents a version of the MySQL server, and it tells MySQL to execute the statement only if that version or a later version is being used. For example, the 40101 in the preceding statement indicates that the statement should be executed only on MySQL version 4.01.01 or above.
Now take a look at one other SETstatement that is included at the beginning of a backup file:
/*!40101 SET NAMES utf8 */;
The SET NAMESstatement specifies the name of the character set that should be used during the execution of the statements in the backup file. The statement is specific to the connection, so once the connection is ended, the setting no longer applies. In this case, the SET NAMESstatement specifies that the utf8character set should be used, which is the character set used when the backup file was created.
that you have backed up. For each table that is backed up, the file includes a table definition and an
INSERTstatement. The table definition is introduced by comments similar to the following:
---- Table structure for table âauthorbookâ
--In this case, the comments tell you that the information that follows applies to the AuthorBook table. The comments are then followed by a DROP TABLEstatement to ensure that MySQL does not try to create a table that already exists, which would result in an error. The DROP TABLEstatement ensures that the
CREATE TABLEstatement that follows can be successfully executed. The CREATE TABLEstatement then defines the table as it existed when the file was created.
After the CREATE TABLEstatement, the backup file then includes comments similar to the following:
---- Dumping data for table âauthorbookâ
--The comment indicates that the section that follows inserts data in the AuthorBook table. After the comment, you see the following set of statements:
/*!40000 ALTER TABLE âauthorbookâ DISABLE KEYS */; LOCK TABLES âauthorbookâ WRITE;
INSERT INTO âauthorbookâ VALUES
(1009,12786),(1006,14356),(1008,15729),(1011,15729),(1014,16284),(1010,17695),(1012, 19264),(1012,19354);
UNLOCK TABLES;
/*!40000 ALTER TABLE âauthorbookâ ENABLE KEYS */;
An ALTER TABLEstatement that tells MySQL to disable the indexes precedes each INSERTstatement. The
ALTER TABLEstatement at the end of this group of statements then enables the indexes. MySQL does this to improve the performance of the insert operations so that the indexes are not created until the operation is complete. This process, however, works only for MyISAMtable types and is ignored by other table types.
ALOCK TABLESstatement also precedes the INSERTstatement, placing a WRITElock on the table so that no other values can be inserted in the table until after this INSERTstatement has been executed. After the INSERTstatement runs, the table is then unlocked. The INSERTstatement itself is a straightforward statement that provides values for all columns in the table. One thing you might have noticed about both the INSERTstatement and the CREATE TABLEstatement that precedes it is that they create a table and insert data in a table that includes foreign key constraints. If you were to try to create the table manually, before creating the referenced tables, you would receive an error. MySQL, however, allows all tables to be created and values to be inserted when done through a backup file, regardless of the foreign key con-straints. MySQL is indifferent to the order in which tables appear in the backup file.
One other aspect of the backup file to look at is the following component:
This is actually only a placeholder for the Authors and Books tables. The statements that are used to create and populate the AuthorBook table are the same statements you would see for any table. As a result, a placeholder is used here merely to show that the other two tables would also appear in this file.
Now that youâve seen the type of information that is included in a backup file, thereâs one other aspect of creating a dump file that you should consider using when running a mysqldump command. The option is the --flush-logsoption, which flushes your log files. If you have binary logging enabled (which you should), a new binary log file is created. This is important when creating a backup because, as you see later in this section, binary log files allow you to restore your database fully. By flushing the logs, youâre providing yourself with an exact starting point for using the binary logs when restoring your database. As a result, it is recommended that you use the --flush-logsoption whenever you back up your data.
To flush the logs when creating a backup file, simply add the --flush-logsoption to your mysqldump command, as shown in the following example:
mysqldump --flush-logs BooksDB > c:\backup\booksdb_041031.sql
Now when you go to restore the database, you will have a much easier time locating the proper log information.
As you have seen, the mysqldump utility allows you to back up all the tables in your database easily. There might be times when you want to back up only individual tables; in that case, you must include those table names in your mysqldump command.
Backing Up Individual Tables
To use the mysqldump client utility to back up individual tables in a database, your mysqldump com-mand should be set up based on the following syntax:
mysqldump <database> [<table> [<table>...]] > <path and filename>
As you can see, the only difference between this command and the command that you use to back up all tables in a database is that now you must add the applicable table names after the database name. For example, the following mysqldump command backs up the Authors and Books table in the BooksDB database:
mysqldump --flush-logs BooksDB Authors Books > c:\backup\authbooks_041031.sql
The command creates a backup file named authbooks_041031.sql. The file contains the same SET com-mands that you find when you back up an entire database. The file now contains table definitions and
INSERTstatements only for those tables identified in the command.
Backing Up Multiple Databases
In addition to backing up the tables in a single database, you can also back up multiple databases. As with backing up a single database, you can use the mysqldump client utility; however, the command format is slightly different. In addition, the backup file includes not only table definitions and INSERT
You can use two formats of the mysqldump utility to back up multiple databases. The first of these allows you to specify the databases that you want to back up, and the second format allows you to back up all databases that are currently stored on your MySQL server.
Backing Up Specific Databases
If you use the mysqldump utility to back up multiple databases, you must add the --databasesoption to your command, as shown in the following syntax:
mysqldump --databases <database> [<database>...] > <path and filename>
After you specify the --databasesoption, you must specify the name of at least one database. You can specify as many names as necessary, separating each name with a space. For example, the following mysqldump command backs up the BooksDB and BooksDB2 databases:
mysqldump --flush-logs --databases BooksDB BooksDB2 > c:\backup\bookstore_041031.sql
Notice that the command includes the --databasesoption, followed by the name of the two databases. When you execute this command, the backed-up databases will be stored in a file named bookstore_041031.sql. The file will contain the same information that youâve seen in previous backup files, with the addition of one element â the statements necessary to create the database. For example, the following data is added to the bookstore_041031.sql file:
---- Current Database: âBooksDBâ
--CREATE DATABASE /*!32312 IF NOT EXISTS*/ âBooksDBâ;
USE âBooksDBâ;
The file first includes comments indicating that the statements that follow apply to the BooksDB database. After the comments, the file contains a CREATE DATABASEstatement, which will add the BooksDB database to your system. Notice that the statement includes the clause /*!32312 IF NOT EXISTS*/. As you learned earlier, because the clause is enclosed in the /*!symbols and */symbols, it is not executed unless the state-ment runs against a MySQL server, version 3.23.12 or later. The file then contains a usecommand, which instructs MySQL to make the BooksDB database the active database. This is done to ensure that the CREATE TABLEand INSERTstatements that follow are correctly applied to the BooksDB database.
Using this form of the mysqldump command is also useful if you want to back up only one database but want to ensure that the backup file includes the necessary database definition. As you learn later in the chapter, if the backup file doesnât include the database definition, you must first manually create the database before you can restore the contents of that database. By including the database definition, restoring the database is an easier process.
Backing Up All Databases
If you plan to back up all the databases on your system, you can use the following form of the mysql-dump client utility:
As the syntax shows, you need to specify the --all-databasesoption but not any database names. For example, the following statement backs up all your databases to a file named databackup_041031.sql:
mysqldump --flush-logs --all-databases > c:\backup\databackup_041031.sql
The backup file will contain all the necessary database and table definitions and INSERTstatements for all the tables in all the databases. The file will also contain the necessary SETstatements. As you can see, this form of the mysqldump utility is simpler than specifying the --databasesoption along with the name of every database that you want to back up. If you use this option, keep in mind that it will also back up the mysql administrative database, which could be a security risk if the backup file is not properly secured.
Now that you have an understanding of how to use the mysqldump client utility to back up your databases, you can try to back up a database for yourself. In the following exercise, you create a database named VideoRentals. The database includes a table named Videos, which is populated with information about several movies. After you create the database, you back up it up to your hard disk, where you can then view the contents of the file.
Try It Out
Backing Up a Database to a Backup File
The following steps describe how to create and then back up the VideoRentals database:
1.
Open the mysql client utility.2.
First, create the VideoRentals database and the Videos table by executing the following SQL statements at the mysql command prompt:CREATE DATABASE VideoRentals; use VideoRentals;
CREATE TABLE Videos (
VideoID SMALLINT NOT NULL AUTO_INCREMENT PRIMARY KEY, VideoName VARCHAR(60) NOT NULL,
Status ENUM(âInâ, âOutâ) NOT NULL )
ENGINE=INNODB;
You should receive a message indicating that the statement executed successfully, affecting no rows.
3.
Now insert data in the Videos table by executing the following SQL statement at the mysql com-mand prompt:INSERT INTO Videos (VideoName, Status) VALUES (âOut of Africaâ, âInâ), (âThe Maltese Falconâ, âInâ),
(âThe Rocky Horror Picture Showâ, âOutâ), (âA Room with a Viewâ, âInâ),
(âMashâ, âOutâ);
4.
Exit the mysql client utility. You should be returned to your operating systemâs command prompt.5.
Create a directory in which to store the backup file. For the purposes of this exercise, it is assumed that on Windows you will be using the C:\backupdirectory, and on Linux you will be using the/backupdirectory. If you use a directory other than these, replace them with your own directory name in any steps that require that you specify a directory.
6.
If youâre running MySQL on Windows, execute the following command at the Windows command prompt:mysqldump --flush-logs --databases VideoRentals > c:\backup\videorentals001.sql
If youâre running MySQL on Linux, execute the following command at the Linux command prompt:
mysqldump --flush-logs --databases VideoRentals > /backup/videorentals001.sql
After you execute the command, youâre returned to your operating systemâs command prompt.
7.
Use a text editor (such as Notepad or Vim) to open the videorentals001.sql file that you created in Step 6. The contents of the file should be similar to the following:-- MySQL dump 10.8
---- Host: localhost Database: VideoRentals
-- --- Server version 4.1.6-gamma-nt-log
/*!40101 SET @OLD_CHARACTER_SET_CLIENT=@@CHARACTER_SET_CLIENT */; /*!40101 SET @OLD_CHARACTER_SET_RESULTS=@@CHARACTER_SET_RESULTS */; /*!40101 SET @OLD_COLLATION_CONNECTION=@@COLLATION_CONNECTION */; /*!40101 SET NAMES utf8 */;
/*!40014 SET @OLD_UNIQUE_CHECKS=@@UNIQUE_CHECKS, UNIQUE_CHECKS=0 */;
/*!40014 SET @OLD_FOREIGN_KEY_CHECKS=@@FOREIGN_KEY_CHECKS, FOREIGN_KEY_CHECKS=0 */; /*!40101 SET @OLD_SQL_MODE= L_MODE, SQL_MODE=âNO_AUTO_VALUE_ON_ZEROâ */;
---- Current Database: âVideoRentalsâ
--CREATE DATABASE /*!32312 IF NOT EXISTS*/ âVideoRentalsâ;
USE âVideoRentalsâ;
---- Table structure for table âvideosâ
--DROP TABLE IF EXISTS âvideosâ; CREATE TABLE âvideosâ (
) ENGINE=InnoDB DEFAULT CHARSET=latin1;
---- Dumping data for table âvideosâ
--/*!40000 ALTER TABLE âvideosâ DISABLE KEYS */; LOCK TABLES âvideosâ WRITE;
INSERT INTO âvideosâ VALUES (1,âOut of Africaâ,âInâ),(2,âThe Maltese Falconâ,âInâ),(3,âThe Rocky Horror Picture Showâ,âOutâ),(4,âA Room with a Viewâ,âInâ),(5,âMashâ,âOutâ);
UNLOCK TABLES;
/*!40000 ALTER TABLE âvideosâ ENABLE KEYS */;
/*!40101 SET SQL_MODE=@OLD_SQL_MODE */;
/*!40014 SET FOREIGN_KEY_CHECKS=@OLD_FOREIGN_KEY_CHECKS */; /*!40014 SET UNIQUE_CHECKS=@OLD_UNIQUE_CHECKS */;
/*!40101 SET CHARACTER_SET_CLIENT=@OLD_CHARACTER_SET_CLIENT */; /*!40101 SET CHARACTER_SET_RESULTS=@OLD_CHARACTER_SET_RESULTS */; /*!40101 SET COLLATION_CONNECTION=@OLD_COLLATION_CONNECTION */;
8.
Close the videorentals001.sql file.How It Works
In this exercise, you used the mysql client utility to create a database named VideoRentals, add a table named Videos to the database, and then insert data in the table. You then exited the mysql client utility and created a directory to store the backup file. From there, you executed a mysqldump command similar to the following:
mysqldump --flush-logs --databases VideoRentals > c:\backup\videorentals001.sql
The mysqldump command creates a backup file named videorentals001.sql in your backup directory. The --flush-logscommand indicates that the logs should be flushed before creating the backup file. This ensures that any changes made to a table after the backup can be easily tracked in the binary log files. The --databasesoption indicates that you plan to back up one or more entire databases. In this case, you backed up only one database. As a result, you did not have to use the --databases
option. By including the option, youâre ensuring that the backup file contains the necessary CREATE DATABASEstatement so that a database does not have to exist prior to restoring the database. If you had not included the --databasesoption, you would first have to create the database before you could restore the tables from the backup file. (You learn more about restoring a database later in the chapter.)
Once you created the backup file, you viewed the contents of the file. As you would expect, the file first lists general information about the backup and defines the necessary variables to hold values based on current system variables. For example, the following SETstatement assigns a value to a user-defined variable named @old_character_set_results:
/*!40101 SET @OLD_CHARACTER_SET_RESULTS=@@CHARACTER_SET_RESULTS */;
The value assigned to the variable is based on the character_set_resultssystem variable. You can retrieve that value currently assigned to the character_set_resultssystem variable by using
statements in the backup file have been executed. The backup file then uses the variable to assign the stored value to the related system variable, as shown in the following statement:
/*!40101 SET CHARACTER_SET_RESULTS=@OLD_CHARACTER_SET_RESULTS */;
The backup file uses a SETstatement to set the character_set_resultssystem variable to the value that is stored in the @old_character_set_resultsuser-defined variable. Because this value is the same value that was assigned to the character_set_resultssystem variable before the backup file statements were executed, the character_set_resultssystem variable is assigned its original value. This process ensures that the system variables are returned to the original state that they were in before the statements in the backup file were executed.
Each SETstatement begins with /*!and ends with */, which means that the statement will be ignored by any database servers other than MySQL. Also, the opening symbols (/*!) are followed by version numbers, which means that MySQL will execute the statement only for that version of MySQL or later. For example, the number 40101 indicates that MySQL will execute the statement only if the server is version 4.1.1 or later.
In addition to the standard SETstatements, the backup file also includes the SQL statements necessary to create the VideoRentals database and the Videos table. ADROP TABLEstatement precedes the CREATE TABLEstatement to ensure that the table doesnât exist before you try to create it. The CREATE TABLE
statement is followed by the INSERTstatement necessary to add the data to the Videos table. The
INSERTstatement is surrounded by two ALTER TABLEstatements that specify that the indexes should be created after the data is inserted in the table. Because the table type is InnoDB, the ALTER TABLE
statements do not apply and have no impact on your statements. The INSERTstatement is also preceded by a LOCK TABLESstatement that sets a WRITElock on the table as data is being inserted, and then an
UNLOCK TABLESstatement that unlocks the table after the insertion has been completed.
The backup file that you created in this exercise contains only one database and one table. As a result, the file includes only one CREATE DATABASEstatement, one CREATE TABLEstatement, and one INSERT
statement. You can, however, back up multiple databases that each contain multiple tables; in that case, the backup file will contain the SQL statements necessary for each database and table. Regardless of how many databases and tables are included in the file, once that file has been created, you can use it to restore your databases and tables in the event that your databases become corrupted or deleted.
Restoring Your Database
Despite your best efforts to protect your databases, disasters can occur, and you might find it necessary to restore one or more of your databases. If you have backed up your files regularly and enabled binary logging, restoring your database consists of only two steps:
1.
Using the mysql client utility to reload your database into the MySQL server2.
Using the applicable binary logs to update the databaseReloading Your Database
In Chapter 3, you learned how to use the mysql client utility in batch mode and interactive mode to exe-cute SQL statements and MySQL commands saved to a text file. You can also use the utility to exeexe-cute the statements in the backup files that you created with the mysqldump utility. When using the mysql client utility in batch mode, you run the program from your operating systemâs command prompt. When using the mysql utility in interactive mode, you must first launch the utility and then execute the necessary commands at the mysql command prompt.
Using the mysql Client Utility in Batch Mode to Reload Your Database
To use the mysql client utility in batch mode to restore a database, you have to specify the mysqlcommand (at your operating systemâs command prompt) along with the left arrow (<), path, and filename, as shown in the following syntax:mysql [<database>] < <path and filename>
As you can see, you also have the option of specifying a database name. If you do specify a database name, the database must exist in the database, which means that you must create the database if it doesnât already exist. You would generally use this option if you are restoring data from a backup file that does not include a database definition. For example, suppose that you want to restore a database from the booksdb_041031.sql file, which does not include a database definition. You would use a statement similar to the following to restore the tables in the database:
mysql BooksDB < c:\backup\booksdb_041031.sql
As the command shows, you include BooksDB, which means that the database must already exist. If you are restoring a database from a backup file that includes the necessary database definition, you can use the following statement:
mysql < c:\backup\bookstore_041031.sql
In this case, the bookstore_041031.sql file includes the database definition, so the database does not have to exist and you do not have to specify it. You simply execute the statement as it is shown here, and the statements related to creating the database, creating the table, and inserting data are automatically executed.
Using the mysql Client Utility in Interactive Mode to Reload Your
Database
You can also use the mysql client utility in interactive mode to restore a database. To do so, you merely specify the source command, along with a path and filename of the backup file, as shown in the following syntax:
source <path and filename>
the backup file. For example, suppose that youâre restoring a database from the booksdb_041031.sql file, which doesnât include a table definition. Because of this, you would have to execute a series of statements:
CREATE DATABASE BooksDB; use BooksDB;
source c:\backup\booksdb_041031.sql
The CREATE DATABASEstatement creates the BooksDB database, the usecommand switches to the new database, and the source command retrieves the backup file. If your backup file includes the database definition, all you need to specify is the source command, the path, and the filename, as shown in the following example:
source c:\backup\bookstore_041031.sql
As you can see, creating a backup file that includes the necessary database definitions makes restoring your databases a simpler process. In addition, if youâre restoring multiple databases from a single file, the file must contain the necessary database definitions. Regardless of which method you use to reload your database into your system, the database is only as current as your last backup, which is where binary logging comes in.
Updating the Restored Database from Binary Log Files
After you reload your database into your system, you will most likely want to apply any changes made to the database since it was backed up. Fortunately, binary logs track all data modifications that occur in your databases, so you can use binary logs to update your database to its more current state. MySQL provides two methods for applying updates from a binary log â restoring data directly from the binary log file or exporting binary log data to a text file and then restoring it from that file.
You must have binary logging enabled on your system to be able to use it to update a restored database. For more information about implementing binary logging, see Chapter 13.
Restoring Data Directly from a Binary Log
To apply updated data to the database that youâve reloaded, you must know which log files apply. By comparing the log file timestamps to the backup file timestamp, you should be able to figure out easily which logs apply. In addition, if you used the --flush-logsoption when you backed up the database, you know that you do not have to look for data starting in the middle of a log file. You can start right at the beginning of the file.
After you identify the log files that you should apply, you can use the mysqlbinlog client utility to exe-cute the statements in the log file. For example, the following mysqlbinlogcommand executes the SQL statements in the server1-bin.000127 log file:
mysqlbinlog âc:\program files\mysql\mysql server 4.1\data\server1-bin.000127â | mysql
command mysql. If you plan to execute multiple log files, you should start with the oldest one first and work your way through to the most current file.
If you want to apply the change in the log files to only one database, you can specify the --one-database
option after the mysql command, as shown in the following example:
mysqlbinlog âc:\program files\mysql\mysql server 4.1\data\server1-bin.000127â | mysql --one-database BooksDB
Notice that you must include the name of the database after the --one-databaseoption. When you do this, MySQL processes only those logged statements that apply to the specified database.
Using the mysqlbinlog utility to apply updates directly from the log file to the database can be a quick way to restore a database fully. But what if the log contains statements that you donât want executed? For example, the log file might contain DROP DATABASEstatements or CREATE TABLEstatements that you donât want executed. Unfortunately, you have little control of which statements are executed except for being able to specify that only statements related to a specific database be executed. You can get around this issue by exporting the contents of the binary log file to a text file.
Restoring Binary Log Data from a Text File
The mysqlbinlog client utility allows you to export data to a text file. From there, you can sort through the text file to remove any statements that you donât want to execute. Of course, the larger the log file, the more difficult this process can be, but there might be times when this is the only way you can ensure that your database is fully restored. After youâre satisfied that the text file contains only the correct statements, you can use the mysql client utility to execute the statements.
The first step, then, is to export the data in the log file to the text file. For example, the following
mysqlbinlogcommand exports the server1-bin.000127 log file to the binlog000127.txt file:
mysqlbinlog âc:\program files\mysql\mysql server 4.1\data\server1-bin.000127â > c:\backup\binlog000127.txt
As you can see, you specify the path and filename of the log file, add a right arrow, and then specify the path and filename of the text file. You can then edit the text file as necessary. Once satisfied, you can exe-cute the statements in the text file by using the following command:
mysql < c:\backup\binlog000127.txt
All SQL statements that are saved in the text file are executed. If you want to run only statements related to a specific database, you can use the --one-databaseoption in the same way you saw earlier, as shown in the following example:
mysql --one-database BooksDB < c:\backup\binlog000127.txt
Enabling and Disabling Binary Logging
When restoring databases and applying log file statements, you might find that you want to execute a statement that you donât want logged. For example, suppose that you want to drop a database before you restore it. If you run the DROP DATABASEstatement, that statement is logged to the binary log file. You can manually turn off logging in a session by using a SETstatement to set the sql_log_binsystem variable, as shown in the following syntax:
SET SQL_LOG_BIN={0 | 1}
As you can see, the sql_log_binsystem variable includes two options: 0 and 1. If set to 0, logging is disabled. If set to 1, logging is enabled. For example, if you want to execute a statement that should not be logged, you would first issue the following SETstatement:
SET SQL_LOG_BIN=0;
The sql_log_binvariable will be turned off for the duration of the connection or until you explicitly turn it back on (by setting the variable to 1). This allows you to control which statements are logged, which can be critical to restoring your database effectively.
As this section demonstrates, restoring a database is as simple as retrieving a backup file from your hard disk and then applying the statements in the applicable binary logs. In the following exercise, you restore the database that was backed up in the previous Try It Out section. To restore the database, you first remove the original database from your system and then use the sourcecommand in the mysql client utility to exe-cute the SQL statement in the backup file.
Try It Out
Restoring a Database from a Backup File
The following steps describe how to restore the VideoRentals databases from the videorentals001.sql backup file:
1.
Use the following command to open the mysql client utility and make the VideoRentals database active:mysql VideoRentals
The mysql client utility is launched, and the VideoRentals database is active. The VideoRentals database is the one that you created in the previous Try It Out section.
2.
Insert data in the Videos table in the VideoRentals database by executing the following SQL statement at the mysql command prompt:INSERT INTO Videos (VideoName, Status) VALUES (âAmadeusâ, âOutâ);
You should receive a message indicating that the statement executed successfully, affecting one row.
3.
Now turn off binary logging. Execute the following SQL statement at the mysql command prompt:You should receive a message indicating that the statement executed successfully.
4.
Remove the original VideoRentals database so that you can test restoring the database. Execute the following SQL statement at the mysql command prompt:DROP DATABASE VideoRentals;
You should receive a message indicating that the statement executed successfully, affecting one row.
5.
Next, execute the contents of the videorentals001.sql backup file. If youâre running MySQL on Windows, execute the following command at the mysql command prompt:source c:\backup\videorentals001.sql
If youâre running MySQL on Linux, execute the following command at the mysql command prompt:
source /backup/videorentals001.sql
You should receive the appropriate message for each SQL statement in the backup file that has been executed, indicating the successful execution of the statement and the number of rows affected. You should receive a warning that the DROP TABLEstatement does not apply because no table exists. You should also receive warnings indicating that the ALTER TABLEstatements do not apply because the ENABLE KEYSand DISABLE KEYSoptions apply only to MyISAM
tables. (You had backed up an InnoDBtable.)
6.
Now re-enable binary logging. Execute the following SQL statement at the mysql command prompt:SET SQL_LOG_BIN=1;
You should receive a message indicating that the statement executed successfully.
7.
Next, view the contents of the Videos table. Execute the following SQL statement at the mysql command prompt:SELECT * FROM Videos;
You should receive results similar to the following:
+---+---+---+ | VideoID | VideoName | Status | +---+---+---+ | 1 | Out of Africa | In | | 2 | The Maltese Falcon | In | | 3 | The Rocky Horror Picture Show | Out | | 4 | A Room with a View | In | | 5 | Mash | Out | +---+---+---+ 5 rows in set (0.00 sec)
8.
Exit the mysql client utility.mysqlbinlog â<path and filename>â | mysql
You need to enclose the data directory and filename in quotes only if the directory path or file-name contain a space. For the <path and filename>placeholder, insert the directory path for your MySQL data directory and the name of the most recent binary file in the data directory. Once you execute this command, you should be returned to your operating systemâs command prompt.
10.
Use the following command to open the mysql client utility and make the VideoRentals database active.mysql VideoRentals
The mysql client utility is launched.
11.
Again view the contents of the Videos table. Execute the following SQL statement at the mysql command prompt:SELECT * FROM Videos;
You should receive results similar to the following:
+---+---+---+ | VideoID | VideoName | Status | +---+---+---+ | 1 | Out of Africa | In | | 2 | The Maltese Falcon | In | | 3 | The Rocky Horror Picture Show | Out | | 4 | A Room with a View | In | | 5 | Mash | Out | | 6 | Amadeus | Out | +---+---+---+ 6 rows in set (0.00 sec)
12.
Because you do not need the VideoRentals database for additional exercises, you can remove it from your system. Execute the following command at your operating systemâs command prompt:DROP DATABASE VideoRentals;
You should receive a message indicating that the statement executed successfully, affecting one row.
13.
Exit the mysql client utility.How It Works
In this exercise, you first inserted data in the Videos table. You did this in order to log an event to the new binary log that was created after you backed up the database. Next, you used the SETstatement to turn off binary logging so that dropping and restoring the database were not logged. If they had been logged, it would have confused the restoration process. Once you turned off logging, you dropped the VideoRentals database so that you could test restoring the database. Next, you used a sourcecommand similar to the following to access the backup file that you created in the previous Try It Out section:
The sourcecommand includes only one argument: the path and filename of the backup file
(c:\backup\videorentals001.sql). Because you used the --databaseoption in the mysqldump command when you created the backup file, the file included the statement necessary to create the VideoRentals database as well as the Videos table.
Once the database and table were restored, you used another SETstatement to re-enable binary logging. You then executed a SELECTstatement that retrieved data from the Videos table, indicating that the table and database had been properly restored. The results show that the table did not contain the row that you inserted in Step 2. This occurs because you inserted the data after you created the backup file. The backup is current only until the time the file was created.
After you verified that the database had been reloaded, you exited the mysql client utility and then ran the following mysqlbinlogcommand:
mysqlbinlog â<path and filename>â | mysql
The mysqlbinlog utility allows you to read the contents of a binary log file. By adding the vertical pipe (|) and mysql to the command, youâre telling the mysqlbinlog utility to use the mysql client utility to exe-cute the SQL statements recorded in the binary log. Because this is the log that contains any statement executed since you created the backup, this process restores the database to its most current state.
After you executed the SQL statements in the binary log, you launched the mysql client utility and again viewed the contents of the Videos table, which showed that the insertion that had been logged now appears in the table, indicating that your database is now current. Once you verified the insertion, you dropped the VideoRentals database from your system and then exited the mysql client utility.
As this exercise demonstrates, the process of restoring a database is a straightforward one; however, it can be a very time-consuming process, which can mean substantial downtime for your database. Another alternative â in addition to performing regular backups â is to replicate your database to one or more servers, thus ensuring that you always have at least one additional copy of your database that is up to date.
Replicating Your Database
Replication refers to the process of maintaining a current copy of your database on a server separate from the server where the original database resides. Whenever the original database changes, those changes are automatically applied to the copy. As a result, you always have one or more up-to-date copies of your database that can be used in case of database or server failure. For example, if the original database becomes suddenly unavailable, you can switch to the copied database so that users and applications have immediate access to the same data, with a minimal amount of downtime.
In MySQL, replication is a one-way process. The primary MySQL server acts as the master server, and the servers that contain the copied databases are considered the slave servers. Data always moves from the master server to the slave server. As a result, only databases on the master server should be updated. The updates are then propagated to the slave servers.
MySQL replication is based on a number of principles:
â The master server must be configured with a user account that grants replication privileges to the slave server. The account allows the slave server to access the master server in order to receive updates.
â Binary logging must be enabled on the master server. The binary logs track all updates to a database, and the logged updates are then used to synchronize the database on the slave server.
â The slave server uses replication coordinates to track updates. The coordinates are based on the name of a binary log file on the master server and the position in that file. The file and position represent where MySQL left off when the last update was performed on the slave server. The coordinates â along with other logon information â are stored in the master.info file on the slave host.
â Each server that participates in the replication process must be assigned a unique numerical server ID. You assign the ID by specifying the server-idoption in the [mysqld]section of the option file for each server.
â A master server can replicate data to one or more slave servers. A slave server can act as a mas-ter server to another slave server in order to create a replication chain. For example, ServerA can be configured as a master server that replicates data to ServerB, the slave server. ServerB can also be configured as a master server that replicates data to ServerC. As a result, ServerA is replicated to ServerB, and ServerB is replicated to ServerC. You can also replicate ServerA directly to ServerC so that ServerB and ServerC are slave servers to ServerA. (Note that a slave server can never have two master servers.)
â To set up replication, the master server and slave server must begin with databases in a synchro-nized state. In other words, the databases to be replicated must be identical when replication is initiated. Once initiated, updates on the master server are replicated to the slave server.
Although not always necessary, it is generally recommended that the master server and slave servers run the same version of MySQL.
When replication is implemented, the slave server maintains a set of files to support the replication. MySQL automatically creates the three types of files on the slave server:
â <host>-relay-bin.<extension>:Primary relay log files that contain the statements to be used to synchronize the replicated database with the database on the master server. The relay log files receive their data from the binary log files on the master server. The filename extension is a number, starting with 000001, that is incremented whenever a relay log file is added.
â master.info:Maintains connection information such as the master server hostname, the MySQL user account name, and the password for that account. Also maintains information about the last binary log file (on the master server) to be accessed and the position in that file.
The replication log files are created automatically when you implement replication. MySQL deletes the relay log file (<host>-relay-bin.<prefix number>) after the statements in the file have been executed and the replicated database has been updated. The master.info and relay-log.info files are updated as needed to support the replication process and to keep the copied databases updated. If you back up a slave server, you should also back up the relay log files, the master.info file, and the relay-log.info file so that you can restore the slave server if necessary.
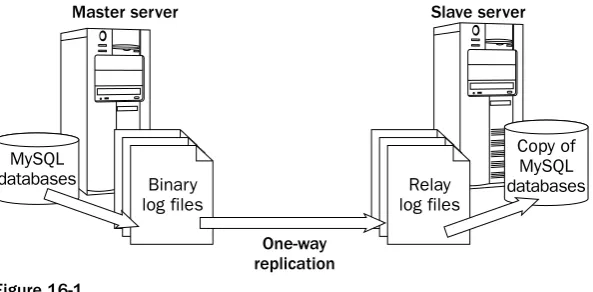
To give you a better overview of how replication is implemented in MySQL, take a look at Figure 16-1. As the illustration shows, updates to the databases on the master server are logged to the binary log files set up for that server. The applicable content in the binary log files is then copied to the relay log files, which reside on the slave server. The content of the relay log files is then used to update the replicated database on the slave server. This is a one-way process, which means that changes are always propa-gated from the master server to the slave server, but never the other way around.
Figure 16-1
Support for replication is built into MySQL. There are no special add-ins or applications that you must install. Tou do have to configure your system to support replication, so the next section shows you how that is accomplished.
When working with replication, keep in mind that itâs a relatively new MySQL technology, so it is still very much a work in progress and evolving continuously. For this reason, the way in which it is imple-mented in the version of MySQL that youâre using might be a little different from the way it is described here. In addition, because itâs still a relatively new technology, you might receive results different from what you expect when you try to implement and administer replication. If you plan to implement repli-cation, be sure to refer to the most current product documentation.
Implementing Replication
Before you setting up replication, binary logging should be enabled on the master server. From there, you can use the following steps to implement replication:
1.
To allow a master server to replicate data to a slave server, you must set up a user account on the master server. The slave server then uses that account to establish a connection to the master server. To set up the account, launch the mysql client utility on the master server; then execute the following GRANTstatement:One-way replication
Master server Slave server
Binary log files
Relay log files
Copy of MySQL databases MySQL
GRANT REPLICATION SLAVE ON *.* TO â<slave account>â@â<slave host>â IDENTIFIED BY â<password>â;
The GRANTstatement grants the REPLICATION SLAVEprivilege at the global level, as specified by the ONclause. The privilege is specific to the process of replication and allows all changes to a database to be replicated to the copy of the database on the slave server. The TOclause defines the username on the account and host from which that account can connect. This is the host where the slave server resides. The IDENTIFIED BYclause then identifies the password that should be used when the slave server logs on to the master server. (For more information about the GRANTstatement and setting up user accounts, see Chapter 14.)
2.
Make a backup of the databases that you want to replicate. Use the --master-dataoption in the mysqldumpcommand. The --master-dataoption adds a CHANGE MASTERstatement similar to the following to your backup file:CHANGE MASTER TO MASTER_LOG_FILE=âmaster1-bin.000128â, MASTER_LOG_POS=79 ;
The CHANGE MASTERstatement identifies the binary log file and the position in that file at the time that the backup file is created. You use this information later when you set up replication on the slave server. This information allows you to synchronize the slave server with the master server. (The CHANGE MASTERstatement is discussed in more detail later in this section. For information about backing up a database to a backup file, see the âBacking Up Your Databaseâ section earlier in the chapter.)
3.
Shut down the master server.4.
Next, you must modify the [mysqld]section of the option file on the master server. You must specify a server ID for the master server. The master server and any slave servers must each be assigned a unique numerical ID. In addition, if you donât want to replicate a specific database, such as the mysql or test databases, you can add a binlog-ignore-dboption for each database to prevent changes to that database from being logged to the binary file. As a result, changes to those tables arenât replicated. When youâre finished editing the option file, the [mysqld]section should include options similar to the following:[mysqld] log-bin
binlog-ignore-db=mysql binlog-ignore-db=test server-id=<master server id>
The log-binoption specifies that binary logging should be enabled. The two binlog-ignore-db
options specify that changes to the mysql and test databases should not be logged to the binary files. The server-idoption specifies the numbered ID for the master server.
If you use a predefined option file, a server-idoption might already exist. Be sure to check for other instances of server-id. If multiple options are specified and the numerical IDs are different, replication might not work.
5.
Restart the master server.7.
Modify the option file on the slave server so that the [mysqld]section includes the following settings:server-id=<slave server id>
Make certain that this server ID is different from the master server ID and different from any other slave server IDs. Also be sure that this is the only server-idoption defined on the slave server.
8.
Restart the slave server.9.
Use the backup file that you created in Step 2 to load the databases into the slave server. (For information about loading a database from a backup file, see the âReloading Your Databaseâ section earlier in the chapter.)10.
Next, you must specify the settings that will be used for the slave server to connect to the master server and determine which binary log file to access. Launch the mysql client utility on the slave server, and then execute the following CHANGE MASTERstatement:CHANGE MASTER TO
MASTER_HOST=â<master host>â, MASTER_USER=â<user account>â, MASTER_PASSWORD=â<password>â, MASTER_LOG_FILE=â<log file>â, MASTER_LOG_POS=<position>;
The CHANGE MASTERstatement identifies the hostname of the master server, the username for the account that you created in Step 1, the password for that account, the binary log file on the master server, and the position in that file. The slave server adds this information to the master.info file, which is used when connecting to the master server. (The CHANGE MASTERstatement is dis-cussed in more detail later in this section.)
11.
The final step that you must take is to start the replication process on the slave server. To do so, execute the following SQL statement on the slave server:START SLAVE;
The statement initiates the threads that connect from the slave server to the master server. (The
START SLAVEstatement is discussed in more detail later in this section.)
Once youâve set up replication, you should try it out. The easiest way to do this is to make a change to a table on the master server and then determine whether that change has been replicated to the slave server. If the change is reflected on the slave server, replication has been properly set up. Once replication is implemented, you might find that you need to view replication settings or make a change. Fortunately, MySQL allows you to administer the replication environment.
Managing Replication
Managing the Master Server
As you have learned, the master server contains the original database. Changes made to databases on the master server are replicated to the slave servers. To allow you to manage replication on the master server, MySQL provides several statements.
Using the RESET MASTER Statement
When youâre setting up replication, you might find that you first want to clean up the binary logs on your master server. Once you have backed up the log files and the index file, you can delete these files and start from scratch. The easiest way to do this is to issue the following statement:
RESET MASTER;
The RESET MASTERstatement deletes all your binary log files, removes them from your binary index file, and starts logging with a new log file.
Using the SHOW MASTER STATUS Statement
Earlier in the chapter, you learned about the steps necessary to set up replication. One of the steps is to create a backup file of the databases that you want to replicate. Indeed, the step instructs you to use the
--master-dataoption in your mysqldumpcommand. The command adds a CHANGE MASTERstatement to your backup file that contains the binary log filename and the position in the file that you should use as a starting point when implementing replication on a slave server.
Using the --master-dataoption in the mysqldumpcommand is a handy way of preserving the filename and position when you go to implement replication on the server. You merely reference the backup file and retrieve that information from there. An alternative that you can use to determine the binary log filename and position is the following statement:
SHOW MASTER STATUS;
When you execute the statement, you should receive results similar to the following:
+---+---+---+---+ | File | Position | Binlog_Do_DB | Binlog_Ignore_DB | +---+---+---+---+ | master1-bin.000030 | 340 | | mysql,test | +---+---+---+---+ 1 row in set (0.00 sec)
As you can see, the results include a binary log filename (master1-bin.000030) and a position in the binary log (340). The Binlog_Do_DB column lists any databases that are specifically logged to the binary files. Currently, no databases are being explicitly logged. As a result, changes to all databases on the server are logged to the binary log file unless explicitly shown in the Binlog_Ignore_DB column. In this case, the mysql and test databases are shown, so changes to those two databases are not logged.
The SHOW MASTER STATUSstatement provides a quick method for discovering the current position in a log file. If you are using this information as part of setting up replication, you must be sure that it is applied exactly to when you backed up the databases. For example, suppose you create a backup file and then issue a SHOW MASTER STATUSstatement. Now suppose that an update had been issued against the database in between when you created the backup file and when you checked the master status. The result would be that the master status information would no longer be accurate. As a result, if you cannot guarantee the accuracy of the master status information, you should simply add the --master-dataoption to your mysqldumpcommand.
Using the SHOW SLAVE HOSTS Statement
You might find it useful at times to know exactly what slave servers are connected to your master server. This can be useful if youâre troubleshooting your replication and you want to determine whether the slave server is connected to the master server. To verify the slave connections to your master that currently exist, execute the following statement:
SHOW SLAVE HOSTS;
The SHOW SLAVE HOSTSstatement should return results similar to the following:
+---+---+---+---+---+ | Server_id | Host | Port | Rpl_recovery_rank | Master_id | +---+---+---+---+---+ | 2 | server20 | 3306 | 0 | 1 | +---+---+---+---+---+ 1 row in set (0.00 sec)
The results should include a row for each slave that is connected to the master. In these results, only one slave is connected. As you can see, the row provides the server ID of the slave (2), the name of the slave host (server20), the port being used to connect to the master (3306), the replication recovery rank (0), and the server ID of the master server (1).
The replication recovery rank (the Rpl_recovery_rank column) refers to the rpl_recover_ranksystem variable, which has a default value of 0. Currently the system variable is not used by MySQL, so it has no meaning in this context. It appears that eventually it will be used to rank master servers so that, if a slave server has lost its master, it can select a new master based on the master ranks.
By default, a slave server is not listed in the results returned by the SHOW SLAVE HOSTSstatement. To include a slave server in these results, you must add the --report-host=<host>option to the [mysqld]
section of the option file on the slave server. When specifying this option, you should provide the name of the slave host, not the master host.
You can also use the SHOW PROCESSLISTstatement to view a list of the threads that are currently running. This is useful if you want to see all your current connections, including the slave connections.
Managing the Slave Server
Using the CHANGE MASTER Statement
The CHANGE MASTERstatement is probably the most important statement that you work with when managing replication. The statement provides the parameters that are used by the master.info file on the slave server. The following syntax shows how to define a CHANGE MASTERstatement:
CHANGE MASTER TO <master option> [<master option>...]
As you can see, you must specify the CHANGE MASTER TOkeywords along with one or more master options. The primary options that youâll be using are described in the following table.
Option syntax Description
MASTER_HOST=â<master host>â The name of the master server
MASTER_USER=â<user account>â The name of the user account set up for the slave server
MASTER_PASSWORD=â<password>â The password for the user account set up for the slave server
MASTER_PORT=<port number> The port number used to connect to the MySQL server on the master server
MASTER_CONNECT_RETRY=<count> The number of times to try to reconnect to the master server if a connection cannot be established initially
MASTER_LOG_FILE=â<log file>â The name of the binary log file on the master server that the slave server should begin reading from when implementing replication on the slave server
MASTER_LOG_POS=<position> The position in the binary log file that determines where to start searching the log files in order to synchronize the slave server with the master server
RELAY_LOG_FILE=<log file> The name of the relay log file on the slave server that the slave server should begin reading from when implementing replication
RELAY_LOG_POS=<position> The position in the relay log file that determines where to start searching the log files in order to implement replication
The CHANGE MASTERstatement is most commonly used when first initiating replication on a slave server. The statement might also come in handy if connection information changes after replication has started. For example, you might have to change the password for the user account that connects to the master server. In that case, you simply specify the MASTER_PASSWORD=â<password>âoption as the statementâs only option.
The MASTER_HOST=â<master host>âoption and the MASTER_PORT=<port number>option are a little different from the other options. If you specify either one, you must also specify the
CHANGE MASTER TO
MASTER_HOST=âserver1â, MASTER_USER=âslave_acctâ, MASTER_PASSWORD=âslave_pwâ,
MASTER_LOG_FILE=âserver1-bin.001234â, MASTER_LOG_POS=79;
In this statement, the master host is server1, the account used to log on to the host is slave_acct, and the password for that account is slave_pw. In addition, the master log binary file is server1-bin.001234, and the position in that log is 79. As you can see, a master host is specified, so a master log file and log position are included. In addition, the relay log file and relay position are not specified. When you execute this statement, the information is added to the master.info file.
Using the RESET SLAVE Statement
If you want to start over with setting up replication on the slave server, you can reset the slave by using the following statement:
RESET SLAVE;
The statement deletes all the relay log files as well as the master.info and relay-log.info files. The state-ment then re-creates all the necessary replication files, providing you with a clean start. As a result, the master.info file does not contain the values necessary to connect to the master server; in that case, you need to issue a CHANGE MASTERstatement.
Using the SHOW SLAVE STATUS Statement
If you want to view information about a slave server, you receive the most complete information by using the following statement:
SHOW SLAVE STATUS;
The SHOW SLAVE STATUSstatement provides status information about the connection to the master server, the binary log file and relay log file, and the positions in the log files. The following results show a part of what you receive when you execute this statement on a slave server:
+---+---+---+---+---| Slave_IO_State +---+---+---+---+---| Master_Host +---+---+---+---+---| Master_User +---+---+---+---+---| Master_Port +---+---+---+---+---| Conn +---+---+---+---+---| Waiting for master to send event +---+---+---+---+---| server1 +---+---+---+---+---| slave1 +---+---+---+---+---| 3306 +---+---+---+---+---| +---+---+---+---+---1 row in set (0.00 sec)
The results shown here represent only a small part of the information you should receive when you run the SHOW SLAVE STATUSstatement. The statement returns nearly any information you need about the slave server. For a complete list of the information returned by the statement, see the MySQL product documentation.
Using the START SLAVE Statement
START SLAVE;
The statement starts the connections to the master server that are necessary for replication to work. Two connections are used by a slave server. The I/O connection accesses data in the binary log files on the master server and copies that data to the relay logs. The SQL connection reads the relay logs and executes the statements against the databases on the slave server.
Using the STOP SLAVE Statement
To stop replication on the slave server, you can issue the following statement on the slave server:
STOP SLAVE;
The statement stops both the I/O connection and the SQL connection, and changes to the databases are no longer replicated. The replication files, though, are preserved, so you can restart the replication process by issuing a START SLAVEstatement.
Summar y
As this chapter has demonstrated, MySQL supports several methods that you can use to protect your system from the loss of data. By backing up your system regularly, youâre ensuring that you maintain an ongoing history of the changes made to your database. And should you need to restore your database, you can use the most recent backup file, along with the applicable binary log files, to restore your system to its original state