SIMULATION OF CLOSE-RANGE PHOTOGRAMMETRIC SYSTEMS FOR
INDUSTRIAL SURFACE INSPECTION
T. Becker a, M. Özkul a, U. Stilla b
a BMW Group AG, Petuel Ring, 80788 München – {tobias.becker, muammer.oezkul}@bmw.de b
Photogrammetry and Remote Sensing, Technische Universität München, 80290 München, Germany - stilla@tum.de
KEY WORDS: Photogrammetry, Simulation, Virtual Reality, POV Ray, Close-Range
ABSTRACT:
Close-range photogrammetric measurement systems are increasingly used for high-precision surface inspection of car body parts. These measurement systems are based on an active light source, the projector, and one or more cameras. Many systems use a sequence of fringe projection, mostly a combination of the gray code and phase shift technique. Basically the quality of the measurement result depends on best possible positions of these sensors, which requires human expert knowledge and experience. But is it possible to use computer-based algorithms to find optimal measuring positions? Simulation processes are discovered as part of a research project aimed at the evaluation of the quality of measuring positions concerning to visibility, the attainable accuracy and realizable feature extraction. One approach is the simulation of the photogrammetric sensor using ray tracing techniques to create photorealistic pictures from the sensor cameras view. This image sequence could be processed with the evaluation software of the system manufacturer in order to calculate a three dimensional point cloud. Following an actual/target comparison should indicate differences that trace back to insufficient measuring positions. In this paper we show how to build up a virtual close range photogrammetric sensor using POV Ray, a free ray tracing software. After introducing the simulation concept, the design of a virtual close range photogrammetric sensor is presented. Based on practical examples of sampled scenes the potential of photorealistic ray tracing is shown. Finally the usability of this simulation approach is discussed.
1. INTRODUCTION
1.1 Motivation
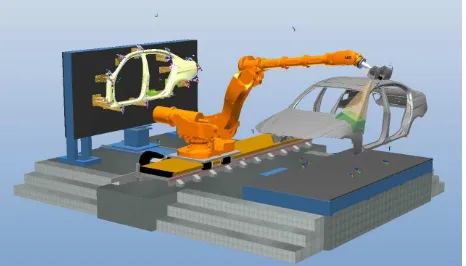
In automotive industry the quality test of car body parts concerning to geometric accuracy and dimensional stability is very important. So far mostly tactile coordinate measuring machines are used for high precision measurement of specified points. Meanwhile there is an increased use of close range photogrammetric systems as they provide industrial compatibility and high accuracy, i.e. Oezkul (2009) researched the practical application of optical measurement systems to detect very small surface defects on body parts. A certain advantage of photogrammetric systems is the contactless and rapid area-based measurement. Figure 1 shows a typical industrial inspection cell where the photogrammetric sensor is mounted on a robot, providing a highly automated process. The practical application has shown that the correct operation of these machines requires expert knowledge and experience, due to a lot of different parameters that affect the measuring process. Major parameters affecting the accuracy are measuring volume, angle between sensor and object, occlusion, shadowing, reflections, contrast/exposure. Furthermore there are some more practical hints like robot configuration or collision. The latest developments of commercial sensor planning tools take care of some of the listed parameters e.g. occlusion, nevertheless they cannot guarantee a sufficient result at single or all measuring positions. These circumstances lead to the fact, that extensive tests within the inspection cell are necessary to ensure best possible results. During these tests the inspection cell is blocked and not usable for the main task – measuring. With a computer-aided simulation tool it should be possible to evaluate the quality of measuring positions concerning to visibility, the
attainable accuracy and realizable feature extraction, outside of the inspection cell. Furthermore this evaluation should not base on detailed information in underlying algorithms of individual system manufacturers.
Figure 1. Industrial surface inspection cell
Using virtual reality for simulation of photogrammetric tasks is the subject of a number of publications. The simulation of sensors with the description of objects, sensors and light sources is subject of Raczkowsky and Mittenbuehler (1989) or Ikeuchi and Robert (1991). Determine sensor positions by avoiding occlusion in urban scenes using VRML is described by Stamos and Allen (1998).
Piatti and Lerma (2006) use a virtual simulator for photogrammetry for the determination of proper exposure stations, i.e. in urban areas with high buildings, in terms of getting maximum ground coverage with a minimum of image overlapping.
Auer et al. (2009, 2010) present an approach to simulate SAR images via calculating the elevation data using ray tracing algorithms of POV Ray.
Raguse and Wiggenhagen (2003) simulate the exposure configuration to evaluate the optical measurement chain. Virtual reality is not used in the truest sense only the imaging geometry, i.e. coordinates of the cameras und object points, and some constants are used to make a statistical statement of the network configuration.
1.2 Overview
In this paper we describe a possible simulation concept based on computer generated photorealistic images. Modelling a close range photogrammetric sensor with its camera and projector is one of the main tasks in this concept. In Section 2 the modelling of a fictive sensor and the scene is explained. Section 3 shows some results of rendered images. In section 4 the simulation concept is discussed.
2. SIMULATION CONCEPT
The proposed simulation concept is based on computing photorealistic pictures from the sensors camera view and to process them with the evaluation software of the system manufacturer. There are several tools to compute more or less photorealistic images from three dimensional scenes. For example OpenGL or DirectX visualise three dimensional scenes in real time using hardware acceleration. Both have the disadvantage of missing essential features like shadows or reflections. Other software tools use time intensive ray tracing algorithms to calculate more realistic images.
We use POV Ray (The Persistence of Vision Ray Tracer v3.6), a free and open source ray tracing software tool, to compute images with high photorealistic quality. The main simulation concept consists of the following parts (Figure 2):
• Modelling of the photogrammetric sensor
• Modelling of the scene within the inspection cell
• Calculating the photorealistic image sequence from the sensor view
• Digitize a 3D point cloud from these images
• Carry out an actual/target comparison.
Figure 2. Simulation concept
The major advantage of this concept is that we have not the constraints to know details of the algorithms implemented by the manufactures. In fact they use highly optimized and specialized algorithms for feature extraction like reference points, edges or bolts. These algorithms are based on the captured image, the computed point cloud or a combination of both and are mostly subject to secrecy.
This paper is focused on modelling the different components of photogrammetric sensors and ray tracing.
2.1 Modelling of the photogrammetric sensor
The following section describes the modelling of a photogrammetric sensor with one projector and one or more cameras.
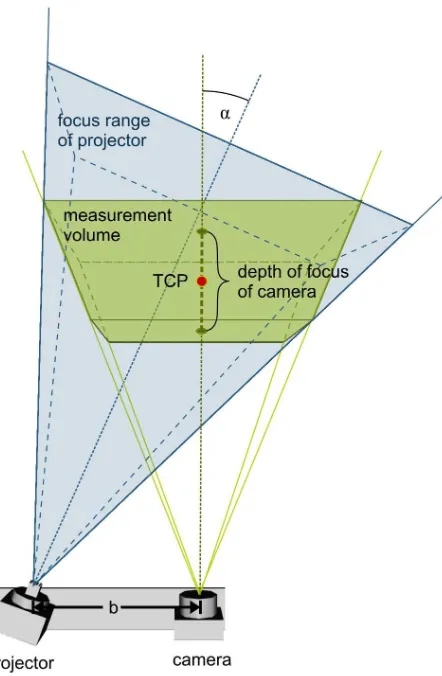
Figure 3 shows a simple model of a photogrammetric sensor with one projector and one camera. In general the sensor has a fixed triangulation angle α≈20° between the camera and projector. The measurement volume of the sensor is defined by the depth of focus of the camera and the focus range of the projector. The center of the cameras depth of focus is termed as TCP (tool center point). According to α and the distance from camera to the TCP the basis length b – the distance between projector and camera – is defined. The sensor used in our experiments has a basis length b=350mm corresponding to a triangulation angle α=20° degrees between projector and a mean measuring distance of t=650mm. In the image the visual range of the camera is marked green and the focus range of the projector is marked blue.
For a more detailed description of photogrammetric sensors the reader is referred to Luhmann (2003).
Figure 3. Sensor with measurement volume International Archives of the Photogrammetry, Remote Sensing and Spatial Information Sciences, Volume XXXVIII-3/W22, 2011
2.1.1 Camera: Close range photogrammetric measurement systems mostly use high precision digital cameras with fixed lenses. The manufacturers pay close attention to high grade camera-lens-combination to minimize optical aberrations that would result in distortions of the measurement. The use of fixed lenses leads to a defined depth of focus so that the visual range is a frustum of a pyramid. Parts of objects that appear in front of or behind the frustum of pyramid are not applicable for a high precision measurement and are rejected by the elevation software. POV Ray uses a simple pinhole camera with different projection types, for example perspective, ultra-wide-angle or fisheye. The camera definition describes the position, projection type, line of sight, sky vector, aspect ratio and horizontal viewing angle. Additionally the focal blur can be simulated by specifying a focal point and aperture value. Large apertures give a lot of blurring, while narrow apertures will give a wide zone of sharpness. Since further aberrations of the photogrammetric camera are considered by the calibration tools of the evaluation software of the manufacturers in a pre-processing step, the pinhole camera model of POV Ray in conjunction with focal blur simulation should be sufficient.
2.1.2 Projector: The photogrammetric measurement systems that are commonly assembled in the automotive industries mostly use a combination of the gray code and phase shift technique. The gray code is used to identify the number of the corresponding strip of the phase shift. The projector himself is integrated in a case and consists of a high intensity light source emitting a beam through a glass sheet, with dark etched or dark coloured stripes, and a lens towards the measuring part. So the stripe patterns of the gray code are being displayed as sharp shadows on the surface of the measuring object. The modelling of the projector in POV Ray is achieved by a point light source which is shielded by a case on five sides. In view direction the case is open to integrate a geometry that simulates the stripe pattern for each image in the sequence. The stripe pattern is simulated by polygons integrated in the open side of the case. For each image of the gray code sequence the number of stripes, there dimensions and positions are calculated.
The phase shift technique uses sinusoidally intensity modulated fringes that are projected on the measuring object. In a number of steps the fringes are shifted and for each phase position an image is recorded. The phase shift allows precise calculation of the coordinates with subpixel accuracy. In POV Ray textures are utilized to simulate sinusoidally intensity modulated fringes. For that a texture bitmap has to be set up with a 32-bit RGBA color space, where the RGB values are set to zero, defining a black image. The alpha channel is set to the values of the calculated modulation, defining the fringes via transparency. Now the projector case in the scene is closed by a polygon which is overlaid with the texture. For each phase shift a suitable texture bitmap is calculated.
In most cases the photogrammetric measurement systems uses two additional images, one with full light of the projector but without any stripes, and another image with light turned off. These two images are used to determine the maximum edge contrast of the stripes on the measuring object. With POV Ray it is just the same, using the original projector model without simulated stripes once with and once without light switched on.
2.2 Modelling of the scene
Modelling a complete scene is done with the POV Ray scene description language. A plain ASCII text file is used to describe the scene in a readable and convenient way. A large amount of
different geometric objects, effects and global settings are available, also mathematic expressions or macros are possible. As the modelling of the scene may become very complex, we developed a software tool, which contains a framework for visualisation via OpenGL, a scene graph for various geometric objects, parameter input and control for the sensor modelling and more. This tool allows creating 3D scenes or parameterised sensor models in a simple way. An export feature creates automatically the input files for POV Ray of the complete image sequence including all necessary parameter settings.
3. EXPERIMENTS AND RESULTS
3.1 Experiment
With the above mentioned tool the measuring object, a front wring, and a model of a fictive photogrammetric sensor is imported and positioned, so that a portion of the wing lies within the visual range of the sensors camera (see Figure 4).
Figure 4. Modelling of the scene
The fictive photogrammetric sensor uses a sequence of 14 images, one with light switched off, one with light switched on but no stripes, eight images with the 8-bit gray code and four images for the phase shifts, each shift by one fourth phase. For a better visualisation of the sinusoidally intensity modulated fringes we use broad stripes. The resolution of the sensor is set to a width of 1600 and height of 1200 pixels. During the export absolute coordinates of the positioned objects are calculated and textures or materials are assigned. For each image in the sequence a separate text file is created. Finally POV Ray is used for sampling each scene.
3.2 Results
Figures 5-7 show the simulated sensor images, first the one without any stripes (light turned on), then a projected gray code and last a phase shift.
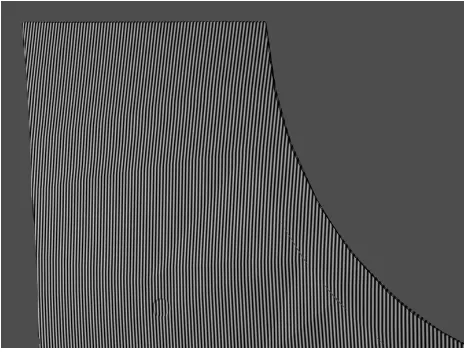
An enlarged view of the sinusoidally intensity modulated fringes is shown in Figure 8.
Figure 5. Render results without stripes
Figure 6. Render result with gray code (7th-Bit)
Figure 7. Render result with phase shift
Figure 8. Enlarged view of phase shift
4. DISCUSSION
The simulated image sequence shows a geometric concordance to recorded images of real photogrammetric sensors, especially for the fringe projection of the gray code. One problem is the texture of the measuring object, which is much more complex in reality, probably caused by impurities like small oil stains or partial reflections.
A main drawback is the time needed to sample the images. With an average PC each sampling of the scene took about 5-8 minutes induced by focal blur and antialiasing parameters. This leads to calculation times of nearly two hours for a complete image sequence of one measuring position. It must be said that large body parts need about 50 or more measuring positions, leading to an overall calculation time of about 4 days and more for a complete simulation of the measuring process. However there are approaches to allow realtime ray tracing using highly efficient hardware architecture for example by Schmittler et al. (2002) or Wald (2004).
5. FUTURE WORK
Based on the parameters of a real photogrammetric sensor it should be possible to make a comparison between real and rendered images. Furthermore the computed photorealistic images are used to calculate a point cloud of the measuring object by the software of the measurement system manufacturer. An actual/target comparison should show the geometrical accuracy of the simulation concept.
In addition the modelling of the camera could be enhanced to simulate some realistic chromatic aberration and also some distortion by adding a lens shaped object just in front of the camera.
ACKNOWLEDGEMENTS
This research is funded by the BFS (Bayerische Forschungsstiftung) within the contract number AZ-876-09. International Archives of the Photogrammetry, Remote Sensing and Spatial Information Sciences, Volume XXXVIII-3/W22, 2011
REFERENCES
Auer, S.; Zhu X.; Hinz S.; Bamler R., 2009. Ray Tracing and SAR-Tomography for 3D Analysis of Microwave Scattering at Man-Made Objects. In: International Archives of the Photogrammetry, Remote Sensing and Spatial Information Science, Vol. 38 (3/W4), pp. 157-162.
Auer, S.; Hinz, S.; Bamler, R., 2010. Ray Tracing Simulation Techniques for Understanding High Resolution SAR Images. IEEE Transactions on Geoscience and Remote Sensing, Vol. 48, pp. 1445-1456.
Ikeuchi, K.; Robert, J., 1991. Modeling Sensor Detectability with VANTAGE Geometric/Sonsor Modeler. IEEE Transactions on Robotics and Automation. Vol. 7, pp. 771-784.
Luhmann, T., 2003. Nahbereichsphotogrammetrie Grundlagen, Methoden und Anwendungen. 2. Auflage. Herbert Wichmann Verlag, Heidelberg, Germany.
Oezkul, M., 2009. Qualitätsansprüche bezüglich des äußeren Erscheinungsbildes von Automobilen der Premiumklasse. Hieronymus Verlag, Munich, Germany.
Piatti, E. J.; Lerma, J. L., 2006. A Virtual Simulator For Photogrammetry. ISPRS Commission V Symposium “Image Engineering and Vision Metrology”, Vol. 36 (5).
Raczkowsky, J.; Mittenbuehler, K. H., 1989. Simulation of Cameras in Robot Applications. Computer Graphics Applications, pp. 16-25.
Raguse, K.; Wiggenhagen, M., 2003. Beurteilung der Optischen Messkette durch Simulation der Aufnahmekonfiguration. In: Seyfert, E. (Hrsg.): 23. Wissenschaftliche Jahrestagung der DGPF. Publikationen der Deutschen Gesellschaft für Photogrammetrie, Fernerkundung und Geoinformation, Vol. 12, pp. 275-283.
Schmittler, J.; Wald, I.; Slusallek, P., 2002. SaarCOR – A Hardware Architecture for Ray Tracing. In: Proceedings of the ACM SIGGRAPH/Eurographics Conference on Graphics Hardware, pp. 27-36.
Stamos, I.; Allen, P., 1998. Interactive Sensor Planning. In: IEEE Conference on Computer Vision and Pattern Recognition, Proceedings, pp. 489-494.
Wald, I., 2004. Realtime Ray Tracing and Interactive Global Illumination. Dissertation, Computer Graphics Group, Saarland University, Germany. http://www.sci.utah.edu/~wald/PhD/ wald_phd.pdf (accessed 15 May 2011)