A CASE STUDY: MANAGING CONSTRUCTION PROJECTS THROUGH
SHARED ONLINE CALENDAR
BY
MOHD SAIFUL RIZAL BIN YUSOFF
A DISSERTATION SUBMITTED IN PARTIAL
FULFILMENT OF THE REQUIREMENT FOR THE
DEGREE OF MASTER IN BUSINESS ADMINISTRATION
(CONSTRUCTION BUSINESS)
CENTRE FOR BUILT ENVIRONMENT
KULIYYAH OF ARCHITECTURE AND ENVIRONMENTAL DESIGN
INTERNATIONAL ISLAMIC UNIVERSITY MALAYSIA
ABSTRACT
APPROVAL PAGE
I certify that I have read this study and that in my opinion it conforms to acceptable standards of scholarly presentation and is fully adequate, in scope and quality, as a dissertation for the degree of Master in Business Administration (Construction Business).
………. Dr. Ramlah Hussein
Kuliyyah of Information and Communication Technology Supervisor
Date:
I certify that I have read this study and that in my opinion it conforms to acceptable standards of scholarly presentation and is fully adequate, in scope and quality, as a dissertation for the degree of Master in Business Administration (Construction Business).
………. Mr Raja Baharuddin bin Anom
Kuliyyah of Information and Communication Technology Examiner
Date:
This dissertation was submitted to the Centre for Built Environment and is accepted as partial fulfillment of the requirement for the degree of Master in Business Administration (Construction Business).
………. Assoc. Prof. Ir. Dr. Maisarah Ali
DECLARATION
I hereby declare that this thesis is the result of my investigations, except where otherwise stated. Other sources are acknowledged by footnotes giving explicit references and a bibliography is appended.
Name: ……….
ACKNOWLEDGEMENT
First and foremost, I praise the Almighty Allah Who gave me the strength and the health in completing this work.
Secondly, I would like to express my utmost gratitude to my respected supervisor, Dr. Ramlah Hussein for her invaluable assistance and guidance in writing this dissertation.
I must also express my warmest thankfulness to Assoc. Prof. Ir. Dr. Maisarah Ali, Director of Centre for Built Environment in given suggestions in improving this paper. Thanks also to Sister Aishah Abdul Karim for her assistance, support and encouragement during the study.
TABLE OF CONTENTS
LIST OF FIGURES ix
LIST OF TABLES xii
LIST OF ABBREVIATIONS xiii
CHAPTER I: INTRODUCTION
1.1 Background of the Study 1
1.2 Research Objectives 4
1.3 Scope of the Study 4
1.4 Significance of Study 5
1.5 Limitations of the Study 5
1.6 Organization of Dissertation 6
CHAPTER II: LITERATURE REVIEW
2.1 Recent Findings Introduction 7
2.1.1 Work Schedule 9
2.1.2 Skala 10
2.1.3 PDA 10
2.1.4 Web Application 10
2.1.5 MS Project Calendar 11
Reminding Options 12 2.1.8 Designing a System and Gathering a Feedback 15
2.2 Summary of Recent Findings 16
2.3 A Study on the Skala Functions 17
2.3.1 Login into the System 17
2.3.2 Main Interface of the System 18
2.3.3 Project Details 19
2.4 A Study on Shared Online Calendar 23
2.4.1 A Review on Yahoo! Calendar 23
2.4.2 A Review on Google Calendar 27
2.4.3 Choosing a Calendar 30
2.5 An Overview of PWD Pulau Pinang Working Environment 31
2.6 Basis of Shared Calendar Implementation 32
CHAPTER III: RESEARCH METHODOLOGY
3.1 Introduction 37
3.2 Selection of Measures 40
3.3 Sampling Design 40
3.4 System Operation 41
3.5 Semi-structured Interview 41
3.6 Sampling Design 42
3.7 System Operation 42
CHAPTER IV: SYSTEM CONFIGURATION
4.1 Introduction 44
4.2 Stage 1: Setup for Initial Test on Functionality 47
4.2.1 Step 1: Setting-up the Equipment 47
4.2.2 Step 2: Setting-up User’s Account 49
4.2.3 Step 3: Setting-up Shared Calendar 54
4.2.4 Step 4: Setting-up Notification System for User 1 62 4.2.5 Step 4: Setting-up Notification System for User 2 71
4.3 Enter and Edit an Event in the Calendar 76
4.3.1 Enter an Event 77
4.3.2 Edit an Event 78
4.3.3 Delete an Event 81
4.4 Stage 2: Setup for Implementation to the Team 82
4.5 SKALA Setup 87
4.6 Summary of System Setup 90
CHAPTER V: RESULTS AND ANALYSIS
5.1 Introduction 91
5.2 Stage 1: Result for Notification System 92
5.2.1 User 1 Email 93
5.2.1.1 Picture Enter 94
5.2.1.2 Picture Update 95
5.2.2.1 Picture Enter 96
5.2.2.2 Picture Update 97
5.2.2.3 Picture Delete 98
5.2.3 User 1 SMS 99
5.2.3.1 Picture Enter 99
5.2.3.2 Picture Update 100
5.2.3.3 Picture Delete 101
5.2.4 User 2 Email 102
5.2.4.1 Picture Enter 103
5.2.4.2 Picture Update 104
5.2.4.3 Picture Delete 105
5.2.5 User 2 Pop-up 107
5.2.5.1 Picture Enter 107
5.2.5.2 Picture Update 108
5.2.5.3 Picture Delete 109
5.2.6 User 2 SMS 110
5.2.6.1 Picture Enter 110
5.2.6.2 Picture Update 111
5.2.6.3 Picture Delete 113
5.3 Stage 2: Result for Notification System (Implementation to
the Project Team 113
5.3.1 SMS Sent and Received 116
5.3.2 SMS Receives for New Invitation 116
5.3.4 SMS Receives for Cancelled Invitation 119
5.4 Feedback from the User 121
5.5 Summary of Research Result 122
CHAPTER VI: CONCLUSIONS AND RECOMMENDATIONS
6.1 Summary and Conclusion 123
6.2 Suggestion for Future Research 125
6.3 Implications 125
LIST OF FIGURES
Figure 1.1: Proposed System 3
Figure 2.1: Login Interface to Skala 13
Figure 2.2: Main Interface of the System 14
Figure 2.3: Interface of Project Details 15
Figure 2.4: Works and other related information 15
Figure 2.5: Detail information of project progress 16
Figure 2.6: Screenshots of Yahoo! Calendar 17
Figure 2.7: Month view 18
Figure 2.8: Add an event 18
Figure 2.9: Reminders option 19
Figure 2.10: Added sample event 20
Figure 2.11: Typical interface of shared calendar 21
Figure 2.12: ‘My Calendar’ options 21
Figure 2.13: ‘Other Calendar’ options 22
Figure 2.14: Calendar Settings 22
Figure 2.15: Mobile Setup 23
Figure 2.16: General roles and responsibility 25
Figure 4.1: Login interface of Google Calendar 34
Figure 4.2: Calendar setup 35
Figure 4.3: Calendar setup (continue) 36
Figure 4.4: A calendar main interface 37
Figure 4.5: Main area of the calendar 38
Figure 4.6: Calendar Settings 39
Figure 4.7: Main ‘Settings’ area 40
Figure 4.8: Sharing Options 41
Figure 4.9: Calendar ‘Shared: Edit settings’ 42
Figure 4.10: Shared functions 42
Figure 4.11: Mobile notifications 44
Figure 4.12: SMS option 45
Figure 4.13: SMS for ‘Other Calendar’ 46
Figure 4.14: Website for the easy-access Projects 47
Figure 4.15: Website link to the Projects 48
Figure 4.16: Skala information on the UiTM Bertam project 48 Figure 4.17: Skala information on the Al-Mansoor project 49 Figure 4.18: Skala information on the Kolej Jururawat project 49
Figure 5.1: Calendar notifications in the email 52
Figure 5.2: Real-time calendar display in the mobile phone 52 Figure 5.3: Real-time activity display in the mobile phone 53 Figure 5.4: Project Al-Mansoor on the Internal Meeting 54
Figure 5.7: SMS receives from the shared calendar 56
Figure 5.8: Discussion Group meeting arrangement 57
LIST OF TABLES
LIST OF ABBREVIATIONS
PDA Personal Digital Assistant PWD Public Works Department
Skala PWDs’ Online System for Project Monitoring Calendar Google Calendar Services
SMS Short Messaging Systems Maps Google Maps Services Ms Excel Microsoft Office Excel 2007
CHAPTER I
INTRODUCTION
1.1 Background of the Study
Since the early of our country’s independences, PWD (Public Works Department) had been in the position to manage the construction activities; ensuring it conforms to the time, quality and cost as been agreed. To assist these management activities, PWD had prepared several guidelines and procedures mainly known as SPK (System of Quality Measurement) and Skala (Online Application for Project Management) (Skala Reference Manual (n.d.)). The combination of this two set of procedures and application has been a great tools to the site personnel.
Although the SPK and SKALA had found to be efficient to the project team, there are still several aspects which in a need for improvement. This study will look at some of the SKALA functions and suggestions on how to improve the functions. From the study, it is been found that the SKALA is a great reporting tool as it enables multi-level of access throughout the management in the organization. This tool, if it can be coupled with the additional functions, it could increases the efficiency of the overall system.
The suggestion is to integrate the shared online calendar to the existing SKALA system. This calendar integration will be able to send a set of reminder to all PWD’s personnel at when it is needed. The notifications can be in terms of email,
SKALA Online Application
Shared calendar functions
Upgraded SKALA which be able to sent notifications through shared calendar Email Pop-up SMS + =
Figure 1.1: Upgraded SKALA system
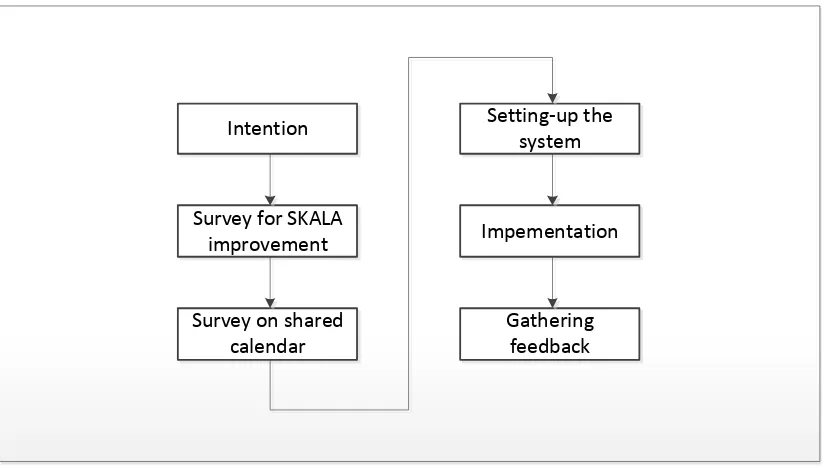
By having the intention to come out with the said system, a step-by-step approached had been conducted. After a survey had been conducted on the SKALA functions, a survey on the shared calendar had been carried out. Upon the decision had been made on the shared calendar functions, the system a setting-up procedure were begun. This lead to the implementation of the system and completed by having the feedback from the participants. The processes are shown in the Figure 1.2.
Intention
Survey for SKALA improvement
By having this idea in mind, the objectives, scope, significance and limitations of the study are given as in part 1.2 to 1.5.
1.2 Research Objectives
The objectives of this research are given as the following:
a) To understand the usage of SKALA in the PWD’s project monitoring.
b) To understand the functions of online shared calendar in the construction environment.
c) To apply the online shared calendar to the construction projects.
d) To determine the implication of the application of shared online calendar to the construction projects.
e) To suggest the possible improvement to the SKALA online application.
1.3 Scope of the Study
The scope of the study is given as the following:
a) The application of the shared online calendar is restricted to the PWD project management environment.
b) The implementation had been to the 3 projects which have been in the jurisdiction of PWD Pulau Pinang.
d) The application restricted to the involvement of the project team which consist of 7 officers.
1.4 Significance of the Study
The study hopefully will be a basis of future enhancement of the existing SKALA system. This enhancement will increase the efficiency of the future PWD project management tools. If it been implemented in the large scales, hopefully it will enhance the efficiency of the project management tools nationwide.
1.5 Limitations of the Study
There had been a numbers of limitations to this study. The possible limitations had been are given as the following:
a) The implementation of the shared online calendar has been in the PWD project management activities. To understand the full functions of the application, it will need to be applied to all levels of the organization which involved in managing the projects.
b) The duration of one year had been a basis of implementation. It is also been observed, more things could be learned if the implementation had been extended to longer period of time.
d) The implementation, if it be able to include the overseas project, it will increase the understanding of the functions of the shared calendar, especially in terms of long distance communication.
1.6 Organization of Dissertation
Chapter I gives the introduction of the study which involves the intention, scope and limitation of the study. Chapter II provide a report to the study conducted to understand the existing functions of the SKALA online application, the functions of shared online calendar and the existing research related to the study area.
Chapter III outlined the methods and requirement needed to set-up the system, conduct the experiment and gathering the results and feedback. Chapter IV outlines the step-by-step procedure to come out with the online calendar that can be shared with the team members. The chapter also gives guidance on how to receive a notification from the system.
CHAPTER II
LITERATURE REVIEW
2.1 Recent Findings Introduction
SKALA Online Application
Shared calendar functions
Upgraded SKALA which be able to sent notifications through shared calendar Email Pop-up SMS + = Survey Survey
Functions, usage and areas for improvement
of SKALA
2 available system in
the internet Existing research
Yahoo! Google Thesis Paper
Decision made on the system to be used
Figure 2.1: A survey on SKALA improvement
This chapter report the study on the existing SKALA online application, a review on the shared online calendar and also a summary of the research which relates to this study.
There also a paper which been published which had been found to be closely related to the study. The paper suggested to have a variety of notifications to the designed system and also a method for gathering the feedback for future improvements.
2.1.1 Work Schedule
2.1.2 Skala
Ainida Suharti (2009) had carried out a research on risk management in the construction environment. Although the focus is to the risk identification, but the researcher had used Skala to identify the project involved in the study. This will provides the basis for the importance of Skala to assist in the evaluation of project progress especially during the process of risk identification.
2.1.3 PDA
Ong Boon Thai (2006) had carried out a research on mobile application in monitoring the defects in the construction environment. The researcher had used a Windows Mobile based gadget with the Ms Access based application in order to have the result on project monitoring. The usage of PDA had been evidence to effectively assist the construction personnel during the project monitoring activity.
2.1.4 Web Application
installation process requires time and cost; time to install and cost to buy the application. This provides the basis for a requirement to online application when time and cost required to buy and install the application could be avoided.
2.1.5 MS Project Calendar
Alvin Stanley Xavier (2006) had carried out a research to compare MS Project calendar and Primavera P3 software. Both had been found reliable where MS Project had been widely used and P3 had been used in the most of the mega-project namely Petronas Twin Tower and Putrajaya. MS Project had been reported to be able to integrate with MS Outlook where the functions of SMS and email notifications could be enabled. This however need teams of technical personnel to set-up and maintained. However, to purchase the software and services require an amount of significant investment to the organization.
2.1.6 Activity Monitoring through Web
chart and also be able to sent and request notifications through email (DotProject Project Management Software).
2.1.7 Collaborative decision to a meeting and reminding options
Weber, J. S., & Smith, N. J. (2008) provide a strong foundation for this study. They had come out with the system that able to make a collaborative decision to conduct a meeting. The system will then be able to tie with the SMS services and sent the notification about the meeting at a given period of time.
The design of the application in a way that it would be able to shares among several persons and at the same time be able to send a reminder notifications will become a framework of this study.
Figure 2.2: Schedule options for a meeting request (Weber, J. S., & Smith, N. J. (2008))
They may refer to a notes on the paper, refer directly to the persons or refer to the paper calendar. This model, although it can be implemented but it also at the same time comes with several constraint such as on how to manage changes to the calendar effectively. So, the writer has an idea of developing a model, an application to try to solve the situation.
Figure 2.4: Schedule option presentation (Weber, J. S., & Smith, N. J. (2008))
The information from the application had been tied to the SMS services from a given telecommunications company. The system were then triggered a set of reminders to the listed user. The SMS were then be sent at a given time. This way, it not only assisted the user to remind on the coming meeting, but at the same time aware of the changes made to the meeting schedules. This kind of visual reminders are shown in Figure 2.5 below.
Figure 2.5: Visual reminders: one displayed on the desktop sidebar and another on a mobile phone (Weber, J. S., & Smith, N. J. (2008))
The study by the writer provide a strong basis for this study but we have not been informed on the 2-way communication of the notification and on how this notification can be controlled. This study will take note on this and will conduct an experiment to proves this 2-way communication practices.
2.1.8 Designing a system and gathering a feedback
Figure 2.6: Meeting cycle model (Valle, C., Prinz, W., & Jarke, M. (2006))
As given in the findings, the system had been designed to be able to send a notifications to the user in a form of email and also integration to the mobile devices had been setup. However none of the SMS notification function had been reported. The SMS function will need to be seriously considered since there is still users with the hanphone which be able only to receives SMS.
2.2 Summary of Recent Findings
There are a research on the usage of Ms Project to be integrates with Ms Outlook where the functions of SMS been enabled. This is however, request for a need of SMS subscription from the service provider and a software installation on each of the computer. A request for online application which has a function for free SMS service relates to each of the activity in the calendar provides the basis for this research.
2.3 A Study on the Skala Functions
The online application had been widely used and also been increases in popularity mainly because it gives the benefit of accessing the application without a need to install any application to the computer. SKALA is one of this online application and it is been developed by PWD’s.
Skala had been widely used for the PWD project monitoring throughout the country. To enhance on the usage, the application had been developed so it be able to automatically produce a progress chart, statistics and reports. At the same time, the application had set to be able a restriction based on the locations and authority of the PDW officers (Skala Reference Manual).
2.3.1 Login into the System
headquarter so the restriction of the usage been securely monitored. To have this, user need to navigate the browser to the address http://skala.jkr.gov.my (Skala Main page).
Figure 2.7: Login interface to Skala
2.3.2 Main Interface of the System
Figure 2.8: Main interface of the system
2.3.3 Project Details
A search of a project will bring user to the interface of project details as shown in Figure 2.9. As shown in the Figure, details of the project include the project status, contract basic information, information relates to the pre-contract and information relates to the cost. Browsing further down will display of works information and other related information, as shown in Figure 2.10.
As displayed, all the data is dynamic which means it is either automatically updates or will be updates by the officer in charge.
Figure 2.9: Interface of Project Details
A link in the other information area, will display detail information of the current progress on site in the graph display formed as shown in Figure 2.11. It is however, the information which link to the graph will need to be updates by the officer in charge.
Figure 2.11: Detail information of project progress
Mu SKALA Built-in functions Add-in functions Ability to generate PDF reports
Search/sort Upload files
and pictures Shared calendars Notification system Interim
Payment Notes/status Graph
Physical Progress
Financial Progress
Email Pop-up SMS
Figure 2.12: Proposed System
Mu SKALA Built-in functions Add-in functions Ability to generate PDF reports
Search/sort Upload files
and pictures Shared calendars Notification system Interim
Payment Notes/status Graph
Physical Progress
Financial Progress
Email Pop-up SMS
Initial study on the Skala found five main functions which operates the system. The functions mainly are multi-level access, ability to generate reports, search/sort functions and ability to upload progress picture.
Among this 5, the function on generation of reports will be a focus on this research. The system currently be able to automatically generates reports in-terms of interim payment (monthly payment to the contractors), notes/status (current status of the project) and graph (physical progress and payment graph).
The suggestion is to add functions to the graph so it will be able to link with the shared online calendar. As a result of this, the functions of SMS (short messaging system) could be enabled as given in the Figure 2.12 and 2.13.
2.4 A Study on Shared Online Calendar
There had been a number of service provider which had offer the web application for shared online calendar functions mainly Google (Google Inc, 2010) and Yahoo (Yahoo Inc, 2010).
2.4.1 A Review on Yahoo! Calendar
been offered by Yahoo! are given as the Figure 2.14. Ones a person had log into the system, the interface as shown in the following picture will be displayed.
Figure 2.14: Screenshots of Yahoo! Calendar
Figure 2.15: Month view
Figure 2.16: Add an event
Figure 2.17: Reminders option
As shown generally, they have an option to not remind or remind at a specific time. User will then had to choose to be reminding on the specific given time, through ‘Yahoo! Messenger’, through ‘email address’ or ‘mobile device email’. It is however, no indication of SMS reminder in the option.
In this example, a sample event had been added to the calendar as shown in the Figure 2.18. Also highlighted, there are no drag and drop user interface to enable easy changes in the calendar.
2.4.2 A Review on Google Calendar
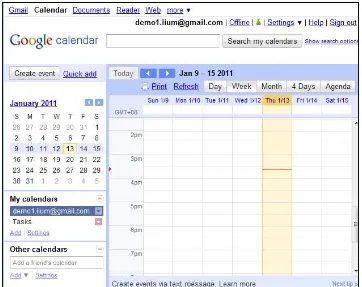
The main user interface of the calendar is given as in Figure 2.19. On the upper right, the user straight away will notice the setting and view options. In view, there is a choice for user to switch the interface to the day, week, month, 4 days and agenda. It is however, had been set in the above figure to be viewed in the month view.
Figure 2.19: Typical interface of shared calendar
2.20 and Figure 2.21. The user will notice a links at the bottom of each of the options area. This links will enable the user to further setup the required functions.
Figure 2.20: ‘My Calendar’ options
Figure 2.21: ‘Other Calendar’ options
For example, a click to the Settings in ‘My Calendar’ options will bring the
Figure 2.22: Calendar Settings
Figure 2.23: Mobile Setup
These are some examples of the functions currently available in the Google shared calendar.
2.4.3 Choosing a Calendar
Table 2.1: Features comparison
No Features Yahoo! Calendar Google Calendar
1. Drag and drop No Yes
2. SMS reminder No Yes
3. Same page editing No Yes
By comparing the level of user-friendly and the multiple functions available, the Google Calendar had been taken into application in this research. The next chapter (Chapter IV) will explain the detail setup in order to have the application up and running in the PWD’s working environment.
2.5 An Overview of PWD Pulau Pinang Working Environment
PWD which locates in the states of Pulau Pinang had been made of by hundreds of professionals and support staff. There had been a list of PWD functions but generally the organizations had been given the authority by the government to monitor the construction projects throughout the country ever since its establishment.
Monitoring Team Project Team
Gathering feedback from the district level
Reporting to the
PWD’s HQ
Auditing the project progress
Reporting to the monitoring
team
Figure 2.24: General roles and responsibility
To have efficiency, there is indeed to have a comprehensive tool to enable the information flow to the right person at the right time. This scenario required an advance capability of the system which bring us to the functions of mobile application.
2.6 Basis of Shared Calendar Implementation
The three construction sites which had been under the Project Team responsibility is locates scattered in the state of Pulau Pinang. There were one site located in the mainland and two on the island. The distance of the sites from the state office is given as the following:
a) UiTM Bertam Site is located at 36.7 km from the State Office as given in the Figure 2.25.
c) Kolej Al-Mansoor is located at 24.1 km from the State Office as given in the Figure 2.27.
Figure 2.26: Distance of Kolej Jururawat from the State Office
As shown, the distance of site from the State Office limits the daily site communication thus provides the needs for shared online calendar as a working tool. Without the calendar, it is quite impossible to get the updates of site activities by visiting each site in one day or by making telephone calls.
In order to have the site managed, there will be two-way communication through the shared calendar. The communication from the State Office to the Site Office and the communication from the Site Office to the State Office. In addition, the communication also need to be built between the Project Team and Monitoring Team. This interactions had been illustrates as in Figure 2.28.
Monitoring Team Project Team
Contractor/
Consultants Project Team
S ta te O ff ic e S it e O ff ic e
Figure 2.28: Interactions between State Office and Site Office
CHAPTER III
RESEARCH METHODOLOGY
3.1 Introduction
Understanding of concept System testing Preliminary implementation Department-wide implementation Organization-wide implementation
Figure 3.1: Flow chart of the methodology use in the study
Our aim is to implement the system to the extend it could be used on the scale of organization-wide. It means, the system could be used in all of the PWD’s offices all over our country. To start this, we need to understand the basic functions of the system, the process called ‘System Testing’.
After had gone through this step, then it would be possible for implementation to the project management team at the PWD Penang’s. This step of implementation had been included in the ‘Preliminary Implementation’. Here is where the actual
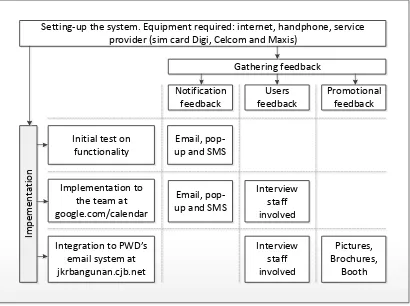
To have our have as mentioned, we need a set of procedure to setup the system, implement the configured system to the organization and gathered a feedback. This way, the implementation could be recorded for reference or for future improvement. The flow diagram of this process is given in the Figure 3.2 below.
Setting-up the system. Equipment required: internet, handphone, service provider (sim card Digi, Celcom and Maxis)
Im p e m e n tati o n Gathering feedback
Initial test on functionality
Implementation to the team at google.com/calendar
Integration to PWD’s
email system at jkrbangunan.cjb.net Notification feedback Users feedback Promotional feedback Email, pop-up and SMS
Email, pop-up and SMS
Interview staff involved Interview staff involved Pictures, Brochures, Booth
Figure 3.2: Setting-up the system, implementation and gathering feedback
3.2 Setting-up the System
In terms of system setup, we need a basic implementation of hardware and software, a package to have the system up and running. As usual, we need a computer, an internet connection, mobile devices and also a service provider. In our country, the service provider can be choose either from Celcom, Maxis, Digi or other service provider which had been in the market and supported by the system from time to time.
After the system had been setting-up, it is now the time to have the system to be implemented and also have it to be measured in forms of feedback. During the implementation, at the same time the feedback could be gathered.
3.3 Implementation of the system
3.4 Gathering feedback
The feedback been gathered during the process of implementation of the system as mentioned above. In this study, the feedback could be considered in 3 ways, notification feedback, users feedback and also promotional feedback. Although we had 3 ways of feedback, but in this study we will only reported the notification feedback and users feedback, which will be reported in the results chapter.
3.2 Selections of Measures
With implementation and at the same time the feedback been gathered, we had identified 3 measures which could be recorded to further understand the functionality of the system. The measures are given as the following:
a) Notification results in terms of email, pop-up and SMS.
b) Interviews results in terms of how the users perceives on the implementation of the system.
c) Promotional feedback in terms of materials used and also visitors views during the promotional activities.
results from the system and also the feedback from the users had been reported in the results chapter.
3.3 Sampling Design
A set of team consist of 7 participants involves in the implementation throughout the duration of more than one year. By considering the amount of data involved, it would not been possible to have all data been reported in this dissertation. So, we had taken a sample from several event and been reported in the results chapter. To make users understand on how the system works, we had reported the initial system testing and it is been reported in detail in the results chapter.
3.4 System Operation
3.5 Semi-structured Interview
A total number of 7 officers which involved in the implementation of the system had been interviewed. All participants had extensive experience with asynchronous communications media such as email, voicemail and fax. Most participants were professionals which had been involved direct or indirectly to the implementation of the projects.
The data had been analyzed based on their views on the system performance. Their experiences and perspectives on the system usage for each participant had been recorded. Only participant’s designation had been reported to preserve their
CHAPTER IV
SYSTEM CONFIGURATION
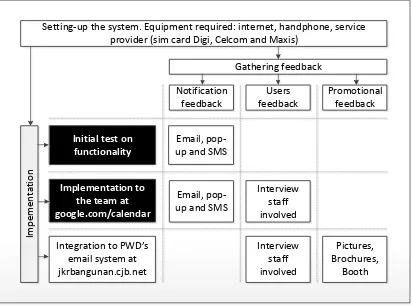
4.1 Introduction
Setting-up the system. Equipment required: internet, handphone, service provider (sim card Digi, Celcom and Maxis)
Im p e m e n tati o n Gathering feedback
Initial test on functionality
Implementation to the team at google.com/calendar
Integration to PWD’s
email system at jkrbangunan.cjb.net Notification feedback Users feedback Promotional feedback Email, pop-up and SMS
Email, pop-up and SMS
Interview staff involved Interview staff involved Pictures, Brochures, Booth
Figure 4.1: Initial test on functionality and implementation to the team
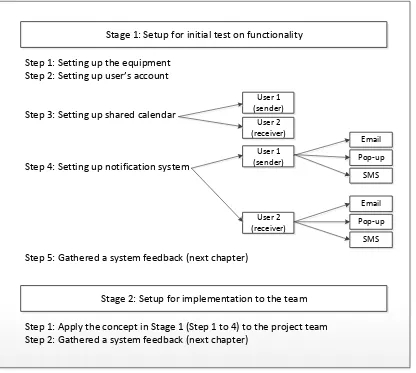
Stage 1: Setup for initial test on functionality
Stage 2: Setup for implementation to the team Step 1: Apply the concept in Stage 1 (Step 1 to 4) to the project team Step 2: Gathered a system feedback (next chapter)
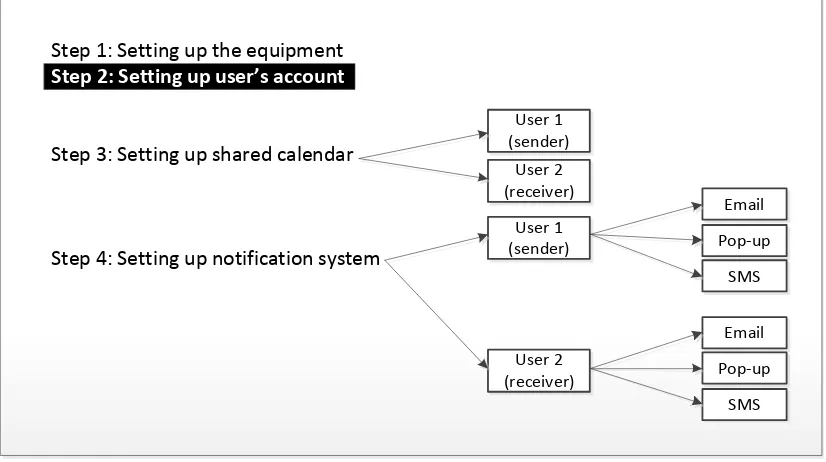
Step 1: Setting up the equipment Step 2: Setting up user’s account
Step 3: Setting up shared calendar
Step 4: Setting up notification system
Step 5: Gathered a system feedback (next chapter) User 1 (sender) User 2 (receiver) User 1 (sender) User 2 (receiver) Email Pop-up SMS Email Pop-up SMS
Figure 4.2: Setup for initial test and setup for implementation
4.2 Setup for initial test on functionality
The first stage will involve the process of setting up the initial test in order to understand the system functionality. To have this, the stage had been divided into five steps. Step 1 to step 4 involve the process of setting up the system whereas the step 5 involve a process of gathering feedback. In this chapter, only Step 1 to step 5 are been reported.
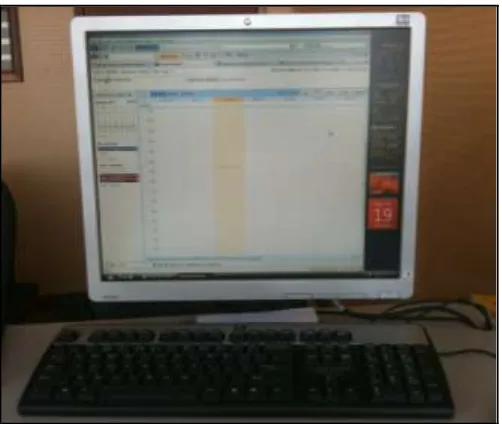
4.2.1 Step 1: Setting up the equipment
Before any system existed, there is a need to have the equipment in place, up and running. In this study, a preparation of the equipment includes desktop computer, internet connection, mobile phones with a connection the telecom services (i.e. Celcom and Maxis). The flow diagram of the step involved had been highlighted as in Figure 4.3.
Step 1: Setting up the equipment Step 2: Setting up user’s account
Step 3: Setting up shared calendar
Step 4: Setting up notification system
User 1 (sender) User 2 (receiver) User 1 (sender) User 2 (receiver) Email Pop-up SMS Email Pop-up SMS
Figure 4.3: Setting up the equipment
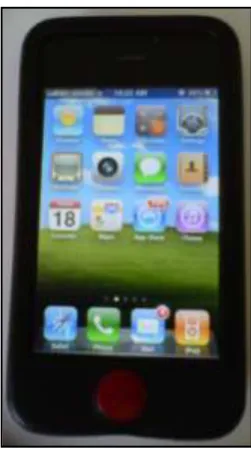
Figure 4.5: iPhone with Maxis as a carrier
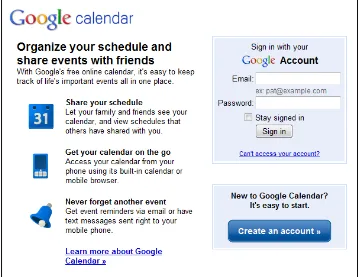
4.2.2 Step 2: Setting up user’s account
Step 1: Setting up the equipment Step 2: Setting up user’s account
Step 3: Setting up shared calendar
Step 4: Setting up notification system
User 1 (sender) User 2 (receiver) User 1 (sender) User 2 (receiver) Email Pop-up SMS Email Pop-up SMS
Figure 4.7: Setting up user’s account
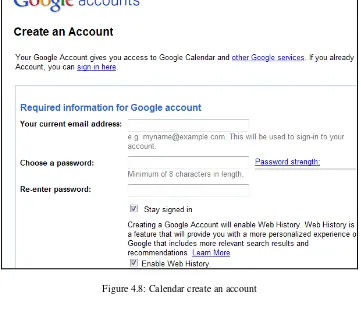
Figure 4.8: Calendar sign-in or create an account
Figure 4.8: Calendar create an account
Users will then had an option to register their first name, last name, location and their time zone. In this report, the details are as given in the Figure 4.9. Upon completion of the settings, click the ‘Continue’ button to proceed to the calendar main
interface as shown in the Figure 4.10.
Figure 4.10: Calendar at Week view
4.2.3 Step 3: Setting up shared calendar
Step 3 involves on how to setting up the team shared calendar. To enable sharing, the system will need at least two accounts to be tied together. The account of User 1 and User 2 which represent the sender and receiver respectively had been used in this process. The step involve in this process is shown as in Figure 4.11.
Step 1: Setting up the equipment Step 2: Setting up user’s account
Step 3: Setting up shared calendar
Step 4: Setting up notification system
User 1 (sender) User 2 (receiver) User 1 (sender) User 2 (receiver) Email Pop-up SMS Email Pop-up SMS
Figure 4.11: Setting up shared calendar
To start the sharing setup, users can click the ‘Add’ link at the ‘My Calendars’
Ones the ‘Add’ button had been pressed, another option to request access to the User 2 account will be displayed. By default, there will be a brief message to be sent to the User 2 in order to have the shared access as it shown in Figure 4.14. Then, press the ‘Sent Request’ button to complete the process. The message which
confirming the message been sent to the User 2 is shown in the Figure 4.15.
Figure 4.14: Press Send Request button
Figure 4.15: Message sent
Figure 4.16: Email sent to accept a request
Ones the link had been clicked, a setup options will be displayed as given in Figure 4.17. The system will automatically register [email protected] in the setup options. User will notify this in the ‘Share with specific people’ area. In the ‘Permission Settings’ option by ensuring ‘See all event details’ been selected, click ‘Add Person’ button. By having done this, the [email protected] account is added to the system as it had been shown in Figure 4.18. Then, click ‘Save’ button.
Upon completion the above step, the ‘Changes saved’ confirmation page will
be displayed as given in Figure 4.19. It is however none of the User 2 option had been displayed in the ‘Other calendars’ area. For this option to be enabled, the same
processes need to be repeated to the User 2 account settings.
Figure 4.19: Changes saved notification
Figure 4.20: Approval from User 2
4.2.4 Step 4: Setting up notification system for User 1
The last step involves a setting up the notification system for User 1. Important to be kept in mind, this process although involves User 1 and User 2, the process are all been conducted in the User 1 account. There are generally three options for having a notifications function to the shared calendar. They are email, pop-up and SMS as it been illustrated in Figure 4.21.
Step 1: Setting up the equipment Step 2: Setting up user’s account
Step 3: Setting up shared calendar
Step 4: Setting up notification system
User 1 (sender) User 2 (receiver) User 1 (sender) User 2 (receiver) Email Pop-up SMS Email Pop-up SMS
Figure 4.21: Setting up notification system for User 1
Figure 4.22: Calendar settings option
Ones the link been selected, a ‘Calendar Settings’ options will be displayed as
in Figure 4.23. In the settings area, user will notice a link to ‘Calendars’, ‘Mobile Setup’ and ‘Lab’. There is a need to register the mobile services to enable the SMS notification. To enable this, click the ‘Mobile Setup’ link.
Figure 4.23: Calendar settings interface
Figure 4.25: Dialog box for sending verification
The message which been received in the phone is given in the Figure 4.26. As stated in the message given, there is a verification code which will need to be entered in the ‘Calendar Settings’ area. After the code entered, click ‘Finish setup’ button. As
a result of this, a note ‘Phone number successfully validated’ will be displayed as in Figure 4.27.
Figure 4.26: Receives the verification code in the handphone
Figure 4.28: Another SMS is sent to mobile phone for verification
By having SMS been activated to the system, now all type of notifications can be setup in the ‘Notifications’ options as it been given in Figure 4.29. In default configuration, email and pop-up had been setup to be notified each at 10 minutes before the event. By clicking the ‘Add a reminder’ link, another option of notification
Figure 4.29: Event reminders
In the ‘Choose how you would like to be notified’ area, there are additional
options to the email and SMS notifications. There are options for new invitations, changed invitations, cancelled invitations, invitation replies and daily agenda. By default, all the options to the invitation changes had been selected by the system. User however has the options either to remain as it is or to unselect these additional functions.
the main page of the calendar with the displayed massage ‘Subscription successfully updated’ as it been given in Figure 4.31.
We are now completing the first step of notification. As been mentioned early, there have two ways to notification of each of the user. First, notification related to user’s own calendar. Second, notification related to the person who the user shared the calendar with. The next part will discussed on this second setup of notification.
4.2.5 Step 4: Setup notification system from User 2
User 2 can be our friends and colleagues. The system need to be setting up to be able subscription to the notifications services. The subscriptions can be choose either to have email, pop-up or SMS. User 1 can also choose to have all this type of notifications. This options had been illustrated in Figure 4.32.
Step 1: Setting up the equipment Step 2: Setting up user’s account
Step 3: Setting up shared calendar
Step 4: Setting up notification system
User 1 (sender) User 2 (receiver) User 1 (sender) User 2 (receiver) Email Pop-up SMS Email Pop-up SMS
Figure 4.32: Setting up notification system from User 2
To enable this, user can click at the arrow located in the demo2.iium@gmail box as given in Figure 4.33. Ones the arrow been clicked, an options will be given. Then, choose ‘Notifications’. The windows will then displays the options for
Figure 4.33: User 2’s notification option
In the event reminders options, click on the link ‘Add a reminder’. Additional options will be displayed, choose SMS and 10 minutes before each of the event. This will activate the SMS services for the calendar. The interface options are shown as given in Figure 4.35.
Figure 4.35: Event reminders options
In the ‘choose how you would like to be notified’ area, select all the given
Figure 4.36: SMS options
If user would want to have the notifications by email, repeat the step by clicking the ‘Add a reminder’ link and choose ‘Email’ as an additional type of
4.4 Enter and edit an event in calendar
To start the notification functions, there is a need to create an event into the configured system. On the upper left of the calendar area, there is a button ‘Create event’ as it been shown in Figure 4.38. A click on the button will navigate the system to the event options as shown in Figure 4.39.
Figure 4.39: Interface to add an event
4.4.1 Enter an event
To demonstrate an event which been registered into the system, user can start by typing in ‘Event A’ in the ‘Click to add a title’ form area. Then click ‘Save’
Figure 4.40: Event added notification
4.4.2 Edit an event
The event is now been entered into the system. User can also edit this event. For instance, user may want to change the time or change the event description. The changes can be made by clicking the area in the ‘Event A’ box. Upon clicking the
Figure 4.41: Notification box upon clicking Event A
In the given box, there is a link ‘Edit event details’. Clicking the link will navigate user to the editing form. User will notice the form for ‘Where’ at the ‘Event
details’ area. Enter ‘Kuala Lumpur’. The interface of this form is given as in Figure 4.42. At the bottom of the page, there are three button for ‘Save’, ‘Discharge’ and ‘Delete’. Click the ‘Save’ button to complete the event editing.
Upon clicking the ‘Save’ button, user will be directed to the main calendar interface. There will be a confirmation notice mentioning ‘The event was updated’ at
Figure 4.42: Interface to edit Event A
4.43 Delete an event
If there any circumstances that the event had been cancelled for some reason, the changes will also been recorded into the system. By repeating the action of clicking the event box as shown in the Figure 4.41, there is a link to ‘Delete’ the registered event from the calendar. Upon clicking the link, user will be directed to main interface of the calendar as shown in the Figure 4.44. At the above calendar area, there will be a notice ‘Event deleted’ confirming the user action.
4.5 Stage 2: Setup for implementation to the team
By having the system to be up and running, it is now the time to implement the system to team members. The first step in this stage is to apply the configuration step in Stage 1 to the project team. The illustration of the flow diagram of this stage had been highlighted as it has been shown in Figure 4.45.
Stage 1: Setup for initial test on functionality
Stage 2: Setup for implementation to the team
Step 1: Apply the concept in Stage 1 (Step 1 to 4) to the project team Step 2: Gathered a system feedback (next chapter)
Step 1: Setting up the equipment Step 2: Setting up user’s account
Step 3: Setting up shared calendar
Step 4: Setting up notification system
Step 5: Gathered a system feedback (next chapter) User 1 (sender) User 2 (receiver) User 1 (sender) User 2 (receiver) Email Pop-up SMS Email Pop-up SMS
The configuration were then been applied to the system which been used by the officer in the project team. The organization chart for PWD’s Pulau Pinang hierarchy is given as in Figure 4.46. The unit involved in the implementation had been highlighted as it has been shown in Figure 4.47.
Mu Director
Head of Assistant Director (Building) Assistant Director (Building) Assistant Engineer (Building) Technician (Building)
Head of Assistant Director (Project) Assistant Director (Project) Assistant Engineer (Project) Technician (Project)
Mu Director
Head of Assistant Director (Building) Assistant Director (Building) Assistant Engineer (Building) Technician (Building)
Head of Assistant Director (Project) Assistant Director (Project) Assistant Engineer (Project) Technician (Project)
Figure 4.47: Detail organization chart based on the equipment used
In the system setup, the ‘Assistant Director (Project)’ had been set as it was
Mu User 1 User 2 User 2 User 2 Assistant Director (Project) Head of Assistant Director (Project)
Assistant Engineer (Project)
Technician (Project)
User 1 to User 2 User 2 to User 1
Figure 4.48: Implementation involves only the person inside the dotted line
To have the above functionality, there is a need to set a configuration as in Figure 4.49. At the ‘Calendar Settings’ interface, it had been set five types of calendar within the team which refer to general calendar ‘JKR Penang’, project ‘Al -Manshoor’, project ‘Kolej Jururawat’, project ‘UiTM Bertam’ and ‘Personal’. The details of the project had been described in the early chapter.
Figure 4.49: Team calendar settings
Figure 4.50: Team share calendar options
Figure 4.51: Team share notifications options
4.6 Skala Setup
Skala system had been setup at the PWD Headquarters, Kuala Lumpur. It is therefore none of the system configuration is assessable at the state office. Therefore in this research, we will use all the functions available hand-in-hand with the shared calendar which had been previously configured.
When the websites links relates to the projects is selected, the interface of Skala details information (refers to the specific project) is projected as shown in the Figure 4.18, Figure 4.19 and Figure 4.20.
Figure 4.53: Website link to the projects
Figure 4.56: Skala information on the Kolej Jururawat project
4.8 Summary of System Setup
The calendar provides a required functionality for sharing and receives notification. A step-by-step explanation on how to configure the system had been discuss. It is been found the interface had been designed in such a way it is easily to be understand by the user.
CHAPTER V
RESULTS AND ANALYSIS
5.1 Introduction
As the system had been configured in the previous chapter, it is now report the evidence of the system operation. There are generally two stages in the recording of the results. Stage 1 refers to the initial test notification and Stage 2 refers to the implementation to the project team notification.
recorded in the SMS forms which relates to the project calendar. The illustration of the overall result flow diagram is given in the Figure 5.1.
Stage 1: Result for notification system (initial test on functionality)
Stage 2: Result for notification system (implementation to project team) Sample results for email, Pop-up and SMS during the implementation to the project team. Results for User 1 (sender) User 2 (receiver) Email Pop-up SMS Email Pop-up SMS
Figure 5.1: Result for notification diagram
5.2 Stage 1: Result for notification system (initial test on functionality)
At this stage, results from both User 1 and User 2 will be recorded. The records will be in terms of email, pop-up and SMS. The event details had been entered to the system as the following:
Event : Meeting
Time : 10:00 am
Date : 19 January 2011
5.2.1 User 1 Email
The flow diagram for the User 1 Email is given as in Figure 5.2. There will be three types of notification in terms of entering, updating and deleting the event. All this changes had been recorded in this report.
Results for User 1 (sender) User 2 (receiver) Email Pop-up SMS Email Pop-up SMS Enter Update Delete
5.2.1.1 Picture Enter
The email notification had been receives by the User 1 on 10 minutes before the event. This notification is recorded as in Figure 5.3. As it been recorded in the email, there is a reminder from the User 1 (refer to [email protected]).
5.2.1.2 Picture Update
User will also receive the updated reminder on the event which had been updated. The result of the reminder on this updated event is given in Figure 5.4.
Figure 5.4: Reminder 10 minutes before the event
5.2.1.3 Picture Delete
5.2.2 User 1 Pop-up
The flow diagram of the User 1 pop-up is given as in Figure 5.5. As been shown in the diagram, there will be three types of pop-up to be recorded. The image of pop-up will be captured after entering the event, updating the event and also deleting the event.
Results for User 1 (sender) User 2 (receiver) Email Pop-up SMS Email Pop-up SMS Enter Update Delete
Figure 5.5: User 1 Pop-up
5.2.2.1 Picture Enter
Figure 5.6: Pop-up 10 minutes before the event
5.2.2.2 Picture Update
Figure 5.7: Pop-up 10 minutes before the event
5.2.2.3 Picture Delete
5.2.3 User 1 SMS
The flow diagram of the User 1 SMS is given as in Figure 5.8. The SMS reminder will be recorded on entering the event, updating and also on deleting the event. The SMS had been sent directly to the User 1 mobile phone from the system without any charges from the mobile line operator.
Results for User 1 (sender) User 2 (receiver) Email Pop-up SMS Email Pop-up SMS Enter Update Delete
Figure 5.8: User 1 SMS
5.2.3.1 Picture Enter
The SMS messages had been receives to the mobile phones on 10 minutes before the event as it shown in the Figure 5.9. It is however, the SMS have not been sent immediately after the event been entered into the system. On the iPhone interface, user will need to click the button ‘Close’ to proceed with the phone
Figure 5.9: SMS received 10 minutes before the event
5.2.3.2 Picture Update
Figure 5.10: SMS received 10 minutes before the event
5.2.3.3 Picture Delete
5.2.4 User 2 Email
Since the system had been configured to link the User 1 calendar with the User 2 calendar, all the information and changes which been registered in the User 1 calendar will also been receives by the User 2 calendar. This also means, the notification system will also been updated simultaneously at the same time. The first notification had been receives by the User 2 is the reminding email on the entering event, updating event and also on the deleting event. The flow diagram of this email reminding is as shown in Figure 5.11.
Results for User 1 (sender) User 2 (receiver) Email Pop-up SMS Email Pop-up SMS Enter Update Delete
5.2.4.1 Picture Enter
The email which been receives from the User 1 to the account of User 2 automatically on 10 minutes before the event is shown as in Figure 5.12. By referring to the given interface, there is also the event details which referring to the [email protected] (User 1 email).
5.2.4.2 Picture Update
The email also had been sent to the User 2 on the updated User 1 calendar. As it has been shown in the Figure 5.13, there is a message ‘Updated Invitation’ included
in the email messages reminding the User 2 of the event been updated. Interestingly, this email is been sent to the user immediately after the changes been made.
Figure 5.13: Reminder immediate after update
Figure 5.14: Reminder 10 minutes before the event
5.2.4.3 Picture Delete
5.2.5 User 2 Pop-up
The flow diagram of the User 2 pop-up on entering, updating and deleting the event by the User 2 is shown in the Figure 5.16.
Results for User 1 (sender) User 2 (receiver) Email Pop-up SMS Email Pop-up SMS Enter Update Delete
Figure 5.16: User 2 Pop-up
5.2.5.1 Picture Enter
Figure 5.17: Pop-up 10 minutes before the event
5.2.5.2 Picture Update
Figure 5.18: Pop-up 10 minutes before the updated event
5.2.5.3 Picture Delete
5.2.6 User 2 SMS
The flow diagram of the User 2 SMS receives as changes been made by the User 1 is shown as in Figure 5.19. The results had been recorded on the action by User 1 entering the event, updating and also on deleting the event.
Results for User 1 (sender) User 2 (receiver) Email Pop-up SMS Email Pop-up SMS Enter Update Delete
Figure 5.19: User 2 SMS
5.2.6.1 Picture Enter
Figure 5.20: SMS received 10 minutes before the event
5.2.6.2 Picture Update
Figure 5.21: SMS received immediate after update the event
5.2.6.3 Picture Delete
Upon deleting the event by the User 1, a SMS also been receives by the User 2 as it been shown in the Figure 5.23. In the SMS content, there is a details of the sender email [email protected] (which refer to User 1) and also a note ‘has been cancelled’.
Figure 5.23: SMS received immediate after cancelled the event
5.3 User Calendar
(iPhone). The images which display the calendar information are given in the Figure 5.24, Figure 5.25 and Figure 5.26.
Stage 1: Result for notification system (initial test on functionality)
Stage 2: Result for notification system (implementation to project team)
Sample results for email, Pop-up and SMS during the implementation to the project team.
Results for
User 1 (sender)
User 2 (receiver)
Pop-up
SMS
Pop-up
SMS
Figure 5.25: Calendar notifications in the email
Figure 5.27: Real-time calendar activities display in mobile phone
5.4 SMS Sent and Received
The SMS receives is depends to the calendar set-up. For example, user may have set to receive the SMS in 30 minutes before each of the event. In this research, the SMS receives for new invitation, SMS receives for change invitation and cancelled invitation had been reported.
5.5 SMS Receives for New Invitation
arrangement for Internal Meeting on the 12 January 2010 as shown in the Figure 5.4. It is therefore, the SMS had been receives in the mobile phone as given in the Figure 5.5.
Figure 5.29: SMS receives from the shared calendar
5.6 SMS Receives for Change Invitation
Change invitation is the information which the user had changed due to the updates in arrangement. In this result, Pn Mafuzah which in-charged to the UiTM Bertam project had carried out an updates to the event. The recorded event is given in the Figure 5.6. The SMS receives which indicates the initial event (no 1) and the updates event (no 2) is given in the Figure 5.7.
Figure 5.31: SMS receives from the shared calendar
5.7 SMS Receives for Cancelled Invitation
Figure 5.32: Discussion Group meeting arrangement
5.8 Feedback from the User
In general, users are happy with the system which had been developed and implemented. We had ask some user on their views on the system and their feed are given as the following:
“The system had been easy to used and most I like is the functions of SMS which had
been remind me on each event”– Site Technician
The SMS function can be configured to be able to sent SMS notifications from the owner’s calendar to their mobile phone. It also can be configured to sent a
notification when other team members update their own calendars. In the other words, when other person update or make changes to their calendar, the system will sent the SMS notifications to the other person which had been set to receives the notification. A quote from one of the participants is given as the following:
“I not only receive the SMS on my own calendar, but also I receive SMS from my
friend’s calendar. This way, when they make changes to the specific events, I will get
the notice instantly” – Site Technician
“The drag and drop interface is really easy to used. We just need to drag an event
from one place to another, there’s no need to wait to another page to load. It is all
have been done in one place” – Assistant Engineer
Users also comment on the integration with the mobile devices. Their positive feedback is given as the following:
“The fact that the calendar can be integrates with my hand phone and also it can be
access and edit through my hand phone. This is very useful when I went to the site and
need to refer for event in the calendar”– Assistant Engineer
All in all, positive comment from the user indicates the system which had been designed and implemented had been well accepted.
5.8 Summary of Research Results
CHAPTER VI
CONCLUSIONS AND RECOMMENDATIONS
6.1 Summary and Conclusion
In the early chapter of this paper, the objectives or research questions are given as the following:
a) To understand the usage of Skala in the PWD projects monitoring. b) To understand the functions of online shared calendar in the construction
environment.
c) To apply the online shared calendar to the construction projects.
e) To suggest the possible improvement to the Skala online application.
Mu
Shared calendars
Notification system
Graph Email Pop-up SMS
6.2 Suggestion for Future Research
The suggestion for future research which relates to the limitations of this paper is given as the following:
a) The implementation of the shared online calendar has been in the PWD project management activities. To understand the full functions of the application, it will need to be applied to all level in the organizations which involved in the projects.
b) The duration of one year had been a basis of implementation. It is also been observed, there could be more challenges could be notified if the implementation had been in the longer period of time.
c) The study if been applied to the private sector projects, there could be more factors which could be learned during the implementation.
d) The implementation, if it be able to be implemented to the overseas project, will increases the understanding of the functions of the shared calendar.
6.3 Implications
The implication of this paper which relates to the significance in the early chapter is given as the following: