Complete Guide
to Open Source
Big Data Stack
—
Complete Guide
to Open Source Big
Data Stack
ISBN-13 (pbk): 978-1-4842-2148-8 ISBN-13 (electronic): 978-1-4842-2149-5 https://doi.org/10.1007/978-1-4842-2149-5
Library of Congress Control Number: 2018930257 Copyright © 2018 by Michael Frampton
This work is subject to copyright. All rights are reserved by the Publisher, whether the whole or part of the material is concerned, specifically the rights of translation, reprinting, reuse of illustrations, recitation, broadcasting, reproduction on microfilms or in any other physical way, and transmission or information storage and retrieval, electronic adaptation, computer software, or by similar or dissimilar methodology now known or hereafter developed.
Trademarked names, logos, and images may appear in this book. Rather than use a trademark symbol with every occurrence of a trademarked name, logo, or image we use the names, logos, and images only in an editorial fashion and to the benefit of the trademark owner, with no intention of infringement of the trademark.
The use in this publication of trade names, trademarks, service marks, and similar terms, even if they are not identified as such, is not to be taken as an expression of opinion as to whether or not they are subject to proprietary rights.
While the advice and information in this book are believed to be true and accurate at the date of publication, neither the authors nor the editors nor the publisher can accept any legal responsibility for any errors or omissions that may be made. The publisher makes no warranty, express or implied, with respect to the material contained herein.
Cover image by Freepik (www.freepik.com) Managing Director: Welmoed Spahr
Distributed to the book trade worldwide by Springer Science+Business Media New York, 233 Spring Street, 6th Floor, New York, NY 10013. Phone 1-800-SPRINGER, fax (201) 348-4505, e-mail [email protected], or visit www.springeronline.com. Apress Media, LLC is a California LLC and the sole member (owner) is Springer Science + Business Media Finance Inc (SSBM Finance Inc). SSBM Finance Inc is a Delaware corporation.
For information on translations, please e-mail [email protected], or visit http://www.apress.com/ rights-permissions.
Apress titles may be purchased in bulk for academic, corporate, or promotional use. eBook versions and licenses are also available for most titles. For more information, reference our Print and eBook Bulk Sales web page at http://www.apress.com/bulk-sales.
Any source code or other supplementary material referenced by the author in this book is available to readers on GitHub via the book’s product page, located at www.apress.com/9781484221488. For more detailed information, please visit http://www.apress.com/source-code.
Printed on acid-free paper Michael Frampton
v
About the Author ... xiii
About the Technical Reviewer ...xv
Acknowledgments ...xvii
Introduction ...xix
Table of Contents
Chapter 1: The Big Data Stack Overview ... 1
What Is Big Data? ... 2
Limitations of Approach ... 4
Why a Stack? ... 5
NoSQL Overview ... 6
Development Stacks ... 7
LAMP Stack ... 7
MEAN Stack ... 7
SMACK Stack ... 7
MARQS Stack ... 7
Book Approach ... 8
Chapter 2 – Cloud Storage ... 9
Chapter 3 – Release Management – Brooklyn ... 9
Chapter 4 – Resource Management ... 10
Chapter 5 – Storage ... 10
Chapter 6 – Processing ... 10
Chapter 7 – Streaming ... 11
Chapter 8 – Frameworks ... 11
Chapter 9 – Data Visualisation ... 11
vi
The Full Stack ... 11
Cloud or Cluster ... 13
The Future ... 15
Chapter 2: Cloud Storage ... 17
CloudStack Overview ... 18
Server Preparation ... 20
Minimum System Requirements ... 20
Check CentOS Install ... 22
Secure Shell (SSH) Access ... 22
Configure Network ... 23
Check Hostname FQDN... 23
Configure SELinux ... 24
Configure NTP ... 24
Configure CloudStack Package Repository ... 25
Configure NFS (Network File System) ... 25
CloudStack Server Install ... 28
MySQL Server Install ... 28
MySQL Connector Installation ... 29
Management Server Installation ... 30
System Template Setup ... 30
KVM Setup and Installation ... 31
Prerequisites ... 31
Create Repository File ... 32
KVM Installation ... 32
KVM QEMU (Quick Emulator) Configuration ... 32
Libvirt Configuration ... 33
Check KVM Running ... 33
Host Naming ... 34
CloudStack Cluster Configuration ... 35
Adding Hosts to the Cloud ... 40
vii
Registering an ISO with CloudStack ... 44
Creating an Instance from an ISO ... 46
Advanced Zone Creation ... 51
Problem-Solving ... 55
CloudStack Log Files ... 56
CloudStack Storage ... 56
CloudStack System VMs ... 57
CloudStack Firewall Issues ... 57
Conclusion ... 58
Chapter 3: Apache Brooklyn ... 59
Brooklyn Install ... 59
Modelling With Blueprints ... 74
Application Installs ... 74
Server-Based Install ... 75
Cloud-Based Install ... 85
Conclusion ... 95
Chapter 4: Apache Mesos ... 97
Mesos Architecture ... 98
Mesos Install ... 99
Overview ... 99
Building Mesos ... 100
Starting Mesos ... 108
Mesos User Interface ... 109
viii
Logging and Problem Investigation ... 131
Build Errors ... 132
Project Myriad ... 135
Myriad Architecture ... 135
Conclusion ... 137
Chapter 5: Stack Storage Options ... 139
HDFS Mesos Framework ... 141
Source Software ... 141
Start Scheduler ... 142
Create and Start HDFS Nodes ... 144
Use HDFS Mesos Framework ... 148
Riak Mesos Framework ... 151
VirtualBox Install ... 152
Vagrant Install... 154
Install Framework ... 154
Use Framework ... 160
Cassandra Mesos Framework ... 164
Install Prerequisites ... 165
Install X Windows ... 165
Install VirtualBox and Vagrant ... 166
Install Vagrant-Based DCOS ... 167
Install Cassandra ... 172
ix
Chapter 6: Processing ... 177
Stack Architecture ... 178
Server Preparation ... 179
Mesos and Spark ... 181
Build Mesos Part 1 ... 181
Build Mesos Part 2 ... 182
Build Mesos Part 3 ... 183
Building the Mesos Source ... 184
Starting Mesos ... 186
Installing the HDFS Framework ... 187
Running Spark ... 192
DCOS and Spark ... 198
DCOS Build Part 1 ... 198
DCOS Build Part 2 ... 199
DCOS Build Part 3—Install Server ... 200
DCOS Master Server Install ... 203
DCOS Agent Server Install ... 203
User Interfaces ... 204
DCOS CLI Command Install ... 205
Running a Spark Application ... 209
Problem Tracking ... 213
Conclusion ... 217
Chapter 7: Streaming ... 219
DCOS Issues ... 221
Port Conflict Issues ... 221
Firewall Issues ... 222
Network Time Synchronisation ... 223
ZooKeeper Issues ... 224
The Kafka System ... 225
x
DCOS UI Kafka Install ... 227
DCOS CLI Kafka Install ... 232
Kafka Management Using the CLI ... 236
Kafka Management Using Spark ... 246
Conclusion ... 257
Chapter 8: Frameworks ... 259
Akka ... 261
OOP Overview ... 261
Distributed Systems Issues ... 262
Akka Architecture ... 264
Actors ... 267
Networking ... 270
Streams ... 273
Other Modules ... 276
Enterprise Offerings... 277
Netty... 277
Spring... 282
RabbitMQ Overview ... 283
Kafka or RabbitMQ? ... 284
Messaging Protocols ... 284
Languages ... 285
Clustering ... 286
Enterprise Support... 287
Routing ... 288
Plug-ins ... 290
Administration ... 291
Chapter 9: Visualisation ... 295
Apache Zeppelin ... 296
Interpreters ... 297
Worked Example ... 299
Graph Options ... 304
Notebook Import ... 307
Dynamic Forms ... 308
Scheduling Notebook ... 310
Sharing Session Output ... 311
Helium ... 312
Multi-user Support ... 316
Possible Extensions ... 316
Grafana ... 316
Datadog ... 324
Conclusion ... 336
Chapter 10: The Big Data Stack ... 339
Hardware Architecture ... 340
Chapter Topics ... 342
Chapter 2 Cloud ... 343
Chapter 3 Brooklyn ... 343
Chapter 4 Resource Management ... 344
Chapter 5 Storage ... 345
Chapter 6 Processing ... 345
Chapter 7 Queueing ... 346
Chapter 8 Frameworks ... 347
Application Architecture ... 348
Application Submission... 348
Brooklyn and DCOS ... 349
Stack Monitoring ... 352
Visualisation ... 354
Cloud or Cluster ... 354
Conclusion ... 355
About the Author
About the Technical Reviewer
Acknowledgments
I would like to thank my wife and son without whose support I don’t think a writing project like this would be possible. I would also like to thank the Apress publishing team (Rita Fernando, Laura Berendson, Susan McDermott) and the reviewers (Olav Jordens, Sumit Pal) for their help in developing this book. Finally, I would like to thank all of the people who gave their time to answer my questions and assist me.
Introduction
I have developed this book to investigate Mesos-based cluster development and integration. I found that data center operating system (DCOS; and it’s command-line interface [CLI]) was a natural progression from basic Mesos; so you will find that the later chapters of this book concentrate on that. Within the limits of the funding and time available to me, I have investigated each element of a Mesos-based big data stack, starting with a local cloud on Apache CloudStack followed by Apache Brooklyn for release management. Chapters are topic specific covering Mesos-based resource management, storage, processing, and queueing. I examine application frameworks like Akka and Netty; and finally, I cover visualisation.
As with previous book projects, I have taken an integration-based approach, investigating how to make systems work together. I found that it was quite a challenge to create a viable and reliable DCOS-based cluster, but the result was worth the effort. DCOS provides a functionally rich and robust system once the learning curve is mastered.
This book is aimed at anyone who is interested in big data stacks based on Apache Mesos and Spark. It would be useful to have some basic knowledge of Centos Linux and Scala. But don’t be deterred if you don’t; I believe that if you are interested in these topics and willing to learn, you will succeed. Most chapters contain examples that you can follow to gain a better understanding. I would advise completing the practical examples yourself to increase confidence.
This book covers each topic to the extent that time and resources have allowed. Having completed the book, I am aware that there are many other topics that I would have liked to have examined such as DCOS framework development, Mesos framework intercommunication, and Brooklyn releases to DCOS. I hope that I will be able to address these topics at some point in the future.
Contact the Author
As with previous books, I am happy for people to contact me, although I don’t guarantee that I will have the time or resources to investigate your problems. Details about my books can be found on my author page on Amazon by following this link:
amazon.com/Michael-Frampton/e/B00NIQDOOM/
I can also be contacted via the LinkedIn web site at the following address:
nz.linkedin.com/pub/mike-frampton/20/630/385
I am happy for you to connect with me there. I also maintain a series of big-data based, easy to understand presentations here:
slideshare.net/mikejf12/presentations
Feel free to take a look and even suggest subjects that you might like to see covered. Finally, you can contact me via my web site (semtech-solutions.co.nz) or email at
I am always interested in new technology, new opportunities, and any type of big data integration. We all have to earn a living, so if you have any projects that you need help with, by all means contact me.
The Big Data Stack
Overview
This is my third big data book, and readers who have read my previous efforts will know that I am interested in open source systems integration. I am interested because this is a constantly changing field; and being open source, the systems are easy to obtain and use. Each Apache project that I will introduce in this book will have a community that supports it and helps it to evolve. I will concentrate on Apache systems (apache.com) and systems that are released under an Apache license.
To attempt the exercises used in this book, it would help if you had some
understanding of CentOS Linux (www.centos.org). It would also help if you have some knowledge of the Java (java.com) and Scala (scala-lang.org) languages. Don’t let these prerequisites put you off, as all examples will be aimed at the beginner. Commands will be explained so that the beginner can grasp their meaning. There will also be enough meaningful content so that the intermediate reader will learn new concepts.
So what is an open source big data stack? It is an integrated stack of big data components, each of which serves a specific function like storage, resource
management, or queuing. Each component will have a big data heritage and community to support it. It will support big data in that it will be able to scale, it will be a distributed system, and it will be robust.
Given that this stack will reside on a distributed cluster or cloud, some kind of resource management system will be required that can manage cluster-based resources, scale up as well as down, and be able to maximize the use of cluster resources. Data visualisation will also be very important; data will need to be presentable both as reports and dashboards. This will be needed for data investigation, collaborative troubleshooting, and final presentation to the customer.
A stack and big data application release mechanism will be required, which needs to be cloud and cluster agnostic. It must “understand” the applications used within the stack as well as multiple cloud release scenarios so that the stack and the systems developed on top of it can be released in multiple ways. There must also be the possibility to monitor the released stack components.
I think it is worth reiterating what “big data” is in generic terms, and in the next section, I will examine what major factors affect big data and how they relate to each other.
What Is Big Data?
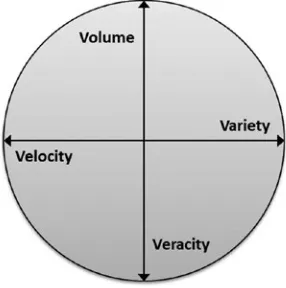
Big data can be described by its characteristics in terms of volume, velocity, variety, and potentially veracity as Figure 1-1 shows in the four V’s of big data.
3 Data volume indicates the overall volume of data being processed; and in big data, terms should be in the high terabytes and above. Velocity indicates the rate at which data is arriving or moving via system ETL (extract, transform, and load) jobs. Variety indicates the range of data types being processed and integrated from flat text to web logs, images, sound, and sensor data. The point being that over time, these first three V’s will continue to grow.
If the data volume is created by or caused by the Internet of things (IoT), potentially sensor data, then the fourth V needs to be considered: veracity. The idea being that whereas the first three V’s (volume, velocity, and variety) increase, the fourth V (veracity) decreases. Quality of data can decrease due to data lag and degradation, and so
confidence declines.
While the attributes of big data have just been discussed in terms of the 4 V’s, Figure 1-2 examines the problems that scaling brings to the big data stack.
Figure 1-2.
Data scaling
The figure on the left shows a straight line system resource graph over time with resource undersupply shown in dark grey and resource oversupply shown in light grey. It is true the diagram is very generic, but you get the idea: resource undersupply is bad while oversupply and underuse is wasteful.
The diagram on the right relates to the IoT and sensor data and expresses the idea that for IoT data over time, order of magnitude resource spikes over the average are possible.
Where do relational databases, NoSQL databases, and the Hadoop big data system sit on the data scale? Well if you image data volume as a horizontal line with zero data on the left most side and big data on the far right, then Figure 1-3 shows the relationship.
Figure 1-3.
Data storage systems
Relational database management systems (RDBMs) such as Oracle, Sybase, SQL Server, and DB2 reside on the left of the graph. They can manage relatively large data volumes and single table sizes into the billions of rows. When their functionality is exceeded, then NoSQL databases can be used such as Sybase IQ, HBase, Cassandra, and Riak. These databases simplify storage mechanisms by using, for instance, key/value data structures. Finally, at the far end of the data scale, systems like Hadoop can support petabyte data volumes and above on very large clusters. Of course this is a very stylized and simplified diagram. For instance, large cluster-based NoSQL storage systems could extend into the Hadoop range.
Limitations of Approach
If I had the funds and/or corporate sponsorship, I would use a range of cloud-based resources from AWS, SoftLayer, CloudStack, and Azure. Given that I have limited funds, I will create a local private cloud on my local cluster and release to that. You the reader can then take the ideas presented in this book and extend them to other cloud scenarios.
I will also use small-data volumes, as in my previous books, to present big data ideas. All of the open source software that I demonstrate will scale to big data volumes. By presenting them by example with small data, the audience for this book grows because ordinary people outside of this industry who are interested to learn will find that this technology is within their reach.
Why a Stack?
You might ask the question why am I concentrating on big data stacks for my third book? The reason is that an integrated big data stack is needed for the big data industry. Just as the Cloudera Distribution Including Apache Hadoop (CDH) stack benefits from the integration testing work carried out by the BigTop project, so too would stack users benefit from preintegration stack test reliability.
Without precreated and tested stacks, each customer has to create their own and solve the same problems time and again, and yes, there will be different requirements for storage load vs. analytics as well as time series (IoT) data vs. traditional non-IoT data. Therefore, a few standard stacks might be needed or a single tested stack with guidance provided on how and when to swap stack components.
A pretested and delivered stack would provide all of the big data functionality that a project would need as well as example code, documentation, and a user community (being open source). It would allow user projects to work on application code and allow the stack to provide functionality for storage, processing, resource management, queues, visualisation, monitoring, and release. It may not be as simple as that, but I think that you understand the idea! Preintegrate, pretest, and standardize.
NoSQL Overview
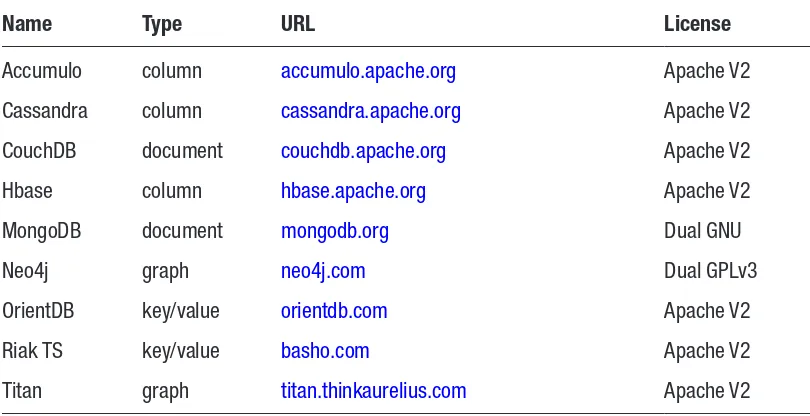
As this book will concentrate on Hadoop and NoSQL for big data stack storage, I thought it would be useful to consider what the term NoSQL means in terms of storage and provide some examples of possible types. A NoSQL database is non-relational; it provides a storage mechanism that has been simplified when compared to RDBMs like Oracle. Table 1-1 lists a selection of NoSQL databases and their types.
Table 1-1.
NoSQL Databases and Their Types
Name Type URL License
Accumulo column accumulo.apache.org Apache V2
Cassandra column cassandra.apache.org Apache V2
CouchDB document couchdb.apache.org Apache V2
Hbase column hbase.apache.org Apache V2
MongoDB document mongodb.org Dual GNU
Neo4j graph neo4j.com Dual GPLv3
OrientDB key/value orientdb.com Apache V2
Riak TS key/value basho.com Apache V2
Titan graph titan.thinkaurelius.com Apache V2
More information can be found by following the URLs listed in this table. The point I wanted to make by listing these example NoSQL databases is that there are many types available. As Table 1-1 shows, there are column, document, key/value, and graph databases among others. Each database type processes a different datatype and so uses a specific format. In this book, I will concentrate on column and key/value databases, but you can investigate other databases as you see fit.
Development Stacks
This section will not be a definitive guide to development stacks but will provide some examples of existing stacks and explain their components.
LAMP Stack
The LAMP stack is a web development stack that uses Linux, Apache web server, MySQL database, and the PHP programming language. It allows web-based applications and web sites with pages derived from database content to be created. Although LAMP uses all open-source components, the WAMP stack is also available, which uses MS Windows as an operating system.
MEAN Stack
The MEAN stack uses the MongoDB NoSQL database for storage; it also uses Express. js as a web application framework. It uses Angular.js as a model view controller (MVC) framework for running scripts in web browser Javascript engines; and finally, this stack uses Node.js as an execution environment. The MEAN stack can be used for building web-based sites and applications using Javascript.
SMACK Stack
The SMACK stack uses Apache Spark, Mesos, Akka, Cassandra, and Kafka. Apache Spark is the in-memory parallel processing engine, while Mesos is used to manage resource sharing across the cluster. Akka.io is used as the application framework, whereas Apache Cassandra is used as a linearly scalable, distributed storage option. Finally, Apache Kafka is used for queueing, as it is widely scalable and supports distributed queueing.
MARQS Stack
In the next section, I will examine this book’s contents chapter by chapter so that you will know what to expect and where to find it.
Book Approach
Having given some background up to this point, I think it is now time to describe the approach that will be taken in this book to examine the big data stack. I always take a practical approach to examples; if I cannot get an install or code-based example to work, it will not make it into the book. I will try to keep the code examples small and simple so that they will be easy to understand and repeat. A download package will also be available with this book containing all code.
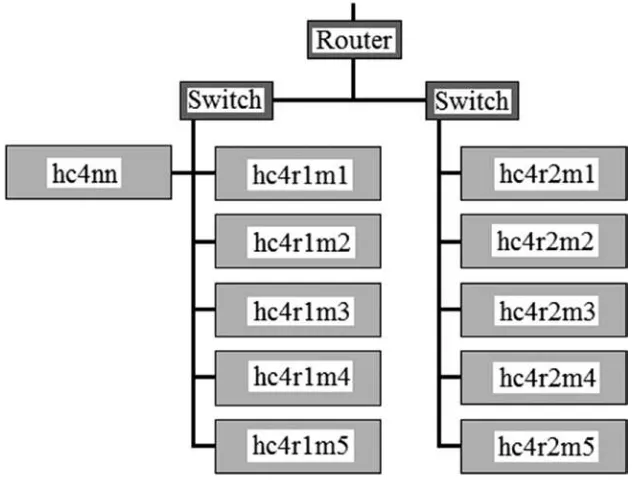
The local private cluster that I will use for this book will be based on CentOS Linux 6.5 and will contain two racks of 64-bit machines. Figure 1-4 shows the system architecture; for those of you who have read my previous books, you will recognize the server naming standard.
Because I expect to be using Hadoop at some point (as well as NoSQLs) for storage in this book, I have used this server naming standard. The string “hc4” in the server name means Hadoop cluster 4; the r value is followed by the rack number, and you will see that there are two racks. The “m” value is followed by the machine number so the server hc4r2m4 is machine 4 in rack 2 of cluster 4.
The server hc4nn is the name node server for cluster 4; it is the server that I will use as an edge node. It will contain master servers for Hadoop, Mesos, Spark, and so forth. It will be the server that hosts Brooklyn for code release.
In the rest of this book, I will present a real example of the generic big data stack shown in Figure 1-5. I will start by creating a private cloud and then move on to installing and examining Apache Brooklyn. After that, I will use each chapter to introduce one piece of the big data stack, and I will show how to source the software and install it. I will then show how it works by simple example. Step by step and chapter by chapter, I will create a real big data stack.
I won’t consider Chapter 1, but it would be useful I think to consider what will be examined in each chapter so that you will know what to expect.
Chapter
2
– Cloud Storage
This chapter will involve installing a private cloud onto the local cluster using Apache CloudStack. As already mentioned, this approach would not be used if there were greater funds available. I would be installing onto AWS, Azure, or perhaps SoftLayer. But given the funding available for this book, I think that a local install of Apache CloudStack is acceptable.
Chapter
3
– Release Management – Brooklyn
With the local cloud installed, the next step will be to source and install Apache
This is somewhat different from the way in which Hadoop was installed for the previous two books. Previously, I had used CDH cluster manager to install and monitor a Hadoop-based cluster. Now that Brooklyn has install and monitoring capability, I wonder, how will it be integrated into cluster managers like CDH?
Chapter
4
– Resource Management
For resource management, I will use Mesos (mesos.apache.org) and will examine the reasons why it is used as well as how to source and install it. I will then examine mesosphere.com and see how Mesos has been extended to include DNS (domain name system) and Marathon for process management. There is an overlap of functionality here because Mesos can be used for release purposes as well as Brooklyn, so I will examine both and compare. Also, Mesosphere data center operating system (DCOS) provides a command-line interface (CLI). This will be installed and examined for controlling cluster-based resources.
Chapter
5
– Storage
I intend to use a number of storage options including Hadoop, Cassandra, and Riak. I want to show how Brooklyn can be used to install them and also examine how data can be moved. For instance, in a SMACK (Spark/Mesos/Application Framework/Cassandra/ Kafka) architecture, it might be necessary to use two Cassandra clusters. The first would be for ETL-based data storage, while the second would be for the analytics work load. This would imply that data needs to be replicated between clusters. I would like to examine how this can be done.
Chapter
6
– Processing
Chapter
7
– Streaming
I am going to initially concentrate on Apache Kafka as a big data distributed queueing mechanism. I will show how it can be sourced, installed, and configured. I will then examine how such an architecture might be altered for time series data. The IoT is just around the corner, and it will be interesting to see how time series data queueing could be achieved.
Chapter
8
– Frameworks
In terms of application frameworks, I will concentrate on spring.io and akka.io, source and install the code, examine it, and then provide some simple examples.
Chapter
9
– Data Visualisation
For those of you who read the Databricks chapters in my second Spark-based book, this chapter will be familiar. I will source and install Apache Zeppelin, the big data visualsation system. It uses a very similar code base to databricks.com and can be used to create collaborative reports and dashboards.
Chapter
10
– The Big Data Stack
Finally, I will close the book by examining the fully built, big data stack created by the previous chapters. I will create and execute some stack-based application code examples.
The Full Stack
These are the big data systems that will be examined in this book to make an example of a big data stack reality. Of course there are many other components that could be used, and it will depend on the needs of your project and new projects that are created by the ever-changing world of apache.org.
In terms of storage, I have suggested HDFS (Hadoop Distributed File System), Riak, Cassandra, and Hbase as examples. I suggest these because I know that Apache Spark connectors are available for the NoSQL databases. I also know that examples of Cassandra data replication are easily available. Finally, I know that Basho are positioning their Riak TS database to handle time series data and so will be well positioned for the IoT.
I have suggested Spark for data processing and Kafka for queuing as well as Akka and Spring as potential frameworks. I know that Brooklyn and Mesos have both release and monitoring functionality. However, Mesos is becoming the standard for big data resource management and sharing, so that is why I have suggested it.
I have suggested Apache Zeppelin for data visualisation because it is open source and I was impressed by databricks.com. It will allow collaborative, notebook-based data investigation leading to reports and dashboards.
Cloud or Cluster
The use of Apache Brooklyn as a release and monitoring system provides many release opportunities in terms of supported cloud release options as well as local clusters. However, this built-in functionality, although being very beneficial, causes the question of “cloud vs. cluster” to require an immediate answer. Should I install to a local cluster or a cloud provider? And if so, what are the criteria that I should use to make the choice? I tried to begin to answer this in a presentation I created under my SlideShare space.
slideshare.net/mikejf12/cloud-versus-physical-cluster
What factors should be used to make the choice between a cloud-based system, a physical cluster, or a hybrid system that may combine the two? The factor options might be the following:
There should be no surprise here that most of the time it will be cost factors that cause the decision to be made. However, in some instances, the need for a very high level of security might cause the need for an isolated physical cluster.
As already explained in the previous section, which describes big data where there is a periodic need to scale capacity widely, it might be necessary to use a cloud-based service. If periodic peaks in resource demand exist, then it makes sense to use a cloud provider, as you can just use the extra resource when you need it.
If you have a very large resource demand in terms of either physical data volume or data arriving (velocity), it might make sense to use a cloud provider. This avoids the need to purchase physical cluster-based hardware. However, depending on the actual size, this might not be the saving that it appears to be. For very large volumes, many cloud providers require that you contract for a fixed period, potentially over a number of years.
If cost is your main priority, as it probably will be, make sure that you completely understand all of the costs involved for each option. Remember to add in the costs to move off of a physical cluster as well as a cloud-based system into your calculations. Remember that most cloud-based providers will charge you to move your data off of their systems. This cost could be considerable depending on the volume involved.
Try also to research what your competitor and brother companies are doing when making this choice. If they have moved to the cloud only to later move back to a co- located/shared physical cluster, investigate why they made the choice so that you can avoid making a costly mistake.
So in closing this section, I will say that you should do some thorough research before making a choice. If you are concentrating on cost, and you likely will be, then try to make a list of items to consider for each option you look at, such as the following:
• Costs to move data
• Costs to mothball system
• Costs associated with location
• Taxes/tax benefits
• Any vendor lock in involved?
• Cost of hardware
• Cost of hardware failures
• Energy and rental
• Personnel costs
• Data transmission
• Networking
• Other?
The Future
The aim of this book is to show how a big data stack might be created and what components might be used. It attempts to do this with currently available Apache full and incubating systems. The aim is to introduce these components by example and show how they might work together. I think that in the very near future, some of the biggest participants in the big data scene will take this kind of approach to make an investigation like this a reality. They will create open-sourced big data stacks for IoT and analytics that will be thoroughly tested and can be trusted. They will enrich the basic components by providing extra example code and documentation. Finally, their approach will make sense and be adopted because user projects will save money through reuse and reduced configuration and coding.
17
© Michael Frampton 2018
Cloud Storage
In this chapter, I will source and install Apache CloudStack onto my physical cluster. Remember I am not suggesting that this is the best choice for cloud-based processing; it is just because my resources are limited, and I want to examine cloud-based installs using Apache Brooklyn as well as physical cluster-based installs.
I have included the big data stack diagram from Chapter 1 here to remind the reader where Apache CloudStack fits into the architecture (see Figure 2-1). It provides a cloud installed on physical servers, and Apache Brooklyn can then be used for system component release to that cloud.
Although this chapter involves the install of Apache CloudStack, it should not be considered to be an in-depth reference. In this chapter, I will show how to source and install CloudStack as well as examine it’s functionality to understand it and keep it running. The primary purpose here is to create a cheap and highly functional cloud that can be used locally and let the rest of the book progress. For those people who want more detail on CloudStack, please check the Apache-based project web site at
cloudstack.apache.org
This will provide further documentation as well as connect you with the project community so that you can investigate and ask questions. Before diving straight into Linux server preparation, I thought it might be useful to examine some of the concepts on which Apache CloudStack is based. The next section will cover this briefly; for further information, examine the CloudStack web site.
CloudStack Overview
Apache CloudStack is an enterprise-level, open-source system for setting up highly scalable infrastructure as a service (IaaS) systems. CloudStack can scale to many thousands of servers and support geographically distributed data centers. CloudStack uses hypervisor software on each server to support virtualisation. At the time of this writing, the current version of CloudStack is 4.10.0.0, and the supported hypervisors are as shown in Table 2-1.
To give an overview of CloudStack, its architecture, and terms, I will use an
architectural diagram based on the docs.cloudstack.apache.org web page as shown in Figure 2-2.
Table 2-1.
CloudStack Supported Hypervisors
Hypervisor Type/Provider URL
BareMetal (via IPMI) Standard various implementors
Hyper-V Microsoft microsoft.com
KVM Open Source linux-kvm.org
LXC GNU LGPLv2.1+ linuxcontainers.org
vSphere (via vCenter) VMware vmware.com
Xenserver Open Source xenserver.org
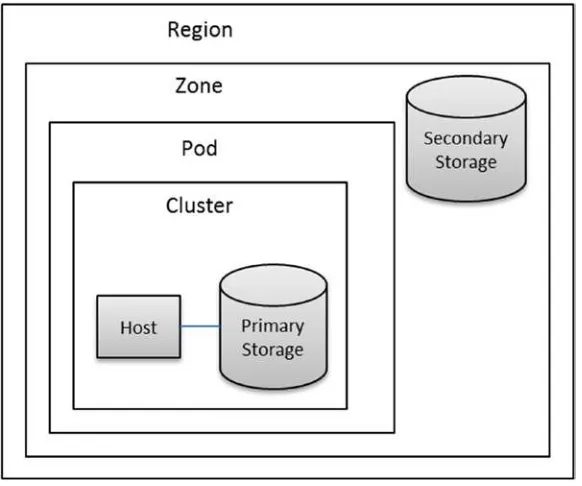
The CloudStack IaaS system is described in terms of regions, zones, pods, clusters, hosts, and primary/secondary storage. Regions are the largest organisational unit within CloudStack and a means of providing fault tolerance and disaster recovery. A region is a grouping of zones in the same geographical area. A zone can be considered to be a data center and may contain one or more pods as well as secondary storage. Secondary storage can be shared by all of the pods within the zone. Zones can be public or private, with public zones being visible to all users.
Pods are equivalent to racks and are contained within zones; all hosts within the pod are on the same subnet. Pods contain one or more clusters and one or more primary storage servers. A cluster within CloudStack provides a means to group hosts. For instance, there might be multiple types of hypervisor used, so there would be a group of KVM (Kernel-based Virtual Machine) hosts as well as a XenServer server pool.
A host is the smallest organisational unit within CloudStack and represents a single server that will have hypervisor software like KVM installed. Hosts provide resources to support virtual machines. While hosts may be from different manufacturers and in different locations, all of the hosts in a single cluster must have the same resource features, that is, CPU, RAM, and so forth.
Having given a brief overview of CloudStack, it is now time to attempt to install the management and agent software for CloudStack. Before this can be done, there are prerequisites that are required on each host. In the next section, I will examine these prerequisites and show what must be installed for CloudStack to operate correctly.
Server Preparation
The current server preparation guide for CloudStack can be found at the cloudstack. apache.org web site by following these steps:
• Go to cloudstack.apache.org
• Choose Menu Documentation ➤ Installation Docs
Before working through a server checklist for server preparation, it makes sense to consider the minimum system requirements for both the management servers and cluster hosts for CloudStack. From the “Installation Docs” page selected previously, it is possible to select the option “Minimum System Requirements” under “General Installation.” The next section will consider these requirements.
Minimum System Requirements
This section will cover the requirements for both the management server and the hypervisor host servers.
Management Server Requirements
The requirements for a management server for CloudStack are as follows:
• Operating System
• CentOS/RHEL 6.3+ or Ubuntu 14.04(.2)
• I will be using CentOS Linux 6.8
• Server type and cores
• 64-bit x86 CPU (more cores results in better performance)
• Memory
• Storage
• 250 GB minimum, 500 GB recommended
• Network
• At least one network interface controller (NIC)
• IP (Internet protocol) addressing
• Must be statically allocated
• Hostname
• Must use fully qualified domain name (FQDN)
Hypervisor Host Requirements
The requirements for a hypervisor server for CloudStack are as follows:
• Must support HVM (hardware virtual machine; Intel-VT or AMD-V enabled)
• Enable in BIOS (basic input/output system) under processor menu
• Server type and cores
• 64-bit x86 CPU (more cores results in better performance)
• Memory
• 4 GB minimum
• Storage
• 36 GB minimum
• Network
• At least one NIC
Having worked through these lists and checked that the servers are ready for CloudStack, it is time to do some server preparation prior to software installs. The documentation for this can be found on the CloudStack site as follows:
1. Go to cloudstack.apache.org
2. Choose Menu Documentation ➤ Installation Docs
3. Left Hand Menu ➤ Quick Installation Guide for CentOS 6
The following sections describe the server preparation checklist options.
Check CentOS Install
Given that I am using CentOS Linux for this project, there is a minimum requirement of CentOS version 6.3. I can check this from the server hc4nn using the cat command to list the contents of the /etc/centos-release file.
[hadoop@hc4nn ~]$ cat /etc/centos-release CentOS release 6.8 (Final)
Secure Shell (SSH) Access
During CloudStack installation, it is necessary to be able to SSH between servers as root. This option should be disabled when a system moves into production. The following commands show how this is checked:
[hadoop@hc4nn ~]$ su -Password:
[root@hc4nn ~]# ssh hc4r1m1
Last login: Sat May 7 15:19:48 2016 from 192.168.1.103 [root@hc4r1m1 ~]# exit
logout
Connection to hc4r1m1 closed.
I have used the Linux su (switch user) command to switch the user from the Hadoop account to root. Then I have accessed the server hc4r1m1 via an SSH session as root. Having done this successfully, I have received a session prompt on that server.
login can be set up using the SSH-based commands ssh-keygen and ssh-copy-id. The ssh-keygen command will create a set of cryptographic keys, whereas the ssh-copy-id command can be used to copy those keys to a remote server. Check Red Hat Enterprise Linux (RHEL)/CentOS sites for the steps to configure passwordless SSH login.
Configure Network
I generally configure the network interface for my servers from the machine console; so to meet the minimum network interface option, I know that I have eth0 (Ethernet instance 0) available. I can check this using the Linux ifconfig command as shown here.
[root@hc4nn sysconfig]# ifconfig
eth0 Link encap:Ethernet HWaddr D4:85:64:14:0E:30
inet addr:192.168.1.109 Bcast:192.168.1.255 Mask:255.255.255.0 UP BROADCAST RUNNING MULTICAST MTU:1500 Metric:1
RX packets:816 errors:0 dropped:0 overruns:0 frame:0 TX packets:417 errors:0 dropped:0 overruns:0 carrier:0 collisions:0 txqueuelen:1000
RX bytes:84458 (82.4 KiB) TX bytes:64590 (63.0 KiB) Interrupt:19 Memory:f0500000-f0520000
As the root user on host hc4nn, I have used the ifconfig command to ensure that the eth0 NIC exists and is running.
Check Hostname FQDN
Many systems require not just a server name to be defined but an associated domain name as well. When preparing my servers, I set this up by default.
[root@hc4nn sysconfig]# grep hc4nn /etc/hosts
192.168.1.109 hc4nn.semtech-solutions.co.nz hc4nn
The Linux grep (global regular expression print) command here shows how the entry for hc4nn has been defined in the file /etc/hosts, IP address followed by long name then a short name. The Linux hostname command with a --fqdn switch ensures that the fully qualified domain name is defined.
Configure SELinux
To install CloudStack, SELinux (Security Enhanced Linux) needs to be in permissive mode, so some changes need to be made to the file /etc/selinux/config.
[root@hc4nn ~]# cd /etc/selinux; cat config
# This file controls the state of SELinux on the system. # SELINUX= can take one of these three values:
# enforcing - SELinux security policy is enforced.
# permissive - SELinux prints warnings instead of enforcing. # disabled - SELinux is fully disabled.
SELINUX=permissive
# SELINUXTYPE= type of policy in use. Possible values are: # targeted - Only targeted network daemons are protected. # strict - Full SELinux protection.
SELINUXTYPE=targeted
To make SELinux change to permissive mode in the current session, use the setenforce (set enforcement) command (shown following) if SELinux is not disabled.
[root@hc4nn selinux]# setenforce 0
Otherwise these changes will take effect when the server is rebooted.
Configure NTP
The NTP (Network Time Protocol) service needs to be installed so that all cloud server clocks can be synchronized. This service is installed using the yum (Yellowdog updater, modified) command using the root account as follows. The -y switch avoids the need for confirmation during the install:
I won’t paste the yum command output here—as long as the command finishes with the “Complete!” line, then you have succeeded. Now ensure that the NTP service starts when the server starts by using the chkconfig command with the service name "ntpd" and the on switch. Finally, start the service using the service command with the start switch.
[root@hc4nn selinux]# chkconfig ntpd on [root@hc4nn selinux]# service ntpd start
Starting ntpd: [ OK ]
Configure CloudStack Package Repository
To install CloudStack using the Linux yum command, it is necessary to provide a configuration file for yum so that it knows how to source the install. The following command shows the file cloudstack.repo being created under /etc/yum.repos.d using the vi command:
[root@hc4nn ~]# vi /etc/yum.repos.d/cloudstack.repo
[cloudstack] name=cloudstack
baseurl=http://cloudstack.apt-get.eu/centos/6/4.9/ enabled=1
gpgcheck=0
The contents of the file indicate the remote server to use when sourcing software using yum as well as the system name and version to source.
Configure NFS (Network File System)
host will be mounted onto those hosts. To set this up and test it, the network file system utilities package must be installed using yum as follows:
[root@hc4nn ~]# yum -y install nfs-utils
Two directories are created under the root partition for CloudStack primary and secondary storage using the Linux mkdir command on the server hc4nn as follows. The -p switch causes mkdir to create all parent directories as needed:
[root@hc4nn ~]# mkdir -p /export/primary [root@hc4nn ~]# mkdir /export/secondary
The /etc/exports file is then modified by adding the following lines to make sure that these directories are available as mounts:
vi /etc/exports
/export/secondary *(rw,async,no_root_squash,no_subtree_check) /export/primary *(rw,async,no_root_squash,no_subtree_check)
(Consult the RHEL/CentOS documentation for the various options.)
Now export the /exports directory using the exportfs command in the current session.
[root@hc4nn ~]# exportfs -a
NFS V4 on CentOS 6.x needs the client domain setting to be the same on all servers. Edit the file /etc/idmapd.conf and set the domain setting to be the server domain name as follows. (Change this value to match your server domain name.) Do this on the management server hc4nn and the hypervisor hosts:
vi /etc/idmapd.conf
Domain = semtech-solutions.co.nz
To ensure that the Linux server firewall will accept these changes, modify the file /etc/sysconfig/iptables and add the following lines at the end of the file. Make sure that the “COMMIT” line in this file terminates the file. Normally during a non-production server install, I would switch off the iptables firewall. However, to function correctly during the install, iptables must be enabled:
vi /etc/sysconfig/iptables
# Add entries for Apache Cloudstack4.9
-A INPUT -s 192.168.1.0/24 -m state --state NEW -p udp --dport 111 -j ACCEPT -A INPUT -s 192.168.1.0/24 -m state --state NEW -p tcp --dport 111 -j ACCEPT -A INPUT -s 192.168.1.0/24 -m state --state NEW -p tcp --dport 2049 -j ACCEPT -A INPUT -s 192.168.1.0/24 -m state --state NEW -p tcp --dport 32803 -j ACCEPT -A INPUT -s 192.168.1.0/24 -m state --state NEW -p udp --dport 32769 -j ACCEPT -A INPUT -s 192.168.1.0/24 -m state --state NEW -p tcp --dport 892 -j ACCEPT -A INPUT -s 192.168.1.0/24 -m state --state NEW -p udp --dport 892 -j ACCEPT -A INPUT -s 192.168.1.0/24 -m state --state NEW -p tcp --dport 875 -j ACCEPT -A INPUT -s 192.168.1.0/24 -m state --state NEW -p udp --dport 875 -j ACCEPT -A INPUT -s 192.168.1.0/24 -m state --state NEW -p tcp --dport 662 -j ACCEPT -A INPUT -s 192.168.1.0/24 -m state --state NEW -p udp --dport 662 -j ACCEPT
Make sure that you change the preceding IP address to match your servers. Now the firewall service iptables can be restarted to pick up these changes using the Linux service command as root:
[root@hc4nn ~]# service iptables restart; chkconfig iptables on
The rpc and nfs services also need to be started in the same way, and then the server must be rebooted. Do this on the hypervisor host and the master on which the manager file systems will be mounted.
[root@hc4nn ~]# service rpcbind restart; service nfs restart [root@hc4nn ~]# chkconfig rpcbind on; chkconfig nfs on [root@hc4nn ~]# reboot
[root@hc4nn ~]# mkdir /primary
[root@hc4nn ~]# mount -t nfs4 hc4nn:/export/primary /primary
[root@hc4nn ~]# df -kh
Filesystem Size Used Avail Use% Mounted on /export/primary 186G 917M 176G 1% /primary
[root@hc4nn ~] umount /primary
[root@hc4nn ~] mkdir /secondary
[root@hc4nn ~] mount -t nfs4 hc4nn:/export/secondary /secondary
[root@hc4nn ~]# df -kh
Filesystem Size Used Avail Use% Mounted on /export/secondary 186G 917M 176G 1% /secondary
[root@hc4nn ~] umount /secondary
This test is most useful when adding a new host to the cluster; it tests that the storage mounts on the storage server can be mounted on the new host. With these prerequisites taken care of, the CloudStack management server can be installed. This will be
attempted in the next section.
CloudStack Server Install
To maintain server metadata, the CloudStack management server uses a MySQL instance. So before the management server is installed, MySQL will be installed and configured. These steps will be carried out on the management server hc4nn.
MySQL Server Install
MySQL will be installed using the Linux yum command as root:
[root@hc4nn ~]# yum -y install mysql-server
The file section called “mysqld” needs to be extended with the following options
The chkconfig command is then used to ensure the MySQL server mysqld starts on server reboot using the “on” switch. The server is then started using the Linux service command with the start option.
[root@hc4nn ~]# chkconfig mysqld on [root@hc4nn ~]# service mysqld start
Starting mysqld: [ OK ]
MySQL Connector Installation
Now the MySQL python connector needs to be installed. Create a repository configuration file called mysql.repo using the vi command as shown here:
vi /etc/yum.repos.d/mysql.repo
Note that gpgcheck has been enabled for the mysql connector in the preceding file (gpgcheck=1), so a gpg (GNU Privacy Guard) key needs to be imported. Import the public GPG key from the MySQL repository to enable the install to be verified.
rpm --import http://repo.mysql.com/RPM-GPG-KEY-mysql
Then install the python MySQL connector using the yum command with a “-y” switch:
yum -y install mysql-connector-python
Management Server Installation
The management server will be installed using the yum command as the root user; the install will refer to the repo configuration file that was created earlier.
[root@hc4nn ~]# yum -y install cloudstack-management
With the Apache CloudStack Manager software installed, the Manager MySQL database can be set up using the following command:
[root@hc4nn ~]# cloudstack-setup-databases cloud:password@localhost --deploy-as=root
You should see a success line that states that the database has been set up and that identifies the db.properties file as following:
CloudStack has successfully initialized database, you can check your database configuration in
/etc/cloudstack/management/db.properties
The CloudStack management server installation can now be finalized by using the following script as root:
[root@hc4nn ~]# cloudstack-setup-management
If this script runs successfully, you should see the line
CloudStack Management Server setup is Done!
Given that the Apache CloudStack management server is now installed, thought must be given to system template installation. This will be examined next.
System Template Setup
The CloudStack quick start guide now advises that system templates need to be downloaded to support various hypervisors. These will be downloaded with the following command:
[root@hc4nn ~]# cd /usr/share/cloudstack-common/scripts/storage/secondary/
-u http://cloudstack.apt-get.eu/systemvm/4.6/systemvm64template-4.6.0-kvm. qcow2.bz2\
-h kvm -F
The backslash characters that terminate the preceding command lines just allow the command to be split across multiple lines and make it easier to comprehend. The resulting templates are stored to the directory /export/secondary/template on the local server.
That concludes the Apache CloudStack server install. Now it is time to install a KVM hypervisor to support virtual instances. In the next section, I will show how this can be done.
KVM Setup and Installation
Apache CloudStack supports many types of hypervisors, as previously mentioned, to enable virtual machines to be created and run on cloud hosts. In this example of a hypervisor install, I will use KVM; as we are on a CentOS 6.x Linux host, it seems appropriate. KVM means Kernel-based Virtual Machine, and it is available as part of the CentOS 6.x install. The steps provided in this section must be carried out on the hosts that will be added to the cloud that we create. I will execute these commands on the server hc4nn.
Again, I will follow the CloudStack KVM Hypervisor quick install steps to complete this KVM install. There are a number of points to be considered, and they are discussed in the following sections.
Prerequisites
The prerequisites for this host have already been met, but if the KVM hypervisor is installed on other cloud hosts, then the following points must be considered. Use the “Minimum System Requirements” section to make the necessary changes.
• The network must be configured.
• The hostname must be defined in FQDN format.
• SELinux must be configured as permissive.
• NTP must be installed.
Create Repository File
The CloudStack repository file must be created on the hypervisor host so that the CloudStack agent can be installed:
[root@hc4nn ~]# vi /etc/yum.repos.d/cloudstack.repo
[cloudstack] name=cloudstack
baseurl=http://cloudstack.apt-get.eu/centos/6/4.9/ enabled=1
gpgcheck=0
KVM Installation
The KVM hypervisor agent can be installed as root using yum with the following command:
[root@hc4nn ~]# yum -y install cloudstack-agent
With the agent installed, KVM now needs to be configured, and there are a few parts to this.
KVM QEMU (Quick Emulator) Configuration
KVM uses the Linux libvirt (library virtualisation) library to support virtualisation, and it is the qemu hypervisor driver within the libvirt library that needs to be configured. The file /etc/libvirt/qemu.conf needs to be modified so that the following line exists and is not commented out. Make sure that the double quotes shown here exist:
Libvirt Configuration
The libvirt, installed as part of the agent install, now needs to be configured to listen for unsecured tcp (Transmission Control Protocol) connections. This is possible by making the following changes to the libvirt deamon file /etc/libvirt/libvirtd.conf:
[root@hc4nn ~]# vi /etc/libvirt/libvirtd.conf
listen_tls = 0 listen_tcp = 1 tcp_port = "16059" auth_tcp = "none" mdns_adv = 0
The parameters sent to the libvirt deamon also need to be changed in the file /etc/sysconfig/libvirtd. The following line needs to be uncommented:
[root@hc4nn ~]# vi /etc/sysconfig/libvirtd LIBVIRTD_ARGS="--listen"
Finally, the libvirtd service needs to be restarted to pick up these changes as root as follows:
[root@hc4nn ~]# chkconfig libvirtd on; service libvirtd restart
Stopping libvirtd daemon: [ OK ] Starting libvirtd daemon: [ OK ]
Check KVM Running
Now it is possible to check that the KVM hypervisor is running using the Linux lsmod command and grepping the output for the string “kvm.” As shown here, all seems to be working:
[root@hcnn secondary]# lsmod | grep kvm kvm_intel 55464 0
kvm 345038 1 kvm_intel
34
Host Naming
It is also necessary to ensure that the host is named correctly and has an entry in the /etc/hosts file that includes its fully qualified domain name. See the entries following from my server hc4nn:
[root@hc4nn ~]# cat /etc/hosts
127.0.0.1 localhost localhost.localdomain localhost4 localhost4.localdomain4 ::1 localhost localhost.localdomain localhost6 localhost6.localdomain6
192.168.1.109 hc4nn.semtech-solutions.co.nz hc4nn
192.168.1.113 hc4r1m1.semtech-solutions.co.nz hc4r1m1 192.168.1.114 hc4r1m2.semtech-solutions.co.nz hc4r1m2 192.168.1.115 hc4r1m3.semtech-solutions.co.nz hc4r1m3 192.168.1.116 hc4r1m4.semtech-solutions.co.nz hc4r1m4 192.168.1.117 hc4r1m5.semtech-solutions.co.nz hc4r1m5
192.168.1.118 hc4r2m1.semtech-solutions.co.nz hc4r2m1 192.168.1.119 hc4r2m2.semtech-solutions.co.nz hc4r2m2 192.168.1.120 hc4r2m3.semtech-solutions.co.nz hc4r2m3 192.168.1.121 hc4r2m4.semtech-solutions.co.nz hc4r2m4 192.168.1.122 hc4r2m5.semtech-solutions.co.nz hc4r2m5
I have ensured that the server hostnames contain the domain name as well; this means that it is the FQDN that appears when the hosts are added to CloudStack.
[root@hc4nn ~]# cat /etc/sysconfig/network
NETWORKING=yes
HOSTNAME=hc4nn.semtech-solutions.co.nz
CloudStack Cluster Configuration
Now that the CloudStack manager has been installed on the CentOS 6.x server hc4nn, and the CloudStack agent is running on that host, the CloudStack user interface can be accessed to finish the install. It is available at
http://hc4nn:8080/client/
The default account is called “admin” with a preset password value of “password.” Once logged in, choose the “Continue With Basic Install” option. You will then be
prompted to enter and reenter a new password for the admin account. Enter new values, and then choose “Save and Continue.”
Next click OK to add a zone; I have called my zone “Zone1” and specified DNS (domain name system) addresses supplied by Google as shown in Figure 2-3.
Click Continue, followed by OK to add a Pod; remember that a zone can be considered to be equivalent to a data center, and a pod could be considered to be a rack cabinet within that data center. When creating a pod, an IP address range must be supplied for the cluster-based hosts that will exist in the Pod (see Figure 2-4).
The pod in Figure 2-4 called Pod1 has been supplied with a gateway IP address to access the rest of the cluster and a netmask value. It has also been supplied with an initial IP address range of 192.168.1.20–30. Click Continue to add a guest network (see Figure 2-5).
The guest network that has been created in the Figure 2-5 has the same gateway and netmask IP addresses used during pod creation. The guest network IP address range has been set to be 192.168.1.131–140. These are the IP addresses that will be used when creating virtual instances later. Click Continue to progress, followed by OK to add a cluster. Remember that within a pod, a cluster is a group of hosts that will use the same
Figure 2-5.
CloudStack Add guest network
hypervisor. Given that the OS being used in this project will be CentOS minimal installs, then the hypervisor to be used will be KVM. This happens naturally, as KVM is supplied with CentOS. A KVM-based cluster called Cluster1 has been created in Figure 2-6.
Click Continue followed by OK to add a host to the KVM-based cluster that was just created. Remember that the CloudStack agent and KVM steps must be followed to add extra hosts. Also, the /etc/hosts file must be set up, and the hostname should be defined as an FQDN value in /etc/sysconfig/network.
Figure 2-6.
CloudStack Add Cluster
Figure 2-7.
CloudStack Add Host
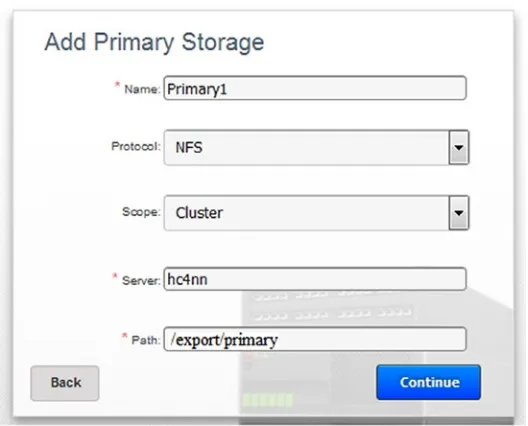
Figure 2-8 shows primary storage being added to the cluster from server hc4nn using the path /export/primary. The protocol used is NFS; click Continue to progress, followed by OK to add secondary storage.
Note that I have used an IP address for the server hc4nn (192.168.1.109) to add secondary storage. As long as you have the correct entries in your /etc/hosts, you could use either method.
The path for zone-wide secondary storage is /export/secondary from the server hc4nn, and the method used is again NFS (see Figure 2-9). Click Continue to progress. As the configuration has now been completed, the CloudStack system is ready to be launched. Click launch on the next page to start the creation of the cluster; if any errors occur, then use the back button to go back and change your cluster options. Some typical errors that may occur are
• Incorrect naming of hosts to be added
• Incorrect IP address ranges
• Failure to set up /etc/hosts files correctly
• Failure to ensure that CloudStack agent is running on hypervisor hosts
Figure 2-9.
CloudStack Add Secondary Storage
Figure 2-10.
CloudStack launch cloud
If all goes well, you should see a screen like Figure 2-10, followed by a screen that indicates “Cloud Setup Successful.” Choose the launch option to access the cloud instance user interface.
A dashboard is displayed on entry that shows command options on the left, alerts on the top of the screen, and system capacity graphs on the bottom of the screen.
When adding a host to a cluster in Apache CloudStack, the steps in the section “KVM Setup and Installation” must be followed. In the next section, I will show how to install hosts into the cloud using this section to prepare the hosts that will be added to the cloud.
Adding Hosts to the Cloud
Following the previous discussion, a private Apache CloudStack cloud has now been created as a target location for software installs later in the book using Apache Brooklyn. However, a cloud with a single host for storage purposes will not suffice, and so more hosts will need to be added. In this section, I will expand the cloud by adding more hosts to it.
As stated at the end of the last section, to add hosts to the cloud, each server must be prepared by ensuring that KVM is available and that the Apache CloudStack agent is installed. Follow the steps in the “KVM Setup and Installation” section, and then proceed from here.
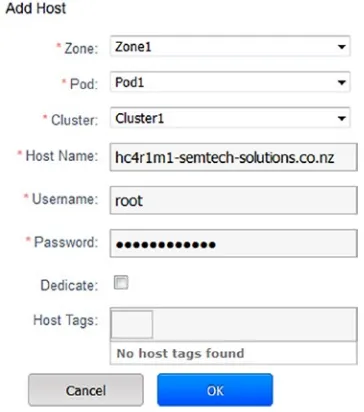
To add a host to the cloud, select the “Infrastructure” menu option on the left of the CloudStack manager user interface, and then select “View All” under hosts (see Figure 2- 12). Finally, click the “+ Add Host” button on the top right of the screen. An add host window will appear.
Figure 2-12.
CloudStack Add Host
I have added this host to Zone1 ➤ Pod1 ➤ Cluster1; and given that I am creating a
small cloud for demonstration purposes, I will add all of the hosts to a single,
KVM- based cluster (see Figure 2-13). If a real production cloud was being created, there would potentially be multiple regions and zones (data centers) containing multiple pods (racks) that would contain multiple clusters of various types of hypervisor (KVM, Xen, HyperV).
As you can see, I now have servers hc4nn and hc4r1m1 to hc4r1m5 added to a KVM- based, Apache CloudStack cluster, Cluster1. You can see from the preceding host list that it is possible to determine both the host state and cluster location from the host list details. The full server names on the left of the list are taken from the hostname defined in the file /etc/sysconfig/network on each server.
By clicking on the Quick View plus (+) icon on the right of each list server, it is possible to gain both some extra information about each server and manage each server in the list.
The details in Figure 2-14 give me the internal cloud ID of each host as well as details like its state. It also gives me some command options; for instance, I could disable the host and place it in maintenance mode if, say, a disk was failing.
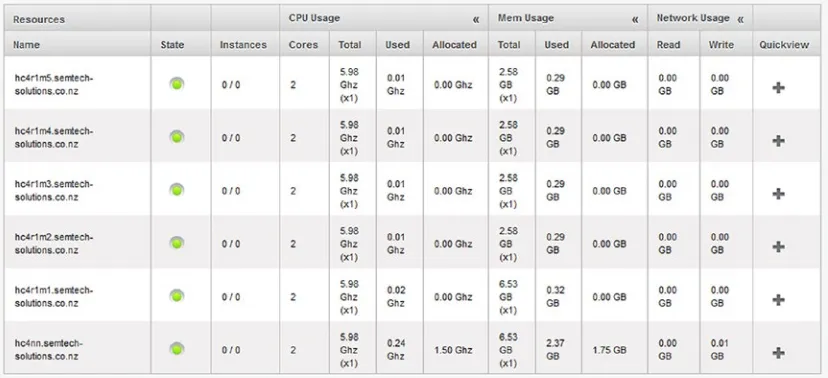
Before moving on, I will mention a final point about the host list. Next to the “+ Add Host” button above the list, there is a Metrics button. Clicking that button provides the host details shown in Figure 2-15.
Figure 2-14.
CloudStack host quick view
As you can see from the list in this figure, the performance metrics are
comprehensive in terms of CPU, memory, and network. This form alone could be useful when trying to monitor or track a resource issue in the cloud. Notice that the instances column lists zero for each host; no virtual KVM-based guest instances have been created on the cloud yet. That will be tackled in the next section.
Adding an Instance to the Cloud
Now that a KVM-based cloud has been created and hosts have been added to it to
provide the resource necessary to support it, virtual instances need to be created that will be used for software installs within the cloud by external systems like Apache Brooklyn. This section will tackle a single creation of an instance that can then be repeated to add as many instances as the cloud can support. Use the metrics refers to Figure 2- 15 host metrics as instances are added to determine the load on the hosts and the free resources available to support the addition of further instances.
Registering an ISO with CloudStack
Note that this is a CentOS 6.8 minimal install ISO to be available to all zones in the cloud, which will be bootable. It will be downloaded via URL from
http://vault.centos.org/6.8/isos/x86_64/CentOS-6.8-x86_64-minimal.iso
Due to the length of time taken to write this book CentOS 6 has been deprecated in favour of CentOS 7. Hence the CentOS 6 ISO suggested above is now sourced from vault.centos.org.
http://mirror.xnet.co.nz/pub/centos/7/isos/x86_64/
The ISO has been given an OS Type of CentOS 6.5 because that was the latest version available within CloudStack. By clicking OK, CloudStack will download the ISO, store it, and therefore it will be available for creating new KVM based instances.
Once an ISO-based template has been created, CloudStack needs to download the ISO file for it to be used in instance creation. By selecting the ISO in the ISO templates list and clicking on the Zones tab, you can see the download state for that ISO. Figure 2- 17 shows a compounded view of an ISO being downloaded in Zone1; and for another, the download is complete, and the ISO is in ready state.
Now that the process to download an ISO has been carried out, a virtual instance can be created using that ISO.
Creating an Instance from an ISO
To create a KVM-based virtual instance on this private cloud, the CloudStack manager menu option “Instances” can be used on the user interface. On the top right side of this page, there is an option button “+ Add Instance” to add an instance to the cloud. Click that and a wizard is started, which is shown in Figure 2-18.


![[Bookflare net] Next Generation Big Data A Practical Guide to Apache Kudu, Impala, and Spark pdf pdf](data:image/gif;base64,R0lGODlhAQABAIAAAP///wAAACH5BAEAAAAALAAAAAABAAEAAAICRAEAOw==)