For your convenience Apress has placed some of the front
matter material after the index. Please use the Bookmarks
Contents at a Glance
Contents ... v
About the Authors ... x
About the Technical Reviewer ... xi
Acknowledgments ... xii
Foreword ... xiii
Introduction ... xiv
■
Chapter 1: Introducing Mobile Flash ... 1
■
Chapter 2: Targeting Applications for the Mobile Profile ... 29
■
Chapter
3
: Building Flash and Flex Applications for Android ... 71
■
Chapter 4: Graphics and Animation ... 121
■
Chapter
5
: Application Deployment and Publication ... 165
■
Chapter 6: Adobe AIR and Native Android Apps ... 199
■
Chapter
7
: Taking Advantage of Hardware Inputs ... 243
■
Chapter 8: Rich Media Integration ... 279
■
Chapter
9
: The Designer-Developer Workflow ... 339
■
Chapter 10: Performance Tuning ...359
■
Chapter 11: Beyond Mobile: Tablets and TV ...399
Introduction
Our goal in writing this book was to open up the amazing world of mobile and device development to every single developer. You no longer need to learn a custom mobile programming language or be an expert in mobile application design to write good-looking, professional business applications. We believe that in the future, handsets and tablets will just be another deployment target for application developers—and with mobile Flash and Fle×
technology, that future is now.
For Those New to Flash
This book starts out with a gentle introduction to the Flash tool chain and underlying technologies, and teaches the programming concepts by example. If you have experience in another C-based language, such as Java, JavaScript, or Objective-C, the pacing of this book will allow you to learn ActionScript and MXML while you are being introduced to Flash and Fle× mobile concepts and APIs.
For Those New to Android
The Flash and Fle× platform takes advantage of all the great features of Android, while insulating the programmer from having to deal with the complexities of the Android APIs and programming model. This means that with simple end-user knowledge of Android, you can be up and running as an application developer, publishing your very own Flash-based applications to Android Market.
For the Rock Star Developers in All of Us
Let’s face it—you didn’t pick up this book to be just another mobile developer. You want to stretch the limits of the platform, tap into features and capabilities that go beyond the average, and build apps that are impossibly cool.
Written by Your Team
We are not your average, faceless authors who write books for a living. We are application
developers and technology geeks just like you. We are invested in the technologies we discuss, the future of mobile development, and, most importantly, your success as a future Flash platform developer.
All of the authors have a visible online presence with heavy community involvement, including leading Adobe user groups and technology evangelism. We are excited about the technology and accessible to questions, inquiries, and conversations. Rather than being just another author team, we are your own personal Flash development team.
You will learn a lot from reading this book and coding the exercises, but don’t stop there. Start dialogs with other readers and Flash developers. Join a technology user group that specializes in Flash and Fle× technology. Reach out to us, the authors, with questions, ideas, concepts, and conjectures.
Chapter
Introducing Mobile Flash
This book, Pro Android Flash, is the definitive guide to building rich, pervasive user experiences on mobile devices using the ubiquitous Flash Platform. We will show you how to leverage the powerful and mature technologies, frameworks, and tooling that make up the Flash Platform to build highly customized applications that take full advantage of all the mobile features that users demand from their devices. In reading this book, you will gain essential knowledge specific to targeting mobile Android devices, including device density, hardware inputs, native integration, and performance optimization.
Why Android?
There are many different mobile platforms to choose from and a plethora of mobile and tablet devices that are offered as options to consumers. Unlike the desktop, where there has been a considerable amount of consolidation and entrenchment, the mobile market is constantly evolving, with continual introduction of new devices and features.
The obvious question is, which platform do you target? Our answer is to start with Android; then, by leveraging Flash technology, you avoid being locked into any particular platform.
This book focuses on creating applications on devices running the Android operating system. The reason for this is that Android is quickly becoming the most popular mobile operating system in the world, with the best support for different hardware platforms and multiple form factors.
According to the Nielsen Company, Android was the top choice among people who bought a smartphone in the second half of 2010. BlackBerry RIM and Apple iOS were in a statistical dead heat for second place, as shown in Figure 1–1.
Figure 1–1. Mobile OS traffic share in the United States1
This could be due to many different factors, including the fact that the platform is open source, which attracts device manufacturers, the relative freedom provided by Android Market, Google’s in-device application storefront, or the Google experience, which provides a seamless integration of Gmail, Google Maps, Gtalk, YouTube, and Google Search for end users. Regardless of the reason for Android’s popularity, chances are that a large percentage of your customers already have Android devices, or are considering purchasing one in the near future.
At the same time, you are building on a platform with tremendous horizontal growth potential. Android is only the beginning for the Flash Platform, which benefits from an abstract virtual machine and APIs designed to work across multiple different operating systems and devices. You can take advantage of the same cross-platform transparency that Flash has brought to the desktop for all your mobile applications.
Flash on Other Platforms
Adobe started the Open Screen Project™,2which is an industry-wide initiative to bring the benefits of Flash-powered applications to all the screens of your life. Adobe has already announced plans to support iOS, BlackBerry, Windows 7, and webOS, freeing you from platform lock-in.
BlackBerry support is initially targeted at its Tablet OS, with the first available device being the BlackBerry PlayBook. Expect this support to be broadened in the future to include its other mobile devices.
1 Source: The Nielsen Company, http://nielsen.com/, 2010
2 Adobe, “Open Screen Project”, http://www.openscreenproject.org/ Jan ‘10
Feb March April May June July Aug ‘10
Top 3
ÿ
Operating System - Recent Acquirers
Acquired Smartphone within 6 months, Jan 2010 to Aug 2010, USA
32% Android OS 25% Apple Phone OS 26% RIM Blackerry OS
Apple still has a restriction on running Flash in the browser, but it has opened up the App Store to allow third-party frameworks. This means that for iOS devices, you can deploy Flash as AIR applications on any iOS device, including the iPod touch, iPhone, and iPad.
You also have the ability to deploy Flash web applications on any devices that support Flash in the browser. This includes Google TV, webOS, and Windows 7. In the future, expect to see even more platforms supporting Flash technology.
Exploring Android
Android is a full mobile stack that includes an operating system, services and
infrastructure, and a core set of applications. While you do not need to be an expert in Android to effectively write and deploy Flash applications to Android devices, it does help to be familiar with how Android works.
At its core, Android is based on the Linux operating system. It uses a modified version of the Linux kernel that has additional drivers and support for mobile hardware devices. On top of this, there is a set of libraries and core services that make up the base Android functionality. You will rarely interact directly with these libraries, but whenever you play a media file, browse to a web page, or even draw on the screen, you are going through one of the core Android libraries.
Native Android applications are written using the Java programming language compiled down to Dalvik bytecodes. Dalvik is the name of Android’s special virtual machine that abstracts the hardware and supports advanced features like garbage collection. All the Android applications that you run (including Adobe AIR applications) execute within the Dalvik virtual machine.
Figure 1–2. Android system architecture3
Besides having a very solid technology foundation, Android is continually evolving to embrace new hardware advances as they become available. Some of the current features of the Android platform include the following:
Mobile browser: WebKit, a modern framework that supports all of the HTML5 proposed extensions and powers Android’s built-in browser
Flash player: Starting with Android 2.2, you can run Flash content from within a web browser as a standard feature.
Multitouch: All Android phones support touchscreens, and most have at least two touch points, which you can use for gesture recognition.
Camera: Android phones are required to have a rear-facing camera, and many now include a front-facing camera as well.
GPS, compass: All Android phones are required to have a three-way GPS and compass, which can be used for navigation applications.
Multitasking: Android was the first mobile OS to expose application switching and background operations to installed applications.
GSM telephony: Android devices that operate as phones give you the full capabilities of GSM telephony.
3
Bluetooth, Wi-Fi, and USB: All Android devices come with Bluetooth and Wi-Fi for connectivity and a standard USB port for data transfer and debugging.
Audio and video support: Android supports playback of most common audio and video formats that are in use on the Web, including MP3, Ogg, and H.264.
These capabilities make the Android platform an exceptionally strong foundation for building mobile applications. Furthermore, Adobe Flash and AIR build on these base capabilities, making Flash a great platform to develop Android applications.
The Flash Platform
The Adobe Flash Platform is a complete system of integrated tools, frameworks,
servers, services, and clients that run across operating systems, browsers, and devices. Companies across many industries use the Flash Platform to eliminate device and platform fragmentation, and develop consistent and expressive interactive user experiences regardless of device. Let’s take a look at the Flash Platform runtimes and tools.
The Flash Runtime
When creating a Flash application, you have the choice of two different deployment targets. The first is the Adobe Flash Player, which is an embedded browser plug-in, and the second is Adobe AIR, which is a stand-alone client runtime. Both of these options are available on desktop and mobile, and give you a lot of flexibility in tailoring your application deployment to the needs of your end users.
Adobe Flash Player
According to Adobe, Flash Player is installed on 98% of Internet-connected PCs and more than 450 million devices,4
offering the widest possible reach for applications that run on the client. For 2011, Adobe projects that Flash Player will be supported on more than 132 million smartphones, and it already comes pre-installed on over 20 million smartphones. An additional 50 new tablet devices are expected to support Flash Player in 2011 as well.
Adobe Flash Player runs inside the browser in a secure container. This allows you to intermingle your Flash content with other web content written in HTML and JavaScript. You also get the benefit of installer-less operation.
4
Source: Adobe, “Benefits of rich internet applications”,
Adobe AIR
Designers and developers that currently publish content for Flash Player can also repurpose that same content to make apps for the Adobe AIR runtime. At the time of writing, there are 84 million smartphones and tablets that can run Adobe AIR
applications, and Adobe expects more than 200 million smartphones and tablets to support Adobe AIR applications by the end of 2011.
Adobe AIR extends Flash beyond the browser, allowing your content to be downloaded from Android Market and installed as a first-class application. In addition, Adobe AIR applications can request permission from the user to get access to restricted hardware such as the camera, microphone, and filesystem.
Table 1–1 summarizes the benefits of deploying within Flash Player or as an Adobe AIR mobile application. Since AIR is a proper superset of the Flash APIs, it is also possible to create a single application that is deployed under both.
Table 1–1. Flash Player vs. AIR Deployment
Flash Player Adobe AIR
Delivery Web browser Android Market
Installation No installation required Applications installed from Android Market
Updates Updated via containing web site
AIR application update service
Background operation Only executing when the browser window is visible
Can run in the background and provide notifications
Multitouch and gestures supported
Fully supported Fully supported
Accessible hardware Limited to browser sandbox Display, keyboard, camera, microphone, GPS,
accelerometer
Media playback Yes Yes
Data storage Temporary browser storage only
Adobe Flex
Flex is an open source software development kit that is tailored for building professional business applications on the Flash Platform. It includes some additional libraries for quickly and easily building user interfaces with layouts, controls, and charts. Also, most Flex UIs are written declaratively in an XML dialect called MXML, which makes it easier to build nested user interface layouts than straight ActionScript.
Adobe is very aggressively adding mobile features such as Views, touch support, and mobile-optimized skins to the Flex framework. Throughout this book, we will take advantage of Adobe Flex technology to demonstrate the mobile APIs. At the same time, we will demonstrate use of pure ActionScript APIs, which you can use if you are building an application that does not include the Flex SDK.
Flash Tooling
Since the Creative Suite 5.5 (CS5.5) release, all of the Adobe tools for doing Flash and Flex development also support mobile development.
Table 1–2 lists the tools provided by Adobe that you can use to develop mobile
applications with Flash and Flex. They all interoperate very closely, making it easy to use each tool for its strengths. This extends to the Adobe design tools, such as InDesign, Photoshop, Illustrator, and Fireworks, which can be used to develop content for your application that will plug directly into your Flash and Flex applications.
Table 1–2. Adobe Mobile Development Tools
Tool Name Description Supports Android
Deployment
Adobe Flash Builder 4.5 Professional Flex and ActionScript development
Device Central Device library and runtime emulation environment
N/A N/A
Adobe Flash Professional
Adobe Flash Professional provides designers and developers with a set of drawing tools, a timeline, and the ability to add interactivity to create rich, interactive experiences for multiple platforms. It actually has its origins as an animation tool. This, of course, means that at its core it’s great for working with animation and graphics. But, from its humble beginnings, it has grown up to be a full-fledged program, able to create rich, immersive experiences, complete with advanced interactivity written in ActionScript that can be published to multiple platforms.
If you are new to Flash development, Flash Professional is a great starting place. It offers a graphical movie and timeline editor that can be used to build content, and a very functional ActionScript editor with code templates, API help, and advanced features like code completion.
Adobe Flash Builder
Adobe Flash Builder software is designed to help developers rapidly develop cross-platform rich Internet applications and games for the Flash Platform. Users can create a game by writing ActionScript code just like you would with Flash Professional. With Flash Builder, you can also write applications using the Flex framework, which is a free, highly productive, open source framework for developing and deploying Rich Internet Applications (RIAs).
If you are developing a large application with a complex UI and complex algorithms or business logic, you will definitely want to add in Flash Builder 4.5. This is based on the full-featured Eclipse IDE and offers everything you would expect from a professional development environment, including code navigation, keyboard accelerators, and a complete GUI builder.
Device Central
Device Central is a complementary application that comes with Flash Professional and allows you to emulate different mobile devices on your desktop, including support for tilt, multitouch, and accelerometers. It also gives you access to a huge information repository that lists all the available mobile and embedded devices supported by the Flash Platform, including full specifications and custom emulators.
Adobe Flash Catalyst
Flash Catalyst is Adobe’s rapid application development platform. It allows you to take art assets made in Photoshop, Illustrator, or Flash, and turn them into first-class UI controls. The mobile workflow for Catalyst is to create or modify an FXP file that
contains your components and assets, and then open it in Flash Builder to add business logic and run it on a mobile platform.
All of these applications are available with free trials; however, if you want to develop with a pure open source stack, you can do Flex and ActionScript development right from the command line using the Flex SDK. All the components that are the basis for Flash Builder and Catalyst are part of the Flex SDK and can be programmatically
accessed. This is also what you would want to use if you were configuring an automated build to compile and test your Flex applications.
Workflow
Aside from the tooling already listed, Adobe has a powerful workflow, allowing designers to use programs like Adobe InDesign, Adobe Photoshop, Adobe Illustrator, and Adobe Fireworks to move graphics into Flash Professional or Flash Builder for further
development, as shown in Figure 1–3. This means there are rarely conversion issues when dealing with graphics, nor is there a lengthy process to move graphics from design to development.
Figure 1–3. The Flash workflow from design to development to publishing to multiple platforms/devices
Running Applications from Flash Professional
The easiest way to get started with writing Flash applications is to use Adobe Flash Professional. It provides a visual environment for building simple movies and also has good ActionScript editing capabilities for building more complex logic.
Creating a New Android Project
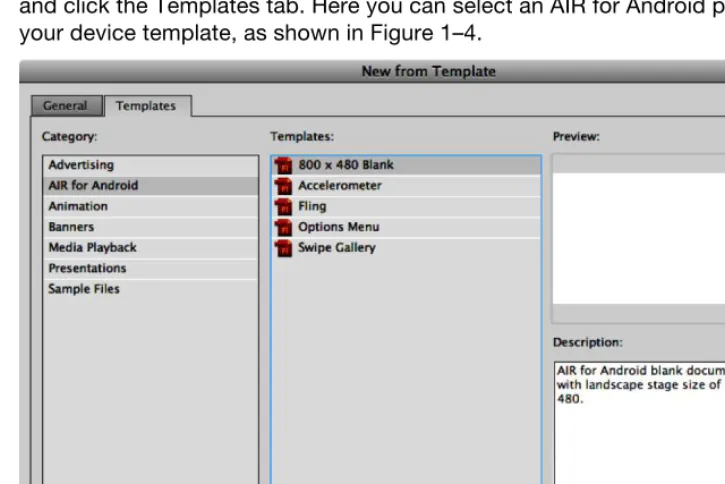
To create a new AIR for Android project, open the new project dialog from File New... and click the Templates tab. Here you can select an AIR for Android project and choose your device template, as shown in Figure 1–4.
Figure 1–4. Flash Professional new template dialog
This will create a new project with the canvas perfectly sized for a mobile project in portrait mode, and it will allow you to test your application in Flash Professional or on a device via USB. For more information about device deployment, see Chapter 5, “Application Deployment and Publication”.
Writing the Flash Capability Reporter
For the ActionScript code, we will use static constants from the Capabilities and Multitouch classes. Most of these return true or false, but some will return string or integer values. By using the string concatenation operator, we can easily format them for display, as shown in Listing 1–1.
Listing 1–1. Flash Capability Checking Code import flash.system.Capabilities; import flash.ui.Multitouch;
capabilityScroller.capabilities.text =
"AV Hardware Disable: " + Capabilities.avHardwareDisable + "\n" + "Has Accessibility: " + Capabilities.hasAccessibility + "\n" + "Has Audio: " + Capabilities.hasAudio + "\n" +
"Has Audio Encoder: " + Capabilities.hasAudioEncoder + "\n" + "Has Embedded Video: " + Capabilities.hasEmbeddedVideo + "\n" + "Has MP3: " + Capabilities.hasMP3 + "\n" +
"Has Printing: " + Capabilities.hasPrinting + "\n" +
"Has Screen Broadcast: " + Capabilities.hasScreenBroadcast + "\n" + "Has Screen Playback: " + Capabilities.hasScreenPlayback + "\n" + "Has Streaming Audio: " + Capabilities.hasStreamingAudio + "\n" + "Has Video Encoder: " + Capabilities.hasVideoEncoder + "\n" + "Is Debugger: " + Capabilities.isDebugger + "\n" +
"Language: " + Capabilities.language + "\n" +
"Local File Read Disable: " + Capabilities.localFileReadDisable + "\n" + "Manufacturer: " + Capabilities.manufacturer + "\n" +
"OS: " + Capabilities.os + "\n" +
"Pixel Aspect Ratio: " + Capabilities.pixelAspectRatio + "\n" + "Player Type: " + Capabilities.playerType + "\n" +
"Screen Color: " + Capabilities.screenColor + "\n" + "Screen DPI: " + Capabilities.screenDPI + "\n" +
"Screen Resolution: " + Capabilities.screenResolutionX + "x" + Capabilities.screenResolutionY + "\n" +
"Touch Screen Type: " + Capabilities.touchscreenType + "\n" + "Version: " + Capabilities.version + "\n" +
"Supports Gesture Events: " + Multitouch.supportsGestureEvents + "\n" + "Supports Touch Events: " + Multitouch.supportsTouchEvents + "\n" + "Input Mode: " + Multitouch.inputMode + "\n" +
"Max Touch Points: " + Multitouch.maxTouchPoints + "\n" + "Supported Gestures: " + Multitouch.supportedGestures;
The "\n" character at the end of each line adds line breaks for readability. The resultant string is then assigned to the Flash text field with ID capabilities defined in the
capabilityScroller movie. The use of an embedded movie in Flash cleans up the main timeline by hiding the scrolling animation of the text.
While this would have been functionally complete, we added some extra graphic niceties to the completed book sample, including the following:
2. Blinking lights: A simple animation was created on the left side by using the Flash Deco Tool with a Grid Fill using a Brick Pattern. Two different colors were chosen with the “Random order” option checked to create the visual appearance of blinking lights over a three-frame animation.
3. Android logo and text: No Android application is complete without a little bit of eye candy. With the full-color, high-resolution display available on Android, you can do a lot with the graphics look of your application. In this case, vector graphics were chosen for smooth scaling to any size of device.
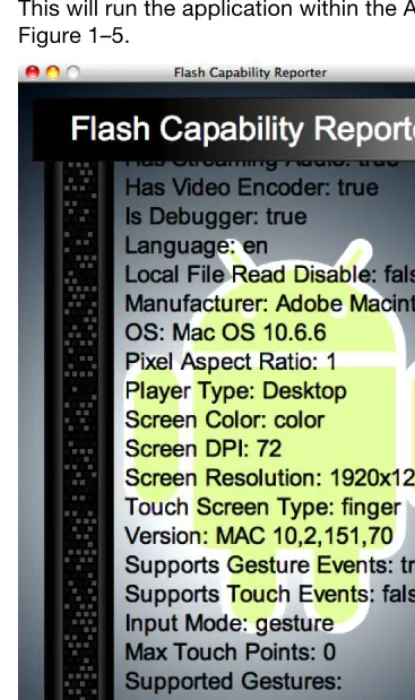
To run the completed example, go to Control Test Movie in AIR Debug Launcher (Mobile). This will run the application within the AIR Debug Launcher (ADL) runtime, as shown in Figure 1–5.
You can make use of this sample during your own development to compare device features across desktop and mobile. Feel free to add to the list of capabilities and experiment with running on different devices.
You will notice that even though we are running in ADL’s mobile mode, the values returned are not consistent with what you would get when running on a device. We will show you how to run your application in the Android emulator or on a device via USB later in this chapter.
Running Applications from Flash Builder
The new version of Flash Builder has great support for building Flash and Flex
applications for mobile devices and running and debugging them right from the IDE. In this section, we will show you how to create a new mobile project from scratch that demonstrates the basics of Flex mobile development, including views, controls, and multitouch gesture recognition.
The application we will be creating is called Gesture Check. It allows you to analyze your device to visually discover what gestures are supported as well as test that they are recognized successfully. In creating this example, you will get a full tour of the mobile capabilities of Flash Builder, including how to create a new Flex mobile project,
debugging your application with the Flash Builder debugger, and running on a device via USB deployment.
Creating a New Flex Mobile Project
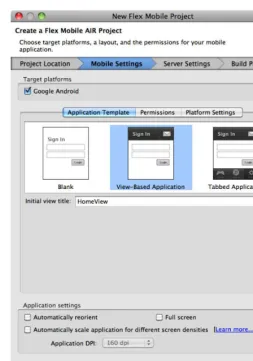
Figure 1–6. Flex mobile project creation wizard
Name your project GestureCheck, and choose a folder to store the project in.
TIP: If you create a project name without spaces in it, Flex will create project files that match your chosen name. If your name has spaces, dashes, or other characters that are not valid in ActionScript identifiers, it will use a generic name of “Main” instead.
Figure 1–7. Mobile Settings tab for selecting the application template and settings
Flash Builder comes with several built-in templates for developing mobile projects that can be used to quickly bootstrap a new project. These include a simple Blank
Application, a View-Based Application that starts on a home page, and a Tabbed Application that lets you switch between different named views. You can find more information about view and tab navigation in Chapter 3.
To start with, the Flex template gives you the following project structure (files marked internal you should never modify directly):
.actionScriptProperties: [internal] Flash Builder settings file containing libraries, platforms, and application settings
.flexProperties: [internal] Flex server settings .project: [internal] Flex Builder project settings .settings: [internal] Eclipse settings folder
bin-debug: This is the output folder where the XML and SWF files are stored during execution.
libs: Library folder where you can add your own custom extensions later
src: Source folder containing all your application code views: Package created to store your application views
[AppName]HomeView.mxml Application
[App-Name]-app.xml: Application descriptor containing mobile settings
[AppName].mxml: Main Application class of your project and entry-point for execution
The files that we will be focusing on for the rest of the tutorial are all in the src directory. This includes your application descriptor and main Application class, both of which are in the root package, and your HomeView, which is created in a package called views.
Writing the Flex Mobile Configurator
The first thing we will do to create the application is to build a declarative XML layout for the UI. For this we are going to use some of the basic layout and UI classes of Flex, including the following:
H/VGroup: The HGroup and VGroup classes let you arrange a set of components in a simple vertical or horizontal stacked layout. The components are laid out in order, with the distance between set by the gap property.
Label: A simple component that displays an uneditable text string; this is commonly used as the label for another control in a form.
CheckBox: A form control that has a value of either selected or
unselected with a visual indicator; it also includes a text description as part of the display.
Using these layouts and controls, we can put together a simple user interface that displays the status of whether a particular multitouch gesture is enabled on the device and whether the user has successfully tested the gesture. The code for the first gesture of “Swipe” is displayed in Listing 1–2. This code should be updated in the view file, which can be found in src/views/GestureCheckHomeView.mxml.
Listing 1–2. UI Elements for the First Gesture Display <?xml version="1.0" encoding="utf-8"?>
<s:View xmlns:fx="http://ns.adobe.com/mxml/2009" xmlns:s="library://ns.adobe.com/flex/spark" title="Supported Gestures" initialize="init()"> <s:VGroup paddingTop="15" paddingBottom="15"
paddingLeft="20" paddingRight="20" gap="10"> <s:HGroup verticalAlign="middle" gap="20">
<s:Label text="Swipe" fontSize="36" width="110"/>
<s:Image source="@Embed('/gestures/swipe.png')" width="137"/> <s:VGroup gap="10">
<s:CheckBox content="Enabled" mouseEnabled="false"/> <s:CheckBox content="Tested" mouseEnabled="false"/> </s:VGroup>
</s:HGroup> </s:VGroup> </s:View>
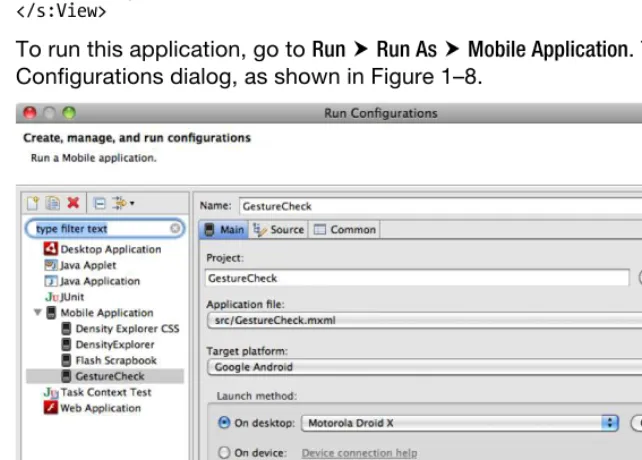
To run this application, go to Run Run As Mobile Application. This will bring up the Run Configurations dialog, as shown in Figure 1–8.
To start with, we will run the application using the AIR Debug Launcher (ADL) on the desktop. To do this, select the desktop launch method, and choose an appropriate device to emulate (for this example, you will want to choose a device with a high-density display, such as the Droid X).
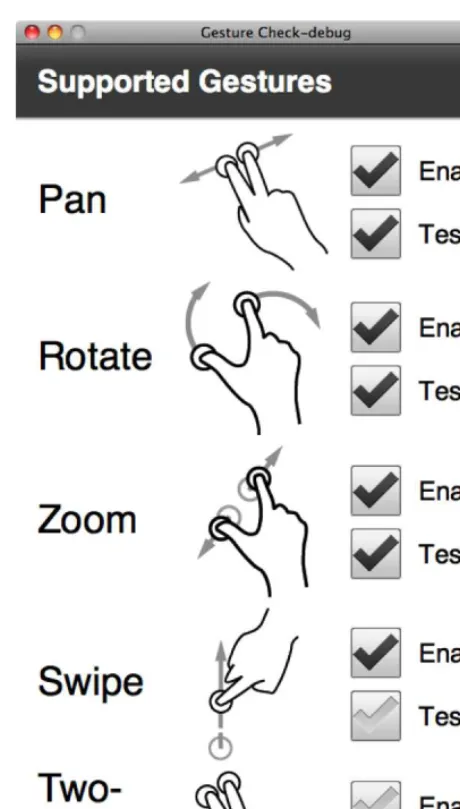
Clicking the Run button will execute the application within ADL, showing you the UI elements you added earlier, as depicted in Figure 1–9.
Figure 1–9. Gesture Check user interface
This builds out the basic UI pattern, but doesn’t have any application logic hooked up to set the state of the CheckBoxes. In order to accomplish this, we are going to make use of an initialize function that iterates through all of the supportedGestures as reported by the Multitouch class. This is shown in Listing 1–3.
Listing 1–3. Additional Code to Detect Gesture Support and Usage Highlighted in Bold <?xml version="1.0" encoding="utf-8"?>
<s:View xmlns:fx="http://ns.adobe.com/mxml/2009" xmlns:s="library://ns.adobe.com/flex/spark" title="Supported Gestures" initialize="init()"> <fx:Script>
<![CDATA[
import flash.ui.Multitouch;
private function init():void {
for each(var gesture:String in Multitouch.supportedGestures) { this[gesture+"Enabled"].selected = true;
addEventListener(gesture, function(e:GestureEvent):void { e.currentTarget[e.type+"Tested"].selected = true; });
} } ]]> </fx:Script>
<s:VGroup paddingTop="15" paddingBottom="15"
paddingLeft="20" paddingRight="20" gap="10"> <s:HGroup verticalAlign="middle" gap="20">
<s:Label text="Swipe" fontSize="36" width="110"/>
<s:CheckBox id="gestureSwipeEnabled" content="Enabled" mouseEnabled="false"/> <s:CheckBox id="gestureSwipeTested" content="Tested" mouseEnabled="false"/> </s:VGroup>
</s:HGroup> </s:VGroup> </s:View>
Notice that we have added a few IDs to the CheckBoxes in order to reference them from the initialize function. The naming convention is the gesture name appended with the words “Enabled” or “Tested”. The same naming convention is used in the code that sets the selected state.
The init function gets called once when the view is created, and iterates through all the supportedGestures. It sets the state of the enabled CheckBox to true and adds an event listener that will set the state of the tested CheckBox to true when that gesture is used in the application. We cover gestures and the event listeners in more detail in Chapter 2, if you want to learn more about this functionality.
If you run the updated example, you will get the same UI, but also trigger an error. The ActionScript error dialog is shown in Figure 1–10, and while it may be obvious to you what the issue in the program is, we will use this opportunity to demonstrate how the Flash Builder debugger works.
Figure 1–10. ActionScript error on execution of the updated application
NOTE: You will get the foregoing error only if you are running on a computer with gesture support enabled, such as a Macintosh with a touchpad. You can instead run against a mobile
device with a touchscreen to reproduce the same error.
Using the Flash Builder Debugger
ideal for production applications where you don’t want minor bugs plaguing your end user if execution can safely continue, it makes debugging the application challenging. Fortunately, Flash Builder comes with a built-in debugger that you can use to diagnose your application. To use the debugger, you have to start the application via the Run Debug As Mobile Application command.
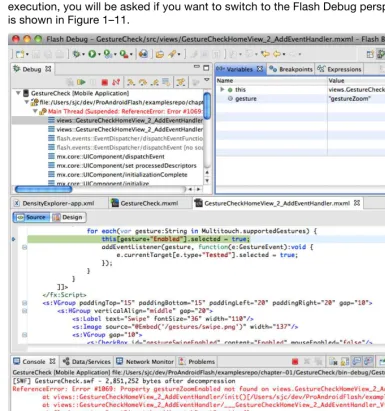
When you do this, the only noticeable difference under a normal application run is that you will now get trace output and errors in the Console panel. This in itself is immensely useful when trying to diagnose application behavior; however, if you hit an error during execution, you will be asked if you want to switch to the Flash Debug perspective, which is shown in Figure 1–11.
The Flash Debug perspective gives you the ability to look inside your application as it is executing, which is extremely powerful. In the top left Debug pane, you have the ability to start and stop your application, as well as navigation stack frames, such as the error condition that we hit.
When you select a frame in the Debug panel, it shows the state of the execution context in the top-right Variable pane, as well as the associated source code in the center panel. This makes it very easy to identify that we failed on the call to set the enabled CheckBox
to true, because there is no CheckBox with the id “gestureZoom”. This is a result of having additional gestures that we did not yet add UI elements to handle.
Since we have identified the problem already, you can stop the application and switch back to the code perspective by using the perspective picker in the top-right corner of the Flash Builder window.
As you will learn in Chapter 2, there are five different gesture events that are supported in Flash on Android. These are as follows:
Pan: Drag two fingers across the display.
Rotate: Place two fingers on the display and rotate them clockwise or counterclockwise.
Zoom: Use two fingers, and move them apart or together at the same time.
Swipe: Press and flick a single finger across the display horizontally or vertically.
Two-Finger Tap: Touch the display with two fingers simultaneously. Listing 1–4 shows the completed application, which will let you try each of these gestures.
Listing 1–4. Complete Code Listing for the Gesture Check Sample Application <?xml version="1.0" encoding="utf-8"?>
<s:View xmlns:fx="http://ns.adobe.com/mxml/2009" xmlns:s="library://ns.adobe.com/flex/spark" title="Supported Gestures" initialize="init()"> <fx:Script>
<![CDATA[
import flash.ui.Multitouch;
private function init():void {
for each(var gesture:String in Multitouch.supportedGestures) { this[gesture+"Enabled"].selected = true;
addEventListener(gesture, function(e:GestureEvent):void { e.currentTarget[e.type+"Tested"].selected = true;
<s:VGroup paddingTop="15" paddingBottom="15"
<s:HGroup verticalAlign="middle" gap="20"> <s:Label text="Pan" fontSize="36" width="110"/>
<s:Image source="@Embed('/gestures/pan.png')" width="137"/> <s:VGroup gap="10">
<s:CheckBox id="gesturePanEnabled" content="Enabled" mouseEnabled="false"/> <s:CheckBox id="gesturePanTested" content="Tested" mouseEnabled="false"/> </s:VGroup>
</s:HGroup>
<s:HGroup verticalAlign="middle" gap="20">
<s:Label text="Rotate" fontSize="36" width="110"/>
<s:Image source="@Embed('/gestures/rotate.png')" width="137"/> <s:VGroup gap="10">
<s:CheckBox id="gestureRotateEnabled" content="Enabled" mouseEnabled="false"/> <s:CheckBox id="gestureRotateTested" content="Tested" mouseEnabled="false"/> </s:VGroup>
</s:HGroup>
<s:HGroup verticalAlign="middle" gap="20">
<s:Label text="Zoom" fontSize="36" width="110"/>
<s:Image source="@Embed('/gestures/zoom.png')" width="137"/> <s:VGroup gap="10">
<s:CheckBox id="gestureZoomEnabled" content="Enabled" mouseEnabled="false"/> <s:CheckBox id="gestureZoomTested" content="Tested" mouseEnabled="false"/> </s:VGroup>
</s:HGroup>
<s:HGroup verticalAlign="middle" gap="20">
<s:Label text="Swipe" fontSize="36" width="110"/>
<s:Image source="@Embed('/gestures/swipe.png')" width="137"/> <s:VGroup gap="10">
<s:CheckBox id="gestureSwipeEnabled" content="Enabled" mouseEnabled="false"/> <s:CheckBox id="gestureSwipeTested" content="Tested" mouseEnabled="false"/> </s:VGroup>
</s:HGroup>
<s:HGroup verticalAlign="middle" gap="20">
<s:Label text="Two-Finger Tap" fontSize="36" width="110"/>
<s:Image source="@Embed('/gestures/twoFingerTap.png')" width="137"/> <s:VGroup gap="10">
<s:CheckBox id="gestureTwoFingerTapEnabled"
content="Enabled" mouseEnabled="false"/> <s:CheckBox id="gestureTwoFingerTapTested"
content="Tested" mouseEnabled="false"/> </s:VGroup>
</s:HGroup>
<s:Label text="Graphics courtesy of GestureWorks.com" fontSize="12"/> </s:VGroup>
</s:View>
Figure 1–12. Limited gesture support available running on a MacBook Pro with a trackpad
While it reports four out of five of the gestures as enabled, it is physically possible to execute only Pan, Rotation, and Zoom on the computer we used to execute this example. As we will see in the next section, it is much more interesting to run it on a device that has full support for all the multitouch gestures.
Running Flash on Device
To run your application on a physical device, you will need to make sure that it is set up properly for USB debugging. On most devices, you can enable USB debugging by going into Settings Applications Development, where you will find the options shown in Figure 1–13.
Figure 1–13. Android development settings screen
Make sure USB debugging is enabled on this page. You may also want to enable support for staying awake at the same time, so you don’t have to continually log back into the phone each time it goes to sleep.
Figure 1–14. Finished Gesture Check application running on an Android mobile device
In case you are having trouble getting your Android phone to connect with your computer, here are some troubleshooting steps you can follow:
Make sure that your device has a USB connection to the computer. The notification area on your Android device will say that it is connected via USB when this is successful.
If you are not getting a USB connection, it could be an issue with drivers. Macintosh computers do not require drivers; however, on Windows you may need to install a special USB driver for your phone.
It could also be an issue with the connection to your computer. Try using a different cable or a different USB port.
If you have a USB connection, but device debugging is not working, you may need to change your USB connection mode on the Android device. Look for an option that says “Charge Mode” or “Disable Mass Storage.”
If you are still having problems, you should verify that your phone is in the list of supported devices for the release of Flash Builder you are using, and check with your manufacturer to make sure you have the correct drivers and settings.
Running Applications from the Command Line
In addition to running from within Flash Professional and Flash Builder, you can also launch your application from the command line using the AIR Debug Launcher (ADL). This is also how you would test your application if you were using Flex directly without tooling support.
To use ADL, you will have to download the Flex 4.5 SDK, which is a free download, or navigate to the sdks/4.5.0 folder of your Flash Builder installation. Make sure that the bin folder of the Flex SDK is in your path so you can invoke the ADL command line tool.
The syntax for the ADL tool is as follows:
adl ( runtime <runtimedir> )? ( pubid <pubid> )? nodebug? ( profile PROFILE )? ( -extdir <extensions-dir> )? ( -screensize SCREEN_SIZE )? <app-desc> <root-dir>? ( -- ... )?
ADL supports a number of optional arguments, most of which are optional. Here is a brief description of all the arguments, with the ones that are important for mobile development highlighted in bold:
runtime: Optional parameter to specify an alternate AIR runtime; by default the runtime that is contained within the SDK will be used.
pubid: Deprecated parameter for specifying the application ID; you should use the ID tag in the application descriptor instead.
nodebug: Disables debugging support, yielding a slight performance gain and application behavior that is closer to production
profile: The type of application you are debugging; for mobile
development, we will be using the mobileDevice profile. Here is the full list of values:
extdir: Optional directory for ActionScript extensions
screensize: The size of the application window, which can be one of the keywords listed in Table 1–3 or a string of this format:
<width>x<height>:<fullscreen width>x<fullscreen height> app-desc: This is the only required parameter for the ADL runtime, and should refer to the application descriptor of the AIR program you want to execute.
root-dir: By default ADL will make the root application directory the folder the application descriptor is stored in, but you can override it by setting this to another path.
(-- …): Finally, you can pass in parameters to your application by adding them after two dashes.
Table 1–3. Valid Screen Size Settings for ADL
Screen Size Keyword Normal Size Full-Screen Size
iPhone 320x460 320x480
iPhoneRetina 640x920 640x960
iPod 320x460 320x480
iPodRetina 640x920 640x960
iPad 768x1004 768x1024
Droid 480x816 480x854
NexusOne 480x762 480x800
SamsungGalaxyS 480x762 480x800
SamsungGalaxyTab 600x986 600x1024
QVGA 240x320 240x320
WQVGA 240x400 240x400
FWQVGA 240x432 240x432
HVGA 320x480 320x480
Screen Size Keyword Normal Size Full-Screen Size
FWVGA 480x854 480x854
1080 1080x1920 1080x1920
720 720x1080 720x1080
480 480x720 480x720
To run the Gesture Check application you developed earlier, navigate to the root project folder and execute the following command:
adl -profile mobileDevice -screensize Droid bin-debug/GestureCheck-app.xml
This will execute the Gesture Check application in the AIR Debug Launcher using a mobile profile and a screen size of the Motorola Droid. Since the Gesture Check
application does not have full-screen set to true in its application descriptor, the window size used by ADL will be 480x816.
Upon execution, you should get results identical to those shown in Figure 1–12, matching the earlier run you executed in Flash Builder.
Summary
It is an exciting time to get started with mobile development. The adoption of
smartphones, and in particular Android-based devices, is exponentially rising, and you can finally use modern development frameworks with full authoring tool support, such as Flash and Flex.
In the short span of this first chapter, you have already learned how to do the following: Create mobile applications using both Flash Professional and Flex Builder Run applications in the AIR Debug Launcher
Deploy and test on Android devices via a USB connection Use the Flash Builder debugger to diagnose your application
Test your application with different screen sizes from the command line
Chapter
Targeting Applications for
the Mobile Profile
Mobile devices are significantly resource-constrained when compared to their desktop brethren. Mobile processors are quickly catching up to the speed of yesterday’s desktops, but RAM and storage are still at a premium. At the same time, users expect mobile applications to start up instantaneously and be entirely fault-tolerant to hard or soft crashes at any time.
For example, to conserve memory resources, the Android OS can choose to kill a background application at any time. When the user accesses the application, it depends upon the last known Activity state to start it up. If the application takes longer than one second to relaunch, the delay will be noticeable to the user, who believes the application is still running in the background.
While a lot of the same concepts apply as in desktop application development, such as the tools and programming languages used, server communication protocols available, and controls and skins available for UI development, there are unique characteristics of mobile devices that affect the UI and application design, such as screen size, input methods, and deployment.
Many of the same constraints on space, footprint, and startup time have existed on the Web for quite a while. Flash browser applications are often expected to fit within a confined web page, download quickly, share limited computing resources, and start instantaneously. As a result, your existing Flash and Flex applications may be good candidates for porting to mobile. In this chapter, we will show you how to build applications that take full advantage of the Android mobile platform.
Screen Size
Android is an operating system and software stack, not a hardware platform. Google provides an open source platform that includes a modified Linux kernel and Java-based applications that can run on a variety of hardware platforms. However, they don’t control
the exact characteristics of the final devices on which Android runs. This means that the exact configuration of the devices varies greatly, and screen size is one area where there are a lot of variations in terms of resolution, physical size, and pixel density. Table 2–1 shows the screen characteristics of a variety of common Android devices that end users may run your applications on.
Table 2–1. Android Devices and Screen Characteristics
Device Name Manufacturer Resolution Size Density Type
HTC Dream/T-Mobile G1 HTC 320x480 3.2" 180ppi HVGA
HTC Hero HTC 320x480 3.2" 180ppi HVGA
Motorola Droid Motorola 480x854 3.7" 265ppi FWVGA
Google Nexus One HTC 480x800 3.7" 252ppi WVGA
Xperia X10 mini Sony Ericsson 240x320 2.55" 157ppi QVGA
Xperia X10 Sony Ericsson 480x854 4" 245ppi FWVGA
HTC Evo 4G HTC 480x800 4.3" 217ppi WVGA
Droid X Motorola 480x854 4.3" 228ppi FWVGA
Motorola ATRIX Motorola 540x960 4” 275ppi qHD
In Table 2–1, resolution is the number of physical pixels in the horizontal and vertical directions, size is the diagonal dimension of the screen, and density is the number of pixels per inch (ppi). Type gives you the common name for the screen resolution, which is one of the following:
QVGA (Quarter Video Graphics Array): 240x320 pixels or one quarter of the resolution of a VGA display (480x640)
HVGA (Half Video Graphics Array): 320x480 or half the resolution of a VGA display
WVGA (Wide Video Graphics Array): 480x800 with the same height as VGA, but 800 width (when viewed in landscape)
FWVGA (Full Wide Video Graphics Array): 480x854 with the same height as VGA, but a 16:9 ratio for displaying uncropped HD video
The usable area of your application will also be reduced by the height of the Android status bar. The height of the bar is 25 pixels on a medium-density display (such as the HTC Hero), 38 pixels on a high-density display (such as the Nexus One), or 50 pixels on an ultra-high-density display. This also changes when the display is switched from portrait to landscape mode. For example, the usable area of a Nexus One in portrait mode is 480x762, while in landscape mode it changes to 442x800.
You will likely have only one or two of these devices to test against, but this doesn't mean that your application can't support them all. Flash can automatically scale your application to fit the screen size, and it is very easy to get the screen resolution to modify your interface programmatically. Listing 2–1 shows how you can retrieve the screen resolution and density from ActionScript code.
Listing 2–1. Programmatic Screen Resolution and Density Capture var resY = Capabilities.screenResolutionX;
var resX = Capabilities.screenResolutionY; var dpi = Capabilities.screenDPI;
trace("Screen Resolution is " + resX + "x" + resY + " at " + dpi + "ppi");
Note: The terms dots per inch (dpi) and pixels per inch (ppi) are equivalent measures. These are used interchangeably throughout the ActionScript APIs.
Screen Resolution vs. Density
While application developers are more likely to focus on differences in screen resolution, screen density is equally important. Your application needs to be able to scale to larger or smaller devices so that text is still readable and targets are large enough to be manipulated. Figure 2–1 compares the physical size as well as the screen resolution of several handsets with different characteristics.
While the screen resolution of the Xperia X10 mini is minuscule compared to the Nexus One, the physical size of the screen is only 30% smaller. This means that all the
graphics in your user interface need to be scaled down significantly to fit on the screen. On the other hand, when building for the Xperia X10 mini, even small targets can easily be manipulated by the user since the pixels are so large. For a Nexus One, you need to make the targets much larger.
In a study done in 2006, researchers at the University of Oulu and in Maryland found that the minimum target size for manipulating a touchscreen using your thumb ranged from 9.2mm to 9.6mm.1
This is very helpful in determining how large to make hit targets in an Android user interface.
1
Pekka Parhi, Amy K. Karlson, and Benjamin B. Bederson, “Target size study for one-handed thumb use on small touchscreen devices”,
Figure 2–1. Physical size and resolution of several Android devices
For example, to allow for touch interaction, you would need to size your targets at 57 pixels wide on the Xperia X10 mini, or a whopping 92 pixels on the Nexus One. By sizing your UI to take density into account, you can ensure the UI is still usable while
maximizing the screen real estate of the active device.
Simulating Device-Independent Pixels in Flash
Android has a concept of device-independent pixels, which can be used to do layouts that will appear similar even if the physical size of the display is different. It is based on the reference platform of a 160 dpi screen, which translates to approximately one 13x13 pixel square per inch. If you specify an Android layout with device-independent pixels, the platform will automatically adjust based on the device your app is running on. Flash does not have a concept of device-independent pixels, but it is very easy to simulate in code. The basic formula is dips = pixels * (160 / density). Listing 2–2 demonstrates how you can calculate this in ActionScript.
Listing 2–2. ActionScript Function to Calculate Device-Independent Pixels (dips) function pixelsToDips(pixels:int) {
return pixels * (160 / Capabilities.screenDPI); }
trace("100 pixels = " + pixelsToDips(100) + " dips");
Nexus One
480 800
Nexus One
HTC Hero
HTC Hero
Xperia
X10 mini
3.7”
3.2”
2.55”
480
320
Xperia
X10 mini
320240
Screen Resolution
Physical Device Size
Using simulated device-independent pixels, you can reproduce similar layout behavior in your Flash application to that of a native Android application.
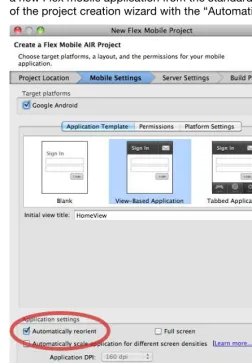
If you plan on scaling your application graphics based on the current device density, make sure that your application is not set to auto-resize to fill the screen or center content on rotation. More information about how to do this can be found in the section entitled “Automatic Orientation Flipping in Flash” found later in this chapter.
Density in Flex Applications
Flex has built-in support to scale the user interface of your application, including graphics, fonts, and controls. Rather than doing arbitrary scaling, it supports three discrete scale factors for common display densities. Table 2–2 lists all of the different display densities along with the mapped DPI range that is used to select a density for the current device.
Table 2–2. Flex Display Densities
Density DPI Mapped DPI Range Example Devices
Medium Density (mdpi) 160 Below 200 T-Mobile G1, Xperia X10 mini, HTC Hero
High Density (hdpi) 240 200 to 280 Motorola Droid, Google Nexus One, HTC Evo 4G
Extra High Density (xhdpi) 320 Above 280 N/A
To take advantage of the Flex density support, set the applicationDPI property on your Application object to the scale the application was originally designed for. At runtime your application will be automatically scaled based on the density of the device screen. An example of what your application descriptor should look like for a 240 dpi is included in Listing 2–3.
Listing 2–3. Application Descriptor to Set the applicationDPI
<s:ViewNavigatorApplication xmlns:fx="http://ns.adobe.com/mxml/2009"
xmlns:s="library://ns.adobe.com/flex/spark" firstView="views.MainHomeView" applicationDPI="240">
</s:ViewNavigatorApplication>
The only valid values for applicationDPI are the text strings of “160”, “240”, and “320”, corresponding to the three supported densities. The applicationDPI property can be set only via MXML.
Bitmap graphics will also be scaled, but may look blurry when scaled up or lose detail when scaled down. To ensure that your bitmaps are sized optimally for different densities, you can provide alternative images that will automatically be swapped in based on the display density by using the MultiDPIBitmapSource class.
Density Explorer Application
To better understand how density affects your Flex applications, we will guide you through the creation of the Density Explorer application. This application lets you input the application dpi and device dpi as parameters, and calculate the Flex-adjusted device density and scale factor that will be used on different devices.
To start, create a new Flex mobile project with the name “Density Explorer”, using the Mobile Application template. This will automatically generate a standard project
template that includes an Adobe AIR application descriptor (DensityExplorer-app.xml), a ViewNavigatorApplication (DensityExplorer.mxml), and an initial View
(DensityExplorerHomeView.mxml).
The first step is to open DensityExplorerHomeView.mxml and add in some controls that let you set the Author Density and the Device DPI. We will cover Flex controls in more detail in Chapter 5, but for this application a few labels, radio buttons, and a horizontal slider should be good enough.
Listing 2–4 shows the basic code to allow input of author density and device dpi using the RadioButton and HSlider classes.
Listing 2–4. Density Explorer Controls for applicationDPI and deviceDPI Entry <fx:Script>
<![CDATA[ [Bindable]
protected var applicationDPI:Number; [Bindable]
public var deviceDPI:Number; ]]>
</fx:Script>
<s:VGroup paddingTop="20" paddingLeft="15" paddingRight="15" paddingBottom="15" gap="20" width="100%" height="100%">
<s:Label text="Application DPI:"/> <s:HGroup gap="30">
<s:RadioButton id="ad160" content="160" click="applicationDPI = 160"/> <s:RadioButton id="ad240" content="240" click="applicationDPI = 240"/> <s:RadioButton id="ad320" content="320" click="applicationDPI = 320"/> </s:HGroup>
<s:Label text="Device DPI: {deviceDPI}"/>
<s:HSlider id="dpiSlider" minimum="130" maximum="320" value="@{deviceDPI}" width="100%"/>
</s:VGroup>
The RadioButtons are wired up to applicationDPI using a simple click handler. A bi-directional data binding expression (prefixed by the @ operator) is used to update the value of dpi when the slider changes. To complete this portion of the UI, the Device DPI text contains a bound reference to dpi so you can see the value of the slider as it changes.
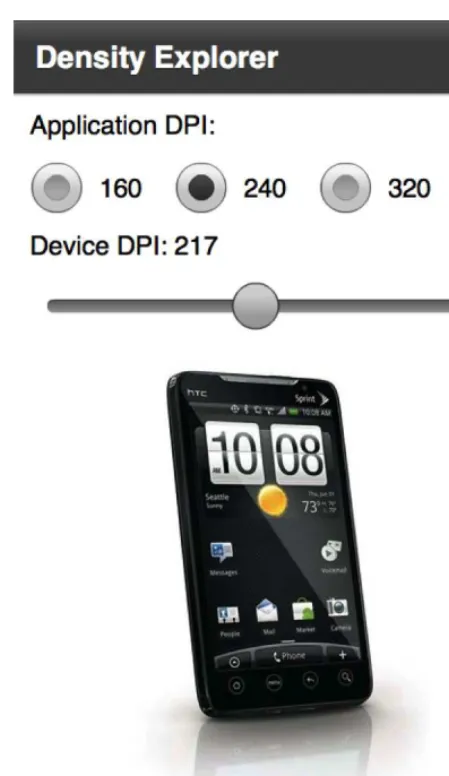
Running this will give you a simple Flex application, as shown in Figure 2–2. You can validate the functionality by moving the slider, which will update the deviceDPI setting.
Figure 2–2. Density Explorer part 1: basic controls
The goal of this application is to calculate the adjusted device density and scale factor that Flex will use. Fortunately, there is a new Flex 4.5 API that exposes this information via ActionScript. The class that we need to invoke is called DensityUtil and can be found in the mx.utils package. DensityUtil has two static methods with the following signatures:
getRuntimeDPI():Number: This function returns the applicationDPI if set, otherwise the current runtime DPI classification of the application; it will always return one of the following values: 160, 240, or 320. getDPIScale(sourceDPI:Number, targetDPI:Number):Number: This function calculates the scale that will be used by Flex given an application DPI (source) and a device DPI (target).
In addition to these functions, we also need to know the current applicationDPI and device dpi values so we can populate the initial values of the UI controls. These can be queried via the following APIs:
Making use of these APIs, we can augment the previous code to add in initialization logic and a readout of density and scale. Listing 2–5 shows the updated code with new additions in bold.
Listing 2–5. Updated Density Explorer Code with Initialization and Output <?xml version="1.0" encoding="utf-8"?>
<s:View xmlns:fx="http://ns.adobe.com/mxml/2009" xmlns:mx="library://ns.adobe.com/flex/mx" xmlns:s="library://ns.adobe.com/flex/spark" title="Density Explorer" initialize="init()"> <fx:Script>
<![CDATA[
import mx.binding.utils.BindingUtils; import mx.utils.DensityUtil;
[Bindable]
protected var applicationDPI:Number; [Bindable]
public var deviceDPI:Number; [Bindable]
protected var dpiClassification:Number;
protected function updateDensity(dpi:Number):void {
dpiClassification = dpi < 200 ? 160 : dpi >= 280 ? 320 : 240; }
protected function init():void {
applicationDPI = parentApplication.applicationDPI; if (applicationDPI != null) {
this["ad" + applicationDPI].selected = true; }
BindingUtils.bindSetter(updateDensity, this, "deviceDPI"); deviceDPI = Capabilities.screenDPI;
} ]]> </fx:Script>
<s:VGroup paddingTop="20" paddingLeft="15" paddingRight="15" paddingBottom="15" gap="20" width="100%" height="100%">
<s:Label text="Application DPI:"/> <s:HGroup gap="30">
<s:RadioButton id="ad160" content="160" click="applicationDPI = 160"/> <s:RadioButton id="ad240" content="240" click="applicationDPI = 240"/> <s:RadioButton id="ad320" content="320" click="applicationDPI = 320"/> </s:HGroup>
<s:Label text="Device DPI: {dpi}"/>
<s:HSlider id="dpiSlider" minimum="130" maximum="320" value="@{deviceDPI}" width="100%"/>
<s:Group width="100%" height="100%">
<s:BorderContainer bottom="0" minHeight="0" width="100%" borderStyle="inset" backgroundColor="#d0d0d0" borderColor="#888888" backgroundAlpha=".6"> <s:layout>
<s:VerticalLayout gap="10" paddingLeft="10" paddingRight="10" paddingTop="10" paddingBottom="10"/>
</s:layout>
<s:Label text="Adjusted Device Density: {dpiClassification}"/>
</s:Group> </s:VGroup> </s:View>
Initialization is performed inside a method called by View.initialize to ensure that all values are available. The applicationDPI is updated first from the parentApplication object, and the correct RadioButton is selected by performing an ID lookup on the returned string. Next the dpi is set from the Capabilities object. To ensure that all updates to dpi from both the initial value assignment and subsequent updates to the slider will recalculate the deviceDensity, a bind setter is configured to fire on all updates to dpi.
In order to display the current values of deviceDensity and the calculated scale, a BorderContainer with a few Labels is added to the end of the View. By using a BorderContainer as the surrounding group, it is easy to change the style to make the outputs visually distinct from the inputs.
The final touch is to add an extra group that will fade in device pictures as the dpi setting is updated. To ensure that the images are optimally scaled for different density displays, we make use of a MultiDPIBimapSource that refers to different pre-scaled artifacts. This code is shown in Listing 2–6.
Listing 2–6. MXML Code for Displaying Representative Device Images Using a MultiDPIBitmapSource <s:Group id="phones" width="100%" height="100%">
<s:Image alpha="{1-Math.abs(deviceDPI-157)/20}" horizontalCenter="0"> <s:source>
<s:MultiDPIBitmapSource
source160dpi="@Embed('assets/xperia-x10-mini160.jpg')" source240dpi="@Embed('assets/xperia-x10-mini240.jpg')" source320dpi="@Embed('assets/xperia-x10-mini320.jpg')" /> </s:source>
</s:Image>
<s:Image alpha="{1-Math.abs(deviceDPI-180)/20}" horizontalCenter="0"> <s:source>
<s:MultiDPIBitmapSource
source160dpi="@Embed('assets/htc-hero160.jpg')" source240dpi="@Embed('assets/htc-hero240.jpg')" source320dpi="@Embed('assets/htc-hero320.jpg')" /> </s:source>
</s:Image>
<s:Image alpha="{1-Math.abs(deviceDPI-217)/20}" horizontalCenter="0"> <s:source>
<s:MultiDPIBitmapSource
source160dpi="@Embed('assets/htc-evo-4g160.jpg')" source240dpi="@Embed('assets/htc-evo-4g240.jpg')" source320dpi="@Embed('assets/htc-evo-4g320.jpg')" /> </s:source>
</s:Image>
<s:Image alpha="{1-Math.abs(deviceDPI-252)/20}" horizontalCenter="0"> <s:source>
<s:MultiDPIBitmapSource
</s:Image>
<s:Image alpha="{1-Math.abs(deviceDPI-275)/20}" horizontalCenter="0"> <s:source>
<s:MultiDPIBitmapSource
source160dpi="@Embed('assets/atrix160.jpg')" source240dpi="@Embed('assets/atrix240.jpg')" source320dpi="@Embed('assets/atrix320.jpg')" /> </s:source>
</s:Image> </s:Group>
All of the pictures chosen are scaled versions of standard press images for the phones. In order to fade the devices in slowly as the dpi value is approached, a simple
mathematical formula is applied to alpha: 1-Math.abs(deviceDPI-{physicalDPI})/{threshold}
For each of the phones, the actual dpi is substituted for the physicalDPI for that device, and the threshold is set to a value low enough that there will not be two phones
overlapping for the target dpi value. For the devices selected, a threshold of 20 is lower than the difference between any of the phone dpi values.
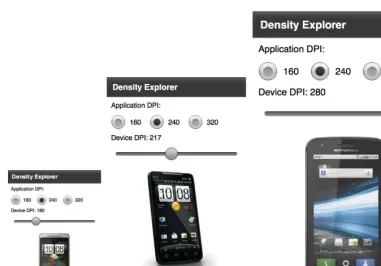
The finished Density Explorer application is shown in Figure 2–3. This is a good
Figure 2–3. Completed Density Explorer application
Figure 2–4. Side-by-side comparison of the Density Explorer when run on a device classified as 160 dpi (left), 240 dpi (center), and 320 dpi (right)
Density Support in CSS
While the applicationDPI setting in Flex gives you a simple mechanism to write your application for one density and let Flex take care of the resizing, it doesn’t give you fine-grained control over the precise layout and style of your application when viewed on different devices. Setting applicationDPI to a constant works fine for simple
applications, but as the complexity of the UI increases this is often not good enough. This is where CSS media queries come in.
Flex media queries let you exercise fine-grained control over the styles on different devices from within your CSS. They are based on the W3C CSS Media Query Candidate Recommendation,2
but contain only a subset of the functionality that is most relevant to Flex and mobile applications.
There are two types of selectors supported in Flex. The first type lets you choose the style based on the device type. The code in Listing 2–7 demonstrates how you can change the font color based on the type of device you are running on.
Listing 2–7. Code Sample Demonstrating a Media Selector for Devices
Adding this style sheet to your application will turn the color of all Labels to blue or red, depending on the mobile platform you are running on. However, when running as a desktop application, this will have no effect.
The second type of selector lets you change the style based on the application dpi. The valid values to match against are the standard Flex densities of 160, 240, and 320. Using a dpi selector lets you fine-tune the layout and fonts, or even substitute images for different density displays.
IMPORTANT: In order to use CSS media selectors, you need to ensure that you have not set the applicationDPI property on your mobile application class.
To demonstrate the use of a dpi selector, we will update the Density Explorer example to make use of a style sheet to substitute the images rather than embedding it in the code with the MultiDPIBitmapSource. The simplified application code for the application images is shown in Listing 2–8.
Listing 2–8. Updated DensityExplorer Code for Integration CSS Media Queries <s:Group id="phones" width="100%" height="100%">
<s:Image alpha="{1-Math.abs(deviceDPI-157)/20}" horizontalCenter="0" source="{phones.getStyle('xperiaX10Mini')}"/>
<s:Image alpha="{1-Math.abs(deviceDPI-180)/20}" horizontalCenter="0" source="{phones.getStyle('htcHero')}"/>
<s:Image alpha="{1-Math.abs(deviceDPI-217)/20}" horizontalCenter="0" source="{phones.getStyle('htcEvo4g')}"/>
<s:Image alpha="{1-Math.abs(deviceDPI-252)/20}" horizontalCenter="0" source="{phones.getStyle('nexusOne')}"/>
<s:Image alpha="{1-Math.abs(deviceDPI-275)/20}" horizontalCenter="0" source="{phones.getStyle('atrix')}"/>
</s:Group>