• • Nice to meet you — get the lowdown on which Surface is right
for you, how to set up your new tablet, and get acquainted with typing, touch, and drawing on your Surface
• Let’s get connected — connect to the Internet, printers, monitors, storage, and more, plus get a complete overview of Surface apps • Go play — start playing with Surface, from listening to music
and watching movies to playing games and taking photos • Get to work — be productive with Surface with a complete
overview of the Windows Desktop and Microsoft Office • And another thing — get even more information about your
great tablet with tips on additional accessories, step-by-step guides to troubleshooting issues, and more
Bestselling author of
Windows
®For Dummies
®Learn to:
•
Navigate the Surface interface
•
Choose which Surface model best fits
your needs
•
Have fun with music, photos,
and movies
•
Work with Microsoft Office
on your Surface
Microsoft
®
Start with
FREE
Cheat Sheets
Cheat Sheets include
• Checklists
• Charts
• Common Instructions
• And Other Good Stuff!
Get Smart at Dummies.com
Dummies.com makes your life easier with 1,000s
of answers on everything from removing wallpaper
to using the latest version of Windows.
Check out our
• Videos
• Illustrated Articles
• Step-by-Step Instructions
Plus, each month you can win valuable prizes by entering
our Dummies.com sweepstakes. *
Want a weekly dose of Dummies? Sign up for Newsletters on
• Digital Photography
• Microsoft Windows & Office
• Personal Finance & Investing
• Health & Wellness
• Computing, iPods & Cell Phones
• eBay
• Internet
• Food, Home & Garden
Find out “HOW” at Dummies.com
*Sweepstakes not currently available in all countries; visit Dummies.com for official rules.
To access the Cheat Sheet created specifically for this book, go to
Surface
™
Surface
™
2nd Edition
Published simultaneously in Canada
No part of this publication may be reproduced, stored in a retrieval system or transmitted in any form or by any means, electronic, mechanical, photocopying, recording, scanning or otherwise, except as permitted under Sections 107 or 108 of the 1976 United States Copyright Act, without the prior written permission of the Publisher. Requests to the Publisher for permission should be addressed to the Permissions Department, John Wiley & Sons, Inc., 111 River Street, Hoboken, NJ 07030, (201) 748-6011, fax (201) 748-6008, or online at
http://www.wiley.com/go/permissions.
Trademarks: Wiley, For Dummies, the Dummies Man logo, Dummies.com, Making Everything Easier, and related trade dress are trademarks or registered trademarks of John Wiley & Sons, Inc. and may not be used without written permission. Microsoft and Surface are trademarks or registered trademarks of the Microsoft Corporation. All other trademarks are the property of their respective owners. John Wiley & Sons, Inc. is not associated with any product or vendor mentioned in this book.
LIMIT OF LIABILITY/DISCLAIMER OF WARRANTY: THE PUBLISHER AND THE AUTHOR MAKE NO REPRESENTATIONS OR WARRANTIES WITH RESPECT TO THE ACCURACY OR COMPLETENESS OF THE CONTENTS OF THIS WORK AND SPECIFICALLY DISCLAIM ALL WARRANTIES, INCLUDING WITHOUT LIMITATION WARRANTIES OF FITNESS FOR A PARTICULAR PURPOSE. NO WARRANTY MAY BE CREATED OR EXTENDED BY SALES OR PROMOTIONAL MATERIALS. THE ADVICE AND STRATEGIES CONTAINED HEREIN MAY NOT BE SUITABLE FOR EVERY SITUATION. THIS WORK IS SOLD WITH THE UNDERSTANDING THAT THE PUBLISHER IS NOT ENGAGED IN RENDERING LEGAL, ACCOUNTING, OR OTHER PROFESSIONAL SERVICES. IF PROFESSIONAL ASSISTANCE IS REQUIRED, THE SERVICES OF A COMPETENT PROFESSIONAL PERSON SHOULD BE SOUGHT. NEITHER THE PUBLISHER NOR THE AUTHOR SHALL BE LIABLE FOR DAMAGES ARISING HEREFROM. THE FACT THAT AN ORGANIZATION OR WEBSITE IS REFERRED TO IN THIS WORK AS A CITATION AND/OR A POTENTIAL SOURCE OF FURTHER INFORMATION DOES NOT MEAN THAT THE AUTHOR OR THE PUBLISHER ENDORSES THE INFORMATION THE ORGANIZATION OR WEBSITE MAY PROVIDE OR RECOMMENDATIONS IT MAY MAKE. FURTHER, READERS SHOULD BE AWARE THAT INTERNET WEBSITES LISTED IN THIS WORK MAY HAVE CHANGED OR DISAPPEARED BETWEEN WHEN THIS WORK WAS WRITTEN AND WHEN IT IS READ.
For general information on our other products and services, please contact our Customer Care Department within the U.S. at 877-762-2974, outside the U.S. at 317-572-3993, or fax 317-572-4002. For technical support, please visit www.wiley.com/techsupport.
Wiley publishes in a variety of print and electronic formats and by print-on-demand. Some material included with standard print versions of this book may not be included in e-books or in print-on-demand. If this book refers to media such as a CD or DVD that is not included in the version you purchased, you may download this material at http://booksupport.wiley.com. For more information about Wiley products, visit
www.wiley.com.
Library of Congress Control Number: 2014931351
ISBN 978-1-111-89863-5 (pbk); ISBN 978-1-118-91661-2 (ebk); ISBN 978-1-118-89875-8 (ebk) Manufactured in the United States of America
Introduction ... 1
Part I: Introductions ... 5
Chapter 1: Which Microsoft Surface Do You Need? ... 7
Chapter 2: Getting Started with Your Surface ... 21
Chapter 3: Setting Up Your Surface ... 35
Chapter 4: Introducing Your Surface’s Start Screen and Controls ... 51
Chapter 5: Typing, Touching, and Drawing on the Surface ... 77
Part II: Connections ... 101
Chapter 6: Connecting to the Internet, Printers, Monitors, Storage, and More... 103
Chapter 7: All About Apps ... 139
Chapter 8: Browsing the Web ... 157
Chapter 9: Reaching Out with Mail, People, Calendar, and Skype ... 175
Part III: Play ... 205
Chapter 10: Photos and Movies ... 207
Chapter 11: Listening to Music ... 219
Part IV: Work ... 233
Chapter 12: Visiting the Windows Desktop ... 235
Chapter 13: Working in Microsoft Office 2013 ... 251
Chapter 14: Changing Set tings ... 267
Chapter 15: Troubleshooting and Repair ... 279
Part V: The Part of Tens ... 291
Chapter 16: Ten Essential Tips ’n’ Tricks ... 293
Chapter 17: Ten Handy Accessories... 299
Introduction ... 1
About This Book ... 1
How to Use This Book ... 2
Foolish Assumptions ... 2
Icons Used in This Book ... 3
Beyond This Book ... 3
Where to Go from Here ... 4
Part I: Introductions ... 5
Chapter 1: Which Microsoft Surface Do You Need? . . . . 7
Why Buy a Microsoft Surface? ... 8
Understanding the Unique Features of a Surface ... 9
Deciding between the Microsoft Surface Tablets ... 10
Surface 2 ... 11
Surface Pro 2... 12
Summing Up the Differences between the Versions ... 14
Identifying a Surface Model ... 17
Understanding Your Surface’s Storage Space ... 18
Chapter 2: Getting Started with Your Surface . . . . 21
The Grand Unboxing ... 21
Charging the Battery ... 24
Figuring Out What’s Included and What’s Missing ... 26
Identifying the Parts of Your Surface Tablet ... 27
Attaching the Keyboard ... 32
Positioning the Surface ... 33
Finding Microsoft Website Support for the Surface ... 33
Chapter 3: Setting Up Your Surface . . . . 35
Turning On Your Surface for the First Time ... 35
Downloading Software Updates ... 40
Activating Windows ... 43
Setting Up Your Free OneDrive and Skype Accounts ... 45
Setting Up User Accounts ... 45
Chapter 4: Introducing Your Surface’s Start
Screen and Controls . . . . 51
Unlocking and Signing In ... 51
Managing Windows’ Start Screen ... 53
Finding, Opening, Closing, and Switching between Apps ... 55
Finding and opening an app ... 55
Closing an app ... 57
Switching between apps ... 58
Installing and uninstalling an app ... 59
Understanding the Charms Bar ... 60
Search ... 61
Share ... 63
Start ... 64
Devices ... 64
Settings ... 65
Organizing the Start Screen ... 67
Browsing Files from the Start Screen ... 71
Using the Start Screen with a Mouse and Keyboard ... 73
Chapter 5: Typing, Touching, and Drawing on the Surface . . . . 77
Controlling a Touchscreen with Your Fingers ... 78
Tap ... 78
Double-tap... 78
Press and hold ... 79
Pinch and/or stretch ... 79
Rotate ... 80
Slide ... 80
Swipe ... 80
Typing with the Click-On Covers ... 81
Typing on the Touch Cover keyboard ... 82
Typing on the Type Cover keyboard ... 84
Using Surface trackpad gestures ... 85
Typing on the Onscreen Keyboard ... 86
Summoning the onscreen keyboard ... 87
Switching between the different onscreen keyboards ... 89
Typing special characters ... 91
Typing smileys (emoticons) ... 92
Predictive typing ... 93
Editing text on a touchscreen ... 94
Typing on a Detachable Keyboard ... 95
Drawing and Writing with a Stylus ... 96
Opening the Handwriting panel ... 96
Part II: Connections ... 101
Chapter 6: Connecting to the Internet, Printers,
Monitors, Storage, and More . . . . 103
Connecting to the Internet ... 104
Connecting to Networked PCs ... 109
Connecting to a Printer ... 112
Connecting to Portable Accessories ... 114
Connecting a mouse or keyboard ... 115
Connecting Bluetooth accessories ... 116
Connecting a digital camera and importing your photos ... 117
Connecting to a scanner ... 121
Connecting to a Monitor, an HDTV, or a Digital Projector ... 124
Connecting your Surface to a monitor ... 124
Sending the display to the attached monitor ... 126
Making your monitor recognize your Surface ... 128
Adding Portable Storage ... 128
Connecting to built-in memory cards... 129
Connecting to portable hard drives ... 130
Connecting to flash drives for file transfers ... 131
Connecting to the Cloud with OneDrive ... 132
Uploading files from your Surface to OneDrive ... 133
Making OneDrive files available offline ... 135
Chapter 7: All About Apps . . . . 139
Making the Most of Apps ... 140
Customizing apps to meet your needs ... 143
Organizing your apps ... 145
Downloading new apps from the Windows Store ... 146
Uninstalling or changing an app ... 150
Working with Two Apps on One Screen ... 152
Installing Desktop Programs ... 155
Chapter 8: Browsing the Web . . . . 157
Opening Internet Explorer ... 158
Opening the Start Screen’s Internet Explorer app ... 158
Opening the desktop’s Internet Explorer ... 159
Opening the Start Screen Browser’s Menus ... 160
Navigating a Website with Your Fingers ... 163
Visiting Websites ... 164
Managing Several Sites in Tabs ... 165
Making Sites Available with One Tap ... 166
Sharing Sites and Their Information ... 167
Downloading Files and Photos ... 168
Chapter 9: Reaching Out with Mail, People, Calendar,
and Skype . . . . 175
Adding Your Social Accounts to Windows ... 176
Sending and Receiving E-Mail ... 178
Switching between the Mail app’s accounts, folders, and e-mail ... 180
Composing and sending an e-mail ... 182
Reading an e-mail ... 184
Sending and receiving files through e-mail... 186
Managing Your Contacts in the People App ... 189
Adding contacts to the People app ... 191
Deleting or editing contacts ... 193
Managing Appointments in Calendar ... 194
Talking with Friends through Skype ... 196
Setting up Skype for the first time ... 197
Adding a friend to Skype ... 200
Calling a friend ... 201
Calling a landline ... 202
Part III: Play ... 205
Chapter 10: Photos and Movies . . . . 207
Snapping Photos or Videos ... 207
Viewing Photos ... 211
Sharing or Printing Photos ... 214
Watching Movies ... 215
Chapter 11: Listening to Music . . . . 219
Understanding the Music App ... 219
Listing to Your Own Music ... 221
Adding your own music to the Music app ... 221
Playing your music in the Music app ... 225
Listening to the Radio ... 228
Exploring and Buying Music ... 231
Part IV: Work ... 233
Chapter 12: Visiting the Windows Desktop . . . . 235
Making the Desktop Finger-Friendly ... 237
Managing Files and Folders by Touch with File Explorer ... 239
Selecting files and folders with a fingertip ... 241
Copying or moving files and folders ... 243
Launching Desktop Programs ... 245
Snapping an App Alongside Another App ... 246
Chapter 13: Working in Microsoft Office 2013 . . . . 251
Opening, Saving, and Printing in Office 2013 RT ... 252
Opening a document ... 252
Starting from a template ... 256
Saving your work ... 258
Printing your document ... 260
Taking Notes with OneNote ... 261
Adding E-Mail Accounts to Outlook ... 263
Chapter 14: Changing Set tings . . . . 267
Tweaking an App’s Settings ... 267
Customizing Your Surface through PC Settings ... 269
PCs and Devices ... 270
Accounts ... 272
OneDrive ... 273
Search and Apps ... 274
Privacy... 275
Network ... 276
Time and Language ... 277
Ease of Access ... 277
Update and Recovery ... 277
Chapter 15: Troubleshooting and Repair . . . . 279
Checking for New or Missed Updates ... 279
It Won’t Turn On! ... 281
It Won’t Turn Off! ... 283
Fixing Problem Apps ... 283
Backing Up Your Surface ... 284
Refreshing Your Surface ... 286
Resetting Your Surface ... 287
Servicing Your Surface through Microsoft ... 289
Part V: The Part of Tens ... 291
Chapter 16: Ten Essential Tips ’n’ Tricks . . . . 293
When Lost, Swipe in from the Screen’s Left Edge ... 293
Search for Items by Typing Directly on the Start Screen ... 294
Take Screenshots ... 295
Stop the Screen from Rotating ... 295
Tweak Your App’s Settings ... 296
Make a Recovery Drive ... 296
Find a Lost Start Screen App ... 296
Increase Your Surface’s Storage Space ... 297
Add Your Contact Information to Your Surface ... 298
Chapter 17: Ten Handy Accessories . . . . 299
Power Adapter ... 299
Touch or Type Cover Keyboard ... 300
Memory Card ... 301
Portable Mouse ... 301
Portable USB Hub ... 302
Case ... 303
Flash Drive ... 303
Portable HDMI Cable ... 304
USB-to-Ethernet Adapter ... 305
Portable Hard Drive ... 305
Portable Car Charger ... 305
W
elcome to Surface For Dummies, 2nd Edition! This book helps you wring the most out of Microsoft’s Surface, the combination work/ pleasure tablets that turn heads in coffee shops, classrooms, and lunch rooms.This book doesn’t explain everything you can do with the Surface. That would take at least ten volumes. No, this book explains everything you need to know to set up your Surface, introduce it to yourself and your social networks, and transform it into a natural extension of your lifestyle and work routine.
This book covers all four Surface models: the original Surface RT and Surface Pro, and the newer Surface 2 and the Surface Pro 2 models. It also covers more Official Surface Accessories than anybody could possibly afford.
About This Book
Today, most people think of desktop PCs as workhorses for creating: They create documents, spreadsheets, and whatever other boring files their boss requires. And they usually require a mouse and keyboard.
Tablets, by contrast, work best at letting you consume: videos, music, the Internet, and e-mail. And you often do it on the couch by using your fingertips. But what if one tablet straddled both worlds, letting you both consume and create?
How to Use This Book
Instead of bundling a user manual with the Surface, Microsoft tossed in a single strip of paper with Ikea-like diagrams of how to fold down your Surface’s kickstand. That’s it.
This book takes over from that ignoble start by explaining exactly what you can and can’t do with your Surface. And when it points out things you can’t
do, it offers some workarounds for going ahead and doing them anyway. The book comes separated into basic parts, each dealing with what you need to do with your Surface at certain times: setting it up, connecting it to things, letting it entertain you, and buckling it down when work beckons.
Jump to the section you need at that particular moment in your life, absorb what you need to know, and move on. There’s no need to read the entire thing from cover to cover. Everything is presented in easily digestible nuggets. Each of this book’s step-by-step instructions works with a strategically placed tap on your Surface’s touchscreen. On those rare occasions when you need to type information on a keyboard, you see easy-to-follow bold text like in this sentence: Type Sarcophagus into the Search box.
If you’re reading this book as an e-book, you’ll find that all the websites are listed as active links, ready to direct you to the page with a tap of your finger.
Foolish Assumptions
Because you’ve purchased this book, I’m making one logical assumption about you: You’ve bought a Microsoft Surface tablet, or you’re thinking about buying one.
So, you should know that everything in this book covers all four models of Microsoft’s Surface tablet:
✓ The original Surface RT and the Surface Pro: After you’ve taken advan-tage of their free upgrade to Windows 8.1, all the instructions in this book apply to them.
✓ The new Surface 2 and the Surface Pro 2: These two new models come with Windows 8.1 installed.
I also cover the Surface’s famous click-on Touch and Type Cover keyboards, as well as their replacements, the new Touch Cover 2 and Type Cover 2 key-boards. Because they’re functionally the same, I refer to them both as simply Touch and Type Cover keyboards.
Icons Used in This Book
This book includes five basic icons, little symbols placed next to paragraphs of particular import. Here’s what to expect when you see any of these icons: Keep an eye out for this icon, which alerts you to time-saving tricks that imme-diately leapfrog you ahead of other Surface owners.
Avert your eyes from paragraphs marked with this icon if technical informa-tion isn’t your thing — the text contains details that appeal to only a few nerdy souls.
Remember these few key tidbits, and you’ll pick up things much more quickly.
Tread carefully with the steps in this paragraph. The information may lead to serious problems if things go wrong.
The Surface 2 and the Surface RT (when upgraded) run Windows 8.1 RT. That means they differ from the Surface Pro and Surface Pro 2 in some fundamental ways. This icon calls out information that explains those differences.
Beyond This Book
The Microsoft Surface has so many cool features that I couldn’t fit them all into this book. You can find additional content at the following places:
✓ Extras: Visit here for step-by-step tutorials on how to play songs directly from a flash drive, as well as how to drop websites onto the Reading List app for later reading at your leisure.
www.dummies.com/extras/surface
Where to Go from Here
New Surface owners should definitely start with a read-through of the first four chapters, with a special emphasis on Chapter 3. The walkthrough steps in there apply not only to you but to everybody with an account on your Surface.
If you don’t have an attached keyboard, spend some time with Chapter 5; that chapter explains the subtleties of your Surface’s built-in keyboard, which pops up when no other keyboard is attached.
Gadget hounds should jump to Part II to see exactly what will and won’t work with their particular Surface models, as well as how to set up their apps and social networks.
After that, jump to your choice: the Play (Chapters 10 and 11) or Work (Chapters 12 through 14) part of the book.
If you’re reading this as an e-book, use your reader’s Bookmark and Search features to find what you want.
Introductions
instruc-✓ Find out why you should consider buying a Surface and which of the four models best meets your needs.
✓ Recognize each Surface model and identify the various but-tons, ports, and sensors.
✓ Discover how to attach a keyboard and charge the battery.
✓ Turn on your Surface for the first time and set it up for your language.
Which Microsoft Surface
Do You Need?
In This Chapter
▶ Choosing between a Microsoft Surface and other tablets
▶ Selecting the right Microsoft Surface
▶ Understanding the difference between the regular and pro Surface models
▶ Identifying the different Surface models
▶ Understanding your Surface’s storage space
M
any people stay tied to a desktop PC at work. They sit in front of a deskbound workhorse that lets them create documents, spreadsheets, and whatever other humdrum files their boss requires that day.When it’s time to relax, however, many of those same people reach for a tablet. Lightweight and portable, tablets make it easy to watch videos, listen to music, browse the web, and check e-mail.
But what if you had a tablet that did it all? You could create files when work called but consume files during your leisure.
That’s the promise of a Microsoft Surface tablet. Its finger-friendly Start screen lets you switch between videos, music, e-books, e-mail, and the web. And, come Monday morning, you can switch to the Windows desktop, fire up Outlook, Word, Excel, or PowerPoint, and get to work.
Why Buy a Microsoft Surface?
Most computer manufacturers create computers, including Windows tablets, as cheaply as possible. By coming up with the lowest price tag, they hope to undercut their competitors. Instead of taking the same road to the bottom, Microsoft created its line of Surface tablets as a showpiece, designed to show off Windows tablets at their finest.
To do that, Microsoft designed the Surface in-house with a large budget and engineering team, a luxury not available to most computer manufacturers. Competitors cut costs by wrapping their tablets in cheap plastic. Microsoft Surface models, by contrast, come sheathed in a magnesium alloy. The rugged but lightweight casing gives the tablet a solid feel.
The Surface includes a built-in kickstand, shown in Figure 1-1. An optional attachable keyboard doubles as a cover when not in use.
Figure 1-1:
Every Surface model includes a kickstand to prop it up at a comfort-able viewing angle.
Photo image provided by Microsoft
When iPad owners need to work, they usually reach for their laptop. Surface owners simply flip their keyboard into place, load the familiar Windows desk-top, and head for the mainstays of Microsoft Office: Word, PowerPoint, Excel, and OneNote.
When you’re ready to hit the road again, flip back the keyboard and run, taking all of your files with you.
Your Surface strips computing down to its essentials, creating a lightweight and mobile workstation that lets you add on accessories when necessary:
✓ Fingers: Your fingertips may be the only accessory you need. Touchscreens simplify many mobile computing tasks. It’s easy to scroll through large documents with a flick of your finger, for example. Plus, touchscreens often seem more natural, especially when paging through digital books, maneuvering through maps, or resizing digital photos.
✓ Keyboard: A pop-up touchscreen keyboard works well for light typing. For heavier work, the optional keyboards add about a half-pound of weight and double as screen covers.
✓ Monitor: When you plug a monitor into your tablet’s video port, you’ve created a two-monitor workstation. You can view your notes on your tablet but compose your document on the second, larger monitor. (I explain how to manage two monitors in Chapter 6.) Or, you can extend your Windows desktop across both monitors, doubling its size.
Understanding the Unique
Features of a Surface
Microsoft Surface tablets introduce several features not found in other tablets:
✓ Kickstand: Place a tablet on the desk, and its screen faces the ceiling, not you. To solve the problem, each Surface includes a built-in kickstand that lets your tablet sit upright like a laptop’s screen. The kickstand on the newest models, the Surface 2 and Surface Pro 2, adjusts to provide two viewing angles, handy for typing in different situations.
✓ USB port/memory card slot: These items come built into every Surface tablet, but you won’t find them on any iPad. Ask any iPad owners how they move information to and from their iPad. Most of them get an uncom-fortable expression on their faces while explaining their workarounds.
✓ Windows desktop: Nearly everybody has grown fairly used to the Windows desktop, a staple around offices for two decades. All Surfaces include the Windows desktop, but with one caveat: You can’t install tra-ditional desktop programs on the Surface RT or Surface 2.
✓ Microsoft Office: The Surface RT and Surface 2 include a copy of Office Home and Student 2013 RT. That gives you Outlook, Word, Excel, PowerPoint, and OneNote, ready to create your own documents or touch up those that arrive in e-mail. (Microsoft Office isn’t included on a Surface Pro or Surface Pro 2, but you can purchase and install it yourself if you want.)
Deciding between the Microsoft
Surface Tablets
Microsoft has sold four types of Surface tablets that look and behave very similarly. (A fifth Surface, available sometime in 2014, will have cellular Internet access.) All of them share many features:
✓ The tile-filled Start screen introduced in Windows 8
✓ The Windows desktop
✓ Downloadable apps from the Windows Store
✓ A USB port and memory card slot for adding storage
✓ The ability to create different accounts for different users
Yet the tablets differ in subtle ways that let them each serve different niches. The following sections explain how the models differ so that you can figure out which Surface meets your needs.
Not sure which Surface you’re looking at? Look for this chapter’s “Identifying a Surface Model” section. It explains how to tell each model apart simply by flipping it over and reading the wording hidden on the back cover.
Surface 2
The Surface 2 works best during your leisure time, letting you watch movies, listen to music, browse the web, and connect with your friends.
Should you need to work, open the Desktop app. There, the built-in Microsoft Outlook, Word, Excel, PowerPoint, and OneNote apps should carry you through until you can get back to the office.
The minimalist Surface 2 doesn’t run Windows 8.1 but an operating system called Windows RT 8.1. In plain English, that means that the Surface 2 can’t run traditional Windows desktop programs. Like the iPad, it’s limited to apps,
small programs downloaded from the Windows Store.
Although it can’t run traditional Windows programs, the Surface 2 offers these perks:
✓ Low price: The Surface 2 comes in a 32GB version that costs $429; adding a Touch Cover keyboard adds another $79. (The newer Surface keyboards cost more, and I describe the differences between all of the Surface keyboards in Chapter 5.)
Upgrading first-generation
Surfaces to Windows 8 .1
Microsoft’s first two Surface models, the Surface RT and the Surface Pro, didn’t fare well in the market. The Surface RT boasted a long battery life but ran at a fairly sluggish pace. The Surface Pro was speedy and powerful but lacked a long battery life. And Windows 8 was too new to gather much enthusiasm.
Microsoft replaced the two older Surface models with the much more capable Surface 2 and Surface Pro 2.
If you own the Surface RT or Surface Pro, by all means, take advantage of Microsoft’s free upgrade to Windows 8.1. To upgrade, visit the Store app with your Surface (as explained in Chapter 7), search for Windows 8.1, and choose to download and install the upgrade.
✓ Thin and light: The Surface 2 weighs less than 1.5 pounds and is 8.9mm thin. That makes it easy to toss into a backpack or keep by the bedside table.
✓ Better camera: The Surface 2 sports a 3.5-megapixel camera in front and a 5-megapixel camera in back. (The Surface RT also includes that camera, but the Surface Pro and Surface Pro 2 include only 1.2-megapixel cameras for the front and back.)
✓ USB 3.0 support: The Surface 2 works well with natively recognized USB gadgets. That means you can plug in storage devices (flash drives, por-table drives), USB hubs with more USB ports, mice, keyboards, cameras, some headsets, and some USB printers. Because it uses the new USB 3.0 standard, your information transfers much more quickly with USB 3.0 gadgets.
✓ Bluetooth support: Nearly anything that connects wirelessly through Bluetooth works well with the Surface RT and Surface 2. Your wireless headsets, mice, keyboards, and other Bluetooth gadgets should work without a hitch.
✓ Memory card slot: To add storage, slide a memory card into the built-in microSDXC slot. That slot works with microSD, microSDHC, or microSDXC cards, which let you add up to 128GB storage space.
✓ Microsoft Office RT: The Surface RT and Surface 2 include Microsoft Office RT, a suite of programs including Outlook, Word, PowerPoint, Excel, and OneNote. That’s one less thing to buy to stay productive.
✓ OneDrive: Your Microsoft account gives you 7GB of free storage on OneDrive, an online cubby hole for files. (OneDrive was called SkyDrive
until early 2014, when Microsoft changed its name.) The Surface 2 con-tains a certificate to increase your OneDrive storage to a whopping 200GB, free for two years.
✓ Apps: The Surface 2 can run only apps downloaded from the Windows Store. The Store doesn’t have as many apps as Apple and Google offer, but the stock grows larger every day.
The Surface 2 differs from the Surface Pro 2 version in many subtle ways too numerous to mention here. If you own a Surface 2 or Surface RT, keep an eye open for this Windows RT icon, like the one in the margin. Paragraphs with this icon explain other ways Windows RT differs from traditional Windows.
Surface Pro 2
And, when work calls, you can load the full-powered Windows 8.1 Desktop app to run the same Windows programs you run on your desktop PC. Windows 8.1 Pro also lets you pony up an extra $15 for the Windows Media Center Pack. This pack lets you play DVDs if you plug in a USB DVD drive. Plug in a TV tuner, connect a TV signal from cable or an antenna, and you’ve turned the Surface into a complete digital video recorder, ready to record TV shows for watching later.
The Surface Pro 2 comes with all the perks given to Surface 2 owners, includ-ing the 200GB of free OneDrive storage for a year.
What
can’t
the Surface 2 handle?
Because the Surface 2 runs Windows 8.1 RT instead of Windows 8.1, it brings some unique compromises. Those compromises will be deal breakers for some people. Other people will say, “Who needs that, anyway?”
Here they are, in no particular order:
✓ No desktop programs: Surface 2 can run only apps downloaded from the Windows Store. You can’t install desktop programs like you can on a desktop PC.
✓ No Windows Media Center: Unlike Windows 8 computers, Surface 2 won’t let you install Windows Media Center for viewing DVDs and watching or recording TV shows.
✓ No Windows Media Player: The Surface 2 desktop doesn’t include Windows Media Player. To watch movies and listen to music, you must use the built-in Music and Video apps or download replacement music and video apps from the Windows Store.
✓ Can’t start a homegroup: When con-nected to a network, the Surface 2 can join homegroups and access files from other
networked computers. However, those computers can’t access your files. To share your files, you can upload them to OneDrive, copy them to a portable flash drive (or hard drive), or send them through e-mail.
✓ No driver support: Windows RT relies on its own set of built-in drivers — special software that lets it communicate with plugged-in accessories. Because you can’t install drivers, the Surface 2 won’t work with some USB gadgets such as TV tuners, barcode readers, GPS units, and other devices that require you to install a program.
✓ No GPS: Lacking a GPS chip, the Surface 2 relies on Wi-Fi to estimate your location. That narrows down your location to within a few hundred feet. (Surface 2 with a built-in 4G LTE cellular data plan also lacks a GPS.)
I won’t list all the advantages here because the Surface Pro 2 is basically a powerful desktop PC flattened into a tablet. Any software that runs on a Windows 8.1 desktop PC runs on a Surface Pro 2.
The same holds true for gadgets you plug into the Surface Pro 2’s USB port: network ports, bar code readers, scanners, MIDI gadgets, and other specialty items.
But all that power brings a few compromises:
✓ Battery life: You can expect six or eight hours of battery life, perhaps more, depending on your use. But the battery probably won’t last as long as it does on the Surface 2.
✓ Higher cost: Surface 2 pricing begins at $449 for a model with 2GB of memory and 32GB of storage. The Surface Pro 2 begins at $899 for 4GB of memory and 64GB of storage.
✓ No Microsoft Office: Unlike the Surface 2, the Surface Pro 2 doesn’t include Microsoft Office. If you need that program, you must buy and install it separately.
✓ No connected standby: When the tablet’s asleep, it’s really asleep. It won’t collect your e-mail in the background.
Summing Up the Differences
between the Versions
Sometimes numbers mean more than words. To satisfy the other side of your brain, the specifications in Table 1-1 show exactly how the Surface 2 and Surface Pro 2 differ from each other.
Table 1-1
Differences between the Surface 2
and Surface Pro 2
Item Surface 2 Surface Pro 2
Operating System Windows RT 8.1 Windows 8.1 Pro Processor NVIDIA Tegra 4 (T40) 1.7
GHz Quad Core
Fourth generation Intel Core i5-4200U Processor with Intel HD Graphics 4400
Item Surface 2 Surface Pro 2
Thickness 0.35 inches (8.9mm) 0.53 inches (13.5mm) Display 10.6 inches, 16:9 ratio,
1920 x 1080 pixels, 5-point multitouch, 1080p resolution
10.6 inches, 16:9 ratio, 1920 x 1080 pixels, 10-point multitouch, 1080p resolution Battery 31.5 watt hours 42 watt hours Ports USB 3.0 slot,
Storage capacity 32GB or 64GB 64GB/128GB with 4GB of memory model; 256GB/512GB with 8GB memory model Cameras and
microphones
Two 720p cameras and two microphones (one each in front and back). The front camera is 3.5 megapixels; the back is 5 megapixels.
Two 720p cameras (one in front and one in back), and one microphone on top. Both cameras are 1.2 megapixels. Price $449 for 32GB, $549 for
64GB. Touch and Type Covers sold separately.
$899 for 64GB, $999 for 128GB, $1,299 for 256GB, and $1,799 for the 512GB model; Touch and Type Covers sold separately Start screen Yes Yes
Office RT Includes RT versions of Word, Excel, PowerPoint, OneNote, and Outlook
No; Office must be pur-chased and installed separately
Stylus Not included, but sup-ports capacitive stylus
Digital stylus included, with built-in charger OneDrive/Skype Includes 200GB of free
OneDrive storage for two years, one year of Skype Unlimited World calling to landlines in over 60 countries, and
Item Surface 2 Surface Pro 2
Sensors Ambient light sensor, accelerometer, gyro-scope, compass
Ambient light sensor, accelerometer, gyro-scope, compass Power supply 24 watts (included) 48 watts, with 5-watt
USB port for charging accessories
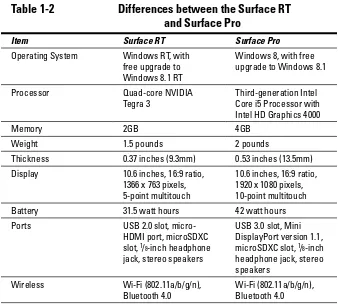
Table 1-2 shows differences between the two original Surfaces, the Surface RT and the Surface Pro.
Table 1-2
Differences between the Surface RT
and Surface Pro
Item Surface RT Surface Pro
Operating System Windows RT, with free upgrade to Windows 8.1 RT
Windows 8, with free upgrade to Windows 8.1 Processor Quad-core NVIDIA
Tegra 3
Third-generation Intel Core i5 Processor with Intel HD Graphics 4000 Memory 2GB 4GB
Weight 1.5 pounds 2 pounds
Thickness 0.37 inches (9.3mm) 0.53 inches (13.5mm) Display 10.6 inches, 16:9 ratio,
1366 x 763 pixels, 5-point multitouch
10.6 inches, 16:9 ratio, 1920 x 1080 pixels, 10-point multitouch Battery 31.5 watt hours 42 watt hours Ports USB 2.0 slot,
Item Surface RT Surface Pro
Storage capacity 32GB or 64GB 64GB or 128GB Cameras Two 720p cameras,
front and rear
Two 720p cameras, front and rear
Price $349 for 32GB, $449 for 64GB and Touch Cover
No longer sold Start screen Yes Yes
Office (Word, Excel, PowerPoint, OneNote)
Yes, includes Home and Student version
No, Office must be pur-chased and installed separately
Stylus Not included but sup-ports capacitive stylus
Digital stylus included, with built-in charger OneDrive/Skype Includes 7GB of free
OneDrive storage space with your Microsoft account, but no Skype credits
Includes 7GB of free OneDrive storage space with your Microsoft account, but no Skype credits
Sensors Ambient light sensor, accelerometer, gyro-scope, compass
Ambient light sensor, accelerometer, gyro-scope, compass Power supply 24 watts (included) 48 watts, with 5-watt
USB port for charging accessories
Identifying a Surface Model
Not sure which Surface model you’re viewing? You can find out by lifting the kickstand on the back of the tablet and peeking underneath. There, you see the word Surface, as well as this identifying information:
✓ Surface RT: These all-black, first-generation models list the term
Windows RT beneath a Windows logo. You’ll also see the amount of stor-age listed as either 32GB or 64GB. The kickstand’s visible side shows a Windows logo.
✓ Surface Pro: These first-generation models list the term Windows 8
✓ Surface 2: These look much like the Surface RT tablets, down to the term Windows RT listed beneath the Windows logo. However, these second-generation tablets have a black front with a silver back. Beneath the kickstand, the amount of storage is listed as either 32GB or 64GB. Models with a 4G LTE data plan have a SIM card slot on the left edge below the volume rocker.
✓ Surface Pro 2: These second-generation models list the term Windows 8.1
beneath the Windows logo. You also see the amount of storage, 64GB, 128GB, 256GB, or 512GB.
The serial number of your Surface, needed for warranty and service informa-tion, is printed directly beneath the word Surface under the kickstand. The serial number of a Surface keyboard is printed on the right edge of its spine — that raised edge that clicks onto the Surface when attaching the keyboard.
Before buying a used Surface on eBay, make sure the seller posts a clear photo of the information printed beneath the kickstand. That way you know exactly what’s being sold.
Understanding Your Surface’s
Storage Space
Microsoft sells its various Surface tablets with up to 512GB of storage space. However, Microsoft tosses some of its own software onto the tablet, which reduces storage space for your own files. Windows consumes some of that space, for example, as do the bundled apps and troubleshooting tools.
That means you can’t copy 32GB of music onto a 32GB Surface. So, how much information can you store? Table 1-3 explains exactly how much storage space you’ll have on each Surface model.
If you need more storage, you can always slip a microSDXC memory card into the microSD memory slot of any Surface.
Table 1-3
Surface Storage Space
This Surface Model . . . . . . Contains This Much Storage Space
Getting Started with Your Surface
In This Chapter
▶ Removing the packaging
▶ Charging the battery
▶ Looking for missing items
▶ Identifying your Surface’s parts
▶ Attaching the keyboard
▶ Positioning the Surface for use
W
hether your Surface arrives in the mail or in a shopping bag from your local Microsoft Store, the fun doesn’t start right away. No, first you need to remove your Surface from its packaging and charge the battery — tasks I cover in this chapter.While you’re waiting for the battery to charge, take some time to identify all of your Surface’s ports, slots, and attachments, all pointed out in this chapter. Some of them sit in plain sight; others hide in mysterious crevices.
But no matter where they hide, this chapter points them all out so you know what each one does. That way, you can either impress your friends or bore them to tears with your Surface port acumen.
The Grand Unboxing
Figure 2-1:
The Surface comes packaged in a white box that’s been pushed inside a black box.
To unpack your Surface, follow these steps:
1. Remove the small strip of clear plastic tape holding the white box to the black sleeve.
2. Slide the white box out of the black sleeve.
3. If your Surface included a keyboard, remove the Touch Cover key-board and its black cardkey-board packaging from beneath the box.
Microsoft bundled a Touch Cover keyboard with some early Surface RT models. Now, none of the Surface models include a keyboard; it’s consid-ered an accessory to be purchased separately.
4. Remove the small strip of plastic tape holding the white box shut and then open the lid.
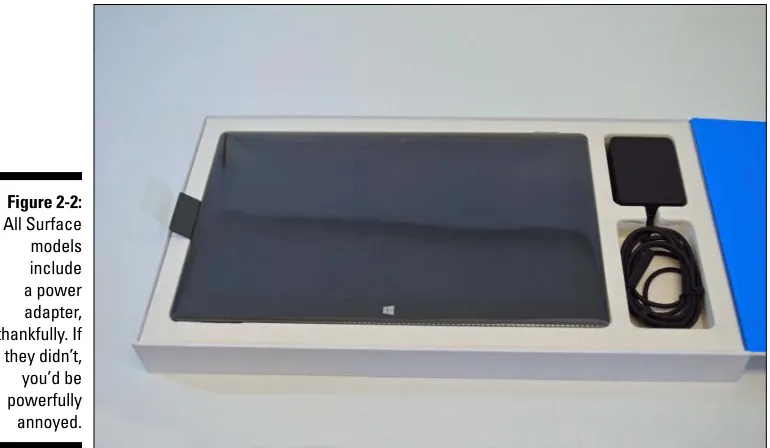
The lid opens, with the hinge along the right edge. As the lid opens, you see the Surface resting peacefully inside, as shown in Figure 2-2, com-plete with its power adapter.
5. Remove the Surface from the box and remove its plastic wrapper. 6. Remove the manual and paperwork from the box beneath the Surface
and remove the charger.
Figure 2-2:
All Surface models include a power adapter, thankfully. If they didn’t, you’d be powerfully annoyed.
As you remove the Surface from its packaging, take note of these things:
✓ The Surface’s manual, if you can call it that, contains illustrations with IKEA-inspired instructions: single sheets of paper with line drawings and arrows. Microsoft supplements it with a downloadable user guide avail-able at its website: www.microsoft.com/surface/userguides.
✓ Pounce on the two blue cards, found as soon as you lift the Surface 2 or Surface Pro 2 from the box. One card has a password for 200GB of
OneDrive (formerly known as SkyDrive) storage space, free for two years. The other card offers a year’s worth of Skype WiFi and Unlimited World. I explain those services and how to redeem them, as well as their fine print, in Chapter 3.
✓ Your Surface’s serial number is listed on the box’s UPC code sticker. (It begins with the letters S/N.)
✓ Your Surface’s serial number and amount of storage space also appears hidden beneath the kickstand.
If your Surface needs to be returned for service, you need to enter its serial number on Microsoft’s online support site.
✓ Okay, if you can’t wait, feel free to use the Surface while it’s charging. But flip ahead to Chapter 3, where I walk you through the process of turning it on for the first time.
Charging the Battery
The Surface’s bundled charger is lightweight, smaller, and flatter than many adapters, making it easy to carry. In the North American version, the outlet’s prongs make sturdy little clicks as they fold in and out.
The charger plugs into the wall easily, politely leaving room to plug some-thing into the adjacent outlet. The charger’s other end has five little metal pins that line up with the five little metal pins recessed into a gap along your Surface’s right edge.
When attached correctly, a little light begins glowing on the charger’s end. If you don’t see that little light, try wiggling the charger until it seats more firmly in the slot.
Follow these steps to charge your Microsoft Surface:
1. Unfold the prongs from the charger’s long end, if necessary, and plug them into an outlet.
On North American models, the prongs fold in for easy storage and out for plugging into a wall. Plug the charger into the wall so it doesn’t cover the second wall outlet, and you’ll leave room for plugging in other gadgets.
On the Surface Pro and Surface Pro 2, you need to plug the charging cable into the charger. It’s easy to see which end fits into which spot.
2. Place the prong’s small end into the charger on your tablet’s lower-right side.
The five magnetically charged metal ports on the end of the charger cable should mesh with the five magnetically charged ports on your tablet’s lower right side. The connector fits in either way, shown in Figure 2-3, with the cord pointing up or down your tablet’s edge. If the connector doesn’t snap tightly into the groove, it won’t charge —
even when it feels like it’s in place. The key is to look for the little light on the connector (shown in Figure 2-4). Keep rocking the connector from side to side until the light glows. When it glows, it’s charging.
On some newer chargers, the glowing light surrounds the plug’s tip; on others, it’s a tiny pinpoint of light, like the one shown in Figure 2-4.
Figure 2-3:
The symmetrical
connector fits into the charger socket either way.
Figure 2-4:
When the connector’s light glows, you’ve successfully
Your Surface takes between two and three hours to charge completely. It may charge in less time, depending on how low its battery has drained. You can use your Surface while it’s charging, but the charging time will take longer. For such a simple device, the charger leads to a long list of stipulations:
✓ You can’t charge the Surface from another computer’s USB port.
✓ You can charge your phone or other USB gadgetry from the USB port of any Surface. If possible, though, plug your Surface into the wall first to avoid draining its battery.
✓ In a pinch, you can charge any Surface with the charger from any other Surface model. However, the Surface Pro and Surface Pro 2 charge much more quickly when using their own Pro chargers.
✓ For travelers, Microsoft offers a portable charger that plugs into a car’s cigarette lighter. I cover optional Surface accessories in Chapter 17.
✓ The power connector doesn’t fit very easily into the Surface RT and the Surface Pro; a gentle rocking motion usually snaps it into place. On the Surface 2 and Surface Pro 2, the connector snaps into place much more easily.
✓ Unlike the 24 watt chargers bundled with the Surface RT and Surface 2, the power adapter bundled with the Surface Pro and Surface Pro 2 puts out 48 watts. Its adapter also includes a USB port for charging accesso-ries, a handy feature missing from the power adapter bundled with the Surface RT and Surface 2.
Figuring Out What’s Included
and What’s Missing
The only things included in the box are the Surface, its charger, and its minis-cule paperwork.
Unless you paid extra for accessories, Microsoft left out these popular items, unfortunately:
If you don’t want to spring for the expensive keyboard covers, you can plug any desktop PC keyboard into a Surface’s USB port. Bluetooth (wireless) keyboards also work well; I explain how to connect Bluetooth devices in Chapter 6.
✓ Cables: You can plug your Surface into an external monitor or HDMI TV set for watching movies, gaming, or just fiddling around. Unfortunately, Microsoft didn’t include the cables. For more information on the required cables, flip ahead to Chapter 6.
✓ Memory card: The Surface includes a memory card slot, but it’s empty. Adding a memory card adds storage, as I describe in the next section.
✓ Microsoft Office: The Surface RT and Surface 2 include a pre-installed copy of Microsoft Office 2013 RT, the suite of programs with Outlook, Word, Excel, PowerPoint, and OneNote. The Surface Pro and Surface Pro 2 don’t include Office, however. If you want it, you must buy and install it yourself.
✓ Stylus: You can draw on your Surface RT and Surface 2 with a plastic pen called a stylus, but only the Surface Pro and Surface Pro 2 include one. And their stylus won’t work on the Surface RT or Surface 2. (Those models require a different type of stylus, which I cover in Chapter 5.)
Identifying the Parts of
Your Surface Tablet
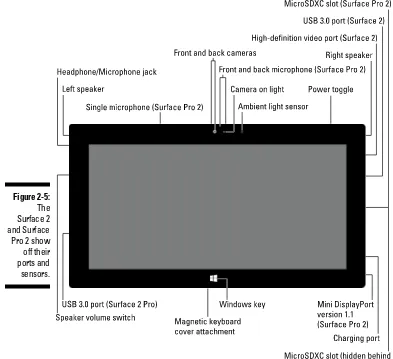
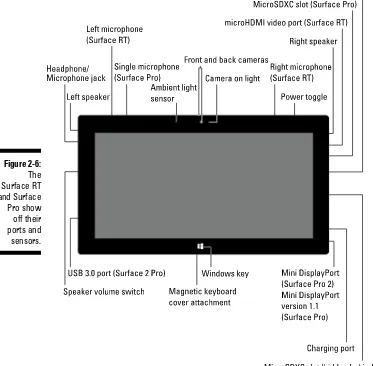
Waiting for your battery to charge can be pretty boring. So, while you’re waiting for your Surface to charge fully for the first time, spend some time examining its front, back, and edges, as shown in Figure 2-5 (which shows the Surface 2 and Surface Pro 2) and Figure 2-6 (which shows the Surface RT and Surface Pro).
This section explains the holes, switches, and distinguishable doodads on each Surface model, what they do, and what they won’t do.
Figure 2-5:
Figure 2-6:
✓ Microphones: Only the Surface RT boasts a pair of stereo microphones across its top edge. The Surface Pro has a single microphone on its top. The Surface 2 and Surface Pro 2 have front and back microphones for picking up the appropriate sounds when recording movies.
✓ Speakers: This pair of speakers lives near the top of your Surface’s sides, providing surprisingly good stereo separation. The speakers aren’t extraor-dinarily loud, however, which is great for neighboring hotel rooms, but not so good at your own party.
✓ microHDMI port: This port lets you send high-definition video from your Surface RT or Surface 2 to an external monitor or TV. You can buy the cool-looking $40 video cable from Microsoft’s website, or you can use almost any microHDMI cable, which usually costs around five dollars.
✓ mini DisplayPort: The Surface Pro and Surface Pro 2 offer this newer type of port, often found on Apple laptops. It puts out high resolution video through a mini DisplayPort cable.
✓ USB port: This port, the same size as the ones found on desktop PCs and laptops, lets you plug in keyboards, mice, portable hard drives, and other USB accessories. Only the Surface RT USB port uses USB 2.0; the Surface Pro, Surface 2, and Surface Pro 2 all use the newer, faster USB 3.0 port.
✓ Charging port: Described in the previous section, this odd five-button port on the lower-right side lets you charge your Surface with your bun-dled adapter or through Microsoft’s auto charger cable, sold separately.
✓ Headphone jack: Headphones and external speakers plug into this ⅛-inch
port on the left side.
The headphone jack also accepts specially designed microphones. These microphones, compatible with iPhones and iPods, have three thin stripes on them and are slightly longer than regular microphones, which only have two thin stripes.
✓ Volume control: This rocker switch on the Surface’s top-left side works as expected: Press the top portion to raise the volume; press the lower portion to lower it. As you press the control, the screen shows the cur-rent sound level. (You can also mute the volume with a Touch or Type Cover keyboard, covered in Chapter 5, or any keyboard with dedicated Windows 8 keys.)
✓ Kickstand: Folding flush against the Surface’s lower back edge, the kick-stand flips out to prop up your Surface when you’re working at a desk. It works on laps, as well, but doesn’t feel as substantial and flat as a tra-ditional laptop. It opens easiest from either of the two bottom corners and, in a boon for lefties, from the indent along the bottom-left side. The Surface 2 and Surface Pro 2 add a second position to the kickstand,
making the Surface easier to use on laps and airplane trays.
✓ microSDXC slot: This slot hides behind the kickstand on the Surface RT and Surface 2, and on the right edge of the Surface Pro and Surface Pro 2. But no matter which Surface you own, the slot accepts a microSD, microSDHC, or a microSDXC card, the same types found in many cell phones for the past few years. Many stores sell cards with up to 128GB of storage space.
✓ Camera: These two cameras, located on the top center of the Surface’s front and back sides, take mediocre snapshots and shoot high-definition video. Most smartphones do a better job. One cool thing: The back camera is angled downward at 22 degrees, so it shoots straight when the tablet sits with its kickstand out on the table.
When shooting with the back camera on the Surface 2 or Surface Pro 2, keep the kickstand in its first position, or the camera won’t shoot straight.
✓ Recording light: Barely visible next to each camera lens, this tiny white light glows whenever you’re framing or shooting a photo or video. In fact, if you see it glowing, smile: You’re being recorded.
✓ Ambient light sensor: Located near the front camera, this barely visible sensor constantly measures the light surrounding the screen. When you walk into a dark room, the screen dims slightly, making it easier to read (and preserving battery life). Similarly, walk outdoors in the sunlight, and the screen brightens to make it easier to read. If you find that this feature leads to constant screen flickering, I explain how to disable it in Chapter 14.
Attaching the Keyboard
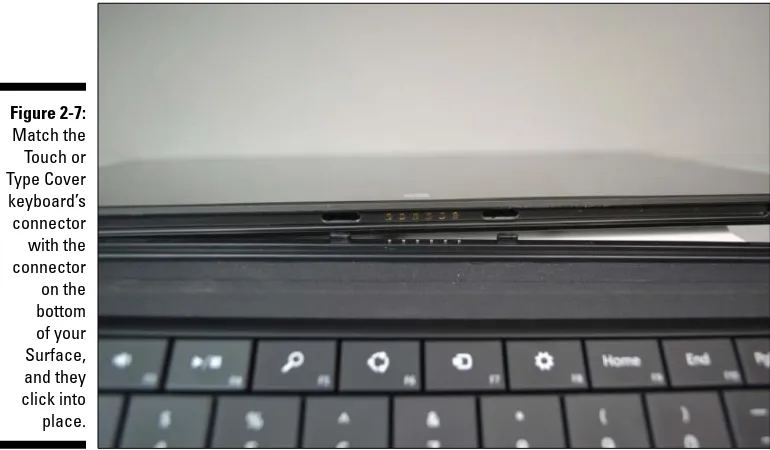
The Surface’s special Touch and Type Cover keyboard covers adhere to the Surface by strong magnets, and they’re not difficult to attach. (The Touch Cover 2 and Type Cover 2 keyboards come with even stronger magnets.) Hold the keyboard’s connector anywhere close to the connector on the Surface’s bottom edge, shown in Figure 2-7, and they lunge for each other.
Figure 2-7:
Match the Touch or Type Cover keyboard’s connector with the connector
on the bottom of your Surface, and they click into place.
However, like tired wrestlers, they occasionally miss. (To test the connection, press the keyboard’s Windows key. If the keyboard is connected, your Surface should toggle between your Start menu and your last-used application.) If your Surface doesn’t acknowledge your keyboard’s keystrokes, try holding down the keyboard and sliding the Surface to the left and right until you feel the keyboard lock into place.
Still not working? Try wiping any oil or dirt from the two connectors. If it still doesn’t work, it’s time to drop by a Microsoft Store in your city or con-tact the Microsoft Surface Online Service Center (https://myservice. surface.com).
Positioning the Surface
Your Surface works in a variety of positions. No matter how you hold it, the screen flips to be right-side up. Although convenient, it’s also disorienting: The familiar power button on the top right suddenly lives on the bottom left. To remember which side is really up, take a look at the white Windows logo button on the Surface’s bottom-front edge. When the logo is on the bottom,
your tablet is right-side up, and all the buttons are where they should be. If it’s on the top, either turn your Surface right-side up or remember that the buttons aren’t in their normal positions.
When you’re seated, fold out the Surface’s kickstand from the Surface’s back: Place your finger in the indentation on the back’s lower-left edge and pull out; the kickstand snaps into place.
Although it looks precarious, the Surface and its kickstand actually feel pretty solid on a lap, especially with an attached clip-on keyboard. (Pull the kick-stand out to its second position on the Surface 2 and Surface Pro 2 for even better lap traction.)
Finding Microsoft Website Support
for the Surface
Microsoft offers several official sites dealing with the Surface, its sales, and support:
✓ Microsoft Surface Tablets (www.microsoft.com/surface):
✓ Microsoft Surface Support (www.microsoft.com/surface/support):
Visit here if your Surface doesn’t seem to work correctly. You can walk through some troubleshooting steps, and if they don’t work, you can contact Microsoft’s technical support. They’ll assess the situation and then make arrangements for a replacement if it’s still under warranty.
✓ Microsoft Community Support (http://answers.microsoft.com/
en-us/surface/forum): Surface owners ask questions and share tips
on this Microsoft forum. Microsoft representatives also help answer questions.
✓ Windows Compatibility Center (www.microsoft.com/en-us/
windows/compatibility): Here you can see what devices people
Setting Up Your Surface
In This Chapter
▶ Turning on your Surface for the first time
▶ Downloading updates from Windows Update and the Store
▶ Setting up user accounts
▶ Turning off your Surface
Y
ou’ve taken your Surface out of the box. You’ve charged the battery. If you bought an optional keyboard, you’ve attached it to your Surface. But your Surface still isn’t ready for action.This chapter walks you through everything you need to do when first turning on your Surface: Sign in with a Microsoft account (or create a new one), name your Surface, download and install updates, and then set up user accounts for each person who will be using your Surface.
Turning On Your Surface for the First Time
After prying off all the cardboard, peeling off the plastic wrappers, and charg-ing your Surface, the fun begins. If you’re near a wireless network, make sure it’s turned on and that you know the network’s name and password. You’ll need to enter those so the Surface can connect with the Internet and down-load all the updates it missed while hiding in its box.
This setup is nearly identical for all four Surface models, so follow these steps to turn on your Surface for the first time:
1. Press and release the power button on your Surface’s top-right edge.
If you made a mistake while following any of the next steps, hold down the Surface’s power button for about five seconds until it turns off. Release the power button, wait a second, and then press and release it again to turn on your Surface. When your Surface wakes up, it begins at the opening step, letting you start over.
2. Tap your preferred language from the list.
As soon as you tap one of the listed languages, the Next button’s wording changes to that language, letting you follow the menu choices in your native tongue.
3. Verify your Country/Region, preferred App Language, Keyboard Layout, and Time Zone.
Your Surface asks you to verify these things:
• Country or Region: Choosing your geographic location helps your Surface display information tailored to your surroundings.
• App Language: Here, you can choose what language you’d like your apps to use, a boon for the bilingual.
• Keyboard Layout: In another hat tip toward the bilingual, this option lets you change your Surface’s onscreen keyboard to show accent marks and characters from different languages and regional dialects.
• Time Zone: Choosing the correct time zone helps your Surface and its apps keep you aware of the correct time.
The decisions you make here aren’t permanent. If you want to change your Surface’s keyboard layout to accommodate other languages, check out Chapter 14.
If you ponder a menu option for more than two minutes, the screen goes blank to preserve battery life. To revive it, touch the Windows key cen-tered beneath your screen. (Or, if you have a keyboard cover attached, tap any key.)
4. Tap Next.
5. When the License Terms page appears, read the License Terms agree-ment and tap the I Accept button.
Pull up a chair and relax. The Surface agreement is about 6,000 words long.
6. When the Personalize screen appears, choose your Start screen’s background color, type a name for your Surface into the PC Name box, and tap Next.
Figure 3-1:
Slide your finger along the bar to choose a color and then create a name for your new Surface.
Then, tap inside the PC Name box and type a name for your Surface. If you haven’t attached a keyboard to your Surface, the tablet’s built-in keyboard pops up, letting you type your Surface’s new name. (I describe how to type on the built-in glass keyboard in Chapter 5.)
The name you choose here will identify your Surface when it connects to networks, either at home, work, or on the Internet. Give every computer a different name so you can tell which one is which.
After choosing a background color and name for your Surface, tap the Next button. (I explain how to change your Surface’s name in Chapter 14.) After you leave this screen, the subsequent screens all have a
backward-pointing arrow in their top-left corner. Tapping a backward-backward-pointing arrow lets you return to the previous screen and change any of your answers.
7. When the Get Online screen appears, connect to a wireless network, if available, and tap Connect.
If you’re within range of a wireless network, the Surface lists all the wire-less networks it detects, shown in Figure 3-2. If you spot your wirewire-less network’s name, tap it; when the Connect button appears, tap it. Type your network’s password, if required, and then tap Next.
Figure 3-2:
Tap a wireless network’s name, and tap the Connect button to connect with the Internet.
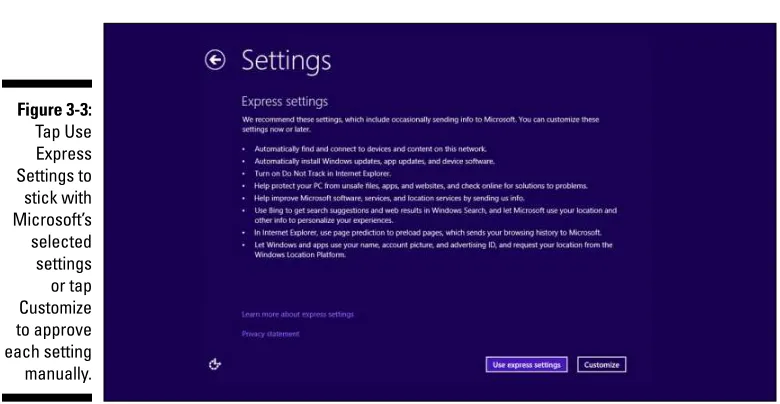
8. When the Settings screen appears, tap the Use Express Settings button.
The Express Settings, shown in Figure 3-3, provide a good mix of security while preserving your privacy. If you prefer to personalize your settings, however, tap the Customize button. (I explain how to change these set-tings later in Chapter 14.)
The Surface Pro and Surface Pro 2 run a different version of Windows than do the Surface RT and Surface 2, so their wording differs slightly on this screen.
Figure 3-3:
9. If you successfully connected with the Internet in Step 7, type your Microsoft account e-mail address. If you didn’t connect, create a Local account and type a name and password.
At this point, your path diverges depending on whether you were able to connect with the Internet in Step 5.
• If you connected with the Internet and you already have a Microsoft account — an e-mail address you use to visit Microsoft services like Hotmail, Messenger, OneDrive (formerly called SkyDrive), Windows Phone, Xbox LIVE, or Outlook.com — type your Microsoft account’s e-mail address into the white box. Type your password into the box beneath it, shown in Figure 3-4. Then move to the next steps to verify your security information.
Figure 3-4:
Type your Microsoft account e-mail address, your
pass-word, and tap Next.
• If you connected with the Internet but don’t have a Microsoft account, tap the words Create a New Account. The setup program then walks you through the necessary steps to transform your favorite e-mail address into a Microsoft account. ( You need a Microsoft account to get the most out of your Surface tablet.)
• If you connected with the Internet but don’t want a Microsoft account, tap the words Create a New Account. On the next screen, tap the words Sign In without a Microsoft Account. Then create a Local account by typing your first name, a password, and a pass-word hint.
• Couldn’t connect with the Internet? Then create a Local account by
No matter which path you take in Step 9, you tap the word Finish and then end up staring at the Windows Start screen. Welcome!
✓ If you signed in with a Microsoft account that you’ve used on other Windows 8.1 PCs, you’re asked how Windows should set up your PC. Choose the option called “Set This Up as a New PC Instead” because your Surface is a new PC.
✓ After you enter your Microsoft account, your Surface begins stocking itself with all of the settings, online contacts, and appointments stored by your Microsoft account. It also gives you access to the OneDrive account linked with your Microsoft account.
✓ When the OneDrive Is Your Cloud Storage screen appears, tap the Next button. You want to take advantage of your free OneDrive storage. If you don’t want free storage for some reason, tap Turn Off These Settings (Not Recommended) before tapping the Next button.
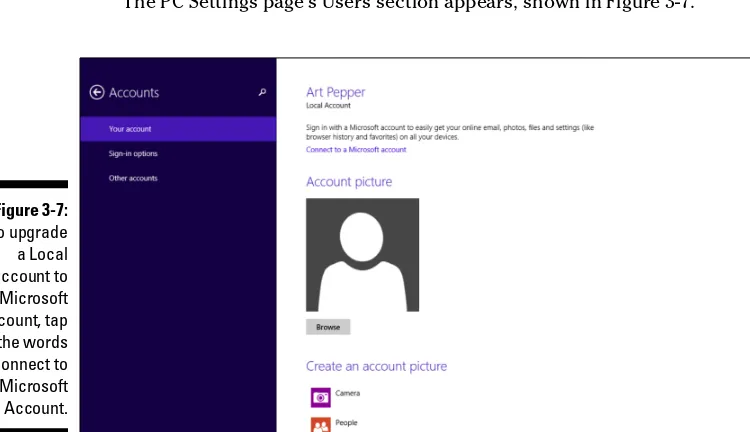
✓ If you couldn’t connect with the Internet and instead created a Local account, I explain how to convert a Local account into a much more conve-nient Microsoft account in this chapter’s “Setting Up User Accounts” section.
Downloading Software Updates
No doubt, your new Surface has updates waiting for it. Some of the software fixes the latest bugs; others add features. If you’ve been able to connect to the Internet, your Surface will probably restart as soon as you sign in for the first time. And
Trusting your PC
Whenever you use a pre-existing Microsoft account on a new Windows 8 or 8.1 PC — and your Surface counts as a PC — Microsoft asks you to “Trust This PC.” The words Trust This PC may appear on a menu on your Surface or in an e-mail.
Trust it with what, you may ask? Actually, Microsoft wants to know if you trust this PC with your information. This security precaution ensures that you’re the one accessing the PC. Here’s how it works:
To verify your identity, Microsoft sends a secret code to the cell phone or e-mail address that
you entered when first setting up your Microsoft account. When you receive the code, visit the listed web address and enter the code into the online confirmation box.