MCSA/MCSE:
Windows XP Professional
San Francisco • London
MCSA/MCSE:
Windows
®
XP Professional
Fast Pass
Technical Editor: Craig Vazquez
Cover Design and Illustration: Richard Miller, Calyx Design
Copyright © 2004 SYBEX Inc., 1151 Marina Village Parkway, Alameda, CA 94501. World rights reserved. No part of this publication may be stored in a retrieval system, transmitted, or reproduced in any way, including but not limited to photocopy, photograph, magnetic, or other record, without the prior agreement and written per-mission of the publisher.
Library of Congress Card Number: 2004109307
ISBN: 0-7821-4362-8
SYBEX and the SYBEX logo are either registered trademarks or trademarks of SYBEX Inc. in the United States and/or other countries.
Screen reproductions produced with FullShot 99. FullShot 99 © 1991-1999 Inbit Incorporated. All rights reserved.
FullShot is a trademark of Inbit Incorporated.
The CD interface was created using Macromedia Director, COPYRIGHT 1994, 1997-1999 Macromedia Inc. For more information on Macromedia and Macromedia Director, visit http://www.macromedia.com.
Microsoft ® Internet Explorer © 1996 Microsoft Corporation. All rights reserved. Microsoft, the Microsoft Internet Explorer logo, Windows, Windows NT, and the Windows logo are either registered trademarks or trade-marks of Microsoft Corporation in the United States and/or other countries.
SYBEX is an independent entity from Microsoft Corporation, and not affiliated with Microsoft Corporation in any manner. This publication may be used in assisting students to prepare for a Microsoft Certified Professional Exam. Neither Microsoft Corporation, its designated review company, nor SYBEX warrants that use of this pub-lication will ensure passing the relevant exam. Microsoft is either a registered trademark or trademark of Microsoft Corporation in the United States and/or other countries.
TRADEMARKS: SYBEX has attempted throughout this book to distinguish proprietary trademarks from descriptive terms by following the capitalization style used by the manufacturer.
The author and publisher have made their best efforts to prepare this book, and the content is based upon final release software whenever possible. Portions of the manuscript may be based upon pre-release versions supplied by software manufacturer(s). The author and the publisher make no representation or warranties of any kind with regard to the completeness or accuracy of the contents herein and accept no liability of any kind including but not limited to performance, merchantability, fitness for any particular purpose, or any losses or damages of any kind caused or alleged to be caused directly or indirectly from this book.
Manufactured in the United States of America
programs and/or text files (the "Software") to be used in connection with the book. SYBEX hereby grants to you a license to use the Software, subject to the terms that follow. Your purchase, acceptance, or use of the Soft-ware will constitute your acceptance of such terms. The Software compilation is the property of SYBEX unless otherwise indicated and is protected by copyright to SYBEX or other copyright owner(s) as indicated in the media files (the "Owner(s)"). You are hereby granted a single-user license to use the Software for your personal, noncommercial use only. You may not repro-duce, sell, distribute, publish, circulate, or commercially exploit the Software, or any portion thereof, without the written consent of SYBEX and the specific copyright owner(s) of any component software included on this media.
In the event that the Software or components include specific license requirements or end-user agreements, statements of condition, disclaimers, limitations or war-ranties ("End-User License"), those End-User Licenses supersede the terms and conditions herein as to that par-ticular Software component. Your purchase, accep-tance, or use of the Software will constitute your acceptance of such End-User Licenses.
By purchase, use or acceptance of the Software you fur-ther agree to comply with all export laws and regula-tions of the United States as such laws and regularegula-tions may exist from time to time.
Software Support
Components of the supplemental Software and any offers associated with them may be supported by the specific Owner(s) of that material, but they are not sup-ported by SYBEX. Information regarding any available support may be obtained from the Owner(s) using the information provided in the appropriate read.me files or listed elsewhere on the media.
Should the manufacturer(s) or other Owner(s) cease to offer support or decline to honor any offer, SYBEX bears no responsibility. This notice concerning support for the Software is provided for your information only. SYBEX is not the agent or principal of the Owner(s), and SYBEX is in no way responsible for providing any support for the Software, nor is it liable or responsible for any support provided, or not provided, by the Owner(s).
Warranty
SYBEX warrants the enclosed media to be free of phys-ical defects for a period of ninety (90) days after pur-chase. The Software is not available from SYBEX in any other form or media than that enclosed herein or posted to www.sybex.com. If you discover a defect in the
the defective media, postage prepaid, with proof of pur-chase to:
After the 90-day period, you can obtain replacement media of identical format by sending us the defective disk, proof of purchase, and a check or money order for $10, payable to SYBEX.
Disclaimer
SYBEX makes no warranty or representation, either expressed or implied, with respect to the Software or its contents, quality, performance, merchantability, or fit-ness for a particular purpose. In no event will SYBEX, its distributors, or dealers be liable to you or any other party for direct, indirect, special, incidental, consequen-tial, or other damages arising out of the use of or inabil-ity to use the Software or its contents even if advised of the possibility of such damage. In the event that the Soft-ware includes an online update feature, SYBEX further disclaims any obligation to provide this feature for any specific duration other than the initial posting. The exclusion of implied warranties is not permitted by some states. Therefore, the above exclusion may not apply to you. This warranty provides you with specific legal rights; there may be other rights that you may have that vary from state to state. The pricing of the book with the Software by SYBEX reflects the allocation of risk and limitations on liability contained in this agree-ment of Terms and Conditions.
Shareware Distribution
This Software may contain various programs that are distributed as shareware. Copyright laws apply to both shareware and ordinary commercial software, and the copyright Owner(s) retains all rights. If you try a share-ware program and continue using it, you are expected to register it. Individual programs differ on details of trial periods, registration, and payment. Please observe the requirements stated in appropriate files.
Copy Protection
Writing a book is a team effort. The following people made it possible.
Huge thanks go out to Rebecca Rider, who worked as the editor for this book; she put in countless hours, was highly detail oriented, and did a tremendous job. Elizabeth Campbell, the production editor, somehow managed to keep this project on track, which was not always an easy task, while at the same time always being wonderful to work with. Craig Vazquez worked as the technical editor. He did a great job of keeping me honest and minimizing any errors within the book.
Thanks to James Chellis for allowing me to work on the MCSE series. Neil Edde, the asso-ciate publisher for this series, has nurtured the MCSE series since the early days. Maureen Adams, the acquisitions and developmental editor, helped get the book going in the early stages.
Any errors missed by the editor and technical editors were caught by the book’s proofread-ers: Laurie O’Connell and Nancy Riddiough. Without the great work of the team, this book would not have been possible.
Introduction xv
Chapter 1 Installing Windows XP Professional 1
Chapter 2 Implementing and Conducting Administration of Resources 37 Chapter 3 Implementing and Conducting Administration of Resources 81 Chapter 4 Monitoring and Optimizing System Performance
and Reliability 119
Chapter 5 Configuring and Troubleshooting the Desktop Environment 153 Chapter 6 Implementing, Managing, and Troubleshooting Network
Protocols and Services 175
Chapter 7 Configuring, Managing, and Troubleshooting Security 233
Introduction xv
Chapter 1 Installing Windows XP Professional 1
Perform and Troubleshoot an Attended Installation of
Windows XP Professional 2
Critical Information 2
Exam Essentials 4
Perform and Troubleshoot an Unattended Installation of
Windows XP Professional 4
Critical Information 4
Exam Essentials 22
Upgrade from a Previous Version of Windows to
Windows XP Professional 23
Critical Information 23
Exam Essentials 26
Perform Post-Installation Updates and Product Activation 27
Critical Information 27
Answers to Review Questions 34
Chapter 2 Implementing and Conducting Administration
of Resources 37
Monitor, Manage, and Troubleshoot Access to Files and Folders 38
Critical Information 38
Exam Essentials 48
Manage and Troubleshoot Access to Shared Folders 48
Critical Information 49
Exam Essentials 57
Connect to Local and Network Print Devices 57
Critical Information 57
Exam Essentials 69
Configure and Manage File Systems 69
Critical Information 69
Exam Essentials 71
Manage and Troubleshoot Access to and Synchronization
of Offline Files 71
Critical Information 72
Review Questions 76
Answers to Review Questions 79
Chapter 3 Implementing and Conducting Administration
of Resources 81
Implement, Manage, and Troubleshoot Disk Devices 83
Critical Information 83
Exam Essentials 89
Implement, Manage, and Troubleshoot Display Devices 89
Critical Information 90
Exam Essentials 92
Configure Advanced Configuration Power Interface (ACPI) 93
Critical Information 93
Exam Essentials 97
Implement, Manage, and Troubleshoot Input and
Output (I/O) Devices 97
Critical Information 98
Exam Essentials 108
Manage and Troubleshoot Drivers and Driver Signing 108
Critical Information 109
Exam Essentials 112
Monitor and Configure Multiprocessor Computers 112
Critical Information 112
Exam Essentials 113
Review Questions 114
Answers to Review Questions 117
Chapter 4 Monitoring and Optimizing System Performance
and Reliability 119
Monitoring, Optimizing, and Troubleshooting Performance 120
Critical Information 120
Exam Essentials 133
Manage, Monitor, and Optimize System Performance for
Mobile Users 133
Critical Information 133
Exam Essentials 136
Restoring and Backing Up the Operating System, System
State Data, and User Data 136
Critical Information 136
Exam Essentials 148
Review Questions 149
Chapter 5 Configuring and Troubleshooting the
Desktop Environment 153
Configure and Manage User Profiles and Desktop Settings 154
Critical Information 154
Exam Essentials 159
Configure Support for Multiple Languages or
Multiple Locations 159
Critical Information 160
Exam Essentials 163
Manage Applications by Using Windows Installer Packages 164
Critical Information 164
Exam Essentials 168
Review Questions 169
Answers to Review Questions 172
Chapter 6 Implementing, Managing, and Troubleshooting
Network Protocols and Services 175
Configure and Troubleshoot the TCP/IP Protocol 176
Critical Information 176
Exam Essentials 191
Connect to Computers by Using Dial-Up Networking 192
Critical Information 192
Exam Essentials 203
Connect to Resources by Using Internet Explorer 203
Critical Information 203
Exam Essentials 204
Configure, Manage, and Implement Internet Information
Services (IIS) 204
Critical Information 205
Exam Essentials 215
Configure, Manage, and Troubleshoot Remote Desktop
and Remote Assistance 216
Critical Information 216
Exam Essentials 225
Configure, Manage, and Troubleshoot an Internet
Connection Firewall (ICF) 226
Critical Information 226
Exam Essentials 226
Review Questions 228
Chapter 7 Configuring, Managing, and Troubleshooting
Security 233
Configure, Manage, and Troubleshoot Encrypting
File System (EFS) 234
Critical Information 234
Exam Essentials 239
Configure, Manage, and Troubleshoot a Security
Configuration and Local Security Policy 240
Critical Information 240
Exam Essentials 255
Configure, Manage, and Troubleshoot Local User and
Group Accounts 255
Critical Information 255
Exam Essentials 270
Configure, Manage, and Troubleshoot Internet Explorer
Security Settings 270
Critical Information 270
Exam Essentials 276
Review Questions 277
Answers to Review Questions 279
Microsoft’s Microsoft Certified Systems Administrator (MCSA) and Microsoft Certified Systems Engineer (MCSE) tracks for Windows 2000 and Windows Server 2003 are the premier certifications for computer industry professionals. Covering the core technologies around which Microsoft’s future will be built, these programs are powerful credentials for career advancement.
This book is organized according to Microsoft’s official objectives for the Installing, Con-figuring, and Administering Microsoft Windows XP Professional (Exam 70-270) exam. The chapters correspond to the seven broad objective categories:
Installing Windows XP Professional
Implementing and Conducting Administration of Resources
Implementing, Managing, Monitoring, and Troubleshooting Hardware Devices and Drivers
Monitoring and Optimizing System Performance and Reliability
Configuring and Troubleshooting the Desktop Environment
Implementing, Managing, and Troubleshooting Network Protocols and Services
Configuring, Managing, and Troubleshooting Security
Within each chapter, the individual exam objectives are addressed. Each section of a chapter covers one exam objective. For each objective, I first present the critical information and then follow it with several Exam Essentials. Additionally, each chapter ends with a section of Review Questions. Here is a closer look at each of those components:
Critical Information Each individual exam objective section begins with a Critical Informa-tion secInforma-tion that presents detailed informaInforma-tion that is relevant to the exam. This is the place to start if you’re unfamiliar with or uncertain of the technical issues related to the objective.
Exam Essentials Here I give you a short list of topics that you should explore fully before you take the test. These Exam Essentials sum up the key information you should take out of the exam objective section.
Review Questions This section comes at the end of every chapter. It provides 10 questions that should help you gauge your mastery of the chapter.
The Microsoft Certified Professional Program
Since the inception of its certification program, Microsoft has certified over 1.5 million people. As the computer network industry increases in both size and complexity, this number is sure to grow—and the need for proven ability will also increase. Companies rely on certifications to verify the skills of prospective employees and contractors.
Several levels of certification are available based on specific suites of exams. Depending on your areas of interest or experience, you can obtain any of the following MCP credentials:
Microsoft Certified System Administrator (MCSA) on Windows 2000 or Windows Server 2003 This certification targets system and network administrators with roughly 6 to 12 months of desktop and network administration experience. The MCSA can be con-sidered the entry-level certification. You must take and pass a total of four exams to obtain your MCSA. Or, if you are an MCSA on Windows 2000, you can take one Upgrade exam to obtain your MCSA on Windows Server 2003.
Microsoft Certified System Engineer (MCSE) on Windows 2000 or Windows Server 2003 This certification track is designed for network and systems administrators, network and sys-tems analysts, and technical consultants who work with Microsoft Windows 2000 Professional and Server and/or Windows XP and Server 2003 software. You must take and pass seven exams to obtain your MCSE. Or, if you are an MCSE on Windows 2000, you can take two Upgrade exams to obtain your MCSE on Windows Server 2003.
Microsoft Certified Desktop Support Technician (MCDST) This certification track is the newest from Microsoft. This program is aimed at professionals who support end users in Win-dows 2000/2003 and XP. You must take two exams to earn your MCDST.
Microsoft Certified Application Developer (MCAD) This track is designed for application developers and technical consultants who primarily use Microsoft development tools. Cur-rently, you can take exams on Visual Basic .NET or Visual C# .ΝΕΤ. You must take and pass three exams to obtain your MCSD.
Microsoft Certified Solution Developer (MCSD) This track is designed for software engineers and developers and technical consultants who primarily use Microsoft development tools. Cur-rently, you can take exams on Visual Basic .NET and Visual C# .ΝΕΤ. You must take and pass five exams to obtain your MCSD.
Microsoft Certified Database Administrator (MCDBA) This track is designed for database administrators, developers, and analysts who work with Microsoft SQL Server. As of this print-ing, you can take exams on either SQL Server 7 or SQL Server 2000. You must take and pass four exams to achieve MCDBA status.
The Installing, Configuring, and Administering Microsoft
Windows XP Professional Exam
The Windows XP Professional exam covers concepts and skills related to installing, configur-ing, and managing Windows XP Professional computers. It emphasizes the following elements of Windows XP Professional support:
Installing Windows XP Professional
Implementing and administering resources
Implementing, managing, and troubleshooting hardware devices and drivers
Monitoring and optimizing system performance and reliability
Configuring and troubleshooting the desktop environment
Implementing, managing, and troubleshooting network protocols and services
Implementing, monitoring, and troubleshooting security
This exam is quite specific regarding Windows XP Professional requirements and operational settings, and it can be particular about how administrative tasks are performed within the oper-ating system. It also focuses on fundamental concepts of Windows XP Professional’s operation. Careful study of this book, along with hands-on experience, will help you prepare for this exam.
Microsoft provides exam objectives to give you a general overview of possible areas of coverage on the Microsoft exams. Keep in mind, however, that exam objectives are subject to change at any time without prior notice and at Microsoft’s sole discretion. Please visit Microsoft’s Training and Certification website (www.microsoft.com/traincert) for the most current listing of exam objectives.
Tips for Taking the Windows XP Professional Exam
Here are some general tips for achieving success on your certification exam:Arrive early at the exam center so that you can relax and review your study materials.
Dur-ing this final review, you can look over tables and lists of exam-related information.
Read the questions carefully. Don’t be tempted to jump to an early conclusion. Make sure
you know exactly what the question is asking.
Answer all questions. Remember that the adaptive format does not allow you to return to
a question. Be very careful before entering your answer. Because your exam may be short-ened by correct answers (and lengthshort-ened by incorrect answers), there is no advantage to rushing through questions.
On simulations, do not change settings that are not directly related to the question. Also,
assume default settings if the question does not specify or imply which settings are used.
For questions you’re not sure about, use a process of elimination to get rid of the obviously
Exam Registration
You may take the Microsoft exams at any of more than 1,000 Authorized Prometric Testing Centers (APTCs) and VUE Testing Centers around the world. For the location of a testing cen-ter near you, call Prometric at 800-755-EXAM (755-3926), or call VUE at 888-837-8616. Out-side the United States and Canada, contact your local Prometric or VUE registration center.
Find out the number of the exam you want to take, and then register with the Prometric or VUE registration center nearest to you. At this point, you will be asked for advance payment for the exam. The exams are $125 each and you must take them within one year of payment. You can schedule exams up to six weeks in advance or as late as one working day prior to the date of the exam. You can cancel or reschedule your exam if you contact the center at least two working days prior to the exam. Same-day registration is available in some locations, subject to space availability. Where same-day registration is available, you must register a minimum of two hours before test time.
You may also register for your exams online at www.prometric.com or www.vue.com.
When you schedule the exam, you will be provided with instructions regarding appointment and cancellation procedures, ID requirements, and information about the testing center loca-tion. In addition, you will receive a registration and payment confirmation letter from Prometric or VUE.
Microsoft requires certification candidates to accept the terms of a Non-Disclosure Agree-ment before taking certification exams.
What’s on the CD?
The enclosed CD offers bonus exams and flashcards to help you study for the exam. The CD’s resources are described here:
Glossary of terms Included is a Glossary of terms used throughout this book in PDF format. We’ve also included Adobe Acrobat Reader, which provides the interface for the PDF contents as well as the search capabilities.
The Sybex MCSE Test Engine This is a collection of multiple-choice questions that will help you prepare for your exam. There are two bonus exams designed to simulate the actual live exam.
Sybex MCSE Flashcards for PCs and Handheld Devices The “flashcard” style of question offers an effective way to quickly and efficiently test your understanding of the fundamental concepts covered in the exam. The Sybex MCSE Flashcards set consists of more than 150 ques-tions presented in a special engine developed specifically for this book. Here’s what the Sybex MCSE Flashcards interface looks like:
Contacts and Resources
To find out more about Microsoft Education and Certification materials and programs, to reg-ister with Prometric or VUE, or to obtain other useful certification information and additional study resources, check the following resources:
Microsoft Training and Certification Home Page
www.microsoft.com/traincert
This website provides information about the MCP program and exams. You can also order the latest Microsoft Roadmap to Education and Certification.
Microsoft TechNet Technical Information Network
www.microsoft.com/technet
800-344-2121
Use this website or phone number to contact support professionals and system administra-tors. Outside the United States and Canada, contact your local Microsoft subsidiary for information.
Prometric
www.prometric.com
800-755-3936
Contact Prometric to register to take an MCP exam at any of more than 800 Prometric Testing Centers around the world.
Virtual University Enterprises (VUE)
www.vue.com
888-837-8616
Contact the VUE registration center to register to take an MCP exam at one of the VUE Testing Centers.
Cramsession on Brainbuzz.com
cramsession.brainbuzz.com
1
XP Professional
MICROSOFT EXAM OBJECTIVES COVERED
IN THIS CHAPTER:
Perform and troubleshoot an attended installation of Windows XP Professional.
Perform and troubleshoot an unattended installation of Windows XP Professional.
Install Windows XP Professional by using Remote
Installation Services (RIS).
Install Windows XP Professional by using the System
Preparation Tool.
Create unattended answer files by using Setup Manager
to automate the installation of Windows XP Professional.
Upgrade from a previous version of Windows to Windows XP Professional.
Prepare a computer to meet upgrade requirements.
Migrate existing user environments to a new installation.
focuses on using unattended installations. You also need to know how to troubleshoot instal-lation problems. If you have an existing operating system, you need to know how to upgrade to Windows XP Professional. Once you have Windows XP Professional installed, you need to know how to perform the post-installation updates and product activation.
Perform and Troubleshoot an Attended
Installation of Windows XP Professional
Windows XP Professional is easy to install. But this doesn’t mean you don’t need to prepare for the installation process. Before you begin the installation, you should know what is required for a successful installation and have all of the pieces of information you’ll need to supply during the installation process. In preparing for the installation, you should make sure you have the fol-lowing information:
The hardware requirements for Windows XP Professional
How to use the Hardware Compatibility List (HCL) to determine whether your hardware
is supported by Windows XP Professional
Verification that your computer’s Basic Input/Output System (BIOS) is compatible with
Windows XP Professional
Whether the devices in your computer have Windows XP drivers
The installation options suitable for your system, including which disk-partitioning scheme
and file system you should select for Windows XP Professional to use
Critical Information
You can run the installation from the CD or over a network. There are four main steps in the Windows XP Professional installation process:
The Windows XP installation process is designed to be as simple as possible. The chances for installation errors are greatly minimized through the use of wizards and the step-by-step process. However, it is possible that errors may occur.
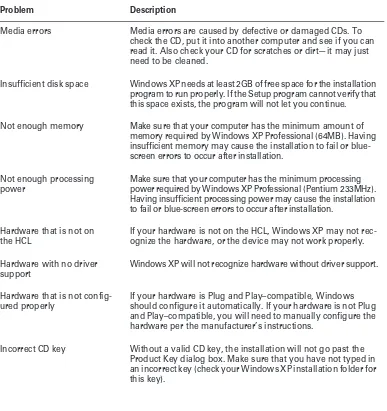
Table 1.1 lists some possible installation errors you might encounter.
T A B L E 1 . 1 Common Installation Problems
Problem Description
Media errors Media errors are caused by defective or damaged CDs. To check the CD, put it into another computer and see if you can read it. Also check your CD for scratches or dirt—it may just need to be cleaned.
Insufficient disk space Windows XP needs at least 2GB of free space for the installation program to run properly. If the Setup program cannot verify that this space exists, the program will not let you continue.
Not enough memory Make sure that your computer has the minimum amount of memory required by Windows XP Professional (64MB). Having insufficient memory may cause the installation to fail or blue-screen errors to occur after installation.
Not enough processing power
Make sure that your computer has the minimum processing power required by Windows XP Professional (Pentium 233MHz). Having insufficient processing power may cause the installation to fail or blue-screen errors to occur after installation.
Hardware that is not on the HCL
If your hardware is not on the HCL, Windows XP may not rec-ognize the hardware, or the device may not work properly.
Hardware with no driver support
Windows XP will not recognize hardware without driver support.
Hardware that is not config-ured properly
If your hardware is Plug and Play–compatible, Windows should configure it automatically. If your hardware is not Plug and Play–compatible, you will need to manually configure the hardware per the manufacturer’s instructions.
Exam Essentials
Know how to install and troubleshoot a Windows XP installation. Be able to install third party disk drives. List the common installation problems and how they can be corrected.
Perform and Troubleshoot an Unattended
Installation of Windows XP Professional
You can automate the installation of Windows XP Professional by using Remote Installation Services (RIS) to remotely deploy unattended installations (which require a Windows 2000 Server or Windows Server 2003) or by using the System Preparation Tool for disk imaging. To help customize both options for automating remote installations, you can also use answer files. Answer files are used with automated installations to provide answers to the questions that are normally asked during the installation process.
Critical Information
Remote Installation Services (RIS) was introduced in Windows 2000 Server and is also sup-ported by Windows Server 2003. It allows you to remotely install Windows XP Professional.
A RIS server installs Windows XP Professional on RIS clients, as illustrated in Figure 1.1. The RIS server must have the RIS server software installed and configured. RIS clients are com-puters that have a Pre-boot eXecution Environment (PXE) network adapter or use a RIS boot disk. PXE is a technology that is used to boot to the network when no operating system or net-work configuration has been installed and configured on a client computer. The RIS boot disk Failure to access Transmission
Control Protocol/Internet Proto-col (TCP/IP) network resources
If you install Windows XP with typical settings, the computer is configured as a Dynamic Host Configuration Protocol (DHCP) client. If there is no DHCP server to provide IP configuration information, the client will still generate an auto-configured IP address, but be unable to access network resources through TCP/IP if the other network clients are using DHCP addresses.
Failure to connect to a domain controller when joining a domain
Make sure that you have specified the correct domain name. If your domain name is correct, verify that your network settings have been set properly and that a domain controller and Domain Name System (DNS) server are available. If you still can’t join a domain, install the computer in a workgroup, then join the domain after installation.
T A B L E 1 . 1 Common Installation Problems (continued)
is a PXE ROM emulator for network adapters that don’t have a PXE boot ROM or for a PC that doesn’t support booting from the network. In order to use a RIS boot disk, the network adapter must be PCI compliant. The RIS boot disk is generated with the Remote Boot Floppy Generator (rbfg.exe) utility.
The RIS clients access RIS servers through DHCP to remotely install the operating system from the RIS server. The network must have a DHCP server, a DNS server, and Active Directory to connect to the RIS server. No other client software is required to connect to the RIS server. Remote installation is a good choice for automatic deployment when you need to deploy to large numbers of computers and your clients are PXE compliant.
The RIS server can be configured with either of two types of images:
A CD-based image that contains only the Windows XP Professional operating system. You
can create answer files for CD-based images to respond to the Setup program’s configura-tion prompts.
A Remote Installation Preparation (RIPrep) image that can contain the Windows XP
oper-ating system and applications. This type of image is based on a preconfigured computer.
Using Remote Installation Services (RIS)
A variety of installation options are available through the Windows XP Client Installation Wiz-ard (CIW). For RIS installation, you need a RIS server that stores the Windows XP Professional operating system files in a shared image folder, and clients that can access the RIS server. Depending on the type of image you will distribute, you may also want to configure answer files so that users need not respond to any Windows XP Professional installation prompts.
Following are some of the advantages of using RIS for automated installation:
You can remotely install Windows XP Professional.
The procedure simplifies management of the server image by allowing you to access Windows
XP distribution files and use Plug and Play hardware detection during the installation process.
You can quickly recover the operating system in the event of a computer failure.
F I G U R E 1 . 1 RIS uses a RIS server and RIS clients. CD-based, or RIPrep images • Answer files (optional)
Requires:
• PXE-based boot ROM, or
• RIS boot disk with a network adapter that supports PXE, or
Windows XP security is retained when you restart the destination computer. Here are the basic steps of the RIS process:
1. The RIS client initiates a special boot process through the PXE network adapter (and the computer’s BIOS configured for a network boot) or through a special RIS boot disk. On a PXE client, the client presses F12 to start the PXE boot process and to indicate that they want to perform a RIS installation.
2. The client computer sends out a DHCP discovery packet that requests an IP address for the cli-ent and the IP address of a RIS server (running Windows 2000 Server or Windows Server 2003). Within the discovery packet, the client also sends its Globally Unique Identifier (GUID). The GUID is a unique 32-bit address that is used to identify the computer account as an object within the Active Directory.
3. If the DHCP server and the RIS server are on the same computer, the information requested in the discovery packet is returned. If the DHCP server and the RIS server are on separate networks, the DHCP server will return the client information for IP configuration. Then the client will send out another broadcast to contact the RIS server.
4. The client contacts the RIS server using the Boot Information Negotiation Layer (BINL) protocol. The RIS server contacts Active Directory to see if the client is a “known client” and whether it has already been authorized (also called pre-staged) through Active Directory.
5. If the client is authorized to access the RIS server, BINL provides to the client the location of the RIS server and the name of the bootstrap image (enough software to get the client to the correct RIS server).
6. The RIS client accesses the bootstrap image via the Trivial File Transfer Protocol (TFTP), and the Windows XP CIW is started.
7. The RIS client is prompted for a username and password that can be used to log on to the Windows 2000 or Windows 2003 domain that contains the RIS server.
8. Depending on the user or group credentials, the user sees a menu offering the operating systems (images) that can be installed. The user sees only the options for the installs deter-mined by the parameters defined on the RIS server.
The following sections describe how to set up the RIS server and the RIS clients, and how to install Windows XP Professional through RIS.
RIS Client Options
RIS offers several client installation options. This allows administrators to customize remote installations based on organizational needs. When the client accesses the Windows XP CIW, they see the installation options that have been defined by the administrator. Remote installa-tion opinstalla-tions include the following:
Customizing the setup of the computer If you configure RIS to support customizing the setup of the computer, then administrators who install computers within the enterprise can override the RIS settings to specify the name and location of the computer being installed within Active Directory.
Restarting a previous setup attempt The option to restart a previous setup attempt is used when a remote installation fails prior to completion. The operating system installation will restart when this option is selected from the CIW.
Performing maintenance or troubleshooting The maintenance and troubleshooting option pro-vides access to third-party troubleshooting and maintenance tools. Examples of tasks that can be completed through this option include updating flash BIOS and using PC diagnostic tools.
Preparing the RIS Server
The RIS server is used to manage and distribute the Windows XP Professional operating system to RIS client computers. RIS servers can distribute CD-based images (created with the Risetup.exe
utility) or images created from a reference Windows XP computer, called RIPrep images (created with the RIPrep.exe utility). A CD-based image contains the operating system installation files taken directly from the Windows XP Professional CD and can be customized for specific computers through the use of answer files. RIPrep images are based on a preconfigured computer and can con-tain applications as well as the operating system. RIPrep.exe is used to create the image of the target computers on the RIS server.
The RIS server is configured to specify how client computers will be installed and configured. The administrator can configure the following options for client computers:
Define the operating system installation options that will be presented to the user. Based
on access permissions from Access Control Lists (ACLs), administrators can define sev-eral installation options, and then allow specific users to select an option based on their specific permissions.
Define an automatic client-computer naming format, which bases the computer name on
a custom naming format. For example, the computer names might be a combination of location and username.
Specify the default Active Directory location for client computers that are installed through
remote installation.
Pre-stage client computers through Active Directory so that only authorized computers can
access the RIS server. This option requires a specified computer name, a default Active Direc-tory location, and identification of RIS servers and the RIS clients the RIS Servers will service.
Authorize RIS servers so that unauthorized RIS servers can’t offer RIS services to clients. Create and modify the RIS answer file.
The following steps for preparing the RIS server are discussed in the upcoming sections:
1. Make sure that the server meets the requirements for running RIS (Windows 2000 Server or Windows Server 2003, TCP/IP, DHCP, DNS, Active Directory).
3. Configure and start RIS, using either a CD-based image or a RIPrep image.
4. Authorize the RIS server through DHCP Manager.
5. Grant users who will perform RIS installations the user right to create computer accounts.
6. Grant users who will perform the RIS installation the Log On as a Batch Job user right.
7. Configure the RIS server to respond to client computers (if this was not configured when RIS was installed).
8. Configure RIS template files (if you wish to customize installation options for different computers or groups).
Preparing the RIS Client
The RIS client is the computer on which Windows XP Professional will be installed. RIS clients rely on PXE, which allows the client computer to remotely boot and connect to a RIS server.
To act as a RIS client, the computer must meet all the hardware requirements for Windows XP Professional and have a network adapter installed. In addition, the RIS client must support one of the following configurations:
Use a PXE-based boot ROM (a boot ROM is a special chip that uses read-only memory)
with a BIOS that supports starting the computer with the PXE-based boot ROM (as opposed to booting from the hard disk).
Follow the Net PC/PC 98 standard for PCs, which uses industry-standard components for
the computer. This includes processor, memory, hard disk, video, audio, and an integrated network adapter and modem, in a locked case with limited expansion capabilities. The pri-mary advantages of Net PCs are that they are less expensive to purchase and to manage.
Have a network adapter that supports PXE and that can be used with a RIS boot disk. The
only network adapters that can be used with RIS boot disks are the network adapters that are displayed when running the RBFG.exe utility. If your network adapter is not on the list, ensure that you have the most current RBFG.exe utility, since Microsoft makes updates and adds drivers to this utility periodically. You can obtain updates through Windows Update or Service Packs.
If the client computer does not have a network adapter that contains a PXE-based boot ROM, then you can use a RIS boot disk to simulate the PXE startup process. The PXE-based boot disk is used to provide network connectivity to the RIS server. In order to use a RIS boot disk, the client computer must use a PCI-compliant network adapter.
If your client uses PCMCIA or ISA network adapters, there is no support to use RIS boot disks.
To create a RIS boot disk, take the following steps:
1. On a Windows XP Professional computer that is connected to the same network as the RIS server, select Start Run. In the Run dialog box, type the following command and click the OK button:
2. The Windows XP Remote File Generator dialog box appears. Insert a blank floppy disk in your computer, select the appropriate destination drive, select the installed network card from the Adapter List, and click the Create Disk button. The network adapter must be on the list of those shown when running the RBFG.exe utility. When the disk is made, it will support any and all of these network adapters.
3. You see a message verifying that the boot floppy was created and asking whether you want to create another disk. You can click Yes and repeat the procedure to create another boot disk, or click No. After you are finished creating RIS boot disks, click the Close button.
Installing Windows XP Professional through RIS
After the RIS server has been installed and configured, you can install Windows XP Professional on a RIS client that uses either a PXE-compliant network card or a RIS boot disk with a network card that supports PXE.
To install Windows XP Professional on the RIS client, take the following steps:
1. Start the computer. When prompted, press F12 for a network service boot.
2. The Client Installation Wizard starts. Press Enter to continue.
3. The Windows XP Logon dialog box appears. Specify the domain to which you will log on, and enter a valid domain username and password.
4. A menu appears with the options Automatic Setup, Custom Setup, Restart a Previous Setup Attempt, and Maintenance and Troubleshooting. Select Automatic Setup.
If you have only one RIS image, it will automatically be installed. If you have multiple RIS images, the user will see a menu of RIS images. After you select a RIS image, the remote instal-lation process will start. What happens next depends on the image type and whether you have configured answer files.
System Preparation Tool
The System Preparation Tool (Sysprep.exe) is used to prepare a computer for disk imaging, which can be done with third-party image software or with disk-duplicator hardware. Disk imaging (also sometimes called disk cloning or disk duplication) is the process of creating a ref-erence computer for the automated deployment. The refref-erence, or source, computer has Win-dows XP Professional installed and is configured with the settings and applications that should be installed on the target computers. An image is then created that can be transferred to other computers, thus installing the operating system, settings, and applications that were defined on the reference computer.
Using the System Preparation Tool and disk imaging is a good choice for automatic deploy-ment when you have the hardware that supports disk imaging and you have a large number of computers with similar configuration requirements. For example, education centers that rein-stall the same software every week might use this technology.
If you are using disk-duplicator hardware, you create a reference computer, and then use the System Preparation Tool to create the image. You would then remove the drive that has the disk image and insert it into a special piece of hardware, called a disk duplicator, to copy the image. The copied disks are inserted into the target computers. After you add the hard drive that con-tains the disk image to the target computers, you can complete the installation from those com-puters. Figure 1.2 illustrates the disk-imaging process. You can also copy disk images by using special third-party software.
When the client computer starts an installation using a disk image, a Mini-Setup Wizard will execute. You can customize what is displayed on the Windows Welcome screen and the options that are displayed through the Mini-Setup Wizard process, which query for information such as username or time zone selection. You can also create fully automated deployments with disk imaging through the use of answer files.
Using the System Preparation Tool to Create Disk Images
To create a disk image, you install Windows XP Professional on the source computer with the configuration that you want to copy. The source computer’s configuration should also include any applications that should be installed.
Once you have your source computer configured, you use the System Preparation Tool (Sysprep.exe) to prepare the disk image for disk duplication. After you’ve created the disk image, you can copy the image to destination computers through third-party software or through hardware disk duplication.
PREPARING FOR DISK DUPLICATION
To use a disk image, the source and target computers must meet the following requirements:
Both the source and destination computers must be able to use the same hard-drive
con-troller driver.
Both the source and destination computers must have the same Hardware Abstraction
Layer (HAL). For example, both use an Advanced Configuration and Power Interface (ACPI) HAL. If the source computer is ACPI-compatible and the target computer is non-ACPI-compatible, Windows XP Professional will not load properly.
F I G U R E 1 . 2 Disk imaging with disk-duplicator hardware
The size of the installation partition must be as large as the smallest space the image
pro-gram will install the image to.
Plug and Play devices on the source and destination computers do not need to match, as
long as the drivers for the Plug and Play devices are available.
USING THE SYSTEM PREPARATION TOOL
The System Preparation Tool (Sysprep.exe) is included on the Windows XP Professional CD in the \Support\Tools folder, in the Deploy.cab file. When you run this utility on the source computer, it strips out information from the master copy that must be unique for each com-puter, such as the security ID (SID).
After you install the copied image on the target computer, a Mini-Setup Wizard runs. This wizard automatically creates a unique computer SID and then prompts the user for computer-specific information, such as the product ID, regional settings, and network configuration. The required information can also be supplied through an automated installation script.
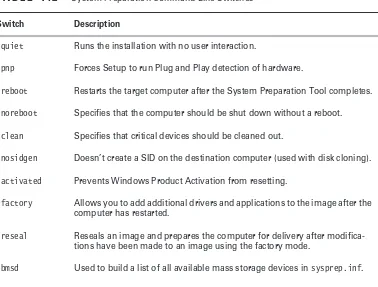
Table 1.2 defines the command switches that you can use to customize the System Prepara-tion Tool’s (Sysprep.exe) operation.
T A B L E 1 . 2 System Preparation Command-Line Switches
Switch Description
-quiet Runs the installation with no user interaction.
-pnp Forces Setup to run Plug and Play detection of hardware.
-reboot Restarts the target computer after the System Preparation Tool completes.
-noreboot Specifies that the computer should be shut down without a reboot.
-clean Specifies that critical devices should be cleaned out.
-nosidgen Doesn’t create a SID on the destination computer (used with disk cloning).
-activated Prevents Windows Product Activation from resetting.
-factory Allows you to add additional drivers and applications to the image after the computer has restarted.
-reseal Reseals an image and prepares the computer for delivery after modifica-tions have been made to an image using the factory mode.
After you run the System Preparation Tool on a computer, you need to run the Mini-Setup Wizard. Then run the Setup Manager to create an answer file that will answer the Mini-Setup Wizard’s questions when the computer (the imaged computer or the original computer that has had the System Preparation Tool run on it) is restarted.
In the following sections, you will learn how to create a disk image and how to copy and install from a disk image.
CREATING A DISK IMAGE
To run the System Preparation Tool and create a disk image, take the following steps:
1. Install Windows XP Professional on a source computer. The computer should have a sim-ilar hardware configuration to the destination computer(s). You should not join a domain, and the administrator password should be left blank.
2. Log on to the source computer as administrator and, if desired, install and configure any applications, files (such as newer versions of Plug and Play drivers), or custom settings (for example, a custom desktop) that will be applied to the target computer(s).
3. Verify that your image meets the specified configuration criteria and that all applications are properly installed and working. Extract the Deploy.cab file from the Windows XP Professional CD.
4. Select Start Run and click the Browse button in the Run dialog box. Select Local Drive (C:), then Deployment Tools; double-click Sysprep and click the OK button.
5. The Windows System Preparation Tool dialog box appears. This dialog box warns you that the execution of this program will modify some of the computer’s security parameters. Click the OK button.
6. You will be prompted to turn off your computer.
7. You may now boot up with third-party imaging software and create an image of the com-puter to deploy to other comcom-puters.
-forceshutdown If you have used the -reseal switch, this switch prepares the operating sys-tem as specified, then immediately shuts down the computer without any user intervention.
-mini Specifies that you want to run the Mini-Setup Wizard on the next restart of the computer.
T A B L E 1 . 2 System Preparation Command-Line Switches (continued)
COPYING AND INSTALLING FROM A DISK IMAGE
After you’ve run the System Preparation Tool on the source computer, you can copy the image and then install it on the target computer.
If you are using special hardware (a disk duplicator) to duplicate the disk image, shut down the source computer and remove the disk. Copy the disk and install the copied disk into the target com-puter. If you are using special software, copy the disk image per the software vendor’s instructions. After the image is copied, turn on the destination computer. The Mini-Setup Wizard runs and prompts you as follows (if you have not configured an answer file):
Accept the End User License Agreement. Specify regional settings.
Enter a name and organization. Specify your product key.
Specify the computer name and administrator password. Specify dialing information (if a modem is detected). Specify date and time settings.
Specify which networking protocols and services should be installed. Join a workgroup or a domain.
If you have created an answer file for use with disk images, you should save the images on the reference computer prior to using the Sysprep utility. Answer files are described in the next section of this chapter. Answer files allow the installation to run without requiring any user input.
Unattended Answer Files
Answer files are automated installation scripts used to answer the questions that appear during a normal Windows XP Professional installation. You can use answer files with Windows XP unattended installations, the System Preparation Tool (disk images), or RIS installations. Set-ting up answer files allows you to easily deploy Windows XP Professional to computers that may not be configured in the same manner, with little or no user intervention.
You create answer files through the Setup Manager (Setupmgr) utility. There are several advantages to using Setup Manager to create answer files:
You can easily create answer files through a graphical interface, which reduces syntax errors. It simplifies the addition of user-specific or computer-specific configuration information. You can include application setup scripts within the answer file.
The utility creates the distribution folder and allows you to populate the distribution folder
In the following sections, you will learn about options that can be configured through Setup Manager, how to create answer files with Setup Manager, answer file format, and how to man-ually edit answer files.
Options That Can Be Configured through Setup Manager
The Setup Manager can be used to configure a wide variety of installation options. The follow-ing list defines what can be configured through Setup Manager and gives a short description of each parameter:
Set user interaction. Sets the level of user interaction that will be used during the setup process. This can be fully automated, or the user can supply configuration information for the items you specify.
Set default username. Specifies the username and organization that will be defined for the computer.
Define computer names. Configures multiple usernames during the setup process. In this case, Setup Manager will generate a Uniqueness Database File (UDF), which maps unique names and settings to specific computers.
Set an administrator password. Encrypts the administrator password that has been defined within the answer file, or allows you to prompt the user on the first logon to specify an admin-istrator password.
Display settings. Configures the display for color depth, screen area, and the refresh frequency display settings that should be applied.
Configure network settings. Specifies any custom network settings you want to be applied. You can also configure the computer to be added to a domain or workgroup, and if you join a domain, automatically create an account within the domain for the computer.
Set time zone and regional options. Specifies the appropriate time zone to be configured for the target computer. Regional options include language settings such as how time and date are displayed.
Set Internet Explorer settings. Configures the basic settings that will be applied to Internet connections.
Set telephony settings. Configures telephony properties—for example, area codes and dialing rules.
Add cmdlines.txt file. Adds applications during the GUI-mode phase of Windows XP Professional installation.
Create an installation folder. Uses the default installation folder (\Windows) to generate or set a custom folder during the setup process.
Install printers. Sets up and configures printers as a part of the automated deployment process.
Add command to the Run Once. Installs whatever command or applications you specify the first time a user logs on to the computer.
Copy additional files. Copies additional files to the user desktop.
Create a distribution folder. Creates a Windows distribution folder on a network share that contains the Windows XP Professional source files or any additional files (such as device drivers) you want to add.
Creating Answer Files with Setup Manager
After you have extracted the Windows XP Deployment Tools from the Windows XP Profes-sional CD, you can run the Setup Manager utility to create a new answer file, create an answer file that duplicates the current computer’s configuration, or edit existing answer files.
The following steps describe how to create a new installation script. In this example, the instructions are for creating an answer file for a RIS installation. This answer file provides default answers, uses the default display configuration, configures typical network settings, and does not edit any additional options.
1. Select Start Run and click the Browse button in the Run dialog box. Double-click the Deployment Tools folder, double-click the Setupmgr program, and then click the OK button.
2. The Windows Setup Manager Wizard starts. Click the Next button.
3. The New or Existing Answer File dialog box appears. This dialog box provides choices for creating a new answer file or modifying an existing answer file. Select the option Create a New Answer File and click the Next button.
4. The Product to Install dialog box appears. You can choose Windows Unattended Installa-tion, Sysprep Install, or Remote Installation Services. Select Remote Installation Services and click the Next button.
5. The User Interaction Level dialog box appears. This dialog box offers the following options:
Provide Defaults allows you to configure default answers that will be displayed. The
user is prompted to review the default answer and can change the answer if desired.
Fully Automated uses all the answers in the answer file and will not prompt the user for
any interaction.
Hide Pages lets you hide the wizard page from the user if you have supplied all of the
answers on the Windows Setup Wizard page.
Read Only allows the user to see the Setup Wizard display page but not to make any
changes to it (this option is used if the Setup Wizard display page is shown to the user).
GUI Attended allows only the text-mode portion of the Windows Setup program to be
automated.
Select the Provide Defaults option and click the Next button to continue.
6. Next, from the Display Settings dialog box, you can configure the following settings:
For the Colors option, set the display color to the Windows default, 16 colors, 256
col-ors, high color (16 bit), high color (24 bit), or high color (32 bit).
The Screen Area option allows you to set the screen area to the Windows default, or to
The Refresh Frequency option (the number of times the screen is updated) allows you to
set the refresh frequency to the Windows default or to 60Hz, 70Hz, 72Hz, 75Hz, or 85Hz.
The Custom button displays a dialog box in which you can further customize display
settings for the color, screen area, and refresh frequency.
For this example, click Next to accept the default configuration and continue.
7. The Time Zone dialog box appears. Select your computer’s time zone from the drop-down list and click the Next button.
8. The Providing the Product Key dialog box appears. Type in the product key for the com-puter that will be installed. Each comcom-puter will need its own license key. When you are done, click the Next button.
9. The Computer Name dialog box will appear. You can let a computer name be automati-cally generated or you can choose to specify the destination computer name.
10. Next is the Administrator Password dialog box. You can choose to prompt the user for a password, or you can specify the administrator password. You can also specify that when the computer starts, the administrator will automatically be logged on. Enter and confirm an administrator password. Then click the Next button.
11. In the Network Settings dialog box, you can choose from Typical Settings, which installs TCP/IP, enables DHCP, and installs Client for Microsoft Networks; or Custom Settings, which allows you to customize the computer’s network settings. Select the Typical Settings option and click the Next button.
12. The Advanced Settings dialog box options appear. These additional settings allow you to configure the following options:
Telephony settings Regional settings Languages
Browser and shell settings Installation folder Install printers
A command that will run once the first time a user logs on
Additional commands that should be run at the end of unattended setup
13. The Setup Information File Text dialog box appears. This dialog box allows you to give the answer file a descriptive name and help text. Enter the name in the Description String text box and the help text in the Help String text box. Click Finish to continue.
14. The Setup Manager dialog box appears. Specify the path and file name you want to use to save your answer file, then click the OK button.
An answer file can be used to provide automated answers for a CD-based installation. Simply create a new answer file named winnt.sif and copy it to a floppy. Insert the Windows XP Professional CD and set the BIOS to boot from CD. As the installation begins, Windows XP will look for winnt.sif and use it as the answer file.
Manually Editing Unattended Answer Files
In addition to creating answer files through Setup Manager, you can edit or create your answer files through a text editor program. Answer files consist of section headers, parameters, and val-ues for the parameters. You do not have to specify every option through your answer file if the option is not required by the installation. Following is a sample answer file, Unattended.txt.
;SetupMgrTag [Data]
AutoPartition=1 MsDosInitiated="0" UnattendedInstall="Yes"
[Unattended]
UnattendMode=ProvideDefault OemPreinstall=Yes
TargetPath=\Windows
[GuiUnattended] AdminPassword=abc OEMSkipRegional=1 TimeZone=4
[UserData]
FullName="Test User" OrgName="ABC Corp" ComputerName=SJ-UserTest
[TapiLocation] CountryCode=1 AreaCode=408
[SetupMgr]
DistShare=winXPdist
[Identification] JoinDomain=SJ-CORP DomainAdmin=administrator DomainAdminPassword=test
[Networking]
InstallDefaultComponents=Yes
The Setup Manager utility allows you to configure answer files through a GUI interface. However, it has limitations on what can be configured, and many additional options can be configured by manually editing the answer files in a text editor (such as Notepad). In the fol-lowing sections, you will learn how to configure settings for the folfol-lowing options:
Mass storage devices Plug and Play devices HALs
Passwords
Language, regional, and time zone settings Display settings
NTFS conversion Application installation Windows product activation Dynamic updates
Driver signing
MASS STORAGE DEVICES
If you have a mass storage device on the remote computer and it is recognized and supported by Windows XP, you need not specify anything in the answer file for mass storage devices. However, if the device has a driver that is not shipped with the Windows XP Professional CD, possibly because the device is brand new, you can configure the device under the [MassStorageDrivers]
section of the answer file.
Here are the steps to configure mass storage devices:
2. Within your answer file, create a [MassStorageDrivers] section. The parameters and val-ues to be set within the Txtsetup.oem file should be provided by the manufacturer of the mass storage device.
3. Within your answer file, create a section named [OEMBootFiles] that includes a list of all of the driver files that are in the \$OEM$\Textmode folder. For example, a device named driver might be configured as follows:
[OEMBootFiles] driver.sys driver.dll driver.inf Txtsetup.oem
4. In the [Unattended] section, include OemPreinstall=Yes.
PLUG AND PLAY DEVICES
If you have a Plug and Play device that does not have a driver included on the Windows XP Pro-fessional CD, you can add the driver to the unattended installation as follows:
1. Within the \$OEM$\$1 subfolder, create a folder that will be used to store the Plug and Play drivers—for example, \$OEM$\$1\PnPdrivers. You may even want to create subdirecto-ries for specific devices, such as \$OEM$\$1\PnPdrivers\Modems.
2. In the answer file, edit the [Unattended] section heading to reflect the location of your Plug and Play drivers. For example, if you installed your Plug and Play modem in \$OEM$\ $1\PnPdrivers\Modems and your sound card in \$OEM$\$1\PnPdrivers\SoundCards, your answer file would have the following line:
[Unattended]
OEMPnPDriversPath=PnPdrivers\Modems; PnPdrivers\SoundCards
If the drivers you are installing are not digitally signed, you will have to configure the driver-signing policy within the [Unattended] section of the answer file as DriverSigningPolicy=Ignore. Use unsigned drivers with caution, as they have not been tested by Microsoft and could cause operating system instability.
HALS
If you want to use alternate HALs, follow these steps:
1. Create a folder called \$OEM$\Textmode (or verify that one exists).
2. Copy any files that are provided by the HAL vendor into the Textmode folder.
PASSWORDS
If you are upgrading a Windows 98 or Windows Millennium Edition (Me) computer to Win-dows XP Professional, you can customize the answer file to set passwords for the user accounts. You can also opt to force users to change their passwords during the first logon.
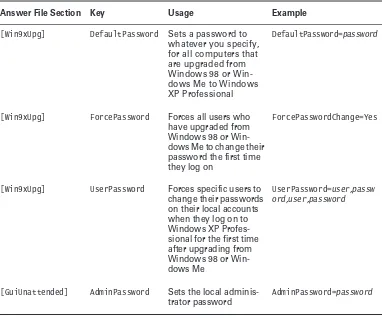
Table 1.3 explains the options that can be configured for passwords.
LANGUAGE, REGIONAL, AND TIME ZONE SETTINGS
The [RegionalSettings] section heading is used to set language and regional settings. Time zone settings are in the [GUIUnattended] section under the TimeZone option.
To set regional settings for answer files, you must copy the appropriate language files to the computer’s hard disk. This can be accomplished by using the /copysource:lang switch with
Winnt32, or the /rx:lang switch with Winnt. Table 1.4 lists the options that can be set for the
[RegionalSettings] section.
T A B L E 1 . 3 Password Options for Answer Files
Answer File Section Key Usage Example
[Win9xUpg] DefaultPassword Sets a password to whatever you specify,
[Win9xUpg] ForcePassword Forces all users who have upgraded from Windows 98 or Win-dows Me to change their password the first time they log on
ForcePasswordChange=Yes
[Win9xUpg] UserPassword Forces specific users to change their passwords on their local accounts when they log on to Windows XP Profes-sional for the first time after upgrading from Windows 98 or Win-dows Me
UserPassword=user,passw ord,user,password
[GuiUnattended] AdminPassword Sets the local adminis-trator password
To set the time zone, you edit the [GuiUnattended] section of the answer file as follows:
[GuiUnattended] TimeZone=TimeZone
DISPLAY SETTINGS
The [Display] section of the answer file is normally used to customize the display settings for portable computers. You should verify that you know what the proper settings are before you set this option. Table 1.5 lists the options that can be set in this section of the answer file.
NTFS CONVERSION
You can configure the answer file to automatically convert FAT16 or FAT32 partitions during the installation. To convert the drives, you add the following entry:
[Unattended]
FileSystem=ConvertNTFS
T A B L E 1 . 4 Regional Setting Options for Answer Files
Option Description
InputLocale Specifies the input locale and the keyboard layout for the computer
Language Specifies the language and locale that will be used by the computer
LanguageGroup Specifies default settings for the SystemLocale, InputLocale, and UserLocale keys
SystemLocale Allows localized applications to run and to display menus and dialog boxes in the language selected
UserLocale Controls settings for numbers, time, and currency
T A B L E 1 . 5 Display Setting Options for Answer Files
Option Description
BitsPerPel Specifies the number of valid bits per pixel for the graphics device
Vrefresh Sets the refresh rate for the graphics device that will be used
Xresolution Specifies the horizontal resolution for the graphics device that will be used