Information in this document is subject to change without notice. Examples provided are fictitious. No part of this document may be reproduced or transmitted in any form, or by any means, electronic or mechanical, for any purpose, in whole or in part, without the express written permission of Actuate Corporation.
© 2003 - 2015 by Actuate Corporation. All rights reserved. Printed in the United States of America.
Contains information proprietary to:
Actuate Corporation, 951 Mariners Island Boulevard, San Mateo, CA 94404
www.actuate.com
The software described in this manual is provided by Actuate Corporation under an Actuate License agreement. The software may be used only in accordance with the terms of the agreement. Actuate software products are protected by U.S. and International patents and patents pending. For a current list of patents, please see http://www.actuate.com /patents.
Actuate Corporation trademarks and registered trademarks include:
Actuate, ActuateOne, the Actuate logo, Archived Data Analytics, BIRT, BIRT 360, BIRT Analytics, BIRT Data Analyzer, BIRT Performance Analytics, Collaborative Reporting Architecture, Dynamic Data Web, e.Analysis, e.Report,
e.Reporting, e.Spreadsheet, Encyclopedia, Interactive Viewing, OnPerformance, Performancesoft, Performancesoft Track, Performancesoft Views, Quite4Me, Quiterian, Report Encyclopedia, Reportlet, The people behind BIRT, X2BIRT, and XML reports.
Actuate products may contain third-party products or technologies. Third-party trademarks or registered trademarks of their respective owners, companies, or organizations include:
Mark Adler and Jean-loup Gailly (www.zlib.net): zLib. Apache Software Foundation (www.apache.org): Axis2, log4, Tomcat. Boost.org: Boost libraries, licensed under the Boost Software License. CURL (curl.haxx.se): Curl, licensed under a MIT/X derivate license. International Components for Unicode (ICU): ICU library. Marcin Kalicinski
(rapidxml.sourceforge.net): RapidXML, licensed under the Boost Software License. Bruno Lowagie and Paulo Soares: iTextSharp, licensed under the Mozilla Public License (MPL). Math.NET: Math.NET, licensed under the MIT/X11 License. Microsoft Corporation: Access Database Engine, SQL Server Express. opencsv team (sourceforg.net): opencsv.
openssl.org: OpenSSL, licensed under the OpenSSL license. qooxdoo.org: qooxdoo, licensed under the Eclipse Public License (EPL). Dave Scriven (svg.codeplex.com): SVG Rendering Engine, licensed under the Microsoft Public License. SQLAPI: SQLAPI++. sqlite.org: SQLite, public domain. stlsoft.org: STLSoft libraries, licensed under the BSD license. Matthew Wilson and Garth Lancaster (www.pantheios.org): Pantheios, licensed under a modified BSD license.
All other brand or product names are trademarks or registered trademarks of their respective owners, companies, or organizations.
Contents
About
Administering BIRT Analytics
. . . iii
Part 1
Administering the BIRT Analytics system
Chapter 1
Using BIRT Analytics Administration . . . 3
About BIRT Analytics Administration . . . .4
Accessing BIRT Analytics Administration . . . .4
Understanding BIRT Analytics Administration . . . .4
Checking the BIRT Analytics release . . . .5
Configuring security . . . .5
Managing security roles . . . .6
Managing access permissions over database objects . . . .8
Managing security filters . . . .9
Security filter query syntax . . . .9
Using multiple security filter queries . . . .10
Security filter management . . . 10
Managing profiles . . . 11
Defining sensitive data . . . 13
Synchronizing the application database . . . .14
Removing temporary information . . . 14
Defining password policy . . . 15
Configuring users and groups . . . 16
Configuring users . . . 16
Configuring groups . . . 17
Configuring the user repository . . . 19
Using the BIRT Analytics repository . . . 19
Using a BIRT iHub user repository . . . 19
Using an Active Directory user repository . . . 20
Mapping user profiles to the external user repository . . . 21
Resetting the user repository settings . . . .22
Configuring system options . . . 22
Managing map images . . . 22
Managing report styles . . . 23
Configuring the e-mail server . . . 24
Monitoring use . . . 25
Managing connections . . . 25
Viewing temporary file usage . . . 26
Viewing usage statistics . . . 26
Chapter 2
Configuring BIRT Analytics . . . 29
About the configuration files . . . 30
Configuring BIRT Analytics Application . . . 30
Configuring BIRT Analytics Administration . . . 31
Configuring BIRT Analytics Client . . . 33
Configuring BIRT Analytics Loader . . . 35
Configuring BIRT Analytics REST API . . . 36
Configuring BIRT Analytics FastDB . . . 37
Part 2
Administering BIRT Analytics reference
Chapter 3
Administering BIRT Analytics functional reference . . . .45
Administering BIRT Analytics functional reference . . . 46
General . . . 46
Administration . . . 48
Administration . . . 48
Access control list (ACL) . . . 49
Configuration . . . 50
Folders . . . 50
Functionalities . . . 50
Groups . . . 51
Integrity . . . 51
Profile . . . 52
Roles . . . 52
Users . . . 52
Analysis . . . 53
Analysis . . . 53
Bubble diagram . . . 54
Calculate Pareto . . . 54
Crosstab . . . 54
Evolution diagram . . . 54
Gallery . . . 55
Map diagram . . . 55
Profile . . . 55
Venn diagram . . . 56
Data exploration . . . 56
Engine security . . . 57
Engineering . . . 57
Engineering . . . 57
Edit engineering fields . . . 58
Events and Alerts . . . 59
Actions . . . 60
Import-Export . . . 61
Links . . . 63
Plug-ins . . . 63
Plug-ins . . . 63
Cworkflow . . . 63
Campaign management . . . 64
Campaign planning . . . 65
Configure CWorkflow . . . 66
Events and Alerts . . . 67
Data Mining . . . 68
Algorithms . . . 68
Preferences . . . 69
A b o u t
A d m i n i s t e r i n g B I R T
A n a l y t i c s
Administering BIRT Analytics includes the following chapters:
■ About Administering BIRT Analytics. Provides an overview of this book.
■ Part 1. Administering the BIRT Analytics system. Describes the general features of the BIRT Analytics Administration application and related operational tasks.
■ Chapter 1. Using BIRT Analytics Administration. Describes BIRT Analytics administration modules, such as security, users, groups, configuration, and monitoring.
■ Chapter 2. Configuring BIRT Analytics. Describes the configuration files used by the different applications in the BIRT Analytics system.
■ Part 2. Administering BIRT Analytics reference. Provides reference information on BIRT Analytics administration modules and terminology.
Part 1
Administering the BIRT Analytics system
■ Using BIRT Analytics Administration
■ Configuring BIRT Analytics
Part
One
C h a p t e r
1
Chapter 1
Using BIRT Analytics
Administration
This chapter contains the following topics:
■ About BIRT Analytics Administration
■ Configuring security
■ Configuring users and groups
■ Configuring system options
About BIRT Analytics Administration
The following sections describe the modules available in the BIRT Analytics Administration application and provide information on how to configure the system.
Accessing BIRT Analytics Administration
BIRT Analytics Administration runs as a browser-based application. After installation, the administrator opens a browser and connects to the administration application by typing a URL of the following format:
http://bahost:8110/baadmin
bahost is the name of the system on which BIRT Analytics Administration is deployed.
8110 is the port number used by BIRT Analytics.
baadmin is the context for BIRT Analytics Administration.
On initial access, the administrator logs in to the application by typing the user name, Administrator, and the default password, PASSWORD, as shown in Figure 1-1. The
administrative user, Administrator, has full permission to modify all configurable features of the BIRT Analytics system.
Figure 1-1 BIRT Analytics Administration login
Actuate recommends changing the administrator password immediately after accessing the system to maintain security. For security reasons, Actuate also recommends that all users, including the administrator, log out of the system before closing any BIRT Analytics application. To log out, choose Logout in the top banner menu, as shown in Figure 1-2.
Figure 1-2 Logout menu option
Understanding BIRT Analytics Administration
■ Security
Manage a security role, access control list (ACL), security filter, profile, sensitive data definition, database synchronization, temporary file information, and password policies.
■ User management
Create, modify, or delete a user account. Create, modify, or delete a group. A group is a set of users belonging to the same organizational unit who share the same permissions for performing tasks. Set up the user repository.
■ Configuration
Configure settings used in document generation, such as map management and report styles, and Simple Mail Transfer Protocol (SMTP) e-mail transmission.
■ Monitoring use
Manage connections, track disk usage for temporary files, and monitor use of the BIRT Analytics tool on database objects.
Figure 1-3 BIRT Analytics Administration modules
Checking the BIRT Analytics release
To find the release number of the BIRT Analytics applications, choose About in the top banner menu, as shown in Figure 1-4.
Figure 1-4 About menu option
The release information appears, as shown in Figure 1-5.
Figure 1-5 BIRT Analytics release information
Configuring security
BIRT Analytics Administration provides the following security pages, as shown in Figure 1-6:
■ Security role management
Create, modify, or delete a security role and configure permissions in the BIRT Analytics system.
■ Access permissions on objects
Create, modify, or delete a security group or access control list (ACL), and manage privileges over database objects.
■ Security filters
Create, modify, or delete a security filter to limit the access to data stored in a database.
■ Profiles
Create, modify, or delete a profile, which is a set of roles, security groups, and security filters assigned to a user.
■ Define sensitive data
Specify sensitive data columns for audit.
■ Synchronize
Synchronize the application database with the BIRT Analytics Engine repository.
■ Remove temporary information
Remove all temporary files and records used by the application.
■ Password policies
Define the rules to use in specifying a user password.
Figure 1-6 BIRT Analytics security options
The following sections provide more information on these security options.
Managing security roles
A security role defines the actions that a user can perform on accessible data.
Click Actions to manage items on the current page Click New to create a role,
The Security role management page allows the administrator to create, modify, or delete a security role. Clicking Actions provides the following choices:
■ Refresh
Choose Refresh to update the list of roles. Any changes that another administrator made to the roles available are displayed.
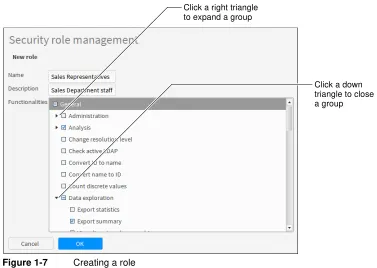
■ New
Choose New to define a new role. In New role, type the role name and a description, and select the functionalities to grant to the role. In Functionalities, select the triangle to expand a functional category. Select the higher-level category to include all elements, or select individual elements in the category list to configure a more restricted subset of privileges, as shown in Figure 1-7.
Figure 1-7 Creating a role
Choose OK. The new role appears in the list of security roles.
■ Modify
In the list of roles, select a role. Then, click Actions and choose Modify to change the settings specified for the role. In Updating role, update the role name or description, select any additional functionalities or privileges to grant to the role, or remove a functionalities selection to remove from the role. For example, after upgrading a license to support a new plug-in, such as Campaign Workflow (Cworkflow), enable the module by assigning the functionality to a security role.
Choose OK.
■ Create As
In the list of roles, select a role. Then, click Actions and choose Create As to define a new role containing the settings specified for the selected role. Create As copies the
functionalities for the selected role to the new role definition. In Create As, type the role name and a description. Then, select any additional functionalities to grant to the new role. Deselect functionalities to remove from the new role.
Choose OK. The new role appears in the list of security roles.
Click a right triangle to expand a group
■ Delete
In the list of roles, select a role. Then, click Actions and choose Delete to remove a role. In Deleting role, the name, description, and list of functionalities appears.
Choose OK. A prompt appears. Choose Yes to confirm deleting the role.
Managing access permissions over database objects
Access permissions restrict a user’s data access to a particular set of databases, tables, or columns. A set of access permissions defines a security group.
The Access permissions on objects page allows the administrator to create, modify, or delete a security group and manage privileges for database objects. Clicking Actions provides the following choices:
■ Refresh
Choose Refresh to update the list of groups. Any changes that another administrator made to the groups available are displayed.
■ New
Choose New to define a new group. In New group, type the group name and a description, as shown in Figure 1-8.
Figure 1-8 Creating a group
Choose OK. The new group appears in the list of security groups.
To define access to database objects for the new group, click Actions and choose Modify.
■ Modify
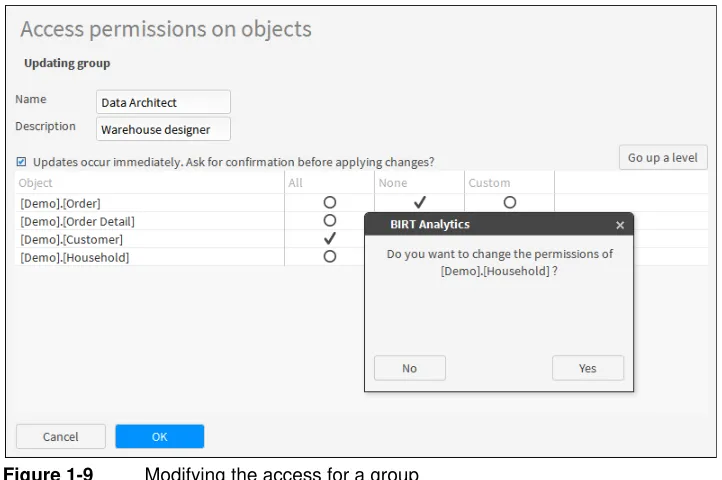
In the list of groups, select a group. Then, click Actions and choose Modify to change the settings for the group. In Updating group, type a new group name or description and grant access to database objects by choosing All, None, or Custom. An object is either a database or a table or field in the database hierarchy.
When Ask for confirmation before applying changes? is not selected, no confirmation message
appears before the updated settings are applied.
Choose All to grant full access to the selected object and all objects in that object.
Choose Custom to specify limited access to individual database tables and columns. The objects that make up the selected object appear. Choose All or None for each object, as shown in Figure 1-9.
Figure 1-9 Modifying the access for a group
Choose OK. Changes to the group name and description appear in the list of groups. If Updates occur immediately is not selected, the updated access settings are applied now.
■ Create As
In the list of groups, select a group. Then, click Actions and choose Create As to define a new group containing the settings, including the name, description, and list of data objects specified for the selected group. Create As copies the settings defined for the selected group to the new group definition. In Create As, type the group name and a description.
Choose OK. The new group appears in the list of security groups.
To define access to database objects for the new group, click Actions and choose Modify.
■ Delete
In the list of groups, select a group. Then, click Actions and choose Delete to remove a group. In Deleting group, the name, description, and list of data objects appears.
Choose OK. A prompt appears. Choose Yes to confirm deleting the group.
Managing security filters
A security filter restricts the set of data values that a named group of users can read from a database. A security filter is made up of one or more queries.
Security filter query syntax
A security filter query is a comparison of a column and data value, as shown in the following example:
[Demo].[Household].[Town] EQ Big Bear Lake
The query must conform to the following syntactical rules:
■ The set of available operators is:
EQ, NE, GE, GT, LE, LT
■ A string value does not require quotation mark delimiters (" or ').
Using multiple security filter queries
A security filter supports multiple queries. The filter joins queries using a logical AND if a link exists in the repository between the queries. If the repository does not provide a link between the queries, the filter joins the queries using a logical OR. For example, the following two queries in a security filter:
[Demo].[Household].[Town] EQ Brisbane [Demo].[Customer].[Gender] EQ F
are equivalent to:
([Demo].[Household].[Town] EQ Brisbane) AND
([Demo].[Customer].[Gender] EQ F)
The following two queries that have no link in the repository:
[FS].[Customer].[Occupation] EQ Director [Demo].[Customer].[Gender] EQ F
are equivalent to:
([FS].[Customer].[Occupation] EQ Director) OR
([Demo].[Customer].[Gender] EQ F)
Security filter management
The Security filters page allows the administrator to create, modify, or delete a security filter and specify one or more queries to control access to data.
Clicking Actions provides the following choices:
■ Refresh
Choose Refresh to update the list of security filters. Any changes that another administrator made to the security filters available are displayed.
■ New
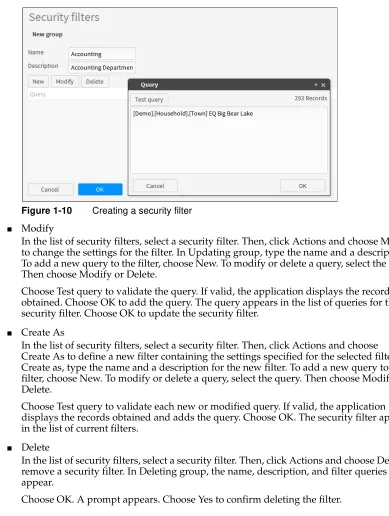
Choose New to define a new security filter. In New security filter group, type the name and a description. Then, choose New and type a query. Choose Test query to validate the query. If valid, the application displays the records obtained, as shown in Figure 1-10. Choose OK to add the query. The query appears in the list of queries for the security filter.
Repeat the procedure to add a query if the security filter requires more queries.
Figure 1-10 Creating a security filter
■ Modify
In the list of security filters, select a security filter. Then, click Actions and choose Modify to change the settings for the filter. In Updating group, type the name and a description. To add a new query to the filter, choose New. To modify or delete a query, select the query. Then choose Modify or Delete.
Choose Test query to validate the query. If valid, the application displays the records obtained. Choose OK to add the query. The query appears in the list of queries for the security filter. Choose OK to update the security filter.
■ Create As
In the list of security filters, select a security filter. Then, click Actions and choose Create As to define a new filter containing the settings specified for the selected filter. In Create as, type the name and a description for the new filter. To add a new query to the filter, choose New. To modify or delete a query, select the query. Then choose Modify or Delete.
Choose Test query to validate each new or modified query. If valid, the application displays the records obtained and adds the query. Choose OK. The security filter appears in the list of current filters.
■ Delete
In the list of security filters, select a security filter. Then, click Actions and choose Delete to remove a security filter. In Deleting group, the name, description, and filter queries appear.
Choose OK. A prompt appears. Choose Yes to confirm deleting the filter.
Managing profiles
A profile combines one or more security roles, security filters, security groups, and users into a matrix that defines the items that a user can access. To log in to BIRT Analytics, a user must be assigned to a profile.
■ Refresh
Choose Refresh to update the list of profiles. Any changes that another administrator made to the profiles available are displayed.
■ New
Choose New to define a new profile. In New profile, type the profile name and a
description. Then, select the roles, security groups, security filters, and users to add to the profile, as shown in Figure 1-11.
If BIRT Analytics security uses an LDAP server, LDAP groups also appear. If the LDAP groups are visible, the administrator can link the profile to a group defined in the LDAP server. If a user belongs to an LDAP group, the BIRT Analytics user inherits the privileges and restrictions from the LDAP group profile. When using LDAP, it is not necessary to select users as the list of users is linked to the LDAP group.
Choose OK. The profile appears in the list of profiles.
Figure 1-11 Creating a profile
■ Modify
In the list of profiles, select a profile. Then, click Actions and choose Modify to change the settings specified for the profile. In Updating profile, update the name and description. Select any additional roles, security groups, security filters, or users to add to the profile, or remove these items from the profile.
Choose OK.
■ Create As
In the list of profiles, select a profile. Then, click Actions and choose Create As to define a new profile containing the settings specified for the selected profile. In New profile as, type the profile name and a description. Then, select the roles, security groups, security filters, and users to add to the profile.
Choose OK. The profile appears in the list of profiles.
■ Delete
In Current profiles, select a profile. Then, click Actions and choose Delete to remove a profile. In Deleting profile, the name, description, and list of roles, security groups, security filters, or users appear.
Choose OK. A prompt appears. Choose Yes to confirm deleting the profile.
LDAP groups appear in this list A non-highlighted item is not included in the profile
Defining sensitive data
Sensitive data are columns for which BIRT Analytics audits all access.
The Sensitive data page allows the administrator to specify which data to audit when tracking user read and update activities. Audit tracking records the following information:
■ User who accessed the data
■ Date and time the access occurred
■ Data read or updated
To specify data for audit, select the following:
■ Databases
■ Tables
■ Columns
The information is recorded in a log file, by default in: [Installation folder]\BIRTAnalytics\log\electronsensitive.log
In the list of columns, select one or more columns and choose Add to list to move the columns to the list of sensitive columns. In the list of sensitive columns, select one or more columns and choose Remove from list to move a column out of the list of sensitive columns, as shown in Figure 1-12.
Figure 1-12 Specifying sensitive data
Each list of columns has an Actions button. Clicking the button provides the following commands:
■ Refresh
Choose Refresh to update the list of columns. Any changes that another administrator made to the definitions of sensitive columns are displayed.
■ Select all
Choose Select all to select all columns in the list. Then, choose Add to list or Remove from list to make all columns in a table sensitive or not sensitive.
■ Deselect all
Choose Deselect all to remove the selection from all columns in the list. Use this command if you need to discard your selections and start over.
Synchronizing the application database
The Synchronize page allows the administrator to update the application database to contain the most recent changes in the BIRT Analytics Engine repository. Execute this option after making a change in the analytical repository that alters the database structure, such as the addition, modification, or deletion of a column, table, or other data object.
The Synchronize page displays the following warning:
WARNING: The synchronization process deletes the database and replaces it with the database structure in the Engine. All outdated links between security groups and objects are removed.
Choose OK to update the application database with the BIRT Analytics Engine repository, as shown in Figure 1-13. A progress animation appears while the synchronization takes place.
Figure 1-13 Synchronizing the application database
Removing temporary information
A temporary file is a temporary data file generated by the BIRT Analytics application. The Remove temporary information page allows the administrator to remove all temporary files and records used by the application to return disk and memory resources to the system. Use this option to refresh the cache after performing analytical calculations that contain obsolete data.
The Remove temporary information page displays the following warning:
WARNING: This process will remove all temporary files and records used by the application. This action may affect any users who are working in BIRT Analytics right now.
Figure 1-14 Removing temporary information
Defining password policy
The Password policies page allows the administrator to define rules to use in specifying a user password. The following choices are available, as shown in Figure 1-15:
Select any of the following items to define password policies:
■ It must contain at least one lowercase letter
■ It must contain at least one uppercase letter
■ It must include at least one of these characters
_, -, !, ·, $, %, (, ), =, |, @, #, €, *, ~, ",", ., " "
■ It must include at least one number
■ Password length has to be greater than 6 characters
■ Password length has to be greater than 8 characters
■ Password length has to be greater than 10 characters
Click Actions and choose Save to implement the password policy changes.
Figure 1-15 Configuring password policies
Configuring users and groups
The User management pages allow the administrator to manage user accounts, user groups, and connection to an Active Directory user repository. If the system security is integrated with an Active Directory system, managing users and groups in the BIRT Analytics Administration application does not change the configuration of the corresponding objects.
A user cannot log in to BIRT Analytics unless the account is assigned to a profile. For information about profiles, see “Managing profiles.”
BIRT Analytics Administration provides the following user and group configuration pages:
■ User management
Create, modify, or delete a user account.
■ Group management
Create, modify, or delete a user group.
■ User repository
Specify the repository used for user authentication.
Configuring users
The User management page allows the administrator to create, modify, or delete a user account. Clicking Actions provides the following choices:
■ Refresh
Choose Refresh to update the list of user accounts. Any changes that another administrator made to the users available are displayed.
■ New
Choose New to define a new user. In Create, specify the settings shown in Table 1-1, as shown in Figure 1-16.
Table 1-1 User definition settings
Setting Purpose and value
Login Unique user ID.
Password Password that conforms to password policies specifications.
Name User name.
Language Local language settings specified for the BIRT Analytics
application environment.
Theme Presentation theme specified for the user application.
User type ADMIN or POWER user type.
Expiration date Whether the user account becomes inactive at a set date and
the date on which to deactivate user account.
Active If selected, the user account is active. If deselected, the user
account is inactive although the user configuration remains on the system.
Must change password at next login
Whether the user must change password at the next login.
Figure 1-16 Creating a user
Choose OK. The user appears in the list of users.
■ Modify
In the list of users, select a user. Then, click Actions and choose Modify to change the settings specified for the user. In Modify, update any of the settings shown in Table 1-1.
Choose OK.
■ Create as
In the list of users, select a user. Then, click Actions and choose Create as to define a new user account containing the settings specified for the selected user. In Create as, type new values for Login and Name. Then, update any of the other settings shown in Table 1-1.
Choose OK. The user appears in the list of users.
■ Delete
In the list of users, select a user. Then, click Actions and choose Delete to remove the user. In Delete, the settings for the selected user appear.
Choose OK. A prompt appears. Choose Yes to confirm deleting the user.
Configuring groups
The Groups management page allows the administrator to create, modify, or delete a group. This option provides the following choices:
■ Refresh
Choose Refresh to update the list of user groups. Any changes that another administrator made to the user groups available are displayed.
■ New
Choose New to define a new group. In Create, specify the settings shown in Table 1-2, as shown in Figure 1-17.
Table 1-2 User group definition settings
Setting Purpose and value
Name User group name.
Figure 1-17 Creating a BIRT Analytics user group
The list of users has an Actions button. Clicking the button provides the following commands:
■ Refresh
Choose Refresh to update the list of users. Any changes that another administrator made to the set of users are displayed.
■ Select all
Choose Select all to select all users in the list.
■ Deselect all
Choose Deselect all to remove the selection from all users in the list. Use this command if you need to discard your selections and start over.
Choose OK. The user group appears in the list of user groups.
■ Modify
In the list of groups, select a group. Then, click Actions and choose Modify to change the group settings specified for the group. In Modify, select any user in the Users list to add to the group or remove the selection from a user to remove them from the group.
Choose OK. The group appears in the list of user groups.
■ Create as
In the list of user groups, select a group. Then, click Actions and choose Create as to define a new user group containing the settings specified for the selected user group. In Create as, type a new value for Name. Then, update any of the other settings shown in Table 1-2.
Choose OK. The user group appears in the list of user groups.
Users List of BIRT Analytics users. Select any user in the Users list to
add to the group.
Table 1-2 User group definition settings
Setting Purpose and value
■ Delete
In the list of groups, select a group. Then, click Actions and choose Delete. In Delete, the settings for the selected group appear.
Choose OK. A prompt appears. Choose Yes to confirm deleting the user group.
Configuring the user repository
The user repository defines and controls users and groups. The default user repository is BIRT Analytics built-in repository.
The user repository page enables the administrator to link the users and groups in the BIRT Analytics application to the default repository, to a BIRT iHub repository or to an Active Directory repository.
BIRT Analytics uses the credentials of the logged-in user to verify the connection to the specified repository. If the logged-in user credentials do not authenticate in the repository, BIRT Analytics does not change the user repository. This behavior ensures continued access to the BIRT Analytics applications.
Using the BIRT Analytics repository
As this is the default repository, BIRT Analytics security is already enabled the first time you open the User repository tab. If necessary, re-enable it. You can set the following property:
■ Expires in
Selecting Expires makes it possible to limit the number of days that the user password will be valid by entering the desired days in the days field. The password must be reset each time the specified days have passed.
Using a BIRT iHub user repository
To set the user repository to a BIRT iHub volume, set the following properties as shown in Figure 1-18:
■ iHub security enabled
Selecting iHub security enabled indicates that you will be using a BIRT iHub user repository and the following fields must be filled in:
■ iHub Server
A URL containing the fully qualified domain name of the machine running BIRT iHub and the port on which the server listens. The default port is 8000.
■ Volume
Figure 1-18 Configuring the BIRT iHub user repository
Click Actions and choose Save to save the user repository settings.
Map the Administrators profile to the matching user repository group. Choose OK.
You must now map the user profiles to the BIRT iHub groups. Failure to map the profiles prevents any user logins.
Using an Active Directory user repository
To set the user repository to an LDAP server, set the following properties, as shown in Figure 1-19. BIRT Analytics uses the system settings relating to the LDAP server for all other LDAP configuration values.
■ Active Directory server connection path
The protocol and path to the Active Directory server and the port on which the server listens. Use either the network name of the server or the IP address. The protocol is LDAP:. The default port is 389.
■ Domain
Figure 1-19 Setting an LDAP server as the user repository Click Actions and choose Save to save the user repository settings.
Map the Administrators profile to the matching user repository group. Choose OK.
You must now map the user profiles to the LDAP groups. Failure to map the profiles prevents any user logins.
Mapping user profiles to the external user repository
To map user profiles to the external user repository, navigate to the Profiles page. For each profile, select the profile and choose Modify. Then, select a User repository group from the list, as shown in Figure 1-20.
Resetting the user repository settings
Click Actions and choose Refresh to reset the display to the current user repository settings or to see changes that another administrator made to the user repository settings. BIRT
Analytics discards unsaved changes and displays the current user repository settings.
Configuring system options
The Configuration pages allow the administrator to specify settings used in document generation, such as map management and report styles, and SMTP e-mail transmission.
BIRT Analytics Administration provides the following system configuration pages:
■ Map management
Manage SVG files used by maps in BIRT Analytics.
■ Styles admin
Manage Rich Text Format (RTF) styles for reports generated by BIRT Analytics.
■ Configure SMTP server
Specify the Simple Mail Transfer Protocol (SMTP) configuration used for sending e-mail notifications.
Managing map images
The Map management page allows the administrator to upload, explore, or delete a Scalable Vector Graphics (SVG) map. This module allows the administrator to manage server folders that provide reference maps in the analysis module. Clicking Actions provides the following choices:
■ Refresh
Choose Refresh to update the list of SVG map files. Any changes that another administrator made to the SVG files available are displayed.
■ Upload SVG
Choose Upload SVG to upload one or more SVG map files to the BIRT Analytics system. In the prompt that appears, choose Upload SVG. Navigate to the folder containing SVG map files. Select one or more SVG map files, and choose Open. The map management module verifies that the file is an SVG file. If a file is a valid SVG file, the file name appears in the list of SVG files.
■ Explore
Figure 1-21 Exploring a map
■ Delete
In the list of SVG files, select a file. Then, click Actions and choose Delete to remove the map.
Choose OK. A prompt appears. Choose Yes to confirm deleting the map from the list of SVG files.
Managing report styles
The Styles admin page allows the administrator to manage Rich Text Format (RTF) styles for reports generated by the BIRT Analytics tool. This page provides the following settings, as shown in Figure 1-22:
■ Title
Select Font to specify a font, such as Arial or Verdana. Type a numeric value in Size to specify the size for report title text.
■ Body
Select Font to specify a font, such as Arial or Verdana. Type a numeric value in Size to specify the size for report body text.
■ Margins
Type numeric values in Left, Right, Top, and Bottom to specify the margin settings in pixels for report content.
■ Header
Figure 1-22 Managing style settings
Click Actions and choose Save to save the modified style settings.
Click Actions and choose Refresh to see changes that another administrator made to the styles.
Configuring the e-mail server
BIRT Analytics supports Simple Mail Transfer Protocol (SMTP) to send e-mail notifications.
The Configure SMTP server page allows the administrator to specify the settings for the SMTP server used for sending e-mail notifications. To configure an SMTP server, specify the following settings:
■ Server
Name of the SMTP server
■ Port
Port on which the SMTP server listens on the network
■ From
E-mail account used to send the e-mail messages
■ User
E-mail account user name
■ Password
E-mail account password
■ Requires SSL
■ Plain: E-mails do not use encryption.
■ SSL: The SMTP service uses Secure Sockets Layer (SSL) to encrypt e-mails.
■ TLS: The SMTP service uses Transport Layer Security (TLS) to encrypt e-mails.
Figure 1-23 shows a typical configuration.
Figure 1-23 Configuring SMTP server settings
Click Actions and choose Save to save the SMTP server settings.
Click Actions and choose Refresh to see changes that another administrator made to the SMTP server settings.
Monitoring use
The Monitoring use pages allow the administrator to manage a connection, track disk usage for temporary files, and monitor use of the BIRT Analytics tool on database objects,.
BIRT Analytics Administration provides the following system configuration pages:
■ Connection management
View the connections to the FastDB database used by BIRT Analytics.
■ Temporary files
View the temporary file storage on disk used by BIRT Analytics.
■ Statistics of use
View the usage of database fields by BIRT Analytics users.
Managing connections
The Connection management page allows the administrator to monitor the state of servers and connections, as shown in Figure 1-24. The server and connection icons indicate whether a component is running or paused.
Figure 1-24 Viewing monitoring servers and connections
Viewing temporary file usage
The Temporary files page provides the following information on the disk space used by temporary files on all servers, as shown in Figure 1-25:
■ Temp folder
File space used for analytical calculations
■ Import folder
File space used during data import operations
■ Export folder
File space used during data export operations
Figure 1-25 Viewing temporary files server and folder lists
Click Actions and choose Refresh to update temporary file information.
Viewing usage statistics
The Statistics of use page provides information on data column use. The administrator can use these statistics to determine which data columns have the highest and lowest access rates and use that information to optimize data queries. This page provides the following filters, as shown in Figure 1-26:
■ Object
Searches only for actions performed on columns in which the object name contains the value in this field
■ User
Searches only for actions performed by the specified user
■ Start and End dates
Limits search to specified date range
■ Actions performed on a column
Searches only for actions selected in the following category list:
■ Administration
■ Advanced Analysis
■ Analysis
■ Campaign Workflow
■ Direct exploration
■ Engineering
■ Import/Export
■ Indirect exploration
■ Links
■ Meta-information
■ Selections
■ Unknown
Choose Search to generate the statistics, displaying the object name and number of times the data has been accessed during the specified time range.
Choose Export to download the statistics to a comma-separated values (CSV) file.
The results of a query are sorted using the following conditions, as shown in Figure 1-26:
■ Descending order of the actions performed on a column
C h a p t e r
2
Chapter 2
Configuring BIRT Analytics
This chapter contains the following topics:
■ About the configuration files
■ Configuring BIRT Analytics Application
■ Configuring BIRT Analytics Administration
■ Configuring BIRT Analytics Client
■ Configuring BIRT Analytics Loader
■ Configuring BIRT Analytics connectors
■ Configuring BIRT Analytics REST API
About the configuration files
This chapter describes the configuration files used by the applications in the BIRT Analytics system. The administrator edits these configuration files to adjust an application to the requirements of a production environment.
BIRT Analytics runs on Windows, LINUX or MAC systems, running as a service on Windows and as either a service or a process on LINUX or MAC.
The following BIRT Analytics applications run as web applications on an Apache Tomcat server.
■ BIRT Analytics Application
■ BIRT Analytics Administration
■ BIRT Analytics Client
■ BIRT Analytics Loader
All of these web applications (except BIRT Analytics Application) provide a user interface as webpages. Each application that has webpages uses an additional configuration file to set the appearance of those pages.
Additional files contain configuration settings for BIRT Analytics connectors, such as the BIRT Analytics REST API, and BIRT Analytics FastDB.
Configuring BIRT Analytics Application
BIRT Analytics Application is the web application that contains business logic and handles communication between the client application and the BIRT Analytics engine system.
BIRT Analytics Application reads configuration parameters from the file configuration.xml. On a Windows system, the location of configuration.xml is:
<BIRTAnalytics Installation folder>\ApplicationWS\WEB-INF\settings
On a Linux system, the location of configuration.xml is:
<BIRTAnalytics Installation folder>/ApplicationWS/WEB-INF/settings
Each parameter is an XML element in the <configuration> element. The value of the parameter is the element value.
Listing 2-1 shows the configuration settings in the configuration.xml file for BIRT Analytics Application installed in C:\BIRTAnalytics on a Windows system.
Listing 2-1 BIRT Analytics Application configuration settings
<configuration> <!-- license -->
<license>C:\BIRTAnalytics\data\ApplicationWS\electron.lic</license>
<!-- database settings -->
<dbdriver>org.postgresql.Driver</dbdriver>
<dburl>jdbc:postgresql://localhost:8111/wpt</dburl> <dbuser>user</dbuser>
<dbpassword>password</dbpassword> <dbmaxactive>20</dbmaxactive> <dbmaxidle>10</dbmaxidle> <dbmaxwait>-1</dbmaxwait>
<maxmemsize>1024</maxmemsize> <maxfilesize>51200</maxfilesize>
<!-- Actuate API WSDL file name -->
<actuateapiwsdl>ActuateAPI.wsdl</actuateapiwsdl>
<campaigndir>C:\BIRTAnalytics\data\ApplicationWS\campaign</campaigndir>
<!-- fastdb engine settings --> <engineuser>SYSTEM</engineuser> <enginepwd>PASSWORD</enginepwd> <engineserver>localhost</engineserver> <engineport>8105</engineport>
<engineignoredangerous>false</engineignoredangerous> <enginesecure>false</enginesecure>
<enginemaxconnection>127</enginemaxconnection> <enginemaxpoolEntries>127</enginemaxpoolEntries>
<!-- collect data for statistics --> <columnstatistics>1</columnstatistics>
<!-- crosstab settings -->
<crosstabpagesize>1000</crosstabpagesize> <!-- languages -->
<defaultlanguage>en_US</defaultlanguage>
<!-- association rule settings -->
<maxPageSizeReadingTransactionsForAssociationRuleAnalysis>10000</ <!-- time series forecasting settings -->
<maxPastIntervalsAllowed>1000</maxPastIntervalsAllowed>
<!-- sensitive log file -->
<sensitivelogfile>C:\BIRTAnalytics\log\electronsensitive.log</ sensitivelogfile>
<!-- location of BAConnectors -->
<baconnector>http://localhost:8110/baconnectors/metainf</baconnector> <baconnectordata>http://localhost:8110/baconnectors/data</
baconnectordata>
</configuration>
Configuring BIRT Analytics Administration
BIRT Analytics Administration is the web application that the administrator uses to configure the system.
BIRT Analytics Administration reads configuration parameters from the file
parameters from the file clientsettings.xml. On a Windows system, the location of the configuration files is:
<BIRTAnalytics Installation folder>\Administration\WEB-INF\settings
On a Linux system, the location of the configuration files is:
<BIRTAnalytics Installation folder>/Administration/WEB-INF/settings
Each configuration parameter in configuration.xml is an XML element in the <configuration> element. The value of the parameter is the element value.
Listing 2-2 shows the configuration settings in the configuration.xml file for BIRT Analytics Administration.
Listing 2-2 BIRT Analytics Administration configuration settings
<configuration>
<urlclient>client/build/client.jsp</urlclient> <title>BIRT Analytics Administration</title> <ignoresslerrors>1</ignoresslerrors>
<!-- uploading files. Unit is Kb --> <maxmemsize>1024</maxmemsize>
<maxfilesize>51200</maxfilesize> <uploadsfolder>uploads</uploadsfolder> <!-- electron WS location and namespace -->
<electronurl>http://localhost:8110/electronws/services</electronurl> <electronqname>http://services.ws.electron.ba.actuate.com</electronqname> <electronns>com.actuate.ba.electron.ws.services</electronns>
<!-- session timeout params --> <msginterval>60000</msginterval>
Each user interface configuration parameter in clientsettings.xml is an XML <setting> element in the <settings> element. The name of the parameter is the value of the name attribute. The value of the parameter is the element value.
Listing 2-3 shows the user interface configuration settings in the clientsettings.xml file for BIRT Analytics Administration.
Listing 2-3 BIRT Analytics Administration user interface configuration settings
<setting name="discreteValuesPageSize">100</setting> <!-- information about the application -->
<setting name="baversion">5.2.985</setting> <setting name="qloaderappname">QLoader</setting> </settings>
Configuring BIRT Analytics Client
BIRT Analytics Client is the web application that an end user uses to interact with the BIRT Analytics system.
BIRT Analytics Client reads configuration parameters from the file configuration.xml. BIRT Analytics Client reads user interface configuration parameters from the file
clientsettings.xml. On a Windows system, the location of the configuration files is:
<BIRTAnalytics Installation folder>\WebClient\WEB-INF\settings
On a Linux system, the location of the configuration files is:
<BIRTAnalytics Installation folder>/WebClient/WEB-INF/settings
Each configuration parameter in configuration.xml is an XML element in the <configuration> element. The value of the parameter is the element value.
Listing 2-4 shows the configuration settings in the configuration.xml file for BIRT Analytics Client.
Listing 2-4 BIRT Analytics Client configuration settings
<configuration>
<urlclient>client/build/client.jsp</urlclient> <title>BIRT Analytics</title>
<ignoresslerrors>1</ignoresslerrors> <!-- uploading files. Unit is Kb --> <maxmemsize>1024</maxmemsize>
<maxfilesize>50000000</maxfilesize>
<!-- electron WS location and namespace -->
<electronurl>http://localhost:8110/electronws/services</electronurl> <electronqname>http://services.ws.electron.ba.actuate.com</electronqname> <electronns>com.actuate.ba.electron.ws.services</electronns>
<!-- session timeout params --> <msginterval>60000</msginterval>
<!-- Electron URL to transfer -->
<electronfiletransfer>/filetransfer</electronfiletransfer> <electronupload>/uploader</electronupload>
<uploadsfolder>/uploads</uploadsfolder> <!-- iHub settings -->
<ihubidentityproviderurl>http://localhost:8000</ihubidentityproviderurl> <webappidentityid>http://localhost:8110/bafrontend</webappidentityid> </configuration>
Each user interface configuration parameter in clientsettings.xml is an XML <setting> element within the <settings> element. The name of the parameter is the value of the name attribute. The value of the parameter is the element value.
Listing 2-5 shows the user interface configuration settings in the clientsettings.xml file for BIRT Analytics Client.
Listing 2-5 BIRT Analytics Client user interface configuration settings
<settings> <!-- information about the application -->
<setting name="baversion">5.2.985</setting> <setting name="qloaderappname">QLoader</setting> <!-- BIRT application name -->
<setting name="birt">BIRT</setting>
<setting name="homepageurl">http://birtanalytics.actuate.com/</setting> <setting name="homepageurltext">Visit BIRT Analytics website</setting> <setting name="documentationurl">
<setting name="documentationurltext">BIRT Analytics Documentation Page </setting>
<setting name="trainingvideosurl">
http://birtanalytics.actuate.com/training-videos</setting> <setting name="trainingvideosurltext">Webcasts and Training Videos
</setting>
<setting name="blogurl">http://blogs.actuate.com/analytics/</setting> <setting name="blogurltext">Actuate Analytics Blog</setting>
<setting name="psurl">
http://birtanalytics.actuate.com/professional-services</setting> <setting name="psurltext">Professional Services for BIRT Analytics
</setting>
<setting name="recentanalysiscount">10</setting> <setting name="loadingpage">loadingpage.html</setting> </settings>
Configuring BIRT Analytics Loader
BIRT Analytics Loader is the web application that reads configuration parameters from the file configuration.xml.
BIRT Analytics Loader reads configuration parameters from the file configuration.xml. BIRT Analytics Loader reads user interface configuration parameters from the file
clientsettings.xml. On a Windows system, the location of the configuration files is:
<BIRTAnalytics Installation folder>\FastDB\Loader\WEB-INF\settings
On a Linux system, the location of the configuration files is:
<BIRTAnalytics Installation folder>/WebClient/WEB-INF/settings
Each configuration parameter in configuration.xml is an XML element in the <configuration> element. The value of the parameter is the element value.
Listing 2-6 shows the configuration settings in the configuration.xml file for BIRT Analytics Loader.
Listing 2-6 BIRT Analytics Loader configuration settings
<configuration>
<!-- uploading files. Unit is Kb --> <maxmemsize>1024</maxmemsize>
<!-- uploading files. Unit is Kb. -1 or 0 mean no limit --> <maxfilesize>-1</maxfilesize>
<connectionstringsfile>connectionstrings.xml</connectionstringsfile> <!-- electron WS location and namespace -->
Each user interface configuration parameter in clientsettings.xml is an XML <setting> element in the <settings> element. The name of the parameter is the value of the name attribute. The value of the parameter is the element value.
Listing 2-7 shows the user interface configuration settings in the clientsettings.xml file for BIRT Analytics Loader.
Listing 2-7 BIRT Analytics Loader user interface configuration settings
<settings>
<setting name="resourceUri">resource</setting> <setting name="wsBase">/qloader</setting>
<setting name="wsBaseFrontend">/bafrontend</setting> <setting name="wsBaseAdmin">/baadmin</setting> <setting name="dispatcher">/dispatcher</setting> <setting name="help">/help</setting>
<setting name="sendByPost">/SendByPost.jsp</setting> <setting name="timeout">6000000</setting>
<setting name="dispatcherUri">../../../dispatcher</setting> <setting name="debug">1</setting>
<setting name="wrongResponseBehaviour">silent</setting> <setting name="msgInterval">60000</setting>
<setting name="applicationName">BIRT Analytics Loader</setting> <setting name="discretevaluespagesize">100</setting>
<setting name="thousandseparator">,</setting> <setting name="decimalseparator">.</setting> </settings>
Configuring BIRT Analytics connectors
BIRT Analytics connectors read configuration parameters from the file configuration.xml. On a Windows system, the location of configuration.xml is:
<BIRTAnalytics Installation folder>\Connectors\WEB-INF\settings
On a Linux system, the location of configuration.xml is:
<BIRTAnalytics Installation folder>/Connectors/WEB-INF/settings
Each parameter is an XML element in the <configuration> element. The value of the parameter is the element value.
Configuring BIRT Analytics REST API
BIRT Analytics REST API reads configuration parameters from the file configuration.xml. On a Windows system, the location of configuration.xml is:
<BIRTAnalytics Installation folder>\restAPI\WEB-INF\settings
On a Linux system, the location of configuration.xml is:
<BIRTAnalytics Installation folder>/restAPI/WEB-INF/settings
Each parameter is an XML element in the <configuration> element. The value of the parameter is the element value.
Listing 2-8 BIRT Analytics REST APIconfiguration settings
<configuration>
<electronurl>http://localhost:8110/electronws</electronurl>
<bootstrap>http://localhost:8110/restapi/rest</bootstrap> </configuration>
Configuring BIRT Analytics FastDB
BIRT Analytics FastDB engine, also known as the dubnium engine, is a web-based, Extract, Transform, and Load (ETL) service that reads most data sources. On a Windows system, the default location and name of the dubnium executable file is:
<BIRTAnalytics Installation folder>\FastDB\dubnium.exe
On a Linux system, the default location and name of the dubnium executable file is:
<BIRTAnalytics Installation folder>/FastDB/dubnium
FastDB runs by default when BIRT Analytics starts. On a Windows system, FastDB typically runs as a Windows service, named BIRT Analytics - FastDB. FastDB reads configuration parameters from the file engine_configuration.ini. On a Windows system, the location of engine_configuration.ini is:
<BIRTAnalytics Installation folder>\data\FastDB
On a Linux system, the location of engine_configuration.ini is:
<BIRTAnalytics Installation folder>/data/FastDB
The configuration file contains only parameters that require a non-default value. As shown in Listing 2-9, parameters are grouped by the functionality they affect. To set a value for a parameter, place the parameter name, an equal sign, and the value on a single line in the appropriate group. Listing 2-9 shows the engine_configuration.ini code for BIRT Analytics FastDB installed in C:\BIRTAnalytics on a Windows system.
Listing 2-9 engine_configuration.ini initial contents
[engine]
license = C:\BIRTAnalytics\data\FastDB\dubnium.lic repository = C:\BIRTAnalytics\data\FastDB\databases exchange_path = C:\BIRTAnalytics\data\FastDB\exchange
[log]
path = C:\BIRTAnalytics\log\engine.log verbosity = 6
dbfibrillator_path = C:\BIRTAnalytics\log\dbfibrillator.log
[server]
admin_file_path = C:\BIRTAnalytics\data\FastDB\admin.sqlite port = 8105
threads = 2
[memory]
Table 2-3 lists and describes the parameters that have a generic effect. These parameters have no default value. To set values for these parameters, place them at the beginning of the configuration file.
Table 2-4 lists and describes the parameters that configure the FastDB engine. To set values for these parameters, place them in the [engine] section of the configuration file.
Table 2-3 BIRT Analytics FastDB overall parameters
Parameter Description Default value
batch The name of a batch file to run
password The password for the user that runs the batch
file
user The user that runs the batch file
working The folder to use as the context for the batch file
Table 2-4 BIRT Analytics FastDB engine configuration parameters
Parameter Description Default value
autocleanup Whether to perform automatic clean-up of the
FastDB repository cache. Set to 0 to disable automatic cache clean-up.
1
autolinkjumps The number of jumps to accept before creating a
new link automatically.
1
autoregeneratederived Whether to perform automatic regeneration of
derived columns. Set to 0 to disable automatic regeneration.
1
cxcachepagesize The internal crosstab cache size. Do not change
this value.
100000
cache_path The path that contains the repository cache. The
value is relative to the repository path.
cache
defaultpagesize The default page size, which is the number of
values returned in a request of discrete values of a column. This parameter takes effect only if the discreteValuesPageSize parameter in the BIRT Analytics web application
clientsetting.xml file is changed accordingly.
100
defaultprecision The default number of digits to display after the
decimal point for numeric values.
2
exchange_path The path to the folder containing import and
export files.
<BIRTAnalytics Installation folder>\data\FastDB \exchange
firstdiscretethreshold Number of rows after which to change strategy
in first discrete operation.
1024
license The path and name of the BIRT Analytics
license file.
Table 2-5 lists and describes the parameters that configure the FastDB logs. To set values for these parameters, place them in the [log] section of the configuration file.
locale The system wide locale. The locale determines
the language used for error messages, date and time formats, and numeric symbols for
thousands separator and decimal point. The locale format uses the standard Java convention of a two-letter language code, an underscore (_) character, and a two-letter country code. If translated messages are not available for the specified value, FastDB uses US English messages.
en_US
max_cache_size The maximum size of the repository cache, in
megabytes (MB). A value of 0 denotes no limit to the cache size.
0
max_dichotomous _columns
The maximum number of dichotomous columns to create from discrete values.
16
maximumprecision The maximum number of digits to display after
the decimal point for numeric values.
8
max_pivot_values The maximum number of discrete values in a
crosstab column to use as a pivot column.
1024
nonlinked_aggregated Whether to aggregate crosstabs non-linked
record values in a row. Set to 1 to aggregate values.
0
repository The engine repository path. <BIRTAnalytics
Installation folder>\data\FastDB \databases
Table 2-4 BIRT Analytics FastDB engine configuration parameters
Parameter Description Default value
Table 2-5 BIRT Analytics FastDB log configuration parameters
Parameter Description Default value
communication Whether to log the request and response
communications with the server. Set to 1 to enable communication logging.
0
dbfibrillator_path The path and name of the dbfibrillator server
log file. The dbfibrillator server monitors the FastDB engine restarts the engine after a failure.
<BIRTAnalytics Installation folder>\log
\dbfibrillator.log
expressions Whether to log the syntax trees of expressions.
Set to 1 to enable expression logging.
0
path The path and name of the log file. <BIRTAnalytics
Installation folder>\log \engine.log
verbosity An integer value denoting the level of detail to
log. A smaller value logs less information. Valid values are 6 for INFORMATIONAL level and 7 for DEBUG level.
Table 2-6 lists and describes the parameters that configure the FastDB memory usage. To set values for these parameters, place them in the [memory] section of the configuration file.
Table 2-6 lists and describes the parameters that configure the FastDB remote data provider. To set values for these parameters, place them in the [rdp] section of the configuration file.
Table 2-6 BIRT Analytics FastDB memory configuration parameters
Parameter Description Default value
buffer_size_datasources Datasources buffer size in kilobytes (KB). 8192
maxmemorysystem Maximum system memory in megabytes (MB).
Estimate the maximum value using the following formula:
[Server memory] - ([OS memory] * 2
4096
(continues)
maxmemorythread Maximum thread memory in megabytes. Each
engine request uses a separate thread. Total memory usage for threads cannot exceed maxmemorysystem. Set the value for
maxmemorythread according to the number of predicted concurrent requests.
2048
memorylogenabled Whether to enable memory logging. This
parameter takes effect only when log verbosity is at DEBUG level. Set to 0 to disable memory logging even at DEBUG log verbosity.
1
Table 2-7 BIRT Analytics FastDB remote data provider (RDP) configuration parameters
Parameter Description Default value
ca_cert A public transport layer security (TLS)
certificate authority (CA) file.
connect_timeout The connection time-out to the RDP server in
seconds.
30
password The password for the account specified by the
username parameter.
proxy_addr The IP address of the proxy server.
proxy_exceptions A comma-separated list of hosts that do not use
a proxy.
proxy_password The password for the account specified by the
proxy_username parameter.
proxy_port The port on which to access the proxy server. 8080
proxy_type The proxy type. One of the following values:
■ HTTP
proxy_username The name of the account used to access the
Table 2-8 lists and describes the parameters that configure the FastDB server. To set values for these parameters, place them in the [server] section of the configuration file.
ssl_verify Whether to verify the transport layer security
(TLS) certificate against a certificate authority (CA). Set to 1 to use a CA.
0
timeout Execution time-out in seconds. 60
use_proxy Whether to use a proxy server to connect to the
RDP source. Set to 1 to use a proxy.
0
username The account name for RDP server
authentication.
Table 2-7 BIRT Analytics FastDB remote data provider (RDP) configuration parameters
Parameter Description Default value
Table 2-8 BIRT Analytics FastDB server configuration parameters
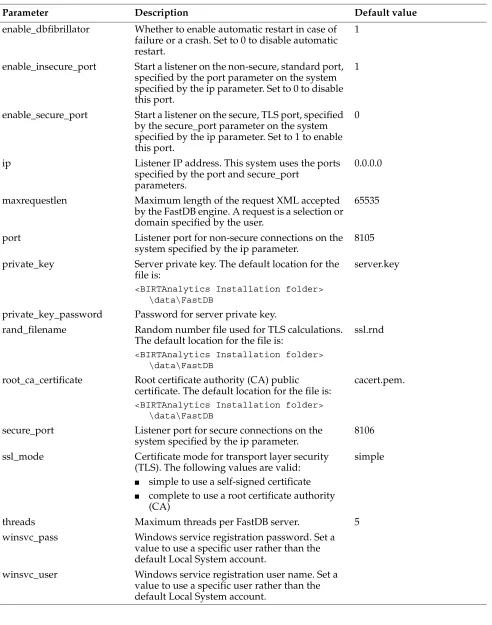
Parameter Description Default value
admin_file_path Authentication and security file path. The
default location for the file is:
<BIRTAnalytics Installation folder> \data\FastDB
admin.sqlite
cert_country Server certificate data: the country as a Java
standard two-character code.
US
cert_email Server certificate data: the contact e-mail
address. For example,
certificate Server public certificate. The default location
for the file is:
<BIRTAnalytics Installation folder> \data\FastDB
server.pem
cert_locality Server certificate data: the locality, which is a
city or town. For example, New York or Barcelona.
cert_organization Server certificate data: organization or
company name. For example, OpenText.
cert_service_names Server certificate separated service names. For
example, yourcompany.com,192.168.0.55.
cert_state Server certificate data: the state.For example,
Texas.
connectiontimeout Time-out of the connection to the engine, in
milliseconds. FastDB closes the connection if no activity occurs in this period of time. A value of 0 denotes that the connection never times out.
0
daemon_pidfile For internal use. Do not change this value. dubnium.pid
dh_filename Diffie-Hellman parameters file. The default
location for the file is:
<BIRTAnalytics Installation folder> \data\FastDB
dhparams.pem
enable_daemon For internal use. Do not change this value. 0


![Table 2-5 lists and describes the parameters that configure the FastDB logs. To set values for these parameters, place them in the [log] section of the configuration file.](https://thumb-ap.123doks.com/thumbv2/123dok/3940964.1884384/45.612.67.549.70.448/table-describes-parameters-configure-fastdb-parameters-section-configuration.webp)