O
N
T
E
N
T
S
C
1
Drawing Application
1
Introducing Computers, the Internet and C#
2
Welcome Application
4
Introducing the Visual Studio .NET IDE
3
Welcome Application
8
Introduction to Visual Programming
4
Designing the Inventory Application
25
Introducing
TextBox
es and
Button
s
5
Completing the Inventory Application
32
Introducing Programming
6
Enhancing the Inventory Application
51
Introducing Variables, Memory Concepts and Arithmetic
7
Wage Calculator Application
71
Introducing Algorithms, Pseudocode and Program Control
8
Dental Payment Application
94
Introducing
CheckBox
es and Message Dialogs
9
Car Payment Calculator Application
131
Introducing the
while
Repetition Statement
10
Class Average Application
153
Introducing the
do
…
while
Repetition Statement
11
Interest Calculator Application
175
Introducing the
for
Repetition Statement
12
Security Panel Application
197
Introducing the
switch
Multiple-Selection Statement
13
Enhancing the Wage Calculator Application
226
Introducing Methods
14
Shipping Time Application
248
15
Fund Raiser Application
267
Introducing Scope and Pass-by-Reference
16
Craps Game Application
285
Introducing Random-Number Generation
17
Flag Quiz Application
306
Introducing One-Dimensional Arrays and
ComboBox
es
18
Student Grades Application
330
Introducing Two-Dimensional Arrays and
RadioButton
s
19
Microwave Oven Application
355
Building Your Own Classes and Objects
20
Shipping Hub Application
395
Introducing Collections, the
foreach
Statement and Access Keys
21
“Cat and Mouse” Painter Application
427
Introducing the
Graphics
Object and Mouse Events
22
Typing Application
447
Introducing Keyboard Events, Menus and Dialogs
23
Screen Scraping Application
475
Introducing
string
Processing
24
Ticket Information Application
497
Introducing Sequential-Access Files
25
ATM Application
521
Introducing Database Programming
26
Check Writer Application
555
Introducing Graphics and Printing
27
Phone Book Application
584
Introducing Multimedia Using Microsoft Agent
28
Bookstore Application: Web Applications
611
Introducing Internet Information Services
29
Bookstore Application: Client Tier
614
Introducing Web Controls
30
Bookstore Application: Information Tier
621
Examining the Database and Creating Database Components
31
Bookstore Application: Middle Tier
625
Introducing Code-Behind Files
32
Enhanced Car Payment Calculator Application
642
T
U
T
O
R
I
A
L
1
Drawing
Application
Introducing Computers, the Internet
and C#
Instructor’s Manual
Exercise Solutions
Tutorial 1
MULTIPLE-CHOICE
QUESTIONS
1.1
The HyperText Markup Language was developed
.
1.2
Microsoft’s
initiative integrates the Internet and the Web into software
development.
1.3 TextBox
es,
Buttons and
RadioButtons are examples of
.
1.4
is an example of primary memory.
1.5
C# is an example of a(n)
language, in which single program statements
accomplish more substantial tasks.
1.6
Which protocol is primarily intended to create a “network of networks?”
1.7
A major benefit of
programming is that it produces software that is more
understandable and better organized than software produced with previously used
techniques.
1.8
.NET’s collection of prepackaged classes and methods is called the
.
1.9
The information-carrying capacity of communications lines is called
.
1.10
Which of these programming languages was specifically created for .NET?
Answers: 1.1)
b.
1.2)a.
1.3)d.
1.4)b.
1.5)c.
1.6)b.
1.7)a.
1.8)c.
1.9)d.
1.10)a.
EXERCISES
1.11Categorize each of the following items as either hardware or software:
a) by ARPA
b) at CERN by Tim Berners-Lee
c) before the Internet
d) as a replacement for the Internet
a) .NET
b) BASIC
c) Windows
d) W3C
a) platforms
b) high-level languages
c) IDEs
d) controls
a) TCP
b) RAM
c) ALU
d) CD-ROM
a) machine
b) intermediate-level
c) high-level
d) assembly
a) TCP
b) IP
c) OOP
d) FCL
a) object-oriented
b) centralized
c) procedural
d) HTML
a) NCL
b) WCL
c) FCL
d) PPCM
a) networking
b) secondary storage
c) traffic
d) bandwidth
a) C#
b) C++
c) BASIC
d) Visual Basic
a) CPU
b) Compiler
c) Input unit
d) A word-processor program
3
Introducing Computers, the Internet and C#
Solutions
Tutorial 1
Answers:
a) hardware. b) software. c) hardware. d) software. e) software.
1.12
Translator programs, such as assemblers and compilers, convert programs from one
guage (referred to as the source language) to another language (referred to as the target
lan-guage). Determine which of the following statements are true and which are false:
a) A compiler translates high-level-language programs into target-language programs.
b) An assembler translates source-language programs into machine-language programs.
c) A compiler translates source-language programs into target-language programs.
d) Machine languages are generally machine independent.
e) A machine-language program requires translation before it can be run on a
computer.
Answers:
a) True. b) True. c) True. d) False. Machine languages are generally machine
dependent. e) False. A machine language program is native to that specific machine and can
be run without translation.
1.13
Computers can be thought of as being divided into six units.
a) Which unit can be thought of as “the boss” of the other units?
b) Which unit is the high-capacity “warehouse” that retains information even when the
computer is powered off?
c) Which unit might determine whether two items stored in memory are identical?
d) Which unit obtains information from devices like the keyboard and mouse?
Answers:a) CPU. b) Secondary storage unit. c) ALU. d) Input unit.
1.14
Expand each of the following acronyms:
Answers:
a) World Wide Web Consortium. b) Transmission Control Protocol/Internet
Pro-tocol. c) Object-oriented programming. d) Framework Class Library. e) HyperText Markup
Language.
1.15
What are the advantages to using object-oriented programming techniques?
Answer:
Programs that use object-oriented programming techniques are easier to
under-stand, correct and modify. The key advantage with using object-oriented programming is that
it tends to produce software that is more understandable because it is better organized and
has fewer maintenance requirements than software produced with earlier methodologies.
OOP helps the programmer build applications faster by reusing existing software
compo-nents. OOP also helps programmers create new software components that can be reused on
future software-development projects.
a) W3C
b) TCP/IP
c) OOP
d) FCL
T
U
T
O
R
I
A
L
4
2
Welcome
Application
Introducing the Visual Studio
®
.NET IDE
Tutorial 2
Welcome
Application
5
Instructor’s Manual
Exercise Solutions
Tutorial 2
MULTIPLE-CHOICE
QUESTIONS
2.1
The
integrated development environment (IDE) is used for creating
applica-tions written in .NET programming languages such as C#.
2.2
The
.csfilename extension indicates a
.
2.3
The pictures on toolbar
Buttons are called
.
2.4
The
allows programmers to modify controls visually, without writing code.
2.5
The
hides the Toolbox when the mouse pointer is moved outside the
Tool-Box’s area.
2.6
A
appears when the mouse pointer is positioned over an IDE toolbar icon
for a few seconds.
2.7
The Visual Studio .NET IDE provides
.
2.8
The
contains a list of helpful links, such as Get Started and Online
Commu-nity
.
2.9
The Properties window contains
.
2.10
A
can be enhanced by adding reusable controls such as
Buttons.
2.11
For Web browsing, Visual Studio .NET includes
.
2.12
An application’s GUI can include
.
a)
Solution Explorer b) Gates
c) Visual Studio .NET
d) Microsoft
a) C# file
b) dynamic help file
c) help file
d) cool solution file
a) prototypes
b) icons
c) tool tips
d) tabs
a)
Properties window
b)
Solution Explorer
c) menu bar
d)
Toolbox
a) component-selection feature
b) Auto Hide feature
c) pinned command
d) minimize command
a) drop-down list
b) menu
c) tool tip
d) down arrow
a) help documentation
b) a toolbar
c) windows for accessing project files
d) All of the above.
a)
Solution Explorer window
b)
Properties window
c)
Start Page d)
Toolbox link
a) the component object box
b) a Solution Explorer
c) menus
d) a menu bar
a) component
b)
Formc) icon
d) property
a) Web View
b) Excel
c) a Web tab
d) Internet Explorer
a) toolbars
b) icons
2.13
The
does not contain a pin icon.
2.14
When clicked,
in the Solution
Explorer window will expand nodes and
will collapse nodes.
2.15 Form
specify attributes such as size and position.
Answers: 2.1)
c
.2.2)
a
.2.3)
b
.2.4)
a
.2.5)
b.
2.6)c
.2.7)
d
.2.8)
c
.2.9)
a
.2.10)
b
.2.11)
d
.2.12)
d
.2.13)
d
.2.14)
b
.2.15)
c
.EXERCISES
2.16(Closing and Opening the
Start Page
)
In this exercise, you will learn how to close and
reopen the Start Page (Fig. 2.30). To accomplish this task, perform the following steps:
Figure 2.30
Showing the Start Page.
a) Close Visual Studio .NET if it is open by clicking its close box.
b) Start Visual Studio .NET.
c) Close the Start Page by clicking its close box (Fig. 2.30).
d) Select Help > Show Start Page to display the Start Page.
2.17
(Enabling Auto Hide for the
Solution Explorer
Window)
In this exercise, you will
learn how to use the Solution Explorer window’s Auto Hide feature (Fig. 2.31) by
perform-ing the followperform-ing steps:
Figure 2.31
Enabling Auto Hide.
a) Open the Start Page.
b) In the Projects tab (displayed by default), click the Open Project
Buttonto display
the
Open Project dialog. You can skip to Step e if the Welcome application is
already open.
c) In the Open Project dialog, navigate to
C:\SimplyCSP\Welcome, and click Open.
d) In the Open Project dialog, select
Welcome.sln, and click Open.
e) Position the mouse pointer on the vertical pin icon in the Solution
Explorer
win-dow’s title bar. After a few seconds, a tool tip appears displaying the words Auto
Hide.
a)
Dynamic Help window
b)
Solution Explorer window
c)
Toolbox window
d) active tab
a) minus boxes; plus boxes
b) plus boxes; minus boxes
c) up arrows; down arrows
d) left arrows; right arrows
a) nodes
b) inputs
c) properties
d) title bars
Close box
Tutorial 2
Welcome
Application
7
f) Click the vertical pin icon. This action causes a Solution
Explorer tab to appear on
the right side of the IDE. The vertical pin icon changes to a horizontal pin icon
(Fig. 2.32). Auto Hide has now been enabled for the Solution Explorer window.
Figure 2.32
Solution Explorer window with Auto Hide enabled.
g) Position the mouse pointer outside the Solution
Explorer window to hide the
win-dow.
h) Position the mouse pointer on the Solution
Explorer tab to view the Solution
Explorer window.
2.18
(Sorting Properties Alphabetically in the
Properties
Window)
In this exercise, you
will learn how to sort the Properties window’s properties alphabetically (Fig. 2.33) by
per-forming the following steps:
Figure 2.33
Sorting properties alphabetically.
a) Open the Welcome application by performing Steps a–d of Exercise 2.17. If the
Wel-come application is already open, you can skip this step.
b) Locate the Properties window. If it is not visible, select View > Properties Window
to display the Properties window.
c) To sort properties alphabetically, click the Properties window’s alphabetic icon. The
properties will display in alphabetic order.
Horizontal pin icon
Solution Explorer tab
8
T
U
T
O
R
I
A
L
3
Welcome
Application
Tutorial 3
Welcome
Application
9
Instructor’s Manual
Exercise Solutions
Tutorial 3
MULTIPLE-CHOICE
QUESTIONS
3.1
The
property determines the
Form’s background color.
3.2
To save all the solution’s files, select
.
3.3
When the ellipsis
Buttonto the right of the Font property value is clicked, the
is displayed.
3.4 PictureBox
property
contains a preview of the image displayed in the
PictureBox
.
3.5
The
tab allows you to create your own color.
3.6
The
PictureBoxclass belongs to the
namespace.
3.7
A
Labelcontrol displays the text specified by the
property.
3.8
In
mode, the application is running (executing).
3.9
The
command prevents programmers from accidentally altering the size and
location of the
Form’s controls.
3.10
Pixels are
.
Answers: 3.1)
a.
3.2)c.
3.3)d.
3.4)c.
3.5)a.
3.6)a.
3.7)c.
3.8)b.
3.9)a.
3.10)a.
EXERCISES
For Exercises 3.11–3.16, you are asked to create the GUI shown in each exercise. You
will use the visual programming techniques presented in this tutorial to create a
vari-ety of GUIs. Because you are creating only GUIs, your applications will not be fully
operational. For example, the
Calculator
GUI in Exercise 3.11 will not behave like a
calculator when its
Buttons are clicked. You will learn how to make your applications
fully operational in later tutorials. Create each application as a separate project.
a)
BackColorb)
BackgroundColorc)
RGBd)
Colora)
Save > Solution > Save Files b)
File > Save
c)
File > Save All d)
File > Save As…
a)
Font Property dialog
b)
New Font dialog
c)
Font Settings dialog
d)
Font dialog
a)
Pictureb)
ImageNamec)
Imaged)
PictureNamea)
Custom b)
Web
c)
System d)
User
a)
System.Windows.Formsb)
System.Form.Formc)
System.Form.Fontd)
System.Form.Controla)
Captionb)
Datac)
Textd)
Namea) start
b) run
c) execute
d) design
a)
Lock Controls b)
Anchor Controls
c)
Lock d)
Bind Controls
3.11
(
Calculator
GUI)
Create the GUI for the calculator shown in Fig. 3.33.
Figure 3.33
Calculator GUI.
a)
Creating a new project.
Open Visual Studio .NET. Create a new project in your
C:\SimplyCSP
directory named
Calculator.
b)
Renaming the
Formfile.
Name the
Formfile
Calculator.cs. Double click the file
name to open the
Formin design view.
c)
Manipulating the
Form’s properties.
Change the
Sizeproperty of the
Formto
272,
192
. Change the
Textproperty of the
Formto
Calculator. Change the
Fontprop-erty to Tahoma.
d)
Adding a
TextBoxto the
Form.
Add a
TextBoxcontrol by double clicking it in the
Toolbox. A
TextBoxcontrol is used to enter input into applications. Set the
Text-Box’s
Textproperty in the Properties window to
0. Change the
Sizeproperty to
240
,
21. Set the
TextAlignproperty to
Right; this right aligns text displayed in the
TextBox
. Finally, set the
TextBox’s
Locationproperty to
8,
16.
e)
Adding the first
Panelto the
Form.
Panelcontrols are used to group other controls.
Double click the
Panelicon (
) in the Toolbox to add a
Panelto the
Form
. Change the
Panel’s
BorderStyleproperty to
Fixed3Dto make the inside of
the
Panelappear recessed. Change the
Sizeproperty to
88,
112. Finally, set the
Location
property to
8,
48. This
Panelcontains the calculator’s numeric keys.
Decimal point ButtonTextBox
Panel (contains 11 Buttons for the numeric keys)
Button
Panel (contains 6 Buttons)
Tutorial 3
Welcome
Application
11
f)
Adding the second
Panelto the
Form.
Click the
Form. Double click the
Panelicon in
the
Toolbox to add another
Panelto the
Form. Change the
Panel’s
BorderStyleproperty to
Fixed3D. Change the
Sizeproperty to
72,
112. Finally, set the
Locationproperty to
112,
48. This
Panelcontains the calculator’s operator keys.
g)
Adding the third (and last)
Panelto the
Form.
Click the
Form. Double click the
Panel
icon in the Toolbox to add another
Panelto the
Form. Change the
Panel’s
BorderStyle
property to
Fixed3D. Change the
Sizeproperty to
48,
72. Finally, set
the
Locationproperty to
200,48. This
Panelcontains the calculator’s C (clear) and
C/A (clear all) keys.
h)
Adding
Buttons to the
Form.
There are 20
Buttons on the calculator. To add a
But-tonto a
Panel, double click the
Buttoncontrol (
) in the Toolbox.
Then add the
Buttonto the
Panelby dragging and dropping it on the
Panel. Change
the
Textproperty of each
Buttonto the calculator key it represents. The value you
enter in the
Textproperty will appear on the face of the
Button. Finally, resize the
Button
s, using their
Sizeproperties. Each
Buttonlabeled
0–9,
x,
/,
-,
=and
.should have a size of
24,24. The 00 and OFF
Buttons have size
48,
24. The +
But-tonis sized
24,
64. The C (clear) and C/A (clear all)
Buttons are sized
32,
24.
i)
Saving the project.
Select File > Save All to save your changes.
j)
Closing the IDE.
Close Visual Studio .NET by clicking its close box.
3.12
(
Alarm Clock
GUI)
Create the GUI for the alarm clock in Fig. 3.34.
Figure 3.34
Alarm Clock GUI.
Buttons
Label RadioButton
a)
Creating a new project.
Open Visual Studio .NET. Create a new project in your
C:\SimplyCSP
directory named
AlarmClock.
b)
Renaming the
Formfile.
Name the
Formfile
AlarmClock.cs. Double click the file
name to open the
Formin design view.
c)
Manipulating the
Form’s properties.
Change the
Sizeproperty of the
Formto
256,
176
. Change the
Textproperty of the
Formto
AlarmClock. Change the
Fontprop-erty to Tahoma.
d)
Adding
Buttons to the
Form.
Add six
Buttons to the
Form. Change the
Textprop-erty of each
Buttonto the appropriate text. Change the
Sizeproperties of the Hour,
Minute and Second
Buttons to
56,
23. The ON and OFF
Buttons get size
40,
23.
The Timer
Buttongets size
48,
32.Align the
Buttons as shown in Fig. 3.34.
e)
Adding a
Labelto the
Form.
Add a
Labelto the
Form. Change the
Textproperty to
Snooze. Set its
Sizeto
248,
23. Set the
Label’s
TextAlignproperty to
Middle-Center. Finally, to draw a border around the edge of the Snooze
Label, change the
BorderStyle
property of the Snooze
Labelto
FixedSingle.
f)
Adding a
GroupBoxto the
Form.
GroupBoxes
are like
Panels, except that
Group-Boxes can display a title. To add a
GroupBoxto the
Form, double click the
GroupBoxcontrol (
) in the Toolbox. Change the
Textproperty to AM/PM, and
set the
Sizeproperty to
72,
72. To place the
GroupBoxin the correct location on the
Form
, set the
Locationproperty to
104,
38.
g)
Adding
AM/PM
RadioButton
s to the
GroupBox.
Add two
RadioButtons to the
FormTutorial 3
Welcome
Application
13
onto the
GroupBoxtwice. Change the
Textproperty of one
RadioButtonto
AMand
the other to
PM. Then place the
RadioButtons as shown in Fig. 3.34 by setting the
Location
of the AM
RadioButtonto
16,
16and that of the PM
RadioButtonto
16,
40
. Set their
Sizeproperties to
48,
24.
h)
Adding the time
Labelto the
Form.
Add a
Labelto the
Formand change its
Textproperty to
00:00:00. Change the
BorderStyleproperty to
Fixed3Dand the
Back-Colorto
Black. Set the
Sizeproperty to
64,23. Use the
Fontproperty to make the
time bold. Change the
ForeColorto
Silver(located in the Web tab) to make the
time stand out against the black background. Set
TextAlignto
MiddleCenterto
center the text in the
Label. Position the
Labelas shown in Fig. 3.34.
i)
Saving the project.
Select File > Save All to save your changes.
j)
Closing the IDE.
Close Visual Studio .NET by clicking its close box.
3.13
(
Microwave Oven
GUI)
Create the GUI for the microwave oven shown in Fig. 3.35.
Figure 3.35
Microwave Oven GUI.
a)
Creating a new project.
Open Visual Studio .NET. Create a new project in your
C:\SimplyCSP
directory named
Microwave.
b)
Renaming the
Formfile.
Name the
Formfile
Microwave.cs. Double click the file
name to open the
Formin design view.
c)
Manipulating the
Form’s properties.
Change the
Sizeproperty of the
Formto
552,
288
. Change the
Textproperty of the
Formto
MicrowaveOven. Change the
Fontproperty to Tahoma.
Buttons
Label Panel
d)
Adding the microwave oven door.
Add a
Panelto the
Formby double clicking the
Panel
(
) in the Toolbox. Select the
Paneland change the
BackColorproperty to
Silver(located in the Web tab) in the Properties window. Then change
the
Sizeto
328,
224. Next, change the
BorderStyleproperty to
FixedSingle.
e)
Adding another
Panel.
Add another
Paneland change its
Sizeto
152,
224and its
BorderStyle
to
FixedSingle. Place the
Panelto the right of the door
Panelas
shown in Fig. 3.35.
f)
Adding the microwave oven clock.
Add a
Labelto the right
Panelby clicking the
Label
in the Toolbox once, then clicking once inside the right
Panel. Change the
Label
’s
Textto
12:00,
BorderStyleto
FixedSingleand
Sizeto
120,
48. Change
Tutorial 3
Welcome
Application
15
g)
Adding a keypad to the microwave oven.
Place a
Buttonin the right
Panelby
click-ing the
Buttoncontrol in the
Toolboxonce, then clicking inside the
Panel. Change
the
Textto
1and the
Sizeto
24,
24. Repeat this process for nine more
Buttons,
changing the
Textproperty in each to the next number in the keypad. Then add the
Start and Clear
Buttons, each of
Size64,
24. Do not forget to set the
Textproper-ties for each of these
Buttons. Finally, arrange the
Buttons as shown in Fig. 3.35. The
1
Buttonis located at
40,
80and the Start
Buttonis located at
8,
192.
h)
Saving the project.
Select File > Save All to save your changes.
i)
Closing the IDE.
Close Visual Studio .NET by clicking its close box.
3.14
(
Cell
Phone
GUI)
Create the GUI for the cell phone shown in Fig. 3.36.
Figure 3.36
Cell Phone GUI.
a)
Creating a new project.
Open Visual Studio .NET. Create a new project in your
C:\SimplyCSP
directory named
Phone.
b)
Renaming the
Formfile.
Name the
Formfile
Phone.cs. Double click the file name to
open the
Formin design view.
c)
Manipulating the
Form’s properties.
Change the
Form’s
Textproperty to
Phoneand
the
Sizeto
160,
488. Change the
Fontproperty to Tahoma.
d)
Adding the display
Label.
Add a
Labelto the
Form. Change its
BackColorto
Aqua(in the Web tab palette), the
Textto
Welcome toDeitelMobilePhone!and the
Size
to
136,
184. Change the
TextAlignproperty to
MiddleCenter. Then place the
Label
as shown in Fig. 3.36.
Tutorial 3
Welcome
Application
17
f)
Adding the keypad
Buttons.
Add the keypad
Buttons to the
Form(12
Buttons in
all). Each
Buttonon the number pad should be of
Size24,
24and should be placed
in the
Panel. Change the
Textproperty of each
Buttonsuch that numbers
0–9, the
pound (
#) and the star (
*) keys are represented. Then add the final two
Buttons such
that the
Textproperty for one is
Talkand the other is
End. Change the
Sizeof each
Button
to
24,
80, and notice how the small
Sizecauses the
Textto align vertically.
Change the
Fontsize of these two
Buttons to
12.
g)
Placing the controls.
Arrange all the controls so that your GUI looks like Fig. 3.36.
h)
Saving the project.
Select File > Save All to save your changes.
i)
Closing the IDE.
Close Visual Studio .NET by clicking its close box.
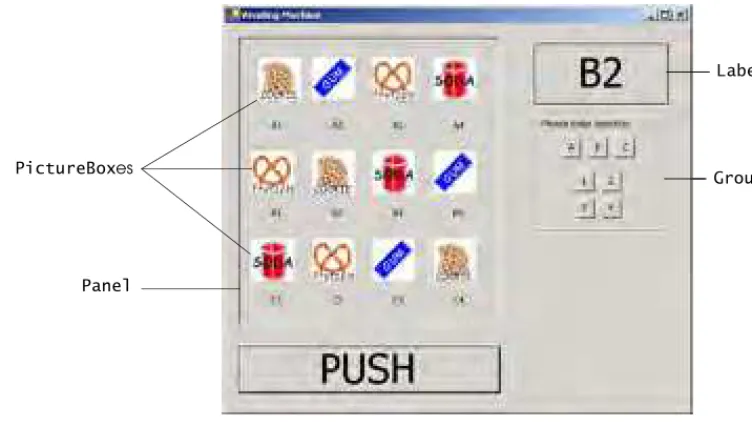
Figure 3.37
Vending Machine GUI.
a)
Creating a new project.
Open Visual Studio .NET. Create a new project in your
C:\SimplyCSP
directory named
VendingMachine.
b)
Renaming the
Formfile.
Name the
Formfile
VendingMachine.cs. Double click the
file name to open the
Formin design view.
c)
Manipulating the
Form’s properties.
Set the
Textproperty of the
Formto
Vending Machineand the
Sizeto
560,
488. Change the
Fontproperty to Tahoma.
d)
Adding the food selection
Panel.
Add a
Panelto the
Form, and change its
Sizeto
312
,
344and
BorderStyleto
Fixed3D. Add a
PictureBoxto the
Panel, and change
its
Sizeto
50,
50. Then set the
Imageproperty by clicking the ellipsis
Buttonand
choosing a file from the
C:\Examples\Tutorial03\ExerciseImages\VendingMa-chinedirectory. Repeat this process for 11 more
PictureBoxes.
Label
GroupBox
Tutorial 3
Welcome
Application
19
e)
Adding
Labels for each vending item.
Add a
Labelunder each
PictureBox.
Change the
Textproperty of the
Labelto
A1, the
TextAlignproperty to
TopCenterand the
Sizeto
56,
16. Place the
Labelso that it is located as in Fig. 3.37. Repeat this
process for
A2through
C4(11
Labels).
f)
Creating the vending machine door (as a
Button).
Add a
Buttonto the
Formby
dragging the
Buttoncontrol in the Toolbox and dropping it below the
Panel.
Change the
Button’s
Textproperty to
PUSH, its
FontSizeto
36and its
Sizeto
312,
g)
Adding the selection display
Label.
Add a
Labelto the
Form, and change the
Textproperty to
B2,
BorderStyleto
FixedSingle,
FontSizeto
36,
TextAlignto
Mid-dleCenterand
Sizeto
160,
72.
h)
Grouping the input
Buttons.
Add a
GroupBoxbelow the
Label, and change the
TextTutorial 3
Welcome
Application
21
i)
Adding the input
Buttons.
Finally, add
Buttons to the
GroupBox. For the seven
But-tons, change the
Sizeproperty to
24,
24. Then change the
Textproperty of the
But-tons such that each
Buttonhas one of the values
A,
B,
C,
1,
2,
3or
4, as shown in
Fig. 3.37. When you are done, move the controls on the
Formso that they are aligned
as shown in Fig. 3.37.
j)
Saving the project.
Select File > Save All to save your changes.
k)
Closing the IDE.
Close Visual Studio .NET by clicking its close box.
Programming Challenge
3.16(
R
adio GUI)
Create the GUI for the radio in Fig. 3.38. [Note: All colors used in this
exercises are from the Web palette.]
Figure 3.38
Radio GUI.
In this exercise, you will create this GUI on your own. Feel free to experiment
with different control properties. For the image in the
PictureBox, use the file
(
MusicNote.gif) found in the
C:\Examples\Tutorial03\ExerciseImages\Radiodirectory.
a)
Creating a new project.
Open Visual Studio .NET. Create a new project in your
C:\SimplyCSP
directory named
Radio.
b)
Renaming the
Formfile.
Name the
Formfile
Radio.cs. Double click the file name to
open the
Formin design view.
c)
Manipulating the
Form’s properties.
Change the
Form’s
Textproperty to
Radioand
the
Sizeto
576,
240. Change the
Fontproperty to Tahoma. Set
BackColorto
PeachPuff
.
d)
Adding the
Preset
Stations
GroupBoxand
Buttons.
Add a
GroupBoxto the
Form.
Set its
Sizeto
232,64, its
Textto
PresetStations, its
ForeColorto
Blackand its
BackColor
to
RosyBrown. Change its
Fontto
bold. Finally, set its
Locationto
24,
16
. Add six
Buttons to the
GroupBox. Set each
BackColorto
PeachPuffand each
Size
to 24, 23. Change the
Buttons’
Textproperties to
1,
2,
3,
4,
5, and
6,
respec-tively.
PictureBox Button CheckBoxes
RadioButtons
TrackBar GroupBox
Tutorial 3
Welcome
Application
23
e)
Adding the
Speakers
GroupBoxand
CheckBoxes.
Add a
GroupBoxto the
Form. Set
its
Sizeto
160,72, its
Textto
Speakersand its
ForeColorto
Black. Set its
Loca-tionto
280,
16. Add two
CheckBoxes to the
Form. Set each
CheckBox’s
Sizeto
56,
24
. Set the
Textproperties for the
CheckBoxes to
Rearand
Front.
f)
Adding the
Power
On/Off
Button.
Add a
Buttonto the
Form. Set its
Textto
Power On/Off, its
BackColorto
RosyBrown, its
ForeColorto
Blackand its
Sizeto
72,
64.
Change its
Fontstyle to
Bold.
g)
Adding the
Volume
Control
GroupBox, the
Mute
CheckBoxand the
Volume
Track-Bar.
Add a
GroupBoxto the
Form. Set its
Textto
VolumeControl, its
BackColorto
RosyBrown
, its
ForeColorto
Blackand its
Sizeto
200,80. Set its
Fontstyle to
Bold
. Add a
CheckBoxto the
GroupBox. Set its
Textto
Muteand its
Sizeto
56,24.
Add a
TrackBarto the
GroupBox.
and its
BackColorto
RosyBrown. Set its
Fontstyle to
Boldand its
Sizeto
216,80.
Add a
Labelto the
Form. Set its
BackColorto
PeachPuff, its
ForeColorto
Black,
its
BorderStyleto
FixedSingle, its
Fontstyle to
Bold, its
TextAlignto
Middle-Centerand its
Sizeto
56,
23. Set its
Text to
92.9. Place the
Labelas shown in the
figure. Add two
RadioButtons to the
GroupBox. Change the
BackColorto
Peach-Puffand change the
Sizeto
40,24. Set one’s
Textto
AMand the other’s
Textto
FM.
i)
Adding the image.
Add a
PictureBoxto the
Form. Set its
BackColorto
Transpar-ent, its
SizeModeto
StretchImageand its
Sizeto
56,
72. Set its
Imageproperty to
C:\Examples\Tutorial03\ExerciseImages\Radio\MusicNote.gif
.
T
U
T
O
R
I
A
L
4
Designing the
Inventory
Application
Instructor’s Manual
Exercise Solutions
Tutorial 4
MULTIPLE-CHOICE
QUESTIONS
4.1
A new Windows application is created by selecting
from the File menu.
4.2
A
Label’s
BorderStyleproperty can be set to
.
4.3
When creating a
Label, you can specify the
of that
Label.
4.4
Changing the value stored in the
property will change the name of the
Formfile.
4.5
should be used to prefix all
TextBoxnames.
4.6
A(n)
helps the user understand a control’s purpose.
4.7
A
is a control in which the user can enter data from a keyboard.
4.8
A descriptive
Labeluses
.
4.9
You should use the
font in your Windows applications.
4.10
should be used to prefix all
Buttonnames.
Answers: 4.1)
c.
4.2)a.
4.3)d.
4.4)c.
4.5)a.
4.6)b.
4.7)b.
4.8)d.
4.9)a.
4.10)d.
EXERCISES
At the end of each tutorial, you will find a summary of new GUI design tips listed in the
GUI Design Guidelines section. A cumulative list of GUI design guidelines, organized by
control appears in Appendix C. In these exercises, you will find C#
Forms that do not
fol-low the GUI design guidelines presented in this tutorial. For each exercise, you must
mod-ify control properties so that your end result is consistent with the guidelines presented in
the tutorial. Note that these applications do not provide any functionality.
4.11
(Address Book
GUI)
In this exercise, you apply the GUI design guidelines you have
learned to a graphical user interface for an address book (Fig. 4.22).
a)
New > Program b)
New > File…
c)
New > Project… d)
New > Application
a)
Fixed3Db)
Singlec)
3Dd) All of the above.
a) alignment of the text
b) border style
c) size
d) All of the above.
a)
Nameb)
Filec)
FileNamed)
FullPatha)
txtb)
tbxc)
Frmd)
tbna)
Buttonb) descriptive
Labelc) output
Labeld) title
bar
a)
Buttonb)
TextBoxc)
Labeld)
PictureBoxa) sentence-style capitalization
b) book-title capitalization
c) a colon at the end of its text
d) Both a and c.
a) Tahoma
b) MS Sans Serif
c) Times
d) Palatino
a)
butb)
lbl27
Introducing TextBoxes and Buttons Solutions
Tutorial 4
Figure 4.22
Address Book application without GUI design guidelines applied.
a)
Copying the template to your working directory.
Copy the directory
C:\Examples\ Tutorial04\Exercises\AddressBookto your
C:\SimplyCSPdirectory.
b)
Opening the application’s template file
. Double click
AddressBook.slnin the
AddressBook
directory to open the application. Double click
AddressBook.csin the
Solution Explorer window to open the
Formin design view.
c)
Applying GUI design guidelines.
Rearrange the controls and modify their properties
so that the GUI conforms to the design guidelines you have learned. Add new
con-trols as necessary.
d)
Saving the project.
Select File > Save All to save your changes.
e)
Closing the IDE.
Close Visual Studio .NET by clicking its close box.
Answer:
1. Change the
Form’s title (
Textproperty).
2. All
TextBoxes should have corresponding
Labels.
3.
Labels indicating control usage should use sentence-style capitalization.
4.
Buttons should use book-title capitalization.
5. Each descriptive
Labeltext should end with a colon.
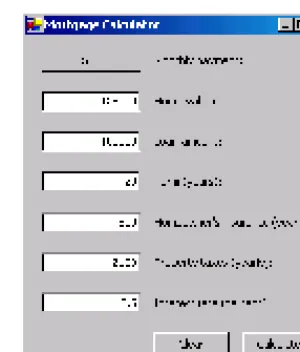
Figure 4.23
Mortgage Calculator application without GUI design guidelines
applied.
a)
Copying the template to your working directory.
Copy the directory
C:\Examples\ Tutorial04\Exercises\MortgageCalculatorto your
C:\SimplyCSPdirectory.
b)
Opening the application’s template file
. Double click
MortgageCalculator.slnin
the
MortgageCalculatordirectory to open the application. Double click
Mortgage-Calculator.csin the Solution Explorer window to open the
Formin design view.
c)
Applying GUI design guidelines.
Rearrange the controls and modify their properties
so that the GUI conforms to the design guidelines you have learned.
d)
Saving the project.
Select File > Save All to save your changes.
e)
Closing the IDE.
Close Visual Studio .NET by clicking its close box.
Answer:
1.
Labelshould be placed above or to the left of the control it is describing.
2. Output
Label’s setting should be
BorderStyleproperty
Fixed3D.
3. Output
Labelinitially should be blank.
4. Place an application’s output below or to the right of the
Form’s input control.
29
Introducing TextBoxes and Buttons Solutions
Tutorial 4
Figure 4.24
Password application without GUI design guidelines applied.
a)
Copying the template to your working directory.
Copy the directory
C:\Examples\ Tutorial04\Exercises\Passwordto your
C:\SimplyCSPdirectory.
b)
Opening the application’s template file
. Double click
Password.slnin the
Pass-worddirectory to open the application. Double click
Password.csin the Solution
Explorer window to open the
Formin design view.
c)
Applying GUI design guidelines.
Rearrange the controls and modify their properties
so that the GUI conforms to the design guidelines you have learned.
d)
Saving the project.
Select File > Save All to save your changes.
e)
Closing the IDE.
Close Visual Studio .NET by clicking its close box.
Answer:1. Keep the
Labelon the
Buttons as short and descriptive as possible.
2. Arrange groups of controls approximately 2 grid units apart on a
Form.
3. Leave approximately 2 grid units of space between the edges of the
Formand
controls nearest the edge. Increase the
Form’s width.
4.
Buttons use book-title capitalization.
Programming Challenge
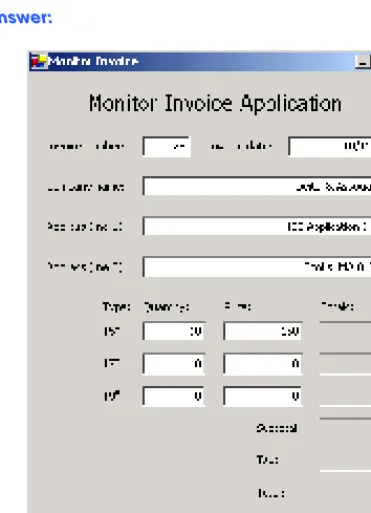
4.14(
Monitor Invoice
GUI)
In this exercise, you apply the GUI design guidelines you have
learned to a graphical user interface for an invoice application (Fig. 4.25).
Multiline TextBox
(you will learn how to create these in later tutorials)
Figure 4.25
Monitor Invoice application without GUI design guidelines
applied.
a)
Copying the template to your working directory.
Copy the directory
C:\Examples\ Tutorial04\Exercises\MonitorInvoiceto your
C:\SimplyCSPdirectory.
b)
Opening the application’s template file
. Double click
MonitorInvoice.slnin the
MonitorInvoice
directory to open the application. Double click
MonitorIn-voice.csin the Solution Explorer window to open the
Formin design view.
c)
Applying GUI design guidelines.
Rearrange the controls and modify their properties
so that the GUI conforms to the design guidelines you have learned. Add new
con-trols as necessary.
d)
Saving the project.
Select File > Save All to save your changes.
e)
Closing the IDE.
Close Visual Studio .NET by clicking its close box.
Answer:
1. Use Tahoma font.
31
Introducing TextBoxes and Buttons Solutions
Tutorial 4
3. The
Labeland the control it describes should be aligned on the left if arranged
vertically.
4.
Labelshould use sentence-style capitalization.
5.
Buttons should be placed in the top right or bottom right of a
Form.
6. Each output
Labelmust have a label that describes it.
7. Output
Labels arranged vertically and used to display numbers in a calculation
should have the
TextAlignproperty set to
MiddleRight.
32
T
U
T
O
R
I
A
L
5
Completing the
Inventory
Application
Tutorial 5
Completing the
Inventory
Application
33
Instructor’s Manual
Exercise Solutions
Tutorial 5
MULTIPLE-CHOICE
QUESTIONS
5.1
A(n)
represents a user action, such as clicking a Button.
5.2
To switch to code view, select
.
5.3
Code that performs the functionality of an application
.
5.4
Comments
.
5.5
A
typically ends a C# statement.
5.6
A(n)
causes an application to produce erroneous results.
5.7
A portion of code that performs a specific task and returns a value is known as a(n)
.
5.8
C# keywords are
.
5.9
Visual Studio .NET allows you to organize code into
, which you can expand
or collapse to facilitate code editing.
5.10
An example of a white-space character is a
character.
Answers: 5.1)
b.
5.2)c.
5.3)a.
5.4)d.
5.5)c.
5.6)a.
5.7)b.
5.8)b.
5.9)c.
5.10)d.
EXERCISES
5.11(
Inventory
Enhancement)
Extend the Inventory application to include a TextBox in
which the user can enter the number of shipments received in a week (Fig. 5.27). Assume
a) statement
b) event
c) application
d) method
a)
Code > View b)
Design > Code
c)
View > Code d)
View > File Code
a) normally is provided by the programmer
b) can never be in the form of an event handler
c) always creates a graphical user interface
d) is always generated by the IDE
a) help improve program readability
b) can be placed at the end of a line of code
c) are ignored by the compiler
d) All of the above.
a) period
b) colon
c) semicolon
d) comma
a) logic error
b) event
c) assignment statement
d) syntax error
a) variable
b) method
c) operand
d) identifier
a) identifiers
b) reserved words
c) case insensitive
d) properties
a) statements
b) operators
c) regions
d) keywords
a) space
b) tab
every shipment has the same number of cartons (each of which has the same number of items).
Then, modify the code so that the Inventory application uses that value in its calculation.
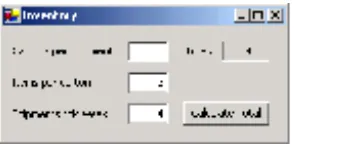
Figure 5.27
Enhanced Inventory application GUI.
a)
Copying the template to your working directory.
Copy the directory C:\Examples\
Tutorial05\Exercises\InventoryEnhancement to your C:\SimplyCSP directory.b)
Opening the application’s template file
. Double click Inventory.sln in the
Inven-toryEnhancement directory to open the application.
c)
Resizing the
Form.
Resize the Form you used in this tutorial by setting the Size
prop-erty to 296,
144. Move the Button toward the bottom of the Form, as shown inFig. 5.27. Its new location should be 184, 78.
d)
Adding a
Label.
Add a Label to the Form and change the Text property to
Ship-ments this week:. Set the Location property to 16, 80. Resize the Label so thatthe entire text displays. Set the Label’s Name property to lblShipments.
e)
Adding a
TextBox. Add a TextBox to the right of the Label. Set the Text propertyto 0 and the Location property to 128, 80. Set the TextAlign and Size properties
to the same values as for the other TextBoxes in this tutorial’s example. Set the
TextBox’s Name property to txtShipments.f)
Modifying the code.
Modify the Calculate Total Click event handler so that it
multi-plies the number of shipments per week with the product of the number of cartons in
a shipment and the number of items in a carton.
g)
Running the application.
Select Debug > Start to run your application. Enter 2 in
the
Cartons per shipment:
TextBox. Enter 3 in the Items per carton: TextBox.Enter 4 in the Shipments this week:
TextBox
. Click the Calculate
Button. TheInventory
Form in Fig. 5.27 shows the correct result after these values have beenentered.
h)
Closing the application.
Close your running application by clicking its close box.
i)
Closing the IDE.
Close Visual Studio .NET by clicking its close box.
Answer:
1
// Exercise 5.11 Solution2
// Inventory.cs (Enhanced)3
4
using System;5
using System.Drawing;6
using System.Collections;7
using System.ComponentModel;8
using System.Windows.Forms;9
using System.Data;10
11
namespace Inventory12
{13
/// <summary>14
/// Summary description for FrmInventory.15
/// </summary>16
public class FrmInventory : System.Windows.Forms.Form17
{Tutorial 5
Completing the
Inventory
Application
35
22
private System.Windows.Forms.TextBox txtCartons;23
private System.Windows.Forms.TextBox txtItems;24
private System.Windows.Forms.Button btnCalculate;25
private System.Windows.Forms.Label lblShipments;26
private System.Windows.Forms.TextBox txtShipments;27
/// <summary>28
/// Required designer variable.29
/// </summary>30
private System.ComponentModel.Container components = null;31
32
public FrmInventory()33
{34
//35
// Required for Windows Form Designer support36
//37
InitializeComponent();38
39
//40
// TODO: Add any constructor code after InitializeComponent41
// call42
//43
}44
45
/// <summary>46
/// Clean up any resources being used.47
/// </summary>48
protected override void Dispose( bool disposing )49
{50
if( disposing )51
{52
if (components != null)53
{54
components.Dispose();55
}56
}57
base.Dispose( disposing );58
}59
60
// Windows Form Designer generated code61
62
/// <summary>63
/// The main entry point for the application.64
/// </summary>65
[STAThread]66
static void Main()67
{68
Application.Run( new FrmInventory() );69
}70
71
// handles Click event72
private void btnCalculate_Click(73
object sender, System.EventArgs e )74
{75
76
77
78
79
80
81
} // end method btnCalculate_Click// multiply values input and display result in Label
5.12
(
Counter
Application)
Create a counter application (Fig. 5.28). Your counter
applica-tion will consist of a Label and Button on the Form. The Label initially displays 0, but, each
time a user clicks the Button, the value in the Label is increased by 1. When incrementing
the Label, you will need to write a statement such as
lblTotal.Text = Convert.ToString( Int32.Parse( lblTotal.Text ) + 1 );
Figure 5.28
Counter GUI.
a)
Creating a new project.
Open Visual Studio .NET. Create a new project in your
C:\SimplyCSP directory named Counter.b)
Modifying a new
Form.
Change the Form’s Size property to 168, 144. Modify the
Form so that the title reads Counter. Change the Name property to FrmCounter.Change Form1 to FrmCounter in method Main and in the comments above the class
declaration.
c)
Adding a
Label.
Add a Label to the Form, and place it as shown in Fig. 5.28. Make
sure that the Label’s Text property is set to 0 and that TextAlign property is set so
that any text will appear in the middle (both horizontally and vertically) of the Label.
This can be done by using the MiddleCenter TextAlign property. Also set the
Bor-derStyle property to Fixed3D. Set the Label’s Name property to lblCountTotal.d)
Adding a
Button.
Add a Button to the Form. Set the Button’s Text property to
con-tain the text Count. Set the Button’s Name property to btnCount.
e)
Creating an event handler.
Add an event handler to the Count Button such that the
value in the Label increases by 1 each time the user clicks the Count Button.
f)
Running the application.
Select Debug > Start to run your application. Click the
Count Button repeatedly and watch the result.
g)
Closing the application.
Close your running application by clicking its close box.
h)
Closing the IDE.
Close Visual Studio .NET by clicking its close box.
Answer:
82
83
} // end class FrmInventory84
}1
// Exercise 5.12 Solution2
// Counter.cs3
4
using System;5
using System.Drawing;6
using System.Collections;7
using System.ComponentModel;8
using System.Windows.Forms;9
using System.Data;10
11
namespace Counter12
{13
/// <summary>14
15
/// </summary>16
public class FrmCounter : System.Windows.Forms.Form17
{Button Label
Tutorial 5
Completing the
Inventory
Application
37
18
private System.Windows.Forms.Label lblCountTotal;19
private System.Windows.Forms.Button btnCalculate;20
/// <summary>21
/// Required designer variable.22
/// </summary>23
private System.ComponentModel.Container components = null;24
25
public FrmCounter()26
{27
//28
// Required for Windows Form Designer support29
//30
InitializeComponent();31
32
//33
// TODO: Add any constructor code after InitializeComponent34
// call35
//36
}37
38
/// <summary>39
/// Clean up any resources being used.40
/// </summary>41
protected override void Dispose( bool disposing )42
{43
if( disposing )44
{45
if (components != null)46
{47
components.Dispose();48
}49
}50
base.Dispose( disposing );51
}52
53
// Windows Form Designer generated code54
55
/// <summary>56
/// The main entry point for the application.57
/// </summary>58
[STAThread]59
static void Main()60
{61
62
}63
64
65
66
67
68
69
70
71
72
73
74
75
}Application.Run( new FrmCounter() );
// handles Click event
private void btnCount_Click( object sender, System.EventArgs e ) {
// when Button is clicked add one to lblCountTotal
lblCountTotal.Text = Convert.ToString( Int32.Parse( lblCountTotal.Text ) + 1 ); } // end method btnCount_Click
5.13
(
Account Information
Application)
Create an application that allows a user to input a
name, account number and deposit amount (Fig. 5.29). The user then clicks the Enter
But-ton, which causes the name and account number to be copied and displayed in two output Labels. The deposit amount entered will be added to the deposit amount displayed inanother output Label. The result is displayed in the same output Label. Every time the
Enter
Button is clicked, the deposit amount entered is added to the deposit amountdis-played in the output Label, keeping a cumulative total. When updating the Label, you will
need to write a statement such as
lblBalance.Text = Convert.ToString(
Int32.Parse( lblDeposits.Text ) + Int32.Parse( txtDepositAmount ) );
Figure 5.29
Account Information GUI.
a)
Copying the template to your working directory.
Copy the directory C:\Examples\
Tutorial05\Exercises\AccountInformation to your C:\SimplyCSP directory.b)
Opening the application’s template file
. Double click AccountInformation.sln in
the AccountInformation directory to open the application.
c)
Creating an event handler.
Add an event handler for the Enter
Button’s Clickevent.
d)
Coding the event handler.
Code the event handler to copy information from the
Name: and Account number:
TextBoxes to their corresponding output Labels.Then add the value in the Deposit amount:
TextBox to the value in Depositamount: output Label, and display the result in the Deposit amount: output Label.
e)
Running the application.
Select Debug > Start to run your application. Begin with
the values in Fig. 5.29 when you test your application.
f)
Closing the application.
Close your running application by clicking its close box.
g)
Closing the IDE.
Close Visual Studio .NET by clicking its close box.
Answer:
1
// Exercise 5.13 Solution2
// AccountInformation.cs3
4
using System;5
using System.Drawing;6
using System.Collections;7
using System.ComponentModel;8
using System.Windows.Forms;9
using System.Data;10
11
namespace AccountInformation12
{13
/// <summary>14
/// Summary description for FrmAccountInformation.15
/// </summary>Tutorial 5
Completing the
Inventory
Application
39
17
{18
private System.Windows.Forms.GroupBox fraInput;19
private System.Windows.Forms.Label lblNameLabel1;20
private System.Windows.Forms.TextBox txtName;21
private System.Windows.Forms.Label lblAccountNumberLabel1;22
private System.Windows.Forms.TextBox txtAccountNumber;23
private System.Windows.Forms.Label lblDepositAmountLabel1;24
private System.Windows.Forms.TextBox txtDepositAmount;25
private System.Windows.Forms.Button btnEnter;26
private System.Windows.Forms.GroupBox fraOutput;27
private System.Windows.Forms.Label lblNameLabel2;28
private System.Windows.Forms.Label lblCopiedName;29
private System.Windows.Forms.Label lblAccountNumberLabel2;30
private System.Windows.Forms.Label lblCopiedAccountNumber;31
private System.Windows.Forms.Label lblDepositAmountLabel2;32
private System.Windows.Forms.Label lblBalance;33
/// <summary>34
/// Required designer variable.35
/// </summary>36
private System.ComponentModel.Container components = null;37
38
public FrmAccountInformation()39
{40
//41
// Required for Windows Form Designer support42
//43
InitializeComponent();44
45
//46
// TODO: Add any constructor code after InitializeComponent47
// call48
//49
}50
51
/// <summary>52
/// Clean up any resources being used.53
/// </summary>54
protected override void Dispose( bool disposing )55
{56
if( disposing )57
{58
if (components != null)59
{60
components.Dispose();61
}62
}63
base.Dispose( disposing );64
}65
66
// Windows Form Designer generated code67
68
/// <summary>69
/// The main entry point for the application.70
/// </summary>71
[STAThread]72
static void Main()73
{74
Application.Run( new FrmAccountInformation() );75
}What does this code do?
5.14After entering 10 in the txtPrice
TextBox and 1.05 in the txtTax TextBox, a userclicks the Button named btnEnter. What is the result of the click, given the following code?
Assume that this application has an output Label,
lblOutput. [Note: The Double.Parsemethod is similar to the Int32.Parse method, but can convert a string of characters into a
number with a decimal point. You will learn more about the Double.Parse method in later
tutorials.]
Answer:
This displays the number 10.5 in a Label. (This is the amount of the sale including
the tax.) The complete code reads:
77
78
79
80
81
82
83
84
85
86
87
88
89
90
91
} // end class FrmAccountInformation92
}// handles Click event
private void btnEnter_Click( object sender, System.EventArgs e ) {
// copy user input
lblCopiedName.Text = txtName.Text; lblCopiedAccountNumber.Text = Convert.ToString( Int32.Parse( txtAccountNumber.Text ) ); lblBalance.Text = Convert.ToString( Int32.Parse( lblBalance.Text ) + Int32.Parse( txtDepositAmount.Text ) ); } // end method btnEnter_Click
▲
1
private void btnEnter_Click( object sender, System.EventArgs e )2
{3
lblOutput.Text = Convert.ToString(4
Double.Parse( txtPrice.Text ) *5
Double.Parse( txtTax.Text ) );6
7
} // end method btnEnter_Click1
// Exercise 5.14 Solution2
// TotalCost.cs3
4
using System;5
using System.Drawing;6
using System.Collections;7
using System.ComponentModel;8
using System.Windows.Forms;9
using System.Data;10
11
namespace TotalCost12
{13
/// <summary>14
/// Summary description for FrmTotalCost.15
/// </summary>16
public class FrmTotalCost : System.Windows.Forms.Form17
{Tutorial 5
Completing the
Inventory
Application
41
23
private System.Windows.Forms.TextBox txtPrice;24
private System.Windows.Forms.Button btnEnter;25
/// <summary>26
/// Required designer variable.27
/// </summary>28
private System.ComponentModel.Container components = null;29
30
public FrmTotalCost()31
{32
//33
// Required for Windows Form Designer support34
//35
InitializeComponent();36
37
//38
// TODO: Add any constructor code after InitializeComponent39
// call40
//41
}42
43
/// <summary>44
/// Clean up any resources being used.45
/// </summary>46
protected override void Dispose( bool disposing )47
{48
if ( disposing )49
{50
if ( components != null )51
{52
components.Dispose();53
}54
}55
base.Dispose( disposing );56
}57
58
// Windows Form Designer generated code59
60
/// <summary>61
/// The main entry point for the application.62
/// </summary>63
[STAThread]64
static void Main()65
{66
Application.Run( new FrmTotalCost() );67
}68
69
// calculates the total cost of an item including tax70
private void btnEnter_Click(71
object sender, System.EventArgs e )72
{73
74
75
76
77
} // end method btnEnter_Click78
79
} // end class FrmTotalCost80
}What’s wrong with this code?
5.15The following event handler should multiply two inputs when the user clicks a
Calcu-late Button. Identify the error(s) in its code. Assume that this application has a Label,
lbl-Result, and two TextBoxes, txtFirst and txtSecond. Also assume that the input enteredinto txtFirst and txtSecond are integers.
Answer:
The code should use the Int32.Parse method to convert the two inputs to
numeri-cal form, as well as the Convert.ToString method to put the answer back into string form
for display in the Label. The complete incorrect code reads:
▲
1
private void btnCalculate_Click( object sender, System.EventArgs e )2
{3
lblResult.Text = txtFirst.Text * txtSecond.Text;4
5
} // end method btnCalculate_Click1
// Exercise 5.15 Solution2
// Multiplication.cs (Incorrect)3
4
using System;5
using System.Drawing;6
using System.Collections;7
using System.ComponentModel;8
using System.Windows.Forms;9
using System.Data;