▸ Baca selengkapnya: download 123dok free
(2)JUMP START RAILS
Jump Start Rails
by Andy Hawthorne
Copyright©2013 SitePoint Pty. Ltd.
English Editor: Paul Fitzpatrick
Product Manager: Simon Mackie
Cover Designer: Alex Walker
Technical Editor: Glenn Goodrich
Notice of Rights
All rights reserved. No part of this book may be reproduced, stored in a retrieval system or transmitted in any form or by any means, without the prior written permission of the publisher, except in the case of brief quotations embodied in critical articles or reviews.
Notice of Liability
The author and publisher have made every effort to ensure the accuracy of the information herein. However, the information contained in this book is sold without warranty, either express or implied. Neither the authors and SitePoint Pty. Ltd., nor its dealers or distributors will be held liable for any damages to be caused either directly or indirectly by the instructions contained in this book, or by the software or hardware products described herein.
Trademark Notice
Rather than indicating every occurrence of a trademarked name as such, this book uses the names only in an editorial fashion and to the benefit of the trademark owner with no intention of infringement of the trademark.
Published by SitePoint Pty. Ltd. 48 Cambridge Street Collingwood
About Andy Hawthorne
Andy is a freelance writer and web developer from Coventry, England. He has spent 12 years as a web developer, and still likes trying new web coding technologies.
About SitePoint
SitePoint specializes in publishing fun, practical, and easy-to-understand content for web professionals. Visit http://www.sitepoint.com/ to access our blogs, books, newsletters, articles, and community forums. You’ll find a stack of information on JavaScript, PHP, Ruby, mobile development, design, and more.
About Jump Start
never-failing love and support I'd never get anything finished. And to my Dad, who inspired me to
Preface
. . . xi
Who Should Read This Book . . . xi
Conventions Used . . . xi
Code Samples . . . xi
Tips, Notes, and Warnings . . . xiii
Supplementary Materials . . . xiii
Do you want to keep learning? . . . xiv
Chapter 1
Getting on Rails
. . . 1
Do I need to know Ruby? . . . 2
What You'll Need . . . 2
The Rails Stack . . . 2
Rails and MVC . . . 3
Installing Rails . . . 4
Installing Rails on Windows . . . 4
Installing on GNU Linux . . . 6
Installing Rails on Mac OS X . . . 10
Some Other Options . . . 12
rbenv . . . 12
Databases . . . 13
Installing Ruby Gems . . . 13
A Word about Editors . . . 14
Summary . . . 15
Chapter 2
Starting an App
. . . 17
Hello, World . . . 18
A Simple App . . . 18
The Project Folders . . . 21
Generators . . . 23
Generating a Controller . . . 24
Some Notes About the Controller . . . 28
Layouts . . . 28
Template Data . . . 29
Setting the Default Page . . . 30
Creating a Route . . . 30
Some Linking . . . 31
Some Styling . . . 32
Putting up Some Scaffolding . . . 33
Generating a Scaffold . . . 33
Active Record Validations . . . 39
Test Driven Development . . . 41
The Environments . . . 43
Tests Rails Has Already Generated . . . 43
Fixtures . . . 44
Unit Testing Models . . . 45
Creating a Layout with Bootstrap . . . 49
Install the Gem . . . 49
Connect the Bootstrap Assets . . . 50
Refining the Layout . . . 52
Some Notes about the Rails Asset Pipeline . . . 53
Summary . . . 54
Chapter 3
Working with Data
. . . 57
Starting the App . . . 58
Generating a Model . . . 62
Adding Some Validation . . . 65
Adding a Controller . . . 70
Adding Another Resource . . . 71
Creating an Association . . . 71
Some Rails Routing Notes . . . 72
Adding a Test for Routes . . . 74
Installing ActiveAdmin . . . 76
Summary . . . 81
Chapter 4
Creating an ActiveAdmin
Resource
. . . 83
Creating Admin Functionality Manually . . . 83
Creating a New Page . . . 86
Showing Pages . . . 87
Creating Resources with ActiveAdmin . . . 89
Back to the Dashboard . . . 94
Editing the Pages Listing . . . 95
A New Resource . . . 97
An Additional Controller . . . 100
Adding Recent Posts to the Dashboard . . . 100
Controlling Fields on the Forms . . . 103
Extra Functionality with Scopes . . . 106
Summary . . . 108
Chapter 5
Adding More Features
. . . 109
The FriendlyId Gem . . . 110
Managing Metadata . . . 113
Installing the Gem . . . 117
Using the Generator . . . 118
Creating an Uploads Folder . . . 118
Updating the Post Model . . . 118
Uploading . . . 119
Displaying Images . . . 121
Creating Thumbnail Images on the Fly . . . 122
Uploading to S3 . . . 125
Creating a Layout with Bootstrap . . . 128
A Custom Helper . . . 131
Changing the Posts Layout . . . 133
Updating the Navigation . . . 136
Controlling Images in the Layout . . . 137
Summary . . . 166
Chapter 6
Deploying to Heroku
. . . 141
Using Partials to Add a Twitter Feed . . . 141
A Dash of CoffeeScript . . . 144
Watch out for Those Turbolinks . . . 150
Adding the Portfolio (or Other Content) Section . . . 151
Deployment . . . 154
Hello, Heroku . . . 156
Deployment . . . 158
Working with Data . . . 160
Adding a Custom Domain Name . . . 166
Preface
Ruby on Rails was created in 2003 by David Heinemeier Hansson. Since then it has been extended by more than 21,000 contributors.
Rails was always intended to make web development a much slicker process than was previously available with other technologies. It doesn't require thousands of lines of code to get common functionality built into your apps. Rails uses the concept of "convention over configuration", meaning that many of the common tasks we do when developing web applications are covered quickly and easily.
It is true to say that Rails has a steeper learner curve than, say, your average PHP framework. However, the effort to learn it is certainly worth it. I doubt that you will ever fully go back to choosing other technologies over Rails where it makes sense for the app you are building.
The Ruby programming language is a delight to work with, too. It's what Rails is built on, and it offers a powerful set of features for all sorts of programming tasks, not just those for the Web.
This is a short book, designed to give you a "jump start" with Rails. I've based it on my own experiences of building a production Rails app for the first time. Hopefully, like me, you will come to enjoy the slick, efficient web development experience that Rails provides.
Who Should Read This Book
Developers seeking a rapid introduction to Rails. You'll need to know HTML and CSS, and experience with other programming languages would be useful.
Conventions Used
You’ll notice that we’ve used certain typographic and layout styles throughout this book to signify different types of information. Look out for the following items.
Code Samples
<h1>A Perfect Summer's Day</h1>
<p>It was a lovely day for a walk in the park. The birds were singing and the kids were all back at school.</p>
If the code is to be found in the book’s code archive, the name of the file will appear at the top of the program listing, like this:
example.css
.footer {
background-color: #CCC; border-top: 1px solid #333; }
If only part of the file is displayed, this is indicated by the wordexcerpt:
example.css (excerpt)
border-top: 1px solid #333;
If additional code is to be inserted into an existing example, the new code will be displayed in bold:
function animate() {
new_variable = "Hello";
}
Also, where existing code is required for context, rather than repeat all the code, a
⋮ will be displayed:
function animate() { ⋮
return new_variable;
}
URL.open("http://www.sitepoint.com/responsive-web-design-real-user-➥testing/?responsive1");
Tips, Notes, and Warnings
Hey, You!
Tips will give you helpful little pointers.
Ahem, Excuse Me …
Notes are useful asides that are related—but not critical—to the topic at hand. Think of them as extra tidbits of information.
Make Sure You Always …
… pay attention to these important points.
Watch Out!
Warnings will highlight any gotchas that are likely to trip you up along the way.
Supplementary Materials
http://www.sitepoint.com/books/jsrails1/
The book’s website, containing links, updates, resources, and more.
http://www.sitepoint.com/books/jsrails1/code.php The downloadable code archive for this book.
http://www.sitepoint.com/forums/forumdisplay.php?227-Ruby-amp-Rails SitePoint’s forums, for help on any tricky web problems.
Do you want to keep learning?
You can now get unlimited access to courses and ALL SitePoint books at Learnable for one low price. Enroll now and start learning today! Join Learnable and you’ll stay ahead of the newest technology trends: http://www.learnable.com.
Once you’ve mastered the principles of Rails, challenge yourself with our online quiz. Can you achieve a perfect score? Head on over to
Chapter
1
Getting on Rails
Welcome to Jump Start Rails! If you've come to Rails from another server-side coding technology such as PHP, you are in for a treat. Rails offers a slick and efficient coding experience for web developers, and was created with built-in solutions to many of the common web development headaches.
Rails is open source and free to use, which means that you don't need to spend a lot to get developing with it. In fact, the biggest outlay will probably be purchasing an editor. We'll look at the options a little later in this chapter.
Rails was created in 2003 by David Heinemeier Hansson of 37 Signals1fame. Since then, it has seen rapid development by the Rails core team2, with over 2,000 con-tributors. Rails runs on the Ruby3general purpose programming language, created by Yukihiro “Matz” Matsumoto, in 1995.
1
http://37signals.com/
2
http://rubyonrails.org/core
3
Do I need to know Ruby?
You can certainly build simple Rails apps with alimitedknowledge of Ruby. Many developers tend to learn Ruby as they learn Rails. And as your knowledge and confidence with Rails increases, you'll want to do more with it.
I've found that you can do this in incremental steps; it's entirely possible to build a Rails app while you are still learning Ruby. The good news is that learning Rails is a great experience, but learning Ruby is equally rewarding — especially if you have come from another language like PHP, for example. Ruby is described on the Ruby website4as "a programmer's best friend" for a reason. So to really get into Rails a good knowledge of Ruby will be required — eventually.
Ruby seems to be built for learning on the go—whenever you come across an obstacle, the answer is never far away. Ruby Docs5will help enormously with this.
What You'll Need
Ruby on Rails6, like many other web coding technologies, requires some setting up on your system first. It's not too scary, though, and since this book covers Rails 4.0, we only have to be concerned with setting up to use the latest versions.
Rails isn't Ruby. It's builtusingRuby, and you use Ruby to build Rails applications. As such, it needs to be present on your system for Rails to run. Happily Ruby is available to run pretty much everywhere.
The Rails Stack
There are several components that make up the Rails stack. Obviously Ruby is one component, the other main one being a database of some kind.
During the process of guiding you through installing Rails in this chapter, I'll mention PostgreSQL7and Ruby Version Manager (RVM)8. Technically neither areessential requirements; it's just that they are common tools used in creating a Rails stack.
RVM is a sandboxed way to install numerous versions of Ruby on your system, all without affecting any system configuration files. It's available for Unix-based systems, and as part of an installer9for Windows.
If you create a Rails project without specifying a database, one will be created any-way. It'll be a SQLite database10, and will serve very well for your initial Rails in-vestigation. However, in Chapter 6, we'll be deploying to Heroku11, and that requires a PostgreSQL database12. As such, we'll be making PostgreSQL part of our Rails stack too.
Rails and MVC
The Rails framework is based on the Model View Controller (MVC) design pattern. No doubt you'll have heard of it if you've already spent time around web develop-ment. The truth is that, with Rails, there are real advantages to be had from MVC.
A few of these advantages are:
■ the ability to keep application logic (or business logic, if you prefer) separate from the user interface
■ Don't Repeat Yourself (DRY) capability. The term DRY also applies in all forms of web and software development. It's a concept where the objective is to only write one piece of code to perform a particular task. You'll see this in action as we begin to build our main app
■ a clear pattern for where each type of code should be stored within the application
Rails uses MVC like this:
■ Modelsare used mostly for setting the rules for interaction with database tables. Normally, you would have one model per database table.
9
http://railsinstaller.org/
10
http://www.sqlite.org/
11
http://www.heroku.com/
12
■ Viewsare HTML files with Ruby embedded to perform tasks for the presentation of data. Views are the user interface the part of your app with which the user interacts.
■ Controllersare the components that decide how to respond to user requests. They are responsible for coordinating responses too. You can think of them as traffic police directing requests and responses around the application. It's im-portant to understand that controllers are the only components that can speak to models and views, as well as to our user's browser.
Installing Rails
Let's run through the basic process of getting Rails installed on Windows, Mac, and Linux.
Installing Rails on Windows
I'm going to stick my neck out here: If you intend to work seriously with Rails, then you might want to consider switching to a Unix-based operating system. The reason is a practical one: You'll be spending a lot time on the command line with Rails. You will also need to keep your Ruby gems up to date. This is all done via the command line. The fact is, it's far easier to manage this stuff on a Unix system such as Linux or Mac OS X. You could always run a Virtual Machine for your Rails-coding projects, and I'll explain how to do that later in this chapter.
There are options for Windows users, and it's worth mentioning that huge efforts are being made to make Ruby easier to work with on Windows.
If you are running Windows, there is now an easy solution for getting going with Rails. The RailsInstaller13has been provided by the team at Engine Yard, and it takes the pain out of configuring Ruby and Rails manually. Simply download the installer, run it, and away you go.
The installer includes all of the required gems and dependencies so that you can start using Rails immediately. It even includes Git, the version control system, widely used in the Ruby/Rails community.
13
PostgreSQL Database
You can download the required software from the PostgreSQL14. It includes the excellent pgAdmin tool—a graphical user interface for the database. You just need to download and install the software and leave it at that. There is very little else to do, as you will work with the database mostly via Rails.
When we get to deployment, I'll explain how you can import and export data between your local PostgreSQL installation and the server running at Heroku.
Another Option for Windows Users
There is another way of setting up for Rails development on Windows―a virtual machine (VM). It's a more involved process, but if you want to try Linux, this is one way to do it.
For example, there is an excellent open source package available for Windows, called VirtualBox15. VirtualBox provides you with the required base in which you're free to create as many virtual machines as your system can handle. The idea is that you install whichever flavor of Linux takes your fancy, install Ruby/Rails and the associated requirements, and do your development in the VM, rather than on your base system.
The advantage of this approach is that you don't have to install any of the required components on your base system so, should anything go awry, you can simply delete the VM and start again. Your base system is not affected in any way.
So, how do we do it? First, you'll have some downloading to do, and it certainly helps if you have installed a Linux distribution (distro for short) before. Here are the steps:
1. Download the ISO for your chosen Linux distro. I always store mine in a folder calledisoin myHomedirectory—it makes it easier to find when you create your VM.
2. Download VirtualBox, and install it. This should prove to be just a normal install-ation, like any other software.
14
http://www.postgresql.org/download/windows/
15
3. Create a new VM, and select the ISO file you downloaded as the source. The ISO file for various flavors of Linux can be found at their respective sites. For Ubuntu, for example, head to Ubuntu's download page16and follow the instructions to download Ubuntu Desktop.
4. Once you have the ISO file, you can create a new VM and mount the ISO file, which will boot into the installation program. Installing Ubuntu, for example, is not difficult, but you may hit a speed bump or two. If you do, search the Web for "installing Ubuntu on VirtualBox" for an avalanche of information.
There is an article on RubySource that demonstrates how to create a functional Rails development environment using VirtualBox here17.
It's worth mentioning that you can install VirtualBox on most platforms, including Linux. Once you have completed the above steps, you can jump in and install Rails for Linux, which is covered in the next section.
Installing on GNU Linux
Most Linux distros come with Ruby installed, but there's a good chance that this will be Ruby 1.8.7. While this is okay for older versions of Rails, we are using the latest, Rails 4.0, so we need Ruby 1.9.3 or higher. And for the purposes of this book we'll be using 2.0.
At the time of writing, there isn't a Rails Installer version for Linux, although there is one planned. So for now, we'll have to do it ourselves. It's not difficult, though, and as long as you're careful about installing the dependencies, you'll have a trouble-free Rails installation running via RVM in no time.
The steps to install RVM vary from distro to distro. I'm going to cover installation on the popular Ubuntu distro (version 12.10).
This routine will work on a fresh Ubuntu installation (so if you are installing in a VM it'll work just fine), and I've also followed the same steps on older installations of Ubuntu 12.10.
16
http://ubuntu.com/download
17
Right, down to business. I've gone through this process with a clean Ubuntu install-ation running in a VM. We'll be doing everything via the Terminal, so fire it up, and install curl:
sudo apt-get install curl
Likewise, we'll be needing Git for version control because that's how we deploy to Heroku, and we need some essential tools to help us build some of the gems:
sudo apt-get install git-core build-essential
Next, we can go ahead and install RVM:
curl -L get.rvm.io | bash -s stable
When the installation completes, RVM provides you with essential information about requirements and dependencies that need to be satisfied to run Ruby properly. You can see what you need with:
rvm requirements
You'll get a list of dependencies thatmustbe installed. The list will look something like this:
Additional Dependencies:
# For Ruby / Ruby HEAD (MRI, Rubinius, & REE), install the following:
ruby: /usr/bin/apt-get install build-essential openssl
➥libreadline6 libreadline6-dev curl git-core zlib1g
➥zlib1g-dev libssl-dev libyaml-dev libsqlite3-dev sqlite3
➥libxml2-dev libxslt-dev autoconf libc6-dev ncurses-dev
➥automake libtool bison subversion pkg-config
sudo apt-get install build-essential openssl libreadline6
➥libreadline6-dev curl git-core zlib1g zlib1g-dev libssl-dev
➥ libyaml-dev libsqlite3-dev sqlite3 libxml2-dev libxslt-dev
➥autoconf libc6-dev ncurses-dev automake libtool bison
➥subversion pkg-config
Please note that the list of dependencies you see may not be the same as what's shown here. Also, RVM does allow you to enable a setting that will automatically handle the requirements (rvm autolibs enable) if you wish. For our purposes we'll install them usingapt-get.
Just to clear up any confusion here, you'll need to usesudohere, because the de-pendencies that are being installed are system wide. However, when we use RVM to install gems a little later, youshouldn'tusesudo. That's because RVM installs on your local user account. That's why it's sandboxed and doesn't affect your system Ruby.
Next, you need to make sure that RVM is being loaded as a function. The usual method is to get on Terminal and enter:
source ~/.rvm/scripts/rvm
Re-start Terminal, and then enter:
type rvm | head -n 1
You should get:RVM is a functionas a reply. If you do, great. If not, you'll need to follow the instructions on the RVM web site18.
Installing Ruby
Now we can install Ruby. Enter:
rvm install 2.0.0
RVM will download and install Ruby version 2.0.0. Next, ensure your system is using the newly installed version of Ruby as the default:
18
rvm use 2.0.0 --default
We should be good to install Rails now:
gem install rails
That's it! Rails is now up and running.
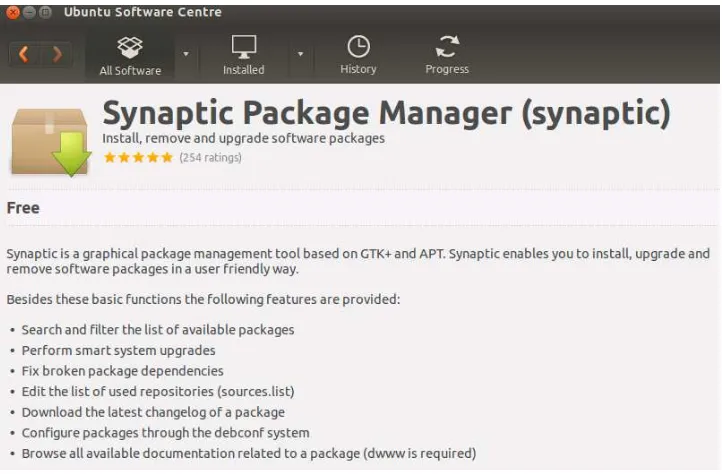
We can also install PostgreSQL.This can be done via apt-get in Terminal, and you'll also find it in the Ubuntu Software Centre. However, since you'll be needing the development header files and their dependencies so that you can install thepggem, the easiest way to do it is to install everything you need via the Synaptic Package Manager.
That can be installed via the Ubuntu Software Centre, as shown in Figure 1.1.
Figure 1.1. Ubuntu Software Centre
Installing Rails on Mac OS X
Macs come with Ruby installed already. The only problem is, Rails needs at least Ruby version 1.9 or higher to run and your Mac (yes, even one running Mountain Lion) comes with Ruby 1.8.7. That's the bad news.
The good news is, Engine Yard have made a version of RailsInstaller19for Macs too. Even better, it installs in a sandbox so it has no effect on your system Ruby. All you need to do is download the .DMG file and install it as you would any other Mac software.
RailsInstaller provides you with everything you need to start building Rails apps. Just keep in mind that the Installer adds RVM to your system so that you can easily run different versions of Ruby, and different isolated sets of gems (called, unsurpris-ingly, "gemsets"). As a beginner, you may not see any advantage in that, but trust me, if you've tried installation in other ways, the resulting pain is not nice at all.
You also get another treat with RailsInstaller. It comes in the shape of the JewelryBox, which is shown in Figure 1.2. It's a graphical user interface for managing the Rubies and associated gem sets you have on your system.
Figure 1.2. RailsInstaller JewelryBox
There are two kinds of experiences when installing gems via this set-up: hellish or easy! To avoid the hellish option, you'll be needing some compilers.
19
For OS X Mountain Lion you need software from Apple called XCode20. It's available on the Mac App Store21, is free (although the download will suck up several gigabytes of data), and installs just like any other software. You'll also need the command line tools. You can use these if you are a member of the Apple developer community as a separate download. Or, you can install them directly from within XCode. You'll find the option to do so from the preferences panel (Preferences>Downloads> Components>Install), as shown in Figure 1.3.
Figure 1.3. XCode command line tools
You can install just RVM without the RailsInstaller. RVM and its gemsets help you jump between Ruby versions for your Ruby applications. XCode gives you the tools that you need to compile those gems that require compilation when installed. If it seems a bit convoluted right now, rest assured, it will get clearer as you play with Ruby and Rails more.
Homebrew
If RVM helps you manage your Ruby-based dependencies (meaning, gems), Homebrew helps you manage those dependenciesoutsideof Ruby. One such de-pendency is PostgresSQL, which I mentioned earlier.
Homebrew refers to itself as "the missing package manager for OS X", and it's a good description.
We are planning to build an app and deploy it to Heroku. For that, you'd be well advised to get used to working with PostgreSQL. And to install that, we really need
20
https://developer.apple.com/xcode/
21
Homebrew. There are Mac binaries available for PostgreSQL, but I don't recommend you use those for one simple reason: For thepggem to install correctly, you'll need the development header files installed; you don't get them with the binary versions, but youdowhen you install via Homebrew.
To install Homebrew you should follow the instructions22. In a nutshell, though, you use Ruby to install it:
ruby -e "$(curl -fsSkL raw.github.com/mxcl/homebrew/go)"
Homebrew will sort out any dependency issues, and install everything in a sand-boxed environment in/usr/local.
Once Homebrew is installed, you can then install PostgreSQL with:
brew install postgresql
I don't recommend installing the download version of PostgreSQL from its website because you'll be missing the development files needed to install thepggem. You can, however, download and install pgAdmin23, which will help you see and ma-nipulate the content of your databases.
Some Other Options
There are some alternatives to the options I've mentioned so far.
rbenv
For completeness, I should mention one other option for managing Rubies. It's called rbenv24and you can read about how it differs from RVM at its website25.
Personally, I've always chosen RVM, and the reason is simple: allowing for the caveats mentioned in this chapter RVM gets very close to the software Nirvana of "it just works." That's not to say rbenvdoesn'twork, but since you're going to be busy mastering Rails, why add learning a different Ruby manager to your to-do list?
22
http://mxcl.github.com/homebrew/
23
http://www.pgadmin.org/
24
https://github.com/sstephenson/rbenv
25
Databases
If you don't specify a different database, Rails will use SQLite by default. Since will deploy to Heroku, I'm going to use PostgreSQL for the main app we build in this book.
It's worth mentioning that you do have the option to develop using SQLite and still deploy to Heroku. However, keep in mind that you cannot use SQLite on Heroku. So the best way to develop locally using SQLite, and deploy to Heroku's PostgreSQL server, is to make a change in your Gemfile. We'll cover how to do that in the next section.
Installing Ruby Gems
Now that you are running RVM, it's worth pointing out that adding other gems is easy. For example, if you type the following at the command line the Thin gem will be installed:
gem install thin
"Thin," by the way, is another web server for running Rails applications.
Rails, along with most Ruby gems and applications, doesn'tt require you to manually install each gem at the command line. To do this you can use Bundler26. If you place all the gems you need into a file called "Gemfile" in the root of your application, Bundler will install them all with a simple command. You'll see this in action soon.
If you were going to use SQLite for local development, then before you deployed to Heroku, you would need to make a change in your Gemfile like this:
group :production, :staging do gem "pg"
end
26
group :development, :test do
gem "sqlite3-ruby", "~> 1.3.0", :require => "sqlite3" end
This ensures that you are using the pg (short for PostgreSQL) gem when running on Heroku, and SQLite when working locally, and demonstrates how important the Gemfile is. Rails usesBundlerto manage a consistent environment for Ruby applic-ations. Bundler is amazing because it tracks the gems your application needs to run, along with the versions.
Your application's Gemfile lists all the gems being used, and what version. To install all the gems in your app's Gemfile, you'd jump into Terminal and enter:
bundle install
The Gemfile has to have at least one source, but once that's in place,bundle install
will download and install all the gems that the app needs to run. You'll see this in action throughout the book.
A Word about Editors
Choosing an editor for Rails, or for any other web development for that matter, is subjective. However, I'll offer this piece of advice: don't use an IDE, because you won't learn that way. You should also consider investing in an editor such as Sublime Text 227. It's available on all platforms, which means you can work on your Windows machine, Mac, or Linux and have the same coding experience.
If you are looking for a free option, you have a couple of choices that are popular in the Ruby/Rails community. First, there is GNU Emacs28, which has a minor mode29(think plugin) that's dedicated to Rails development. The other well-known free option is Vim30. There are versions of it available for most platforms, and there is also a dedicated Rails plugin31. You'll also find there are many packages specific to Rails development being added. That said, the learning curve for Emacs and Vim
can be daunting, and most new Rails developers are already absorbing a lot of new information.
Summary
You now have Rails up and running on your computer. Most problems that arise when installing Rails have been answered, and the Rails community is friendly and helpful. In the worse-case scenario, installing via RVM means that it is easy to dump the local RVM folder and start again. However, that shouldn't be necessary as long as you've paid attention to the dependencies needed for your chosen platform.
Chapter
2
Starting an App
The plan, by the end of the book, is for you to have built a fully functioning Rails application—and, in this chapter, we are going to start that process. We'll do it by building a smallertrainingapp—something you can refer back to and experiment with as your knowledge of Rails grows. That way, you'll get a feel for how a Rails app hangs together. You'll also become familiar with the various files and directories that make up a standard Rails app.
Data First?
It's common when building an app for the data requirements to come first. In fact, we'll be doing exactly that when we start our main project for the book―planning the database schema and creating models arethe first tasks.
Hello, World
It's common practice when trying out a new programming technology to build something that says: "Hello, world!" Our training app will initially include a simple layout and seeing a view in action. We'll link some pages together too, so you can develop a feel for how static pages in Rails work. And while it won'tdoanything in particular, our training appwillserve as a reference and a place for experimenting.
Let's write some code.
A Simple App
As I said in Chapter 1, when developing with Rails, you'll be spending a lot of time on the command line. Now is the time to start getting used to that, so fire up the terminal!
I suggest that you create a new folder in your home directory for storing all your Rails projects. I call minerails_projects. Not the most imaginative title, perhaps, but, for the purposes of this book, it would be useful if you follow my example and give yours the same name, then we'll all know where we are.
In terminal, change directory into yourrails_projectsfolder:
cd ~/rails_projects
In Chapter 1, we installed Ruby Version Manager (RVM). One of the many excellent features of RVM is that we can create project specific gemsets. That means we create a bundle of gems dedicated to the project we are working on. If it helps, think of it as a way to manage app-specific dependencies.
Type the following via terminal:
rvm use --create 2.0.0@training
gem install rails
You will now see a ton of text on the screen as all the dependencies of Rails are installed.
Then, to create a Rails app we enter:
rails new training
Next, we switch into thetrainingdirectory, and create a RVM project file:
cd training
rvm --rvmrc 2.0.0@training
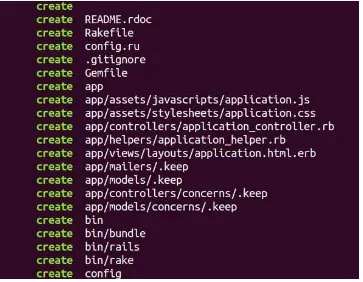
That's it. We now have a project-specific gemset. Therails newcommand will have generated a whole bunch of files and folders, as seen in Figure 2.1.
As you may have gathered, therails newcommand has a number of other options you can use. We'll be discovering these as we progress. One such option is to choose which database we want to employ. Since we didn't specify a database in this in-stance, we'll receive a default SQLite database to use should we need it.
I bet you'd like to see what this app looks like, wouldn't you? Let's take a peek. Back in terminal type:
rails server
You can shorten that command to justrails s. You'll see the built-in server start up, as shown in Figure 2.2.
Figure 2.2. Webrick start-up
Should you get an error like "Could not find a JavaScript runtime," then you need to open your Gemfile in an editor and find the line that references "therubyracer". Uncomment this line, save the Gemfile, and typebundle installin the terminal. This will create a JavaScript runtime that is used by Rails to evaluate CoffeeScript.
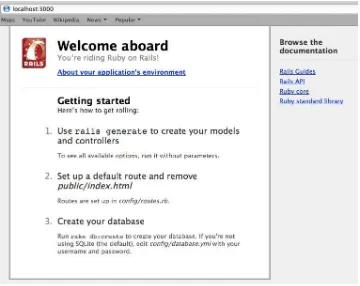
Now you can open your browser, and head to the default Rails welcome page1, which is shown in Figure 2.3.
1
Figure 2.3. Default Rails
Cool! So now you're up and running. However, while the default Rails page is really nice, it would be good if we could create something ourselves. Just before we do that, though, it's worth taking a quick look at all the stuff Rails created for us when we created our app.
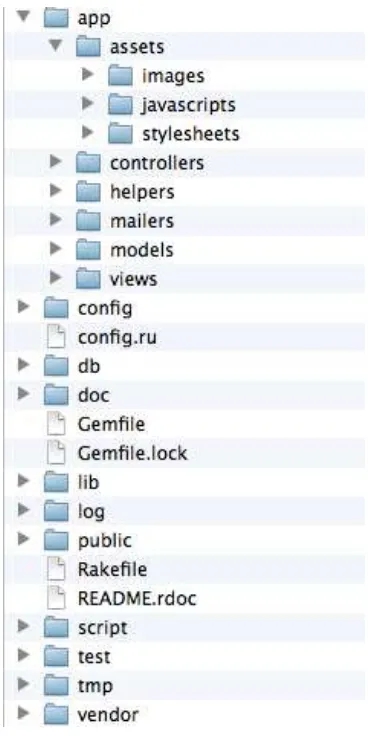
The Project Folders
Figure 2.4. A Rails project
Here's a quick run-through of what they all are:
■ app—The core of your application is found here. This is where you'll spend most of your time.
■ config—As the name implies, all the configuration options for your app can be found here, including the.ymlfile for database connection parameters, and
routes.rbfor creating routing options.
■ db— This is the home for scripts that are used to manage relational database tables.
■ lib— This is the place for code that isn't a natural fit for model, views, or con-trollers. You'll put code here that you want to share across resources.
■ log— Log data about how your app runs is stored here. It doesn't just contain errors, but also information about requests and how they were processed.
■ public— You'll find the home for default 404 pages, and static HTML files here. In previous versions of Rails, you'd find the defaultindex.htmlhere.
■ test— Rails generates tests for you, and then you add to them to test your applic-ation.
■ tmp— This is where you'll find cached data, temporary files, and session files.
■ vendor— Third-party code and assets go in this directory.
There are also some other files, such asGemfileandGemfile.lock, but we'll get to those later.
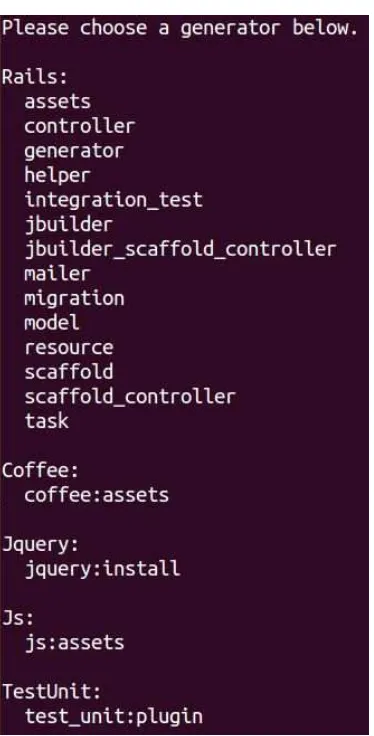
Generators
Generators are the built-in way we generate all sorts of resources for our app. In terminal we can produce a list of the generators we have available to us:
rails generate
Figure 2.5. Rails generators
As we build our app(s) you'll see most of these generators in action.
Generating a Controller
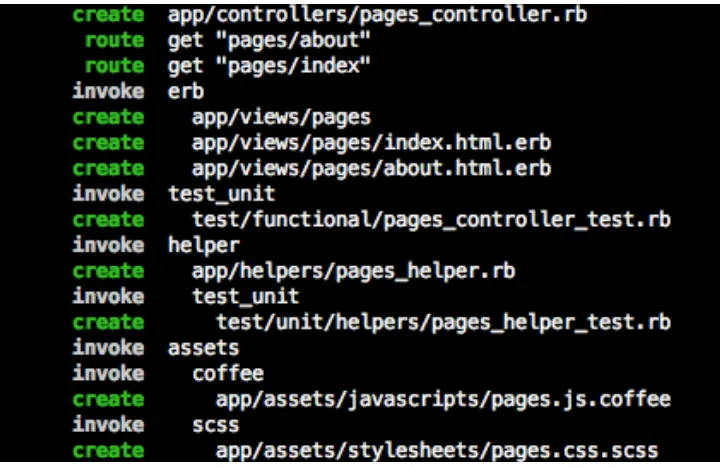
Right now we want to create the simplest page possible, so we need a controller. The function of a controller is to translate an incoming request into an action provided by your application.
rails generate controller pages index about
You'll see Rails create the controller for you, as shown in Figure 2.3.
Figure 2.6. Generating a controller
You'll notice that a bunch of other files are created too. Don't concern yourself with these for now. Instead, let's take a look at the core files Rails generated for us (Fig-ure 2.7).
Therails generate controllercommand created thePagesControllerwith the two methods we specified:indexandabout.
We'll be flipping between terminal and our editor a lot, so it's worth opening another tab in terminal. This way we'll have a tab for typing commands, and a tab for running the Rails server.
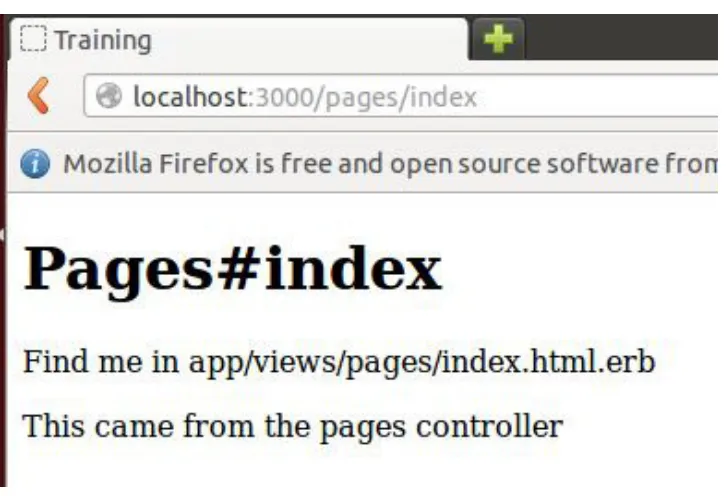
Let's test what we've got so far by opening a new tab in terminal and entering:rails serverorrails sfor short. Then you can go tolocalhost:3000. Figure 2.8 shows the modest masterpiece you'll be presented with
Figure 2.8. A first look
If we want to spice up our page just a little bit, we can add aninstance variable, and then display the contents in our view.
Inpages_controller.rbinside theindexaction, you can add an instance variable, like so:
def index
@notice = "This came from the pages controller" end
<h1>Pages#index</h1>
<p>Find me in app/views/pages/index.html.erb</p> <p><%= @notice %></p>
Figure 2.9. A first change
You may be thinking that, so far, we've put in a lot of effort to display a very simple HTML page. While that's true, you've seen a small piece of Ruby code for the first time. And it provides a glimpse of the power we have to create all sorts of data in-teractions between our business logic and the user interface. Ourpagescontroller has a method calledindexthat will render the view calledindex.html.erbin the
views/pagesdirectory. Hopefully, you can see the conventions of Rails start to be-come clearer.
Some Notes About the Controller
Before moving on, we should take a slightly closer look at what happened when we ran the generator. You can see that Rails created a file calledpages_controller.rb, and inside it we see that there is a class calledPagesController. So what Rails did was take the name we entered in the generator, and use it to create the resource we requested.
Controllers we generate almost always inherit from theApplicationController
class, which is what is meant by the line:
class PagesController < ApplicationController
TheApplicationControlleris created when we runrails new. It can be found inapp/controllers/application_controller.rb.
We define methods usingdef, sodef indexis the start of our index method. At the moment, we have very little else in the method, so it hasendpretty much straight away.
Layouts
We can see already that what's presented to us in the browser is a little bland. Part of the fix for this is layouts. They provide a way for us to set out our pages with all the common elements in place, using placeholders for the content that varies for each page.
And in case you're wondering, you can use more than one layout, too.
If you look at the code in our Rails-generated views, you'll notice that they don't even have a full HTML page. Yet if you "view source" in your browser, you'll see complete HTML page code. You might conclude that a layout of some kind is already in use, and you'd be correct. You'll find it in:app/views/layoutsand it's called application.html.erb. This one looks after the whole app. But what if you wanted a layout for a particular controller?
the code below we create something known as acode spike. This means it's proof-of-concept code. We'll learn more about code spikes later on in this chapter.
<!DOCTYPE html> <html>
<head>
<title>Training</title>
<%= stylesheet_link_tag "application", :media => "all",
➥"data-turbolinks-track" => true %>
<%= javascript_include_tag "application",
"data-turbolinks-➥track" => true %>
<%= csrf_meta_tags %> </head>
<body>
<div style="width: 950px; margin: 0px auto;">
<h2>This is the layout for the pages controller</h2> <%= yield %>
</div> </body>
</html>
You've probably guessed that<%= yield %>gets replaced with the contents of the view that we load from the controller action.
If you reloadhttp://localhost:3000/pages/indexin your browser, you'll see our new layout take effect immediately.
Template Data
There's another neat trick you can use, too. Let's say there's an element of design you want to appear on all pages, but not necessarily with the same content each time. You can add something like this to thepageslayout:
<%= yield :note %>
Then, in your views, enter the following:
<% content_for(:note) do %>
<p>This could be different for each view.</p> <% end %>
Setting the Default Page
Pointing your browser athttp://localhost:3000/pages/indexwill deliver the default Ruby on Rails start page. It's fine, but we probably don't want that for our application. This means it's time to do some initial work with Rails routes.
It'd be easy to dedicate an entire book to the wonders of routing with Rails. For now, though, we just need to get something up and running.
If you openconfig/routes.rbyou'll see something like this:
Training::Application.routes.draw do get "pages/index"
get "pages/about"
Rails has already created two routes for the methods we have in our page controller (the generator did that for us). You may be wondering if there's a better way of telling Rails about ourPagesresource. There is, and we'll get to that a little later. To begin with we'll concentrate on creating simple routes.
To set the default page, inconfig/routes.rbadd:
root :to => 'pages#index'
When you go tohttp://localhost:3000/pages/indexnow, you should see the page we have been working on.
Creating a Route
You've already seen how a Rails generator created routes for each action in our
pagescontroller. That gives us a URL likehttp://localhost/pages/about. What about if we wanted to drop thepagespart of that URL, though?
Update your routes file (config/routes.rb) so it looks like this:
Training::Application.routes.draw do get "pages/index"
root :to => 'pages#index' end
Then, back in your browser, you can try openinglocalhost:3000/about. You should see that theaboutpage is loaded. But what would happen if we wanted a bunch of static pages? Our route file could start getting quite long. This is Rails, however, so there is a better way.
Ryan Bates of railscasts.com2fame has a useful solution3for this. All we need to do is create an array in the routes file, then we can pass in a variable to process the actual route for us, like this:
routes.rb (excerpt)
Training::Application.routes.draw do root :to => 'pages#index'
%w[about contact cv].each do |page|
get page, controller: 'pages', action: page end
end
The%w[...element is Ruby shorthand for creating an array from strings without having to quote each string. It saves typing all those commas; for example:values = ["one", "two", "five", "three sir", "three"]
After you have created the actions and views, visitinglocalhost:3000/contact
will display yourcontactpage. Notice that our array has also eliminated the need forpagesto be in our URLs too. How great is that?
Some Linking
We can link our two views together using thelink_tomethod. For example, in app/views/pages/index.html.erbyou can add:
2
http://www.railscasts.com
3
<p><%= link_to "About", '/about' %></p>
In the generated source in your browser, you'll see this:
<p><a href="/about">About</a></p>
Then, inapp/views/about.html.erbyou can add:
<p><%= link_to "Home", '/' %></p>
It's basic, but at least you've seen how we can link our static pages.
Some Styling
So, we can create layouts, and we can do some basic routing, but our pages still look ugly. Let's do something about that next.
It's worth noting that stylesheets in Rails use Sass4. Sass became part of Rails at version 3.1 and is described as a "meta-language on top of CSS." It provides more control over styling by adding features such as nested rules, variables, mixins and more. Variables, for example, are a useful feature of Sass; imagine needing to assign a colour to multiple elements in your stylesheet. With a Sass variable you only have to do it once.
Also, remember when we generated the controller and Rails generated a bunch of other files for us? Well, one of those other files was a stylesheet for our pages con-troller.
Take a look inapp/assets/stylesheetsand you'll see a file called:pages.css.scss. For now, any style rules that we want to apply to our pages controller can go in there. Let's add some:
4
pages.css.scss (excerpt)
body{
font-family: Georgia, Times, "Times New Roman", serif; font-size: 1.2em;
}
You can check your changes in the browser, or add more styles if you wish. You may be wondering how the style rule(s) you added got picked up by Rails.
If you remember, in the layout file (app/views/layouts/pages.html.erb) there is a line of code that looks like this:
<%= stylesheet_link_tag "application", media:"all", "data-turbolinks-track" => "true" %>
Any style rules that you add to your stylesheets are compiled and included in application.cssat run time. Neat, eh?
Putting up Some Scaffolding
We now have a simple app that responds to requests for static pages. We'll use this knowledge for our personal website's info pages. A simple blog engine is also one of the features for our main app. While we're working with the training app, it's worth taking a look at a feature in Rails calledscaffolding.
Scaffolding lets you quickly create a resource that interacts with the database. You pass in the field names that you want, and Rails pretty much does the rest. It can be useful for creating a working version of a particular feature in a single operation. It's also useful for getting an overview of working with data in a Rails app.
We don't employ scaffolding like this in a production app. This is largely because the end goals are more complex than scaffolding is able to produce. But while, usually, it's easier just to write Rails code in the first place, itisworth a look.
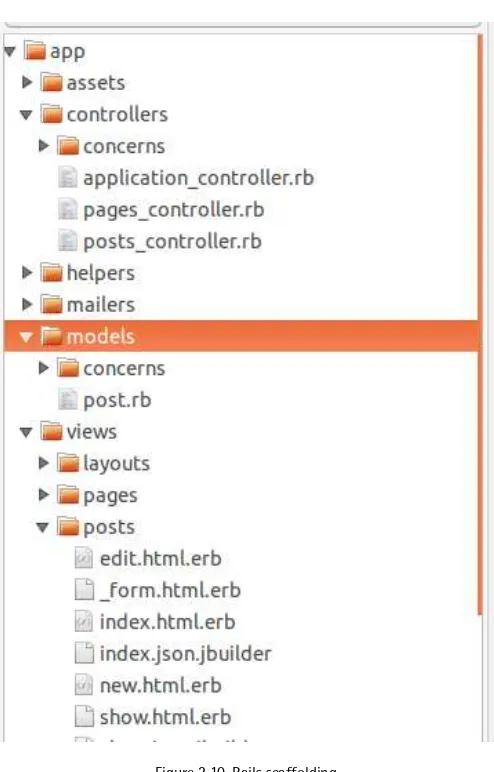
Generating a Scaffold
rails g scaffold Post title:string blurb:string body:text
You'll see that a bunch of files are created, shown in Figure 2.10.
Figure 2.10. Rails scaffolding
You can see that Rails created a controller, model, and an assortment of views. You'll notice that Rails addedresources :poststo yourroutes.rbfile too.
To achieve this we use our friend rake, like so:
rake db:migrate
rake, also called "ruby make," is a build program that allows you to create and run tasks easily. Rails uses rake for many things.
The above command will run any outstanding migrations. Rails is clever enough to figure out which migrations have already been processed. We didn't specify a database, so Rails will use a default SQLite database. Figure 2.11 shows what's generated (in thedbdirectory):
Figure 2.11. Rails database
We can see that Rails chose SQLite by taking a look at the/config/database.ymlfile:
database.yml
# SQLite version 3.x # gem install sqlite3 #
# Ensure the SQLite 3 gem is defined in your Gemfile # gem 'sqlite3'
development: adapter: sqlite3
database: db/development.sqlite3 pool: 5
timeout: 5000
# Do not set this db to the same as development or production. test:
adapter: sqlite3
database: db/test.sqlite3 pool: 5
timeout: 5000
production:
adapter: sqlite3
database: db/production.sqlite3 pool: 5
timeout: 5000
So now we have a basic structure for the sample blog element of our app. You can visit your creation by pointing your browser atlocalhost:3000/posts. There, you will be greeted by an empty list of posts. We can fix that, though. Click theAdd Post link, and you'll be taken through to a form. Enter a couple of posts using this, and you'll see that when the form is submitted, you are now populating the database.
After you have submitted a post, clicking theBacklink will take you back to the listing of all your posts. Click theEditlink next to the post, and you get taken through to a form where you can change any part of the contents of the post, and then re-save it.
Figure 2.12. Deleting a post
ClickOKand the post will be deleted.
What we have here is a working application. It's a long way from being complete, of course, but it does give a useful insight into what can be achieved. There are some issues to address, though. For example, we wouldn't want our blog admin to be available to everyone, would we? And what happens if we try adding an empty record? Give it a go.
Fixing the permissions/authentication problem is a bigger deal, so we'll come to that a little later. However, fixing the empty record problem can be achieved quickly, so let's do that now.
To begin with, let's make sure we understand what happens when we are working with records via the forms that scaffolding produced for us.
Open upapp/controllers/post_controller.rband you'll see that we have actions named:
Theindexaction contains an ActiveRecord call:@posts = Post.allto retrieve all the records in thepoststable in our database.
Theshowaction retrieves one record using the passed-in parameter of the post id your user clicked on:@post = Post.find(params[:id]).
Thenewaction provides a form for users to add a new record to the database. The call toPost.newcreates a new blank structure based on thePostmodel. The con-troller doesn't worry about what the actual schema for a post is; it just passes the structure to the view. It's thecreatemethod that performs the actual save to the database.
Theeditaction also uses GET to collect a record for user editing:@post = Post.find(params[:id]). The record is passed to the view that contains a form that you then use to make the edits. Likenew, the actual data editing doesn't take place here. The changes will be processed via theupdatemethod.
Thecreatemethod creates a newPostobject based on the:postparameters sent in from the form. You'll see in thecreateaction that an attempt is made to save the data withif @post.save. If the attempt is successful, the user is informed that the save succeeded. If it fails, the error is reported back to the user and the incoming data is sent to a copy of the form with:
else
format.html { render action: "new" }
Theupdateaction works much the same way ascreate, but it responds to PUT rather than POST. The record to update is selected via the passed-in parameter from the URL:@post = Post.find(params[:id]). Once the record is found, the up-date_attributesmethod is used to try to change the stored values. There is a success or error response here too.
Finally, you may be wondering why a few of our actions mention format and what this means. Briefly, Rails controllers respond to requests for HTML pages by default, so when you go tolocalhost:300/posts, you get an HTML representation of the existing posts. You don't have to say you want HTML, because it is the default presentation mode, but you could if you appended .htmlto your request like so:
http://localhost:3000/posts.html. Rails controllers can also respond to requests for JavaScript Object Notation (JSON). JSON is a serializable, text-based format that is readily consumed by JavaScript clients, like your web browser. JSON is most often used to create Application Programming Interfaces (APIs) and is not meant to be seen by humans. I won't be covering JSON and API creation in this book, but your career as a Rails developer will, no doubt, take you down that path eventually.
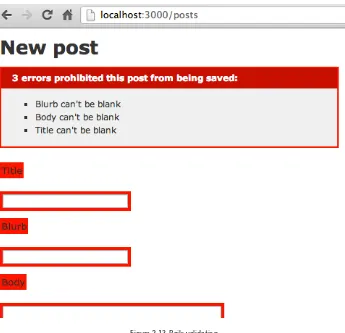
Active Record Validations
Let's face it — people don't always enter the data we'd like them to enter. Evenyou might be guilty of this occasionally — when entering a new blog post on your own blog, for example. And because we live in an imperfect world we need some way of protecting our data integrity.
Figure 2.13. Rails validation
And that's that, for basic validation anyway. Let's take a closer look, though; what does the actual code in the model look like?
class Post < ActiveRecord::Base
attr_accessible :title, :slug, :blurb, :content validates :body, :title, :presence => true end
You should try each of the following in your browser, so that you can see how Rails handles each validation change. You'll be impressed, I promise.
seems reasonable that our blurb field should contain at least 10 characters. We can validate for that:
class Post < ActiveRecord::Base
attr_accessible :title, :slug, :blurb, :content validates :blurb, :length => { :minimum => 10 } validates :body, :title, :presence => true end
There is something else we can do to strengthen the validation on the blurb field. Since the field has the data type ofstring, it's limited in capacity to around 255 characters. So let's create a validation rule that satisfies both conditions (minimum and maximum):
class Post < ActiveRecord::Base
validates :blurb, :length => { :in => 10..255 } validates :body, :title, :presence => true end
Here, you can see that the number of characters is restricted within acceptable parameters for our database table. There's one more thing. What about a situation in which we only want text to be added? That is, characters, not numbers? We can do that, too, by adding a regular expression:
validates :blurb, :length => { :in => 10..255 }, :format => { :with
➥=> /^\A[a-zA-Z\d ]+\z/, :message => "Only letters allowed",
➥:multiline => true}
Now we have validation that works in the way we want.
Test Driven Development
The first thing to note is that Rails was built with testing in mind. You'll have already spotted that tests are generated for you each time you add a new resource.
The second thing is that Rails has its testing rig built-in. You can use others, such as RSpec5. In truth, you may find that you switch to RSpec quite quickly because of its support for Behavior Driven Development (BDD).
5
We'll focus on Ruby's built-in Test::Unit here, though. It has plenty to offer and provides good code coverage for our app.
You can think of TDD as a design activity. It furthers the purpose of testing from being just a way to make sure code runs as expected. Rather, TDD offers a way to clarify the purpose of the code. As you add new features to your app, you create tests that test the idea with which you're working.
If you're new to TDD, Figure 2.14 shows a diagram that explains the basic concept behind it.
Figure 2.14. Test Driven Development
that out by writing a code spike. All that means is code that won't make it into production, but which enables you to figure out what you're attempting to do.
The tests you create, then, help to steer the design of the app based on the required functionality. By writing your tests first, they will fail initially. But as you figure out the design, you will eventually receive passing tests. From here you tighten up the code to make it as good as it can be. This process is often referred to as"red, green, refactor."
Let's see what Rails has to offer.
The Environments
All Rails applications have three environments: one for production, one for devel-opment, and one for testing. If you take a look in yourconfig/database.ymlfile, you'll see the three environments clearly. The test database is designed to be used for all your testing activity. As such, it shouldn't matter if you end up deleting its data.
You can make sure that the test database is ready to go with:
rake db:test:prepare
This ensures that there are no pending migrations. And it loads the test schema for the database.
Tests Rails Has Already Generated
Figure 2.15 shows the tests Rails has already generated.
Figure 2.15. Rails tests
inter-acting. You'll notice that we also have afixturesfolder. Fixtures is just another way of saying sample data.
Fixtures
Good tests require good fixtures. Rails will populate your test database with pre-defined data before the tests are run. They are created using the YAML format. As you begin to create resources, Rails will generate some fixtures for you. Take a look intest/fixtures:
one:
title: MyString blurb: MyString body: MyText
two:
title: MyString blurb: MyString body: MyText
You probably should replace the content with something more meaningful for our application:
posts.yml
one:
title: The first post
blurb: This post won't be about very much at all. body: So, here is a meaningless post.
two:
title: The second post
blurb: There had to be two, didn't there?
body: Yep, you guessed it, this is the second post.
Rails will automatically load the fixtures found intest/fixturesfor the unit and functional tests that you create.
Something to Watch Out For
or tests and, while those tests might pass, the fixture change can then break the original tests.
There is an answer, though, which we'll see in action shortly. In short, it revolves around specifying which fixture file gets loaded for our tests. After all, the default action by Rails is to loadallthe fixtures, because, to Rails, it seems logical that's what you'd want. For now, just keep in mind that there's a way to get past the problem should you need to.
Unit Testing Models
I mentioned earlier that Unit Tests are tests for your models. The default test (in test/models/post_test.rb) that Rails has created for us when we created theposts
scaffold looks like this:
require 'test_helper'
class PostTest < ActiveSupport::TestCase # test "the truth" do
# assert true # end
end
Thetest_helperfile contains the default configuration used to run our tests. You can see that our testing class inherits from:ActiveSupport::TestCase.
Let's run a test. We'll need to make sure everything is ready to go with:
rake db:migrate rake db:test:load
Looking at the code in our test, we can uncomment thethe truthmethod, and then from the terminal enter:
rake test
Figure 2.16. A first test
The '.' indicates a passing test. We've used a simple truthassertionhere. Assertions are used to evaluate an object or expression for the expected results. Obviously this is not a test of our app, but it demonstrates how to run a test. It's worth noting that
Test::Unitcomes with some ready-to-run tests.
If your tests fail, it's likely due to the validators we added on thePostmodel above. Can you get them to pass? If not, don't worry, we'll get them to pass in a bit.
Now we'll add an actual test. Here, we want to make sure that when a post is saved it has a title. You may remember that we have a validation that already does this. But let's create the test anyway:
test "should not save post without title" do post = Post.new
assert !post.save end
Now, when we runrake test, what happens? That's right: all our tests and asser-tions pass. If you temporarily comment out the validaasser-tions inapp/models/post.rb, however, and run the test again you'll see your first failing test.
Now, if you're thinking that there's no point testing when you can use validations, not so fast. Think about what we've done here: if we were using proper TDD tech-niques, we'd have written our testbeforeadding any validation. Unit tests on models are mostly for ensuring that we're getting the data we want. So our test proves that we have a fighting chance of getting the data we want in our database.
we think they are going to do. Well, guess what? This is Rails, so we can do just that.
Here's a new test to add totest/unit/post_test.rb:
test "post values should not be empty" do post = Post.new
assert post.invalid?
assert post.errors[:title].any? assert post.errors[:blurb].any? assert post.errors[:body].any? end
Can you see how this addresses the issue about tests versus validations? This test creates a new post, fires it at the model, and then ensures that the model correctly fires errors back because the fields can't be blank. How awesome is that? You can run the tests withrake test:units, too.
This means we know that the model is working in its most basic form. We can now drill down and do some specific testing. For example, our validations say that the blurb field should only accept text. Let's make sure that's going to be the case. And while we're at it, we'll use one of our fixtures to throw some data at the test too:
test "blurb should be a string" do
post = Post.new(title: posts(:one).title, blurb: posts(:one).blurb, body: "Body? Whose?")
assert blurb.title.kind_of? String end
Run the tests, and we get:
Run options: # Running tests: ..
Finished tests in 0.095570s, 20.9271 tests/s, 52.3177 assertions/s. 2 tests, 5 assertions, 0 failures, 0 errors, 0 skips
descriptive fixture names. "One" is fine for this simple example, but more descriptive names will make things easier in a bigger app.
Functional Tests
We can also test the controllers. Or, to put it another way, test the user-facing layers. Controller tests let us check with assertions how a single request to a controller action is handled. The scaffolding we generated has created a whole series of tests already. Take a look intest/controllers/posts_controller_test.rbto see what I mean.
Now run them with:rake test:functionals, and you'll notice they fail. Why is that?
When we try to add a blank record, the model validation kicks in, and the tests fail. What we need to do is change the tests in order to reflect that fact.
We do this by setting up the test so that some data actually gets fired at the model. Open uptest/functional/posts_controller_test.rband add the setup code like this:
class PostsControllerTest < ActionController::TestCase setup do
@post = posts(:one) @update = {
title: 'Here is the title', blurb: 'Here is the blurb', body: 'Here is the body' }
end
The two tests that failed were:should get newandshould update post. For the new post test, update it to look like this:
test "should create post" do
assert_difference('Post.count') do post :create, post: @update
end
test "should update post" do
put :update, id: @post, post: @update
assert_redirected_to post_path(assigns(:post)) end
Done? Now rerun the tests:
Run options: # Running tests: ...
Finished tests in 0.443877s, 20.2759 tests/s, 27.0345 assertions/s. 9 tests, 12 assertions, 0 failures, 0 errors, 0 skips
Excellent. Problem solved! Hopefully this little run-though of writing some tests for our app has shown you the power of Rails' built-in testing.
Creating a Layout with Bootstrap
There are lots of reasons to like the flexibility that offered by Rails layouts. However, if you're not a designer, making something that looks nice can still be a challenge. Enter Bootstrap6. Bootstrap is a CSS framework that provides a set of grids for layout, typographical and HTML element styles, and some cool JavaScript interactions.
Thanks to the extensive Ruby ecosystem there are several gems we can use with our Rails app to seamlessly integrate Bootstrap. The example I'll demonstrate here (we'll be using it in our main app, too) is called boostrap sass7.
It takes very little effort to set the gem up, and it's also very easy to add the Bootstrap resources into our app.
Install the Gem
Open up your Gemfile, and add the line:
gem 'bootstrap-sass'
Then, in terminal, runbundle install.
6
http://twitter.github.com/bootstrap/
7
Connect the Bootstrap Assets
Next, create a newcustom.css.scssfile inapp/assets/stylesheets. There are other ways to add the Bootstrap styles, but I've found that by having a separate file, it's easy to add the style rules you want to use for the layout, among other things.
To use the Bootstrap stylesheets just add the following tocustom.css.scss:
@import "bootstrap";
@import "bootstrap-responsive";
To use the Bootstrap JavaScript files, just add//= require bootstrapto app/assets/javascripts/application.jslike this:
//= require jquery //= require jquery_ujs //= require_tree . //= require bootstrap
That's it, Bootstrap is now installed.
So now we can start thinking about a layout. The Bootstrap website has some useful examples, so we'll borrow one of those. I've chosen the fluid layout8example. First, let's copy the style rules found in the<head>of the example file into our custom.css.scssfile:
body {
padding-top: 60px; padding-bottom: 40px; }
.sidebar-nav { padding: 9px 0; }
Then, copy and paste the HTML code from the sample into your
app/views/layouts/pages.html.erbfile. We're using a fluid layout, meaning that Bootstrap will use percentage values rather than pixels for column widths.
8
Your layout file should now look like this:
<!DOCTYPE html> <html>
<head>
<meta name="viewport" content="width=device-width,
➥initial-scale=1.0">
<%= stylesheet_link_tag "application", :media => "all",
➥"data-turbolinks-track" => true%>
<%= javascript_include_tag "application",
➥"data-turbolinks-track" => true %> <%= csrf_meta_tags %>
</head> <body>
<div class="navbar navbar-inverse navbar-fixed-top"> <div class="navbar-inner">
<div class="container-fluid">
<a class="brand">Jump Start Rails</a> </div> </div> </div> <div class="container-fluid"> <div class="row-fluid"> <div class="span3">
<ul class="nav nav-list">
<li class="nav-header">Sidebar</li>
Refining the Layout
What we have is looking good, but there are still some improvements we can make. For example, it's reasonable to assume that we'll want the menu to appear on most of our pages. So rather than leave that big, untidy blob in the layout file, we'll move it into apartial.
You can think of partials as a kind of include file. They are created using the handy
rendermethod. To create one for the menu, do the following:
Add a new folder inapp/viewscalledshared. Inside that folder, create a file called _menu.html.erb. Note the "_". That's how we tell Rails we intend this file to be a partial. You can now copy the code for the left-hand menu into it:
<ul class="nav nav-list">
<li class="nav-header">Sidebar</li>
<li class="active"><a href="#">Link</a></li>