VBA Bible
For Data-Centric Microsoft
®Office Applications
VBA Bible
For Data-Centric Microsoft
®Office Applications
10475 Crosspoint Boulevard Indianapolis, IN 46256 www.wiley.com
Copyright © 2007 by Wiley Publishing, Inc., Indianapolis, Indiana Published by Wiley Publishing, Inc., Indianapolis, Indiana Published simultaneously in Canada
ISBN: 978-0-470-04702-6
Manufactured in the United States of America 10 9 8 7 6 5 4 3 2 1
No part of this publication may be reproduced, stored in a retrieval system or transmitted in any form or by any means, electronic, mechanical, photocopying, recording, scanning or otherwise, except as permitted under Sections 107 or 108 of the 1976 United States Copyright Act, without either the prior written permission of the Publisher, or authorization through payment of the appropriate per-copy fee to the Copyright Clearance Center, 222 Rosewood Drive, Danvers, MA 01923, (978) 750-8400, fax (978) 646-8600. Requests to the Publisher for permission should be addressed to the Legal
Department, Wiley Publishing, Inc., 10475 Crosspoint Blvd., Indianapolis, IN 46256, (317) 572-3447, fax (317) 572-4355, or online at http://www.wiley.com/go/permissions.
Limit of Liability/Disclaimer of Warranty:The publisher and the author make no representations or warranties with respect to the accuracy or completeness of the contents of this work and specifically disclaim all warranties, including without limitation warranties of fitness for a particular purpose. No warranty may be created or extended by sales or promotional materials. The advice and strategies contained herein may not be suitable for every situation. This work is sold with the understanding that the publisher is not engaged in rendering legal, accounting, or other professional services. If professional assistance is required, the services of a competent professional person should be sought. Neither the publisher nor the author shall be liable for damages arising herefrom. The fact that an organization or Website is referred to in this work as a citation and/or a potential source of further information does not mean that the author or the publisher endorses the information the organization or Website may provide or recommendations it may make. Further, readers should be aware that Internet Websites listed in this work may have changed or disappeared between when this work was written and when it is read.
For general information on our other products and services or to obtain technical support, please contact our Customer Care Department within the U.S. at (800) 762-2974, outside the U.S. at (317) 572-3993 or fax (317) 572-4002. Library of Congress Cataloging-in-Publication Data:
Feddema, Helen Bell.
Access 2007 VBA Bible: For Data-Centric Microsoft Office Applications / Helen Feddema. p. cm.
Includes index.
ISBN 978-0-470-04702-6 (paper/website)
1. Microsoft Access. 2. Database management. 3. Microsoft Visual Basic for applications. I. Title. QA76.9.D3F435 2007
005.75’65--dc22
2007007061
Trademarks:Wiley, the Wiley logo, and related trade dress are trademarks or registered trademarks of John Wiley & Sons, Inc. and/or its affiliates, in the United States and other countries, and may not be used without written permission. Microsoft and Access are trademarks or registered trademarks of Microsoft Corporation in the United States and/or other countries. All other trademarks are the property of their respective owners. Wiley Publishing, Inc., is not associated with any product or vendor mentioned in this book.
trating on Access, Word, and (since 1996) Outlook. She has written or co-authored many books on Access and other Office applications, including Inside Microsoft Access(New Riders, 1992),
Power Forms for Microsoft Accessand Power Reports for Microsoft Access (Pinnacle, 1994), Access How-Tos(Waite Group Press, 1995), MCSD: Access 95 Study Guide(Sybex, 1998), DAO Object Model: The Definitive Guide(O’Reilly, January 2000), and Access 2002 Inside-Out (Microsoft Press, 2001), which was judged #1 in the Desktop and Office Applications book category at the Waterside 2004 confer-ence. Her most recent book is Expert One-on-One Microsoft Access Application Development
(Wiley/Wrox, 2003).
Credits
Mary Beth Wakefield
Production Manager
Tim Tate
Vice President and Executive Group Publisher
Richard Swadley
Vice President and Executive Publisher
Joseph B. Wikert
Project Coordinator
Adrienne Martinez
Graphics and Production Specialists
Introduction . . . xv
Part I: The Office Components and What They Do Best
1
Chapter 1: Storing and Displaying Data in Access . . . 3
A Brief History of Office Data Exchange ...3
Storing Data in Access ...4
Displaying Data in Access Forms and Reports ...5
Creating Access Form Letters ...8
Creating Worksheet-type Reports in Access ...11
Plain Datasheet Reports ...11
PivotTables ...19
PivotCharts ...22
Summary ...25
Chapter 2: Creating Word Documents from Access . . . 27
Filling Word Documents with Access Data Using the TypeText Method ...27
Using Word Templates for Creating Formatted Word Documents...30
Bookmarks ...31
Document Properties ...39
Form Field Documents...45
Summary ...48
Chapter 3: Analyzing Data with Excel . . . 49
Exporting Access Data to an Unformatted Worksheet...50
Using Excel Templates to Create Formatted Worksheets Filled with Access Data ...52
Formatting Excel Worksheets in VBA Code ...62
Summary ...69
Chapter 4: Organizing and Communicating with Outlook . . . 71
Exporting Appointments and Tasks to Outlook ...72
Exporting Journal Information to Outlook ...79
Creating Emails from an Access Table...81
Part II: Writing VBA Code to Exchange Data between
Office Components
87
Chapter 5: Working with Access Data . . . 89
Working with Older Format Databases in Access 2007 ...91
Disambiguating References to Object Model Components ...91
The DAO Object Model (Old and New) ...96
New Objects in the Access 2007 DAO Object Model ...97
Hidden Objects in the Access 2007 DAO Object Model ...98
Databases ...99
Recordsets...99
QueryDefs ...104
TableDefs and Fields ...106
The ADO Object Model ...110
Connection ...110
Command...113
Recordset ...116
Record ...129
Stream ...129
Converting DAO Code to ADO Code ...129
Summary ...131
Chapter 6: Working with Word Documents and Templates . . . 133
Built-in Word Export in Office 2007 ...135
Exporting Access Data to Word Using Automation Code ...138
The Word Object Model ...139
Creating a New, Blank Word Document ...140
Creating a Word Document Based on a Template ...141
Using a Query to Concatenate Data for Export ...143
Choosing a Method for Merging Access Data to Word ...145
Working with Word Document Properties ...146
Word Bookmarks ...165
The TypeText Method ...170
Word Mail Merge ...175
Summary ...182
Chapter 7: Working with Excel Worksheets. . . 183
Simply Exporting Access Data to Excel...184
The Excel Object Model ...187
Minimally Formatted Worksheets ...191
Tabular Worksheets Formatted from Code ...195
Timesheets ...202
Chapter 8: Working with Outlook Items . . . 219
Exporting Access Data to Outlook Items ...220
Using the Collect Data Group ...220
Using the Import Group to Import or Link to Outlook Data...221
Using Sample Databases and Forms ...230
The Outlook Object Model ...234
Explorer, Inspector, and other Outlook Objects ...234
Syntax for Referencing Outlook Objects ...235
Referencing Outlook Items in VBA Code ...240
Working with Outlook Appointments ...241
Working with Outlook Tasks ...247
Working with Outlook Contacts...254
Summary ...262
Chapter 9: Working with Files and Folders . . . 263
Working with Windows Explorer Folders ...264
The Office FileDialog Object...264
The FileSystemObject...271
Backing up Your Database ...277
Working with Text Files ...282
Writing Data to Text Files ...282
ADO ...291
FileSystemObject ...292
VB ...292
Reading Data from Text Files ...292
ADO ...296
FSO ...296
VB ...296
Working with Attachment Fields ...297
Loading Files into Attachment Fields ...299
Saving Attachments to Files ...302
Summary ...304
Chapter 10: Working with External Data . . . 305
Working with Text Files Using the TransferText Method...306
Creating an Import or Export Specification...306
Importing and Exporting Text File Data in VBA Code...312
Importing Text Data ...312
Exporting Text Data ...320
Working with Legacy Database and Spreadsheet Files ...324
Importing Database Files ...324
Importing Spreadsheet Files ...328
Working with XML and HTML Files ...338
Importing HTML and XML Files ...338
Exporting HTML and XML Files...341
Emailing Exported Text Files ...348
Summary ...350
Chapter 11: Synchronizing Access and Outlook Contacts . . . 351
Creating a Denormalized Table from a Set of Linked Tables ...352
Comparing Outlook and Access Contacts...359
Re-creating the Flat-file Tables of Access and Outlook Data ...361
Copying Contact Data from Access to Outlook (or Vice Versa) ...374
Working with Attachments...391
Summary ...396
Chapter 12: Going Beyond the Basics . . . 397
Creating Fancy Word Shipping Labels ...397
Creating Excel PivotCharts from Access Queries ...415
Emailing Shipping and Reordering Reports ...426
Summary ...432
Part III: Adding More Functionality to Office
427
Chapter 13: Creating COM Add-ins with Visual Basic 6 . . . 435
Creating a COM Add-in Using Visual Basic 6.0 ...436
Using the COM Add-in Template ...436
Creating the LNC Control Renaming COM Add-in...440
The SharedCode Module ...440
The AccessDesigner Module ...442
Creating the DLL ...463
Installing a COM Add-in ...463
Troubleshooting a COM Add-in ...466
Using a COM Add-in ...467
Comparing COM Add-ins with Access Add-ins ...469
Summary ...469
Chapter 14: Creating Access Add-ins . . . 471
The Purpose of Access Add-ins...472
Add-in Types ...472
Creating a Library Database ...473
Menu Add-ins ...478
Wizards ...479
Property Builders ...480
Things You Need to Know When Writing Add-ins ...481
Special Requirements for Add-in Code ...481
The Extras Add-in Code ...483
Extras Options ...483
basExtras Module ...486
Back up Database ...489
Back up Back End Database ...491
List Query Fields ...495
List Table Fields ...497
Other Procedures ...499
Finalizing the Add-in ...502
Troubleshooting Add-ins ...503
Interpreting Add-in Error Messages ...506
Installing an Add-in ...507
Using the Extras 2007 Add-in ...510
Extras Options ...511
Back up Database ...512
Back up Database Back End ...512
List Query Fields ...513
List Table Fields ...514
Summary ...514
Chapter 15: Customizing the Ribbon with XML in Access Databases
and Add-ins . . . 515
Useful Tools for Creating and Editing XML Code ...517
XML Notepad 2007 ...517
VB 2005 XML Editor ...518
Office 2007 Custom UI Editor ...518
Customizing the Ribbon in an Access Database ...519
Creating the XML Code ...522
Adding a New Tab, Group, and Controls to the Ribbon ...527
Removing a Tab or Group from the Ribbon ...528
VBA Code...542
Form Ribbons...547
Customizing the Ribbon with an Access Add-in ...549
Summary ...558
Chapter 16: Customizing the Access Ribbon with a Visual Studio 2005
Shared Add-in. . . 559
Preparing to Write a Visual Studio Add-in ...559
Adding .NET Support to Office ...559
Modifying the Connect Class Module Code ...573
Adding Functionality to the Shared Add-in ...575
Debugging the Add-in ...582
Building and Installing the Add-in ...583
Using the Add-in ...588
Chapter 17: Creating Standalone Scripts with Windows Script Host . . . . 591
Tools for Working with Windows Script Host Scripts ...591
The Microsoft Script Editor ...592
The VBScript Help File ...597
Differences between VBA and VBScript Code ...599
Useful Scripts ...603
Setup Scripts ...603
Office Scripts ...611
Miscellaneous Scripts ...616
Scheduling a Backup Script with the Windows Vista Task Scheduler ...619
Summary ...626
Chapter 18: Working with SQL Server Data . . . 627
Getting SQL Server 2005 ...628
Preparing an Access Database for Upsizing to SQL Server ...629
Configuring SQL Server 2005 for Data Access ...631
Getting through the Firewall...640
Windows XP...640
Windows Vista ...643
Other Security Roadblocks ...647
Using the Upsizing Wizard...648
Converting Access Tables to SQL Server Tables ...649
Creating a Client/Server Application...657
Linking to Data in SQL Server Tables ...662
The SQL Server Migration Assistant for Access...671
Summary ...672
learning. This book is a fairly comprehensive resource on writing VBA code to exchange data among the main Office applications (Access, Word, Excel, and Outlook), using Access as the cen-tral application for storing data, and using the other applications for producing attractively format-ted documents of various types. By the time you have compleformat-ted the Access 2007 VBA Bible, you will be well-prepared to write VBA Automation code that uses your Access data to produce Word letters, mailing labels and other documents (without the overhead of mail merge), to create Excel worksheets and PivotCharts, and to create Outlook appointments, mail messages, contacts, and journal items, with or without attachments. Additionally, you will be able to synchronize contact data (both ways) between Access and Outlook.
Who Should Read This Book
The book is written for the Access/Office developer or power user who is familiar with working with Office applications (particularly Access) in the interface, and has at least a basic familiarity with writing VBA code, but needs more information on how to write Automation code to work with Word, Excel, and Outlook objects, so as to be able to use each Office application for creating the documents that are its specialty, while storing most of the data in Access databases.
How This Book Is Organized
The book starts out in Part I with a description of the Office components (Access, Word, Excel, and Outlook) and what they do best, as a guide to selecting the appropriate Office component for a specific task.
Part III covers topics that add more functionality to Office, including the creation of COM add-ins with VB 6, Access add-ins, and Visual Studio 2005 Shared add-ins. It also covers customizing the Office 2007 Ribbon with XML in Access databases and with add-ins of various types. Additionally, there is a chapter on creating standalone scripts with Windows Script Host, and another chapter on using Access as a front end for working with SQL Server data.
Conventions and Features
There are many different organizational and typographical features throughout this book designed to help you get the most of the information.
Whenever the authors want to bring something important to your attention, the information will appear in a Tip, Note, or Caution.
This information is important and is set off in a separate paragraph with a special icon. Cautions provide information about things to watch out for, whether simply inconve-nient or potentially hazardous to your data or systems.
Tips generally are used to provide information that can make your work easier—special shortcuts or methods for doing something easier than the norm.
Notes provide additional, ancillary information that is helpful, but somewhat outside of the current presentation of information.
New features introduce components or functionality that are new or improved in the software compared to earlier versions.
What’s on the Companion Web Site
On the companion web site you will find sample code. Each chapter has its own subfolder on the web site. You’ll in subfolders find all the sample databases and other files (such as Word and Excel templates, or Windows Script Host scripts) that were discussed in each chapter.
Minimum Requirements
To run the sample code in this book, you need a computer capable of running at least Windows XP, and of course you need Office 2007. Because Office 2007 runs fine on Windows XP, you don’t need Windows Vista, but Office 2007 works even better on Vista. If you intend to run Vista, you need a Vista-ready computer. If you buy a new computer, look for the “Windows Vista Capable” sticker; however, an older computer may support Vista even if it doesn’t have the sticker (though probably not the Aero Glass interface, which requires a high-powered video card).
Where to Go from Here
You should take away from this book the ability to select the Office component that does the best job for the task at hand. You should also take away how to write VBA Automation code to transfer data from Access to documents created with other Office components and format the documents as needed; this will let you create procedures that can be run from form events or toolbar buttons to automate any Office-related tasks you need to do on a regular basis.
Components and
What They Do Best
IN THIS PART
Chapter 1
Storing and Displaying Data in Access
Chapter 2
Creating Word Documents from Access
Chapter 3
Analyzing Data with Excel
Chapter 4
S
ince its earliest days — about 14 years ago — Access has been a rela-tional database program, storing data in tables and using its own queries, forms, and reports to sort, filter, display, and print data. With successive Office versions, moving data among Office components (espe-cially Word, Excel, and Outlook) has become so much easier that it is now often more efficient to use another Office component rather than an Access report for a task such as printing letters or analyzing numeric data. Additionally, using other Office components to display or print data from Access makes the data stored in Access tables more widely accessible. Many Office users have an edition of Office that doesn’t include Access — but they all have Word and Excel, and many also have Outlook, so they can easily work with Word documents, Outlook messages or appointments, and Excel worksheets, filled with data from Access tables.Whether you plan to present your data as an Access report, PivotChart, or PivotTable; or a Word document or Excel worksheet, the data is stored in Access tables, and entered and edited in Access forms.
A Brief History of Office
Data Exchange
As the Windows operating system has progressed from Windows 3.0 to Windows XP and Vista, data transfer techniques have improved, from simple cut and paste using the Windows 3.0 clipboard, to Dynamic Data Exchange (DDE) and Open Database Connectivity (ODBC), to Automation (originally
IN THIS CHAPTER
A brief history of Office data exchange
Storing data in Access
Displaying Access data in forms and reports
Working with rich text in Memo fields
New report interactivity
Using Access as a control center for working with Office documents
called Object Linking and Embedding [OLE], then OLE Automation) and Extensible Markup Language (XML).
In early Windows and Office versions, DDE and ODBC were difficult to use, cranky and unreliable in operation, and ODBC in particular often required elaborate setup. I know — I used both DDE and ODBC, when they were the only connectivity tools available. But I gladly dropped them when OLE became available in Windows 95/Office 95, because it offered a much simpler way to connect Office applications, though at first only in a limited manner.
Before Office 97, there was a distinction between Office components that were OLE servers, which could be manipulated by code running from other applications, and OLE clients, which could work with objects in OLE server applications’ object models. Back in the days of Access 1.0 or even 2.0, Access developers had few tools available for connecting to other Office applications such as Word or Excel. Access, for example, was only a client, whereas Word was only a server. In Office 95 AccessBasic was upgraded to standard Office VBA, and Access became an OLE server (previously it was only an OLE client). By Office 2000, all the major Office applications (Access, Word, Excel, Outlook, and PowerPoint) had been upgraded to support Automation both as clients and servers, so the OLE server/client distinction is no longer significant.
You can write Automation code in any major Office application to connect to any other Office application’s data and functionality (and some third-party applications as well).
Storing Data in Access
Access was designed from the start to store data, so (if you have a choice — which is not always the case) it is the place where you should store your data. You may need to use that data to produce Word letters, SharePoint lists, Excel worksheets, or Outlook mail messages, but the data itself should be kept in Access tables, unless there is a very strong reason to store it elsewhere.
One valid exception is storing data in SQL Server back-end databases, using Access as the front end. SQL Server is usually the choice for huge corporate databases, not small-to medium-sized databases used by individuals or small companies, where Access can easily handle the number of records. See Chapter 18 for more information on this option.
Data entry and editing, too, should be done in Access, for the most part, because you can create Access forms that offer an attractive interface for entering and editing data. You can write VBA code that runs from form and control events for purposes of error handling, and create functions that automate repetitive data-processing operations.
In my earlier book, Expert One-on-One Microsoft Application Development, I discussed creating Access applications, with details on using queries, forms, reports, and code. I won’t duplicate this information here, but instead in this chapter I concentrate on new or improved features in Access 2007, which enhance the utility of Access forms and reports.
CRO
SS
-REF
Displaying Data in Access Forms and
Reports
Sometimes you don’t need to go outside of Access to present your data — if you are designing an Access application, displaying data in forms and printing it in reports may be all you need.
Over the years, Access forms and reports have been significantly upgraded. In Access 2007, one long-requested feature has finally arrived in a workable form (I recall an early and unreliable implementation that made a brief appearance in Access 95). Memo fields can now store and display rich text, using the Text Align property, which takes a value of either Plain Text or Rich Text. When you select Rich Text for this property, you can apply various fonts, colors, and other attributes to selected portions of text in a table field or a control bound to that field.
In earlier versions of Office, if you wanted to generate a letter or other document including a block of text with color, bolding, or other attributes applied to selected words or phrases within the block, you had to create a Word letter and use Word’s formatting features. In Access 2007, you can produce Access reports with varied formatting within text blocks, displaying text entered into Access memo fields in a textbox on a form.
The sample database for this section is RichText.accdb.
To create a field that can store data in Rich Text format (behind the scenes, this is done using HTML code, but you don’t have to worry about writing the code), start by creating a table field of the Memo data type, and selecting Rich Text as the Text Format value (see Figure 1.1).
FIGURE 1.1
Creating a Memo field to hold Rich Text data.
NOTE
NOTE
NEW FEATURE
If you select a block of text in a Rich Text–enabled Memo field, you will see a floating toolbar that lets you apply some formatting, including indenting or outdenting, similar to Word (this works fine; see Figure 1.2). However, if you apply bullets or numbering from this tool-bar, you will get the bullets or numbers, but the text that runs over one line won’t be indented prop-erly, as shown in Figure 1.3. For this reason, I recommend against using these features, unless all the items on your lists are no more than one line in length.
FIGURE 1.2
Indenting text from the floating toolbar in a Rich Text field.
FIGURE 1.3
Incorrect indentation of an item in a numbered list in a Rich Text field.
Create a form bound to the table with the Memo field; you can now enter data into this textbox control and format it with different fonts, color, bolding, and other attributes, as you would while working in a Word document. When you place the cursor into a control with Rich Text enabled, a formatting group on the Form Ribbon is enabled, with a variety of formatting selections, as shown in Figure 1.4.
Figure 1.5 shows the form with a variety of formatting attributes applied to the text in the textbox.
WARNIN
G
FIGURE 1.4
Selecting formatting for a portion of text in a Rich Text–enabled textbox on a form.
FIGURE 1.5
Once you have applied formatting to the text on a form, you can create a report based on the table, and the formatting will display on the report as well (see Figure 1.6).
FIGURE 1.6
A report showing Rich Text formatting applied in a textbox on a form.
Creating Access Form Letters
A more realistic example of Rich Text formatting would be a form letter report, with the body of the letter text coming from a Rich Text–enabled field, and the name and address information from a table of contacts or customers. I created a table called tblLetterText in the sample database, with a Rich Text–enabled Memo field to hold the letter body text, and an ID and a LetterType text field. The LetterBody field holds formatted text, as shown in Figure 1.7 (the Rich Text formatting can be seen directly in the table, though you will find it easier to create and edit the rich text in a textbox control on a form).
You can copy and paste formatted text from a Word document into a Memo field with Rich Text enabled (or a textbox bound to such a field), and the formatting will be pre-served. However, bullets and numbered lists won’t be aligned correctly, so it is best to turn off those features before copying text to Access.
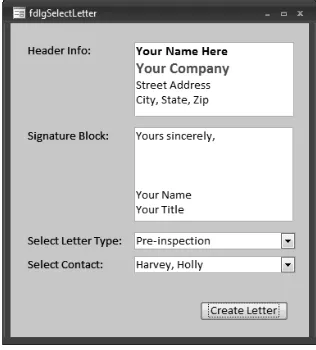
I also created a one-row table to hold information to use in the database; in this case, it has two Rich Text–enabled Memo fields for the letter header and signature information. The form fdlgSelectLetter (bound to the information table, zstblInfo) lets you edit the header and signature (Figure 1.8) and select a letter type and a contact.
FIGURE 1.7
A table with formatted letter body text.
FIGURE 1.8
Clicking the Create Letter button opens a filtered Access report displaying name and address data from the selected Contact record, and the letter body from the selected letter type, as depicted in Figure 1.9.
With Rich Text formatting now supported in Access forms and reports, you may not need to pro-duce a Word letter to get the look you want in printed documents. However, compared with Word, Access reports using Rich Text–enabled Memo fields have one significant limitation. In Word, you can place merge fields or DocProperty fields within a block of text, so that merged data or data stored in document properties will print at a certain point in the text, with the surrounding text wrapping as needed, depending on the length of the text in the fields. This is not possible with a Memo field on an Access report, so if you need to embed merge fields or DocProperty fields within the letter body text, you still need to create Word documents.
See Chapter 2 for information on creating Word documents of various types filled with Access data.
FIGURE 1.9
A report with formatted text.
CRO
SS
-REF
Creating Worksheet-type Reports in Access
If you need to produce a report formatted in familiar worksheet-type rows and columns, you can do this with an Access report. Access 2007 reports have some new features, letting you sort and fil-ter infil-teractively — and if you want full infil-teractivity, you can create a PivotTable or PivotChart form. To demonstrate these features, I used a variation of the Northwind sample database, with objects renamed according to the Leszynski Naming Convention.
Plain Datasheet Reports
The sample database for this section is Modified Northwind.accdb.
The query qryNorthwindAlllinks all the tables in the Modified Northwind database. To produce a plain datasheet report, start by selecting qryNorthwindAll, and selecting Report Wizard in the Reports group on the Create tab of the Ribbon, as shown in Figure 1.10.
NOTE
NOTE
Using a Naming Convention
I
first realized what a problem it is to work in a database with no naming convention when I took over a database created by another programmer. The database had a table, a query, a form, a report, a function, and five or six variables (of different data types) all called Sales (this was only one of a number of sets of objects with the same name). This meant that when I encountered the word “Sales” in VBA code, I had no idea whether it was a reference to a table, form, query, function, or variable, unless the context made it clear. There were numerous errors because of the use of the same name for different types of objects, because (among other possible sources of errors) you can set the value of a field with a variable, or with a function — and if several variables and a function are all called Sales, the code may use the wrong one.You can also get circular reference errors when a control has the same name as the field to which it is bound — which is still the case in Access 2007, when you create a form bound to a table using the Form Wizard. To prevent these reference errors, it is an excellent idea to use a naming convention for database objects, controls, and variables. Using a naming convention also makes your database self-documenting (to some extent, at least), and prevents confusion when selecting an object from a drop-down list.
FIGURE 1.10
Selecting the Report Wizard to create a report.
Select the fields to include on the report (see Figure 1.11) and click Next.
FIGURE 1.11
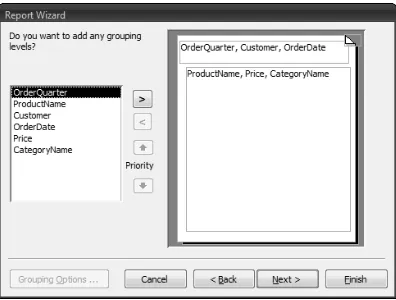
On the next screen of the wizard (see Figure 1.12), select the top-level grouping you want for the report (in this case, I accepted the default selection of OrderQuarter, Customer, OrderDate).
FIGURE 1.12
Selecting a major grouping level for a report.
The next screen lets you select groups, if desired; I accepted the default (no further sub-grouping, as shown in Figure 1.13).
FIGURE 1.13
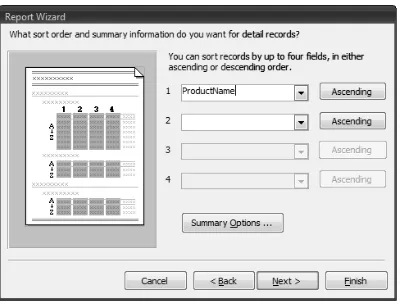
Next, select sorting and summarizing options; I selected ProductName for sorting, as shown in Figure 1.14.
FIGURE 1.14
Selecting sorting and summarizing options for a report.
On the report layout screen, depicted in Figure 1.15, I selected the Block option.
FIGURE 1.15
Select a style on the next screen, shown in Figure 1.16 (bear in mind that some of the more artistic styles won’t look good when printed on a black-and-white printer). I selected None for a plain report.
FIGURE 1.16 Selecting a report style.
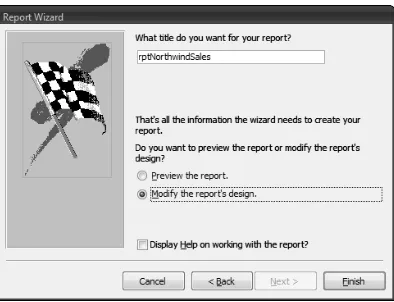
Give the report a name on the Finish screen (Figure 1.17) — I called it rptNorthwindSales. Select the “Modify the report’s design” option to open the report in design view, and click Finish.
FIGURE 1.17
You will need to make some adjustments to the report’s design in the property sheet; if it is not open, click the Property Sheet button in the Tools group on the Design tab of the Ribbon, as shown in Figure 1.18.
FIGURE 1.18
Opening the property sheet.
By default, in the Block report layout only the cells with values have visible borders, so to create an overall worksheet-type layout, select all the controls in the Detail section of the report, and turn off display of duplicate data values by setting the Hide Duplicates property to No on the Format tab of the properties sheet, as shown in Figure 1.19.
FIGURE 1.19
Setting the Hide Duplicates property to No to eliminate duplicate data on a report.
Although it is generally not a problem for report controls to have the same names as their bound fields (because they are rarely, if ever, referenced in code), I like to give the appropriate tags to the bound controls at least. To do this manually, give the textboxes the prefix txt. (On a report created by the Report Wizard, labels are named with the non-standard suffix _Label.)
The Report Wizard generally applies the default alignment to each column label, which may result in inconsistent alignment. That doesn’t look good, so (if necessary) adjust the alignment of the column headings labels as desired (generally they should be either all left-aligned or all centered); on the sample report I made them all centered.
If you need to adjust an individual column width, it may be necessary to turn off control grouping (a new feature in Access 2007). To accomplish this, first select the controls in the Detail section and click the yellow group anchor that should now be visible (though not very visible — Microsoft should have selected a color with more contrast than dull mustard yellow) at the upper-left corner of the group, then right-click any control in the group and select Remove from the Layout submenu (see Figure 1.20).
FIGURE 1.20
Turning off control grouping.
Figure 1.21 shows the finished worksheet-type report.
You can interactively sort and filter a report in report view — for example, when you want to view records from only one customer, as shown in Figure 1.22.
NEW FEATURE
FIGURE 1.21
A worksheet-type Access report.
FIGURE 1.22
After making the selection, the report shows only Gourmet Lanchonetes records (Figure 1.23).
FIGURE 1.23
A report filtered by a Customer value.
PivotTables
If you need more advanced interactivity, you can make a PivotTable based on the same
FIGURE 1.24 Creating a PivotTable.
A new form based on the data source opens in PivotTable view (see Figure 1.25), with the Field List open so you can drag fields to the drop zones of the PivotTable, one field each to the Row Fields, Column Fields, and (optionally) Filter Fields drop zones, which are indicated in gray text at the upper-left corner of the form. The data field to be displayed in the body of the table is dragged to the drop zone in the center of the form; Access will automatically create a Count or Sum field when appropriate.
See Chapter 5 of my book, Expert One-on-One Microsoft Application Development, for more information on creating and using PivotTables and PivotCharts.
Figure 1.26 shows the PivotTable with Salesperson selected as the Row field and CategoryName as the Column field, with Price as the Totals field.
CRO
SS
-REF
FIGURE 1.25
A newly created PivotTable, ready to select fields.
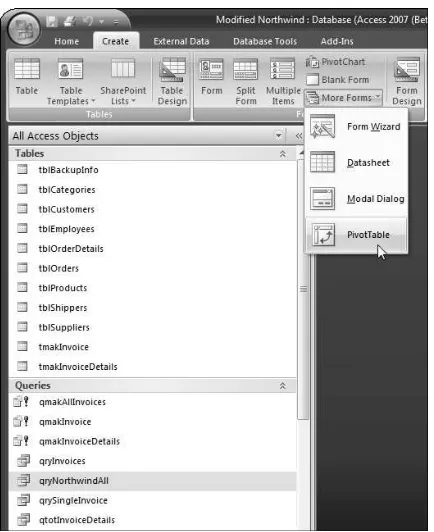
PivotCharts
Making a PivotChart is even easier: select the data source query or table and click the PivotChart button in the Forms group in the Create tab of the Ribbon. Figure 1.27 shows the new, blank PivotChart with drop zones at the top and right sides of the form.
FIGURE 1.27
A new, blank PivotChart.
FIGURE 1.28
The PivotChart with fields assigned to its drop zones.
The next step is to give names to the chart’s vertical and horizontal axes. To name the axes, select an Axis Title label, open the property sheet, and select its Format tab; enter the name you want to dis-play for that axis in the Caption property, as shown in Figure 1.29. Repeat for the other axis label.
FIGURE 1.29
To make the chart’s Legend visible (generally a good idea), click the Legend button in the Show/Hide group of the Design tab of the Ribbon, as shown in Figure 1.30.
FIGURE 1.30
Making the PivotChart’s Legend visible.
The finished Pivot Chart is shown in Figure 1.31.
FIGURE 1.31 A completed PivotChart.
See Chapter 3 for information on creating Excel worksheets and charts filled with Access data, and Chapter 12 for information on creating Excel PivotCharts filled with Access data.
Summary
In this chapter you have learned about some new features of Access 2007, especially those related to producing Access reports to display data stored in Access tables. But sometimes you need to dis-play your data in Word documents or Excel worksheets, rather than Access reports; or you may need to create Outlook appointments, tasks, contacts, or mail messages, using Access as a control center for working with Office documents.
When you need to produce Word documents, Excel worksheets, or Outlook items, either to make use of the special features of these Office components or to distribute your data in formats that can be used by everyone who has Office, you have two options: use the built-in Export selections on the Ribbon, or write VBA code to create the Office documents and fill them with Access data. The next three chapters describe how to create Word documents, Excel worksheets or charts, and Outlook items, and fill them with Access data.
CRO
SS
-REF
I
f you need to produce documents with more sophisticated formatting than is available in an Access report, your best option is to create Word documents and fill them with data from Access. There are many ways to export data from Access to Word; which one to use depends on the circum-stances, the type of data to export, and user preferences. This chapter dis-cusses the various types of Word documents you can create and the methods you can use to fill them with data, with basic examples.For more complex and realistic examples of exporting Access data to Word documents, see Chapters 6 and 12. The sample database for this chapter is Access to Word.accdb.
Filling Word Documents with
Access Data Using the TypeText
Method
You can create a blank Word document (based on the default Word tem-plate) with two lines of code:
Set appWord = GetObject(, “Word.Application”) Set doc = appWord.Documents.Add
NOTE
NOTE
CRO
SS
-REF
CRO
SS
-REF
IN THIS CHAPTER
Word documents and templates
Working with Word bookmarks
Working with the TypeText method
Working with Word document properties
Working with form fields
Working with tables
In most of my Automation code working with other Office applications (Word, Excel, and Outlook), I use the GetObjectfunction in the body of a procedure, to set a refer-ence to the running instance of the application, if there is one; the procedure’s error handler runs
CreateObjectif the application is not already running (see the code samples later in this chapter for examples). This prevents creation of multiple instances of Word, Excel, or Outlook.
If you don’t need any fancy formatting, just a plain text document, you can fill a blank Word docu-ment with text using the TypeTextmethod. The FillWithTypeTextprocedure listed next creates a blank Word document, then enters a document heading, then reads text from fields in an Access table and writes it directly to the Word document, and finally applies some simple format-ting, using Word commands:
Private Sub FillWithTypeText ()
On Error GoTo ErrorHandler
Dim appWord As Word.Application Dim doc As Word.Document
Dim dbs As DAO.Database Dim rst As DAO.Recordset
Set appWord = GetObject(, “Word.Application”) Set doc = appWord.Documents.Add
Insert and format document title:
With appWord.Selection
.TypeText “Current Contacts as of “ _ & Format(Date, “Long Date”)
.TypeParagraph
.MoveLeft Unit:=wdWord, Count:=11, _ Extend:=wdExtend
.Font.Size = 14 .Font.Bold = wdToggle
.MoveDown Unit:=wdLine, Count:=1 End With
Insert a two-column table to hold contact data (one column for contact names, the other for user comments): If .Style <> “Table Grid” Then
.Style = “Table Grid” End If
NOTE
.ApplyStyleHeadingRows = True
Insert contact data from Access table into Word table:
Set dbs = CurrentDb
Set rst = dbs.OpenRecordset(“tblContacts”) Do While Not rst.EOF
With appWord.Selection
.TypeText rst![LastName] & “, “ & rst![FirstName] .MoveRight Unit:=wdCell, Count:=2
End With rst.MoveNext Loop
Delete the last, blank row:
appWord.Selection.Rows.Delete
Sort contact names alphabetically:
doc.Tables(1).Select
Set appWord = Nothing Exit Sub
ErrorHandler:
If Err = 429 Then
Word is not running; open Word with CreateObject:
Set appWord = CreateObject(“Word.Application”) Resume Next
Else
MsgBox “Error No: “ & Err.Number _ & “; Description: “ & Err.Description
Resume ErrorHandlerExit End If
If you don’t know the VBA syntax for an operation, you can record a Word macro to create a procedure containing the code, though you may have to trim out the excess — recorded macros generally set every single argument of a method, whether or not they are needed.
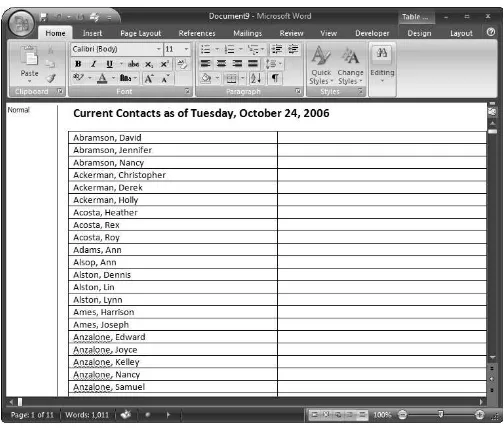
The finished contact list document is shown in Figure 2.1.
FIGURE 2.1
A Word document filled with Access data using the TypeText method.
Using Word Templates for Creating
Formatted Word Documents
The TypeTextmethod used in the previous section is only suitable for creating very simple Word documents. If you need to produce fully formatted Word documents, with headers, footers, and sections with different margins, or if you need to place Access data at various points within blocks of text, it’s best to prepare one or more Word templates in advance, formatting them as needed. Then you can create new documents from the templates and fill them with Access data as needed, using either bookmarks or (my preferred method) Word document properties.
The first step is to create the Word templates, with headers, footers, logo, and different fonts as needed. Depending on the method you want to use, either place bookmarks in the template where you want the Access data to appear or create document properties to accept the Access data, and place DocProperty fields in the template where you want the Access data to appear.
Bookmarks
As an example of using bookmarks in a Word template, I created a template designed to print on a certain type of paper (Paper Direct Milano), with a header and footer, several fonts, and two sec-tions, the first for the letter itself and the second for a matching COM 10 envelope. I placed several bookmarks in the letter portion of the template, where the letter date, name and address, and salu-tation should print, and cross-reference fields in the envelope portion, to print the name and address there, as well as a PostNet ZIP bar code.
This chapter uses the new .dotx Word 2007 template format, which creates a document of the .docx type. Documents in this new Word format can only be used by people run-ning Office 2007, so if you need to distribute Word documents to people runrun-ning older versions of Office, it is best to use the .dot template format, and create .doc documents, which are usable in Office 97 through 2007.
WARNIN
G
WARNIN
G
Working with Word User Information Fields
Y
ou can place Word UserName and UserAddress fields in the document header to print your name and address. If you have used these fields in previous versions of Word, you may have dif-ficulty locating them in the new Word 2007 interface, especially because Microsoft has chosen to put them in different places (in Word 2003, they were all conveniently located on the User Information tab of the Options dialog). In Word 2007, the user name is entered in the User Name field on the Personalize page of the Word Options dialog, which is opened from the Word Options button on the File menu.Entering the user name in the Word Options dialog.
continued
Curiously, the user address information is entered in a different location, as “Mailing address” at the bottom of the Advanced page of the Word Options dialog.
Entering the mailing address (user address) in the Word Options dialog.
To place a field with the user name or user address into a template, select Field from the Quick Parts list in the Text group of the Insert menu.
This opens the Field dialog (similar to the one in Word 2003), where you can select the User Name or User Address field for insertion.
Inserting the UserAddress field on a template.
The following figure shows the user name and address information in a template header.
To insert a bookmark in a document or template, select Bookmark from the Links group on the Insert tab, as in Figure 2.2.
It is advisable to uncheck the “Preserve formatting during updates” checkbox when inserting fields, as otherwise you can get different fonts or sizes for the text displayed in the fields.
FIGURE 2.2
Opening the Bookmark dialog.
Type the bookmark name in the Bookmark dialog and click Add (Figure 2.3).
FIGURE 2.3 Creating a bookmark.
By default, you won’t see the I-beam markers that indicate bookmarks in a Word docu-ment; to see them, check the “Show bookmarks” checkbox on the Advanced page of the Word Options dialog, as depicted in Figure 2.4.
NOTE
NOTE
WARNIN
G
WARNIN
G
FIGURE 2.4
Turning on bookmark display in the Word Options dialog.
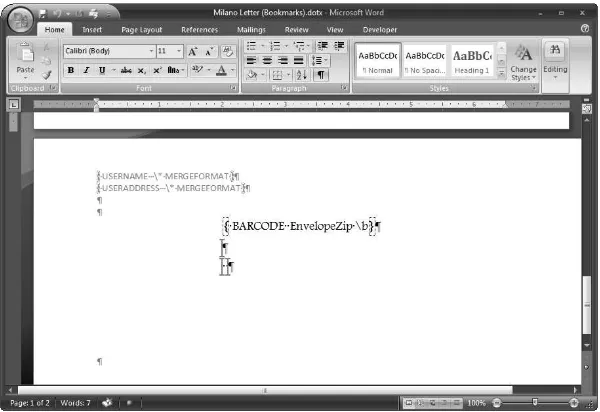
Figure 2.5 shows the second (envelope) page of the Milano Word template, with user information fields, bookmarks, and a BarCode field (to see these fields, press Alt+F9).
FIGURE 2.5
In code for this chapter’s sample database, the assumption is that the Word templates are located in the default folder, which is C:\Users\User Name\AppData\Roaming\ Microsoft\Templates for Windows Vista or C:\Documents and Settings\User Name\Application Data\Microsoft\Templates for Windows XP. For a more flexible method of setting the Templates folder, see Chapter 6.
The form frmContacts in the sample Access to Word database displays contacts located in the U.S.A. The form, shown in Figure 2.6, has three buttons, each of which creates a letter to the selected contact using a different method.
FIGURE 2.6
The Contacts form with buttons to create Word letters.
The code for creating a document using bookmarks is listed as follows:
Private Sub cmdBookmarks_Click()
On Error GoTo ErrorHandler
Dim appWord As Word.Application Dim doc As Word.Document
Dim dbs As DAO.Database Dim rst As DAO.Recordset Dim strTemplatePath As String Dim strTemplateName As String
Dim strTemplateNameAndPath As String Dim lngContactID As Long
Dim strRecipientName As String Dim strRecipientAddress As String
CRO
SS
-REF
Dim strRecipientZip As String Dim strPrompt As String Dim strTitle As String Dim strSalutation As String
Dim fso As New Scripting.FileSystemObject Dim fil As Scripting.File
lngContactID = Nz(Me![ContactID]) If lngContactID = 0 Then
strPrompt = “No contact selected” strTitle = “Problem”
MsgBox strPrompt, vbOKOnly + vbExclamation, strTitle GoTo ErrorHandlerExit
Set appWord = GetObject(, “Word.Application”)
Get the default User Template path from the Word Options dialog (it is still available in code, though it has disappeared from the Word 2007 interface):
strTemplatePath = _
appWord.Options.DefaultFilePath(wdUserTemplatesPath) _ & “\”
Debug.Print “Templates folder: “ & strTemplatePath strTemplateName = “Milano Letter (Bookmarks).dotx”
strTemplateNameAndPath = strTemplatePath & strTemplateName
On Error Resume Next
Try to locate the template in the default Templates folder, and put up a message if it is not found:
Set fil = fso.GetFile(strTemplateNameAndPath) If fil Is Nothing Then
strPrompt = “Can’t find “ & strTemplateName _ & “ in “ & strTemplatePath & “; canceling” MsgBox strPrompt, vbCritical + vbOKOnly GoTo ErrorHandlerExit
End If
On Error GoTo ErrorHandler
Write information to Word bookmarks in the document:
With appWord.Selection
.Goto what:=wdGoToBookmark, Name:=”LetterDate” .TypeText Text:=Format(Date, “Long Date”)
.Goto what:=wdGoToBookmark, Name:=”RecipientName”
Reinsert the EnvelopeZip bookmark so the zip code will be available for use by the bar code field on the envelope:
.MoveLeft Unit:=wdWord, Count:=3, Extend:=wdExtend doc.Bookmarks.Add Range:=Selection.Range, _
Name:=”EnvelopeZip”
.Goto what:=wdGoToBookmark, Name:=”LetterText” strPrompt = “Ready to enter letter text” strTitle = “Access data imported”
MsgBox strPrompt, vbOKOnly, strTitle appWord.Visible = True
appWord.Activate
End With
ErrorHandlerExit:
Set appWord = Nothing Exit Sub
ErrorHandler:
Word is not running; open Word with CreateObject:
Set appWord = CreateObject(“Word.Application”) Resume Next
Else
MsgBox “Error No: “ & Err.Number _ & “; Description: “ & Err.Description Resume ErrorHandlerExit
End If
End Sub
Document Properties
When you use Word document properties rather than bookmarks to write Access data to a Word document, you don’t need to have two (or more) sets of bookmarks, one for each place you want to display a piece of data (for example, displaying the recipient’s name and address on the letter and the envelope). You can write the data to a document property once and display it in multiple places in the Word document with DocProperty fields.
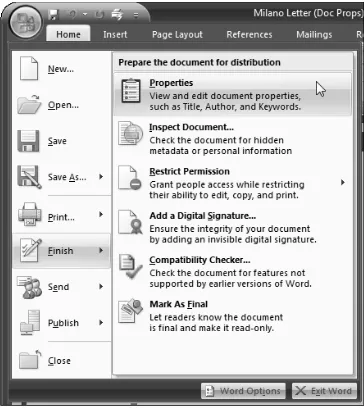
To create the properties, first select Finish from the File menu in the template, and select Properties, as shown in Figure 2.7.
FIGURE 2.7
This opens the Document Information panel, with a few of the more common document proper-ties displayed (see Figure 2.8).
FIGURE 2.8
The Document Information panel.
To get to the Properties sheet, select Advanced from the Properties drop-down at the top of the panel; this opens the Properties sheet, which looks much the same as in Word 2003. Click the Custom tab (Figure 2.9) to start creating document properties.
FIGURE 2.9
The Custom page of the Word Properties sheet.
FIGURE 2.10
The Doc properties for the Milano Letter (Doc Props) template.
Next, place DocProperty fields in the template where you want the values in the doc properties to display.
One bookmark is still needed, even if you are using doc properties to display data from Access: The BarCode field needs to reference a bookmark in order to create the PostNet bar code. Therefore, after placing a DocProperty field for the zip into the template, select that field and create a bookmark for it.
To insert a DocProperty field, select QuickParts from the Text group on the Insert tab of the Ribbon, select DocProperty as the field type, and then select the doc property from the Property list (see Figure 2.11).
Don’t give your doc properties the same names as any built-in properties, although Word lets you do this, because this will make it difficult to select the correct property from the list of properties, which includes both built-in and custom doc properties.
Figure 2.12 shows the first page of the template, with DocProperty fields displayed, and one book-mark to indicate the place where the letter text is to be typed.
TIP
TIP
NOTE
FIGURE 2.11
Inserting a DocProperty field.
FIGURE 2.12
The code that creates the document with text written to doc properties is listed as follows:
Private Sub cmdDocProps_Click()
On Error GoTo ErrorHandler
Dim appWord As Word.Application Dim doc As Word.Document
Dim dbs As DAO.Database Dim rst As DAO.Recordset Dim strTemplatePath As String Dim strTemplateName As String
Dim strTemplateNameAndPath As String Dim lngContactID As Long
Dim strRecipientName As String Dim strRecipientAddress As String Dim strRecipientZip As String Dim strPrompt As String Dim strTitle As String Dim strSalutation As String
Dim fso As New Scripting.FileSystemObject Dim fil As Scripting.File
Dim prps As Object
lngContactID = Nz(Me![ContactID]) If lngContactID = 0 Then
strPrompt = “No contact selected” strTitle = “Problem”
MsgBox strPrompt, vbOKOnly + vbExclamation, strTitle GoTo ErrorHandlerExit
Set appWord = GetObject(, “Word.Application”)
Get the default User Templates path from the Word Options dialog:
strTemplatePath = _
appWord.Options.DefaultFilePath(wdUserTemplatesPath) _ & “\”
Debug.Print “Templates folder: “ & strTemplatePath strTemplateName = “Milano Letter (Doc Props).dotx”
strTemplateNameAndPath = strTemplatePath & strTemplateName
Try to locate the template in the default Templates folder, and put up a message if it is not found:
Set fil = fso.GetFile(strTemplateNameAndPath) If fil Is Nothing Then
strPrompt = “Can’t find “ & strTemplateName _ & “ in “ & strTemplatePath & “; canceling” MsgBox strPrompt, vbCritical + vbOKOnly GoTo ErrorHandlerExit
End If
On Error GoTo ErrorHandler
Set doc = appWord.Documents.Add(strTemplateNameAndPath)
Write information to Word doc properties:
Set prps = doc.CustomDocumentProperties
prps.Item(“LetterDate”).Value = Format(Date, “Long Date”) prps.Item(“RecipientName”).Value = strRecipientName
strPrompt = “Ready to enter letter text” strTitle = “Access data imported”
MsgBox strPrompt, vbOKOnly, strTitle appWord.Visible = True
appWord.Activate
ErrorHandlerExit:
Set appWord = Nothing Exit Sub
ErrorHandler:
If Err = 429 Then
Word is not running; open Word with CreateObject:
Else
MsgBox “Error No: “ & Err.Number _ & “; Description: “ & Err.Description Resume ErrorHandlerExit
End If
End Sub
Form Field Documents
Sometimes you need to create documents that display some data from Access and also allow users to enter more data in a controlled fashion. This can be done using either bookmarks or doc prop-erties to display the Access data, and Word content controls (called form fields in earlier versions of Word) for the user-entered data.
The third button on frmContacts creates a letter filled with data from Access, using doc properties; additionally, the template has two form fields, to be filled in by the user when creating the docu-ment. Of course, users can just type text into a document, but form fields allow the developer to limit the information to a selection of appropriate values, perhaps in a protected document section that does not allow free-form entry.
To insert a content control into a template, select the control type from the Controls group on the Developer tab of the Ribbon, as shown in Figure 2.13.
FIGURE 2.13
Inserting a dropdown-type content control.
If you don’t see the Developer tab, turn it on by checking the “Show Developer tab in the Ribbon” checkbox on the Personalize page of the Word Options dialog (Figure 2.14).
To add the choices for a drop-down or combo box list, switch to Design mode by clicking the Design button in the Controls group, select the control, and then select Properties from the Controls group on the Developer tab, as depicted in Figure 2.15.
FIGURE 2.14
Turning on the Developer tab on the Word Ribbon.
FIGURE 2.15
Add the choices for the drop-down list in the Properties sheet (see Figure 2.16). To add a choice, click the Add button, enter the display name and value, and click OK; repeat for each selection you want to add to the list.
FIGURE 2.16
Adding choices for a drop-down list content control.
Don’t check the “Contents cannot be edited” checkbox; if you do, selections can’t be made from the drop-down list.
When a new document is created from a template with content controls, when you hover the mouse over a content control, the title appears over the control, and you can click the drop-down arrow to open the list and select an item (Figure 2.17).
FIGURE 2.17
Selecting an item from a drop-down content control.
Summary
Y
ou can print Access data directly, using Access reports, as described in Chapter 1, or you can present the data interactively in PivotTables or PivotCharts. But, as mentioned in Chapter 1, these options have some limitations, because you can only work interactively with PivotTables and PivotCharts within an Access database. If you (or others) want to be able to manipulate and analyze Access data without the need to have Access installed, Excel worksheets are an excellent choice.Rather than preparing Access reports, PivotTables, or PivotCharts (or in addition to them), you can export data to Excel, and allow users to analyze the data with Excel’s tools. This option is available to everybody who has Office installed, because even the most basic editions of Office include Excel, whereas Access is only included in some editions (the more expensive ones). You can export the Access data to an unformatted worksheet and let the users work with it as they want (this works fine if they just need the data and don’t require fancy formatting), or you can create Excel templates and export the data to a new worksheet made from a template; this technique allows you to do some of the formatting in advance.
A third alternative is to export the Access data into either a default worksheet or a worksheet created from a template, and sort the data, create totals, or apply formatting using Excel commands in VBA code. The following sections describe using these three methods to export Access data to Excel.
The sample database for this chapter is Access to Excel.accdb.
NOTE
NOTE
IN THIS CHAPTER
Exporting Access data to Excel using a Ribbon command
Creating new Excel worksheets from templates
Exporting Access Data to
an Unformatted Worksheet
If you just need to move a chunk of data from Access to Excel, and you don’t need fancy format-ting, you can use the Excel command in the Export group on the External Data tab of the Ribbon to export the Access data to a plain, unformatted worksheet. The sample database, based on the Northwind sample database, has a query that links all the data tables, qryNorthwindAll. A query of this type is very useful for doing data exports, because it contains all the data you might want to export. (Figure 3.1 shows this query selected in the Object Bar.)
FIGURE 3.1
Exporting to Excel from a Ribbon command.
FIGURE 3.2
The Export dialog opened from the Excel command.
Using qryNorthwindAllas the data source, you get the plain worksheet shown in Figure 3.3.
FIGURE 3.3
Using a query as a data source allows you to combine data from multiple tables and also to format data as you want it to appear in the target worksheet, using data type conver-sion functions such as CDate, CCur, or CStr.
With a few clicks, you can resize the worksheet columns as needed, edit the column headers as needed, and make the column header row bold, and a plain but serviceable worksheet (Figure 3.4) is ready for use.
FIGURE 3.4
The exported worksheet with a little formatting applied manually.
Using Excel Templates to Create Formatted
Worksheets Filled with Access Data
If you want to produce a more formatted worksheet, you can prepare an Excel template and format it as needed — for example, adding a large, centered title and column headings with appropriate text, perhaps in a larger or bolder font than the data area. Then, instead of using the Excel com-mand on the Ribbon, use VBA code to export the Access data row by row to the data area of a new worksheet created from the template. I created a set of queries for archiving data, again using the sample Northwind data, and a dialog form (fdlgArchiveOrders) that allows the user to select a date range for archiving Orders data, as shown in Figure 3.5.
Note the calendar icon next to the date controls (it appears when a control bound to a Date field has the focus). Clicking the icon opens a calendar for selecting a valid date, as shown in Figure 3.6. The new calendar pop-up is definitely useful, though selecting a date far in the past can be tedious, because there is no way to move year by year.
NEW FEATURE
FIGURE 3.5
A dialog form for selecting Northwind Orders data to archive.
FIGURE 3.6
Selecting a date from the calendar pop-up.
Once the start date and end date have been entered or selected, clicking the Archive button runs a procedure that creates a new Excel worksheet from a template (Orders Archive.xltx) in the same folder as the database, fills it with data from tblOrders in the selected date range, and deletes the archived records.
The ArchiveDataprocedure uses the Start Date and End Date values selected in the dialog as arguments. This procedure is listed as follows, together with the CreateAndTestQuery proce-dure it uses to create a query programmatically, and another proceproce-dure (TestFileExists) that tests whether a file exists in a specific folder:
Public Sub ArchiveData(dteStart As Date, dteEnd As Date)
On Error GoTo ErrorHandler
Dim appExcel As Excel.Application Dim intReturn As Integer
Dim rng As Excel.Range Dim rngStart As Excel.Range Dim strDBPath As String Dim strPrompt As String Dim strQuery As String Dim strSaveName As String Dim strSheet As String Dim strSheetTitle As String Dim strSQL As String
Dim strTemplate As String Dim strTemplateFile As String Dim strTemplatePath As String Dim strTitle As String
Dim wkb As Excel.Workbook Dim wks As Excel.Worksheet
Create a filtered query using the dates selected in the dialog:
strQuery = “qryArchive” Set dbs = CurrentDb
strSQL = “SELECT * FROM tblOrders WHERE “ _
& “[ShippedDate] Between #” & dteStart & “# And #” _ & dteEnd & “#;”
Debug.Print “SQL for “ & strQuery & “: “ & strSQL lngCount = CreateAndTestQuery(strQuery, strSQL) Debug.Print “No. of items found: “ & lngCount If lngCount = 0 Then
Exit if no orders are found in the selected date range:
strPrompt = “No orders found for this date range; “ _ & “canceling archiving”
strTitle = “Canceling”
MsgBox strPrompt, vbOKOnly + vbCritical, strTitle GoTo ErrorHandlerExit
Else
strPrompt = lngCount & “ orders found in this date “ _ & “range; archive them?”
strTitle = “Archiving”
intReturn = MsgBox(strPrompt, vbYesNo + vbQuestion, _ strTitle)
If intReturn = vbNo Then GoTo ErrorHandlerExit End If
End If
Create a new worksheet from the template and export the Access data to it:
strTemplate = “Orders Archive.xltx” strTemplateFile = strDBPath & strTemplate If TestFileExists(strTemplateFile) = False Then
Put up a message and exit if the template is not found:
strTitle = “Template not found”
strPrompt = “Excel template ‘Orders Archive.xlt’” _ & “ not found in “ & strDBPath & “;” & vbCrLf _ & “please put template in this folder and try again” MsgBox strPrompt, vbCritical + vbOKOnly, strTitle GoTo ErrorHandlerExit
Else
Debug.Print “Excel template used: “ & strTemplateFile End If
Template found; create a new worksheet from it:
Set appExcel = GetObject(, “Excel.Application”) Set rst = dbs.OpenRecordset(“qryRecordsToArchive”) Set wkb = appExcel.Workbooks.Add(strTemplateFile) Set wks = wkb.Sheets(1)
wks.Activate
appExcel.Visible = True
Write the date range to title cell:
Set rng = wks.Range(“A1”)
strSheetTitle = “Archived Orders for “ _ & Format(dteStart, “d-mmm-yyyy”) _ & “ to “ & Format(dteEnd, “d-mmm-yyyy”) Debug.Print “Sheet title: “ & strSheetTitle rng.Value = strSheetTitle
Go to the first data cell:
Set rngStart = wks.Range(“A4”) Set rng = wks.Range(“A4”)
Reset lngCount to the number of records in the data source query:
rst.MoveLast rst.MoveFirst
lngCount = rst.RecordCount
For n = 1 To lngCount
rng.Value = Nz(rst![OrderID])
Set rng = rng.Offset(columnoffset:=1) rng.Value = Nz(rst![Customer])
Set rng = rng.Offset(columnoffset:=1) rng.Value = Nz(rst![Employee])
Set rng = rng.Offset(columnoffset:=1) rng.Value = Nz(rst![OrderDate]) Set rng = rng.Offset(columnoffset:=1) rng.Value = Nz(rst![RequiredDate]) Set rng = rng.Offset(columnoffset:=1) rng.Value = Nz(rst![ShippedDate]) Set rng = rng.Offset(columnoffset:=1) rng.Value = Nz(rst![Shipper])
Set rng = rng.Offset(columnoffset:=1) rng.Value = Nz(rst![Freight])
Set rng = rng.Offset(columnoffset:=1) rng.Value = Nz(rst![ShipName])
Set rng = rng.Offset(columnoffset:=1) rng.Value = Nz(rst![ShipAddress]) Set rng = rng.Offset(columnoffset:=1) rng.Value = Nz(rst![ShipCity])
Set rng = rng.Offset(columnoffset:=1) rng.Value = Nz(rst![ShipRegion]) Set rng = rng.Offset(columnoffset:=1) rng.Value = Nz(rst![ShipPostalCode]) Set rng = rng.Offset(columnoffset:=1) rng.Value = Nz(rst![ShipCountry]) Set rng = rng.Offset(columnoffset:=1) rng.Value = Nz(rst![Product])
Set rng = rng.Offset(columnoffset:=1) rng.Value = Nz(rst![UnitPrice]) Set rng = rng.Offset(columnoffset:=1) rng.Value = Nz(rst![Quantity])
Set rng = rng.Offset(columnoffset:=1) rng.Value = Nz(rst![Discount])
Go to the next row in the worksheet, using the rowoffsetargument:
rst.MoveNext
Set rng = rngStart.Offset(rowoffset:=n)
Next n
Save and close the filled-in worksheet, using a workbook save name with the date range selected in the dialog: