LIMIT OF LIABILITY/DISCLAIMER OF WARRANTY: THE PUBLISHER AND THE AUTHOR MAKE NO REPRESENTATIONS OR WARRANTIES WITH RESPECT TO THE ACCURACY OR COMPLETENESS OF THE CONTENTS OF THIS WORK AND SPECIFICALLY DISCLAIM ALL WARRANTIES, INCLUDING WITHOUT LIMITATION WARRANTIES OF FITNESS FOR A PARTICULAR PURPOSE. NO WARRANTY MAY BE CREATED OR EXTENDED BY SALES OR PROMOTIONAL MATERIALS. THE ADVICE AND STRATEGIES CONTAINED HEREIN MAY NOT BE SUITABLE FOR EVERY SITUATION. THIS WORK IS SOLD WITH THE UNDERSTANDING THAT THE PUBLISHER IS NOT ENGAGED IN RENDERING LEGAL, ACCOUNTING, OR OTHER PROFESSIONAL SERVICES. IF PROFESSIONAL ASSISTANCE IS REQUIRED, THE SERVICES OF A COMPETENT PROFESSIONAL PERSON SHOULD BE SOUGHT. NEITHER THE PUBLISHER NOR THE AUTHOR SHALL BE LIABLE FOR DAMAGES ARISING HEREFROM. THE FACT THAT AN ORGANIZATION OR WEBSITE IS REFERRED TO IN THIS WORK AS A CITATION AND/OR A POTENTIAL SOURCE OF FURTHER INFORMATION DOES NOT MEAN THAT THE AUTHOR OR THE PUBLISHER ENDORSES THE INFORMATION THE ORGANIZATION OR WEBSITE MAY PROVIDE OR RECOMMENDATIONS IT MAY MAKE. FURTHER, READERS SHOULD BE AWARE THAT INTERNET WEBSITES LISTED IN THIS WORK MAY HAVE CHANGED OR DISAPPEARED BETWEEN WHEN THIS WORK WAS WRITTEN AND WHEN IT IS READ.
FOR PURPOSES OF ILLUSTRATING THE CONCEPTS AND TECHNIQUES DESCRIBED IN THIS BOOK, THE AUTHOR HAS CREATED VARIOUS NAMES, COMPANY NAMES, MAILING, E-MAIL AND INTERNET ADDRESSES, PHONE AND FAX NUMBERS AND SIMILAR INFORMATION, ALL OF WHICH ARE FICTITIOUS. ANY RESEMBLANCE OF THESE FICTITIOUS NAMES, ADDRESSES, PHONE AND FAX NUMBERS AND SIMILAR INFORMATION TO ANY ACTUAL PERSON, COMPANY AND/OR ORGANIZATION IS UNINTENTIONAL AND PURELY COINCIDENTAL.
Contact Us
For general information on our other products and services please con-tact our Customer Care Department within the U.S. at 877-762-2974, outside the U.S. at 317-572-3993 or fax 317-572-4002.
For technical support please visit www.wiley.com/techsupport. Teach Yourself VISUALLY™ PowerPoint® 2013
Published by
John Wiley & Sons, Inc.
10475 Crosspoint Boulevard Indianapolis, IN 46256
www.wiley.com
Published simultaneously in Canada
Copyright © 2013 by John Wiley & Sons, Inc., Indianapolis, Indiana
No part of this publication may be reproduced, stored in a retrieval system or transmitted in any form or by any means, electronic, mechani-cal, photocopying, recording, scanning or otherwise, except as permit-ted under Sections 107 or 108 of the 1976 Unipermit-ted States Copyright Act, without either the prior written permission of the Publisher, or authorization through payment of the appropriate per-copy fee to the Copyright Clearance Center, 222 Rosewood Drive, Danvers, MA 01923, (978) 750-8400, fax (978) 646-8600. Requests to the Publisher for per-mission should be addressed to the Perper-missions Department, John Wiley & Sons, Inc., 111 River Street, Hoboken, NJ 07030, 201-748-6011, fax 201-748-6008, or online at www.wiley.com/go/permissions.
Wiley publishes in a variety of print and electronic formats and by print-on-demand. Some material included with standard print versions of this book may not be included in e-books or in print-on-demand. If this book refers to media such as a CD or DVD that is not included in the version you purchased, you may download this material at http://booksupport.wiley. com. For more information about Wiley products, visit www.wiley.com.
Library of Congress Control Number: 2012956412
ISBN: 978-1-118-51042-1
Manufactured in the United States of America
10 9 8 7 6 5 4 3 2 1
Trademark Acknowledgments
Project Editor
Jade L. Williams
Technical Editor
Vince Averello
Copy Editor
Marylouise Wiack
Editorial Director
Robyn Siesky
Business Manager
Amy Knies
Senior Marketing Manager
Sandy Smith
Vice President and Executive Group Publisher
Richard Swadley
Vice President and Executive Publisher
Barry Pruett
Graphics and Production Specialists
Ana Carrillo Andrea Hornberger Jennifer Mayberry Corrie Niehaus
Quality Control Technicians
John Greenough Lauren Mandelbaum Susan Moritz
Proofreading
Shannon Ramsey
Indexing
About the Author
William (Bill) Wood is a consultant who teaches the Microsoft Office Suite and develops programs with the VBA language. As a part-time writer, he has written books and classroom workbooks about Microsoft Access, Excel, and PowerPoint. He has a formal education as a Biomedical Engineer, a field in which he has worked for many years. He also continues his education in graduate studies at Milwaukee School of Engineering and Medical College of Wisconsin in the field of Medical Informatics. Bill also works as a volunteer member of the National Ski Patrol.
Author’s Acknowledgments
Thank you to the entire Wiley team for helping me complete another book — you are all very friendly and helpful. Special thanks go to Aaron Black and Jade Williams, who gave me their undivided attention when I needed it.
Thank you to Technical Editor Vince Averello for doing a thorough and detailed job. Thanks to Copy Editor Marylouise Wiack for being thorough. I write like an engineer and Marylouise gave my writing eloquence with her recommendations.
Special thanks to my sweetheart and wife, Shane, who kept things together while I took the time to write this book — it would have been difficult to do it without her help and support.
particular technology or software application. It is also for readers who want to expand their knowledge.
The Conventions in This Book
1
Steps
This book uses a step-by-step format to guide you easily through each task. Numbered steps are actions you must do; bulleted steps clarify a point, step, or optional feature; and indented steps give you the result.
2
Notes
Notes give additional information — special conditions that may occur during an operation, a situation that you want to avoid, or a cross-reference to a related area of the book.
4
Tips
Tips offer additional information, including warnings and shortcuts.
5
Bold
Bold type shows command names or options that you must click or text or numbers you must type.
6
Italics
Italic type introduces and defines a new term.
CHAPTER
10
Adding Graphics and Drawings
TIPS
Can I search the entire Internet for clip art?
Yes. First, try the Bing Image search feature. If unsuccessful, Search the web with your browser and save an image to your computer. Then click Pictures
on the Insert tab and use the Insert Picture dialog box to browse to your saved clip art.
What happens if I insert a sound clip instead of clip art?
When you insert a sound clip on a slide, a small megaphone icon appears on the slide. You can set the sound clip so the sound plays automatically or only when you click the icon. See Chapter 12 for more about inserting sound and movie clips. The clip art appears on the
slide.
Note: See the sections, “Move Objects” and “Resize Objects,” to learn how to position and size the clip art.
6 Click and drag the scroll bar to scroll through and view the images. 7 Click an image from the
gallery. 8 Click Insert.
The Insert Pictures dialog box appears. 4 Type a keyword or phrase in
the Office.com Clip Art text box or the Bing Image Search text box. 5 Click the Search icon ( ).
A You can click the Close
button ( ) to cancel. 1 Select a slide in Normal view.
Note: To learn how to select a slide, see Chapter 2. 2 Click the Insert tab. 3 Click Online Pictures.
Insert Clip Art
C
lip art can be interesting drawings, silhouettes, cartoons, caricatures, and other representations. Photographs are not clip art and the clip art files are usually much smaller than photographs. You can add clip art to slides to make them interesting and engaging. Clip art is usually easier for an audience to see because it lacks the detail of a picture. You can search for clip art by keyword with the online feature in PowerPoint or you can insert your own clip art from your computer. You can insert clip art anywhere on your slide without using a content placeholder, which gives you complete flexibility with how you use it.Table of Contents
Introducing PowerPoint ... 4
Start PowerPoint and Explore the Start Screen ... 6
Start a New Presentation ... 8
Search for Templates Online ... 10
Save a Presentation ... 12
Find a Presentation ... 14
Open an Existing Presentation ... 16
Close a Presentation ... 18
Delete a Presentation ... 19
Chapter
1
Starting with PowerPoint Basics
Explore Normal View ... 22
Navigate PowerPoint Views ... 23
Work with Ribbon Groups, Commands, and Galleries .... 24
Arrange Presentation Windows ... 26
Find and Use KeyTips ... 27
Using the Quick Access Toolbar ... 28
Resize the Notes Pane ... 29
Zoom to Full Screen... 30
Navigate Slides ... 32
Using Help ... 34
Change Spelling Options ... 42
Change AutoCorrect Settings ... 44
Change AutoFormat Settings ... 46
Customize Save Options ... 48
Modify View and Slide Show Options ... 50
Change Editing Settings ... 52
Work with Print Options ... 54
Customize the Quick Access Toolbar ... 56
Customize the Ribbon ... 58
Understanding Slide Structure ... 64
Explore Text Formatting Options ... 65
Add a Slide ... 66
Delete a Slide in Normal View ... 67
Type and Edit Text on a Slide ... 68
Format Text Color and Style ... 70
Format Text Font and Size ... 72
Cut, Copy, and Paste Text ... 74
Format Bulleted Lists ... 76
Using the Spelling Check Feature ... 78
Using the Research Feature ... 80
Table of Contents
Understanding Layouts and Placeholders ... 84
Insert a New Slide with the Selected Layout ... 85
Change a Slide Layout ... 86
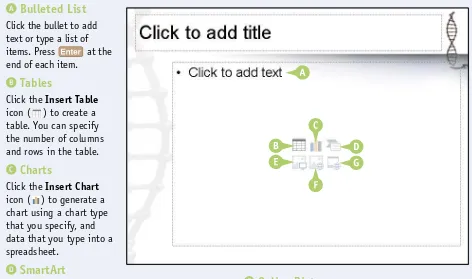
Using Layouts with a Content Placeholder ... 87
Insert a Table ... 88
Format a Table ... 90
Insert a Chart ... 92
Format a Chart ... 94
Edit Chart Data ... 96
Insert Pictures... 98
Insert Video ...100
Insert a SmartArt Graphic ...102
Edit SmartArt ...104
Insert a Slide from Another File ...106
Chapter
5
Working with Layouts
Move a Slide ...110
Copy and Paste a Slide ...111
Delete a Slide in Slide Sorter View ...112
Make a Duplicate Slide ...113
Hide a Slide ...114
Zoom In the View ...115
Go to an Individual Slide ...116
Enter Presentation Content in an Outline...128
Move Slides and Bullet Points in an Outline ...130
Promote and Demote Items ...132
Collapse and Expand an Outline ...134
Edit Outline Content ...135
Insert Slides from an Outline ...136
Understanding Themes ...140
The Anatomy of a Theme ...141
Apply a Theme to Selected Slides ...142
Apply a Theme to All Slides ...144
Apply a Theme to a Section ...145
Change Theme Colors ...146
Modify the Background ...148
Apply a Texture or Picture Background ...150
Save Your Own Theme ...152
Make a Theme the Default for New Presentations ...153
Save a Template ...154
Table of Contents
Understanding Masters ...158
Understanding Slide Master Elements ...159
Open and Close Slide Master View ...160
Remove a Placeholder ...161
Insert a Placeholder ...162
Add a Footer ...164
Add a Date...165
Set Up Slide Numbers ...166
Insert a Graphic in Slide Master View ...167
Work with Multiple Masters ...168
Insert a New Blank Master ...169
Preserve Master Slides ...170
Rename Master Slides ...171
Work with the Notes Master ...172
Work with the Handout Master ...174
Omit Master Graphics on a Slide ...175
Create a Custom Slide Layout ...176
Chapter
9
Using Masters
Select Objects ...180
Move Objects...182
Resize Objects ...183
Change Object Order ...184
Group and Ungroup Objects ...185
Merge Shapes ...186
Understanding Animations and Action Buttons...210
Embracing the Animation Pane ...211
Apply an Animation ...212
Preview an Animation ...214
Add an Animation ...215
Change Animation Effects ...216
Change the Animation Trigger ...217
Modify Animation Timing ...218
Reorder Animations ...219
Add a Motion Path ...220
Remove an Animation ...222
Apply a Transition ...223
Remove a Transition ...224
Advance a Slide after a Set Time Interval ...225
Add a Transition Sound ...226
Set a Transition Speed ...227
Chapter 11
Enhancing Slides with Action
Format Objects ...198
Color with the Eyedropper ...200
Arrange Objects with Smart Guides ...202
Use the Grid and Guides ...204
Nudge Objects ...205
Align Objects ...206
Table of Contents
Insert a Picture ...232
Add a Border ...233
Adjust Brightness and Contrast ...234
Adjust Color ...235
Crop a Picture ...236
Remove the Background from a Picture ...238
Using Artistic Effects ...240
Compress Pictures ...241
Using Layout Effects ...242
Insert Media from the Internet ...244
Insert Video and Audio Clips ...246
Record an Audio Clip ...248
Trim Video Clips ...250
Trim Audio Clips ...252
Insert a Screenshot ...254
Create a Photo Album ...256
Chapter 12
Incorporating Media
Send a Presentation for Review ...260
Protect a Presentation ...262
Add and Delete Comments ...264
Review Comments ...266
Select a Show Type and Show Options ...268
Specify Slides to Include ...270
Print Hidden Slides ...283
Print Handouts ...284
Print Handouts with Microsoft Word ...286
Print the Outline Only ...288
Print Notes ...289
Print in Black and White or Grayscale ...290
Frame Slides...291
Get Ready to Present ...294
Start and End a Show ...295
Navigate Among Slides ...296
Zoom In ...298
Use the Pointer ...300
Mark Up with Pen and Highlighter ...302
Erase Annotations ...304
Display Slide Show Help ...305
Enable Presenter View ...306
Use Presenter View ...307
Switch to a Different Program ...308
Table of Contents
Compare Presentations ...312
Make a PDF Document from a Presentation ...314
Create a Video of a Presentation ...316
Save a Presentation as a Slide Show ...318
Publish Slides as Graphics ...320
Broadcast a Presentation ...322
Save the Presentation to SkyDrive ...324
Share the Presentation with SkyDrive ...326
C H A P T E R 1
Starting with
PowerPoint
Basics
Search for Templates Online . . . 10
Save a Presentation . . . 12
Find a Presentation . . . 14
Open an Existing Presentation . . . 16
Close a Presentation . . . 18
W
ith PowerPoint, you can create a professional-looking slide show. The PowerPoint program
provides tools you can use to build presentations that include graphics, media, animations, and
an assortment of ways to transition from slide to slide. It provides various views and user interfaces
to suit your particular needs. These PowerPoint tools enable you to design and build a quality
presentation. Many tasks start in Backstage view. To access this view, click the File tab on the ribbon.
Introducing PowerPoint
Build an Outline
You can type text in outline form to build slides for your presentation. In the Outline view, an icon represents each slide, and each slide contains a slide title next to the icon. Second-level lines of text on the outline appear as bullet points on the slide. These bullets convey the main points you want to make about each topic.
Add Content
You can add content such as text, charts, and pictures to the slide in the Slide pane of Normal view. You can also insert text boxes that enable you to add slide text that does not appear in the presentation outline.
Choose a Slide Design and Layout
Work with Masters
A set of slide designs and a slide theme combine to create a set of master slides. Masters enable you to add content that you want to appear in a particular location on slides. This saves you from having to add repeating content, such as your company logo, to each slide. For example, you can set up the master so an identical footer appears on every slide.
Organize Slides
After creating several slides, you may need to reorganize them to create the proper sequence for your presentation. You can reorder slides in Slide Sorter view. This view shows slide thumbnails that you can move, delete, duplicate, or hide. You can also perform these actions on the Slides Thumbnail pane in Normal view.
Set Up Your Show
You can add narration, animations, and transitions to your slides. You can record a narration that plays when you give your presentation. Use animation to move an element on-screen, such as a ball bouncing onto the screen. Transitions control how a new slide appears on-screen — for example, a slide can fade in over the previous slide.
Run a Slide Show
The Start screen appears.
3
Right-click the background on the Start screen.The All apps button appears.
4
Click the All apps button.1
Turn on your computer.2
Press .Start PowerPoint and Explore the Start Screen
Y
ou can start PowerPoint from the new Windows 8 Start screen so you can begin designing
a presentation. When you open PowerPoint 2013, the redesigned start screen appears
automatically. From the start screen, you can start a new presentation or open an existing one.
The start screen lists recently opened presentations and allows you to create a presentation from
templates on your computer, or search for PowerPoint templates on the Internet.
TIP
Is there a quicker way to open PowerPoint?
1
Repeat Steps 1 to 6.2
Right-click PowerPoint 2013.3
Click Open file location.4
Click the Home tab.5
Click Copy and the shortcut appears on PowerPoint opens and displaysthe start screen.
B You can open a recently opened presentation.
C You can open a file from your computer.
D You can create a new presentation by clicking a template.
E You can search for a template on the Internet.
the Start screen.
5
Position the mouse pointer ( ) at the bottom of the Start screen.A A scroll bar appears.
6
Scroll across to find the PowerPoint 2013 icon.2
Click New.Templates available on your computer appear.
A You can choose a blank presentation.
B You can click the Pushpin
button ( ) to pin a template to this list ( changes to ).
3
1
Click the File tab to show Backstage view.Start a New Presentation
Y
ou can create a new presentation from the start screen when you start PowerPoint, or from the
File tab on the ribbon
(also known as Backstage View)
. You can create a new presentation from
scratch or by using a template. Creating a presentation from scratch allows you to design freely without
preconceived notions, while working from a template saves time and promotes ideas by starting you off
with a certain look and theme. You can find templates on your computer, as well as on the Internet for
free or for a fee. Your computer needs an Internet connection to download online templates.
TIPS
Is there another way to create a blank presentation?
Yes. When you launch PowerPoint from the Windows 8 Start screen, the start screen has an option to create a blank template. Simply click the Blank Presentation option.
Can I get templates from the Internet?
Yes. You can find many templates online, a lot of them free. Click the File tab, and then click New. At the top of the screen, click the Search online templates and themes textbox to start the process. A dialog box appears that allows you to search online.
of the template.
C You can click the Close button ( ) to cancel.
D You can click Back ( ) or Forward ( ) to view other slides from this template.
E You can click Back ( ) or Forward ( ) to view other templates from the list.
4
Click a color scheme.The preview changes to reflect your preferences.
5
Click Create.PowerPoint shows online templates that match the search text.
B Click the Pushpin button ( ) to pin a template to your list of templates ( changes to ).
5
Click the template of your choice.1
Click the File tab to show Backstage view.2
Click New.Templates available on your computer appear.
A You can search by clicking one of the suggested searches.
3
Type a keyword in the search text box and click ( ).This example uses Sports.
4
Click Search ( ).Search for Templates Online
T
he larger your choice of PowerPoint templates, the greater the chance you will find one that suits
your needs. Fortunately, there are literally thousands of PowerPoint templates available online. You
can search for an online template by using the PowerPoint search feature, or an Internet search engine.
The PowerPoint search feature allows you to search by a keyword and shows you online presentation
templates associated with that keyword. The search feature shows you a preview of the template and
the name of who provided it, and then downloads the template for you! Remember to download only
files from websites that you trust.
TIPS
Do templates come in different sizes?
Yes. Templates come in two slide sizes. The 16:9 aspect ratio is for widescreen, and the 4:3 aspect ratio is for conventional monitors. Your choice of template may require you to change the aspect ratio. See Chapter 6 to learn about changing aspect ratios.
I need more space to work. Can I hide the ribbon?
Yes. To hide the ribbon, simply double-click a tab and the ribbon disappears except for the tabs. Then click a tab and the ribbon appears temporarily so you can execute a command. Double-click a tab again to show the ribbon continuously.
PowerPoint creates a presentation from the template.
a preview of the template.
C You can click Back ( ) or
Forward ( ) to view other slides from this template.
D You can click Back ( ) or
Forward ( ) to view other templates from the list.
E You can click the Close button ( ) to leave Backstage view.
The Save As dialog box appears.
5
Click the folder where you want to save your file.This example saves to My Documents.
6
Click in the File name text box to select the text and then type a filename.A You can click and drag the
1
Click the File tab to show Backstage view.2
Click Save As.3
Click Computer.4
Click Browse.Save a Presentation
A
fter you create a presentation, you should save it for future use. You should also save the
presentation often while working on it to avoid losing any changes. Saving a PowerPoint file
works much like saving any other Microsoft Office program file: You need to specify the location
in which to save the file and give the file a name. If you want to save a presentation that has
previously been saved, you can click the Save icon in the upper-left corner of the PowerPoint window
to quickly save it.
TIPS
I save presentations in a specific folder all the time. Is there a quick way to locate that folder in the Save As dialog box?
Yes. You can make your favorite folder the default local file location in the PowerPoint Options dialog box. When you perform a save, your favorite folder is the default location in the Save As dialog box. See Chapter 3 to learn how to change PowerPoint options.
Must I always use the Save As dialog box?
No. You can click the Save icon ( ) on the Quick Access Toolbar or press + . To save a copy of your presentation under a new name, click the File tab, click Save As, and then specify a new filename and save location.
PowerPoint saves the
presentation and the Save As dialog box closes.
C The new filename appears in the title bar.
WaterWaves.
7
Click the Save as Type down arrow ( ) to change the file type from the default.Note: If you choose a format other than the default PowerPoint format, you may see a prompt about an issue such as version compatibility. Respond to the prompt to continue saving.
5
Click the parent folder that you think may hold the file, even if you think it is in a subfolder.6
Type a keyword in the search text box.Note: PowerPoint searches filenames and file contents.
This example searches for Water.
As you type, the Open dialog box shows files containing the keyword.
7
Use the Open Dialog Box
1
Click the File tab to showBackstage view.
2
Click Open.3
Click Computer.4
Click Browse.Find a Presentation
S
ometimes you want to open a presentation file but you forget what you named it or you forget
which folder contains it. Finding that file is very important because you need it not only to
design the presentation, but also to present the slide show. If it is not on the Recent Presentations
list in Backstage view and browsing for it is unsuccessful, you can use the PowerPoint search feature
to locate the file. You can also use the search feature on the Windows 8 Start screen to locate it.
TIP
4
I remember the date I last saved my presentation, but nothing else. How can I find it?
Repeat Steps 1 to 4 to start the search in the Open dialog box and click the search textbox. The textbox becomes a drop-down list, and on the bottom are two choices under Add a search filter. The two choices are Date modified and Size. If you click Date modified, a calendar appears — click a date on the calendar and you will see only files modified on that date. If you click Size, a list appears with ranges of file sizes — click one of the ranges to see only files of that particular file size.
Files that contain the keyword appear in the search results.
4
If PowerPoint finds your file, click it.A You can position your mouse pointer ( ) over the file to see details about the file.
The file opens.
Screen
1
Press + .The Search screen appears.
2
Type a keyword in the text box.5
If your presentation is not on the Recent Presentations list, Click Computer.B If you find your folder location in the Recent Folders, you can click it there.
6
Click Browse.1
Click the File tab to show Backstage view.2
Click Open.3
Click Recent Presentations. The Recent Presentations list appears.A You can click the Pushpin ( ) to pin a presentation to the list ( changes to ).
4
If you find your presentation on the list, click it and PowerPoint opens it.Open an Existing Presentation
A
fter you save and close a presentation, you must find it and open it the next time you want to
use it — you need to open it to design it as well as to present the slide show. You can locate
your presentation by using the Open dialog box to browse your computer for it. If you used the
presentation recently, the quickest way to open it is to find it in the Recent Presentations list in
Backstage view.
TIPS
Is there a way to keep my presentation on the Recent Presentations list?
Yes. To pin a presentation to the Recent
Presentations list, position the mouse pointer ( ) over a presentation on the Recent Presentations list and then click the Pushpin to the right of the name ( changes to ). To unpin a presentation, click
Unpin ( ).
Is there a command for exiting PowerPoint?
No. The PowerPoint application automatically exits when you close your last presentation. If you want to close PowerPoint directly, click the Close button ( ) in the upper-right corner of the PowerPoint window.
PowerPoint opens the presentation.
7
Click the folder that contains the presentation file you want to open.This example selects Documents.
8
Click the filename. This example selects WaterWaves.A message may appear, asking if you want to save changes.
2
Click Save.A If you do not want to save the changes to your presentation, click
Don’t Save.
B To abort closing the presentation, click Cancel.
The file closes, but PowerPoint
1
Click the Close button ( ).Close a Presentation
W
hen you finish working with a presentation, you can close it. Closing the presentation gives you
a less cluttered workspace on your computer and frees valuable computer memory to process
other work that you need to do. If you share the file with others on a network, closing it allows them
to access the file without worrying about sharing violations.
When you close a file with unsaved changes, PowerPoint prompts you to save the presentation to
avoid accidentally losing your work. For more on saving a presentation, see the section, “Save a
Presentation,” in this chapter.
The Open dialog box appears.
5
Right-click the file you want to delete.This example deletes WaterWaves.
The submenu appears.
6
Click Delete.The Delete File dialog box appears.
1
Click the File tab to show Backstage view.2
Click Open.3
Click Computer.4
Click Browse.Delete a Presentation
O
may have out-of-date information or may be an unneeded backup copy. You can conveniently
delete the file from the Open dialog box.
Deleting old files frees up space on your hard drive. However, you should make sure that the file is
backed up somewhere in case you need it in the future.
7
Click Yes.PowerPoint deletes the file and puts it in the Recycle Bin.
C H A P T E R 2
Navigating
PowerPoint
Arrange Presentation Windows . . . 26
Find and Use KeyTips. . . . 27
Using the Quick Access Toolbar . . . . 28
Resize the Notes Pane . . . 29
Zoom to Full Screen . . . 30
Navigate Slides . . . 32
P
owerPoint offers several views that you can use to work on different aspects of your presentation.
Having different views is important because certain views are better for performing certain tasks.
For example, arranging slides is easiest in Slide Sorter view.
You will usually work in Normal view, where you can create, position, and format objects on each
slide. In Outline view, you can enter presentation text in outline form and the text automatically
appears on the slide.
Explore Normal View
A
Navigation
Buttons
You can change views using the command buttons on the View tab of the ribbon, or using the command buttons on the status bar. These buttons include Normal view ( ),
Slide Sorter view ( ), Slide Show view ( ), and Reading view ( ).
B
Slides Thumbnail
Pane
The Slides Thumbnail pane contains thumbnails of each slide. The thumbnails are numbered by the order in which
they appear in the slide show. You can click and drag the thumbnails to change the order of slides and you can delete slides from this
C
Slide Pane
The Slide pane is the largest pane in Normal view and shows a slide and all its contents. Here you can create and manipulate slide
D
Notes Pane
I
create detailed speaker notes, and Slide Show view or Reading view to display your presentation.
Each view has certain tasks that are easier to perform in that particular view.
Outline View
Outline view has a pane that enables you to enter text into your slides in a familiar outline format. In this view, the Outline pane replaces the Slides Thumbnail pane. Top-level headings in the outline are slide titles, and entries at the second level appear as bullet points. The outline is a great reference if you need to write a paper to accompany your presentation.
Reading View
You can click Slide Show view ( ) to present your show. Slides appear one at a time at full screen size. Reading view ( ) is very similar to Slide Show view, but gives you more navigation flexibility because the status bar remains at the bottom of the screen. To exit either view, press .
Notes Page View
In Notes Page view, you can display each slide and the associated speaker notes as one full page. You can also type notes on the page while viewing your slide — this is the most convenient view for typing presentation notes. From the View tab, click Notes Page to work with this view.
Slide Sorter View
4
Click the down arrow ( ) next to any button to display a gallery.Note: Clicking a down arrow ( ) displays a menu or menu.
5
Click the desired choice from the menu or gallery that appears.1
Click any tab on the ribbon. This example selects the View tab.The commands for the particular tab you clicked appear on the ribbon.
2
Click the button or check box for any command.This example selects Macro.
The Macro dialog box appears.
3
Click Cancel to cancel the command.Work with Ribbon Groups, Commands, and Galleries
Y
ou can find all the commands that you need to design and present your slide show on the ribbon.
The
ribbon
is the user interface at the top of the PowerPoint window. Commands are necessary
to design your presentation, and knowing their location allows you to find them quickly so you can
work efficiently.
Related commands are grouped on the ribbon tabs. Commands are further arranged into groups on
the tab, with the group names shown at the bottom of the group. Some command buttons include
down arrows that display menus or galleries of commands when you click them.
TIPS
How do I learn what a particular ribbon button does?
Position the mouse pointer ( ) over the button, and a ScreenTip describing the button appears. You see ScreenTip that lists the button name, any available shortcut key, and a brief description of the button. By default, ScreenTip features are enabled, but you can disable them in the PowerPoint Options dialog box (described in Chapter 3).
What happens if I click the main part of a ribbon button that has a down arrow on it?
If the sole purpose of the button is to open a gallery or menu, PowerPoint does that. If the main part of the button executes a command, PowerPoint applies that command using either the settings you last used or the most
commonly used settings for that command.
A For some ribbon commands, such as those on a contextual tab, you must first select an object on the slide before choosing a command.
B Note that the Drawing Tools Format tab does not appear until you click an object like a text box.
6
Note: A dialog box launcher ( ) displays a dialog box when you click it.
In this example, the Grid and Guides dialog box appears.
7
Click OK to accept any selections you have made in the dialog box.The presentation windows appear side by side.
B You can drag a window’s title bar to move the window.
5
Click the Maximize button ( ) on one of the windows.The window appears full screen again.
1
Open two or more presentations.2
Click the View tab.3
Click Cascade ( ).The presentation windows move so they overlap.
A You can click Switch Windows
and then click a presentation in the menu to make that
presentation active.
4
Click Arrange All ( ).Arrange Presentation Windows
S
ometimes you need to view multiple presentations on-screen at once — for example, when you
want to compare their contents or copy a slide from one presentation to another. You can arrange
PowerPoint in such a way that you can see multiple open presentations at the same time. This handy
feature is found on the View tab.
You should limit the number of open presentations to three or four. Otherwise, you cannot see
enough of each presentation to make this feature useful.
The Slide Show tab appears with KeyTips displayed next to the commands.
Note: To abort using KeyTips, press .
3
Press the shortcut key for the command you want to execute.The command executes, or a menu, gallery, or dialog box appears so you can finish choosing commands.
B This example presses ( changes to ).
1
Press .A The KeyTips (shortcut keys) for the ribbon tabs and Quick Access Toolbar appear in boxes beside the ribbon tabs.
2
Press the shortcut key for the tab you want to use.This example presses to display the Slide Show tab.
Find and Use KeyTips
2
Click the down arrow ( ) on the right side of the Quick Access Toolbar to access the menu.A Note the check mark ( ) appearing next to commands on the Quick Access Toolbar.
B Click More Commands to see all available commands (see Chapter 3 for more information).
3
Click one of the commands from the menu list.C The selected command appears as an icon on the Quick Access Toolbar and a check mark ( ) appears next to it in the menu.
1
Click the desired button on the Quick Access Toolbar.PowerPoint executes the command.
Note: Finish executing the command if any menu or dialog box appears.
Using the Quick Access Toolbar
T
he
Quick Access Toolbar
appears above the File tab at the top of the PowerPoint application
window. For your convenience, it contains command buttons for the most commonly used
PowerPoint commands.
You can click the command buttons on the Quick Access Toolbar to execute these commands quickly.
You can also easily add (or remove) some of these commonly used commands to (or from) the Quick
Access Toolbar. You can even add your personal favorite commands to it.
4
Click and drag upward.The Notes pane resizes and the slide automatically resizes in the Slide pane to compensate.
5
Click Notes to hide the Notes pane.1
Click the View tab.2
Click Notes.A The Notes pane appears.
3
Position the mouse pointer ( ) over the pane divider until the mouse splitter pointer ( ) appears.Resize the Notes Pane
5
Slide Sorter view zooms to the entire screen.
5
Click the Ellipsis button ( ) in the upper-right corner of the screen.Hide the Ribbon
1
Click the View tab.2
Click Slide Sorter. Slide Sorter view appears.3
Click the Ribbon Display Options button ( ) in the upper-right corner of the PowerPoint window.4
Click Auto-hide Ribbon.Zoom to Full Screen
T
here are times when you need maximum space to work on your presentation. For instance, while
moving slides in Slide Sorter view, a little more space may allow you to see more slides or allow
you to make the slides bigger so you can see them more clearly. You can zoom to full screen in
design mode to take advantage of every little bit of space. When you zoom to full screen, the space
occupied by the ribbon, status bar, and other elements is used to view the slides. You can zoom to
full screen in any view.
TIPS
I need more space to work, but I want to use the Quick Access Toolbar. Can I hide the ribbon?
Yes. To hide the ribbon, simply double-click a tab and the ribbon disappears except for the tabs. Click a tab and the ribbon appears temporarily so you can execute a command. Double-click a tab again to show the tab continuously.
Is there an advantage to using the Full Screen feature over using Reading view?
Yes. You cannot design the presentation in Reading view, so if you want to work on your presentation, use the Full Screen feature. If you want to quickly view the slide show and then quickly come back to design mode, use Reading view.
View the Ribbon Continuously
1
Click the Ribbon DisplayOptions button ( ).
2
Click Show Tabs and Commands. PowerPoint returns to the window view.1
Navigate Using the Slide
Thumbnail Pane
1
Click and drag the scroll bar to move through the slides.2
Click a slide thumbnail. The selected slide appears in the Slide pane.Navigate Using the Scroll Bar
1
Click the View tab.2
Click Normal.3
Click and drag the scroll bar to scroll through slides.4
Click the Next Slide button ( ) to display the next slide.5
Click the Previous Slide button ( ) to display the previous slide.Navigate Slides
S
lide show presentations generally contain many slides. As a result, PowerPoint provides different
ways to navigate the slides so that you can choose one that is most efficient and effective for
what you are doing. The way you work on your project determines the way you choose to navigate.
You can use the various scroll bar buttons to navigate slides in Normal view, click a slide in the
Slides Thumbnail pane to select a slide, or view slide thumbnails in Slide Sorter view.
TIPS
2
Why are there no scroll bars in the Slide Thumbnails or Outline View panes?
If PowerPoint can display all slides in the
presentation without scrolling down or up, it does not display a scroll bar. The fact that there is not a scroll bar means you are viewing all of the slides in the presentation.
Is there a way to see more slides in Slide Sorter view so I can easily find the one I want to view?
Yes. You can click and drag the Zoom slider in the lower-right corner of the PowerPoint window to make the slides smaller, which shows more slides. You can also click the Zoom In ( ) or Zoom Out ( ) buttons at each end of the slider.
Navigate in Slide Sorter View
1
Click Slide Sorter.Slide Sorter view appears.
2
Click and drag the scroll bar to move through the slides.3
Click a slide.PowerPoint selects the slide.
Note: Double-click a slide to view it in Normal view.
1
Click Outline View.2
Click and drag the scroll bar to move through the slides.3
Click a slide icon ( ).4
PowerPoint shows a list of online articles.
4
Click the Home button ( ).1
Click the Help button ( ). The PowerPoint Help window appears.2
Type a keyword in the search text box.A Optionally, you can click in the Popular Searches list.
3
Click the Search button ( ).Using Help
M
icrosoft Office PowerPoint Help offers two ways to get help. If you are connected to the
Internet, it provides help from Microsoft Office Online. If an Internet connection is not
available, PowerPoint uses Help files installed on your computer. PowerPoint also allows you to
select between searching online and searching on your computer manually. You can find answers
to your questions by selecting from a list of popular searches or by searching using keywords. The
keyword searches are very similar, whether online or on your computer.
TIP
Is there a fast and easy way to open the Microsoft Office.com Help page from PowerPoint?
Yes. Click more (A) after executing a search and PowerPoint launches your Internet browser and opens the Microsoft Office.com Help web page. From here, you can click various topics for help. You can even get a training video for PowerPoint 2013 for free!
The Basic Help home page appears.
C Click Back ( ) and Forward ( ) to navigate back and forth.
D Click Print ( ) to print information.
E Click Use Large Text ( ) to increase font size.
7
Type a keyword in the search text box.8
Click the Search button ( ).PowerPoint displays ribbon commands associated with the keyword you typed.
9
Click an item to display detailed information about that item.0
Click Next to see more results.!
Click the Close button ( ) to exit Help.B You can click a graphic to show a help article for that topic.
5
Click the PowerPoint Help down arrow ( ). The drop box opens.C H A P T E R 3
Changing
PowerPoint
Options
Change AutoCorrect Settings . . . 44
Change AutoFormat Settings . . . 46
Customize Save Options . . . 48
Modify View and Slide Show Options . . . 50
Change Editing Settings . . . 52
Work with Print Options . . . 54
Customize the Quick Access Toolbar. . . . 56
P
owerPoint provides a wide variety of option settings that enable you to customize how it
performs. The options are grouped on tabs in the PowerPoint Options dialog box, and then
further grouped into categories. You can change these settings to control the behavior of certain
features in PowerPoint, and optimize less noticeable settings such as the default save location.
Settings that are more visible include customizing the Quick Access Toolbar and the ribbon so that
your favorite and most commonly used commands are at your fingertips. Changing PowerPoint
options allows you to design presentations as effectively and efficiently as possible.
Introducing PowerPoint Options
General Options
In the General options, you can enable or disable the Mini Toolbar and Live Preview. The Mini Toolbar
is a floating contextual toolbar that gives you quick access to formatting commands when you select text. Live Preview shows how a feature affects your slide when you position the mouse pointer ( ) over a choice in a gallery. You can enable or disable
ScreenTips, which is the feature that gives you pop-up descriptions of command buttons when you position the mouse pointer ( ) over a command button on the ribbon. You can also change the username, which appears in the properties of presentations.
Proofing Options
The Proofing tab affects the way that Microsoft Office checks for spelling and grammar errors in PowerPoint. Changes to these settings also affect the settings in the other Microsoft Office programs. You can add words to the custom dictionary and make exceptions to spelling rules. You can customize the powerful AutoCorrect and AutoFormat tools. While you type, AutoCorrect detects possible spelling errors and AutoFormat adjusts formatting to the surrounding formatting. You can control settings such as whether PowerPoint automatically capitalizes the first words of sentences and whether it checks the spelling of words that are in all uppercase.
Save Options
You can adjust the way PowerPoint saves presentations with the Save options. This tab controls the default file location for saving documents, and allows you to choose the default file format. AutoRecovery automatically saves your PowerPoint presentation at regular intervals so that if PowerPoint unexpectedly closes, it can recover your work. You can disable AutoRecovery or adjust how often AutoRecovery automatically saves presentations. You can even save the fonts you use in your presentation so you can guarantee that the
Language Options
The Language tab allows you to choose the
Advanced Options
Advanced options allow you to customize settings for printing, some editing, and slide show features. Some settings, such as print options, only apply to individual PowerPoint presentations. Advanced options control what you see on the screen during slide show presentations. For example, you can control whether you see the pop-up toolbar during presentations. The slide show pop-up toolbar allows you to perform various tasks during a slide show presentation. Cut, copy, and paste options and display options are also found here.
Ribbon and Quick Access Toolbar Options
Although you can add a limited number of commands to the Quick Access Toolbar from the toolbar itself, you can add any command to it from the Quick Access Toolbar tab in the Options dialog box. Along with being able to add commands to the ribbon, you can also add tabs, add groups, and rename existing tabs and groups. An excellent use of this feature is to create a ribbon tab with your most commonly used commands so they are at your fingertips on a single tab, thereby making design work efficient and effective.
Add-ins
Add-ins are small chunks of programming that enhance the functionality of PowerPoint. Add-ins can be developed specifically for PowerPoint, or can be Component Object Model (COM) add-ins that enable you to use the functionality of another program in PowerPoint, such as a PDF writer or screen-capture program. You can get add-ins that give you special tools to design presentations or that add special functionality to your slide shows. Add-ins are available through third parties, or you can create them if you have programming
experience.
Trust Center
The PowerPoint Options dialog box appears.
3
Click General.4
Click to enable ( ) or disable ( ) options under the User Interface options heading.A You can position your mouse pointer ( ) over the Information icon ( ) to see a brief description of an option.
B You can click the Office Background
down arrow ( ) and select a color scheme for the PowerPoint window.
C You can click the ScreenTip style
down arrow ( ) and select a ScreenTip style to display when you
1
Click the File tab to show Backstage view.2
Click Options.Modify General Options
P
owerPoint provides a wide variety of options that enable you to customize how it works. Options
for features such as Live Preview, ScreenTips, and the Mini Toolbar are found in General options.
These settings determine whether you see the Start screen when you open PowerPoint and which file
extensions PowerPoint will open. You can also change the username, which PowerPoint records in
the properties of each presentation to identify who creates it. You can change these options in the
General tab of the PowerPoint Options dialog box.
TIP
What is the Mini Toolbar?
The Mini Toolbar is a floating, contextual formatting toolbar that appears when you right-click an object to use the submenu. The Mini Toolbar contains the most commonly used formatting commands for the object that you select. For example, it shows
the formatting commands from the Font group of the Home tab when you select text. If you enable the Mini Toolbar in the General options, the Mini Toolbar automatically appears when you click and drag across text in a placeholder.
8
Type your username and Initials in the text boxes.9
Click Show the Start screen when this application starts ( changes to ) to disable the Start screen page when PowerPoint starts.0
Click OK.PowerPoint applies your new settings and closes the PowerPoint Options dialog box. dialog box appears.
6
Click to enable ( ) or disable ( ) files whose extensions you want PowerPoint to open by default.7
Click Save.The PowerPoint Options dialog box appears.
3
Click Proofing.4
Click to enable ( ) or disable ( ) options that determine how spell-checker flags certain errors.Note: Changes that you make here also affect the spell-checker in the other Microsoft Office
1
Click the File tab to show Backstage view.2
Click Options.Change Spelling Options
M
isspellings in presentations are never good. The powerful spell-checker in Microsoft Office
automatically and continually checks spelling in PowerPoint as you type. The spell-checker
identifies possible misspellings by underlining them with a red, wavy line. To review a word, you
can simply right-click it. You can use this tool to check spelling as you type text, or you can disable
the tool. When you need to check spelling, you can always use the spell-checker manually. You can
customize how the spell-checker handles possible misspellings in the PowerPoint Options.
TIP
Can I delete words from the custom dictionary?
Yes. You can delete words from the custom dictionary by following these steps:
dialog box. PowerPoint automatically creates a custom dictionary (CUSTOM.DIC) when you add words during a spelling check. You can manually add words to your custom dictionary.
6
Click CUSTOM.DIC from the list so it is checked ( ).7
Click Edit Word List.The CUSTOM.DIC dialog box appears.
8
Type the desired word in the Word(s): text box.9
Click Add.PowerPoint adds the word to the Dictionary list.
0
Click OK.The CUSTOM.DIC dialog box closes.
!
Click to enable ( ) or disable ( ) spell-checker options in PowerPoint.A If you disable the Check spelling as you type option, you can run the spell-checker manually by clicking the Spelling command on the Review tab of the ribbon.
@
Click OK.PowerPoint applies your new settings and closes the PowerPoint Options dialog box.
The PowerPoint Options dialog box appears.
3
Click Proofing.4
Click AutoCorrect Options.1
Click the File tab to show Backstage view.2
Click Options.Change AutoCorrect Settings
T
he AutoCorrect feature automatically corrects common typing and spelling errors as you type.
You can add words to a list of common misspellings, empowering AutoCorrect to automatically
correct words that you routinely misspell. For example, you can tell it to change “actoin” to the word
“action” automatically. You can also delete corrections that already exist on the list. For example,
you can delete the automatic correction of changing (c) to ©. You can also make exceptions of words
that you do not want to be marked as misspelled.
TIP
AutoCorrect thinks the word “TO.” is the end of a sentence and capitalizes the next letter. How can I prevent this?
You can add the word to a list of exceptions by following these steps:
7
To add a word to the list, type the misspelled version of the word in the Replace: text box.8
Type the correct spelling of the word in theWith: text box.
9
Click Add.B You can delete a word from the list by clicking it and then clicking Delete.
0
Click OK in each of the two open dialog boxes. PowerPoint applies your new settings.5
Click the AutoCorrect tab.6
Click to enable ( ) or disable( ) any of the standard AutoCorrect options.
A To disable the misspelling correction feature, click the Replace text as you type
option ( changes to ).
1
Follow Steps 1 to 5 in this section.2
Click the Exceptions button.3
Click the First Letter tab.4
Type your exception in theDon’t capitalize after: text box.
5
Click Add.The PowerPoint Options dialog box appears.
3
Click Proofing.4
Click AutoCorrect Options.1
Click the File tab to show Backstage view.2
Click Options.Change AutoFormat Settings
A
utoCorrect has a feature called AutoFormat, which speeds up certain formatting that is
cumbersome to perform. Examples include changing 1/2 to
1⁄
2, replacing ordinals (1st) with
superscript (1
st), and changing Internet paths to hyperlinks (www.test.com). This is a very
convenient feature because making these types of formatting changes can be tedious. It also
automates bulleted and numbered lists, and automatically fits text to placeholders. You can
customize these settings to suit your particular needs to streamline your work.
TIP
Why does PowerPoint change words that I type in all caps to lowercase?
AutoCorrect has a setting that corrects the accidental use of the Caps Lock key. To disable this option:
1
Follow Steps1 to 4 in this section.2
Click the Correct accidental use of cAPS LOCK key option ( changes to ).3
Click OK to close each of the open dialog boxes.7
Click to enable ( ) or disable ( ) any of the options under Apply as you type.These settings control whether text automatically sizes in the placeholders.
8
Click OK in each of the two open dialog boxes.PowerPoint applies your new settings and closes both the AutoCorrect and PowerPoint Options dialog boxes. appears.
5
Click the AutoFormat As You Type tab.The PowerPoint Options dialog box appears.
3
Click Save.4
Click the Save files in this formatdown arrow ( ).
5
Click a file format.Note: The file type for PowerPoint 2013 is PowerPoint Presentation.
The next time you save a new file,
1
Click the File tab to show Backstage view.2
Click Options.Customize Save Options
B
y default, PowerPoint saves a presentation in your user Documents folder with the PowerPoint
2013 format. For example, if your username is Bill and you save a presentation for the first time,
the Save As dialog box uses the folder c:\Users\Bill\Documents\ as the default. If you share your
presentations with colleagues who use an older PowerPoint version, you may want to change the
settings so the default file format is the PowerPoint 2003 format because PowerPoint 2003 cannot
open a file format later than that. You can also embed fonts in the saved presentation to preserve its
look on any computer.
TIPS
What are the pros and cons of having the AutoRecover feature save frequently?
AutoRecover automatically saves your work at regular intervals in case PowerPoint closes unexpectedly. However, the pause you experience during the save might be lengthy if your presentation is large. You can disable AutoRecover if you do not want to be inconvenienced with this pause.
Why would I want to embed fonts in a presentation?
Some fonts are not available on every computer. If you view your presentation on a computer that is missing the fonts you used to design it, PowerPoint replaces the fonts with standard fonts from that computer. Embedded fonts travel with the presentation to ensure they are always in the presentation.
6
options under the Save presentations heading.
A If desired, click the spinner box ( ) to change the number of minutes between AutoRecover saves.
B Click to deselect ( ) the Save
AutoRecover information every option to disable the automatic saving feature.
C AutoRecover files are discarded when you close PowerPoint. Click to enable ( ) this option to retain the last file if you close without saving the file.
D To change the default save location, type a new default location.
7
Click the Embed fonts in the file option ( changes to ).E The fonts for this particular presentation are saved with it, so it will not appear differently when viewed on a system without those fonts.
F You can further specify whether to embed all characters or only those in use.
8
Click OK.The PowerPoint Options dialog box appears.
3
Click Advanced.4
Click and drag the scroll bar to locate the Display and Slide Show headings.5
Click to enable ( ) or disable ( ) options under the Display heading.6
1
Click the File tab to show Backstage view.2
Click Options.Modify View and Slide Show Options
Y
ou can change which features are available in the various PowerPoint views. The availability of
these features may be determined by the option settings or by the type of presentation. In the
Display and Slide Show options, you can select which view PowerPoint uses by default, such as Normal
view or Slide Sorter view. You can also control whether the toolbar appears during the slide show
presentation. These choices ensure that your preferred tools are on-screen when you need them.
TIPS
What is the benefit of opening the presentation in Outline view?
If you start viewing the outline alone, you can concentrate on building the text for the presentation. This can be particularly helpful when you need a clean slate on which to organize your thoughts. The graphics of a slide can distract you from your outline because you may start thinking about the slide design.
Can I save annotations if I disable the Prompt to keep ink annotations when exiting option?
No. You can only save annotations by using the dialog box that prompts you to save them at the end of the slide show presentation. The prompt does not appear if you disable this option.
9
Click to enable ( ) or disable ( ) options affecting behavior during a slide show.B Determines whether you can use the shortcut menu.
C Controls the toolbar that faintly appears at the bottom-left corner of slides.
D Determines whether you can save annotations you made on the slides upon exiting the slide show.
E Determines whether the slide show ends with a blank, black slide.
0
Click OK.PowerPoint applies your new settings and closes the PowerPoint Options dialog box.
pointer ( ) over the information icon ( ) to see a brief description of an option.