• Table of Contents
• Index
core JavaServer™ Faces
By
DAVID GEARY
,CAY HORSTMANN
Publisher : Addison Wesley Pub Date : June 15, 2004
ISBN : 0-13-146305-5 Pages : 552
JavaServer Faces promises to bring rapid
user-interface development to server-side
Java. It allows developers to painlessly write
server-side applications without worrying
about the complexities of dealing with
browsers and Web servers. It also automates
low-level, boring details like control flow and
moving code between web forms and
business logic.
applications, but you can also think of it as a
conceptual layer on top of servlets and
JavaServer Pages (JSP). Experienced JSP
developers will find that JavaServer Faces
provides much of the plumbing that they
currently have to implement by hand. If you
already use a server-side framework such as
Struts, you will find that JavaServers Faces
uses a similar architecture, but is more
flexible and extensible. JavaServer Faces also
comes with server-side components and an
event model, which are fundamentally similar
to the same concepts in Swing.
JavaServer Faces is quickly becoming the
standard Web-application framework.
Core
JavaServer Faces
is the one book you need to
master this powerful and time-saving
technology.
Without assuming knowledge of JSP and
servlets,
Core JavaServer Faces
:
shows how to build more robust
applications and avoid tedious handcoding
even know to ask
demonstrates how to use JSF with Tiles to
build consistent user interfaces
automatically
provides hints, tips, and explicit "how-to"
information that allows you to quickly
become more productive
explains how to integrate JSF with
databases, use directory services, wireless
apps, and Web services
teaches best practices and good habits like
using style sheets and message bundles
• Table of Contents
• Index
core JavaServer™ Faces
By
DAVID GEARY
,CAY HORSTMANN
Publisher : Addison Wesley Pub Date : June 15, 2004
ISBN : 0-13-146305-5 Pages : 552
Copyright
About Prentice Hall Professional Technical Reference
Preface
About This Book
Required Software
Web Support
Acknowledgments
Chapter 1. Getting Started
Why JavaServer Faces
Software Installation
A Simple Example
Sample Application Analysis
Visual Development Environments
JSF Framework Services
Behind the Scenes
Automation of the Build Process with Ant
Chapter 2. Managed Beans
Definition of a Bean
A Sample Application
Backing Beans
Bean Scopes
Configuring Beans
The Syntax of Value Binding Expressions
Chapter 3. Navigation
Static Navigation
Dynamic Navigation
Advanced Navigation Issues
Chapter 4. Standard JSF Tags
h:dataTable Attributes
Headers and Footers
Scrolling Techniques
Chapter 6. Conversion and Validation
Overview of the Conversion and Validation Process
Using Standard Converters
Using Standard Validators
Programming with Custom Converters and Validators
Implementing Custom Tags
Chapter 7. Event Handling
Life-Cycle Events
Value Change Events
Action Events
Immediate Components
Content Inclusion in the Book Viewer
The Library
Chapter 9. Custom Components
Implementing Custom Components with Classes
Encoding: Generating Markup
Decoding: Processing Request Values
Implementing Custom Component Tags
Revisiting the Spinner
Encoding JavaScript to Avoid Server Roundtrips
Using Child Components and Facets
Chapter 10. External Services
Accessing a Database
Using LDAP for Authentication
Managing Configuration Information
Using Web Services
Chapter 11. Wireless Clients
Rendering Technologies for Mobile Clients
MIDP Basics
Mobile Communication and Control Flow
Component Implementation for Mobile Clients
Copyright
© 2004 Sun Microsystems, Inc.
Printed in the United States of America. 4150 Network Circle, Santa Clara, California 95054 U.S.A.
All rights reserved. This product and related documentation are protected by copyright and distributed under licenses restricting its use, copying, distribution, and decompilation. No part of this product or related documentation may be reproduced in any form by any means without prior written authorization of Sun and its licensors, if any.
RESTRICTED RIGHTS LEGEND: Use, duplication, or disclosure by the United States Government is subject to the restrictions set forth in DFARS 252.227-7013 (c)(1)(ii) and FAR 52.227-19. The products described may be protected by one or more U.S. patents, foreign patents, or pending applications.
TRADEMARKSHotJava, Java, Java Development Kit, J2EE, JPS, JavaServer Pages, Enterprise JavaBeans, EJB, JDBC, J2SE, Solaris, SPARC, SunOS, and Sunsoft are trademarks of Sun Microsystems, Inc. All other products or services mentioned in this book are the trademarks or service marks of their
respective companies or organizations.
Prentice Hall PTR offers excellent discounts on this book when ordered in quantity for bulk purchases or special sales. For more information, please contact U.S.
Corporate and Government Sales, 1-800-382-3419,
[email protected]. For sales outside of the
Acquisitions Editor: Gregory G. Doench Editorial Assistant: Raquel Kaplan
Production Supervision: Patti Guerrieri Cover Design Director: Jerry Votta Cover Designer: Anthony Gemmellaro Art Director: Gail Cocker-Bogusz
Manufacturing Manager: Alexis R. Heydt Marketing Manager: Chris Guzikowski
Sun Microsystems Press Publisher: Myrna Rivera First Printing
Sun Microsystems Press
About Prentice Hall Professional
Technical Reference
With origins reaching back to the industry's first computer
science publishing program in the 1960s, and formally launched as its own imprint in 1986, Prentice Hall Professional Technical Reference (PH PTR) has developed into the leading provider of technical books in the world today. Our editors now publish over 200 books annually, authored by leaders in the fields of
computing, engineering, and business.
Our roots are firmly planted in the soil that gave rise to the technical revolution. Our bookshelf contains many of the
industry's computing and engineering classics: Kernighan and Ritchie's C Programming Language, Nemeth's UNIX System Administration Handbook, Horstmann's Core Java, and
Johnson's High-Speed Digital Design.
PH PTR acknowledges its auspicious beginnings while it looks to the future for inspiration. We continue to evolve and break new ground in publishing by providing today's professionals with tomorrow's
Preface
When we heard about JavaServer™ Faces (JSF) at the 2002 Java One conference, we were very excited. Both of us had extensive experience with client-side Java programming, and had lived to tell the taleDavid in Graphic Java, and Cay in Core Java, both published by Sun Microsystems Press. When we first tried web programming with servlets and JavaServer Pages (JSP), we found it to be rather unintuitive and tedious.
JavaServer Faces promised to put a friendly face in front of a web application, allowing programmers to think about text
fields and menus instead of fretting over page flips and request parameters. Each of us proposed a book project to the
publisher, who promptly suggested that we should jointly write the Sun Microsystems Press book on this technology.
It took the JSF expert group (of which David is a member) another two years to release the JSF 1.0 specification and reference implementation. This release fulfills many of the original promises. You really can design web user interfaces by putting components on a form and linking them to Java objects, without having to write any code at all. The framework was
designed for tool support, and the first batch of drag-and-drop GUI builders is now emerging. The framework is extensibleyou are not limited to the standard set of HTML components, and you can even use completely different rendering technologies, to support, for example, wireless devices. And finally, unlike competing technologies that let you tumble down a deep cliff once you step beyond the glitz, JSF supports the hard
stuffseparation of presentation and business logic, navigation, connections with external services, and configuration
management.
with utility classes in the com.corejsf.util package to reduce your pain. Also, there are fewer components than we originally expected. While JSF has a powerful and convenient data table component, some useful components such as tabbed panes, scrollers, file uploads, and so on, were not included for lack of time. In the book, we show you how to implement these
features. Of course, we expect the next release of JSF to remedy many of these shortcomings.
About This Book
This book is suitable for web developers whose main focus is user interface design, as well as for programmers who
implement reusable components for web applications. This is in stark contrast to the official JSF specification, a dense and
pompously worded document whose principal audience is framework implementors, as well as long-suffering book authors.
The first half of the book, extending to the middle of Chapter 6, focuses on the JSF tags. These tags are similar to HTML form tags. They are the basic building blocks for JSF user interfaces. No programming is required for use of to use the tags. We only assume only basic HTML skills for web pages and standard Java programming for the business logic.
The first part of the book covers these topics:
Setting up your programming environment (Chapter 1) Connecting JSF tags to application logic (Chapter 2) Navigating between pages (Chapter 3)
Using the standard JSF tags (Chapters 4 and 5) Converting and validating input (Chapter 6)
Starting with the final sections of Chapter 6, we begin JSF programming in earnest. You will learn how to perform
Implementing custom converters and validators (Chapter 6) Event handling (Chapter 7)
Including common content among multiple pages (Chapter 8)
Implementing custom components (Chapter 9)
Connecting to databases and other external services (Chapter 10)
Supporting wireless clients (Chapter 11)
We end the book with a chapter that aims to answer common questions of the form "How do I….?" We encourage you to have a peek at that chapter as soon as you become comfortable with the basics of JSF. There are helpful notes on debugging and logging, and we also give you implementation details and working code for features that are missing from JSF 1.0, such as file uploads, popup menus, and a pager component for long tables.
Required Software
All software that you need for this book is freely available. You need the Java Software Development Kit from Sun
Microsystems, a servlet container such as Tomcat, and, of course, a JSF implementation, such as Sun's reference
implementation. The software runs identically on Linux, Mac OS X, Solaris, and Windows. We used the 1.4.2 J2SE and Tomcat 5.0.19 on both Linux and Mac OS X to develop the code
examples in the book.
Web Support
The web page for this book is http://corejsf.com. It contains The source code for all examples in this book
Useful reference material that we felt is more effective in browseable form than in print
Acknowledgments
First and foremost, we'd like to thank Greg Doench, our editor at Prentice Hall, who has shepherded us through this project, never losing his nerve in spite of numerous delays and
complications. Thanks to Mary Lou Nohr for editing the
manuscript, and to Patti Guerrieri for her production work. We very much appreciate our reviewers who have done a splendid job, finding errors and suggesting improvements in various drafts of the manuscript. They are:
Larry Brown
Frank Cohen, PushToTest
Rob Gordon, Crooked Furrow Farm
Marty Hall, author of Core Java Servlets and JavaServer Pages
Jeff Markham, Markham Software Company Angus McIntyre, IBM Corporation
John Muchow, author of Core J2ME
Sergei Smirnov, principal architect of Exadel JSF Studio Roman Smolgovsky, Flytecomm
Christopher Taylor, Nanshu Densetsu Michael Yuan, author of Enterprise J2ME
Chapter 1. Getting Started
Topics in This Chapter"Why JavaServer Faces" on page 3
"Software Installation" on page 4
"A Simple Example" on page 6
"Sample Application Analysis" on page 12
"Visual Development Environments" on page 21
"JSF Framework Services" on page 23
"Behind the Scenes" on page 25
Why JavaServer Faces
Judging from the job advertisements in employment web sites, there are currently two popular techniques for developing web applications.
The "rapid development" style, using a visual development environment such as Microsoft ASP.NET.
The "hard-core coding" style, writing lots of code to support a high-performance back end such as J2EE (the Java 2
Enterprise Edition).
As we write this book, development teams face a difficult
choice. J2EE is an attractive platform. It is highly scalable. It is portable to multiple platforms. It is supported by many vendors. On the other hand, ASP.NET makes it easy to create attractive user interfaces without tedious programming. Of course,
programmers want both: a high-performance back end and easy user-interface programming.
The promise of JavaServer Faces is to bring rapid user-interface development to server-side Java.
If you are familiar with client-side Java development, you can think of JSF as "Swing for server-side applications." If you have experience with JavaServer Pages (JSP), you will find that JSF provides much of the plumbing that JSP developers have to implement by hand. If you already know a server-side
framework such as Struts, you will find that JSF uses a similar architecture.
You need not know anything about Swing, JSP, or Struts in order to use this book. We assume basic familiarity only with Java and HTML.
JSF has these parts:
A set of prefabricated UI components An event-driven programming model
A component model that enables third-party developers to supply additional components
JSF contains all the necessary code for event handling and component organization. Application programmers can be
blissfully ignorant of these details and spend their effort on the application logic.
Software Installation
You need the following software packages to get started. The Java SDK 1.4.1 or higher (http://java.sun.com/j2se) The Tomcat servlet container
(http://jakarta.apache.org/tomcat/).
The JavaServer Faces reference implementation
(http://java.sun.com/j2ee/javaserverfaces)
The sample code for this book, available at
http://corejsf.com
We assume that you already installed the Java SDK and that you are familiar with the SDK tools. For more information on the Java SDK, see Horstmann & Cornell, Core Java, Sun Microsystems Press, 2003.
In this chapter, we describe how to use JSF with Tomcat 5.
Tomcat is a servlet container: a program that serves web pages and executes servletsJava programs that process web requests. JavaServer Faces is built on top of the servlet technology, but you need not know anything about servlets to build JSF
applications.
Download and unzip Tomcat, the JSF reference implementation, and the sample code. Place them into directories of your choice. (As always, it is best to avoid path names with spaces, such as
c:\Program Files.)
tomcat/conf/server.xml, you will need to look inside a
directory such as /usr/local/jakarta-tomcat-5.0.19/conf
or c:\jakarta-tomcat-5.0.19\conf.
If you use Windows, you can choose a Windows installer for Tomcat instead of the platform-independent ZIP file. Download and execute the installer program. When you are prompted for the installation directory, we suggest that you use c:\tomcat instead of the default location inside the c:\Program Files
directory.
NOTE
You can run JSF applications with any servlet container that supports the Servlet 2.3 and JSP 1.2 specifications. To keep the instructions simple, we cover only Tomcat 5. If you prefer another servlet container, simply follow the standard procedure for deploying web applications on your server.
NOTE
You can also obtain JSF from other sources, such as the J2EE SDK (http://java.sun.com/j2ee/download.html) or the Java Web Services Development Pack
(http://java.sun.com/webservices/webservicespack.html). However, these bundles contain many other software components and have more complex configurations. We suggest that you move on to more sophisticated
Now you are ready to get started. Open a command shell and start Tomcat. On Unix/Linux, you use the command
tomcat/bin/startup.sh
(See Figure 1-1.) On Windows, launch
tomcat\bin\startup.bat
Alternatively, if you used the Windows installer to install
Tomcat, you can use the "Start Tomcat" menu item in the start menu.
To test that Tomcat runs properly, point your browser to http://localhost:8080. You should see a welcome page (see
Figure 1-2).
You shut down Tomcat with the command
tomcat/bin/shutdown.sh
tomcat\bin\shutdown.bat
Alternatively, if you used the Windows installer to install
A Simple Example
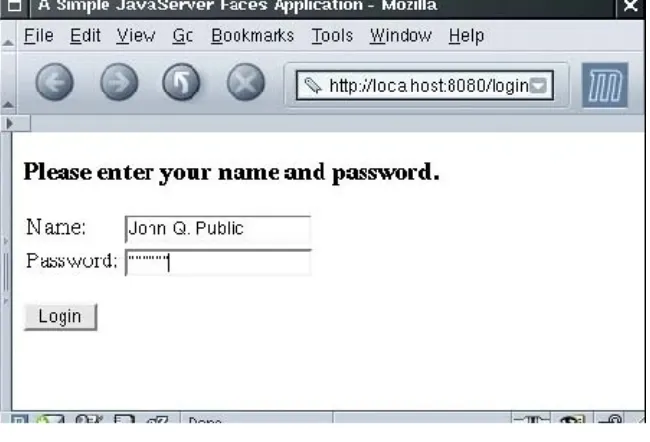
Let us move on to a simple example of a JavaServer Faces application. Our first example starts with a login screen, shown in Figure 1-3.
Figure 1-3. A Login Screen
Of course, in a real web application, this screen would be beautified by a skilled graphic artist.
The file that describes the login screen is essentially an HTML file with a few additional tagssee Listing 1-1. Its visual
appearance can be easily improved by a graphic artist who need not have any programming skills.
1. <html>
2. <%@ taglib uri="http://java.sun.com/jsf/core" prefix="f" %>
3. <%@ taglib uri="http://java.sun.com/jsf/html" prefix="h" %>
4.
5. <f:view>
6. <head>
7. <title>A Simple JavaServer Faces Application</title>
8. </head>
9. <body>
10. <h:form>
11. <h3>Please enter your name and password.</h3>
12. <table>
13. <tr>
14. <td>Name:</td>
15. <td>
16. <h:inputText value="#{user.name}"/>
17. </td>
19. <tr>
20. <td>Password:</td>
21. <td>
22. <h:inputSecret value="#{user.password}"/>
23. </td>
24. </tr>
25. </table>
26. <p>
27. <h:commandButton value="Login" action="login"/>
28. </p>
29. </h:form>
30. </body>
31. </f:view>
32. </html>
We discuss the contents of this file in detail later in this chapter. For now, note the following points:
Some tags have prefixes, such as f:view and h:inputText. These are JSF tags. The two taglib declarations declare the JSF tag libraries.
The h:inputText, h:inputSecret, and h:commandButton
tags correspond to the text field, password field, and submit button in Figure 1-3.
The input fields are linked to object properties. For
example, the attribute value="#{user.name}" tells the JSF implementation to link the text field with the name property of a user object. We discuss this linkage in more detail later in this chapter.
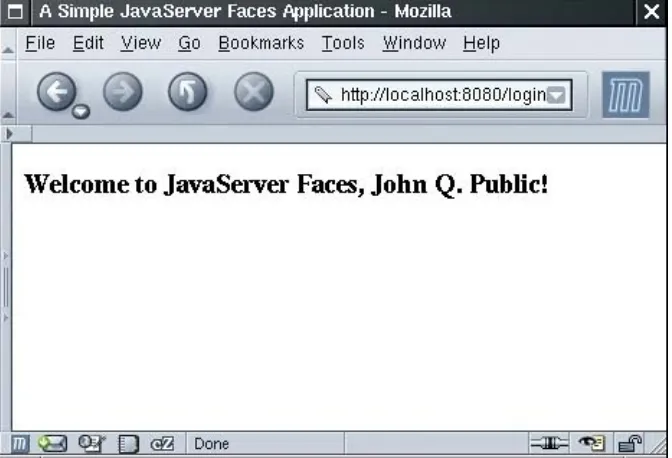
When the user enters the name and password and clicks the login button, a welcome screen appears (see Figure 1-4).
The welcome message contains the user name. The password is ignored for now.
The purpose of this application is, of course, not to impress anyone, but merely to illustrate the various pieces that are necessary to produce a JSF application.
Ingredients
Our sample application consists of the following ingredients: Pages that define the login and welcome screens. We call them index.jsp and welcome.jsp.
A bean that manages the user data (in our case, username and password). A bean is simply a Java class that exposes properties, usually by following a simple naming convention for the getter and setter methods. The code is in the file
UserBean.javasee Listing 1-2. Note that the class is contained inside the com.corejsf package.
A configuration file for the application that lists bean
resources and navigation rules. By default, this file is called
faces-config.xml.
Miscellaneous files that are needed to keep the servlet container happy: the web.xml file and an index.html file that redirects the user to the correct URL for the login page. More advanced JSF applications have the same structure, but they can contain additional Java classes, such as event
Listing 1-2.
login/WEB-INF/classes/com/corejsf/UserBean.java
1. package com.corejsf;
2.
3. public class UserBean {
4. private String name;
5. private String password;
6.
7. // PROPERTY: name
8. public String getName() { return name; }
9. public void setName(String newValue) { name = newValue; }
10.
11. // PROPERTY: password
12. public String getPassword() { return password; }
13. public void setPassword(String newValue) { password = newValue; }
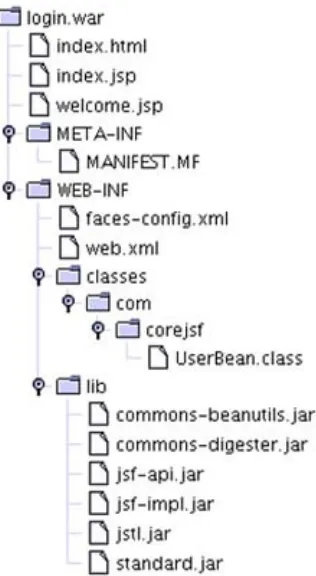
Directory Structure
A JSF application is deployed as a WAR file: a zipped file with extension .war and a directory structure that follows a
standardized layout: HTML and JSP files
WEB-INF/
configuration files
classes/
class files
lib/
library files
For example, the WAR file of our sample application has the directory structure shown in Figure 1-5. Note that the UserBean
class is in the package com.corejsf. The META-INF directory is automatically produced by the JAR program when the WAR file is created.
To minimize confusion, we package our application source in the exact same directory structure as a WAR file, except that the
classes directory contains the source files (see Figure 1-6).
Build Instructions
We now walk you through the steps required for building JSF applications with your bare hands. At the end of this chapter, we show you how to automate this process.
1. Launch a command shell.
2. Change to the ch1/login/WEB-INF/classes directory inside corejsf-examples, the directory that contains the sample code for this book.
3. Run the command
(On Windows, use backslashes instead: javac com\corejsf\UserBean.java.)
4. Make a ch1/login/WEB-INF/lib directory. Into that directory, copy the following files:
jsf/lib/jsf-api.jar
jsf/lib/jsf-impl.jar:jsf/lib/jsf-impl.jar
tomcat/server/lib/commons-digester.jar
tomcat/server/lib/commons-beanutils.jar
tomcat/webapps/jsp-examples/WEB-INF/lib/jstl.jar
tomcat/webapps/jsp-examples/WEB-INF/lib/standard.jar
5. Change to the ch1/login directory.
jar cvf login.war.
(Note the period at the end of the command, indicating the current directory.)
7. Copy the login.war file to the directory tomcat/webapps.
8. Now point your browser to http://localhost:8080/login
The application should start up at this point.
TIP
If you are very impatient, you can use two shortcuts. Copy the six library JAR files into the tomcat/common/lib
directory and restart the server. Then you don't have to place the libraries into the WEB-INF/lib directory of your applications. Moreover, you can bypass the WAR filesimply copy the entire login directory (including its
subdirectories) to the tomcat/webapps directory. Remember to compile the source files in the WEB-INF/classes directory.
the following JAR files:
tomcat/common/lib/servlet-api.jar
tomcat/common/lib/jsp-api.jar
jsf/lib/jsf-api.jar
jsf/lib/jsf-impl.jar
A typical compilation command would look like this:
javac -classpath .:tomcat/common/lib/servlet-api.jar
:tomcat/common/lib/jsp-api.jar:jsf/lib/jsf-api.jar
The entire command needs to be placed on a single line.
Sample Application Analysis
Web applications have two parts: the presentation layer and the business logic. The presentation layer is concerned with the look of the application. In the context of a browser-based application, the look is determined by the HTML tags that specify layout, fonts, images, and so on. The business logic is implemented in the Java code that determines the behavior of the application.
Some web technologies intermingle HTML and code. That approach is seductive since it is easy to produce simple
applications in a single file. But for serious applications, mixing markup and code poses considerable problems. Professional web designers know about graphics design, but they typically rely on tools that translate their vision into HTML. They would certainly not want to deal with embedded code. On the other hand, programmers are notoriously unqualified when it comes to graphic design. (The example programs in this book bear ample evidence.) Thus, for designing professional web
applications, it is important to separate the presentation from the business logic. This allows both web designers and
programmers to focus on their core competences.
In the context of JSF, the application code is contained in beans, and the design is contained in web pages. We look at beans first.
Beans
A Java bean is a class that exposes properties and events to an environment such as JSF. A property is a named value of a
the reader and writer methods, namely, the familiar get/set
convention. The first letter of the property name is changed to upper case in the method names.
For example, the UserBean class has two properties: name and
password, both of type String.
public class UserBean {
public String getName() { . . . }
public void setName(String newValue) {. . . }
public String getPassword() { . . . }
public void setPassword(String newValue) { . . . }
. . .
}
The get/set methods can carry out arbitrary actions. In many cases, they simply get or set an instance field. But they might also access a database or a JNDI directory.
According to the bean specification, it is legal to omit a read or write method. For example, if getPassword is omitted, then password is a write-only property. That might indeed be desirable for security reasons. However, JSF 1.0 deals poorly with this situation. For now, it is best to give read/write access to all bean properties.
In JSF applications, you use beans for all data that needs to be accessible from a page. The beans are the conduits between the user interface and the back end of the application.
JSF Pages
You need a JSF page for each browser screen. Depending on your development environment, JSF pages typically have extension .jsp or .jsf. At the time of this writing, the
extension .jsp requires less configuration effort when used with Tomcat. For that reason, we use the .jsp extension in the examples of this book.
NOTE
The extension of the page files is .jsp or .jsf, whereas in the preferred configuration, the extension of the page
URLs is .faces. For example, when the browser requests the URL http://localhost:8080/login/index.faces, the URL extension .faces is mapped to the file extension.jsp and the servlet container loads the file index.jsp. This
Let's have a second look at the first page of our sample application in Listing 1-1.
The page starts out with the tag library declarations
<%@ taglib uri="http://java.sun.com/jsf/core" prefix="f" %>
<%@ taglib uri="http://java.sun.com/jsf/html" prefix="h" %>
The JSF implementation defines two sets of tags. The core tags are independent of the rendering technology. For example, you need the f:view tag both for HTML pages and for pages that are rendered by a cell phone. The HTML tags generate HTML specific markup. If you want your web application to render pages for an alternative client technology, you must use a different tag library. (We discuss support for alternative client technologies in Chapter 11.)
NOTE
You can choose any prefixes for tags, such as
Much of the page is similar to an HTML form. Note the following differences:
All JSF tags are contained inside an f:view tag.
Instead of using an HTML form tag, you enclose all of the JSF components inside an h:form tag.
Instead of using the familiar input HTML tags, use
h:inputText, h:inputSecret, and h:commandButton. We discuss all standard JSF tags and their attributes in
Chapters 4 and 5. In the first three chapters, we can get by
with input fields and command buttons.
The input field values are bound to properties of the bean with name user:
<h:inputText value="#{user.name}"/>
You will see the definition of the user bean in the next section. The #{...} delimiters are explained in Chapter 2.
entered.
The h:commandButton tag has an action attribute whose value is used when specifying navigation rules.
<h:commandButton value="Login" action="login"/>
We discuss navigation rules in the next section. The value
attribute is the string that is displayed on the button.
The second JSF page of our application is even simpler than the first. It merely uses the h:outputText tag to display the user namesee Listing 1-3.
Listing 1-3.
login/welcome.jsp1. <html>
2. <%@ taglib uri="http://java.sun.com/jsf/core" prefix="f" %>
3. <%@ taglib uri="http://java.sun.com/jsf/html" prefix="h" %>
4.
6. <head>
7. <title>A Simple JavaServer Faces Application</title>
8. </head>
9. <body>
10. <h3>
11. Welcome to JavaServer Faces,
12. <h:outputText value="#{user.name}"/>!
13. </h3>
14. </body>
15. </f:view>
16. </html>
NOTE
We use a plain and old-fashioned format for our JSF pages so that they are as easy to read as possible.
<?xml version="1.0" ?>
<f:verbatim><![CDATA[<!DOCTYPE html
PUBLIC "-//W3C//DTD XHTML 1.0 Transitional//EN"
"http://www.w3.org/TR/xhtml1/DTD/xhtml1-transitional.dtd">]]>
</f:verbatim>
<html xmlns="http://www.w3.org/1999/xhtml">
If you use an XML-aware editor, you should seriously consider this form.
CAUTION
You sometimes see naive page authors produce documents that start with an HTML DOCTYPE declaration, like this:
<!DOCTYPE HTML PUBLIC "-//W3C//DTD HTML 4.01 Transitional//EN">
<html>
<%@ taglib uri="http://java.sun.com/jsf/html" prefix="h" %>
<%@ taglib uri="http://java.sun.com/jsf/core" prefix="f" %>
<f:view>
. . .
This may have been acceptable at one time, but nowadays, it is quite reprehensible. Plainly, this document is not an "HTML 4.01 Transitional" document. It merely aims to produce such a document. Many XML editors and tools don't take it kindly when you lie about the document type. Therefore, either omit the DOCTYPE altogether or follow the outline given in the preceding note.
Navigation
navigation rules. A navigation rule tells the JSF implementation which page to send back to the browser after a form has been submitted.
In this case, navigation is simple. When the user clicks the "Login" button, we want to navigate from the index.jsp page to welcome.jsp. You specify this navigation rule in the faces-config.xml file:
<navigation-rule>
<from-view-id>/index.jsp</from-view-id>
<navigation-case>
<from-outcome>login</from-outcome>
<to-view-id>/welcome.jsp</to-view-id>
</navigation-case>
</navigation-rule>
<h:commandButton value="Login" action="login"/>
In addition to the navigation rules, the faces-config.xml file contains the bean definitions. Here is the definition of the user
bean.
<managed-bean>
<managed-bean-name>user</managed-bean-name>
<managed-bean-class>
com.corejsf.UserBean
</managed-bean-class>
<managed-bean-scope>session</managed-bean-scope>
You can use the bean name, user, in the attributes of the user interface components. For example, index.jsp contains the tag
<h:inputText value="#{user.name}"/>
The value attribute refers to the name property of the user
bean. (The #{...} delimiters denote the fact that user.name is a "value binding expression." We explain this syntax in Chapter 2.)
The managed-bean-class tag simply specifies the bean class, in our case, com.corejsf.UserBean. Finally, the scope is set to
session. That means that the bean object is available for one user across multiple pages. Different users who use the web application are given different instances of the bean object.
Listing 1-4 shows the complete faces-config.xml file.
Listing 1-4.
login/WEB-INF/faces-config.xml1. <?xml version="1.0"?>
3. <!DOCTYPE faces-config PUBLIC
4. "-//Sun Microsystems, Inc.//DTD JavaServer Faces Config 1.0//EN"
5. "http://java.sun.com/dtd/web-facesconfig_1_0.dtd">
6.
7. <faces-config>
8. <navigation-rule>
9. <from-view-id>/index.jsp</from-view-id>
10. <navigation-case>
11. <from-outcome>login</from-outcome>
12. <to-view-id>/welcome.jsp</to-view-id>
13. </navigation-case>
14. </navigation-rule>
15.
16. <managed-bean>
17. <managed-bean-name>user</managed-bean-name>
18. <managed-bean-class>com.corejsf.UserBean</managed-bean-class>
19. <managed-bean-scope>session</managed-bean-scope>
21. </faces-config>
Servlet Configuration
When you deploy a JSF application inside an application server, you need to supply a configuration file named web.xml.
Fortunately, you can use the same web.xml file for most JSF applications. Listing 1-5 shows the file.
Listing 1-5.
login/WEB-INF/web.xml1. <?xml version="1.0"?>
2.
3. <!DOCTYPE web-app PUBLIC
4. "-//Sun Microsystems, Inc.//DTD Web Application 2.3//EN"
5. "http://java.sun.com/dtd/web-app_2_3.dtd">
6.
7. <web-app>
8. <servlet>
9. <servlet-name>Faces Servlet</servlet-name>
11. <load-on-startup>1</load-on-startup>
12. </servlet>
13.
14. <servlet-mapping>
15. <servlet-name>Faces Servlet</servlet-name>
16. <url-pattern>*.faces</url-pattern>
17. </servlet-mapping>
18.
19. <welcome-file-list>
20. <welcome-file>index.html</welcome-file>
21. </welcome-file-list>
22. </web-app>
The only remarkable aspect of this file is the servlet mapping. All JSF pages are processed by a special servlet that is a part of the JSF implementation code. To ensure that the correct servlet is activated when a JSF page is requested, the JSF URLs have a special format. In our configuration, they have an extension
.faces. For example, you cannot simply point your browser to http://localhost:8080/login/index.jsp. The URL has to be
strips off the faces suffix and loads the index.jsp page.
NOTE
You can also define a prefix mapping instead of the
.faces extension mapping. Use the following directive in your web.xml file:
<servlet-mapping>
<servlet-name>Faces Servlet</servlet-name>
<url-pattern>/faces/*</url-pattern>
</servlet-mapping>
Then use the URL
http://localhost:8080/login/faces/index.jsp. That URL activates the JSF servlet, which then strips off the faces
prefix and loads the file /login/index.jsp.
NOTE
<servlet-mapping>
<servlet-name>jsp</servlet-name>
<url-pattern>*.jsf</url-pattern>
</servlet-mapping>
You now need to tell the JSF implementation to map the .faces
extension of the URLs to the .jsf extension of the associated files.
<context-param>
<param-name>javax.faces.DEFAULT_SUFFIX</param-name>
<param-value>.jsf</param-value>
</context-param>
Note that this configuration affects only the web developers, not the users of your web application. The URLs still have a
.faces extension or /faces prefix.
The Welcome File
index.html or index.jsp page when they are given a directory URL. Unfortunately, that mechanism doesn't work smoothly with JSF pages. For example, if a user visits the URL
http://localhost:8080/login, then Tomcat should not load
index.jsp. Doing so would skip the JavaServer Faces processing phase.
To overcome this issue, you can supply an index.html file that automatically redirects the user to the start of the application, using the proper faces URL. Listing 1-6 shows such an index file.
Listing 1-6.
login/index.html1. <html>
2. <head>
3. <meta http-equiv="Refresh" content= "0; URL=index.faces"/>
4. <title>Start Web Application</title>
5. </head>
6. <body>
7. <p>Please wait for the web application to start.</p>
8. </body>
Finally, it is a good idea to specify index.html as the "welcome file" in web.xml. See the welcome-file tag in Listing 1-5 on page 18.
NOTE
The index.html file redirects the browser to the
index.faces URL. It is slightly more efficient to use a JSP forward action instead. Create a page, say, start.jsp, that contains the line
<jsp:forward page="/index.faces"/>
Then set this page as the welcome-file in the web.xml
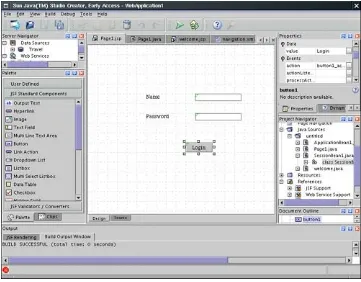
Visual Development Environments
We produced the JSF pages and configuration files for this application with a text editor. However, we expect that many JSF programmers will use visual development environments once they become available. A visual environment displays a graphical representation of the components and allows a
designer to drag and drop components from a palette. Figure 1-7 shows a prerelease of Sun Java Studio Creator
(http://www.sun.com/software/products/jscreator). The
component palette is in the lower-left corner. You drag the
components onto the center of the window and customize them with the property sheet in the upper-right corner. The
environment produces the corresponding JSF tags automatically (see Figure 1-8).
Figure 1-8. JSF Markup Is Automatically
Generated
Moreover, visual environments give you graphical interfaces for specifying the navigation rules and beanssee Figure 1-9. Those environments automatically produce the faces-config.xml file.
JSF Framework Services
Now that you have seen your first JSF application, it is easier to explain the services that the JSF framework offers to
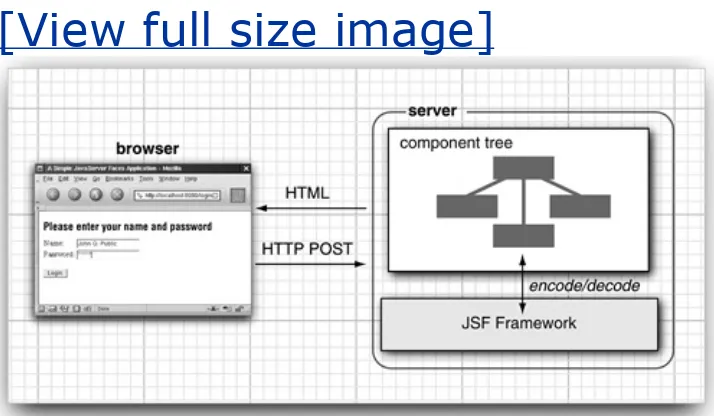
developers. Figure 1-10 gives a high-level overview of the JSF architecture. As you can see, the JSF framework is responsible for interacting with client devices, and it provides tools for tying together the visual presentation, application logic, and business logic of a web application. However, the scope of JSF is
restricted to the presentation tier. Database persistence, web services, and other back-end connections are outside the scope of JSF.
Figure 1-10. High-Level Overview of the JSF
Framework
[View full size image]
Model-View-Controller Architecture
All software applications let users manipulate certain data, such as shopping carts, travel itineraries, or whatever data are required in a particular problem domain. These data are called the model. Just like an artist creates a painting of a model in a studio, a software developer produces views of the data model. In a web application, HTML (or a similar rendering technology) is used to paint these views.
JSF connects the view and the model. As you have seen, a view component can be wired to a bean property of a model object, such as
<h:inputText value="#{user.name}"/>
Moreover, JSF operates as the controller that reacts to the user by processing action and value change events, routing them to code that updates the model or the view. For
<h:commandButton value="Login" action="#{user.check}"/>
When the button is clicked and the form is submitted to the server, the JSF implementation invokes the check method of the user bean. That method can take arbitrary actions to update the model, and it returns the navigation ID of the next page to be displayed. We discuss this mechanism further in Chapter 3.
Thus, JSF implements the classical model-view-controller architecture.
Data Conversion
Users enter data into web forms as text. Business objects want data as numbers, dates, or other data types. As explained in Chapter 6, JSF makes it easy to specify and customize conversion rules.
Validation and Error Handling
JSF makes it easy to attach validation rules for fields such as "this field is required" or "this field must be a number." Of course, when users enter invalid data, you need to display appropriate error messages. JSF takes away much of the tedium of this programming task. We cover validation in Chapter 6.
Internationalization
encodings and the selection of resource bundles. We cover resource bundles in Chapter 2.
Custom Components
Component developers can develop sophisticated
components that page designers simply drop into their pages. For example, suppose a component developer
produces a calendar component with all the usual bells and whistles. You just use it in your page, with a command such as
<acme:calendar value="#{flight.departure}" startOfWeek="Mon"/>
Chapter 9 covers custom components in detail.
Alternative Renderers
By default, JSF generates markup for HTML pages. But it is easy to extend the JSF framework to produce markup for another page description language such as WML or XUL. In
Chapter 11, we show you how to use JSF to communicate
with J2ME-powered cell phones. Tool Support
Behind the Scenes
Now that you have read about the "what" and the "why" of JavaServer Faces, you may be curious just how the JSF framework does its job.
Let us look behind the scenes of our sample application. We'll start at the point when the browser first connects to
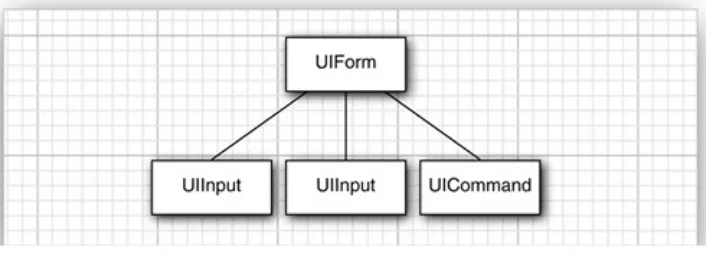
http://localhost:8080/login/index.faces. The JSF servlet initializes the JSF code and reads the index.jsp page. That page contains tags such as f:form and h:inputText. Each tag has an associated tag handler class. When the page is read, the tag handlers are executed. The JSF tag handlers collaborate with each other to build a component tree (see Figure 1-11).
Figure 1-11. Component Tree of the Sample
Application
The component tree is a data structure that contains Java objects for all user interface elements on the JSF page. For example, the two UIInput objects correspond to the
Rendering Pages
Next, the HTML page is rendered. All text that is not a JSF tag is simply passed through. The h:form, h:inputText,
h:inputSecret, and h:commandButton tags are converted to HTML.
As we just discussed, each of these tags gives rise to an associated component. Each component has a renderer that produces HTML output, reflecting the component state. For example, the renderer for the component that corresponds to the h:inputText tag produces the following output:
<input type="text" name="unique ID" value="current value
This process is called encoding. The renderer of the UIInput
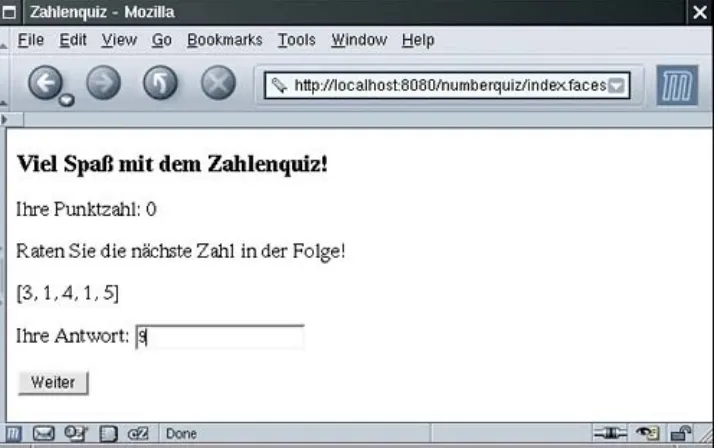
object asks the framework to look up the unique ID and the current value of the expression user.name. By default, ID strings (such as _id0:_id1) are assigned by the framework. The encoded page is sent to the browser, and the browser displays it in the usual way (see Figure 1-12).
[View full size image]
TIP
Select View->Page source from the browser menu to see the HTML output of the rendering process. Figure 1-13 shows a typical output. This is useful for debugging JSF problems.
Decoding Requests
After the page is displayed in the browser, the user fills in the form fields and clicks the "Login" button. The browser sends the form data back to the web server, formatted as a "POST
request." This is a special format, defined as part of the HTTP protocol. The POST request contains the URL of the form
NOTE
The URL for the POST request is the same as that of the request that renders the form. Navigation to a new page occurs after the form has been submitted.
The form data is a string of ID/value pairs, such as
_id0:_id1=me&_id0:_id2=secret&_id0:_id3=Login&_id0=_id0
As part of the normal servlet processing, the form data is placed in a hash table that all components can access.
Next, the JSF framework gives each component a chance to inspect that hash table, a process called decoding. Each
component decides on its own how to interpret the form data. The login form has three component objects: two UIInput
objects that correspond to the text fields on the form and a
referenced in the value attributes: they invoke the setter methods with the values that the user supplied.
The UICommand component checks whether the button was clicked. If so, it fires an action event to launch the login
action referenced in the action attribute. That event tells the navigation handler to look up the successor page,
welcome.jsp.
Now the cycle repeats.
You have just seen the two most important processing steps of the JSF framework: encoding and decoding. However, the
processing sequence (also called the "life cycle") is a bit more intricate. If everything goes well, you don't need to worry about the intricacies of the life cycle. However, when an error occurs, you will definitely want to understand what the framework does. In the next section, we look at the life cycle in greater detail.
The Life Cycle
The JSF specification defines six distinct phases, as shown in
Figure 1-14. The normal flow of control is shown with solid
lines; alternative flows are shown with dashed lines.
Figure 1-14. The JavaServer Faces Life Cycle
The Restore View phase retrieves the component tree for the requested page if it was displayed previously or constructs a new component tree if it is displayed for the first time. If the page was displayed previously, all components are set to their prior state. This means that JSF automatically retains form information. For example, when a user posts illegal data that are rejected during decoding, the old inputs are redisplayed so that the user can correct them.
If the request has no query data, the JSF implementation skips ahead to the Render Response phase. This happens when a page is displayed for the first time.
Otherwise, the next phase is the Apply Request Values phase. In this phase, the JSF implementation iterates over the
component objects in the component tree. Each component object checks which request values belong to it and stores them.
In addition to extracting request information, the "Apply Request Values" phase adds events to an event queue when a command button or link has been clicked. We discuss event handling in detail in Chapter 7. As you can see in Figure 1-14, events can be executed after each phase. In specialized situations, an event handler can "bail out" and skip to the Render Response phase or even terminate request processing altogether.
In the Process Validations phase, the submitted string values are first converted to "local values," which can be objects of any type. When you design a JSF page, you can attach validators that perform correctness checks on the local values. If
validation passes, the JSF life cycle proceeds normally. However, when conversion or validation errors occur, the JSF
implementation invokes the Render Response phase directly, redisplaying the current page so that the user has another chance to provide correct inputs.
NOTE
To many programmers, this is the most surprising aspect of the JSF life cycle. If a converter or validator fails, the current page is simply redisplayed. You should add tags to display the validation errors so that your users know why they see the old page again. See Chapter 6 for details.
In the Invoke Application phase, the action method of the button or link component that caused the form submission is executed. That method can carry out arbitrary application processing. It returns an outcome string that is passed to the navigation handler. The navigation handler looks up the next page.
Finally, the Render Response phase encodes the response and sends it to the browser. When a user submits a form, clicks on a link, or otherwise generates a new request, the cycle starts
anew.
Automation of the Build Process with Ant
The manual build process that we described earlier in this
chapter can become tedious if you need to do it over and over. In this section, we describe how you can automate the process. The material in this section is not required for working with JSFfeel free to skip it if the manual build process doesn't bother you.
We recommend the Ant tool for automating the building and deployment of JSF applications. Ant is not required to work with JSF, but we find it convenient and easy to learn. In fact, you need not know much about Ant at all if you simply want to use the build script that we prepared.
Download Ant from http://ant.apache.org and install it in a directory of your choice. The page
http://ant.apache.org/resources.html contains links to tutorials
and other information about Ant.
Ant takes directions from a build file. By default, the build file is named build.xml. We provide a build.xml file for building JSF applications. This file is contained inside the root of the
corejsf-examples directory. The build.xml file contains the instructions for compiling, copying, zipping, and deploying to Tomcat, described in XML syntax.
The file is rather long and we won't reproduce it in its entirety.
Listing 1-7 contains the most important elements.
Listing 1-7.
build.xml2.
3. <property file="build.properties"/>
4. <property name="appdir" value="${basedir}/${app}"/>
5. <property name="builddir" value="${appdir}/build"/>
6. <basename property="appname" file="${appdir}"/>
7. <property name="warfile" value="${builddir}/${appname}.war"/>
8.
9. <path >
10. <pathelement location="${servlet.api.jar}"/>
11. <pathelement location="${jsp.api.jar}"/>
12. <fileset dir="${builddir}/WEB-INF/lib">
13. <include name="*.jar"/>
14. </fileset>
15. </path>
16.
17. <target name="init">
18. <tstamp/>
19. <fail unless="app" message="Run ant -Dapp=..."/>
21.
22. <target name="prepare" depends="init"
23. description="Create build directory.">
24. <mkdir dir="${builddir}"/>
25. </target>
26.
27. <target name="copy" depends="prepare"
28. description="Copy files to build directory.">
29. <copy todir="${builddir}">
30. <fileset dir="${appdir}">
31. <exclude name="**/*.java"/>
32. <exclude name="build/**"/>
33. </fileset>
34. </copy>
35. <copy todir="${builddir}/WEB-INF/lib">
36. <fileset dir="${jsf.lib.dir}" includes="${jsf.libs}"/>
37. <fileset dir="${jstl.lib.dir}" includes="${jstl.libs}"/>
39. </copy>
40. </target>
1. <target name="compile" depends="copy"
1. description="Compile source files.">
1. <javac
1. srcdir="${appdir}/WEB-INF/classes"
1. destdir="${builddir}/WEB-INF/classes"
1. debug="true"
1. deprecation="true">
1. <include name="**/*.java"/>
1. <classpath ref/>
1. </javac>
1. </target>
1.
1. <target name="war" depends="compile"
1. description="Build WAR file.">
1. <delete file="${warfile}"/>
1. <jar jarfile="${warfile}" basedir="${builddir}"/>
1.
1. <target name="install" depends="war"
1. description="Deploy web application.">
1. <copy file="${warfile}" todir="${tomcat.dir}/webapps"/>
1. </target>
1.
1. </project>
To use this build file, you must customize the
build.properties file that is contained in the same directory (see Listing 1-8). The default file looks like this.
Listing 1-8.
build.properties1. jsf.dir=/usr/local/jsf-1_0
2. tomcat.dir=/usr/local/jakarta-tomcat-5.0.19
3.
4. username=me
5. password=secret
7.
8. jsp.api.jar=${tomcat.dir}/common/lib/jsp-api.jar
9. jsp.api.jar=${jsp.lib.dir}/jsp-api.jar
10.
11. jsf.lib.dir=${jsf.dir}/lib
12. jstl.lib.dir=${tomcat.dir}/webapps/jsp-examples/WEB-INF/lib
13. commons.lib.dir=${tomcat.dir}/server/lib
14.
15. jsf.libs=jsf-api.jar,jsf-impl.jar
16. jstl.libs=jstl.jar,standard.jar
17. commons.libs=commons-beanutils.jar,commons-digester.jar
You need to change the directories for Tomcat and JSF to match your local installation. Simply edit the first two lines of
build.properties. On Windows, remember to use forward slashes for file separators.
Now you are ready to build the sample application (see Figure 1-15).
2. Run the command
apache-ant/bin/ant -Dapp=ch1/login
Here, apache-ant is the directory into which you installed Ant, such as c:\apache-ant-1.6.1.
TIP
You'll be running ant all the time. We suggest that you add the apache-ant/bin directory to the PATH
environment variable.
NOTE
single script that can build almost all applications in the book. You use the -Dapp=... flag to specify the name of the application that you want to build. We think that approach is better than supplying lots of nearly identical scripts. Note that you call the script from the corejsf-examples directory, not the directory of the application.
Using the Deployment Manager with Ant
The build.xml file of the preceding section exactly imitates the manual deployment process by copying the WAR file to the
Tomcat directory. This deployment method relies on the "auto deploy" feature of Tomcat. When "auto deploy" is turned on, Tomcat checks the timestamp of the WAR file before fulfilling a web request. When the WAR file has changed, Tomcat discards the old pages and Java classes and reads the new versions from the WAR file. This behavior is activated by default, but you can turn it off by editing the tomcat/conf/server.xml file.
In our experience, automatic deployment works well most of the time, but there are occasional glitches. Sometimes, there is a slight delay before the new version of the application becomes available. Occasionally, you will find that Tomcat is in an
inconsistent state, and you have to restart it.
We prefer to use the Tomcat deployment manager instead. The
build.xml file in in the corejsf-examples directory defines several tasks for this purpose (which are not shown in Listing 1-7). You need to carry out several configuration steps to activate them.
<user username="me" password="secret" roles="manager"/>
This tag defines a user who is allowed to add and remove web applications. Of course, if your computer is publicly accessible, you should use secure values for the username and password.
2. If you changed the manager username and password, edit the build.properties file and update the username and
password settings.
3. Copy the following file to the apache-ant/lib directory:
tomcat/server/lib/catalina-ant.jar
When you want to deploy a new web application, first make sure that Tomcat is running. Then issue the command
apache-ant/bin/ant -Dapp=ch1/login deploy
Your application will now be deployed to the servlet container.
TIP
If Ant complains that it does not know the deploy task, double-check that you added catalina-ant.jar to the
apache-ant/lib directory.
apache-ant/bin/ant -Dapp=ch1/login undeploy
Then deploy the application again.
TIP
We found it tedious to remember whether our application was currently deployed or not. Our Ant script contains a task redeploy that automatically undeploys and
redeploys an application. However, undeploying a nonexistent application throws an exception that
terminates Ant. We overcame that problem by using the handy ant-contrib library from
http://ant-contrib.sourceforge.net. If you want to use the redeploy
task, you need to download and install the library. Next, copy the JAR file in the lib subdirectory of the ant-contrib installation into the apache-ant/lib directory. Then
simply issue the command
apache-ant/bin/ant -Dapp=chapter/appname redeploy
Chapter 2. Managed Beans
Topics in This Chapter"Definition of a Bean" on page 37
"Message Bundles" on page 41
"A Sample Application" on page 45
"Backing Beans" on page 52
"Bean Scopes" on page 53
"Configuring Beans" on page 55
"The Syntax of Value Binding Expressions" on page 62
A central theme of web application design is the separation of presentation and business logic. JSF uses beans to achieve this separation. JSF pages refer to bean properties, and the program logic is contained in the bean implementation code. Because beans are so fundamental to JSF programming, we discuss them in detail in this chapter.
The first half of the chapter discusses the essential features of beans that every JSF developer needs to know. We then present an example program that puts these essentials to work. The remaining sections cover more technical aspects about bean configuration and value binding expressions. You can safely skip these sections when you first read this book, and return to
Definition of a Bean
According to the JavaBeans specification (available at
http://java.sun.com/products/javabeans/), a Java Bean is "a
reusable software component that can be manipulated in a builder tool." That is a pretty broad definition, and indeed, as you will see in this chapter, beans are used for a wide variety of purposes.
At first glance, a bean seems to be similar to an object.
However, beans serve a different purpose. Objects are created and manipulated inside a Java program when the program calls constructors and invokes methods. However, beans can be
configured and manipulated without programming.
NOTE
You may wonder where the term "bean" comes from. Well, Java is a synonym for coffee (at least in the United States), and coffee is made from beans that encapsulate its flavor. You may find the analogy cute or annoying, but the term has stuck.
The "classic" application for JavaBeans is a user-interface
builder. A palette window in the builder tool contains component beans such as text fields, sliders, check boxes, and so on.
Instead of writing Swing code, a user-interface designer drags and drops component beans into a form and customizes them, by selecting property values from a dialog (see Figure 2-1).
In the context of JavaServer Faces, beans go beyond user interface components. You use beans whenever you need to wire up Java classes with web pages or configuration files. Consider the login application in Chapter 1. A UserBean
instance is configured in the faces-config.xml file:
<managed-bean>
<managed-bean-name>user</managed-bean-name>
<managed-bean-scope>session</managed-bean-scope>
</managed-bean>
This means: Construct an object of the class
com.corejsf.UserBean, give it the name user, and keep it alive for the duration of the session, that is, for all requests that originate from the same client.
Once the bean has been defined, it can be accessed by JSF components. For example, this input field reads and updates the password property of the user bean.
<h:inputSecret value="#{user.password}"/>
As you can see, the JSF developer does not need to write any code to construct and manipulate the user bean.
In a JSF application, beans are commonly used for the following purposes:
For tying together the behavior of a web form (called "backing beans")
For business objects whose properties are displayed on web pages
For services such as external data sources that need to be configured when an application is assembled
Because beans are so ubiquitous, we now turn to a review of those parts of the JavaBeans specification that are relevant to JSF programmers.
Bean Properties
Bean classes need to follow specific programming conventions in order to expose features that tools can use. We discuss these conventions in this section.
The most important features of a bean are the properties that it exposes. A property is any attribute of a bean that has
a name a type
methods for getting and/or setting the property value
For example, the UserBean class of the preceding chapter has a property with name password and type String. The methods
is simply a class that follows certain coding conventions. The JavaBeans specification puts a single demand on a bean class: It must have a default constructor, that is, a constructor without parameters. However, in order to define properties, a bean must either use a naming pattern for property getters and setters, or it must define property descriptors. The latter
approach is quite tedious and not commonly used, and we will not discuss it here. See Horstmann & Cornell, Core Java vol. 2 ch. 8, Sun Microsystems Press 2003 for more information. Defining properties with naming patterns is straightforward. Consider the following pair of methods:
T getFoo()
void setFoo(T newValue)
The pair corresponds to a read-write property with type T and name foo. If you only have the first method, then the property is read-only. If you only have the second method, then the property is write-only.
The method names and signatures must match the pattern precisely. The method name must start with get or set. A get
other methods, but they do not yield bean properties.
Note that the name of the property is the "decapitalized" form of the part of the method name that follows the get or set
prefix. For example, getFoo gives rise to a property named foo, with the first letter turned into lower case. However, if the first two letters after the prefix are upper case, then the first letter stays unchanged. For example, the method name getURL
defines a property URL, and not uRL.
For properties of type boolean, you have a choice of prefixes for the method that reads the property. Both
boolean isConnected()
and