For your convenience Apress has placed some of the front
matter material after the index. Please use the Bookmarks
and Contents at a Glance links to access them.
v
Contents at a Glance
About the Authors ...
xix
About the Technical Reviewer ...
. xxi
Acknowledgments ...
xxiii
Introduction ...
xxv
Chapter 1: Introduction to the Windows Phone SDK
■
...
1
Chapter 2: Multi-Resolution Support and Basic User Interface Components
■
...
23
Chapter 3: Gestures
■
...
.55
Chapter 4: Tiles and Lock Screen
■
...
79
Chapter 5: Background Agents and Local Notifications
■
...
109
Chapter 6: Appointments and Contacts
■
...
141
Chapter 7: Camera, Photos, and Media
■
...
163
Chapter 8: Maps, Location, and Routing
■
...
195
Chapter 9: Communications and Speech
■
...
.225
Chapter 10: Launching and Resuming Apps
■
...
253
Chapter 11: Data Storage
■
...
277
Chapter 12: Windows Azure Mobile Services
■
...
299
Chapter 13: Using the Microsoft Live SDK
■
...
.343
Chapter 14: Publishing Your App
■
...
365
Introduction
The .NET Compact Framework 1.0 and GUID.NewGuid(). . . that’s where it all began . . . or rather didn’t, as I was
discouraged from really getting started at that point. The problem was that the static NewGuid method returned an empty string. Many trade-offs were made in the PocketPC operating system and the initial version of the Compact Framework in order to strike a balance between performance, footprint, and time to market. Several of the Windows API functions upon which NewGuid relied were not included in PocketPC, and the Compact Framework didn’t implement an alternative, so you just ended up with not so much as a NotImplementedException for your troubles. Just an empty string. The prescribed workaround took you on a journey into the depths of the Crypto-API, COM Interop, and P/Invoke. I just didn’t want to know that much about it. This is probably why at the time I had never met a single happy mobile developer.
The next problem faced by PocketPC developers was that there was no hardware standardization. You couldn’t count on anything being the same from one device model to the next even within the same manufacturer. Some devices had hardware-based buttons for certain actions while others did not. Writing an application that would work on any device running the PocketPC operating system was an opportunity for personal growth, to put it somewhat euphemistically. Android developers right now will know exactly what I’m talking about. An even greater challenge awaits them in that not only do they face hardware differences but they also have to cope with the fragmentation of the Android operating system. No thank you.
My dear friend and coauthor, Lori Lalonde, relates a similar experience when developing for BlackBerry. The sheer amount of ceremonial code that needed to be written to accomplish certain seemingly simple tasks was discouraging.
With the introduction of Windows Phone 7 there dawned a new age. Manufacturers that wanted to produce Windows Phone devices were required to support a rigid design specification. Certain hardware elements were required to be present, and certain device interactions were tied to the hardware. The Back button, Windows button, and Search button were the main examples.
The Windows Phone OS as well could now provide a consistent API for interaction with the device. Many of the functions that you used to have to code yourself are now provided as native services or exposed via Launchers and Choosers. You’ll see examples of Launchers and Choosers in Chapter 6 on appointments and contacts as well as Chapter 8 on maps and navigation. Chapter 7 on the camera, photos, and media introduces you to the Background Audio Service that you can use. There’s no need for DirectX knowledge here.
This is one of the main design goals of Windows Phone. Providing these services through a common operating system–provided API enables developers to focus on providing greater value in their applications rather than having to reinvent the wheel. This also helps protect the user of the device. For example, as shown in Chapter 6, there is no way to flood the contact store with contacts or to even add a single contact without the user’s consent. Also, because you must interact with the built-in contact management UI, there is no way to subvert the process
Who This Book Is For
xxvi
How This Book Is Structured
This book is structured so that it does not have to be read from cover to cover. Each chapter is focused on a specific area of functionality and attempts to cover common problems you may encounter. As much as possible, each recipe has been written as a stand-alone solution to a single problem statement.
Some chapters, such as Chapter 12 on Windows Azure Mobile Services, for example, can be read in order from start to finish as the information in each recipe builds upon concepts introduced in the previous one. Having said that, each recipe can still stand on its own. Recipes that may build upon concepts that have been discussed in other recipes or even other chapters will contain references to these dependencies so that you can find them quickly.
Conventions
The style of text in the book follows the standard Apress format, so many of you will already be familiar with it. This introduction follows the same standard. For example, when code is presented inline with body text, it will LookLikeThis. This style is used to call out ClassNames, Types, variableNames, and just about any other text that would normally appear in your code. When code is presented in a block, it will be captioned, referred to in the body text by number, and have a consistent code style applied to it. See Listing 1 for an example.
Listing 1. Device Resolution Enumeration
public enum Resolution {
WVGA, WXGA, HD720p }
Text that appears in bold is generally reserved for something you need to type into the interface.
Downloading the Code
The code for the examples shown in this book is available on the Apress web site, www.apress.com. A link can be found on the book’s information page on the Source Code/Downloads tab. This tab is located underneath the “Related Titles” section of the page.
The sources for this book may change over time to provide new implementations that incorporate the most up-to-date features in Windows Phone 8 or to correct errata that is identified postpublication. As we go to press, we are also working to refine some of the samples into full applications and deploy them to the Windows Phone Store. You can contact Lori or Dave via the book’s email address at [email protected] should you have trouble running any of the samples or if you want to inquire about the progress of the sample application publishing process.
Contacting the Authors
Introduction to the Windows
Phone SDK
Welcome to this new and exciting journey toward Windows Phone 8 development! In this chapter, we will cover the essential information you will need to hit the ground running in mobile application development for the Windows Phone OS 8.0 platform. If you have developed Windows Phone 7 applications, don’t skip over this chapter just yet! We also have a recipe for upgrading your Windows Phone 7.x apps to Windows Phone 8.
For your first taste of Windows Phone 8 development, we will provide you with the following recipes:
1-1. Install the Development Tools •
1-2. Create Your First Windows Phone 8 Application •
1-3. Launch an App in the Windows Phone Emulator •
1-4. Launch an App on a Windows Phone Device •
1-5. Upgrade a Windows Phone 7.x app to Windows Phone 8 •
1-6. Become Acquainted With the Capabilities and Requirements in the Windows Phone •
Application Manifest
1-1. Install the Development Tools
Problem
Recently, you’ve been hearing the latest buzz around the newly released Windows Phone 8 devices. You want to capitalize on this by developing mobile apps for this platform while the market is hot. The problem is you don’t have a lot of time to spare to figure it out on your own. You want to know what you need to do to get your development environment up and running today.
Solution
2
How It Works
Just as a great artist needs a specific set of tools to create her masterpiece, a skillful mobile application developer needs the right tools to create quality applications. To develop Windows Phone 8 applications, you will need to download and install the necessary development tools from the Microsoft site. To obtain access to Windows Phone SDK downloads, documentation, developer forums, and more, go to http://dev.windowsphone.com. This web site is one which you will use often as you progress on your development journey, so you may want to bookmark it now.
On the main landing page, click the link “Get SDK,” which will take you to the download page. You will notice within the download page there are links to download previous and current versions of the Windows Phone SDK.
Before attempting to download and install the SDK, you should verify that your system meets the minimum requirements. You can check this by clicking the link “Get additional details and languages,” or for a quick summary refer to Table 1-1.
Table 1-1. Minimum Requirements for Windows Phone SDK 8.0 and Windows Phone Emulator
Windows Phone SDK 8.0
Windows Phone Emulator
Windows 8 or Windows 8 Pro operating system Windows 8 Pro edition or higher
Windows 8 64-bit (x64) client versions Same as SDK
6.5 GB of available hard disk space Same as SDK
4 GB RAM Same as SDK
64-bit (x64) CPU Same as SDK
-- Requires processor that supports Second Level Address
Translation (SLAT)
Figure 1-1. Coreinfo command-line utility results
If the minimum requirements for the SDK are met, but the minimum requirements are not met for the Emulator, the SDK setup will still run and install the assemblies required for Windows Phone development; however, the Windows Phone Emulator will not be installed, and you will not be able to test your apps in the Emulator. In this case, you will need to test your app on a device, which we will discuss in Recipe 1-4. To install the latest SDK, you will need to perform the following steps:
1. Click the “Download” button for the SDK 8.0. You will be prompted to save or run the installation, WPexpress_full.exe
2. Launch the setup once it has finished downloading.
3. The installation will check to ensure your system meets the minimum requirements for Windows Phone SDK 8.0. If it does not meet the minimum requirements, an error will display and you will not be able to proceed with the installation.
4. Once the installation completes successfully, you may be required to restart your machine. Along with the required assemblies, and the Windows Phone emulator, the setup will install Visual Studio Express 2012 for Windows Phone on your system unless you have Visual Studio 2012 installed prior to running the SDK setup.
5. If you already have Visual Studio 2012 installed (i.e., Professional, Premium or Ultimate edition), then an add-in for your Visual Studio IDE will be installed to enable Windows Phone development. It doesn’t matter which version of Visual Studio 2012 that you use, you will still have the same templates available for building Windows Phone applications.
Note
■
Windows Phone SDK 8.0 contains the necessary tools to develop apps for both Windows Phone 7.5 and
Windows Phone 8 platforms. However, for the remainder of this book, we will focus on Windows Phone 8 application
development.
1-2. Create Your First Windows Phone 8 Application
Problem
Now that you have the right development tools at hand, you want to develop your first app but you are not sure where to begin.
Solution
Use Visual Studio 2012 to create a new Windows Phone project.
How It Works
4
Now, you have the choice to select the directory where you will store this project. The default directory provided in the Location field points to your user profile’s documents location, under a Visual Studio 2012 Projects subdirectory. I prefer to specify my own location that I reserve for Windows Phone projects, but the choice is up to you.
Also, notice the checkbox labeled “Create directory for solution”. Leaving this box checked will ensure that a subdirectory with the name of your project is created, and all project files will be saved within this subdirectory. If you uncheck this option, then your project files will be stored within the directory specified in the Location field. Again, the choice is up to you, but if you plan on creating multiple projects within the same directory, you want to ensure they are stored within subdirectories to avoid confusion and the possibility of files overwriting each other.
Figure 1-2. New Project dialog with Windows Phone templates displayed
If you select Windows Phone OS 7.1, it means that this is the minimum OS version on which the application will run. You can create a Windows Phone OS 7.1 application and it will run on Windows Phone 7.x and Windows Phone 8 devices.
The focus of this book is intended to discuss Windows Phone 8 development, so we will create applications that target Windows Phone OS 8.0. Since this is the default selection, all you need to do in this dialog is click the OK button.
A progress bar will appear on screen, and it will take a few seconds or so for the development environment to create the default files and layout for your Windows Phone application.
Once the Visual Studio development environment loads, you will see a visual representation of the default phone page in the left pane. This is a good way to see what the page will look like on the device as you are designing your page. A sample of the Visual Studio IDE view on the initial load of a Windows Phone project is depicted in Figure 1-4.
Figure 1-3. Select the Windows Phone Platform that your application will target Once you have the name and directory specified, click the OK button.
6
Every Windows Phone page will have markup that must remain intact for the page to work. Let’s examine the markup of MainPage.xaml.
<phone:PhoneApplicationPage
x:Class="MyFirstWPApp.MainPage"
xmlns="http://schemas.microsoft.com/winfx/2006/xaml/presentation" xmlns:x="http://schemas.microsoft.com/winfx/2006/xaml"
xmlns:phone="clr-namespace:Microsoft.Phone.Controls;assembly=Microsoft.Phone" xmlns:shell="clr-namespace:Microsoft.Phone.Shell;assembly=Microsoft.Phone" xmlns:d="http://schemas.microsoft.com/expression/blend/2008"
xmlns:mc="http://schemas.openxmlformats.org/markup-compatibility/2006" mc:Ignorable="d"
FontFamily="{StaticResource PhoneFontFamilyNormal}" FontSize="{StaticResource PhoneFontSizeNormal}" Foreground="{StaticResource PhoneForegroundBrush}" SupportedOrientations="Portrait" Orientation="Portrait" shell:SystemTray.IsVisible="True">
Any markup that you add to the page will be contained within the root element of the page,
phone:PhoneApplicationPage. Note that the root element is prefixed with the namespace phone. If you look within the element attributes, you will notice the phone namespace is declared, which references the Microsoft.Phone.Controls namespace in the Microsoft.Phone assembly. This is the assembly that contains the definition of a
PhoneApplicationPage.
Next, the class reference for the current page is defined, x:Class="MyFirstWPApp.MainPage". This is what is used to associate the proper code behind file which contains any additional code that needs to be executed.
FontFamily, FontSize, and Foreground specify the page defaults for font type, font size, and font color,
respectively. These can be changed, but note that they will affect all text on the page that does not have a style defined for font family, size, and/or foreground color. Those page elements that do not have a style defined will inherit their immediate parent’s style, or page style, if a parent does not have a style defined.
SupportedOrientations element indicates which orientation the application supports. You can specify Portrait, Landscape, or PortraitOrLandscape. Portrait means that the application page will only display horizontally, even if the phone is rotated by the user. Landscape means the application page will only display vertically, meaning the user needs to rotate the phone to use the application. PortraitOrLandscape means the page will change with the physical rotation of the phone. This is the desired behavior by users, and if you can tailor your application with rotational support, then do so. In Windows Phone development, this is a simple as setting the SupportedOrientations property to PortraitorLandscape.
Orientation element is the default orientation that is displayed when the page is first loaded. For this you have multiple options: Landscape, LandscapeLeft, LandscapeRight, None, Portrait—this is the default option, PortraitDown and PortaitUp.
The final element, shell:SystemTrayIsVisible element, determines whether or not the Windows Phone system tray will be displayed while your application is loaded. The default value is set to True, which means it will continue to display even while your application is loaded. The System Tray on a Windows Phone, also known as the Status Bar, is the area at the top of the screen that displays the device’s signal strength, connection status, battery life indicator, and current time. The current time is always displayed, and the remaining indicators are displayed when the user taps on the system tray. For standard apps, it is best to ensure that the system tray remains available from within your application, unless there is a good reason to hide it (e.g., if you’re developing a game).
Notice that contained within the phone:PhoneApplicationPage element, there is a child element which is a Grid, named LayoutRoot. This Grid is automatically generated by the Windows Phone App template.
Within the LayoutRoot grid is a StackPanel, which by default is labeled TitlePanel, and a Grid, which by default is labeled ContentPanel.
The TitlePanel contains two textboxes to display the application name and the page name, respectively. The ContentPanel is an empty grid. This is the grid where you will add your page controls. These two panels are not set in stone, and you can essentially remove them and add other elements (i.e., Grid, StackPanel, Text Box, Label, etc.), as you see fit for your application’s purpose.
When designing your page, be aware that there can only be one direct child element, either a Grid, StackPanel, or Canvas, within the phone:PhoneApplicationPage element. It must be an element that can serve as a host to other controls. If you attempt to add more than one child element within the phone:PhoneApplicationPage element, outside of the main grid, you will receive an “Invalid Markup” error in the Visual Studio designer.
Now that you have the basics down, let’s continue on to developing your first Windows Phone 8 application! This is a birds-eye view of what we are going to do within the main page:
1. Change the application title
2. Change the page name
3. Add some controls
4. Write some code to make it do something
8
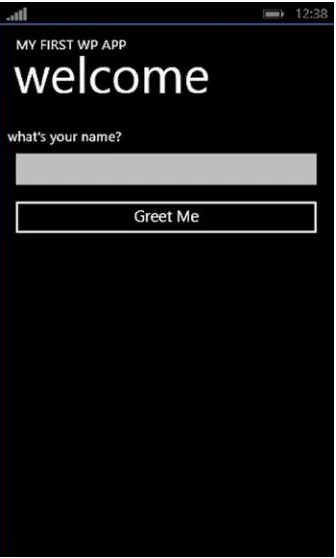
To change the page name, change the Text property in the second textbox from “page name” to “welcome”.
<Grid x:Name="LayoutRoot" Background="Transparent">
<StackPanel x:Name="TitlePanel" Grid.Row="0" Margin="12,17,0,28"> <TextBlock Text="MY FIRST WP APP"
Style="{StaticResource PhoneTextNormalStyle}" Margin="12,0"/> <TextBlock Text="welcome" Margin="9,-7,0,0"
Style="{StaticResource PhoneTextTitle1Style}"/> </StackPanel>
<Grid x:Name="ContentPanel" Grid.Row="1" Margin="12,0,12,0"> ...
</Grid> </Grid>
Now, we will add some control elements to the page to really spice things up. You can either drag a control from the Visual Studio toolbox to the page or manually enter the XAML markup for the control you want to add.
The easiest way to add controls to your page is to select a control from the Toolbox and, while holding the left mouse button down, drag it onto your page, then release the left mouse button. This action will create the XAML markup in your page automatically once you drop the control onto the page in the designer. At this point, you can modify your control by modifying the control properties in the XAML markup or by modifying the properties through the designer.
Add a textbox, a button, and two textblocks to the page by dragging those controls from the Toolbox to the page. Once they are on the page we need to format them and ensure are in the ContentPanel grid. Notice how the main grid, named LayoutRoot, defined rows using the Grid.RowDefinitions elements. We will do the same for ContentPanel, so that we can ensure a nice clean layout, without needing to define spacing or margins to ensure the controls do not overlap.
Add the following markup to the ContentPanel grid:
<Grid x:Name="ContentPanel" Grid.Row="1" Margin="12,0,12,0"> <Grid.RowDefinitions>
<RowDefinition Height="Auto"/> <RowDefinition Height="Auto"/> <RowDefinition Height="Auto"/> <RowDefinition Height="Auto"/> </Grid.RowDefinitions>
</Grid>
Next, we will enhance the default controls markup to place them in separate rows so that in the UI they look like they are nicely stacked. To do this, we need to specify the row number each control will be contained within. This is achieved by setting the Grid.Row property within each control element.
Listing 1-1. The ContentPanel grid within MainPage.xaml
<Grid x:Name="ContentPanel" Grid.Row="1" Margin="12,0,12,0"> <Grid.RowDefinitions>
<RowDefinition Height="Auto"/> <RowDefinition Height="Auto"/> <RowDefinition Height="Auto"/> <RowDefinition Height="Auto"/> </Grid.RowDefinitions>
<TextBlock Name="nameLabel" Grid.Row="0"
Text="what's your name?" /> <TextBox Name="nameText"
Grid.Row="1" /> <Button Name="greetMeButton" Grid.Row="2"
Content="Greet Me"
Tap="greetMeButton_Tap_1" /> <TextBlock Name="greetingText" Grid.Row="3" />
</Grid>
Note
■
The Tap event is equivalent to the Click event, which is the event that most .NET developers are accustomed to
using. You can create a Click event handler, which will be triggered when the user taps the button via the touch screen on
the device. However, for Windows Phone development, it is ideal to get used to handling the Tap event in lieu of the Click
event, when available.
10
At this point, we need to add code to the button’s Tap event handler so that it does something when the user taps it. To do this, we have to switch to the page’s code behind file. In the Visual Studio Solution Explorer, in the right pane, click the arrow next to MainPage.xaml. You will notice a second file below the MainPage.xaml file, with the same name, but with a file extension of .cs. This denotes that the code behind file is using the programming language C#. Double-click on this file in the Solution Explorer to launch it in the Visual Studio’s designer pane.
The first thing you will notice is that the code behind file does not provide the same page designer view that the XAML file does. This is because the XAML defines the way the UI appears, but the code behind the file contains the actions that will be performed. It is not necessary to add code to this file to compile and run your Windows Phone application, but then again, it wouldn’t be very useful to the user, would it?
Let’s add code to the button’s Tap event handler, so that when tapped, it will check the TextBox to determine if a name was entered. If so, then we will display a greeting in the greetingText TextBlock. Otherwise, we will display a message prompting for a valid name.
private void greetMeButton_Tap_1(object sender, System.Windows.Input.GestureEventArgs e) {
if (nameText.Text.Length == 0) {
greetingText.Text = "Enter your name to receive a proper greeting"; }
else {
greetingText.Text = String.Format("It's a pleasure to meet you, {0}", nameText.Text); }
}
Now, you can build your project, which will compile your code and generate the application’s XAP file. The XAP file is simply an archive containing all of the compiled code and related assemblies that are needed to successfully run your app. This is a valid Windows Phone application that you can now run in the Windows Phone emulator or deploy to a device.
Congratulations, you just created your first Windows Phone 8 app!
1-3. Launch an App in the Windows Phone Emulator
Problem
You want to test out the application you just created, but you don’t have a Windows Phone handy to run it on.
Solution
Run your app from the Visual Studio IDE, using the Windows Phone Emulator.
How It Works
If your machine met the requirements to run the Windows Phone Emulator, it would have been installed on your system during the SDK installation, which we completed in Recipe 1-1. If it was installed successfully, you should see the Emulator menu next to the “Start Debugging” button in your Visual Studio 2012 toolbar, as shown in Figure 1-6.
Figure 1-6. Windows Phone Emulator menu
Let’s use the application that we developed in Recipe 1-2 as the application we will test in this exercise. To test your newly developed application in the Windows Phone 8 emulator, click on the green arrow button to the left of the emulator menu in the Visual Studio tool bar. Clicking the Debug button will force a build of the project, if it hasn’t been compiled yet with the latest code changes and will launch the Windows Phone emulator. Note that the first launch of the emulator will be slow and will take a minute or two to initialize.
12
on a machine, users find it more convenient to use their physical keyboards for data entry in the emulator. To enable physical keyboard entry while running an app within the emulator, press the Page Down key. This will hide the Soft Input Panel and now you will be able to use your physical keyboard for text entry fields. To return back to the Soft Input Panel, simply press the Page Up key.
Now, enter a value in the text field, then click the Greet Me button. Notice that the emulator recognized the mouse click action as a Tap event, and executed the code we had added to the button’s Tap event handler, and your custom greeting displayed in the TextBlock below the button.
Clear the value in the textbox, and click the Greet Me button again. As expected, the greeting label prompts for a valid entry in the textbox.
That’s all there is to it! We’ve demonstrated launching your first Windows Phone app in the emulator and tested both cases to ensure we received the desired greeting message when a value was entered and when there was no value in the textbox.
1-4. Launch an App on a Windows Phone Device
Problem
You finally have your hands on a new Windows Phone and you want to take your newly developed app for a test run on the device.
Solution
Sign up for a developer account and then unlock your phone for testing.
How It Works
Before you can deploy a Windows Phone app to your device to test, you will need a Microsoft Live ID and a Windows Phone developer account. If you do not have a Microsoft Live ID, simply go to http://www.outlook.com and sign up for a free account. If you wish to associate your current e-mail address with a Microsoft Live ID, then go to
http://go.microsoft.com/fwlink/p/?LinkID=238657 and enter your current email address on the sign-up page. Once you have a Microsoft Live ID set up, you will need to register for a Windows Phone developer account. To register for a developer account, go to https://dev.windowsphone.com/en-us/join. The cost for a 1-year
subscription is $99 at the time of this writing. Along with being able to test your apps on a real device, this account will also allow you to publish apps to the Windows Phone Store, as well as allow you to provide trial versions and in-app purchases within your apps, if you so choose.
Once the install has completed, you are ready to proceed with unlocking your device for testing. The first thing you need to do is ensure your device is not at the lock screen. If it is, swipe from bottom up to unlock your device.
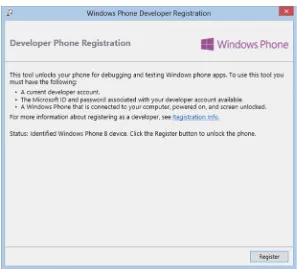
On your computer, hit the Windows key to switch to the All Apps view in Windows 8. Start typing the word “Developer” to filter your apps list view. You should see Windows Phone Developer Registration in the list. Click it to launch the Developer Phone Registration dialog as shown in Figure 1-8. Click the Register button within this dialog.
Figure 1-7. Dialog displayed when connecting your Windows Phone to a computer for the first time
14
At this point, you will be prompted to sign in using your Microsoft Live ID. This must be the same Microsoft Live ID under which you registered your developer account. Upon successful sign-in, you will notice the Status message changes in the Developer Phone Registration dialog to indicate that you have successfully unlocked your phone.
Now, you can go ahead and close the dialog, then load the Windows Phone project we created in Recipe 1-2 in the Visual Studio 2012 IDE. Be sure to keep your device connected to your computer. Once the project loads, expand the menu options for the Windows Phone Emulator, to change your debugging option from the Windows Phone Emulator to Device.
Hit the F5 key, or click the Start Debugging button to launch your app for testing. You will now see that the emulator does not launch at all. Instead, your app is deployed directly to your device. The difference you will notice when debugging an app on your device is that the performance counters that you are used to seeing along the right side of the emulator screen are also displayed on your device.
Hit Shift + F5, or click Debug ➤ Stop Debugging in the Visual Studio IDE. One thing you should be aware of is that even though you are no longer debugging your app, the app remains on your device. If you launch the app directly from your device, notice that the performance counters no longer display on the right side of your device’s screen, because you are not in Debug mode at this point.
To remove this test app from your device:
Swipe from right to left on your device to reveal your installed apps list •
Locate the test app in the list or use the Search textbox to filter the list •
Tap and hold your test app’s name in the list until a context menu appears •
Tap the “uninstall” option from the context menu list •
1-5. Upgrade a Windows Phone 7.x app to Windows Phone 8
Problem
You have already developed a Windows Phone 7.x app, and you want to upgrade it to Windows Phone 8.
Solution
Upgrade the application’s project within Visual Studio.
How It Works
Before we get into the details on upgrading your Windows Phone 7.x app, we need to take some steps to ensure that your live source code base is not lost. The first thing you will need to do is copy your Windows Phone 7.x app project to a new directory, separate from the original project.
Within Windows Explorer, my suggestion is to create a directory structure that separates your projects by version number. For example: D:\Projects\WindowsPhone\v8_0.
Copy your Windows Phone 7.x project directory structure and contents to the new directory that we created for Windows Phone OS 8.0 projects. Now let’s load the copy of your Windows Phone 7.x project in Visual Studio 2012. Once it has loaded into the Visual Studio IDE, right-click on the project name in the Solution Explorer pane, and click Properties from the popup menu.
Notice that for Windows Phone project, there is a special dropdown labeled, “Target Windows Phone OS Version”. Expand this dropdown list, and select the option “Windows Phone OS 8.0”. This action will cause the confirmation message to display, as shown in Figure 1-10.
Figure 1-9. Windows Phone Project Properties Page in Visual Studio 2012
Figure 1-10. Confirmation dialog when upgrading to project to Windows Phone OS 8.0
Click “Yes” in this dialog to continue, since we have already performed our due diligence by making a backup copy ahead of time.
You are probably thinking to yourself, “Now what?”
16
app is a true Windows Phone 8.0 application. You cannot revert back to the previous version. As well, take a look at your Manifest Editor. You will notice some major changes here.
As shown in Figure 1-11, Windows Phone 7.x projects only allow you to include a single tile image of a specific size. The tile image dimensions are required to be 173px X 173px. There is no support for varying tile sizes for your Windows Phone apps prior to Windows Phone 8.
Figure 1-11. Windows Phone 7.1 project—Manifest Editor
The next thing you will notice is that the Capabilities list for Windows Phone 8 is far more extensive, including capabilities for the new features available in the new SDK, such as speech recognition, near field communications, and wallet. We will be discussing Capabilities in Recipe 1-6. For comparison purposes, Figure 1-13 depicts a screen capture of the Windows Phone OS 7.1 Capabilities list.
18
1-6. Become Acquainted With the Capabilities and Requirements
in the Windows Phone Application Manifest
Problem
You want to understand the purpose of the Capabilities and Requirements lists when developing Windows Phone apps.
Solution
Checkmark the Capabilities and Requirements needed by your app within the Application Manifest.
How It Works
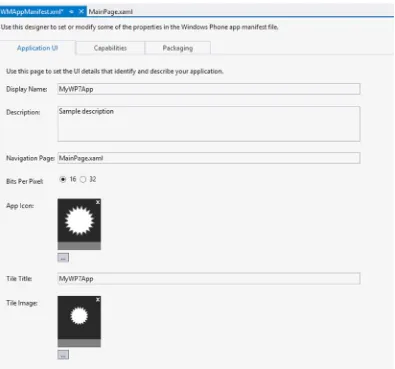
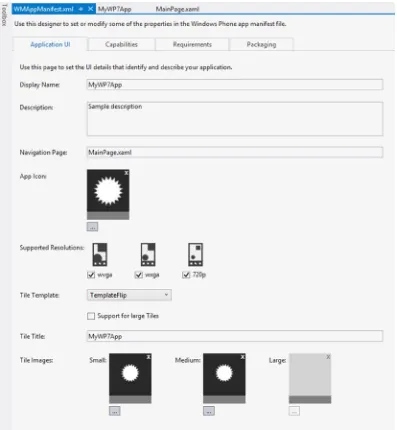
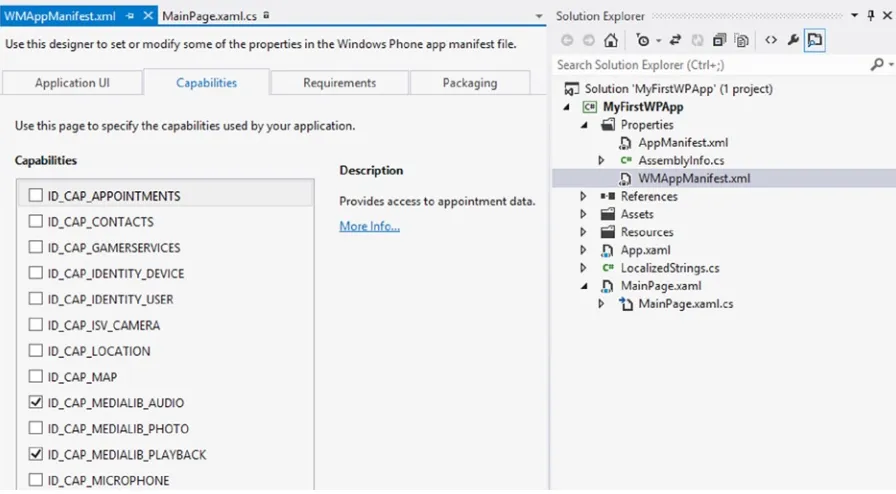
The Application Manifest file, WMAppManifest.xml, contains information that serves as the metadata for your Windows Phone application. It can be found within the Properties folder in your project, as shown in Figure 1-14.
Capabilities are used to inform the user which device features your application will be using when installed. For this reason, it is important to ensure you check the capabilities that your app leverages before submitting your app to the Windows Phone Store.
Both Windows Phone OS 7.0 and 7.1 provided tools that you could use to verify the capabilities your application utilized. In addition to that, when submitting a 7.x app to the Windows Phone Store, your app capabilities were analyzed and the app manifest file would be corrected and regenerated if there were entries missing.
Unfortunately, this is not the case with apps developed on Windows Phone OS 8.0. The SDK does not contain a tool to detect the capabilities your Windows Phone 8 app requires. When you submit your Windows Phone 8 app to the Store, it does not analyze or correct your app manifest file. In turn, if you submit your app to the Store without including the proper capabilities in your app, your app may not function properly on a device.
When you create a Windows Phone project in Visual Studio, you will notice that some capabilities are checked by default. To view the Application Manifest, expand the Properties folder within your project in the Solution Explorer, and then double-click on the WMAppManifest.xml file to load it in the main Visual Studio pane.
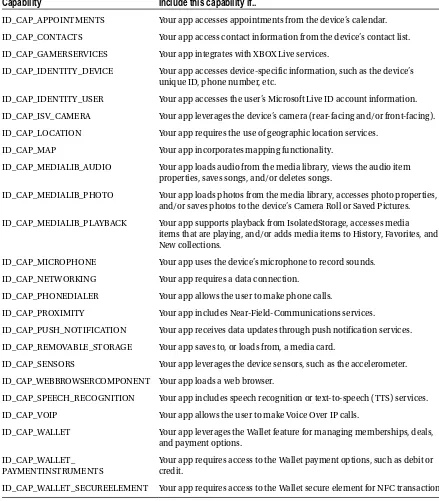
When the Application Manifest is loaded, you will see the following tabs: Application UI, Capabilities, Requirements and Packaging. Click on the Capabilities tab to view the list of available capabilities. Table 1-2 lists the set of capabilities for Windows Phone OS 8.0, with a brief description on when you should include each capability.
20
Table 1-2. Windows Phone Capabilities
Capability
Include this capability if..
ID_CAP_APPOINTMENTS Your app accesses appointments from the device’s calendar.
ID_CAP_CONTACTS Your app access contact information from the device’s contact list.
ID_CAP_GAMERSERVICES Your app integrates with XBOX Live services.
ID_CAP_IDENTITY_DEVICE Your app accesses device-specific information, such as the device’s unique ID, phone number, etc.
ID_CAP_IDENTITY_USER Your app accesses the user’s Microsoft Live ID account information.
ID_CAP_ISV_CAMERA Your app leverages the device’s camera (rear-facing and/or front-facing).
ID_CAP_LOCATION Your app requires the use of geographic location services.
ID_CAP_MAP Your app incorporates mapping functionality.
ID_CAP_MEDIALIB_AUDIO Your app loads audio from the media library, views the audio item properties, saves songs, and/or deletes songs.
ID_CAP_MEDIALIB_PHOTO Your app loads photos from the media library, accesses photo properties, and/or saves photos to the device’s Camera Roll or Saved Pictures.
ID_CAP_MEDIALIB_PLAYBACK Your app supports playback from IsolatedStorage, accesses media items that are playing, and/or adds media items to History, Favorites, and New collections.
ID_CAP_MICROPHONE Your app uses the device’s microphone to record sounds.
ID_CAP_NETWORKING Your app requires a data connection.
ID_CAP_PHONEDIALER Your app allows the user to make phone calls.
ID_CAP_PROXIMITY Your app includes Near-Field-Communications services.
ID_CAP_PUSH_NOTIFICATION Your app receives data updates through push notification services.
ID_CAP_REMOVABLE_STORAGE Your app saves to, or loads from, a media card.
ID_CAP_SENSORS Your app leverages the device sensors, such as the accelerometer.
ID_CAP_WEBBROWSERCOMPONENT Your app loads a web browser.
ID_CAP_SPEECH_RECOGNITION Your app includes speech recognition or text-to-speech (TTS) services.
ID_CAP_VOIP Your app allows the user to make Voice Over IP calls.
ID_CAP_WALLET Your app leverages the Wallet feature for managing memberships, deals, and payment options.
ID_CAP_WALLET_ PAYMENTINSTRUMENTS
Your app requires access to the Wallet payment options, such as debit or credit.
In many cases, it is obvious which capabilities you will need. For example, if you want to search the device’s calendar data for appointments, you would ensure that the capability, ID_CAP_APPOINTMENTS, is checked.
In other cases, it may not be obvious which capabilities are needed. One good example is the Microsoft Ad SDK, which requires multiple capabilities. This is something we will touch on in Chapter 10, when discussing how to implement advertisements into your app. For now, it’s enough to know that you will need to come here to enable capabilities within your application.
Similarly, you will notice the Requirements tab allows you to specify the device hardware leveraged within your app (Figure 1-15). In this way, devices that do not meet the requirements will not be able to install your app. For example, if your app depends on Near Field Communications to function, then including the requirement ID_REQ_NFC will prevent devices that do not have an NFC chip from installing your app, since the app will not work properly on those devices anyway. Table 1-3 lists the hardware requirements available for Windows Phone 8.0, with a brief description on when to include each requirement.
Figure 1-15. Hardware Requirements list in the Windows Phone App Manifest
Table 1-3. Windows Phone Hardware Requirements
Requirement
Include this requirement if..
ID_REQ_NFC Your app requires the use of the device’s NFC chip.
ID_REQ_FRONTCAMERA Your app requires the use of the device’s front-facing camera.
ID_REQ_REARCAMERA Your app requires the use of the device’s rear-facing camera.
ID_REQ_MAGNETOMETER Your app requires the use of the device’s compass.
23
Multi-Resolution Support and Basic
User Interface Components
Windows Phone 7.x only had support for WVGA resolution. Windows Phone 8 expands that to include WXGA and HD720p. It’s important to understand how to tailor your application to these different resolutions.
Therefore, the following recipes are included in this chapter:
2-1. Managing Resolution Dependent Assets •
2-2. Dynamic Layout •
2-3. Adding buttons and menus to the Application Bar •
2-4. Page Navigation •
2-5. The
• LongListSelector control
2-6. Enhancing the UI with the Silverlight Toolkit •
Table 2-1 lists the different resolutions and how they relate to each other.
The different number of pixels on the x- and y-axis of each resolution is to be expected, but you’ll notice that HD720p is unique in that it has a different aspect ratio. The HD720p resolution has its origin in high-definition television and is exactly twice the width and one and one half the height of 4:3 VGA. VGA’s aspect ratio and line count is virtually the same as DV-NTSC video. Figure 2-1 shows these resolutions relative to each other.
Table 2-1. Windows Phone 8 Supported Resolutions, Aspect Ratios, and Scaling Factors
Resolution
Pixels
Aspect Ratio
Scale Factor
Scaled Resolution
WVGA 480 x 800 15 : 9 1.0 480 x 800
WXGA 768 x 1280 15 : 9 1.6 480 x 800
In general you don't really need to be concerned with these ratios, as everything is worked out for you by the rendering subsystem. There are a few cases, however, where these factors come into play: providing dynamic user interface layout, managing resolution-dependent assets, and working with Direct3D using the Direct3DInterop and DrawingSurface classes.
FrameworkElement-derived classes report their ActualWidth and ActualHeight values in Device Independent Pixels. You’ll notice in Table 2-1 that the scale factor for WVGA is 1.0, which means there is a one-to-one ratio between device independent and native pixels. The D3DInterop properties NativeResolution and RenderResolution need to be set in native pixels and the scale factor helps you work this out.
Direct3D programming is beyond the scope of this book1 but we are still left with the problem of
resolution-dependent assets and dynamic layout. A recipe is included for each of these scenarios.
With proper scaling taken care of, we move on to the basic user interface components that are integral to Windows Phone application development. The chapter wraps up with an example using the LongListSelector control, which is new to Windows Phone 8, as well as a look at using the Silverlight Toolkit to enhance your mobile application’s user interface.
2-1. Managing Resolution Dependent Assets
Problem
Sometimes you have no choice but to use a bitmapped image. The problem with bitmaps is that there is always some amount of visual compromise when the image is scaled to a different size and changes to the aspect ratio almost never results in a satisfactory result.
Figure 2-1. From left to right: WVGA, WXGA, and HD720p
25
Solution
The visual assets you include in your application should, as much as possible, be vector-based. Vector-based graphics have the distinct advantage of being infinitely scalable. You can stretch them as much as you like and they will always look good and not display the pixilation that is common with bitmapped images.
For your application’s splash screen you can do one of two things:
1. Add a single 720 x 1280 image named SplashScreenImage.jpg to the root folder of your project and set its Build Action to Content or . . .
2. Add three images named SplashScreenImage.screen-WVGA.jpg, SplashScreenImage. screen-WXGA.jpg and SplashScreenImage.screen-720p.jpg each with its corresponding resolution to the root folder of your application. Again, set the Build Action of each file to
Content
Note
■
Sample splash screen images can be found in the Chapter02\BasicMultiResolution root folder and sample
resolution dependent images can be found in the Chapter02\BasicMultiResolution\Assets folder.
For all other assets you must include a separate image file for each of the supported resolutions and then, based on the resolution of the device, load the appropriate file.
How It Works
For the splash screen, it just works. The phone will automatically scale your image to the proper size if you chose to have a single image or it will automatically select the right image if you provided three correctly named images. Automatic selection of the right image only works for the splash screen. All other resolution-dependent assets require you to write code that selects the right asset.
The Application.Host.Content.ScaleFactor property will give us a value that we can use to determine which asset to load. The ScaleFactor property returns an integer value representing the amount by which the content area scales its contents. By referring to Table 2-1, you can determine the resolution of the device. Let’s create a helper class that we can use in our code.
Create a new Windows Phone App by following the directions in Chapter 1 and name your project
MultiResolution. First we’ll create an enumeration for the supported resolutions. Add a new class to the project and name it Resolution. Delete the default Class1 declaration and add in the following code:
public enum Resolution
Add a second class to the project and name it DeviceHelper. Again, delete the default Class1 declaration and add the following code:
public static class DeviceHelper {
static DeviceHelper()
The scaleFactor field will be initialized to the ScaleFactor of the current host’s Content the first time our DeviceHelper class is used. Next, the static constructor will run and allow us to examine the scaleFactor field’s value and set the resolution field’s value to the correct enumeration value. The only thing left is to provide a public static property to return the enumeration. Add the Resolution property to your class.
public static Resolution Resolution
Since we’ve only just met I won’t expect you to just take my word for it that this will work. Let’s modify the MainPage.xaml so we can see our helper in action. Open the MainPage.xaml file in the Visual Studio designer and look in the XAML. You should see a section marked with the following comment and an empty Grid:
<!--ContentPanel - place additional content here--> <Grid x:Name="ContentPanel" Grid.Row="1">
</Grid>
Remove the Margin attribute and add the following XAML inside the Grid:
<StackPanel> <TextBlock
27
<TextBlockStyle="{StaticResource PhoneTextNormalStyle}" x:Name="resolution"/>
<Image x:Name="resolutionImage"/> </StackPanel>
Open the MainPage.xaml.cs code-behind file and add the following line of code just after the call to InitializeComponent(). Add the MainPageLoaded method after the constructor.
public MainPage() {
InitializeComponent();
this.Loaded += MainPageLoaded;
// Sample code to localize the ApplicationBar //BuildLocalizedApplicationBar();
}
void MainPageLoaded(object sender, RoutedEventArgs e) {
resolution.Text = DeviceHelper.Resolution.ToString();
string uriString = string.Format("Assets/{0}-Asset.jpg", DeviceHelper.Resolution); resolutionImage.Source = new BitmapImage(new Uri(uriString, UriKind.Relative)); }
Select an emulator from the drop-down list and then run the application. You should see the splash screen for the resolution of the emulator you chose to run. When the main page of the application displays you should see not only the proper text but also the corresponding image. Figure 2-2 shows the screen when running in the WVGA emulator.
2-2. Dynamic Layout
Problem
There was only one supported resolution for phones running Windows Phone OS 7.1: WVGA. You always knew the exact dimensions of the screen on which your application would be displayed. Windows Phone 8 introduces two additional resolutions, and one of them (HD720p) has a 16:9 aspect ratio whereas the others are 15:9. Your application needs to be able to adapt its layout accordingly.
Solution
The WPF and Silverlight developers in the audience will have no doubt already guessed the answer: Don’t hard-code the width, height or position of the controls in your application. Use controls such as the Grid and StackPanel and let the layout subsystem do the work for you.
How It Works
Some controls will grow to fill the space allotted to them by their parents while others will expand to accommodate their children. Two of the most commonly used layout controls are the StackPanel and the Grid. A key difference between the two is the way that controls inside them behave.
For example, a Button or TextBlock in a StackPanel with the Orientation set to the default of Vertical will expand to fill the width of the StackPanel but not the height since the height is really the sum of the height of all the child controls inside it. Changing the Orientation to Horizontal causes the children to expand to fill the height of the stack panel but not the width since the width is really the combined width of the children.
A Button or TextBlock in a cell of a Grid control will expand to fill all of the available space. You can achieve a fairly fine degree of control over the layout of your application by using a Grid with properly set row and column definitions and still have it be flexible. There are three common methods of setting the Height of a row and the Width of a column. You can have them automatically adjust to the size of their content, divide themselves evenly across the available space, or divide proportionately according to a ratio you define (called “star” sizing). We’ll use row definitions in our example but the rules apply equally to column definitions.
Note
■
You can also set a hard-coded Width or Height value but then you lose the flexible layout that we are trying to
achieve. For the best results, avoid hard-coded layout property values.
The default behavior of rows and columns in a Grid is to divide themselves evenly across the available space. You don’t need to set a value at all if this is the desired result. For example:
29
More often than not, you probably want the space divided up in a more specific manner. You would want a heading row to only take up enough room to display its contents. The “Auto” setting will allow you to achieve this. The following will give you a first row sized to its content and the other two rows dividing the remaining height between them.
Now that you have the heading row taking up only the space that it needs, you may want to divide up the space for the remaining two rows by a proportion other than 50-50. When you set the Height or Width to “*” this is actually the same as setting it to “1*.” If you total up the numbers for each row you can then take an individual row’s value and calculate the ratio. In our simple example, 1 + 1 = 2 so each row gets 1 / 2 = 0.5 or 50%. Let’s look at another example
How much space does each row get in this example? Again, we simply add up all of the ratios and use that total as the denominator when dividing for each row.
Total = 9 + 6 + 3 = 18 Row 1 = 3/18 = 1/6 Row 2 = 6/18 = 1/3 Row 3 = 9/18 = 1/2
Some people go wrong when using star sizing because they don’t understand how the calculations are being carried out. Usually these are the same people that are hard-coding the parent control’s size as well so it looks good right up to the point when it doesn’t. If the sum of your star ratios is the same as, or a multiple of, the fixed size then it’s going to look alright. Things are going to go weird if not and it will be hard to figure out what’s going on.
Let’s apply what we’ve learned to our sample application. We’ll move the image to the bottom of the screen and add a column so that we can put the screen resolution label and the reported value side by side. We’ll configure the rows so that the middle row fills any space not used by the heading and the image.
Start by changing the StackPanel to a Grid. Next add in the column and row definition elements. We’ll want two columns and three rows. Set the height of the first and last row to “Auto.” Don’t set a height for the middle row. You also don’t need to set a width for the columns because the default split of 50-50 is fine for our purposes. Set the Grid.Row and Grid.Column attached properties to position the label TextBlock in row zero, column zero, the resolution TextBlock in row zero, column one, and the Image in row two, column zero. You’ll also need to set the Grid.ColumnSpan attached property on the Image control because we want it to take up the full width of the screen. Your XAML should now look like this:
<Grid x:Name="ContentPanel" Grid.Row="1">
<RowDefinition Height="Auto"/> <RowDefinition/>
<RowDefinition Height="Auto"/> </Grid.RowDefinitions>
<TextBlock Grid.Row="0" Grid.Column="0"
Style="{StaticResource PhoneTextNormalStyle}" Text="Device Resolution: "/>
<TextBlock Grid.Row="0" Grid.Column="1"
Style="{StaticResource PhoneTextNormalStyle}" x:Name="resolution"/>
31
Run your application and make sure you see the desired results. Try it in the different emulators to see how the layout is the same at all resolutions and aspect ratios. Finally, let’s fill up the middle row with something useful. Add the following XAML between the second TextBlock and the Image:<Grid Grid.ColumnSpan="2" Grid.Row="1"> <Grid.RowDefinitions>
<RowDefinition Height="*" /> <RowDefinition Height="*" /> <RowDefinition Height="*" /> <RowDefinition Height="*" /> </Grid.RowDefinitions>
<Grid.ColumnDefinitions>
<ColumnDefinition Width="*" /> <ColumnDefinition Width="*" /> <ColumnDefinition Width="*" /> </Grid.ColumnDefinitions>
<Button Grid.Row="0" Margin="0" Grid.Column="0" Content="1" /> <Button Grid.Row="0" Grid.Column="1" Content="2" />
<Button Grid.Row="0" Grid.Column="2" Content="3" /> <Button Grid.Row="1" Grid.Column="0" Content="4" /> <Button Grid.Row="1" Grid.Column="1" Content="5" /> <Button Grid.Row="1" Grid.Column="2" Content="6" /> <Button Grid.Row="2" Grid.Column="0" Content="7" /> <Button Grid.Row="2" Grid.Column="1" Content="8" /> <Button Grid.Row="2" Grid.Column="2" Content="9" /> <Button Grid.Row="3" Grid.Column="0" Content="#" /> <Button Grid.Row="3" Grid.Column="1" Content="0" /> <Button Grid.Row="3" Grid.Column="2" Content="*" /> </Grid>
2-3. Working with the Application Bar
Problem
The ApplicationBar, ApplicationBarIconButton, and ApplicationBarMenuItem classes do not derive from DependencyObject and therefore do not support data binding. The lack of data binding means we can’t just wire up our buttons and menu items to a view model and be done.
Solution
We can achieve a happy medium that still gives us a loosely coupled user interface by using a combination of code-behind, custom dependency properties, and delegation.
“The MVVM police will not take your family away if you use code behind.”
— Glen Block
How It Works
33
interface exposed via the ViewModel. This allows you to encapsulate any code that would normally be handled in code-behind to be contained in the ViewModel.There is a problem when it comes to the ApplicationBar and its menu items and buttons. They are not derived from FrameworkElement and don’t implement a Command ability. This recipe is an exploration of some techniques for working around this limitation. There’s a lot of ground to cover here, so let’s get started.
The Basics
The ApplicationBar, ApplicationBarIconButton, and ApplicationBarMenuItem classes are actually system components with which our application is interoperating. ApplicationBarIconButton and ApplicationBarMenuItem also don’t support the ICommand. Normally you would just use an attached behavior on the Click event to execute a command but since the button and menu item doesn’t inherit from FrameworkElement behaviors aren’t going to work either.
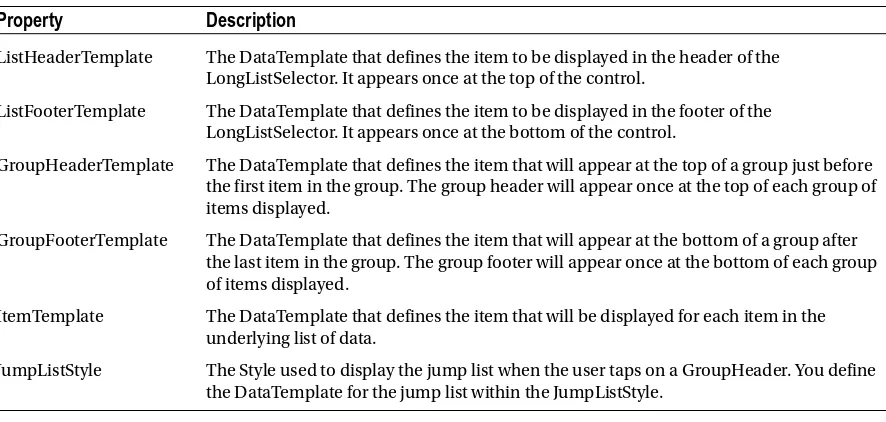
The ApplicationBar is exposed as a property of the PhoneApplicationPage and the creation and population of it is easily accomplished in either XAML or code. The ApplicationBar exposes several properties that we may want to configure at runtime. Table 2-2 lists the properties of the ApplicationBar.
Table 2-2. Properties of the ApplicationBar
Property
Description
Mode The Mode property controls the initial appearance of the ApplicationBar as well as the mode to which it returns after the user expands it using the ellipsis. Use the mini setting to maximize available screen space for your page.
In landscape orientation, the ApplicationBar's setting will be ignored and it will remain in default mode to improve usability. Switching from portrait to landscape will also cause the ApplicationBar to display in default mode.
Opacity This value can range from 0.0 (complete transparency) to 1.0 (fully opaque). You can set this property to any valid System.Double value. For best results it is highly recommended to limit the choice to three values: 0.0, 0.5, and 1.0.
• 0.0 - The host page is not resized, the ApplicationBar is completely transparent and is laid over the page contents
• 0.5 - The host page is not resized and the ApplicationBar is partially transparent and is laid over the page contents
• 1.0 - The host page is resized to accommodate the ApplicationBar, which is completely opaque. This value must be greater than or equal to one for the transition to be triggered
BackgroundColor This is the color of the background of the ApplicationBar and can be any valid System.Windows.Media.Color value. This will also be the background color of the buttons if you are using transparent images.
ForegroundColor This is the color of the foreground of the ApplicationBar and can be any valid System. Windows.Media.Color value. This color will be used for the menu item text as well as the button labels. It will also be the color of the buttons if you are using transparent images.
It is strongly recommended that you use the default theme colors for your ApplicationBar and its menu items and buttons. Custom colors can have an effect on the display quality of the icon buttons and lead to strange visual artifacts in menu animations.
IsMenuEnabled A System.Boolean that controls the visibility of the menu items when the user expands the ApplicationBar.
Create a new Windows Phone 8 application and call it ApplicationBarButtonMenu. Open the MainPage.xaml.cs file and add the code from Listing 2-1.
Listing 2-1. Defining an ApplicationBar in Code
// add this line right after the call to InitializeComponet() // in the MainPage constructor
BuildApplicationBar();
private void BuildApplicationBar() {
ApplicationBar = new ApplicationBar();
ApplicationBarIconButton appBarButton =
new ApplicationBarIconButton(new Uri("/Assets/like.png", UriKind.Relative));
appBarButton.Text = "like";
ApplicationBar.Buttons.Add(appBarButton);
appBarButton = new ApplicationBarIconButton(new Uri("/Assets/save.png", UriKind.Relative)); appBarButton.Text = "save";
ApplicationBar.Buttons.Add(appBarButton);
// Create a new menu item with the localized string from AppResources.
ApplicationBarMenuItem appBarMenuItem = new ApplicationBarMenuItem("advanced options"); ApplicationBar.MenuItems.Add(appBarMenuItem);
}
void AdvancedOptionsClick(object sender, EventArgs e) {
MessageBox.Show("Advanced Options Clicked"); }
Comment out the call to BuildApplicationBar() in the MainPage constructor. Open MainPage.xaml in the editor and then add the XAML in Listing 2-2 to the area just above the layout grid.
Listing 2-2. Defining an ApplicationBar in XAML
<phone:PhoneApplicationPage.ApplicationBar>
<shell:ApplicationBar IsVisible="True" IsMenuEnabled="True"> <shell:ApplicationBar.MenuItems>
<shell:ApplicationBarMenuItem Click="AdvancedOptionsClick" Text="advanced options"/> </shell:ApplicationBar.MenuItems>
<shell:ApplicationBarIconButton IconUri="/Assets/like.png " Text="like"/> <shell:ApplicationBarIconButton IconUri="/Assets/save.png" Text="save"/> </shell:ApplicationBar>
</phone:PhoneApplicationPage.ApplicationBar>
<!--LayoutRoot is the root grid where all page content is placed--> <Grid x:Name="LayoutRoot" Background="Transparent">
35
Note
■
Images for the ApplicationBarIconButton can be found in the SDK in C:\Program Files (x86)\Microsoft SDKs\
Windows Phone\v8.0\Icons\Dark. You only need to include the Dark versions and Windows Phone will switch them to
work with the Light Theme as well.
View Model and Data-Binding Support
Ideally that logic that manages these property values would be encapsulated in a view model. Fortunately, the PhoneApplicationPage ultimately inherits from DependencyObject, which means we can create our own dependency properties. We can then bind these properties to properties of our view model, and in the PropertyChanged event we can update the corresponding property of our ApplicationBar.
We’ll work through adding functionality to enable us to control the IsMenuEnabled property from the view model. You can then copy the pattern to extend it to the other properties. You could also extend this technique to control properties of the buttons and menu items. I will leave it as an exercise for the reader.2
Figure 2-4. The results are the same whether defining the ApplicationBar in XAML or code
The first thing we need to do is create a view model for our page. Add a new folder to your project and name it ViewModels.
Add a new class to the ViewModels folder and name the class MainPageViewModel. Your view model class will need to implement support for property change notification. This is probably best defined in a base class that can be reused for all ViewModels. Add an IsApplicationBarVisible property to the view model. See Listing 2-3.
Listing 2-3. The MainPageViewModel Class
internal class MainPageViewModel : ViewModel {
// we'll use this to flip the visibility // one per second for demo purposes private DispatcherTimer timer;
public MainPageViewModel() {
timer = new DispatcherTimer();
timer.Interval = new TimeSpan(0, 0, 1); // one second timer.Tick += (s, e) =>
{
IsApplicationBarVisible = !IsApplicationBarVisible; };
timer.Start(); }
// default to visible...
private bool isApplicationBarVisible = true; public bool IsApplicationBarVisible
{
Open up the MainPage.xaml.cs file and add the code is Listing 2-4 to setup a Model property that will delegate to the DataContext of the page. This allows us to access the view model in a strongly typed manner without having to cast it every time we need it.
Listing 2-4. Adding a Model Property to Our Page
// add this line in the constructor after the call // to InitializeComponent()
37
private MainPageViewModel Model{ get {
return (MainPageViewModel)DataContext; }
Now that we have a view model with a property of interest to our page, we need to implement a way to have the view respond to changes in that property without the view model “knowing” anything about the view. This is where dependency properties come in.
Add a DependencyProperty of type System.Boolean to the MainPage. Open the MainPage.xaml.cs file and add the code from Listing 2-5 to the code-behind.
Listing 2-5. Declaring a DependencyProperty
public static readonly DependencyProperty IsApplicationBarMenuEnabledProperty = DependencyProperty.Register("IsApplicationBarMenuEnabled",
typeof(bool), typeof(MainPage),
new PropertyMetadata(true, OnIsApplicationBarEnabledChanged));
private static void OnIsApplicationBarEnabledChanged(DependencyObject d, DependencyPropertyChangedEventArgs e)
{
((MainPage)(d)).OnIsApplicationBarEnabledChanged((bool)e.OldValue, (bool)e.NewValue); }
private void OnIsApplicationBarEnabledChanged(bool oldValue, bool newValue) {
ApplicationBar.IsMenuEnabled = newValue; }
public bool IsApplicationBarMenuEnabled {
// IMPORTANT: To maintain parity between setting a property in XAML
// and procedural code, do not touch the getter and setter inside this dependency property! get
{
return (bool)GetValue(IsApplicationBarMenuEnabledProperty); }
set {
SetValue(IsApplicationBarMenuEnabledProperty, value); }