AngularJS
by Brad Green and Shyam Seshadri
Copyright © 2013 Brad Green and Shyam Seshadri. All rights reserved.
Printed in the United States of America.
Published by O’Reilly Media, Inc., 1005 Gravenstein Highway North, Sebastopol, CA 95472.
O’Reilly books may be purchased for educational, business, or sales promotional use. Online editions are also available for most titles (http://my.safaribooksonline.com). For more information, contact our corporate/ institutional sales department: 800-998-9938 or [email protected].
Editors: Simon St. Laurent and Meghan Blanchette Production Editor: Melanie Yarbrough
Copyeditor: Rachel Leach Proofreader: Jilly Gagnon
Indexer: Judith McConville Cover Designer: Randy Comer Interior Designer: David Futato Illustrator: Rebecca Demarest April 2013: First Edition
Revision History for the First Edition: 2013-04-05: First release
See http://oreilly.com/catalog/errata.csp?isbn=9781449344856 for release details.
Nutshell Handbook, the Nutshell Handbook logo, and the O’Reilly logo are registered trademarks of O’Reilly Media, Inc. AngularJS, the image of a thornback cowfish, and related trade dress are trademarks of O’Reilly Media, Inc.
Many of the designations used by manufacturers and sellers to distinguish their products are claimed as trademarks. Where those designations appear in this book, and O’Reilly Media, Inc., was aware of a trade‐ mark claim, the designations have been printed in caps or initial caps.
While every precaution has been taken in the preparation of this book, the publisher and authors assume no responsibility for errors or omissions, or for damages resulting from the use of the information contained herein.
ISBN: 978-1-449-34485-6
Table of Contents
Preface. . . vii
1. Introduction to AngularJS. . . 1
Concepts 1
Client-Side Templates 2
Model View Controller (MVC) 3
Data Binding 3
Dependency Injection 5
Directives 5
An Example: Shopping Cart 6
Up Next 9
2. Anatomy of an AngularJS Application. . . 11
Invoking Angular 11
Loading the Script 11
Declaring Angular’s Boundaries with ng-app 12
Model View Controller 12
Templates and Data Binding 14
Displaying Text 15
Form Inputs 16
A Few Words on Unobtrusive JavaScript 19
Lists, Tables, and Other Repeated Elements 21
Hiding and Showing 23
CSS Classes and Styles 24
Considerations for src and href Attributes 26
Expressions 26
Separating UI Responsibilities with Controllers 27
Publishing Model Data with Scopes 28
Observing Model Changes with $watch 29
Performance Considerations in watch() 31
Organizing Dependencies with Modules 33
How Many Modules Do I Need? 36
Formatting Data with Filters 37
Changing Views with Routes and $location 38
index.html 39
list.html 39
detail.html 40
controllers.js 40
Talking to Servers 41
Changing the DOM with Directives 43
index.html 44
controllers.js 44
Validating User Input 45
Moving On 46
3. Developing in AngularJS. . . 47
Project Organization 47
Tools 50
IDEs 50
Running Your Application 51
With Yeoman 51
Without Yeoman 51
Testing with AngularJS 52
Karma 52
Unit Tests 54
End-to-End/Integration Tests 55
Compilation 57
Other Awesome Tools 59
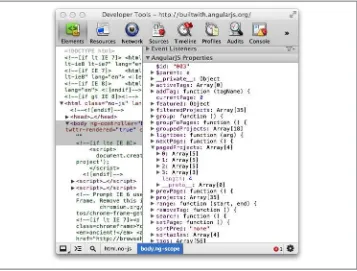
Debugging 59
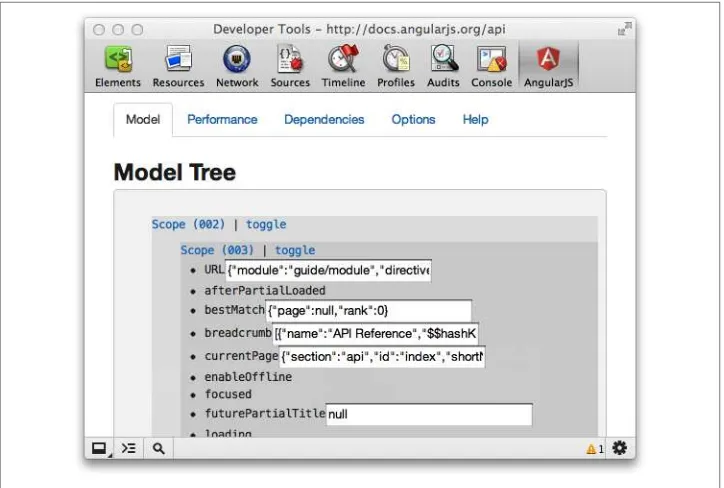
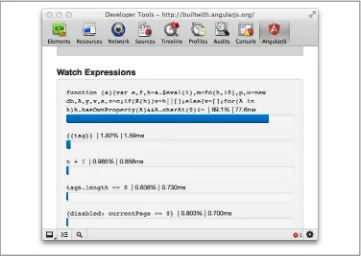
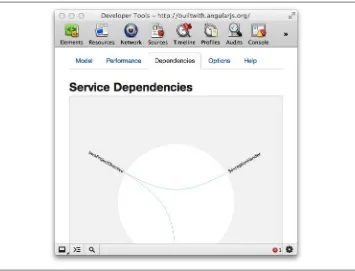
Batarang 60
Yeoman: Optimizing Your Workflow 64
Installing Yeoman 65
Starting a Fresh AngularJS project 65
Running Your Server 65
Adding New Routes, Views, and Controllers 65
The Testing Story 66
Building Your Project 66
Integrating AngularJS with RequireJS 67
4. Analyzing an AngularJS App. . . 77
Relationship Between Model, Controller, and Template 78
The Model 79
Controllers, Directives, and Services, Oh My! 80
Services 80
Directives 84
Controllers 85
The Templates 89
The Tests 95
Unit Tests 96
Scenario Tests 99
5. Communicating with Servers. . . 101
Communicating Over $http 101
Configuring Your Request Further 103
Setting HTTP Headers 104
Caching Responses 105
Transformations on Requests and Responses 106
Unit Testing 107
Working with RESTful Resources 108
The Declaration 111
Custom Methods 111
No Callbacks! (Unless You Really Want Them) 112
Simplified Server-Side Operations 112
Unit Test the ngResource 112
The $q and the Promise 113
Response Interception 115
Security Considerations 115
JSON Vulnerability 116
XSRF 116
6. Directives. . . 119
Directives and HTML Validation 119
API Overview 120
Naming Your Directive 121
The Directive Definition Object 122
Transclusion 126
Compile and Link Functions 126
Scopes 128
Manipulating DOM Elements 132
Controllers 133
Moving On 136
7. Other Concerns. . . 137
$location 137
HTML5 Mode and Hashbang Mode 140
AngularJS Module Methods 142
Where’s the Main Method? 142
Loading and Dependencies 143
Convenience Methods 144
Communicating Between Scopes with $on, $emit, and $broadcast 146
Cookies 148
Internationalization and Localization 148
What Can I Do in AngularJS? 149
How Do I Get It All Working? 149
Common Gotchas 150
Sanitizing HTML & the Sanitize Module 150
Linky 152
8. Cheatsheet and Recipes. . . 153
Wrapping a jQuery Datepicker 153
ng-model 155
Binding select 155
Calling select 155
The Rest of the Example 156
The Teams List App: Filtering and Controller Communication 157
The Search Box 161
The Combo Boxes 161
The Check Box 161
The Repeater 161
File Upload in AngularJS 162
Using Socket.IO 164
A Simple Pagination Service 167
Working with Servers and Login 171
Conclusion 174
Preface
I can trace Angular’s beginnings to 2009, on a project called Google Feedback. We’d gone through months of frustration with our development speed and ability to write testable code. At around the six month mark, we had around 17,000 lines of front-end code. At that point, one of the team members, Misko Hevery, made a bold statement that he’d be able to rewrite the whole thing in two weeks using an open source library that he’d created as a hobby.
I figured that a two week delay couldn’t hurt us that much and we’d at least be entertained by Misko scrambling to build something. Misko missed his time estimate. It took three weeks. We were all astounded, but even more astounding was that the line count for this new app had dropped from 17,000 to a mere 1,500. It seemed that Misko was onto something worth pursuing.
Misko and I decided we’d built a team around the concepts he started with a simple charter: to simplify the web developer’s experience. Shyam Seshadri, this book’s co-author, went on to lead the Google Feedback team in developing Angular’s first shipping application.
Since then, we’ve developed Angular with guidance both from teams at Google and from hundreds of open source contributors around the world. Thousands of developers rely on Angular in their daily work and contribute to an amazing support network.
We’re excited to learn what you’ll teach us.
Conventions Used in This Book
The following typographical conventions are used in this book: Italic
Indicates new terms, URLs, email addresses, filenames, and file extensions.
Constant width
Used for program listings, as well as within paragraphs to refer to program elements such as variable or function names, databases, data types, environment variables, statements, and keywords.
Constant width bold
Shows commands or other text that should be typed literally by the user.
Constant width italic
Shows text that should be replaced with user-supplied values or by values deter‐ mined by context.
This icon signifies a tip, suggestion, or general note.
This icon indicates a warning or caution.
Using Code Examples
This book is here to help you get your job done. In general, if this book includes code examples, you may use the code in this book in your programs and documentation. You do not need to contact us for permission unless you’re reproducing a significant portion of the code. For example, writing a program that uses several chunks of code from this book does not require permission. Selling or distributing a CD-ROM of examples from O’Reilly books does require permission. Answering a question by citing this book and quoting example code does not require permission. Incorporating a significant amount of example code from this book into your product’s documentation does require per‐ mission.
We appreciate, but do not require, attribution. An attribution usually includes the title, author, publisher, and ISBN. For example: “AngularJS by Brad Green and Shyam Se‐ shadri (O’Reilly). Copyright 2013 Brad Green and Shyam Seshadri, 978-1-449-34485-6.”
Safari® Books Online
Safari Books Online is an on-demand digital library that delivers ex‐ pert content in both book and video form from the world’s leading authors in technology and business.
Technology professionals, software developers, web designers, and business and crea‐ tive professionals use Safari Books Online as their primary resource for research, prob‐ lem solving, learning, and certification training.
Safari Books Online offers a range of product mixes and pricing programs for organi‐ zations, government agencies, and individuals. Subscribers have access to thousands of books, training videos, and prepublication manuscripts in one fully searchable database from publishers like O’Reilly Media, Prentice Hall Professional, Addison-Wesley Pro‐ fessional, Microsoft Press, Sams, Que, Peachpit Press, Focal Press, Cisco Press, John Wiley & Sons, Syngress, Morgan Kaufmann, IBM Redbooks, Packt, Adobe Press, FT Press, Apress, Manning, New Riders, McGraw-Hill, Jones & Bartlett, Course Technol‐ ogy, and dozens more. For more information about Safari Books Online, please visit us
online.
How to Contact Us
Please address comments and questions concerning this book to the publisher:
O’Reilly Media, Inc.
1005 Gravenstein Highway North Sebastopol, CA 95472
800-998-9938 (in the United States or Canada) 707-829-0515 (international or local)
707-829-0104 (fax)
We have a web page for this book, where we list errata, examples, and any additional information. You can access this page at http://oreil.ly/angularJS.
To comment or ask technical questions about this book, send email to bookques [email protected].
For more information about our books, courses, conferences, and news, see our website at http://www.oreilly.com.
Find us on Facebook: http://facebook.com/oreilly
Follow us on Twitter: http://twitter.com/oreillymedia
Watch us on YouTube: http://www.youtube.com/oreillymedia
Acknowledgments
CHAPTER 1
Introduction to AngularJS
Our ability to create amazing web-based apps is incredible, but the complexity involved in making these apps is similarly incredible. We on the Angular team wanted to relieve the pain involved with developing AJAX applications. At Google, we’d worked through the hard lessons of building large web applications like Gmail, Maps, Calendar, and several others. We thought we might be able to use these experiences to benefit everyone.
We wanted writing web apps to feel more like the first time we wrote a few lines of code and stood back in amazement at what we’d made happen. We wanted the coding process to feel more like creating and less like trying to satisfy the strange inner workings of web browsers.
At the same time, we wanted an environment that helped us make the design choices that make apps easy to create and understand from the start, but that continue to be the right choices to make our apps easy to test, extend, and maintain as they grow large.
We’ve tried to do this in the Angular framework. We’re very excited about the results we’ve achieved. A lot of credit goes to the open source community around Angular who do a fantastic job supporting each other and who have taught us many things. We hope you’ll join our community and help us learn how Angular can be even better.
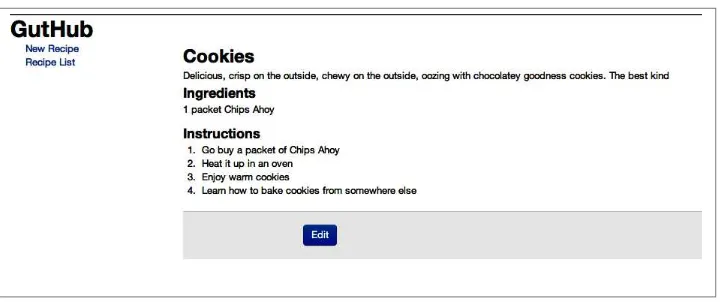
Some of the larger and more involved examples and code snippets are available on a GitHub repository for you to look at, fork, and play with at our GitHub page.
Concepts
There are a few core ideas that you’ll use throughout an Angular app. As it turns out, we didn’t invent any of these. Instead, we’ve borrowed heavily from successful idioms in other development environments and implemented them in a way that embraces HTML, browsers, and many other familiar web standards.
Client-Side Templates
Multi-page web applications create their HTML by assembling and joining it with data on the server, and then shipping the finished pages up to the browser. Most single-page applications—also known as AJAX apps—do this as well, to some extent. Angular is different in that the template and data get shipped to the browser to be assembled there. The role of the server then becomes only to serve as static resources for the templates and to properly serve the data required by those templates.
Let’s see an example of what assembling this data and template on the browser looks like in Angular. We’ll take the obligatory Hello, World example, but instead of writing “Hello, World” as a single string, let’s structure the greeting “Hello” as data that we could change later.
For it, we’ll create our template in hello.html:
<html ng-app> <head>
<script src="angular.js"></script>
<script src="controllers.js"></script> </head>
<body>
<div ng-controller='HelloController'>
<p>{{greeting.text}}, World</p>
</div> </body> </html>
And our logic in controllers.js:
function HelloController($scope) {
$scope.greeting = { text: 'Hello' }; }
Loading hello.html into any browser will then produce what we see in Figure 1-1:
Figure 1-1. Hello, World
There are a few interesting things to note here in comparison with most methods in widespread use today:
• There are no classes or IDs in the HTML to identify where to attach event listeners. • When HelloController set the greeting.text to Hello, we didn’t have to register
• HelloController is a plain JavaScript class, and doesn’t inherit from anything that Angular provides.
• HelloController got the $scope object that it needed without having to create it. • We didn’t have to call the HelloController’s constructor ourselves, or figure out
when to call it.
We’ll look at more differences soon, but it should be clear already that Angular appli‐ cations are structured very differently than similar applications were in the past.
Why have we made these design choices and how does Angular work? Let’s look at some good ideas Angular stole from elsewhere.
Model View Controller (MVC)
MVC application structure was introduced in the 1970s as part of Smalltalk. From its start in Smalltalk, MVC became popular in nearly every desktop development envi‐ ronment where user interfaces were involved. Whether you were using C++, Java, or Objective-C, there was some flavor of MVC available. Until recently, however, MVC was all but foreign to web development.
The core idea behind MVC is that you have clear separation in your code between managing its data (model), the application logic (controller), and presenting the data to the user (view).
The view gets data from the model to display to the user. When a user interacts with the application by clicking or typing, the controller responds by changing data in the model. Finally, the model notifies the view that a change has occurred so that it can update what it displays.
In Angular applications, the view is the Document Object Model (DOM), the controllers are JavaScript classes, and the model data is stored in object properties.
We think MVC is neat for several reasons. First, it gives you a mental model for where to put what, so you don’t have to invent it every time. Other folks collaborating on your project will have an instant leg up on understanding what you’ve written, as they’ll know you’re using MVC structure to organize your code. Perhaps most importantly, we’ll claim that it delivers great benefits in making your app easier to extend, maintain, and test.
Data Binding
Before AJAX single-page apps were common, platforms like Rails, PHP, or JSP helped us create the user interface (UI) by merging strings of HTML with data before sending it to the users to display it.
Libraries like jQuery extended this model to the client and let us follow a similar style, but with the ability to update, part of the DOM separately, rather than updating the whole page. Here, we merge template HTML strings with data, then insert the result where we want it in the DOM by setting innerHtml on a placeholder element.
This all works pretty well, but when you want to insert fresher data into the UI, or change the data based on user input, you need to do quite a bit of non-trivial work to make sure you get the data into the correct state, both in the UI and in JavaScript properties.
But what if we could have all this work done for us without writing code? What if we could just declare which parts of the UI map to which JavaScript properties and have them sync automatically? This style of programming is called data binding. We included it in Angular because it works great with MVC to eliminate code when writing your view and model. Most of the work in moving data from one to the other just happens automatically.
To see this in action, let’s take the first example and make it dynamic. As is, the Hello Controller sets the model greeting.text once and it never changes from then on. To make it live, let’s change the example by adding a text input that can change the value of greeting.text as the user types.
Here’s the new template:
<html ng-app> <head>
<script src="angular.js"></script>
<script src="controllers.js"></script> </head>
<body>
<div ng-controller='HelloController'>
<input ng-model='greeting.text'>
<p>{{greeting.text}}, World</p>
</div> </body> </html>
The controller, HelloController, can stay exactly the same.
Loading it in a browser, we’d see the screen captured in Figure 1-2.
Figure 1-2. The default state of the greeting app
Figure 1-3. The Greeting App with input changed
Without ever registering a change listener on the input field, we have a UI that will dynamically update. The same would be true for changes coming to and from the server. In our controller, we could make a request to our server, get the response, and set $scope.greeting.text to equal what it returns. Angular would automatically update both the input and the text in the curly braces to that value.
Dependency Injection
We mentioned it before, but it bears repeating that there’s a lot going on with Hello Controller that we didn’t have to write. For example, the $scope object that does our data binding is passed to us automatically; we didn’t have to create it by calling any function. We just asked for it by putting it in HelloController’s constructor.
As we’ll find out in later chapters, $scope isn’t the only thing we can ask for. If we want to data bind to the location URL in the user’s browser, we can ask for an object that manages this by putting $location in our constructor, like so:
function HelloController($scope, $location) {
$scope.greeting = { text: 'Hello' };
// use $location for something good here... }
We get this magical effect through Angular’s dependency injection system. Dependency injection lets us follow a development style in which, instead of creating dependencies, our classes just ask for what they need.
This follows a design pattern called the Law of Demeter, also known as the principle of least knowledge. Since our HelloController’s job is to set up the initial state for the greeting model, this pattern would say that it shouldn’t worry about anything else, like how $scope gets created, or where to find it.
This feature isn’t just for objects created by the Angular framework. You can write the rest of this code as well.
Directives
One of the best parts of Angular is that you can write your templates as HTML. You can do this because at the core of the framework we’ve included a powerful DOM trans‐ formation engine that lets you extend HTML’s syntax.
We’ve already seen several new attributes in our templates that aren’t part of the HTML specification. Examples include the double-curly notation for data binding, ng-controller for specifying which controller oversees which part of the view, and ng-model, which binds an input to part of the model. We call these HTML extension directives.
Angular comes with many directives that help you define the view for your app. We’ll see more of them soon. These directives can define what we commonly view as the template. They can declaratively set up how your application works or be used to create reusable components.
And you’re not limited to the directives that Angular comes with. You can write your own to extend HTML’s template abilities to do anything you can dream of.
An Example: Shopping Cart
Let’s look at a slightly larger example that shows off a bit more of Angular. Let’s imagine that we’re going to build a shopping app. Somewhere in the app we’ll need to show the user’s shopping cart and let him edit it. Let’s skip straight to that part.
<html ng-app='myApp'> <head>
<title>Your Shopping Cart</title> </head>
<body ng-controller='CartController'>
<h1>Your Order</h1>
<div ng-repeat='item in items'>
<span>{{item.title}}</span>
<input ng-model='item.quantity'>
<span>{{item.price | currency}}</span>
<span>{{item.price * item.quantity | currency}}</span>
<button ng-click="remove($index)">Remove</button>
</div>
<script src="angular.js"></script>
<script>
function CartController($scope) {
$scope.items = [
{title: 'Paint pots', quantity: 8, price: 3.95},
{title: 'Polka dots', quantity: 17, price: 12.95},
{title: 'Pebbles', quantity: 5, price: 6.95}
];
$scope.remove = function(index) {
$scope.items.splice(index, 1);
}
}
</script>
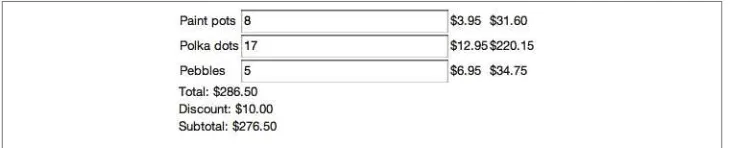
The resulting UI looks like the screenshot in Figure 1-4.
Figure 1-4. The Shopping Cart UI
The following is a brief tour of what’s going on here. The rest of the book is dedicated to a more in-depth explanation.
Let’s start at the top:
<html ng-app>
The ng-app attribute tells Angular which parts of the page it should manage. Since we’ve placed it on the <html> element, we’re telling Angular that we want it to manage the whole page. This will often be what you want, but you might want to place it on a <div> within the app if you’re integrating Angular with an existing app that uses other methods to manage the page.
<body ng-controller='CartController'>
In Angular, you manage areas of the page with JavaScript classes called controllers. By including a controller in the body tag, I’m declaring that CartController will manage everything between <body> and </body>.
<div ng-repeat='item in items'>
The ng-repeat says to copy the DOM inside this <div> once for every element in an array called items. On every copy of the div, it will also set a property named item to the current element so we can use it in the template. As you can see, this results in three <div>s each, containing the product title, quantity, unit price, total price, and a button to remove the item entirely.
<span>{{item.title}}</span>
As we showed in the “Hello, World” example, data binding via {{ }} lets us insert the value of a variable into part of the page and keep it in sync. The full expression {{item.title}} retrieves the current item in the iteration and then inserts the contents of that item’s title property into the DOM.
<input ng-model='item.quantity'>
The ng-model definition creates data binding between the input field and the value of item.quantity.
The {{ }} in the <span> sets up a one-way relationship that says “insert a value here.” We want that effect, but the application also needs to know when the user changes the quantity so it can change the total price.
We’ll keep changes in sync with our model by using ng-model. The ng-model declaration inserts the value of item.quantity into the text field, but it also automatically updates item.quantity whenever the user types a new value.
<span>{{item.price | currency}}</span>
<span>{{item.price * item.quantity | currency}}</span>
We want the unit price and total price to be formatted as dollars. Angular comes with a feature called filters that lets us transform text, and there’s a bundled filter called currency that will do this dollar formatting for us. We’ll look at filters more in the next chapter.
<button ng-click='remove($index)'>Remove</button>
This allows users to remove items from their carts by clicking a Remove button next to the product. We’ve set it up so that clicking this button calls a remove() function. We’ve also passed in $index, which contains the iteration number of the ng-repeat, so we know which item to remove.
function CartController($scope) {
This CartController manages the logic of the shopping cart. We’ll tell Angular that the controller needs something called $scope by putting it here. The $scope is what lets us bind data to elements in the UI.
$scope.items = [
{title: 'Paint pots', quantity: 8, price: 3.95},
{title: 'Polka dots', quantity: 17, price: 12.95},
{title: 'Pebbles', quantity: 5, price: 6.95} ];
By defining $scope.items, I’ve created a dummy data hash to represent the collection of items in the user’s shopping cart. We want to make them available to data bind with the UI, so we’ll add them to $scope.
Of course, a real version of this can’t just work in memory, and will need to talk to a server to properly persist the data. We’ll get to that in later chapters.
$scope.remove = function(index) {
$scope.items.splice(index, 1); }
bound, the list automatically shrinks when items disappear. Remember, this remove() function gets called from the UI whenever the user clicks on one of the Remove buttons.
Up Next
We’ve looked at just the most basic idioms in Angular and some very simple examples. The rest of the book is dedicated to showing off what the framework has to offer.
CHAPTER 2
Anatomy of an AngularJS Application
Unlike typical libraries where you pick and choose functions as you like, everything in Angular is designed to be used as a collaborative suite. In this chapter we’ll cover all of the basic building blocks in Angular so you can understand how they fit together. Many of these blocks will be covered in more detail in later chapters.
Invoking Angular
Any application must do two things to start Angular:
1. Load the angular.js library
2. Tell Angular which part of the DOM it should manage with the ng-app directive
Loading the Script
Loading the library is straightforward and follows the same rules as any other JavaScript library. You can load the script from Google’s content delivery network (CDN), like so:
<script
src="https://ajax.googleapis.com/ajax/libs/angularjs/1.0.4/angular.min.js"> </script>
Using Google’s CDN is recommended. Google’s servers are fast, and the script is cache‐ able across applications. That is, if your user has multiple apps that use Angular, she’ll have to download only it once. Also, if the user has visited other sites that use the Google CDN link for Angular, she won’t need to download it again when visiting your site.
If you prefer to host locally (or anywhere else), you can do that too. Just specify the correct location in the src.
Declaring Angular’s Boundaries with ng-app
The ng-app directive lets you tell Angular which part of your page it should expect to manage. If you’re building an all-Angular application, you should include ng-app as part of the <html> tag, like so:
<html ng-app>
…
</html>
This tells Angular to manage all DOM elements in the page.
If you’ve got an existing app where some other technology expects to manage the DOM, such as Java or Rails, you can tell Angular to manage only a part of the page by placing it on some element like a <div> within the page.
<html>
…
<div ng-app>
… </div>
…
</html>
Model View Controller
In Chapter 1, we mentioned that Angular supports the Model View Controller style of application design. Though you have a lot of flexibility in designing your Angular app, you will always have some flavor of:
• A model containing data that represents the current state of your application. • Views that display this data.
• Controllers that manage the relationship between your model and your views.
You’ll create your model using object attributes, or even just primitive types containing your data. There’s nothing special about model variables. If you want to display some text to the user, you could have a string, like so:
var someText = 'You have started your journey.';
You create your views by writing a template as an HTML page and merging it with data from your model. As we’ve seen, you can insert a placeholder in the DOM and set its text like this:
<p>{{someText}}</p>
The controllers are classes or types you write to tell Angular which objects or primitives make up your model by assigning them to the $scope object passed into your controller:
function TextController($scope) {
$scope.someText = someText; }
Bringing it all together, we have:
<html ng-app>
<body ng-controller="TextController">
<p>{{someText}}</p>
<script
src="https://ajax.googleapis.com/ajax/libs/angularjs/1.0.1/angular.min.js">
</script>
<script>
function TextController($scope) {
$scope.someText = 'You have started your journey.';
}
</script> </body> </html>
Loading this in a browser, you would see:
You have started your journey.
Though this primitive-style model works in simple cases, for most applications you’ll want to create a model object to contain your data. We’ll create a messages model object and use it to store our someText. So instead of:
var someText = 'You have started your journey.';
you would write:
var messages = {};
messages.someText = 'You have started your journey.';
function TextController($scope) {
$scope.messages = messages; }
and use it in your template as:
<p>{{messages.someText}}</p>
As we’ll see later when we discuss the $scope object, creating a model object like this will prevent unexpected behavior that could be caused by the prototypal inheritance in $scope objects.
While we’re discussing practices that will save you in the long run, in the previous example, we’ve created TextController in the global scope. While this is fine for ex‐ amples, the right way to define a controller is as part of something called a module,
which provides a namespace for related parts of your application. The updated code would look like the following:
<html ng-app='myApp'>
<body ng-controller='TextController'>
<p>{{someText.message}}</p> <script
src="https://ajax.googleapis.com/ajax/libs/angularjs/1.0.1/angular.min.js"> </script>
<script>
var myAppModule = angular.module('myApp', []);
myAppModule.controller('TextController',
function($scope) {
var someText = {};
someText.message = 'You have started your journey.';
$scope.someText = someText;
});
</script> </body> </html>
In this version, we told our ng-app element about the name of our module, myApp. We then called the Angular object to create a module named myApp and pass our controller’s function to a call to that module’s controller function.
We’ll get to all the whys and hows of modules in a bit. For now, just remember that keeping things out of the global namespace is a good thing and that modules are the mechanism we use to do so.
Templates and Data Binding
Templates in Angular applications are just HTML documents that we load from the server or define in a <script> tag like any other static resource. You define your UI in the template, using standard HTML plus Angular directives where you need UI com‐ ponents.
Once in the web browser, Angular expands these templates into your full application by merging your template with data. We saw an example of this in Chapter 1 when we displayed a list of items in the shopping cart:
<divng-repeat="item in items">
<span>{{item.title}}</span>
...
</div>
So where does this data come from? In our shopping cart example, we just defined it in an array in our code. This works great for when you’re starting to build a UI and just want to test out how it will work. Most apps, however, will use some persistent data source on the server. Your app in the browser connects to your server and requests whatever it needs for the page the user is on, and Angular merges it with your template.
The basic startup flow looks like this:
1. A user requests the first page of your application.
2. The user’s browser makes an HTTP connection to your server and loads the in dex.html page containing your template.
3. Angular loads into the page, waits for the page to be fully loaded, and then looks for ng-app to define its template boundaries.
4. Angular traverses the template and looks for directives and bindings. This results in registration of listeners and DOM manipulation, as well as fetching initial data from the server. The end result of this work is that the app is bootstrapped and the template is converted into view as a DOM.
5. You connect to your server to load additional data you need to show the user as needed.
Steps 1 through 3 are standard for every Angular app. It’s in steps 4 and 5 that you have choices. These steps can happen synchronously or asynchronously. For performance, the data your app needs to display to the user on the first view can come down with the HTML template to avoid multiple requests.
By structuring your application with Angular, your application’s templates are kept sep‐ arate from the data that populates them. The result of this is that these templates are now cacheable. Only new data need come down to the browser after the first load. Just as with JavaScript, images, CSS, and other resources, caching these templates can give your application even better performance.
Displaying Text
You can display and update text anywhere in your UI using the ng-bind directive. It has two equivalent forms. One we’ve seen with double-curly braces:
<p>{{greeting}}</p>
Then there’s an attribute-based directive called ng-bind:
<p ng-bind="greeting"></p>
Both are equivalent in their output. If the model variable greeting is set to “Hi there,” Angular will generate the HTML:
<p>Hi there</p>
And the browser will display “Hi there”.
So why would you use one form over the other? We created the double-curly interpo‐ lation syntax to read more naturally and require less typing. While both forms produce equivalent output, with the double-curly syntax, on the very first page load of your application’s index.html, there’s a chance that your user will see the un-rendered template before Angular has a chance to replace the curlies with your data. Subsequent views won’t suffer from this.
The reason is that the browser loads the HTML page, renders it, and only then does Angular get a chance to interpret it as you intended.
The good news is that you can still use {{ }} in the majority of your templates. For the data binding you do in your index.html page, however, use ng-bind instead. That way, your users will see nothing until the data has loaded.
Form Inputs
Working with form elements in Angular is simple. As we’ve seen in several examples, you can use the ng-model attribute to bind elements to your model properties. This works with all the standard form elements like text inputs, radio buttons, checkboxes, and so on. We can bind a checkbox to a property like so:
<form ng-controller="SomeController">
<input type="checkbox" ng-model="youCheckedIt"> </form>
This means that:
1. When the user checks the box, a property called youCheckedIt on the SomeCon troller’s $scope will become true. Unchecking the box makes youCheckedIt false.
2. If you set $scope.youCheckedIt to true in SomeController, the box becomes checked in the UI. Setting it to false unchecks the box.
Now let’s say we actually want to take action when the user does something. For input elements, you use the ng-change attribute to specify a controller method that should be called whenever the user changes the input’s value. Let’s do a simple calculator to help startup owners understand how much money they need to get going:
<form ng-controller="StartUpController">
Starting: <input ng-change="computeNeeded()"
ng-model="funding.startingEstimate">
Recommendation: {{funding.needed}}
</form>
function StartUpController($scope) {
$scope.funding = { startingEstimate: 0 };
$scope.computeNeeded = function() {
$scope.needed = $scope.startingEstimate * 10;
}; }
There is, however, a potential problem with the strategy in the preceding code. The issue is that we’re only recomputing the needed amount when users type in the input field. This works fine if this input field is only ever updated when users type in this particular input. But what if other inputs bind to this property in the model? What if it gets updated when data comes in from the server?
To update the field no matter how it gets updated, we want to use a $scope function called $watch(). We’ll talk about watch in detail later in this chapter. The basics are that you can call $watch() with an expression to observe and a callback that gets invoked whenever that expression changes.
In this case, we want to watch funding.startingEstimate and call computeNeeded() whenever it changes. We could then rewrite the StartUpController to use this tech‐ nique:
function StartUpController($scope) {
$scope.funding = { startingEstimate: 0 };
computeNeeded = function() {
$scope.funding.needed = $scope.funding.startingEstimate * 10;
};
$scope.$watch('funding.startingEstimate', computeNeeded); }
Note that the expression to watch is in quotes. Yes, it is a string. This string is evaluated as something called an Angular expression. Expressions can do simple operations and have access to the properties in the $scope object. We’ll cover expressions more later in this chapter.
You could also watch the return value of a function, but it won’t work to watch the property funding.startingEstimate as this evaluates to zero, its initial value, and that zero never changes.
Then, because our funding.needed will automatically update whenever funding.star tingEstimate changes, we can write a simpler template, like so:
<form ng-controller="StartUpController">
Starting: <input ng-model="funding.startingEstimate">
Recommendation: {{funding.needed}}
</form>
There are some cases where you don’t want to take action on every change; instead, you want to wait until the user tells you he’s ready. Examples might be completing a purchase or sending a chat message.
If you have a form that groups inputs, you can use the ng-submit directive on the form itself to specify a function to call when the form submits. We can extend our previous example to let the user request funding for her startup by clicking a button:
<form ng-submit="requestFunding()" ng-controller="StartUpController">
Starting: <input ng-change="computeNeeded()" ng-model="startingEstimate">
Recommendation: {{needed}} <button>Fund my startup!</button> </form>
function StartUpController($scope) {
$scope.computeNeeded = function() {
$scope.needed = $scope.startingEstimate * 10;
};
$scope.requestFunding = function() {
window.alert("Sorry, please get more customers first.");
}; }
The ng-submit directive also automatically prevents the browser from doing its default POST action when it tries to submit the form.
To handle other event cases, like when you want to provide interactions that don’t submit a form, Angular provides event-handling directives that resemble the browser’s native event attributes. For onclick, you’d use ng-click. For ondblclick, use ng-dblclick, and so on.
We can try this out by extending our startup calculator one last time with a reset button that will reset the input value to zero:
<form ng-submit="requestFunding()" ng-controller="StartUpController">
Starting: <input ng-change="computeNeeded()" ng-model="startingEstimate">
Recommendation: {{needed}} <button>Fund my startup!</button>
<button ng-click="reset()">Reset</button> </form>
function StartUpController($scope) {
$scope.computeNeeded = function() {
$scope.needed = $scope.startingEstimate * 10;
};
$scope.requestFunding = function() {
window.alert("Sorry, please get more customers first.");
};
$scope.startingEstimate = 0;
}; }
A Few Words on Unobtrusive JavaScript
At some point in your JavaScript development career, someone probably told you that you should be writing “unobtrusive JavaScript,” and that using click, mousedown, and other such inline event handlers in your HTML was a bad idea. He was right.
The idea of unobtrusive JavaScript has been interpreted many ways, but the rationale for this style of coding is something along the following lines:
1. Not everyone’s browser supports JavaScript. Let everyone see all of your content and use your app without needing to execute code in the browser.
2. Some folks use browsers that work differently. Visually impaired folks who use screen-readers and some mobile phone users can’t use sites with JavaScript. 3. Javascript works differently across different platforms. IE is usually the culprit here.
You need to put in different event-handling code depending on the browser. 4. These event handlers reference functions in the global namespace. It will cause you
headaches when you try to integrate other libraries with functions of the same names.
5. These event handlers combine structure and behavior. This makes your code more difficult to maintain, extend, and understand.
In most ways, life was better when you wrote JavaScript in this style. One thing that was not better, however, was code complexity and readability. Instead of declaring your event handler actions with the element they act on, you usually had to assign IDs to these elements, get a reference to the element, and set up event handlers with callbacks. You could invent a structure to only create these associations in well-known locations, but most apps ended up with these handler setups littered all over.
In Angular, we decided to reexamine the problem.
The world has changed since these concepts were born. Point #1 is no longer true for any interesting population. If you’re running a browser without JavaScript, you’re rele‐ gated to sites created in the 1990s. As for point #2, modern screen-readers have caught up. With proper use of ARIA semantic tags, you can make very rich UIs easily accessible. Mobile phones now run JavaScript on par with desktop machines.
So now the question is: could we solve #3 and #4 while regaining the readability and simplicity of the inline technique?
As previously mentioned, for most inline event handlers, Angular has an equivalent in the form of ng-eventhandler="expression" where eventhandler would be replaced
by click, mousedown, change, and so on. If you want to get notified when a user clicks on an element, you simply use the ng-click directive like this:
<div ng-click="doSomething()">...</div>
Is your brain saying “No, no, no! Bad, bad, bad!”? The good news is that you can relax. These directives differ from their event handler predecessors in that they:
• Behave the same in every browser. Angular takes care of the differences for you. • Do not operate on the global namespace. The expressions you specify can only
access functions and data that is in the scope of the element’s controller.
This last point may sound a little cryptic, so let’s look at an example. In a typical app, you would create a nav bar and a content area that changes as you select different menu options from the nav. We could write the skeleton for it, like so:
<div class="navbar" ng-controller="NavController">
…
<li class="menu-item" ng-click="doSomething()">Something</li>
…
</div>
<div class="contentArea" ng-controller="ContentAreaController">
…
<div ng-click="doSomething()">...</div>
…
</div>
Here both the <li> in the navbar and the <div> in the content area call a function called doSomething() when a user clicks on them. As the developer, you set up the function that these calls refer to in your controller code. They could be the same function or different ones:
function NavController($scope) {
$scope.doSomething = doA; }
function ContentAreaController($scope) {
$scope.doSomething = doB; }
Here, doA() and doB() functions can be the same or different, as you define them.
There’s a simple acid test we can use to figure out if our system suffers from this coupling: can we create a unit test for our app logic that doesn’t require the DOM to be present?
In Angular, yes we can write controllers containing our business logic without having references to the DOM.The problem was never in the event handlers, but rather in the way we needed to write JavaScript previously. Notice that in all the controllers we’ve written so far, here and elsewhere in this book, there are no references to the DOM or DOM events anywhere. You can easily create these controllers without the DOM. All of the work of locating elements and handling events happens within Angular.
This matters first when writing unit tests. If you need the DOM, you have to create it in your test setup, adding to your test complexity. There’s more maintenance because when your page changes, you need to change the DOM for your tests. Finally, DOM access is slow. Slow tests mean slow feedback and eventually slow releases. Angular controller tests have none of these problems.
So there you go. You can happily use declarative event handlers with simplicity and readability, without the guilt of violating best practices.
Lists, Tables, and Other Repeated Elements
Possibly the most useful Angular directive, ng-repeat creates a copy of a set of elements once for every item in a collection. You should use it everywhere you want to create lists of things.
Let’s say we’re writing a student roster application for teachers. We’d likely get the student data from a server, but for this example let’s just define it as a model in JavaScript:
var students = [{name:'Mary Contrary', id:'1'},
{name:'Jack Sprat', id:'2'},
{name:'Jill Hill', id:'3'}];
function StudentListController($scope) {
$scope.students = students; }
To display this list of students, we can do something like the following:
<ul ng-controller=''>
<li ng-repeat='student in students'>
<a href='/student/view/{{student.id}}'>{{student.name}}</a>
</li> </ul>
The ng-repeat will make a copy of all of the HTML inside the tag, including the tag it’s placed on. With this, we would see:
• Mary Contrary • Jack Sprat
• Jill Hill
…linking to /student/view/1, /student/view/2, and /student/view/3, respectively.
As we’ve seen before, changing the student’s array will automatically change the ren‐ dered list. If we were to do something like inserting a new student into the list:
var students = [{name:'Mary Contrary', id:'1'},
{name:'Jack Sprat', id:'2'},
{name:'Jill Hill', id:'3'}];
function StudentListController($scope) {
$scope.students = students;
$scope.insertTom = function () {
$scope.students.splice(1, 0, {name:'Tom Thumb', id:'4'});
}; }
and adding a button to invoke it in the template:
<ul ng-controller=''>
<li ng-repeat='student in students'>
<a href='/student/view/{{student.id}}'>{{student.name}}</a>
</li> </ul>
<button ng-click="insertTom()">Insert</button>
we now see:
• Mary Contrary • Tom Thumb • Jack Sprat • Jill Hill
The ng-repeat directive also gives you references to the index of the current element via $index, and booleans that tell you if you’re on the first element, somewhere in the middle, or the last element of the collection with $first, $middle, and $last.
You might imagine using the $index to label rows in a table. Given a template like this:
<table ng-controller='AlbumController'>
<tr ng-repeat='track in album'>
<td>{{$index + 1}}</td>
<td>{{track.name}}</td>
<td>{{track.duration}}</td>
</tr> </table>
var album = [{name:'Southwest Serenade', duration: '2:34'},
{name:'Northern Light Waltz', duration: '3:21'},
{name:'Eastern Tango', duration: '17:45'}];
function AlbumController($scope) {
$scope.album = album; }
We get the following:
1 Southwest Serenade 2:34 2 Northern Light Waltz 3:21 3 Eastern Tango 17:45
Hiding and Showing
For menus, context-sensitive tools, and many other cases, showing and hiding elements is a key feature. As with everything else in Angular, we drive UI changes based on change in a model, and reflect that change into the UI through directives.
Here, it’s ng-show and ng-hide that do our work. They provide equivalent but inverse functionality for showing and hiding based on the expression you pass to them. That is, ng-show will show its element when its expression is true and hide it when false. The ng-hide hides when true and shows when false. You should use whichever makes more sense to express your intention.
These directives work by setting the element styles to display:block to show and display:none to hide as appropriate. Let’s take a fictitious example where we’re building the control panel for a Death Ray.
<div ng-controller='DeathrayMenuController'>
<button ng-click='toggleMenu()'>Toggle Menu</button>
<ul ng-show='menuState.show'>
<li ng-click='stun()'>Stun</li>
<li ng-click='disintegrate()'>Disintegrate</li>
<li ng-click='erase()'>Erase from history</li>
</ul> <div/>
function DeathrayMenuController($scope) {
$scope.menuState.show= false;
$scope.toggleMenu = function() {
$scope.menuState.show = !$scope.menuState.show;
};
// death ray functions left as exercise to reader }
CSS Classes and Styles
It may be obvious by now that you can dynamically set classes and styles in your appli‐ cation just by data binding them using the {{ }} interpolation notation. You can even compose partial class name matches in your templates. If, for example, you want to conditionally disable some menus, you might do something like the following to visually indicate it to your user:
Given this CSS:
.menu-disabled-true {
color: gray; }
you could show the stun function of your DeathRay as disabled with this template:
<div ng-controller='DeathrayMenuController'>
<ul>
<li class='menu-disabled-{{isDisabled}}' ng-click='stun()'>Stun</li>
... </ul> <div/>
where you’d set the isDisabled property via your controller as appropriate:
function DeathrayMenuController($scope) {
$scope.isDisabled = false;
$scope.stun = function() {
// stun the target, then disable menu to allow regeneration $scope.isDisabled = 'true';
}; }
The class on the stun menu item will be set to menu-disabled- plus the value of $scope.isDisabled. As this is initially false, the result will be menu-disabled-false. As there’s no CSS rule that matches, there will be no effect. When $scope.isDisa bled is set to true, the CSS rule becomes menu-disabled-true, which invokes the rule to make the text gray.
This technique works equally well when combining inline styles with interpolation, such as with style="{{some expression}}".
While kind of clever, this technique has the drawback of using a level of indirection in composing your class names. While you can easily understand it in this small example, it can quickly become unmanageable having to read both your template and JavaScript to correctly create your CSS.
• A string representing space-delimited class names • An array of class names
• A map of class names to boolean values
Let’s imagine that you want to display errors and warnings to your users in a standard location in the application’s header. Using the ng-class directive, you could do some‐ thing like this:
.error {
background-color: red; }
.warning {
background-color: yellow; }
<div ng-controller='HeaderController'>
...
<div ng-class='{error: isError, warning: isWarning}'>{{messageText}}</div>
…
<button ng-click='showError()'>Simulate Error</button>
<button ng-click='showWarning()'>Simulate Warning</button> </div>
function HeaderController($scope) {
$scope.isError = false;
$scope.isWarning = false;
$scope.showError = function() {
$scope.messageText = 'This is an error!';
$scope.isError = true;
$scope.isWarning = false;
};
$scope.showWarning = function() {
$scope.messageText = 'Just a warning. Please carry on.';
$scope.isWarning = true;
$scope.isError = false;
}; }
You can even do nifty things like highlighting a selected row in a table. Let’s say we’re building a restaurant directory and we want to highlight a row that the user clicks on.
In our CSS, we set up the style for a highlighted row:
.selected {
background-color: lightgreen; }
In the template, we set ng-class to {selected: $index==selectedRow}. This has the effect of setting the selected class when our model property called selectedRow matches the ng-repeat’s $index. We’ll also set up an ng-click to notify our controller as to which row the user clicks:
<table ng-controller='RestaurantTableController'>
<tr ng-repeat='restaurant in directory' ng-click='selectRestaurant($index)'
ng-class='{selected: $index==selectedRow}'>
<td>{{restaurant.name}}</td>
<td>{{restaurant.cuisine}}</td>
</tr> </table>
In our JavaScript, we just set up some dummy restaurants and create the selectRow function:
function RestaurantTableController($scope) {
$scope.directory = [{name:'The Handsome Heifer', cuisine:'BBQ'},
{name:'Green's Green Greens', cuisine:'Salads'}, {name:'House of Fine Fish', cuisine:'Seafood'}];
$scope.selectRestaurant = function(row) {
$scope.selectedRow = row;
}; }
Considerations for src and href Attributes
When data binding to an <img> or <a> tag, the obvious path of using {{ }} in the src or href attributes won’t work well. Because browsers are aggressive about loading images parallel to other content, Angular doesn’t get a chance to intercept data binding requests. While the obvious syntax for an <img> might be:
<imgsrc="/images/cats/{{favoriteCat}}">
Instead, you should use the ng-src attribute and write your template as:
<imgng-src="/images/cats/{{favoriteCat}}">
Similarly, for the <a> tag, you should use ng-href:
<a ng-href="/shop/category={{numberOfBalloons}}">some text</a>
Expressions
The goal behind the expressions that you use in templates is to let you be as clever as you need to be to create hooks between your template, your application logic, and your data, but at the same time prevent application logic from sneaking into the template.
simple math (+, -, /, *, %), make comparisons (==, !=, >, <, >=, ⇐), perform boolean logic (&&, ||, !) and bitwise operations (\^, &, |). You can call functions you expose on $scope in your controller and you can reference arrays and object notation ([ ], { }, .).
All of these are valid examples of expressions:
<div ng-controller='SomeController'>
<div>{{recompute() / 10}}</div>
<ul ng-repeat='thing in things'>
<li ng-class='{highlight: $index % 4 >= threshold($index)}'>
{{otherFunction($index)}} </li>
</ul> </div>
The first expression here, recompute() / 10, while valid, is a good example of putting logic in the template, and should be avoided. Keeping a separation of responsibilities between your view and controllers ensures that they’re easy to reason and easy to test.
While you can do quite a lot with expressions, they are computed with a custom parser that’s part of Angular. They are not evaluated using JavaScript’s eval(), and are con‐ siderably more restrictive.
Instead, they are evaluated using a custom parser that comes with Angular. In it, you won’t find looping constructs (for, while, and so on), flow-of-control operators (if-else, throw) or operators that modify data (++, --). When you need these types of operations, do them in your controller or via a directive.
Though expressions are more restrictive than JavaScript in many ways, they are more forgiving to undefined and null. Instead of throwing a NullPointerException error, templates will simply render nothing. This allows you to safely use model values that haven’t been set yet, and have them appear in the UI as soon as they get populated.
Separating UI Responsibilities with Controllers
Controllers have three responsibilities in your app:
• Set up the initial state in your application’s model
• Expose model and functions to the view (UI template) through $scope • Watch other parts of the model for changes and take action
We’ve seen many examples of the first two in this chapter already. We’ll get to that last one in a bit. The conceptual purpose of controllers, however, is to provide the code or logic to execute the user’s wishes as they interact with the view.
To keep your controllers small and manageable, our recommendation is that you create one controller per functional area in your view. That is, if you have a menu, create a
MenuController. If you have a navigational breadcrumb, write a BreadcrumbControl ler, and so on.
You’re probably starting to get the picture, but to be explicit, controllers are tied to a specific piece of the DOM that they’re in charge of managing. The two main ways of associating a controller with a DOM node are specifying it in the template by declaring it in an ng-controller attribute, and associating it with a dynamically loadable DOM template fragment, called a view, through a route.
We’ll talk about views and routes later in this chapter.
If you have complex sections of your UI, you can keep your code simple and maintain‐ able, by creating nested controllers that can share model and functions through an inheritance tree. Nesting controllers is simple; you do it by simply assigning a controller to a DOM element that is inside another one, like so:
<divng-controller="ParentController">
<div ng-controller="ChildController">...</div> </div>
Though we express this as nested controllers, the actual nesting happens in scopes. The $scope passed to a nested controller prototypically inherits from its parent controller’s $scope. In this case, this means that the $scope passed to ChildController will have access to all the properties of the $scope passed to ParentController.
Publishing Model Data with Scopes
The $scope object passed to our controllers is the mechanism we use to expose model data to views. You may have other data in your application, but Angular only considers it part of the model when it can reach these properties through a scope. You can think of scopes as a context that you use to make changes to your model observable.
We’ve seen many examples of setting up scopes explicitly, as in $scope.count = 5. There are also some indirect ways to set up the model from the template itself. You can do so in the following ways:
1. Through an expression. Since expressions execute in the context of the controller’s scope associated with their element, setting properties in expressions is the same as setting a property of the controller’s scope. That is, doing this:
<button ng-click='count=3'>Set count to three</button>
has the same effect as doing this:
<div ng-controller='CountController'>
<button ng-click='setCount()'>Set count to three</button> </div>
function CountController($scope) {
$scope.setCount = function() {
$scope.count=3;
} }
2. Using ng-model on a form input. As with expressions, the model specified as the argument for ng-model also works within the scope of the enclosing controller. The one addition is that this creates a bi-directional data binding between the form field state and your specified model.
Observing Model Changes with $watch
Possibly the most used of all scope functions is $watch, which notifies you when parts of your model change. You can watch individual object properties and computed results (functions), really anything that could be accessed as a property or computed as a Java‐ Script function. The function’s signature is:
$watch(watchFn, watchAction, deepWatch)
The details of each parameter are as follows:
watchFn
This parameter is a string with an Angular expression or a function that returns the current value of the model that you want to watch. This expression will be evaluated multiple times, so you need to make sure that it has no side effects. That is, it can be called multiple times without changing state. For the same reason, watch expressions should be computationally cheap. If you’ve passed in an Angular ex‐ pression in a string, it will be evaluated against objects available to the scope it’s called on.
watchAction
This is the function or expression to be called when the watchFn changes. In the function form, it receives the new and old values of watchFn as well as a reference to the scope. Its signature is function(newValue, oldValue, scope).
deepWatch
If set to true, this optional boolean parameter tells Angular to examine each prop‐ erty within the watched object for changes. You’d use this if you wanted to watch individual elements in an array or properties in an object instead of just a simple value. As Angular needs to walk the array or object, this can be computationally expensive if the collection is large.
The $watch function returns a function that will de-register the listener when you no longer want to receive change notifications.
If we wanted to watch a property and then later de-register it, we would use the following:
...
var dereg = $scope.$watch('someModel.someProperty', callbackOnChange()); …
dereg();
Let’s revisit our shopping cart scenario from Chapter 1 for a full example. Let’s say that we want to apply a $10 discount when the customer adds more than $100 worth of merchandise to her cart. For a template, we’ll use:
<divng-controller="CartController">
<div ng-repeat="item in items">
<span>{{item.title}}</span>
<input ng-model="item.quantity">
<span>{{item.price | currency}}</span>
<span>{{item.price * item.quantity | currency}}</span>
</div>
<div>Total: {{totalCart() | currency}}</div>
<div>Discount: {{bill.discount | currency}}</div>
<div>Subtotal: {{subtotal() | currency}}</div> </div>
With a CartController, it would look like the following:
function CartController($scope) {
$scope.bill = {};
$scope.items = [
{title: 'Paint pots', quantity: 8, price: 3.95},
{title: 'Polka dots', quantity: 17, price: 12.95},
{title: 'Pebbles', quantity: 5, price: 6.95}
];
$scope.totalCart = function() {
var total = 0;
for (var i = 0, len = $scope.items.length; i < len; i++) {
total = total + $scope.items[i].price * $scope.items[i].quantity;
}
return total;
}
$scope.subtotal = function() {
return $scope.totalCart() - $scope.discount;
};
function calculateDiscount(newValue, oldValue, scope) {
$scope.bill.discount = newValue > 100 ? 10 : 0;
}