TeAM
YYePG
Digitally signed by TeAM YYePG DN: cn=TeAM YYePG, c=US, o=TeAM YYePG, ou=TeAM YYePG, [email protected]
Reason: I attest to the accuracy and integrity of this document
Adobe
®
Premiere
®
Elements
FOR
by Keith Underdahl
Author of
Digital Video For Dummies,
3rd Edition
Adobe
®
Premiere
®
Elements
FOR
Adobe®
Copyright © 2005 by Wiley Publishing, Inc., Indianapolis, Indiana Published by Wiley Publishing, Inc., Indianapolis, Indiana Published simultaneously in Canada
No part of this publication may be reproduced, stored in a retrieval system or transmitted in any form or by any means, electronic, mechanical, photocopying, recording, scanning or otherwise, except as permit-ted under Sections 107 or 108 of the 1976 Unipermit-ted States Copyright Act, without either the prior written permission of the Publisher, or authorization through payment of the appropriate per-copy fee to the Copyright Clearance Center, 222 Rosewood Drive, Danvers, MA 01923, (978) 750-8400, fax (978) 646-8600. Requests to the Publisher for permission should be addressed to the Legal Department, Wiley Publishing, Inc., 10475 Crosspoint Blvd., Indianapolis, IN 46256, (317) 572-3447, fax (317) 572-4355, e-mail: brand [email protected].
Trademarks:Wiley, the Wiley Publishing logo, For Dummies, the Dummies Man logo, A Reference for the Rest of Us!, The Dummies Way, Dummies Daily, The Fun and Easy Way, Dummies.com, and related trade dress are trademarks or registered trademarks of John Wiley & Sons, Inc. and/or its affiliates in the United States and other countries, and may not be used without written permission. Adobe and Premiere are reg-istered trademarks of Adobe Systems Incorporated in the United States and/or other countries. All other trademarks are the property of their respective owners. Wiley Publishing, Inc., is not associated with any product or vendor mentioned in this book.
LIMIT OF LIABILITY/DISCLAIMER OF WARRANTY: THE PUBLISHER AND THE AUTHOR MAKE NO REP-RESENTATIONS OR WARRANTIES WITH RESPECT TO THE ACCURACY OR COMPLETENESS OF THE CON-TENTS OF THIS WORK AND SPECIFICALLY DISCLAIM ALL WARRANTIES, INCLUDING WITHOUT LIMITATION WARRANTIES OF FITNESS FOR A PARTICULAR PURPOSE. NO WARRANTY MAY BE CRE-ATED OR EXTENDED BY SALES OR PROMOTIONAL MATERIALS. THE ADVICE AND STRATEGIES CON-TAINED HEREIN MAY NOT BE SUITABLE FOR EVERY SITUATION. THIS WORK IS SOLD WITH THE UNDERSTANDING THAT THE PUBLISHER IS NOT ENGAGED IN RENDERING LEGAL, ACCOUNTING, OR OTHER PROFESSIONAL SERVICES. IF PROFESSIONAL ASSISTANCE IS REQUIRED, THE SERVICES OF A COMPETENT PROFESSIONAL PERSON SHOULD BE SOUGHT. NEITHER THE PUBLISHER NOR THE AUTHOR SHALL BE LIABLE FOR DAMAGES ARISING HEREFROM. THE FACT THAT AN ORGANIZATION OR WEBSITE IS REFERRED TO IN THIS WORK AS A CITATION AND/OR A POTENTIAL SOURCE OF FUR-THER INFORMATION DOES NOT MEAN THAT THE AUTHOR OR THE PUBLISHER ENDORSES THE INFOR-MATION THE ORGANIZATION OR WEBSITE MAY PROVIDE OR RECOMMENDATIONS IT MAY MAKE. FURTHER, READERS SHOULD BE AWARE THAT INTERNET WEBSITES LISTED IN THIS WORK MAY HAVE CHANGED OR DISAPPEARED BETWEEN WHEN THIS WORK WAS WRITTEN AND WHEN IT IS READ.
For general information on our other products and services, please contact our Customer Care Department within the U.S. at 800-762-2974, outside the U.S. at 317-572-3993, or fax 317-572-4002.
For technical support, please visit www.wiley.com/techsupport.
Wiley also publishes its books in a variety of electronic formats. Some content that appears in print may not be available in electronic books.
Library of Congress Control Number: 2004111025 ISBN: 0-7645-7881-2
Manufactured in the United States of America 10 9 8 7 6 5 4 3 2 1
About the Author
Keith Underdahlis a digital-media specialist residing in Albany, Oregon. Professionally, Keith is an electronic publishing specialist for AGES Software, where he serves as program manager, interface designer, multimedia producer, graphic artist, programmer, customer support manager, and resident Portable Document Format (PDF) guru. At the end of the day, he even sweeps up the place. Mr. Underdahl has written numerous books, including Teach Yourself Microsoft Word 2000, Microsoft Windows Movie Maker For Dummies, Macworld Final Cut Pro 2 Bible(co-author), Digital Video For Dummies, 3rd Edition, and
Dedication
My beloved brethren, let every man be swift to hear, slow to speak, slow to anger.
— James 1:19
Author’s Acknowledgments
So many people helped me complete this project that I hardly know where to begin. First and foremost I wish to thank my family for allowing me to work two full-time jobs as I completed Adobe Premiere Elements For Dummies. My wife, Christa, has been my entire support staff, head cheerleader, creative advisor, and inspiration throughout my entire writing career. She was the one who urged me to start writing for a small motorcycle magazine in 1995, and that endeavor has led to so many great adventures and challenges in the years since. I owe everything to Christa.
My undying gratitude also goes out to my two very favorite movie subjects, Soren and Cole Underdahl. Not only do my boys take direction well, but they are also incredibly intelligent and look great on camera! I also received help both on-screen and behind the scenes from Brian and Darlene Underdahl. I wish I could take full credit for the quality and content of Adobe Premiere Elements For Dummies, but many other kind folks contributed to this work to make it what it is. I’d like to thank Steve Hayes for hiring me once again to write this book, my project editor Nicole Haims, my technical editor Dennis Short, and the many other folks at Wiley who toiled to make this one of the best references on Adobe Premiere Elements to be found.
Publisher’s Acknowledgments
We’re proud of this book; please send us your comments through our online registration form located at www.dummies.com/register/.
Some of the people who helped bring this book to market include the following:
Acquisitions, Editorial, and Media Development
Project and Copyeditor:Nicole Haims Senior Acquisitions Editor:Steven H. Hayes Technical Editor:Dennis Short
Editorial Manager:Carol Sheehan Media Development Manager:
Laura VanWinkle
Media Development Supervisor: Richard Graves
Editorial Assistant:Amanda Foxworth Cartoons:Rich Tennant, www.the5thwave.com
Composition
Project Coordinator: Maridee Ennis Layout and Graphics: Andrea Dahl, Joyce Haughey, LeAndra Hosier, Lynsey Osborn, Heather Ryan, Julie Trippetti
Proofreaders:Joe Niesen, Brian H. Walls, TECHBOOKS Production Services
Indexer: TECHBOOKS Production Services
Publishing and Editorial for Technology Dummies
Richard Swadley,Vice President and Executive Group Publisher Andy Cummings,Vice President and Publisher
Mary Bednarek,Executive Acquisitions Director Mary C. Corder,Editorial Director
Publishing for Consumer Dummies
Diane Graves Steele,Vice President and Publisher Joyce Pepple,Acquisitions Director
Composition Services
Contents at a Glance
Introduction ...1
Part I: Presenting Adobe Premiere Elements ...7
Chapter 1: Feeling at Home with Adobe Premiere Elements ...9
Chapter 2: Equipping Yourself for Moviemaking...27
Chapter 3: Revving Up Premiere Elements ...39
Chapter 4: Introduction to Moviemaking ...57
Part II: Basic Editing in Adobe Premiere Elements ...77
Chapter 5: Starting Movie Projects ...79
Chapter 6: Capturing and Organizing Your Media ...89
Chapter 7: Trimming and Editing Video Clips ...115
Chapter 8: Making Movies with the Timeline ...129
Chapter 9: Using Video Transitions ...149
Part III: Advanced Editing in Premiere Elements ...163
Chapter 10: Improving and Repairing Video Images...165
Chapter 11: Compositing and Animating Video Clips...179
Chapter 12: Adding Special Effects to Your Movies ...191
Chapter 13: Adding Sound to Your Movies ...213
Chapter 14: Adding Titles to Your Movies ...229
Part IV: The Finishing Touches...243
Chapter 15: Wrapping Up Your Movies...245
Chapter 16: Preparing Movies for Online Viewing ...261
Chapter 17: Burning Your Movies on DVD ...275
Chapter 18: Recording Movies on Tape...291
Part V: The Part of Tens ...299
Chapter 19: Ten Advanced Premiere Elements Techniques ...301
Chapter 20: Ten Videography Tips and Secrets ...317
Chapter 21: Ten Essential Extras for Moviemaking...329
Appendix: Glossary ...341
Table of Contents
Introduction...1
Why This Book?...2
Foolish Assumptions ...2
Conventions Used in This Book ...3
How This Book Is Organized...4
Part I: Presenting Adobe Premiere Elements ...4
Part II: Basic Editing in Adobe Premiere Elements ...5
Part III: Advanced Editing in Premiere Elements...5
Part IV: The Finishing Touches...5
Part V: The Part of Tens...5
Appendix ...6
Icons Used in This Book...6
Where to Go from Here...6
Part I: Presenting Adobe Premiere Elements ...7
Chapter 1: Feeling at Home with Adobe Premiere Elements . . . .9
What Is Adobe Premiere Elements?...10
Taking the Grand Tour...11
Launching Premiere Elements for the first time...11
Getting to know the Media window ...13
Reviewing the Monitor window...15
Trying out the Timeline ...15
Saying howdy to the How To window...17
Meeting the Effects and Effect Controls windows...17
Understanding floating palettes ...19
Commanding the Interface...19
Making Your First Movie ...21
Starting your first project...22
Capturing video ...22
Assembling the movie...24
Saving your movie for the Web...25
Chapter 2: Equipping Yourself for Moviemaking . . . .27
Choosing a Computer for Video Editing...28
Identifying your needs ...28
Building your own PC ...32
Selecting Video Gear...33
Cameras ...33
Video decks ...35
Audio recorders...36
Chapter 3: Revving Up Premiere Elements . . . .39
Arranging the Premiere Elements Workspace...39
Using preset workspaces...41
Restoring a workspace ...46
Adjusting Premiere Preferences...47
Setting up your scratch disks ...47
Reviewing other options ...49
Customizing the Windows in Premiere Elements ...50
Using the Media window ...50
Modifying the Timeline...52
Using the Monitor...52
Customizing keyboard commands...53
Installing Plug-Ins for Premiere Elements ...56
Chapter 4: Introduction to Moviemaking . . . .57
Mastering broadcast compatibility issues ...61
The many aspects of aspect ratios ...63
Understanding timecode ...65
The Nonlinear Editing Method ...70
Shooting Better Video...72
Planning the shot...72
Composing the shot ...72
Lighting the shot ...74
Shooting the shot ...76
Part II: Basic Editing in Adobe Premiere Elements ...77
Chapter 5: Starting Movie Projects . . . .79
Starting New Projects ...79
Changing project settings...81
Creating your own presets ...82
Opening an existing project ...83
Reviewing and Changing Project Settings...83
General settings...84
Capture settings...86
Adobe Premiere Elements For Dummies
Video Rendering settings ...87
Default Timeline settings...87
Saving a Project ...88
Chapter 6: Capturing and Organizing Your Media . . . .89
Capturing Video...89
Getting your hardware set up ...90
Capturing digital video ...95
Dealing with dropped frames...99
Capturing analog video...100
Importing Audio, Video, and other Media ...103
Capturing audio clips...104
Preparing still images for your movie...105
Importing stills and other media...107
Keeping Your Media Organized ...108
Managing scratch disk space...108
Using the Media window ...110
Chapter 7: Trimming and Editing Video Clips . . . .115
Reviewing Your Clips ...115
Getting the details on your clips ...116
Playing clips in the Monitor window ...117
Working with Clip Markers...120
Setting In and Out points...120
Using clip markers...122
Changing the Speed and Duration of Clips ...123
Changing the duration of still clips ...123
Changing the playback speed of your clips ...125
Undoing Mistakes...127
Chapter 8: Making Movies with the Timeline . . . .129
Making Sense of the Timeline ...129
Adding and renaming Timeline tracks...131
Working with the Work Area bar ...132
Using Timeline tools ...133
Adding Clips to the Timeline ...134
Inserting clips ...134
Moving clips in the Timeline...137
Performing ripple edits...137
Deleting blank space with Ripple Delete ...138
Selecting clips in the Timeline ...139
Freezing video frames ...140
Slicing clips in half with the Razor tool ...141
Changing playback speed ...142
Using Timeline Markers...144
Marking your place in the Timeline ...144
Using DVD markers ...145
Moving around with Timeline markers ...147
xiii
Chapter 9: Using Video Transitions . . . .149
Reviewing the Premiere Elements Library of Transitions ...149
Three-dimensional transitions...150
Incorporating Transitions into Your Movies ...154
Finding transitions t0 use...154
Applying a transition ...155
Fine-tuning transitions...157
Working with default transitions ...160
Previewing (And Rendering) Transitions...161
Part III: Advanced Editing in Premiere Elements...163
Chapter 10: Improving and Repairing Video Images . . . .165
Understanding How Video Color Works...166
Correcting Video Color...167
Surveying color and light effects in Premiere Elements ...167
Making color adjustments...169
Saving Your Settings as Presets...175
Matching Colors with the Color Match Effect ...176
Chapter 11: Compositing and Animating Video Clips . . . .179
Compositing Video Clips ...179
Working with clip transparency ...180
Using video keys to create partial transparencies...182
Creating an image matte...185
Animating Video Clips ...187
Resizing a clip with motion controls ...188
Animating video clips ...189
Adobe Premiere Elements For Dummies
Perspective...195
Introducing the Effect Controls Window...198
Using Keyframes...200
Removing Effects...201
Working with Effect Presets ...202
Surveying Premiere Elements effect presets ...203
Saving your own presets ...204
Using Some Common Video Effects ...205
Twirling video ...205
Disorienting your audience...207
Flipping video ...208
Creating a picture-in-picture effect ...209
Adding Web links to movies...211
Chapter 13: Adding Sound to Your Movies . . . .213
What Is Audio?...213
Understanding sampling rates...214
Delving into bit depth ...214
Conforming audio...214
Recording Sounds ...215
Making better quality audio recordings ...216
Recording audio with your computer...217
Working with Audio in Your Movies ...218
Editing audio visually...218
Setting audio In and Out points...220
Unlinking audio and video in the Timeline ...222
Adjusting audio volume...223
Using Audio Effects and Transitions...225
Reviewing the Premiere Elements audio effects ...225
Using audio transitions...226
Adjusting audio balance ...227
Chapter 14: Adding Titles to Your Movies . . . .229
Introducing and Setting Up Adobe Title Designer ...230
Revealing the Safe Title Margin ...230
Displaying video images in the Adobe Title Designer ...231
Important Title Formatting Rules for Video ...232
Creating and Manipulating Text ...233
Using title templates ...233
Setting text properties ...234
Coloring and shadowing text ...235
Using styles ...235
Making a rolling or crawling title...236
xv
Adding Graphics to Titles ...238
Opening and Saving Titles ...240
Adding Titles to Your Movie ...240
Adding titles to the Timeline ...240
Previewing titles ...242
Part IV: The Finishing Touches ...243
Chapter 15: Wrapping Up Your Movies . . . .245
Previewing Your Movie...245
Critiquing your project ...246
Looking at your movie on an external monitor ...247
Making Final Additions to Your Video ...248
Creating a counting leader ...249
Adding color bars and tone ...250
Generating black video ...251
Exporting Audio ...252
Exporting Still Images from Your Project ...254
Exporting stills from Premiere Elements...254
Correcting still images from your movie with Adobe Photoshop Elements ...255
Exporting AVI and MPEG Files ...258
Exporting AVI files ...258
Exporting MPEG files ...259
Chapter 16: Preparing Movies for Online Viewing . . . .261
Entering the World’s Largest Screening Room ...261
Choosing Player Software ...263
Apple QuickTime ...264
Windows Media Player ...264
Exporting Your Movie...266
Exporting an Apple QuickTime movie ...266
Choosing advanced export settings for Apple QuickTime ...268
Exporting Windows Media ...272
Choosing advanced export settings for Windows Media...273
Chapter 17: Burning Your Movies on DVD . . . .275
Getting on the DVD Bandwagon ...276
Decrypting DVD Standards ...276
How much video can you cram onto a DVD?...276
How much video can you cram onto a double-layer DVD?...277
What is the deal with the DVD-R/RW+R/RW alphabet soup? ...278
What are VCDs and SVCDs? ...279
Adobe Premiere Elements For Dummies
Getting Your Movie Ready for DVD...279
Recording DVDs with Premiere Elements ...280
Choosing a DVD template...280
Customizing DVD menus ...283
Previewing your DVD ...287
Burning your DVD ...288
Chapter 18: Recording Movies on Tape . . . .291
Getting Ready for Analog Playback...291
Getting your movie ready for tape ...292
Setting up your recording hardware ...292
Blacking and coding a tape ...293
Preparing your computer to export video ...294
Exporting Your Movie...294
Exporting to tape with device control ...295
Exporting to tape without device control ...297
Part V: The Part of Tens ...299
Chapter 19: Ten Advanced Premiere Elements Techniques . . . .301
Now You See Him, Now You Don’t ...302
Seeing Double ...303
Freeze-Framing Video ...305
Working in the Golden Age of Cinema ...307
A Long Time Ago. . . ...308
The Ken Burns Effect ...309
Working with Mattes ...310
Adding a Lens Flare...312
Removing Audio Hums ...315
A Zoom with a View ...315
Chapter 20: Ten Videography Tips and Secrets . . . .317
Making Realistic Sound Effects...317
Tricking the Camera Eye with Forced Perspective...318
Managing Ambient Noise ...321
Dealing with the Elements ...322
Rehearse!...323
Reflecting and Diffusing Light...324
Seeing Stars...325
Using Video Filters ...326
Using (But Not Abusing) the Zoom Lens...327
Video Shoot Checklist...328
xvii
Chapter 21: Ten Essential Extras for Moviemaking . . . .329
Adobe Premiere Pro...329
Audio Recorders...331
Microphones...332
Digital Camcorders ...333
Musical Soundtracks...335
Multimedia Controllers ...335
Tripods and Other Stabilization Devices ...336
Video Converters ...337
Video Decks ...339
Web Space ...339
Appendix: Glossary ...341
Index...349
Adobe Premiere Elements For Dummies
Introduction
B
ack in the Dark Ages — a little over a decade ago — most video editing was conducted in specialized TV and movie production facilities staffed by professionals working on equipment that cost millions of dollars. Then in 1993, Adobe released a program called Adobe Premiere. Premiere allowed people to edit video on conventional desktop computers, a revolutionary idea at the time.Years went by, and new technologies entered the picture. More and more video professionals switched to editing on desktop computers. This switch created a growing market of users — and new competition for software manufacturers to produce programs like Adobe Premiere, Apple Final Cut Pro, Avid Xpress, and Pinnacle Edition, all of which cater to professional-consumer (or prosumer) users.
Meanwhile, “regular” consumers started editing their own movies too, using low-cost (or even no-cost) programs like Apple iMovie, Pinnacle Studio, and Windows Movie Maker. These programs, combined with high-quality, afford-able digital camcorders, created an explosion in moviemaking as a hobby enjoyed by many rather than a profession practiced by only a few.
Adobe kept updating Premiere over the years, and when the name changed to Adobe Premiere Pro in 2003, we knew it was only a matter of time before they also released a more affordable non-Pro version. Adobe Premiere Elements is that version. Adobe Premiere was a pioneer in desktop video editing, and Adobe’s many years of experience shows in the high quality of Premiere Elements.
Now that there are two versions of Adobe Premiere — Pro and Elements — you must decide which version is for you. When I spoke with one of Adobe’s marketing people during the development of Premiere Elements, he sug-gested that the difference boils down to this: If you are getting paid to edit video, you should use Premiere Pro. If you’re editing video for fun, use Premiere Elements.
Ultimately, the choice of whether to buy Adobe Premiere Pro or Premiere Elements boils down to price. Adobe offers Premiere Elements at a remark-ably low retail price of about $100 in the U.S., and Premiere Pro costs about $700 more. Although Premiere Pro does offer some extra features, it is not eight times better than Premiere Elements.
Adobe Premiere Elements allows you to get serious about your video-editing hobby without having to spend serious money. When it comes to video-editing programs, Premiere Elements truly gives you more for less.
Why This Book?
Despite the low price, Adobe Premiere Elements is an advanced program.
Adobe Premiere Elements For Dummies is an advanced reference to this program, but like Premiere Elements itself, this book doesn’t come with an advanced price tag. I realize that you want to get right to work with Premiere Elements, so I’ve written this book with the goal of providing you easy-to-follow instructions, as well as real-world tips and tricks to help you work smarter and better.
Needless to say, you’re no “dummy” — otherwise, you wouldn’t be reading this book and trying to figure out how to use Adobe Premiere Elements cor-rectly. Video editing is fun, and it is my hope that you’ll find this book fun to use as well. I have included instructions on performing the most important video-editing tasks, and I’ve included lots of graphics so that you can better visualize what I’m talking about. You’ll also find tips and ideas in this book that you just won’t find in the dry, cryptic help files that Adobe delivers with the program.
Adobe Premiere Elements For Dummies doesn’t just help you use the Premiere Elements program. If you’re relatively new to moviemaking, you’ll find that this book helps you choose a good camcorder, shoot better video, publish movies online, and speak the industry techno babble like a Hollywood pro.
Foolish Assumptions
I’ve made a few basic assumptions about you while writing this book. First, I assume that you have an intermediate knowledge of computer use, and that you are ready, willing, and able to take on the challenge of movie editing, which is one of the more technically advanced things a person can do with a computer.
Because you’re an intermediate user, I assume you already know how to locate and move files around on hard drives, open and close programs, and perform other such tasks. I also assume that you have Windows XP, because that is the only operating system in which Adobe Premiere Elements will run. Premiere Elements will not run in Windows Me or Windows 2000. And I’m sorry to say it, but there’s no Macintosh-compatible version of Premiere Elements either.
Another basic assumption I’ve made is that you might not (at least not yet, anyway) be an experienced video editor. I explain the fundamentals of video editing in ways that help you immediately get to work on your movie projects. Most of the coverage in this book assumes that you’re producing movies as a hobby, or you are just getting into professional video editing by doing wedding videos and such, but you can’t yet afford a professional-grade program like Premiere Pro. Typical projects might include vacation travelogues, weddings, birthday parties, or even amateur fictional movie productions.
Conventions Used in This Book
Adobe Premiere Elements For Dummies helps you get started with Premiere Elements quickly and efficiently. The book serves as a reference to this pro-gram, and because Premiere Elements is a computer propro-gram, you’ll find this book a bit different from other kinds of texts you have read. The following are some unusual conventions that you encounter in this book:
⻬File names or lines of computer code will look like THISor this. This style of print usually indicates something you should type in exactly as you see it in the book.
The display format for the timecode (the unit for measuring time in video) is hours;minutes;seconds;frames. The timecode 01;33;20;03 rep-resents 1 hour, 33 minutes, 20 seconds, and 4 frames (the frame count begins with 0).
⻬Internet addresses will look something like this: www.dummies.com. Notice that I’ve left the http://part off the address because you almost never have to actually type that into your Web browser anymore.
⻬You will often be instructed to access commands from the menu bar in Premiere Elements and other programs. The menu bar is that strip that lives along the top of the Premiere Elements program window and usu-ally includes menus called File, Edit, Project, Clip, Timeline, Marker, Title, Window, and Help. If (for example) I tell you to access the Save command in the File menu, I will use arrows that look like this: Choose File➪Save.
3
⻬You’ll be using your mouse a lot. Sometimes you have to click something to select it. This means you should click oncewith the left mouse button after you’ve put the mouse pointer over whatever it is you’re supposed to click. I’ll specify when you have to double-click or right-click (that is, click once with the right mouse button).
⻬Another mouse-related task you’ll often have to perform is the classic click-and-drag. For example, I often ask you to click-and-drag a video clip from one window to another. To click-and-drag an item, hover the mouse pointer over the item and then hold down the left mouse button. While holding down the button, move the mouse pointer to a new location. Release the mouse button to drop the item on the new location.
How This Book Is Organized
I took all the chapters of Adobe Premiere Elements For Dummies and put them in a bucket. I stirred that bucket with a stick and then poured the chapters out on the floor. This was how I decided which order to place things in, and I think that it has yielded a book which is pretty well organized. The chapters of Adobe Premiere Elements For Dummies are divided into five major parts, plus an appendix. The parts are described in the next section.
Part I: Presenting Adobe
Premiere Elements
Adobe Premiere Elements is an advanced program, and if you’re new to video editing, many parts of this program may seen unfamiliar. Part I helps you get started with your moviemaking adventure by introducing you to Adobe Premiere Elements. You’ll begin by touring the Premiere Elements program and getting familiar with its tools and basic features. If you’ve never edited a movie before, Chapter 1 gets you started right away on your first movie project — you can complete it from start to finish in the first chapter. Because Premiere Elements is just one of many tools that you will use to make movies, I spend some time helping you prepare your production studio. I also show you how to prepare Premiere Elements for use with a variety of media formats. Chapter 4 introduces you to the fundamentals of video tech-nology, which you’ll need to be familiar with as you create your movies.
Part II: Basic Editing in Adobe
Premiere Elements
After you’re comfortable with Adobe Premiere Elements, you are ready to get right to work. The first chapter in Part II shows you how to start new projects in Premiere Elements. Next, I show you how to capture video from a digital camcorder onto your computer, and I show you how to import and manage other kinds of media as well. Chapters 7 and 8 take you through the most common and important video-editing tasks, and in Chapter 9, I show you how to add fancy transitions between video clips.
Part III: Advanced Editing
in Premiere Elements
Adobe Premiere Elements is far more advanced than any other program in its price range. The chapters in Part III show you how to use the more advanced features that come with the software. I show you how to improve colors and lighting in video images, how to create compositing effects with blue screens, how to add and customize special effects, and how to work with audio and titles in your movies.
Part IV: The Finishing Touches
Moviemaking is a highly expressive art form. The chapters in Part IV show you how to share your artistic expression. First, I show you how to put the finishing touches on your movie projects, and then I show you how to make sure they’re ready to share with others. Next, I show you how to share your movies on the Internet, how to burn your movies to DVD, and how to record your movies onto videotape.
Part V: The Part of Tens
I wouldn’t be able to call this a For Dummies book without a “Part of Tens” (really, it’s in my contract). Actually, the Part of Tens always serves an impor-tant purpose. In Adobe Premiere Elements For Dummies, this part gives me a chance to show you ten advanced video-editing techniques that you can use in Premiere Elements, ten moviemaking tips and secrets used by the pros, and ten gadgets and programs that will help you make better movies.
5
Appendix
Video editing is a technical subject with a language all its own, so at the end of Part V I’ve provided a glossary to help you quickly decrypt the alphabet soup of video-editing terms and acronyms.
Icons Used in This Book
Occasionally, you’ll find some icons in the margins of this book. The text next to these icons includes information and tips that deserve special attention and some of them may warn you of potential hazards and pitfalls you may encounter. Icons you’ll find in this book are easy to spot:
Although every word of Adobe Premiere Elements For Dummies is important, I sometimes feel the need to emphasize certain points. I use Remember to occasionally provide this emphasis.
Tips are usually brief instructions or ideas that aren’t always documented but can greatly improve your movies and make your life easier. Tips are among the most valuable tidbits in this book.
Heed warnings carefully. Some warn of situations that can merely inconve-nience you; others tell you when a wrong move could cause expensive and painful damage to your equipment and/or person.
Computer books are often stuffed with yards of techno babble, and if it’s sprinkled everywhere, it can make the whole book a drag, and just plain difficult to read. As much as possible, I’ve tried to pull some of the deeply technical stuff out into these icons. This way, the information is easy to find if you need it, and just as easy to skip if you already have a headache.
Where to Go from Here
If you’ve always wanted to be in pictures, this is your time. Video editing is
the hot topic in computer technology today, and you’re at the forefront of this multimedia revolution. If you still need to set up your movie studio or need some equipment, I suggest that you start off with Chapter 2, “Equipping Yourself for Moviemaking.” If you aren’t quite ready to start editing yet, you may want to spend some time in Chapter 4, “Introduction to Moviemaking.” Otherwise, you should go ahead and familiarize yourself with Adobe Premiere Elements, beginning with Chapter 1.
Part I
In this part . . .
V
ideo-editing programs have been around for a few years now, but the programs on the affordable end of the price scale have tended to lack features and provide an almost cartoonish interface. Adobe Premiere Elements has changed this, making truly pro-caliber editing power affordable for almost anyone.This part of Adobe Premiere Elements For Dummies
Chapter 1
Feeling at Home with Adobe
Premiere Elements
In This Chapter
䊳Introducing Adobe Premiere Elements
䊳Taking the Grand Tour
䊳Making your first movie
A
few years ago, video editing was only practical for people with a lot of fancy editing equipment and piles of cash. But a revolution has been hap-pening for a few years now, a revolution that is putting the moviemaking art within reach of almost anyone. The revolution has occurred in three phases:1. The creation of mega-powerful computers with huge hard drives that are unbelievably affordable has changed the rules of video editing. Such computers incorporate technologies like IEEE-1394 FireWire, which make working with video easy.
2. The advent of affordable digital camcorders has made collecting high-quality video a snap. These camcorders interface easily with computers. 3. The clincher is software. High-end video editing programs like Adobe
Premiere Pro and Apple Final Cut Pro brought pro-caliber video editing to desktop computers, and simpler programs like Apple iMovie and Pinnacle Studio made editing software affordable.
I hesitate to call Adobe Premiere Elements the next step in the video editing revolution, but it’s definitely a step forward. Premiere Elements delivers about 90 percent of the video-editing power of high-end programs like Final Cut Pro for an astoundingly low retail price of just $100. I cannot think of another pro-gram that costs less than $300 and offers anywhere near the level of features of Premiere Elements.
What Is Adobe Premiere Elements?
You already know that Adobe Premiere Elements is a video-editing program. But what does that mean? It means that using Adobe Premiere Elements, you can quickly take video from your digital camcorder, delete and rearrange scenes, add some special effects and credits, and within minutes export your movie to a DVD or the Internet. Just a few years ago all of this required equip-ment and software that costs thousands — if not tens, or even hundreds, of thousands — of dollars.
You can find lots of video-editing programs on the market, even at the $100 price point of Adobe Premiere Elements. But several important features set Premiere Elements apart from the others:
⻬Make use of up to 99 separate video tracks that can be composited and combined to make a single image.
⻬Add and edit audio soundtracks to your program. Up to 99 separate audio tracks can be added to the program.
⻬Add animated elements. For example, you can create advanced, professional-style titles and add still graphics to your movie projects. Then you can animate these titles and graphics in a variety of ways.
⻬Apply one of over 70 different transitions to video. Transitions can be used in any video track.
⻬Modify your movie with over 70 video and more than a dozen audio effects.
⻬Fine-tune color and lighting in your video images and improve audio quality.
⻬Preview edits immediately, in real time, without having to render effects first.
⻬Record movies to videotape at full broadcast quality.
⻬Export tightly compressed movies for the Web in QuickTime or Windows Media formats.
⻬Output movies directly to DVD and easily create DVD navigation menus.
⻬Integrate Premiere Elements with Adobe Photoshop Elements to quickly burn your still-image collections onto slideshow DVDs.
Even these hefty capabilities are only a smattering of what you can do with Adobe Premiere Elements. It’s one of the most versatile programs you’ll ever use.
Taking the Grand Tour
Adobe developed Premiere Elements on the foundations of Premiere Pro, and one of their primary design goals was to make Premiere Elements much easier to use, especially if you don’t have any prior experience with video-editing pro-grams. Still, even though the user interface has been simplified, I would not call Premiere Elements a “dumbed down” version of Premiere Pro. Little has been left out — you are probably going to have more options than you even need. And the quality of the tools is great; the basic aspects of a high-quality video editing program are all there. In short, I think that video newbies and veterans alike will feel right at home using Premiere Elements.
Launching Premiere Elements
for the first time
To launch Premiere Elements, click the Start button to open the Start menu and choose All Programs➪Adobe Premiere Elements. For more information on using Windows XP, see “Commanding the Interface,” later in this chapter. When you first launch Premiere Elements, you see a welcome screen that looks like Figure 1-1. The area under Recent Projects gives you quick access to any projects you’ve been working on recently. (If this is the first time you’ve launched Premiere Elements, you probably won’t have anything listed under Recent Projects.)
11
Chapter 1: Feeling at Home with Adobe Premiere Elements
Where’s the Mac?
Older versions of Adobe Premiere (version 6.5 and earlier) were available for both Macintosh and Windows computers. Adobe’s announce-ment that Premiere Pro (technically Version 7 of Premiere) would run only in Windows XP was met with some shock and surprise, especially considering that only a few years ago, Adobe was considered a very Mac-oriented software company. Adobe Premiere Elements is based heavily on Premiere Pro, so like the Pro version, Premiere Elements only runs on computers using Windows XP. And by the way, Adobe really means it when it says that Windows XP is required. Premiere Elements will not run on older versions of the Windows operating system such as Windows 2000 or Windows Me.
If you have a Macintosh, you might be consider-ing runnconsider-ing Premiere Elements on your Mac using a program that emulates the Windows operating system. I do not recommend this workaround: As I describe in Chapter 2, Premiere Elements relies heavily on a technology called
If you don’t have a previous project to open and continue work on, you have to start a new project if you want to see Premiere Elements in action. Click the New Project button in the welcome screen. A dialog box like the one shown in Figure 1-2 appears. Enter a name for your project — the exact name isn’t important for now — and click OK.
When you give your project a name, Premiere Elements opens (at last) to the editing workspace.
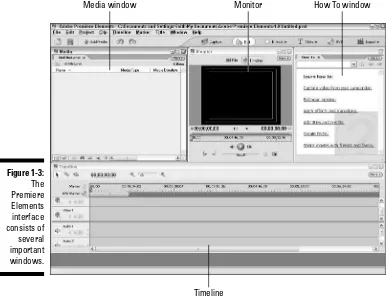
The exact appearance of your workspace depends upon the current screen resolution setting on your computer, but the basic appearance should resem-ble Figure 1-3.
Although the exact appearance varies, you still see at least the four funda-mental windows that make up the Premiere Elements interface — the Media window, the Monitor, the Timeline, and the How To window, as shown in Figure 1-3. These windows are explained in greater detail in the following sections.
Figure 1-2:
Give your new project a name.
Figure 1-1:
Adobe Premiere Elements welcomes you with this screen.
Getting to know the Media window
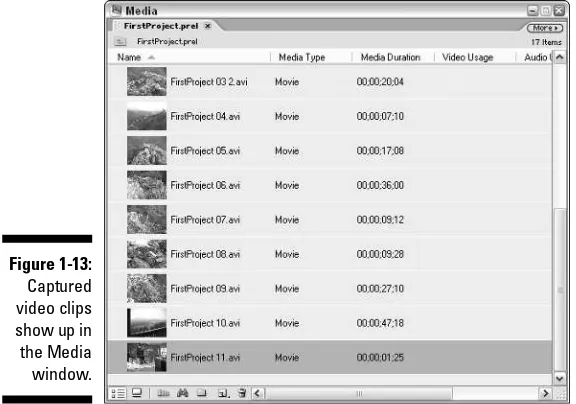
Think of the Media window as a sort of filing cabinet that helps you organize the various video clips, audio clips, and other pieces of media that you use in your project. Whenever you capture video from your camcorder, import still graphics, or capture audio from an audio CD, the files show up in the Media window. If you’re working on a big project, you’ll end up with many different files in this window; a full Media window looks similar to Figure 1-4. You can create new folders in the Media window to help organize your files. Folders in the Media window work just like folders in your operating system. To create a new folder, follow these steps:
1. Click in the Media window to select it and make it active.
2. From the menu bar at the top of the Premiere Elements screen, choose File➪New➪Folder.
A new folder appears in the Media window with the name highlighted.
3. Type a name for your new folder and press Enter.
Media window Monitor How To window
Timeline
Figure 1-3:
The Premiere Elements interface consists of several important windows.
13
Your new folder now appears in the Media window. Click the folder to view its contents. To add items to a folder, simply click-and-drag them into the folder from elsewhere in the Media window. Figure 1-4 shows a Media window for a project I’m working on; as you can see, I’ve imported and captured a lot of files into it.
Although the Media window is primarily a storage place, you can also use it to
⻬Review data about a file. What’s the frame size of the image? Is the file an audio clip, video, or a still graphic? How long is the clip? Columns in the Media window provide a wealth of information about your files.
⻬Preview the file. The Media window has an optional preview area that you can display if you wish. Click the More button in the upper-right corner of the Media window and choose View➪Preview Area from the menu that appears. The preview area appears, as shown in Figure 1-4. If you click a file in the Media window, a preview of it appears in the preview area. If you click the little Play button next to the preview, you can play audio and video clips to get a better idea of what’s in them.
Preview More menu
Use folders to organize media. Click-and-drag to expand window.
Figure 1-4:
The Media window stores the files you use in your movie projects.
Reviewing the Monitor window
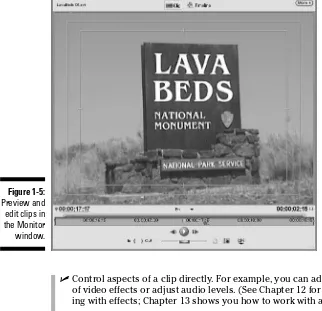
Try to imagine editing video without being able to look at it. Would it be possi-ble? Perhaps. After all, Beethoven composed his epic Ninth Symphony while completely deaf. But most of us aren’t Beethoven and we need to be able to directly experience our work. Thankfully, Premiere Elements makes sure you can always see exactly what your movie looks like as you work on it. The Monitor window is where you view your work. It has controls for playing video and audio clips and for performing other editing tasks.
In the Monitor, you can
⻬Play through clips you plan to add to a movie project. As you play each clip, you decide which portions to add to the movie by setting In points
and Out points. When you set In and Out points, only the portions of the clip between those two points will be added to your movie program.
⻬Play through the edits you have already made in your project. The Monitor has two modes:
⻬Clip mode: In Clip mode, shown in Figure 1-5, the Monitor window lets you preview clips before placing them in your project. If you double-click a clip in the Media window, it automatically opens in the Monitor in Clip mode.
⻬Timeline mode:In this mode, the Monitor shows you the contents of the Timeline, which is where you assemble your movies. To switch between Clip and Timeline modes, simply click the buttons labeled Clip and Timeline at the top of the Monitor window. I explain what the Timeline is in the next section.
Trying out the Timeline
The Timeline could be considered the heart and soul of Adobe Premiere Elements. As with virtually every other video-editing program, the Timeline in Premiere Elements is the tool that enables you to craft your movie by putting its pieces in the desired order. You assemble clips, add effects, com-posite multiple clips on top of each other, and add sound with this bad boy. As you can see in Figure 1-6, the Timeline shows audio tracks on the bottom and video tracks on top. You can have up to 99 video tracks and 99 audio tracks in the Premiere Elements Timeline.
I can’t completely explain the Timeline here. That would fill a chapter all by itself. (In fact, it does — Chapter 8.) However, I do want you to know that by using the Timeline, you can
⻬Figure out where you are in the project by using the Timeline ruler.
⻬Use the CTI (Current Time Indicator) to set the current playback and editing location in the Timeline.
15
⻬Control aspects of a clip directly. For example, you can adjust the timing of video effects or adjust audio levels. (See Chapter 12 for more on work-ing with effects; Chapter 13 shows you how to work with audio.)
⻬Use the Zoom control to zoom your view of the Timeline in and out.
Current timecode Zoom control CTI Timeline ruler
Figure 1-6:
The Timeline is where your clips come together to make a movie.
Figure 1-5:
Preview and edit clips in the Monitor window.
⻬Move clips by simply dragging-and-dropping them to new locations in the Timeline. If your clip calls for some effects and transitions, you can add them by dragging them to the Timeline as well.
Saying howdy to the How To window
Admittedly, the Media window, the Monitor, and the Timeline are the three primary components of Adobe Premiere Elements. An introduction to Adobe Premiere can’t stop there, though. A new feature in Premiere Elements is the How To window, which is shown in Figure 1-7. If you don’t see the How To window, choose Window➪How To. Adobe created the How To window as part of an effort to make Premiere Elements easier to use. The idea is that the How To can quickly provide help and tips on whatever it is you happen to be working on at any given time. Click blue links in the How To window to view help articles and tips.
The menu at the top of the How To window allows you to choose a general help category. In Figure 1-7 the How To window displays help tips on basic edit-ing. If you’re working on Titles or a DVD, for example, choose a different option from the menu. Or if you find that you get all the help you need from Adobe Premiere Elements For Dummies, and the How To is just a big waste of screen space, click the red X in the upper-right corner to hide the How To window.
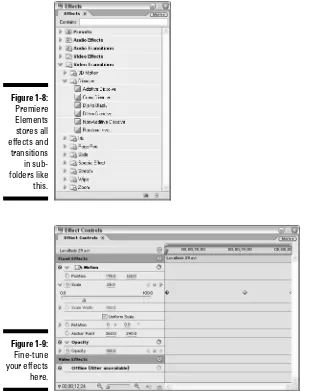
Meeting the Effects and
Effect Controls windows
As you work on your movies you’ll eventually get to the point at which you’ll want to do more advanced editing. That means adding transitions and special effects. Adobe Premiere Elements stores all of its transitions and effects in the Effects window, which is shown in Figure 1-8. To view the Effects window,
Figure 1-7:
Need help? Consult the How To window.
17
choose Window➪Effects. Effects and transitions are arranged into folders and subfolders. For example, if you want to create a transition that dissolves one clip into another (this one of my favorite effects), simply open the Video Transitions folder to reveal the Dissolve subfolder as well as other subfolders. Just as important as applying transitions and effects is the ability to fine-tune and control those effects. Premiere Elements offers the Effect Controls window, shown in Figure 1-9, to help you control your effects. Choose Window➪Effect Controls to open the Effect Controls window, and then click a clip in the Timeline to view the effect controls for that particular clip. I show you how to work with video transitions in Chapter 9. In Chapter 12, I show how to work with video effects and I describe audio effects and transitions in Chapter 13.
Figure 1-9:
Fine-tune your effects here.
Figure 1-8:
Premiere Elements stores all effects and transitions in sub-folders like this.
Understanding floating palettes
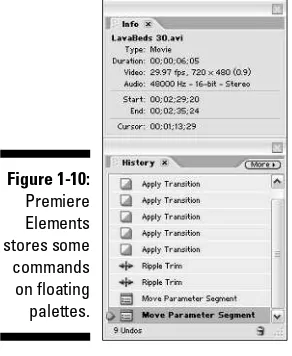
If you have ever used other Adobe programs like Photoshop or Illustrator, you’re probably familiar with the small floating windows called palettes. Like most other Adobe creative programs, Premiere Elements stores some of its advanced features and effects in floating palettes. Premiere Elements offers just two palettes, the History palette, and the Info palette. The History palette (described in Chapter 7) shows a record of all the edits and changes you’ve made, and the Info palette displays detailed information about clips and other items in Premiere Elements. To view them, do this:
1. Choose Window➪History.
2. Choose Window➪Info.
Two floating palettes that look something like Figure 1-10 appear on-screen. You can move these palettes around by dragging the title bar, or close them by clicking the little Close (X) button in the upper-right corner. Use the Window menu to re-open the palettes. To resize a palette, click-and-drag an edge or corner of the palette.
Commanding the Interface
As I mention in the “Foolish Assumptions” section of the Introduction, one of the assumptions I make about you is that you already know how to open and close programs on your computer. You probably also know how to open menus, click buttons, and even resize or minimize windows.
Figure 1-10:
Premiere Elements stores some commands on floating palettes.
19
That said, Adobe Premiere Elements is so advanced (and video editing is so demanding of a computer’s resources) that I suspect you’ve recently bought a new computer — and there’s a good chance you’ve recently “switched camps” from Macintosh to your first Windows PC. To help ease your transition, I want to provide a brief overview of the basic Windows interface controls in Adobe Premiere Elements.
Adobe Premiere Elements requires Windows XP. Any edition — Home, Professional, or Media Center — of Windows XP will suffice. You can’t run Premiere Elements in Windows 2000, Windows Me, or any previous version of Windows. If you’re new to Windows XP and are feeling a bit discombobu-lated, I suggest you purchase a book with more detailed information on using and managing the system. I recommendWindows XP For Dummies, by Andy Rathbone (Wiley). For more advanced Windows XP tips, check out 50 Fast Windows XP Techniques by Yours Truly (Wiley).
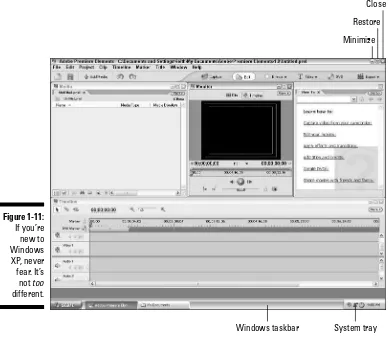
The fundamental look and feel of the Microsoft Windows interface has not changed significantly since Windows 95 was released in (ahem) 1995, although the cosmetics were modernized a bit with the release of Windows XP. Figure 1-11 shows a typical Premiere Elements screen.
To launch Premiere Elements, click the Start button to open the Start menu and choose All Programs➪Adobe Premiere Elements. If you use Premiere Elements a lot, it will show up in the list of commonly used programs that appears when you first click Start.
Basic Windows XP controls include
⻬Start menu: Use this menu to access programs on your computer, as well as to shut down and restart controls. The Start menu is similar in concept to the Apple menu on a Macintosh.
⻬Taskbar:All currently open programs have a button on the Taskbar. Click a program’s button on the Taskbar to open it. The Taskbar is simi-lar in concept to the Mac OS X Dock.
⻬System Tray:Memory-resident programs like antivirus programs and other utilities often show an icon in the system tray. In Chapter 6, I show you how to prepare your computer for resource-intensive operations such as video capture, and part of that preparation includes temporarily disabling a lot of your system tray icons.
⻬Minimize: Click this button to minimize a window. When a program is minimized, it becomes a button on the Taskbar. Use this button like you would the Collapse or Minimize buttons on a Mac.
⻬Restore/Maximize:Use this button to change the window size. Restore/ Maximize works like the Zoom button in the Mac OS.
⻬Close:Click this to close a program or window.
If you don’t like digging through the Start menu every time you want to launch Premiere, you can launch it from a desktop icon created by the Premiere Elements setup program. If you don’t see a Premiere Elements desktop icon, right-click the Adobe Premiere Elements link in the Start menu and choose Send To➪Desktop (create shortcut) from the menu that appears. Doing so cre-ates a desktop icon that you can double-click to launch Premiere Elements.
Making Your First Movie
Sometimes the best way to get to know a program is to just dig in and get your hands dirty with it, actually putting its features to use as the designers intended. If you have a digital camcorder handy with some video already recorded on the tape, and you have installed Adobe Premiere Elements on your computer, you’re ready to start making movies. The following sections
Close
Windows taskbar System tray Restore Minimize
Figure 1-11:
If you’re new to Windows XP, never fear. It’s
not too
different.
21
walk you through the basic steps of making a movie, and if you’ve never used Premiere Elements before or even edited a movie on your computer, the fol-lowing sections should serve as a good introduction.
Starting your first project
Your first step in making a movie is perhaps the most obvious one. Launch Premiere Elements, and when the welcome screen appears (refer to Figure 1-1) click New Project. Enter a name for your project in the New Project dialog box — any old name will do, as long as it’s something you will remember later — and click OK. Premiere Elements creates your project and opens to the basic Premiere Elements screen. Wasn’t that easy?
Capturing video
After you’ve created a new project in Premiere Elements, you need some source footage to work with. For now I assume you have a digital camcorder and you’ve already recorded some video that you want to edit. The process of getting video from the camcorder into your computer is called capturing. To capture some video, follow these steps:
1. Connect your digital camcorder to your computer’s FireWire (IEEE-1394) port.
If you’re not sure whether your computer has a FireWire port, or if you need to add one, see Chapter 2. Premiere Elements can only capture video from a digital camcorder connected to a FireWire port; if you have an older analog camcorder, you’ll need to use special analog video cap-ture hardware and probably some different video capcap-ture software. See Chapter 6 for more on capturing analog video. See Chapter 4 for informa-tion on the differences between digital video and analog video.
2. Turn the Camcorder on to VTR or Player mode.
If Windows automatically opens a window stating that a digital video device was detected, click Cancel to close the window.
3. In the toolbar and the top of the Premiere Elements window, click Capture.
The Premiere Elements Capture window appears as shown in Figure 1-12. You should see the words Capture Device Onlineat the top of the window. If you see a message that says Capture Device Offline, see Chapter 6 for more on video capture.
4. Rewind the tape in your camcorder to the beginning of a section that you want to capture.
You may notice that as you play and rewind your camcorder tape, the video image from the camcorder appears in the Capture window.
5. Click the Play button in the Capture window to begin playing the tape, and click the Capture button to start capturing some video.
6. After you’ve captured a few minutes of video, click the Stop Capture button.
7. Close the Capture window when you’re done capturing video.
You now see a collection of video clips in the Premiere Elements Media window, as shown in Figure 1-13. These are the video clips that you captured from the camcorder, and they are ready to be used in a movie project. Capture problems are usually caused by a computer that hasn’t been properly prepared for video capture. If you have any trouble capturing video, I show how to prepare your computer for capture in Chapter 6.
Figure 1-12:
The Capture window is where you capture video from your digital camcorder.
23
Assembling the movie
After you’ve captured some video, turning your footage into a movie is easy. (Of course, I am skipping the fancy stuff that you can do using later chapters in this book.) Follow these steps:
1. If your Premiere Elements screen doesn’t look something like Figure 1-11, click Edit on the Premiere Elements toolbar.
If the workspace seems stubborn and won’t change to the basic editing layout, choose Window➪Restore Workspace➪Edit. For more on setting up your Premiere Elements workspace, visit Chapter 3.
2. To preview a clip, double-click it in the Media window.
The clip loads into the Monitor window, where you can click the Play button to play the clip. For more on previewing clips and selection por-tions of clips to use in movies, see Chapter 7.
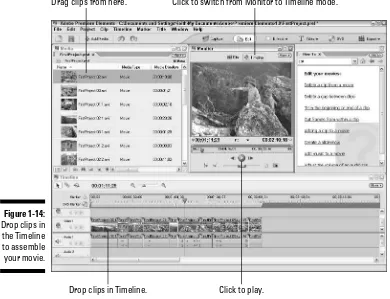
3. Click-and-drag some clips from the Media window and drop them on the Timeline as shown in Figure 1-14.
For now, just drop each clip on the track labeled Video 1, and drop the clips one after the other in the Timeline in the order in which you want them to play. Chapter 8 gives more detailed information on putting movies together using the Timeline.
4. Click the Timeline button at the top of the Monitor window, and then click Play to preview the movie you have put together in the Timeline. Figure 1-13:
Captured video clips show up in the Media window.
Saving your movie for the Web
After you’ve put together a basic movie in the Timeline, Premiere Elements lets you quickly save it in a Web-friendly format. One of the formats you can choose is the Windows Media format. Check out Chapters 15 and 16 for more on preparing movies for online use in either the Windows Media or Apple QuickTime formats. To quickly export your movie in Windows Media format:
1. Click Export on the Premiere Elements toolbar, and choose Windows Media from the menu that appears.
Alternatively, you can choose File➪Export➪Windows Media.
2. In the Export Windows Media dialog box that appears (see Figure 1-15), choose Cable Modem/DSL in the menu on the left and click OK.
The exact format you choose isn’t important right now. For more on what the different formats mean, see Chapters 15 and 16.
Drag clips from here. Click to switch from Monitor to Timeline mode.
Drop clips in Timeline. Click to play.
Figure 1-14:
Drop clips in the Timeline to assemble your movie.
25
3. In the Save File dialog box that appears, choose a location in which to save the file, enter a filename for the movie file, and click Save.
A Rendering dialog box appears. Rendering is the process that Premiere Elements goes through when it applies your edits and compresses a movie pro-ject into its final output format. Rendering may take a few seconds or minutes, depending on the length of your movie and the speed of your computer. When rendering is complete, locate the movie file, and double-click it to open it in Windows Media Player. Congratulations! You’ve just made your first movie!
Figure 1-15:
Exporting your movie in a Web-friendly format is easy.
Chapter 2
Equipping Yourself
for Moviemaking
In This Chapter
䊳Choosing a computer that can handle Adobe Premiere Elements
䊳Comparing video cameras
䊳Selecting capture cards and other hardware
N
ot so long ago, the price of a good video-editing system could have bought you a pretty nice home in the suburbs. But thanks to programs like Adobe Premiere, many of those suburban homes now havegood video-editing systems — and the owners of said homes didn’t have to take out second mortgages to purchase the equipment. For several years now, Adobe Premiere has been revolutionizing video by providing professional-grade edit-ing capabilities in a software package that runs on affordable computers. Now Premiere Elements is so affordable that even video hobbyists on the tightest of budgets can afford near-professional level editing capabilities.Choosing a Computer for Video Editing
Although ultra-powerful computers have certainly become affordable, you should be aware that you can’t expect to edit video on just any old PC. That PC your parents bought you for college ten years ago, for example, won’t cut it. In fact, almost any computer that is not fairly new or has not been significantly upgraded for a couple of years is probably barely adequate for use with Adobe Premiere Elements. The following sections help you identify what kind of com-puter you need, including specific system requirements.
Macintosh computers have long been favored by video professionals, but as of this writing, Adobe Premiere Pro and Premiere Elements are both Windows-only programs. This is a departure from earlier versions of the software, which were both Mac and Windows compatible up through Adobe Premiere 6.5.
Identifying your needs
First, you need a computer that is capable of running Adobe Premiere Elements without crashing. Beyond that, your computer should run Premiere efficiently without making you wait for hours on end while it performs a simple action. You need lots of storage space for your video files. And you need special hard-ware tailored to video editing. The next two sections describe the computer that you need.
Minimum system requirements
Like virtually all software programs, Adobe Premiere Elements has some min-imum system requirements that your computer must meet. You’ll find them emblazoned on the side of Premiere’s retail box, as well as in the INSTALL READ MEfile located on the Premiere Elements installation disc. The minimum requirements are
⻬Pentium III processor, 800 MHz or higher
⻬Windows XP
⻬256MB of RAM
⻬24-bit video display and a monitor capable of displaying a screen resolu-tion of at least 1024 x 768
⻬DirectX compatible sound card
⻬IEEE-1394 / FireWire adapter
⻬1.2 GB of free hard-drive space for program-installation files
You must be logged in to Windows XP with administrator rights to install the software. You must also be able to restart and log in again to Windows with administrator rights to complete installation.
The real system requirements
You’ve seen the minimumsystem requirements, but I think you’ll find that you can work a lot easier and faster if you use a computer that well exceeds those requirements. Video editing puts unusually high demands on a computer. Video files require massive amounts of disk space, as well as special hardware to capture video and lay it back to tape or burn it to DVD — and the computer’s memory and processor are utilized to their maximum capabilities when you render video for playback. Premiere Elements works computer hardware especially hard as it displays effects and other complex edits in real-time.
29
Chapter 2: Equipping Yourself for Moviemaking
Can I run Premiere Elements
in a Windows emulator?
No.
When Adobe released Premiere Pro, one of its most important features was the ability to pre-view complex video effects and edits in real time. This was a big improvement over older versions of Premiere, as well as most other video-editing programs, which required you to spend minutes or even hours rendering effects, transitions, and other changed before you could preview them. Adobe was able to incorporate this powerful new feature into Premiere Pro by designing the software to take advantage of specific advanced graphics and processing features in Windows XP and modern Intel and AMD central processor chips.
Premiere Elements is based on Premiere Pro and it has the same basic requirements. One of the processor technologies that Premiere Elements relies on is called SSE, which is short for Streaming SIMD Extensions. This is a multi-media instruction set found only in certain
processors from Intel and AMD. These proces-sors include the Intel Pentium III and Pentium 4, as well as the AMD Athlon XP. The 1 GHz+ “Morgan” versions of the AMD Duron proces-sor also support SSE, but not the older 600-950 MHz “Spitfire” versions of the Duron. Any new PC sold today that runs Windows XP should have a processor that supports SSE.
Whether you are buying a new computer or upgrading, you really need some relatively souped-up capabilities:
⻬A seriously powerful processor: Think of the central processing unit
(CPU) as the brain of the computer; a faster processor affects how well everything else runs. The faster the processor, the less time you spend twiddling your thumbs as your video renders, and the better real-time previews play. Adobe recommends an Intel Pentium 4 3GHz (or better) processor, but an equivalent AMD Athlon XP processor works just as well. Any processor you use with Premiere Elements must support the SSE instruction set, a set of CPU instructions that helps the processor handle multimedia data. This means that you should stick with a Pentium III, Pentium 4, or Athlon XP processor. Older AMD Athlon processors (without the XP suffix) and Duron processors may cause system crashes or other stability problems during certain video-editing operations. You will find the very best editing performance with an Intel Pentium 4 because that processor includes an even more powerful instruction set called SSE2.
⻬Lots of memory: Your CPU uses random-access memory (RAM) as its working space. The more RAM that is available to the CPU, the more pro-grams and processes (like video rendering and real-time previews) you can run. Although Adobe says that 256MB is the bare minimum, they recommend at least 1GB of RAM for use with Premiere Elements, and I think that is a good recommendation.
⻬A big, fast hard drive: Video requires lotsof storage space. You can get a good start with 80GB (gigabytes) of disk space, but more is always better. If your computer uses IDE hard drives (it probably does; check the spec sheet), always choose 7200 RPM drives over 5400 RPM drives. I recommend installing a second internal hard drive in your system, and dedicating it solely to video storage.
Many interesting hard-drive alternatives have appeared in recent years. These include external hard drives that plug into FireWire or USB ports. I recommend against using such drives for video storage when you’re editing in Premiere Elements. External drives are seldom fast enough to keep up with video’s demands, meaning that you may experience
dropped frames(that is, some frames of video are skipped and lost) and other problems when you try to output your video.
⻬A good video card: Many new PCs have the display adapter built into the motherboard. When you’re reading the spec sheet, you may see some-thing like “32MB on-board video” or “Shared VRAM.” If you see somesome-thing like this, run away! On-board video cards almost always use up some system RAM and they tend to make the whole PC perform quite slowly. The better solution is to buy a system with a separate video card in an expansion slot. This is the way PCs have been built for over a decade, and the separate card is still the way to go. I recommend a video adapter card with at least 64MB of video RAM.