•
•
•
•
•
•
Beginning
Xcode
Matthew Knott
Xco
de
Learn Xcode 5 to create amazing,
innovative applications for iOS and OS X
For your convenience Apress has placed some of the front
matter material after the index. Please use the Bookmarks
v
Chapter 3: Project Templates and Getting Around
■
...
39
Chapter 4: Building Interfaces
■
...
73
Chapter 5: Getting Help and Code Completion
■
...
113
Chapter 10: Advanced Editing
■
...
313
Chapter 11: Debugging and Analysis
■
...
341
Part 3: Final Preparations and Releasing
■
...
369
Chapter 12: Version Control with Git
■
...
371
Chapter 13: Localization
■
...
405
Chapter 14: The Organizer
■
...
445
Chapter 15: Building, Sharing, and Distributing Applications
■
...
479
xxi
Introduction
Welcome to Beginning Xcode, the book that aims to give you all of the knowledge to start writing applications using what is probably the most powerful integrated development environment (IDE) ever, and it’s free.
As with many Apple products, Xcode has simplicity and ease of use in abundance, but don’t be fooled; the shiny exterior masks a workhorse of a tool, incredibly powerful with an extensive set of integrated tools for every eventuality. Xcode is the development environment that all other IDEs have a poster of pinned to their bedroom walls.
Xcode hasn’t always been this shining Rock God of awesomeness; it used to be a sorry band of ragtag applications. When I first picked up Xcode 3 in 2007, I remember going through a multitude of different applications to perform varying tasks, such as the very basic Interface Builder, and finding out how to adapt my knowledge of C into Objective-C. Back then what I really wanted was something that showed me how to get the most out of Xcode and give me the understanding I needed to get going with the hundreds of app ideas I had in my head.
Fast forward six years and both myself and Xcode have come a long way. I feel as if I’ve gone from a kid, bumping my leaky paddle boat aimlessly around a boating lake, to a handsome sea captain at the prow of my vessel, gazing forth as I slice through choppy waves with grace and ease. Well, aside from the handsome part, the analogy is a good one. Xcode 5 is now a complete, integrated product that puts the same power in your hands as the developers at Apple who write the apps found in iOS and Mac OS X.
Throughout this book I aim to guide you through every facet of Xcode, helping you to understand the capabilities of each of the key areas as you build a number of cool and exciting projects along the way.
Part
1
3
Chapter
1
Welcome to Xcode
Apple provides Xcode to developers to help them create applications for Macs, iPhones, and iPads, namely, OS X and iOS. Xcode runs behind the vast majority of your favorite iOS and OS X applications. Arguably, without such a powerful, refined, integrated development environment (IDE), the thriving ecosystem that is the App Store would not exist as it does today.
What Is Xcode?
Every developer, regardless of the platform for which he or she is developing, has an array of tools that are used to take an application from an idea to something that is readily available to millions of people. Apple is no exception, and it provides a cultured, powerful, and polished set of development tools. These tools are brought together within one application called Xcode. Xcode provides
everything you need to create, test, deploy, and distribute applications for iOS and OS X. With the release of iOS 7 and Xcode 5, Apple has radically overhauled its toolset and created powerful, new technologies that aid developers in making the process of creating an application fun and rewarding.
The purpose of this book is to guide you in becoming familiar with Xcode 5 in the hope that you’ll become more than confident and embrace it to create amazing, innovative new applications for iOS and OS X. Like many other technical books, as you progress through each chapter, you will build upon your knowledge and systematically create a number of iOS applications.
Why Choose Xcode?
If you have experience developing for other platforms, then you probably want to know what exactly makes Xcode so great. The main reason is because there’s simply no other IDE like it; it’s unique in the sense that Apple has created it to be simple, yet at the same time it masks a powerful interior. You have the ability to work with a range of technologies and also have a phenomenal developer toolkit at your disposal. Xcode itself contains everything you could need: an intuitive code editor, advanced debugging, seamless interface editing features, and the benefit of being constantly updated and maintained by Apple.
In addition, using Xcode is arguably the only practical way to develop applications for iOS and OS X that can truly be called native. Xcode is what Apple itself uses to produce its own innovative software, which is used by millions of people.
Aside from Xcode, it’s hard to actually find a commendable alternative if you’d like to develop native iOS or OS X applications. Of course there are third-party services and tools, but oftentimes you’ll find yourself battling with inconsistencies and a lack of compatibility rather than focusing on what’s really important: creating great apps (and enjoying doing so). The purpose of Xcode isn’t to simply be an IDE, it also helps, aids, and guides you on your quest of creating something that has the potential to reach a staggeringly large audience, and for that reason, Xcode is a fantastic choice.
Prior Assumptions
Before you dive in and start reading this book, it’s assumed that you have at least some familiarity with Objective-C and Cocoa Touch. This book is geared toward those developing for iOS; however, it is possible to get a lot out of this book if you’re developing OS X applications, as many of the principles presented can be applied to either platform.
It’s assumed that you are using a Mac and are preferably running the latest version of OS X. Although it isn’t necessary that you run the latest version of Xcode, this book is written specifically for Xcode 5, and some of the instructions may not be possible in older versions. There’s also the misconception that you need the greatest and latest “souped-up” Mac, but in fact many previous generation MacBooks will work just fine.
It’s also assumed that you know how to operate your Mac and how to use OS X. For example, you need to know how to use the Finder, save files, and so forth—all the basics. Finally, a couple of the chapters present scenarios in which an active Internet connection is required, and some features of Xcode perform better when you are connected.
It’s also worth mentioning that the purpose of this book is not to teach you how to create
What’s Covered in This Book
Part 1: Getting Acquainted
Chapter 1: This first chapter will start you on your journey into the world of Xcode and explain how to get Xcode onto your machine and prepare it for first use. You also are shown how to sign up as an Apple developer and you get a look at the wealth of resources provided by Apple to iOS and OS X developers.
Chapter 2: Here, you’ll start a project and get the ball rolling in terms of
becoming familiar with Xcode. You’ll learn the basics of how to create projects, creating and building applications, along with how to get around in Xcode.
Chapter 3: Next, the focus will shift to how to choose from Xcode’s different project templates, and you’ll also have a guided tour around Xcode’s interface along with an introduction to many of the menus, inspectors, and panels you should make use of to work efficiently.
Chapter 4: This chapter focuses solely on how to design your interfaces using Xcode’s built-in interface editor, Interface Builder, and gives you an in-depth look at the libraries and inspectors available.
Chapter 5: Next, you’re shown how to access the invaluable help resources that are built right in to Xcode and also how to make the most of its intelligent code completion feature.
Chapter 6: Building on Chapter 4, you will be shown the new Auto Layout system introduced in Xcode 5, and how Xcode makes it simple to support the iPhone 5’s larger display and how to constrain elements so they display perfectly on many iOS devices.
Part 2: Diving Deeper
Chapter 7: This chapter shows you how to make use of a key feature for rapid development in Xcode, Storyboards, and how it can add a certain degree of logic to how you display and push views in your application.
Chapter 8: This chapter explains how Xcode makes it easy to populate and create table and collection views with the addition of how to customize their appearance and functionality.
Chapter 10: This chapter will show you how to add your own personal touches to Xcode in terms of editing code. In particular, the code editor will be the focus of this chapter, and you’ll be guided on how to work more productively and how to customize its appearance and behavior to suit your tastes and requirements.
Chapter 11: This chapter presents the idea of making your application run more efficiently and faster. This is done by looking at the range of different tools and methods included within Xcode, for example, breakpoints, and stepping through your code systematically.
Part 3: Final Preparations and Releasing
Chapter 12: Here you’ll learn how you can protect your code and work effectively as a team by using Git, Xcode’s integrated version control software.
Chapter 13: This chapter examines the idea of localization and how to use Xcode to accurately support multiple languages in your app.
Chapter 14: This chapter looks at the Organizer, what it’s for, how to navigate around in it, and how to keep your developer assets in good standing order.
Chapter 15: To conclude, you’ll make final touches on the application, build it for release, and then share it either as an IPA file or via the App Store using either Application Loader or the Organizer.
Getting and Installing Xcode
Before you can download Xcode, there are a couple of things you need to do. First, you’ll need an iTunes account (or an Apple ID) that allows you to download content from the Mac App Store, and then you’re good to go. If you do not have an Apple ID, you can sign up for one at no cost at
http://appleid.apple.com. This book is written for Xcode 5, and to run it you’ll also need a Mac that’s running the latest version of OS X or at least OS X 10.8.4; however, if you have an older version of OS X with an older version of Xcode, many of the lessons here will still apply.
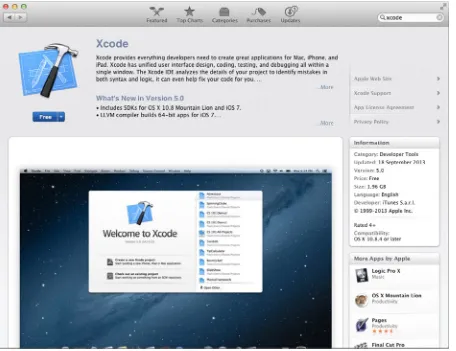
Once you’re equipped with an Apple ID and a Mac running OS X 10.8.4+, you can actually begin downloading Xcode. As with many other Mac apps, you simply download it from the Mac App Store at no additional cost. Open the App Store on your Mac and select Categories from the top bar of the window and then click the Developer Tools category. Usually, you’ll be able to find Xcode right away, either at the top of the window or in the sidebar on the right displaying the top free apps. Alternatively, you can use the Search bar in the top right and enter “xcode”. Xcode’s icon is an apt
Note If you don’t have access to the latest version of OS X or are running an older version that isn’t supported, you can download previous versions of Xcode from the iOS Dev Center, but for this you’ll need to have a registered Apple developer account. This is all explained later. However, this book covers the latest version of Xcode (which is 5.0 at the time of writing).
Figure 1-1. Xcode within the Mac App Store
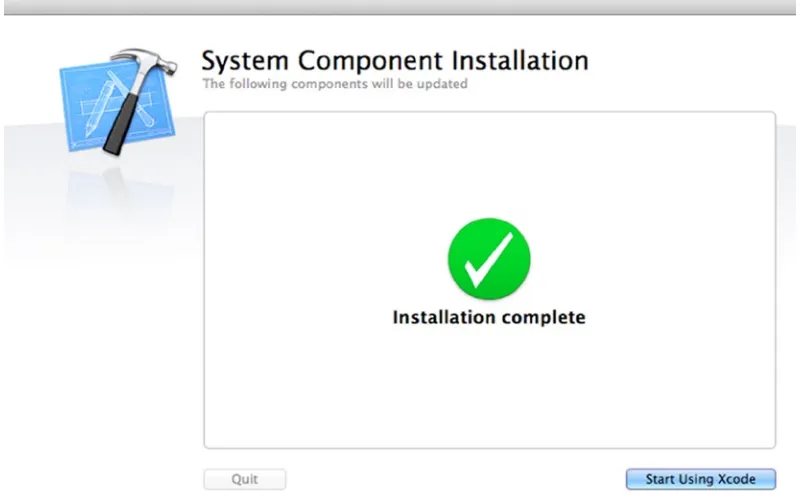
With Xcode downloaded, open it from your Applications folder and you’ll be prompted to install some additional packages, chick Install and enter your user password. This installation should take a
matter of seconds, as shown in Figure 1-3.
Firing Up Xcode
Once you’ve successfully downloaded and installed the additional components, you can now begin using Xcode. In Chapter 2, you’ll actually create your first project and become familiar with the basic areas of Xcode, but for now, just make sure that everything is in good order so you don’t encounter any problems later on.
When you first launch Xcode, you’re presented with a Welcome splash screen, and from here you can create a new project, connect to an external repository, open documentation, visit Apple’s developer portal, and also browse a list of your recent projects. For some, this screen will cause irritation, and you can prevent it from appearing each time you open Xcode by simply checking or
unchecking the Show this window when Xcode launches box, as shown in Figure 1-4.
To create a new project, you can simply click the Create a new Xcode project button on the
Welcome screen or you can navigate to File ➤ New ➤ Project where you’ll be presented with a
range of templates provided by default by Xcode.
If you have gotten to this point, it’s safe to assume you’ve successfully installed Xcode correctly and that you’re ready to start creating projects. However, I’ll save this for a deeper explanation in Chapter 2 and for now look at the variety of resources provided to developers by Apple.
Apple’s Resources for Developers
At this point, you now have Xcode downloaded to your machine and you’ve fired it up to make sure it runs. If there’s one thing that makes Apple stand out from its competitors it’s the wealth of knowledge, resources, and tools that are made just for developers. There are thousands of documents, thousands of samples to download, and dozens upon dozens of videos you can watch. Currently, you have Xcode installed, but that alone isn’t going to make you a great developer of iOS and OS X applications. You also need to make use of the vast library provided by Apple. To gain access to Apple’s resources, I urge you to sign up as a registered Apple developer. To do this, all you need is an Apple ID, and you can create a new one or use the same ID you used to download content from iTunes or the App Store.
First, head over to http://developer.apple.com. This is the central web site for Apple developers.
On the home page of the site, click iOS Dev Center. The iOS Dev Center is the central location for all the resources provided to those who create iPhone, iPad, and iPod touch applications, as shown in Figure 1-5.
You aren’t required to sign up in order to gain access to many of the resources including the Developer Library, an overwhelming wealth of example source code, release notes, and many more things. You can happily browse through the iOS Dev Center right now without having to sign up.
However, there are great advantages to signing up as a registered Apple developer, and it will become essential at some point if you’re planning on distributing applications via the App Store. Therefore, it’s a good idea to sign up right from the start. To begin the process of signing up, simply click the Register for free text just below the Log in button; alternatively, you can visit
http://developer.apple.com/programs/register/. In order to sign up, you’ll need to have a valid Apple ID; if you don’t have one or would like to dedicate an Apple ID to your developer account, create a new one (don’t worry, none of your purchases or downloaded content from the App Store or iTunes Store will be affected if you use your current one).
Once you’re happy with your Apple ID, go to the link above and sign up for an account. In order to complete the process of signing up, you’ll need to create a personal and professional profile; don’t worry, you can change these at any time if you need to.
Next, you’re required to complete your professional profile by telling Apple any previous platforms you’ve developed for along with your primary markets and experience with Apple’s platforms. This information is used by Apple simply to get an idea of the spectrum of people who are signing up as developers. Again, once you have completed this, simply click the Next button. Also, it’s important to note that what you select when updating your professional profile doesn’t bind you to anything, and that you are able to develop and release applications to any of the App Store’s markets. Furthermore, you can, if needed, make any amendments to your professional profile (and personal
profile, for that matter) after you’ve signed up, as shown in Figure 1-6.
Figure 1-6. Completing your developer professional profile
Finally, you will come to the tiresome agreement that comes with many of Apple’s products; simply read, click to agree, and then continue with the process. To finish, all you need to do is verify that the e-mail address supplied is valid; you do this by opening the e-mail sent to you by Apple and entering the verification code contained within.
The Dev Center
invaluable section of Apple’s developer web site. The Developer Library is a rather simple and straightforward site: simply use the links on the left-hand side to navigate around and to filter the results, either search for specific keywords or sort the results using one of the column titles, as
shown in Figure 1-7.
Figure 1-7. The iOS Developer Library
Aside from the iOS Developer Library, you also have access to an array of getting started videos that explain core Objective-C and Cocoa Touch concepts. You’re also given access to a direct link to the latest version of Xcode on the Mac App Store and the ability to download previous versions of Xcode if you’re not running the latest version of OS X or would like to target older versions of iOS.
Your Developer Account
versions of iOS before they’re available to the public, prerelease versions of Xcode, the ability to test your applications on your iOS devices, and, of course, the ability to submit applications to the iOS App Store. The cost of signing up at the time of the writing of this book is $99 per year, and it is required for some of the concepts presented toward the end of the book.
As mentioned previously, it isn’t necessary to sign up this instant, but it is recommended that you do
so at some point. To sign up for a paid account, visit https://developer.apple.com/programs/ios/
and click the Enroll Now button. You’ll then be guided through the process of signing up; it’s rather
straightforward if you follow the steps on screen, as shown in Figure 1-8.
Figure 1-8. Choosing between an individual or a company developer account
It’s useful to note that when you’re prompted to choose between an individual or company account, if you are planning to operate under a name other than your own, you will have to register as
Again, this can be done at a later date, but it’s essential if you’re planning on releasing any
applications on the App Store (free or paid) or even if you’d like to test your apps on an actual iOS device. Toward the end of this book, we will look at using Provisioning Profiles and deployment onto actual iOS devices as opposed to the virtual iOS Simulator, so you will then need access to a paid developer account.
Additional Resources
Apart from Apple’s own resources, there’s an extensive amount of third-party resources available and on hand if you ever have a burning question or get stuck somewhere.
Forums: Forums are a great way to ask questions, learn from other people’s questions, and also to help other people. In particular Stack Overflow
(http://stackovervlow.com/) has been invaluable to the entire developer spectrum for years and has a vibrant active collection of iOS developers. There are also the Apple developer forums, which are available to those with a paid Apple developer account.
Mailing lists: There’s a handy Xcode users mailing list that I’d recommend you subscribe to and periodically check over. Many other developers, including myself, participate in answering questions relating to Xcode. You can subscribe at
https://lists.apple.com/mailman/listinfo/xcode-users.
The Xcode User’s Guide: Apple provides a handy user’s guide that’s always being updated to accompany the latest release of Xcode, so it’s a good idea to refer to it when there’s a new update or if you’d like to follow up on something. It is available at http://developer.apple.com/library/ios/#documentation/ToolsLanguages/ Conceptual/Xcode4UserGuide/000-About_Xcode/about.html. Similarly, it’s also handy to glance over the latest release notes when an Xcode is updated. This is available at http://developer.apple.com/library/ios/#releasenotes/DeveloperTools/RN-Xcode/_index.html.
Search engines: It’s easy to underestimate the power of a simple Google search (and it’s apparent many people on online forums don’t have access to them), and it can save a lot of time as someone, somewhere, at some point will have undoubtedly had the same question you do, all you need to do is find where they asked it!
Summary
In this chapter, you have:
Successfully downloaded and installed Xcode
Had a look around the iOS Dev Center and also looked at the resources
provided by Apple to aid developers
Signed up and registered as an Apple developer and are aware of the option of
signing up for a paid developer account
17
Chapter
2
Diving Right In
In Chapter 1, you downloaded Xcode, made sure it was correctly configured, and you also signed up for a developer account and explored the wealth of resources provided by Apple to help you get started with not only Xcode but also some of its fantastic new technologies. This chapter will actually explain how to create a working application using Xcode’s visual interface building tool, aptly named Interface Builder, and its built-in code editor and then run it on your machine.
As mentioned, as you progress through this book, the ultimate goal is not only to get a grip on the latest and greatest version of Xcode but also, by the end of the book, to have a fully featured application that you will systematically build as you progress through the chapters. The application that you will build in this chapter will give you a flavor of what it feels like to develop with Xcode and won’t be part of our final app; you will begin that in Chapter 3. For now you will develop a very simple application that has a custom background color and a label and also programmatically update the text in the label.
You should also be forewarned that in this chapter, a lot of the concepts will be new and therefore require a little more explanation to do them total justice. As a result, you’ll notice that on several occasions you’re told that you’ll revisit many of the concepts presented in later chapters. This is because the main goal of this chapter isn’t to turn you into an Xcode pro, but rather to get you started and give you the confidence to believe that Xcode really isn’t as overwhelming as it may first
appear. In Figure 2-1, you get a glimpse of the very simple application; although simple, it will make
Creating Your First Xcode Project
First, you need to bring this project into existence. To do this, click Create a new Xcode project from
the Welcome Screen or go to File ➤ New ➤ Project … (+ Shift + N) and you’ll be presented with
a new window asking what kind of project you’d like to create. Apple provides, by default, a variety of different project templates for both OS X and iOS, each of which is useful for different types of projects. Chapter 3 will cover each of them in more detail, but because you’re creating a basic one-view application, it seems appropriate to choose Single View Application, which can be found within the Application category underneath iOS on the left-hand side of the dialog. Once you’ve selected the Single View Application project template, click the Next arrow in the bottom right-hand
corner. Figure 2-2 illustrates the template screen.
With your project template selected, you need to specify a couple of different things before you can
actually get started. Once you select your project template, a screen identical to that of Figure 2-3
will be displayed. Below is a brief overview of each of the values required to proceed, but bear in mind, more information on them will be provided later in this book:
Product Name: The product name is essentially what you would like to call your application, for example, if you wanted to create an application called Chocolate Recipes, you’d specify the Product Name to be something along the line of ChocolateRecipes. Although not required, it’s generally good practice to omit any spaces and instead capitalize each new word. The Product Name can be amended during the development of your application, so you’re not obliged to stick with what you specify, but regardless, the Product Name is a rather important detail that you’re required to specify at this stage.
Organization Name: Whether you’re working independently or you’re part of a software development company, you are required to specify an Organization Name. For now, your own name is perfectly adequate, but if you’re looking to submit an application to the App Store, it would be in your best interests to specify the correct name; although not required, it is recommended. Furthermore, when you create a new file, your Organization Name will automatically appear
along with copyright details at the top; something to bear in mind if you plan on working in a team or handing your project off to someone else.
Company Identifier: This, like the Bundle Identifier, is only really required if you’re planning on distributing your application in some capacity. For example, to distribute an app via the App Store, you’re required to specify an App ID along with a Bundle Identifier, which is created by Xcode depending on what you input as your Company Identifier. The company identifier is written in the style of
reverse domain name notation; my web site, for example, is mattknott.com, so
my Company Identifier is com.mattknott.
Bundle Identifier: You cannot edit this here, but its value depends on the Company Identifier, in order to avoid confusion (I won’t focus on this too much right now). Class Prefix: A Class Prefix is something that is added to the start of every file you
add to your project along with classes you create. This is a great idea if you’re creating your own class library, something you’ll look at later on in this book. For example, if I were to input my initials as the class prefix (MK), then every file I create via Xcode would have MK at the start, more specifically, if I were to create a UIViewController subclass, it would have MK at the start: MKViewController.xib. Devices: Possibly the most simple part of getting up and running with your
project is specifying what device you’d like your application to run on. You have three choices: iPhone, iPad, or Universal. The iPhone and iPad choices are self-explanatory, however, a Universal application is one that would be compatible with both the iPhone (and iPod touch) and iPad.
If you are using an older version of Xcode, you may see some additional options at this stage. In Xcode 5, Apple decided that using these features should be best practice, so for the majority of their project templates, it includes them by default. Even though you may not see these options, let’s take a look at what they do.
Use Storyboards: Storyboards were introduced to Xcode along with iOS 5 and they allow you to systematically lay out your application in terms of how the user would navigate around it. I will touch on Storyboards in this chapter, but Chapter 7 focuses in greater depth on how to use Storyboards.
Use Automatic Reference Counting: As with Storyboards, Automatic Reference Counting (sometimes referred to as ARC) is a relatively new feature for Xcode. Apple introduced ARC to automate memory management, automatically disposing of controls and objects when they’re no longer needed by the view. This can cause some problems when using older third-party libraries that haven’t been optimized for ARC.
Include Unit Tests: Unit testing is when individual parts of source code are tested to determine if they are fit for use. Again, Apple includes this functionality by default in all Xcode 5 projects.
Now that you vaguely know what each of these values are for and what they correspond to, you are
probably wondering what exactly you should input to create this project. As shown in Figure 2-3: you
Once you’ve made sure all of your values are correct, click Next and you’re required to save your project to disk. When prompted to, use the familiar OS X dialog to find a location and make sure the box for Create local git repository for this project is unchecked; then click Create.
Figure 2-3. Specifying the project’s details
Note Git is a popular system used for version control and source code management. You can integrate a local Git repository with a web site such as GitHub or Bitbucket if you want to back up or share your code online, but if none of these things are familiar to you, Chapter 12 will explain everything.
So far you’ve given Xcode all the relevant details and specified what kind of project you’re looking to create. As a result, Xcode has conveniently created an application for you and this is your starting point. Xcode has produced a flawless, full application that you can run right now if you like. Go to
Product ➤ Run and you’ll find your application builds successfully and the iOS Simulator pops up
with your application running, as shown in Figure 2-4. Granted it’s nothing spectacular nor will it be
Tip With the high resolution of modern iOS devices, unless you have a top-of-the-range Mac, it’s possible that the simulator is too large for your computer screen. If this is the case, then with the simulator selected, go to Window ➤ Scale ➤ 50% or use the key shortcut + 3. The scale menu also gives you the option to go to 100% of 75% scale using + 1 and + 2, respectively.
Figure 2-4. The initial application created by Xcode
The Project
In order to make the app a little more interesting than a simple white screen, you need to actually open up some files that have been created by Xcode. As with previous versions of Xcode, the way in which Xcode organizes your project’s file is somewhat strange. Upon returning back to Xcode, if you were to look to the left of the interface, you should be able to see what would appear to be an
arrangement of folders and files. These are the files that make up your project (Figure 2-5). This part
Project Navigator (+ 1). It’s important to note that when you create a folder in the Project Navigator, it does not correspond to the structure in which the files are saved within the Finder. Folders and the organization of the Project Navigator are purely to help you locate different files within Xcode. If you create a folder within the Navigator, you’ll find that the same folder isn’t present within your project when browsed within Finder. I’ll revisit this when you add a file to your project later in this chapter.
Figure 2-5. The Project Navigator
With that in mind, select Main.storyboard from the Project Navigator and Xcode will open its built-in
graphical user interface design tool, usually referred to as Interface Builder. As Xcode 4.0 was a major overhaul of Apple’s developer tools, Interface Builder, which was previously a separate application, was conveniently integrated into Xcode, making it easy to switch between the built-in
code editor and interface design tool all within one application, as shown in Figure 2-6. One warning
Designing the Interface
As noted previously, the app’s interface is neither exceptional nor revolutionary, and here you’ll be creating something very simple. However, the basics presented here will be echoed later in the book in much more detail. To begin with, let’s look at the Attributes Inspector. You’ll can find this by selecting the fourth tab in the sidebar on the right-hand side of Xcode’s interface, alternatively
you can go to View ➤ Utilities ➤ Show Attributes Inspector ( + ⌥ + 4). The Attributes Inspector
will play an important role when it comes to layout and fine tuning interface elements. First, you’ll simply change the background color of the application, making sure the view is selected by clicking
the white area with an arrow pointing to it (Figure 2-6), under the View heading of the Attributes
Inspector, select the color picking option for the background and then use OS X’s default color
picker to choose a background color, as shown in Figure 2-7. In this example, I’ve used the RGB sliders and chosen a background of Red: 88, Green: 98, and Blue: 255, although you’re free to choose whichever colors you wish.
Figure 2-7. Changing the view’s background using the Attributes Inspector
Figure 2-8. The Object Library
Next you’ll add a label to your view. To do this, you’ll need to open the Object Library (shown in Figure 2-8) and drag a label object to your view. Generally, the Object Library is right below the Attributes
Inspector and accessible by selecting the third tab, however, you can access it via View ➤ Utilities ➤
Show Object Library (⌃ + + ⌥ + 3). With the library open, use the small search bar and search for
When you drag the label to your view, you’ll notice that Xcode helps you align the label. I’ve aligned
it to the top and expanded it so that it spans the whole width of the view (shown in Figure 2-9) and
then used the text alignment properties within the Attributes Inspector to Center the text and also
changed the font to Avenir and the color to white, as shown in Figure 2-10.
Figure 2-9. Xcode’s autoaligning feature
At this stage, you can use the Attributes Inspector to actually specify the text that will be displayed within the label; however, Xcode isn’t just about creating graphical interfaces. It also houses a very powerful code editor, so as you progress in this chapter, you’ll actually update the contents of your label programmatically as opposed to graphically.
Making Connections
Before you leave Interface Builder and move on to focus on Xcode’s code editor, let’s look at a powerful feature that allows you to use both simultaneously. Open the Assistant Editor by selecting
the shirt and bowtie icon in the top-right corner of Xcode, as shown in Figure 2-11, or by selecting
View ➤ Assistant Editor ➤ Show Assistant Editor ( + ⌥ + Return).
Figure 2-11. The button to select the Assistant Editor looks like a shirt with a bowtie
Figure 2-12. Selecting the right file in the Assistant Editor
This will split your screen, with Interface Builder occupying the left frame and the code editor
occupying the right, unless you have customized this appearance, which is something I will show you later in the book. Before you continue, you’ll need to make sure Xcode has opened the correct file.
You want to open ViewController.h (the header file), but you may find that in the tabs directly above
the code, it says ViewController.m (the implementation file). To correct this, select ViewController.m
to show a list of options and then choose ViewController.h, as shown in Figure 2-12.
Once you have loaded the header file, ViewController.h, in the Interface Builder window, click the
Holding down the Control key, click the label and drag a connection over to the header file, positioning
the cursor and releasing the click just below the line @interface ViewController : UIViewController,
as shown in Figure 2-13.
Figure 2-13. Creating an outlet using the Assistant Editor
Figure 2-14. Creating an outlet for your label
When you release the click, a connection dialog will appear, asking for a number of values, as
shown in Figure 2-14. The two key options you need to be aware of here are the Connection
drop-down list and the Name text field. The Connection list has two options: Outlet and Outlet Collection for a label, but for an object that can be interacted with such as a button, there will be an option called Action.
If everything’s gone according to plan, you show now see the following code:
@interface ViewController : UIViewController
@property (weak, nonatomic) IBOutlet UILabel *lblOutput;
@end
You’re finished with the Assistant Editor for now, so let’s switch back to the Standard Editor by selecting the icon from the toolbar with three lines in a box to the left of the Assistant Editor icon (Figure 2-11).
You’ve finished with Interface Builder for this project, so now you’ll need to look at writing some
code to manipulate your label. Go to the Project Navigator and select ViewController.m, which will
open the View Controller’s implementation file in the code editor, as shown in Figure 2-15. Within this
chapter, I’ll touch upon many of the areas and concepts that I’ll explain throughout the book; but at this point you are going to start using Xcode’s powerful code editor and see some of the intuitive features that make Xcode one of the best IDEs ever made.
Figure 2-15. Xcode’s built in code editor with our ViewController.m file open
Within the code of the implementation file, look for a line that starts with - (void)viewDidLoad, this is
the start of the viewDidLoad method. To complete the very simple code for this application, you need
to tell the View Controller that when the view loads it should set the label’s text to Bonjour!. Add the
highlighted code into the viewDidLoad method as shown:
- (void)viewDidLoad {
[super viewDidLoad];
// Do any additional setup after loading the view, typically from a nib. _lblOutput.text = @"Bonjour!";
}
Here, you can see Xcode’s powerful code completion feature in action, which is able to assist you in
writing code much more efficiently. As you type _lbl you’ll see a pop-up appear that says UILabel
*_weak _lblOutput; when this is highlighted, press the Tab or Return key, which will complete the
word _lblOutput for you. Next type .te and again Xcode’s code completion will snap into action and
show a number of options, but the first one in the list is the one you want: NSString * text. With
that item selected, press the Return key and continue typing the code. You can easily see from this example how Xcode’s code completion helps you become a really efficient programmer, as well as helps you cut down on errors.
To recap, what you’ve done here is to declare a property which is linked to the UILabel you added to the view in Interface Builder using the Assistant Editor. You then added a single line of code to the viewDidLoad method to set the text of the label programmatically—well done!
Running and Testing
It’s hard to stress just how important it is to test your application thoroughly before even thinking about submitting it to the App Store. There are many reasons for this. First, the App Store review process is very thorough, that is, if your app isn’t up to par, Apple isn’t afraid to let you know in the form of a rejection. So testing means that not only do you reduce your chances of being rejected by Apple, but also when you submit your app, if you’re rejected, you’ll have to make the amendments and then resubmit your application, all of which is time consuming—time that could otherwise have been used to sell your app. Second, when someone downloads your application, they’re parting with their money and expect a certain standard. So when they purchase and download an app, it’s would be very disappointing to find that it’s slow and hard to use. Finally, it makes you a better developer, that is, by smoothing out the creases in your applications now and building good habits, you carry these on and they become second nature, so testing can seriously save a lot of time when working on larger, more demanding projects.
Now that you have your application ready to be run, the quickest way to check if it will build
successfully without crashing is to go to Product ➤ Build ( + B). If everything’s in order, then you
should see a small dialog stating the build has completed successfully. It’s now time to run your
application; similarly go to Product ➤ Run ( + R), and Xcode will build and then run the application
Once the build has completed, your application will open in an application that accompanies Xcode, iOS Simulator. The iOS Simulator is invaluable when you need to test your application quickly or to test a feature that you’ve recently implemented. However, it’s important to note that testing your app using the iOS Simulator is not the same as testing your applications on an iOS device, that is, an actual iPhone/iPod Touch or an iPad. This is because applications may not perform the same on a device as they do on iOS Simulator because the simulator does not simulate all software and hardware functionality. To change the type of device you’d like your application to be tested on via the iOS Simulator, go back to Xcode and click the Stop button in the top left-hand corner. With the
application now not running, go back to the iOS Simulator and choose Hardware ➤ Device and then
choose from the list of devices available. Figure 2-16 shows both a device with a 4-inch screen,
such as the iPhone 5, and a device with a 3.5-inch screen, such as the iPhone 4S.
Figure 2-16. The iOS Simulator running the app on a 4-inch screen (left) and a 3.5-inch screen (right)
Adding Files
One final thing that’s worth mentioning at this early stage is how to actually add your own files to your project. Applications are literally made up of hundreds upon hundreds of files, ranging from images to sounds, so what you’ll do finally is add some images to your application. First, let’s change the app’s icon without writing any code, and then add an image to the main view.
Before you add an icon file, you’re going to have to create one or you can download the source code for this book from the Apress web site and use the included files. Because this isn’t a book on iOS design, or even iOS development, I won’t digress on how to create perfect iOS app icons, instead I’ll just state that you’ll need to create a PNG file that, in this instance, I’m calling Icon.png with the dimensions of 120 px by 120 px. Include whatever you like as the actual graphic, just make sure it conforms to the above specifications. For our purposes here, simply create the file with a basic gradient with a speech bubble saying Hi! in the middle; that will be used as your icon.
You’re going to be working with a feature that’s new in Xcode 5, Asset Catalogs. From the Project
Navigator, select Images.xcassets. This is where you set the application icon in Xcode 5, not in
the project as with the previous version of Xcode. Drag your icon file to the right-hand box labeled iPhone App Icon iOS 7 60pt, as shown in Figure 2-17.
Now let’s run the app and see the icon in action. Once the application is running, click the Home
button, or Hardware ➤ Home (+ Shift + H). If you’ve done everything right, you should see
something like the image in Figure 2-18.
Figure 2-19. The Add Files dialog available from the Project Navigator
Figure 2-18. The application’s new icon within the iOS Simulator
Note With the new icon formats for iOS 7 applications, the required resolutions for icon changed from what you may have known with iOS 6 and Xcode 4. If your app is going to support older versions of iOS, open the
Images.xcassets file, highlight the app icon entry, and in the Identity Inspector, mark the box that says iOS 6.1 and Prior Sizes. This will allow you to add two icons of 57 pixels and 114 pixels, respectively.
With the icon successfully set, let’s look at another way of adding files to the project. You could expand on your Asset Catalog knowledge for this example, but I’ll explain this in more depth later in the book. For now, let’s look at the more traditional way of adding files to your project. They say there’s more than one way to skin a cat, and the same could be said for Xcode’s Add Files dialog.
First, you could go to File ➤ Add Files to “HelloWorld”… ( + ⌥ + A), or you could right-click in the
Project Navigator area and choose Add Files to “HelloWorld”. But the method I would like you to use is to click the plus icon in the bottom left corner of the Project Navigator and then click Add Files to
“HelloWorld”…, as shown in Figure 2-19.
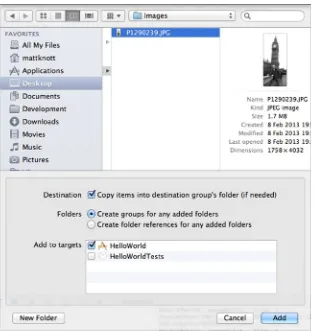
The Add Files dialog will instantly be familiar to any user of OS X; locate your file (I’ve simply used a photo from my iPhone), select it, and then make sure Copy items into destinations group’s folder
At this point you will return to Xcode, and if you look at the Project Navigator, you’ll see that your file has been added to the file structure of the project. When I asked you to add the file, I also asked that you ensure that Copy items into destinations group’s folder (if needed) was checked. The reason for this is that if you don’t check this option, the file will appear in the project structure as it does now, but it isn’t copied into the project. Hence, if you were to send the project to someone or to archive it, the image would be omitted.
Before you proceed and make this image appear in your view, let’s talk about organizing files. As I mentioned earlier, Xcode gives the illusion of organization, a kind of faux folder structure that in Xcode is actually called Groups. Let’s start by moving the file you added to the Supporting Files group by
clicking it and dragging it until Supporting Files is highlighted. Now if you look at Figure 2-21, you
can see a comparison of the structure of the files within Finder compared to the structure of the files in Xcode.
You’ve done the hard work of adding the file into Xcode, now let’s do the fun part—adding the image
to the View Controller using the Storyboard. Start by selecting Main.storyboard from the Project
Navigator. Now, from the Object Library, select an Image View (UIImageView) control and drag it to
your View Controller. If you’re having trouble finding it in the list, remember you can filter the list by typing “image” in the search field. Resize the Image View so it fills the entire view controller; your
screen should now look something like the image in Figure 2-22.
Figure 2-21. The structure of the files in the Project Navigator within Xcode (left) compared to those in Finder (right)
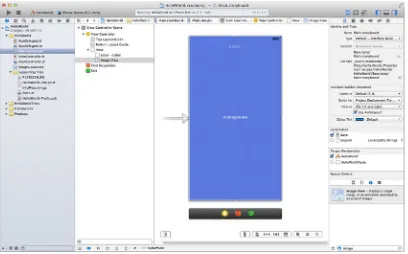
With the Image View positioned, it’s time to tell it which image to use. With the Image View selected, go to the Attributes Inspector on the right and from the Image drop-down, select the file you added. You’ll find that the image fills the Image View, but it may have been distorted in doing so. What you want is for the photo to fill the Image View but to maintain its ratio; to achieve this, click the Mode drop-down list and select Aspect Fill. Your image will still fill the Image View, but the ratio is maintained, preserving the original look of the image.
So you’re finished, right? Not quite. With the Image View filling all of the available space, you can’t see the label you added at the start of the project! This is because of the way these two items are ordered, with the Image View being rendered in a layer above the label. To resolve this, let’s look at the Document Outline. If you can’t see the Document Outline (the column to the left of the View
Controller in Figure 2-21), then click the Show Document Outline button in the bottom left corner of
the Storyboard design area.
Expand all of the items in the Document Outline and, beneath View, you should have your Label, followed by the Image View. Now drag the Image View carefully to move it above the Label, as
shown in Figure 2-23. Because of the hierarchy of the view, the Image View will now be rendered
beneath the label, although you may want to tweak the color of your label to make sure it’s visible
against the background of your image. Now you’re ready to run your app! Figure 2-24 presents the
finished product.
Tip Remember, if you can’t see the Object Library, you can access it via View ➤ Utilities ➤ Show Object Library (⌃ + + ⌥ + 3).
Figure 2-24. The finished app
Summary
You’ve learned a lot in this chapter, specifically you have:
Set up a new Xcode project and found that Xcode generates a functioning, yet
boring, application.
Designed an interface using Xcode’s built-in graphical interface builder and used
the Attributes Inspector to change some basic properties of the objects you added to your view.
Used the Assistant Editor to visually create connected outlets quickly and
efficiently with drag and drop.
Looked at Xcode’s code editor and updated the contents of a UILabel
programmatically and also had an introduction to Xcode’s code completion tool.
Built and ran your application within iOS Simulator and looked at some different
features of the iOS Simulator.
Compared and contrasted the basics of the structure of your files within the
Added an Image View, or
UIImageView, to use its correct but less friendly name,
to your view controller and set its image in the Attribute Inspector.
Moved objects in the Document Outline hierarchy.
Essentially, the main purpose of this chapter wasn’t to create a ground-breaking application but rather to give you at least a certain degree of comfort when it comes to working with the latest version of Xcode. It’s easy to become overwhelmed with the sheer amount of menus, tools, dialogs, and inspectors; however, as you have seen, creating an app isn’t too daunting when you know where to look and what to press.
39
Chapter
3
Project Templates and Getting
Around
In Chapter 2 you created a very basic application and then tested it on the iOS Simulator. You were also introduced to the basics of the Project Navigator and looked at two commonly used inspectors: the Attributes and the Connections Inspectors. You also programmatically updated the contents of a label that had been placed onto the view using Interface Builder and then made it show an image file that had been added to the project. In the first half of this chapter, I’m going to take a step back from app creation and instead look at the array of different tabs, inspectors, panels, buttons, and windows that come with Xcode and also take a look at the different project templates provided by Xcode.
In order to be an accomplished app developer, it’s important that you become intimately familiar with the key areas of your IDE, and there’s a good chance you already knew this, which is why you bought this book. By the end of this chapter you should be a lot more familiar with many of the different interface elements of Xcode and should be able to quickly access a certain feature of Xcode. You’ll also be able to choose a project template without having to worry if you’ve picked the right one and will have some of the key knowledge required to start creating your own applications.
In the second half of this chapter, you’ll look at how to create a working multi-view application from nothing (almost nothing) without using Storyboards as you did in Chapter 2. You’ll also discover how to pass information from one view to another and display that information in the ShowMe application. Although this is going to be quite involved, it will give you a better understanding of how View Controllers can share information, but later on in the book when I’ll explain Storyboards in detail, you will see how much easier they can make the development process.
Figure 3-1. Xcode’s different project templates
Project Templates
As a developer, you have the somewhat daunting task of making many, many decisions throughout the development of your application, and, with iOS and OS X apps, arguably, the first decision you need to make is choosing the correct project template in Xcode. At this point, you’re optimistic, excited about the adventure ahead, and eager to get straight in there and begin writing your application, but not so fast! Choosing the right project template can have a huge impact on the direction your application takes, and that’s why I’m going to go through each of them and explain in which cases you should choose a project template provided by Xcode. It’s worth mentioning here that, with the main focus of this book being iOS development, I won’t go into detail about the OS X templates and instead will focus more on the ones targeted at iOS application development.
To begin, you’re going to need to fire up Xcode if you haven’t done so already, and either choose
Create a new Xcode project from the Welcome screen or go to File ➤ New ➤ Project (⌘ + Shift + N)
By default, when you first open Xcode and choose a project template, you’re given the option to choose only from the ones provided by Apple; however, if you’d like to see what really goes into making an Xcode project and perhaps tinker with one yourself, the default location of Xcode’s
project template is /Applications/Xcode.app/Contents/Developer/Platforms/iPhoneOS.platform/
Developer/Library/Xcode/Templates/Project Templates (this is, of course, assuming that you have Xcode located within your /Applications folder). Here, you can open the different project templates provided by Apple and dissect them. However, I recommend that before you do this you back up that folder just in case you change something that corrupts the template.
Note You’ll notice that throughout this book you’ll be given the keyboard shortcut equivalent whenever you are to access a menu item, open a window, or show a navigator or inspector. I strongly encourage you to take advantage of keyboard shortcuts because it can drastically improve your workflow and allow you to become a more productive developer, or, at the very least, make you appear to know what you’re doing. It can also make even the more tiresome tasks somewhat bearable. What’s more, many of the shortcuts that apply to Xcode can also be brought over to other applications, for example, to Finder. You could also visit Xcode’s preferences (⌘ + ,) and modify some of the shortcuts if they’re not quite to your liking.
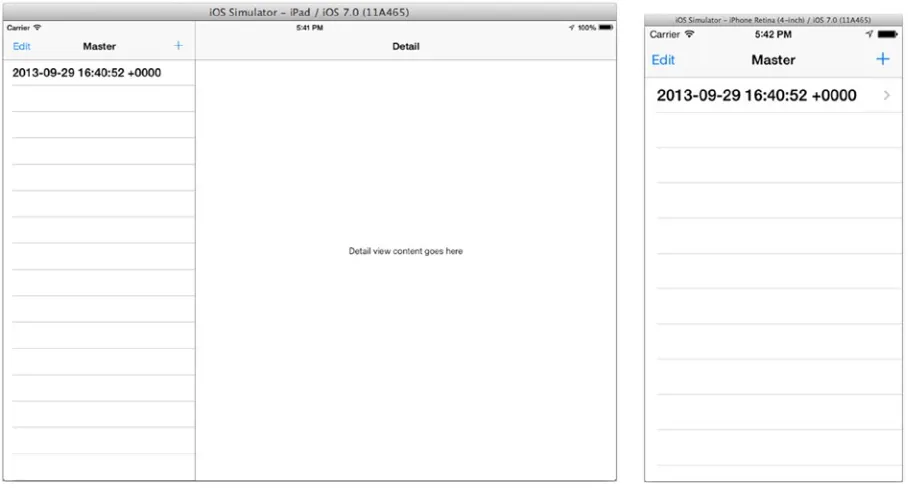
Master Detail View
The Master Detail View template is a starting point if you’re looking to create an application that presents the user with a UITableView and then pushes a detail view when the user taps a row. By default, Xcode creates a project that, if targeting an iPhone, has one table view that has the ability for the user to add rows when they tap the plus button in the top right corner of the navigation bar. If targeting the iPad, a new row is added to the table view, however, the layout of both the table and detail view fits much more nicely within the iPad’s larger display.
Figure 3-2 displays the default project created when you specify Master Detail View as your project
Figure 3-2. Master detail view template running on both iPad (left) and iPhone (right)
OpenGL Game
The OpenGL Game template is an excellent choice if you’re planning to create a game using Apple’s OpenGL ES and GLKit frameworks. As a starting point, Xcode creates a simple application in which two cubes, varying in color, float around the screen, detecting collisions. Furthermore, Xcode also includes two rather unique files default: Shader.fsh and Shader.vsh. Both of these are OpenGL shading language source files. Because using Xcode for game development is out of the scope of focus for this book, I won’t go into too much detail.
Figure 3-3 shows the default project created for an OpenGL Game project running on both the iPad
Page-Based Application
Creating an application using the Page-Based template gives users the impression they are actually swiping through the pages of a book. With the Page-Based project, Xcode gives you everything you need to create an application that displays information in a book-like format, that is, it reveals information as the user swipes the screen either left or right. By default, you’re provided with UIPageViewControllerDelegate, which specifies the root view controller and initializes the view by
loading PageViewModelController.
Figure 3-4 shows the default project created by Xcode when you choose to create a page-based
application; on the left, you can see it running on the iPad and, on the right, it is running on the iPhone. If you were to swipe or click the left- or right-most side of the screen, the content will be pulled over as if reading a book.
Figure 3-4. Page-Based template running on both iPad (left) and iPhone (right)
Single View Application
This is perhaps the most organic project template provided by Xcode and it will inevitably be the starting point for many applications. The Single View project template provides you with a single UIViewController that’s loaded when the application runs. It’s like a completely blank canvas, in which the application can take any shape you like. This is especially useful if you’re creating a custom iOS application, if you aren’t sure of the exact approach you’re going to take, or if the alternative templates don’t seem appropriate for your project.
Figure 3-5 illustrates what you’re given by Xcode when you choose this project template and,
Figure 3-5. Single View template running on both iPad (left) and iPhone (right)
Tabbed Application
Because many applications use tab bars to display different parts of an application, it’s no surprise
that Apple has created a project template that allows you to quickly implement UIViewControllers
within a UITabBarController. By default you’re provided with two view controllers, each of which has
its own tabs.
Figure 3-6 illustrates a tabbed application. As you can see, the application consists of a tab bar with
Utility Application
Next there is the Utility project template. When you choose this project template, you’re provided
with two view controllers: MainViewController and FlipViewController. The purpose of a Utility
application is that it allows the user to flip the first view controller around to reveal additional settings and other information. By default when you run a utility application a gray view in the form of
MainViewController is displayed along with a small information button that, when clicked, flips the
view around to display whatever is within FlipViewController.
Figure 3-7 illustrates a Utility project-based application running on both an iPad and iPhone.
Figure 3-7. Utility template running on both iPad (left) and iPhone (right)
Empty Application
The penultimate template is the Empty application project template. Technically, if you were to choose this template and run the application right off, you would already encounter a problem. That problem would be that your application doesn’t really have anything to load except a window and no root view controller, as generally expected by Xcode. It’s easy to mistake the Single View template for the Empty application because, although both are blank, the Single View template is actually displaying a view with a view controller, albeit blank, whereas for the Empty application, as the name suggests, it isn’t even displaying a white view—it’s displaying nothing, just a window by itself. This template is useful if you’d like to start completely from scratch, if you don’t have a clear idea where your application is going or how it will perform, or if you’d prefer to actually work from the ground up and create your application that way. The only thing provided by this template is an application delegate and a window.
SpriteKit Game
The Sprite Kit framework and its application template were introduced for the first time in Xcode 5. Sprite Kit is Apple’s answer to third-party game engines like Cocos2D. It may not have the features of Cocos2D, but its simplicity, coupled with the powerful physics and the animation tools it provides to developers, has made it one of the hottest new frameworks in Xcode 5. In addition to giving you the tools to create your own version of your favorite 2D physics game, you can also use Sprite Kit to
add complex animations to your more traditional applications (Figure 3-9).
Template Selection
Now that I’ve explained each of the eight default project templates provided by Apple, you can start looking at the various panels and panes you will see in Xcode. To help you with this, and for the only time in this book, you’ll have a go at developing your own application entirely without the use of Storyboards. As a beginner, this is not entirely unlike taking a tightrope walk without a safety net. Storyboards make the development process much more visual, but from time to time it’s good to know how to do things the old-fashioned way. For this project, which is called ShowMe, you’ll use the Empty Application template.
As with any other application created using Xcode, you need to start by creating a new project,
which should now be second nature to you, but if you’ve forgotten, it’s File ➤ New ➤ New Project…
(⌘ + Shift + N) or, alternatively, click Create a new Xcode project from the Welcome
screen (⌘ + Shift + 1).
Once you’ve started the process of creating this app, you need to specify which application template you would like to use and which one would best suit this ShowMe application. In this instance, use the Empty Application template simply because it doesn’t really contain anything, and you’ll turn that into something useful. Ordinarily, however, when choosing a template, there is a certain thought process you would go through to make sure you start with the right template:
How users will navigate around your application: If you’re using a good old UINavigationController as the crux of the application, chances are you’ll
need a Single View application and then implement a UINavigationController
manually; however, if the users will navigate using the UITabBarController, then
your best choice, surprisingly, will be Tabbed application.
How you’d like your screens to be laid out: Again, if screens are going
to be pushed via a UINavigationController or displayed as a single
UIViewController, a Single View application will suffice; however, if you’re creating a book or an application in which you’d like the view to flip around to display additional settings, either the Page Based or Utility template, respectively, is your best bet.
Whether or not you’re creating a game: If you’re creating a game, Apple has provided the OpenGL Game and SpriteKit Game templates, which give you the tools and features for almost any game project, but if they don’t go far enough, you can use the Empty Application template and make use of third-party frameworks.
Because for this example I’ve already decided you’re going to select Empty Application from the project templates dialogue, select it and click Next. Now, you’re required to provide Xcode with those
all-important little details such as the Product Name, Organization Name, and so on. Figure 3-10 illustrates
the values to put in (remember to input your own first and last names in the relevant fields though!).
Figure 3-10. Inputting the options to create the application
For the Product Name, let’s use ShowMe. For this project, you can specify your own name (that is, your first and last names) as the Organization Name, so in my case this would be Matthew Knott. In
this instance, I’ve again used reverse domain notation and entered com.mattknott, but you could just
as easily use com.YOURSURNAME. You won’t be using a Class Prefix in this case, so select iPhone as
To finish, simply click Next and you’ll be prompted to choose a location for your project. Save your project somewhere that’s easy for you to find and ensure that Create git repository on… is unchecked. Also, make sure Don’t add to any project or workspace is selected from the drop-down menu and then click Create. You’re now ready to explore the many different areas of Xcode.
Getting Around
Now that you have your application ready and the project set up, it’ll be useful to become familiar with the main areas of Xcode’s interface, that is the navigators, toolbar, editor, utilities panel, and the debugging area. Essentially, most actions you’ll need to perform will be among those main areas of the interface, with the exception of the actions contained within the menu bar. In the next section, I’ll focus on each of these sections so that when attention is brought to them later in the book, you’ll
have an idea where to look and what purpose they serve. In Figure 3-11, you can see a breakdown
of the main area of Xcode’s interface.
Figure 3-11. Five main parts of Xcode’s interface
Navigators
The first focus will be on the left-most side of Xcode, the section that houses the navigators. A navigator in Xcode is something that allows you to browse various different things, whether that’s files, folders, warnings, build errors, memory leaks, breakpoints, and so on. If you look at the top of the navigator’s panel, you’ll see that you can toggle the view using eight different tabs,
The Project Navigator, the first tab, is perhaps one of the most important features of the whole navigator panel. It allows you to explore the files within your project and also displays what makes up your project in terms of frameworks and interface files. As previously mentioned, the file structure of the Project Navigator does not correspond to that of the Finder; things like folders are there just to make it easier for you to navigate around your own project within Xcode.
Next there is the Symbol Navigator, which is where you can browse what is classed by Xcode as a symbol within your project. A symbol is generally the name of a class or a method. If you look at the bar at the bottom of the Symbol Navigator, you can filter what’s displayed and you can view Cocoa’s built-in symbols or symbols that are defined within your project. The Symbol Navigator is especially useful when you have dozens of header and implementation files and you need to quickly browse them to find a certain class declaration or method.
Third, there is the Search Navigator. The Search Navigator is a very useful means of searching through your project to find a certain bit of code. If you select the small magnifying glass within the search area, you can specify certain search options such as where Xcode should look along with the ability to more accurately define what you’re looking for. The Search Navigator is very useful when you need to quickly find something and you have hundreds of different files and thousands of lines of code.
Moving along there is the Issue Navigator. As you develop your application, the Issue Navigator will alert you to any issues with the application by flagging warnings and errors. The Issue Navigator will not only tell you what’s wrong but also attempt to accurately pinpoint exactly where the issue lies.
Next you’ll find a new tab for Xcode 5, the Test Navigator. This is where your test targets, and its test classes, can be found. From here you manage all of your tests and they’re coded in a similar way to how the Project Navigator and the editor work together in that selecting a test will open the relevant code and allow you to write unit tests that ensure individual classes and methods work as they should.
The Debug Navigator, the sixth tab, is used when your code pauses and, by default, will open automatically if a pause is encountered. However, the Debug Navigator will remain dormant otherwise. Equally, the Debug Navigator will appear when a breakpoint is reached in your code. When in use, the Debug Navigator displays call stacks along with the names of nested methods. If you were to click the method name, you would have the ability to navigate through it further. In addition to this there are useful CPU and memory monitors that display the real-time impact of your code. The Debug Navigator should not be confused with the Debug Area of Xcode; I’ll cover this area later in this chapter.
Figure 3-12. Xcode’s different navigators among which you can toggle