Basics Guide
Panduan Dasar
The information contained in this document is subject to change without notice.
All rights reserved. Reproduction, adaptation, or translation of this material is prohibited without prior written permission of Hewlett-Packard, except as allowed under copyright laws. The only warranties for HP products and services are set forth in the express warranty statements accompanying such products and services. Nothing herein should be construed as constituting an additional warranty. HP shall not be liable for technical or editorial errors or omissions contained herein. © 2009 Hewlett-Packard Development Company, L.P.
Windows, Windows 2000, and Windows XP are U.S. registered trademarks of Microsoft Corporation.
Windows Vista is either a registered trademark or trademark of Microsoft Corporation in the United States and/or other countries.
Intel and Pentium are trademarks or registered trademarks of Intel Corporation or its subsidiaries in the United States and other countries.
Pemberitahuan Hewlett-Packard Company
Informasi yang terkandung dalam dokumen ini dapat berubah tanpa pemberitahuan.
Hak Cipta dilindungi Undang-Undang. Dilarang memperbanyak, mengadaptasi, atau menerjemahkan bahan ini tanpa izin tertulis dari Hewlett-Packard, kecuali sebagaimana yang diperbolehkan menurut hukum hak cipta. Jaminan yang diberikan untuk produk dan layanan HP hanya meliputi jaminan yang ditetapkan dalam pernyataan jaminan tersurat yang disertakan pada masing-masing produk dan layanan. Dokumen ini tidak memberikan jaminan tambahan apa pun. HP tidak bertanggung jawab atas segala ketidaklengkapan atau kesalahan teknis atau editorial dalam dokumen ini.
© 2009 Hewlett-Packard Development Company, L.P.
Windows, Windows 2000, dan Windows XP adalah merek dagang Microsoft Corporation yang terdaftar di AS.
Windows Vista adalah merek dagang terdaftar atau merek dagang Microsoft Corporation di Amerika Serikat dan/atau negara-negara lain. Intel dan Pentium adalah merek dagang atau merek dagang terdaftar Intel Corporation atau anak perusahaannya di Amerika Serikat dan negara-negara lain.
HP Photosmart C4600 series
Basics Guide
Engl
is
Contents
1 HP Photosmart overview
The HP Photosmart at a glance...2
Control panel buttons...3
Find more information...4
Load originals and load paper...4
Avoid paper jams...7
Print 10 x 15 cm (4 x 6 inch) photos...7
Scan an image...8
Make a copy...9
Replace the print cartridges...9
Clean the HP Photosmart...12
2 Troubleshooting and support Uninstall and reinstall the software...14
Hardware setup troubleshooting...15
Clear paper jams...17
Print cartridge troubleshooting...18
Support process...18 3 Technical information System requirements...19 Product specifications...19 Regulatory notices...19 Warranty...20 1 Engl is h
1
HP Photosmart overview
Use the HP Photosmart to quickly and easily accomplish tasks such as making a copy, scanning documents, or printing photos from a memory card. You can access many HP Photosmart functions directly from the control panel, without turning on your computer.
NOTE: This guide introduces basic operations and troubleshooting, as well as provides information for contacting HP support and ordering supplies.
The Electronic Help details the full range of features and functions, including use of the HP Photosmart Software that came with the HP Photosmart.
The HP Photosmart at a glance
Label Description
1 Color graphics display (also referred to as the display)
2 Control panel
3 On button
4 Photo light
5 Memory card slot for Memory Stick cards
6 Memory card slot for Secure Digital and xD cards
7 Paper tray
8 Paper tray extender (also referred to as the tray extender)
9 Cartridge door
10 Cartridge access area
11 Print carriage
E
n
Label Description
12 Glass
13 Lid-backing
14 Lid
15 Rear door
16 Rear USB port
17 Power connection (Use only with the power adapter supplied by HP.)
Control panel buttons
The following diagram and related table provide a quick reference to the HP Photosmart control panel features.
2.
Label Name and Description
1 Back: Returns to the previous screen.
2 Cancel: Stops the current operation, restores default settings, and clears
the current photo selection.
3 OK: Selects a menu setting, value, or photo.
4 Scan: From the Home screen, opens the Scan Menu. When viewing
screens other than the Home screen, selects options related to the current display.
5 Photo: From the Home screen, opens the Photo Menu. When viewing
screens other than the Home screen, selects options related to the current display.
6 Copy: From the Home screen, opens the Copy Menu. When viewing
screens other than the Home screen, selects options related to the current display.
(continued)
Control panel buttons 3
Engl
is
Find more information
A variety of resources, both printed and electronic provide information about setting up and using the HP Photosmart.
Start Here guide
The Start Here guide provides instructions for setting up your HP Photosmart and installing software. Make sure you follow the steps in the Start Here guide in order. If you have problems during setup, see Troubleshooting in the last section of the Start Here guide, or see “Troubleshooting and support” on page 14 in this guide.
Electronic Help
The Electronic Help provides detailed instructions on features of your HP Photosmart that are not described in this guide, including features that are only available using the software you installed with your HP Photosmart. The Electronic Help also provides regulatory and environmental information.
To access the Electronic Help
• Windows: Click Start > All Programs > HP > Photosmart C4600 series > Help. • Macintosh: Open the HP Device Manager and click the ? icon. Next, click the main
menu and select Photosmart C4600 series.
HP Web site
If you have Internet access, you can get help and support from the HP Web site at ordering information.
Load originals and load paper
You can load different types and sizes of paper in the HP Photosmart, including letter or A4 paper, photo paper, transparencies, and envelopes. For more information, see the Electronic Help.
To load an original on the glass
1. Lift the lid to the open position.
2. Load your original print side down on the right front corner of the glass.
TIP: For more help on loading an original, refer to the engraved guides along the edge of the glass.
E
n
glish
3. Close the lid. To load full-size paper
1. Slide the paper-width guide to its outermost position.
NOTE: If you are using letter or A4 paper or smaller, make sure the tray extender is open all the way. When you use legal-size paper, leave the tray extender closed. TIP: Tap a stack of paper on a flat surface to align the edges. Make sure all the paper in the stack is the same size and type and free of rips, dust, wrinkles, and curled or bent edges.
2. Insert the stack of paper into the paper tray with the short edge forward and the print side down. Slide the stack of paper forward until it stops.
Load originals and load paper 5
Engl
is
CAUTION: Make sure that the product is idle and silent when you load paper into the paper tray. If the product is servicing the print cartridges or otherwise engaged in a task, the paper stop inside the product might not be in place. You could push the paper too far forward, causing the product to eject blank pages. TIP: If you are using letterhead, insert the top of the page first with the print side down.
3. Slide the paper-width guide inward until it stops at the edge of the paper.
Do not overload the paper tray; make sure the stack of paper fits within the paper tray and is no higher than the top of the paper-width guide.
To load small-size photo paper in the paper tray
1. Slide the paper-width guide to its outermost position.
2. Insert the stack of photo paper into the far-right side of the paper tray with the short edge forward and the print side down. Slide the stack of photo paper forward until it stops.
If the photo paper you are using has perforated tabs, load the photo paper so that the tabs are closest to you.
E
n
3. Slide the paper-width guide inward until it stops at the edge of the paper.
Do not overload the paper tray; make sure the stack of paper fits within the paper tray and is no higher than the top of the paper-width guide.
Avoid paper jams
To help avoid paper jams, follow these guidelines.
• Remove printed papers from the paper tray frequently.
• Prevent curled or wrinkled photo paper by storing all unused photo paper flat in a resealable bag.
• Ensure that paper loaded in the paper tray lays flat and the edges are not bent or torn.
• If you are printing labels, ensure that the label sheets are no more than two years old. Labels on older sheets might peel off when the paper is pulled through the product, and cause paper jams.
• Do not combine different paper types and paper sizes in the paper tray; the entire stack of paper in the paper tray must be the same size and type.
• Adjust the paper-width guide in the paper tray to fit snugly against all paper. Make sure the paper-width guide does not bend the paper in the paper tray.
• Do not force paper too far forward in the paper tray.
• Use paper types that are recommended for the product.
Print 10 x 15 cm (4 x 6 inch) photos
To achieve the best print quality, HP recommends using HP papers that are specifically designed for the type of project you are printing along with genuine HP ink. HP papers and HP ink are specifically designed to work well together to provide high-quality output.
Print 10 x 15 cm (4 x 6 inch) photos 7
Engl
is
1 Memory Stick, Memory Stick Pro, Memory Stick Select, Memory Stick Magic Gate, Memory Stick Duo or Duo Pro (adapter optional), or Memory Stick Micro (adapter required) 2 xD-Picture Card, Secure Digital (SD), Secure Digital Mini (adapter required), Secure Digital
High Capacity (SDHC), MultiMediaCard (MMC), MMC Plus, MMC Mobile (RS-MMC; adapter required), TransFlash MicroSD Card, or Secure MultiMedia Card
To print one or more small-size photos
1. Load 10 x 15 (4 x 6 inch) photo paper in the paper tray.
2. Insert your memory card into the appropriate slot on the product.
3. Press the buttons next to the up arrow or down arrow icons on the display to scroll through the photos on your memory card until the photo you want to print appears. 4. Press the button next to Select to select the photo, and then press OK.
5. Leave the default settings as 4 x 6 photo and Borderless.
6. Press the button next to Prints to increase the number of copies you want to print of the current image.
7. Press OK.
TIP: While the photo is printing, you can continue to scroll through the photos on your memory card and add more photos to the print queue by pressing the button next to Print More....
Scan an image
You can start a scan from your computer or from the control panel of the HP Photosmart. This section explains how to scan from the control panel of the HP Photosmart only.
NOTE: You can also use the software you installed with the HP Photosmart to scan images. Using this software, you can edit a scanned image and create special projects using a scanned image.
E
n
To scan to a computer
1. Load your original print side down on the right front corner of the glass.
NOTE: Ensure that there are no memory cards inserted in the memory card slots on the product.
2. Press the button next to Scan. The Scan Menu appears.
3. Press the button next to Scan to PC.
A preview image of the scan appears on your computer, where you can edit it. Any edits that you make apply to the current scan session only.
The HP Photosmart Software has many tools that you can use to edit your scanned image. You can improve the overall image quality by adjusting the brightness, sharpness, color tone, and saturation. You can also crop, straighten, rotate, or resize the image.
4. Make any edits to the preview image, and then click Accept when you are finished.
Make a copy
You can make quality copies from the control panel. To make a copy from the control panel
1. Load paper in the paper tray.
2. Load your original print side down on the right front corner of the glass. 3. Press the button next to Copy.
4. Press the button next to Black Copy or Color Copy.
5. Press the button next to Copies to increase the number of copies. 6. Press OK.
TIP: To make copies of thick originals, such as books, you can remove the lid.
Replace the print cartridges
Follow these instructions to replace print cartridges. Following these instructions might also help solve print quality issues related to the cartridges.
NOTE: When the ink level for the print cartridge is low, a message appears on your computer screen. You can also check the ink levels by using the software installed with the HP Photosmart.
When you receive a low-ink warning message, make sure you have a replacement print cartridge available. You should also replace the print cartridges when you see faded text or if you experience print quality issues related to the print cartridges.
To order print cartridges for the HP Photosmart, go to www.hp.com/buy/supplies. If prompted, choose your country/region, follow the prompts to select your product, and then click one of the shopping links on the page.
Replace the print cartridges 9
Engl
is
To replace the print cartridges
1. Make sure the product is on and you have letter or A4 unused plain white paper loaded in the paper tray.
2. Open the print cartridge door.
The print carriage should move to the center of the product. If the print carriage does not move to the center, turn the product off, and then on.
3. Wait until the print carriage is idle and silent, and then lightly press down on a print cartridge to release it.
If you are replacing the tri-color print cartridge, remove the print cartridge from the slot on the left.
If you are replacing the black print cartridge, remove the print cartridge from the slot on the right.
1 Print cartridge slot for the tri-color print cartridge 2 Print cartridge slot for the black print cartridge
4. Pull the print cartridge towards you out of its slot.
5. If you are disposing of the print cartridge, recycle the print cartridge. The HP Inkjet Supplies Recycling Program is available in many countries/regions, and lets you recycle used print cartridges free of charge. For more information, go to the following Web site:
www.hp.com/hpinfo/globalcitizenship/environment/recycle/inkjet.html
6. Remove the new print cartridge from its packaging, being careful to touch only the black plastic. Gently remove the plastic tape using the pink pull tab.
E
n
1 Copper-colored contacts
2 Plastic tape with pink pull tab (must be removed before installing) 3 Ink nozzles under tape
CAUTION: Do not touch the copper-colored contacts or ink nozzles. Touching these parts can result in clogs, ink failure, and bad electrical connections.
7. Slide the new print cartridge at a slight upward angle into the empty slot. Then gently push on the upper part of the print cartridge forward until it snaps into place. If you are installing the tri-color print cartridge, slide it into the left slot. If you are installing the black print cartridge, slide it into the right slot.
8. Close the print cartridge door.
Replace the print cartridges 11
Engl
is
9. When prompted, press OK to print a cartridge alignment page.
10.Load alignment page print side down on right front corner of glass, and then press OK to scan page.
The product aligns the print cartridges. Recycle or discard the print cartridge alignment sheet.
Clean the HP Photosmart
To ensure that your copies and scans remain clear, you might need to clean the glass and lid backing. You might also want to dust the exterior of the HP Photosmart.
TIP: You can purchase an HP Cleaning Kit for Inkjet Printers and All-in-Ones (Q6260A) that provides everything needed to safely clean your HP device. For more information, go to: www.shopping.hp.com/accessories-store/printer.
To clean the glass
1. Turn off the product, unplug the power cord, and raise the lid.
2. Clean the glass with a soft cloth or sponge slightly moistened with a nonabrasive glass cleaner.
CAUTION: Do not use abrasives, acetone, benzene, or carbon tetrachloride on the glass, since they can damage it. Do not place or spray liquid directly on the glass. The liquid might seep under the glass and damage the product.
3. Dry the glass with a dry, soft, lint-free cloth to prevent spotting. 4. Turn on the product.
E
n
To clean the lid backing
1. Turn off the product, unplug the power cord, and raise the lid.
2. Clean the white document backing with a soft cloth or sponge slightly moistened with a mild soap and warm water.
Wash the backing gently to loosen debris. Do not scrub the backing. 3. Dry the backing with a dry, soft, lint-free cloth.
CAUTION: Do not use paper-based wipes, as these might scratch the backing. 4. If further cleaning is needed, repeat the previous steps using isopropyl (rubbing)
alcohol, and wipe the backing thoroughly with a damp cloth to remove any residual alcohol.
CAUTION: Be careful not to spill alcohol on the glass or exterior of the product, as this might damage it.
5. Plug in the power cord, and then turn on the product.
TIP: You can remove the lid for an easy cleaning experience.
Clean the HP Photosmart 13
Engl
is
2
Troubleshooting and support
This chapter contains troubleshooting information for the HP Photosmart. Specific information is provided for installation and configuration issues, and some operational topics. For more troubleshooting information, see the Electronic Help that came with your software.
Many issues are caused when the HP Photosmart is connected to the computer using a USB cable before the HP Photosmart software is installed on the computer. If you connected the HP Photosmart to your computer before the software installation screen prompts you to do so, you must follow these steps:
Troubleshooting common setup issues
1. Disconnect the USB cable from the computer.
2. Uninstall the software (if you have already installed it).
3. Restart your computer.
4. Turn off the HP Photosmart, wait one minute, then restart it.
5. Reinstall the HP Photosmart software.
CAUTION: Do not connect the USB cable to the computer until prompted by the software installation screen.
For support contact information, see the inside back cover of this guide.
Uninstall and reinstall the software
If your installation is incomplete, or if you connected the USB cable to the computer before prompted by the software installation screen, you might need to uninstall and then reinstall the software. Do not simply delete the HP Photosmart application files from your computer. Make sure to remove them properly using the uninstall utility provided when you installed the software that came with the HP Photosmart.
To uninstall and reinstall the software
1. On the Windows taskbar, click Start, Settings, Control Panel (or just Control Panel).
2. Double-click Add/Remove Programs (or click Uninstall a program).
3. Select HP Photosmart All-in-One Driver Software, and then click Change/Remove. Follow the onscreen instructions.
4. Disconnect the product from your computer.
5. Restart your computer.
NOTE: It is important that you disconnect the product before restarting your computer. Do not connect the product to your computer until after you have reinstalled the software.
6. Insert the product CD-ROM into your computer’s CD-ROM drive and then start the Setup program.
NOTE: If the Setup program does not appear, locate the setup.exe file on the CD-ROM drive and double-click it.
NOTE: If you no longer have the installation CD, you can download the software from
www.hp.com/support.
7. Follow the onscreen instructions and the instructions provided in the Setup Guide that came with the product.
When the software installation is complete, the HP Digital Imaging Monitor icon appears in the Windows system tray.
E
n
To verify that the software is properly installed, double-click the HP Solution Center icon on the desktop. If the HP Solution Center shows the essential icons (Scan Picture and Scan
Document), the software has been properly installed. To uninstall from a Mac and then reinstall
1. Disconnect the HP Photosmart from your Mac.
2. Open the Applications:Hewlett-Packard folder.
3. Double-click HP Uninstaller. Follow the onscreen instructions.
4. After the software is uninstalled, restart your computer.
5. To reinstall the software, insert the HP Photosmart CD-ROM into your computer’s CD-ROM drive.
6. On the desktop, open the CD-ROM and then double-click HP All-in-One Installer.
7. Follow the onscreen instructions and the instructions provided in the Setup Guide that came with the HP Photosmart.
Hardware setup troubleshooting
Use this section to solve any problems you might encounter while setting up the HP Photosmart hardware.
The product will not turn on
Try the following solutions if there are no light indications, no noise, and no movement from the product when you turn it on.
Solution 1: Make sure you use the power cord that came with the product Solution
• Make sure the power cord is firmly connected to both the product and the power adapter. Plug the power cord into a power outlet, surge protector, or power strip.
• If you are using a power strip, make sure the power strip is turned on. Or, try plugging the product directly into a power outlet.
• Test the power outlet to make sure it is working. Plug in an appliance that you know works, and see if the appliance has power. If not, then there might be a problem with the power outlet.
• If you plugged the product into a switched outlet, make sure the outlet is switched on. If it is switched to on but still does not work, then there might be a problem with the power outlet.
Cause: The product was not being used with the power cord provided.
If this did not solve the issue, try the next solution.
Solution 2: Reset the product
Solution: Turn off the product, and then unplug the power cord. Plug the power cord back in,
and then press the On button to turn on the product.
Cause: The product experienced an error.
If this did not solve the issue, try the next solution.
Solution 3: Press the On button more slowly
Solution: The product might not respond if you press the On button too quickly. Press the On button once. It might take a few minutes for the product to turn on. If you press the On button
again during this time, you might turn the product off.
Cause: You pressed the On button too quickly.
If this did not solve the issue, try the next solution.
Hardware setup troubleshooting 15
Engl
is
Solution 4: Contact HP to replace the power supply
Solution: Contact HP support to request a power supply for the product.
Go to: www.hp.com/support.
If prompted, choose your country/region, and then click Contact HP for information on calling for technical support.
Cause: The power supply was not intended for use with this product or it had a mechanical
failure.
If this did not solve the issue, try the next solution.
Solution 5: Contact HP support for service
Solution: If you have completed all of the steps provided in the previous solutions and are still
having a problem, contact HP support for service. Go to: www.hp.com/support.
If prompted, choose your country/region, and then click Contact HP for technical support.
Cause: You might need assistance to enable the product or software to function properly. The display shows the wrong language
Solution: Change the language setting. To set your language and country/region
1. Press the button next to Copy on the Home screen. The Copy Menu appears.
2. Press the top-right, middle-left, and bottom-left buttons in sequence. The Basic Settings menu appears.
3. Press the button next to Set Language.
4. Press the buttons next to the up arrow or down arrow icons on the display to scroll through the languages. When the language you want to use is highlighted, press the button next to
OK.
5. When prompted, press the button next to Yes for confirmation. The Basic Settings menu reappears.
6. Press the button next to Set Region.
7. Press the buttons next to the up arrow or down arrow icons on the display to scroll through the countries/regions. When the country/region you want to use is highlighted, press the button next to OK.
8. When prompted, press the button next to Yes for confirmation.
Cause: You might have selected the incorrect language when setting up the product. I connected the USB cable, but I am having problems using the product with my computer
Solution: You must first install the software that came with the product before connecting the
USB cable. During installation, do not plug in the USB cable until prompted by the onscreen instructions.
Once you have installed the software, plug one end of the USB cable into the back of your computer and the other into the back of the product. You can connect to any USB port on the back of your computer.
For more information on installing the software and connecting the USB cable, see the Setup Guide that came with the product.
Cause: The USB cable was connected before the software was installed. Connecting the USB
cable before you are prompted can cause errors.
E
n
After setting up the product, it does not print
Try the following solutions to resolve the issue. Solutions are listed in order, with the most likely solution first. If the first solution does not solve the problem, continue trying the remaining solutions until the issue is resolved.
Solution 1: Press the On button to turn on the product
Solution: Look at the display on the product. If the display is blank and the On button is not
lit, the product is turned off. Make sure the power cord is firmly connected to the product and plugged into a power outlet. Press the On button to turn on the product.
Cause: The product might not have been turned on.
If this did not solve the issue, try the next solution.
Solution 2: Set your product as the default printer
Solution: Use the system tools on your computer to change your product to be the default
printer.
Cause: You sent the print job to the default printer, but this product was not the default printer.
If this did not solve the issue, try the next solution.
Solution 3: Check the connection between the product and computer Solution: Check the connection between the product and computer. Cause: The product and computer were not communicating with each other.
If this did not solve the issue, try the next solution.
Solution 4: Check that the print cartridges are installed properly and have ink Solution: Check that the print cartridges are installed properly and have ink.
Cause: There might have been a problem with one or more of the print cartridges.
If this did not solve the issue, try the next solution.
Solution 5: Load paper in the paper tray Solution: Load paper in the paper tray.
Cause: The product might have been out of paper.
Clear paper jams
In case of a paper jam, check the rear door. You might need to clear the paper jam from the rear door.
To clear a paper jam from the rear door
1. Press in the tab on the left side of the rear door to release the door. Remove the door by pulling it away from the product.
Clear paper jams 17
Engl
is
2. Gently pull the paper out of the rollers.
CAUTION: If the paper tears when you are removing it from the rollers, check the rollers and wheels for torn pieces of paper that might be remaining inside the product. If you do not remove all the pieces of paper from the product, more paper jams are likely to occur.
3. Replace the rear door. Gently push the door forward until it snaps into place.
4. Press the button next to OK to continue the current job.
Print cartridge troubleshooting
If you are experiencing problems with printing, you might have a problem with one of the print cartridges. For more information, see “Replace the print cartridges” on page 9 in this guide.
Support process
If you have a problem, follow these steps:
1. Check the documentation that came with the product.
2. Visit the HP online support Web site at www.hp.com/support. HP online support is available to all HP customers. It is the fastest source for up-to-date device information and expert assistance and includes the following features:
• Fast access to qualified online support specialists • Software and driver updates for the product
• Valuable product and troubleshooting information for common problems
• Proactive device updates, support alerts, and HP newsgrams that are available when you register the product
3. Call HP support. Support options and availability vary by device, country/region, and language. For support contact information, see the inside back cover of this guide.
E
n
3
Technical information
The technical specifications and international regulatory information for the HP Photosmart are provided in this section.
For additional regulatory and environmental information, including the Declaration of Conformity statement, see the Electronic Help.
System requirements
Software system requirements are located in the Readme file.
Product specifications
For product specifications, go to the HP Web site at www.hp.com/support.
Paper specifications
Paper tray capacity: Plain paper sheets: Up to 85 (60 to 90 gsm. (20 lb.) paper)
NOTE: For a complete list of supported media sizes, see the printer software.
Physical specifications
• Height: 16.5 cm (6.5 inches) • Width: 44.2 cm (17.4 inches)
• Depth: 57.6 cm (22.7 inches) with tray extender open; 40.7 cm (16 inches) with tray extender closed
• Weight (with cartridges) : 4.70 kg (10.34 pounds)
Power specifications
• •
NOTE: Use only with the power adapter supplied by HP.
Environmental specifications
• Recommended operating temperature range: 15 ºC to 32 ºC (59 ºF to 90 ºF) • Allowable operating temperature range: 5 ºC to 40 ºC (41 ºF to 104 ºF)
• Humidity: 20% to 80% RH non-condensing (recommended); 28 ºC maximum dewpoint • Non-operating (Storage) temperature range: -25 ºC to 60 ºC (13 ºF to 140 ºF)
• In the presence of high electromagnetic fields, it is possible the output from the HP Photosmart may be slightly distorted
• HP recommends using a USB cable less than or equal to 3 m (10 feet) in length to minimize injected noise due to potential high electromagnetic fields
Regulatory notices
The HP Photosmart meets product requirements from regulatory agencies in your country/region. For a complete listing of regulatory notices, see the Electronic Help.
Regulatory model identification number
For regulatory identification purposes, your product is assigned a Regulatory Model Number. The Regulatory Model Number for your product is SNPRH-0803. This regulatory number should not be confused with the marketing name (HP Photosmart C4600 series, etc.) or product numbers (Q8418A, etc.). Technical information 19 Engl is h Input voltage (0957-2269): AC 100 to 240 V ~ 600 mA 50-60 Hz Power consumption: 20 watts maximum (average printing)
Warranty
A. Extent of limited warranty
1. Hewlett-Packard (HP) warrants to the end-user customer that the HP products specified above will be free from defects in materials and workmanship for the duration specified above, which duration begins on the date of purchase by the customer.
2. For software products, HP’s limited warranty applies only to a failure to execute programming instructions. HP does not warrant that the operation of any product will be interrupted or error free.
3. HP's limited warranty covers only those defects that arise as a result of normal use of the product, and does not cover any other problems, including those that arise as a result of:
a. Improper maintenance or modification;
b. Software, media, parts, or supplies not provided or supported by HP; c. Operation outside the product's specifications;
d. Unauthorized modification or misuse.
4. For HP printer products, the use of a non-HP cartridge or a refilled cartridge does not affect either the warranty to the customer or any HP support contract with the customer. However, if printer failure or damage is attributable to the use of a non-HP or refilled cartridge or an expired ink cartridge, HP will charge its standard time and materials charges to service the printer for the particular failure or damage.
5. If HP receives, during the applicable warranty period, notice of a defect in any product which is covered by HP's warranty, HP shall either repair or replace the product, at HP's option.
6. If HP is unable to repair or replace, as applicable, a defective product which is covered by HP's warranty, HP shall, within a reasonable time after being notified of the defect, refund the purchase price for the product.
7. HP shall have no obligation to repair, replace, or refund until the customer returns the defective product to HP. 8. Any replacement product may be either new or like-new, provided that it has functionality at least equal to that of the
product being replaced.
9. HP products may contain remanufactured parts, components, or materials equivalent to new in performance. 10. HP's Limited Warranty Statement is valid in any country where the covered HP product is distributed by HP. Contracts
for additional warranty services, such as on-site service, may be available from any authorized HP service facility in countries where the product is distributed by HP or by an authorized importer.
B. Limitations of warranty
TO THE EXTENT ALLOWED BY LOCAL LAW, NEITHER HP NOR ITS THIRD PARTY SUPPLIERS MAKES ANY OTHER WARRANTY OR CONDITION OF ANY KIND, WHETHER EXPRESS OR IMPLIED WARRANTIES OR CONDITIONS OF MERCHANTABILITY, SATISFACTORY QUALITY, AND FITNESS FOR A PARTICULAR PURPOSE. C. Limitations of liability
1. To the extent allowed by local law, the remedies provided in this Warranty Statement are the customer's sole and exclusive remedies.
2. TO THE EXTENT ALLOWED BY LOCAL LAW, EXCEPT FOR THE OBLIGATIONS SPECIFICALLY SET FORTH IN THIS WARRANTY STATEMENT, IN NO EVENT SHALL HP OR ITS THIRD PARTY SUPPLIERS BE LIABLE FOR DIRECT, INDIRECT, SPECIAL, INCIDENTAL, OR CONSEQUENTIAL DAMAGES, WHETHER BASED ON CONTRACT, TORT, OR ANY OTHER LEGAL THEORY AND WHETHER ADVISED OF THE POSSIBILITY OF SUCH DAMAGES.
D. Local law
1. This Warranty Statement gives the customer specific legal rights. The customer may also have other rights which vary from state to state in the United States, from province to province in Canada, and from country to country elsewhere in the world.
2. To the extent that this Warranty Statement is inconsistent with local law, this Warranty Statement shall be deemed modified to be consistent with such local law. Under such local law, certain disclaimers and limitations of this Warranty Statement may not apply to the customer. For example, some states in the United States, as well as some governments outside the United States (including provinces in Canada), may:
a. Preclude the disclaimers and limitations in this Warranty Statement from limiting the statutory rights of a consumer (e.g., the United Kingdom);
b. Otherwise restrict the ability of a manufacturer to enforce such disclaimers or limitations; or
c. Grant the customer additional warranty rights, specify the duration of implied warranties which the manufacturer cannot disclaim, or allow limitations on the duration of implied warranties.
3. THE TERMS IN THIS WARRANTY STATEMENT, EXCEPT TO THE EXTENT LAWFULLY PERMITTED, DO NOT EXCLUDE, RESTRICT, OR MODIFY, AND ARE IN ADDITION TO, THE MANDATORY STATUTORY RIGHTS APPLICABLE TO THE SALE OF THE HP PRODUCTS TO SUCH CUSTOMERS.
HP Limited Warranty
Dear Customer,
You will find below the name and address of the HP entity responsible for the performance of the HP Limited Warranty in your country.
You may have additional statutory rights against the seller based on your purchase agreement. Those rights are not in any way affected by this HP Limited Warranty.
Ireland: Hewlett-Packard Ireland Limited, 63-74 Sir John Rogerson's Quay, Dublin 2 United Kingdom: Hewlett-Packard Ltd, Cain Road, Bracknell, GB-Berks RG12 1HN
Malta: Hewlett Packard International Trade BV, Branch 48, Sqaq Nru 2, Triq ix-Xatt, Pieta MSD08, Malta
South Africa: Hewlett-Packard South Africa Ltd, 12 Autumn Street, Rivonia, Sandton, 2128, Republic of South Africa HP product Duration of limited warranty
Software Media 90 days
Printer 1 year
Print or Ink cartridges Until the HP ink is depleted or the “end of warranty” date printed on the cartridge has been reached, whichever occurs first. This warranty does not cover HP ink products that have been refilled, remanufactured, refurbished, misused, or tampered with. Printheads (only applies to products with customer 1 year
replaceable printheads)
Accessories 1 year unless otherwise stated
E
n
HP Photosmart C4600 series
Panduan Dasar
Ba hasa I n done siaIsi
1 Gambaran umum HP Photosmart
Sekilas tentang HP Photosmart...23 Tombol panel kendali ...24 Mendapatkan informasi lebih lanjut...25 Memuatkan sumber asli dan kertas...25 Mencegah kemacetan kertas...28 Mencetak foto 10 x 15 cm (4 x 6 inci)...28 Memindai gambar...29 Membuat salinan...30 Mengganti kartrij cetak...30 Membersihkan HP Photosmart...33 2 Mengatasi masalah dan dukungan
Menghapus instalasi dan menginstal ulang perangkat lunak...35 Mengatasi masalah pemasangan perangkat keras...36 Membersihkan kertas macet...39 Mengatasi masalah kartrij cetak...39 Proses dukungan...39 3 Informasi teknis Persyaratan sistem...41 Spesifikasi produk...41 Maklumat pengaturan...41 Garansi...42 B ahasa Indon esia
1
Gambaran umum HP Photosmart
Gunakan HP Photosmart untuk menyelesaikan tugas-tugas dengan cepat dan mudah, seperti membuat salinan, memindai dokumen, atau mencetak foto dari kartu memori. Anda dapat mengakses banyak fungsi HP Photosmart langsung dari panel kontrol tanpa harus menghidupkan komputer.
Catatan Panduan ini memperkenalkan pengoperasian dasar dan pemecahan masalah, serta menyediakan informasi untuk menghubungi dukungan HP dan memesan persediaan.
Bantuan Elektronik merinci serangkaian lengkap fitur dan fungsi, termasuk penggunaan Perangkat Lunak HP Photosmart yang disertakan dengan HP Photosmart.
Sekilas tentang HP Photosmart
Label Keterangan
1 Tampilan grafis berwarna (juga disebut layar)
2 Panel kontrol
3 Tombol Hidup
4 Lampu foto
5 Slot kartu memori untuk kartu Stik Memori
6 Slot kartu memori untuk kartu Secure Digital dan kartu xD
7 Baki kertas
8 Penyangga baki kertas (juga disebut penyangga baki)
9 Pintu kartrid
10 Area akses kartrid
Gambaran umum HP Photosmart 23
Ba
hasa I
n
done
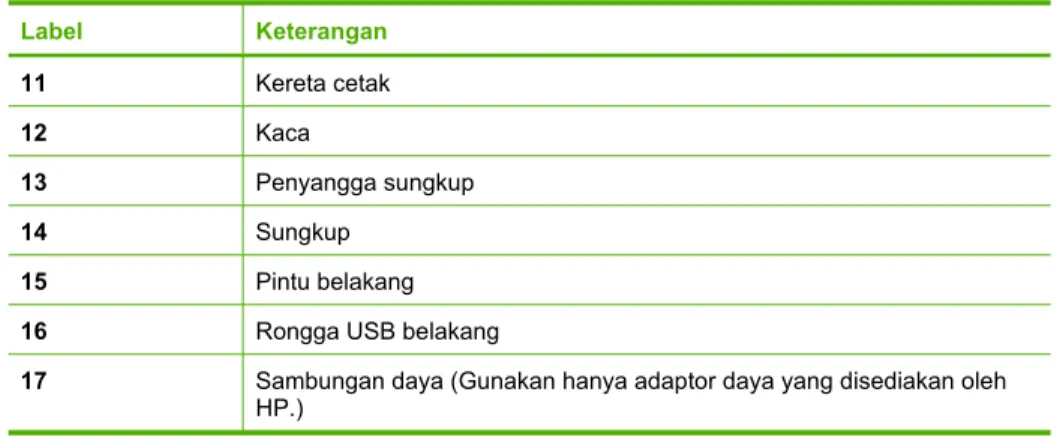
Label Keterangan 11 Kereta cetak 12 Kaca 13 Penyangga sungkup 14 Sungkup 15 Pintu belakang
16 Rongga USB belakang
17 Sambungan daya (Gunakan hanya adaptor daya yang disediakan oleh
HP.)
Tombol panel kendali
Diagram dan tabel di bawah ini berisi petunjuk singkat untuk fitur-fitur panel kontrol HP Photosmart.
2.
Label Nama dan Keterangan
1 Kembali: Kembali ke layar sebelumnya.
2 Batal: Menghentikan operasi saat ini, mengembalikan pengaturan standar,
dan menghapus pemilihan foto saat ini.
3 OK: Memilih pengaturan menu, nilai, atau foto.
4 Pindai: Dari layar Home (Halaman Depan), akan membuka Menu Pindai.
Jika layar yang tampil selain layar Home (Halaman Depan), pilih opsi yang terkait dengan tampilan saat ini.
5 Foto: Dari layar Home (Halaman Depan), akan membuka Menu Foto. Jika
layar yang tampil selain layar Home (Halaman Depan), pilih opsi yang terkait dengan tampilan saat ini.
6 Salin: Dari layar Home (Halaman Depan), akan membuka Menu Salin. Jika
layar yang tampil selain layar Home (Halaman Depan), pilih opsi yang terkait dengan tampilan saat ini.
(bersambung)
B
ahasa Indon
Mendapatkan informasi lebih lanjut
Aneka ragam sumber informasi, baik cetak maupun elektronik menyediakan informasi tentang pemasangan dan penggunaan HP Photosmart.
Panduan Mulai Di Sini
Panduan Mulai Di Sini menyediakan petunjuk untuk pemasangan HP Photosmart Anda dan penginstalan perangkat lunak. Pastikan Anda mengikuti langkah-langkah dalam Panduan Mulai Di Sini secara berurutan.
Jika Anda mengalami masalah selama pemasangan, lihat Mengatasi Masalah di bagian akhir panduan Mulai Di Sini, atau lihat “Mengatasi masalah dan dukungan”
pada halaman 35 dalam panduan ini.
Bantuan Elektronik
Bantuan Elektronik menyediakan petunjuk terperinci mengenai fitur HP Photosmart yang tidak dijelaskan dalam panduan ini, termasuk fitur yang hanya tersedia melalui perangkat lunak yang Anda instal dengan HP Photosmart. Bantuan Elektronik juga menyediakan informasi pengaturan dan lingkungan.
Untuk mengakses Bantuan Elektronik
• Windows: Klik Start (Mulai) > All Programs (Semua Program) > HP > Photosmart C4600 series > Help (Bantuan).
• Macintosh: Buka HP Device Manager (Pengelola Perangkat HP), lalu klik ikon ?. Selanjutnya, klik menu utama lalu pilih Photosmart C4600 series.
Situs Web HP
Jika Anda memiliki akses Internet, Anda bisa mendapatkan bantuan dan dukungan dari situs Web HP di www.hp.com/support. Situs Web ini menyediakan dukungan teknis, penggerak, persediaan dan informasi pemesanan.
Memuatkan sumber asli dan kertas
Anda dapat memuatkan berbagai jenis dan ukuran kertas dalam HP Photosmart, termasuk kertas letter atau A4, kertas foto, transparansi, dan amplop. Untuk informasi lebih lanjut, lihat Bantuan Elektronik.
Untuk memuatkan sumber asli pada kaca
1. Angkat penutup ke posisi terbuka.
2. Muatkan dokumen asli Anda dengan muka cetak menghadap bawah di sudut kanan depan kaca.
Tip Untuk bantuan lebih lanjut tentang cara memuatkan sumber asli, lihat petunjuk yang tertera di bagian tepi kaca.
Memuatkan sumber asli dan kertas 25
Ba
hasa I
n
done
3. Tutup penutupnya.
Untuk memuatkan kertas ukuran penuh
1. Geser pemandu lebar kertas ke posisi terluar.
Catatan Jika Anda menggunakan kertas surat, kertas A4, atau kertas yang lebih kecil, pastikan penyangga baki terbuka sepenuhnya. Jika Anda menggunakan kertas berukuran legal, biarkan penyangga baki tertutup.
Tip Luruskan tumpukan kertas pada permukaan yang datar untuk menyamakan ujungnya. Pastikan seluruh kertas pada tumpukan itu sama ukuran dan jenisnya serta bebas dari sobek, debu, kerutan, tergulung atau ujung yang terlipat. 2. Masukkan tumpukan kertas ke dalam baki kertas dengan tepi yang pendek di depan
dan muka cetak di bawah. Dorong tumpukan kertas ke depan sampai berhenti.
B
ahasa Indon
Perhatian Pastikan produk dalam keadaan siaga dan diam saat Anda memuatkan kertas ke dalam baki kertas. Jika produk sedang mengoperasikan kartrid cetak atau tugas tertentu, penahan kertas di bagian dalam produk mungkin tidak dapat bekerja dengan benar. Anda mungkin mendorong kertas terlalu ke depan, mengakibatkan produk mengeluarkan halaman kosong.
Tip Jika Anda menggunakan kop surat, masukkan bagian atas halaman terlebih dulu dengan permukaan cetak menghadap ke bawah.
3. Geser masuk pemandu lebar kertas sampai berhenti di pinggir kertas.
Jangan isi baki kertas terlalu penuh; pastikan tumpukan kertas pas dengan baki kertas dan tidak lebih tinggi dari batas atas pemandu lebar kertas.
Untuk memuatkan kertas foto ukuran kecil ke dalam baki kertas
1. Geser pemandu lebar kertas ke posisi terluar.
2. Masukkan tumpukan kertas foto ke sisi paling kanan dari baki kertas dengan tepi yang pendek di depan dan muka cetak di bawah. Dorong ke depan tumpukan kertas foto sampai berhenti.
Jika kertas foto yang Anda gunakan memiliki tab perforasi, muatkan kertas foto sehingga tab perforasi menghadap ke arah Anda.
Memuatkan sumber asli dan kertas 27
Ba
hasa I
n
done
3. Geser masuk pemandu lebar kertas sampai berhenti di pinggir kertas.
Jangan isi baki kertas terlalu penuh; pastikan tumpukan kertas pas dengan baki kertas dan tidak lebih tinggi dari batas atas pemandu lebar kertas.
Mencegah kemacetan kertas
Untuk membantu menghindari kemacetan kertas, ikuti petunjuk-petunjuk ini.
• Ambil setiap kertas yang telah selesai dicetak dari baki kertas.
• Cegah kertas foto tergulung atau berkerut dengan menyimpan semua kertas foto yang tidak digunakan secara mendatar dalam tas yang dapat ditutup kembali.
• Pastikan kertas tersebut dimuat di baki kertas dengan rata dan ujung-ujungnya tidak terlipat atau sobek.
• Jika Anda mencetak label, pastikan lembar label tersebut tidak berusia lebih dari dua tahun. Label-label pada lembar yang lebih tua mungkin akan terkelupas saat kertas ditarik melalui produk, sehingga mengakibatkan kertas macet.
• Jangan campur jenis dan ukuran kertas yang berbeda di dalam baki kertas; seluruh tumpukan kertas dalam baki kertas harus memiliki ukuran dan jenis yang sama.
• Sesuaikan pemandu lebar kertas pada baki kertas untuk menjepit seluruh kertas. Pastikan pemandu lebar kertas tidak menyebabkan kertas di baki tertekuk.
• Jangan dorong kertas terlalu jauh ke depan pada baki kertas.
• Gunakan jenis kertas yang dianjurkan untuk produk.
Mencetak foto 10 x 15 cm (4 x 6 inci)
Untuk mendapatkan kualitas cetak terbaik, HP merekomendasikan untuk menggunakan kertas HP yang khusus dirancang untuk jenis proyek yang dicetak berserta tinta asli HP. Kertas HP dan tinta HP dirancang secara khusus agar dapat berfungsi bersama dengan baik untuk menghasilkan hasil yang berkualitas tinggi.
B
ahasa Indon
1 Memory Stick, Memory Stick Pro, Memory Stick Select, Memory Stick Magic Gate, Memory Stick Duo atau Duo Pro (adaptor opsional), atau Memory Stick Micro (membutuhkan adaptor) 2 xD-Picture Card, Secure Digital (SD), Secure Digital Mini (membutuhkan adaptor), Secure
Digital High Capacity (SDHC), MultiMediaCard (MMC), MMC Plus, MMC Mobile (RS-MMC; membutuhkan adaptor), TransFlash MicroSD Card, atau Secure MultiMedia Card
Untuk mencetak satu atau beberapa foto ukuran kecil
1. Muatkan kertas foto 10 x 15 (4 x 6 inci) ke dalam baki kertas.
2. Masukkan kartu memori Anda ke dalam slot yang sesuai pada produk.
3. Tekan tombol di sebelah ikon panah atas atau panah bawah pada tampilan untuk menelusuri foto pada kartu memori sampai foto yang ingin Anda cetak muncul. 4. Tekan tombol di sebelah Pilih untuk memilih foto, lalu tekan OK.
5. Gunakan pengaturan standar sebagai Foto 4 x 6 dan Tanpa bingkai.
6. Tekan tombol Cetakan untuk menambah jumlah salinan yang ingin Anda cetak pada citra saat ini.
7. Tekan OK.
Tip Saat foto sedang dicetak, Anda bisa terus menelusuri foto pada kartu memori dan menambahkan beberapa foto lagi ke dalam antrian cetak dengan menekan tombol di sebelah Cetak Lagi....
Memindai gambar
Anda dapat mulai memindai dari komputer atau dari panel kendali HP Photosmart. Bagian ini menjelaskan cara memindai dari panel kendali HP Photosmart saja.
Catatan Anda juga dapat menggunakan perangkat lunak yang diinstal dengan HP Photosmart untuk memindai gambar. Dengan menggunakan perangkat lunak ini, Anda dapat mengedit gambar yang dipindai dan membuat proyek khusus
menggunakan gambar yang dipindai tersebut.
Memindai gambar 29 Ba hasa I n done sia
Untuk memindai ke komputer
1. Muatkan muka cetak dokumen sumber menghadap ke bawah di sudut kanan depan kaca.
Catatan Pastikan tidak ada kartu memori yang dimasukkan ke dalam slot kartu memori pada produk.
2. Tekan tombol di sebelah Pindai. Menu Pindai akan muncul.
3. Tekan tombol di sebelah Pindai ke PC.
Citra pratayang dari pindaian akan muncul pada komputer untuk dapat diedit. Setiap pengeditan yang Anda buat hanya berlaku pada sesi pemindaian saat ini.
Perangkat lunak HP Photosmart dilengkapi beberapa alat bantu yang dapat digunakan untuk mengedit citra terpindai. Anda dapat memperbaiki kualitas citra secara keseluruhan dengan menyesuaikan tingkat kecerahan, ketajaman, rona warna, dan saturasi. Anda juga dapat memotong, menyejajarkan, memutar, atau mengubah ukuran citra.
4. Lakukan pengeditan pada citra pratayang, lalu klik Accept (Terima) setelah selesai.
Membuat salinan
Anda dapat membuat salinan bermutu tinggi dari panel kendali. Untuk membuat salinan dari panel kontrol
1. Muatkan kertas pada baki kertas.
2. Muatkan sumber asli Anda dengan muka cetak menghadap bawah di sudut kanan depan kaca.
3. Tekan tombol di sebelah Salin.
4. Tekan tombol di sebelah Salin Hitam atau Salin Warna.
5. Tekan tombol di sebelah Salinan untuk menambah jumlah salinan. 6. Tekan OK.
Tip Untuk membuat salinan dari dokumen sumber yang tebal, seperti buku, Anda dapat melepas sungkup.
Mengganti kartrij cetak
Ikuti petunjuk ini untuk mengganti kartrij cetak. Mengikuti petunjuk ini juga dapat membantu menyelesaikan masalah kualitas cetak yang berhubungan dengan kartrij.
Catatan Jika tingkat tinta kartrij cetak rendah, sebuah pesan akan muncul pada layar komputer Anda. Anda juga dapat memeriksa tingkat tinta dengan menggunakan perangkat lunak yang diinstal di HP Photosmart.
Saat pesan peringatan tingkat tinta rendah muncul pada layar, pastikan Anda telah memiliki persediaan kartrij cetak penggantinya. Anda juga sebaiknya mengganti kartrij cetak saat teks hasil cetak tidak terlihat jelas atau jika Anda mengalami persoalan kualitas cetakan yang terkait dengan kartrij cetak.
Untuk memesan kartrij cetak HP Photosmart, kunjungi www.hp.com/buy/supplies. Jika diminta, pilih negara/wilayah Anda, ikuti petunjuk untuk memilih produk, dan klik salah satu pautan belanja pada halaman web.
B
ahasa Indon
Untuk mengganti kartrid cetak
1. Pastikan produk menyala dan baki kertas berisi kertas putih bekas biasa berukuran letter atau A4.
2. Buka pintu kartrid cetak.
Kereta cetak harus bergerak ke tengah produk. Jika kereta cetak tidak bergerak ke tengah, matikan produk, lalu hidupkan kembali.
3. Tunggu sampai kereta cetak berhenti dan diam, kemudian tekan sedikit kereta cetak tersebut agar terlepas.
Jika Anda mengganti kartrid cetak triwarna, keluarkan kartrid cetak dari slot di sisi kiri.
Jika Anda mengganti kartrid cetak hitam, keluarkan kartrid cetak dari slot di sisi kanan.
1 Slot kartrid cetak untuk kartrid cetak triwarna 2 Slot kartrid cetak untuk kartrid cetak hitam
4. Tarik kartrid cetak ke arah Anda sampai keluar dari slotnya.
5. Daur ulang kartrid cetak saat Anda membuangnya. Dengan ketersediaan Program Daur Ulang Persediaan HP Inkjet di banyak negara/wilayah, Anda dapat mendaur-ulang kartrid cetak bekas secara gratis. Untuk informasi lebih lanjut, kunjungi situs Web berikut:
www.hp.com/hpinfo/globalcitizenship/environment/recycle/inkjet.html
6. Keluarkan kartrid cetak baru dari kemasannya, pastikan hanya menyentuh plastik hitam. Lepas secara perlahan pita plastik menggunakan tab tarik berwarna merah muda.
Mengganti kartrij cetak 31
Ba
hasa I
n
done
1 Kontak berwarna tembaga
2 Pita plastik dengan tab tarik merah muda (harus dilepas sebelum pemasangan) 3 Saluran tinta di bawah pita
Perhatian Jangan sentuh kontak berwarna tembaga atau nosel tinta. Jika bagian ini tersentuh akan menyebabkan nosel tinta menjadi macet, rusak, serta terganggunya sambungan listrik.
7. Dorong kartrid cetak baru agak sedikit miring ke atas ke dalam slot yang kosong. Kemudian tekan perlahan bagian atas kartrid cetak sampai terkunci pada tempatnya. Jika Anda memasang kartrid cetak triwarna, geser kartrid tersebut ke slot kiri. Jika Anda ingin memasang kartrid cetak hitam, geser kartrid tersebut ke slot kanan.
8. Tutup pintu kartrid cetak.
B
ahasa Indon
9. Jika diminta, tekan OK untuk mencetak halaman pensejajaran kartrid.
10.Muatkan muka cetak halaman pensejajaran menghadap ke bawah di sudut kanan depan kaca, lalu tekan OK untuk memindainya.
Produk akan mensejajarkan kartrid cetak. Gunakan kembali atau buang lembar pensejajaran kartrid cetak.
Membersihkan HP Photosmart
Untuk memastikan hasil salinan dan pindaian tetap jelas, Anda perlu membersihkan kaca dan penahan tutup. Anda juga dapat membersihkan debu di bagian luar HP Photosmart. Tip Anda dapat membeli HP Cleaning Kit for Inkjet Printers dan All-in-One (Q6260A) yang menyediakan segala sesuatu yang dibutuhkan untuk membersihkan perangkat HP Anda secara aman. Untuk mendapatkan informasi lebih lanjut, kunjungi:
www.shopping.hp.com/accessories-store/printer. Untuk membersihkan kaca
1. Matikan produk, cabut kabel listrik, dan angkat tutupnya.
2. Bersihkan kaca dengan kain lembut atau spons yang sedikit dibasahi dengan larutan pembersih kaca nonabrasif.
Perhatian Jangan gunakan pembersih abrasif, aseton, benzena, atau karbon tetraklorida pada kaca, karena akan merusak permukaannya. Jangan gunakan atau semprotkan cairan semprot pada permukaan kaca. Cairan tersebut dapat meresap ke bagian bawah kaca dan merusak produk.
Membersihkan HP Photosmart 33 Ba hasa I n done sia
3. Keringkan kaca menggunakan kain kering, lembut, dan bebas serabut agar tidak berbekas.
4. Hidupkan produk.
Untuk membersihkan penahan tutup
1. Matikan produk, cabut kabel listrik, dan angkat tutupnya.
2. Bersihkan penahan dokumen putih menggunakan kain lembut atau spons yang sedikit dibasahi dengan sabun lembut dan air hangat.
Cuci penahan dengan hati-hati untuk menghilangkan kotoran yang melekat. Jangan gosok penahan.
3. Keringkan penahan menggunakan kain kering, lembut, dan bebas serabut. Perhatian Jangan gunakan kertas pembersih, karena kaca dapat tergores. 4. Jika harus dibersihkan lebih lanjut, ulangi langkah sebelumnya mengunakan alkohol
isopropil (gosok), kemudian seka seluruh permukaan penahan menggunakan kain lembab untuk menghilangkan sisa alkohol.
Perhatian Berhati-hatilah, jangan sampai memercikkan alkohol pada kaca atau permukaan luar produk, karena dapat merusak produk.
5. Sambungkan kabel listrik, dan kemudian hidupkan produk.
Tip Anda dapat melepas sungkup untuk membersihkan secara mudah.
B
ahasa Indon
2
Mengatasi masalah dan
dukungan
Bab ini berisi informasi tentang pemecahan masalah HP Photosmart. Informasi tertentu akan diberikan untuk masalah pemasangan dan konfigurasi, serta beberapa topik pengoperasian. Untuk informasi lebih lanjut, lihat Bantuan Elektronik yang disertakan pada perangkat lunak.
Berbagai masalah muncul saat HP Photosmart dihubungkan ke komputer dengan menggunakan kabel USB sebelum perangkat lunak HP Photosmart diinstal pada komputer. Jika Anda
menghubungkan HP Photosmart ke komputer sebelum layar penginstalan perangkat lunak meminta Anda melakukannya, Anda harus mengikuti langkah-langkah ini:
Mengatasi masalah umum pemasangan
1. Lepaskan kabel USB dari komputer.
2. Hapus penginstalan perangkat lunak (jika Anda telah menginstalnya).
3. Inisiasi ulang komputer.
4. Matikan HP Photosmart, tunggu satu menit, lalu inisiasi kembali.
5. Instal ulang perangkat lunak HP Photosmart.
Perhatian Jangan hubungkan kabel USB ke komputer sampai diminta oleh layar instalasi perangkat lunak.
Untuk informasi tentang kontak dukungan, lihat bagian dalam sampul belakang panduan ini.
Menghapus instalasi dan menginstal ulang perangkat lunak
Jika penginstalan Anda tidak sempurna, atau jika Anda menghubungkan kabel USB ke komputer sebelum diminta oleh layar penginstalan perangkat lunak, Anda mungkin perlu menghapus dan menginstal ulang perangkat lunak. Jangan hanya menghapus berkas aplikasi HP Photosmart dari komputer. Pastikan untuk menghapusnya dengan benar menggunakan utilitas penghapus instalasi yang tersedia saat Anda menginstal perangkat lunak yang menyertai HP Photosmart.
Untuk menghapus dan memasang kembali perangkat lunak
1. Pada batang tugas Windows, klik Start (Mulai), Settings (Pengaturan), Control Panel (Panel Kendali) (atau cukup Control Panel (Panel Kendali)).
2. Kllik dua kali ikon Add/Remove Programs (Tambah/Hapus Program) (atau klik Uninstall a
program (Buang program)).
3. Pilih HP Photosmart All-in-One Driver Software (Perangkat Lunak Penggerak HP Photosmart All-in-One), lalu klik Change/Remove (Ubah/Hapus).
Ikuti petunjuk pada layar.
4. Lepaskan produk dari komputer Anda.
5. Aktifkan kembali komputer Anda
Catatan Penting agar Anda mencabut produk sebelum menghidupkan ulang komputer Anda. Jangan menghubungkan produk ke komputer Anda hingga Anda telah memasang ulang perangkat lunak.
Mengatasi masalah dan dukungan 35
Ba
hasa I
n
done
6. Masukkan CD-ROM produk ke drive CD-ROM komputer Anda, kemudian mulailah program Pemasangan.
Catatan Jika program Setup tidak muncul, cari berkas setup.exe dalam drive CD-ROM dan klik dua kali.
Catatan Jika Anda tidak lagi memiliki CD instalasi, Anda dapat men-download perangkat lunak dari www.hp.com/support.
7. Ikuti petunjuk pada layar dan petunjuk yang diberikan pada Panduan Pemasangan yang menyertai produk.
Jika penginstalan perangkat lunak sudah selesai, ikon HP Digital Imaging Monitor (Monitor
Pencitraan Digital HP) akan muncul pada baki tugas Windows.
Untuk memastikan perangkat lunak telah diinstal dengan benar, klik dua kali ikon Pusat Solusi HP pada desktop. Jika Pusat Solusi HP menampilkan ikon-ikon dasar (Scan Picture (Pindai
Gambar) dan Scan Document (Pindai Dokumen)), maka perangkat lunak telah terinstal dengan
benar.
Untuk menghapus dan menginstal kembali dari Mac
1. Putuskan sambungan HP Photosmart dari Mac.
2. Buka map Applications (Aplikasi):Hewlett-Packard.
3. Klik dua kali HP Uninstaller (Penghapus Instalasi HP). Ikuti petunjuk pada layar.
4. Setelah perangkat lunak selesai dihapus, inisiasi ulang komputer Anda.
5. Untuk menginstal ulang perangkat lunak, masukkan CD-ROM HP Photosmart ke dalam penggerak CD-ROM komputer Anda.
6. Pada desktop, buka CD-ROM lalu klik dua kali HP All-in-One Installer.
7. Ikuti petunjuk pada layar juga yang terdapat dalam Panduan Pemasangan yang menyertai HP Photosmart.
Mengatasi masalah pemasangan perangkat keras
Gunakan bagian ini untuk mengatasi masalah-masalah yang muncul selama pemasangan perangkat keras HP Photosmart.
Produk tidak dapat dihidupkan
Coba solusi berikut ini jika tidak ada petunjuk lampu, tidak ada suara, dan tidak ada gerakan pada produk saat Anda menyalakannya.
Solusi 1: Pastikan Anda menggunakan kabel listrik yang disertakan dengan produk Solusi
• Pastikan kabel listrik tersambung dengan benar ke produk dan adaptor daya. Hubungkan kabel listrik ke stopkontak, pengaman arus, atau perpanjangan kabel.
• Jika Anda menggunakan perpanjangan kabel, pastikan perpanjangan kabel telah dinyalakan. Atau, coba hubungkan produk secara langsung ke stopkontak.
• Periksa aliran arus dari stopkontak. Hubungkan perangkat yang Anda ketahui berfungsi dengan baik ke stopkontak tadi, dan periksa apakah perangkat dapat dihidupkan. Jika tidak, mungkin ada masalah dengan stopkontak.
• Jika Anda mencolok produk ke stopkontak bersakelar, pastikan sakelar dinyalakan. Jika telah dihidupkan namun tetap tidak dapat berfungsi, mungkin ada masalah dengan stopkontak.
Penyebab: Produk yang tidak sedang menggunakan kabel listrik yang disediakan.
Jika hal ini tidak menyelesaikan masalah, coba solusi berikutnya.
B
ahasa Indon
Solusi 2: Atur ulang produk
Solusi: Matikan produk, kemudian cabut kabel listriknya. Hubungkan kembali kabel listrik, lalu
tekan tombol Hidup untuk menghidupkan produk.
Penyebab: Produk mengalami eror.
Jika hal ini tidak menyelesaikan masalah, coba solusi berikutnya.
Solusi 3: Tekan tombol Hidup sekali dengan lebih perlahan.
Solusi: Produk kemungkinan tidak dapat memberi tanggapan jika Anda menekan tombol Hidup terlalu cepat. Tekan tombol Hidup sekali. Diperlukan waktu beberapa menit sebelum
produk menyala. Jika Anda menekan tombol Hidup sekali lagi saat ini, Anda dapat mematikan produk.
Penyebab: Anda terlalu cepat menekan tombol Hidup.
Jika hal ini tidak menyelesaikan masalah, coba solusi berikutnya.
Solusi 4: Hubungi HP untuk mengganti catu daya
Solusi: Hubungi dukungan HP untuk meminta pemasok daya untuk produk.
Kunjungi: www.hp.com/support.
Jika diminta, pilih negara/wilayah Anda, lalu klik Contact HP (Hubungi HP) untuk informasi tentang cara menghubungi layanan dukungan teknis.
Penyebab: Pemasok listrik bukan untuk digunakan pada produk ini atau produk mengalami
kerusakan mekanis.
Jika hal ini tidak menyelesaikan masalah, coba solusi berikutnya.
Solusi 5: Hubungi dukungan HP untuk mendapatkan layanan
Solusi: Jika Anda telah menyelesaikan semua langkah yang disediakan pada solusi
sebelumnya dan masih mengalami masalah, hubungi dukungan HP untuk layanan. Kunjungi: www.hp.com/support.
Jika diminta, pilih negara/wilayah, kemudian klik Contact HP (Hubungi HP) untuk dukungan teknis.
Penyebab: Anda mungkin membutuhkan bantuan untuk dapat membuat produk atau
perangkat lunak berfungsi dengan baik.
Layar menunjukkan bahasa yang salah Solusi: Ubah pengaturan bahasa.
Untuk mengatur bahasa dan negara/wilayah Anda
1. Tekan tombol di sebelah Salin pada layar Home (Halaman Depan).
Menu Salin akan muncul.
2. Tekan tombol di kanan atas, kiri tengah, dan kiri bawah secara berurutan. Menu Pengaturan Dasar akan muncul.
3. Tekan tombol di sebelah Atur Bahasa.
4. Untuk menelusuri bahasa, tekan tombol di sebelah ikon panah atas atau panah bawah pada layar. Jika bahasa yang akan Anda gunakan telah tersorot, tekan tombol di sebelah OK.
5. Saat diminta, tekan tombol di sebelah Ya untuk konfirmasi. Menu Pengaturan Dasar akan muncul.
6. Tekan tombol di sebelah Atur Wilayah.
7. Untuk menelusuri negara/wilayah, tekan tombol di sebelah ikon panah atas atau panah bawah pada layar. Jika negara/wilayah yang akan Anda gunakan telah tersorot, tekan tombol di sebelah OK.
8. Saat diminta, tekan tombol di sebelah Ya untuk konfirmasi.
Penyebab: Anda mungkin telah memilih bahasa yang tidak sesuai saat memasang produk.
Mengatasi masalah pemasangan perangkat keras 37
Ba
hasa I
n
done
Saya sudah menancapkan kabel USB, tapi saya masih mengalami kesulitan menggunakan produk lewat komputer
Solusi: Anda harus terlebih dahulu menginstal perangkat lunak yang disertakan bersama
produk sebelum menghubungkan kabel USB. Selama penginstalan, jangan hubungkan kabel USB sampai diminta oleh petunjuk pada layar.
Setelah Anda menginstal perangkat lunak, sambungkan satu ujung kabel USB ke bagian belakang komputer Anda dan ujung lain ke bagian belakang produk. Anda dapat menghubungkan ke salah satu port USB yang ada di bagian belakang komputer Anda. Untuk mendapatkan informasi lebih lanjut tentang menginstal perangkat lunak dan menghubungkan kabel USB, baca Panduan Pemasangan yang disertakan dalam produk.
Penyebab: Kabel USB telah terpasang sebelum perangkat lunak diinstal. Menghubungkan
kabel USB sebelum Anda diminta dapat menyebabkan kerusakan.
Setelah memasang produk, jika tidak mencetak
Coba solusi berikut ini untuk menyelesaikan masalah. Solusi dicantumkan secara berurutan, dengan solusi berpeluang terbesar terlebih dahulu. Jika solusi pertama tidak menyelesaikan masalah, teruskan coba solusi yang tersisa sampai masalah terselesaikan.
Solusi 1: Tekan tombol Hidup untuk mehidupkan produk
Solusi: Lihat tampilan pada produk. Jika layar kosong dan tombol Hidup tidak menyala, maka
produk mati. Pastikan kabel daya tersambung erat dengan produk dan dihubungkan ke stopkontak. Tekan tombol Hidup untuk menyalakan produk.
Penyebab: Produk mungkin belum dihidupkan.
Jika hal ini tidak menyelesaikan masalah, coba solusi berikutnya.
Solusi 2: Atur produk sebagai printer standar
Solusi: Gunakan alat bantu sistem pada komputer untuk mengubah produk menjadi printer
standar.
Penyebab: Anda mengirim pekerjaan cetak ke printer standar, tetapi produk ini bukan printer
standar.
Jika hal ini tidak menyelesaikan masalah, coba solusi berikutnya.
Solusi 3: Periksa sambungan antara produk dan komputer Solusi: Periksa sambungan antara produk dan komputer. Penyebab: Produk dan komputer tidak saling berkomunikasi.
Jika hal ini tidak menyelesaikan masalah, coba solusi berikutnya.
Solusi 4: Periksa apakah kartrid cetak sudah terpasang dengan benar dan berisi tinta.
Solusi: Periksa apakah kartrid cetak sudah terpasang dengan benar dan berisi tinta. Penyebab: Mungkin telah terjadi gangguan pada satu atau beberapa kartrid cetak.
Jika hal ini tidak menyelesaikan masalah, coba solusi berikutnya.
Solusi 5: Muatkan kertas ke dalam baki kertas Solusi: Muatkan kertas ke dalam baki kertas. Penyebab: Produk mungkin kehabisan kertas.
B
ahasa Indon