7.5 x 9.25 spine = 0.75" 400 page count
THE EXPERT’S VOICE
®IN OPEN SOURCE
Pro
PHP
and
jQuery
Jason Lengstorf
Add quick, smooth, and easy interactivity
to your PHP sites with jQuery
this print for content only—size & color not accurate
US $49.99
Pro PHP and jQuery
■ ■ ■
ii
Pro PHP and jQuery
Copyright © 2010 by Jason Lengstorf
All rights reserved. No part of this work may be reproduced or transmitted in any form or by any means, electronic or mechanical, including photocopying, recording, or by any information storage or retrieval system, without the prior written permission of the copyright owner and the publisher.
ISBN-13 (pbk): 978-1-4302-2847-9
ISBN-13 (electronic): 978-1-4302-2848-6
Printed and bound in the United States of America 9 8 7 6 5 4 3 2 1
Trademarked names, logos, and images may appear in this book. Rather than use a trademark symbol with every occurrence of a trademarked name, logo, or image we use the names, logos, and images only in an editorial fashion and to the benefit of the trademark owner, with no intention of infringement of the trademark.
The use in this publication of trade names, trademarks, service marks, and similar terms, even if they are not identified as such, is not to be taken as an expression of opinion as to whether or not they are subject to proprietary rights.
President and Publisher: Paul Manning Lead Editor: Michelle Lowman
Technical Reviewer: Robert Banh
Editorial Board: Clay Andres, Steve Anglin, Mark Beckner, Ewan Buckingham, Gary Cornell, Jonathan Gennick, Jonathan Hassell, Michelle Lowman, Matthew Moodie, Duncan Parkes, Jeffrey Pepper, Frank Pohlmann, Douglas Pundick, Ben Renow-Clarke, Dominic Shakeshaft, Matt Wade, Tom Welsh
Coordinating Editor: Anita Castro
Copy Editor: Patrick Meader and Heather Lang Compositor: Kimberly Burton
Indexer: BIM Indexing & Proofreading Services Artist: April Milne
Cover Designer: Anna Ishchenko
Distributed to the book trade worldwide by Springer Science+Business Media, LLC., 233 Spring Street,
6th Floor, New York, NY 10013. Phone 1-800-SPRINGER, fax (201) 348-4505, e-mail
[email protected], or visit www.springeronline.com.
For information on translations, please e-mail [email protected], or visit www.apress.com.
Apress and friends of ED books may be purchased in bulk for academic, corporate, or promotional use. eBook versions and licenses are also available for most titles. For more information, reference our
Special Bulk Sales–eBook Licensing web page at www.apress.com/info/bulksales.
The information in this book is distributed on an “as is” basis, without warranty. Although every precaution has been taken in the preparation of this work, neither the author(s) nor Apress shall have any liability to any person or entity with respect to any loss or damage caused or alleged to be caused directly or indirectly by the information contained in this work.
iv
Contents at a Glance
■
About the Author ... xii
■
About the Technical Reviewer ... xiii
■
Acknowledgements ... xiv
■
PART 1: Getting Comfortable with jQuery...1
■
Chapter 1: Introducing jQuery ...3
■
Chapter 2: Common jQuery Actions and Methods ...25
■
PART 2: Getting Into Advanced PHP Programming ...85
■
Chapter 3: Object-Oriented Programming ...87
■
Chapter 4: Build an Events Calendar ...119
■
Chapter 5: Add Controls to Create, Edit, and Delete Events ...167
■
Chapter 6: Password Protecting Sensitive Actions and Areas ...199
■
PART 3: Combining jQuery with PHP Applications ...233
■
Chapter 7: Enhancing the User Interface with jQuery ...235
■
Chapter 8: Editing the Calendar with AJAX and jQuery ...263
■
PART 4: Advancing jQuery and PHP...309
■
Chapter 9: Performing Form Validation with Regular Expressions ...311
■
Chapter 10: Extending jQuery...345
v
Contents
■
About the Author ... xii
■
About the Technical Reviewer ... xiii
■
Acknowledgements ... xiv
■
PART 1: Getting Comfortable with jQuery...1
■
Chapter 1: Introducing jQuery ...3
Choosing jQuery over JavaScript ...3
Understanding JavaScript Libraries ... 3
Understanding the Benefits of jQuery... 4
Understanding the History of jQuery... 4
Setting Up a Testing Environment ...4
Installing Firefox ... 5
Installing Firebug... 5
Including jQuery in Web Pages ...7
Including a Downloaded Copy of the jQuery Library... 7
Including a Remotely Hosted Copy of the jQuery Library ... 8
Using the Google AJAX Libraries API ... 8
Setting up a Test File ...8
Introducing the jQuery Function ($) ... 9
Selecting DOM Elements Using CSS Syntax ... 10
Summary ...23
■
Chapter 2: Common jQuery Actions and Methods ...25
■ CONTENTS
vi
Understanding jQuery Methods ...25
Traversing DOM Elements ... 26
Creating and Inserting DOM Elements... 36
Accessing and Modifying CSS and Attributes... 53
Affecting Result Sets ... 62
Using Animation and Other Effects... 65
Handling Events... 71
Using AJAX Controls ... 78
Summary ...84
■
PART 2: Getting Into Advanced PHP Programming ...85
■
Chapter 3: Object-Oriented Programming ...87
Understanding Object-Oriented Programming...87
Understanding Objects and Classes ...87
Recognizing the Differences Between Objects and Classes ... 88
Structuring Classes ... 88
Defining Class Properties ... 89
Defining Class Methods... 90
Using Class Inheritance ... 99
Assigning the Visibility of Properties and Methods ... 103
Commenting with DocBlocks... 110
Comparing Object-Oriented and Procedural Code ...112
Ease of Implementation... 112
Better Organization... 117
Easier Maintenance ... 117
Summary ...117
■
Chapter 4: Build an Events Calendar ...119
Planning the Calendar...119
■ CONTENTS
vii
Creating the Class Map ... 119
Planning the Application’s Folder Structure ... 120
Modifying the Development Environment... 122
Building the Calendar ...124
Creating the Database ... 124
Connecting to the Database with a Class ... 125
Creating the Class Wrapper... 127
Adding Class Properties ... 127
Building the Constructor... 129
Loading Events Data... 136
Outputting HTML to Display the Calendar and Events ... 143
Outputing HTML to Display Full Event Descriptions... 160
Summary ...166
■
Chapter 5: Add Controls to Create, Edit, and Delete Events ...167
Generating a Form to Create or Edit Events...167
Adding a Token to the Form ... 169
Creating a File to Display the Form ... 171
Adding a New Stylesheet for Administrative Features ... 172
Saving New Events in the Database ...176
Adding a Processing File to Call the Processing Method ... 179
Adding a Button to the Main View to Create New Events ... 181
Adding Edit Controls to the Full Event View...185
Modifying the Full Event Display Method to Show Admin Controls ... 187
Adding the Admin Stylesheet to the Full Event View Page... 188
Deleting Events ...190
Generating a Delete Button ... 191
Creating a Method to Require Confirmation ... 192
■ CONTENTS
viii
Summary ...198
■
Chapter 6: Password Protecting Sensitive Actions and Areas ...199
Building the Admin Table in the Database...199
Building a File to Display a Login Form ...200
Creating the Admin Class ...202
Defining the Class... 202
Building a Method to Check the Login Credentials... 203
Modifying the App to Handle the Login Form Submission... 213
Allowing the User to Log Out ...218
Adding a Log Out Button to the Calendar ... 218
Creating a Method to Process the Logout ... 220
Modifying the App to Handle the User Logout ... 221
Displaying Admin Tools Only to Administrators ...223
Showing Admin Options to Administrators... 223
Limiting Access to Administrative Pages ... 228
Summary ...231
■
PART 3: Combining jQuery with PHP Applications ...233
■
Chapter 7: Enhancing the User Interface with jQuery ...235
Adding Progressive Enhancements with jQuery ...235
Setting Progressive Enhancement Goals... 236
Include jQuery in the Calendar App ...236
Create a JavaScript Initialization File ... 237
Creating a New Stylesheet for Elements Created by jQuery... 238
Creating a Modal Window for Event Data ...240
Binding a Function to the Click Event of Title Links ... 240
Preventing the Default Action and Adding an Active Class... 240
■ CONTENTS
ix
Creating a Modal Window... 243
Retrieve and Display Event Information with AJAX ... 247
Add a Close Button ... 253
Add Effects to the Creation and Destruction of the Modal Window... 254
Summary ...262
■
Chapter 8: Editing the Calendar with AJAX and jQuery ...263
Opening the Event Creation Form ...263
Adding an AJAX Call to Load the Form ... 264
Modifying the AJAX Processing File to Load the Form ... 265
Making the Cancel Button Behave Like the Close Button... 268
Saving New Events in the Database ...269
Modifying the AJAX Processing File to Handle New Submissions ... 271
Adding Events Without Refreshing ...273
Deserializing the Form Data ... 274
Creating Date Objects... 279
Appending the Event to the Calendar ... 283
Getting the New Event’s ID ... 286
Editing Events in a Modal Window...290
Determining the Form Action... 291
Storing the Event ID if One Exists ... 292
Remove Event Data from the Modal Window ... 294
Ensuring Only New Events Are Added to the Calendar... 296
Confirming Deletion in a Modal Window...298
Displaying the Confirmation Dialog ... 298
Configuring the Form Submission Event Handler for Deletion ... 301
Remove the Event from the Calendar After Deletion ... 304
Summary ...307
■ CONTENTS
x
■
Chapter 9: Performing Form Validation with Regular Expressions ...311
Getting Comfortable with Regular Expressions ...311
Understanding Basic Regular Expression Syntax ... 311
Drilling Down on the Basics of Pattern Modifiers... 316
Getting Fancy with Backreferences... 318
Matching Character Classes... 320
Finding Word Boundaries ... 323
Using Repetition Operators... 323
Detecting the Beginning or End of a String ... 324
Using Alternation ... 324
Using Optional Items... 325
Putting It All Together... 326
Adding Server-Side Date Validation...328
Defining the Regex Pattern to Validate Dates... 328
Adding a Validation Method to the Calendar Class... 333
Returning an Error if the Dates Don’t Validate... 334
Adding Client-Side Date Validation ...338
Creating a New JavaScript File to Validate the Date String... 338
Including the New File in the Footer... 339
Preventing the Form Submission if Validation Fails ... 339
Summary ...343
■
Chapter 10: Extending jQuery ...345
Adding Functions to jQuery...345
Adding Your Date Validation Function to jQuery ... 345
Modifying the Include Script... 348
Modifying the Initialization Script ... 348
■ CONTENTS
xi
Building Your Plugin ... 351
Implementing Your Plugin ... 357
Summary ...360
xii
About the Author
■ Jason Lengstorf is a web designer and developer based in Big Sky country. He specializes in content management software using PHP, MySQL, AJAX, and web standards.
He spends most of his time running Ennui Design: a collection of web designers and developers from all over the world specializing in premium custom websites. In his off hours, he runs a clothing
company called Humblecock™ and tries to make time for hobbies
■ CONTENTS
xiii
About the Technical Reviewer
Robert Banh is an accomplished developer, working in
code since the existence of Pluto. He's known for hacking core systems and deploying websites over the weekends. He specializes in building custom PHP/MySQL web applications using technologies such as Zend framework and CodeIgniter. Depending on the project, he’s known to jump from content management systems of Wordpress, Drupal, and Expression Engine to e-commerce solutions of Magento and Shopify. When he's not coding, he's playing with Adobe Photoshop and aligning hand drawn boxes into a 960 grid. He also dreams in hex colors.
His passion lives on the web, designing and building custom solutions for clients stemming from IBM, HP, Unisys, and KLRU, to small mom and pop shops and non-profit organizations. He is currently employed at the University of Texas at Austin where they let him run free and code in multiple frameworks and
experiment taking over the world with unorthodox designs for the web.
xiv
Acknowledgments
I feel like I should probably thank Robert Banh, Michelle Lowman, and Anita Castro first. They put up with my insane schedule, inability to make up my mind about the book's content, and my general scattered work habits.
Mom and Dad, I've said it before, but thanks for everything. I couldn't have done it if you hadn't been willing to put up with my many identity crises.
Nate, you keep me motivated, as usual, by continually doing cooler things than I'm doing. Kyle, Scott, Mike, Harris, Rhino, Amie, Shannon: thanks for forcing me to be social and leave the house every once in a while. Checkers, thanks for setting up the tee times.
Of course, I need to thank Drew, Henry, and Tom for joining the Ennui Design team and allowing me to take the time to write. It's great to have people with whom I can bounce ideas around; you probably don't know how much it means to me to have people around who understand what I'm talking about (and, more importantly, actually care about the subject matter).
To Peter, Rose, Molly, Lucy, Kathryn, Jenna, and the rest of the girls at Caffé Dolcé, you're as responsible for this book reaching completion as I am. Thanks for remembering my order on days I was too frazzled to articulate.
Everyone at the Montana Programmers meetups — Ian Merwin, Wes Hunt, Monica Ray, Nathan and Jennifer Stephens, Christopher Cable, Ashton Sanders, Andy Laken, Scott Rouse, Nora McDougall-Collins, and everyone whose name escapes me right now — I have more fun at those meetups than I do at most gatherings. Thanks for showing up and proving that even Montana can have a developers' community.
P A R T 1
■ ■ ■
Getting Comfortable with
jQuery
In the first part of this book, you’ll be getting familiar with the history and basic
capabilities of jQuery. By the end of this section, you will have a general grasp on the
overarching concepts behind jQuery, and—after you’ve revisited object-oriented PHP
in Part 2—you’ll be ready to tackle the exercises in Part 3 (where you actually start
C H A P T E R 1
■ ■ ■
3
Introducing jQuery
To fully understand jQuery and its applications in modern web programming, it's important to take a moment and look back at where jQuery came from, what needs it was built to fill, and what
programming in JavaScript was like before jQuery came around.
In this chapter you'll learn about JavaScript libraries and the needs they seek to fulfill, as well as why jQuery is the library of choice for the majority of web developers. You'll also learn the basics of jQuery, including how to make the library available for use in your applications and how the core of jQuery—its powerful selector engine—works.
Choosing jQuery over JavaScript
JavaScript has a reputation for being rather unwieldy in web applications. A lack of consistent browser support, difficult debugging, and an intimidating syntax can make learning JavaScript feel impossible.
To be fair, all the things that make JavaScript seem difficult are part of what make it so powerful, but that doesn't make it any more inviting to a novice web developer looking to add JavaScript to his arsenal.
Understanding JavaScript Libraries
The steep learning curve associated with JavaScript has been a sore spot for developers for years, and as frustrations grew, several ambitious developers started building JavaScript libraries, also referred to as JavaScript frameworks.
These libraries aimed to simplify the use of JavaScript to make it more accessible to both new and existing developers by creating easy-to-use control functions that remove some of the heavy lifting from everyday JavaScript tasks. Libraries are especially useful in the realm of Asynchronous JavaScript and XML (AJAX) due to the complexity of performing the same tasks using straight JavaScript.
CHAPTER 1 ■ INTRODUCING JQUERY
4
■
Note
The difference between using jQuery's AJAX tools versus the straight JavaScript method will be explored
later on in Chapter 2.
A good number of JavaScript libraries are available. Several of the most popular currently in use are Prototype (http://www.prototypejs.org), MooTools (http://mootools.net), Yahoo! UI Library
(http://developer.yahoo.com/yui), and the focus of this book, jQuery.
Understanding the Benefits of jQuery
Every JavaScript framework has its own benefits; jQuery is no exception, providing the following benefits:
• Small file size (approximately 23KB as of version 1.4)
• Extremely simple syntax
• Chainable methods
• Easy plug-in architecture for extending the framework
• A huge online community
• Great documentation at http://api.jquery.com
• Optional extensions of jQuery for added functionality, such as jQueryUI
Understanding the History of jQuery
The brain child of developer John Resig jQuery was first announced at BarCamp NYC in early 2006 (for more on BarCamp, see http://barcamp.org). Resig noted on his web site, that he created jQuery because he was unhappy with the currently available libraries and felt that they could be vastly improved by reducing “syntactic fluff” and adding specific controls for common actions
(http://ejohn.org/blog/selectors-in-javascript/).
jQuery was a big hit in the development community and quickly gained momentum. Other developers came on to help refine the library, ultimately resulting in the first stable release of jQuery, version 1.0, on August 26, 2006.
Since then, jQuery has progressed to version 1.4.2 (at the time of this writing) and has seen a huge influx of plug-ins from the development community. A plug-in is an extension of jQuery that isn’t part of the core library. You'll learn more about (and build) jQuery plug-ins in Chapter 10.
Setting Up a Testing Environment
CHAPTER 1 ■ INTRODUCING JQUERY
5
Throughout this book, all exercises will assume that you are using the Firefox browser with the Firebug plug-in due to its excellent JavaScript testing console.
Installing Firefox
To get Firefox up and running on your computer, navigate to http://firefox.com and download the
latest version of Firefox (version 3.6 at the time of this writing). After running the installer (Firefox Setup x.x.x.exe on a PC or Firefox x.x.x.dmg on Mac), Firefox will be running.
Installing Firebug
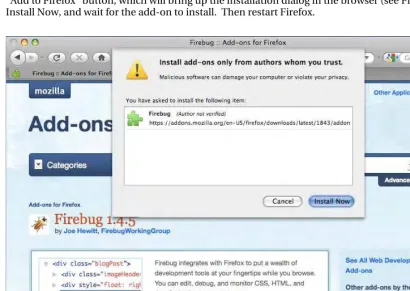
To install Firebug, use Firefox to navigate to http://getfirebug.com, and click the “Install Firebug x.x for Firefox” button. This takes you to the Firefox add-ons directory entry for Firebug. Once there, click the “Add to Firefox” button, which will bring up the installation dialog in the browser (see Figure 1-1). Click Install Now, and wait for the add-on to install. Then restart Firefox.
CHAPTER 1 ■ INTRODUCING JQUERY
6
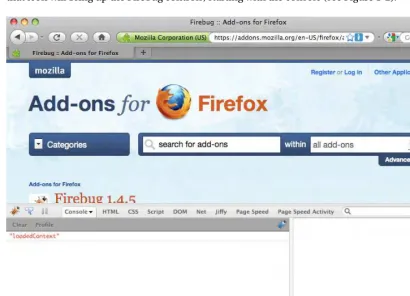
After restarting Firefox, an icon will appear in the status bar that looks like a lightning bug. Clicking that icon will bring up the Firebug controls, starting with the console (see Figure 1-2).
Figure 1-2. The Firebug add-on opens to the console panel
CHAPTER 1 ■ INTRODUCING JQUERY
7
SETTING UP A LOCAL TESTING ENVIRONMENT
Though setting up a local testing environment is not required for the exercises presented in this book,
doing so is a good development practice. Testing locally allows for quicker, more secure development and
is generally easier than trying to develop on a remote server.
Installing XAMPP
To quickly and easily set up a local development environment on your computer, download and install
XAMPP using the following steps:
1.
Visit
http://www.apachefriends.org/en/xampp.html, and download the latest version of XAMPP
for your operating system.
2.
Open the downloaded file. For a PC, run the EXE file, select a directory, and install. For a Mac, mount
the DMG, and drag the XAMPP folder into your
Applicationsfolder.
3.
Open the XAMPP Control Panel in the XAMPP folder, and start Apache.
4.
Navigate to
http://localhost/to ensure than XAMPP is working. If so, the XAMPP home page will
let you know.
In addition to the Windows and Mac versions of XAMPP, there are distributions for Linux and Solaris. Each
operating system has quirks when installing XAMPP, so refer to the help section for additional information
on getting a local testing environment running on your machine.
Including jQuery in Web Pages
To use jQuery in a project, the library needs to be loaded in your HTML document to give your script access to the library’s methods. If the library is not loaded first, any scripts using jQuery syntax will likely result in JavaScript errors. Fortunately, loading jQuery is very simple, and there are several options available to developers to do so.
Including a Downloaded Copy of the jQuery Library
The first option for including jQuery in a project is to save a copy of the library within your project’s file structure and include it just like any other JavaScript file:
CHAPTER 1 ■ INTRODUCING JQUERY
8
Including a Remotely Hosted Copy of the jQuery Library
The second option is to include a copy of the jQuery library hosted on Google Code. This is done in the hopes that visitors to your web site will have a copy of the library already cached from another site including the same file, which decreases load time for your site’s users.
The remote copy is included just like the downloaded copy:
<script type="text/javascript"
src="http://ajax.googleapis.com/ajax/libs/jquery/1.4.2/jquery.min.js"> </script>
Using the Google AJAX Libraries API
Google Code also offers an option for loading jQuery called the AJAX Libraries API (see
http://code.google.com/apis/ajaxlibs). In Google’s words, “The AJAX Libraries API is a content distribution network and loading architecture for the most popular, open source JavaScript libraries.”
Using the AJAX Libraries API is simple and straightforward, and this is method that will be used throughout this book. To include jQuery in your web site using the AJAX Libraries API, use the following snippet:
<script type="text/javascript"
src="http://www.google.com/jsapi"></script> <script type="text/javascript">
google.load("jquery", "1.4.2"); </script>
Setting up a Test File
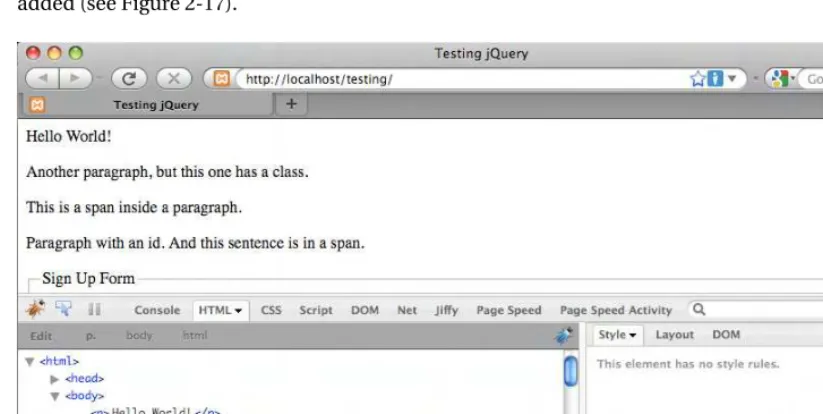
Now that your testing environment is set up, create a new folder in the htdocs folder within your XAMPP installation called testing, and create a new file inside it called index.html. In the editor of your choice, insert the following HTML markup:
<!DOCTYPE html> <html>
<head>
<title>Testing jQuery</title> </head>
<body>
<p>Hello World!</p>
<p class="foo">Another paragraph, but this one has a class.</p> <p><span>This is a span inside a paragraph.</span></p>
<p id="bar">Paragraph with an id.
<span class="foo">And this sentence is in a span.</span> </p>
<script type="text/javascript"
CHAPTER 1 ■ INTRODUCING JQUERY
9
google.load("jquery", "1.4.2"); </script>
</body> </html>
■
Note
Loading the JavaScript right before the closing body tag (
</body>) is done to keep the scripts from
blocking other page elements, such as images, from loading. Doing so also prevents JavaScript from running
before the elements are fully loaded on
the
page, which can result in unexpected behavior or JavaScript errors.
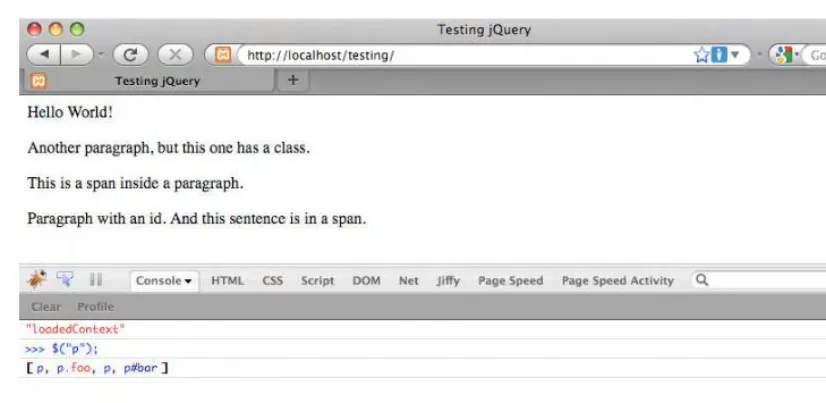
Save this file and navigate to http://localhost/testing/ in Firefox (see Figure 1-3).
Figure 1-3. Our test file loaded in Firefox
You’ll be using this file to get your feet wet with the basic operations of jQuery.
Introducing the jQuery Function ($)
At the core of jQuery is the jQuery function. This function is the heart and soul of jQuery and is used in every instance where jQuery is implemented. In most implementations of jQuery, the shortcut $() is used instead of jQuery() to keep the code concise.
CHAPTER 1 ■ INTRODUCING JQUERY
10
■
Caution
Certain other JavaScript libraries also use the
$()function, so conflicts may occur when attempting to
use multiple libraries simultaneously. jQuery provides a fix for this situation with
jQuery.noConflict(). For more
information, see
http://docs.jquery.com/Core/jQuery.noConflict.
Selecting DOM Elements Using CSS Syntax
Everything in jQuery revolves around its incredibly powerful selector engine. The rest of this chapter teaches you the different methods with which you can select elements from the Document Object Model (DOM) using jQuery.
■
Note
The DOM is a collection of objects and nodes that make up HTML, XHTML, and XML documents. It is
platform-and language-independent—this essentially means that developers can use a variety of programming
languages (such as JavaScript) to access and modify DOM information on multiple platforms (such as web
browsers) without compatibility issues.
One of the strongest and most alluring features of jQuery is the ease with which a developer is able to select elements within the DOM. The use of pseudo-CSS selectors1
adds an incredible level of power to jQuery. Pseudo-CSS allows a developer to target specific instances of elements in his HTML. This is especially helpful to anyone with prior experience with CSS due to the nearly identical syntax.
Essentially, using the same CSS syntax you would use to set up style rules, you’re able to select elements in the following ways:
• Basic selectors
• Hierarchy selectors
• Filters
• Basic filters
• Content filters • Visibility filters
• Attribute filters
• Child filters
• Form filters
1
CHAPTER 1 ■ INTRODUCING JQUERY
11
Basic Selectors
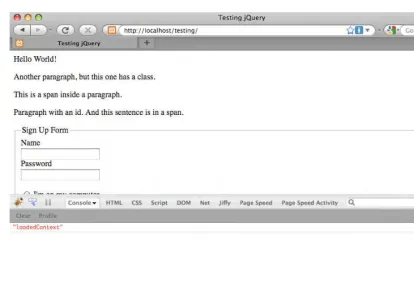
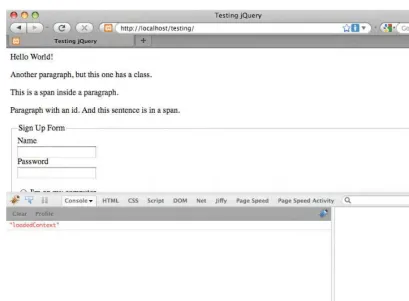
The basic selectors allow developers to select elements by tag type, class name, ID, or any combination thereof. While viewing http://localhost/testing/, launch the Firebug dialog, and click the Console tab (see Figure 1-4). If the Console panel is disabled, click the Console tab, and select Enabled. You will be using this console for all examples in this chapter.
■
Note
If you’re familiar with CSS, you will be able to skim this section, because the selectors behave the same
as their CSS counterparts.
Selecting Elements by Tag Type
To select an element by tag type, simply use the name of the tag (such as p, div, or span) as your selector:
element
To select all paragraph (<p>) tags in our test document, enter the following snippet at the bottom of the console:
$("p");
Press Enter and the code will execute. The following results will be displayed in the console (see Figure 1-4):
>>> $("p");
[ p, p.foo, p, p#bar ]
The first line shows the command that was executed, and the second line shows what was returned from the code. There are four paragraph tags in our test document: two without class or ID attributes, one with a class foo, and one with an ID bar (you’ll learn about this syntax in the next sections). When we pass the tag name to the jQuery function, all instances are found and added to the jQuery object.
CHAPTER 1 ■ INTRODUCING JQUERY
12
Figure 1-4. The Firebug console after executing a command
Selecting Tags by Class Name
Just as quickly as you can select by tag type, you can select elements by their assigned class or classes. The syntax for this is the use the class name preceded by a period (.):
.class
Select all the elements with the class foo by executing the following snippet in the console:
$(".foo");
After execution, the following will show up in the console:
>>> $(".foo"); [ p.foo, span.foo ]
Both a paragraph tag and a span are returned, since they both have the class foo.
Selecting Elements by ID
To select an element by its id attribute, the CSS syntax of the id preceded by a hash sign (#) is used.
#id
Match all elements with an ID of bar with the following:
CHAPTER 1 ■ INTRODUCING JQUERY
13
Only one paragraph in our document has an id of "bar", as we see in the result:
>>> $("#bar"); [ p#bar ]
Combining Selectors for More-Precise Selection
In some situations, it may be necessary to isolate only certain tags that correspond to a class, which is easy to do by combining tag type and class in your selector.
Enter the following in the console to select only paragraph tags with the class foo:
$("p.foo");
The results in the console confirm that the span was ignored, even though it has the class foo:
>>> $("p.foo"); [p.foo]
Using Multiple Selectors
In the event that you need to access multiple elements, multiple selectors can be used to access all of those elements at once. For instance, if you wanted to select any paragraph tag with a class of foo or any element with an ID of bar, you would use the following:
$("p.foo,#bar");
This returns elements that match at least one selector specified in |the string:
>>> $("p.foo,#bar"); [ p.foo, p#bar ]
Hierarchy Selectors
Sometimes, it’s not enough to be able to select by element, class, or ID. There are points at which you’ll need to access elements contained within, next to, or after another element, such as removing an active class from all menu items except the one that was just clicked, grabbing all the list items out of the selected unordered list, or changing attributes on the wrapper element when a form item is selected.
Selecting Descendant Elements
Selecting descendant elements, which are elements contained within other elements, is done using the ancestor selector followed by a space and the descendant selector.
CHAPTER 1 ■ INTRODUCING JQUERY
14
To select descendant spans in your test document, execute the following command in the Firebug console:
$("body span");
This will find all spans contained within the body tag (<body>) of the document, even though the spans are also inside paragraph tags.
>>> $("body span"); [ span, span.foo ]
Selecting Child Elements
Child elements are a more-specific style of descendant selector. Only the very next level of element is considered for matching. To select a child element, use the parent element followed by a greater than (>) symbol, followed by the child element to match:
parent>child
In your test file, try to select any spans that are child elements of the body element by entering the following command in the console:
$("body>span");
Because there are no spans directly contained within the body element, the console will output the following:
>>> $("body>span"); [ ]
Next, filter all span elements that are direct children of a paragraph element:
$("p>span");
The resulting output looks like this:
>>> $("p>span"); [ span, span.foo ]
Selecting Next Elements
Occasionally in a script, you’ll need to select the next element in the DOM. This is accomplished by providing an identifier for the starting element (any selector pattern works here), followed by a plus sign (+), followed by the selector to match the next instance of:
start+next
CHAPTER 1 ■ INTRODUCING JQUERY
15
$(".foo+p");
There is only one element with the class foo, so only one paragraph element is returned:
>>> $('.foo+p'); [ p ]
Next, use a more general query, and select the next paragraph element after any paragraph element:
$('p+p');
There are four paragraphs in our markup, and all of them but the last have a next paragraph, so the console will display three elements in the result:
>>> $('p+p'); [ p.foo, p, p#bar ]
This result set is the second, third, and fourth paragraphs from the HTML markup.
Selecting Sibling Elements
Sibling elements are any elements contained within the same element. Selecting sibling elements works similarly to selecting next elements, except the sibling selector will match all sibling elements after the starting element, rather than just the next one.
To select sibling elements, use the starting element selector, followed by an equivalency sign (~), and the selector to match sibling elements with:
start~siblings
To match all siblings after the paragraph with class foo, execute the following command in the console:
$(".foo~p");
The result set will look like the following:
>>> $(".foo~p"); [ p, p#bar ]
Basic Filters
Filters are another very powerful method of accessing elements in the DOM. Instead of relying on element types, classes, or IDs, you’re able to find elements based on their position, current state, or other variables.
The basic syntax of a filter is a colon (:) followed by the filter name:
CHAPTER 1 ■ INTRODUCING JQUERY
16
In some filters, a parameter can be passed in parentheses:
:filter(parameter)
The most common and useful filters are covered in the next few sections.
■
Note
Not all available filters are covered here for the sake of getting into actual development quickly. For a
complete listing of available filters, see the jQuery documentation.
Selecting First or Last Elements
One of the most common uses of filters is to determine if an element is the first or last element in a set. With filters, finding the first or last element is incredibly simple; just append the filter :first or :last to any selector:
$("p:last");
This returns the following when executed in the console:
>>> $("p:last"); [ p#bar ]
Selecting Elements that Do Not Match a Selector
If you need to find all elements that don't match a selector, the :not() filter is the easiest way to go about it. Append this filter to your selector along with a selector as its parameter, and the results set will return any elements that match the original selector, but not the selector passed as a parameter to :not().
For example:
$("p:not(.foo)");
Will return the following result set:
>>> $("p:not(.foo)"); [ p, p, p#bar ]
Selecting Even or Odd Elements
Similar to :first and :last, the :even and :odd filters are syntactically simple and return exactly what you might expect: the even or odd elements from a result set, respectively.
$("p:odd");
CHAPTER 1 ■ INTRODUCING JQUERY
17
>>> $("p:odd"); [ p.foo, p#bar ]
Selecting Elements by Index
In the event that you need to grab a particular element by its index, the :eq() filter allows you to specify which element is needed by passing an index as the filter’s parameter:
$("p:eq(3)");
This outputs the following:
>>> $("p:eq(3)");¸ [ p#bar ]
■
Note
An element's
index
refers to its position among other elements in the set. Counting in programming starts
a zero (
0), so the first element is at index
0; the second is at index
1, and so on.
Content Filters
Filters are also available to select elements based on their content. These can range from containing certain text to surrounding a given element.
Selecting Elements That Contain Certain Text
To select only elements that contain certain text, use the :contains() filter, where the text to be matched is passed as a parameter to the filter:
$("p:contains(Another)");
When executed in the console, the preceding line will return the following:
>>> $("p:contains(Another)"); [ p.foo ]
CHAPTER 1 ■ INTRODUCING JQUERY
18
documentation by a member of the development community. For more on this filter, see
http://api.jquery.com/contains-selector
.
Selecting Elements That Contain a Certain Element
If you need to select only elements that contain another element, you would use the :has() filter. This works similarly to :contains(), except it accepts an element name instead of a string of text:
$("p:has(span)");
When executed in the console, this outputs the following:
>>> $("p:has(span)"); [ p, p#bar ]
Only paragraphs containing span elements are returned.
Selecting Elements That Are Empty
To find elements that are empty (meaning the element contains neither text nor any other elements), the :empty filter comes into play.
In the HTML example you’re using, the only empty elements are not visible. Select them by looking for any empty element:
$(":empty");
This outputs the following:
>>> $(":empty");
[ script jsapi, script jquery.min.js, div#_firebugConsole ]
Both the second script tag and the div are dynamically generated. The script tag comes from jQuery being loaded by the Google JSAPI, and the div comes from Firebug.
Selecting Elements That Are Parents
The opposite of :empty, :parent will only match elements that contain children, which can be either other elements, text, or both.
Select all paragraphs that are parents using the following:
$("p:parent");
CHAPTER 1 ■ INTRODUCING JQUERY
19
>>> $("p:parent"); [ p, p.foo, p, p#bar ]
Visibility Filters
Visibility filters, :hidden and :visible, will select elements that are, respectively, hidden and visible. Select all visible paragraphs like so:
$("p:visible");
Because none of the elements in your HTML example are currently hidden, this returns the following result set:
>>> $("p:visible"); [ p, p.foo, p, p#bar ]
Attribute Filters
Element attributes are also a great way to select elements. An attribute is anything in the element that further defines it (this includes the class, href, ID, or title attributes). For the following examples, you'll be accessing the class attribute.
■
Note
Please bear in mind that it is faster (and better practice) to use ID
(#id) and class (
.class) selectors in
production scripts whenever possible; the examples below are just to demonstrate the capabilities of the filter.
Selecting Elements That Match an Attribute and Value
To match elements that have a given attribute and value, enclose the attribute-value pair in square brackets ([]):
[attribute=value]
To select all elements with a class attribute of foo, execute the following in the console:
$("[class=foo]");
This returns the following:
CHAPTER 1 ■ INTRODUCING JQUERY
20
Selecting Elements That Don’t Have the Attribute or Don’t Match the Attribute Value
Inversely, to select elements that do not match an attribute-value pair, insert an exclamation point (!) before the equals sign between the attribute and value:
[attribute!=value]
Select all paragraphs without the class foo by running the following command:
$("p[class!=foo]");
This results in the following:
>>> $("p[class!=foo]"); [ p, p, p#bar ]
Child Filters
Child filters add an alternative to the use of :even, :odd, or :eq(). The main difference is that this set of filters starts indexing at 1 instead of 0 (like :eq() does).
Selecting Even or Odd Parameters or Parameters by Index or Equation
One of the more versatile filters, :nth-child() provides four different options to pass as a parameter when selecting elements: even, odd, index, or an equation.
Like other child filters, this one starts indexing at 1 instead of 0, so the first element is at index 1, the second element at 2, and so on.
Using :odd, the result set contained the paragraphs with a class of foo and an ID of foo; select odd paragraphs using :nth-child() to see the difference in how the filters handle by executing the following command:
$("p:nth-child(odd)");
The results display as follows in the console:
>>> $("p:nth-child(odd)"); [ p, p ]
Though this output may seem strange, the mismatched results are a product of the difference in how the elements index.
Selecting First or Last Child Elements
While very similar to :first and :last, :first-child and :last-child differ in that the returned element set can contain more than one match. For instance, to find the last span that is a child of a paragraph element, you might use the following:
CHAPTER 1 ■ INTRODUCING JQUERY
21
which returns the following in the console:
>>> $("p span:last"); [ span.foo ]
However, if you needed to find every span that was the last child of a paragraph element, you would use :last-child instead:
$("p span:last-child");
This uses each parent as a reference instead of the DOM as a whole, so the results are different:
>>> $("p span:last-child"); [ span, span.foo ]
Form Filters
Forms are a huge part of web sites these days, and their major role inspired a set of filters specifically geared toward forms.
Because your HTML example does not have any form elements in it, you’ll need to append the file with some new markup for the following examples.
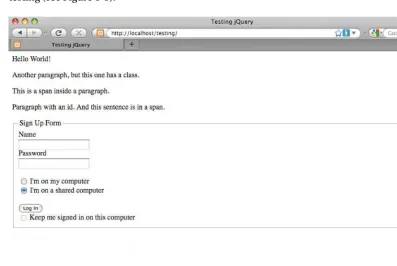
In index.html, add the following HTML between the last paragraph tag and the first script tag:
CHAPTER 1 ■ INTRODUCING JQUERY
22
After saving, reload the page in your browser at http://localhost/testing/ to see the form for testing (see Figure 1-5).
Figure 1-5. The form as it appears after editing index.html
Matching by Form Element Type
The most common form-specific filters simply match form element types. The available filters are
:button, :checkbox, :file, :image, :input, :password, :radio, :submit, and :text. To select all radio inputs, use the following code:
$("input:radio");
This outputs the following in the console:
>>> $("input:radio"); [ input on, input on ]
CHAPTER 1 ■ INTRODUCING JQUERY
23
Selecting Only Enabled or Disabled Form Elements
Additionally, filters to select enabled or disabled form elements are available using :enabled and
:disabled. To select all disabled form elements, use the following code:
$(":disabled");
This outputs the following in the console:
>>> $(":disabled"); [ input on ]
The “Keep me signed in on this computer” check box is disabled, and therefore returned, by the
:disabled filter.
Selecting Checked or Selected Form Elements
Radio and check box inputs have a checked state, and select inputs have a selected state. Filters are provided to retrieve the form elements that are in either state using :checked or :selected, respectively.
To select the currently checked radio button in your HTML example, execute the following code in the console:
$(":checked");
This returns the radio input that is currently selected in the console:
>>> $(":checked"); [ input on ]
Summary
In this chapter you learned what jQuery is, why it was created, and the basics of how it works. You also went over setting up a development environment using XAMPP, Firefox, and the Firebug plugin. At this point, you should feel comfortable selecting elements from the DOM using jQuery’s powerful selector engine. This chapter was a tad dry, but it’s important that you fully understand the how of jQuery before moving on to heavier bits of coding.
C H A P T E R 2
■ ■ ■
25
Common jQuery Actions and
Methods
Now that you understand how element selection works, you can start learning the basics of how jQuery simplifies interaction with web pages. In this chapter, you’ll get your hands dirty with the most common and useful aspects of jQuery.
This chapter will read more like a reference and may be a bit dry at times, but it’s definitely in your best interest to work through the examples presented within. Having a basic understanding of how these methods work and what they do will prove invaluable as you start building the example project later on in this book.
Understanding the Basic Behavior of jQuery Scripts
One of the most convenient features of jQuery is the fact that nearly all its methods are chainable, which means methods can be executed one right after the other. This leads to clear, concise code that is easy to follow:
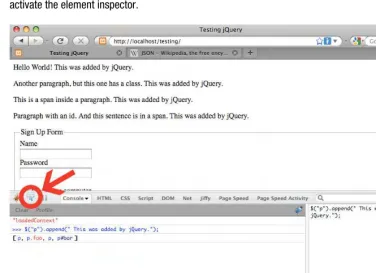
$('p')
.addClass('new-class') .text("I'm a paragraph!") .appendTo('body');
Chainable methods are possible because each method returns the jQuery object itself after modification. At first, this concept may seem difficult to understand, but as you work through the examples in this chapter, it should become clearer.
Understanding jQuery Methods
jQuery attempts to make several common programming tasks easier. At a glance, it simplifies JavaScript development by providing the following powerful tools:
• DOM element selection using CSS syntax (which you learned in Chapter 1)
• Simple traversal and modification of the DOM
CHAPTER 2 ■ COMMON JQUERY ACTIONS AND METHODS
26
• Access to all attributes of an element, including CSS and styling properties, and the ability to modify them
• Animation and other effects
• Simple AJAX controls
■
Note
The preceding list is only a partial list of jQuery’s features and capabilities. As you continue on through the
projects in this book, other helpful features will be explored. As always, for a complete reference, visit the
documentation at
http://api.jquery.com.
Traversing DOM Elements
Traversal in jQuery is the act of moving from one DOM element to another; traversal is essentially another form of filtering performed after the initial selection has been made. This is useful because it allows developers to complete an action and then move to another part of the DOM without needing to perform another search by selector.
It also aids developers in affecting the elements immediately surrounding an element that is being manipulated or otherwise utilized by a script. This can range from adding a class to parent elements to indicate activity to disabling all inactive form elements to any number of other useful tasks.
■
Note
You will be using the same HTML test file from Chapter 1 for the examples in this chapter as well. If you're
using XAMPP to test locally, point your browser to
http://localhost/testing/to load this file. Make sure the
Firebug console is open and active (see Chapter 1 for a refresher on using the Firebug console).
.eq()
If a set of elements needs to be narrowed down to just one element identified by its index, then you’re able to use the .eq() method. This method accepts one argument: an index for the desired element. For
.eq(), indices start at 0.
$("p").eq(1);
When executed in the Firebug console, the following returns:
>>> $("p").eq(1); [ p.foo ]
CHAPTER 2 ■ COMMON JQUERY ACTIONS AND METHODS
27
To select the same paragraph as the preceding example by counting backward from the end of the result set, use the following code:
$("p").eq(-3);
This returns the same paragraph in the console:
>>> $("p").eq(-3); [ p.foo ]
.filter() and .not()
To use a whole new selector within a set of elements, the .filter() method comes in handy. It accepts any selector that can be used in the jQuery function, but it applies only to the subset of elements contained within the jQuery object.
For instance, to select all paragraphs and then filter out all but the ones with class foo, you would use the following:
$("p").filter(".foo");
The result in the console will read as follows:
>>> $("p").filter(".foo"); [ p.foo ]
The inverse of .find() is .not(), which will return all elements from a result set that do not match the given selector. For instance, to select all paragraphs and then limit the selection to paragraphs that do not have the class foo, you would use the following:
$("p").not(".foo");
This results in the following:
>>> $("p").not(".foo"); [ p, p, p#bar ]
.first() and .last()
The .first() and .last() methods work identically to .eq(0) and .eq(-1), respectively. To select the last paragraph from a set of all paragraphs on the page, use the following:
$("p").last();
CHAPTER 2 ■ COMMON JQUERY ACTIONS AND METHODS
28
>>> $("p").last(); [ p#bar ]
.has()
To select an element that contains elements matching a certain pattern, you can use the .has() method. For instance, you would use the following to select all paragraphs and filter the results to only
paragraphs that contain a span element:
$("p").has("span");
This outputs the following:
>>> $("p").has("span"); [ p, p#bar ]
.is()
The .is() method is a little different from other methods in that it does not return the jQuery object. It evaluates a result set without modifying it, which makes it ideal for use in callback functions or functions executed after the successful execution of a function or method.
You’ll learn more about practical uses of .is() in later examples of this book; right now, select all paragraphs in your test document then check if one has the class foo:
$("p").is(".foo");
The result is a Boolean (true or false) answer:
>>> $("p").is(".foo"); true
.slice()
To select a subset of elements based on its index, the .slice() method comes into play. It accepts two arguments: the first is a starting index from which to generate the subset, and the second is an optional ending point. If the second parameter isn’t supplied, the subset will continue until the end of the selection is reached.
CHAPTER 2 ■ COMMON JQUERY ACTIONS AND METHODS
29
Additionally, like with .eq(), a negative index can be used. This can be applied to the start and/or end point.
To select all paragraphs and then limit the selection to the second and third paragraphs, use the following code:
$("p").slice(1,3);
The result in the console reads as follows:
>>> $("p").slice(1,3); [ p.foo, p ]
To select the last two elements from the paragraph set, you would use the following:
$("p").slice(-2);
This generates the following result:
>>> $("p").slice(-2); [ p, p#bar ]
.children()
Oftentimes, it becomes necessary to drill down in a result set to find child elements. This is
accomplished using the .children() method, which accepts one optional parameter: a selector to match
child elements against.
To select all paragraphs and then change the selection to match all child elements of the paragraphs, execute the following code:
$("p").children();
This outputs the following:
>>> $("p").children(); [ span, span.foo ]
If you need a more specific set of children than that, you’re able to pass an optional selector to the
.children() method. To select all paragraphs and then find all children with a class foo, use the following:
$("p").children(".foo");
The results in the console are as follows:
CHAPTER 2 ■ COMMON JQUERY ACTIONS AND METHODS
30
[ span.foo ]
.closest()
The .closest() method is an easy way to find elements up the DOM tree, which is the nesting order of elements (a DOM tree relationship in your example is the span within a paragraph within the body element).
For example, to find the closest paragraph to the span with class foo, run the following code snippet in the console:
$("span.foo").closest("p");
This outputs the following:
>>> $("span.foo").closest("p"); [ p#bar ]
.find()
Similar to the .children() method, the .find() method matches descendants of elements within the current set. The main difference between .find() and .children() is that .children() only checks one
level down in the DOM tree, whereas .find() doesn’t care how deep the matched elements are.
To demonstrate, select the body tag and then find any contained span elements using the following:
$("body").find("span");
This results in both spans being returned:
>>> $("body").find("span"); [ span, span.foo ]
However, if you were to try the same thing using .children(), an empty result set is returned:
>>> $("body").children("span"); [ ]
.next(), .nextAll(), and .nextUntil()
A trio of useful methods for finding the next sibling elements in a set is provided in .next(), .nextAll(), and .nextUntil().
CHAPTER 2 ■ COMMON JQUERY ACTIONS AND METHODS
31
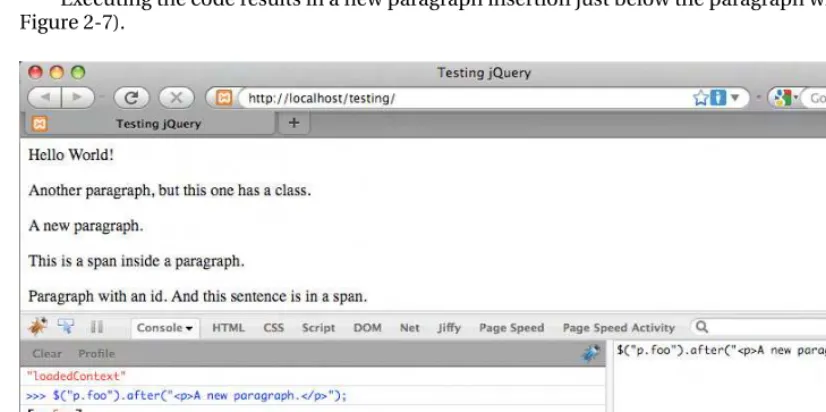
$("p.foo").next();
This generates the following output:
>>> $("p.foo").next(); [ p ]
A selector can be passed to .next() as well, which allows developers to determine which type of next sibling element should be matched:
$("p.foo").next("#bar");
This returns an empty result set, since the next element does not have an ID of bar:
>>> $("p.foo").next("#bar"); [ ]
Because .next() returns only one element, a companion method was created that returns all next sibling elements, .nextAll(). To select all paragraphs after the paragraph with the class foo, use the following code:
$(".foo").nextAll("p");
This returns the following result:
>>> $(".foo").nextAll("p"); [ p, p#bar ]
■
Note
The selector is optional in
.nextAll(), as it is in
.next().
The third method available for selecting next sibling elements is the .nextUntil() method. As its name suggests, this method will return all next elements until a selector is matched. It’s important to note that the element matched by the selector will not be included in the result set.
To demonstrate this, select the paragraph with the class foo and use .nextUntil() with a selector of
"#bar":
$(".foo").nextUntil("#bar");
Only one paragraph is returned in the result set, and the paragraph with the ID of bar is not included:
CHAPTER 2 ■ COMMON JQUERY ACTIONS AND METHODS
32
[ p ]
To include the paragraph with an ID of bar, you need to look at the element immediately following, which is the form element in this case. Try the selector again using this updated code:
$(".foo").nextUntil("form");
Now, both following paragraphs are returned:
>>> $(".foo").nextUntil("form"); [ p, p#bar ]
.prev(), .prevAll(), and .prevUntil()
The .prev(), .prevAll(), and .prevUntil() functions work exactly like .next(), .nextAll(), and
.nextUntil(), except they look at previous sibling elements rather than next sibling elements:
>>> $("#bar").prev();
[ p ]
>>> $("#bar").prevAll();
[ p, p.foo, p ]
>>> $("#bar").prevUntil(".foo");
[ p ]
.siblings()
To select sibling elements on both sides of an element, use the .siblings() method. This accepts a selector as an argument to limit what types of elements are returned. To match all sibling paragraph elements to the paragraph with ID bar, execute the following code:
$("#bar").siblings("p");
The results will look as follows:
CHAPTER 2 ■ COMMON JQUERY ACTIONS AND METHODS
33
[ p, p.foo, p ]
.parent()
The .parent() method returns a set of the immediate parent elements of the current selection. For instance, to select all parent elements of any elements with the class foo, use the following:
$(".foo").parent();
This returns the following:
>>> $(".foo").parent(); [ body, p#bar ]
To match only paragraph elements that are parents of elements with class foo, modify the code to the following:
$(".foo").parent("p");
This narrows the result set:
>>> $(".foo").parent("p"); [ p#bar ]
.parents() and .parentsUntil()
Unlike .parent(), .parents() will return all parent elements, with an optional selector passed to filter the results.
To select all parent elements of the check box in the form on the example page, use the following code:
$(":checkbox").parents();
This finds every parent element, all the way out to the html element:
>>> $(":checkbox").parents();
[ label, fieldset, form #, body, html ]
To filter the results so that only the parent form element is returned, modify the code as follows:
$(":checkbox").parents("form");
This returns only the parent form element:
CHAPTER 2 ■ COMMON JQUERY ACTIONS AND METHODS
34
[ form # ]
Finally, to select a range of parents until a selector is matched, similar to .nextUntil() or
.prevUntil(), use .parentsUntil():
$(":checkbox").parentsUntil("form");
This returns all parent elements until the form element is encountered:
>>> $(":checkbox").parentsUntil("form"); [ label, fieldset ]
.add()
The .add() method is versatile and, therefore, a bit more complicated. Essentially, it allows you to add additional elements to the existing jQuery object using a selector or a string of HTML.
To select all paragraphs and then add the span with class foo to the object, use the following:
$("p").add("span.foo");
This outputs the following:
>>> $("p").add("span.foo"); [ p, p.foo, p, p#bar, span.foo ]
The .add() method also allows you to create elements on the fly, like so:
$("p").add('<span id="bat">This is a new span</span>');
Executing the preceding code will output this:
>>> $("p").add('<span id="bat">This is a new span</span>'); [ p, p.foo, p, p#bar, span#bat ]