by Elaine Marmel,
Nancy C. Muir
Microsoft
®Office
Project 2007
A L L - I N - O N E D E S K R E F E R E N C E
FOR
Microsoft
®Office
Project 2007
A L L - I N - O N E D E S K R E F E R E N C E
FOR
by Elaine Marmel,
Nancy C. Muir
Microsoft
®Office
Project 2007
A L L - I N - O N E D E S K R E F E R E N C E
FOR
111 River Street Hoboken, NJ 07030-5774 www.wiley.com
Copyright © 2007 by Wiley Publishing, Inc., Indianapolis, Indiana Published by Wiley Publishing, Inc., Indianapolis, Indiana Published simultaneously in Canada
No part of this publication may be reproduced, stored in a retrieval system or transmitted in any form or by any means, electronic, mechanical, photocopying, recording, scanning or otherwise, except as permit-ted under Sections 107 or 108 of the 1976 Unipermit-ted States Copyright Act, without either the prior written permission of the Publisher, or authorization through payment of the appropriate per-copy fee to the Copyright Clearance Center, 222 Rosewood Drive, Danvers, MA 01923, (978) 750-8400, fax (978) 646-8600. Requests to the Publisher for permission should be addressed to the Legal Department, Wiley Publishing, Inc., 10475 Crosspoint Blvd., Indianapolis, IN 46256, (317) 572-3447, fax (317) 572-4355, or online at http://www.wiley.com/go/permissions.
Trademarks:Wiley, the Wiley Publishing logo, For Dummies, the Dummies Man logo, A Reference for the Rest of Us!, The Dummies Way, Dummies Daily, The Fun and Easy Way, Dummies.com, and related trade dress are trademarks or registered trademarks of John Wiley & Sons, Inc. and/or its affiliates in the United States and other countries, and may not be used without written permission. Microsoft is a registered trademark of Microsoft Corporation in the United States and/or other countries. All other trademarks are the property of their respective owners. Wiley Publishing, Inc., is not associated with any product or vendor mentioned in this book.
LIMIT OF LIABILITY/DISCLAIMER OF WARRANTY: THE PUBLISHER AND THE AUTHOR MAKE NO REPRESENTATIONS OR WARRANTIES WITH RESPECT TO THE ACCURACY OR COMPLETENESS OF THE CONTENTS OF THIS WORK AND SPECIFICALLY DISCLAIM ALL WARRANTIES, INCLUDING WITHOUT LIMITATION WARRANTIES OF FITNESS FOR A PARTICULAR PURPOSE. NO WARRANTY MAY BE CREATED OR EXTENDED BY SALES OR PROMOTIONAL MATERIALS. THE ADVICE AND STRATEGIES CONTAINED HEREIN MAY NOT BE SUITABLE FOR EVERY SITUATION. THIS WORK IS SOLD WITH THE UNDERSTANDING THAT THE PUBLISHER IS NOT ENGAGED IN RENDERING LEGAL, ACCOUNTING, OR OTHER PROFESSIONAL SERVICES. IF PROFESSIONAL ASSISTANCE IS REQUIRED, THE SERVICES OF A COMPE-TENT PROFESSIONAL PERSON SHOULD BE SOUGHT. NEITHER THE PUBLISHER NOR THE AUTHOR SHALL BE LIABLE FOR DAMAGES ARISING HEREFROM. THE FACT THAT AN ORGANIZATION OR WEBSITE IS REFERRED TO IN THIS WORK AS A CITATION AND/OR A POTENTIAL SOURCE OF FURTHER INFORMATION DOES NOT MEAN THAT THE AUTHOR OR THE PUBLISHER ENDORSES THE INFORMATION THE ORGANIZATION OR WEBSITE MAY PROVIDE OR RECOMMENDATIONS IT MAY MAKE. FURTHER, READERS SHOULD BE AWARE THAT INTERNET WEBSITES LISTED IN THIS WORK MAY HAVE CHANGED OR DISAPPEARED BETWEEN WHEN THIS WORK WAS WRITTEN AND WHEN IT IS READ.
For general information on our other products and services, please contact our Customer Care Department within the U.S. at 800-762-2974, outside the U.S. at 317-572-3993, or fax 317-572-4002. For technical support, please visit www.wiley.com/techsupport.
Wiley also publishes its books in a variety of electronic formats. Some content that appears in print may not be available in electronic books.
Library of Congress Control Number: 2007931548 ISBN: 978-0-470-13767-3
About the Authors
Elaine Marmelis President of Marmel Enterprises, LLC, an organization that specializes in technical writing and software training. Elaine left her native Chicago for the warmer climes of Arizona (by way of Cincinnati, Ohio; Jerusalem, Israel; Ithaca, New York; Washington, D.C., and Tampa, Florida) where she basks in the sun with her PC, her dog Josh, and her cats, Cato, Watson, and Buddy, and sings barbershop harmony with the 2006 Inter-national Championship Scottsdale Chorus. Elaine spends most of her time writing; she has authored and co-authored over 50 books about Microsoft Project, QuickBooks, Peachtree, Quicken, Microsoft Excel, Microsoft Word for Windows, Microsoft Word for the Mac, Windows, 1-2-3 for Windows, and Lotus Notes. From 1994 to 2006, she also was the contributing editor to monthly publications Peachtree Extraand QuickBooks Extra.
Dedication
To my brother and sister-in-law for always being there for me, and to my co-author, Nancy Muir — working with you inspires me, and you’re fun when we’re not working, too.
— Elaine Marmel
To Earl for his ongoing love and support, and to my co-author, Elaine Marmel, for being as great a friend as she is a writer.
— Nancy Muir
Authors’ Acknowledgments
Some of the people who helped bring this book to market include the following:
Acquisitions, Editorial, and Media Development
Project Editor:Blair J. Pottenger Acquisitions Editor:Kyle Looper Copy Editor:Virginia Sanders Technical Editor:Thuy Le
Editorial Manager:Kevin Kirschner
Media Development and Quality Assurance: Angela Denny, Kate Jenkins,
Steven Kudirka, Kit Malone Media Development Coordinator:
Jenny Swisher Media Project Supervisor:
Laura Moss-Hollister
Editorial Assistant:Amanda Foxworth Sr. Editorial Assistant:Cherie Case Cartoons:Rich Tennant
(www.the5thwave.com)
Composition Services
Senior Project Coordinator:Kristie Rees Layout and Graphics: Claudia Bell,
Stacie Brooks, Denny Hager, Shane Johnson, Stephanie D. Jumper, Barbara Moore, Melanee Prendergast, Erin Zeltner
Proofreaders: Aptara, Christy Pingleton Indexer: Aptara
Anniversary Logo Design:Richard Pacifico
Publishing and Editorial for Technology Dummies
Richard Swadley,Vice President and Executive Group Publisher Andy Cummings,Vice President and Publisher
Mary Bednarek,Executive Acquisitions Director Mary C. Corder,Editorial Director
Publishing for Consumer Dummies
Diane Graves Steele,Vice President and Publisher Joyce Pepple,Acquisitions Director
Composition Services
Contents at a Glance
Introduction ...1
Book I: Project Management...7
Chapter 1: A Project Management Overview...9
Chapter 2: The Ins and Outs of Using Project...21
Chapter 3: Just What Tasks Should You Include?...35
Chapter 4: Exploring the Project Environment...45
Chapter 5: What’s New in Project 2007...63
Book II: Project Basics...73
Chapter 1: Building a Project Plan ...75
Chapter 2: Creating That First Task ...85
Chapter 3: Exploring Task Views ...97
Chapter 4: Working with Calendars ...111
Chapter 5: Getting Help ...129
Book III: Getting Your Plan in Order ...141
Chapter 1: Organizing the Structure of a Project Plan...143
Chapter 2: Assigning Outline Codes to Tasks ...163
Chapter 3: Using WBS Coding ...177
Chapter 4: Linking and Consolidating Projects ...191
Book IV: Establishing Task Timing ...227
Chapter 1: Looking at Timing...229
Chapter 2: Defining What Drives Task Timing ...237
Chapter 3: Adding Dependencies ...251
Chapter 4: Working with Constraints and Deadlines ...267
Book V: Working with Resources and Costs...275
Chapter 1: Creating Resources ...277
Chapter 2: Understanding Costs ...289
Chapter 3: Assigning Resources to Tasks...299
Chapter 4: Tallying Costs...321
Book VI: Communicating Project Information...333
Chapter 1: Working with Views...335
Book VII: Resolving Problems in Your Plan ...423
Chapter 1: Working with Filters ...425
Chapter 2: Solving Resource Conflicts...437
Chapter 3: Reviewing Timing and Costs...451
Chapter 4: Putting Final Changes into Place ...463
Book VIII: Tracking ...471
Chapter 1: Working with Baselines and Interim Plans...473
Chapter 2: Entering Actuals ...487
Chapter 3: Reviewing Your Budget...517
Book IX: Advanced Project Topics ...527
Chapter 1: Working Your Own Way ...529
Chapter 2: Changing the Look of a Project...555
Chapter 3: Using Macros ...585
Chapter 4: Importing Information into Project...603
Chapter 5: Exporting Project Information...619
Book X: The Basics of Project Server ...635
Chapter 1: Understanding Project Server ...637
Chapter 2: The Project Server Administrator...647
Chapter 3: Project Server and the Project Manager ...665
Chapter 4: Project Server and the Team Member...683
Glossary...699
Table of Contents
Introduction...1
About This Book...1
How This Book Is Organized...2
Book I: Project Management ...2
Book II: Project Basics ...2
Book III: Getting Your Plan in Order ...2
Book IV: Establishing Task Timing ...3
Book V: Working with Resources and Costs ...3
Book VI: Communicating Project Information ...3
Book VII: Resolving Problems in Your Plan...3
Book VIII: Tracking ...4
Book IX: Advanced Project Topics ...4
Book X: The Basics of Project Server ...4
Glossary...4
Conventions Used in This Book ...4
Foolish Assumptions ...5
Icons Used in This Book...5
Where to Go from Here...6
Book I: Project Management ...7
Chapter 1: A Project Management Overview . . . .9
The Life of a Project...9
So, just what is a project?...9
Taking a closer look at the project life cycle ...10
Everybody Plays a Role...13
Stakeholders of all types ...14
Getting a Few Project Management Concepts under Your Belt ...14
The dreaded triple constraint ...15
Keeping on track: Critical path and slack ...15
Using tried-and-true methodologies ...16
Resource Management Basics ...18
How Project sees resources ...18
What it takes to manage people ...19
Chapter 2: The Ins and Outs of Using Project . . . .21
The Basics of Computerized Project Management...21
Making the leap to Project ...22
What You Have to Put Into Project ...24
Tasks and their timing ...24
Lining up resources...29
Keeping a Project on Track...32
Keeping Others in the Loop...33
Chapter 3: Just What Tasks Should You Include? . . . .35
First Things First: Define the Business Need...35
Target Practice: Project Goal Setting ...36
Getting your goal straight ...37
Writing a goal statement...37
Taking a Look at Your Project’s Scope ...38
A scope is not a goal ...38
Writing a scope statement...38
Breaking Your Project into Phases...39
Thinking things through ...39
It’s just a phase ...40
Choosing how granular to make your tasks ...41
Chapter 4: Exploring the Project Environment . . . .45
Exploring Menus and Toolbars in Project...45
Menu basics ...46
Displaying and using toolbars ...47
Navigating Project...48
Getting to a view...48
Scrolling to get a better view ...49
Jumping to a particular point in time ...51
Finding Another View ...52
A popular view: Gantt Chart ...52
Following the (work)flow: Network Diagram view...53
Controlling time with Calendar view ...54
Changing Views ...55
Modifying view panes ...56
Changing tables ...60
Displaying task panes ...61
Displaying and Hiding Project Guide ...61
Chapter 5: What’s New in Project 2007 . . . .63
Exploring the Many Versions of Project ...63
Getting out of Hot Water with Multiple Undo ...64
Spotting Changes with Change Highlighting...66
Knowing What’s Driving Your Tasks ...67
Making Reports More Visual...68
A New Resource: Cost...70
Table of Contents
xiii
Book II: Project Basics ...73
Chapter 1: Building a Project Plan . . . .75
Creating That First Project...75
Starting from scratch ...75
Getting a head start with templates...76
Making Global Project Settings...79
Entering settings...79
Using start and finish dates ...81
Save That Project! ...83
Saving a project ...83
Saving in other formats ...84
Chapter 2: Creating That First Task . . . .85
Tackling Task Basics ...85
Identifying what makes up a task ...86
What task settings control ...87
The Many Different Ways to Create a Task ...88
Creating a task in Gantt Chart view ...88
Going the Task Information dialog box route ...89
Importing tasks from Outlook...91
Getting your tasks from Excel...92
Creating a task that represents another project ...94
Chapter 3: Exploring Task Views . . . .97
A View for Every Need...97
Finding Just the Right View for You ...99
Discovering Various Task Views...100
What Resource Views Tell You ...103
The Best Views for Tracking Progress on Your Project ...106
Displaying Combination Views...108
Chapter 4: Working with Calendars . . . .111
The Big 4: Base, Project, Resource, and Task Calendars ...111
How calendars work ...112
How does one calendar relate to another? ...114
Understanding Calendar Options and Working Times...114
Setting calendar options...115
Making exceptions ...116
Getting the Project Calendar Set Up ...118
Letting Project Guide Make Calendar Settings For You...119
Making Changes to Task Calendars ...121
Setting Up Resource Calendars ...122
Calendars for different types of resources...123
Creating Your Own Custom Calendar Template...125
Sharing Calendars with Other Projects ...126
Chapter 5: Getting Help . . . .129
Entering the Universe of Project Help ...129
Exploring Microsoft Office Project Help...130
Browsing topics ...131
Using the Table of Contents ...132
Searching for Help ...132
Going Online to Find the Answer ...134
Running Diagnostics ...136
Putting Project Guide to Work...137
Where Project Guide can lead you ...137
Getting to work with Project Guide...138
Book III: Getting Your Plan in Order ...141
Chapter 1: Organizing the Structure of a Project Plan . . . .143
A To-Do List . . . or a Project Schedule?...143
Building an outline ...145
“I’ve got a little list . . .”...145
A typical project outline ...146
Summary tasks are special...146
The most special task of them all — the project summary task...147
Creating Structure in the Schedule ...149
Selecting tasks ...149
Promoting and demoting tasks...149
Expanding and collapsing the outline ...150
So, What Happens When You Reorganize the Outline?...152
Adding tasks...152
Understanding Outline Numbers ...163
Letting Project Assign Outline Numbers...164
Understanding Outline Codes ...165
Designing Your Own Outline Numbers...166
Selecting an outline code to define ...166
Table of Contents
xv
Defining values for the lookup table ...169
Entering outline codes...171
Outline Numbers and Codes and Renumbering...172
Chapter 3: Using WBS Coding . . . .177
What’s a WBS Code? ...177
Creating WBS Codes ...178
Creating a WBS Chart ...179
Customizing WBS Codes ...183
WBS Codes and Renumbering ...186
Chapter 4: Linking and Consolidating Projects . . . .191
Connecting Projects with Hyperlinks ...191
Creating a hyperlink...191
What happened? My hyperlinks don’t work ...193
Editing hyperlinks ...194
Moving or copying hyperlinks ...195
Consolidating Projects ...195
What is consolidation? ...195
Do I need to use consolidation? ...196
Creating subprojects...198
Creating a consolidated project ...201
Inserted projects and the outline...204
Moving subprojects within a consolidated project ...208
Dependencies in Consolidated Projects ...209
Creating dependencies across projects ...209
Changing cross-project dependencies...212
Saving a consolidated project...213
The Critical Path in a Consolidated Project ...215
Sharing Resources Using a Resource Pool...218
Creating a resource pool ...218
Sharing resources...218
Opening a project ...220
Updating the resource pool ...221
Viewing resource assignments when you share resources ...222
Stop sharing resources ...224
Book IV: Establishing Task Timing ...227
Chapter 1: Looking at Timing . . . .229
Understanding What Drives Timing ...229
Timing factors...229
Scheduling Backwards or Forwards ...231
How scheduling works...232
A word of warning about backward scheduling ...233
Surviving Schedule Shock ...234
Chapter 2: Defining What Drives Task Timing . . . .237
Finding Just the Right Task Type ...237
The big three: Task types ...238
Specifying task type ...238
Task types in practice...239
Setting Task Duration ...241
Determining the right duration ...241
Entering duration ...242
Working with tasks with no duration: Milestones...243
They keep showing up: Recurring tasks...244
Starting and Pausing Tasks ...246
Entering the task start date ...246
Taking a break: Splitting tasks ...247
Understanding Effort-Driven Tasks...249
How effort-driven tasks work...249
When effort rules timing...249
Chapter 3: Adding Dependencies . . . .251
Why Dependencies Are Needed ...251
Understanding Dependencies ...252
Identifying the players in a dependency relationship ...252
When to set a dependency and when to leave well enough alone ...252
All types of dependencies ...254
More complex dependencies: Lag and lead time ...256
Setting Dependencies ...256
Setting up dependency links...257
Connecting to other projects with external dependencies ...260
Things change: Deleting dependencies ...260
Visualizing Task Dependencies ...262
Chapter 4: Working with Constraints and Deadlines . . . .267
Beginning with the Start and Finish Dates...267
Understanding How Constraints Work...268
Default constraints...268
Constraint types ...269
Flexible versus inflexible constraints ...269
Constraints and dependencies ...270
Establishing Constraints ...271
Table of Contents
xvii
Book V: Working with Resources and Costs ...275
Chapter 1: Creating Resources . . . .277
What Exactly Is a Resource? ...277
All Kinds of Resources...278
Understanding resources ...278
Resource types: Work, Material, and Cost ...280
Estimating your resource requirements...282
Committed versus proposed resources ...283
Creating Resources ...283
Creating one resource at a time...283
Identifying resources you don’t know ...285
Resources that work in groups...286
Chapter 2: Understanding Costs . . . .289
Accruing Costs All Over the Place ...289
Tallying costs ...290
The sound of costs hitting the bottom line ...290
Assigning Costs to Resources...291
Fixed costs you can count on ...291
Paying per hour ...293
Setting alternative rates ...294
The cost-per-use scenario ...295
Oops . . . you’re into overtime! ...296
Chapter 3: Assigning Resources to Tasks . . . .299
Locating the Right Resource for the Job...299
Finding resources ...300
Creating custom fields ...302
Acquiring the right resources...303
Keeping resource workload balanced ...303
Your Assignment Is . . . ...305
How resources affect task timing ...305
Determining Work, Material, and Cost resource assignment units...305
Making assignments...306
Contours set the level of work...309
Making Sure of Availability...311
Setting availability...311
When resources appear and disappear...312
Sharing Resources...313
When Do My Resources Work?...315
Chapter 4: Tallying Costs . . . .321
How Your Settings Affect Your Budget ...321
How Project Calculates Costs...323
Letting Project calculate or doing it yourself?...323
Earned-value options ...324
Examining Cost Data...325
Viewing cost information ...326
Customizing cost fields...327
The Value of a Project Summary Task ...329
Book VI: Communicating Project Information ...333
Chapter 1: Working with Views . . . .335
What’s a View?...335
Selecting the Startup View ...339
Making a View Handy to Display ...339
Sorting Tasks in a View...341
Filtering a View ...343
Applying a filter to a view...346
Creating custom filters ...348
Using AutoFilters ...349
Grouping Information ...351
Using a predefined group ...351
Grouping and usage views ...352
Do-it-yourself groups...354
Using Combination Views ...356
Customizing a View...360
Creating a New Combination View...361
Printing Your Project ...363
Chapter 2: Working with Tables . . . .369
Understanding Tables...369
Understanding Indicators ...373
Making Changes to a Table ...376
Inserting and hiding table fields...376
Changing column width...378
Changing row height ...379
Customizing Tables...381
Working with the Details of Usage Views ...383
Adding new fields to the Details section ...385
Table of Contents
xix
Chapter 3: Preparing Traditional Reports . . . .389
Preparing and Printing Reports ...389 Preparing Big Picture Reports...392 Reporting on Task Status ...394 Reporting on Costs ...395 Reporting on Assignments...396 Preparing Workload Reports ...398 Viewing Custom Reports...398 Adapting Reports to Suit Your Needs...401
Chapter 4: Creating Visual Reports . . . .407
Preparing a Visual Report ...407 Working with an Excel visual report ...408 Working with a Visio visual report ...410 Visually Reporting on Task Usage...411 Visually Reporting on Resource Usage ...411 Visually Reporting on Assignment Usage ...413 Preparing Visual Task Summary Reports...414 Preparing Visual Resource Summary Reports ...415 Preparing Visual Assignment Summary Reports ...415 Customizing Visual Reports...417
Book VII: Resolving Problems in Your Plan...423
Chapter 1: Working with Filters . . . .425
Filtering to Spot Resource and Schedule Problems...425 How filters work ...426 Applying filters ...426 Letting AutoFilters do the work...428 Creating your own filters...429 Filtering in Action...431 Discovering some very useful filters ...431 Identifying the critical path...432 Working with Groups ...433 Applying predefined groups...434 Coming up with your own groups ...435
Chapter 2: Solving Resource Conflicts . . . .437
Change Highlighting ...442 Undoing again and again ...444 Leveling to fix resource problems...446 Combining Solutions...448
Chapter 3: Reviewing Timing and Costs . . . .451
Timing is Everything...451 Doing It All in Less Time...452 Check your dependencies ...454 Rethinking your resource needs...454 Modifying task constraints...455 Delete the tasks you don’t need ...455 Getting It for Less ...456 Making Your Project Timing Realistic...456 Reviewing the critical path ...457 How many critical paths are enough? ...458 Giving yourself some slack...458
Chapter 4: Putting Final Changes into Place . . . .463
Getting to a Final Project Plan ...463 Redefining the scope of your project ...463 Product scope versus project scope ...464 Selling Changes to Shareholders...466 Using Project’s tools to close the “sale”...466 Creating a compression table ...469
Book VIII: Tracking ...471
Chapter 1: Working with Baselines and Interim Plans . . . .473
Understanding Baselines and Interim Plans...473 Setting a Baseline ...474 Saving an Interim Plan ...477 Changing a Baseline or Interim Plan...478 Clearing Baselines and Interim Plans ...480 Viewing the Critical Path...481
Chapter 2: Entering Actuals . . . .487
Table of Contents
xxi
Ways to Record Actuals...496 Estimating the Percent Complete...497 Using start or finish dates ...499 Recording actual and remaining durations...500 Recording Actual Work ...501 Speeding up recording actuals ...504 Tracking materials usage...505 Viewing Progress ...506 Using progress lines ...507 Using Tracking Gantt view ...509 Using tables to review progress ...510
Chapter 3: Reviewing Your Budget . . . .517
The Basics of Earned Value Fields ...517 Examining Cost Variance...519 Physical % Complete Versus % Complete ...522 Calculating BCWP using Physical % Complete ...523 Using Physical % Complete selectively ...524 Entering Physical % Complete values...525
Book IX: Advanced Project Topics...527
Chapter 1: Working Your Own Way . . . .529
Controlling the Project Guide’s Behavior ...529 How Many Times Can You Undo? ...531 Switching Between Open Projects ...532 Customizing the Way You Open ...534 Customizing the Way You Save...536 Customizing the Toolbars ...538 One line or two?...538 Creating your own toolbar ...539 Modifying a toolbar...540 Messing with button images ...543 Customizing the Menus ...545 Personalizing menu behavior ...546 Creating your own menu ...547 Naming a new menu you created ...549 Adding commands to a menu ...550 Deleting commands and menus ...550 Using the Organizer to Share Project Elements ...551
Chapter 2: Changing the Look of a Project . . . .555
Applying Special Formatting to Gantt Chart View ...558 Using the Gantt Chart Wizard ...559 Changing individual taskbars ...562 Changing taskbar styles for categories of tasks...563 Changing the Gantt chart layout ...566 Changing Gantt chart gridlines...567 Working with the Network Diagram...569 Controlling the layout of Network Diagram view ...570 Controlling the appearance of Network Diagram boxes ...572 Controlling the content in Network Diagram boxes ...575 Modifying Calendar View ...578 Changing the time period displayed in Calendar view...579 Changing Calendar view layout ...580 Formatting Calendar view entries ...581
Chapter 3: Using Macros . . . .585
Understanding Macros ...585 Creating a Macro ...585 Knowing your macro’s steps...586 Recording the macro...586 Using a Macro ...589 Running a macro from the Macros dialog box...589 Using a keyboard shortcut to run a macro ...590 Using a menu command to run a macro ...591 Using a toolbar button to run a macro ...595
Chapter 4: Importing Information into Project . . . .603
Using Graphic Objects in Project ...603 Getting Tasks from Outlook ...605 Importing Excel and Access Information into Project...607 Changing Project’s security settings...607 Using an import map...608 Creating a Task List in Excel using a Project-related template...611 Importing the Excel Task List into Project ...613 Importing Project Exchange Files into Project...616 Importing Text or Comma-Separated Files into Project...616
Chapter 5: Exporting Project Information . . . .619
Table of Contents
xxiii
Book X: The Basics of Project Server ...635
Chapter 1: Understanding Project Server . . . .637
What is Project Server? ...637 Do You Need Project Server?...640 Planning the Implementation of Project Server ...640 Defining requirements ...641 Designing the system ...642 Developing an implementation strategy ...643 Reviewing software needs ...644 Reviewing hardware needs ...644 Considering software and hardware configurations...645
Chapter 2: The Project Server Administrator . . . .647
Understanding the Structure of the Project Server Database...647 Reviewing Defaults...648 Working with Users ...650 Working with Views...651 Working with the Enterprise Global Template ...652 Creating Enterprise Custom Fields ...653 Establishing Enterprise Calendars...654 Working with Enterprise Resources ...655 Loading Projects into the Project Server Database...657 Managing Timesheet and Task Settings ...658 Customizing Project Web Access ...659 Checking in Enterprise Projects and Resources ...661 Managing Information in the Project Server Database ...662 Backing Up and Restoring...662 Managing the Queue ...664
Chapter 3: Project Server and the Project Manager . . . .665
Logging onto Project Server ...665 Working with Web-based Projects ...667 Opening and closing a project ...670 Managing the local cache ...672 Adding Enterprise resources to a project ...674 Replacing generic resources with real resources ...675 Using the Resource Substitution Wizard...676 Assigning resources using Project Web Access ...676 Creating Status Report Layouts ...678 Receiving Task Updates from Team Members ...679
Chapter 4: Project Server and the Team Member . . . .683
Working with Your Tasks...687 Recording time...688 Adding a task ...689 Working with Your Timesheet ...690 Integrating the Outlook Calendar with Project Web Access ...693 Enabling integration...694 Sending Project Web Access assignments to Outlook...695 Sending Outlook information to Project Web Access...695 Reporting Status...696
Glossary ...699
Introduction
P
roject management has been around as long as there have been people coming together trying to get things done. Some ancient fellow with a lot of ambition probably took the lead as the very first project manager. He carved diagrams in stone tablets to help his team members understand his strategy and actually talked to them to communicate progress (no e-mail in those days!). Unlike you, this early project manager had no senior manage-ment to report to, no formal budget, and no cubicle, but the fundamanage-mental spirit of a project was there.Over the years, project management has evolved into a sophisticated disci-pline that involves standardized methodologies and techniques. Project man-agers have a toolkit that includes detailed analyses and projections, tools to track time and money, and highly visual reports to impress management. Project management software — which has been around only about 25 years or so — has brought a new face and functionality to project management that would have left our ancient project managers speechless.
About This Book
Microsoft Office Project 2007, the most recent version of the world’s most popular project management software, provides a treasure trove of function-ality; it makes the features of your average word processing software look like child’s play in comparison.
All that functionality can be wonderful, but if you’ve never used project management software, those features can also be a bit overwhelming. One key to making the leap from your traditional project management methods to project management software is to understand how its features relate to what you do every day as a project manager. Another is to get a book like this one that tells you all about Project’s features and how to use them. Even if you have used project management software or Project itself before, this book offers a wealth of advice and information on Project 2007 features that can help you get productive right away.
How This Book Is Organized
This book is organized into digestible chunks of chapters contained in ten minibooks. Each minibook covers an important topic you need in order to use Project, such as basic project management concepts, resources, and tracking. If you’re new to Project, you might want to read each book in sequence, but if you’ve used Project before, you can simply refer to the mini-book that you need at the moment.
In addition, we include case studies throughout this book to help you see how Project works in action. Files that go along with those case studies are on the book’s companion Web site, located at www.dummies.com/go/project
2007aiofd.
The following sections offer a quick synopsis of what each book contains.
Book I: Project Management
This book gives you a firm grounding in project management concepts and the Microsoft Project 2007 environment. You discover what typical tasks go into a project, as well as how using Project to manage your tasks and resources can save you time and money. Finally, in Chapter 5, we explore what’s new in Project 2007, particularly some neat features such as Change Highlighting and Task Drivers.
Book II: Project Basics
Some of the basic building blocks of Project include the overall structure of a project plan, which we discuss in Chapter 1, and the tasks that make up that plan. It’s in this minibook that you create your first task and explore the many views Project offers to help you review and analyze your project data. In Chapter 4, we cover calendars, very important tools in building your pro-ject’s timing. Finally, in Chapter 5, we explore Propro-ject’s help system so you can use it to find topics of interest easily.
Book III: Getting Your Plan in Order
How This Book Is Organized
3
Book IV: Establishing Task Timing
Task timing is determined by a number of factors, several of which are reviewed in the chapters of this minibook. Chapter 1 explores the basics of timing. Chapter 2 provides an introduction to what drives task timing, includ-ing the start and finish dates of a project and the settinclud-ing for how Project schedules tasks. In Chapter 3, you explore dependencies, timing relationships between tasks that control their timing in relation to each other. Finally, Chapter 4 deals with constraints, settings such as Start No Later Than that force a task’s timing in some fashion.
Book V: Working with Resources and Costs
Resources are the people, equipment, and materials that you use to get things done on your project. There are various kinds of resources, which you discover in Chapter 1, “Creating Resources.” Chapter 2 shows you how resources relate to costs in your project. Chapter 3 is where you discover how to assign resources you’ve created to tasks in your project. The last chapter in this minibook explores how Project totals up costs resulting from resource assignments.
Book VI: Communicating Project Information
When you input data about tasks and resources into Project, it returns a wealth of information about your schedule and costs. In this minibook, you look more closely at all the views Project offers for reviewing that informa-tion, as well as tables of data you can display in those views and even cus-tomize. This minibook ends with two chapters about reporting, one covering traditional Project reports and one covering a Visual Reports feature that’s new in Project 2007.Book VII: Resolving Problems in Your Plan
Book VIII: Tracking
The project has started, tasks are being worked on, resource costs are tallying up. Now comes the tracking phase, when you set a baseline against which you can record progress. In this minibook, we discuss recording actual activity on tasks and reviewing what that activity is doing to your budget.
Book IX: Advanced Project Topics
Project is a very sophisticated piece of software, and it provides you with several more advanced tools to make your life easier. Book IX is where you find out how to customize the interface that Project shows you and the look of the various elements in your project plan. You also discover how to use macros to automate procedures and how to both import and export data in Project.
Book X: The Basics of Project Server
Project Professional can be used in conjunction with Project Server to create an enterprise-wide project management solution. Chapter 1 of this book gives you an overview of Project used with Project Server. Chapters 2 through 4 approach enterprise project management using Project and Project Server from the perspective of the Project Server administrator, the project manager, and the project team member.
Glossary
Project management and Project itself involve a lot (and we mean a lot) of terms and acronyms that you need to know to input and analyze data. This glossary is a good place to go when an unfamiliar word or string of letters pops up.
Conventions Used in This Book
We use a few conventions in this book that you ought to know about.
Web site addresses, or URLs, and other items such as filenames are highlighted like this: www.microsoft.comand IAmAFile.mpp.
Menu commands are given in the order in which you select them; for example, Choose Tools➪Resource Sharing➪Share Resources.
Icons Used in This Book
5
Foolish Assumptions
We’ve made some assumptions in writing this book. First, we’ve assumed that you are computer literate — that you’ve used software and know what a menu and dialog box are. We assume you know how to use a mouse to select objects and text. We assume you have good file management skills and know that you should keep copies of your files and save frequently.
We have notassumed that you have used Project before, though you might have used a previous version and simply want to find out more about some area of it.
We haven’t assumed that you manage multimillion dollar projects; whether you deal with small projects or large projects, the information and concepts in this book help you manage them better.
In case you’re new to project management, we’ve provided the first minibook to give you a grounding in some key project management concepts.
Icons Used in This Book
Putting little pictures in the margins of tech books to call your attention to certain types of information has become a standard, and For Dummiesbooks use the neatest little pictures around. Here’s what they mean:
Tips are the advice columns of computer books. They offer wise advice from those of us who have been in the Project trenches, a bit more information about a topic under discussion, or a different way to achieve some results.
Remember icons offer a relevant fact or reminder of a key concept. These juicy tidbits are likely to be useful to you repeatedly, so don’t forget them.
Warning icons alert you to potential problems, so don’t ignore them. If you don’t take the advice in warnings, you might end up with lost data, a faulty project plan, or a really bad day.
This icon marks Project information that goes beyond the basics.
Throughout this book, we have included case studies that help you envision how Project works in a real world (well, a pretend real world) setting. The files for these case studies are also included on the companion Web site
Where to Go from Here
If you know a bit about Project and want to explore some aspect of it further, just jump to the relevant book and have at it. If you want to start by checking out what’s new in Project 2007, Book I, Chapter 5 is the place to go. If you need to start from square one, start with Chapter 1 of Book I and work your way through each minibook to get a logically organized introduction to all that project management with Project has to offer.
Book I
Chapter 2: The Ins and Outs of Using Project ...21 Chapter 3: Just What Tasks Should You Include?...35
Chapter 1: A Project Management
Overview
In This Chapter
⻬Examining the project life cycle
⻬Looking at project roles
⻬Understanding the triple constraint, critical path, and slack
⻬Exploring the basics of resource management
M
icrosoft Project 2007 is a wonderful tool for managing projects.However, a tool is only as good as the person wielding it. Understanding how Project fits in the context of a typical project is important to using it successfully.
In this chapter, we look at what occurs during the life of a project and how Microsoft Project fits within that life cycle; the typical roles in a project and how people in each of those roles might interact with Project; and some basic project management concepts.
The Life of a Project
You handle projects day in and day out. Some take a few hours to complete, such as that shed you built in your yard last Saturday. Others might take years from beginning to end to complete the work and reach your goals. However, most projects that you handle will have several things in common.
So, just what is a project?
Microsoft Project has certain features that help you deal with all the elements of a typical project. So what is a typical project? All projects have
✦ An overall goal
✦ A project manager
✦ Individual tasks to be performed
✦ Timing for those tasks to be completed (such as three hours, three
days, or three months)
✦ Timing relationships between those tasks (For example, you can’t
✦ Resources(people, equipment, facilities, and supplies, for example) to
accomplish the work
✦ A budget(the costs associated with the people, equipment, facilities, and
supplies)
Project managementis simply the process of managing all the elements of a project, whether that project is large or small.
Taking a closer look at the project life cycle
You can typically expect to work through several phases of a project, and in each phase, you’ll perform different activities in Microsoft Project. Projects typically break down into the following phases:
1.
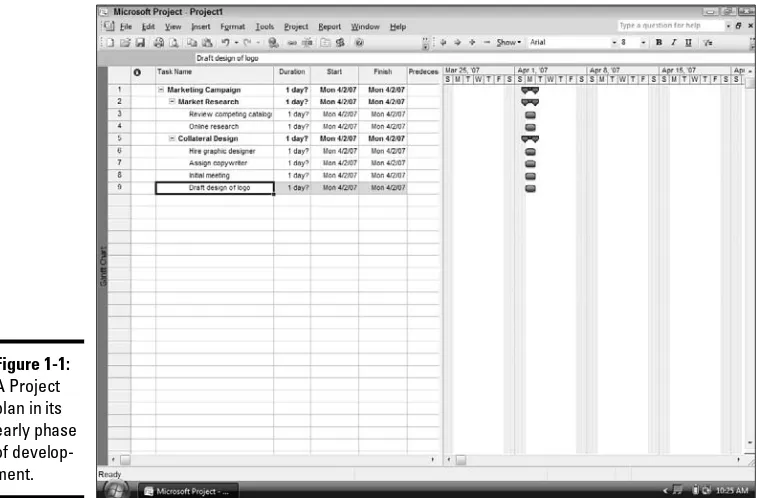
Planning:Whether it takes hours, days, or months, this is a very impor-tant phase. This is when you identify your goal or goals (see Chapter 2 of this minibook for more about this process), get management support for the project, and line up your internal and external resources, includ-ing people, facilities, equipment, and so on. In Project you can start to sketch out your Project plan by adding tasks that, at this point, might or might not have timing (see Figure 1-1) and entering information about resources that you’ll use.Figure 1-1:
Book I Chapter 1
A Project
Management
Overview
The Life of a Project
11
2.
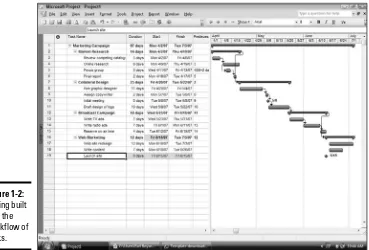
Finalizing the plan:After you’ve gathered all your resources and thought through the steps of your project in the planning phase, it’s time to dot your i’s and cross your t’s so you’re ready to launch the project. In Project, this means making sure all the logical timing relationships between tasks have been accounted for (see Figure 1-2), all the cost information for resources is correct, and that you resolve any resource conflicts. (An exam-ple of a resource conflictis when one person is booked to work 16 hours in one day, for example.) This is also the time to present your final plan to management and get their approval. (Project’s reporting capabilities come in handy here.) When your plan is approved, you save a baseline project against which you can track actual progress after your project begins.See Book IV for information about task timing, Book VII about resolving problems in your plan, and Book VIII, Chapter 1 for information about setting a baseline.
Figure 1-2:
3.
Launching the project:With an approved plan in hand, you can officially launch the project. Make sure your entire team has information about individual responsibilities and that you’ve set up channels of communi-cation either online, using printed reports, or through regular in-person meetings. Also make sure you have set up reporting mechanisms for your team members to report their work hours on tasks and progress. Be sure to instruct your team in how to use those mechanisms, such as the Timesheet feature built into Project Web Access (see Figure 1-3). See Book X, Chapter 4 for more about this.4.
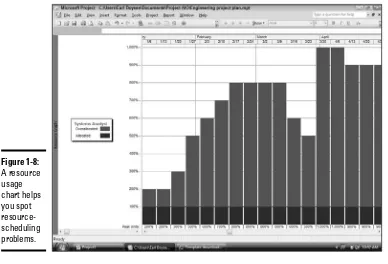
Tracking and revising your plan:When your team starts working on tasks and reporting progress, you or somebody you designate has to track that progress in Project. With information on tasks and resource time added into your project plan, you’ll find that actual work is likely to differ from your projections. When that happens, you might have to make adjustments to the remainder of your plan to meet your deadline, budget limits, or goals. You can also use Project’s reporting capabilities (see Figure 1-4) to keep your management, clients, and other project stakeholders current on the status of your project. See Book VIII for details about tracking activity on a project.5.
Ending the project and debriefing:If you’ve established a clear set of goals and deliverables, you’ll know when the project is over. When that moment comes, your job isn’t quite finished. It’s important that you send out final reports or accountings to management and clients, thank your team members for their efforts and communicate with them about the project’s success, and hold a meeting to debrief the team about the proj-ect so you can learn from both your failures and successes along the way.Figure 1-3:
Book I Chapter 1
A Project
Management
Overview
Everybody Plays a Role
13
Everybody Plays a Role
Projects are driven by people, and just as everybody on a sports team plays a particular role, everybody in a project has unique responsibilities. From the project manager to the folks who do work on tasks and even the client or customer who will benefit from the final results, you need to understand how each person in your project fits in. What does a project manager do?
A project managercould be described as somebody who knows how to wear many hats. A project manager is a scheduler, a budget maker, a facilitator of communications, a resolver of conflicts, a troubleshooter, a counselor, and much, much more.
A project manager isn’t always the highest authority in a project; often, that role belongs to the project manager’s own manager, up to and including members of senior management. Rather, the project manager is the person on the front lines who puts together a plan, gathers resources, makes sure that the tasks in the project happen, and records project activity in Project.
Ideally, a project manager should have some experience in managing people and processes and to some degree should be familiar with the type of work that resources will be asked to perform.
Figure 1-4:
A project manager supervises these essential pieces of a project:
✦ The project plan or schedule:This is what you create with Microsoft
Project. It includes the estimated steps and associated timing and costs involved in reaching the project goal.
✦ Resources:Managing resources involves assigning resources and
track-ing their activities on the project as well as resolvtrack-ing resource conflicts and building consensus. This part of the job also involves managing the use of nonhuman resources, such as materials and equipment.
✦ Communication with the project team, management, and customers:
Communicating the project’s status to everyone who has a legitimate stake in its success (stakeholders)is a key responsibility.
As a project manager, it’s your job to keep all stakeholders informed, get appropriate approvals, and involve the right people at the right time.
Stakeholders of all types
In addition to a project manager and the resources who perform tasks, others will have an interest in the project and its outcome. In project management parlance, anybody involved in a project is considered a stakeholder.
✦ The person who champions (and has the ultimate responsibility for) a
project is the project sponsor. This person usually belongs to higher-up management and should support the project manager by helping to get key approvals, providing input on larger organizational priorities, and obtaining funding from management.
✦ Although a project manager might work for a project sponsor, the project
often also has a customerfor whom the end product is produced. That customer can be outside the project manager’s own company or within. A customer generally gets final approval of the deliverables of a project and pays the costs of a project.
✦ A project might have a whole slew of additional stakeholders in the form
of vendors, contractors, or consultants who will work on the project along with internal resources.
Getting a Few Project Management
Concepts under Your Belt
Book I Chapter 1
A Project
Management
Overview
Getting a Few Project Management Concepts under Your Belt
15
The dreaded triple constraint
You’ve seen the signs at the copy store or the auto repair place: “You can have it fast, cheap, or right; pick two.” That, good friend, is the triple con-straint of project management in a nutshell.
In a project, you have timing, resources (which are essentially costs), and the quality of the product or service you want to produce at the end of the project. Microsoft Project helps you to manage the resources and timing of your project. Still, the quality of your project is often affected directly by how well you manage these other two elements. If you add time, costs increase because resources are working longer hours at a certain wage. If you take away resources, you save money, but this can affect quality.
Creating a balance among time, money, and quality is the juggling act you will perform throughout the life of a project. Project offers the following tools to help you do this:
✦ Change Highlightinghelps you see how one change (say, in timing)
affects other aspects (such as cost). See Book I, Chapter 5 for more about Change Highlighting.
✦ Resource levelingis a calculation that moves your schedule out to
free up overtaxed resources. Of course, in this case you sacrifice time, but with less-stressed resources, you probably improve the quality of your outcome. See Book VII, Chapter 2 to discover how to use this handy feature.
✦ You can set priorities on tasksso that you can keep tabs on changes
that occur on tasks that ensure quality (for example, quality testing or QA tasks).
Keeping on track: Critical path and slack
If you look at all the tasks in a project, you find a series of tasks that, if delayed, would delay the project. This is called the critical path.The simplest example of a critical path is a project with two tasks, one of which takes two weeks to complete and one of which takes one week to complete. If those tasks can happen simultaneously, the longer path is on the critical path, but the shorter task could be delayed several days and not delay the end date of the project. If the shorter task is delayed, say, eight days, it then becomes the critical task in the project.
Tasks that aren’t on the critical path in your project have some slack— that is, some time that they could be delayed without delaying the entire project. Ideally, every task in your project shouldhave slack because things can come up that you never expected (shortages of vital materials, asteroid strikes, or management turnover that places you in an entirely different department). It’s up to you to build slack into your schedule as you build in task timing in Project (see Book IV for more about how to do this).
See Book VII, Chapter 4 for more about working with slack.
Using tried-and-true methodologies
Microsoft Project incorporates some scheduling and tracking tools that are the result of many years of developing project management methods. A few of these are worth noting:
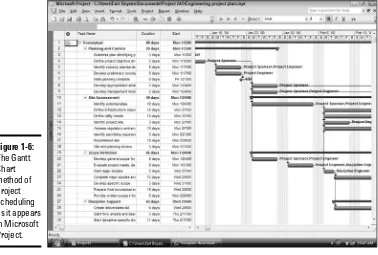
✦ A Gantt chart(shown in Gantt Chart view in Figure 1-6, which is the main
view of Project), shows you a spreadsheet with columns of data along with a graphical representation of the tasks in the project arranged along
Figure 1-5:
Book I Chapter 1
A Project
Management
Overview
Getting a Few Project Management Concepts under Your Belt
17
a horizontal timeline. By using the data in the columns (such as task name, start date, finish date, and resources assigned to tasks), you can understand the parameters of each task and see its timing in the graphi-cal area. Being able to view all this information on one page helps you understand what’s happening in your project in terms of time and costs. If you’re a history buff, you’ll be interested to hear that the Gantt chart was created in 1910 by Henry Gantt, a mechanical engineer, and the idea was first published in The Engineering Magazine.
See Book II, Chapter 3 for more about working with and changing Project views.
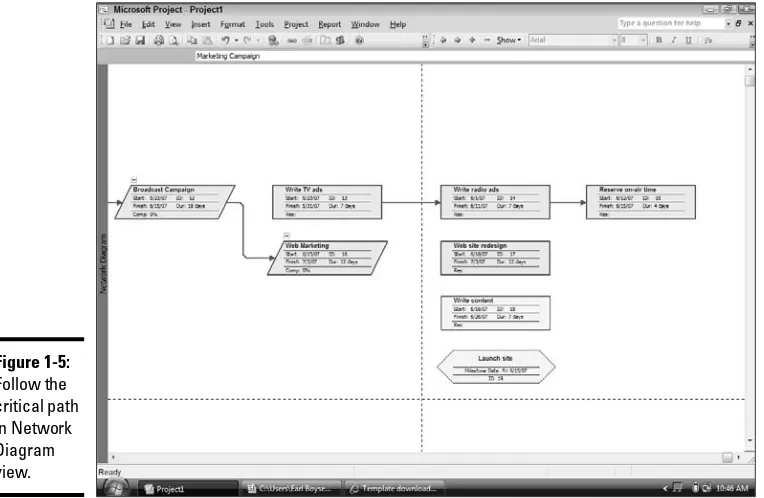
✦ The Network Diagram (also called alogic diagram), shown in Figure 1-7,
is essentially the Microsoft version of a PERT chart. PERT(Program Evaluation and Review Technique)was developed during the construction of the Polaris submarine in the 1950s. This mostly graphical representa-tion of the tasks in your project reflects the flow of work in your project rather than the literal timing of tasks. This view helps you to see how one task flows into another and to get a sense of where you are — not so much in time, but rather in terms of the work you have to accomplish.
Figure 1-6:
Resource Management Basics
If you asked us to do so, we could write an entire book about resource management. This is one of the most important skills a project manager can acquire because resources are the way things get accomplished in any project. But we have much more to cover, so here’s the ten-cent tour of resource management.
How Project sees resources
Resource management consists of using your resources wisely. This involves not only managing people, but also strategically selecting the right resource and making the right assignments.
In Microsoft Project, resources are also the method used to accrue costs. Resources, in Project’s terms, can be people, equipment, facilities that you rent, or fixed costs such as a consultant’s fee or an airplane ticket; in short, a resource is anything or anybody you use to perform the tasks in your project.
All resources have a defined amount of availability. You might have to ensure that there is enough material on hand to complete a task, that a meeting
Figure 1-7:
Book I Chapter 1
A Project
Management
Overview
Resource Management Basics
19
room is available when you need it, that an in-demand piece of scientific test-ing equipment isn’t offline, or that a key human resource isn’t on vacation or assigned to another project.
What it takes to manage people
When dealing with human resources, a good project manager can do the following:
✦ Find the right resource for the job, taking into account skill level and cost.
✦ Provide any required training for resources.
✦ Assign the resource a reasonable workload, which sometimes means
negotiating with other project managers for that person’s time.
✦ Stay alert for shifts in the schedule that cause the resource to be
overbooked.
✦ Make adjustments during the life of the project that keep all resources
most productive.
In Project, tools are available, such as a resource graph (traditionally called a histogram) and the resource usage chart (shown in Figure 1-8), to help you track resource workload. You can see how overbooked the Systems Analyst is.
Project allows you to assign codes for resources that you can use to desig-nate skill levels or abilities so that finding the right resource for each job is as simple as performing a search.
Do I always need resources?
Resources in Project are there to accrue costsand to help you monitor overbooked resources, which might cause delays in your schedule. Some project managers choose not to assign resources to tasks in Project if those resources have no associated cost and their time doesn’t need to be tracked. For example, if an administrative assistant does some work for the
It’s especially hard to anticipate resource assignments in a lengthy project because it’s difficult to know who will be available a year or two from now. To deal with that, consider creating generic resources, such as “Engineer,” and fill in the appropriate individual’s information later in the project.
Figure 1-8:
Chapter 2: The Ins and Outs
of Using Project
In This Chapter
⻬Exploring what you need to put into Project
⻬Understanding tasks, timing, and resources
⻬Using tracking to update a project
⻬Getting useful reports out of Project
W
elcome to the world of computerized project management with Microsoft Project. If you’ve never used project management software, you’re stepping into a whole new era of project management. You’ll be leav-ing the world of the handwritten to-do list and enterleav-ing a world teemleav-ing with hi-tech calculations and sophisticated project data.Everything you ever did with handwritten to-do lists, word processors, and spreadsheets all magically comes together in Project. However, the transition into computerized project management doesn’t happen in seconds. First you need a basic understanding of what project management software can do, what it demands of you, and what results it can provide.
If you’ve used previous versions of Project, this little overview can help you refresh your memory as well as ease you into a few of the new features of Project 2007.
The Basics of Computerized Project Management
If you’ve scanned this book’s Table of Contents, you’re probably shaking your head and saying, “Boy, handwritten to-do lists look pretty good right now. Beats having to key in tons of data about tasks, schedules, and resources,” right?
Making the leap to Project
“So,” you ask, “what exactly can Project do for me?” The following list describes the payoff that you get for investing time to understand and use Project to manage your work.
With Project, you enjoy the following benefits:
✦ Automatic calculations:Project automatically calculates costs and
timing for you based on your input. This gives you an instant snapshot of your status at any point during your project. See Book VII for more about automatic versus manual calculations.
✦ Ability to try out what-if scenarios:You can quickly have Project
recal-culate what-if scenarios to solve resource conflicts, get your costs within budget, or meet your final deadline.
✦ Views and reports:Project offers views and reports that, with the click
of a button, make a wealth of information available to you and those you report to. No more manually building a report on total-costs-to-date to meet a last-minute request from your boss. If she wants to know total-costs-to-date, you can just print your Tracking Gantt view with the Tracking table displayed. See Book VI for information about reporting.
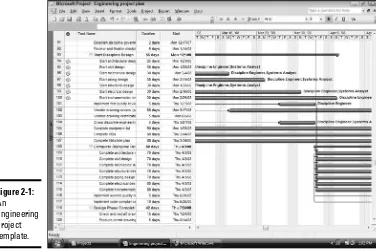
✦ Templates:You can use built-in templates to get a head start on your
proj-ect. Project templatesare prebuilt plans for a typical business project, such as commercial construction, an engineering project, a new product rollout, software development, or an office move (see Figure 2-1 for an example). See Book II, Chapter 1 for more about using templates.
You’re likely to do similar types of projects all the time. After you create one project, make it a custom template for future projects. See Book II, Chapter 1 for information about how to save a file as a template.
✦ Resource management:You can create resources for your project based
on information that already exists in your Outlook Address Book. Your company could create one set of resources and give access to them to every project manager in the company. This not only saves you time in building resources from scratch, but it also helps you track resource time across multiple projects. See Book V for more about working with resources.
✦ Calculation of project data:A number of tools in Project employ
Book I Chapter 2
The Ins and Outs
of Using Project
The Basics of Computerized Project Management
23
Connecting with your team online
You can hop onto the Internet and communicate with your project team by using Project collaboration features. In fact, using Project 2007 you can enter the world of Enterprise Project Management (EPM), where it becomes possi-ble for you to easily share ideas, information, and documents across your entire enterprise.
You can do a number of useful activities online; for example, Project allows you to request updates on a task’s progress from team members via e-mail. You can post documents to a SharePoint site and ask for team input. You can even publish your project on the Web so those without Project can view it.
The Professional version of Project includes Project Server and Project Web Access, which enable many of the workgroup collaboration features in Project. With these tools, you can take advantage of an online project center and resource center with areas for discussions, progress tracking, document exchange, and more.
Book X looks at how to take advantage of the enterprise-wide features of Project Server and Project Web Access.
Figure 2-1:
What You Have to Put Into Project
Project can give a lot back, but it depends on the information you put in to produce its calculations, reports, and so on.
Though there are a few other pieces of information you can provide to Project, by far the two biggest chunks of data it requires of you are the tasks, or steps, to be completed to reach your project goal and the resources you will use to accomplish those tasks.
Tasks and their timing
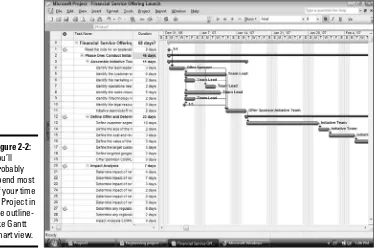
A taskis simply one of those items you used to scribble on your handwritten to-do lists, such as Write final reportor Apply for permits.Tasks are typically organized into phases(appropriate stages) in Project, arranged in an outline-like structure, as you can see in the project shown in Figure 2-2.
The length of tasks (their duration) and the sequence of tasks together create the timeline for your project. Project allows you to create that sequence by building in timing relationships among tasks.
Figure 2-2:
Book I Chapter 2
The Ins and Outs
of Using Project
What You Have to Put Into Project
25
Mastering tasks
A task can be as broad or as detailed as you like. For example, you can create a single task to research your competition, or you can create a project phase that consists of a summary taskand various subtasksbelow it (see Figure 2-3).
In a project phase involving researching your competition, the summary task might be Competitive Research, which includes the subtasks Researching Online Business Databases, Assembling Company Annual Reports, and Reviewing Competitive Product Lines.
A project can have as many tasks and as many phases as you like. You simply use the outlining structure in Project to indent various levels of tasks. The more deeply indented in an outline a task is, the more detailed the task. However, don’t overdo it: If you’re tallying up task 2,503, consider whether you need to make your project less granular or start to break up this behemoth into a few smaller projects.
Figure 2-3:
One handy thing about Project’s outlining structure is that you can roll up all the timing and cost data from the subtasks within your phases into summary-level tasks. Three sequential subtasks that take two days each to complete and cost you $500 apiece result in a summary task that spans six days and costs $1,500. You can view your project at various levels of detail. If you view only summary tasks, you get automatic tallies of timing and costs, and if you display deeper levels of detail, you get an accounting of every last dime and minute in your project.
For more about organizing your tasks and outlining, see Book III.
It’s all in the timing
They say that timing is everything: Knowing when to sell that hi-tech stock, buying real estate before the boom hits, and finding the best time to pop the question come to mind. The importance of timing applies to Project tasks, as well. Almost all tasks have timing — referred to as duration. Duration is simply the amount of time it takes to complete the task.
The only tasks without duration are called milestones. A milestoneis a task of zero duration; in essence, it simply marks a moment in time that you need to account for in your Project outline. Typical milestones are the approval of a proposal and an assembly line startup. Figure 2-4 shows a project with sev-eral important milestones, indicated by a diamond-shaped icon.
Unfortunately, you can’t ask Project to come up with accurate durations: You assign duration based on your own experience and judgment. Does printing a product package take three days or three weeks? Will getting senior man-agement approval take a day or a month? (Don’t forget to pad this task in proportion to how many of those senior types have to buy in.) Project can’t come up with these estimates: You have to provide facts, figures, and edu-cated guesses to build your Project schedule. After you enter that informa-tion, though, Project can do some wonderful things to help you maintain your schedule and monitor your progress.
How tasks depend on each other
Book I Chapter 2
The Ins and Outs
of Using Project
What You Have to Put Into Project
27
Figure 2-5:
This schedule includes tasks with timing but no dependen-cies.
Milestones
Figure 2-4:
Here’s how this works. On the simplest level, if each of ten 2-day tasks hap-pens in sequence — that is, each task can’t begin until the task before it is completed — it will take 20 days to complete them. But dependencies are often more complex. For example, one task might begin only after another is finished, but another task can start halfway through the preceding task. The second task cannot start until a week after the first task is finished. Only after you start to assign these relationships can you begin to see a project’s timing as related not just to each task’s duration but also to the specific ways in which the tasks relate to each other.
Here are some examples of dependencies:
✦ You can’t begin to use a new piece of equipment until you train people in
how to use it.
✦ You must wait for a nuclear reactor to get online before you can begin to
generate energy.
✦ You can’t start to ship a new food product until the FDA approves it.
Figure 2-6 shows a project plan where each task’s duration and the depend-encies among tasks have been established. Note the resulting overall timing of the project.
You can find out more about the fine art of managing dependencies in Book IV, Chapter 3.
Figure 2-6: