iPad and iPhone Kung Fu
iPad and iPhone Kung Fu is a handy and fun reference for those new to iOS, as well as those who have a lot of experience. The tips contained in this book can help users open up a new level of usefulness for their Apple devices.
➤ Jon Kurz
President, Dycet Research Group
This is a really great book. In fact, I’m recommending it to my dad! I have used an iPhone since the 3G version and am surprised I had so many things to learn!
➤ Jeff Holland
Web developer, University of Wisconsin—Eau Claire
iOS devices are awesome and amazingly intuitive, but I was surprised to find out how much I didn’t know. This book has tips and hints that take “It just works” to a whole different level.
➤ Tony Bradley
Principal analyst at Bradley Strategy Group
Within minutes of picking up this book, I found several tips that helped me move around the interface more easily, enter text more quickly and accurately, and enjoy my iPad more. Whether you just started using an iPad or have had one since the early days, this book offers something for you.
➤ Ian Dees
iPad and iPhone Kung Fu
Tips, Tricks, Hints, and Hacks for iOS 7
Keir Thomas
The Pragmatic Bookshelf
Programmers, LLC was aware of a trademark claim, the designations have been printed in initial capital letters or in all capitals. The Pragmatic Starter Kit, The Pragmatic Programmer, Pragmatic Programming, Pragmatic Bookshelf, PragProg and the linking g device are trade-marks of The Pragmatic Programmers, LLC.
Every precaution was taken in the preparation of this book. However, the publisher assumes no responsibility for errors or omissions, or for damages that may result from the use of information (including program listings) contained herein.
Our Pragmatic courses, workshops, and other products can help you and your team create better software and have more fun. For more information, as well as the latest Pragmatic titles, please visit us at http://pragprog.com.
The team that produced this book includes: Jacquelyn Carter (editor)
Potomac Indexing, LLC (indexer) Candace Cunningham (copyeditor) David J Kelly (typesetter)
Janet Furlow (producer) Ellie Callahan (support)
For international rights, please contact [email protected].
Copyright © 2014 The Pragmatic Programmers, LLC. All rights reserved.
No part of this publication may be reproduced, stored in a retrieval system, or transmitted, in any form, or by any means, electronic, mechanical, photocopying, recording, or otherwise, without the prior consent of the publisher. Printed in the United States of America.
ISBN-13: 978-1-93778-572-7
Contents
Acknowledgments . . . xxv
Preface . . . xxvii
1. A Crash Course in iOS 7 . . . 1
First-Time Setup 1
Switching On and Off 3
Setting Up Non-Apple Accounts 6
Status Bar 8
Charging Your iPad or iPhone 11
Apps 11
Gestures 29
Security 30
Spotlight Search 34
System Configuration 34
Cutting, Copying, and Pasting 45
Notifications 46
Sharing with Others 47
Usability Tips and Tricks 49
Jailbreaking 49
2. The Tips. . . 53
Take photos in burst mode 53
Tip 1.
Tip 2. Instantly clear lock-screen notifications 54
Tip 3. Let people FaceTime-call a specific iPad, iPhone, or
Mac 54
Tip 4. Preview driving directions in Maps 55
Tip 5. See recently closed browser tabs 57
Tip 6. Easily select paragraphs, sentences, and lines 57
Tip 7. Use emoji—full-color emoticons 57
Tip 9. Stop being told twice about new messages 59
Tip 10. Record the screen of an iPad or iPhone 60
Tip 11. Take better HDR pictures 61
Tip 12. Type on the iPad keyboard with your thumbs 62
Tip 13. Rotate clips in iMovie 64
Tip 14. Get more weather information 64
Tip 15. Know when iMessage is being used 64
Tip 16. Use autoplay variations in GarageBand 65
Tip 17. Undo and redo quickly in iWork and iLife 65
Tip 18. Hide the keyboard when messaging 66
Tip 19. Gain extra exposure within iPhoto 66
Tip 20. Lock your iPad or iPhone with a long PIN 66
Tip 21. Navigate without spoken directions 68
Tip 22. Group shapes, photos, and text boxes in iWork 68
Tip 23. View Map pins that are close together 69
Tip 24. Jump to the top of any page or list 70
Tip 25. Enable two-step verification for extra security 70
Tip 26. Take photos while shooting video 72
Tip 27. Move email addresses in the Mail app 73
Tip 28. See a list of all upcoming calendar events 73
Tip 29. Quickly rip your CD collection for your iPad or
iPhone 73
Tip 30. Move backward and forward when giving a Keynote
presentation 74
Tip 31. Control the Ken Burns effect in iMovie 74
Tip 32. Forward an SMS/MMS message or iMessage to another
person 75
Tip 33. Create folders in the Dock 76
Tip 34. Stop the phone’s ringing, but still take the call 77
Tip 35. Trim movies you record 77
Tip 36. Instantly align maps with north 78
Tip 37. Easily rearrange home-screen icons 78
Tip 38. Put your photos online instantly for non-Apple
users 79
Tip 39. Type rather than speak Siri questions 80
Tip 40. Take a snapshot of the screen 81
Tip 41. Copy and paste a text style in Pages 81
Tip 42. Quickly scroll through home screens 82
Tip 43. View lyrics while listening to music 82
Tip 45. Snooze an alarm quickly 83
Tip 46. Delete shared photo-stream comments 84
Tip 47. Shake to undo 84
Tip 48. Quit multiple apps in one gesture 85
Tip 49. Always quit GPS apps to save battery life 85
Tip 50. Quote only part of a message in an email reply 86
Tip 51. Quickly switch to large or small fonts in Pages 86
Tip 52. Use the built-in dictionary to look up definitions 86
Tip 53. Have directions repeated 88
Tip 54. Listen to just the audio of a music video 88
Tip 55. Make maps orient to the direction you’re facing 89
Tip 56. Cancel Siri 89
Tip 57. Forward just an email’s attachment 90
Tip 58. Be notified of only important emails 90
Tip 59. Use vocal or guitar tracks for sampling in
GarageBand 91
Tip 60. Move from right to left when taking a panorama
shot 92
Tip 61. Default to walking directions in Maps 92
Tip 62. Group slides in Keynote 93
Tip 63. Quickly type a period 94
Tip 64. Import contact photos from Facebook and Twitter 94
Tip 65. Get free stuff from Apple 95
Tip 66. View the number of items on your iPad/iPhone via
iTunes 96
Tip 67. Store PDFs 96
Tip 68. Repeat calendar events on the first or last day of each
month 97
Tip 69. Activate Siri using your headphones 98
Tip 70. Save time when typing numbers and symbols 98
Tip 71. Create fancy email signatures 98
Tip 72. Remotely view the remaining charge of your Apple
devices 99
Tip 73. Why can’t I use a tune with iMovie?! 100
Tip 74. Copy contact photos 101
Tip 75. Send map locations from iPad to iPhone 101
Tip 76. Tap to shrink Control Center 102
Tip 77. Bow strings in GarageBand 102
Tip 78. Less obvious things to say to Siri 103
Tip 79. Access a hidden “field test” iPhone mode 104
Tip 80. Lock out notifications while using an app 104
Tip 81. Print to any printer connected to a Mac or Windows
PC 105
Tip 82. Prune your contacts list without going insane 107
Tip 83. Transfer photos from a Mac or Windows PC 107
Tip 84. Use the Calculator app’s scientific mode 109
Tip 85. Read manuals online 109
Tip 86. Drop pins even when driving a route 110
Tip 87. Play the drums better in GarageBand 110
Tip 88. Use Bluetooth or Wi-Fi even in airplane mode 111
Tip 89. Save and share iWork files with WebDAV 111
Tip 90. Move shapes or images precisely in iWork 113
Tip 91. Use Siri to plan a route in Google Maps 113
Tip 92. Dial a voicemail PIN or phone extension
automatically 114
Tip 93. Take long and tall shots using Panorama mode 116
Tip 94. Take photos like you would with a point-and-shoot
camera 117
Tip 95. Use Bluetooth devices 117
Tip 96. Easily type capital letters when needed 118
Tip 97. Undo photo edits—even after you’ve saved them 119
Tip 98. Add words to the spelling dictionary 119
Tip 99. Help iOS type contractions (“we’ll,” “I’ll,” and so
on) 120
Tip 100. Let people iMessage a specific iPad, iPhone, or
Mac 121
Tip 101. Divert all iPhone calls straight to voicemail 121
Tip 102. Apply EQ to individual tracks or albums 122
Tip 103. Listen quietly at night 123
Tip 104. Start Safari ultraquickly in “clean” mode 123
Tip 105. See if it’s dark somewhere 124
Tip 106. Get your longitude and latitude 125
Tip 107. Use kaomoji emoticons 125
Tip 108. Share and print “moments” photo albums 127
Tip 109. Jump to the Music app from Control Center 127
Tip 110. Getting around a broken Home button 128
Tip 111. See where suspicious links point 129
Tip 112. Delete app folders and put apps in alphabetical
Tip 113. Automatically stop music or videos playing after a
time 129
Tip 114. See your own number quickly 130
Tip 115. Use nicknames for people 130
Tip 116. Stop advertisers from tracking you 131
Tip 117. Open browser tabs in the background 132
Tip 118. Have iBooks read to you 132
Tip 119. Take photos without touching your iPad or iPhone 134
Tip 120. Know your pins in the Maps app 135
Tip 121. See larger thumbnail previews when browsing
photos 135
Tip 122. Hard-reboot your iPhone or iPad 136
Tip 123. Find out which apps understand which kinds of
files 136
Tip 124. Make Siri less loud! 137
Tip 125. Jump to the beginning or end of an iMovie project 138
Tip 126. Turn off in-app purchases 138
Tip 127. Download from foreign App Stores or iTunes
Stores 139
Tip 128. Deal with photo-stream warnings when importing
images 141
Tip 129. Find a lost password for an iTunes backup 141
Tip 130. Discover the IMEI and UDID 142
Tip 131. Insert the ellipsis character 143
Tip 132. Instantly create a calendar event 143
Tip 133. Make images and shapes the same size in iWork 143
Tip 134. Copy Calculator results 144
Tip 135. Move the browser pane in iPhoto 144
Tip 136. Rip CD tracks in the very best audio quality 144
Tip 137. Avoid wearing out the Home button 145
Tip 138. Cancel an app download 146
Tip 139. Create your own wallpaper from images 147
Tip 140. Instantly redial a busy line 148
Tip 141. Move images, shapes, or text boxes in straight lines
in iWork 148
Tip 142. Personalize the Music app 149
Tip 143. Scroll text boxes on web pages 149
Tip 144. Trim audio tracks to remove nonsense 149
Tip 145. Send map locations to a desktop PC 150
Tip 146. Be multilingual 151
Tip 147. Fast-forward through music 152
Tip 148. Use iPod/iPhone headphones with Mac computers 153
Tip 149. See more info in the Stocks app 153
Tip 150. View and delete iCloud documents 154
Tip 151. Move calendar events easily 154
Tip 152. Back up your contacts 154
Tip 153. Stop iPad or iPhone backups from eating your hard
disk 155
Tip 154. Preview a slide in Keynote 156
Tip 155. Make an iPhone truly quiet 156
Tip 156. Stop being nagged about missed calls or messages 156
Tip 157. Fully utilize fonts in iWork apps 157
Tip 158. Beam items using iPhoto 158
Tip 159. Play music or video on computers you haven’t synced
to 158
Tip 160. Use Pages for outlining 159
Tip 161. Type in all capital letters 160
Tip 162. Quickly type accented letters 161
Tip 163. Get a refund for an app 161
Tip 164. Right-justify text 162
Tip 165. Quickly adjust color and brightness in iPhoto 163
Tip 166. Make Maps show titles in native languages 163
Tip 167. See how long construction work will last 164
Tip 168. Easily move alarms on an iPad 165
Tip 169. Instantly see any unread emails 165
Tip 170. Hide photos in iPhoto 166
Tip 171. Chat to groups of people via iMessage 166
Tip 172. Use custom ringtones and vibrations for individual
callers 167
Tip 173. View “invisibles” in Pages 167
Tip 174. Choose the order in which notifications appear 168
Tip 175. Find level surfaces with your iPhone 169
Tip 176. Search for businesses in Maps 170
Tip 177. Access photo-stream pics on a Windows PC 171
Tip 178. Answer or decline calls when wearing headphones 171
Tip 179. Save website images for viewing later 172
Tip 180. See the time of messages at a glance 172
Tip 181. See the full video frame when recording 172
Tip 182. Get curly quotes 173
Tip 184. Fix crashes 173
Tip 185. See how much data was used in a FaceTime call 174
Tip 186. Quickly access your browsing history 174
Tip 187. Find the serial number of a stolen iPad/iPhone 175
Tip 188. Insert commonly used currency symbols when
typing 176
Tip 189. Add another person’s Touch ID 177
Tip 190. Choose a serendipitous destination 177
Tip 191. Zoom in further to pictures 177
Tip 192. Remove a photo filter 178
Tip 193. Look up a phone number 179
Tip 194. Crop a photo for printing 179
Tip 195. Refer to the page number in a Pages document 180
Tip 196. Export high-res edited images in iPhoto 181
Tip 197. Sort documents in iWork apps 181
Tip 198. Get pictures off your device without iCloud 182
Tip 199. Easily send emails to groups of people 183
Tip 200. Be reminded of birthdays 184
Tip 201. Reduce the space your music collection takes up 185
Tip 202. See links from Twitter buddies 186
Tip 203. Create a “lost or stolen” lock-screen message 186
Tip 204. Get a visual cue when notifications appear 188
Tip 205. Zoom when recording video or taking photos 188
Tip 206. Bounce to activate the lock-screen camera 189
Tip 207. Create footnotes in Pages 189
Tip 208. Type apostrophes and quotes quickly on an iPad 190
Tip 209. Make Siri pronounce names correctly 190
Tip 210. Easily select paragraphs in iWork apps 191
Tip 211. Instantly dismiss notifications 191
Tip 212. Get free apps even if your device doesn’t have the
space 191
Tip 213. See more detail when viewing Safari tabs on an
iPhone 192
Tip 214. Turn the first home screen into a picture frame 192
Tip 215. Rate songs 193
Tip 216. Quickly reject a call 193
Tip 217. View upcoming reminders 193
Tip 218. Scrub properly 194
Tip 219. Copy items between iWork apps 194
Tip 220. Create your own ringtones 195
Tip 221. Use Siri to maintain a grocery list 196
Tip 222. Listen to iTunes Radio worldwide 197
Tip 223. Search on a web page 197
Tip 224. Block calls and messages from certain people 198
Tip 225. View larger thumbnails in iPhoto 200
Tip 226. Fun things to ask Siri 200
Tip 227. Check to see what Apple services are working 202
Tip 228. Make albums bigger in Cover Flow mode 202
Tip 229. View countdowns from the lock screen 203
Tip 230. Let Siri take you to settings 203
Tip 231. Avoid explicit music or videos 203
Tip 232. Listen to the audio of videos—even after switching
away from them 204
Tip 233. Easily set start times in Calendar 205
Tip 234. Have Siri read its results to you 206
Tip 235. Search Google or Yahoo! with Siri, not Bing 206
Tip 236. Quickly respond to lock-screen notifications 206
Tip 237. Select different language keyboards quickly 207
Tip 238. End calls and lock the screen in one movement 207
Tip 239. Instantly switch to the last-used app 207
Tip 240. Lock the iPhone screen in landscape mode 208
Tip 241. Attach files to calendar events 209
Tip 242. Stream movies and music from your Mac or Windows
PC 210
Tip 243. Turn off the iPhone flashlight quickly 211
Tip 244. Quickly navigate through Pages 212
Tip 245. Delete a miskeyed Calculator entry 213
Tip 246. Ask Siri about driving directions 213
Tip 247. Look up callers online 213
Tip 248. Ultraquickly reply to emails and messages 214
Tip 249. Scroll and zoom when using brushes in iPhoto 215
Tip 250. Have Safari fill in credit-card details 215
Tip 251. Create contact groups 216
Tip 252. Cue back and forth in iMovie without hassle 217
Tip 253. Allow only one person (or a select few people) to call
you 217
Tip 254. Edit iWork documents on a Windows PC 218
Tip 255. Dial foreign numbers 218
Tip 256. Get transit directions 219
Tip 258. Create a cut-out around images in iWork apps 220
Tip 259. Create “vibrate only” notifications 221
Tip 260. Open a web page in a non-Safari web browser 222
Tip 261. Manually sync music to your iPad or iPhone 223
Tip 262. Raise the iPhone to your ear to dictate 224
Tip 263. Rearrange reminder lists on the iPhone 224
Tip 264. Stop “sampling” alert sounds when setting an
alarm 225
Tip 265. Put a call on hold 225
Tip 266. Interview people using your phone 226
Tip 267. Create events years in advance in Calendar 226
Tip 268. Make and change tab stops in Pages 227
Tip 269. Fix annoyances and make iOS easier to use 228
Tip 270. Create shortcuts to autotype text 229
Tip 271. Mass-delete photos 231
Tip 272. Change iMovie’s theme without re-editing 232
Tip 273. Be reminded at a place via your iPhone 232
Tip 274. Use your iPhone when parking 233
Tip 275. FaceTime on TV 234
Tip 276. Get Siri to request bank-account details 235
Tip 277. Create folders in iCloud storage 236
Tip 278. Stop being told about spam messages 236
Tip 279. Add a “Phone me,” “Message me,” or “FaceTime me”
link to email signatures 237
Tip 280. View Coordinated Universal Time/Greenwich Mean
Time 238
Tip 281. Instantly close all browser tabs 238
Tip 282. Listen to music while playing games 239
Tip 283. Move the cursor using gestures in Pages 239
Tip 284. Turn voice recordings into ringtones or alert tones 240
Tip 285. Monitor currency exchange rates in the Stocks
app 241
Tip 286. Search only a single email account 242
Tip 287. Dictate like a pro 242
Tip 288. Apply a watermark to documents in Pages 245
Tip 289. Control Keynote remotely from another iPad or
iPhone 246
Tip 290. Rotate and crop photos in iPhoto 247
Tip 291. Temporarily stop the screen from rotating when
viewing photos 248
Tip 292. Upload GarageBand songs to iCloud 248
Tip 293. Quickly search the Web or Wikipedia 249
Tip 294. Apply multiple effects in iPhoto 249
Tip 295. Recover an iPhone that’s been disabled 250
Tip 296. Switch from one call to another while wearing
headphones 250
Tip 297. View a list of songs you’ve heard on iTunes Radio 251
Tip 298. Access iOS files via iTunes 251
Tip 299. Boost Safari with bookmarklets 252
Tip 300. Create shared calendars and Reminder lists 253
Tip 301. Create an ultrastrong passcode 255
Tip 302. Stop apps from using cellular data 257
Tip 303. Save battery life 257
Tip 304. Add more detail to iMovie’s timeline 259
Tip 305. Create an apps wish list 260
Tip 306. View forgotten passwords 260
Tip 307. Limit Safari to a selection of websites 261
Tip 308. Switch Siri’s voice to male 263
Tip 309. Quickly view all images received from somebody via
iMessage 263
Tip 310. Stop Facebook from posting to the wrong
audience 264
Tip 311. Easily email the text of a web page 264
Tip 312. Tell iOS where you work 265
Tip 313. Cut an iMovie clip quickly and easily 266
Tip 314. Temporarily turn off FaceTime video 266
Tip 315. View non-local weather on an iPad 266
Tip 316. Create a security camera 267
Tip 317. Record more-fluid HD video 267
Tip 318. FaceTime from your iPad to your iPhone (or vice
versa) 268
Contents by Topic
Office
Tip 6. Easily select paragraphs, sentences, and lines 57
Tip 17. Undo and redo quickly in iWork and iLife 65
Tip 22. Group shapes, photos, and text boxes in iWork 68
Tip 30. Move backward and forward when giving a Keynote
presentation 74
Tip 41. Copy and paste a text style in Pages 81
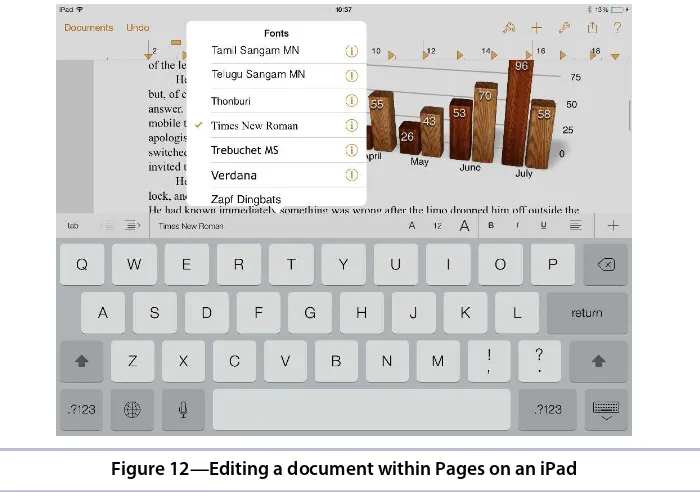
Tip 51. Quickly switch to large or small fonts in Pages 86
Tip 62. Group slides in Keynote 93
Tip 89. Save and share iWork files with WebDAV 111
Tip 90. Move shapes or images precisely in iWork 113
Tip 133. Make images and shapes the same size in iWork 143
Tip 141. Move images, shapes, or text boxes in straight lines in
iWork 148
Tip 154. Preview a slide in Keynote 156
Tip 157. Fully utilize fonts in iWork apps 157
Tip 160. Use Pages for outlining 159
Tip 173. View “invisibles” in Pages 167
Tip 182. Get curly quotes 173
Tip 195. Refer to the page number in a Pages document 180
Tip 197. Sort documents in iWork apps 181
Tip 207. Create footnotes in Pages 189
Tip 210. Easily select paragraphs in iWork apps 191
Tip 219. Copy items between iWork apps 194
Tip 244. Quickly navigate through Pages 212
Tip 254. Edit iWork documents on a Windows PC 218
Tip 258. Create a cut-out around images in iWork apps 220
Tip 268. Make and change tab stops in Pages 227
Tip 283. Move the cursor using gestures in Pages 239
Tip 289. Control Keynote remotely from another iPad or iPhone 246
Tip 300. Create shared calendars and Reminder lists 253
Maps and Navigation
Tip 4. Preview driving directions in Maps 55
Tip 21. Navigate without spoken directions 68
Tip 23. View Map pins that are close together 69
Tip 36. Instantly align maps with north 78
Tip 53. Have directions repeated 88
Tip 55. Make maps orient to the direction you’re facing 89
Tip 61. Default to walking directions in Maps 92
Tip 75. Send map locations from iPad to iPhone 101
Tip 86. Drop pins even when driving a route 110
Tip 106. Get your longitude and latitude 125
Tip 120. Know your pins in the Maps app 135
Tip 145. Send map locations to a desktop PC 150
Tip 166. Make Maps show titles in native languages 163
Tip 167. See how long construction work will last 164
Tip 176. Search for businesses in Maps 170
Tip 183. Alter the 3D maps angle 173
Tip 190. Choose a serendipitous destination 177
Tip 246. Ask Siri about driving directions 213
Tip 256. Get transit directions 219
Creativity
Tip 1. Take photos in burst mode 53
Tip 11. Take better HDR pictures 61
Tip 13. Rotate clips in iMovie 64
Tip 16. Use autoplay variations in GarageBand 65
Tip 19. Gain extra exposure within iPhoto 66
Tip 26. Take photos while shooting video 72
Tip 31. Control the Ken Burns effect in iMovie 74
Tip 35. Trim movies you record 77
Tip 38. Put your photos online instantly for non-Apple users 79
Tip 46. Delete shared photo-stream comments 84
Tip 59. Use vocal or guitar tracks for sampling in GarageBand 91
Tip 60. Move from right to left when taking a panorama shot 92
Tip 73. Why can’t I use a tune with iMovie?! 100
Tip 77. Bow strings in GarageBand 102
Tip 87. Play the drums better in GarageBand 110
Tip 93. Take long and tall shots using Panorama mode 116
Tip 94. Take photos like you would with a point-and-shoot
camera 117
Tip 97. Undo photo edits—even after you’ve saved them 119
Tip 108. Share and print “moments” photo albums 127
Tip 119. Take photos without touching your iPad or iPhone 134
Tip 121. See larger thumbnail previews when browsing photos 135
Tip 125. Jump to the beginning or end of an iMovie project 138
Tip 128. Deal with photo-stream warnings when importing
images 141
Tip 135. Move the browser pane in iPhoto 144
Tip 158. Beam items using iPhoto 158
Tip 165. Quickly adjust color and brightness in iPhoto 163
Tip 170. Hide photos in iPhoto 166
Tip 177. Access photo-stream pics on a Windows PC 171
Tip 179. Save website images for viewing later 172
Tip 181. See the full video frame when recording 172
Tip 191. Zoom in further to pictures 177
Tip 192. Remove a photo filter 178
Tip 194. Crop a photo for printing 179
Tip 196. Export high-res edited images in iPhoto 181
Tip 198. Get pictures off your device without iCloud 182
Tip 205. Zoom when recording video or taking photos 188
Tip 206. Bounce to activate the lock-screen camera 189
Tip 225. View larger thumbnails in iPhoto 200
Tip 249. Scroll and zoom when using brushes in iPhoto 215
Tip 252. Cue back and forth in iMovie without hassle 217
Tip 266. Interview people using your phone 226
Tip 271. Mass-delete photos 231
Tip 272. Change iMovie’s theme without re-editing 232
Tip 290. Rotate and crop photos in iPhoto 247
Tip 292. Upload GarageBand songs to iCloud 248
Tip 294. Apply multiple effects in iPhoto 249
Tip 304. Add more detail to iMovie’s timeline 259
Tip 313. Cut an iMovie clip quickly and easily 266
Tip 317. Record more-fluid HD video 267
Entertainment
Tip 29. Quickly rip your CD collection for your iPad or iPhone 73
Tip 43. View lyrics while listening to music 82
Tip 54. Listen to just the audio of a music video 88
Tip 102. Apply EQ to individual tracks or albums 122
Tip 103. Listen quietly at night 123
Tip 109. Jump to the Music app from Control Center 127
Tip 113. Automatically stop music or videos playing after a time 129
Tip 118. Have iBooks read to you 132
Tip 136. Rip CD tracks in the very best audio quality 144
Tip 142. Personalize the Music app 149
Tip 144. Trim audio tracks to remove nonsense 149
Tip 147. Fast-forward through music 152
Tip 148. Use iPod/iPhone headphones with Mac computers 153
Tip 159. Play music or video on computers you haven’t synced
to 158
Tip 201. Reduce the space your music collection takes up 185
Tip 215. Rate songs 193
Tip 218. Scrub properly 194
Tip 222. Listen to iTunes Radio worldwide 197
Tip 226. Fun things to ask Siri 200
Tip 228. Make albums bigger in Cover Flow mode 202
Tip 231. Avoid explicit music or videos 203
Tip 232. Listen to the audio of videos—even after switching away
from them 204
Tip 242. Stream movies and music from your Mac or Windows
PC 210
Tip 261. Manually sync music to your iPad or iPhone 223
Tip 282. Listen to music while playing games 239
Tip 297. View a list of songs you’ve heard on iTunes Radio 251
System and Security
Tip 2. Instantly clear lock-screen notifications 54
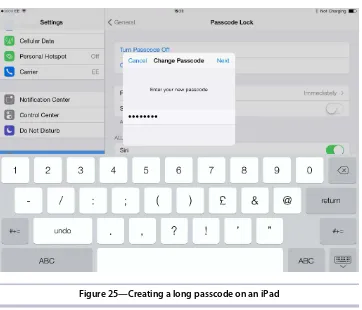
Tip 20. Lock your iPad or iPhone with a long PIN 66
Tip 25. Enable two-step verification for extra security 70
Tip 33. Create folders in the Dock 76
Tip 37. Easily rearrange home-screen icons 78
Tip 40. Take a snapshot of the screen 81
Tip 42. Quickly scroll through home screens 82
Tip 49. Always quit GPS apps to save battery life 85
Tip 66. View the number of items on your iPad/iPhone via
iTunes 96
Tip 79. Access a hidden “field test” iPhone mode 104
Tip 81. Print to any printer connected to a Mac or Windows PC 105
Tip 85. Read manuals online 109
Tip 88. Use Bluetooth or Wi-Fi even in airplane mode 111
Tip 95. Use Bluetooth devices 117
Tip 110. Getting around a broken Home button 128
Tip 112. Delete app folders and put apps in alphabetical order 129
Tip 116. Stop advertisers from tracking you 131
Tip 122. Hard-reboot your iPhone or iPad 136
Tip 124. Make Siri less loud! 137
Tip 126. Turn off in-app purchases 138
Tip 127. Download from foreign App Stores or iTunes Stores 139
Tip 129. Find a lost password for an iTunes backup 141
Tip 130. Discover the IMEI and UDID 142
Tip 137. Avoid wearing out the Home button 145
Tip 138. Cancel an app download 146
Tip 139. Create your own wallpaper from images 147
Tip 150. View and delete iCloud documents 154
Tip 153. Stop iPad or iPhone backups from eating your hard
disk 155
Tip 163. Get a refund for an app 161
Tip 174. Choose the order in which notifications appear 168
Tip 184. Fix crashes 173
Tip 187. Find the serial number of a stolen iPad/iPhone 175
Tip 189. Add another person’s Touch ID 177
Tip 203. Create a “lost or stolen” lock-screen message 186
Tip 209. Make Siri pronounce names correctly 190
Tip 214. Turn the first home screen into a picture frame 192
Tip 220. Create your own ringtones 195
Tip 227. Check to see what Apple services are working 202
Tip 230. Let Siri take you to settings 203
Tip 239. Instantly switch to the last-used app 207
Tip 240. Lock the iPhone screen in landscape mode 208
Tip 295. Recover an iPhone that’s been disabled 250
Tip 301. Create an ultrastrong passcode 255
Tip 302. Stop apps from using cellular data 257
Tip 303. Save battery life 257
Tip 306. View forgotten passwords 260
Tip 308. Switch Siri’s voice to male 263
Tip 316. Create a security camera 267
Calls, Messages, and Communication
Tip 3. Let people FaceTime-call a specific iPad, iPhone, or
Mac 54
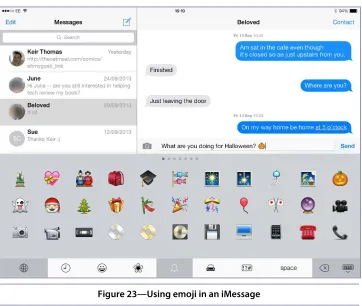
Tip 7. Use emoji—full-color emoticons 57
Tip 9. Stop being told twice about new messages 59
Tip 15. Know when iMessage is being used 64
Tip 18. Hide the keyboard when messaging 66
Tip 32. Forward an SMS/MMS message or iMessage to another
person 75
Tip 34. Stop the phone’s ringing, but still take the call 77
Tip 92. Dial a voicemail PIN or phone extension automatically 114
Tip 100. Let people iMessage a specific iPad, iPhone, or Mac 121
Tip 101. Divert all iPhone calls straight to voicemail 121
Tip 114. See your own number quickly 130
Tip 140. Instantly redial a busy line 148
Tip 156. Stop being nagged about missed calls or messages 156
Tip 171. Chat to groups of people via iMessage 166
Tip 172. Use custom ringtones and vibrations for individual
callers 167
Tip 178. Answer or decline calls when wearing headphones 171
Tip 180. See the time of messages at a glance 172
Tip 185. See how much data was used in a FaceTime call 174
Tip 193. Look up a phone number 179
Tip 216. Quickly reject a call 193
Tip 224. Block calls and messages from certain people 198
Tip 238. End calls and lock the screen in one movement 207
Tip 247. Look up callers online 213
Tip 253. Allow only one person (or a select few people) to call
you 217
Tip 255. Dial foreign numbers 218
Tip 265. Put a call on hold 225
Tip 275. FaceTime on TV 234
Tip 278. Stop being told about spam messages 236
Tip 284. Turn voice recordings into ringtones or alert tones 240
Tip 296. Switch from one call to another while wearing
Tip 309. Quickly view all images received from somebody via
iMessage 263
Tip 314. Temporarily turn off FaceTime video 266
Tip 318. FaceTime from your iPad to your iPhone (or vice versa) 268
Web and Email
Tip 5. See recently closed browser tabs 57
Tip 8. Automatically end web and email addresses 59
Tip 27. Move email addresses in the Mail app 73
Tip 44. Access your email drafts 83
Tip 50. Quote only part of a message in an email reply 86
Tip 57. Forward just an email’s attachment 90
Tip 58. Be notified of only important emails 90
Tip 71. Create fancy email signatures 98
Tip 104. Start Safari ultraquickly in “clean” mode 123
Tip 111. See where suspicious links point 129
Tip 117. Open browser tabs in the background 132
Tip 143. Scroll text boxes on web pages 149
Tip 169. Instantly see any unread emails 165
Tip 186. Quickly access your browsing history 174
Tip 199. Easily send emails to groups of people 183
Tip 202. See links from Twitter buddies 186
Tip 213. See more detail when viewing Safari tabs on an iPhone 192
Tip 223. Search on a web page 197
Tip 248. Ultraquickly reply to emails and messages 214
Tip 250. Have Safari fill in credit-card details 215
Tip 257. Remove “Recents" suggestions when emailing 220
Tip 260. Open a web page in a non-Safari web browser 222
Tip 279. Add a “Phone me,” “Message me,” or “FaceTime me” link
to email signatures 237
Tip 281. Instantly close all browser tabs 238
Tip 286. Search only a single email account 242
Tip 299. Boost Safari with bookmarklets 252
Tip 307. Limit Safari to a selection of websites 261
Tip 311. Easily email the text of a web page 264
Productivity
Tip 10. Record the screen of an iPad or iPhone 60
Tip 12. Type on the iPad keyboard with your thumbs 62
Tip 14. Get more weather information 64
Tip 24. Jump to the top of any page or list 70
Tip 28. See a list of all upcoming calendar events 73
Tip 39. Type rather than speak Siri questions 80
Tip 45. Snooze an alarm quickly 83
Tip 47. Shake to undo 84
Tip 52. Use the built-in dictionary to look up definitions 86
Tip 56. Cancel Siri 89
Tip 63. Quickly type a period 94
Tip 64. Import contact photos from Facebook and Twitter 94
Tip 65. Get free stuff from Apple 95
Tip 67. Store PDFs 96
Tip 68. Repeat calendar events on the first or last day of each
month 97
Tip 69. Activate Siri using your headphones 98
Tip 70. Save time when typing numbers and symbols 98
Tip 72. Remotely view the remaining charge of your Apple
devices 99
Tip 74. Copy contact photos 101
Tip 76. Tap to shrink Control Center 102
Tip 78. Less obvious things to say to Siri 103
Tip 80. Lock out notifications while using an app 104
Tip 82. Prune your contacts list without going insane 107
Tip 84. Use the Calculator app’s scientific mode 109
Tip 96. Easily type capital letters when needed 118
Tip 98. Add words to the spelling dictionary 119
Tip 99. Help iOS type contractions (“we’ll,” “I’ll,” and so on) 120
Tip 105. See if it’s dark somewhere 124
Tip 107. Use kaomoji emoticons 125
Tip 115. Use nicknames for people 130
Tip 123. Find out which apps understand which kinds of files 136
Tip 131. Insert the ellipsis character 143
Tip 132. Instantly create a calendar event 143
Tip 134. Copy Calculator results 144
Tip 146. Be multilingual 151
Tip 149. See more info in the Stocks app 153
Tip 151. Move calendar events easily 154
Tip 152. Back up your contacts 154
Tip 155. Make an iPhone truly quiet 156
Tip 161. Type in all capital letters 160
Tip 164. Right-justify text 162
Tip 168. Easily move alarms on an iPad 165
Tip 175. Find level surfaces with your iPhone 169
Tip 188. Insert commonly used currency symbols when typing 176
Tip 200. Be reminded of birthdays 184
Tip 204. Get a visual cue when notifications appear 188
Tip 208. Type apostrophes and quotes quickly on an iPad 190
Tip 211. Instantly dismiss notifications 191
Tip 212. Get free apps even if your device doesn’t have the
space 191
Tip 217. View upcoming reminders 193
Tip 221. Use Siri to maintain a grocery list 196
Tip 229. View countdowns from the lock screen 203
Tip 233. Easily set start times in Calendar 205
Tip 234. Have Siri read its results to you 206
Tip 235. Search Google or Yahoo! with Siri, not Bing 206
Tip 236. Quickly respond to lock-screen notifications 206
Tip 237. Select different language keyboards quickly 207
Tip 241. Attach files to calendar events 209
Tip 243. Turn off the iPhone flashlight quickly 211
Tip 245. Delete a miskeyed Calculator entry 213
Tip 251. Create contact groups 216
Tip 259. Create “vibrate only” notifications 221
Tip 262. Raise the iPhone to your ear to dictate 224
Tip 263. Rearrange reminder lists on the iPhone 224
Tip 264. Stop “sampling” alert sounds when setting an alarm 225
Tip 267. Create events years in advance in Calendar 226
Tip 269. Fix annoyances and make iOS easier to use 228
Tip 270. Create shortcuts to autotype text 229
Tip 274. Use your iPhone when parking 233
Tip 276. Get Siri to request bank-account details 235
Tip 277. Create folders in iCloud storage 236
Tip 280. View Coordinated Universal Time/Greenwich Mean
Time 238
Tip 285. Monitor currency exchange rates in the Stocks app 241
Tip 287. Dictate like a pro 242
Tip 291. Temporarily stop the screen from rotating when viewing
photos 248
Tip 293. Quickly search the Web or Wikipedia 249
Tip 298. Access iOS files via iTunes 251
Tip 305. Create an apps wish list 260
Tip 310. Stop Facebook from posting to the wrong audience 264
Tip 312. Tell iOS where you work 265
Acknowledgments
Many thanks to those who reviewed iPad and iPhone Kung Fu prior to publi-cation: Tony Bradley, Ian Dees, Kevin Gisi, Jeff Holland, Jon Kurz, Mike Riley, and Loren Sands-Ramshaw. Their comments, corrections, and suggestions were invaluable.
Thanks to Jacquelyn Carter for expertly guiding me through my fourth book with Pragmatic Bookshelf, and, of course, thanks to all those switched-on in-dividuals at Pragmatic who run perhaps the most extraordinary and amazing publishing outfit I’ve had the privilege of working with (there’s no need to send me another polo shirt, guys; I wear the one I have with pride!).
Preface
Welcome to iPad and iPhone Kung Fu, the only title you need to get the very best from iOS 7—the latest major release of Apple’s mobile operating system.
What This book Is
iPad and iPhone Kung Fu squeezes out every possible tip, trick, hint, and hack there is—and then squeezes some more to reveal a substantial number of secrets.
No other book has the same drive to help you boost productivity, save time, and simply do things the best way possible when using an Apple handheld device running iOS 7—all while having fun, of course.
Each of the 300+ tips in this book meets one or more of the following criteria:
• It is genuinely useful for newcomers and old hands alike.
• It will substantially improve the way you use your iPad, iPhone, or iPod Touch.
• It shows the amazing things that can be done with an iPad, iPhone, or iPod Touch.
Many of the tips are blockbusters, but not all of them are. Some point out very subtle tricks. But even these will change the way you work and play.
Who This Book Is For
The tips in this book are good for users of any of the following Apple handhelds:
• iPad Air
• iPad Mini (both Retina and non-Retina) • iPad (both Retina and non-Retina) • iPhone 5s, 5c, and 5
• iPhone 4 and 4s
Importantly, for the sake of convenience throughout the book we refer simply to the iPad or iPhone. When seeing “iPad” you should read “iPad Air, iPad, and iPad Mini”; when seeing “iPhone” you should read “iPhone and iPod Touch.”
How to Read This Book
In a nutshell, iPad and iPhone Kung Fu is a big book of tips. As such, I don’t recommend any particular way of reading it. You don’t need to be using your iPad, iPhone, or iPod Touch while you read. The whole point of iPad and iPhone Kung Fu is that you can jump in anywhere. Start at the beginning, or start in the middle. You could even start at the end and work your way to the front. Just start reading. If you find a tip you like, then try it!
The tips were written for the version 7 release of iOS, Apple’s operating system for portable devices. That isn’t to say many won’t work on previous releases of iOS. However, we have tested the tips only against iOS 7, and some termi-nology changed in this release. If you do intend to use the book with an older release, some common sense will go a long way.
Sharing
If you’d like to share some of the tips from this book on your blog, then feel free. It’s unlikely my publisher will be too happy if you take liberties, but sharing a couple of tips you’ve found useful can only be a good thing. If you do, it would be great if you could mention the book and provide a link to the book’s official web page—see below.
Online Resources
You can find this book’s official web page at http://pragprog.com/book/ktios/ipad-and-iphone-kung-fu. There you can report any errata in the book as well as make suggestions for future editions. You can also get involved in a discussion with other readers in the book’s official forum and ask me questions. We’d love to see you there!
Keir Thomas February 2014
A Crash Course in iOS 7
iOS is the name of the operating system at the heart of the iPad and iPhone, and this chapter presents a concise beginner’s guide.
Note that any references to onscreen buttons or icons in this book assume the iPad or iPhone is being held in portrait mode rather than landscape mode unless specified otherwise.
First-Time Setup
After removing your iPad or iPhone from the box for the first time, you should connect it to a power source via the USB cable, then switch it on by pressing and holding the Lock/Sleep button at the top of the device until the screen becomes active. Booting will then commence and take a minute or two, during which time you’ll see the Apple logo.
Once it’s booted you’ll be prompted to step through several configuration options. You’ll need to be within range of Internet-enabled Wi-Fi for these (except for iPhones and 3G/4G iPads, which can use their cellular data con-nection). Alternatively, you can connect to a Mac or Windows PC using a USB cable, as prompted during the setup steps.
After you’ve confirmed your location and region, the setup wizard will walk you through some options, as follows:
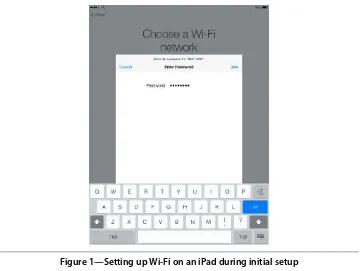
• Wi-Fi: The first option is to choose the Wi-Fi base station to connect to. You’ll need to enter its password, as shown in Figure 1, Setting up Wi-Fi on an iPad during initial setup, on page 2—just tap your Wi-Fi base sta-tion’s entry within the list. As mentioned earlier, setup can’t continue unless you’re online in some fashion.
Figure 1—Setting up Wi-Fi on an iPad during initial setup
Location Services, on page 5). Lots of apps use Location Services, not to mention Apple’s own Maps app, so enabling it is a good idea.
• Restoring from backup: You’re offered the choice of setting up the iPad or iPhone afresh, or restoring from a backup. If you’ve previously owned an iPad or iPhone, you can restore from a backup that was stored in iCloud, or on the hard disk of your computer via iTunes (which will require a USB connection). Restoring a backup is possible even if the backup was made on an older device and/or an older version of iOS.
• Apple ID: You’re prompted to enter your Apple ID, if you have one, or to create one. (See Apple ID, on page 13, for more details about what an Apple ID is.) You can skip creating or inputting an Apple ID here, although you’ll be prompted as necessary when using the device, such as when you attempt to make App Store purchases.
• Terms and conditions: Be sure to read the full terms and conditions for using iOS.
• iCloud: iCloud is Apple’s technology that lets you seamlessly share and sync data and settings across all your devices and computers—see iCloud,
on page 26. Here you can choose whether to use it on this device.
• Find My iPhone/iPad: If your iPhone or iPad is lost or stolen, Find My iPhone/iPad lets you lock it, locate it, or remotely wipe its data, as dis-cussed in Security, on page 30. Enabling it is a very good idea.
• iMessage and FaceTime: As explained in Calls and Messaging, on page 16, iMessage lets other iPhone, iPad, and Mac users communicate with you via short text messages (with file attachments), while FaceTime lets users communicate with you via video and audio calls sent over the Internet. Here you can choose which cell-phone number and email addresses you wish to be contacted via.
• Touch ID: If you’re using an iPhone 5s you’ll be invited to set up Touch ID fingerprint recognition, which will be used in the future to unlock the device (see Touch ID, on page 8). Setup involves tapping the Home button several times from various angles and approaches with your chosen fin-ger(s), as prompted, until a print is recorded and stored.
• Creating a passcode: Although users of the iPhone 5s can rely upon fingerprint detection to unlock a device, they’ll still need to enter a passcode, as will users of all other iPhones and iPads. A passcode is a four-digit PIN used to unlock non–Touch ID devices, and in certain other situations where important settings might be changed. Here you’ll be invited to create that PIN. Note that once the phone is up and running it’s possible to create longer passcodes—see Security, on page 30.
• Siri: If you’re using an iPhone 4s or later, or an iPad third generation or later, you’ll be prompted to set up Siri, as shown in Figure 2, Setting up Siri on an iPad, on page 4. Siri is Apple’s digital assistant, and you can activate it once you’ve set up the iPhone or iPad by pressing and holding the Home button. Because Siri sends your speech and personal details to Apple, there are some potential privacy issues.1
• Diagnostics: Apple improves its products based on reports from real-life users, and you can opt in to help Apple. Reports are sent automatically, virtually anonymously, and in the background.
Switching On and Off
iPads and iPhones are designed to spend all their time switched on, although when not being used they will go into sleep mode to conserve power. Depending on what services are activated on the phone, an iPad or iPhone can last up to two weeks during sleep mode.
Figure 2—Setting up Siri on an iPad
An iPad or iPhone will automatically enter sleep mode after not being used for a moment (unless you’ve changed this setting), although you can manually put a device to sleep in the following ways:
• By pressing the Lock/Sleep button on top of the unit
• By placing the Smart Cover over the front of the device, in the case of an iPad or iPad Mini (or the cover of a Smart Case)
You can wake a device from sleep by pressing the Home button or the Lock/Sleep button, or by lifting the Smart Cover (or the cover of a Smart Case) for an iPad or iPad Mini. Usually a device will then need to be unlocked by providing a passcode, although on an iPhone 5s both waking and unlocking are achieved by simply pressing the Home button.
Location Services
All iPads and iPhones come with Location Services, by which the device can be pin-pointed on the globe with varying degrees of accuracy. Apps make use of this to provide mapping services, for example, or to track the device’s location over a period of time (useful for apps that track your running or walking). Social apps like Facebook use the information to automatically add your location to any postings you make, and the Find My iPhone/iPad service uses the information to locate the device if it’s stolen. All iPhones and 3G/4G iPads capable of running iOS 7 come with global positioning system (GPS) hardware that, provided a clear signal is available, can accurately locate the device to within a few feet of its position. Additionally, a slightly less accurate system called the Wi-Fi Positioning System (WPS) is used to augment the GPS signal. WPS uses the location of the Wi-Fi base station to which you’re connected to discover your general location. This is possible because Apple maintains a database of the physical locations of most Wi-Fi base stations in the world—from those in cafés and offices to those in homes. It does this using a fleet of cars that drive across the country logging the information. Strange but true!
Non–3G/4G iPads and iPod Touch devices lack actual GPS hardware, so they use WPS exclusively to discover their location. This means their accuracy can be limited to simply placing you within a building or on a particular street, for example. If you’re not connected to a Wi-Fi base station, then the accuracy will be severely compromised and it can take several minutes to get a fix.
Location Services brings with it privacy concerns because it lets Apple and apps log places you visit.a For example, iOS 7 is designed to learn where you live and where you work, so it can automatically display transit times within Notification Center. You can control Location Services settings by opening the Settings app, tapping the Privacy heading, then selecting the Location Services option.
Bear in mind that, unlike with dedicated GPS devices, iOS 7 doesn’t store nationwide street-level map data on the iPad or iPhone. Instead, it’s looked up online when nec-essary. This means the Maps app is very likely to be useless if the Internet signal is lost—street-level maps for your local area might be viewable because the data is usually stored on your device for quick access but you won’t be able to search for destinations, or view detailed maps for locations even a relatively short distance away. However, some third-party mapping apps do store map data on the device, and this is usually made clear within an app’s description in the App Store.
a. https://www.eff.org/issues/location-privacy
Because sleep mode is so effective at conserving battery life, there’s no need to completely power down devices when you’re not using them. However, should you legitimately need to turn off an iPad or iPhone, you can do so by pressing and holding the Lock/Sleep button for a few seconds until Slide to Power Off appears at the top of the screen. Sliding your finger across this will turn off the device. However, even when entirely powered down, an iPad or iPhone will still use a trickle of power and will therefore deplete its battery over time.
Setting Up Non-Apple Accounts
Although Apple sets up or creates your iCloud account automatically during setup, you can connect to your Google, Yahoo!, AOL, and Outlook.com (Microsoft Live) accounts with similar ease once the device is up and running.
Setup
Open the Settings app, then tap the Mail, Contacts, Calendars heading and tap the Add Account button. From there, all you need do for setup is select your desired provider and enter your username and password. You’ll then be able to choose which services to sync with your phone by tapping the switch alongside each (see Figure 3, Setting up a Yahoo! account on an iPhone 5, on
page 7). The services you can sync with are as follows:
• Gmail: Email, contacts, calendars, and notes
• Yahoo!: Email, contacts, calendars, reminders, and notes • AOL: Email and notes
• Outlook.com: Email, contacts, calendars, and reminders
You’ll send and receive email in a way that means the messages are still stored on the server so they can be accessed by other computers and devices.
You may have noticed that instant messaging and video calling were not listed there. Other than iMessage, which is part of iCloud, iOS 7 doesn’t let you add any chat accounts to the Messaging app or the FaceTime app. The only way to access messaging or video chat from other providers is to download dedicated apps via the App Store; most providers have supplied an app (including RIM, which provides a Blackberry Messaging app).
In addition to services from major providers, you can configure an account to access an Exchange server run by a business. You will need to consult your technical-services department to find out the server address and the domain name. You’ll be able to sync with email, contacts, and calendars stored on the server.
Figure 3—Setting up a Yahoo! account on an iPhone 5
You can also manually add email accounts, provided you know the SMTP and IMAP/POP3 server addresses. Additionally, you can add LDAP and CardDAV accounts to sync contacts, and CalDAV accounts for calendar sharing. In each case you’ll need to know the server address and login details.
Clicking on a Calendar link file sent to you by email will also offer the oppor-tunity to subscribe to a calendar. Such files typically have the extension .ics.
Push vs. Fetch
Once you’ve configured a third-party account, be sure to tap the Fetch New Data heading in the Mail, Contacts, Calendars section of the Settings app. Here you can set in what way the accounts are synced, and how frequently. Alongside a setting for configuring manual checking, there are two choices for the manner in which data is automatically retrieved: push and fetch. Push is the better choice because it uses less battery power and updates are near instantaneous—you’ll be notified of email almost as soon as it arrives in your inbox, for example. Unfortunately, not all providers offer push services, so instead data must be fetched from the server periodically. You can alter the frequency of attempts to fetch data under the Fetch heading, but beware that fetching too frequently can cause battery life to be depleted quickly.
• Gmail: Fetch and manual only (but see note after this list) • Yahoo!: Push, fetch, and manual
• AOL: Push, fetch, and manual
• Outlook.com: Push, fetch, and manual
• Manually configured Exchange accounts: Push, fetch, and manual • Manually configured POP3/IMAP accounts: Fetch and manual
Note that Gmail accessed as part of a paid-for Google Apps for Business account offers push support.2 Consult your domain administrator for details.
Touch ID
The iPhone 5s is the first phone to make fingerprint recognition reliable enough for everyday use. Once it’s been set up, simply touching a finger against the Home button’s sensor will unlock the device within a second or two. Additionally, when purchasing apps through the App Store or iTunes Store, you can use your fingerprint as proof of your identity, with no need to enter your Apple ID password as you do on other Apple devices.
Touch ID is not foolproof. It requires a dry, relatively clean finger, although just wiping the fingertip on a tissue or garment should be enough to provide a usable scanning surface.
It might sound odd, but at no time does Touch ID record a photographic representation of your fingerprint. Instead, thousands of tiny sensors map the ridges and pits of your skin, and a mathematical algorithm creates an encrypted representation called a hash. This data is stored in a specially protected area of the main system-on-a-chip that forms the heart of every Apple device. In other words, it is literally impossible for a hacker to get an image of your fingerprint—it doesn’t exist.
Like all fingerprint ID systems, Touch ID is difficult to bypass, but not impossible. Hackers have a variety of methods of manufacturing fake fingerprints. Some do so using resins and glues, requiring just a high-resolution photograph of a fingerprint left on a glass surface. However, the expertise and effort involved in creating such a fake, as well as the difficulty of sourcing a fingerprint sample of sufficiently high quality, mean that bypassing Touch ID is unlikely to be an everyday occurrence. You can disable Touch ID under the General heading of the Settings app, in which case your device will revert to using passcodes for authorization and you’ll be required to enter your Apple ID password when making purchases.
Status Bar
Running along the top of the iPad and iPhone screen is a status bar that shows the type of connection the device is using or the modes to which it’s
2. https://www.google.com/enterprise/apps/business/
been set. The icons are identical on the iPad and iPhone. The following figure shows an annotated example.
Figure 4—The iOS 7 status-bar icons
See the following list for details of what each icon indicates (The Settings App,
on page 37 provides details of the technologies mentioned):
• Airplane mode: This status-bar symbol replaces the cellular information and indicates the iPad or iPhone is in airplane mode, in which cellular, Wi-Fi, and Bluetooth hardware inside the device are deactivated. See
Control Center, on page 34.
• Cellular strength: Indicates the strength of the cellular signal, ranging from one dot for a virtually nonexistent signal to five full dots for a strong signal. If there is no signal, “No service” will be shown.
• Cellular provider: This is the name of the cellular provider.
• Wi-Fi: Indicates the device is connected to a Wi-Fi base station. The three bars indicate the strength of the signal, ranging between one bar (weak) and three bars (strong).
– LTE: Indicates cellular communications are using Long-Term Evolution (LTE) speeds, which at present offer the fastest possible cellular data speeds. Use of LTE can be configured in the Settings app.
– 4G: Indicates 4G (High-Speed Packet Access; HSPA) cellular technol-ogy is being used for voice calls and data. HSPA is also sometimes referred to as 3.5G, 3.75G, or even 3.9G, depending on the technology utilized by the cellular carrier, and it offers significant speed benefits over the older 3G technology.
– 3G: Indicates 3G cellular technology is being used for voice calls and data, and data speeds will be fast, although not as fast as with LTE or 4G.
– E: Indicates Enhanced Data Rates for GSM Evolution (EDGE) is being used for voice calls and data. Data-transfer rates will likely be slow over cellular if EDGE is in use.
– GPRS: Indicates GPRS or 1xRTT (CDMA) technology is being used for voice calls and data. Data-transfer rates will likely be very slow over cellular if these technologies are being used—to the point of being unusable, especially if the cellular signal is weak. On some networks a circle symbol may be displayed instead.
• Call forwarding: This indicates that your iPhone is set to forward calls to another number. Note that this reflects only what’s been toggled in the Settings app, and not any call-forwarding setting configured independently using your cellular carrier.
• Activity: This rotating pinwheel pattern appears whenever the device is fetching data or, in some cases, working on a background task.
• iTunes sync: Indicates that the device is currently syncing with iTunes on a Mac or Windows PC.
• Personal Hotspot: Indicates the iPad or iPhone is connected to a Personal Hotspot provided by another iPad or iPhone. If the device itself is providing a Personal Hotspot for another computer or device, the icon will appear and the status bar will turn blue. An additional status bar will appear beneath, showing the number of devices connected.
• VPN: Indicates a virtual private network (VPN) connection is in use, by which secure connections can be made to Internet computers for the purposes of data transfer and logging into office networks.
• Do Not Disturb: Indicates Do Not Disturb mode is in use.
• Rotation lock: Indicates that the screen orientation has been locked to landscape or portrait mode.
• Alarm: Indicates that an alarm is set in the Clock app.
• Location Services (GPS): Indicates an app is using Location Services to discover the geographical location of the device.
• Bluetooth: When light-colored, indicates Bluetooth is activated; when dark, the iPad or iPhone is currently connected to a Bluetooth device, such as a headset or a keyboard.
• Battery: Gives a graphical representation of the battery strength. A light-ning bolt appearing alongside indicates the battery is being charged.
Charging Your iPad or iPhone
To charge your iPad or iPhone, use the included USB cable and attach it either to a charger outlet or the USB connection of a computer. Beware that charging via a computer may take a long time, particularly in the case of an iPad. Additionally, it’s unlikely either an iPhone or iPad will charge at all when connected to an unpowered USB hub (that is, a hub that lacks a power supply of its own).
If using third-party chargers, remember that to charge in a reasonable amount of time an iPad requires a USB charger outputting at least 10 watts (that is, 5 volts at greater than 2 amps). This is usually more than the output of chargers designed for phones or other handheld devices, such as music players.
Apps
Everything you might want to do with an iPad or iPhone is done via an app, whether that’s making a phone call, sending a message, or performing sophisticated tasks like working out a route using the Maps app.
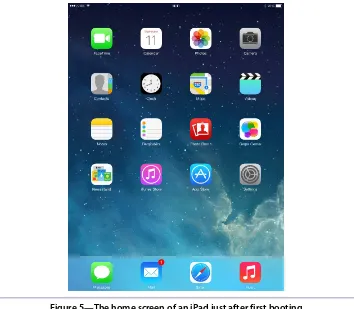
Home Screen
Figure 5—The home screen of an iPad just after first booting
All iPads and iPhones come with a complement of built-in apps, and you can download more to the device using the App Store app. Download and instal-lation happen automatically once you opt to purchase an app, at which point you’ll need to provide your Apple ID password (or Touch ID authentication) to verify your identity. Although some apps are free, Apple still considers downloading them to be a purchase, and you’ll still need to enter your pass-word (or provide Touch ID authentication).
Updates for apps are also provided via the App Store. A number set against the App Store’s home-screen icon indicates how many updates are available and you can view the list by opening the App Store and tapping the Updates icon at the bottom.
You can also view and buy apps via the App Store with iTunes on a Mac or Windows PC (click iTunes Store at the top right, then App Store on the top-middle tab bar). Apps will be copied to your iPad or iPhone the next time you sync via USB or Wi-Fi. Alternatively, you can activate automatic downloads
under the iTunes & App Store heading of the Settings app on the iPad or iPhone, which will automatically download and install apps regardless of where or how you buy them. This will take place in the background, even if the device is in sleep mode.
Apple ID
Your Apple ID is your identity card in the Apple universe. It’s significantly more than a request to register your personal details, as with other manufacturers. An Apple ID provides three things in particular:
• Identification: Your Apple ID tells Apple who you are, especially online, although often in real life too. You’ll need an Apple ID to book an appointment with a Genius at an Apple Store, for example, and to track subsequent repairs. Your purchase history and a list of devices you own are stored against your Apple ID, and this can help Apple Store staff identify loyal customers, who sometimes receive preferential treatment.
• iCloud: An Apple ID brings with it iCloud access (see iCloud, on page 26), although you only gain full iCloud access after one or more of your devices or Mac comput-ers has signed in using the Apple ID—something that usually happens during the first-time setup. However, this means you can’t create an Apple ID on a Windows PC without owning an Apple device, for example, then log into the iCloud website.a
• iTunes and App Store: In addition to providing name and address details, creating an Apple ID usually requires registering a payment card, which lets you use your Apple ID to log into the iTunes and App Stores to make purchases. Using a reg-istered payment card is the only way to make App Store/iTunes Store purchases other than using an iTunes gift card.b
Although Apple doesn’t recommend it, it’s possible to use two separate Apple IDs—one for payments, and one for iCloud use. Simply enter the iCloud address into the iCloud component of the Settings app (see The Settings App, on page 37), and enter the payment Apple ID when prompted in the iTunes and App Store apps. Notably, Apple offers no facility to merge two or more Apple IDs, so it’s best in most circumstances to use a single Apple ID.
It’s also possible to create an Apple ID without registering a payment card, which can be useful for iPads or iPhones owned by children. An Apple support document explains the steps,c which you can take (using the App Store or using iTunes on a Mac or Windows PC) once an iPad or iPhone is up and running. Apple IDs that don’t have a payment card registered can be used to download and install free apps.
a. https://icloud.com
b. https://www.apple.com/itunes/gifts/
Uninstalling Apps and Rearranging Apps and Folders
To remove an app from an iOS device, begin by tapping and holding its icon until all the home-screen icons begin to wobble. Then tap the X at the top left of the icon to uninstall the app and its data from your device (it will remain installed on other iOS devices you own). Note that built-in apps provided as part of iOS cannot be uninstalled.
Uninstalling an app doesn’t mean you no longer own it. You can reinstall an app at a later date by finding its entry in the Purchased list within the App Store (click the Purchased icon on an iPad, or the Updates icon on an iPhone) and tapping the cloud icon.
While the icons are wobbling you can also rearrange their order on your home screen by tapping and dragging them, and create folders by hovering one icon over another. Folders are deleted by removing all the icons inside them; to remove the icons in a folder you can either uninstall the apps or move them to a new location on the home screen.
You can also rearrange the icons on the Dock when the device is in this mode, and in the case of the iPad add icons to the Dock to join the four that are there by default. Up to six icons can be kept in the iPad’s Dock, and up to four on the iPhone’s.
Click the Home button when you’ve finished.
Multitasking and Switching Apps
You can view which apps are open by double-clicking the Home button, which will show the multitasking screen. Figure 6, Opening the multitasking apps list on an iPhone, on page 15 shows an example taken from an iPad. You can switch to an app by tapping its icon or window preview.
Swipe left or right to see other running apps—there are likely quite a few, and you can switch to any by tapping its icon or the window preview above it. You can quit apps by flicking the preview of the app window toward the top of the screen. Note that, unlike applications on a Mac or Windows PC, there’s usu-ally no need to manuusu-ally quit apps in iOS. Whenever you return to the home screen or a new app is launched, all other apps are moved to the background so that they consume negligible system sources. In theory, you could open every app installed on an iOS device without any impact on overall system performance.
However, iOS includes limited multitasking support; some apps can continue certain functions when you switch away from them. Some apps can continue
Figure 6—Opening the multitasking apps list on an iPhone
to receive data, for example, so that they’re up to date the instant you switch back to them. The Clock app will continue any stopwatch or countdown that you’ve started, and music will continue to play when you switch away from the Music app. However, most apps will simply pause when you switch away from them—quite literally in the case of the Video app or games, where switching away effectively presses the pause button.
App Rules
Rules govern how apps can be bought and used.
Purchasing
A key feature of Apple’s App Store system is that an app purchase includes a license to install it on all iOS devices that you own and that are logged in with the same Apple ID (in a home environment; corporate and academic users managing a range of iOS devices require individual licenses).3
Purchase the popular Angry Birds game, for example, and you can install it on any iPhones, iPads, or iPod Touches that you own and on which you’re logged into the App Store with your Apple ID. This rule applies to music and movies you purchase via iTunes, too.