Drupal 6 Performance Tips
Learn how to maximize and optimize your Drupal
framework using Drupal 6 best practice performance
solutions and tools
Trevor James
TJ Holowaychuk
BIRMINGHAM - MUMBAI
Drupal 6 Performance Tips
Copyright © 2010 Packt Publishing
All rights reserved. No part of this book may be reproduced, stored in a retrieval system, or transmitted in any form or by any means, without the prior written permission of the publisher, except in the case of brief quotations embedded in critical articles or reviews.
Every effort has been made in the preparation of this book to ensure the accuracy of the information presented. However, the information contained in this book is sold without warranty, either express or implied. Neither the authors, Packt Publishing, nor its dealers or distributors will be held liable for any damages caused or alleged to be caused directly or indirectly by this book.
Packt Publishing has endeavored to provide trademark information about all the companies and products mentioned in this book by the appropriate use of capitals. However, Packt Publishing cannot guarantee the accuracy of this information.
First published: February 2010
Production Reference: 1080210
Published by Packt Publishing Ltd. 32 Lincoln Road
Olton
Birmingham, B27 6PA, UK.
ISBN 978-1-847195-84-5
www.packtpub.com
Credits
About the Authors
Trevor James
is a Drupal developer and web designer based in Middletown, MD, USA. Trevor has been designing websites for 13 years using a combination of HTML, XHTML, CSS, and ColdFusion, and has been using Drupal intensively for more than 2 years. Trevor's focus is on building web portals for higher education, public education (K-12), non-profit and small business environments. He is interested in the best methods of developing Drupal themes, Drupal site performance, and using CCK, Views, and Panels to develop frontend interfaces to support data intensive websites. He loves teaching people about Drupal and how to use this excellent open source content management framework.Trevor has designed and developed websites for many non-profit, education-based, and small business organizations. He is currently working on a number of
Drupal-related projects.
A huge thank you to my wife, Veronica, and our two beautiful twin girls, Francesca and Clare, for their love and support while I was writing this book.
Thanks to my father-in-law, Tony Gornik, for offering his residence in Hershey, PA, as writing space on weekends. The quiet and slower pace of Hershey helped inspire the writing of these chapters. Many thanks to the Hershey Fire Company crew for giving me and my twin daughters tours of the big trucks during the much-needed writing breaks.
Many thanks to the entire Packt editorial and project team for inviting me to work on this project and for continuing to publish excellent titles on Drupal and open source applications. More thanks to Steven Wilding, Packt Acquisition Editor; Joel Goveya, Project Coordinator; Akash Johari, Technical Editor; Lata Basantani, Projects Team Leader; and Patricia Weir, for keeping the project on track and for guiding me in the construction of this title. I look forward to working with you all again in the near future.
TJ Holowaychuk
, the president of http://vision-media.ca, is a self-taught web development guru whose skills range from high performance programming in C to agile and elegant solutions written in Ruby or PHP. He has contributed to and started over 50 open source projects including Drupal, JSpec, Evolution CMS, and jQuery. With such a large array of skills, TJ provides a unique perspective with all challenges regarding performance, design, or development.About the Reviewers
Daniel Hanold
is a software developer and business consultant based in New York City. After graduating from Stuttgart Media University with degrees in IT and Economics, he co-founded PeoplesMD, an online patient education resource. He began his love affair with Drupal shortly afterwards.Equipped with his background in PHP and MySQL, Daniel creates applications ranging from brochure websites for high-profile clients to social networks for non-profit organizations. Daniel is an expert in combining CSS, JavaScript, and jQuery to make user interactions with any application as simple, elegant, and efficient as possible.
Currently, Daniel focuses on large scale community websites and performance optimization using technologies such as Apache Solr and Memcached. His personal blog can be found at http://danielhanold.com.
Joeri Poesen
is a longtime Drupal user, developer, and trainer. He loves nothing more than scouring the planet, learning how open source tools such as Drupal empower individuals and organizations, and how he can contribute to their adoption.When not traveling or organizing community events, Joeri is probably giving a Drupal training session somewhere in Europe—most likely in Paris, France.
This book is dedicated to my parents, Michael and Judy James, who taught me the value of hard work and dedication to the task at hand.
—Trevor James
Table of Contents
Preface
1
Chapter 1: Upgrading Drupal
7
Upgrading Drupal 5.x core 8
Backing up your site and database 10 Taking your site offline 12 Running Status report 13
Upgrading to 5.19 15
Installing the Update Status module 16 Installing contributed module updates 19 Uninstalling and removing Update Status 20 Running cron and checking recent log entries 21 Dealing with contributed modules during upgrades 22
Backing up and exporting your Drupal 5.x Views 23
Reviewing your Panels code 26
Final prep for upgrading to 6.13 27
Disabling all contributed modules 28 Enabling the Garland theme site-wide 29
Downloading Drupal 6.13 29
Upgrading Drupal core 30
Running update.php 33
Upgrading contributed modules 38 Updating your PHP memory limit 41
Installing the updated Zen theme files 44
Upgrading your custom theme 44 Cleaning up and resetting Views 47 Placing your site back online 49
Summary 50
Chapter 2: Maintaining your Drupal Site
51
Checking your Drupal configuration status 52
Checking your PHP and MySQL settings 55
Files to delete and clean up 57
Enabling the Update Status module 57
Disabling unused modules and themes 58
Introduction to Drupal caching 59
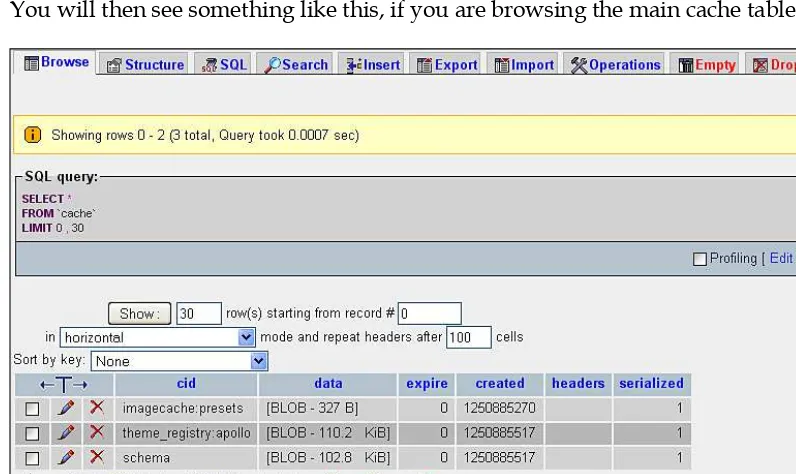
Enabling and configuring Drupal caching 61 Cache tables in your MySQL database 65 Clearing your performance cache 67 Clearing your theme registry 68
Running cron manually 69
Installing the Poormanscron module 70 Setting up cron through cPanel 73
Backing up your site using SFTP/FTP and cPanel 74
Backing up your database through phpMyAdmin 77
Tweaking your HTACCESS file 78
Summary 80
Chapter 3: Using Development Modules and Tools
81
Viewing and inspecting recent log entries 82
Viewing your recent log entries 82 Logging and alerts configuration 84 Page not found and access denied errors 84
The Devel module 86
Installing and enabling Devel 87 Checking Devel module permissions 88 Enabling Themer info 89
Devel settings 92
Inspecting database queries and Devel results 95 Enabling the Devel module block 98 Using the Devel module block 100
[ iii ]
Theme registry 106
Variable editor 106
Summary 108
Chapter 4: Performance Optimization
109
Enabling and configuring the Throttle module 110
Configuring the Throttle module for auto throttling features 111 Throttling your modules 113
Throttling blocks 114
Generating test users, categories, and content 115
Views caching 120
Clearing your Views 2 module cache 124
Using Panels caching 127
Creating a panel and adding content to it 127
Summary 129
Chapter 5: Using DB Maintenance and Boost
131
Using the DB Maintenance module 132
Using the Boost module 135
Installing and configuring Boost 136
Boost settings 137
Boost File Cache settings 138
Boost cacheability settings 139
Boost directories and file extensions 140
HTACCESS file tweaks 142
Testing your Boost configuration 145 Boost and Poormanscron 147 Configuring Poormanscron 148 Clearing the Boost cache 148 Boost admin and stats blocks 148
Boost: Pages cache status block 149
Boost: Pages cache configuration block 150
Summary of Boost's basic configuration 151
Summary 152
Chapter 6: Advanced Boost
153
Updating contributed modules 154
Recommended modules that work with Boost 154
Global Redirect 155
Transliteration and Pathauto 156
Advanced Boost settings 157
Boost advanced settings 158
Testing your Database timestamp settings 162
Boost crawler settings 167
Summary 168
Chapter 7: Using Memcache API and Integration
169
Using the Memcache API and Integration module 170
MoWeS Portable development WAMP server 171 Installing Memcached libraries and service 172 Integrating and testing Memcached with PHP 5.2.x 173 Installing the Memcache API and Integration module 175 Enabling the Memcache Admin module 177
Memcache status 178
Memcache statistics per page 179
Viewing the Memcache tables in MySQL 181 Running Memcache without saving cache data to your database 181
Summary 182
Chapter 8: Advanced Caching and Contributed Modules
for Caching
183
Cache Router 184
Cache Router versus Memcache API 185
Authenticated User Page Caching (Authcache) 186
Tweaking your settings.php file to support Authcache 187 Configuring the Authcache module 188
Page Caching Settings 190
Testing the Authcache module and its caching mechanism 192
Checking the AuthcacheFooter code 192
Checking the Authcache Debug window 192
Advanced cache 193
APC (Alternative PHP cache) 197
File Cache module 197
[ v ]
Chapter 9: Multisite Configuration and Performance
199
Using Drupal multisite 200
Configuring multisite in a localhost environment 201
Creating the multisite folders 202
Setting up databases for your multisite 202
Tweaking settings.php for each site 205
Editing your Apache configuration 206
Tweaking the hosts driver file on Windows 208
Tweaking the Base URL 209
Loading your multisites 209
Testing your multisite configuration 209
Using core and contributed modules in multisite 210 Installing modules and themes to a multisite 211
Setting themes per multisite 211
Caching and multisite 212
Enabling page caching and CSS/JS optimization per site 212
Multisite resources 213
Summary 214
Index
215
Preface
The Drupal content management framework allows us to get a website up and running quickly, and proves that a multi-layer website and application environment doesn't need to be complex to set up and configure. The next step after we get our site installed, themed, and populated with content, is to monitor our site's performance. We, as users of the site and developers of the site's architecture and backend, want our site to run smoothly and quickly. We want our page loads to be super quick and our backend administration to run lightning fast. How do we optimize our large Drupal-powered, database-driven, content-heavy website with performance and speed in mind? This book will show you the steps to enable the performance 'boost' on your Drupal site.
We will discuss all aspects of Drupal performance from simple optimization and site maintenance to the larger and more complex issues of anonymous and authenticated site caching. We'll look at some basic core Drupal modules that help to govern and control performance on our site, and also look in detail at more advanced contributed module options, such as the Development, Boost, Authcache, Advanced Cache, and Cache Router modules.
With speed in mind, both for our anonymous site visitors and our logged in users, we're going to take a close look at how to optimize our Drupal site for higher performance. This book is an introduction to this complex and large subject, and we hope that it serves as a stepping stone for both novice and advanced Drupal users and developers.
What this book covers
Chapter 1, Upgrading Drupal, focuses on preparing a Drupal environment for running a high performance Drupal website. We will discuss upgrading Drupal 5.x to Drupal 6.x, creating backups of our site files and databases, running the Drupal Status report, upgrading contributed modules to their latest 6.x versions, and running update.php. We will also tweak our PHP settings using the Drupal settings.php file.
Chapter 2, Maintaining your Drupal Site, covers the basics of maintaining your Drupal website including inspecting your Drupal configuration file, checking your MySQL and PHP configurations, enabling and using the Drupal Update Status module, disabling and uninstalling contributed modules, and clearing the Drupal performance cache and theme registry. We'll also look at running cron jobs, tweaking our php.ini file, and tweaking our .htaccess file.
Chapter 3, Using Development Modules and Tools, focuses on using Drupal
development modules and tools such as the Development module. We will look in detail at the Development module's functionality and use it to monitor performance on our site.
Chapter 4, Performance Optimization, focuses on Drupal performance optimization, including throttling modules and blocks through the Development module to generate dummy taxonomy, and content for our site using Views 2.x, and clearing our Views cache.
Chapter 5, Using DB Maintenance and Boost, focuses on using the DB Maintenance and the Boost modules. We'll look in detail at a basic configuration of the Boost module to enhance performance for our anonymous site users.
Chapter 6, Advanced Boost, focuses on using the Boost module to do advanced performance functionality. We'll look at using the Boost module along with Global Redirect and Transliteration, configuring advanced Boost module caching, configuring Boost crawler, and how to check and tweak our Boost .htaccess settings.
Chapter 7, Using Memcache API and Integration, focuses on using the Memcache API and Integration module. We will install a development WAMP environment using MoWeS Portable in this chapter as well as install the Memcached binary libraries, integrate and configure Memcached to work with PHP, and test the module on our development site.
[ 3 ]
Chapter 9, Multisite Configuration and Performance, focuses on Drupal multisite configuration and performance. We will create multisite folders and configure our Drupal settings.php for multisite. We will tweak our httpd.conf file to support multisite, and use caching in a multisite environment.
What you need for this book
To follow along with the examples in this book, you will need a computer which can run MySQL, PHP, and the Apache web server, which are all prerequisites for Drupal. Luckily, every major operating system can run these applications. You may want to create an account with a website hosting company to test your work although you can also use a regular desktop or a laptop computer.
You will also need the Drupal Content Management framework, which is available from drupal.org. We will discuss downloading and installing Drupal in Chapter 1.
Who this book is for
This book is for Drupal website users and developers who want to boost and tweak performance on their website using Drupal's core and contributed performance module functionality.
You are expected to know about the basic operation of Drupal, be familiar with the concept of site configuration, and know how core and contributed modules are installed and work in Drupal. No experience with programming Drupal is required. The author will teach you how to implement specific code and patches that work with specific performance modules. Almost everything in the book will be focused on the module visual interface, and how to use this interface to configure and implement the performance module.
This book also covers upgrading Drupal, running Drupal security patches, creating backups of your Drupal site, and other basic Drupal site maintenance that will be helpful to the novice Drupal user and developer. Modules are covered in both their basic and advanced configurations; so both novice and advanced developer will learn how best to implement performance practices on their Drupal site with this step-by-step guide.
Performance is a large discussion within, and presents a large terrain to cover throughout, the Drupal community, but this book does not claim to cover every performance and site optimization issue. The authors have done their best to cover the majority of performance-based tips and tricks to run your Drupal site. They hope that the book will enhance the discussion of Drupal performance, and pave the way for more books and tutorials to be released on Drupal performance topics.
Conventions
In this book, you will find a number of styles of text that distinguish between different kinds of information. Here are some examples of these styles and an explanation of their meaning.
Code words in text are shown as follows: "Update the $conf in your settings.php file."
A block of code is set as follows:
<?php
$conf = array(
// The path to wherever memcache.inc is. The easiest is to simply point it
// to the copy in your module's directory.
// 'cache_inc' => './sites/all/modules/memcache/memcache.inc', // or
'cache_inc' => './sites/all/modules/memcache/memcache.db.inc', );
?>
New terms and important words are introduced in a bold-type font. Words that you see on the screen, in menus or dialog boxes, for example, appear in our text like this: "Once enabled, you can browse to this module's admin interface by going to Reports | Memcache status via your administrative menu."
Warnings or important notes appear in a box like this.
Reader feedback
Feedback from our readers is always welcome. Let us know what you think about this book, what you liked or may have disliked. Reader feedback is important for us to develop titles that you really get the most out of.
To send us general feedback, simply drop an e-mail to [email protected], making sure to mention the book title in the subject of your message.
If there is a book that you need and would like to see us publish, please send us a note in the SUGGEST A TITLE form on www.packtpub.com or e-mail [email protected].
[ 5 ]
Customer support
Now that you are the proud owner of a Packt book, we have a number of things to help you to get the most from your purchase.
Downloading the example code for the book
Visit http://www.packtpub.com/files/code/5845_CODE.zip to directly download the example code.
The downloadable files contain instructions on how to use them.
Errata
Although we have taken every care to ensure the accuracy of our contents, mistakes do happen. If you find a mistake in one of our books—maybe a mistake in the text or the code—we would be grateful if you would report this to us. By doing this you can save other readers from frustration, and help to improve subsequent versions of this book. If you find any errata, report them by visiting http://www.packtpub. com/support, selecting your book, clicking on the let us know link, and entering the details of your errata. Once your errata are verified, your submission will be accepted and the errata are added to the list of existing errata. The existing errata can be viewed by selecting your title from http://www.packtpub.com/support.
Piracy
Piracy of copyright material on the Internet is an ongoing problem across all media. At Packt, we take the protection of our copyright and licenses very seriously. If you come across any illegal copies of our works in any form on the Internet, please provide the location address or website name immediately so we can pursue a remedy.
Please contact us at [email protected] with a link to the suspected pirated material.
We appreciate your help in protecting our authors, and our ability to bring you valuable content.
Questions
You can contact us at [email protected] if you are having a problem with some aspect of the book, and we will do our best to address it.
Upgrading Drupal
To run a high performance and secure Drupal website, you should keep your Drupal core code and your contributed Drupal module code patched and upgraded regularly. The Drupal project frequently releases updated security patches to its core code and it should be a standard maintenance workflow for you as a Drupal developer to keep your site patched to the latest core Drupal release. This will prevent security issues on your site (most of these patch releases are security upgrades) and it will help to improve your site's performance, as these patch releases fix minor and major issues reported from Drupal's bug tracking tools. Many performance issues and security issues with the Drupal code are fixed on a weekly to monthly basis by Drupal developers working with the Drupal project.
Besides security patches, Drupal releases major upgrades every 1-2 years. The most recent major upgrade was from Drupal 5.x to Drupal 6.x. Plans are underway now for the next major release, Drupal 7.x. It's good practice to begin the process of upgrading your Drupal 5.x site to Drupal 6.x as soon as possible, so you'll be in a better position to eventually upgrade and use Drupal 7.x. Major Drupal releases often solve performance issues reported over months and years by Drupal developers using Drupal sites. It's to your benefit and your site's future growth to upgrade soon after a major release appears.
All security patches and major Drupal upgrade releases are listed at the top of the home page at http://drupal.org/ and each release provides background information on why the release has occurred.
In this chapter, you will learn how to maintain your Drupal site by doing the following:
Upgrading your Drupal 5.x core to the latest 5.x version, and upgrading your Drupal 5.x contributed modules to the latest 5.x versions
Backing up your entire Drupal site and database Running Status report
Taking your Drupal site offline for maintenance Upgrading your Drupal 5.x site to Drupal 6.x
Upgrading your contributed modules to the latest 6.x versions Running update.php
Placing your new Drupal 6.x site back online
Learning these steps will allow you as a Drupal webmaster and developer to easily maintain your Drupal site and to troubleshoot performance issues with client websites. You will learn that immediately checking which version of Drupal and contributed modules the site is running can tell you a lot about the performance of the site.
There is a wealth of information about the upgrade process along with upgrade tutorials on drupal.org at the following URLs/pages:
Upgrading from previous versions: http://drupal.org/upgrade/ Upgrading from Drupal 5.x to Drupal 6.x: http://drupal.org/ videocasts/upgrading-to-6
Upgrading Drupal 5.x core
[ 9 ] Here is our 5.x upgrade plan:
We're going to upgrade a site running Drupal 5.18 in preparation for a full version upgrade to Drupal 6.x. The first thing we're going to do is to upgrade this site to Drupal 5.19. We're also going to upgrade all of our contributed modules to the latest 5.x versions of those modules. This is important to do before an upgrade to 6.x—if all of your modules and core code are the latest version of 5.x, it will make the upgrade process run more smoothly and leave less room for parse errors, white screens, and other upgrade issues.
Drupal.org notes the importance of upgrading to the latest minor version of your current Drupal version before starting an upgrade to a next major version release. So, in our case we need to upgrade to the latest version of Drupal 5.x (at the time of this writing, it is Drupal 5.19) before running an upgrade to Drupal 6.13. See the Drupal.org upgrade tutorial and articles at: http://drupal.org/upgrade/.
It may seem as though this workflow takes more time, but in the end your
upgrade process will run more smoothly and with fewer problems.
The site we're upgrading is running Drupal 5.18. The theme is a custom version of the Zen StarterKit theme. The contributed modules on this site include CCK, Devel, Imagecache, Imagefield, FCK, Panels, Webform, jQuery, Views 1, and Lightbox. One of the main sections of the site includes an image gallery using Views and the Lightbox module to display photos of fire trucks. The Panels module is used to create a home page for the site displaying one blog post and the Lightbox-powered photo gallery.
Backing up your site and database
Before beginning, run a full backup of both your Drupal directory and your Drupal database(s). If you run a backup, you can be confident that if an issue arises during the upgrade process causing possible corruption of your database, you can easily restore your site with your backup. The rule is to always run backups before performing any upgrades, even minor security patches.
If you are on a shared hosting server environment, you may have access to your site's directory and files through FTP/SFTP or a cPanel type of file manager utility (cPanel and Plesk being two of the common utilities). You can either use file transfer protocol (FTP) to download your directory to your local desktop or use a backup application that your host provides through your cPanel tool.
To backup your database, you can use a tool such as phpMyAdmin—this will allow you to connect to your MySQL database and export your full database to your local desktop (as a SQL file). Here are the steps to back up your site:
1. FTP/SFTP into your server and copy all of your Drupal files or directories to your local desktop.
[ 11 ]
2. Access your phpMyAdmintool in your web browser (if your host provides access) and run an export of your Drupal database. Save the export file as a SQL (.sql) file in the same backup directory as your Drupal files.
3. If you are running your Drupal site locally (via localhost) or you have remote access to the actual server, you can simply copy the entire Drupal site folder and paste the folder into a backup folder on your server desktop or computer desktop. Then you can zip the backup or archive and save it until you know you have successfully completed the upgrade process. Before copying the entire Drupal site folder, you may want to check to make sure you can see all the files in your site folder. Occasionally, the operating system will hide files, for example your .htaccess file, so it's a good idea to show these files before backing up to make sure you are also backing up your.htaccess and any other hidden file.
Now you have a full backup of your Drupal site files and your database. You're ready to proceed with upgrading your site to 5.19.
Taking your site offline
The next step is to take your site offline for maintenance. It's good practice to always take your Drupal site offline during the upgrade process to prevent any public site visitor from accessing your site and viewing error messages that may appear during the upgrade. Your authenticated users with administrative level permissions will still be able to login to the site while it's offline. Good practice states that you should advise your authenticated user base that you will be performing site maintenance, so they avoid logging in during the process.
First login to your site asyour site as site as user/1 (the super user admin) and then:
1. Click on the on the Administer link in your main navigation menu. in your main navigation menu.
2. Click on the Site Maintenance link (in the Site configuration section of your admin screen).
3. Select the Off-line radio button.
4. Type in a Site offline message that your general public site visitors will see message that your general public site visitors will seemessage that your general public site visitors will see when they try launching your site while it's offline. You can add full HTML and images to this message.
[ 13 ]
Running Status report
You will be running the Status report often during the upgrade process to check on the status of your Drupal site. The Status report will tell you if you have any issues in your site that need to be resolved before trying an upgrade. To have upgrades run as smoothly as possible, it's good practice to run Status report and make sure the majority of your report is checked green telling you the site is operating smoothly. This will cut down on the amount of parse errors you get during the upgrade process as well as removing other upgrade problems. Let's go ahead and run it now to get a quick update on the site we'll be upgrading. The Status report tells us how our Drupal site is currently running and performing.
1. Go to your Drupal Logs' admin section and click on Status report (Administer | Logs | Status report)
2. Review the current status of your site. Notice that our site is running Drupal 5.18. This tells us immediately that we need to upgrade to Drupal 5.19 before doing a full upgrade to 6.x.
3. Notice that our PHP memory_limit is set too low for performance purposes. We're getting a flag with our imagecache settings due to the 32M limit we have set currently. Once we complete the upgrade process, we'll want to return to this issue and raise our memory_limit. This is something we will cover in Chapter 2.
4. Run cron manually to flush the Status report and re-index our site. This also will allow you to check to see if any other red flags show up.
[ 15 ]
Upgrading to 5.19
Let's go ahead and start the 5.19 upgrade. Here are the steps:
1. Download and extract the 5.19 tar.gz (from(from http://drupal.org/) to your local desktop. This will create a folder titled drupal-5.19.
2. Connect to your server through FTP/SFTP. Open up your local FTP window to show the Drupal 5.19 folder. Make sure your remote window shows your current Drupal site.
3. Select and move the following folders: includes, misc, modules, profiles, scripts, themes). Also, move over all of the root level files (cron.php, index.php, and so on). You do not need to move over the /sites folder as this has your customized settings.php file. You do not want to replace that file, so just ignore that folder. You do not want to replace your .htaccess file or your robots.txt file either, as those may also have customized code. The rest of the folders and files will only replace the core Drupal files and folders, updating their code with the latest version. You do not need to replace the /files folder either.
4. Start the transfer.
5. As soon as the files have transferred over through FTP, refresh your site's Status report. You should now see Drupal 5.19 listed.
6. Run cron manually again to see if you receive any new flag messages or errors. At this point Drupal will tell you that you need to update your database schema by running update.php. This is a crucial step during any Drupal upgrade process, as it updates your entire Drupal database schema. For minor version upgrades, you usually do not need to run update.php, but if in doubt, run your Status report and this will tell you whether you need to update your database schema.
7. If you are using the jQuery Update module in Drupal 5.x, you may receive a message in your Status report telling you to copy the jQuery.js script file to the correct location. The upgrade process places this script into the /misc folder and will overwrite your previous jQuery.js file. You will need to follow the instructions that Drupal gives you in your Status report and copy the file from sites/all/modules/jquery_update/misc/jquery.js.
8. Run cron once more to check Status report. You should now have a fully upgraded core Drupal 5.19 site.
Installing the Update Status module
[ 17 ]
1. Go directly here: http://drupal.org/project/update_status and download the 5.x-2.3 version.
2. Extract the tar.gz file to your desktop and then copy the update_status folder into your /sites/all/modules folder using FTP.folder using FTP.
3. Enable the module in your modules admin at Administer | Site building | Modules. Save your module configuration.
4. Go back to your Status report. You should see a red-flagged box notifying you that your modules need updating. The Module update status box will state: Not secure!
5. Click on the available updates link to see what contributed modules in your site need updating.
6. The Available Updates page will load and all modules needing updates will be flagged in red with the recommended version listed. The module provides a link to the module's project page at http://drupal.org/, so you can easily download the most recent version to your desktop.
[ 19 ]
Installing contributed module updates
Remember that you need to update your contributed modules to the latest 5.x released versions before attempting to upgrade your Drupal site to 6.x. Before upgrading the 5.x versions of contributed modules, it's a good idea to back up your site files and database once more now that you're at the core Drupal 5.19 release.
1. Download the latest stable release of the Imagefield, Lightbox2, and Webform modules. The Project pages are here:
http://drupal.org/project/imagefield
http://drupal.org/project/lightbox2 http://drupal.org/project/webform
2. Copy the extracted folders to your /sites/all/modules folder to replace current versions. Be aware here that you will be overwriting your contributed module code. So if you have made any hacks or edits to contributed code, you will need to replace those files later aftercontributed code, you will need to replace those files later after, you will need to replace those files later after you've upgraded.
Remember that the golden rule followed by the Drupal project and community is donot hack core. This is also a good rule to follow with your contributed modules. If you have to manipulate module code, do this by using proper Drupal theme and module overrides in your template.php file. 3. Once you have replaced your Imagefield, Lightbox2, and Webform
modules, refresh your available updates page.
4. Notice that in our FTP screenshot there's a bunch of tar.gz folders residing in our /sites/all/modules directory. Sometimes you'll find these zippeddirectory. Sometimes you'll find these zipped folders remaining in your modules directory. They are just taking up unnecessary space. You can delete them safely from your /sites/all/ modules directory.
5. Once you copy over your new versions, your available updates page should be green next to each module.
6. Run your Status report again—this is important because Drupal will then let you know if you need to run update.php. Very often with contributed module upgrades and updates, you need to update your database schema. It's recommended to run update.php after every contributed module upgrade.
• • •
7. In this case, after running Status report we do not need to update our database schema. The three modules we updated did not make any database level changes. So, we're good to go with our Drupal 5.19 upgrade. The update/upgrade process is now complete and we're ready to move onto the Drupal 6.x upgrade procedure.
Uninstalling and removing Update Status
Before proceeding with the full version upgrade to Drupal 6.x, we must uninstall and remove the Drupal Update Status module. This module comes packaged with Drupal 6.x core, so we cannot leave the 5.x version of the Update status module in place.
1. Go to your modules admin page (Administer | Site Building | Modules). 2. Uncheck the Update status module checkbox and save the module
configuration. This will disable the module.
3. Click on the Uninstall tab at the top of your modules page. This will load the uninstall list and any modules available (disabled modules) for uninstalling. 4. Check the Update status module box.
5. Click on the Uninstall button.
6. Drupal will ask you to confirm that you want to uninstall the module. Click on Uninstall again.
[ 21 ]
8. If you revisit your module admin list, you'll notice that the Update status module is still listed, but is not checked/enabled. You need to also delete the entire file folder for this module from your /sites/all/modules directory before proceeding with the upgrade. If any files are lingering on the server for this module, you could generate errors during the upgrade process. 9. FTP into your server and remove the update_status folder from
/sites/all/modules.
10. Refresh your modules admin list and the Update_status module table row should be deleted.
Running cron and checking recent log entries
Before proceeding with the upgrade to Drupal 6.x, complete the following steps:
1. Run cron again here: /admin/logs/status.
2. View recent log entries to make sure you're not getting any parse errors or other errors in your current Drupal 5.19 site. It's a good idea to check and try to get as few errors as possible in your recent log reports before upgrading to Drupal 6.x. This will make the process go smoother.
3. To check recent log entries, go to Administer | Logs | Recent log entries. Your report or table should list all blue links and successful tasks. If you notice any red errors, make a note of them to troubleshoot before going forward. You should see something similar to the following screenshot (notice that no errors are visible):
Dealing with contributed modules during
upgrades
[ 23 ]
While viewing a module's project page at drupal.org, look for the release versions in the Releases table at the bottom of the project page. For example, for the Views module you will see this:
Official releases with a green background and blue hyperlinks mean that the release is stable and ported for that version of Drupal. So, Views has a valid and stable 6.x release according to the project page. You will also see many development versions (snapshots) of the release. Use stable versions as much as possible. Development versions should not be run on production web servers.
Backing up and exporting your Drupal
5.x Views
Drupal 5.x uses Views version 1.x. Our site is currently using the last version of Views for Drupal 5.x (Views5.x-1.6). The Views module is notoriously difficult to upgrade to the latest version of Views2 for Drupal 6.x. You will want to make sure you export all of your View code from the Drupal 5.x version, and keep it in backup notepad files in case you need this code to rebuild your Views in Views2 in the event you receive errors during the upgrade process. This is a good practice before upgrading the Views module.
On our site we have two custom Views built, both to control photo galleries on the site. We have a general Photo Gallery view using the Lightbox2 module plugin, and we have a new View that the developer of the site is working on to integrate some jQuery code for the display of the images. This view is not completed and enabled yet, but it's a good idea to export the code to have a backup if necessary.
This is also a great time in the upgrade process to see if you have Views in your site that you no longer need and can delete. Cleaning house is good practice before an upgrade to 6.x. You can export the View code for your disabled Views and keep a backup of that exported code. Then, you can delete those Views and not have to worry about converting them in the upgrade to 6.x.
Default Drupal Views that come packaged in the Drupal Views module should convert and translate without issues to Views2, but if in doubt it's a good idea to export these Views as well.
For more on the Views module visit: http://drupal.org/project/views. For Views2 documentation, you'll need to install the Advanced Help module (we'll do this after we upgrade to Drupal 6.x.).
[ 25 ]
2. This will launch a screen that contains all of your View's export code. Right-click on the code window and select all, or copy all of the code using your mouse to select it.
3. Paste the exported code into WordPad or Notepad and save the file with the following naming convention—use the name of your View_code.txt. So, for our example we'll name the file photo_gallery.txt. This can be a text file, as you'll be copying and pasting the code directly from this file back into Drupal later in the 6.x version, if you need it while using the Views Import Code utility.
4. Do the same process for your other Views if you have multiple Views. 5. You now have export backups for all your View code.
Reviewing your Panels code
The other module that tends to give developers a difficult time during the upgrade time during the upgradetime during the upgrade process is Panels. We'll be upgrading from Panels5.x-1.2 to the latest stable version for Drupal 6.x, Panels3 (6.x-3.0-rc1). Upgrading to and installing Panels 3 will also require us to add another dependent module called CTools. You can learn more about Panels3 and CTools here: http://drupal.org/project/panels.
It's a good idea to make notes about your panel configuration—the type of panel you created originally in Drupal 5.x, the content you added to the Panel, and any other detailed configuration you may have added, including CSS styles, and so on. You may need this information to rebuild your Panels in Drupal 6.x if you run into issues or errors.
[ 27 ]
In our panel we do not have any CSS specified. The panel is a two column stacked panel. We do have two pieces of content loaded into our panel layout. Our top pane has a node and a View loaded. The node is one Drupal page and the View is our photo_gallery View. Our other panes are empty. We'll make a note of this layout arrangement in a WordPad document and save it to our desktop for reference later.
Final prep for upgrading to 6.13
Here's a final prep checklist before we start the 6.13 upgrade:1. Run cron manually a final time before the upgrade.
2. Check your recent log entries one final time at Administer | Logs | Recent log entries before upgrading..
3. Make a list of all of your contributed modules so that you have a module checklist to work from during the upgrade process. Here is our list of contributed modules for the site that we'll need to update once we upgrade Drupal core:
It's also good practice to print out the list of your modules before doing the upgrade, so that you have the printout as a reference to fall back on when you're downloading your 6.x versions.
Disabling all contributed modules
Access your Modules list and uncheck all contributed modules to disable them in advance of the upgrade. You do not need to uninstall any of the modules (apart from the Drupal Update Status module that we already removed), but it's a good idea to disable all contributed modules.
Save your module configuration once you have disabled all the contributed modules.
[ 29 ]
Enabling the Garland theme site-wide
Before upgrading it's a good idea to disable your custom theme (in this case we are using a sub-theme of Zen called 'Apollo'). Enable the Garland default Drupal theme (the one you're currently using on the admin portions of the site) for your entire site during the upgrade process. We're going to be deleting the entire Zen theme in order to upgrade it to the 6.x version of Zen, so let's disable it first.
1. Go to the Administer | Site building | Themes admin list and disable the Apollo theme.
2. Check the Default radio button next to the Garland theme to make it your default system theme for the upgrade process.
3. Save configuration.
Downloading Drupal 6.13
Download the latest stable release of Drupal (for this book it's 6.13) from the drupal.org home page.
1. Click on Download Drupal 6.13 and then save the tar.gz file to your local desktop.
2. Extract tar.gz to your desktop. This will create a drupal-6.13 folder.
Upgrading Drupal core
We're going to upgrade the Drupal core code first. Here are the steps:
1. Login to your server through FTP/SFTP.
2. You should have your local drupal-6.13 folder on your local FTP side (left side) and your Drupal site on your right side in the FTP window. 3. Open up /sites/all/modules and delete your entire contributed module
list—you can safely delete all the contributed module code as you'll be adding the new Drupal 6.x versions during the upgrade process. It's a good idea to remove the legacy module folders first.
[ 31 ]
5. Delete all of your core Drupal files taking care not to delete the /sites or / files folders. Do not delete your .htaccess, robots.txt files, or any other files you may have added custom code to either. This includes php.ini. These files can remain in your Drupal directory.
[ 33 ]
7. Refresh your Drupal site (on whatever admin page you are currently on). If you receive immediate parse errors or a white screen (the infamous white screen of death, though it's really nothing to be afraid of), make sure to carry out the following steps and run your update.php to update the database schema. You should see a screen with a bunch of parse errors at this point:
Running update.php
Immediately after moving your new Drupal 6.x core files over to your server and refreshing your site page, you'll see a bunch of parse errors. Don't panic! Follow these steps to run your update.php script in order to update your Drupal database schema, so it updates to the latest Drupal 6.x configuration:
1. Type in update.php at the root level of your site URL. So, for this site we'll have the following URL to run our script: http://variantcube.com/fire/ update.php
2. Click the Return button on your keyboard to load theReturn button on your keyboard to load thebutton on your keyboard to load the update.php script.
[ 35 ]
4. Click on the Continue button to begin the update process.
5. A second Drupal database update page will load. You do not need to select the versions—Drupal will do this automatically. Click on the Update button.
6. The updates will run. You will see a progress bar and each core module will be updated in the database schema. Allow all the database updates to complete. Do not click your mouse during this process.
7. Once completed, you should see a final Drupal database update page load. A series of messages will be visible telling you the database update is complete. For example, on our site Drupal tells us that it now has separate edit and delete permissions. This is good information to read, as you know This is good information to read, as you know exactly what Drupal did during the upgrade process. You'll also see a long list of executed database queries. This list will tell you exactly what updates the Drupal update.php script performed in your database tables. For example, if the update script altered or replaced tables.
8. At this point your update page should show all green messages and gray query executed updates. You should also see green checks next to your upgrade list at the top left corner of the page—Overview, Select Updates, Run updates, and Review log.
9. Your core upgrade process is now completed from the database side. 10. Click on the Main page or Administration pages link to be taken back to
[ 37 ]
11. Once you click on the Administration pages link, you can then go to your Status report page through the Reports | Status report link.
12. The Status report should now show you the new version of Drupal 6.13 listed. It should also show you green checks next to the rest of your configuration. This shows you that you have successfully upgraded your core code to Drupal 6.13. Congratulations!
13. Run cron manually to make sure the Status report loads again without any errors. cron should run successfully.
14. We're now ready to complete the entire upgrade process by installing the new 6.x versions of our contributed modules, and our Zen theme and corresponding custom theme files.
15. We will then enable the update status module (that now comes packaged with Drupal 6.x) and that will complete the entire upgrade.
Upgrading contributed modules
We're now ready to update our contributed modules to their 6.x versions. Follow these steps:
1. Download all of the contributed module tar.gz files corresponding to the latest 6.x stable releases to a folder on your desktop. You may want to create a folder called contrib._module_upgrades to put the new releases in. 2. Once you have downloaded all the tar.gz files, extract them into your
contributed modules folder. This will create all of your module folders folder. This will create all of your module folders (one for each module).
If you are using CCK and Imagefield, you'll also need to download the Filefield module—this is a dependency of
Imagefield in Drupal 6.x.
[ 39 ]
4. You should by now have extracted all of your modules ready to upload via FTP:
5. Move your new contributed modules using FTP to your /sites/all/ modules directory.
6. Go to your Modules admin list and re-enable the 6.x versions of the modules you just installed through their respective groups. For example, re-enable all of the Views modules and then run your update.php script. Then come back to the modules admin list and re-enable your Panels modules. Doing it in this way by enabling the modules as groups will help you to identify problems with your module upgrades and more easily diagnose problems than if you just re-enable all your contributed modules at the same time.
7. The only module you do not need to enable at this time is the Devel module. We're going to look at that module in detail in Chapter 3, so leave it disabled for now. Be sure to enable the Advanced Help module as well. Click on Save configuration.
8. You may receive a Fatal Error warning about your memory_limit size (in your PHP settings). If you receive this, go ahead to the next step and run your update.php script. We'll address our memory issue immediately after running update.php.
9. If you receive parse errors, immediately run update.php again. This time the script will update all of your contributed modules database schemas.
10. You will see your Drupal database update page again (at update.php). Click on the Continue button.
11. Click on Update on the next screen (the same as our update.php during core upgrade above).
[ 41 ]
Updating your PHP memory limit
We're getting errors related to PHP memory, so we need to increase our
memory_limit in our PHP settings. There are a number of methods of doing this. You can set a higher memory limit in your .htaccess, php.ini or settings.php files. We'll try doing this by adding a memory limit increase to our Drupal site's settings.php file first. There's more about tweaking Drupal PHP memory limits here: http://drupal.org/node/207036
1. Either login to your cPanel File Manager utility or to your site through FTP to edit the settings.php file that is in your /sites/default folder. If you do this via FTP, you will need to edit the file's permissions first in order to add or edit the file. It needs to have write permissions for editing purposes. 2. I've logged into my cPanel File Manager utility and I've browsed to my
/sites/default directory.
3. I check the box next to my settings.php file and then click on the Change Permissions button in the File Manager admin screen. I add full write and execute permissions. I click on the Change Permissions button.
4. I then click on the Edit button in the File Manager utility.
5. This launches the settings.php file in edit mode. I look for the PHP settings section of the file and the array of ini_set settings. I add the following line of code to my file: ini_set('memory_limit','96M');
6. I specify 96M as my new memory_limit value.
7. Save the changes to your file.
8. Refresh your site admin screen to see if the changes worked.
9. If you refresh your update.php screen, the updates should automatically begin because your memory limit is now working. If you receive any remaining parse errors, run the update.php script again until you see no errors.
10. Drupal will give you the following note/info when you run update.php to upgrade your modules.
Please note that the Panels upgrade from Drupal 5 to Drupal 6 is far fromnote that the Panels upgrade from Drupal 5 to Drupal 6 is far from perfect, especially where Views and CCK are involved. Please check all your panels carefully and compare them against the originals. You may need to do some rework to regain your original functionality.
This is why we took the time earlier to make notes about the home page panel we're using on the site, in case we need to rebuild it.
[ 43 ]
12. If you have installed the CTools module (to allow Panels to work) you'll see two messages appear at the top of the Administer page: The directory
files/ctools has been created and The directory files/ctools/css has been created.
13. Load your Status report page and you should see everything in green mode with checks. You've successfully completed stage 1 of the contributed module upgrade process. Congratulations! Notice that on your Status report page you'll see the PHP memory limit is now set to 96M.
14. Run cron manuallyonce more to make sure you do not receive any errors. The last items to address will be to re-enable your View for the photo gallery and your home page panel. Finally, we'll re-install and enable your custom Zen sub-theme.
Installing the updated Zen theme files
We're going to install and upgrade the contributed Zen theme (6.x-1.0) so that we can reinstall and configure our Apollo custom theme files. The first part of this process is to install the main Zen theme folder in your /sites/all/themes directory.1. Download the 6.x version of the Zen theme from its project page here: http://drupal.org/project/zen
2. Extract the file in your contributed modules directory on your desktop. 3. Connect to your site through FTP and browse to the /sites/all/
themes folder.
4. Upload the Zen folder.
5. Now when you refresh your themes admin list, you'll see the 6.x-1.0 versions of Zen, Zen Classic, and the Zen Themer's Starter Kit.
Upgrading your custom theme
[ 45 ]
1. Copy over your existing apollo folder using FTP into the main Zen directory in your /sites/all/modules folder.
2. Open the apollo folder on the remote side and delete the following files: template.php, theme-settings.php, and theme-settings.init.php. These are the older template files and we will replace these with the latest TPL versions—make sure you note down any specific theme override functions you may have customized or added—you can copy those out and then paste them back into the new TPL files once you add them. In our case, we did not add any specific theme overrides.
3. Now, with Drupal 6.x themes the new rule is that you need to have a .info file in your theme directory, so that the theme will show up in the modules admin list, and in order for all of your theme regions to be defined properly. You need to add an apollo.info file in the root directory of the theme. Copy the STARTERKIT.info file (from the STARTERKIT theme folder) to your local side of FTP. Open the file in WordPad, and change any reference to STARTERKIT in the file to apollo.
4. Save the file and then re-name it to apollo.info. Upload this apollo.info file back to your apollo theme directory.
5. Refresh your themes admin list and the Apollo theme will now be visible. 6. Grab the template.php file and the theme-settings.php files from the
STARTERKIT folder and move those to your local site. Rename any instance of STARTERKIT in those 2 files to apollo. This includes the main function in template.php (function apollo_theme):
/**
* Implementation of HOOK_theme(). */
function apollo_theme(&$existing, $type, $theme, $path) { $hooks = zen_theme($existing, $type, $theme, $path); // Add your theme hooks like this:
/*
$hooks['hook_name_here'] = array( // Details go here ); */
// @TODO: Needs detailed comments. Patches welcome! return $hooks;
}
This is the renamed function in theme-settings.php: function apollo_settings($saved_settings) {
// Get the default values from the .info file.
$defaults = zen_theme_get_default_settings('apollo');
// Merge the saved variables and their default values. $settings = array_merge($defaults, $saved_settings);
/*
* Create the form using Forms API: http://api.drupal.org/api/6 */
[ 47 ] 8. Refresh your themes admin listing. 9. Enable your Apollo theme as the Default.
10. Confirm that your Garland theme is set to the default admin theme here: Administer | Site Configuration | Administration theme. You can also choose whether you want to use the Garland theme for content editing. Save configuration.
11. Congratulations! You've upgraded your custom theme to Drupal 6.x. Good work!
Cleaning up and resetting Views
The last thing to do in order to have a completely successful upgrade process is to carry out any content cleanup that's required and to reset your Views. Looking at our photo gallery content pages post-upgrade, I notice that the Lightbox2 imagecache settings were not implemented during the upgrade process. In order to use the correct Teaser and Full node display types, you may need to go back into your Photo Gallery content type and manage the Display fields configuration on your Photo file field.
The last thing you need to do is import your View code that we had exported from our Drupal 5.x site before we upgraded. Go ahead and open that .txt tile you saved and copy all the code.
1. Select all and copy code from your photo_gallery.txt file.
2. Go to your Site Building | Views admin and click on the Import button. 3. Leave the View name field blank.
4. Paste your copied View export code into the box.
5. Click on Import.
6. Check your View settings in the new Views2 interface to make sure they're translated correctly.
7. Save your View.
[ 49 ]
Placing your site back online
Now that you have completed the upgrade process, you can place your site back online. Browse to Administer | Site configuration | Site maintenance and check the Online radio button. Save configuration and your site will return to online status.
Summary
Congratulations! You have successfully upgraded your Drupal site. Here's a brief recap of what you did in this chapter:
After backing up your site and database, taking your site offline and running Status report, you upgraded your Drupal core code to Drupal 5.19.
You installed the Drupal Update Status module and later removed the module so that it would not cause conflicts during the 6.x upgrade. You upgraded all of your 5.x versions of contributed modules—a very important step prior to the upgrade to Drupal 6.x.
You backed up your Views by exporting their code.
You prepped for the Drupal 6.x upgrade by disabling all contributed modules and enabling the default Drupal Garland theme.
You upgraded the Drupal core code to 6.13 and ran update.php to update the entire Drupal database schema, thereby confirming that your MySQL database tables were updated.
You made your first major performance tweak to your server and site by raising the PHP memory_limit settings to 96M—this setting needs to be larger to run Drupal 6.x and all of the contributed modules you have.
At this point you can bring your site back online using the site maintenance configuration. We'll see you back here for more performance tips in Chapter 2, including how to manage the Drupal cache system, clear the theme registry, and tweak your PHP settings.
•
•
•
• •
•
Maintaining your Drupal Site
Now that you have upgraded to Drupal 6.13, you're ready to learn how to maintain the site, keep it running smoothly on a regular basis, and enable some performance enhancements that we will continue to monitor. This chapter will show you a selection of best practice Drupal maintenance tips and tricks that you can enable using the core Drupal administration interface. These performance enhancements will help you to run a powerful and well-maintained Drupal site.
Running a Drupal website is like keeping a fire truck prepared to go on a rescue call. The apparatus needs to be washed and inspected daily by firefighters so that it's ready to go fight a fire or rescue someone in need at a moment's notice. Your Drupal site also needs to be closely taken care of daily so that it runs smoothly, leaving less room for issues both on the site frontend and the backend, including the server.
By the end of this chapter, you will be able to perform the following maintenance:
Inspect your Drupal configuration file.
Check PHP and MySQL configuration using the Status report.
Delete files you no longer need in your Drupal directory post upgrade. Enable the Drupal 6.x core Drupal Update Status module.
Disable and uninstall contributed modules that are inactive. Enable and configure the Drupal performance cache.
Clear your Drupal performance cache and clear the theme registry so that you can view theme tweaks immediately.
Run cron tasks manually by using the Status report.
Run cron tasks automatically using the Poormanscron module. Set up server side cron tasks using the cPanel admin.
•
Tweak your PHP.ini settings including the memory_limit, upload_max_ size, and post_max_size, and check which PHP extensions are enabled or disabled.
Tweak your HTACCESS settings and configuration.
Back your site up using phpMyAdmin and SFTP via cPanel. Through direct remote access, keep regular site directory and database backups, and use contributed backup modules.
By the conclusion of the chapter, you will develop a new skill set as a Drupal maintenance technician, ready to maintain your own Drupal site on an hourly and daily basis. You've already learned how to upgrade your site, so let's learn how to keep a close watch on the site and maintain its ongoing growth and development.
Checking your Drupal configuration
status
Now that you have successfully upgraded to Drupal 6.13, you can run your Status report to check on the status of your configuration file and other site components such as the PHP and MySQL versions; GD library version, memory_limit, and whether or not your modules are updated. Status report will give you the most up-to-date checklist on the general performance of your site. When we run Status report we find out the following:
Our update.php file is protected. The permissions on this file are 644, meaning that read permissions are granted to user, group, and and world, whilewhile write and execute permissions are enabled only for the users of the file.
CTool CSS Cache is in use and exists. This is the CSS cache for the CTools module that is used in conjunction with Panels.
Our main site settings.php file is protected. This has the same permissions level as the update.php file: read-only permissions.
It's important to emphasize here that your settings.php configuration file should always be set to read-only when your site is online and publicly accessible. If you download the file and view it in a text editor, you'll see this information at the top of the file under the IMPORTANT NOTE section. The file also tells you where it's located in your Drupal directory. For example, if you are running one Drupal site then the file is located in the /sites/default folder. If you are running a multisite installation, the file may be located in the /sites/nameofsite.org/ folder. With multisite installations, each site will have its own settings.php file in its
[ 53 ]
The next set of information in the configuration file specifies your database settings.information in the configuration file specifies your database settings. file specifies your database settings. With Drupal you can integrate your site with one database (the common install method) using one $db_url line of code. You can also specify multiple databases if you need your Drupal site to connect to multiple databases (for example, if you're running CiviCRM you could set the CiviCRM database as the second database to use). Finally, you can specify database table prefixes. This is a possible configuration if you need your Drupal site to have a contributed module like Views2 Integrate with another module such as CiviCRM—there are times when this type of db_prefix is necessary.
See the following articles on http://drupal.org/ and CiviCRM for more information. Views2 Integration Module: http://wiki. civicrm.org/confluence/display/CRMDOC/Views2+Integrat ion+Module. How to configure multiple databases in your settings. php file: http://drupal.org/node/18429
As this article states, the code you'll use depends on whether you're connecting to one database or multiple. The default Drupal installation has one line of code:
<?php
$db_url = 'mysql://dbusername:dbuserpassword@localhost/dbname'; ?>
If you are connecting to multiple databases, you'll need to add another db_url line of code. Set your main Drupal database as default. For example:
<?php
You may need to configure this type of setup if you are trying to integrate a module such as CiviCRM with a Drupal module such as Views2. You need to set up the Drupal database user to have SELECT access to the CiviCRM database as well, and then add a specific array to your $db_prefix. For example, this array may look something like the one in this article: http://wiki.civicrm.org/confluence/ display/CRMDOC/Views2+Integration+Module.