6
Manipulating Data in a
MySQL Database
At the heart of every RDBMS is the data stored in that system. The RDBMS is configured and the database is designed for the sole purpose of managing data storage, access, and integrity. Ultimately, the purpose of any RDBMS is to manage data. For this reason, this chapter and the following five chapters focus exclusively on data access and manipulation. You learn how to add and modify data, retrieve data, and use advanced techniques to carry out these operations.
To start you off in the direction of data management, this chapter introduces you to the SQL state-ments available in MySQL to manipulate data. The statestate-ments provide numerous options for effectively inserting data into a database, updating that data, and deleting it once it is no longer useful. By the end of the chapter, you’ll be able to populate your database tables according to the restrictions placed on those tables, and you’ll be able to access those tables to perform the neces-sary updates and deletions. Specifically, the chapter covers the following topics:
❑ How to use INSERTand REPLACEstatements to add data to tables in a MySQL database
❑ How to use UPDATEstatements to modify data in tables in a MySQL database
❑ How to use DELETEand TRUNCATEstatements to delete data from tables in a MySQL database
Inser ting Data in a MySQL Database
MySQL supports two types of statements that insert values in a table: INSERTand REPLACE. Both state-ments allow you to add data directly to the tables in your MySQL database. MySQL also supports other methods for inserting data in a table, such as copying or importing data. These methods are discussed in Chapter 11.
Using an INSERT Statement to Add Data
An INSERTstatement is the most common method used to directly insert data in a table. The statement provides a great deal of flexibility in defining the values for individual rows or for multiple rows. The following syntax defines each element that makes up the INSERTstatement:
<insert statement>::=
INSERT [LOW_PRIORITY | DELAYED] [IGNORE] [INTO] {<values option> | <set option> | <select option>}
<values option>::=
<table name> [(<column name> [{, <column name>}...])]
VALUES ({<expression> | DEFAULT} [{, {<expression> | DEFAULT}}...]) [{, ({<expression> | DEFAULT} [{, {<expression> | DEFAULT}}...])}...]
<set option>::= <table name>
SET <column name>={<expression> | DEFAULT}
[{, <column name>={<expression> | DEFAULT}}...]
<select option>::=
<table name> [(<column name> [{, <column name>}...])] <select statement>
You can use the INSERTstatement to add data to any table in a MySQL database. When you add data, you must do so on a row-by-row basis, and you must insert exactly one value per column. If you specify fewer values than there are columns, default or null values are inserted for the unspecified values.
Now take a look at the first line of the INSERTstatement syntax:
INSERT [LOW_PRIORITY | DELAYED] [IGNORE] [INTO]
As you can see, the first line includes the required INSERTkeyword and a number of options. The first of these options are LOW_PRIORITYand DELAYED. You can include either one of these options, but you cannot include both. If you specify LOW_PRIORITY, the statement is not executed until no other client connections are accessing the same table that the INSERTstatement is accessing. This can result in a long delay while you’re waiting for the statement to execute. During that time, you cannot take any other actions. If you specify DELAYED, the execution is also delayed, but you can continue to take other actions while the INSERTstatement is in queue. The LOW_PRIORITYand DELAYEDoptions can be used only for inserts against MyISAM and ISAM tables.
The next option that you can specify in the INSERTclause is IGNORE. This option applies primarily to INSERTstatements that add multiple rows to a table. If you specify IGNORE, inserted rows are ignored if they contain a value that duplicates a primary key or unique index value. The INSERTstatement contin-ues to insert the remaining rows. If you do not specify IGNORE, the supplicated values abort the insert process.
The final option in the INSERTclause is the INTOkeyword. The keyword has no impact on how the INSERTstatement processes, although it is used quite often as a way to provide a sort of roadmap to the statement by indicating the table that is the target of the inserted rows.
Moving on to the next line of syntax in the INSERTstatement, you can see that there are three options from which to choose:
{<values option> | <set option> | <select option>}
Each option refers to a clause in the INSERTstatement that helps to define the values to insert in the tar-get table. The remaining part of the syntax defines each INSERTalternative. As you can see from the syn-tax, a number of elements are common to all three statement options. One of these elements — the
<expression>placeholder — is of particular importance to the INSERTstatement. An expressionis a type of formula that helps define the value to insert in a column. In many cases, an expression is nothing more than a literal value,which is another way of referring to a value exactly as it will be inserted in a table. In addition to literal values, expressions can also include column names, operators, and functions. An operatoris a symbol that represents a particular sort of action that should be taken, such as compar-ing values or addcompar-ing values together. For example, the plus (+) sign is an arithmetic operator that adds two values together. Afunction,on the other hand, is an object that carries out a predefined task. For example, you can use a function to specify the current date.
You can use expressions in your INSERTstatement to help define the data to insert in a particular col-umn. Because operators and functions are not discussed until later chapters (Chapters 8 and 9, respec-tively), the inclusion of expressions in the example INSERTstatements in this chapter, except for the most basic expressions, is minimal. Later in the book, when you have a better comprehension of how to use functions and operators, you’ll have a better sense of how to include complex expressions in your INSERTstatements.
For now, the discussion moves on to the three INSERTalternatives included in the syntax. Each alternative provides a method for defining the values that are inserted in the target table. The <values option>
alternative defines the values in the VALUESclause, the <set option>defines the values in the SET clause, and the <select option>defines the values in a SELECTstatement, which is embedded in the INSERTstatement. Because SELECTstatements are not discussed until later in the book, the <select option>alternative is not discussed until Chapter 11. The following two sections discuss how to create
INSERTstatements using the other two alternatives.
Using the
<values option>
Alternative of the INSERT Statement
The <values option>alternative of the INSERTstatement allows you to add one or more rows to a table, as shown in the following syntax:
<values option>::=
<table name> [(<column name> [{, <column name>}...])]
VALUES ({<expression> | DEFAULT} [{, {<expression> | DEFAULT}}...]) [{, ({<expression> | DEFAULT} [{, {<expression> | DEFAULT}}...])}...]
Once you specify the table and optional column names, you must specify a VALUESclause. The clause must include at least one value, which is represented by the <expression>placeholder or the DEFAULT keyword. If you include column names after the table name, the VALUESclause must include a value for each column, in the order that the columns are listed. If you did not specify column names, you must provide a value for every column in the table, in the order that the columns are defined in the table.
If you’re uncertain of the names of columns or the order in which they are defined in a table, you can use a DESCRIBEstatement to view a list of the columns names. See Chapter 5 for more information about the DESCRIBEstatement.
All values must be enclosed in parentheses. If there are multiple values, they must be separated by com-mas. For columns configured with the AUTO_INCREMENToption or a TIMESTAMPdata type, you can specify NULLrather than an actual value, or omit the column and value altogether. Doing so inserts the correct value into those columns. In addition, you can use the DEFAULTkeyword in any place that you want the default value for that column inserted in the table. (Be sure to refer back to Chapter 5 for a complete description on how MySQL handles default values.)
Now that you have a basic overview of the syntax, take a look at a few examples of how to create an INSERTstatement. The examples are based on the following table definition:
CREATE TABLE CDs (
CDID SMALLINT UNSIGNED NOT NULL AUTO_INCREMENT PRIMARY KEY, CDName VARCHAR(50) NOT NULL,
Copyright YEAR,
NumberDisks TINYINT UNSIGNED NOT NULL DEFAULT 1, NumberInStock TINYINT UNSIGNED,
NumberOnReserve TINYINT UNSIGNED NOT NULL, NumberAvailable TINYINT UNSIGNED NOT NULL, CDType VARCHAR(20),
RowAdded TIMESTAMP );
You should be well familiar with all the elements in the table definition. If you have any questions about any component, refer back to Chapter 5 for an explanation. Nothing has been used here that you have not already seen.
If you want to create the CDs table (or any of the example tables in this chapter) and try out the exam-ple SQL statements, you should use the test database or you should create a database for specifically for this purpose.
The table in this definition, which is named CDs, stores information about compact disks. Suppose that you want to use an INSERTstatement to add information about a CD named Ain’t Ever Satisfied: The Steve Earle Collection. You can set up your statement in a couple of ways. The first is to specify a value for each column, without specifying the name of the columns, as shown in the following INSERTstatement:
INSERT INTO CDs
VALUES (NULL, ‘Ain\’t Ever Satisfied: The Steve Earle Collection’, 1996, 2, 10, 3, NumberInStock-NumberOnReserve, ‘Country’, NULL);
In this statement, the first line contains the mandatory keyword INSERT, the optional keyword INTO, and the name of the table (CDs). The VALUESclause includes a value for each column, entered in the order in which the columns appear in the table definition. The values are enclosed in parentheses and separated with commas.
The first specified value is NULL. The value is used for the CDID column, which is configured with the AUTO_INCREMENToption and is the primary key. By specifying NULL, the next incremented value is auto-matically inserted in that column when you add this row to the table. Because this is the first row added to the table, a value of 1 is inserted in the CDID column.
The next value in the VALUESclause corresponds to the CDName column. Because this value is a string, it is enclosed in parentheses. In addition, the backslash precedes the apostrophe. The backslash is used in a string value to notify MySQL that the following character is a literal value and should not be inter-preted as the ending quote of the string. The backslash is useful for any characters that could be misin-terpreted when executing a statement that contains a string value.
You can also use the backslash to specify other literal values, such as double quotes (\”), a backslash (\\), a percentage sign (\%) or an underscore (\_).
The next four values specified in the VALUESclause are date and numerical data that correspond with the columns in the table definition (Copyright = 1996, NumberDisks = 2, NumberInStock = 10, and NumberOnReserve = 3).
The value specified for the NumberAvailable column (NumberInStock-NumberOnReserve) is an expres-sion that uses two column names and the minus (-) arithmetic operator to subtract the value in the NumberOnReserve column from the NumberInStock column to arrive at a total of the number of CDs available for sale. In this case, the total is 7.
The next value specified in the VALUESclause is Country, which is inserted in the CDType column. The final value is NULL, which is used for the RowAdded column. The column is configured as a TIMESTAMP column, which means that the current time and date are inserted automatically in that column.
Another way that you can insert the current date in the table is to use the NOW()function, rather than NULL. The NOW()function can be used in SQL statements to return a value that is equivalent to the current date and time. When used in an INSERTstatement, that value can be added to a time/date column. If you want to retrieve only the current date, and not the time, you can use the CURDATE()function. If you want to retrieve only the current time, and not the current date, you can use the CURTIME()function.
In addition to the functions mentioned here, you can use other functions to insert data into a table. Chapter 9 describes many of the functions available in MySQL and how you can use those functions in your SQL statements.
The next example INSERTstatement also adds a row to the CDs table. In this statement, the columns names are specified and only the values for those columns are included, as the following statement demonstrates:
INSERT LOW_PRIORITY INTO CDs (CDName, Copyright, NumberDisks, NumberInStock, NumberOnReserve, NumberAvailable, CDType) VALUES (‘After the Rain: The Soft Sounds of Erik Satie’,
In this statement, the CDID column and the RowAdded column are not specified. Because CDID is an AUTO_INCREMENTcolumn, an incremented value is automatically inserted in that column. Because the RowAdded column is a TIMESTAMPcolumn, the current date and time are inserted in the column. Whenever a column is not specified in an INSERTstatement, the default value for that column is inserted in the column.
The values that are specified in this INSERTstatement are similar to the previous example except for one difference. For the NumberDisks column, DEFAULTis used. This indicates that the default value should be inserted in that column. In this case, that value is 1. Otherwise, the values are listed in a matter simi-lar to what you saw previously. There is one other difference between the two statements, however. The last example includes the LOW_PRIORITYoption in the INSERTclause. As a result, this statement is not processed and the client is put on hold until all other client connections have completed accessing the target table.
To demonstrate the types of values that are inserted in the CDID column and the NumberDisks column of the CDs table by the last two example, you can use the following SELECTstatement to retrieve data from the CDID, CDName, and NumberDisks of the columns the CDs table:
SELECT CDID, CDName, NumberDisks FROM CDs;
The SELECTstatement returns results similar to the following
+---+---+---+ | CDID | CDName | NumberDisks | +---+---+---+ | 1 | Ain’t Ever Satisfied: The Steve Earle Collection | 2 | | 2 | After the Rain: The Soft Sounds of Erik Satie | 1 | +---+---+---+ 2 rows in set (0.00 sec)
As you can see, incremented values have been inserted in the CDID column, and a value of 1 has been inserted in the NumberDisks column of the second row.
The next example INSERTstatement is much simpler than the rest. It specifies the value for only the CDName column, as shown in the following statement:
INSERT INTO CDs (CDName) VALUES (‘Blue’);
Because the statement specifies only one value, default values are inserted for all other columns. This approach is fine for the CDID, NumberDisks, and RowAdded columns, but it could be problematic for the other columns, unless those are the values you want. For example, because null values are permitted in the Copyright column, NULLwas inserted. The NumberInStock and CDType columns also permit null values, so NULLwas inserted in those two as well. On the other hand, the NumberOnReserve and NumberAvailable columns do not permit null values, so 0 was inserted into these columns. As a result, whenever you’re inserting rows into a table, you must be aware of what the default value is in each column, and you must be sure to specify all the necessary values.
The last example of an INSERTstatement that uses the <values option>alternative inserts values into
multiple rows. The following INSERTstatement includes the name of the columns in the INSERTclause and then specifies the values for those columns for three rows:
INSERT INTO CDs (CDName, Copyright, NumberDisks,
NumberInStock, NumberOnReserve, NumberAvailable, CDType) VALUES (‘Mule Variations’, 1999, 1, 9, 0,
NumberInStock-NumberOnReserve, ‘Blues’), (‘The Bonnie Raitt Collection’, 1990, 1, 14, 2,
NumberInStock-NumberOnReserve, ‘Popular’), (‘Short Sharp Shocked’, 1988, 1, 6, 1,
NumberInStock-NumberOnReserve, ‘Folk-Rock’);
As the statement demonstrates, when using one INSERTstatement to insert values in multiple rows, you must enclose the values for each row in their own set of parentheses, and you must separate the sets of values with a comma. By using this method, you can insert as many rows as necessary in your table, without having to generate multiple INSERTstatements.
Using the
<values option>
Alternative to Insert Data in the
DVDRentals Database
In Chapter 5, you created the tables for the DVDRentals database. In this chapter you populate those tables with data. The following three Try It Out sections walk you through the steps necessary to add the initial data to each table. Because some dependencies exist between tables — foreign keys have been defined on numerous columns — you must add data to the referenced parent tables before adding data to the referencing child tables. To facilitate this process, first add data to the lookup tables, then to the people tables, and finally those tables configured with foreign keys.
Try It Out
Inserting Data in the Lookup Tables
The lookup tables contain the data that generally changes more infrequently than other data. To insert data in these tables, follow these steps:
1.
Open the mysql client utility, type the following command, and press Enter: use DVDRentalsYou should receive a message indicating that you switched to the DVDRentals database.
2.
To insert a record int the Formats table, type the following INSERTstatement at the mysql command prompt, and then press Enter:INSERT INTO Formats
VALUES (‘f1’, ‘Widescreen’);
You should receive a response saying that your statement executed successfully, affecting one row.
3.
To insert the next record in the Formats table, type the following INSERTstatement at the mysql command prompt, and then press Enter:INSERT INTO Formats (FormID, FormDescrip) VALUES (‘f2’, ‘Fullscreen’);
4.
To insert records in the Roles table, type the following INSERTstatement at the mysql command prompt, and then press Enter:INSERT INTO Roles
VALUES (‘r101’, ‘Actor’), (‘r102’, ‘Director’), (‘r103’, ‘Producer’),
(‘r104’, ‘Executive Producer’), (‘r105’, ‘Co-Producer’), (‘r106’, ‘Assistant Producer’), (‘r107’, ‘Screenwriter’), (‘r108’, ‘Composer’);
You should receive a response saying that your statement executed successfully, affecting eight rows.
5.
To insert records in the MovieTypes table, type the following INSERTstatement at the mysql command prompt, and then press Enter:INSERT INTO MovieTypes VALUES (‘mt10’, ‘Action’), (‘mt11’, ‘Drama’),
(‘mt12’, ‘Comedy’),
(‘mt13’, ‘Romantic Comedy’),
(‘mt14’, ‘Science Fiction/Fantasy’), (‘mt15’, ‘Documentary’),
(‘mt16’, ‘Musical’);
You should receive a response saying that your statement executed successfully, affecting seven rows.
6.
To insert records in the Studios table, type the following INSERTstatement at the mysql com-mand prompt, and then press Enter:INSERT INTO Studios
VALUES (‘s101’, ‘Universal Studios’), (‘s102’, ‘Warner Brothers’),
(‘s103’, ‘Time Warner’), (‘s104’, ‘Columbia Pictures’), (‘s105’, ‘Paramount Pictures’), (‘s106’, ‘Twentieth Century Fox’), (‘s107’, ‘Merchant Ivory Production’);
You should receive a response saying that your statement executed successfully, affecting seven rows.
7.
To insert records in the Ratings table, type the following INSERTstatement at the mysql com-mand prompt, and then press Enter:INSERT INTO Ratings
VALUES (‘NR’, ‘Not rated’), (‘G’, ‘General audiences’),
(‘PG’, ‘Parental guidance suggested’), (‘PG13’, ‘Parents strongly cautioned’), (‘R’, ‘Under 17 requires adult’), (‘X’, ‘No one 17 and under’);
You should receive a response saying that your statement executed successfully, affecting six rows.
8.
To insert records in the Status table, type the following INSERTstatement at the mysql com-mand prompt, and then press Enter:INSERT INTO Status
VALUES (‘s1’, ‘Checked out’), (‘s2’, ‘Available’),
(‘s3’, ‘Damaged’), (‘s4’, ‘Lost’);
You should receive a response saying that your statement executed successfully, affecting four rows.
How It Works
In this exercise, you added data to the five lookup tables in the DVDRentals database. The first table that you populated was the Formats table. You used the following INSERTstatement to add a single row to the table:
INSERT INTO Formats
VALUES (‘f1’, ‘Widescreen’);
Because you did not specify the columns in this statement, you had to specify values for all columns in the table. The table contains only two columns, and the primary key values are not generated automatically, so you were required to specify all the values anyway. As a result, specifying the column names wasn’t neces-sary. In the next step, you did specify the column names, as shown in the following statement:
INSERT INTO Formats (FormID, FormDescrip) VALUES (‘f2’, ‘Fullscreen’);
As you can see, the results were the same as in the previous steps. Specifying the column names in this case required extra effort but provided no added benefit.
In the remaining steps, you used individual INSERTstatements to add multiple rows to each table. For example, you used the following INSERTstatement to add data to the Roles table:
INSERT INTO Roles
VALUES (‘r101’, ‘Actor’), (‘r102’, ‘Director’), (‘r103’, ‘Producer’),
(‘r104’, ‘Executive Producer’), (‘r105’, ‘Co-Producer’), (‘r106’, ‘Assistant Producer’), (‘r107’, ‘Screenwriter’), (‘r108’, ‘Composer’);
Because the table contains only two columns and both values are provided for each row, you are not required to specify the columns’ names. You do need to enclose the values for each row in parentheses and separate each set of values by commas.
Once you insert the data into the lookup tables, you’re ready to add data to the tables that contain infor-mation about the people whose participation is recorded in the database, such as employees, customers, and those who make the movies.
Try It Out
Inserting Data in the People Tables
To insert data in these tables, follow these steps:
1.
If it’s not already open, open the mysql client utility, type the following command, and press Enter:use DVDRentals
You should receive a message indicating that you switched to the DVDRentals database.
2.
To insert records in the Participants table, type the following INSERTstatement at the mysql command prompt, and then press Enter:INSERT INTO Participants (PartFN, PartMN, PartLN) VALUES (‘Sydney’, NULL, ‘Pollack’),
(‘Robert’, NULL, ‘Redford’), (‘Meryl’, NULL, ‘Streep’), (‘John’, NULL, ‘Barry’), (‘Henry’, NULL, ‘Buck’), (‘Humphrey’, NULL, ‘Bogart’), (‘Danny’, NULL, ‘Kaye’), (‘Rosemary’, NULL, ‘Clooney’), (‘Irving’, NULL, ‘Berlin’), (‘Michael’, NULL, ‘Curtiz’), (‘Bing’, NULL, ‘Crosby’);
You should receive a response saying that your statement executed successfully, affecting 11 rows.
3.
To insert records in the Employees table, type the following INSERTstatement at the mysql command prompt, and then press Enter:INSERT INTO Employees (EmpFN, EmpMN, EmpLN) VALUES (‘John’, ‘P.’, ‘Smith’),
(‘Robert’, NULL, ‘Schroader’), (‘Mary’, ‘Marie’, ‘Michaels’), (‘John’, NULL, ‘Laguci’), (‘Rita’, ‘C.’, ‘Carter’), (‘George’, NULL, ‘Brooks’);
You should receive a response saying that your statement executed successfully, affecting six rows.
4.
To insert records in the Customers table, type the following INSERTstatement at the mysql com-mand prompt, and then press Enter:INSERT INTO Customers (CustFN, CustMN, CustLN) VALUES (‘Ralph’, ‘Frederick’, ‘Johnson’), (‘Hubert’, ‘T.’, ‘Weatherby’),
(‘Anne’, NULL, ‘Thomas’), (‘Mona’, ‘J.’, ‘Cavenaugh’), (‘Peter’, NULL, ‘Taylor’), (‘Ginger’, ‘Meagan’, ‘Delaney’);
You should receive a response saying that your statement executed successfully, affecting six rows.
How It Works
In this exercise, you used three INSERTstatements to insert data in the three people tables (one state-ment per table). Each statestate-ment was identical in structure. The only differences were in the values defined and the number of rows inserted. For example, you used the following statement to insert data in the Participants table:
INSERT INTO Participants (PartFN, PartMN, PartLN) VALUES (‘Sydney’, NULL, ‘Pollack’),
(‘Robert’, NULL, ‘Redford’), (‘Meryl’, NULL, ‘Streep’), (‘John’, NULL, ‘Barry’), (‘Henry’, NULL, ‘Buck’), (‘Humphrey’, NULL, ‘Bogart’), (‘Danny’, NULL, ‘Kaye’), (‘Rosemary’, NULL, ‘Clooney’), (‘Irving’, NULL, ‘Berlin’), (‘Michael’, NULL, ‘Curtiz’), (‘Bing’, NULL, ‘Crosby’);
As you can see, the INSERTclause includes the INTOoption, which has no effect on the statement, and the name of the columns. Because the PartID column is configured with the AUTO_INCREMENToption, you don’t need to include it here. The new value is automatically inserted in the column. Because these are the first rows to be added to the table, a value of 1 is added to the PartID column of the first row, a value of 2 for the second row, and so on. After you specify the column names, the statement uses a VALUESclause to specify the values for each column. The values for each row are enclosed in parenthe-ses and separated by commas. Commas also separate the sets of values. In addition, you use NULL wher-ever a value is not known, which in this case is the PartMN column for each row.
You can view the values that you inserted in the Participants table by executing the following SELECT statement:
SELECT * FROM Participants;
The last tables to add data to are the four configured with foreign keys. Because the data in these tables references data in other tables, you had to populate those other tables first so that they contained the ref-erenced data. Once the refref-erenced tables contain the proper data, you can insert rows in the columns configured with the foreign keys. Because some of these tables have dependencies on each other, they too have to be populated in a specific order.
Try It Out
Inserting Data in the Foreign Key Tables
To insert data in these tables, take the following steps:
1.
If it’s not already open, open the mysql client utility, type the following command, and press Enter:use DVDRentals
2.
To insert a record in the DVDs table, type the following INSERTstatement at the mysql com-mand prompt, and then press Enter:INSERT INTO DVDs
VALUES (NULL, ‘White Christmas’, DEFAULT, 2000, ‘mt16’, ‘s105’, ‘NR’, ‘f1’, ‘s1’);
You should receive a response saying that your statement executed successfully, affecting one row.
3.
To insert the next record in the DVDs table, type the following INSERTstatement at the mysql command prompt, and then press Enter:INSERT INTO DVDs
(DVDName, NumDisks, YearRlsd, MTypeID, StudID, RatingID, FormID, StatID) VALUES (‘What\’s Up, Doc?’, 1, 2001, ‘mt12’, ‘s103’, ‘G’, ‘f1’, ‘s2’);
You should receive a response saying that your statement executed successfully, affecting one row.
4.
To insert additional records in the DVDs table, type the following INSERTstatement at the mysql command prompt, and then press Enter:INSERT INTO DVDs
VALUES (NULL, ‘Out of Africa’, 1, 2000, ‘mt11’, ‘s101’, ‘PG’, ‘f1’, ‘s1’), (NULL, ‘The Maltese Falcon’, 1, 2000, ‘mt11’, ‘s103’, ‘NR’, ‘f1’, ‘s2’), (NULL, ‘Amadeus’, 1, 1997, ‘mt11’, ‘s103’, ‘PG’, ‘f1’, ‘s2’);
You should receive a response saying that your statement executed successfully, affecting three rows.
5.
To insert the remaining records in the DVDs table, type the following INSERTstatement at the mysql command prompt, and then press Enter:INSERT INTO DVDs
(DVDName, NumDisks, YearRlsd, MTypeID, StudID, RatingID, FormID, StatID) VALUES
(‘The Rocky Horror Picture Show’, 2, 2000, ‘mt12’, ‘s106’, ‘NR’, ‘f1’, ‘s2’), (‘A Room with a View’, 1, 2000, ‘mt11’, ‘s107’, ‘NR’, ‘f1’, ‘s1’),
(‘Mash’, 2, 2001, ‘mt12’, ‘s106’, ‘R’, ‘f1’, ‘s2’);
You should receive a response saying that your statement executed successfully, affecting three rows.
6.
To insert records in the DVDParticipant table, type the following INSERTstatement at the mysql command prompt, and then press Enter:INSERT INTO DVDParticipant VALUES (3, 1, ‘r102’), (3, 4, ‘r108’), (3, 1, ‘r103’), (3, 2, ‘r101’), (3, 3, ‘r101’), (4, 6, ‘r101’), (1, 8, ‘r101’), (1, 9, ‘r108’), (1, 10, ‘r102’), (1, 11, ‘r101’), (1, 7, ‘r101’), (2, 5, ‘r107’);
You should receive a response saying that your statement executed successfully, affecting 12 rows.
7.
To insert records in the Orders table, type the following INSERTstatement at the mysql com-mand prompt, and then press Enter:INSERT INTO Orders (CustID, EmpID) VALUES (1, 3),
(1, 2), (2, 5), (3, 6), (4, 1), (3, 3), (5, 2), (6, 4), (4, 5), (6, 2), (3, 1), (1, 6), (5, 4);
You should receive a response saying that your statement executed successfully, affecting 13 rows.
8.
To insert records in the Transactions table, type the following INSERTstatement at the mysql command prompt, and then press Enter:INSERT INTO Transactions (OrderID, DVDID, DateOut, DateDue) VALUES (1, 1, CURDATE(), CURDATE()+3),
(1, 4, CURDATE(), CURDATE()+3), (1, 8, CURDATE(), CURDATE()+3), (2, 3, CURDATE(), CURDATE()+3), (3, 4, CURDATE(), CURDATE()+3), (3, 1, CURDATE(), CURDATE()+3), (3, 7, CURDATE(), CURDATE()+3), (4, 4, CURDATE(), CURDATE()+3), (5, 3, CURDATE(), CURDATE()+3), (6, 2, CURDATE(), CURDATE()+3), (6, 1, CURDATE(), CURDATE()+3), (7, 4, CURDATE(), CURDATE()+3), (8, 2, CURDATE(), CURDATE()+3), (8, 1, CURDATE(), CURDATE()+3), (8, 3, CURDATE(), CURDATE()+3), (9, 7, CURDATE(), CURDATE()+3), (9, 1, CURDATE(), CURDATE()+3), (10, 5, CURDATE(), CURDATE()+3), (11, 6, CURDATE(), CURDATE()+3), (11, 2, CURDATE(), CURDATE()+3), (11, 8, CURDATE(), CURDATE()+3), (12, 5, CURDATE(), CURDATE()+3); (13, 7, CURDATE(), CURDATE()+3);
How It Works
In this exercise, you added data to the final four tables in the DVDRentals database. You populated these tables last because each one includes references (through foreign keys) to other tables in the database. In addition, the remaining tables include references to each other, so you had to add data to them in a spe-cific order. You began the process by using the following INSERTstatement:
INSERT INTO DVDs
VALUES (NULL, ‘White Christmas’, DEFAULT, 2000, ‘mt16’, ‘s105’, ‘NR’, ‘f1’, ‘s1’);
In this statement, you added one row to the DVDs table. Because you did not specify any columns, you included a value for each column in the table. To ensure that you inserted the correct data in the correct columns, you listed the values in the same order as they are listed in the table definition. For the first col-umn, DVDID, you specified NULL. Because the column is configured with the AUTO_INCREMENToption, the value for this column was determined automatically. For the NumDisks column, you specified DEFAULT. As a result, the value 1 was inserted in this column because that is the default value defined on the column. For all other columns, you specified the values to be inserted in those columns.
The next INSERTstatement that you used also inserted one row of data in the DVDs table; however, this statement specified the column names. As a result, the VALUESclause includes values only for the speci-fied columns, as shown in the following statement:
INSERT INTO DVDs
(DVDName, YearRlsd, MTypeID, StudID, RatingID, FormID, StatID) VALUES (‘What\’s Up, Doc?’, 2001, ‘mt12’, ‘s103’, ‘G’, ‘f1’, ‘s2’);
By using this approach, you do not have to specify a NULLfor the DVDID column or DEFAULTfor the NumDiscs column. One other thing to note about this statement is that you used a backslash in the DVDName value to show that the apostrophe should be interpreted as a literal value. Without the back-slash, the statement would not execute properly because the apostrophe would confuse the database engine.
The next statement you executed inserted several rows in the DVDs table, as the following statement demonstrates:
INSERT INTO DVDs
VALUES (NULL, ‘Out of Africa’, 1, 2000, ‘mt11’, ‘s101’, ‘PG’, ‘f1’, ‘s1’), (NULL, ‘Maltese Falcon, The’, 1, 2000, ‘mt11’, ‘s103’, ‘NR’, ‘f1’, ‘s2’), (NULL, ‘Amadeus’, 1, 1997, ‘mt11’, ‘s103’, ‘PG’, ‘f1’, ‘s2’);
Once again, because you didn’t specify the column names, you had to provide NULLfor the DVDID col-umn. In addition, you provided a literal value (1) for the NumDisks column, even though that column is configured with a default of 1. Because you had to include a value, the value had to be DEFAULTor it had to be the literal figure.
You could have also created a statement that defined the columns to be inserted. In that case, you could have avoided repeating NULLfor each row. Unless the value for the NumDisks column is always the default value, you would have had to include that column either way. The choice of whether to include column names or instead include all values depends on the table and how many rows you need to insert. For tables in which there are many rows of data and an AUTO_INCREMENTprimary key, you’re
usually better off specifying the column names and taking that approach, as you did when you inserted data in the Transactions table and the Orders table.
For example, when you inserted rows in the Transactions table, you specified the column names for every column except TransID, which is the primary key and which is configured with the AUTO_INCREMENT option. The following code shows just the first few rows of data of the INSERTstatement that you used for the Transactions table:
INSERT INTO Transactions (OrderID, DVDID, DateOut, DateDue) VALUES (1, 1, CURDATE(), CURDATE()+3),
(1, 4, CURDATE(), CURDATE()+3), (1, 8, CURDATE(), CURDATE()+3), (2, 3, CURDATE(), CURDATE()+3),
In this case, you can see the advantage of specifying the column names because you did not have to repeat NULLfor each row. There is another aspect of this statement, though, that you haven’t seen before. The DateOut value is determined by using the CURDATE()function. The function automatically returns the date on which the row is inserted in the table. The function is also used for the DateDue column. A value of 3 is added to the value returned by the function. As a result, the value inserted in the DateDue column is three days after the current date. Functions are very useful when creating expressions and defining values. For this reason, Chapter 9 focuses exclusively on the various functions supported by MySQL.
Using the
<set option>
Alternative of the INSERT Statement
The <set option>method for creating an INSERTstatement provides you with an alternative to the
<values option>method when you’re adding only one row at a time to a table. The following syntax
demonstrates how to use the <set option>alternative to create an INSERTstatement: <set option>::=
<table name>
SET <column name>={<expression> | DEFAULT}
[{, <column name>={<expression> | DEFAULT}}...]
As the syntax shows, your INSERTstatement must include the name of the table and a SETclause that specifies values for specific columns (all, of course, in addition to the required INSERTclause at the beginning of the statement). Although column names are not specified after the table name, as is the case for some statements that use the <values option>alternative, the column names are specified in the
SETclause. For each value, you must specify the column name, an equal (=) sign, and an expression or the DEFAULTkeyword. The <expression>option and the DEFAULTkeyword work in the same way as they do for the previous INSERTstatements that you saw. Also, if you include more than one
column/value pair, you must separate them with a comma.
The <set option>alternative is most useful if you’re providing values for only some of the columns
and allowing default values to be used for the remaining columns. For example, suppose that you want to insert an additional row in the CDs table (the table used in the previous examples). If you used the
<values option>method to create an INSERTstatement, it would look similar to the following: INSERT INTO CDs (CDName, Copyright, NumberDisks,
NumberInStock, NumberOnReserve, NumberAvailable, CDType) VALUES (‘Blues on the Bayou’, 1998, DEFAULT,
Notice that each column is specified after the table name and that their respective values are included in the VALUESclause. You could rewrite the statement by using the <set option>alternative, as shown in the following example:
INSERT DELAYED INTO CDs
SET CDName=’Blues on the Bayou’, Copyright=1998,
NumberDisks=DEFAULT, NumberInStock=4, NumberOnReserve=1, NumberAvailable=NumberInStock-NumberOnReserve, CDType=’Blues’;
As you can see, the column names, along with their values, are specified in the SETclause. You do not have to enclose them in parentheses, although you do need to separate them with commas. The main advantage to using this method is that it simplifies matching values to column names, without having to refer back and forth between clauses. As a result, you ensure that you always match the proper value to the correct column. If you plan to provide values for each column, you save yourself keystrokes by using the <values option>alternative because you don’t need to specify column names when values are provided for all columns. In addition, the <values option>alternative allows you to insert multiple
rows with one statement. The <set option>alternative does not.
In the previous Try It Out sections, you used the <values option>alternative to insert data in the DVDRentals database. In this exercise, you use the <set option>alternative to insert a row in the
DVDs table.
Try It Out
Using the
<set option>
Alternative to Insert Data in the DVDRentals
Database
Follow these steps to insert the data:
1.
Open the mysql client utility, type the following command, and press Enter: use DVDRentalsYou should receive a message indicating that you switched to the DVDRentals database.
2.
To insert the record in the DVDs table, type the following INSERTstatement at the mysql com-mand prompt, and then press Enter:INSERT INTO DVDs
SET DVDName=’Some Like It Hot’, YearRlsd=2001, MTypeID=’mt12’, StudID=’s108’, RatingID=’NR’, FormID=’f1’, StatID=’s2’;
You should receive an error message stating that a foreign key constraint failed because the StudID value does not exist in the referenced parent table (Studios).
3.
To insert the necessary record in the Studios table, type the following INSERTstatement at the mysql command prompt, and then press Enter:INSERT INTO Studios
VALUES (‘s108’, ‘Metro-Goldwyn-Mayer’);
You should receive a response saying that your statement executed successfully, affecting one row.
4.
Now you should be able to insert the record in the DVDs table. Type the following INSERT statement at the mysql command prompt, and then press Enter:INSERT INTO DVDs
SET DVDName=’Some Like It Hot’, YearRlsd=2001, MTypeID=’mt12’, StudID=’s108’, RatingID=’NR’, FormID=’f1’, StatID=’s2’;
You should receive a response saying that your statement executed successfully and that one row was affected.
How It Works
The first INSERTstatement that you used in this exercise attempted to insert a row in the DVDs table in the DVDRentals database, as shown in the following statement:
INSERT INTO DVDs
SET DVDName=’Some Like It Hot’, YearRlsd=2001, MTypeID=’mt12’, StudID=’s108’, RatingID=’NR’, FormID=’f1’, StatID=’s2’;
As you would expect with the <set option>alternative, the column names and values are specified in the SETclause. This INSERTstatement failed, though, because you attempted to insert a row that con-tained a StudID value of s108. As you recall, you defined a foreign key on the StudID column in the DVDs table. The column references the StudID column in the Studios table. Because the Studios table doesn’t contain the referenced value of s108 in the StudID column, you could not insert a row in DVDs that includes a StudID value of s108.
To remedy this situation, the following INSERT statement inserts the necessary value in the Studios table:
INSERT INTO Studios
VALUES (‘s108’, ‘Metro-Goldwyn-Mayer’);
Because the Studios table contains only two columns and because you needed to provide values for both those columns, the <values option>alternative adds the row to the Studios table. Once you
com-pleted this task, you then used the original INSERTstatement to add the same row to the DVDs table. This time the statement succeeded.
Using a REPLACE Statement to Add Data
In addition to using an INSERTstatement to add data to a table, you can also use a REPLACEstatement. AREPLACEstatement is similar to an INSERTstatement in most respects. The main difference between the two is in how values in a primary key column or a unique index are treated. In an INSERTstatement, if you try to insert a row that contains a unique index or primary key value that already exists in the table, you aren’t able to add that row. AREPLACEstatement, however, deletes the old row and adds the new row.
Another method that programmers have used to support the same functionality as that of the REPLACE
Despite the issue of primary key and unique index values, the syntax for the REPLACEstatement basi-cally contains the same elements as the INSERTstatement, as the following syntax shows:
<replace statement>::=
REPLACE [LOW_PRIORITY | DELAYED] [INTO]
{<values option> | <set option> | <select option>
<values option>::=
<table name> [(<column name> [{, <column name>}...])]
VALUES ({<expression> | DEFAULT} [{, {<expression> | DEFAULT}}...]) [{, ({<expression> | DEFAULT} [{, {<expression> | DEFAULT}}...])}...]
<set option>::= <table name>
SET <column name>={<expression> | DEFAULT}
[{, <column name>={<expression> | DEFAULT}}...]
<select option>::=
<table name> [(<column name> [{, <column name>}...])] <select statement>
As you can see, the main difference between the INSERTsyntax and the REPLACEsyntax is that you use the REPLACEkeyword rather than the INSERT keyword. In addition, the REPLACEstatement doesn’t support the IGNOREoption. The REPLACEstatement does include the same three methods for creating the statement: the <values option>alternative, the <set option>alternative, and the <select option>alternative. As with the INSERTstatement, the discussion here includes only the first two alternatives. Chapter 11 discusses the <select option>alternative.
Although the REPLACEstatement and the INSERTstatement are nearly identical, the difference between the two can be a critical one. By using the REPLACEstatement, you risk overwriting important data. Use caution whenever executing a REPLACEstatement.
Using the
<values option>
Alternative of the REPLACE Statement
As the following syntax shows, the <values option>alternative for the REPLACEstatement is the same as that alternative for the INSERTstatement:
<values option>::=
<table name> [(<column name> [{, <column name>}...])]
VALUES ({<expression> | DEFAULT} [{, {<expression> | DEFAULT}}...]) [{, ({<expression> | DEFAULT} [{, {<expression> | DEFAULT}}...])}...]
As you can see, this version of the INSERTstatement contains all the same elements, so have a look at a couple of examples to help demonstrate how this statement works. The examples are based on the following table definition:
CREATE TABLE Inventory (
ProductID SMALLINT UNSIGNED NOT NULL PRIMARY KEY, NumberInStock SMALLINT UNSIGNED NOT NULL,
NumberOnOrder SMALLINT UNSIGNED NOT NULL, DateUpdated DATE
);
The main characteristic to note about the Inventory table is that the ProductID column is configured as the primary key. It doesn’t use the AUTO_INCREMENToption, so you have to provide a value for this col-umn. The following REPLACEstatement adds values to each column in the Inventory table:
REPLACE LOW_PRIORITY INTO Inventory VALUES (101, 20, 25, ‘2004-10-14’);
You can view the values that you inserted in the Inventory table by executing the following SELECT statement:
SELECT * FROM Inventory;
Note that the LOW_PRIORITYoption, the INTOkeyword, the table name, and the values in the VALUES clause are specified exactly as they would be in an INSERTstatement. If you were to execute this state-ment and no rows in the table contain a ProductID value of 101, the statestate-ment would be inserted in the table and you would lose no data. Suppose that you then executed the following REPLACEstatement:
REPLACE LOW_PRIORITY INTO Inventory VALUES (101, 10, 25, ‘2004-10-16’);
This statement also includes a ProductID value of 101. As a result, the original row with that ProductID value would be deleted and the new row would be inserted. Although this might be the behavior that you expected, what if you had meant to insert a different ProductID value? If you had, the original data would be lost and the new data would be inaccurate. For this reason, you should be very cautious when using the REPLACEstatement. For the most part, you are better off using an INSERTstatement.
In the following exercise, you try out a REPLACEstatement by inserting a row in the Studios table.
Try It Out
Using the REPLACE...VALUES Form to Insert Data in the DVDRentals
Database
To complete this exercise, follow these steps:
1.
Open the mysql client utility, type the following command, and press Enter: use DVDRentalsYou should receive a message indicating that you switched to the DVDRentals database.
2.
To insert the record in the Studios table, type the following REPLACEstatement at the mysql command prompt, and then press Enter:REPLACE Studios (StudID, StudDescrip) VALUES (‘s109’, ‘New Line Cinema, Inc.’);
You should receive a response saying that your statement executed successfully, affecting one row.
3.
Now insert another record in the Studios table. This record includes the same primary key value as the last row you inserted, but the studio name is slightly different. Type the following REPLACEstatement at the mysql command prompt, and then press Enter:REPLACE Studios
You should receive a response saying that your statement executed successfully, affecting two rows.
How It Works
The first REPLACEstatement inserted a new row in the Studios table, as shown in the following statement:
REPLACE Studios (StudID, StudDescrip) VALUES (‘s109’, ‘New Line Cinema, Inc.’);
The new row contained a StudID value of s109 and a StudDescrip value of New Line Cinema, Inc. After executing this statement, you then executed the following REPLACEstatement:
REPLACE Studios
VALUES (‘s109’, ‘New Line Cinema’);
For this statement, you did not specify the column names because you inserted a value for each column. You again inserted a row that contained a StudID value of s109. Because the StudID column is config-ured as the primary key, that last statement replaced the row that the first statement created. As a result, the StudDescrip column now has a value of New Line Cinema.
You can view the values that you inserted in the Studios table by executing the following SELECTstatement:
SELECT * FROM Studios;
Using the
<set option>
Alternative of the REPLACE Statement
As with the <values option>alternative, the <set option>alternative of the REPLACEstatement also includes the same elements that you use in the INSERTstatement, as shown in the following syntax:
<set option>::= <table name>
SET <column name>={<expression> | DEFAULT}
[{, <column name>={<expression> | DEFAULT}}...]
The SETclause in the REPLACEstatement includes the column names and the values for those columns. Take a look at a couple of examples that help demonstrate this. The following REPLACEstatement uses the <values option>alternative to add a row to the Inventory table (which is the same table used in
the previous REPLACEexamples):
REPLACE INTO Inventory (ProductID, NumberInStock, DateUpdated) VALUES (107, 16, ‘2004-11-30’);
Notice that values are specified for the ProductID, NumberInStock, and DateUpdated columns, but not for the NumberOnOrder column. Because this column is configured with an integer data type and because the column does not permit null values, a 0 value is added to the column. (When a value is not provided for a column configured with an integer data type, a 0 is inserted if that column does not per-mit null values and no default is defined for the column. For more information about integer data types, see Chapter 5.)
You could insert the same data shown in the preceding example by using the following REPLACEstatement:
REPLACE INTO Inventory
SET ProductID=107, NumberInStock=16, DateUpdated=’2004-11-30’;
Notice that a SETclause is used this time, but the column names and values are the same. The SETclause provides the same advantages and disadvantages as using the SETclause in an INSERTstatement. The main consideration is, of course, that you do not accidentally overwrite data that you intended to retain.
In the following exercise, you try out the <set option>alternative of the REPLACEstatement. You use this form of the statement to add two rows to the MovieTypes table.
Try It Out
Using the
<set option>
Alternative to Insert Data in the DVDRentals
Database
To add these rows, follow these steps:
1.
Open the mysql client utility, type the following command, and press Enter: use DVDRentalsYou should receive a message indicating that you switched to the DVDRentals database.
2.
To insert the record in the MovieTypes table, type the following REPLACEstatement at the mysql command prompt, and then press Enter:REPLACE MovieTypes
SET MTypeID=’mt17’, MTypeDescrip=’Foreign-subtitled’;
You should receive a response saying that your statement executed successfully, affecting one row.
3.
Now insert another record in the MovieTypes table. This record includes the same primary key value as the last row you inserted, but the name is slightly different. Type the following REPLACEstatement at the mysql command prompt, and then press Enter:REPLACE MovieTypes
SET MTypeID=’mt17’, MTypeDescrip=’Foreign’;
You should receive a response saying that your statement executed successfully, affecting two rows. MySQL reports that two rows are affected because it treats the original row as a deletion and the updated row as an insertion.
How It Works
The first REPLACEstatement adds one row to the MovieTypes table, as shown in the following statement:
REPLACE MovieTypes
SET MTypeID=’mt17’, MTypeDescrip=’Foreign-subtitled’;
The added row includes an MTypeID value of mt17 and an MTypeDescrip value of Foreign-subtitled. Because values are defined for both columns in this table, you could just as easily use the <values option>
After adding the row to the MovieTypes table, you executed the following REPLACEstatement:
REPLACE MovieTypes
SET MTypeID=’mt17’, MTypeDescrip=’Foreign’;
Notice that you’ve specified the same MTypeID value (mt17), but a slightly different MTypeDescrip value. The question then becomes whether your intent is to replace the original row or to include two rows in the table, one for Foreign films with subtitles and one for other foreign films. Again, this points to the pitfalls of using a REPLACEstatement rather than an INSERTstatement.
Updating Data in a MySQL Database
Now that you have a foundation in how to insert data in a MySQL database, you’re ready to learn how to update that data. The primary statement used to modify data in a MySQL database is the UPDATE statement. The following syntax shows the elements included in an UPDATEstatement:
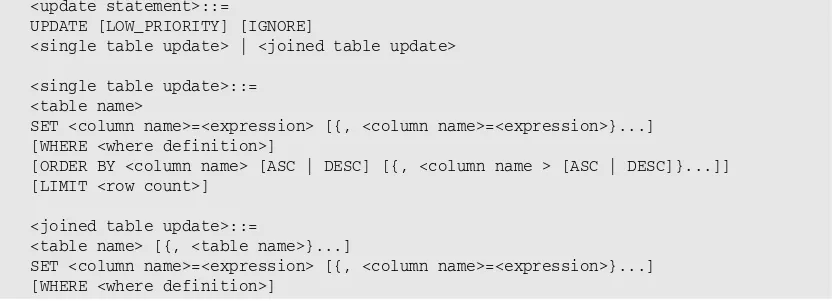
<update statement>::=
UPDATE [LOW_PRIORITY] [IGNORE]
<single table update> | <joined table update>
<single table update>::= <table name>
SET <column name>=<expression> [{, <column name>=<expression>}...] [WHERE <where definition>]
[ORDER BY <column name> [ASC | DESC] [{, <column name > [ASC | DESC]}...]] [LIMIT <row count>]
<joined table update>::=
<table name> [{, <table name>}...]
SET <column name>=<expression> [{, <column name>=<expression>}...] [WHERE <where definition>]
The first line of the syntax for the UPDATEstatement contains the mandatory UPDATEkeyword along with the LOW_PRIORITYoption and the IGNOREoption, both of which you’ve seen in the INSERT state-ment. You should use the LOW_PRIORITYoption when you want to delay the execution of the UPDATE statement until no other client connections are accessing that targeted table. You should use the IGNORE option if you want an update to continue even if duplicate primary key and unique index values are found. (The row with the duplicate value is not updated.)
In addition to the UPDATEclause, the syntax for the UPDATEstatement specifies two statement alterna-tives: the <single table update>alternative and the <joined table update>alternative. A joined table refers to a table that is joined to another table in an SQL statement, such as the UPDATEstatement. The join is based on the foreign key relationship established between these two tables. You can use this relationship to access related data in both tables in order to perform an operation on the data in the related tables. Although Chapter 10 discusses joins in greater detail, this chapter includes a brief discus-sion of joins because they are integral to the <joined table update>method of updating a table.
Before getting into a discussion about updating joined tables, this chapter first discusses updating a single table.
Using an UPDATE Statement to Update a Single Table
To update a single table in a MySQL database, in which no join conditions are taken into account in order to perform that update, you should create an UPDATEstatement that uses the <single table update>alternative, which is shown in the following syntax:
<single table update>::= <table name>
SET <column name>=<expression> [{, <column name>=<expression>}...] [WHERE <where definition>]
[ORDER BY <column name> [ASC | DESC] [{, <column name> [ASC | DESC]}...]] [LIMIT <row count>]
As the syntax shows, you must specify a table name and a SETclause. The SETclause includes, at the very least, a column name and an associated expression, connected by an equal (=) sign. The information sets a value for a particular column. If you want to include more than one column, you must separate the column/expression pairs with commas.
In addition to the of the <single table update>alternative’s required elements, you can choose to
include several additional clauses in your statement. The first of these — the WHEREclause — determines which rows in a table are updated. Without a WHEREclause, all tables are updated, which might some-times be what you want, but most likely you want to use a WHEREclause to qualify your update. The WHEREclause includes one or more conditions that define the extent of the update.
Because the WHEREclause is such an integral part of a SELECTstatement, it is discussed in detail in Chapter 7; however, this chapter includes information about the clause so that you have a better under-standing of the UPDATEstatement. But know that, after you gain a more in-depth knowledge of the
WHEREclause in Chapter 7, you’ll be able to refine your UPDATEstatements to an even greater degree.
The next optional clause in the UPDATEstatement is the ORDER BYclause. The ORDER BYclause allows you to specify that the rows updated by your UPDATEstatement are updated in a specified order accord-ing to the values in the column or columns you specify in the clause. If you specify more than one col-umn, you must separate them by a comma, in which case, the rows are updated based on the first column specified, then the second, and so on. In addition, for each column that you include in the clause, you can specify the ASCoption or the DESCoption. The ASCoption means that the rows should be updated in ascending order, based on the column values. The DESCoption means that the rows should be updated in descending order. If you specify neither option, the rows are updated in ascending order.
In addition to the ORDER BYclause, you can include a LIMITclause that limits the number of rows updated to the value specified in the LIMITclause. For example, if your UPDATEstatement would nor-mally update 10 rows in a table, but you specify a LIMITclause with a value of 5, only the first five rows are updated. Because of a LIMIT clause’s nature, it is best suited to use in conjunction with an ORDER BYclause.
CREATE TABLE Books (
BookID SMALLINT NOT NULL PRIMARY KEY, BookName VARCHAR(40) NOT NULL, InStock SMALLINT NOT NULL )
ENGINE=INNODB;
The following INSERTstatement populates the Books table:
INSERT INTO Books
VALUES (101, ‘Noncomformity: Writing on Writing’, 12), (102, ‘The Shipping News’, 17),
(103, ‘Hell\’s Angels’, 23),
(104, ‘Letters to a Young Poet’, 32), (105, ‘A Confederacy of Dunces’, 6), (106, ‘One Hundred Years of Solitude’, 28);
The next table is the Orders table, which includes a foreign key that references the Books table, as shown in the following table definition:
CREATE TABLE Orders (
OrderID SMALLINT NOT NULL PRIMARY KEY, BookID SMALLINT NOT NULL,
Quantity TINYINT (40) NOT NULL DEFAULT 1, DateOrdered TIMESTAMP,
FOREIGN KEY (BookID) REFERENCES Books (BookID) )
ENGINE=INNODB;
The following INSERT statement populates the Orders table:
INSERT INTO Orders
VALUES (1001, 103, 1, ‘2004-10-12 12:30:00’), (1002, 101, 1, ‘2004-10-12 12:31:00’), (1003, 103, 2, ‘2004-10-12 12:34:00’), (1004, 104, 3, ‘2004-10-12 12:36:00’), (1005, 102, 1, ‘2004-10-12 12:41:00’), (1006, 103, 2, ‘2004-10-12 12:59:00’), (1007, 101, 1, ‘2004-10-12 13:01:00’), (1008, 103, 1, ‘2004-10-12 13:02:00’), (1009, 102, 4, ‘2004-10-12 13:22:00’), (1010, 101, 2, ‘2004-10-12 13:30:00’), (1011, 103, 1, ‘2004-10-12 13:32:00’), (1012, 105, 1, ‘2004-10-12 13:40:00’), (1013, 106, 2, ‘2004-10-12 13:44:00’), (1014, 103, 1, ‘2004-10-12 14:01:00’), (1015, 106, 1, ‘2004-10-12 14:05:00’), (1016, 104, 2, ‘2004-10-12 14:28:00’), (1017, 105, 1, ‘2004-10-12 14:31:00’), (1018, 102, 1, ‘2004-10-12 14:32:00’), (1019, 106, 3, ‘2004-10-12 14:49:00’), (1020, 103, 1, ‘2004-10-12 14:51:00’);
Notice that the values added to the BookID column in the Orders table include only values that exist in the BookID column in the Books table. The BookID column in Orders is the referencing column, and the BookID column in Books is the referenced column.
After creating the tables and adding data to those tables, you can modify that data. The following UPDATEstatement modifies values in the InStock column of the Books table:
UPDATE Books
SET InStock=InStock+10;
This statement includes only the required elements of an UPDATEstatement. This includes the UPDATE keyword, the name of the table, and a SETclause that specifies one column/expression pair. The expres-sion in this case is made up of the InStock column name, a plus (+) arithmetic operator, and a literal value of 10. As a result, the existing value in the InStock column increases by 10. Because you specify no other conditions in the UPDATEstatement, all rows in the table update. This approach might be fine in some cases, but in all likelihood, most of your updates should be more specific than this. As a result, you want to qualify your statements so that only certain rows in the table update, rather than all rows.
The method used to qualify an UPDATEstatement is to add a WHEREclause to the statement. The WHERE clause provides the specifics necessary to limit the update. For example, the following UPDATEstatement includes a WHEREclause that specifies that only rows with an OrderID value of 1001 should be updated:
UPDATE Orders SET Quantity=2 WHERE OrderID=1001;
As you can see, the WHEREclause allows you to be much more specific with your updates. In this case, you specify the OrderID column, followed by an equal (=) sign, and then followed by a value of 1001. As a result, the value in the OrderID column must be 1001 in order for a row to be updated. Because this is the primary key column, only one row contains this value, so that is the only row updated. In addition, the SETclause specifies that the value in the Quantity column be set to 2. The result is that the Quantity column in the row that contains an OrderID value of 1001 is updated, but no other rows are updated.
As you have seen, another method that you can use to update a value in a column is to base the update on the current value in that column. For example, in the following UPDATEstatement, the SETclause uses the Quantity column to specify the new value for that column:
UPDATE Orders
SET Quantity=Quantity+1 WHERE OrderID=1001;
In this statement, the SETclause specifies that the new value for the Quantity column should equal the current value plus one. For example, if the current value is 2, it increases to 3. Also, because the UPDATE statement is qualified by the use of a WHEREclause, only the row with an OrderID value of 1001 increases the value in the Quantity column by a value of 1.
In the last two examples, the WHEREclause specifies that only one record should be updated
case in an UPDATEstatement. For example, the following statement updates all rows with an InStock value of less than 30:
UPDATE LOW_PRIORITY Books SET InStock=InStock+10 WHERE InStock<30;
In this statement, the SETclause specifies that all values in the InStock column should be increased by 10. (The addition [+] operator is used to add 10 to the value in the InStock column.) The WHEREclause limits that update only to those columns that contain an InStock value of less than 30. (The less than [<] operator indicates that the value in the InStock column must be less that 30.) As a result, the number of rows updated equals the number of rows with an InStock value less than 30. (Chapter 8 describes the operators available in MySQL and how to use those operators in your SQL statements.)
An UPDATEstatement can be further qualified by the use of the ORDER BYclause and the LIMITclause. For example, suppose you want to update the Orders table so that orders that contain a BookID value of 103 are increased by 1. You want to limit the increase, though, to the last five orders for that book. You could use the following UPDATEstatement to modify the table:
UPDATE Orders
SET Quantity=Quantity+1 WHERE BookID=103
ORDER BY DateOrdered DESC LIMIT 5;
By now, you should be familiar with the first three lines of code. In the first line, the UPDATEclause spec-ifies the Orders table. In the second line, the SETclause specifies that the values in the Quantity column should be increased by 1. In the third line, the WHEREclause specifies that only rows that contain a BookID value of 103 should be updated.
The ORDER BYclause then further qualifies the statement by ordering the rows to be updated by the val-ues in the DateOrdered column. Notice the use of the DESCoption, which means that the values are sorted in descending order. Because this is a TIMESTAMPcolumn, descending order means that the most recent orders are updated first. Because the LIMITclause specifies a value of 5, only the first five rows are updated.
As you can see, the ORDER BYand LIMITclauses are useful only in very specific circumstances, but the WHEREand SETclauses provide a considerable amount of flexibility in defining UPDATEstatements.
Now that you have seen examples of how an UPDATEstatement works, it’s time to try a couple out for yourself. In this exercise you create UPDATEstatements that modify values in the DVDs table of the DVDRentals database.
Try It Out
Using UPDATE Statements to Modify Data in a Single Table
Follow these steps to perform updates to the DVDs table:
1.
Open the mysql client utility, type the following command, and press Enter: use DVDRentalsYou should receive a message indicating that you switched to the DVDRentals database.
2.
To update the record in the DVDs table, type the following UPDATEstatement at the mysql com-mand prompt, and then press Enter:UPDATE DVDs SET StudID=’s110’ WHERE DVDID=9;
You should receive an error message stating that a foreign key constraint has failed. This hap-pens because the StudID value does not exist in the referenced parent table (Studios).
3.
Now try updating the table in a different way. To update the record in the DVDs table, type the following UPDATEstatement at the mysql command prompt, and then press Enter:UPDATE DVDs SET StatID=’s1’ WHERE DVDID=9;
This time, you should receive a response saying that your statement executed successfully, affecting one row.
4.
To update the same record in the DVDs table, type the following UPDATEstatement at the mysql command prompt, and then press Enter:UPDATE DVDs
SET StatID=’s3’, MTypeID=’mt13’ WHERE DVDID=9;
You should receive a response saying that your statement executed successfully, affecting one row.
How It Works
In this exercise, you created three UPDATEstatements that attempted to update the DVDs table. The first statement tried to update the StudID value in the row that contained a DVDID of 9, as shown in the fol-lowing statement:
UPDATE DVDs SET StudID=’s110’ WHERE DVDID=9;
Your attempt to execute this statement failed because you tried to update the StudID value to a value that didn’t exist in the referenced column in the parent table (Studios). Had the Studios table contained a row with a StudID value of s110, this statement would have succeeded.
In this next UPDATEstatement that you created, you tried to change the StatID value of the row that con-tains a DVDID value of 9, as shown in the following statement:
UPDATE DVDs SET StatID=’s1’ WHERE DVDID=9;
with a DVDID value of 9 should be updated, only one row changed because the DVDID column is the primary key, so only one row contained that value.
The final UPDATEstatement that you created in this exercise updated two values in the DVDs table, as the following statement shows:
UPDATE DVDs
SET StatID=’s3’, MTypeID=’mt13’ WHERE DVDID=9;
In this statement, you specified that the StatID value should be changed to s3 and that the MTypeID value should be changed to mt13, both acceptable values in the referenced column. Notice that a comma separates the expressions in the SETclause. In addition, as with the previous statement, the updates applied only to the row that contained a DVDID value of 9.
Using an UPDATE Statement to Update Joined Tables
In the example UPDATEstatements that you’ve looked at so far, you updated individual tables without joining them to other tables. Although the tables contained foreign keys that referenced other tables, you specified no join conditions in the UPDATEstatements. For a join condition to exist, it must be explicitly defined in the statement.
As you saw earlier in the chapter, the UPDATEstatement includes an option that allows you to update joined tables. The following syntax shows the basic elements that are used to create an UPDATEstatement that modifies joined tables:
<joined table update>::=
<table name> [{, <table name>}...]
SET <column name>=<expression> [{, <column name>=<expression>}...] [WHERE <where definition>]
As you can see, this syntax contains many of the same elements as the syntax used to update a single table that is not specified in a join. One difference, however, is that you can specify more than one table in a statement that uses the <joined table update>alternative. In addition, this method of updating
a table does not allow you to specify an ORDER BYclause or a LIMITclause.
Generally, using an UPDATEstatement to modify data in multiple tables is not recommended for
InnoDBtables. Instead, you should rely on the ON DELETEand ON CASCADEoptions specified in the foreign key constraints of the table definitions.
When updating a joined table, you must specify the tables in the join, qualify the column names with table names, and define the join condition in the WHEREclause, as shown in the following UPDATEstatement:
UPDATE Books, Orders
SET Books.InStock=Books.InStock-Orders.Quantity WHERE Books.BookID=Orders.BookID
AND Orders.OrderID=1002;
Take a look at this statement one clause at a time. The UPDATEclause includes the name of both the Books table and the Orders table. Although you are updating only the Books table, you must specify both tables because both of them are included in the joined tables. Notice that a comma separates the table names.
The SETclause in this statement uses qualified column names to assign an expression to the InStock col-umn. Aqualified column nameis one that is preceded by the name of the table and a period. This allows MySQL (and you) to distinguish between columns in different tables that have the same name. For example, the first column listed (Books.InStock) refers to the InStock column in the Books table. Qualified names are required whenever column names can be confused.
According to the SETclause, the UPDATEstatement should set the value of the Books.InStock column to equal its current value less the value in the Quantity column of the Orders table. For example, if a value in the Books.InStock column is 6 and the value in the Orders.Quantity column is 2, the new value of the Books.InStock column should be 4.
The next clause in the UPDATEstatement is the WHEREclause. In this clause, you join the two tables by matching values in the BookID columns in each table: Books.BookID=Orders.BookID. By associating the tables through related columns in this way, you are creating a type of join. (Ajoinis a condition defined in a SELECT, UPDATE, or DELETEstatement that links together two or more tables. You learn more about joins