Software Testing with Visual
Studio Team System 2008
A comprehensive and concise guide to testing your
software applications with Visual Studio Team
System 2008
Software Testing with Visual Studio Team System 2008
Copyright © 2008 Packt Publishing
All rights reserved. No part of this book may be reproduced, stored in a retrieval system, or transmitted in any form or by any means, without the prior written permission of the publisher, except in the case of brief quotations embedded in critical articles or reviews.
Every effort has been made in the preparation of this book to ensure the accuracy of the information presented. However, the information contained in this book is sold without warranty, either express or implied. Neither the authors, Packt Publishing, nor its dealers or distributors will be held liable for any damages caused or alleged to be caused directly or indirectly by this book.
Packt Publishing has endeavored to provide trademark information about all the companies and products mentioned in this book by the appropriate use of capitals. However, Packt Publishing cannot guarantee the accuracy of this information.
First published: December 2008
Production Reference: 1121208
Published by Packt Publishing Ltd. 32 Lincoln Road
Olton
Birmingham, B27 6PA, UK.
ISBN 978-1-847195-58-6
www.packtpub.com
About the Authors
Subashni.S
, holds a Bachelors Degree in Computer Science Engineering and has around 10 years of experience in software development and testing life cycle, project,and program management. She is a certified PMP (Project Management Professional) and CSTM (Certified Software Test Manager). She started her career as DBA in
Oracle 8i technology and later developed many software applications using Borland software products for a multinational company based in Chennai, India and then moved to Bangalore, India. She is presently working for a multinational company
in the area of Project Management for developing and testing projects. Currently
working for one of the top multinational companies headquartered at Dallas, Texas
and placed at a MNC client in Austin, Texas.
holds a Bachelor's degree in Computer Science Engineering and has around 12 years of experience in software development life cycle, project, and program management. He started his career developing software applications using Borland software products in a company based in India. He then moved to the UAE where he continued developing applications using Borland Delphi and
customizing Great Plain Dynamics (now known as Microsoft Dynamics) for an
automobile sales company. He later moved to India again, spending three years in
designing and developing application software using Microsoft products for a top multinational company. A couple of years were also spent in Project Management and Program Management activities. Now he works as a Technical Architect for a top retail company based in the United States. He works with the latest Microsoft
technologies and has published many articles on LINQ and other features of .NET. He has also authored LINQ Quickly for Packt Publishing.
Table of Content
Preface 1
Chapter 1: Visual Studio Team System 2008 Test Types
7
Software testing in Visual Studio Team System 2008 7 Testing as part of Software Development Life Cycle 8
Types of testing 10
Test management and new testing features in VS 2008 15
Team explorer 15
Team system testing tools introduction 16
Test view 20
Test list editor 25
Lists of tests 25
Test results 29
Code coverage results 33
Overview of XML files for testing tools in Visual Studio 2008 35
Chapter 2: Unit Testing
37
Creating unit tests 38
Naming settings 40
General settings 41
Generated unit test code 43
StringAsserts 59
CollectionAssert 62
AssertFailedException 70
UnitTestAssertionException 71 ExpectedExceptionAttribute 71
Unit tests and generics 73 Data-driven unit testing 76 Unit testing an ASP.NET application 82 Unit testing web services 86 Code coverage unit test 89 Summary 91
Chapter 3: Web Testing
93
Creating web test 94
Recording a test 95
Adding comments 101
Cleaning the recorded tests 101
Copying the requests 101
Web test editor 102
Web test properties 103
Web test request properties 105
Other request properties 108
Form post parameters 109
Add web test plug-in 124
Add request plug-in 125
Performance session for the test 126
Debug/running web test 128
Settings for .testrunconfig file 128
General 129
Running the test 133
Chapter 4: Advanced Web Testing
139
Dynamic parameters in web testing 139
Coded web test 142
Creating a coded test from a recorded test 143
Transactions in coded test 149
Custom code 150
Adding comment 150
Running the coded web test 150
Debugging coded web test 153
Custom rules 155
Extraction rule 156
Validation rule 160
Testing web services 162
Summary 167
Chapter 5: Load Testing
169
Creating load test 170
Running the load test 199
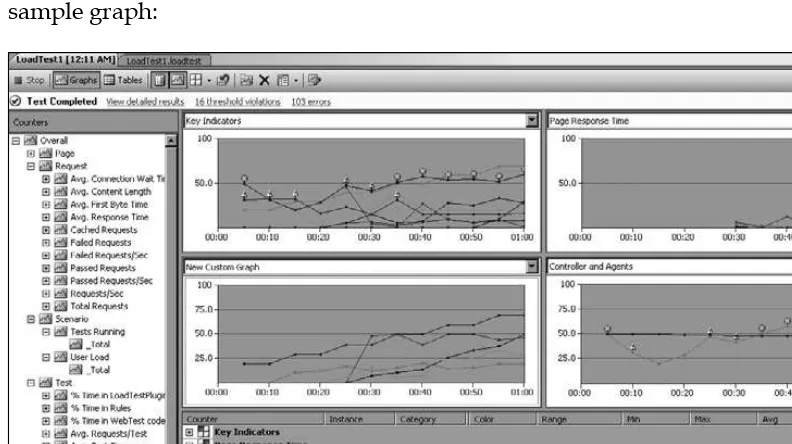
Running load test using rig 201 Working with test result and analyzing test results 204
Graphical view 204
Summary view 206
Table view 208
Exporting to Excel 210
Summary 210
Chapter 6: Manual, Generic, and Ordered Tests
211
Manual tests 212
Ordered tests 228
Creating an ordered test 228
Properties of an ordered test 230
Executing an ordered test 231
Generic tests 232
Creating a generic tests 233
Summary results file 235
Properties of a generic test 243
Summary 245
Chapter 7: Managing and Configuring the Test
247
Managing tests using test lists 247
Organizing test list 248
Setup and cleanup scripts 257
Test timeouts 258
Web test 258
Editing test run configuration file 259
Test properties 263
Summary 267
Chapter 8: Deploying and Running Tests
269
Local deployment 270
Remote deployment 272
Deploy additional files 273 Using deploymentItem attribute 275 Deploy items for individual test 276
Deployment order 277
Running tests 277
Run and rerun a test 277
Pause, resume, and stop a test run 278
Schedule test run 279
Chapter 9: Command Line
281
MSTest utility 281
Running a test from the command line 284
/testcontainer 284
Chapter 10: Working with Test Results
299
Test results 299
Test as part of Team Foundation Server build 300 Build report and test result 302
Code coverage 304
Build report with failed test 305
Stack trace 307
Creating Work Item from the result 307
Publish test results 311
Summary 312
Chapter 11: Reporting
313
TFS reports for testing 315
Bugs 315
Bug rates 316
Bugs by priority 317
Bugs found without corresponding tests 318
Load test summary 320
Creating new report 320
Report server project 321
Create a new report in Excel 330
Customizing report 332
Summary 333
Preface
The fi rst time we looked at the Visual Studio Team System 2008, we realized that there were lot of features that used to be different individual products on their own, that were very well integrated, and readily available under a single IDE. Some of these were available with earlier versions of Visual Studio, but this version is tightly integrated with the Team Foundation Server.
Microsoft Visual Studio Team System 2008 suite contains several tools that satisfy the needs of developers, testers, managers, and architects. Not only are the tools available, but they are also well integrated to collect information at every stage of the project life cycle and to maintain this information under one roof. The Visual Studio Team System 2008 is supported by Team Foundation Server, which is the central repository system that provides version control, process guidance and templates, automated build, manual and automated testing, bug tracking, work item tracking, and reporting.
Visual Studio Team System 2008 Team Suite provides all of the integrated tools for different team members. There are different editions for specifi c team members, including Architecture Edition, Test Edition, Database Edition, and Development Edition. This book covers the tools for the test and development phase of a project and for reporting the project status.
This book will help developers to get to know how to use the tools for automated unit testing, code analysis, and profi ling to test their own code and to fi nd out the performance and quality of their code. Testers will learn more about creating the web test, load test, and manual test, to determine the quality of the product, and also to raise defects and assign them to the developers for fi xing.
What This Book Covers
Chapter 1,Software Testing and Visual Studio Team System 2008—This chapter gives an overall introduction to software testing and the types of testing involved in the software development life cycle (SDLC). It also provides an introduction to the different tools available in Visual Studio Team System 2008 to support different testing types for the SDLC.
Chapter 2,Unit Testing—This chapter explains the testing tool used by developers to make sure that the code produces the expected result. Creating unit tests, generating code and different assert statements, and the types used for testing are explained in detail in this chapter. Various attributes used for differentiating classes from test classes and methods from test methods, along with the initializing and cleaning methods are also explained in detail in this chapter.
Chapter 3, Web Testing—This chapter walks us through the tool used for testing web applications developed using .NET. This tool is used for recording a test scenario and then testing it with sample data from different data sources. Applying validation and extraction rules, adding data sources, and adding transactions are explained in detail using a sample application in Visual Studio Team System 2008. Some of the features, such as adding Plug-ins, parameterizing the web server, and running and debugging the web tests, are covered in this chapter.
Chapter 4, Advanced Web Testing—Generating coded web tests from recorded web tests and creating coded web tests using the Visual Studio Team System 2008 tool are explained in detail and with examples. Some of the other advanced topics covered in this chapter include adding dynamic parameters, adding rules to the coded web test, creating custom rules, and running the coded web test.
Chapter 6, Manual, Generic, and Ordered Test—This chapter explains different tools that support testing an application manually, without using an automated testing tool. In the case of multiple interdependent tests, we can easily defi ne the tests to be run in a specifi c order so that the dependent tests don't fail. Visual studio supports all these including Generic and Smoke tests which are explained here.
Chapter 7, Managing and Confi guring Tests—Even though we have a lot of testing types and tools, managing these tests is sometimes a very diffi cult task. This chapter explains the easy way to organize the tests into lists, to enable and disable tests, confi gure the tests and test runs, view the tests using the Test View window and the test list editor, and run the tests in Visual Studio Team System 2008.
Chapter 8, Deploying and Running the tests—Once we are ready with the required type of test for the application, we have to deploy it on the test machines, run the test application, and collect the results for analysis. There are multiple ways of deploying the application and running the application using some of the advanced features provided by Visual Studio Team system 2008, and these are explained in detail in this chapter.
Chapter 9, Command Line—There are different ways of running a test based on the environment and requirements. In some situations, we may need a test to be run from the command line without using the user interface. The test works in the same way, but it runs without any user interaction. This chapter explains the different command line options and parameters used for running a test using command line commands.
Chapter 10, Working with Test Results—The main objective of running the tests is to collect the results and analyze them to correct any application errors, to make sure that the test is producing the expected result, and to increase the performance and stability of the application. This chapter explains in detail how to look at the test results and code coverage, and publish the test results.
What You Need for This Book
This book requires a basic knowledge of Visual Studio Team System 2008 and of integrating this with Team Foundation Server. The reader must be familiar with the Visual Studio IDE. Most testers might have used different testing tools, but they should be little bit familiar with coding in Visual Studio if they are intent on using the coded web test and their own unit testing. The following tools are required by testers and developers in order to make the most of all of the chapters of this book.
1. Visual Studio Team System 2008 Team Suite, Test Edition, or Developer edition
2. SQL Server Express
3. Team Foundation Server 2005 or later
4. Microsoft Offi ce (Word is required for Manual testing)
5. SQL Server Analysis and Reporting Server (for customizing reports and publishing them)
Who is This Book For
This book is for Microsoft developers and testers who are working with Visual Studio 2008, and who need to create a structured testing environment for their applications. No prior knowledge of testing is required. The reader will need to be familiar with the standard Visual Studio 2008 environment, but anyone who has previously created and compiled code in this environment will easily follow this book.
Conventions
In this book, you will fi nd a number of styles of text that distinguish between different kinds of information. Here are some examples of these styles, and an explanation of their meaning.
Code words in text are shown as follows: "We can include other contexts through the use of the include directive."
A block of code will be set as follows:
<Deployment>
<DeploymentItem filename="Test.dll" />
When we wish to draw your attention to a particular part of a code block, the relevant lines or items will be shown in bold:
pdbFile="C:\Workspace\WebTestPluginSample\
bin\Debug\WebTestPluginSample.pdb" instrumentInPlace="true" />
<CodeCoverageItem binaryFile="C:\Workspace\
WebTestPluginSample\bin\Debug\
Any command-line input and output is shown as follows:
mstest /testmetadata:[file name] /testlist:[test list name]
New terms and important words are shown in bold. Words that you see on the screen, for example in menus or dialog boxes, appear in the text like this: "Select the test project, right–click, and choose Add. Then select the option Web test from the context menu."
Warnings or important notes appear in a box like this.
Tips and tricks appear like this.
Reader Feedback
Feedback from our readers is always welcome. Let us know what you think about this book—what you liked or may have disliked. Reader feedback is important for us to develop titles that you really get the most out of.
To send us general feedback, simply send an email to [email protected], making sure that you mention the book title in the subject of your message.
If there is a book that you need and would like to see us publish, please send
Customer Support
Now that you are the proud owner of a Packt book, we have a number of things to help you to get the most from your purchase.
Downloading the Example Code for the Book
Visit http://www.packtpub.com/files/code/5586_Code.zip to directly download the example code.The downloadable fi les contain instructions on how to use them.
Errata
Although we have taken every care to ensure the accuracy of our contents, mistakes do happen. If you fi nd a mistake in one of our books—maybe a mistake in the text or in the example code code—we would be grateful if you would report this to us. By doing this you can save other readers from frustration, and help to improve subsequent versions of this book. If you fi nd any errata, please report them by visiting http://www.packtpub.com/support, selecting your book, clicking on the let us know link, and entering the details of your errata. Once your errata are verifi ed, your submission will be accepted and the errata added to any list of existing errata. Any existing errata can be viewed by selecting your title from
http://www.packtpub.com/support.
Piracy
Piracy of copyright material on the Internet is an ongoing problem across all
media. At Packt, we take the protection of our copyright and licenses very seriously. If you come across any illegal copies of our works in any form on the Internet, please provide the location address or website name to us immediately, so that we can pursue a remedy.
Please contact us at [email protected] with a link to the suspected pirated material.
We appreciate your help in protecting our authors, and supporting our ability to bring you valuable content.
Questions
Visual Studio Team System
2008 Test Types
Software testing is one of the most important phases of the Software Development Life Cycle (SDLC). The end product is based on design, coding, testing, and meeting the specifi ed requirements. The quality of the end product is measured by testing the product based on the requirement, using different testing tools and techniques. Even though we test the product with different tools, the real judgement of the product comes from the testing that simulates the real life situation, for example, by simulating the actual number of users, by simulating the load and simulating the actual production environment, and then by measuring the product. Microsoft Visual Studio 2008 provides not only the development environment and code maintenance for application but also different testing features such as Unit test, Load test, Web test, Coded tests, and Ordering tests list.
This chapter will give us an understanding of the tools in Visual Studio and an overview of the different types of testing supported by Visual Studio.
Software testing in Visual Studio Team
System 2008
The other aspect of this chapter is to see the different fi le types getting created in Visual Studio during testing. Most of these fi les are in XML format, which get created automatically whenever the corresponding test is created.
The tools such as the Team Explorer, Code Coverage, Test View and Test Results are not new to Visual Studio 2008 but actually available since Visual Studio 2005. For the new learners of Visual Studio, there is a brief overview on each one of those windows as we are going to deal with these windows throughout all or most of the chapters in this book. While we go through the windows and their purposes, we can check the IDE and the tools integration into Visual Studio 2008.
Testing as part of Software Development
Life Cycle
The main objective of testing is to fi nd the defects early in the SDLC. If the defect is found early, then the cost will be less, but if the defect is found during production or implementation stage, then the cost will be higher. Moreover, testing is carried out to assure the quality and reliability of the software. In order to fi nd the defect earlier, the testing activities should start early, that is, in the Requirement phase of SDLC and continue till the end of SDLC.
In the Coding phase, various testing activities takes place. Based on the design, the developers start coding the modules. Static and dynamic testing is carried out by the developers. Code reviews and code walkthroughs are also conducted.
Once the coding is completed, then comes the Validation phase, where different phases or forms of testing are performed.
Unit Testing: This is the fi rst stage of testing in SDLC. This is performed by the developer to check whether the developed code meets the stated requirements. If there are any defects, the developer logs them against the code and fi xes the code. The code is retested and then moved to the testers after confi rming the code without any defects for the piece of functionality. This phase identifi es a lot of defects and also reduces the cost and time involved in testing the application and fi xing the code.
Integration Testing: This testing is carried out between two or more modules or functions together with the intent of fi nding interface defects between them. This testing is completed as a part of unit or functional testing, and sometimes becomes its own standalone test phase. On a larger level, integration testing can involve putting together groups of modules and functions with the goal of completing and verifying that the system meets the system requirements. Defects found are logged and later fi xed by the developers. There are different ways of integration testing such as top-down testing and bottom-up testing:
The Top-Down approachis followed to test the highest level of components and integrate fi rst to test the high-level logic and the fl ow. The low-level components are tested later. The Bottom-Up approach is the exact opposite of the
top-down approach. In this case, the low-level functionalities are tested and integrated fi rst and then the high-level
functionalities are tested. The disadvantage in this approach is that the high-level or the most complex functionalities are tested later.
The Umbrella approach uses both the top-down and bottom-up patterns. The inputs for functions are integrated in the bottom-up approach and then the outputs for the functions are integrated in the top-down approach.
System Testing: It compares the system specifi cations against the actual system. The system test design is derived from the system design documents and is used in this phase. Sometimes, system testing is automated using testing tools. Once all the modules are integrated, several errors may arise. Testing done at this stage is called system testing. Defects found in this testing are logged and fi xed by the developers.
Regression Testing: This is not mentioned in the testing phase, but is carried out once the defects are fi xed by the developers. The main objective of this type of testing is to determine if bug fi xes have been successful and have not created any new problems. Also, this type of testing is done to ensure that no degradation of baseline functionality has occurred and to check if any new functionality was introduced in the software.
Types of testing
Visual Studio provides a range of testing types and tools for software applications. Following are some of those types:
Unit test
In addition to these types, there are additional tools provided to manage, order the listing, and execute tests created in Visual Studio. Some of these are the Test View, Test List Editor, and the Test Results window. We will look at these testing tools and the supporting tools for managing the testing in Visual Studio 2008 in detail later.
Unit test
As soon as the developer fi nishes the code, the developer wants to know if it is producing the expected result before getting into any more detailed testing or handing over the component to the tester. The type of testing performed by the developers to test their own code is called Unit testing. Visual Studio has great support for Unit testing.
The main goal of the unit testing is to isolate each piece of the code or individual functionality and test if the method is returning the expected result for different set of parameter values. It is extremely important to run unit tests to catch the defects in the early stage.
Unit testing code can be easily created by using the code generation feature, which creates the testing source code for the source application code. The generated unit testing code will contain several attributes to identify the Test Class, Test Method, and Test Project. These attributes are assigned when the unit test code gets generated from the original source code. Then using this code, the developer has to change the values and assert methods to compare the expected result from these methods.
The Unit test class is similar to the other classes in any other project. The good thing here is that we can create new test classes by inheriting the base test class. The base test class will contain the common or reusable testing methods. This is the new Unit testing feature which helps us reduce the code and reuse the existing test classes.
Whenever any code change occurs, it is easy to fi gure out the fault with the help of Unit tests, rerun those tests, and check whether the code is giving the intended output. This is to verify the code change the developer has made and to confi rm that it is not affecting the other parts of the application.
All the methods and classes generated for the automated unit testing are inherited from the namespaceMicrosoft.VisualStudio.TestTools.UnitTesting.
Manual test
Manual testing is the oldest and the simplest type of testing, but yet very crucial for software testing. It requires a tester to run all the tests without any automation tool. It helps us to validate whether the application meets various standards defi ned for effective and effi cient accessibility and usage.
Manual testing comes to play in the following scenarios:
1. There is not enough budget for automation.
2. The tests are more complicated, or are too diffi cult to be converted into automated tests.
3. The tests are going to be executed only once. 4. There is not enough time to automate the tests.
5. Automated tests would be time-consuming to create and run.
Web tests
Web tests are used for testing the functionality of the web page, web application, web site, web services, and a combination of all these. Web tests can be created by recording the interactions that are performed in the browser. These can be played back to test the web application. Web tests are normally a series of HTTP requests (GET/POST).
Web tests can be used for testing the application performance as well as for stress testing. During HTTP requests, the web test takes care of testing the web page redirects, validations, viewstate information, authentication, and JavaScript executions.
There are different validation rules and extraction rules used in web testing. The validation rules are used for validating the form fi eld names, texts, and tags in the requested web page. We can validate the results or values against the expected result as per business needs. These validation rules are also used for checking the time taken for the HTTP request.
At some point in time, we need to extract the data returned by the web pages. We may need the data for future use, or we may have to collect the data for testing purposes. In this case, we have to use the extraction rules for extracting the data returned by the page requested. Using this process, we can extract the form fi elds, texts, or values in the web page and store it in the web test context or collection.
Web tests cannot be performed only with the existence of a web page. We need some data to be populated from the database or some other source to test the web page functionality and performance. There is a data binding mechanism used in Web test, which is used for providing the data required for the requested page. We can bind the data from a database or any other data source. For example, the web page would be a reporting page that might require some query string parameters as well as the data to be shown in the page according to the parameters passed. To provide data for all these data-driven testing, we have to use the concept of data binding with the data source.
Web tests can be classifi ed into Simple Web tests and Coded Web tests. Both these are supported by VSTS.
Simple Web tests are very simple to create and execute. It executes on its own as per the recording. Once the test is started, there won't be any intervention. The disadvantage is that it is not conditional. It's a series of valid fl ow of events.
Coded Web tests are bit more complex, but provide a lot of fl exibility. For example, if we need some conditional execution of tests based on some values then we have to depend on this coded web test. These tests are created using either C# or Visual Basic code. Using the generated code we can
control the fl ow of test events. But the disadvantage is its high complexity and maintenance cost.
Load test
Load testing is a method of testing used in different types of testing. The important thing with Load testing is that it is about performance. This type of testing is conducted with other types of testing, which means that it can be performed along with either Web testing or Unit testing.
The main purpose of load testing is to identify the performance of application based on different scenarios. Most of the time, we can predict the performance of the application that we develop, if it is running on one machine or a desktop. But in the case of web applications such as online ordering systems, we know the estimated maximum number of users, but do not know the connection speeds and location from where the users will access the web site. For such scenarios, the web application should support all the end users with good performance irrespective of the system they use, their Internet connection, the place, and the tool they use to access the web site.
So before we release this web site to the customers or the end users, we should check the performance of the application so that it can support the mass end user group. This is where load testing will be very useful in testing the application along with Web test or Unit test.
When a Web test is added to a Load test, it will simulate multiple users opening simultaneous connections to the same web application and making multiple HTTP requests. Load testing in Visual Studio comes with lots of properties which can be set to test the web application with different browsers, different user profi les, light loads, and heavy loads. Results of different tests can be saved in a repository to compare the set of results and improve their performance.
In case of client server and multi-tier applications, we will be having a lot of components which will reside in the server and serve the client requests. To get the performance of these components, we have to make use of a Load test with a set of Unit tests. One good example would be to test the data access service component that calls a stored procedure in the backend database and returns the results to the
Load tests can be run either from the local machine or by submitting to a rig, which isa group of computers used for simulating the tests remotely. A rig consists of a single controller and one or more agents.
Load tests can be used in different scenarios of testing:
1. Stress testing: This checks the functionality of the application under heavy load. The resource provided to the application could vary based on the input fi le size or the size of the data set, for example, uploading a fi le which is more than 50MB in size.
2. Smoke testing: This checks if the application performs well for a short duration with a light load.
3. Performance testing: This checks the responsiveness and throughput of the application with different loads.
4. Capacity Planning test: This checks the application performance with various capacities.
We will see more about setting the Load test properties, working with test rig and analysing the Load test results later in this book.
Ordered test
As we know, there are different types of testing required to build quality software. We take care of running all these tests for the applications we develop. But we also have an order in which to execute all these different tests. For example, we do the unit testing fi rst, then the integration test, then the smoke test, and then we go for the functional test. We can order the execution of these tests using Visual Studio.
Another example would be to test the confi gurations for the application before actually testing the functionality of the application. If we don't order the test, we would never know whether the end result is correct or not. Sometimes, the tests will not go through successfully if the tests are not run in order.
Ordering of tests is done using the Test View window in Visual Studio. We can list all the available tests in the Test View and choose the tests in the same order using different options provided by Visual Studio and then run the tests. Visual Studio will take care of running the tests in the same order we have chosen in the list.
Ordered test is the best way of controlling the tests and running the tests in an order.
Generic test
We have seen different types and ways of testing the applications using VSTS. There are situations where we might end up having other applications for testing, which are not developed using Visual Studio. We might have only the executables or binaries for those applications. But we may not have the supported testing tool for those applications. This is where we need the generic testing method. This is just a way of testing third-party applications using Visual Studio.
Generic tests are used to wrap the existing tests. Once the wrapping is done, then it is just another test in VSTS.
Using Visual Studio, we can collect the test results, and gather the code coverage data too. We can manage and run the generic tests in Visual Studio just like the others tests.
Test management and new testing
features in VS 2008
Visual Studio Team 2008 has great features for working with the type of tests we've just described. These features are greatly improved from the previous versions of VSTS. The Team Explorer, Test View, and Test List Editor are some of those main IDE add-ins used for tests management.
Team explorer
Team Explorer is the add-on to the VSTS IDE. Using this explorer, the developer or a user of Visual Studio can browse through the Team Projects in the TFS to which the explorer is connected. TFS is the central repository for managing and controlling the team projects. To work with any of the team projects in the TFS, fi rst we have to connect to it using VSTS. After connecting to the server, we can use Team Explorer to browse through the details of the particular Team Project.
Team Explorer is a client of TSF and is integrated with the VSTS. Team Explorer provides features to work with the team project details such as:
Accessing project, process guidance documents that explain the process to be
Managing work items such as tasks, defects, issues, and requirements. Importing and exporting the work items.
Accessing the project fi les and source control management. Adding, removing, confi guring, and managing the Team Projects. Creating, managing, and automating the project builds.
Managing favorites which are shortcuts to the favorite nodes of the Team Project.
Managing the reports. It could be defect reporting or any type of work items reporting.
Team system testing tools introduction
Visual Studio 2008 provides many tools to create, run, debug, and view results of the tests for the applications. It is very fl exible for running a test and getting the results. Given below are an overview of the tools and windows provided by Visual Studio to view the test details and test output details. We will look into more details of the actual usage of these tools later in Chapter 10. But here, we will look into the overview of each of the tools available in Visual Studio 2008.
• • • • • •
Let us see how we can create a new testing project using Visual Studio 2008, and then we will test a sample project to get to know about the tools and features.
O pen Visual Studio 2008 and open the solution of the application which is developed using C# or VB.NET. We will not go into the details of the sample application
TestingApp as shown in the preceding screenshot. We will just create a test project for the sample application and see the features of the tools and windows.
Now similar to adding the projects and code fi les to the solution, we have to create the test project and test fi les and add the test project to the solution. There are different ways of creating test projects under the solution.
2. Select the solution and then from the top toolbar menu option, select the option Test|New Test..., which will list down all the test type templates. Now you can select the type of template we need for the testing. You can see the option which is a drop-down saying Add to Test Project with the options as list of <projectnames>, Create a new Visual C# test project…, Create a new Visual Basic test project..., and three more options.
The Add New Test dialog contains nine different template options for creating the tests. There are two different templates for the Manual Test with one using Text fi le and the other using a Word document. The Unit testing template is of three types; one is for the Database Unit Test, the second one for the general Unit Test, and the third one for the Unit Test Wizard. Following are the fi le extensions for each of the VSTS test types as shown in the preceding in the image.
. vb—is for the Database Unit test .generictest—for the Generic test type
.loadtest—for test which is of type load test
.mtx—for manual test using text fi le format
.mht—for manual test using word document format
.orderedtest—for ordered test types
.vb—for unit test
.webtest—for web testing
After selecting the test type, give a name for the test in the Test Namefi eld. Select the Create new Visual C# test Project… in the Add to Test Project option. We will
•
•
Now, the system will ask for a name for the new test project. Let us name it TestProjectforTestingApp.
Now, we can notice that there are two fi les created as <ProjectName>.vsmdi, which is the metadata fi le, and LocalTestRun.testrunconfi gfi le created under the solution for the test projects. The metadata fi le contains all the information about the tests list. It is an XML fi le which has all the details.
Add two more tests of any type you want. For this example, I have added one more Manual Test using Word document and one Unit test as shown in the Solution Explorer here.
Now, let us see the different windows and tools available in support of all the tests that we can perform using Visual Studio. We will take the sample Manual testing example for getting to know about the tools.
Test view
The screenshot shows the default test view with the list of tests based on the type. We can customize the test view using the fi lters, grouping and adding or removing the columns which we are going to see in the coming paragraphs.
The Test View window has its own toolbar for different operations that can be performed on the list. The left-most option in the toolbar is the run and debug option, by which we can start the VSTS process for running or debugging the selected tests.
The third one is the Group By option which has a drop-down with a list of test properties using which we can group the list of tests available.
In the preceding screenshot, remove the criteria entered for the fi lter in the second drop-down and click on the arrow which will show all the available tests.
1. Now select any of the values available in the Group By drop-down.
2. On selecting the drop-down, we can see the list groups based on the value of the property selected in the drop-down.
The three screenshots below show the tests grouped based on the type. We have two Manual tests and one Unit test. If we select the Group By as the Class Name as shown in the second screenshot, we can see that both of the Manual tests are under No Class Name and the Unit Test is under UnitTest1. Here the class name is no name because the manual tests will not have any classes. Same is the case when we select Description as the Group Byfi eld as shown in the third screenshot below. The test which is of type Unit test, and the test which is of type Manual Test are shown together because both these tests do not have a description.
The screenshot below shows the tests grouped by Class Name. The Manual tests does not have class name as it is not derived from any class and does not have a class.
We can change the descriptions of the tests and group them together. Whenever we change the description or class name or an editable property of the test, it will be grouped under that property, if it exists. Otherwise, it will be shown as a new property with that new group. For example, if we change the description of all the tests to Sample Test and group the tests by description, then we can see all the tests grouped together as shown here:
In the Test View, we can select the available columns to display in the view, and we can also sort them using the column header.
The following steps explain how to show a column in the view display and how to sort them:
1. Right-click on the columns that are available in the Test View window, and select the Add/Remove Columns option. The Add/Remove Columns dialog box get displayed.
For sorting the columns, click on each column header to change the sorting order. If the same column is already sorted, then the sorting order will be changed.
Test list editor
All features available in Test View are also available in the Test List Editor with some additional features. Through this window, we can create the test lists by grouping the available tests. We can also select multiple tests from the list and run them using this window.
Whenever we open the Test List Editor using the menu option Test | Windows | Test List Editor, we can see the window as follows showing all the available tests:
The toolbar in the Test List Editor window has the same features that we saw in the Test View window. But you can see that the details section of the list window is split into two panes. The left pane of the window has three nodes, and the right pane displays all the tests in the lists based on the selection in the left pane. The Test List Editor displays the following three options as nodes.
Lists of tes ts
We can click on the here link and give the details for the new test list in the window that opens up as Create New Test List. Let's call that test list Manual Tests to group all the available manual tests.
Now choose both the Manual tests on the right pane and just drag and drop them on the Manual Tests node on the left pane, which we created earlier. The other way of doing the same is, after selecting both manual tests, by right-clicking and choosing the New Test List.. option. We will get a window similar to what we saw earlier in Create New Test List.
Now if we select the node Tests Not in a List, we can see only the other tests that we had not selected in our previous steps to add to the Manual Tests list.
Select the third node in the left pane All Loaded Tests. This option will list down all the tests available, whether it is added to a Test List or not. We can also see the Test List name to which a particular test is added; and it will remain empty for the tests which are not part of any of the Test Lists. The following screenshot shows all the loaded tests in the project:
There are two more options in editor toolbar: Load Metadata and Import Metadata. These are helpful in loading the existing Test Lists, which are already saved but not available in the current list. This Import and Load refer to the metadata fi le that gets created for the Test Project under the solution. It's the fi le with the extension vsmdi, which contains all the information about the tests lists.
All other options in the toolbar are the same as the options available in the Test View window such as grouping, fi ltering, and adding or removing columns.
Test results
This window shows the results of the tests run. It shows the error messages or the statuses of the multiple tests run. We can also reselect the tests from the Test Results window and rerun the tests. Using this window, we can export the test results or import the results already exported. This is useful in viewing the result in the Test Results window and rerun the test.
We will see more details about the Manual Tests in Chapter 5. But for now, we will consider the test, manualtestdoc as passed, and the test ManualTestText as failed. While running the tests, we can fi nd the tests in progress and the status of the completed tests in the Test Results window as shown below. It's just the starting of the tests. So both the tests are in pending stage.
After completing both the tests, we can see the results as shown in the following screenshot. It will clearly indicate the status for each result. The window also shows the summary of the results, passed and failed. If we want to rerun the test, we don't need to go to the List Editor. From the results window, we can select the tests and rerun them. Using the checkbox before the test in the list window, we can select the test and then choose the Run or Debug option to rerun it.
In the preceding screenshot, we can also notice that there are two panes similar to the Test List Editor. The second option in the toolbar shows the list of Test Lists available and their corresponding tests in the right pane. It is the same option that we saw in the Test List Editor.
There is another option in the Test Results, which is the option to export the results. Whenever we fi nish our testing, we always would want to save the results of the tests for our further analysis. In the toolbar, we can see the option for exporting the test results. It provides two options, Export Test Run Results... to export all test results and Export Selected Test Results... to export only the selected test run result. We can also import the saved result using this window. Refer Chapter 10 for more details about the export and import functionality.
The .trx test result fi le is created by the VSTS on execution of the test every time. The fi le is named after the user, machine name, the date and time of execution. In the previous image, you can see the test name as Subashni@MyPC 2008-02-16 19:59:50, which shows the name of the user logged in and running the test, the machine name, and then the date and time of execution. The .trxfi le is an XML fi le with all information about the test result. If you open the .trxfi le, it will open the test result window in Visual Studio and show the details in the Test Results window. The contents of the test result fi le would look like the code shown below. This is just a sample and part of the generated test result fi le:
<?xml version="1.0" encoding="UTF-8"?>
<TestRun id="7c0e0d0a-5068-436c-887e-b4367ad893c2"
name="Subashni@MyPC (2008-02-16 29:59:50)" runUser="Subashni" xmlns="http://microsoft.com/schemas/VisualStudio/
TeamTest/2006">
<TestRunConfiguration name="TestRunConfig1"
id="fa788594-6ac2-495e-a484-2229faa94326"> <Description>Test configuration file with the user defined scheme</Description>
<CodeCoverage enabled="true"> <Regular>
<CodeCoverageItem binaryFile="C:\Workspace\CustomRules\bin\ Debug\CustomRules.dll"
<Timeouts runTimeout="1800000" testTimeout="2700000" /> <Remote controllerName="<Local - No controller>" /> <Deployment runDeploymentRoot="C:\Workspace\TestingApp\
TestResults\Subashni_MyPC _2008-02-16 19_59_50_"> <DeploymentItem filename="C:\Workspace\CustomRules\bin\Debug\ CustomRules.dll" />
<DeploymentItem filename="C:\Workspace\ServiceHostApp\ ServiceHostApp\bin\ServiceHostApp.dll" /> <DeploymentItem filename="C:\Workspace\WebTestPluginSample\bin\ Debug\WebTestPluginSample.dll" />
<DeploymentItem filename="C:\Workspace\ProjectGenericsSample\ bin\Debug\ProjectGenericsSample.exe" /> <DeploymentItem filename="Test.dll" />
<DeploymentItem filename="C:\Workspace\TestLibrary\bin\Debug\ TestLibrary.dll" />
<DeploymentItem filename="C:\Program Files\
</Deployment>
<NamingScheme baseName="Subashni@MyPerPC" useDefault="false" /> <Scripts setupScript="C:\Workspace\TestingApp\
SetEnvironment.bat" />
Code coverage results
Code coverage provides info rmation about codes and how many kinds of codes are covered during the test run. This is to view the statistical information about the test run. This result will show how many lines of code are executed and how many lines are not executed. We can also get the color coding for the lines run, and different color coding for the lines not run. This is also a kind of test result.
Before starting the code coverage we have to confi gure the code coverage. Select the Test | Edit Test Run Confi gurations | Local Test Run option. These confi gurations are stored in the confi guration fi le, localtestrun.testrunconfig.In the
confi guration window, select the option Code Coverage in the left pane. On the right-side pane, we can see the list of all the available artifacts for code coverage. The artifacts could be an application, or a library, or any type of assembly. We can choose the artifacts from the list, or we can also import the artifacts using the Add Assembly option and then choose that for the code coverage. As shown in the following
When we click on apply in th e above window, the code coverage is enabled only for the assemblies selected. When the application is executed, we can see the code coverage window collecting information about the source code covered in testing as shown in the following screenshot. The code coverage window is available under the menu option Test | Windows | Code Coverage Results. Lets try running the unit test application available in the test list editor under the Tests Not in a List which has the Unit test. After running the test, we can see the code coverage results as shown in the following screenshot:
The Code Coverage Results window shows each block covered, blocks not covered, and the percentage of coverage for blocks. This applies to each run of the test. Next time we run the same test, we can see a different set of results under a new name. We can see more about how we can run the Unit test and analyze the code coverage in the next chapter on Unit Tests.
In the Unittest1 class, we can also notice the color coding based on the coverage. This is the code which is covered under testing, and code that is not covered will be highlighted with color coding.
Overview of XML files for testing tools in
Visual Studio 2008
T here are several XML fi les used by the VSTS Test Edition for storing the test information. All these documents should conform to the schema defi ned in the
TestTypes.xsdfi le.
We have seen some of the XML document types in the previous examples, and here is the summary of all the XML documents for different test types supported by Visual Studio. Each of these is explained in detail in the individual chapter that explains the type of test.
1. Test Metadata fi le: This fi le stores information about all the tests in the solution. It has the extension .vsmdi.
2. Test Results fi le: This fi le contains the results of the tests that were run. This fi le will be created automatically by Visual Studio when any test is run. It has the extension .trx.
3. Test Run Confi guration fi le: This fi le contains the settings that specify how the test runs should proceed further. It has the extension .testrunconfig. 4. There are other XML fi les for different test types with some specifi c
extensions such as .webtest, .loadtest, .orderedtest, .generictest.
XML schema was changed from Visual Studio 2005 Team Edition to the release of Visual Studio Team System 2008 Test Edition. So the XML documents that were created using Visual Studio 2005 Team Edition for Testers need to be upgraded to VSTS 2008 Test Edition before starting to use those XML documents. These XML documents can be converted to the current format using the exe,
VSTST-FileConverter.exe.
This fi le accepts one parameter which is the XML document for the test created using Visual Studio 2005. For example, if the test is an ordered test with the name SampleOrderedTest1, then it should be converted using the converter to
>VSTST-FileConverter.exe SampleOrderedTest1.orderedtest
To get help on the fi le converter, we can use the following command:
Summary
This chapter gave an overview of the different types of testing that we can perform using Visual Studio 2008. We have also looked at how we can create the test project in Visual Studio, and how we make use of different tools that support testing in Visual Studio. Now, we should be able to create and execute a test project and create the test lists. We got an idea of how to view the test results using the Test Results window and look into the Code Coverage Results window. This chapter also explained about different types of XML and confi guration documents that were created during the testing.
Unit Testing
Unit testing is the testing technique used for confi rming if the piece of code is producing the result as expected. In project development, there may be many modules and each module comprises a set of code or functionalities. Identifying the piece of code in the module, which causes the defect is always a time-consuming task and the cost involved is also more. It is always better to test the code in units and confi rm the functionality before integrating the code into module(s). Requiring all code to pass the unit tests before they can be integrated ensures that the functionality always works. Make sure each unit of code is written for one piece of functionality so that the result produced by each unit test is for a single functionality. Every time a defect is fi xed or code is modifi ed, we don't have to manually retest the unit, spending a lot of time and money. The automated unit test will help us make sure the functionality is unaffected.
VSTS is used for generating the unit test for the methods irrespective of whether they are public or private. Unit test is another class fi le similar to any other class and methods having additional attributes to defi ne the Test class and the Test method. The unit tests can be created either by manually writing the code or by generating the unit test code using the Create Unit Tests option from the context-menu in VSTS.
The generated unit test class contains special attributes assigned to the class and methods in the class. Test classes are marked by the attribute [TestClass()] and each test method is marked with the attribute [TestMethod()]. Apart from these two, there are many other attributes used for unit testing. After generating the unit test class and methods, we can use the Assert method to verify the produced result with the expected value.
All of the unit test classes and methods are defi ned in the namespace Microsoft.
Creating unit tests
There are two different ways of creating a unit test. One is the manual way of writing the code and the other is to generate the unit test code for the class using the option in Visual Studio. To see how a test class is generated, let us consider the class library below, following which is a very simple example of total price calculation.
For creating a new class library, open VSTS and select New Project under the File menu option and then select Class Library from the available templates.
using System;
public double CalculateTotalPrice(double quantity) {
Let us select both the methods CalculateTotalPrice(System.Double) and
GetTotalPrice(). Now Visual Studio creates a new class fi le for the selected method's class. We can see the class name as Class1 in the previous screenshot. So the test class created for this would be Class1Test.
Wh ile creating the unit test, we can change the settings using the option in the Create Unit Tests window. These settings are used for changing the way of creating the unit tests by changing the fi le name, unit test class names, and the method name generation. The settings also enable and disable some of the standard code and method attributes that generates by default for all the unit test code.
The following two sections explain in detail about the settings that may be used during unit test code generation.
Na ming settings
The following are the fi elds under the Name settings section of the Test Generation Settings dialog:
File Name—This is to modify the way the fi le name is generated. The [Class] will be replaced with the actual class name at the time of generating the code. If required, we can add our own text in addition to the name.
Class Name—By default the unit test class name is made up of the actual class name with the string Test added. We can customize the class name as we want if we don't like the default name suggested by the tool.
•
Method Name—This is similar to the Class Name and the File Name. By default VSTS assigns the actual method name followed by the text Test. The [Method] is replaced with the actual method name at the time of code generation.
General settings
The se are the general settings applicable for the default basic code generated for each unit test. Using this we can enable or disable some of the common code generated for the classes.
Mark all test results Inconclusive by default—When this option is enabled,
the Assert.Inconclusive statement is added to all the methods in the unit
test class. This is useful to specify the method is incomplete, as we have not added any test code yet. The method only contains the skeleton of the auto-generated test method. Later on, once we add the actual test code to the method we can safely remove this Assert.Inconclusive call.
Assert.Inconclusive("Verify the correctness of
this test method.");
Enable generation warnings—If there are any unexpected errors during the test method generation, the code generator will add the error message as a comment within the test method body. This will help us resolve the issue and add the code later on.
Globally qualify all types—This is to resolve the confl ict between the same type name used in multiple classes. The unit test code may contain multiple class fi le test methods. Sometimes the same type may be used in different class fi les. So to make sure the types are unique across the test, the namespaces are added to all the types in the test.
Honor InternalsVisiableTo Attribute—This attribute will make all the internal attributes visible to the assembly and we will be able to call this just like any other public method.
For example if we have an internal method like this,
// Sample method for generating unit test for Internal // method
internal static bool MethodforInternalExample(string str) {
The unit test generated for this internal method would be just a public method like any other method.
/// <summary>
///A test for MethodforInternalExample ///</summary>
[TestMethod()]
public void MethodforInternalExampleTest() {
Add assembly—This option in the Create Unit Tests dialog, is used for adding additional assemblies for generating the unit tests. The Add assembly option helps us select the assembly to be added and then displays the methods and classes from the assembly. We can select the methods from the tree view and then generate the unit test.
•
Ge nerated unit test code
The following is the unit test code generated for the selected methods and the class with all the default attributes set for each method. You may also notice that the
Assert.Inconclusive call is added to all the methods by default based on the
settings. VSTS also adds the default start up and cleaning methods, which we can make use of for testing. The following are the list of attributes used for test class and test methods:
Attributes Description
TestClass() To identify the unit test class within the fi le.
ClassInitialize() The method with this attribute is used for preparing the class for
the test; for example, setting up the environment or collecting details which are required for testing are handled within this method; the method with this attribute is executed just before the
fi rst test in the class; each test class can have only one method as
the class initializer.
ClassCleanup() The method with this attribute is used for cleaning or destroying
the objects used in the test; this method is executed after all the tests in the class are run; test class can contain only one method as the ClassCleanup method.
TestInitialize() The method with this attribute is used for initializing or running
the code before each test.
TestCleanup() This method is run after each test in the class; this is similar to
the ClassCleanup but the difference here is that the method is executed once after each test.
TestMethod() This attribute identifi es the method to be included as part of
the test; this method has the unit test code for the method in the original class fi le.
In the following code, we can see many attributes and properties set to the class and methods. Visual Studio by default creates some methods with special attributes which are commented. If these methods are required for testing, we can uncomment it and make use of it.
public class Class1Test {
private TestContext testContextInstance;
/// <summary>
//{
It is recommended to use the TestCleanup and ClassCleanup methods instead of the Finalizer method for all the test classes. The exceptions thrown from the
Finalizer method will not be caught leading to unexpected result. The cleanup
activity should be used for bringing the environment to its original state. For example, during testing we might have updated or inserted more records to the database tables or would have created lot of fi les and logs. This information should be removed once the testing is complete and the exceptions during this process should be caught and rectifi ed.
Assert statements
The assert statement is used for comparing the result from the method with the expected result and then passing or failing the test based on the match. Whatever may be the result produced by the method, the end result of the test method depends on the return value of the assert method. The assert statement takes care of setting the result. There are different statements supported by the Assert class to set the return value to Pass or Fail or Inconclusive. If the assert statement is not present in the test method, the test method will always return a Pass. If there are many assert statements in the test method, the test will be in Pass state until one of the assert statements returns Fail.
In the previous example, the test method CalculateTotalPriceTest has two assert statements Assert.AreEqual and Assert.Inconclusive. The Assert.AreEqual
has two parameters—one as expected which is the expected value that should be returned by the CalculateTotalPrice method and the other as actual indicating the actual value returned by the method. The Assert.AreEqual statement, which is explained in detail in the next section, compares these two values and returns the test result as Pass if both the value matches. Returns Fail if there is a mismatch between these two values.
[TestMethod()]
The test method also has the Assert.Inconclusive statement to return the result as inconclusive if the test method is not complete. We can remove this line if the code is complete and we do not want the test result to be inconclusive. In the previous code, if we run the test without setting the value for quantity and expected the return would
be Inconclusive. Now set the value for the quantity and expected as:
double quantity = 10F;
double expected = 159F;
The result returned would be a Fail because the actual value returned by the method would be 160, while our expected value is 159. If you change the expected value to 160 then the test would pass. We have seen only one type of assert
statement. There are many other asserts, which we can use in test methods for passing or failing the test.
Types of asserts
The Assert classes in VSTS contain the comparison and conditional testing
capabilities. The namespace Microsoft.VisualStudio.TestTools.UnitTesting
in VSTS contains all these asserts. The actual and the expected values are compared based on the type of assert used and the result decides the test pass or failure.
The assert class
The assert class has many different overloaded methods for comparing the values. Each method is used for a specifi c type of comparison. For example, an assert can compare a string with a string or an object with another object, but not an integer with an object. Overloaded methods are like the additional or optional parameters to the method in case we want custom messages or the additional functionality to be added. For example, the assert method provides an overloaded method to compare the values within a specifi ed accuracy, which we will see in detail when comparing double values.