Matthew MacDonald
Silverlight 2
Visual Essentials
232
PAGES
Available as a PDF Electronic Book
About firstPress
Apress's firstPress series is your source for understanding cutting-edge technology. Short, highly focused, and written by experts, Apress's firstPress books save you time and effort. They contain the information you could get based on intensive research yourself or if you were to attend a conference every other week—if only you had the time. They cover the concepts and techniques that will keep you ahead of the technology curve. Apress's firstPress books are real books, in your choice of electronic or print-on-demand format, with no rough edges even when the technology itself is still rough. You can't afford to be without them.
Silverlight 2 Visual Essentials
Dear Reader,This concise book explores what visual elements and visual programming functionality Silverlight 2 has to offer. These visual elements are really the key to the appeal of Silverlight, and so they are the focus of the book. Among the topics addressed are
A solid introduction to all aspects of Silverlight where you build a simple Silverlight project Silverlight’s layout manager and Silverlight elements
The Silverlight event model The application model
Shapes and geometries available to Silverlight developers Brushes and transforms
A brief discussion of what you can do with animations in Silverlight
While there is some code, that is not the point of the book. Rather, it is to get you to quickly understand what visual functionality is available and what programming options are available, without getting bogged down in much code.
The text assumes that if you are a programmer, you have an understanding of XAML. However, if you ignore the code, any decision maker who needs to get a better understanding of what Silverlight can do, any layperson, or even an administrator can come to grips with the visual elements of Silverlight.
Best Regards,
Contents
Chapter 1: Introducing Silverlight...1
Understanding Silverlight... 2
Silverlight vs. Flash... 6
Silverlight 1.0 and 2.0 ... 9
Silverlight and WPF ... 9
Silverlight and Visual Studio... 12
Understanding Silverlight Web Sites ... 12
Creating a Silverlight Project ... 14
The Anatomy of a Silverlight Application... 15
Creating a Simple Silverlight Page ... 18
Adding Event Handling Code ... 20
Browsing the Silverlight Class Libraries ... 23
Testing a Silverlight Application ... 27
Creating an ASP.NET Web Site with Silverlight Content... 29
Silverlight Compilation and Deployment... 34
Compiling a Silverlight Assembly ... 34
Deploying a Silverlight Assembly ... 36
The HTML Entry Page... 38
The Application Manifest... 46
The Last Word ... 48
Chapter 2: Layout ...49
Borders ... 54
Simple Layout with the StackPanel... 55
Layout Properties ... 58
Alignment... 60
Margin ... 61
Minimum, Maximum, and Explicit Sizes ... 63
The Grid... 66
Fine-Tuning Rows and Columns... 70
Nesting Layout Containers... 72
Spanning Rows and Columns ... 74
Using the GridSplitter ... 74
Coordinate-Based Layout with the Canvas... 75
The Page ... 78
Scrolling ... 80
Scaling ... 81
Full Screen... 81
Navigation ... 82
Loading Child User Controls ... 83
Hiding Elements ... 83
The Last Word ... 84
Chapter 3: Dependency Properties and Routed Events...85
Dependency Properties ... 86
Defining and Registering a Dependency Property... 87
Dynamic Value Resolution ... 90
Attached Properties ... 91
Routed Events... 92
The Core Element Events... 92
Mouse Movements ... 96
Capturing the Mouse ... 97
Mouse Cursors... 98
Key Presses... 99
Key Modifiers... 100
Focus ... 101
The Last Word ... 102
Chapter 4: Elements ... 103
The Silverlight Elements... 103
Static Text ... 106
Font Properties ... 108
Underlining... 113
Runs... 114
Wrapping Text... 115
Content Controls ... 117
The Content Property ... 119
Aligning Content ... 122
Buttons... 123
Tooltips... 129
List Controls ... 134
Text Controls ... 138
Text Selection... 138
The WatermarkedTextBox ... 140
Range-Based Controls ... 141
Date Controls... 143
The Last Word ... 148
Application Events ... 149
Application Startup... 150
Application Shutdown... 151
Unhandled Exceptions... 151
XAML Resources... 153
Application Tasks ... 154
Accessing the Current Application ... 155
Initialization Parameters... 155
Changing the Page... 159
Splash Screens... 163
Resources... 164
Class Library Assemblies ... 165
Using Resources in an Assembly ... 165
Downloading Assemblies on Demand ... 167
The Last Word ... 168
Chapter 6: Shapes and Geometries ... 169
Basic Shapes... 169
The Shape Classes ... 170
Rectangle and Ellipse ... 172
Sizing and Placing Shapes... 175
Line... 179
Polyline... 181
Polygon... 183
Line Caps and Line Joins ... 187
Dashes ... 190
Paths and Geometries ... 193
Line, Rectangle, and Ellipse Geometries ... 194
Combining Shapes with GeometryGroup ... 196
The Geometry Mini-Language... 207
Clipping with Geometry... 210
Exporting Clip Art... 211
Expression Design... 211
Conversion... 213
Save or Print to XPS... 214
The Last Word ... 218
Chapter 7: Brushes and Transforms ... 219
Brushes ... 219
Transparency... 220
Making the Silverlight Control Transparent ... 221
Transforms ... 221
The Last Word ... 225
Chapter 8: Animation ... 227
Understanding Silverlight Animation ... 228
The Rules of Animation ... 229
The Last Word ... 231
Related Titles ... 232
Silverlight 2 Visual Essentials
by Matthew MacDonald
Microsoft Silverlight is a cross-browser, cross-platform plug-in, similar to Flash, that delivers rich interactive applications for the Web. Silverlight offers a flexible programming model based largely on Windows Presentation Foundation (WPF); it supports a number of different programming languages and techniques
(making it cross-platform) and all major browsers (providing cross-browser support). There is lots of interest in Microsoft’s Flash killer, and several conferences have seen heavy support for this exciting technology.
Little published information on this technology is available on the market now, and so this introduction to the visual features and capabilities of Silverlight will hopefully get you going quickly.
This concise book is meant to give you a sense of what you, as a programmer, can expect from Silverlight in terms of what the user is going to see. The emphasis here is on understanding what Silverlight has to offer. While there is some code given, that is not the point of the book. The point is to be able to quickly understand what functionality is available to you and what options you might have without getting bogged down in much code.
The text assumes that you are a programmer and that you have an understanding of XAML. However, if you ignore the code that exists in the book, then any
Chapter 1: Introducing Silverlight
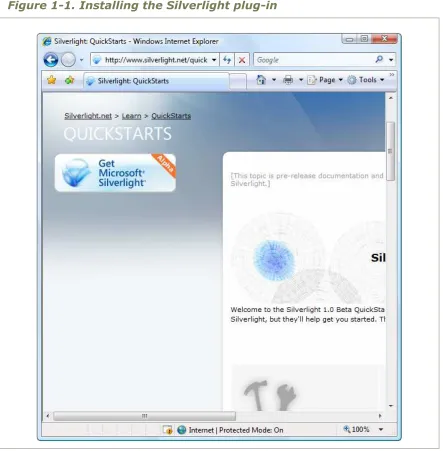
Silverlight is a framework for building rich, browser-hosted applications that run on a variety of operating systems. Silverlight works its magic through a browser plug-in. When you surf to a web page that includes some Silverlight content, this browser plug-in runs, executes the code, and renders that content in a specifically designated region of the page. The important part is that the Silverlight plug-in provides a far richer
environment than the traditional blend of HTML and JavaScript that powers ordinary web pages. Used carefully and artfully, you can create Silverlight pages that have interactive graphics, use vector animations, and play video and sound files.
If this all sounds familiar, it’s because the same trick has been tried before. Several other technologies use a plug-in to stretch the bounds of the
browser, including Java, ActiveX, Shockwave, and (most successfully) Adobe Flash. Although all these alternatives are still in use, none of them has become the dominant platform for rich web development. Many of them suffer from a number of problems, including installation headaches, poor development tools, and insufficient compatibility with the full range of browsers and operating systems. The only technology that’s been able to avoid these pitfalls is Flash, which boasts excellent cross-platform support and widespread adoption. However, Flash has only recently evolved from a spunky multimedia player into a set of dynamic programming tools. It still offers far less than a modern programming environment like .NET.
That’s where Silverlight fits into the picture. Silverlight aims to combine the raw power and cross-platform support of Flash with a first-class
programming platform that incorporates the fundamental concepts of .NET. At the moment, Flash has the edge over Silverlight because of its
that it’s based on a scaled-down version of .NET’s common language runtime (CLR) and allows developers to write client-side code using pure C#.
In this chapter, you’ll take your first tour of the Silverlight world. You’ll see how Silverlight applications are structured, and you’ll learn to create one in Visual Studio. Lastly, you’ll peer under the covers to see how Silverlight applications are compiled and deployed to the Web.
Understanding Silverlight
Silverlight uses a familiar technique to go beyond the capabilities of standard web pages: a lightweight browser plug-in.
The advantage of the plug-in model is that the user needs to install just a single component to see content created by a range of different people and companies. Installing the plug-in requires a small download and forces the user to confirm the operation in at least one security dialog box (and
usually more). It takes a short but definite amount of time, so it’s an
Note Silverlight is designed to overcome the limitations of ordinary HTML to allow developers to create more graphical and interactive applications. However, Silverlight isn’t a way for developers to break out of the browser’s security sandbox. For the most part, Silverlight applications are limited in equivalent ways to ordinary web pages. For example, a Silverlight application is allowed to create and access files, but only those files that are stored in a special walled-off isolated storage area. Conceptually, isolated storage works like the cookies in an ordinary web page. Files are separated by web site and the current user, and size is severely limited.
Silverlight vs. Flash
The most successful browser plug-in is Adobe Flash, which is installed on over 90 percent of the world’s web browsers. Flash has a long history that spans more than ten years, beginning as a straightforward tool for adding animated graphics and gradually evolving into a platform for developing interactive content.
It’s perfectly reasonable for .NET developers to create web sites that use Flash content. However, doing so requires a separate design tool and a completely different programming language (ActionScript) and
programming environment (Flex). Furthermore, there’s no straightforward way to integrate Flash content with server-side .NET code. For example, creating Flash applications that call .NET components is awkward at best. Using server-side .NET code to render Flash content (for example, a custom ASP.NET control that spits out a Flash content region) is far more difficult.
Note There are some third-party solutions that help break down the barrier between ASP.NET and Flash. One example is the innovative SWFSource.NET (http://www.activehead.com/SWFSource.aspx), which provides a set of .NET classes that allow you to dynamically generate Flash (SWF) files. However, these tools work at a relatively low level, falling far short of a full development platform.
and VB) and use many of the same abstractions (including streams, controls, collections, generics, and LINQ).
The Silverlight plug-in has an impressive list of features, some of which are shared in common with Flash, and a few of which are entirely new and even revolutionary. Here are some highlights:
Widespread browser support: It’s too early to tell how well the Silverlight browser works on different platforms. Currently, the beta builds of Silverlight 2.0 work on Windows Vista and Windows XP (in the PC universe) and OS X 10.4.8 or later (in the Mac world). The minimum browser versions that
Silverlight 2.0 supports are Internet Explorer 6, Firefox 1.5.0.8, and Safari 2.0.4. Although Silverlight 2.0 doesn’t currently work on Linux, the Mono team is creating an open source Linux implementation of Silverlight 1.0 and Silverlight 2.0. This project is known as Moonlight, and it’s being developed with key support from Microsoft. To learn more, visit http://www.mono-project.com/Moonlight.
Lightweight download: In order to encourage adoption, Silverlight is installed with a small-size setup (about 4MB) that’s easy to download. That allows it to provide an all-important “frictionless” setup experience, much like Flash (but quite different from Java).
2D drawing: Silverlight provides a rich model for 2D drawing. Best of all, the content you draw is defined as shapes and paths, so you can manipulate this content on the client side. You can even respond to events (like a mouse click on a portion of a graphic), which makes it easy to add interactivity to anything you draw.
Controls: Developers don’t want to reinvent the wheel, so Silverlight is stocked with a few essentials, including buttons, text boxes, lists, and a grid. Best of all, these basic building blocks can be restyled with custom visuals if you want all of the functionality but none of the stock look.
Media: Silverlight provides playback of Windows Media Audio (WMA), Windows Media Video (WMV7 through WMV9), MP3 audio, and VC-1 (which supports high definition). You aren’t tied to the Windows Media Player ActiveX control or browser plug-in—instead, you can create any front end you want, and you can even show video in full-screen mode. Microsoft also provides a free companion hosting service (at
http://silverlight.live.com) that gives you space to store media files. Currently, it offers a generous 10GB.
The CLR: Most impressively, Silverlight includes a scaled-down version of the CLR, complete with an essential set of core classes, a garbage collector, a just-in-time (JIT) compiler, support for generics, threading, and so on. In many cases, developers can take code written for the full .NET CLR and use it in a Silverlight application with only moderate changes.
Networking: Silverlight applications can call old-style ASP.NET web services (ASMX) or Windows Communication Foundation (WCF) web services. They can also send manually created XML requests over HTTP. This gives developers a great way to combine rich client-side code with secure server-side routines.
Data binding: Although it’s not as capable as in its big brother, Windows Presentation Foundation (WPF), Silverlight data binding provides a
convenient way to display large amounts of data with minimal code. You can pull your data from XML or in-memory objects, giving you the ability to call a web service, receive a collection of objects, and display their data in a web page—often with just a couple of lines of code.
these features are available in Windows-centric WPF applications, and they may someday migrate to the Silverlight universe—or not.
Silverlight 1.0 and 2.0
Silverlight exists in two versions: The first version, Silverlight 1.0, is a relatively modest technology. It includes the 2D drawing features and the media playback features. However, it doesn’t include the CLR engine or support for .NET languages, so any code you write must use JavaScript.
The second version, Silverlight 2.0, adds the .NET-powered features that have generated the most developer excitement. It includes the CLR, a subset of .NET Framework classes, and a user interface model based on WPF (as described in the next section, “Silverlight and WPF”).
Many developers consider Silverlight 2.0 to be the real first release of the Silverlight platform. It’s the only version you’ll consider in this book.
Note At present, Silverlight is only on a fraction of computers. However, Microsoft is convinced that if compelling content exists for Silverlight, users will download the plug-in. A number of factors support this argument. Flash grew dramatically in a short space of time, and Microsoft has obvious experience with other web-based applications that have started small and eventually gained wide adoption. (Windows Messenger comes to mind, along with numerous ActiveX plug-ins for tasks ranging from multiuser coordination on MSN Games to Windows verification on MSDN.)
Silverlight and WPF
One of the most interesting aspects of Silverlight is the fact that it borrows the model WPF uses for rich, client-side user interfaces.
notable because it not only simplifies development with a powerful set of high-level features, but also increases performance by rendering everything through the DirectX pipeline. To learn about WPF, you can refer to another of my books, Pro WPF in C# 2008: Windows Presentation Foundation with .NET 3.5, Second Edition (Apress, 2008).
Silverlight obviously can’t duplicate the features of WPF, because many of them rely deeply on the capabilities of the operating system, including Windows-specific display drivers and DirectX technology. However, rather than invent an entirely new set of controls and classes for client-side
development, Silverlight uses a subset of the WPF model. If you’ve had any experience with WPF, you’ll be surprised to see how closely
Silverlight resembles its bigger brother. Here are a few common details:
To define a Silverlight user interface (the collection of elements that makes up a Silverlight content region), you use XAML markup, just as you do with WPF. You can even map data to your display using the same data binding syntax.
Silverlight borrows many of the same basic controls from WPF, along with the same styling system (for standardizing and reusing formatting) and a similar templating mechanism (for changing the appearance of standard controls).
To draw 2D graphics in Silverlight, you use shapes, paths, transforms, geometries, and brushes, all of which closely match their WPF equivalents.
Silverlight provides a declarative animation model that’s based on storyboards and works in the same way as WPF’s animation system.
Microsoft has made no secret about its intention to continue to expand the capabilities of Silverlight by drawing from the full WPF model. In future Silverlight releases, you’re likely to find that Silverlight borrows more and more features from WPF. This trend is already on display with the shift from Silverlight 1.0 to Silverlight 2.0.
In other words, Silverlight is a .NET-based Flash competitor. It aims to compete with Flash today, but provide a path to far more features in the future. Unlike the Flash development model, which is limited in several ways due to the way it’s evolved over the years, Silverlight is a starting-from-scratch attempt that’s thoroughly based on .NET and WPF, and will therefore allow .NET developers to be far more productive. In many ways, Silverlight is the culmination of two trends: the drive to extend web pages to incorporate more and more rich-client features, and the drive to give the .NET Framework a broader reach.
Note WPF is not completely cut off from the easy deployment world of the Web. WPF allows developers to create browser-hosted applications called XAML Browser Applications (XBAPs). These applications download seamlessly, cache locally, and run directly inside the browser window, all without security prompts. However, although XBAPs run in Internet Explorer and Firefox, they are still a Windows-only technology, unlike Silverlight.
Silverlight and Visual Studio
Although it’s technically possible to create the files you need for a Silverlight application by hand, professional developers always use a development tool. If you’re a graphic designer, that tool is likely to be Microsoft Expression Blend 2.5, a graphically rich design package. If you’re a developer, you’ll probably start with Visual Studio 2008 instead. Because both tools are equally at home with the Silverlight 2.0 application model, you can easily create a workflow that incorporates both of them. For example, a developer could create a basic user interface with Visual Studio and then hand it off to a crack design team, which would then polish it up with custom graphics in Expression Blend. When the facelift is
finished, they’d deliver the project back to the developer, who could then continue writing and refining code in Visual Studio.
Note Before you can use Visual Studio 2008 to create Silverlight applications, you need to install a set of extensions for Silverlight development.
Understanding Silverlight Web Sites
Ordinary HTML web site: In this case, the entry point to your Silverlight application is a basic HTML file that includes a Silverlight content region.
ASP.NET web site: In this case, Visual Studio creates two projects—one to contain the Silverlight application files, and one to hold the server-side ASP.NET web site that will be deployed alongside your Silverlight files. The entry point to your Silverlight application can be an ordinary HTML file or an ASP.NET web form that also includes server-generated content.
No matter which option you choose, your Silverlight application will run the same way—the client browser will receive an HTML web page, that HTML page will include a Silverlight content region, and the Silverlight code will run on the local computer, not the web server. However, the ASP.NET web approach makes it easier to mix ASP.NET and Silverlight content. This is usually a better approach in the following cases:
You want to create a web application that combines ASP.NET web pages with Silverlight-enhanced pages.
You want to generate Silverlight content indirectly, using ASP.NET web controls.
You want to create a Silverlight application that calls a web service, and you want to design the web service at the same time (and deploy it to the same web server).
If you decide to create an ASP.NET web site, your application’s
ADDING SILVERLIGHT CONTENT TO AN EXISTING WEB SITE
A key point to keep in mind when considering the Silverlight development model is that in many cases you’ll use Silverlight to augment the existing content of your web site, which will still include generous amounts of HTML, CSS, and JavaScript. For example, you might add Silverlight content that shows an advertisement or allows an enhanced experience for a portion of a web site (such as playing a game, completing a survey, interacting with a product, taking a virtual tour, and so on). Your Silverlight pages may present content that’s already available in your web site in a more engaging way, or they may represent a value-added feature for users who have the Silverlight plug-in.
Of course, it’s also possible to create a Silverlight-only web site, which is a somewhat more daring approach. The key drawback is that Silverlight is still relatively new, and it doesn’t support legacy clients (most notably, it currently has no support for users of Windows ME and Windows 98, and Internet Explorer–only support for Windows 2000). As a result, it doesn’t have nearly the same reach as ordinary HTML. Many businesses that are adopting Silverlight are using it to distinguish themselves from other online competitors with cutting-edge content.
Creating a Silverlight Project
Now that you understand the two types of Silverlight web sites, you’re ready to create a new Silverlight application by following these steps:
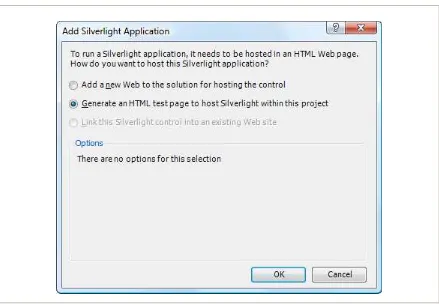
2. At this point, Visual Studio will prompt you to choose whether you want to create an ordinary HTML web site or a full-fledged ASP.NET web site that can run server-side code (see Figure 1-2). For now, choose the second option to create an ordinary web site and click OK.
Figure 1-2. Choosing the type of web site
The Anatomy of a Silverlight Application
Figure 1-3. A Silverlight project
All the files that end with the extension .xaml use a flexible markup standard called XAML. All the files that end with the extension .cs hold the C# source code that powers your application.
Here’s a rundown of the files shown in Figure 1-3:
App.xaml and App.xaml.cs: These files allow you to configure your
Silverlight application. They allow you to define resources that will be made available to all the pages in your application, and they allow you to react to application events such as startup, shutdown, and error conditions. In a newly generated project, the startup code in the App.xaml.cs file specifies that your application should begin by showing Page.xaml.
Page.xaml.cs: This file includes the code that underpins your first page, including the event handlers that react to user actions
Tip Unlike App.xaml, the name of your pages is not important. However, if you simply renaming a XAML file in Solution Explorer, you’ll still keep the old class name. (For example, if you rename Page.xaml to Page1.xaml, you’ll end up with a file named Page1.xaml that defines a class named Page.xaml.) To correct this discrepancy and make sure your file names and code are consistent, you can change the class name by hand (using XAML), or you can simply delete the existing file and add a new one with the right name.
Along with these four essential files, there are a few more ingredients that you’ll only find if you dig around. Under the Properties node in Solution Explorer, you’ll find a file named AppManifest.xml, which lists the
assemblies that your application uses. You’ll also find a file named AssemblyInfo.cs that contains information about your project (such as its name, version, and publisher), which is embedded into your Silverlight assembly when it’s compiled. Neither of these files should be edited by hand—instead, they’re modified by Visual Studio when you add references or set projects properties.
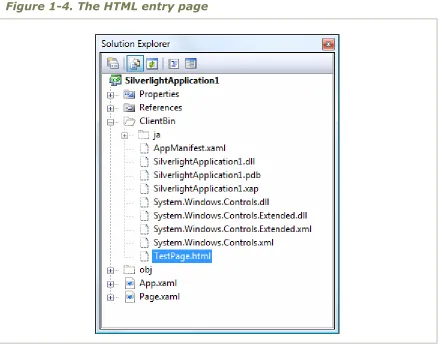
Lastly, the gateway to your Silverlight application is an automatically generated but hidden HTML file named TestPage.html (see Figure 1-4). To see this file, click the Show All Files icon at the top of the Solution
Figure 1-4. The HTML entry page
Creating a Simple Silverlight Page
As you’ve already learned, every Silverlight page includes a markup portion that defines the visual appearance (the XAML file) and a source code file that contains event handlers. To customize your first Silverlight application, you simply need to open the Page.xaml file and begin adding markup.
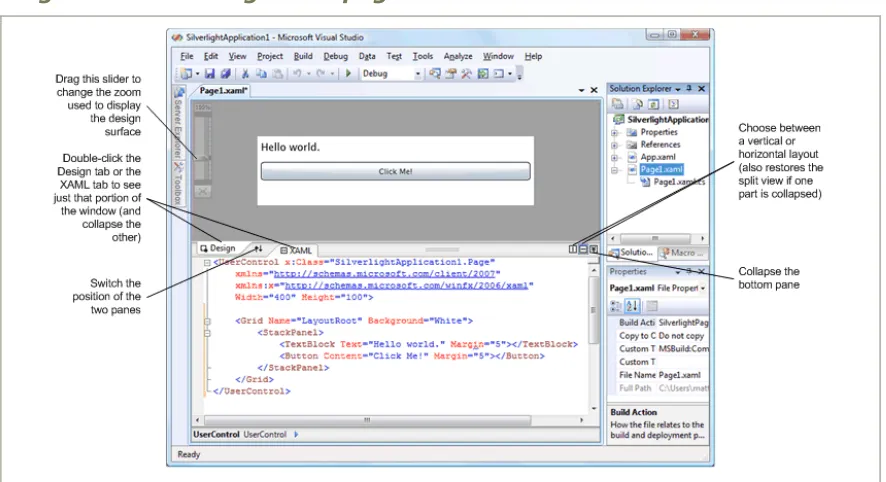
stacked one atop the other. Figure 1-5 shows this view and points out the buttons you can use to change your vantage point.
Figure 1-5. Viewing XAML pages
As you’ve no doubt guessed, you can start designing your XAML page by dragging controls from the Toolbox and dropping them onto the design surface. However, this convenience won’t save you from learning the full intricacies of XAML. In order to organize your elements into the right layout containers, change their properties, wire up event handlers, and use Silverlight features like animation, styles, templates, and data binding, you’ll need to edit the XAML markup by hand.
<UserControl x:Class="SilverlightApplication1.Page" xmlns="http://schemas.microsoft.com/client/2007" xmlns:x="http://schemas.microsoft.com/winfx/2006/xaml" Width="400" Height="100">
<Grid Name="LayoutRoot" Background="White"> <StackPanel>
<TextBlock Name="lblMessage" Text="Hello world." Margin="5"> </TextBlock>
<Button Name="cmdClickMe" Content="Click Me!" Margin="5"></Button> </StackPanel>
</Grid> </UserControl>
This creates a page that has a stacked arrangement of two elements. On the top is a block of text with a simple message. Underneath it is a button.
Note In Silverlight terminology, each graphical widget that appears in a user interface and is represented by a .NET class is called an element. The term control is generally reserved for elements that receive focus and allow user interaction. For example, a TextBox is a control, but a TextBlock is not.
Adding Event Handling Code
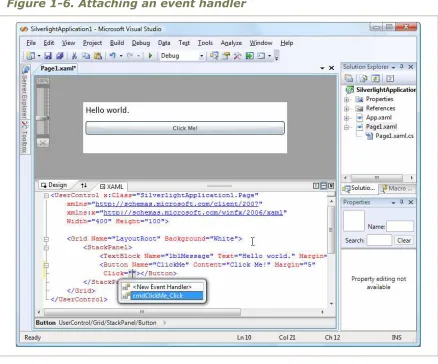
You attach event handlers to the elements in your page using attributes, which is the same approach that developers take in WPF, ASP.NET, and JavaScript. For example, the Button element exposes an event named Click that fires when the button is triggered with the mouse or keyboard. To react to this event, you add the Click attribute to the Button element, and set it to the name of a method in your code:
Tip Although it’s not required, it’s a common convention to name event handler methods in the form ElementName_EventName. If the element doesn’t have a defined name (presumably because you don’t need to interact with it in any other place in your code), consider using the name it would have.
This example assumes that you’ve created an event handling method named cmd_ClickMe. Here’s what it looks like in the Page.xaml.cs file:
private void cmdClickMe_Click(object sender, RoutedEventArgs e) {
lblMessage.Text = "Goodbye, cruel world."; }
Figure 1-6. Attaching an event handler
It’s possible to use Visual Studio to create and assign an event handler in one step by adding an event attribute and choosing the <New Event Handler> option in the menu.
You can also connect an event with code. The place to do it is the
constructor for your page, after the call to InitializeComponent(), which initializes all your controls. Here’s the code equivalent of the XAML markup shown previously:
public Page() {
InitializeComponent();
cmdClickMe.Click += cmdClickMe_Click; }
The code approach is useful if you need to dynamically create a control and attach an event handler at some point during the lifetime of your window. By comparison, the events you hook up in XAML are always attached when the window object is first instantiated. The code approach also allows you to keep your XAML simpler and more streamlined, which is perfect if you plan to share it with nonprogrammers, such as a design artist. The drawback is a significant amount of boilerplate code that will clutter up your code files.
If you want to detach an event handler, code is your only option. You can use the -= operator, as shown here:
cmdClickMe.Click -= cmdClickMe_Click;
It is technically possible to connect the same event handler to the same event more than once. This is usually the result of a coding mistake. (In this case, the event handler will be triggered multiple times.) If you attempt to remove an event handler that’s been connected twice, the event will still trigger the event handler, but just once.
Browsing the Silverlight Class Libraries
In order to write practical code, you need to know quite a bit about the classes you have to work with. That means acquiring a thorough
Silverlight includes a subset of the classes from the full .NET Framework. Although it would be impossible to cram the entire .NET Framework into Silverlight—after all, it’s a 4MB download that needs to support a variety of browsers and operating systems—Silverlight includes a remarkable amount of functionality.
The Silverlight version of the .NET Framework is simplified in two ways. First, it doesn’t provide the sheer number of types you’ll find in the full .NET Framework. Second, the classes that it does include often don’t provide the full complement of constructors, methods, properties, and events. Instead, Silverlight keeps only the most practical members of the most important classes, which leaves it with enough functionality to create surprisingly compelling code.
Note The Silverlight classes are designed to have public interfaces that resemble their full-fledged counterparts in the .NET Framework. However, the actual plumbing of these classes is quite different. All the Silverlight classes have been rewritten from the ground up to be as streamlined and efficient as possible.
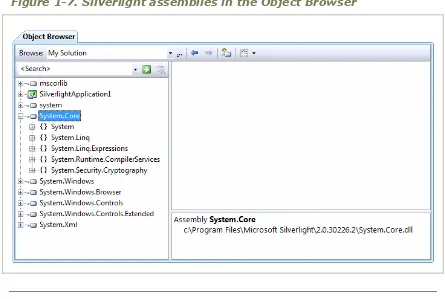
mscorlib.dll: This assembly is the Silverlight equivalent of the mscorlib.dll
assembly that includes the most fundamental parts of the .NET Framework. The Silverlight version includes core data types, exceptions, and interfaces in the System namespace, ordinary and generic collections, file management classes, and support for globalization, reflection, resources, debugging, and multithreading.
System.dll: This assembly contains additional generic collections, classes for dealing with URIs, and classes for dealing with regular expressions.
System.Core.dll: This assembly contains support for LINQ. The name of the assembly matches the full .NET Framework, which implements new .NET 3.5 features in an assembly named System.Core.dll.
System.Windows.dll: This assembly includes many of the classes for building Silverlight user interfaces, including basic elements, shapes and brushes, classes that support animation and data binding, and a version of the
OpenFileDialog that works with isolated storage.
System.Windows.Controls.dll: This assembly defines the Silverlight controls—elements that have support user interaction and use a flexible template model, which allows you to supply new visuals without rewriting a control’s built-in functionality.
System.Windows.Controls.Extended.dll: This assembly defines controls that are specialized for Silverlight or aren’t based on WPF at all. For example, this assembly includes Silverlight’s Calendar and
WatermarkedTextBox controls, neither of which is present in WPF.
System.Windows.Browser.dll: This assembly contains classes for interacting with HTML elements.
Figure 1-7. Silverlight assemblies in the Object Browser
Testing a Silverlight Application
You now have enough to test your Silverlight project. When you run a Silverlight application, Visual Studio launches your default web browser and navigates to the hidden browser entry page, named TestPage.html. The test page creates a new Silverlight control and initializes it using the
markup in Page.xaml.
Note Visual Studio sets TestPage.html to be the start page for your project. As a result, when you launch your project, this page will be loaded in the browser. You can choose a different start page by right-clicking an HTML file in Solution Explorer and choosing Set As Start Page.
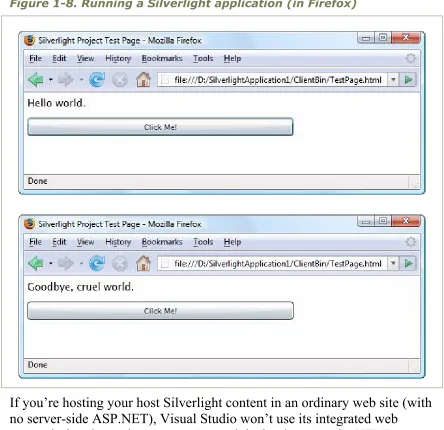
Figure 1-8. Running a Silverlight application (in Firefox)
If you’re hosting your host Silverlight content in an ordinary web site (with no server-side ASP.NET), Visual Studio won’t use its integrated web
server during the testing process. Instead, it simply opens the HTML entry page for your Silverlight project in your browser. (You can see this in the address bar in Figure 1-7.)
full-fledged web server that serves pages over HTTP. The most obvious difference is the security context—in other words, you could configure your web browser to allow local web pages to perform actions that remote web content can’t. In practice, this isn’t often a problem, because
Silverlight always executes in a stripped-down security context and doesn’t include any extra functionality for trusted locations. This simplifies the Silverlight development model and ensures that features won’t work in certain environments and break in others. However, when production testing a Silverlight application, it’s best to create an ASP.NET test web site (as described in the next section) or—even better—deploy your Silverlight application to a test web server.
Creating an ASP.NET Web Site with Silverlight Content
Although Silverlight does perfectly well on its own, you can also develop, test, and deploy it as part of an ASP.NET web site. Here’s how to create a Silverlight project and an ASP.NET web site that uses it in the same solution:1. Select File h New h Project in Visual Studio, choose the Visual C# group of project types, and select the Silverlight Application template. It’s a good idea to use the Create directory for solution option, so you can group together the two projects that Visual Studio will create—one for the Silverlight assembly and one for ASP.NET web site.
2. Once you’ve picked the solution name and project name, click OK to create it.
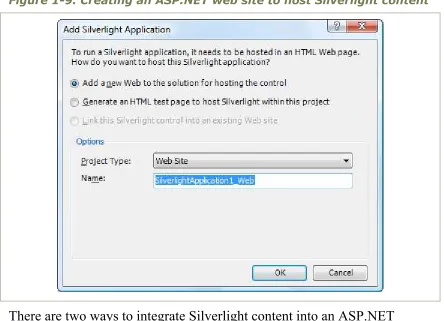
3. When asked whether you want to create a test web, choose the first option, Add a new Web. You’ll also need to supply a project name for the
Figure 1-9. Creating an ASP.NET web site to host Silverlight content
There are two ways to integrate Silverlight content into an ASP.NET application:
Place Silverlight content inside an ASP.NET web form: To pull this trick off, you need the help of the Xaml web control. You can also add other ASP.NET controls to different regions of the page. The only disadvantage to this approach is that the page is always processed on the server. If you aren’t actually using any server-side ASP.NET content, this creates an extra bit of overhead that you don’t need when the page is first requested.
Of course, you’re also free to mingle both of these approaches, and use Silverlight content in dedicated HTML pages and inside ASP.NET web pages in the same site. When you create a Silverlight project with an ASP.NET web site, you’ll start with both. For example, if your Silverlight project is named SilverlightApplication1, you can use
SilverlightApplication1TestPage.html or
SilverlightApplication1TestPage.aspx. The HTML file is identical to the test page in the ordinary Silverlight-only solution you saw earlier. The .aspx file is an ASP.NET web form that uses ASP.NET’s Xaml web control to show your Silverlight application. The end result is the same, but the Silverlight control creates the test page markup dynamically, when it’s processed on the server. (This extra step gives you a chance to use your own server-side code to perform other tasks when the page is initially requested, before the Silverlight application is downloaded and launched.)
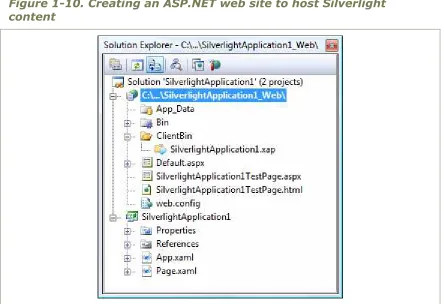
Figure 1-10. Creating an ASP.NET web site to host Silverlight content
Silverlight and ASP.NET provide essentially the same debugging experience as a Silverlight-only solution. When you run the solution,
Visual Studio compiles both projects and copies the Silverlight assembly to the ClientBin folder in the ASP.NET web site. (This is similar to assembly references—if an ASP.NET web site references a private DLL, Visual Studio automatically copies this DLL to the Bin folder.) Once both projects are compiled, Visual Studio looks to the startup project (which is the
ASP.NET web site) and looks for the start page (which is
The difference is that it doesn’t request the start page directly from the file system. Instead, it communicates with its built-in test web server. This web server automatically loads up on a randomly chosen port. It acts like a scaled-down version of IIS, but accepts requests only from the local computer. This gives you the ease of debugging without needing to configure IIS virtual directories. Figure 1-11 shows the same Silverlight application you considered earlier, but hosted by ASP.NET.
Figure 1-11. An ASP.NET page
To navigate to a different page from the ASP.NET project, you can type in the address bar of the browser. Or, you can change the startup page by right-clicking the page you want to use and choosing Set As Start Page.
Silverlight Compilation and Deployment
Now that you’ve seen how to create a basic Silverlight project, add a page with elements and code, and run your application, it’s time to dig a bit deeper. In this section, you’ll see how your Silverlight is transformed from a collection of XAML files and source code into a rich browser-based application.
Compiling a Silverlight Assembly
When you compile a Silverlight project, Visual Studio uses the same
csc.exe compiler that you use for full-fledged .NET applications. However, it references a different set of assemblies and it passes in the command-line argument nostdlib, which prevents the C# compiler from using the
standard library (the core parts of the .NET Framework that are defined in mscorlib.dll). In other words, Silverlight applications can be compiled like normal .NET applications written in standard C#, just with a more limited set of class libraries to draw on. The Silverlight compilation model has a number of advantages, including easy deployment and vastly improved performance when compared to ordinary JavaScript.
Your Silverlight project is compiled into a DLL file named after your
project. For example, if you have a project named SilverlightApplication1, the csc.exe compiler will create the file SilverlightApplication1.dll. The project assembly is dumped into a ClientBin folder in your project
directory, along with a few other important files:
A PDB file: This file contains information required for Visual Studio debugging. It’s named after your project assembly (for example,
SilverlightApplication1.pdb).
AppManifest.xaml: This file lists assembly dependencies.
Dependent assemblies: The ClientBin folder contains the assemblies that your Silverlight project uses, provided these assemblies have the Copy Local property set to true. Assemblies that are a core part of Silverlight have Copy Local set to False, because they don’t need to deployed with your application. (You can change the Copy Local setting by expanding the References node in Solution Explorer, selecting the assembly, and using the Properties window.).
TestPage.html: This is the entry page that the user requests to start your Silverlight application.
A XAP file: This is a Silverlight package that contains everything you need to deploy your Silverlight application, including the application manifest, the project assembly, and any other assemblies that your application uses.
Figure 1-12. Project properties in Visual Studio
Deploying a Silverlight Assembly
Once you understand the Silverlight compilation model, it’s a short step to understanding the deployment model. The XAP file is the key piece. It wraps the units of your application (the application manifest and the assemblies) into one neat container.
Figure 1-13. The contents of a XAP file
The XAP file system has two obvious benefits:
It compresses your content: Because this content isn’t decompressed until it reaches the client, it reduces the time required to download your application. This is particularly important if your application contains large static
resources , like images or blocks of text.
It simplifies deployment: When you’re ready to take your Silverlight application live, you simply need to copy the XAP file to the web server, along with TestPage.html or a similar HTML file that includes a Silverlight content region. You don’t need to worry about keeping track of the
assemblies and resources.
involves making the appropriate XAP file available, so the clients can download it through the browser and run it on their local machines.
However, there’s one potential stumbling block. When hosting a Silverlight application, your web server must be configured to allow requests for the XAP file type. This file type is included by default in IIS 7, provided
you’re using Windows Server 2008 or Windows Vista with Service Pack 1. If you have Windows Vista without Service Pack 1, you have an earlier version of IIS, or you have another type of web server, you’ll need to add a file type that maps the .xap extension to the MIME type application/x-silverlight-app. For IIS instructions, see
http://learn.iis.net/page.aspx/262/silverlight.
Tip In some situations, you may want to optimize startup times by splitting your Silverlight application into pieces that can be downloaded separately.
The HTML Entry Page
The last ingredient in the deployment picture is the HTML entry page. This page is the entry point into your Silverlight content—in other words, the page the user requests in the web browser. Visual Studio names this file TestPage.html (in a Silverlight-only solution), although you’ll probably want to rename it to something more appropriate.
<html xmlns="http://www.w3.org/1999/xhtml" > <head>
<title>Silverlight Project Test Page</title>
<style type="text/css"> ...
</style>
<script type="text/javascript"> ...
</script> </head>
<body>
<!-- Runtime errors from Silverlight will be displayed here. --> <div id='errorLocation' style="font-size: small;color: Gray;"></div>
<!-- Silverlight content will be displayed here. --> <div id="silverlightControlHost">
<object data="data:application/x-silverlight,"
type="application/x-silverlight-2" width="100%" height="100%"> <param name="source" value="SilverlightApplication1.xap"/> <param name="onerror" value="onSilverlightError" />
<param name="background" value="white" />
<a href="http://go.microsoft.com/fwlink/?LinkID=108182"> <img src="http://go.microsoft.com/fwlink/?LinkId=108181" alt="Get Microsoft Silverlight" style="border-style: none"/> </a>
</object>
<iframe style='visibility:hidden;height:0;width:0;border:0px'></iframe> </div>
</body> </html>
<script type="text/javascript">
function onSilverlightError(sender, args) { if (args.errorType == "InitializeError") {
var errorDiv = document.getElementById("errorLocation"); if (errorDiv != null)
errorDiv.innerHTML = args.errorType + "- " + args.errorMessage; }
} </script>
Tip The error display is a debugging convenience. When you’re ready to deploy the application, you should remove the <div> element so sensitive information won’t be shown to the user (who isn’t in a position to correct the problem anyway).
This second <div> element is more interesting. It represents the Silverlight content region. It contains an <object> element that loads the Silverlight plug-in and an <iframe> element that’s used to display it in certain
browsers. The <object> element includes four key attributes: data (which indentifies it as a Silverlight content region), type (which indicates the required Silverlight version), and height and width (which determine the dimensions of the Silverlight content region).
<object data="data:application/x-silverlight,"
type="application/x-silverlight-2" width="100%" height="100%"> ...
</object>
Sizing the Silverlight Content Region
page—for example, in a cell in a table, in another fixed-sized element, or between other <div> elements in a multicolumn layout.
Even though the default entry page allows Silverlight content to take as much size as it wants, your XAML pages may include hard-coded
dimensions. By default, Visual Studio gives every new page a width of 400 pixels and a height of 300 pixels, and the example you saw earlier in this chapter limited the page to 400×100 pixels. If the browser window is larger than the hard-coded page size, the extra space won’t be used. If the browser window is smaller than the hard-coded page size, part of the page may fall outside the visible area of the window.
Hard-coded sizes make sense when you have a graphically rich layout with absolute positioning and little flexibility. If you don’t, you might prefer to remove the Width and Height attributes from the <UserControl> start tag. That way, the page will be sized to match the browser window, and your Silverlight content will fit itself into the currently available space.
To get a better understanding of the actual dimensions of the Silverlight content region, you can add a border around it by adding a simple style rule to the <div>, like this:
<div id="silverlightControlHost" style="border: 1px red solid">
Configuring the Silverlight Content Region
The <object> element contains a series of <param> elements that specify additional options to the Silverlight plug-in. Here are the options in the standard entry page that Visual Studio generates:
<param name="source" value="SilverlightApplication1.xap"/> <param name="onerror" value="onSilverlightError" />
<param name="background" value="white" />
Table 1-1. Parameters for the Silverlight Plug-In
NAME VALUE
source
A URI that points to the XAP file for your Silverlight application. This parameter is required.
background
The color that’s used to paint the background of the Silverlight content region, behind any content that you display (but in front of any HTML content that occupies the same space). If you set the Background property of a page, it’s painted over this background.
enableHtmlAccess
A Boolean that specifies whether the Silverlight plug-in has access to the HTML object model. Use
true if you want to be able to interact with the HTML elements on the entry page through your Silverlight code
initParams
NAME VALUE
maxFramerate
The desired frame rate for animations. Higher frame rates result in smoother animations, but the system load and
processing power of the current computer may mean that a high frame rate can’t be honored. The value is 60 (for 60 frames per second). Animation is discussed briefly in Chapter 8.
splashScreenSource
The location of a XAML splash screen to show while the XAP file is downloading.
windowless
A Boolean that specifies whether the plug-in renders in windowed mode (the default) or windowless mode. If you set this to true, the HTML content underneath your Silverlight content region can show through. This is ideal if you’re planning to create a shaped Silverlight control that integrates with HTML content.
onSourceDownloadProgressChanged
Table 1-1. continued
NAME VALUE
onSourceDownloadComplete
A JavaScript event handler that’s triggered when the entire XAP file has been downloaded.
onLoad
A JavaScript event handler that’s triggered when the markup in the XAP file has been processed and your startup page has been loaded.
onResize
A JavaScript event handler that’s triggered when the size of
Silverlight content region has changed.
onError
A JavaScript event handler that’s triggered when an unhandled error occurs in the Silverlight plug-in or in your code.
Note By convention, all of these parameter names should be written completely in lowercase (for example, splashscreensource rather than splashScreenSource). However, they’re shown with mixed case here for better readability.
Displaying Alternative Content
wrapped in a hyperlink that, when clicked, takes the user to the Silverlight download page.
<a href="http://go.microsoft.com/fwlink/?LinkID=108182"> <img src="http://go.microsoft.com/fwlink/?LinkId=108181" alt="Get Microsoft Silverlight" style="border-style: none"/> </a>
CHANGING THE TEST PAGE
If you’re creating a combined Silverlight and ASP.NET solution, the test page is generated when the project is first created. As a result, it’s easy to change it. However, if you’re using a Silverlight-only project, you need to go to a bit more work. That’s because the test page is generated each time you run the project, and so any changes you make to it will be discarded.
The easiest solution is to create a new test page for your project. Here’s how:
1. Run your project at least once to create the test page.
2. Click the Show All Files icon at the top of Solution Explorer.
3. Expand the ClientBin folder in Solution Explorer.
4. Find the TestPage.html file, right click it, and choose Copy. Then right-click the ClientBin folder and choose Paste. This duplicate will be your custom test page. Right-click the new file and choose Rename to give it a better name.
5. To make the custom test page a part of your project, right-click it and choose Include in Project.
The Application Manifest
As you’ve seen, the Silverlight execution model is quite straightforward. First, the client requests the HTML entry page (such as TestPage.html). At this point, the browser downloads the HTML file and processes its markup. When it reaches the <object> element, it loads the Silverlight plug-in and creates the Silverlight content region. After this step, the client-side plug-in takes over. First, it downloads the linked XAP file (which is identified by the source parameter inside the <object> element). Then, it looks at the AppManifest.xaml file to decide what to do next.
Here’s the content of the AppManifest.xaml for a newly generated Visual Studio project, which also matches the AppManifest.xaml in the simple example you saw earlier in this chapter:
<Deployment xmlns="http://schemas.microsoft.com/client/2007/deployment" xmlns:x="http://schemas.microsoft.com/winfx/2006/xaml"
EntryPointAssembly="SilverlightApplication1" EntryPointType="SilverlightApplication1.App" RuntimeVersion="2.0.30226.2">
<Deployment.Parts>
<AssemblyPart x:Name="SilverlightApplication1" Source="SilverlightApplication1.dll" /> <AssemblyPart x:Name="System.Windows.Controls" Source="System.Windows.Controls.dll" />
<AssemblyPart x:Name="System.Windows.Controls.Extended" Source="System.Windows.Controls.Extended.dll" /> </Deployment.Parts>
</Deployment>
The EntryPointAssembly and EntryPointType attributes are the key details that determine what code the Silverlight plug-in will execute next.
EntryPointAssembly indicates the name of the DLL that has your compiled Silverlight code (without the .dll extension). EntryPointType indicates the name of the application class in that assembly. When the Silverlight plug-in sees the AppManifest.xaml shown here, it loads the
inside. The App object triggers a Startup event, which runs this code, creating the first page:
private void Application_Startup(object sender, StartupEventArgs e) {
// Load the main control. this.RootVisual = new Page(); }
If you’ve added a different user control to your application, and you want to show it as the first page, simply edit the App.xaml.cs file, and replace the Page class with the name of your custom class:
this.RootVisual = new CustomPage();
SILVERLIGHT DECOMPILATION
Now that you understand the infrastructure that underpins a Silverlight 2.0 project, it’s easy to see how you can decompile any existing application to learn more about how it works. Here’s how:
1. Surf to the entry page.
2. View the source for the web page, and look for the <param> element that points to the XAP file.
3. Type a request for the XAP file into your browser’s address bar. (Keep the same domain, but replace the page name with the partial path that points to the XAP file.)
4. Choose Save As to save the XAP file locally.
6. Open the project assembly in a tool like Reflector (http://www.aisto.com/roeder/dotnet) to view the IL and embedded resources. Using the right plug-in, you can even decompile the IL to C# syntax.
Of course, many Silverlight developers don’t condone this sort of behavior (much as many .NET developers don’t encourage end users to decompile their rich client applications). However, it’s an unavoidable side effect of the Silverlight compilation model.
Because IL code can be easily decompiled or reverse engineered, it’s not an appropriate place to store secrets (like encryption keys, proprietary algorithms, and so on). If you need to perform a task that uses sensitive code, consider calling a web service from your Silverlight application. If you just want to prevent other hotshots from reading your code and copying your style, you may be interested in raising the bar with an obfuscation tool that uses a number of tricks to scramble the structure and names in your compiled code without changing its behavior. Visual Studio ships with a scaled-down obfuscation tool named Dotfuscator, and many more are available commercially.
The Last Word
In this chapter, you took your first look at the Silverlight application model. You saw how to create a Silverlight project in Visual Studio, add a simple event handler, and test it. You also peered behind the scenes to explore how a Silverlight application is compiled and deployed.
Chapter 2: Layout
Half the battle in user interface design is organizing the content in a way that’s attractive, practical, and flexible. In a browser-hosted application, this is a particularly tricky task, because your application may be used on a wide range of different computers and devices (all with different display hardware), and you have no control over the size of the browser window in which your Silverlight content is placed.
Fortunately, Silverlight inherits the most important part of WPF’s extremely flexible layout model. Using the layout model, you organize your content in a set of different layout containers. Each container has its own layout logic—one stacks elements, another arranges them in a grid of invisible cells, and another uses a hard-coded coordinate system. If you’re ambitious, you can even create your own containers with custom layout logic.
The Layout Containers
A Silverlight window can hold only a single element. To fit in more than one element and create a more practical user interface, you need to place a container in your page and then add other elements to that container. Your layout is determined by the container that you use.
Figure 2-1. The hierarchy of the Panel class
The Panel class adds two public properties: Background and Children. Background is the brush that’s used to paint the panel background. (You’ll learn more about brushes in Chapter 7.) Children is the collection of items that’s stored in the panel. This is the first level of elements—in other words, these elements may themselves contain more elements.
Note The Panel class also has a bit of internal plumbing you can use if you want to create your own layout container. You’ll learn how it works when you learn how to create a custom layout container later in this chapter.
Table 2-1. Core Layout Panels
NAME DESCRIPTION
StackPanel Places elements in a horizontal or vertical stack. This layout container is typically used for small sections of a larger, more complex page.
Grid Arranges elements in rows and columns according to an invisible table. This is one of the most
flexible and commonly used layout containers.
Canvas Allows elements to be positioned absolutely using fixed coordinates. This layout container is the simplest but least flexible.
Layout containers can be nested. A typical user interface begins with the Grid, Silverlight’s most capable container, and contains other layout containers that arrange smaller groups of elements, such as captioned text boxes, items in a list, icons on a toolbar, a column of buttons, and so on.
The Panel Background
All Panel elements introduce the concept of a background by adding a Background property. It’s natural to expect that the Background property would use some sort of color object. However, this property actually uses something much more versatile: a Brush object. That gives you the
flexibility to fill your background and foreground content with a solid color (by using the SolidColorBrush) or something more exotic (for example, by using a LinearGradientBrush or TileBrush). In this section, you’ll consider only the simple solid-color fills provided by the SolidColorBrush (I will mention other options later on in the book).
For example, if you want to give your entire page a light blue background, you could adjust the background of the root panel. Here’s the code that does the trick:
layoutRoot.Background = new SolidColorBrush(Colors.AliceBlue);
This code creates a new SolidColorBrush using a ready-made color via a static property of the handy Colors class. (The names are based on the color names supported by most web browsers.) It then sets the brush as the
background brush for the button, which causes its background to be painted a light shade of blue.
The Colors class offers handy shortcuts, but it’s not the only way to set a color. You can also create a Color object by supplying the R, G, B values (red, green, and blue). Each one of these values is a number from 0 to 255:
int red = 0; int green = 255; int blue = 0;
layoutRoot.Background = new SolidColorBrush(Color.FromRgb(red, green, blue));
You can also make a color partly transparent by supplying an alpha value when calling the Color.FromArgb() method. An alpha value of 255 is completely opaque, while 0 is completely transparent.
Often, you’ll set colors in XAML rather than in code. Here, you can use a helpful shortcut. Rather than define a Brush object, you can supply a color name or color value. The type converter for the Background property will automatically create a SolidColorBrush object using the color you specify. Here’s an example that uses a color name:
<Grid x:Name="layoutRoot" Background="Red">
It’s equivalent to this more verbose syntax:
<Grid x:Name="layoutRoot"> <Grid.Background>
<SolidColorBrush Color="Red" /> </Grid.Background>
You need to use the longer form if you want to create a different type of brush, such as a LinearGradientBrush, and use that to paint the background.
If you want to use a color code, you need to use a slightly less convenient syntax that puts the R, G, and B values in hexadecimal notation. You can use one of two formats—either #rrggbb or #aarrggbb (the difference being that the latter includes the alpha value). You need only two digits to supply the A, R, G, and B values because they’re all in hexadecimal notation. Here’s an example that creates the same color as in the previous code snippets using #aarrggbb notation:
<Grid x:Name="layoutRoot" Background="#FFFF0000">
Here the alpha value is FF (255), the red value is FF (255), and the green and blue values are 0.
Note Brushes support automatic change notification. In other words, if you attach a brush to a control and change the brush, the control updates itself accordingly.
The Background isn’t the only drawing detail you can set with a brush. You can also paint foreground text color in many controls using the Foreground property, and paint a border around some using the BorderBrush and
BorderThickness properties. BorderBrush takes a brush of your choosing, and BorderThickness takes the width of the border in device-independent units. You need to set both properties before you’ll see the border.
By default, the Background of a layout panel is set to a null reference, which is equivalent to this:
<Grid x:Name="layoutRoot" Background="{x:Null}">
there’s an important difference—the layout container won’t be able to receive mouse events.
Borders
The layout containers allow you to paint a background, but not a border outline. However, there’s an element that fills in the gap—the Border.
The Border class is pure simplicity. It takes a single piece of nested content (which is often a layout panel) and adds a background or border around it. To master the Border, you need nothing more than the properties listed in Table 2-2.
Table 2-2. Properties of the Border Class
NAME DESCRIPTION
Background Sets a background that appears behind all the content in the border using a Brush object. You can use a solid color or something more exotic.
BorderBrush and
BorderThickness
Sets the color of the border that appears at the edge of the Border object, using a Brush object, and sets the width of the border, respectively. To show a border, you must set both properties.
CornerRadius Allows you to gracefully round the corners of your border. The greater the CornerRadius, the more dramatic the rounding effect is.
Here’s a straightforward, slightly rounded border around a button in a StackPanel:
<Border Margin="25" Padding="8" Background="LightYellow"
BorderBrush="SteelBlue" BorderThickness="8" CornerRadius="15"> <Button Margin="3" Content="Click Me"></Button>
</Border>
Figure 2-2 shows the result.
Figure 2-2. A basic border
Simple Layout with the StackPanel
The StackPanel is one of the simplest layout containers. It simply stacks its children in a single row or column. These elements are arranged based on their order.