Victor Gaudioso
Expression Blend 2
Create fantastic Rich Media Applications in Microsoft Expression Blend 2
Move your applications to the Web using WPF and Silverlight
Foundation Expression Blend 2
Building Applications in WPF
and Silverlight
Lead Editor
Copyright © 2008 by Victor Gaudioso
All rights reserved. No part of this work may be reproduced or transmitted in any form or by any means, electronic or mechanical, including photocopying, recording, or by any information storage or retrieval system, without the prior written permission of
the copyright owner and the publisher. ISBN-13 (pbk): 978-1-59059-976-1
ISBN-10 (pbk): 1-59059-976-4 ISBN-13 (electronic): 978-1-4302-0612-5
ISBN-10 (electronic): 1-4302-0612-8
Printed and bound in the United States of America 9 8 7 6 5 4 3 2 1
Trademarked names may appear in this book. Rather than use a trademark symbol with every occurrence of a trademarked name, we use the names only in an editorial fashion and to the benefit of the trademark owner, with no intention of infringement of
the trademark.
Distributed to the book trade worldwide by Springer-Verlag New York, Inc., 233 Spring Street, 6th Floor, New York, NY 10013. Phone 1-800-SPRINGER, fax 201-348-4505, e-mail[email protected], or visitwww.springeronline.com. For information on translations, please contact Apress directly at 2855 Telegraph Avenue, Suite 600, Berkeley, CA 94705.
Phone 510-549-5930, fax 510-549-5939, e-mail[email protected], or visitwww.apress.com.
Apress and friends of ED books may be purchased in bulk for academic, corporate, or promotional use. eBook versions and licenses are also available for most titles. For more information, reference our Special Bulk Sales–eBook Licensing web page at
www.apress.com/info/bulksales.
The information in this book is distributed on an “as is” basis, without warranty. Although every precaution has been taken in the preparation of this work, neither the author(s) nor Apress shall have any liability to any person or entity with respect to any
loss or damage caused or alleged to be caused directly or indirectly by the information contained in this work. The source code for this book is freely available to readers atwww.friendsofed.comin the Downloads section.
Credits
Manufacturing Director
always believed in me and pushed me to reach for the stars.
I would also like to dedicate this book to my three beautiful kids,
Brianna, Tristan, and Luke.
About the Author
. . .xiii
About the Technical Reviewer
. . .xv
About the Cover Image Designer
. . .xvii
Acknowledgments
. . .xix
Introduction
. . .xxi
Chapter 1
Setting Up the WPF Development Environment
. . .1
Chapter 2
The WPF/Blend Workflow and Your First
WPF Application
. . .23
Chapter 3
The Blend 2 Integrated Development Environment
. . .53
Chapter 4
C# and XAML
. . .91
Chapter 5
Layout Elements
. . .99
Chapter 6
The MediaElement
. . .117
Chapter 7
ControlTemplates, Styles, and Custom UserControls
. . .141
Chapter 8
Events and EventHandlers
. . .167
Chapter 9
ObservableCollections and the Data Factory
. . .189
Chapter 10
WPF and 3D
. . .207
Chapter 11
DependencyProperties
. . .247
Chapter 12
Case Study A: 3DImageProject
. . .267
Chapter 13
Case Study B: 3DTieFighterProject
. . .293
Chapter 14
Case Study C: SilverlightPagingSystemProject
. . .309
Chapter 15
Case Study D: SilverlightVideoPlayerProject
. . .325
About the Author
. . .xiii
About the Technical Reviewer
. . .xv
About the Cover Image Designer
. . .xvii
Acknowledgments
. . .xix
Introduction
. . .xxi
Chapter 1
Setting Up the WPF Development Environment
. . .1
Downloading and installing Visual Studio 2008 Professional . . . 3
Downloading and installing Microsoft Silverlight Tools Alpha Refresh for Visual Studio 2008 Beta 2 . . . 8
Downloading and installing Blend 2 . . . 9
Creating your first WPF project . . . 14
Summary . . . 21
Chapter 2
The WPF/Blend Workflow and Your First
WPF Application
. . .23
A new way of working . . . 23
Your first WPF application: “Hello World!” . . . 27
Getting to know Solution Explorer . . . 29
Time for Blend 2! . . . 30
Changing the size of the application . . . 31
Styling the Background . . . 32
Styling the TextBlock . . . 34
Making the “Hello World!” application more exciting. . . 38
Creating a WPF button. . . 38
Creating EventTriggers for the spinBtn . . . 41
Summary . . . 51
Chapter 3
The Blend 2 Integrated Development Environment
. . .53
The Blend 2 toolbar . . . 54
The Selection tool . . . 55
The Direct Selection tool. . . 55
The WrapPanel . . . 107
Chapter 7
ControlTemplates, Styles, and Custom UserControls
. . .141
Chapter 13
Case Study B: 3DTieFighterProject
. . .293
Importing a model from ZAM 3D . . . 294
Creating the 3DTieFighterProject. . . 295
Cleaning the XAML . . . 296
Creating the buttons . . . 297
Creating the Storyboard animations . . . 299
Styling the background . . . 302
Adding descriptive text to a 3D plane . . . 303
Coding the text in Visual Studio . . . 304
Summary . . . 307
Chapter 14
Case Study C: SilverlightPagingSystemProject
. . .309
Creating the SilverlightPagingSystemProject . . . 310
Setting up various page properties . . . 311
Creating the navigation buttons . . . 313
Creating the content Canvas container and the content pages . . . 316
Creating the functionality in Visual Studio . . . 319
Summary . . . 322
Chapter 15
Case Study D: SilverlightVideoPlayerProject
. . .325
Creating the SilverlightVideoPlayerProject . . . 325
Creating the functionality in Visual Studio 2008 . . . 329
Summary . . . 331
Appendix
WPF and Silverlight Resources
. . .333
References . . . 333
Blogs . . . 334
Tutorials. . . 334
Tools . . . 335
Community sites . . . 335
Professional WPF/Silverlight development resources. . . 335
Corné van Doorendesigned the front cover image for this book. After taking a brief from friends of ED to create a new design for the Foundation series, he worked at combining technological and organic forms, with the results now appearing on this and other books’ covers.
Corné spent his childhood drawing on everything at hand and then began exploring the infinite world of multimedia— and his journey of discovery hasn’t stopped since. His mantra has always been “The only limit to multimedia is the imagi-nation,” a saying that keeps him moving forward constantly. Corné works for many international clients, writes features for multimedia magazines, reviews and tests software, authors multimedia studies, and works on many other friends of ED books. You can see more of his work at and contact him through his web site,www.cornevandooren.com.
If you like Corné’s work, be sure to check out his chapter inNew Masters of Photoshop: Volume 2
Welcome toFoundation Expression Blend 2: Building Applications in WPF and Silverlight! I am very excited about this book, as I love Windows Presentation Foundation (WPF) and Silverlight, and I have a passion for teaching them both. Throughout the course of the book, I am going to take you step by step from being a novice in Blend/WPF/Silverlight to being a skilled practi-tioner, able to create your own dynamic Rich Media Applications with animations, stunning effects, and even 3D objects. As well as these innovative tools from Microsoft, you will also use some third-party applications that will really make your creations visually stunning.
Because this technology is so new, only a handful of people in the world know how to develop in it, and those who can are compensated very well and are highly sought after. It’s a rapidly expanding market, and more and more companies are looking for Silverlight and WPF developers—if you have those skills, then you’ll be a developer in demand! To give you an example from the real world, the company I work for, Identity Mine (www.identitymine.com), is always on the lookout for talented WPF and Silverlight developers, and if someone were to approach us with a portfolio of skills similar to those you’ll learn in this book, we’d pretty much hire that person on the spot! And that doesn’t just go for us; Silverlight and WPF are hot topics, and there are many more companies out there looking designers and developers who can use them well. In fact, if you’ve worked through this book and think you’ve got what it takes, feel free to e-mail your résumé with code samples to me at[email protected].
So, before you roll up your sleeves and get started, let me start off by introducing you to WPF/Blend and giving you some important information about the rest of this book.
Who this book is for
What this book will teach you
Following is a complete list of what exactly this book will teach you so that you know what you will be able to accomplish in WPF/Blend once you have completed the book. You will
Understand the typical WPF/Blend workflow for creating WPF applications. Understand the Blend IDE—what tools are available and how to use them. Understand XAML and C# basics.
Know the basic WPF framework element controls.
Understand the WPF MediaElement and how to use it to create video and audio for your application.
Learn how to create reusable Styles and control templates. Understand and know how to create events and EventHandlers. Learn about and create ObservableCollections of data.
Create 3D objects and know how to bring them into WPF and use them. Learn about WPF visual brushes and how to use them.
Understand the difference between timelines and Storyboards and know how to use timelines to create compelling Storyboard animations.
Put all of the new knowledge you learn together to make two very fun and dynamic 3D WPF applications, as well as two Silverlight applications that you will be able to reuse as you continue to develop in Silverlight.
What WPF/Blend is and what C# and XAML are
WPF has a large number of framework elements or controls such as Buttons, Grids, and MediaElements, among others. These are all written in the Extensible Application Markup Language (XAML), an XML-based markup language. XAML also allows you to create Storyboard animations. These UI controls can be controlled partially in the XAML by Storyboards, but for the most part they are controlled with C#. This type of structure is very similar to HTML and JavaScript, as HTML displays the content, while JavaScript adds functionality to the interactive parts of the HTML such as mouseover effects. Conversely, controls can be created in C#, but, again, most controls are created in XAML. XAML can also display assets such as images, audio, and video.
C# is a very robust object-oriented programming language developed by Microsoft and is part of the .NET Framework. Basically, I like to think of XAML as the pretty exterior of a cool car and C# as the powerful engine under the hood. So the typical way that WPF creates and displays content goes like this:
1.
XAML describes how the controls, images, video, and other assets are shown.3.
The compiler then puts the XAML UI and functionality together into an executable (EXE) file for a Windows application or a XAML browser application (XBAP) executable for online applications.4.
The browser or Windows then displays the application.The real power of WPF is the robustness of C# and the capability of using XAML to create the interface as well as to make use of 3D objects.
What tools you will need
It is worth mentioning here that C# is created and edited in Visual Studio 2005 or C# Express, and XAML can be edited in both Blend and Visual Studio 2005 or C# Express. Visual Studio 2005 is a developer tool for creating applications with the .NET Framework and has been around for some years. Some of the tools offered by Visual Studio 2005 are the control toolbox for adding controls to an application as well as tools to assist in writing code such as IntelliSense (discussed in Chapter 2). Blend, however, is a new instrument that allows you to create and display WPF assets such as controls and images in code or visually. TheSelectionandBrush Transformtools, as well as the various shape tools, are just a few of the features that Blend offers the developer. I will go into these and other tools in Chapter 3, and you will master these development tools in later chapters.
What Silverlight is and how it differs from WPF
Silverlight, formerly known as Windows Presentation Foundation Everywhere (WPF/E), is a cross-platform version of WPF. Basically, it is a scaled down version of WPF that can run on a Mac or PC. WPF can only run on Windows Vista or Windows XP with .NET 3.0 or later installed (Windows XP ships with .NET 2). There are other differences, but most important, for me any-way, is WPF can make use of 3D objects, while Silverlight cannot without third-party plug-ins. This is because it is difficult to port 3D hardware acceleration across different platforms. The other major difference is that Silverlight 1.1 can use C#, JavaScript, and Python, among others, for its code-behind language, and Silverlight 1.0 can use only JavaScript for its code-behind lan-guage (the code that gives functionality to XAML assets), while WPF can use only C# or Visual Basic. The final difference is that Silverlight integrates right into an HTML page by using the Silverlight browser plug-in, while WPF needs to be inserted into an IFrame to mix with HTML content. Silverlight is still being developed, so the differences I have just explained may not exist in future Silverlight releases.
Online resources
Layout conventions
To keep this book as clear and easy to follow as possible, the following text conventions are used throughout:
Important words or concepts are normally highlighted on the first appearance inbold type. Code is presented infixed-width font.
New or changed code is presented inbold fixed-width font.
Menu commands are written in the formMenu➤Submenu➤Submenu. Where I want to draw your attention to something, I’ve highlighted it like this:
What this chapter covers:
Downloading Visual Studio 2008 Beta 2 Installing Visual Studio 2008 Beta 2
Downloading Microsoft Silverlight Tools Alpha Refresh for Visual Studio 2008 Beta 2
Installing Microsoft Silverlight Tools Alpha Refresh for Visual Studio 2008 Beta 2
Downloading Blend 2 September Preview1
Installing Blend 2
Creating a WPF test application in Visual Studio 2008 Creating very simple content in your WPF test application Compiling/running your WPF test application
Opening your WPF test application in Blend 2
SETTING UP THE WPF DEVELOPMENT
ENVIRONMENT
Before we delve into the download and installation of the WPF/Silverlight development environment, I feel it would be good to make certain you and your machine are able to handle the tasks that will be asked of you in this chapter. This chapter assumes the following:
You have a computer that is running either Windows XP with Service Pack 2 installed or any version of Windows Vista.
Your system has at least 1GB of RAM.
Your hard drive has at least 5GB of free space available. Your PC has a relatively fast CPU.
Your system has a relatively good video card. You have Internet access (high speed is preferred). You know how to navigate the Internet.
You know how to download, save, and install programs. You have a DVD burner with DVD burning software.
If I have not scared you off, you can start downloading and installing the WPF/Silverlight development environment.
Until recently, installing the WPF/Silverlight development environment was very difficult to do. You had to install the Microsoft .NET Framework 3.0 (if you were not running Windows Vista), Microsoft Visual Studio 2005 or Visual C# 2005 Express, the MSDN Library for Visual Studio, Expression Blend, and finally, the Microsoft Visual Studio 2005 Extensions for Windows Workflow Foundation. The download and install process took a very long time, and oftentimes the install would fail. Fortunately, Microsoft has streamlined the install process for WPF and Silverlight in that now you only need to download and install Visual Studio 2008, Blend 2, and the Microsoft Silverlight Tools Alpha Refresh for Visual Studio 2008 Beta 2 (this last one is just for Silverlight development). In this chapter, I am going to tell you how to find these downloads and then show you how to install them step by step. You are then going to open Visual Studio 2008 and create a new WPF project to ensure you have installed everything correctly, and finally, you are going to open that same WPF project in Blend 2, again, to make certain you have installed the WPF development environment correctly.
Downloading and installing Visual Studio 2008
Professional
Unfortunately, URLs can and do change over time. For that reason, I am not going to provide you with specific URLs to downloads. I am, however, going to point you to the Microsoft Download Center where you can search for the programs you will need.
1.
Type the following URL into your web browser:www.microsoft.com/downloads/
2.
Once you navigate there, you enter visual studio 2008 professionalin the search input box at the top of the page as I have done in Figure 1-1 and click the Gobutton.Figure 1-1.Finding Visual Studio 2008 from the Microsoft Download Center page
With any amount of luck, you will see the results that match what I have in Figure 1-2.
Figure 1-2.Your search should return the Visual Studio 2008 Beta 2 Professional Editionlink.
3.
Click the Visual Studio 2008 Beta 2 Professional Editionlink and then click the Downloadbutton. You will be prompted to Openor Savethe file to your local hard drive as shown in Figure 1-3.4.
Choose to Savethe file on your local hard drive and make note of where you saved it. It will then start to download. The file is about 3GB, so this may be a good time to make and enjoy a cup (or possibly a pot) of coffee. This may seem like a very long download to you, but the pre-vious installation method for Visual Studio 2008 required you to download eight files, seven of which were almost a gigabyte each!5.
Once the file has finished downloading, navigate to wherever you chose to save it on your local hard drive and double-click it. It will then open your default DVD burning software (mine is Nero), and attempt to burn a DVD. This should take under 10 minutes on most modern computers.Figure 1-3.Save the IMG file to your local hard drive, and make a note of where you saved it.
6.
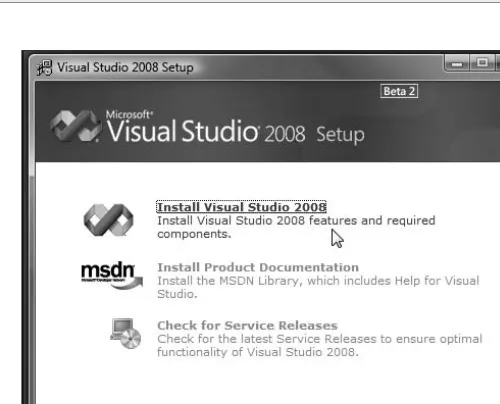
Once the DVD is complete, the fun begins! Open the DVD drive that contains the new Visual Studio 2008 Beta 2 installer DVD and close it again, and it should automatically run. Some PCs may not have autorun enabled. If this is the case, use Window Explorer to navigate to your DVD drive and double-click the setup.exe file. You will then see a screen like the one in Figure 1-4.Figure 1-4.Once you run the Visual Studio 2008 Beta 2 installer DVD,
7.
Click the Install Visual Studio 2008link. The installer will then perform a check to make certain that Visual Studio 2008 can be installed on your machine and which components your particu-lar machine will require to develop WPF applications (see Figure 1-5).8.
You will then be asked to read and accept the license terms. To do that, select the appropriate radio button as I have done in Figure 1-6, and click Next.Figure 1-6.Accepting the license terms
9.
The installer will then ask what features you want to install for Visual Studio 2008. ChooseDefaultlike I have done in Figure 1-7, and then click Install.
Figure 1-7.Selecting the Defaultfeatures
Figure 1-8.The install process begins.
The best advice I can offer you to make the installation process easier is to be patient. Personally, I have witnessed the installation of Visual Studio 2008 be as short as one hour and as long as two hours. Two components that take particularly long to install are the .NET Framework 3.5 and Microsoft Visual Studio 2008. The good news is that this version of the installer will install components that previously had to be downloaded and installed separately. For example, previously you had to download and install the .NET Framework 3.0 and the Visual Studio Tools for WPF separately.
10.
Once the installer has completed, click Finishand then you can move on and download and install the Silverlight Tools for Visual Studio.Downloading and installing Microsoft Silverlight Tools
Alpha Refresh for Visual Studio 2008 Beta 2
1.
You can find the download under the “DOWNLOAD THE RUNTIME AND TOOLS” section located here: http://silverlight.net/GetStarted/.2.
Select the link that reads Microsoft Silverlight Tools Alpha Refresh for Visual Studio 2008 Beta 2 (July 2007).3.
You will then be redirected to a download page. Click the Downloadbutton on that page.4.
When prompted, save the file to your hard drive and make a mental note of the name of the file and where it was saved.5.
When the program has finished downloading, navigate to where you saved it on your hard drive and double-click it.6.
Run through the installation process. It is very simple and fast (no longer than 5 minutes).Downloading and installing Blend 2
If you already own a copy of Blend 2, you can skip this section. If you do not have Blend 2, this section will describe where to find and install the free trial version.
1.
To find the Blend 2 trial, head back to the Microsoft Download Center (located here:www.microsoft.com/downloads/) and in the search field enter blend 2 septemberlike I have done in Figure 1-9.
Figure 1-9.Navigating to the Microsoft Download Center and entering blend 2 septemberin the search box
Again, with any degree of luck, your search will yield the same results that mine did, as the only result returned to me was exactly the one I was looking for (see Figure 1-10).
2.
Click the Expression 2 September Previewlink, and you will be taken to the download page for Microsoft Expression Blend 2 as I was in Figure 1-11.Figure 1-11.Your search result should take you to the download page for Microsoft Expression Blend 2.
3.
Click the Continuebutton, and you will be taken to a page asking whether you want to register to receive the download. Registration is optional, and can be skipped if you prefer. Once that’s done, you will be redirected to the page that will actually let you download the program (see Figure 1-12).4.
You are then asked whether you want to RunorSavethe file. In my experience, I have found that it is best to save it locally and then run it once it has completed downloading. That being the case, save the file to your local hard drive (making note of the file’s name and location). Once the file has completed downloading, navigate to where you saved it on your hard drive and double-click it.5.
Click Run(see Figure 1-13).Figure 1-13.When the Open Filedialog box appears, click Run.
6.
Click Next(see Figure 1-14).7.
Accept the end-user license agreement and click Next(see Figure 1-15).Figure 1-15.Accept the end-user license agreement
8.
You will then be prompted to choose the setup type that best suits your needs. Select Typical(see Figure 1-16) and then click Install. You will then see the Blend installer progress bar (see Figure 1-17).
Figure 1-17.The Blend installer progress bar shows you how far along the install is.
9.
After only a few minutes, the Blend 2 installer will inform you that it has completed the instal-lation and will ask you to finish the process; choose Finish(see Figure 1-18).Figure 1-18.The Blend 2 install is complete.
Creating your first WPF project
When I create WPF projects, I like to create them in Visual Studio 2008, even if I create the project and then immediately switch over to Blend to work on it. This is because Visual Studio and Blend 2 create WPF projects a little bit differently from each other.
Blend doesn’t offer the option for creating a WPF online application.
As soon as Blend 2 creates projects, it starts to name the UIElementsthat the developer then, if so inclined, has to change.
When Blend 2 creates a WPF project, it automatically closes off the main UIElementlike this:
<Grid x:Name="LayoutRoot"/>
If you wanted to add something to the preceding root element in the XAML, you would have to open up the element like this:
<Grid x:Name="LayoutRoot">
</Grid>
But Visual Studio 2008 does it for you like this:
<Grid>
</Grid>
By default, a WPF project created in Visual Studio has more reference assemblies (I will explain reference assemblies later in the book in Chapter 10).
Visual Studio is a little more tidy when it creates a WPF project: VS puts all of the project’s properties inside of a Properties directory, while Blend 2 just creates a file called
AssemblyInfo.csin the root of the project. And, Visual Studio’s AssemblyInfo.csfile (located in the Propertiesdirectory) is much more advanced.
Granted, these are subtle differences, but altogether they make it a good idea to create your WPF applications in Visual Studio.
That being said, let’s move on and create a new WPF solution:
Figure 1-19.Navigating to Microsoft Visual Studio 2008 Beta 2 and selecting it
2.
At this point Visual Studio may ask you what developer settings you would like. Set this for C#.3.
Once Visual Studio 2008 Beta 2 opens, select File ➤ New ➤ Project like I have done in Figure 1-20.Figure 1-20.Opening a new project
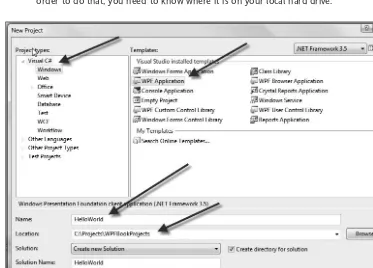
The New Projectdialog box will appear. Under Visual C#, you will see the project templates available to you, two of which will be WPF Application(for stand-alone Vista WPF applications) and WPF Browser Applications(for online browser WPF applications).
4.
Choose WPF Application, name your project WPFTestApplication, select C:\Projects(you will have to create this Projectsdirectory by clicking Browseand creating a new folder in the New Projectdialog box) for the location, and then click OK(see Figure 1-21).Figure 1-21.Selecting Visual C#for the project type, WPF Applicationfor the template, WPFTestApplication
for the name, and C:\Projectsfor the location
You are currently creating a WPF stand-alone Vista application, but under C# the option for creating a Silverlight application should also be available.
Visual Studio 2008 will then create a new WPF solution for you. A WPF solution is essentially a directory with one or more WPF projects that have associated files in them made up of XAML and C#. So Visual Studio has created a solution for you named WPFTestApplication and inside of that a project with the same name.
Visual Studio has a design tab that attempts to show you your project visually. Personally, I like to use Blend for my visuals and Visual Studio strictly for code. That being the case, I like to turn off the Visual Studio Designer. To do this, continue with the following steps:
5.
Right-click any XAML file in Visual Studio’s Solution Explorer (located in the top right of Visual Studio) and click Open Withas shown in Figure 1-22.6.
A dialog box will then appear. Select XML Editor, click the Set as Defaultbutton, as shown in Figure 1-23, and click OK.Figure 1-23.Selecting XML Editoras the default Don’t let terms like “Solution Explorer” and “the Visual Studio Designer” scare you, as I’ll go over all of these
7.
Visual Studio will then ask you if you want to close your XAML file; click Yes. Visual Studio will then close the Designer and open your XAML file in XML view as shown in Figure 1-24.Figure 1-24.Visual Studio closes the Designer and opens your XAML page in XML view.
8.
Now, just to be certain you can compile and run your project, give it some very basic content. In between the Gridtags, create a simple TextBlockas shown here:<Window x:Class="WPFTestApplication.Window1"
xmlns="http://schemas.microsoft.com/winfx/2006/xaml/presentation" xmlns:x="http://schemas.microsoft.com/winfx/2006/xaml"
Title="Window1" Height="300" Width="300"> <Grid>
<TextBlock Text="FOO"/> </Grid>
</Window>
9.
Now press F5 to run the application, and you should see something very similar to what I have in Figure 1-25.It is worth noting here that when you compiled your application, Visual Studio automatically saved your project. So now you can leave Visual Studio open, and fire up Blend and open your project.
10.
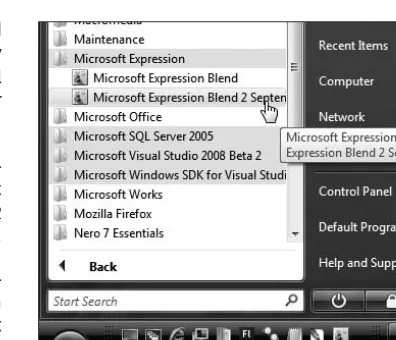
To open Blend 2, look under your pro-grams for Microsoft Expression; in that folder, click Microsoft Expression Blend 2 September Release, as shown in Figure 1-26. Blend will open and will show you a welcome dia-log box. Personally, I don’t like diadia-log boxes when programs start, so I uncheck the Run at startupbox and click Close(see Figure 1-27). If you ever want this screen back, you can click Help ➤Welcome Screen. You can also check Run at Startupto make it reappear every time Blend is started.I am using the terms “compile” and “run” interchangeably, but technically, they are not. “Compile” means to create an executable application from your project, while “run” means to create an executable application from your code and run it immediately afterward. Oftentimes throughout the book, I will use them interchangeably; however, if I want you to compile the application but not run it, I will be sure and explicitly tell you to do that. So for now, just know that I use both terms to basically mean “start the application.”
11.
Now select File ➤ Open Project/Solution and then navigate to where you saved your WPFTestApplication (I saved mine under C:\Projects). Then double-click the .sln(solution) file (see Figure 1-28).Figure 1-28.Navigating to where you saved your WPFTestApplication and double-clicking the .slnfile
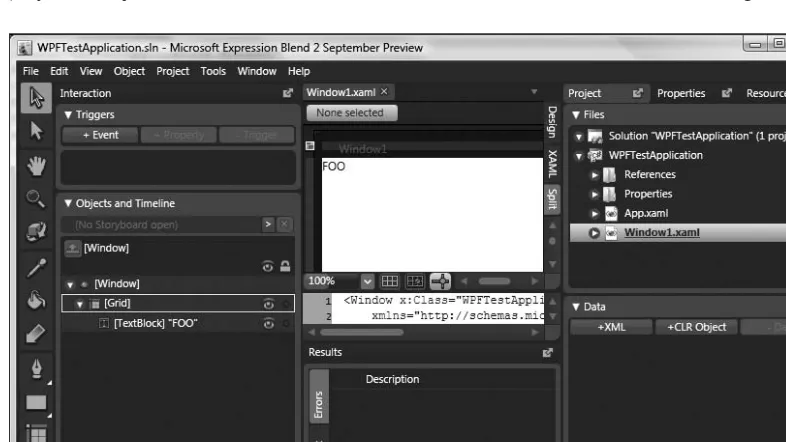
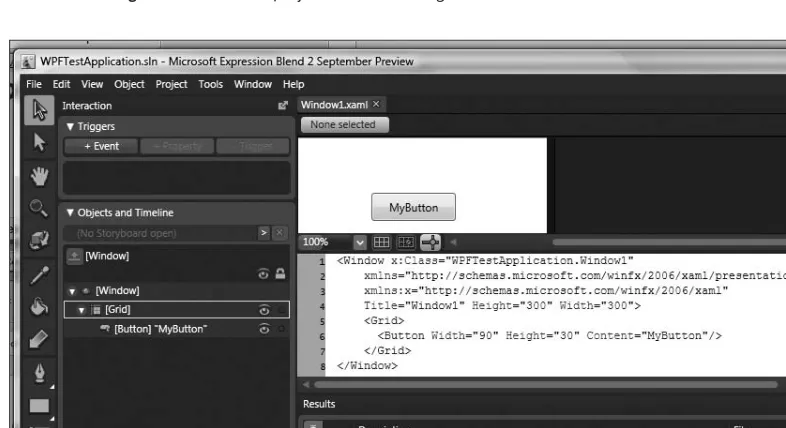
You will then see that Blend opens your project and shows it to you in Split view, that is, you see the project visually as well as its XAML code . . . this is a brand new feature to Blend 2 (see Figure 1-29).
Figure 1-29.Blend shows your project in the brand new Split view.
Summary
What this chapter covers:
The WPF/Silverlight improved workflow Creating your first WPF application
Microsoft has addressed problems with the designer/developer workflow with WPF and Silverlight. In this chapter, I will discuss that workflow and talk about how Microsoft thinks it has come up with a solution. I will also discuss a typical way of working in WPF and Silverlight using Blend 2 and Visual Studio 2008. Finally, I am going to show you how to create your very first WPF application, “Hello World!” with a twist, literally.
A new way of working
One of the major selling points for WPF and Silverlight is that Microsoft has recog-nized some of the difficulties that sometimes crop up when designers and develop-ers try to work together, and provided a better set of tools and workflow to allow them to interact more easily. Blend 2 is intended to be used by designers to visually manipulate the application user interface (UI)—they can control layout, create visual
Storyboardanimations, add in assets such as graphics and video, etc. Developers, on the other hand, can use Visual Studio to interact with the application through code,
in an environment they are familiar with—connecting it up to data sources, providing button interac-tion, creating MediaElementcontrols, etc. This makes the workflow between designers and developers much more simple, harmonious, and time efficient, and thus cost effective.
Before I started working in WPF and Silverlight, I was an ActionScript engineer for a large advertising firm in Los Angeles where we made large web sites for entertainment companies such as Disney, Universal, Mattel, and Warner Bros. Here I will describe a typical workflow between the developers, the designers, and myself, pointing out the limitations of that workflow along the way and then describing to you how WPF and Silverlight address those problems.
First, the designers design the entire site, top to bottom, as a series of Photoshop mockups. Once the mockups are agreed upon and signed off, the Photoshop PSD files are handed off to me and my team to “make work.” This is a typical workflow not only for Flash development, but also for other technologies as well (HTML, Java, etc.).
I use the Photoshop file as a guide and re-create an object, let’s say something simple like a button. I re-create it in Flash, or sometimes if I’m lucky I can copy it from Adobe Illustrator as a vector graphic.
Then we plug the functionality into the newly created Flash objects, for example, the event handlers that handle the functionality for buttons.
This sounds pretty effective, so what then are the limitations? Let’s say for some reason the client changes his mind and wants the button to look radically different. Being that I am not much of a designer, the job then falls upon the designers to make the change. They go back and make the required change to their Photoshop or Illustrator file. When they have completed the change, they then inform me that the files have been updated. I open up their Illustrator or Photoshop file and then either re-create the Photoshop file or copy the new vector graphic from Illustrator into Flash. This may not seem problematic, and in fact, it is not. It is, however, time consuming.
Microsoft’s solution is to have the developers and the designers working on the same set of files in the same project so that if the style of a Buttonhas changed, the designers can go into the same files that I, the developer, am working on and make the change. Further, WPF/Silverlight allows you to use something called Stylesto specify the way user interface elements (UIElements) appear in your application. And these Stylesare 100% reusable so that if I or the designer change the Style file (commonly defined in a WPF Resource Dictionary, which we will get to in Chapter 7) of, say, the navi-gation Buttons, that change is then reflected in any WPF/Silverlight UIElementsthat make use of that
Style, which could be hundreds of Buttons in a large application. As you can ascertain, this saves a good amount of time. Now if you take into account that this type of scenario takes place many times during a project, the amount of time that is saved is dramatically increased. And as we all know, time is money, and money is what allows us to be able to pursue our hobby of developing Rich Media Applications.
the developer to “wire up.” But now with WPF, the designers and developers could work on the appli-cation at the same time, thus saving vast amounts of time. This proved to be a much more effective and thus harmonious workflow.
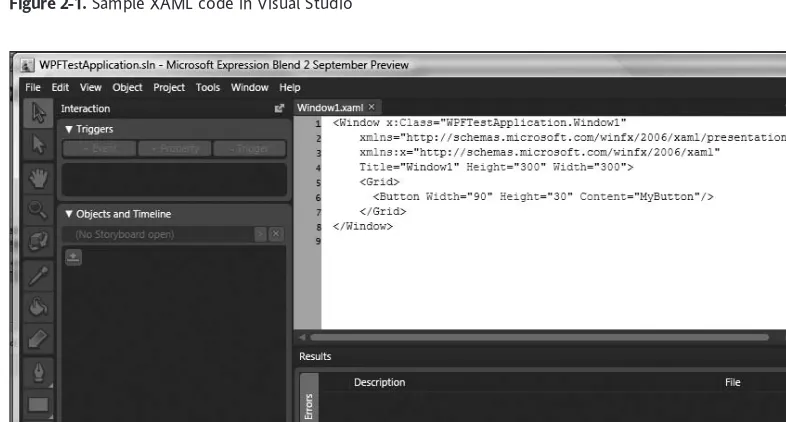
I have included a few screenshots in the last part of this section to show the similarities as well as the differences between Visual Studio 2008 and Blend 2. Figure 2-1 shows how XAML code looks in Visual Studio, and Figure 2-2 shows the same XAML code in Blend in the XAML view. Figure 2-3 shows the same project in Blend’s Design view. Finally, Figure 2-4 shows the same project in Blend 2’s new Split view, which displays the Design view and the XAML view on the same screen.
Figure 2-1.Sample XAML code in Visual Studio
Figure 2-3.The same project in Blend’s Design view
Your first WPF application: “Hello World!”
Without further ado, let’s start you building your first WPF application. If you have ever read any pro-gramming books before, I am certain you know what your first application is going to be . . . yes, you guessed it, “HELLO WORLD!”Because “Hello World!” is the first application of almost every technical publication, everyone, including myself, usually hates it, as it tends to be very boring. So, I decided to make this particular “Hello World!” application one that harnesses the real power of WPF. This “Hello World!” application is going to have gradient colors, Buttons, and Storyboardanimations that are run from EventTriggers. I can pretty much guarantee you that this will be the most exciting “Hello World!” application you have ever created. So get ready and let’s create “Hello Word!” but with a twist . . . literally!
1.
Open Visual Studio 2008 and click Create: Projector click File ➤New➤Project.The New Project dialog box appears. Here, you want to make sure you have a few things selected (see Figure 2-5):
Project type: Under Visual C#select Windows.
Template: Select WPF Application.
Name: Type HelloWorld.
This creates and opens up a new project named HelloWorld, as you may have expected. In later chapters, I am going to explain what everything is, but for now I am just going to give you a taste of working with WPF and Blend. So if I use terms you don’t quite understand, fear not, as I will go over everything in depth in later chapters.
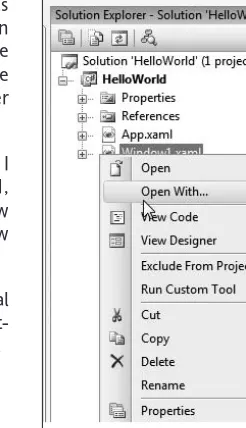
Visual Studio 2008 shows the new project in its Design view. I talked about how to close Visual Studio’s Design view in Chapter 1, but because Visual Studio 2008 loses this setting for every new project you create, I will explain how to close the Design view again:
2.
In Visual Studio Solution Explorer, top right of the Visual Studio integrated development environment (IDE), right-click Window1.xamland select Open With(see Figure 2-6).3.
Now select XML Editor.4.
Click Set as Default.5.
Click OK(see Figure 2-7).6.
Visual Studio 2008 will now ask you if you want to closeWindow1.xaml. Click Yes.
Figure 2-7.Setting XML Editor as the default
Visual Studio 2008 now shows you the XAML for Window1.xaml.
Figure 2-6.Selecting the Open With
Getting to know Solution Explorer
Before I continue, let me tell you about Solution Explorer and what it is for. You can see where Solution Explorer is located in Figure 2-8. Solution Explorer is exactly that—a tool that lets you explore all of the different parts of your solution or project. Here you can see all of the directories as well as all files included in your application, XAML documents, CS files (C# code-behind pages—files that, along with their companion XAML files, describe a WPF application or control), images, audio and video files, XML files, etc. It allows you to easily look and see what files you have and where they are located.
Figure 2-8.The arrow indicates where you can find Solution Explorer in Visual Studio 2008. A similar feature, called the Projectpanel, appears in the same place in Blend 2.
1.
Now take a look at the code—what you should currently see in the XAML window is this:<Window x:Class="HelloWorld.Window1"
xmlns="http://schemas.microsoft.com/winfx/2006/xaml/presentation" xmlns:x="http://schemas.microsoft.com/winfx/2006/xaml"
Title="Window1" Height="300" Width="300"> <Grid>
You are now going to add some code to your application:
2.
Place your cursor in between the open <Grid>and the closing </Grid>tags.3.
Enter the following bold line so that your code now looks like this:<Grid>
<TextBlock/>
</Grid>
Great! Now you have a TextBlock, the only problem remaining is that it is an empty TextBlock. You want to fix that by adding in a Text attribute to tell your TextBlock
what text to contain:
4.
Change the TextBlockline so it matches the follow-ing bold one:<Grid>
<TextBlock Text="Hello World!"/>
</Grid>
5.
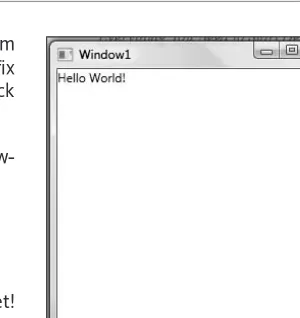
Now run your application and see what you get! Press F5 to compile and run the application. Provided you did not make any mistakes, you should see a window with the words “Hello World!” in the upper-left corner as shown in Figure 2-9.Time for Blend 2!
Amazing, huh? What do you mean it looks boring? OK, OK, I know, it is not much to look at, but now that you’ve got the simple programming part out of the way, you can open the project in Blend 2 and make your “Hello World!” application look a little cooler.
1.
Open Blend 2 and then select File ➤Open➤Project/Solution.2.
Blend will then prompt you to provide the location of the solution file (.sln). Navigate to where you created your project and double-click the .slnfile.Once you open that file, you will notice immediately that Blend has a cool Design view as well as a XAML view. So I am sure you can see your “Hello World!” TextBlock. But shown in Figure 2-10. But it is almost as plain as it looked in the window when you ran it before. Thatis about to change.
Did you notice that when you started to type, Visual Studio attempted to figure out what you wanted and offered you a list of options? This is an autocomplete function called IntelliSense and is a very handy tool.
Figure 2-10.This is what your “Hello World!” application looks like in Blend’s new Split view.
Changing the size of the application
First thing you are going to want to do is to give yourself a little breathing room by setting the Width and Height
properties of Window1.xaml.Window1.xamlis the first page that the user will see when running your “Hello World!” application. Visual Studio 2008 created Window1.xaml by default because you chose to create a WPF application. If you had chosen to create a WPF browser application or a Silverlight application, the default would have been
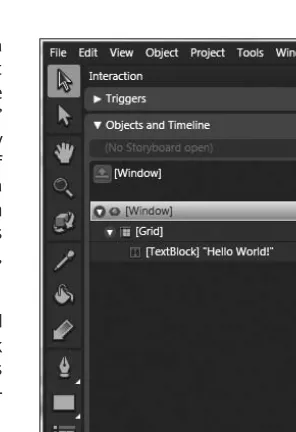
Page1.xaml. In order to manipulate [Window]’s properties such as Widthand Height, you need to select it. To do that, follow these steps:
1.
Go over to the Objects and Timelinepanel located on the left side of the Blend IDE and double-click the [Window] UIElement until it is highlighted, as shown in Figure 2-11 (it will appear outlined in yel-low on your screen).Figure 2-11.Selecting elements in the project by clicking them in the Objects
2.
Next, go over to your Propertiespanel (located on the right side of the Blend IDE), select thePropertiestab, and change the Widthand Heightvalues to 800and 600, respectively, as shown in Figure 2-12.
Figure 2-12.Changing the Widthand Height
settings of the [Window] UIElementin the
Propertiestab
Styling the Background
Ahh, nice, a little breathing room. Now with [Window]still selected in the Objects and Timelinepanel, you’ll give your Backgrounda little style.
1.
In the Propertiestab, find the Brushessection, and if it is not already expanded, click the arrow to turn down the content for the Brushesbucket as shown in Figure 2-13. Once you turn down the arrow for the Brushes bucket, you will see the Backgroundproperty for [Window].
2.
Select theBackgroundproperty (step 1 in Figure 2-14) and follow these steps:a.
Click the Gradient brush(step 2 in Figure 2-14).b.
Click the default black color stop (step 3 in Figure 2-14).c.
Click the color bar and drag it to a color you like (step 4 in Figure 2-14).d.
In the large square color editor, click a color (step 5 in Figure 2-14).Figure 2-14.Making changes to the “Hello World!” application’s background
Notice your Backgroundchanged to reflect your choices. Fun, huh?
3.
Notice also that your gradient is going from left to right; you want it to go from top to bottom, so grab the Brush Transformtool, shown by the arrow in Figure 2-15. Once you select the Brush Transformtool, you will see that your Backgroundnow has an arrow. You can use this arrow to change the gradient properties, one of which is rotation.4.
Place your mouse over the handle of the arrow until it turns into a semicircular arrow, and then click and drag to rotate it so that it goes from top to bottom.Holding down Shift while you rotate limits rotation to set degrees so that it is easy to get the gradient arrow and the resulting gradient perfectly up and down.
Starting to look better, isn’t it? To see more of the design, you can click the Designtab, shown by the arrow in Figure 2-16, so that you can no longer see the XAML for your project (this can also be done by clicking View ➤Design).
Figure 2-16.This shows what the project looks like in Blend 2’s Design view.
Styling the TextBlock
Now that you have your Backgroundlooking somewhat cool, you can move ahead and make your [TextBlock] UIElementlook good.
1.
Click the Selectiontool (or press the V key to select it), as shown by the arrow in Figure 2-17.2.
Double-click your [TextBlock] so that it is highlighted in the Objects and Timelinepanel like I have done in Figure 2-18, and in the Layoutsection (sometimes referred to as a bucket container) of the Propertiespanel change its Widthsetting from Auto
to 400and its Heightsetting to 100as shown in Figure 2-19.
Figure 2-18.Selecting the [TextBlock] Figure 2-19.Changing the Widthand in the Objectsand Timelinepanel Heightof your [TextBlock]to 400
and 100, respectively
Notice that this centered the [TextBlock]to the stage; if you don’t want it centered, select it in the
Objects and Timelinepanel and then use your Selectiontool to drag it to wherever you want.
Now that you have it where you want it, you’ll change the text to look a little more aesthetically pleasing.
3.
With the [TextBlock]still selected (it should have a blue line around it in the Workspace when it is selected), go to the Propertiespanel and under the Brushessection click Foreground. (TheForegroundis the color property for the actual text.)
4.
Grab the color selector and slide it to a color you want; you will see that the text changes colors on the fly in Blend’s Design view. I chose a neon greenish color that has a Hex value of #FF16FA45, as you can see in Figure 2-20.You can visually set the color of the Foregroundproperty like you did earlier for the
Figure 2-20.Choosing a color for your selected [TextBlock]
Once you’ve changed the color of your text, your changes should be reflected onscreen, as demon-strated in Figure 2-21.
Figure 2-21.Your [TextBlock]will change colors dynamically in the Design view as you change the color in the Brushessection of the Propertiespanel.
The hex values for Blend are much like the hex values in other visual programs such as Photoshop and Illustrator, the only difference is that Blend requires FF before the 6-character hex code.
Next, you’ll make your text a little more colorful and change the foreground from a solid color to a gradient color.
1.
To do this, make sure that the [TextBlock]is still selected and then click the Foreground prop-erty (step 1 in Figure 2-22).2.
Click the Gradientbutton (step 2 in Figure 2-22).3.
Select the first color tab (step 3 in Figure 2-22).4.
Drag your color selector until your first color is a shade of red (step 4 in Figure 2-22).5.
Click in the center of your gradient to add another color tab stop (step 5 in Figure 2-22).6.
Slide the color selector around until the middle color tab is white (step 4 in Figure 2-22).7.
Select the color tab stop furthest to the right (step 6 in Figure 2-22).8.
Drag your color selector until it is a shade of green (step 4 in Figure 2-22).Figure 2-22.The final gradient setting for the foreground
Figure 2-23 shows that the [TextBlock]is starting to look pretty cool. Note: I have made the size of my [TextBlock]’s text bigger to show the gradient more clearly. In the next step, I will show you how to do this.
1.
Now change the size and font of the [TextBlock]. To do that, drop down to the Textbucket in the Propertiespanel and change the font size to 72, as shown in Figure 2-24.Because you set your [TextBlock]to have a Widthof 600and a Heightof 100, your text should all show without being cut off. But if it was, as shown in the example in Figure 2-25, it can be fixed by grabbing the size handles on the right and dragging them out until all text shows clearly.
Figure 2-24.Changing the text font size Figure 2-25.If the text is being cut off, grab the size handle to 72in the Textbucket of the and drag it to the right until all text is visible.
Propertiespanel
2.
Press F5 to run the application and take a look. Not a bad little “Hello World!” application for a short amount of work, huh?Making the “Hello World!” application more exciting
I think at this point your “Hello World!” application already blows the competition away, but let’s go forward and really make this thing do something cool. And if, at this point, you are starting to get a lit-tle confused because we are moving fast, don’t worry, as everything you are doing here will be cov-ered in depth in later chapters. Keep in mind this exercise was intended to get your hands dirty with WPF. So, next you’ll move forward and really make your “Hello World!” application sing . . . or should I say spin?
Creating a WPF button
OK, now for the additional functionality. I thought it would be cool to create a simple button that when clicked fires an event that runs a Storyboard animation that will make the “Hello World!”
First you need to create your Button. To do that, follow these steps:
1.
Locate the Buttontool in the Blend 2 toolbar. If another control is selected, hold the mouse button down until all controls show up, and then click the Buttontool as shown in Figure 2-26.The button will be styled with a default skin that comes as standard in Blend; I will cover custom styling later on in Chapter 7.
Figure 2-26.Selecting Button
in the toolbar
2.
With the Buttontool selected, draw a Buttoncontrol in the Workspace (this is the same area as what’s known as the stage in Flash) by clicking and dragging the mouse. You can make theButtonany size you want. Figure 2-27 shows my Buttoncontrol relative to the TextBlockin the Workspace.
Figure 2-27.Drawing a Buttoncontrol in the Workspace
That went easy enough, right? Now let’s be a little creative and give the Buttonsome text other than the default of “Button.”
An alternative way to put a Buttoncontrol in the Workspace is to double-click the
Buttontool on the toolbar, and Blend 2 will place a Buttoncontrol into the Workspace for you with default dimensions. I rarely use the default dimensions, as I personally like to draw my controls by hand.
3.
First make sure the Button is selected in the Objects and Timeline panel, and then in thePropertiespanel find the Contentproperty under the Common Propertiessection as shown in Figure 2-28.
Figure 2-28.To change the Buttontext, change the Contentproperty in the
Propertiespanel.
4.
Change the Contentproperty (where it currently saysButtonin Figure 2-28) to read something like Spin the Text.
5.
Press Enter, and you will see the Buttonnow reflects your change (see Figure 2-29).Now you have your Buttonset up, but currently it doesn’t do anything. You need to tell the Button what you want it to do—in order to control a Button it, must have a unique name, so give it one:
6.
Go to the Properties panel and change the Nameproperty to spinBtn, as shown in Figure 2-30.
The Propertiespanel has a search field that allows you to enter the name of the property, such as Content, that will then filter the properties for you based upon your search crite-ria. This is very convenient when you don’t know what bucket a particular property is in.
Figure 2-29.Your Buttoncontrol will update once you change the Content
property in the Propertiespanel.
Now that you’ve given the Buttona name (an instance name, in official terminology), you can start to give it functionality in a number of different ways. You could, for example, animate it visually in Blend using the Animation Workspace or do it using XAML in the Blend XAML view, or you could even do it in either C# or in XAML using Visual Studio. Eventually, I will show you how to supply functionality in all these different ways, but for now I am keeping it simple and very visual, so you will do it in the Design view of Blend.
Creating EventTriggers for the spinBtn
At this point, you want to give the Buttona Trigger. ATriggeris basically something that occurs when a user does something. The Triggeryou are going to make use of is known as an EventTrigger. In this case, the clicking of your Buttonis going to fire an EventTrigger. When the Triggeris fired, you are going to run an animation called a Storyboard (I cover Storyboards in more detail in Chapter 10).
You are not going to make a dance Storyboardbut rather a spin Storyboard. That Storyboardwill be aResourceavailable throughout the application, but will never be used unless you tell the application to make use of it. So, when the user presses the spinBtnbutton, you are going to “trigger” your spin
Storyboard, and voilà! Your text will spin. Storyboardsare created using the timeline feature, a fea-ture that you will find very familiar if you’ve ever used Flash before. Blend 2 has made some radical changes to the Objects and Timeline panel that have made it much easier to create very cool
Storyboardanimations. Some of the changes to the Objects and Timelinepanel in Blend 2 are The ability to copy Storyboards
The ability to click one button in Blend and reverse a Storyboard
This last feature makes creating animations for ButtonEnter(when the mouse moves over a Button) and ButtonLeave (when the mouse moves off a Button) a breeze. But we’ll get into that in later chapters.
AStoryboardis basically an animation sequence that you create and can then reuse whenever you want—a Storyboardwill change the value of an object’s properties over time. As an analogy, say we have a friend named Bri, and Bri can do a cool little dance. Say we took Bri’s dance and turned it into a Storyboard. We would have access to Bri’s dance Storyboardat any time—basically, Bri’s dance Storyboardis a Resource
that we possess to be reused. So, in our analogy, we could take Bri’s dance Storyboard
and apply it to her friend Tristan, who could then perform Bri’s dance. It is worth not-ing that Storyboardsare much like traditional timeline animations that are seen in animation programs such as Flash or After Effects.
I think at this time it would be a rather smart idea to show you Triggers, timelines, and Storyboards
in action. So let’s go ahead and start using them.
Make certain your Buttonis selected in the Objects and Timelinepanel and then press F7 to switch Blend 2 from the Design Workspace to the Animation Workspace (the Animation Workspace can also be shown by clicking Window ➤Animation Workspace). At the bottom of the page, you will see the
Interactionpanel (see Figure 2-31).
Notice that the Objects and Timelinepanel has moved to the bottom of the page. You can also see there is a Triggerspanel. This panel may be collapsed; if it is, click anywhere on the collapsed Triggers
panel as shown by the arrow in Figure 2-32.
Figure 2-31.Blend 2’s Animation Workspace Figure 2-32.Click anywhere in the collapsed shows an Interactionpanel at the bottom of Triggerspanel to expand it.
the page.
Figure 2-33 shows an expanded Triggerspanel.
Figure 2-33.This shows expanded Triggersand Objects and Timeline
Let’s run through some steps one by one to create the Triggersand Storyboards:
First, however, make sure your spinBtn is still selected; sometimes when you are clicking around, selected objects can become unselected. If it is not selected, you can select it by clicking it in the Workspace or by selecting it in the Objects and Timeline panel (this panel appears at the bottom of Blend while Blend is in the Animation Workspace), as shown in Figure 2-34. When your button is selected, it will have a blue line around it with size and rotate handles, and it will be highlighted in your Objects and Timelinepanel.
Figure 2-34.The button is selected.
1.
With spinBtnselected, click the + Eventbutton as shown in Figure 2-35 to create a new event.Figure 2-35.With spinBtnselected, click the + Eventbutton in the
The default event that Blend creates when you click + Eventis a [Window].Loadedevent (see Figure 2-36). You don’t want a [Window].Loadedevent—because this will fire the event every time the [Window]is loaded . . . you want to fire the event when your spinBtnis clicked.
Figure 2-36.Clicking the + Eventbutton in Blend 2 creates a
[Window].Loadedevent by default.
In order to change your Triggerto fire on a click Event, do the following:
2.
Click the Whendrop-down menu (see Figure 2-37).3.
Select the spinBtnbutton (see Figure 2-38).Figure 2-37.Clicking the When Figure 2-38.Selecting spinBtn
drop-down menu from the Whendrop-down menu
4.
Click the is raiseddrop-down menu (see Figure 2-39).5.
Select Click(see Figure 2-40).Figure 2-39.Selecting the is raiseddrop-down Figure 2-40.Selecting Clickfrom menu just to the right of the When theis raiseddrop-down menu drop-down menu
This is a visual way create a narrative of what is going to occur. You can read it like a sentence that says “When spinBtn Clickis raised” (where “raised” means when the event occurs). Make sense? But now what? What do you want to happen “When spinBtn Clickis raised?” Good question, and here is how you add that piece:
6.
Click the +button as shown in Figure 2-41 to add a new action that will fire when spinBtnis clicked.7.
Blend 2 will then pop up a dialog box that informs you that no timeline exists for you to begin and that it is going to create an empty one for you. This is what you want to happen, so clickOK.Blend 2 now creates a timeline in your Objects and Timelinepanel as shown in Figure 2-42.
Figure 2-42.Blend 2 creates an empty timeline for you in the Objects and Timelinepanel.
Blend 2 also places a red frame around your Workspace indicating that anything you do now is being recorded (see Figure 2-43).
At this point everything you do on the Workspace is being recorded into a Storyboard with the default name of OnClick1. You can change the name of this Storyboardby right-clicking OnClick1
and selecting Renamefrom the context menu as shown in Figure 2-44.
Figure 2-43.Blend 2 places a red line Figure 2-44.Selecting Renameto rename your Storyboard
around your Workspace indicating that anything you do is being recorded.
8.
Rename OnClick1 Storyboardto SpinTextSB.Now at 0 seconds (this is the default position of the playhead), you need to record your original position.
Why do you need to do this, you ask? Because if you drag your playhead out to, say, 2 seconds and then spin the text on your Workspace and then run the application, this is what will happen:
The TextBlockwill spin to the new angle that you determine in the Storyboard.
What’s the problem? What if you click the spinBtnagain? What would happen? See where I am going with this? Nothing would happen. Why? Because your Storyboardwould tell the TextBlockto spin to the angle you declared in the Storyboard, but since the TextBlockis already at that angle, nothing would happen. To remedy this, you tell your TextBlockto start out at a 0 angle at 0 seconds and then 2 seconds later to be at another angle. Thus when you click the spinBtna second time, the text will spin again, over and over and over. So, let’s now record the angle of your text at 0 seconds.
9.
With your TextBlockselected in the Objects and Timelinepanel, click the Record Keyframe but-ton, as shown in Figure 2-45.Figure 2-45.The Record Keyframebutton
Now you can look at your timeline and see that a dot representing the angle of your TextBlockhas been recorded at 0 seconds (see Figure 2-46).
Figure 2-46.A dot represents the angle of your TextBlock
10.
Move your playhead out to 2 seconds as I have done in Figure 2-47.Figure 2-47.Moving the playhead out to 2 seconds in the Objects and Timelinepanel
11.
Set the TextBlock’s Angleproperty to 180in the Transformbucket of the Propertiespanel like I have done in Figure 2-48.Figure 2-48.Changing the TextBlock’s
Angleproperty to 180
Notice two things:
Your TextBlockis now upside down (see Figure 2-49).
Figure 2-49.Your TextBlockis now upside down, representing the change to the Angleproperty you made.
There is a dot on your Objects and Timelinepanel at 2 seconds representing the Angleproperty of your
TextBlock(see Figure 2-50).
Figure 2-50.Your Objects and Timelinepanel now has a small dot at 2 seconds, representing your TextBlock’s changed Angleproperty.
So, now your timeline should look like what I have in Figure 2-51.
Figure 2-51.Your Objects and Timelinepanel now has three small dots, representing your TextBlock’s changed Angleproperty over time.
You can click and hold the playhead and scrub back and forth through the Storyboardanimation. You can also click the Playbutton on top of the timeline to run the Storyboard. These tools are great for getting your Storyboardjust the way you want it.
13.
Now close yourStoryboardby clicking the Xbutton as shown in Figure 2-52.Figure 2-52.Clicking the Xbutton to close your Storyboard
Notice the red line goes away as well as your Objects and Timelinepanel? Now, the moment of truth:
14.
Press F5 to run the application, and voilà! You click the spinBtnand your TextBlockdoes in fact spin 360 degrees over a 4-second time span. Click it again, and voilà again! It does it once more.Summary
You just created your first WPF application. Congratulations! Now honestly, have you ever seen a “Hello World!” application do anything like this before? I don’t think so. This exercise was intended for you to get hands-on experience with creating a WPF application in Visual Studio 2008 and Blend 2. You will be doing a lot of work in Visual Studio 2008 as well as Blend 2 in the upcoming chapters, but before you create any more applications, I will cover some Blend, C#, and XAML basics in the follow-ing chapters. Along the way, you will perform little exercises, and when you have learned all the basics, you will move on to learn several exciting creative techniques, including those for two 3D applications that will absolutely blow your mind and wow your friends! So let’s get moving!
You will find the executable for your “Hello World!” application in the bin\Debugdirectory of your project so that if you like, you can keep it on your desktop or even give it to your friends so they can run it. My executable .exe file is located at C:\Projects\ WPFBookProjects\HelloWorld\HelloWorld\bin\Debug.
What this chapter covers: The Blend 2 toolbar
The Objects and Timelinepanel The Projectpanel
The Propertiespanel The Resourcespanel
3D objects that can be created in Blend 2
Now that you have your development environment set up and you have had a taste of how fun and easy it is to create a cool looking and interactive WPF application, we can take a step back and get to the basics and discuss some of the major features of the Blend 2 integrated development environment (IDE). As we proceed, I will explain each major feature and then task you with little exercises that will help you to famil-iarize yourself with these tools and features. Some of these tools and features I will discuss briefly here and in more depth in later chapters. Now we are going to jump right in and start to explore some of Blend 2’s major features.