• • • • • • •
Jeff Tang
Beginning
Google Glass
Development
START DEVELOPING GOOGLE GLASSWARE TODAY!
For your convenience Apress has placed some of the front
matter material after the index. Please use the Bookmarks
v
Contents at a Glance
About the Author ...
xiii
About the Technical Reviewer ...
xv
Acknowledgments ...
xvii
Introduction ...
xix
Chapter 1: Getting Started
■
...
1
Chapter 2: Hello, Glass! Your First GDK App
■
...
13
Chapter 3: Glass User Interface
■
...
47
Chapter 4: Camera and Image Processing
■
...
81
Chapter 5: Video: Basics and Applications
■
...
113
Chapter 6: Voice and Audio
■
...
147
Chapter 7: Networking, Bluetooth, and Social
■
...
175
Chapter 8: Location, Map, and Sensors
■
...
215
Chapter 9: Graphics, Animation, and Games
■
...
249
Chapter 10: The Mirror API
■
...
297
Index ...
337
xix
Introduction
Google Glass is a wearable computer developed by Google. Although Glass is based on Android, it is fundamentally different from existing mobile platforms. The best line to describe Glass is “There when you need it. Out of the way when you don’t.” Glass is designed to complement a smartwatch, smartphone, tablet, or computer.
In April 2013, the Google Glass Explorer Edition was made available, for the first time, to Google I/O 2013 developers. There were four Glass-related sessions at Google I/O 2013 held in May 2013:
Developing for Glass:
n
n
https://developers.google.com/events/io/sessions/332490621
Building Glass Services with the Mirror API:
n
Fireside Chat with the Glass Team:
n
n
https://developers.google.com/events/io/sessions/332695704 Since then, several important events have happened:
On November 19, 2013, Google officially released the native Android-based
n
n
Glass Development Kit (GDK) Sneak Peek, so developers can now build native apps in Android 4.0.4 (API Level 15) for Glass.
On April 15, 2014, Google announced a major upgrade for Glass to
n
n
Android 4.4.2 (API Level 19).
On May 15, 2014, Google made the Glass Explorer Edition available to any U.S.
n
n
resident older than 18 and with a U.S. shipping address.
It is almost mid-June 2014 now, and Google I/O 2014 is only a couple of weeks away. More
This is a great time to start learning Glass development; if you need more reasons, see the “Why Glass?” section in Chapter 1. You should definitely check out those Google I/O 2013 and 2014 videos on Glass if you are interested in Glass development. In addition, Google Glass’s developer site at https://developers.google.com/glass/ has great documentation on designing, developing, and distributing for Glass. But none of this compares to having step-by-step tutorials with working code examples on every major Glass development topic, using both GDK and the Mirror API. That is exactly what this book is provides.
What’s in This Book
There are ten chapters in this book, covering every major Glass development topic.
Chapter 1, “Getting Started”: In this chapter, I’ll discuss several general topics about Glass and Glassware: Why Glass? What is Glass and Glassware? What can you do with GDK Glassware and Mirror Glassware? Why this book? Who is the book for? I’ll also list popular Glass development web resources.
Chapter 2, “Hello, Glass! Your First GDK App”: I’ll first cover the detailed steps of how to set up your GDK Glassware development environments, whether your favorite is Mac, Windows, or Linux. Then I’ll discuss how to set up Glass to get it ready for development and how to run sample GDK apps on it. Finally, I’ll introduce the generic template Glassware, which you’ll use to create new GDK apps, and show you a step-by-step tutorial of building HelloGlass, your first GDK app, with nice features such as menu actions, text-to-speech, and speech-recognition versions of HelloGlass.
Chapter 3, “Glass User Interface”: In this chapter, you’ll enter the exciting world of Glass and learn what kinds of UI elements can be built with GDK for a Glass app. The main Glass UI elements—the timeline, Glass-styled cards, live cards, immersions, menu items, and gestures—will be discussed in detail with fully tested sample code that shows you how to render standard UI content, content from an XML layout, and content created using Android’s Canvas 2D and OpenGL ES 1.0 and 2.0. By end of this chapter, you’ll have a basic understanding of what kinds of apps you can build with GDK and when to use which or a combination of them.
Chapter 4, “Camera and Image Processing”: In this chapter, you’ll start with how to use the Glass camera to take pictures, both in the easy way and in the custom way, which allows you to preview and zoom before taking a picture. Then I’ll briefly cover how to browse the photos in any directory of your Glass. After that, I’ll discuss step-by-step many common practical image-processing tasks, including barcode and QR code recognition, OCR, image web search, and OpenCV. I’ll cover how to integrate the best open source libraries out there, if needed, to your own app and how to call their APIs from within your app. By the end of this chapter, you’ll be well prepared for exploring your own great app ideas using all kinds of image-processing techniques.
Chapter 5, “Video: Basics and Applications”: In this chapter, you’ll start with the basic video capture and custom video capture with preview and then look at how video can play on Glass. Then I’ll discuss how to use OpenCV to add image effects on frames extracted from video. A more powerful video-processing library, FFmpeg, will be introduced with detailed instructions of how to integrate it with your own app. Commands for various video filtering effects will be presented. Finally, a YouTube video search and play app will be covered in detail, which can be used as the foundation of a full-fledged karaoke app.
Chapter 6, “Voice and Audio”: In this chapter, I’ll cover a lot of voice- and audio-related topics, from the standard Glass voice input, both high-level and low-level audio capture and playback, to various audio-processing examples, including musical note detection, DTMF touchtone detection, and, finally, song identification. Voice and audio are essential parts of our communication with each other and with devices, so you can expect to see many innovative apps in this area, developed by people like you.
Chapter 7, “Networking, Bluetooth, and Social”: In this chapter, I’ll first cover how to implement the basic HTTP GET, POST, and file uploading operations using the recommended HttpURLConnection class. Then I’ll discuss how to accomplish low-level socket programming and let Glass talk with another Android or iOS device for data exchange, both as a client and as a server. After that, I’ll illustrate in detail how to use Classic Bluetooth for communication between Glass and another Android device, without the need of wi-fi. I’ll then introduce the exciting topic of BLE support and how to let Glass act as a BLE client and also how to use the Samsung Galaxy S4 smartphone or an iOS device as a bridge between Glass and BLE devices. Finally, I’ll show you how to use Apple’s push technology to let you share your new picture taken on Glass with your WhatsApp or WeChat friends in seconds.
Chapter 8, “Location, Map, and Sensors”: In this chapter, I’ll discuss in detail how to get your current location and show its address and map, how to zoom in and out the map, and how to find nearby business information based on your location information. Then I’ll cover the eight sensors Glass supports and how to detect head movement and direction, how to detect Glass shake, how to develop a metal detector, and how to add the compass support easily to your app. Finally, I’ll outline the steps to build a planet-finder Glass app.
Chapter 9, “Graphics, Animation, and Games”: In this chapter, I’ll cover common graphics and animation APIs and show many demos running on Glass, which you can use in your own simple Glass apps. Then I’ll discuss in great detail how to set up and run three popular open source game engines (Cocos2d-x, libgdx, and AndEngine) on Glass. You’ll learn how to run and interact with many examples for the three game engines, as well as how to create new apps using the engines. Finally, you’ll learn how to use the Glass rotation vector sensor to control your game with head movement. By the end of this chapter, you’ll be well armed with these powerful tools before you continue your own exciting game development journey.
Before Getting Started
I actually wrote this Introduction after I finished writing the book. It took me about six long months of weekday evenings and weekends to learn and get up to speed on the GDK and Mirror API, to develop and test dozens of examples that illustrate what Glass can truly do (as summarized in the previous section), to write step-by-step tutorials on how to run and use the examples, and to review and fix any known issues.
No matter what your background and interests are, there should be some examples in the wide range of Glass development topics covered in the book that will inspire you and help you have a quick start on developing your own great Glass apps. I hope the hundreds of hours I spent on the book will save you a lot of time when developing for the exciting Glass platform.
Have a wonderful trip in the Glass development world! If you have any questions or comments on the trip, just email me anytime at [email protected], and you’ll receive my response within 24 hours.
1
Chapter
1
Getting Started
Welcome to the exciting new world of Google Glass! If you are reading this book, either you are most likely a Google Glass owner or you do not own Glass yet but are intrigued by it. Chances are that you are a mobile, web, or enterprise application developer looking for the next big thing and platform and trying to understand what great apps can be built on the new Glass platform. Or maybe you just want to understand the potential of Glass and see what Glass can truly do.
Before you start the journey of Glass development, let’s first discuss some big questions in this chapter: Why Glass? What is Glass and Glassware? What can Glass do? What kinds of Glassware can you develop? I’ll also cover Google’s Glassware Policies and resources for Glass development at the end of this chapter.
Why Glass
The first generation of iPhone was released in June 2007, and Apple’s App Store was launched a year later. Android Market (renamed to Google Play later) was released in October 2008. It is absolutely amazing how many successful apps and companies have been built on and for the iOS and Android platforms.
Could Google Glass be the next big thing, in terms of mobile computing platform? Nobody knows for sure. But the attention that Glass has garnered in 2013 and 2014 is bigger than any other mobile products except iPhone or iPad, so here are several questions to ask yourself:
What if it becomes a big thing and everyone seems to wear their Google
Can you imagine the use of Glass in cases where smartphones are not
appropriate or convenient, especially where hands-free devices are required or when the moment would be over if you had to take the time to reach for your smartphone to take a picture or video? Or imagine you need to access some quick information or have answers to some quick questions while your hands are busy with, for example, cooking, fixing something, playing with your kids, washing your pets, playing cards, or even doing a surgery.
How do others bet on Glass? You can do lots of research on the Internet and see
how many new search results for Google Glass come up every day. You may also want to check out http://glasscollective.com to find out how some of the most visionary Silicon Valley investors back up the Glass development. Mary Meeker, “Queen of the Net,” predicted in her 2013 Internet Trends Report that “Wearable computing is emerging as the type of significant technology shift that will drive innovation in the way personal computing did in the 1980s or mobile computing and tablets are doing currently.” Forrester Research, one of the leading
technology and market research companies, also noted that Google Glass could be the next big thing and estimated that up to 21.6 million Americans would be willing to wear Glass daily if it were available in stores right now.
Note You may want to create an alert with the query google glass at www.google.com/alerts to get daily e-mail updates when there are any new search results for that query. As of May 2014, there are many exciting new results every day. Also, you can check out the web sites for the Glass community and developers detailed in the “Resources” section later in this chapter.
So, if you want to bet on Glass yourself and plan to learn about Glass development, this book is right for you! My goal is to reduce your learning curve as much as possible by providing clear and concise tutorials with fully tested samples for every topic in Glass development.
What Is Glass and Glassware?
Glass is a new, potentially paradigm-shifting mobile computing platform, or wearable computer, developed by Google. Glassware is the term for the apps that developers build to run on Glass.
According to the Wikipedia page at http://en.wikipedia.org/wiki/Google_Glass, Glass began testing in April 2012 and was further demonstrated by Google founder Sergery Brin in June 2012 at Google I/O that year, where attendees were invited to the Glass Explorer Program. Glass was first available to testers and developers in early 2013 through the program; people who were interested in buying the device for $1,500 were required to tweet a message using #ifihadglass specifying how they intended to use Glass if they had it. The people who were selected by Google and went to buy Glass are called the Glass Explorers. In October 2013, those first explorers received e-mails from Google saying they could invite up to three people to join the Glass Explorer Program. The invited people would then receive an e-mail from Google with information on how to order Glass and become new explorers. Weeks after that, the new explorers also received an e-mail from Google
stating that they could invite up to three more people. People can also go to the Glass web site and register their e-mails to request Glass from Google.
On April 15, 2014, Google made the Glass Explorer Edition publicly available for purchase, but only for that day. By the next day, all five Glass models (Charcoal, Tangerine, Cotton, Shale, and Sky) sold out. In May 2014, anyone can become a Glass Explorer by purchasing the Glass Explorer Edition at
http://www.google.com/glass. With the anticipated consumer version release date coming in late
2014, it should become cheaper for developers and others to get Glass.
In case you don’t have Glass yet, just search for google glass at http://images.google.com to see how it looks. Glass keeps getting updated, so for an update of how it looks, you should check out
www.google.com/glass/start/how-it-looks/.
To effectively use Glass and develop apps, you need to understand the timeline, which is the Glass user interface with which the user interacts with Glass. You should definitely check out
https://developers.google.com/glass/design/ui to get a general idea of how the timeline works.
Here’s a quick overview of how you use Glass: After your Glass is turned on, you can either tap the glass or tilt your head up to go to the home screen, also called the OK Glass screen, where you see the words ok glass with the current time. There you can either tap Glass again or say “OK Glass” to enter the voice menu, which includes the actions Google, Take Picture, Record Video, Get Directions, Message, Video Call, Take Note, and other Glassware you have added. If you don’t tap or speak to enter the OK Glass menu, you can swipe Glass forward or backward on the touchpad to see the timeline cards, and on each card, you can tap to see its specific menu actions. You may also want to check out Google’s video of the basics of how to use Glass at www.youtube.com/
watch?v=4EvNxWhskf8.
Note The order of the voice menu actions after entering the OK Glass screen for the Glass XE 16 update
(released on April 15, 2014) and later is different from that for the Glass XE 12 update (released in December 2013). XE 16 or 17 sorts the menu actions by use frequency and recency, while XE 12 and older show the actions always in the same order.
Before late November 2013, there was only one official way to develop Glassware: the Mirror API way. Basically, you build web-based services that talk to Google’s cloud API, which in turn talks to Glass. Glassware built with the Mirror API can send updated information to Glass, subscribe to notifications of when users take actions on your updated information or when their location changes, and let users share information with others or other Glassware.
It was not until the release of the Glass Development Kit (GDK) Sneak Peak Rev. 1 on November 20, 2013, that the power to developers was officially presented. The GDK is built on top of Android, with rich and fuller user interaction that, unlike the Mirror API, does not always require network connectivity. Imagine that you can run OpenCV, a popular and powerful open source image processing library, or optical character recognition (OCR) completely in your Glass. You can also have access to low-level Glass hardware with the GDK. Unlike the Glassware built with the Mirror API, which runs on a server, the GDK Glassware runs natively on Glass. This book is mainly focused on the GDK but will also cover the Mirror API and how it can interact with the GDK in a complete but quick way.
Note The GDK Sneak Peak was based on Android 4.0.3 (API Level 15). On April 15, 2014, the next major GDK update, called the Glass Development Kit Preview, based on the latest Android 4.4.2, was released. This massive version bump means a lot to developers because they can now use APIs available for Android API Levels 15 up to 19. For example, the important Bluetooth Low Energy APIs were introduced in Android 4.3 (API Level 18), so they were not available with the GDK Sneak Peak (Android 4.0.3, API Level 15) but are available now with the GDK Preview (Android 4.4.2, API Level 19).
What Can Glass Do?
There are a lot of things Glass already can do and some other things you may not even know it can do.
Feature-wise, Glass offers the following built-in features:
Take a picture, in one of three ways: with a voice command, the press of a
button, or a wink of your right eye
Record video hands-free and send live streaming video to others of what you’re
seeing
Activate speech recognition, speech synthesis, and voice dictation
Perform a Google search using voice
Connect to your Android or iOS device via Bluetooth to get location updates and
directions
Browse text, image, and video content, as well as share them with others via wi-fi
Seamlessly integrate with Gmail, Google Now, and Google+
Install Glassware developed in the Mirror API or GDK
Application-wise, you can use Glass to accomplish tasks such as the following:
Get updated text, photo, or video from Glassware such as from YouTube,
Facebook, Twitter, Evernote, Path, CNN, and the New York Times sites
Share and upload notes, photos, and videos on Facebook, Path, and Evernote
Play innovative games unique to Glass (check out the samples at
https://developers.google.com/glass/samples/mini-games);
Find and submit favorite recipes
Translate printed words you see on Glass to many other languages
For a complete list of active Glassware available for you to install on Glass, visit
https://glass.google.com/u/0/myglass.
From a developer’s perspective, you can build all kinds of apps for Glass with the GDK and the Mirror API, such as the following:
Interactive voice apps with Android’s speech recognition and synthesis APIs
Image- or video-processing apps using the OpenCV, barcode, OCR, and
FFmpeg libraries
Audio- and voice-processing apps for pitch, touchtone, or song recognitions
HTTP, socket, and both Bluetooth Classic and Bluetooth Low-Energy
communication apps
Location-based services with the Location APIs, with support for both a network
location provider, which uses cell tower and wi-fi signals to determine user location, and a full-blown GPS provider, which requires you to pair Glass with a smartphone or tablet with the MyGlass app installed
Apps taking advantage of low-level hardware and sensors, including the
accelerometer, gravity, gyroscope, magnetic field, light, orientation, and rotation vector
Graphics, animation, and game apps with Canvas 2D and OpenGL ES drawing,
and game engines such as Cocos2d-x, libgdx, and AndEngine
Apps that send updated information to users and let users share text, image,
or video to your own Glassware or other social apps
Enterprise apps in sports, education, healthcare, and many other fields
You’ll see lots of working sample code related to the previously mentioned apps throughout the book, and depending on whether you’re an end user or a developer, you can either install and use the apps developed in the book or make further improvement and use them in your own apps.
Finally, here are some important quick tech specs on Glass:
5MP photos and 720p videos
12GB of usable memory, 16GB flash total
682MB RAM available for development, 1GB total
Wi-fi and Bluetooth connectivity
Android 4.4.2 (API Level 19), as of June 8, 2014
What Kinds of Glassware Can You Develop?
Before November 2013, the only official way to develop Glassware was using the web-based Mirror API. In November 2013, Google officially released the native Glass Development Kit.
Mirror API–Based Glassware
Mirror API–based Glassware consists of web-based services developed with the Mirror API. You can use many programming languages—on Google’s web site (https://developers.google.com/glass/
samples/mirror) , sample start projects in Java, PHP, Python, Ruby, .NET, and Go are provided—to
develop such web services to interact with the Mirror API running on Google’s server, which further interacts with your Glass on behalf of your Glassware. Figure 1-1 illustrates these interactions.
Figure 1-1. Interactions between your Mirror API–based Glassware, Google Mirror APIs, and Glass
Before the GDK, the timeline consisted of only static cards; the other type of cards are live cards
and will be covered in the next section. Cards are the core of the Glass user experience. The size of each card, static or live, is 640 pixels in width and 360 pixels in height. Static cards can display text, images, videos, and HTML content.
Actions that can be completed on timeline cards include creating, updating, deleting, getting, listing, and patching. You can also associate menu items with timeline cards to let users perform built-in actions and/or your app-specific actions.
Timeline cards can also be shared with another person or Glassware. This is accomplished via subscribing to timeline notifications (using the Mirror API, of course). After the subscription, whenever a user selects a menu item or shares a timeline card content, or there is any insertion, deletion, and update in the timeline, the Mirror API can send notifications to your Glassware via a callback URL (to your Glassware web service) specified in the subscription API call. This is called timeline notification.
The other type of notification is location; you can get users’ location updates about every ten minutes after subscribing to the notification. You may also request for the location information for a specific timeline card or attach a location and menu item to a timeline card so the user can navigate to it when choosing the menu item.
One powerful feature of the Mirror API is that you can launch native GDK apps from a static card.
That is all you can do with the Mirror API. On one hand, you can build amazing services with the building blocks offered by the Mirror API. Here are some examples:
The Mirror API–based Glassware Facebook, Twitter, Evernote, and Path allow
you to easily share a picture or video (in the case of Evernote, you can also create a new note with voice dictation and upload it to your Evernote account handily). If you’re a developer of a web site that allows people to upload photos or videos, you can develop a Mirror API–based Glassware to let users easily share their Glass pictures or videos to your site too.
The Path Glassware can send you a new timeline card when there’s a new
picture or video uploaded by your Path friends. You can then choose an action on the item: Love, Smile, Laugh, Surprise, Frown, Comment, or Get Directions. Imagine a Mirror Glassware that uses the similar interaction: Send to the user’s Glass some interesting content, get notified by the user’s action on the content, and keep the fun and engaging interaction going!
Face recognition seems to be a hot and natural topic for Glass. Basically, a
picture of someone taken with the Glass camera is sent to a server to search for Facebook, Twitter, Google+, LinkedIn, and Instagram profiles (or even profiles of hundreds of thousands of sex offenders). If a match is found, the person’s name and other profile information can be sent back to Glass. Although Google specifically forbids the development of face recognition Glassware (see the section “Google’s Glassware Policies” for details), this policy could change under certain circumstances. Or, it’s not hard to imagine other types of computer vision–based services. For example, how about recognition of all kinds of interesting physical objects, such as plants, animals, or architecture?
The Mirror API Playground (
https://developers.google.com/glass/tools-downloads/playground) shows a list of elegantly designed static card templates
that you can easily use in your Mirror API apps. Those beautiful templates can also inspire you to see what kinds of apps can be built with the Mirror API.
On the other hand, there is some serious limitation of the Mirror API in terms of what kinds of Glassware you can build with it: The timeline cards created via the Mirror API can’t access the camera, sensors, and other low-level hardware, and an online web server and always-on network connectivity are required for most of the application features. Enter the more sophisticated world of GDK Glassware.
GDK Glassware
The GDK is an Android SDK add-on that you can use to build powerful Glassware that runs directly on Glass. (Remember, the Mirror API–based Glassware runs on your own web server and interacts indirectly with your Glass via Google’s API server.)
Most of the Android APIs and Java language features can be used directly in Glass, which grants your GDK Glassware great power. For example, Android’s APIs for speech recognition, text-to-speech, hardware sensors, Bluetooth, media controller, location, and JNI and Java’s networking and
device, has its own unique hardware support. All the details that can save you time will be covered in the later chapters. Here I’ll present a quick overview of the GDK APIs.
As described in the previous section, the timeline and timeline cards are the key elements of the Glass user experience. The following building blocks are what’s unique in the GDK and not available in the Mirror API:
Live cards: Unlike static cards that display information relevant to the user at the time of delivery and do not require immediate user attention, live cards display information that is relevant to the user at the current time and require immediate user attention. Also, live cards can access the low-level hardware such sensors, GPS, and 3D graphics.
Immersions: These are created using Android activities when Glassware requires more custom and interactive user interfaces than a timeline live or static card offers. Games and sophisticated apps can be created using immersions.
Voice input and output: There are two official ways to let your GDK Glassware accept voice input: from the OK Glass voice menu or from any activity within your Glassware that launches the Android’s RecognizerIntent. Text-to-speech can also be accomplished in any Glassware using Android’s TextToSpeech class. Both speech recognition and synthesis can be done in offline mode, which can be quite useful for some Glassware.
Sensors: Glass supports most of the common sensors such as the
accelerometer, gravity, gyroscope, and magnetic field. Innovative apps such as games shown at https://developers.google.com/glass/samples/mini-games can be built using these sensors and Android’s APIs.
Camera: Image or video can be captured, accessed, and processed locally in Glassware. This makes offline OCR, computer vision (using the OpenCV Android library), and image processing possible.
Network and Bluetooth connectivity: Low-level socket programming can be used for developing advanced networking apps; both Bluetooth Classic and Bluetooth Low-Energy can be used to connect with other smart devices.
Graphics and animations: Canvas 2D and OpenGL ES 2D and 3D graphics and all kinds of animations and game engines can be used to build apps.
By exposing the Glass API as an add-on to the Android API, the GDK no doubt has opened up limitless opportunities for developers to build innovative Glassware.
When to Use Which
This is similar to a question that arises when building mobile apps: Do you use the native APIs or the web-based solution? GDK allows you to access Glass’s hardware and develop advanced features available for offline use and with rich user interaction. But the learning curve is also steeper, especially if you don’t have Android development experience. The Mirror API uses Glass’s built-in functionality and can be developed with many common web development languages, but you need a web server running for the Mirror API, and there’s a courtesy limit of 1,000 requests per day per app for using the Mirror API.
If your app is mainly information-oriented and does not require an advanced user interface or if a server is required for content updates or data processing, then the Mirror API is more appropriate. If your app requires low-level hardware access or offline processing or rich user interaction or the user input data can be processed in the Glass itself, then the GDK is the right choice.
In some cases, you may want to build a hybrid app that uses both the Mirror API and the GDK. This is made possible because the static timeline card inserted by your Mirror API–based Glassware can invoke the GDK Glassware with a menu item associated with the card. I’ll show you a sample project that does this in Chapter 10.
You can also find a good summary on when to use each one at Glass’s developer site:
https://developers.google.com/glass/develop/overview.
Google’s Glassware Policies
Understanding Google’s policies on Glass development can be important because as a developer, you need to know what you can and can’t do; you don’t want to spend lots of time developing an app such as facial recognition but find out later that it’s against Google’s policy. Here is a brief summary of the Google’s Glassware policies that are most likely related to your development effort:
You can’t use the camera or microphone to present personal information
identifying anyone other than the Glass user. This means Glassware that does Facebook or Twitter profile searching based on facial recognition and voice print will not be approved by Google.
Don’t disable or turn off the display when using the camera to take a picture or
record a video.
Don’t develop Glassware with content or services that facilitate online gambling,
such as online casinos, sports betting, and lotteries.
You may not charge end users any fees or collect any payments or virtual goods
to use your Glassware. This can be a little demotivating to developers. But if you think of the history of Apple’s App Store, for the first year after the release of the iPhone, the SDK was not even available. With Glass, the Mirror API and the GDK were available even before the public release of Glass. This shows how important a role Google thinks developers will play in the success of Glass. One way or another, Google will figure out something that makes developers’ investment in time and effort worthwhile.
There are a lot of other details in terms of Glassware policies. You should check Google Glass’s web site for any updates because the policies may be revised now and then.
Why This Book?
steep for me. When I first came across the book months later, I still remember my reaction: How I had wished I could have had the book the moment I started iPhone programming; it’d have saved me a lot of time.
The moral of the story is more than just “Be aware.” I’m trying to do the same thing in this book for those interested in Glass development: to help save a lot of your time and to provide you with lots of working code with clear explanations on every Glass development topic.
Who Is This Book For?
The book is mainly for mobile Android/iOS and web app developers, but other developers such as enterprise app developers can also easily follow the step-by-step tutorials and get up to speed quickly. However, I do assume you are familiar with some modern programming language.
In his book Social Psychology, David Myers, one of my favorite authors, stated, “I continue to envision this text as solidly scientific and warmly human, factually rigorous and intellectually
provocative.” It may seem interesting that in this book for developers, I try to achieve the exact same goal. Glass is an amazing device built with solid and sophisticated technology; all the topics related to the Glass development need to be presented accurately and be “factually rigorous.” On the other hand, what really amazes me about Glass is that it can touch our human feelings by never missing a precious moment and by letting us feel Glassware is especially designed for us human. Check out the Glass design principles at https://developers.google.com/glass/design/principles and you’ll see how Glass and great Glassware can touch us at a deep level. I hope you’ll find that this book provides plenty of “intellectually provocative” samples and projects to inspire you.
For Beginning Android Developers
Most of this book requires you to be comfortable with Android, which is what the GDK and Glass are built upon. A good book to help you on that is Pro Android 4 by Satya Komatineni and Dave MacLean, published by Apress. The Android developer site also has great Training lessons
(http://developer.android.com/training/index.html) that cover every major Android
development topic.
Fully tested working sample code is included in step-by-step tutorials in each chapter for you to quickly learn every topic related to the GDK and the Mirror API.
For Intermediate or Advanced Android Developers
Advanced sample code with potential for real-world apps is also covered extensively in the book for you to apply as easily as possible to your own real projects.
For iOS Developers
If you are entering the Glassware development world as an iOS developer, you’ll be glad to find a unique treat in Chapter 7, Networking, Bluetooth and Social: I’ll show you how Glassware can be integrated with iOS apps to create more innovative apps.
For Web Developers
If you want to use only the Mirror API to develop your Glassware, you can go to Chapter 10 directly. The code examples there are mainly in PHP and Java, but you should be able to easily understand them and port them to your familiar web programming language. It is true that even with just the Mirror API, you can develop practical and innovative Glassware (see the “What Kinds of Glassware Can You Develop?” section earlier in this chapter). After you become familiar with Java and Android, you can come back to learn how to develop GDK Glassware and hybrid apps.
For Other Programmers
If you don’t know how to program in Java (for the GDK or the Mirror API) or PHP (for the Mirror API), you should be able to learn the basics of it quickly online or from Apress books such as Learn Java for Android Development by Jeff Friesen or Beginning PHP and MySQL by Jason Gilmore. Before you do that, however, you may want to be strongly motivated by skimming through the book quickly to see what kind of Glassware you can develop and what it takes to build amazing Glassware.
For Nonprogrammers
Glass has been considered a paradigm-shifting mobile computing platform with great business potential. Naturally, if you’re a nontechnical entrepreneur with, for example, a design or business background, you’ll also want to know what is possible with Glass. You can take a quick look at the many examples in the book, get inspired, and be better prepared when teaming up with a developer to build your own Glass-based startup. If you want to test some cool GDK Glassware without having to let the developer physically access your Glass, you can also learn how to install all the apps developed in the book on your Glass.
Resources
1. Google’s Glass Developers’ site at https://developers.google.com/glass obviously has the most authoritative documentation on Glass development, with API references, quick starts, developer guides, samples, and design best practices. You should definitely check it out regularly. But what’s missing there—the how-to recipes for common problems, the detailed tutorials on each complicated topic, and fully implemented and tested working code—is what this book is about.
2. http://stackoverflow.com/questions/tagged/google-glass and
http://stackoverflow.com/questions/tagged/google-gdk have lots of
questions and answers on common Glass development issues.
3. The Glass GDK and Mirror API Bug Reports and Feature Requests site is at
https://code.google.com/p/google-glass-api/.
4. The Glass Explorers Community on Google+ is at www.glass-community.com/.
5. The Glass Developers Community on Google is at https://developers.
Questions and Feedback
I always love to hear from readers. If you have any questions or feedback, please send me an e-mail
at [email protected] or connect with me on Google+ with [email protected].
Summary
This chapter discussed several general topics about Glass and Glassware: Why Glass? What is Glass and Glassware? What can you do with GDK Glassware and Mirror Glassware? Why this book? Who is the book for? I hope by now you are eager to start the exciting Glass development journey ahead, no matter what your development background is. In Chapter 2, I’ll show you how to get your development environment set up and your first GDK Glassware up and running in no time.
13
Chapter
2
Hello, Glass! Your First GDK App
In this chapter, I’ll first discuss how to set up your environment for GDK development, whether you use Mac, Linux, or Windows. I’ll then show you how to get your Glass ready for development, how to use the Android command-line tool adb to perform common operations on Glass, and how to run GDK samples on Glass. After that, I’ll walk you through a complete tutorial of the GDK app template and how to use it to quickly create your first GDK app. You will use the template in most of the following chapters to create all the new GDK apps.
Setting Up the Development Environment
In this section, I’ll discuss the system requirements for Glass development and how to install the Android Developer Tools (ADT) Bundle, which includes Eclipse + ADT plugin, Android SDK tools and platform tools. If you already have an Android development environment up and running, you can skip this section.
System Requirements
You can develop GDK Glassware with the ADT or Eclipse IDE on a computer running Windows, Mac, or Linux with the following requirements (see http://developer.android.com/sdk/index.html for more details):
Intel-based Mac OS X 10.5.8 or newer
Windows XP (32-bit), Vista (32/64-bit), or Windows 7 (32/64-bit) or newer
Linux (preferably Ubuntu Linux 8.04 or newer)
Android Developer Tools
The ADT Bundle is Google’s recommended tool for developing Android and GDK apps quickly. If you’re an experienced developer, you should be able to follow the instructions at
http://developer.android.com/sdk and get it installed in less than an hour. If you experience
any issues and can’t find the right answers on Google, you can refer to the following steps.
ADT on Mac
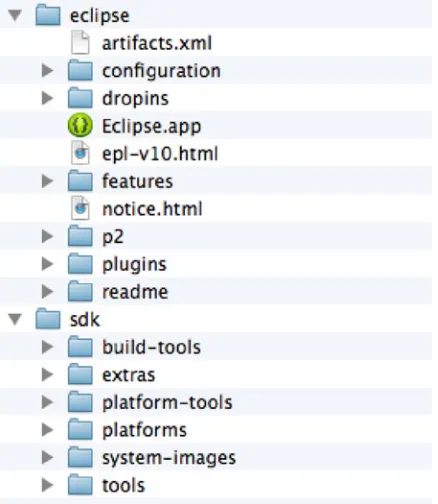
After you download the ADT bundle for Mac from http://developer.android.com/sdk, unzip it, and you’ll see two subfolders, as shown in Figure 2-1.
Figure 2-1. File structure of ADT on Mac
Eclipse.app is the IDE you’ll use to develop all your GDK Glassware. Simply double-click it to launch the app. You may need to update the ADT plug-in to successfully import the template project later in the chapter; you can select Help ➤ Check for Updates or Install New Software in Eclipse/ADT and then add https://dl-ssl.google.com/android/eclipse/ to update the ADT plug-in.
ADT on Windows
Follow these steps to install and set up ADT on Windows:
1. Download the ADT bundle for Windows at http://developer.android.com/sdk.
2. Unzip the downloaded file. The unzipped ADT bundle folder on Windows also has two subfolders, eclipse and sdk, with similar files in them as on Mac. There is an additional SDK Manager.exe file in the unzipped ADT folder on Windows. The first time you run eclipse.exe in ADT’s eclipse folder, you may see a dialog box like the one shown in Figure 2-2.
Figure 2-2. Setting up Eclipse ADT on Windows
If you see this dialog box, just click “Extract all.” This may take about 30 minutes and more than 1GB to uncompress all the files. After that, you can just double-click the eclipse.exe file again to start the IDE. If you don’t have the JRE or JDK installed on your computer, you’ll see message similar to Figure 2-3. (Note that on March 21, 2014, “20131030” in the adt package name was upgraded to “20140321,” which may be changed again by the time you’re reading the book.)
Note Although http://developer.android.com/sdk/index.html says that “JRE alone is not
sufficient,” in my test on a clean Windows machine with no JDK or JRE installed, I found that you don’t have to download the JDK; JRE 6 or 7 is enough to work with ADT. This may be a little surprising, but the Eclipse message in Figure 2-3 does suggest that the JRE may be good enough. Also, the latest JDK/JRE 8 should work, but I haven’t tested it.
Note If you accidently downloaded the 32-bit JRE EXE (all those x86 ones) for your 64-bit Windows, or vice
versa, you may see an error message “Failed to load the JNI shared library ‘C:\Program Files (x86)\Java\jre6\ client\jvm.dll.’” You can fix this by downloading and installing the right JRE for your Windows version.
ADT on Linux
If you have a Windows PC but prefer to run Ubuntu Linux, you can download the Ubuntu Windows installer at www.ubuntu.com/download/desktop/windows-installer and follow the installation steps
at www.ubuntu.com/download/desktop/install-ubuntu-with-windows. After the installation is
completed, simply restart and boot your computer to Ubuntu.
3. If you see message shown in Figure 2-3, you need to go to Oracle’s web site
at www.oracle.com/technetwork/java/javase/downloads to download the
JDK (you don’t need to download the JDK; the JRE is enough to work with ADT). Remember to click the download link for Windows x86 if your Windows is 32-bit or the download link for Windows x64 if your Windows is 64-bit. You may have to register with Oracle or log in to be able to download it.
4. Run the setup EXE file and then add the path to the JRE bin directory (C:\Program Files\Java\jre7\bin or C:\Program Files\Java\jre6\bin by default) to your computer’s PATH environment variable by selecting Start ➤
Control Panel ➤ System and Security ➤ System ➤ Advanced system settings
➤ Advanced ➤ Environment Variables ➤ System Variables.
5. Run eclipse.exe again, and you should see the ADT IDE up and running!
Note If you have another Linux distribution or Ubuntu on a virtual machine, the steps to install ADT should
be similar. The following steps have been tested on Ubuntu downloaded and installed from the previous URLs.
The steps to install and set up ADT on Ubuntu Linux are as follows:
1. Download the ADT bundle called Linux 64-bit adt-bundle-linux-x86_64-20140321.zip or the latest ADT bundle at
http://developer.android.com/sdk under Download for Other Platforms.
(Notice that the browser on your Ubuntu distribution may automatically detect that you’re using Linux and therefore show a Download the SDK button.)
2. Download the JRE for Linux x64 file, named jre-7u45-linux-x64.tar.gz, at www.oracle.com/technetwork/java/javase/downloads/jre7-downloads-
1880261.html.
3. Uncompress both archives and move the jre-7u45-linux-x64 folder to the eclipse directory of the ADT folder; you should see something like Figure 2-4. (I renamed the jre-7u45-linux-x64 folder to jre. If you prefer, you can also leave the jre-7u45-linux-x64 folder where it is and modify eclipse.ini;
see http://wiki.eclipse.org/FAQ_How_do_I_run_Eclipse%3F#eclipse.ini
for details.)
Figure 2-4. File structure of Eclipse ADT on Ubuntu Linux
4. Edit your .bashrc file in your home directory to update your PATH variable:
5. If you run the Eclipse program now and see the error message “./android: java: not found,” you can fix it by running a command similar to this:
sudo ln -s <path-to-adt-folder>/eclipse/jre/bin/java /usr/bin/java
6. Another possible error message, “platform-tools/adb: No such file or directory,” implies there is a missing shared library needed by adb (the
powerful Android Debug Bridge command-line tool, which I’ll discuss in more detail in the next section) and can be fixed by running this:
apt-get install ia32-libs
Note As you can tell, installing Oracle’s JRE/JDK on Ubuntu is a nontrivial process. The earlier
instructions have been tested on my Windows PC with Ubuntu Windows, but your environment may be different. For example, if you already have OpenJDK installed, then you can check out resources such as
www.liberiangeek.net/2012/04/install-oracle-java-jdk-7-in-ubuntu-12-04-precise-pangolin. In other cases, Google should be your best friend for fixing installation-related issue.
Now that you have the ADT bundle (Eclipse plus the ADT plug-in) installed on your computer, you’re ready to start having fun with Glass as a developer—well, almost ready, if you use Windows.
Playing with Glass
In this section, I’ll cover how to use the powerful Android command-line tool adb to communicate with Glass, how to run GDK sample apps on your Glass, and, finally, how to see Glass screens on your computer.
Enabling Debugging Mode on Glass
To get your Glass ready for development purpose, you need first to enable USB debugging on Glass. After you turn on Glass and see the OK Glass menu, swipe your Glass backward on the touchpad until you see Settings; then, tap it and swipe forward to find “Device info,” as shown in Figure 2-5. Tap again and swipe to find and select “Turn on debug.” Now connect Glass to your computer via USB.
The adb Command
Android Debug Bridge (adb) is a handy command-line tool that you’ll use to communicate with Glass. Its main uses are listing connected Android devices (adb devices), browsing the device folders (adb shell), installing and uninstalling apps (adb install and adb uninstall), and copying files (adb pull and adb push). As a Glass developer, you should definitely check out its documentation
at http://developer.android.com/tools/help/adb.html and get familiar with it.
Before you can run the adb command, you need to add the path to ADT’s platform-tools directory to your system’s PATH variable. If you use Windows, update the PATH variable at Start ➤ Control Panel ➤ System and Security ➤ System ➤ Advanced system settings ➤ Advanced ➤ Environment Variables ➤ System Variables. If you use Mac or Linux, update your PATH variable in ~/.bashrc to be
like this:
PATH=$PATH:<path-to-adt-folder>/sdk/platform-tools
Now launch a terminal window on Mac or Linux, and run the following command; you’ll see your Glass listed as shown here:
adb devices
List of devices attached 015xxxxxxxx17xxx device
Installing the USB Driver on Windows
Unfortunately on Windows, most likely you won’t see any devices listed with the adb devices command. This is because if you’re developing on Mac or Linux, you don’t need to install a USB driver, but on Windows, you need to manually install the right USB driver. The steps are as follows:
1. Download the Google USB Driver package for Windows at
http://developer.android.com/sdk/win-usb.html; you can either download
the ZIP file at the URL directly or use ADT’s Android SDK Manager and select the Google USB Driver package to download, as shown in Figure 2-6.
Figure 2-6. Installing Google USB Driver for Windows
2. Unzip the file to a location you choose and find the usb_driver folder; or if you use the Android SDK Manager to download the driver, you can find your auto-unzipped files in ADT’s sdk\extras\google\usb_driver folder.
3. Double-click the android_winusb.inf file in the usb_driver folder and add the following lines to the [Google.NTx86] and [Google.NTamd64] sections:
;Google Glass
%SingleAdbInterface% = USB_Install, USB\VID_18D1&PID_9001&REV_0216 %CompositeAdbInterface% = USB_Install, USB\VID_18D1&PID_9001&MI_01
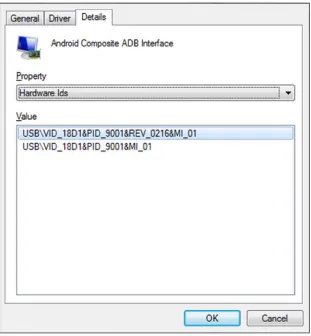
You may want to verify those seemingly magic values by these steps: Right-click Computer and select Manage. Then select Device Manager, and on the right panel under Other Devices, right-click Glass 1 and switch to the Details tab. Finally, select Hardware Ids Property; now you should see something like Figure 2-7 and Figure 2-8. (You need to make the previous code lines the same as the values in Figure 2-8.)
4. Save the android_winusb.inf file, right-click Glass 1, and choose Update Driver Software ➤ Browse my computer for driver software. Choose the path to the usb_driver folder described in step 2 and dismiss the warning message; you should see the message “Windows has successfully updated your driver software.” Your Glass1 device will also be changed to Android Composite ADB Interface.
Figure 2-8. Values for Google Glass USB setup info file on Windows
Note Steps 3 and 4 were tested on Windows 7. For Windows XP and Vista, you may want to check the
document at http://developer.android.com/tools/extras/oem-usb.html#InstallingDriver
for more details.
5. Open a command prompt window on Windows and run adb devices to verify your Glass is listed. You may have to run the command adb kill-server first and then adb devices to see your Glass listed. If you see a message saying “’adb’ is not recognized as an internal or external commands,” you should check your PATH variable as described earlier in “The adb Command.”
Showing the Glass Screen on a Bigger Screen
You can use tools to show your Glass screen on your computer running Mac, Windows, or Linux. This can make your development easier because you can look at the bigger computer screen most of the time instead of the small Glass screen. It can also make your demo, presentation, or training sessions much easier.
Before you continue, you should verify that the adb command, discussed in the previous section, works fine and shows your Glass in the “List of devices attached” area or the following tools won’t work.
There are at least two good tools to use here. You can download the latest Droid@Screen version at http://droid-at-screen.ribomation.com/download or Android Screen Monitor at
https://code.google.com/p/android-screen-monitor. Droid@Screen has a better UI, but Android
Screen Monitor has better frame rate. After downloading one of them (and unzipping it for Android Screen Manager), you can run one of the following commands to see on your computer something like Figure 2-9 and Figure 2-10:
java -jar droidAtScreen-1.0.2.jar
java -jar ASM_2_50/asm.jar
Figure 2-10. More Glass screens on your computer
Another great way to see your Glass screen content on a bigger screen is to install the MyGlass app on any Android and iOS device (preferably tablets) and use its Screencast feature. There are two ways to activate Screencast: You can pair with Glass via Bluetooth and turn on Personal Hotspot, or you can connect Glass and your Android/iOS devices to the same wi-fi network.
Developing with Simulated Devices or Emulators
If you have some experience with Android or iOS app development, most likely you have used simulators to speed up your development. The bad news is that there is no official support from Google for the Glass development with emulators or Android devices; the good news is that because Glass is an Android device, theoretically you can just extract the .apk files from the system image of Glass and install them to your non-Glass Android. The web page
www.elekslabs.com/2013/11/google-glass-development-without-glass.html is a summary
but hasn’t been updated for the GDK release as of May 2014.
Although there are some developers who don’t own Glass but are interested in learning Glass development, I decided not to cover the GDK Glass development with simulated devices in this book for two main reasons. A lot of non-Glass-development-related hacks would be needed, and the time spent there can be better used for learning about the exciting GDK and Mirror API development. In addition, by the time you are reading this book, chances are Google will have made, or soon make, Glass publicly available at an acceptable price of several hundred dollars. Google will likely also release an official way to do Glass development on emulators or other Android devices.
Testing with GDK Samples
Finally, you’re ready to see some samples working on Glass, whether you use Mac, Linux, or Windows. Compared to what it takes to get the development environment set up correctly, especially on Windows and Linux, and configure the Glass USB Driver package on Windows, testing the GDK samples is a lot easier. (After all, there’s a balance in everything.) Whether you’re an Android expert or beginner, just follow the well-documented GDK Quick Start instructions at
https://developers.google.com/glass/develop/gdk/quick-start to install the Android 4.4.2 (API 19) SDK, the Glass Development Kit Preview add-on, and the three GDK samples (Compass, Stopwatch, and Timer).
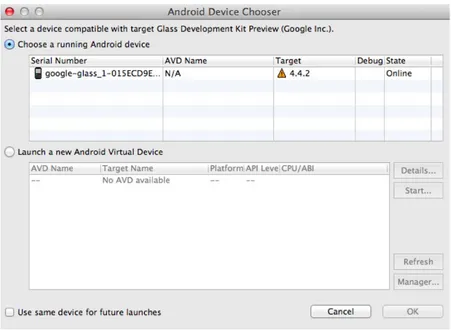
After you select a sample from Eclipse to run as an Android app, if you have Glass connected to your computer via USB, you’ll see your Glass shown as a running Android device, as in Figure 2-11.
Figure 2-11. Android Device Chooser showing Google Glass
Now tap Glass, say “OK Glass,” and then say “Start a timer.” The Timer app will get launched on Glass, displaying 00:00:00 for hour:minute:second. Tap the Glass touchpad, and the first menu item, “Set timer,” appears. Swipe forward, and you’ll see the Stop menu item. Figure 2-13 shows both screens.
Figure 2-13. Showing menu items for the Timer sample
Figure 2-14. Before and after timer setting
Figure 2-12. Installing sample Glass app called Timer
Tap the “Set timer” menu item; you’ll see the hours text with the first two 0s highlighted. Tap again to see 00 in a large font size centered in a new screen. You can swipe left and right to choose a value between 00 and 23. After you tap a number, it becomes your selected hour. You can then swipe to select minutes and seconds. Figure 2-14 shows the timer information before and after setting it (with 2 hours 30 minutes).
Figure 2-15. Timer in action with menu items
Now swipe down on the touchpad, and you’ll see the set timer 02:30:00; tap again, and this time a new menu item, Start, appears. Tap it, and you’ll see the timer gets updated every second. Tapping one more time will show the new menu items Pause, Reset, Change time, and Stop. Figure 2-15 shows two of these menu items.
To play more with Glass, you can run the other two samples Compass and Stopwatch in the same way. You should also look into the samples’ source code. If you’re like me when I started to learn Glass GDK development, you probably hope there’s a step-by-step tutorial on how to create such a GDK app. That is exactly what you’ll get in the next section of this chapter.
The HelloGlass Glassware
In this section, I’ll answer two important questions to get you ready for the exciting journey ahead: Can you use a template for creating new GDK apps? How do you create a new GDK app project?
Step-by-Step Tutorial
Follow these steps to build a generic GDK template app that will be used as the basis to build your first HelloGlass app and all the GDK apps in the coming chapters:
1. Launch Eclipse.
2. In ADT’s Package Explorer, right-click to show the menu and then select Import. (You can also select File ➤ Import.)
3. Select Android ➤ Existing Android Code Into Workspace and then click Next.
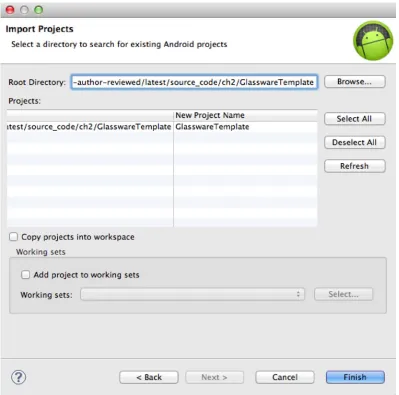
4. In the Import Projects window, click Browse and select the
Note You may notice some slight differences between your Eclipse screens and the following screenshots. This is because the ADT looks on Mac, Windows, and Linux are not 100 percent the same, but the difference is so insignificant (for example, the order of Cancel and Finish buttons is different) that you shouldn’t have any trouble following the tutorial.
Figure 2-16. Importing GlasswareTemplate project to ADT
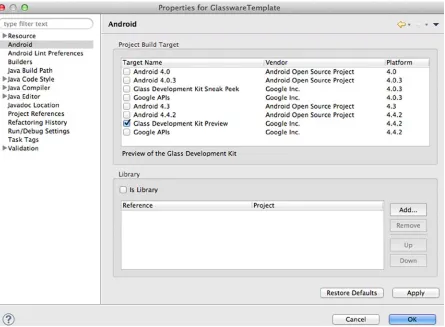
5. An error may occur because an incorrect target could be set as Project Build Target when the project was imported. To fix this, simply right-click GlasswareTemplate in ADT’s left Package Explorer panel, select Properties, and then change Project Build Target to Glass Development Kit Preview, as shown in Figure 2-17. Click OK, and you’re ready to run the template Glassware.
Figure 2-17. Fixing possible project target error after importing
6. Connect Glass to your computer and turn it on if you haven’t (you may want to verify your Glass is connected by running adb devices). Right-click GlasswareTemplate and select Run As ➤ Android Application. You’ll see the Android Device Chooser window with your Glass; select it and click OK.
Note Sometimes after you import the GDK template app to Eclipse or create a new project based on it, you
may get an error message when building the app: “Unable to execute dex: java.nio.BufferOverflowException.” You can fix this by right-clicking the project and then selecting Android Tools and Add Support Library.
8. Tap your Glass, say “OK Glass,” and then say “Glassware.” Or tap the OK Glass screen and then tap again when you see #glassware#, which should be the first item in the menu (starting with XE 16, recent and frequently visited items are placed first). GlasswareTemplate will run and show the main screen with the “Hello Glass!” text. Tap it and swipe, and you’ll see the menu items STOP, TTS (for text-to-speech), ASR (for automated-speech-recognition). Tap STOP to close the app; tap TTS to listen to “Hello Glass!”; tap ASR and say “Hello Glass.” Glass will recognize your speech!
Congratulations! You have the generic Glassware template app up and running.
Next, follow these steps to build and test HelloGlass, your first GDK app created based on the template app. I’ll then explain the project, files, and code for both HelloGlass and GlasswareTemplate in detail in the next section.
1. In ADT, select File ➤ New ➤ Android Application Project and enter the information shown in Figure 2-18.
2. Click Next three times and keep all the default settings.
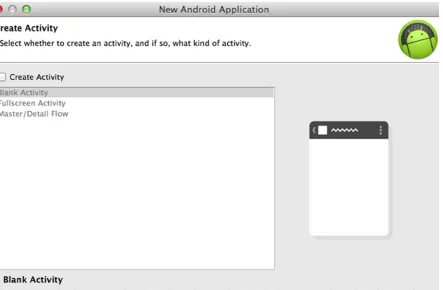
3. Uncheck Create Activity on the Create Activity screen, as shown in Figure 2-19, and then click Finish.
4. Open GlasswareTemplate, as shown in Figure 2-20; the files showing are to be copied to your HelloGlass app.
Figure 2-19. Changed setting for your HelloGlass app
5. Right-click the HelloGlass app’s src, folder, select New ➤ Package, and enter the name shown in Figure 2-21 (or change the package name to be other name you like better); click Finish.
6. In Eclipse, copy the four files from GlasswareTemplate’s src folder and paste them to HelloGlass’s src folder. The first line in the four files of HelloGlass’s src folder should have been changed automatically by Eclipse from com. morkout.glasswaretemplate to com.morkout.helloglass; if not, change them manually. Ignore the errors in the HelloGlass project; they’ll all be fixed soon in the following steps.
Figure 2-21. Creating a new package name for HelloGlass
7. In Eclipse, copy the drawable, menu, and xml folders in GlasswareTemplate’s res folder and paste them to HelloGlass’s res folder; then copy the files in GlasswareTemplate’s res, layout, and values folders and paste them to HelloGlass’s res, layout, and values folders (you need to overwrite the strings.xml and styles.xml files in the HelloGlass res, layout, and values folders when you copy and paste). Replace the whole <application> ... </application> section in HelloGlass’s AndroidManifest.xml with that in GlasswareTemplate’s AndroidManifest.xml. Change android:name’s value in the service tag from com.morkout.glasswaretemplate.AppService to com.morkout.helloglass.AppService, and change android:name’s value in the activity tag from com.morkout.glasswaretemple.MenuActivity to com.morkout.helloglass.MenuActivity.
8. Copy the line <uses-permission android:name="com.google.android.glass. permission.DEVELOPMENT" />from GlasswareTemplate’s AndroidManifest.xml file to HelloGlass’s AndroidManifest.xml file. This is something new in XE 16 or later and is required when you develop your GDK apps; see
https://developers.google.com/glass/develop/gdk/starting-glassware
for more details.
9. Finally, change the string value for say_glasswaretemplate in HelloGlass’s res/values/strings.xml file to #helloglass#. Run HelloGlass as an Android application while Glass is connected and turned on. You’ll see on your computer something like Figure 2-11 and Figure 2-12. Then on your Glass, you’ll see your #helloglass# app in the app list on the OK Glass screen. Tap the app to start it and see “Hello Glass,” where you can tap and then swipe to see the menu like in the GlasswareTemplate app.
Note You may wonder why you went through all the previous steps to create a new app based on the
template app without adding any exciting new features to the app. You’ll soon see in the coming chapters that the steps are repeated for each new category of apps, such as UI elements, image processing, video processing, audio processing, and so on. Creating a new app this way instead of importing and modifying the template app directly will help you organize your apps effectively.
What’s Going On
The Big Picture
A typical GDK app starts with a service (AppService) that runs when the app’s voice command is uttered or the app is tapped in the OK Glass app list. When the service is started, it creates a live card. A live card is one of the essential Glass UI elements that I’ll discuss in detail next chapter; for now you can just think of it as a card that gets created on the left side of the OK Glass item as the initial Timer card shown in Figure 2-14. (For a quick review of the Glass UI and live cards, you can also check out https://developers.google.com/glass/design/ui and https://developers.google.
com/glass/develop/gdk/live-cards.) The live card then adds an instance of a class (AppDrawer) that
implements SurfaceHolder.Callback for rendering, as well as a menu activity action (MenuActivity). AppDrawer creates an instance of a View subclass (AppViewer) that does the real rendering, sets the view’s layout, and requests the view to draw the content. AppViewer is similar to common Android app view class, drawing UI elements based on a layout XML; in the example, it simply sets the content for a TextView.
Figure 2-22 shows how the classes in the template Glassware interact with each other.
Figure 2-22. Interactions of service, live card, drawer, viewer, menu, and Glass
Source Code
In the HelloGlass project’s src folder, there are four files copied from GlasswareTemplate’s src folder:
AppDrawer.java
AppService.java
AppViewer.java
MenuActivity.java
Detailed explanations for these files follow.
AppDrawer.java
The AppDrawer.java file in Listing 2-1 defines the class AppDrawer that implements the SurfaceHolder.Callback interface (SurfaceHolder allows you to access and control a display surface’s size and format and monitor its changes), which has three public abstract methods: surfaceChanged, surfaceCreated, and surfaceDestroyed.
Listing 2-1. AppDrawer.java
package com.morkout.glasswaretemplate;
import android.content.Context; import android.graphics.Canvas; import android.util.Log;
import android.view.SurfaceHolder; import android.view.View;
public class AppDrawer implements SurfaceHolder.Callback { private static final String TAG = "AppDrawer";
private final AppViewer mView; private SurfaceHolder mHolder;
public AppDrawer(Context context) { mView = new AppViewer(context); }
@Override
public void surfaceChanged(SurfaceHolder holder, int format, int width, int height) { // Measure and layout the view with the canvas dimensions.
int measuredWidth = View.MeasureSpec.makeMeasureSpec(width, View.MeasureSpec.EXACTLY); int measuredHeight = View.MeasureSpec.makeMeasureSpec(height, View.MeasureSpec.EXACTLY); mView.measure(measuredWidth, measuredHeight);
mView.layout(0, 0, mView.getMeasuredWidth(), mView.getMeasuredHeight()); draw(mView);
@Override
public void surfaceCreated(SurfaceHolder holder) { mHolder = holder;
mView.start(); draw(mView); }
@Override
public void surfaceDestroyed(SurfaceHolder holder) { mHolder = null;
AppDrawer first creates an instance of AppViewer, a View subclass, and then goes through the two-pass layout process (measure and layout), in surfaceChanged before actually drawing the view. The width and height passed to the surfaceChanged method are 640 and 360 pixels, the size of the Glass display. The view draw request is made between the canvas lock and unlock.
AppService.java
import com.google.android.glass.timeline.LiveCard;
import com.google.android.glass.timeline.LiveCard.PublishMode;
public class AppService extends Service {
private static final String TAG = "AppService";
private static final String LIVE_CARD_ID = "HelloGlass";
private AppDrawer mCallback; private LiveCard mLiveCard;
@Override
public void onCreate() { super.onCreate(); }
@Override
public IBinder onBind(Intent intent) { return null;
}
@Override
public int onStartCommand(Intent intent, int flags, int startId) { if (mLiveCard == null) {
mLiveCard = new LiveCard(this, LIVE_CARD_ID); mCallback = new AppDrawer(this);
mLiveCard.setDirectRenderingEnabled(true).getSurfaceHolder().addCallback(mCallback); Intent menuIntent = new Intent(this, MenuActivity.class);
mLiveCard.setAction(PendingIntent.getActivity(this, 0, menuIntent, 0));
mLiveCard.publish(PublishMode.REVEAL);