Expert’s Voice in Swift
ook
The Expert’s Voice in Swift
Swift Quick Syntax
Reference
Matthew Campbell
•
For your convenience Apress has placed some of the front
matter material after the index. Please use the Bookmarks
and Contents at a Glance links to access them.
Contents at a
Glance
About the Author ...
xv
About the Technical Reviewer ...
xvii
Introduction ...
xix
Chapter 1: Hello World
■
...
1
Chapter 2: Declaring Constants and Variables
■
...
7
Chapter 3: Printing Variables and Constants
■
...
11
Chapter 4: Code Comments
■
...
15
Chapter 5: Numbers
■
...
19
Chapter 6: Strings
■
...
21
Chapter 7: Booleans
■
...
25
Chapter 8: Tuples
■
...
27
Chapter 9: Optionals
■
...
29
Chapter 10: Type Aliases
Contents at a Glance vi
Chapter 12: Assertions
■
...
35
Chapter 13: Assignment Operators
■
...
37
Chapter 14: Arithmetic Operators
■
...
39
Chapter 15: Comparison Operators
■
...
43
Chapter 16: Ternary Conditional Operator
■
...
45
Chapter 17: Range Operators
■
...
47
Chapter 18: Logical Operators
■
...
49
Chapter 19: Enumerations
■
...
51
Chapter 20: Arrays
■
...
. 53
Chapter 21: Dictionaries
■
...
. 57
Chapter 22: Loops
■
...
61
Chapter 23: if Statements
■
...
65
Chapter 24: switch Statements
■
...
67
Chapter 25: Control Transfer Statements
■
...
71
Chapter 26: Labeled Statements
■
...
75
Chapter 27: Functions
■
...
79
Chapter 28: Nested Functions
■
...
83
Chapter 29: Closures
■
...
87
Chapter 30: Structures
■
...
89
Chapter 31: Classes
■
...
93
Chapter 32: Using Instances
■
...
97
Chapter 33: Class Identity Operators
■
...
99
Chapter 34: Properties
■
...
101
Chapter 35: Property Observers
Contents at a Glance vii
Chapter 36: Class Type Properties
■
...
109
Chapter 37: Type Methods
■
...
111
Chapter 38: Subscripts
■
...
113
Chapter 39: Inheritance
■
...
115
Chapter 40: Overriding Methods and Properties
■
...
117
Chapter 41: Initialization
■
...
121
Chapter 42: De-initialization
■
...
123
Chapter 43: Type Casting
■
...
125
Chapter 44: Nested Types
■
...
129
Chapter 45: Extensions
■
...
131
Chapter 46: Protocols
■
...
133
Chapter 47: Delegation
■
...
137
Chapter 48: Generics
■
...
143
Chapter 49: Automatic Reference Counting
■
...
147
Index
Introduction
The expressions of the WWDC 2014 audience quickly changed from excitement and enthusiasm to looks of shock, horror, and awe. At this WWDC, after a succession of ever-surprising announcements, Apple ended the conference by announcing a completely new programming language designed entirely for Mac and iOS applications. This programming language is named Swift, which is what I have written about in this book.
The audience members’ looks of shock and horror were understandable in context. Most of the developers at that conference had spent the past six years mastering the previous, relatively obscure programming language used to develop apps called Objective-C. The people sitting in those seats were world-class experts in a programming language that was just declared dead right in front of them.
Introduction xx
This is one of the reasons I was so excited to write this book with Apress. Swift is absolutely the programming language that will take iOS and Mac into the future. Swift is a dramatic improvement to the application ecosystem. If you were turned off from making applications before because of Objective-C, now is the time to give making your app another go.
This book is written for programmers who want to get up to speed quickly in Swift. I made an effort to keep chapter headings specific, simple, and clear so you can go right to the area that you need to focus on. Chapters are short and focus on the syntax, but concepts are briefly illustrated at times when the information is crucial to the programming concepts that I’m presenting. Since Swift is so new, I didn’t make many assumptions about your technical background, so anyone with a general understanding of programming will benefit from this book. If you know what loops, functions, and objects are, you can follow the content here. Any niche or advanced programming constructs will be explained so you can follow along.
Chapter
1
Hello World
I will start our conversation about Swift with the venerable Hello World program. However, you need to get some things in place before I can do that. Most importantly, you need a Mac app that will help you write and test Swift code. This Mac app is called Xcode.
Xcode
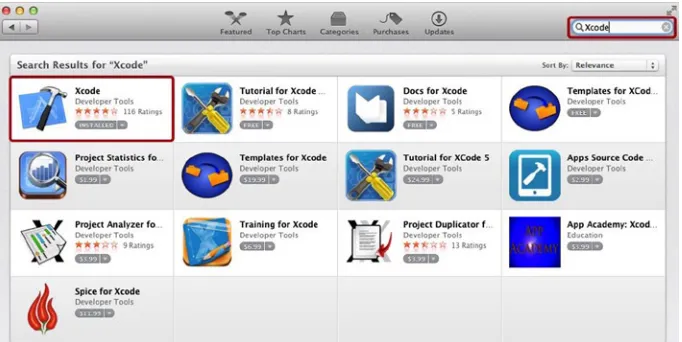
Xcode is a free app that you can download from the Apple App Store. Xcode gives you all the tools that you need to build applications for the Mac and iOS devices. These tools include a code editor, debugging tools, and everything else you need to turn your Swift code into an app.
Note Xcode requires a Mac with OS X 10.9.3 or OS X 10.10. You cannot install Xcode on a Windows- or Linux-based computer.
Install Xcode
CHAPTER 1: Hello World 2
Note Xcode version 6 is required to do Swift programming. By the time
this book is released, Xcode 6 should be available in the Apple App Store, and you should be able to get it by following the previous instructions. However, at the time of this writing, Xcode 6 is still in beta and available only to registered Apple developers who can download it from the Apple developer web site at http://developer.apple.com.
Figure 1-1. Downloading Xcode from the App Store
Create a New Playground
Playgrounds are a workspace that you use to quickly prototype Swift code. The examples in this book will assume that you are using playgrounds to follow along. You use Xcode to make a playground.
CHAPTER 1: Hello World 3
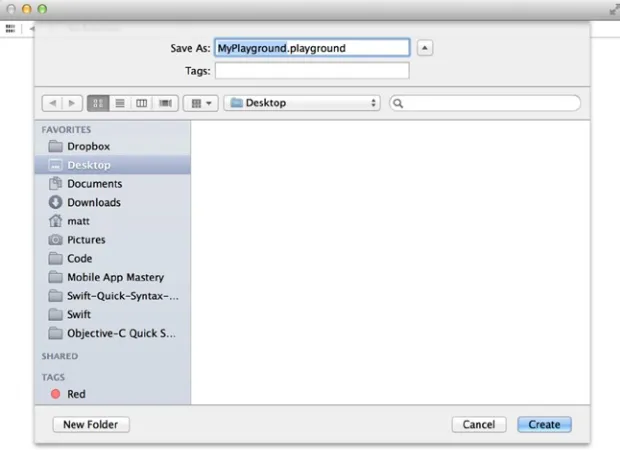
You will be presented with a Save As screen, as shown in Figure 1-3. Use this screen to choose a name and location for your Swift playground.
CHAPTER 1: Hello World 4
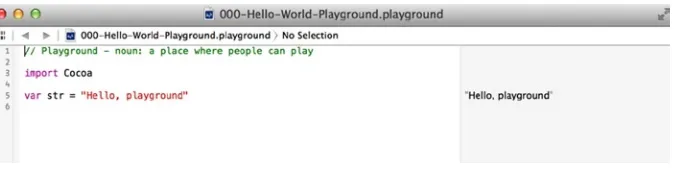
Once you choose your playground’s name and folder location, Xcode will present a code editor with some boilerplate code already filled in for you (see Figure 1-4).
Figure 1-4. Playground boilerplate
Your first playground has been created, and you already have a sort of Hello World program coded for you. Well, not exactly. Your code says “Hello, playground,” as you can see in Listing 1-1.
Listing 1-1. Hello Playground
// Playground - noun: a place where people can play import Cocoa
var str = "Hello, playground"
You use a playground by typing in code in the left area of the code editor. You can immediately see results appear on the right in the playground. To create a Hello World program, all you need to do is type in the phrase "Hello World"
(including the quotes) into the playground code editor (see Listing 1-2).
Listing 1-2. Hello World
// Playground - noun: a place where people can play import Cocoa
var str = "Hello, playground" "Hello World"
CHAPTER 1: Hello World 5
Chapter
2
Declaring Constants and
Variables
While you can use values like the string "Hello World" from the previous chapter or a number like 3.14 directly in code, usually you assign values like these to either a variable or a constant. You can give values a convenient name using variables and constants in Swift.
Variables can change their values over time, while constants get an assigned value and keep that value throughout the execution of a program. Both variables and constants can store only one type of data.
Constants
Let’s reproduce the Hello World example from Chapter 1 using a constant. Listing 2-1 shows how to store the string "Hello World" in a constant named s1.
Listing 2-1. Hello World Constant
let s1:String = "Hello World"
The first part of the constant declaration is the let keyword. The let
keyword lets you know that you are working with a constant. The next part is the constant name s1. You will use the constant name s1 to refer to this constant in your code from now on.
You also have the type declaration :String. The type declaration tells you what data type the constant stores. Since you used the type declaration
CHAPTER 2: Declaring Constants and Variables 8
The next part is the assignment operator =, which assigns a value to the constant s1. The value here is a string enclosed in quotes, "Hello World". If you use a playground to prototype the code here, you will see that it
immediately reports the value of the s1 constant on the right side of the screen. You can reference a constant by using its name. To get the value of s1, you can just type in the constant name anywhere in your code. Try it right now by typing s1 into your playground (see Listing 2-2).
Listing 2-2. Referencing Constants
s1
You will be using constants more as you learn about the capabilities of Swift.
Constants Are Immutable
Let’s say you would rather have “Hello World” print as “Hello World!” (with an exclamation point). Since s1 is a constant, you cannot simply change the value or this code would cause an error (see Listing 2-3).
Listing 2-3. Error Caused by Assigning a Value to a Constant
s1 = "Hello World!"
When you need to change a value when a program runs, you must use a variable.
Variables
Variables are mostly used like constants but with two key differences. The first is that variables use the var keyword instead of the let keyword when variables are being declared. The second difference is that variable values can change.
Listing 2-4 shows an example of a variable s2 that can change value over time.
Listing 2-4. Variable Declaration
CHAPTER 2: Declaring Constants and Variables 9
As you can see in Listing 2-4, you use the var keyword to specify variables. Variables also don’t require that you immediately assign a value to them, so you could have waited to assign the "Hello World" string to s2.
Variables Are Mutable
Since s2 is a variable, you can change its value. So, if you wanted to say “Hello World” in Spanish instead, you could change the value of s2 as shown in Listing 2-5.
Listing 2-5. Changing Variable Value
s2 = "Hola Mundo"
Now if you type s2 into your playground, you will see the value “Hola Mundo” appear on the right.
Type Inference
In the previous examples, you clearly spelled out the data type for both the variables and the constants. However, Xcode can figure this out for you based on what value you assign to the variable or constant. This is called
type inference. This means you could have omitted the :String from your declarations and instead use something like Listing 2-6.
Listing 2-6. Type Inference
var s3 = "Hallo Welt"
Data Types
CHAPTER 2: Declaring Constants and Variables 10
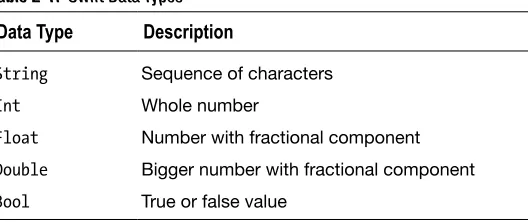
Table 2-1. Swift Data Types
Data Type Description
String Sequence of characters
Int Whole number
Float Number with fractional component
Double Bigger number with fractional component
Bool True or false value
See Listing 2-7 for examples of how to use these data types.
Listing 2-7. Swift Data Types
let s:String = "Hey There" let i:Int = -25
Chapter
3
Printing Variables and
Constants
When you are prototyping your code with playgrounds, you automatically get output for any variable or constant that you are working with. But, if you are coding an application, you will need to use special functions to print out values to the console screen.
Since playgrounds have no console window, you will need to create a new Mac command-line tool to print values to a console screen.
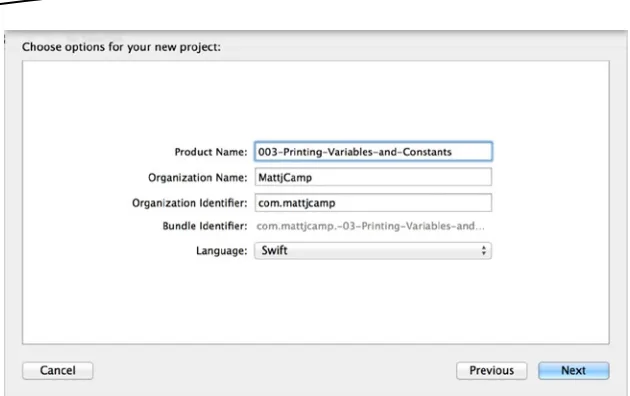
Creating a Command-Line Tool
Open Xcode 6 and then choose Create a new Xcode project from the welcome screen.
On the screen that appears, choose OS X ➤ Application ➤ Command Line Tool. Click Next.
CHAPTER 3: Printing Variables and Constants 12
Click Next.
Choose the folder location for your command tool application and then click Create.
The Command Line Tool Xcode project is a little bit more complicated than a playground. You are most interested in the Swift code file named
main.swift. You should see this file in Xcode’s folder view on the left part of your screen. Click the file main.swift. You should see a screen similar to Figure 3-2.
CHAPTER 3: Printing Variables and Constants 13
In the middle of your screen you should see a code editor with a simple “Hello World!” line of code filled in.
Printing to the Console
The code that appears in main.swift contains the function that you will use to print out values to the console window: println(), as shown in Listing 3-1.
Listing 3-1. println( )
import Foundation
println("Hello, World!")
To see the output of the println() function, click the big arrow in the upper-left area of your Xcode screen to build and run the command-line tool application. At the bottom of your screen, you should see the console window with the “Hello World!” message printed out.
Note If you adjusted your Xcode screens and ended up hiding your
CHAPTER 3: Printing Variables and Constants 14
You can use println() to print strings like you have just seen, or you can print out variable and constant values, as shown in Listing 3-2.
Listing 3-2. Printing Variables
println(s)
While println() prints something out and then goes to the next line,
print() will print out a value without moving to the next line in the console window, as shown in Listing 3-3.
Listing 3-3. print() Function
print("Print this") print(" and ") print("that")
The code in Listing 3-3 will print everything on one line like this:
Print this and that
String Interpolation
If you need to print out different variables, constants, literals, and
expressions in a string on one line, you can use string interpolation. You do this by putting a forward slash (\) in front of a variable name in parentheses. For instance, let’s say you have the constants from the end of Chapter 2 and want to print them out all in one line with a println() function, as shown in Listing 3-4.
Listing 3-4. String Interpolation
let i:Int = -25 let f:Float = 3.14 let d:Double = 99.99 let b:Bool = true
println("i = \(i), f = \(f), d = \(d), b = \(b)")
The code in Listing 3-4 will print out the following line:
Chapter
4
Code Comments
You use code comments when you want to add information to your code. With Swift, you can add a one-line code comment, multiple-line code comments, and even nested code comments.
One-Line Code Comments
Use the double backslashes (//) to start a one-line code comment. See Listing 4-1 as an example.
Listing 4-1. One-Line Code Comment
//One line code comment
You can fill up one line with these types of comments.
Multiline Comments
One-line comments are fine for quick notes about code that may need some extra information provided. But when you want to add a lengthier description, you can write over many lines at once. To write a multiline comment, you start the comment with a backslash and asterisk (/*), write the comment, and end it with an asterisk and backslash (*/). See Listing 4-2.
Listing 4-2. Multiline Comments
/*
Multiple line code comment
CHAPTER 4: Code Comments 16
Nested Code Comments
Swift supports nested comments. Nested comments allow you to quickly comment out large chunks of code that have code comments included in the code. You can use the same code comment symbols /* and */ with nested comments. For instance, let’s assume you have two sets of two constants declared, each of which have their own comments. You could write that as shown in Listing 4-3.
Listing 4-3. Multiple Code Comments
/*
Define a and b constants */
let a = 1 let b = 2
/*
Define c and d constants */
let c = 3 let d = 4
You can comment out all of this code by enclosing everything in Listing 4-3 in code comments, as shown in Listing 4-4.
Listing 4-4. Nested Code Comments
/* /*
Define a and b constants */
let a = 1 let b = 2
/*
Define c and d constants */
CHAPTER 4: Code Comments 17
let d = 4
*/
Chapter
5
Numbers
Numbers have their own data types in Swift. Like with other programming languages, in Swift some number data types can store larger numbers than others, and numbers that have a fractional component are treated differently than numbers that are whole numbers.
Integers
Integers are whole numbers that may be either positive or negative. Integers don’t have any decimal places. For example, 1, 2, and -9 are all integers. While there are several integer data types, you will usually use the Int data type. Int is used when you don’t need to specify a size for the integer. Listing 5-1 shows two examples of declaring integers.
Listing 5-1. Declaring Integers
let i1:Int = 5 var i2 = 7
In Listing 5-1, i1 is an integer constant, while i2 is an integer variable.
Integer Sizes
CHAPTER 5: Numbers 20
If you do want to specify the integer size, you can use data types that correspond to the C data types such as Int8, Int16, Int32, Int64, UInt8,
UInt16, UInt32, and UInt64.
In these data types, the numbers indicate the size of the integer.
For example, Int8 means 8-bit, which gives you an integer range of -127 to 127. The data types that have a U as the first character are unsigned integers. These integers must be positive. UInt8 gives you a range of 0 to 255.
Floating-Point Numbers
Floating-point numbers can have decimal places. An example of a floating-point number is 9.99. To specify a floating-point number, you can use the Float data type, as shown in Listing 5-2.
Listing 5-2. Declaring Floating-Point Numbers
let f1:Float = 9.99 let f2 = 3.14
If you leave out the data type and include a number with decimal places, Swift will use type inference to assume you want a number with the Float
data type.
Float is a 32-bit floating-point number, and you should use that when you don’t require 64-bit precision. When you do require 64-bit precision, use the
Double data type, as shown in Listing 5-3.
Listing 5-3. Declaring Double Floating-Point Numbers
Chapter
6
Strings
A string is a sequence of characters, such as "Hello World!". Strings use the String data type, although you don’t need to specify the data type to use a string, as shown in Listing 6-1.
Listing 6-1. Declaring Strings
var s1 = "Hello World!"
Unicode Characters
Strings can include any Unicode characters. To write single-byte Unicode characters, you must include \x before the two hexadecimal digits. Two-byte Unicode characters are prefixed with \u before four hexadecimal digits, and four-byte Unicode characters have \U written before eight hexadecimal digits. Listing 6-2 shows an example of using Unicode characters.
Listing 6-2. Unicode Characters
let percentage = "\x{25}" let snowflake = "\u{2744}" let heart = "\u{0001F497}"
CHAPTER 6: Strings 22
Character Data Type
Strings are collections of characters, and characters have their own data type called Character. Characters can have only one character, and you must explicitly declare your variable or constant as a Character. See Listing 6-3 for an example of how to declare a Character.
Listing 6-3. Character Declaration
let c1:Character = "A"
Concatenation
In Swift, you can combine strings and characters to create longer strings. Since a character can contain only one character, you can’t combine strings or characters using a Character type variable.
If you think you want to have a string that you can add more characters to, make sure to declare the string as a String type variable with the var
keyword. Constants cannot be modified.
Listing 6-4 shows an example of how you might start constructing an alphabet string based on characters and strings that you already have on hand.
Listing 6-4. String/Character Concatenation
//Declare characters and strings let c1:Character = "A"
let c2:Character = "B" let c3:Character = "C" let c4:Character = "D" let c5:Character = "E" let s2 = "FGHIJ"
//Declare an empty string var alphabet = String()
//Concatenate strings, characters and literals alphabet = c1 + c2 + c3 + c4 + c5 + s2 + "KLMNOP"
If you’re using a playground, you will see the first part of the alphabet appear on the right.
CHAPTER 6: Strings 23
Comparing Strings
You can find out whether one string is equal to another with the equality comparison operator (==). If you do this, you will get a boolean (true or false) value back. If you wanted to see whether the alphabet variable contains the entire alphabet, you can use the comparison operator to test alphabet, as shown in Listing 6-5.
Listing 6-5. Comparing Strings
//returns boolean false
alphabet == "ABCDEFGHIJKLMNOPQRSTUVWXYZ"
//returns boolean true
alphabet == "ABCDEFGHIJKLMNOP"
Note Comparison operators are usually used with if statements,
and both of these topics are covered later in the book (Chapters 15 and 25, respectively).
String Interpolation
As I discussed in Chapter 3, you can use string interpolation to insert values into strings to create new strings. These values can be numbers, other strings, and other types.
In addition to printing out interpolated strings to the console window with
println(), you can create new strings with interpolation, as shown in Listing 6-6.
Listing 6-6. String Interpolation
let s3 = "Three Times Three = \(9) & the alphabet is \(alphabet)"
In Listing 6-6, you are creating a new string with string interpolation by inserting the value 9 and the value of the variable alphabet into the string
"Three Times Three = & the alphabet is".
Chapter
7
Booleans
Boolean values can be either true or false. Booleans are used to help evaluate logical expressions. To declare a boolean value, you can assign a value immediately, or you can use the Bool data type to declare a boolean variable, as shown in Listing 7-1.
Listing 7-1. Declaring Booleans
var b1:Bool let b2 = false
In Chapter 6, you saw how to make a comparison between two strings to get a boolean value. You can store the results of an equality comparison like that in a boolean variable or constant, as shown in Listing 7-2.
Listing 7-2. Storing Boolean Results
let alphabet = "ABCDEFGHIJKLMNOP" let b4 = alphabet == "ABCDEFGHIJKLMNOP"
Chapter
8
Tuples
Tuples are ordered lists of values. In Swift, you can group related elements together as a tuple, reducing the need to depend on complex types, objects, and immutable arrays.
Listing 8-1 shows how you would declare a tuple for a rectangle.
Listing 8-1. Declaring Tuples
let rectangle1 = (0, 0, 200, 100)
In Listing 8-1, you use the let keyword to declare a constant and give the constant the name rectangle1. After the assignment operator (=), you supply a comma-separated list of values enclosed in parentheses.
The value of rectangle1 from Listing 8-1 would be (0, 0, 200, 100). For greater clarity, you can annotate each value in the tuple list as shown in Listing 8-2.
Listing 8-2. Annotated Tuple
var rectangle2 = (x:0, y:0, width:200, height:100)
To pull an individual value out of a tuple, you can decompose the values and assign them to a constant, as shown in Listing 8-3.
Listing 8-3. Decomposed Tuple
let (a, b, c, d) = rectangle1
CHAPTER 8: Tuples 28
To decompose your tuple values, you can use the let keyword followed by a comma-separated list of variable names. Each name will be filled with the corresponding value from the tuple. You can now use these variables as usual. For instance, when you type c, the variable name from Listing 8-1, the value 200 from the tuple will appear.
To ignore some values in a tuple, you can replace a variable name with an underscore ( _ ). So, if you needed only the x origin for the rectangle, you could do this as shown in Listing 8-4.
Listing 8-4. Ignoring Tuple Parts
var (e, _, _, _) = rectangle2
//prints 0 e
Chapter
9
Optionals
In situations where you can’t be sure a variable has a value present, you can use optionals. An optional is a variable that can have either an assigned value or no value at all. Using optionals is an alternative to setting objects to nil. Optionals can be used with any type in Swift including numbers, strings, and objects.
You declare optionals like variables or constants, but you must include a ?
after the type declaration (see Listing 9-1). Like variables and constants, the data type of an optional may be inferred.
Listing 9-1. String Optional Declaration
var s:String?
The variable s in Listing 9-1 is declared as an optional, and the starting value is nil.
Forced Unwrapping
If you are sure that an optional has a value, then you can use an exclamation point (!) to unwrap the value. For instance, if you know that s has a value, then you could unwrap s and use the value as shown in Listing 9-2.
Listing 9-2. Unwrapping
var s:String?
s = "ABC"
CHAPTER 9: Optionals 30
You will see the value of s display on the right pane of your playground. If you attempt to unwrap an optional that has no value, then you will get a runtime error, and your playground will stop functioning. Make sure the Assistant Editor is visible so you can see runtime errors (click Xcode ➤ View ➤
Show Assistant Editor). For this reason, you will want to test your optional with an if statement before attempting to unwrap the optional (Listing 9-3). See Chapter 23 for more information on if statements.
Listing 9-3. Testing Before Unwrapping Optionals
if s{
"The value of s is " s!
} else{
"No value in s" }
Optional Bindings
Optional bindings give you a way to test an optional and unwrap the optional in an if statement. Optional bindings will save you from explicitly unwrapping the optional inside your if statement. To rewrite Listing 9-3 with optional bindings, use the code in Listing 9-4.
Listing 9-4. Optional Bindings
if let myString = s{ "The value of s is " myString
}else{
"No value in s" }
Chapter
10
Type Aliases
You can add an alternative name for existing types using type aliases. This is something you might do if you want to make your API more expressive and clearer to other programmers. For instance, let’s say you had a type of string that you wanted to treat as a note in your code. You could use a type alias to define Note as an alternative to String.
Use the typealias keyword to define a type alias, as shown Listing 10-1.
Listing 10-1. Type Alias
typealias Note = String
Now that you’ve defined the type alias, you can use the type Note in place of String when you are declaring new variables, constants, or optionals (see Listing 10-2).
Listing 10-2. Using Type Aliases
typealias Note = String
var n1:Note = "Today is the first day of our new project"
You can treat n1 as a string, which means you will have the same
functionality as a string object. The only difference is that you can refer to certain strings as Note types, making the purpose of the notes clearer. Some types like Int have functions associated with them. For instance, if you wanted to find out the maximum integer value that can be stored by an
CHAPTER 10: Type Aliases 32
Listing 10-3. Int Max Function
Int.max
If you do this on your Mac, you will see a large number appear in the playground. If you set an alias for Int, any function available to Int will be available to the alias.
For instance, if you defined an alias for Int to represent speed, then you could do something like Listing 10-4.
Listing 10-4. Speed Max Function
typealias Speed = Int
Speed.max
Chapter
11
Global and Local
Variables
Most of the variables that you have been working with in the examples have had global scope. Global scope means that once the variable is declared, you can access its value from anywhere in your Swift program. This is in contrast to Objective-C, which couldn’t have variables with global scope.
Scope Defined
Scope refers to a portion of a program. In other words, you can access variables only from the portion of the program where the variable has been declared. Portions of the program are defined by various Swift constructs such as if statements (Chapter 23), functions (Chapter 27), and classes (Chapter 30).
Note Scope applies broadly to other types in Swift as well as variables.
CHAPTER 11: Global and Local Variables 34
Listing 11-1. If Statement Scope
let isTrue = true
if(isTrue){
var myString = "This is a true statement" println(myString)
}
Listing 11-1 declares a boolean constant called isTrue and uses an if
statement to test to see whether isTrue is set to a true value. If this statement is true, you define an area of scope with curly brackets ({}) and put the code that you want to execute in between the curly brackets. If you look at the area in the curly brackets (the scoped area), you will see the variable that is declared is named myString. myString is a variable that is local to the scoped area.
This means you can access myString only in that scoped area. So, Listing 11-2 would cause an error.
Listing 11-2. Variable Out of Scope
let isTrue = true
if(isTrue){
var myString = "This is a true statement" println(myString)
}
println(myString)
However, since isTrue is a global variable, you can use that anywhere in your program, including the scoped area after your if statement.
Variables remain in scope even when a scoped area itself has scoped portions. So, if you have an if statement that contains other if statements, then variables declared in the topmost scoped area are still accessible in the nested scoped areas.
Global Variables
Chapter
12
Assertions
Assertions are a tool that you can use to help with your debugging efforts. Assertions work by testing a condition to see whether the condition is satisfied. If the condition is not satisfied, then a runtime error occurs, and the program stops executing. Assertions may have an optional message that is printed in the console window when the condition is not met. To create an assertion, write the assertion shown in Listing 12-1.
Listing 12-1. Assert
var triangleSides = 4
assert(triangleSides == 3, "A triangle must have three sides")
The assert statement in Listing 12-1 is testing to make sure that the
triangleSides variable has the correct number of sides. If triangleSides
CHAPTER 12: Assertions 36
Assertions are tested only in Debug mode since they are meant to help you when debugging your application. You use assertions when logical conditions that are possible would cause a fatal error in your application. You can use any comparison operator (Chapter 15) or logical operator (Chapter 18) in your assertions.
Note It is hard to see how assertions work when you are working with a playground since your program doesn’t really stop like it would if you were coding an app. However, you can see the console window in the playground by going to the Xcode menu bar and then clicking View ➤ Assistant Editor ➤
Chapter
13
Assignment Operators
When you want to initialize or update a value, you use the assignment
operator (=). You saw this already when you learned to declare constants and variables with a value using the assignment operator (see Listing 13-1).
Listing 13-1. Declaring and Assigning Values
//Assigning a variable value var a = 1
//Assigning a constant value let b = 2
You can update the variable values at any time after the variable has been declared using the assignment operator (see Listing 13-2).
Listing 13-2. Updating Values
a = 3
Of course, you cannot do this with a constant.
You can assign multiple values to multiple variables or constants on the same line to save space (see Listing 13-3).
Listing 13-3. Multiple Assignments
let (c, d) = (4, 5)
In Listing 13-3, c will equal 4, and d will equal 5.
CHAPTER 13: Assignment Operators 38
Listing 13-4. Assigning Tuple Values
let e = (6, 7, 8)
The output that will appear in the right pane of your playground will be
(.0 6, .1 7, .2 8).
When you need to extract a tuple value from a variable or constant, you can use an assignment operator to assign one of the tuple values to a new variable or constant. Every tuple value except the one you are interested in must be replaced with an underscore ( _ ) character (see Listing 13-5).
Listing 13-5. Extract a Tuple Value
let (_,_,f) = e
Listing 13-5 will give you a new constant f that has the same value as the third value in the tuple e.
Compound Operators
The assignment operator is often combined with an arithmetic operator (see Chapter 14) when you want to perform an arithmetic operator and assign the result to the value in the same line of code (see Listing 13-6).
Listing 13-6. Compound Assignment/Arithmetic Operations
//Declare and assign i integer equal to 0 var i = 0
//Add 4 to i and assign result back to i i+=4
//Multiple i by 2 and assign result back to i i*=2
Chapter
14
Arithmetic Operators
You use the arithmetic operators to do addition (+), subtraction (-),
multiplication (*), and division (/). Generally, you use these operators in the same way you would in math (see Listing 14-1).
Listing 14-1. Arithmetic Operators
let r1 = 1 + 2 let r2 = 3 - 1 let r3 = 6 * 5 let r4 = 12 / 3
If you are using arithmetic operators on two integers, then you can expect an integer result by default. All of the examples in Listing 14-1 will result in integer output. If one of the values is a Float or Double data type, then the result will be a floating-point data type as well.
Note Be careful when dividing two integers since you can’t always be
CHAPTER 14: Arithmetic Operators 40
Remainder Operator
When you use the division operator (/), you will get the whole number part only when you are dividing integers. If you want to also use the remainder part of the result, you can use the remainder operator (%).
For example, if you wanted to divide 13 by 3, you could use the code in Listing 14-2.
Listing 14-2. Division and Remainder Operators
//Division and remainder operators let r5 = 13 / 3
let r6 = 13 % 3
In Listing 14-2, r5 would equal 4, and r6 would be 1.
Order of Operations and Parentheses
You can have more than one arithmetic operator on a line of code. Each operator requires two values unless the operator is a unary operator (see the “Unary Minus Operator” section). The entire set of values and operators is called an expression. Expressions are solved going from left to right, and multiplication and division are performed before addition and subtraction. This is called the order of operations. You can change the order of
operations by using parentheses, which could create a completely different result. See Listing 14-3 for an example.
Listing 14-3. Changing the Order of Operations
let r8:Float = 1 + 2 * 3 - 4 / 5 let r9:Float = (1 + 2) * (3 - 4) / 5
In Listing 14-3, r8 equals a value of 6.19999980926514, while r9 equals a value of -0.600000023841858.
Increment and Decrement Operators
The unary increment operator (++) and the unary decrement operator (--)Unary decrement operator (--) increase or decrease the value of a number by 1.
CHAPTER 14: Arithmetic Operators 41
Listing 14-4. Increment Operator
var i1 = 5
++i1
In Listing 14-4, ++i1 adds 1 to i1, resulting in a value of 6. You could also use decrement operator (--) to decrease the value of i1 by 1.
You could achieve the same effect by simply writing i1 = i1 + 1, but using the increment operator is easier to write.
The placement of the operator here matters. If you place the ++ or -- before the variable, then the value will be changed first and then returned. If you put the operator after the variable, then the original value will be returned first, and the variable will be incremented or decremented (see Listing 14-5).
Listing 14-5. Increment Operator Placement
var i1 = 5
//Returns 5 i1
//Returns 6 ++i1
//Returns 6 i1++
//Returns 7 i1
As you can see in Listing 14-5, when you increment i1 with the ++ as a suffix, you still get the original value reported. But, when you use i1 on the next line of code, you will get the updated value of 7.
Unary Minus Operator
CHAPTER 14: Arithmetic Operators 42
Compound Operators
Arithmetic operators can be combined with the assignment operator (Chapter 13) when you want to perform an arithmetic function and assign the result to the value in the same line of code (see Listing 14-6).
Listing 14-6. Compound Assignment/Arithmetic Operations
//Declare and assign i integer equal to 0 var i = 0
//Add 4 to i and assign result back to i i+=4
//Multiple i by 2 and assign result back to i i*=2
In Listing 14-6, you start off with an integer i that has a value of 0 and then use compound assignment/arithmetic operations to first add 4 to i and then multiply i by 2. You can use any arithmetic operation like this with the assignment operator.
String Concatenation
The addition operator (+) is also used to add strings (and characters) together (see Listing 14-7).
Listing 14-7. String Concatenation
let s1 = "Hello" let s2 = "World"
let s3 = s1 + " " + s2 + "!"
Chapter
15
Comparison Operators
You use comparison operators to compare two values. You can test for equality or whether one value is greater or less than another value. Table 15-1 describes the comparison operators available in Swift.
Table 15-1. Comparison Operators
Operator Description
x == y Equal to
x != y Not equal to
x > y Greater than
x >=y Greater than or equal to
x < y Less than
x <= y Less than or equal to
x === y Two objects are equal
x !== y Two objects are not equal
Note The last two comparison operators in Table 15-1 (=== and
CHAPTER 15: Comparison Operators 44
Comparison operators return a boolean result that you can store in a boolean variable or constant. See Listing 15-1 for an example.
Listing 15-1. Using Comparison Operators
let x = 100
let y = 200
//Returns true let b1 = x < y
//Returns false let b2 = x == y
Chapter
16
Ternary Conditional
Operator
You use the ternary conditional operator to evaluate a question and then do one of two things based on the result of the question. The ternary conditional operator is written like this: question ? action1 : action2 (see Listing 16-1).
The question is an expression that returns a boolean true or false. If the question returns true, then the first action takes place. If the question returns false, then the second action takes place.
Listing 16-1. Ternary Conditional Operator
let a = 5
a == 5 ? "We're good" : "O0ps, not quite"
In Listing 16-1, the first part of the ternary conditional operator is the statement a ==5, which is using the equality comparison operator to test to see whether a is equal to 5.
In the next part of Listing 16-1, you have two possible actions that can take place separated by the semicolon (:). The first action, “We’re good,” takes place if the statement is true, while the second action, “Oops, not quite,” takes place if the statement is not true.
Chapter
17
Range Operators
You use range operators to specify a range of integers such as 1 through 10. There are two types of range operators: the closed range operator (...) and the half-open range operator (..<).
Closed Range Operator
The closed range operator gives you a way to specify a range of numbers when you want to include the number that defines the end of the range. You must specify the beginning of the range and the end of the range with the closed range operator (...), as shown in Listing 17-1.
Listing 17-1. Closed Range Operator
1...10
This operator is not useful by itself, but you will see range operators used in
for loops (see Chapter 22), as shown in Listing 17-2.
Listing 17-2. Closed Range Operator in a for Loop
for i in 1...10 { println("i = \(i)") }
The code in Listing 17-2 produces output that includes i = 1 through
CHAPTER 17: Range Operators 48
Listing 17-3. for Loop Output
i = 1 i = 2 i = 3 i = 4 i = 5 i = 6 i = 7 i = 8 i = 9 i = 10
Half-Open Range Operator
The half-open range operator (..<) works like the closed range operator except that the ending value in the range is not included. So, if you replaced the closed range operator in the for loop from Listing 17-2 with a half-open range operator, you would print out to i = 9 only (see Listing 17-4).
Listing 17-4. Half-Open Range Operator in for Loop
for i in 0..<10 { println("i = \(i)") }
The output from the for loop in Listing 17-4 would produce Listing 17-5.
Listing 17-5. for Loop Output
Chapter
18
Logical Operators
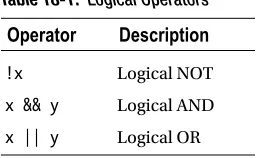
The logical operators are used with boolean values and expressions that return boolean values. You use these operators to deal with expressions that are made up of parts that can be either true or false. Logical operators are used to test whether two expressions are true or whether one expression is true. Table 18-1 describes the logical operators supported by Swift.
Table 18-1. Logical Operators
Operator Description
!x Logical NOT
x && y Logical AND
x || y Logical OR
For instance, let’s assume you already have two variables, x and y, with values of true and false. To test and see whether both x and y are true, you would use logical AND, as shown in Listing 18-1.
Listing 18-1. Logical AND
let x = true let y = false
let a = x && y
In Listing 18-1, the value of a would be false because x and y are not both true.
CHAPTER 18: Logical Operators 50
Listing 18-2. Logical OR
let x = true let y = false
let b = x || y
In Listing 18-2, the value of b would be true because one of the conditions (x) is true.
You use logical NOT as indicated by ! to test for the opposite of a boolean value. An exclamation point before a boolean value means the opposite of the boolean value. So, !true means false, while !false means true. If you wanted to test x to see what the opposite boolean value is, you could do Listing 18-3.
Listing 18-3. Logical NOT
let x = true let y = false
let c = !x
The c value in Listing 18-3 will be false since the value of x is true.
Note While you can use logical operators by assigning the results to
Chapter
19
Enumerations
You use an enumeration (or an enum) to define a restricted set of values. Enums make your code clearer because you can use descriptive names instead of something abstract like an integer value.
If you wanted to define an enumeration to describe a machine state, you could do something like Listing 19-1.
Listing 19-1. Defining Enumerations
enum State { case Inactive case Active case Hibernate case Terminated }
var machineState = State.Inactive
In Listing 19-1, you defined an enum named State that can have four values:
Inactive, Active, Hibernate, and Terminated. You specify enum values with the case keyword. You can specify one value per case keyword, or you can provide a comma-separated list of enum values on one line.
You can use enumeration types like other types. In Listing 19-1, you are assigning the value State.Inactive to the variable machineState.
You can also reference the enum type in the ternary conditional operator (Chapter 16), if statements (Chapter 23), switch statements (Chapter 24), and anywhere else variables or constants are used.
CHAPTER 19: Enumerations 52
Listing 19-2. Using Enums
machineState == State.Inactive ? println("Machine Inactive") : println("Machine State Unknown")
In Listing 19-2, the text “Machine Inactive” will appear since the value of
machineState is State.Inactive.
Enum types can be defined as their own value types, or you can assign other types to an enumeration, including integers, strings, and floating-point numbers.
To assign another type to an enumeration, you must specify the enum type and then use the assignment operator to assign the values. For instance, if you wanted to define an enumeration for the alphabet while keeping track of the position of each letter in the alphabet, you could use the code in Listing 19-3.
Listing 19-3. Integer Enum
enum Alphabet:Int{ case A = 1
case B, C, D, E, F, G, H, I case J, K, L, M, N, O, P, Q case R, S, T, U, V, W, X, Y, Z }
In Listing 19-3, you defined the enum type Alphabet as an Int. This means each Alphabet value has a corresponding integer value. You also need to provide each enum value with a corresponding integer value. You did this for case A, which has a value of 1. Since this is an integer type, Swift can figure out that you want the remaining enum values to correspond to integer values in the order you listed them.
While you would use Alphabet in the same way as State, with Alphabet you can reference the raw integer value using the toRaw() function.
For instance, if you want to add the integer value of A to the integer value of B, you would use the code in Listing 19-4.
Listing 19-4. Accessing Raw Enum Values
let result = Alphabet.A.toRaw() + Alphabet.B.toRaw()
Chapter
20
Arrays
To organize a list of variables, constants, and other types, you can use arrays. All items in an array must be of the same type, and you can have lists of items such as integers, floating-point numbers, strings, and objects. Listing 20-1 shows two ways to create empty arrays that you can add items to later.
Listing 20-1. Creating Arrays
var a1:Array<String> = Array<String>() var a2:[String] = [String]()
The first line in Listing 20-1 shows you the long way of declaring an array. You must use the Array keyword and include the type that is stored in the array between the less-than (<) and greater-than (>) signs. In Listing 20-1, a1
is an array that can hold a list of strings.
You must also use the assignment operator (=) to initialize the array followed by the word Array along with the type between the less-than (<) and greater-than (>) signs. You can see two parentheses after the type in the first line of code in Listing 20-1, which is a call to the default initializer. This initializer creates the array object.
There is also a shorthand method for creating arrays, and that is how you create the a2 array shown in Listing 20-1. a2 simply has the type in square brackets: [String].
CHAPTER 20: Arrays 54
Listing 20-2. Array Type Inference
var a3 = ["A", "B", "C"]
In Listing 20-2, you simply set a3 to ["A", "B", "C"], which was enough information for Swift to figure out that a3 is a String array. ["A", "B", "C"] is known as an array literal, which is a quick way to write out a constant array.
Array Mutability
Since both of the arrays in Listing 20-1 are declared with the var keyword, they are considered mutable. This means you can add, remove, and change the items in the list. You can also use immutable arrays if you use the let
keyword when creating the array (see Listing 20-3).
Listing 20-3. Immutable Array Example
let ma1 = ["D", "E", "F"]
//Causes build error ma1+="G"
In Listing 20-3, you can see an example of using the let keyword to create an immutable array. Immutable arrays cannot be changed, and if you attempt to add a new item to the array, you will get a build error.
Adding Items to Arrays
Arrays store items in a list that is indexed by integers starting with zero. Use the += operator or the append function to add items to the end of an array (see Listing 20-4).
Listing 20-4. Adding Items
a1+="Apples"
a1.append("Oranges")
a1 would now contain the two strings "Apples" and "Oranges". If you want to add a new item to the array but you don’t want the item to be appended to the end of the list, you can use the insert function, as shown in Listing 20-5.
Listing 20-5. Inserting Items
CHAPTER 20: Arrays 55
When you add the code from Listing 20-5, your list will look like this:
[Apples, Pineapples, Oranges]. Type a1 into your playground to see this for yourself.
Removing Items from Arrays
To remove items from arrays, you use removeAtIndex(). All you need to do is supply the index of the item you want to remove from the array. Listing 20-6 shows an example of that function along with some others that you can use to remove items from arrays.
Listing 20-6. Removing Items
a1.removeAtIndex(0)
a1.removeLast()
a1.removeAll(keepCapacity: false)
In Listing 20-6, you removed the first item from a1 using the removeAtIndex()
function and then removed the last item using the function removeLast(). Finally, you removed all remaining items with the function removeAll(keepCapacity:). The parameter in removeAll(keepCapacity:) lets you indicate whether you want the array to stay initialized for the number of items that the array contained. If you know you are replacing the items immediately, it could save processing resources if you leave the array initialized.
Changing Items in Arrays
To change an item in an array, you simply reference the item index in square brackets and use the assignment operator to change the item (see Listing 20-7).
Listing 20-7. Changing Array Items
var a4 = [1, 2, 33, 4, 5]
a4[2] = 3
In Listing 20-7, you start with an array of integers based on this array literal:
CHAPTER 20: Arrays 56
Iterating Over Array Items
When you have a list of items stored in an array, there are many situations where you want to be able to go over each item in the array and access the item’s value or perform some action on the item. You can use the for-in
loop to do this (see Listing 20-8).
Listing 20-8. Array Iteration
for i in a4{
println("i = \(i)") }
Listing 20-8 used a for-in loop to iterate over each item in the a4 array. Each item value will be accessed and printed out to the console log. Loops are covered in more detail in Chapter 22. Here is what the loop in Listing 20-8 will print out to the log:
Chapter
21
Dictionaries
Use a dictionary when you want to store items that you need to reference with unique identifier keys. Arrays keep items in the order in which you put the items into the array, while dictionaries don’t guarantee any order at all. However, you can access each item based on the key that you provided when the item was originally added to the dictionary.
To create a new dictionary, you will need to specify both the data type for the key and the data type for the value (see Listing 21-1).
Listing 21-1. Declaring Dictionaries
var d1:Dictionary<String, Int>
In Listing 21-1, d1 is declared as a dictionary that requires String keys and Int values. Before you add any items, you will need to initialize d1 (see Listing 21-2).
Listing 21-2. Initializing Dictionaries
d1 = Dictionary()
Oftentimes, you will declare the dictionary and initialize the dictionary with a dictionary literal (see Listing 21-3). A dictionary literal is an constant dictionary that is filled with an immutable collection of keys and values.
Listing 21-3. Dictionary Literals
var webPages = [1:"http://site/home", 2:"http://site/blog", 3:"http://site/contact"]
CHAPTER 21: Dictionaries 58
Referencing Dictionary Items
To reference a dictionary item, you must supply the key enclosed in square brackets, [], after the dictionary name (see Listing 21-4).
Listing 21-4. Referencing Dictionary Items
var webPages = [1:"http://site/home", 2:"http://site/blog", 3:"http://site/contact"]
let blogPage = webPages[2]
In Listing 21-4, the constant blogPage will be set to http://site/blog since the integer key value 2 points to the string http://site/blog.
Updating Dictionary Items
You can update the value of a mutable dictionary by getting a reference to the item and using the assignment operator to supply the new value (see Listing 21-5).
Listing 21-5. Updating Dictionary Items
webPages[1] = "http://site/home/a"
In Listing 21-5, you simply provide the key in square brackets to change the web page address. This works the same way for other kinds of keys such as strings and floating-point numbers (see Listing 21-6).
Listing 21-6. Using String and Float Keys
var d2:Dictionary = ["a":"AAAA", "b":"BBBB"] var d3:Dictionary = [1.1:"AAAA", 1.2:"BBBB"]
d2["a"] = "AAAAaaaa" d3[1.2] = "BBBBbbbb"
The code in Listing 21-6 uses String keys to access and change d2
dictionary values. It also uses floating-point numbers to reference and change d3 dictionary values.
To remove an item from a dictionary, simply update the item with the nil
value or use the removeValueForKey() function (see Listing 21-7).
CHAPTER 21: Dictionaries 59
In Listing 21-7, you use the removeValueForKey() function to remove the value for key a from dictionary d2.
Iterating Over Dictionary Items
To iterate over dictionary items, use the for-in loop (see Chapter 22 for more information on loops). You will get a reference to each key and item in the loop (see Listing 21-8).
Listing 21-8. Iterating Over Dictionary Items
for (key, value) in d3{
println("key:\(key), value:\(value)") }
The loop in Listing 21-8 prints this:
key:1.10000002384186, value:AAAA key:1.20000004768372, value:BBBBbbbb
If you only need to iterate through the keys, you can access the key property on the dictionary, as shown in Listing 21-9.
Listing 21-9. Iterating Over Dictionary Keys
for key in d3.keys{ println("key:\(key)") }
Listing 21-9 will print out the keys like this:
Chapter
22
Loops
When you want to repeat operations, you can use loops. Loops give you a neat way to do something a set number of times or to do operations until a certain condition (that you define) is met. Collection types such as arrays and dictionaries use loops for iteration.
for-condition-increment Loop
This for loop will be familiar to many programmers. The for -condition-increment loop gives you a loop that will execute a set number of times. You will have to use the for keyword along with an ending condition and an increment statement.
The loop shown in Listing 22-1 prints out 1 through 10 to the console as an example.
Listing 22-1. for-condition-increment Loop
for var i = 1; i <= 10; ++i { println("i = \(i)") }
Let’s look at the loop in Listing 22-1 more closely. The first thing you see is the for keyword. This indicates you are using a for loop. Next you can see three sections of code separated by semicolons (;).
The first section of code, var i = 1, declares a variable i and then assigns 1 to the variable i.
The next section of code is i <= 10;. This is the condition part of the
CHAPTER 22: Loops 62
Next, you have the increment part of the for-condition-increment loop: ++i;. This means i will increment by 1 each time the loop executes.
Finally, you have the code block between the curly brackets, {}, and the code that you want to execute in the loop: println("i = \(i)").
When the loop from Listing 22-1 executes, the following list is printed out to the console:
i = 1 i = 2 i = 3 i = 4 i = 5 i = 6 i = 7 i = 8 i = 9 i = 10
for-in Loop
Use the for-in loop to iterate over items in collections such as arrays and dictionaries. To use a for-in loop, you must specify a local variable name and the collection you are iterating over. Like other for loops, you also need to supply the for keyword and put the code that executes each time into a code block.
Listing 22-2. for-in Loops
let names = ["Jim", "John", "Jill"]
for n in names{ println(n) }
let inventory = [1:"TV", 2:"Bookcase", 3:"Table"]
for (key,item) in inventory{ println("\(key) : \(item)") }
CHAPTER 22: Loops 63
Listing 22-3. Iterating with Range Operators
var result = 0
for i in 1…3{ ++result }
result
The code in Listing 22-3 uses a range operator to specify a range between 1 and 3 and uses this to increment the variable result.
While Loop
while loops work by evaluating a condition and executing code as long as the condition is true. You write a while loop by including the while keyword followed by the condition and the code block to execute (see Listing 22-4).
Listing 22-4. while Loop
var i = 1
while i <= 10{
println("i = \(i)") i++
}
In Listing 22-4 you reformulated the for-condition-increment loop from Listing 22-1 as a while loop to get the same result.
CHAPTER 22: Loops 64
do-while Loop
The do-while loop will execute the code in the block before evaluating the condition. Use this loop when you want to make sure that code executes at least one time. Listing 22-5 shows how you would rewrite the while loop from Listing 22-4 as a do-while loop.
Listing 22-5. do-while Loop
do{
println("i = \(i)") i++
}while i <= 10
The do-while loop in Listing 22-5 required the do keyword followed by a code block. The condition was specified right after the while keyword. You may have noticed that you just reused the variable i from the while loop in Listing 22-4 and the value of i is already 11. Of course, I’m assuming that you followed along with the code in the order it’s presented in this chapter. The do-while loop goes through the code even though the condition was never met, resulting in the following output:
Chapter
23
if Statements
if statements are used when you want to make a choice to execute code based on the result of a comparison expression. To make this work, you evaluate an expression that uses comparison and logical operators to yield a
true or false result. If you evaluate an expression to be true, then you can execute the code; otherwise, you can ignore the code.
You need the if keyword and an expression along with a code block to use the if statement (see Listing 23-1).
Listing 23-1. if Statement
if (1 < 2){
println("This is true") }
The statement is saying that if 1 is less than 2, then execute the code that will print out the string “That is true” to the console log.
else Keyword
You can also define an alternate action with the else keyword. This gives you a way of executing either one of two actions based on the results of the expression that you are evaluating (see Listing 23-2).
Listing 23-2. else Keyword
if (1 < 2){
println("That is true") } else {
CHAPTER 23: if Statements 66
Listing 23-2 will print out the text “That is true” to the console log since 1 is always less than 2.
Each if statement can contain nested if statements. This gives you a way of testing multiple conditions. Generally speaking, it’s best to limit yourself to three nested if statements at most. Listing 23-3 shows what a nested if
statement looks like.
Listing 23-3. Nested if Statements
if (1 > 2){
println("True") } else {
if (3 > 4){
println("True") } else {
println("Not True") }
}
Chapter
24
switch Statements
switch statements are used to execute code based on the value of a variable. To make a switch statement work, you need to define a level variable, and then you need to write a code block for each possible value of the level variable that you expect.
For this chapter, let’s assume you are writing code to help you do some geometry work. You have different shapes that you need to work with, and you want to calculate the area of each shape. You can keep track of what type of shape you are working with by using an integer variable named
shape (see Listing 24-1).
Listing 24-1. shape Variable
var shape = 0
Each value of shape will correspond to a type of shape; for instance, 0 could be a square, 1 could be a parallelogram, and 2 could be a circle. Variables like shape are called level variables because they represent possible levels. For the purposes of this example, you also need a variable to store the results of any calculation you make, which is why you define a float variable named area (see Listing 24-2).
Listing 24-2. area Variable
var area: Float?
CHAPTER 24: switch Statements 68
switch Keyword
Now, let’s get to the switch statement itself. To start a switch statement, you need the switch keyword followed by the level variable. Use curly braces to create a code block for the switch statement (see Listing 24-3).
Listing 24-3. switch Statement
switch shape {
}
Case Keyword
Next, you can define code that will be associated with each value that the level variable can take on. You use the <