Jeffrey Cogswell
Developing
Visual Studio
®
Dear Valued Customer,
We realize you’re a busy professional with deadlines to hit. Whether your goal is to learn a new technology or solve a critical problem, we want to be there to lend you a hand. Our primary objective is to provide you with the insight and knowledge you need to stay atop the highly competitive and ever-changing technology industry.
Wiley Publishing, Inc., offers books on a wide variety of technical categories, including security, data warehousing, software development tools, and networking — everything you need to reach your peak. Regardless of your level of expertise, the Wiley family of books has you covered.
• For Dummies®– The funand easyway™to learn
• The Weekend Crash Course®–The fastestway to learn a new tool or technology • Visual – For those who prefer to learn a new topic visually
• The Bible – The 100% comprehensivetutorial and reference
• The Wiley Professional list – Practicaland reliableresources for IT professionals
The book you now hold, Developing Visual Studio®.NET Macros and Add-Ins,is your complete guide to customizing the Visual Studio development environment. With this book, you will be able to automate routine tasks, build custom interfaces, use Office objects, and much more — using any Visual Studio-enabled language — to make this powerful development tool even more responsive and better suited to the needs of your development process.
Our commitment to you does not end at the last page of this book. We’d want to open a dialog with you to see what other solutions we can provide. Please be sure to visit us at www.wiley.com/compbooks to review our complete title list and explore the other resources we offer. If you have a comment, suggestion, or any other inquiry, please locate the “contact us” link at www.wiley.com.
Thank you for your support and we look forward to hearing from you and serving your needs again in the future.
Sincerely,
Richard K. Swadley
Vice President & Executive Group Publisher Wiley Technology Publishing
WILEY
Jeffrey Cogswell
Developing
Visual Studio
®
Developmental Editor: Adaobi Obi Tulton Editorial Manager: Kathryn Malm
Production Editors: Micheline Frederick/Felicia Robinson Media Development Specialist: Megan Decraene
Text Design & Composition:Wiley Composition Services This book is printed on acid-free paper. ∞
Copyright © 2003 by Jeff Cogswell. All rights reserved.
Published by Wiley Publishing, Inc., Indianapolis, Indiana
Published simultaneously in Canada
No part of this publication may be reproduced, stored in a retrieval system, or transmitted in any form or by any means, electronic, mechanical, photocopying, recording, scanning, or otherwise, except as permitted under Section 107 or 108 of the 1976 United States Copyright Act, without either the prior written permission of the Publisher, or authorization through payment of the appropriate per-copy fee to the Copyright Clearance Center, Inc., 222 Rose-wood Drive, Danvers, MA, 01923, (978) 750-8400, fax (978) 646-8700. Requests to the Publisher for permission should be addressed to the Legal Department, Wiley Publishing, Inc., 10475 Crosspoint Blvd., Indianapolis, IN, 46256, (317) 572-3447, fax (317) 572-4447, e-mail: [email protected].
Limit of Liability/Disclaimer of Warranty: While the publisher and author have used their best efforts in preparing this book, they make no representations or warranties with respect to the accuracy or completeness of the contents of this book and specifically disclaim any implied warranties of merchantability or fitness for a particular purpose. No warranty may be created or extended by sales representatives or written sales materials. The advice and strategies contained herein may not be suitable for your situation. You should consult with a professional where appropriate. Neither the publisher nor author shall be liable for any loss of profit or any other commercial damages, including but not limited to special, incidental, consequential, or other damages.
For general information on our other products and services please contact our Customer Care Department within the United States at (800) 762-2974, outside the United States at (317) 572-3993 or fax (317) 572-4002. Trademarks: Wiley, the Wiley Publishing logo, and related trade dress are trademarks or registered trademarks of Wiley Publishing, Inc., in the United States and other countries, and may not be used without written permission. Visual Studio is a trademark or registered trademark of Microsoft Corporation. All other trade-marks are the property of their respective owners. Wiley Publishing, Inc. is not associated with any product or vendor mentioned in this book.
Wiley also publishes its books in a variety of electronic formats. Some content that appears in print may not be available in electronic books.
Library of Congress Cataloging-in-Publication Data:
ISBN: 0-471-23752-3
Printed in the United States of America
Acknowledgments xiii
About the Author xv
Introduction xvii
Part 1
Automating Your Work
1
Chapter 1 All about Macros and Add-ins 3
What Are Macros and Add-ins? 4
Why Use Macros and Add-ins? 4
Automating Your Work with Macros 5
Enhancing the IDE with Add-ins 7
Online Help for Macros and Add-ins 8
Other Ways to Customize Visual Studio .NET 9
Manipulating the Windows 10
Managing the Toolbars and Commands 17
Customizing the Menus 22
Moving Forward 26
Chapter 2 Just Enough VB.NET 27
VB.NET Subroutines and Functions 29
VB.NET Variables 30
Arrays in VB.NET 34
Strings in VB.NET 36
VB.NET Control Structures 40
Conditional Statements 40
Loop Statements 41
Exceptions 43
Classes in VB.NET 44
Other VB.NET Topics 46
Moving Forward 48
Contents
Chapter 3 Introducing the Visual Studio Macro IDE 49
The Macro System and the Main IDE 49
Macro Development Divisions 51
Projects and Modules 51
Class Files and Code Files 53
Scoping 53
Working with the Macros IDE 54
The Parts of the Macros IDE 55
Managing Projects and Modules 56
Creating a New Project 57
Loading and Unloading Projects 57
Saving Your Project 58
Default Macro Location 59
Creating a New Module 59
Renaming Projects and Modules 59
Deleting a Module 60
Running a Macro 60
Stopping a Macro 61
Using the Code Editor in the Macros IDE 62
Collapsible Code 62
Working with Blocks of Code 63
Debugging a Macro 63
Working with the Macro Explorer 64
Quickly Recording a Temporary Macro 66
Selecting the Recording Project 67
Recording a Macro 67
Editing the Temporary Macro 68
Assigning Shortcut Keys to Your Macros 70
Moving Forward 71
Chapter 4 Macros That Interact with the User 73
Referencing Assemblies and Macro Projects 73
Referencing External Assemblies 74
Referencing Items in Other Macro Projects 75
Referencing One of Your Own Assemblies 77
Creating Windows and Forms 83
Getting Input from a User 83
Creating a Form 84
Displaying Standard Dialog Boxes 85
Working with System Event Handlers 87
Categories of Events 88
Moving Forward 93
Chapter 5 Just Enough .NET Architecture 95
Getting to Know Microsoft .NET 95
Common Language Runtime 96
Packaging Your Software: Assemblies and Manifests 98
Looking at an Assembly 99
Organizing Multiple Versions of an Assembly 100
.NET and OLE/COM 101
Globally Unique Identifiers 102
Building an Assembly from a COM Component 102
Macro and Add-in Models 103
Visual Studio Packages 104
Visual Studio Project Types 104
Accessing Project Types Not Supported by the Macros IDE 106
Accessing the Project Object 107
Accessing Visual Basic and C# Projects 108
Accessing C++ Projects 109
Macro IDE Automation Model 112
Moving Forward 113
Part 2
Enhancing Visual Studio
115
Chapter 6 Introducing Add-ins 117
About Add-ins 117
Startup and Shutdown 119
Invoking Your Add-in 120
Interacting with the IDE 121
Creating Custom Options Pages 123
Creating Tool Windows 124
Add-ins and the Command System 124
Wizards 125
Add-ins Are COM Components 126
Creating an Add-in 129
Using the Wizard 130
Building and Running the Add-in 136
Managing Add-ins 137
Moving Forward 138
Chapter 7 Creating Add-ins for the IDE 139
Building an Add-in in C++ 139
Including a GUI with Your Add-in 140
Working with Commands 141
Using the Forms Library 141
Building a Tool Window 145
Using the Form Designer with a Tool Window 153
Moving Forward 159
Chapter 8 Life Cycles, Debugging, and Satellite DLLs 161
The Life Cycle of an Add-in 161
Debugging an Add-in 162
Keeping the Registry Clean 163
Debugging the Command-Line Version 163
Debugging the Command-Line Add-in 164
Creating a Satellite DLL for Resources 167
About Culture-Specific Information 168
Valid Culture Identifiers 169
Adding Culture-Specific Resources in .NET 170
Forms and Multiple Languages 170
Adding Cultural Assemblies in General 171
Making Your Add-ins Multilingual 175
Moving Forward 184
Chapter 9 Manipulating Solutions and Projects 185
Determining the Currently Selected Project 186
Manipulating a Project’s Items 188
Manipulating a Project’s Settings 193
Accessing and Setting Configuration Properties 195
Adding Configurations 198
Configuring Projects at the Solution Level 200
Configuring Individual Files 201
Manipulating Language-Specific Information 205
Moving Forward 206
Chapter 10 Programming the Document and User Interface Objects 207 Managing Documents with the Document Classes 207
The Form Editor and Documents 209
Opening or Creating a Document 210
Processing Text 212
The EditPoint, TextPoint, and VirtualPoint Objects 218 Working with Multiple Windows and Panes 221
Navigating the User Interface Hierarchy 223
Finding a Hierarchy Item 226
Finding an Item Using Regular Expressions 226
Selecting a Hierarchy Item 228
Collapsing Nodes 230
Moving Forward 231
Chapter 11 The CodeModel and Build Objects 233
Manipulating Code with the CodeModel 234
A FileCodeModel Add-in 237
Working with Build Objects 248
Spawning a Build Process 250
Building with the SolutionBuild Object 252
More on the SolutionBuild Object 252
Moving Forward 254
Chapter 12 Creating Project Wizards 255
Dissecting the Wizard Directory Structure 256
Wizard File Interactions and Symbols 259
Rendering the Template Files 263
Wizard Properties 267
The common.js File 276
Viewing Your HTML Files 279
Moving Forward 281
Part 3
VS.NET and Other Products
283
Chapter 13 Writing .NET Add-ins for Microsoft Office 285
Introducing Office Add-ins 285
Writing Add-ins for Other Products 287
Preparing the Office Application 287
Creating the Add-in 288
Adding References to Office Products 291
Writing the Add-in 295
Debugging for Multiple Products 301
Responding to Office Events 303
Moving Forward 311
Chapter 14 Integrating Visual Studio .NET with Microsoft Office 313
Adding a Spelling Checker 314
Integrating an Excel Spreadsheet 322
Automating from Macros 326
Moving Forward 333
Chapter 15 Integrating with Other Products 335
Windows Script Host 335
Delphi 338 Python 340
Script Explorer Add-in 343
Moving Forward 352
Part 4
Deploying and Supercharging
353
Chapter 16 Deploying Your Macros and Add-ins 355
All about Security and Add-ins 355
.NET Security 356
Valid and Verified .NET Code 357
Security Permissions 357
Security Administration for .NET 358
Security in Action 359
COM Security 362
Deploying Macros 364
Setting Up the Deployment Project 365
Adding a Shortcut to the .vsmacros File 370
Creating the Custom Action Project 371
Moving Forward 375
Chapter 17 Supercharging Visual Studio .NET 377
Creating an Options Page for Your Add-in 377
Another Useful Add-in 388
Exploring the CLI 393
Understanding the CLI 394
Other Languages and the CLI 394
Wrap-up 395
Appendix A Class and Object Quick Reference 397
Root DTE Object 397
DTE Properties 397
DTE Methods 400
Other EnvDTE Objects 401
Enumerations 402
When I first set out to write this book, I seriously doubted whether the topic of macros and add-ins would be broad enough to fill some 456 pages. But as I began to develop the outline, it became clear that the information was certainly dense enough. And as I wrote page after page, I was astounded at how much there was to say about the topic. In the end, I can say honestly that this book was a blast to write.
And since writing such a book is never a one-person deal, I want to acknowledge the many people who worked hard and stayed up late to help me get this book done on time. These include Ben Ryan (acquisitions editor), who was very kind throughout this process; Adaobi Obi Tulton (development editor), who is very talented and patient; Kel Good (technical editor), who is extremely knowledgeable on all the topics covered in the book. And, of course, thanks to all the production people and additional editorial staff, including Micheline Frederick and Janice Borzendowski for the won-derful job with the final edits.
In addition to the editorial staff and John Wiley & Sons, Inc., I want to thank my dear friends Jenniffer Lesh, Jennifer and Greg Wood, and Andrea Vaduva M.D. (okay, future M.D., anyway); and my friend and agent Margot Maley Hutchison of Waterside Pro-ductions in San Diego, who, as I type this, is right now in the hospital giving birth to her second child.
Acknowledgments
Jeff Cogswellis a software engineer by trade, and a writer and teacher at heart. He has written numerous books and articles on programming, and has taught oodles of peo-ple how to program; he enjoys seeing the light turn on for each student. He currently lives in Southern California, but as you read this he might be sitting with his laptop in a coffeehouse far from his home, possibly near your home. If you see him, be sure to say hello. Or just email him at [email protected]. Also be sure to visit his Web site, www.jeffcogswell.com, where you can find even more information on .NET pro-gramming.
About the Author
Welcome to Macros and Add-ins
This is a book about developing macros and add-ins for Visual Studio .NET. Every pro-grammer who uses Visual Studio .NET, regardless of the type of project he or she is developing, and regardless of his or her skill level, sooner or later wonders: Why can’t Visual Studio .NET do such-and-such? Or: Wouldn’t it be nice if Visual Studio .NET had this feature I’m thinking of? Or: There must be a way to simplify this task that I do over and over!
Surely you’ve thought of ways you could make Visual Studio .NET better, whether it’s simply by automating a repetitive task that you have to do 158 times today or by implementing a full-scale improvement Visual Studio .NET that, for example, would add an entire window that contains suggestions for misspelled words in the comments in your code.
For the first case, simplifying repetitive tasks, you can either use a macro, which is a simple, interpreted piece of code, or an add-in, which is a compiled library that Visual Studio .NET loads and runs. In the second case, creating a new window for the Visual Studio .NET environment, you use an add-in. For numerous other tasks, you can use either a macro or an add-in.
This is all possible thanks to the developers at Microsoft, who, when they created Visual Studio .NET, included an automation librarythat provides a set of the objects and classes for manipulating the Visual Studio .NET environment. This library is available to you whether you’re writing a macro or an add-in.
For the macros, Microsoft has built on the previous generation of macro tools for its products. Whereas these earlier tools featured Visual Basic for Applications (VBA), Visual Studio .NET uses Visual Basic .NET for its macro language. This means that not only can your macros drive Visual Studio .NET, but they can access the full, rich .NET framework library.
For the add-ins, Microsoft used a process that already existed in the Microsoft Office products. (For those of you who are already familiar with add-ins, I’m talking about
Introduction
the IDTExtensibility2 interface that Microsoft has used in the past.) This means that if you already know how to develop add-ins for Microsoft Office, you’ve got a head start on developing add-ins for Visual Studio .NET. Likewise, after you read the chapters in this book on how to develop add-ins for Visual Studio .NET, you will know how to design add-ins for Microsoft Office. For this reason, I have devoted a chapter to using Visual Studio .NET to develop add-ins for Microsoft Office products.
All that said, this book does much more than just explain how to develop and use macros and add-ins. By working through the entire book, you will also learn about .NET programming in general. Specifically, you learn:
■■ How the Common Language Runtime works. ■■ What Microsoft Intermediate Language is.
■■ How to develop satellite DLLs that provide for globalization of your software. ■■ What COM is, how .NET differs from COM, and how you can make the two
work together. ■■ And much more!
In short, at the conclusion of this book, you will have a very strong knowledge of .NET programming in general.
Required Tools
The tools you need to get the most from this book depend on what you want to do:
■■ If you plan to develop add-ins, you must have the Professional Edition, or either of the Enterprise editions of Visual Studio .NET. (Theoretically, you could develop add-ins using the Standard edition of C++, VB.NET, or C#, but you would have an uphill battle. For that reason, if you’re seriously interested in developing add-ins, I recommend that you purchase a Professional or Enterprise Edition.) ■■ If you plan to develop macros, you can use any edition of Visual Studio .NET,
provided it’s a .NET edition. Though you can develop macros for earlier editions of Visual Studio, to take advantage of all the features I describe in this book, you will want to have a .NET edition.
Minimal system requirements include the following: You must have Windows NT 4.0 or later (that is, anything except Windows 3.1, 95, and 98; and if you’re going with XP, you’ll want the Professional, not the Home Edition). Microsoft also lists some requirements on its Web site; however, I recommend that you go way beyond these requirements, at least in RAM. Remember, these are minimal requirements, meaning Visual Studio .NET will run, but not necessarily very quickly, giving you plenty of time to go refill the coffee cup as the virtual memory loads and unloads. Here are the minimum RAM requirements Microsoft suggests:
Microsoft Windows XP Professional. 160 megabytes (MB) of RAM Windows 2000 Professional. 96 MB of RAM
Windows NT 4.0 Workstation. 64 MB of RAM Windows NT 4.0 Server. 160 MB of RAM
I strongly recommend that you double or even triple these numbers, especially if you’re developing add-ins, because often you’ll run two instances of Visual Studio .NET on a single computer. For the development of this book, I used Windows 2000 Pro-fessional with 320 Meg of RAM, and there were times my system had trouble keeping up. However, in general 320 Meg on a Win2000 box did fine. Remember, these days, RAM is pretty cheap, and if you’re a serious developer, RAM is definitely something you will want to invest in. Go for 512 Meg if you can.
As for other tools, consider that programming is changing. These days, thanks to the miracle of hypertext, we have access to endless bits and bytes of documentation, all online, which we can access without having to worry about our computers grinding to a halt. And for the purposes of this book, you will need access to the online help that ships with Visual Studio .NET. So if you didn’t install it already, do so before you begin reading this book, because rather than rewriting the online help, listing every single method of every single object, I provide you with an augmentation to the online help. Also, at times I refer you to the online help for more information. (But note: I do not assume prior knowledge of macros and add-ins, and I certainly don’t expect you to read the online help before reading this book. The online help is simply a reference; this book will teach you what you need to know.)
Finally, I’ll state the obvious by adding that you should have easy access to the Inter-net, preferably high-speed, for several reasons. First, this book has an accompanying Web site, where you can find additional information from me, more add-ins and macros, and a forum where you can share ideas and thoughts with other program-mers. Second, even with the online help loaded, you will be spending a good deal of time at Microsoft’s development site, http://msdn.microsoft.com, specifically in the library at http://msdn.microsoft.com/library/. If you aren’t familiar with these two sites, I encourage you to take a peek at them the next time you’re online, for it is at these sites that you can find nearly all the answers to anything you might ever get stuck on, well beyond the topics of macros and add-ins.
Background Knowledge
I assume you are familiar with .NET Programming basics, such as how to create solu-tions and projects, how to use some of the basic framework classes such as those in the IO namespace, how to run console applications, how to use the form designers, how to run the debugger, and similar information.
In addition, it will help if you know C++ programming, although most of the work in this book is in C# and VB.NET. A bit of COM and ActiveX familiarity will help, too, although for the uninitiated, I explain most of what you’ll need to know of COM and ActiveX for developing add-ins. (The reason you need to know a bit about these tech-nologies is that Visual Studio .NET is a COM automation server, and you’ll be developing add-ins as COM in-process servers.)
VB.NET. But for VB, too, I walk the uninitiated through the essentials. And I devote an entire chapter, Chapter 2, “Just Enough VB.NET,” to introducing VB.NET. And rest assured, if you’re an expert in C++ or C#, you probably will pick up VB.NET in no time, as the syntax is simple and the language is easy to learn.
I also suggest you learn a bit of C#, if you don’t know it already, because many of the examples in this book are in C#. More important, the C# language is, in all likelihood, the future of .NET. Microsoft created C# from the ground floor with .NET in mind (while borrowing a good bit of the syntax from Java and, to an extent, C++). Basically C# is the language of .NET, and so, if you’re going to develop for .NET, you will want to at least explore this exciting new language. If you know another programming lan-guage (especially C++ or Java), I guarantee you’ll be able to pick up the basics of C# in a single day. The syntax is straightforward (it’s based on C++ and Java) and the language is easy to learn.
About the Book
This book is divided into four parts:
Part 1: Automating Your Work. In Part I, I focus primarily on macro development, showing you how to automate processes in Visual Studio .NET. Even if your pri-mary interest is add-ins, I encourage you to read this part, as there is a great deal of information overlap between macros and add-ins; most of what you can do in macros you can also do in add-ins. Moreover, in the chapters on add-ins, I assume you’ve at least given the chapters in Part I a quick read. And note that Part I includes a chapter that introduces the Visual Basic .NET language.
Part 2: Enhancing Visual Studio. Here I introduce the concepts and technology behind add-ins and then take you through the whole world of add-in development. Part 3: VS.NET and Other Products. In this part I describe how you can use
Visual Studio .NET to write add-ins for Microsoft Office, and how you can integrate Microsoft Office products such as Word, Excel, and Outlook directly into Visual Studio .NET. There are two ways of integrating: by automating the office products, using their functionality (such as checking the spelling of source comments or emailing a source file to another developer); and by embedding a spreadsheet or other Office document right into Visual Studio .NET. I wrap up Part 3 with a discussion of other tools useful in automation, such as the Windows Scripting Host and other languages such as Delphi and Python. (Yes, you can write automation macros using nearly any language you want, provided you’re comfortable stepping away from the main macro development tools built into Visual Studio .NET.)
About the Web Site
In addition to reading this book, I invite you to visit our official Web site at www .wiley.com/compbooks/cogswell, where you’ll find :
■■ Code examples submitted by other readers
■■ Pages describing additional issues you may encounter, submitted by readers such as yourself
■■ A discussion forum where you can talk about any issues relating to macros, add-ins, and .NET development in general
■■ Links to more add-ins and macros that you can download ■■ And much more.
One
3
Macros and add-ins are nothing new. For a long time, programmers have been creating products that include features allowing users to somehow add their own customiza-tions and enhancements to the product. Microsoft products in particular have been rich with such features for some time. For example, early versions of Word and Excel had their own macro languages, which Microsoft later replaced with Visual Basic for Applications (VBA). This included a full-featured, integrated development environ-ment (IDE) that allowed you to design complete programs written in the VBA lan-guage. This tool was very similar to the actual Visual Basic development tool, as it enabled you to write functions in the Visual Basic language and even design forms with controls such as buttons on them. But the “for applications” part of “Visual Basic for Applications” meant that the language also made it possible to access features that were part of the program. For example, in Word, you could select text and change the font programmatically from your VBA program. In Excel, you could write data to cells and perform Excel functions such as summations.
Visual Studio .NET now has the richest macro and add-in capabilities of any previ-ous Microsoft tool, as it uses Visual Basic .NET as its macro language. This means that in addition to the previous VBA features, you also have full access to the entire .NET foundation library.
What Are Macros and Add-ins?
Macros are small programs that automate repeated tasks. For example, in Visual Stu-dio .NET you might write a macro that automatically saves a backup copy of your pro-gram prior to compiling for version control purposes; or you might write a macro that automatically reformats your code by reworking all the indentations and general lay-out, and then replaces all tabs with spaces. You might then attach these two macros to hotkeys (which Visual Studio .NET calls keyboard shortcuts) so that you can easily access them simply by pressing a few keys.
To write your macros, you can use a simple recorder feature. Most of the Microsoft products (including Visual Studio .NET) allow you to easily record a sequence of key-strokes and menu commands to a macro, and then play it back later. But if you want to write more sophisticated macros, you can open up the Visual Studios Macro IDE and develop macros using a full-featured IDE that looks much like the standard Visual Stu-dio .NET IDE.
Add-ins are larger programs that do more than simply automate work. They are compiled programs that are added directly into the Visual Studio .NET process. Although you can automate work with add-ins just as you can with macros, you can write much more complex programs. In this sense, add-ins are more like enhance-ments to the Visual Studio .NET IDE, rather than simply an automation of a common task.
Why Use Macros and Add-ins?
Since the real purpose of Visual Studio .NET is to create software, it might seem a little strange that you can use Visual Studio .NET to create parts to use directly in that envi-ronment. The reason that feature is included is that we programmers love automation. We love to simplify our work. For example, why go through the headache of repeating the same task over and over when you can get Visual Studio .NET to do it for you? That’s where the macros come in. You can easily automate common or complex tasks, and make them work for you.
You can use many of the macro techniques described in this book in other Microsoft programs, such as Microsoft Word and Microsoft Excel. They all use a form of Visual Basic for the macros, and the techniques are similar in all these products.
Automating Your Work with Macros
Think of macros as a way to automate Visual Studio .NET. With Visual Studio .NET’s built-in macro language (which is really Visual Basic .NET, or VB.NET for short) you can write programs that manipulate the Visual Studio .NET IDE. Because the macros use VB.NET, which is a full-featured language, you have great flexibility and power in your programs.
If you’re a die-hard C++ fan, as many of us are, please don’t be put off by the fact that macros use VB.NET. The new VB.NET language is much more powerful than previous versions of Visual Basic. It has to be, because when you use Visual Studio .NET to create standalone VB.NET programs, Visual Studio .NET compiles it to the same intermediate language to which it compiles managed C++ program, called the Microsoft Intermediate Language, or MSIL.
But beyond the fact that you’re using a full-featured language that includes all the old standards like control structures and classes, your macros also have access to the full automation engine that controls the Visual Studio .NET product. This automation engine is an OLE Automation librarythat provides control over the IDE. The object you use to access the IDE is called Development Tools Extensibility (DTE). Through this object, you have access to the full automation system for Visual Studio .NET. You will be able to access items in the Visual Studio .NET IDE such as:
■■ Currently open documents or just the current active document (usually a source code file).
■■ A list of the add-ins.
■■ Menu commands and available macro commands.
■■ Windows such as the toolbars or the tool windows. Once you have a reference to a window, you can manipulate the window.
■■ The solution and its projects.
Microsoft uses the term VSMacroto refer to a macro written for Visual Studio .NET. In this book, I generally use the term macro, as it’s more convenient; but if I need to distinguish it from other types of macros, I use the term VSMacro.
looks very similar to the Visual Studio .NET IDE. But this window is for the develop-ment of macros. By itself, it’s an entire integrated developdevelop-ment environdevelop-ment for build-ing and editbuild-ing macros.
To get to the Macros IDE from the main IDE, choose Tools➪Macros➪Macros IDE. (Or simply press Alt-F11.) The Macros IDE will open as an entirely separate window from the main IDE.
The Macros IDE contains many of the same features you find in the usual Visual Stu-dio .NET IDE; it also has the same look and feel. In addition, it has its own explorer, which is similar to the Solution Explorer called Project Explorer, which shows the cur-rently loaded macro projects. But, unlike the Solution Explorer, the Project Explorer does not contain a solution; instead, it simply contains a single root node called Macros. Also, just as in the main IDE, in the Macros IDE you can access the integrated online help in the same way as the standard IDE.
Macros “live” in files with a .vsmacros extension. These files contain the VB.NET code for the macros. A single .vsmacros file can hold multiple macros; each macro lives as a subroutine.
When you set out to write a macro, you might be tempted to try writing in C++ as a standalone program. But it won’t work. The reason is that the C++ program will not have access to the DTEobject for the particular Visual Studio .NET instance you are running.
Here’s a brief rundown of how to get up and running with macros. In Chapters 2 and 3, I give more detailed descriptions.
1. Open the Macros Explorer by choosing Tools➪Macros➪Macro Explorer (or press Alt-F8).
2. Create a new macro project. To do this, in the Macros Explorer, right-click the word “Macros” at the top of the tree and choose New Macros Project. In the dialog box that appears, choose a name and location for your macro project. (I’m calling mine “Chapter1”, since they go with Chapter 1 of this book.) 3. Double-click the name Module1. This will open the module in the Macros IDE.
Here’s the code that you will see:
Imports EnvDTE
Imports System.Diagnostics
Public Module Module1
There’s not much there, but it’s the basic starting point. It imports the EnvDTE name-space, which gives you access to the DTEobject. It also imports the System.Diagnostics namespace, which gives you access to system processes and debugging information. Next are the two lines denoting the start and end of the local module, presently called Module1. Inside here is where you’ll write your macros. For example, here’s a short macro that does nothing more than minimize the Visual Studio .NET IDE window.
Imports EnvDTE
Imports System.Diagnostics
Public Module Module1 Sub MinimizeMainWindow()
Dim win As Window win = DTE.MainWindow()
win.WindowState = vsWindowState.vsWindowStateMinimize End Sub
End Module
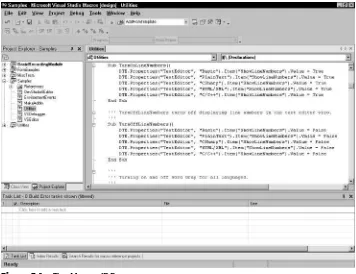
The MinimizeMainWindow subroutine contains the macro. This code creates a variable called winof type Window. Next the code asks the DTEobject for the main window object, saving it in the win variable. Finally, it sets the WindowStatemember to vsWindowStateMinimize, which is a member of the enumerated type vsWin-dowState.
There are many ways to run the macro, but one easy way is to return to the main IDE window. In the Macros Explorer you’ll see that your macro is now listed in the tree under the name Module1. If you double-click the name, the macro will run. (Or you can right-click and in the popup menu choose Run).
If you want to add more macros, you add more subroutines inside the module.
Enhancing the IDE with Add-ins
An add-in is a compiled program that exists as an OLE COM object. In order for Visual Studio .NET to recognize add-ins, they must implement the IDTExtensibility2 interface.
In this book, I’m assuming that you’re somewhat familiar with COM objects. In short, a COM object is one that usually lives in a DLL that implements an expected set of functions called the interface. In the case of add-ins, they must include the functions specified in the IDTExtensibility2interface. Fortunately, there’s a wizard that automatically sets up the classes for you, including the function headers for the interface, so all you have to do is fill in the appropriate code. I show you how to do this starting with Chapter 6, “Creating Add-ins for the IDE.”
add-ins. When you run an add-in project opened in Visual Studio .NET, a new Visual Studio .NET process will start up. Your add-in will run in this new process, which will then allow you to debug it from within the original Visual Studio .NET process.
To access the wizards that simplify the task of writing add-ins, you need to have the Visual Studio .NET Professional Edition or better (which contains C++ .NET). If you purchase the product called Visual C++ .NET, you can still write add-ins, but you do not have the wizards to help you with the task. In this book, I’m assuming that you have the Professional Edition and, therefore, have access to the Add-in wizard.
Like macros, add-ins have access to the Visual Studio .NET automation object, the DTE. This means you can completely control the Visual Studio .NET environment from within your add-in.
You have great flexibility in what you can do with add-ins. Here’s a short list of some of the possibilities.
■■ Add new tool windows. By tool windows, I don’t just mean a window that has features like a toolbar. Rather, all the auxiliary windows in Visual Studio .NET are tool windows. They sport tabs at their bottom, and you can drag them around so they share a window with other tool windows; and you can drop them in the middle of the IDE so they become floating windows. Examples of tool windows are the Solution Explorer, the Help index, and the Output window.
■■ Add new pages to the Options dialog box. ■■ Add new menu items and enable or disable them.
When developing add-ins, remember that you typically write them in C++, and then compile them. (However, you can also develop them in C# or VB.NET, and then compile them.) Therefore, one of the benefits of add-ins is that you can distribute them without distributing the source code. That’s not the case with macros, which are inter-preted from a form of VB.NET. (I go into the details of creating an add-in starting in Chapter 6, “Creating Add-ins for the IDE.”)
Online Help for Macros and Add-ins
which most programmers I know don’t use much, but you might find it helpful. Dynamic help tracks what you are doing and offers suggested help pages to assist you.)
You can also open the online help in its own IDE-like window. You can find this from the Start Menu, in the menu group where you installed Visual Studio .NET. The one you want is the menu item called Microsoft Visual Studio .NET Documentation. When you open this item, you will see a standalone program open that looks remarkably sim-ilar to the main Visual Studio .NET IDE. It has the same general look and feel, with a similar layout and even similar menu items; to get to the help entries, choose Help➪Index or one of the other items under the Help menu. But note that this pro-gram’s purpose is strictly to display the online help, not to develop programs. I like to use this program when I’m looking up topics, but for whatever reason don’t have the IDE open (such as when I’m writing a book or article or doing general research). I also find it to be useful when developing macros. The Macros IDE is a separate window from the main IDE window, which enables me to put my online help in its own win-dow as well. Then, whether I’m working in the main IDE or the Macros IDE, I just press Alt-Tab once or twice to get to the help. An added advantage is that it takes up no extra space in the IDEs. But, really, this is all a matter of taste.
Finally, you have access to the same help from within the Macros IDE, again from the Help➪Index, Help➪Contents, and Help➪Search menus.
When searching for help on a particular class, the best way to find the help item is by opening the help index and typing the name of the class, followed by a space, and then the word Class. This will get you closest to the item. For instance, if you want help on the .NET String class and you type just String, you will find several entries for string. But if you type String Class, you will see a couple lines devoted to the ATL string class; and right after that, you’ll see the string class pertaining to .NET.
When looking for information on the classes that deal with macros, sometimes typing the class name followed by the word Class doesn’t quite get you to where you need to be. Instead, for most of the classes that pertain strictly to the automation engine of .NET, the entries are listed with the word Object instead of Class. Thus, the entry for DTE is listed under DTE Object, not DTE Class.
Also, when looking up information that pertains to macros, I find that the index is a bit less crowded when I open the Filtered By combobox in the help index, and choose Visual Studio Macros. Of course, the same information is available when you don’t fil-ter, but I find it a bit easier on the nerves to navigate when the filter is on.
Other Ways to Customize Visual Studio .NET
In this book I focus primarily on macros and add-ins. However, to make your devel-opment as productive as possible, you should know how to completely manipulate the IDE in these alternate manners. Therefore, in this section I show you how to do this. There are actually many things that you can do with the IDE, so you might be sur-prised as you read this section.
If you are a language developer, you can add support for your language to the Visual Studio .NET. For example, if you have a Pascal compiler, you can create an add-in that lets people use Visual Studio .NET to develop programs in your Pascal language. To do this, use the Visual Studio Integrator Program (VSIP), which is a special program with Microsoft where you get additional SDKs for writing lower-level components for Visual Studio .NET. This program requires a separate agreement with Microsoft, meaning it is not a part of the Visual Studio .NET product that you normally purchase. For information on this program, visit http://msdn.microsoft.com/vstudio/vsip/default.asp.
Manipulating the Windows
Although most people who use Visual Studio .NET know how to find their way around the IDE, not everyone knows these interesting tidbits regarding how Visual Studio .NET handles its tool windows. In addition to knowing all the little tricks to get-ting around in Visual Studio .NET, it’s also important to understand how the windows behave if you’re writing macros and add-ins that might manipulate the windows.
First, Visual Studio .NET distinguishes between two different types of windows: documentand tool. Document windows are those into which you type your code, after which their names appear in the Window menu. Tool windows are the auxiliary win-dows that do not hold code. Figure 1.1 shows an example of a document window; Fig-ure 1.2 shows an example of a tool window.
Figure 1.2 A tool window.
Visual Studio .NET also supports a tabbed window. There is a dedicated window (which I’ll call a document frame) that contains tab sheets, each holding a document window. You can split the document frame into multiple smaller document frames, either vertically or horizontally, each with its own set of tabs. To do this, right-click on one of the tabs in the document frame and choose either New Horizontal Tab Group or New Vertical Tab Group. You can move document windows within a document frame by dragging one tab over another; this will change the z-order(that is, the front-to-back ordering). Or you can move a document window to another document frame by dragging the document window’s tab onto any location on the new document frame. Figure 1.3 shows an example of the document window frame split to contain two documents side by side.
Similarly, the tool windows can coexist alongside one another inside a tool frame window that has tabs. You can rearrange the z-order by dragging the tabs, and you can move a tool window from one tool frame to another by dragging the tab to the new tool frame. But unlike document windows, you can drag a tab and drop it so it gets its own floating tool frame window. To do this, grab the tab of your chosen tool window and drag it over the middle of another frame—noton a tab and not on the border of the frame. (If you drop it on a border, the window will move to another frame, rather than become floating.) The IDE will display a rectangular box showing where the frame will appear if you let go of the mouse button. But, remember, when you do this, you get a new tool frame. That means you can drag other tool windows onto this same tool frame, thereby either adding more tabs to the frame or splitting the frame either hori-zontally or vertically, putting one tool window in one half, and the other tool window in the other half. Figure 1.4 shows an example of such a split tool window.
To drop the tool window onto another tool window’s frame so that the frame splits, drop the tool near one of the boarders of the frame: near the left to split the frame hori-zontally, and drop your tool window on the left half; near the top to split the frame ver-tically, and drop your tool window on the top; and so on. (When the frame window splits like this, it really becomes two frame windows sharing a common outer window.) But if you prefer to drop your tool window so it gets its own tab in the frame, rather than splitting the frame, drop the tool window either on the title bar of the tool frame or on the existing tabs of the frame, if there are any. (There won’t be any tabs if the frame only holds a single tool window.) And speaking of which, if you need to drag a tool window and it’s the only tool window in a frame, and therefore has no tabs, just drag the title bar of the frame. The IDE will interpret that as dragging the tool window.
Also be aware that you can turn off some of this behavior. If you want your tool win-dow to be in its own floating frame where you cannot dock it, and the frame will not allow other tool windows to enter it, right-click on the tool window’s tab, and in the popup menu choose Floating. Yes, it’s possible that your tool window is already float-ing; but in this case, the word means something different:It means the tool window gets its own private frame, hence the IDE considers this form of floating the opposite of dockable. Until now, all the behavior I’ve been describing refers to tool windows that are dockable (yes, even when they’re floating—but not floating as far as the IDE is concerned).
Now for the strange part: You can drop a tool window on a document frame and it will get a tab inside the frame, as shown in Figure 1.5. However, the document frame is still a document frame and behaves like one. But you cannot grab the tab of a docu-ment window and drop it on a tool frame, because docudocu-ments cannot live inside a tool window.
But wait, there’s more! You can also set up tool frames (not tool windows, but frames) so that they are in auto-hide mode. When in this mode, they appear as a small tab on the left or right side of the window. When you drag the mouse over one of these tabs, the window appears to pop out of the side (just like in one of those animal docu-mentaries where the sand crab jumps out of the earth to snatch its prey).
To turn on the auto-hide mode, first dock the tool window or frame, if it’s not already docked. Then right-click on either the title bar of the frame or one of the tabs (any tab will do, as long as it’s on the same frame). In the popup menu that appears, choose Auto Hide.
Now remember, this auto-hide behavior works only for tool frames, not tool win-dows. And when you auto-hide a tool frame, it gets one side tab with multiple icons on it, one for each tool window, as shown in Figure 1.6. When you drag the mouse over the icon for one of the tool windows, that tool window will pop open and its name will appear beside the side tab. (There’s also some strange widening behavior with the tab as the name appears and the other name disappears, but I’ll let you explore that rather than try to describe it here.)
Figure 1.6 The tool window tabs are on the left.
Now let’s assume you like the auto-hide behavior but don’t like the way the tool windows share a tab. In this case, you can give each its own tab. To do that, first give the tool window its own frame (by dragging it around until it gets its own frame); then right-click the frame’s title bar (there will be no tab to click) and choose Auto Hide.
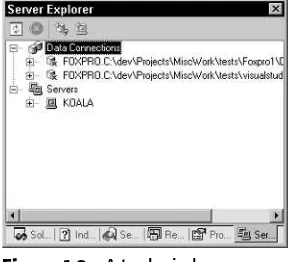
When you write macros and add-ins, you have access to this windowing behavior. Here’s a macro that moves the Server Explorer to a document window:
Public Sub ServerExplorerToDocument() Dim win As Window
win = DTE.Windows.Item(Constants.vsWindowKindServerExplorer) If win.AutoHides = False Then
win.IsFloating = False End If
If win.Linkable = True Then win.AutoHides = False win.Linkable = False win.Visible = True End If
End Sub
windows in the IDE. (That said, be aware that the online help lists the Window class under Window Object, even though it is indeed a class.)
The second line initializes winwith the Server Explorer window. To find the Server Explorer window, the macro first grabs the DTEinstance (this time we’re dealing with an object called DTE, not a class), then gets its Windowsproperty, which is a container object that holds all the windows. The Item property is the actual container data, and you can access Itemas a function. To find the Server Explorer window, you call the Itemfunction, passing an enumerated data type called vsWindowKindServerEx-plorer. This cumbersome word is an item in the Constantsobject, and thus I fully qualify the name by starting it with Constants.
Next I check whether the AutoHides property is True. This property refers to the Auto Hide feature that I described a few moments ago; when it’s true, it means the window has the Auto Hide feature enabled. If this property is False, then I set the IsFloating to False. Checking AutoHides before setting IsFloating to Falsetook some calculating on my part to get the correct order for setting the prop-erties. The reason I first checked AutoHidesis that I wanted IsFloatingto be False; but the problem is that if AutoHidesis True, the macro engine issued a runtime error (in the form of a popup message called Invalid Parameter) when I tried to set IsFloating to False. That’s because the Window class only lets you modify IsFloatingif AutoHidesis strictly False. Yes, it’s kind of strange, but true.
Next I check whether Linkableis True. Why? Because if Linkable is False, it implies the window is already living as a Document window, and the macro can finish. But if it’s True, I go ahead and reset the various properties. First, I set AutoHidesto False, then Linkableto False(this is where the window actually switches to being a document window), and, finally, Visibleto True,so you can actually see the window.
Here’s a macro that moves the Server Explorer back to a tool window:
Public Sub ServerExplorerToTool() Dim win As Window
win = DTE.Windows.Item(Constants.vsWindowKindServerExplorer) If win.AutoHides = False Then
win.IsFloating = False End If
If win.Linkable = False Then win.Linkable = True win.Visible = True End If
End Sub
Then I check whether Linkable is False, because I only want to make the changes if the window is presently a document window. And if it’s a document win-dow, Linkablewill be False. Then when I switch Linkableto True, this causes the window to switch back to being a tool window.
An interesting aspect of Visual Studio .NET is that you can choose whether you want your document windows to be tabbed windows or MDI windows (MDI stands for Multiple Document Interface). (This applies only to document windows, not tool windows.) When you open up the Options dialog through Tools➪Options, under the Environment category, the General options allows you to choose between Tabbed Doc-uments and MDI environment. (Be aware that if you change this setting, you will have to restart Visual Studio .NET before you will see the changes.) Figure 1.7 shows what the Visual Studio .NET IDE looks like with MDI windows.
If you choose Tabbed Documents, your document windows will have tabs at the top, allowing you to choose which document you wish to edit. Additionally, the upper-right corner of the document window will have a small box with an xin it that you can click to close the current document. (The document window itself will not close unless there is only one document in the window and you close the document.) To the left of the close box are two arrows (that look like triangles) that you use to scroll the tabs into view if there are too many tabs to fit in the view.
Be aware of an odd behavior in Visual Studio .NET that takes some getting used to: When you are in Tab Documents mode and you are looking at a window, you can press Ctrl+Tab to switch to the next window. But “next” does not necessarily imply the window whose tab is directly to the right of the current window’s tab, since the IDE maintains a z-order (remember, that’s a front-to-back order) that is independent of the order of the tabs. Note, also, that if you want to go in the opposite direction, back to front, you can use Shift+Ctrl+Tab.
The alternative to Tabbed Documents is the MDI environment. MDI is the standard interface for a lot of older Windows programs. When you choose this option, the tabs are not present in the document windows, and each document gets its own window. You can maximize, minimize, and restore the document windows inside the IDE. When they are restored (but not maximized), they have their own title bar with the usual goodies—the title, a minimize button, a maximize/restore button, and a close button. When you maximize the window, it takes up the entire free area of the IDE (the area not used by the tool windows), but it does not have its own title bar; instead, the minimize, maximize/restore, and close buttons appear to the right of the main menu bar in the IDE.
Most people prefer the newer tabbed look, simply because the names of the documents are all right there in the form of tabs. It’s easy to quickly switch between them. With MDI, you can’t see all your document names at once until you click on the Window menu to get a list of them.
Managing the Toolbars and Commands
Toolbars aren’t nearly as complicated to describe as the tool and document windows. The toolbars live around the edges of the IDE window. When they’re docked at the top or bottom of the IDE window, you will see a small dashed bar to the left. You can drag this bar to move the toolbar around. You can slide it around, swap it with another tool-bar in the same docking edge of the IDE window, or move it to another edge. And although the dashed bar’s purpose is for dragging, you can also drag the toolbar from any spacerbetween the buttons and controls on the toolbar. (Spacers are areas that are not clickable; they simply provide for space between the controls, and they have a ver-tical line when the toolbar is docked in the top or bottom edge, or a horizontal line when the toolbar is docked on the left or right edge.)
You can add and remove toolbars by right-clicking in the free space around the tool-bars or by right-clicking on the dashed line of the toolbar or on the spacers. When you right-click, you will see a popup menu listing all the toolbars available. Those that are visible have checkmarks by them. You can hide a toolbar by unchecking its name in the popup menu, or make the toolbar visible by checking its name.
The final item in the popup menu is Customize. When you click this item, you will see the Customize dialog box. (This is the same dialog box that appears when you choose Tools➪Customize.) In this dialog are three tabs: Toolbars, Commands, and Options.
The Toolbars tab, shown in Figure 1.8, lists all the toolbars in a checked listbox. The visible toolbars have checkmarks by them. This tab is handy, as you can add new tool-bars. In this tab is a button called New, and when you click it, a small window opens asking you for the name of the new toolbar. When you type the name and click OK, the new toolbar will appear floating somewhere in the middle of the IDE window, with no buttons inside it. Its name will also appear in the checked listbox, with a check beside it. To add and remove buttons from it, use the Commands tab.
The Commands tab, shown in Figure 1.9, is the second tab in the Customize dialog box. It lists all the commands available. These include all the menu items and the macros, divided up into categories. The left listbox gives the categories, and the right listbox gives the commands for that category. If there’s a command you wish to add to a toolbar, find the command in listbox on the right, then drag the command’s name to the toolbar on which you want to put the command. You can do this for any toolbar, including any toolbars you created. To remove a command from a toolbar, just drag the button off the toolbar and let go anywhere. (But, note, if you drag it onto another tool-bar, you will move it to the other toolbar.)
Figure 1.9 The Commands tab.
There’s another way you can add and remove commands from a toolbar. (Once again, we’re bordering on feature overload with this product.) While the toolbar is docked on the top or bottom of the IDE, you will see at the right end a little arrow pointing down; or, if the toolbar is docked on the right or left side, the arrow will be at the bottom and pointing left; finally, if the toolbar is floating, you will see this arrow on the right-hand side of the toolbar’s title bar, to the left of its close button. When you click the arrow, you will see a drop-down menu with one item on it called Add or Remove Buttons. When you move your mouse over the item, you will see a submenu appear with either one or two items. If the toolbar is one of the standard toolbars (that is, not one you created) the first menu item will be the name of the toolbar, along with the commands relating to that name. (For example, the Web toolbar has a Web menu item containing commands related to the Web and browser.) These commands will have checkboxes next to them, and you can check and uncheck them to add or remove the commands from the toolbar. (Yes, it’s true: These are menu items, but they have clickable checkboxes next to them.) The second menu item is Customize, which brings up the standard Customize dialog box. If the toolbar is a custom toolbar, then you will only see the Customize menu item.
The Options tab is the third in the Customize dialog box. When you click on this tab, the first thing you’ll notice is that the top half of the controls are disabled. That’s because the toolbars section of the IDE come from Microsoft Office XP, and with that section came this Customize dialog box. And as it happens, Microsoft decided the fea-ture called Personalized Menus and Toolbars wouldn’t be made available in the Visual Studio .NET IDE; so instead of removing them altogether, the company simply dis-abled them. But the bottom half isavailable, and these options are:
List font names in their font. When you have a font list on a toolbar, the font names will be in their own font.
Show ScreenTips on toolbars. When this is selected, a description will appear in a tooltip window when you float the mouse over a command on a toolbar. Show Shortcut keys in ScreenTips. If you’ve assigned a shortcut key (also called
a hotkey) to your commands, the tooltip will also include the shortcut key. Menu animations. Supposedly, this will change the way the menus appear.
Unfortunately, it doesn’t seem to work. (Or, probably, Microsoft didn’t imple-ment it when it reused the Customize dialog box.)
Keeping in mind that this book is about macros and add-ins, not about how to use the IDE, take a look at the list of Commands. There you will see all the commands cur-rently available to the IDE. You can call any of these commands from your macros and add-ins. In a moment, I’ll show you a macro that lists all the commands. But before you can run this macro (and after you type it in or, at least, after you have created the mod-ule where you’ll be typing it), you need to do the following:
1. Make sure you’re in the Macros IDE and that your macro project is open. 2. Choose Project➪Add Reference. The Add Reference dialog box will open (see
Figure 1.10).
3. In the Add Reference dialog box that opens, scroll down and find
System.Drawing.dll. Click on it, then on the Select button. You will see it added to the Selected Components list at the bottom of the dialog box. Click OK. 4. In the code editor, scroll to the top of your module and add the following line
immediately after the existing line Imports System.Diagnostics:
Imports System.Windows.Forms
The reason you need to add the reference is that the macro makes use of a sizing class called ClientWidth (to set the listbox’s size to match that of the form), and this class lives inside the System.Drawing DLL (which is actually an assembly). (I talk about assemblies in Chapter 5, “Just Enough .NET Architecture.”) The reason for the additional Importsstatement is in the code I make use of various objects in the Sys-tem.Windows.Formsassembly, but I don’t fully qualify the names. The Imports statement lets me type the class name without preceding it with System.Win-dows.Forms.
Now here’s the code for the macro:
Sub GetAllCommands()
Dim cmdlist As Commands = DTE.Commands Dim c As Command
Dim myform As Form = New Form() Dim list As ListBox = New ListBox() Dim i As Integer = 0
Dim count As Integer = cmdlist.Count
list.Top = 0
list.Width = myform.ClientRectangle.Width
list.Height = myform.ClientRectangle.Height - 15
list.Anchor = AnchorStyles.Bottom + AnchorStyles.Top + _ AnchorStyles.Left + AnchorStyles.Right
myform.Controls.Add(list) For Each c In cmdlist
status.Progress(True, “”, i, count) If c.Name <> Nothing Then
list.Items.Add(c.Name) End If
i = i + 1 Next
myform.ShowDialog() status.Progress(False) End Sub
The first seven lines of this macro (the lines that start with Dim) declare the local variables for the macro’s subroutine. The first of these is cmdlist, which the macro initializes to DTE.Commands. The DTE.Commandsobject is the key to this macro, as it contains a list of all the commands. The list lives in DTE.Commands object’s List property. The second variable, c, is a holder that’s used later on when the macro loops through the commands; this variable holds the current command in the list.
The third variable creates a new instance of the Form class, which is the macro name for a window. The next line creates a ListBox instance. Note that this list-box doesn’t automatically get put inside the window until later on when I call Controls.Add(list)for the Formobject.
The next two variables, iand count, are used for looping through the command list. Notice that I’m initializing the count with the command list’s Countproperty, which is the number of commands in the list.
The variable that follows, status, is a reference to the main status bar in the Visual Studio .NET IDE’s main window. When the macro cycles through the command list, the macro puts up a progress bar in the status bar to show how far along it is in gath-ering up the list. (Gathgath-ering the list takes a few moments to do; that’s why I decided to use a status bar.) The next four lines set the size of the listbox; the following line anchors it, which simply means that when you resize the form, the listbox will resize with it. Finally, the line to add the listbox control to the form follows.
Next begins the retrieval of the commands. This loop cycles through the command list and updates the progress bar accordingly; it then adds the commands to the listbox. (I first make sure the command isn’t an empty string, since you don’t want to add any empty strings to the list.) Finally, after the loop finishes, the macro shows the window in the form of a dialog box by calling the form’s ShowDialogfunction.
To clean things up after the user closes the window, the macro clears out the progress bar (otherwise it will stay there).
Customizing the Menus
The menus in the Visual Studio .NET IDE are fully customizable. First, the Tools menu has its own customization feature that is pretty handy for launching external programs and scripts.
For example, for a project I recently completed, I wrote a VBScript program that runs under the Windows Shell system that automatically does a screen capture of the Visual Studio .NET IDE and saves it to a file. Then I added an item under the Tools menu that launches the script, passing a filename as a parameter.
Though this book isn’t about VBScript, I do talk a bit about the Windows Script Host in Chapter 15. Here’s the script I used for my recent project, if you’re curious:
dim filename
Set objArgs = WScript.Arguments if objArgs.Count = 0 then
WScript.Echo “Error; No filename given.” else
filename = objArgs(0)
Set WshShell = WScript.CreateObject(“WScript.Shell”) WshShell.Run “PHOTOED.EXE.lnk”
WScript.Sleep 200
WshShell.SendKeys “ %en%fa+{end}” ‘ Paste, File-SaveAs, Select filename WshShell.SendKeys filename ‘ Enter filename WshShell.SendKeys “%tt” ‘ Select TIF type WshShell.SendKeys “%s” ‘ Save it!
WshShell.SendKeys “ %fc” ‘ Close it! end if
This program went inside a file called screencapture.vbs. If you build a script such as this, you can then add a menu item under the Tools menu that accesses the script. To add the menu item, choose Tools➪External Tools. In the External Tools dialog box that opens, click Add. The dialog box will add a new item to the Menu Contents listbox, and the Title edit control will be active. You then type the name of your menu item name into the Title control. (For mine, I typed “screenshot.”)
For the Command edit control, you type the name of the command you want to run. Make sure you include the .exe filename extension or other executable extension; otherwise, the IDE will not find the command. I usually also include the full path. Also, don’t put any command-line arguments here; they go in the next box. If you put them here, the IDE will get confused and won’t be able to find the program. To run my screenshot script, I typed “c:\winnt\system32\wscript.exe into the Command edit control.”
Next, in the Arguments edit control, you list the arguments to your program. For my script, this is the script file itself, followed by the command-line arguments that get passed into the script. Here’s what I put for the Arguments edit control:
C:\Tools\screencapture.vbs c:\$(ItemFileName)
Now notice the variable ItemFileName. To fill that in, you can click the small arrow to the right of the Arguments edit control. This opens a popup menu containing a list of possible variables for the arguments. I chose Item File Name, and the dialog box automatically filled in the $(ItemFileName) variable for me.
Here are the variables available to you in the Arguments edit box:
Item Path, Item Directory, Item File Name, and Item Extension. These enter the name of the current document (typically a source code filename). The first, Item Path, refers to the entire path and filename, such as c:\dev\system\main.cpp. The second, Item Directory, refers to just the path name, up to and including the final backslash, but excluding the filename. The third, Item File Name, is just the filename, without the extension. The final, Item Extension is simply the filename extension.