PHP
PHP
for Absolute Beginners
J a s o n L e n g s t o r f
PHP for Absolute
Beginners
■ ■ ■
ii
PHP for Absolute Beginners
Copyright © 2009 by Jason Lengstorf
All rights reserved. No part of this work may be reproduced or transmitted in any form or by any means, electronic or mechanical, including photocopying, recording, or by any information storage or retrieval system, without the prior written permission of the copyright owner and the publisher.
ISBN-13 (pbk): 978-1-4302-2473-0 ISBN-13 (electronic): 978-1-4302-2474-7
Printed and bound in the United States of America 9 8 7 6 5 4 3 2 1
Trademarked names may appear in this book. Rather than use a trademark symbol with every
occurrence of a trademarked name, we use the names only in an editorial fashion and to the benefit of the trademark owner, with no intention of infringement of the trademark.
Lead Editor: Michelle Lowman Technical Reviewer: Gordon Forsythe
Editorial Board: Clay Andres, Steve Anglin, Mark Beckner, Ewan Buckingham, Tony Campbell, Gary Cornell, Jonathan Gennick, Michelle Lowman, Matthew Moodie, Jeffrey Pepper, Frank Pohlmann, Ben Renow-Clarke, Dominic Shakeshaft, Matt Wade, Tom Welsh
Project Manager: Debra Kelly Copy Editor: Patrick Meader Compositor: Lynn L’Heureux Indexer: John Collin
Distributed to the book trade worldwide by Springer-Verlag New York, Inc., 233 Spring Street, 6th Floor, New York, NY 10013. Phone 1-800-SPRINGER, fax 201-348-4505, e-mail orders-ny@springer-sbm.com, or visit http://www.springeronline.com.
For information on translations, please e-mail info@apress.com, or visit http://www.apress.com. Apress and friends of ED books may be purchased in bulk for academic, corporate, or promotional use. eBook versions and licenses are also available for most titles. For more information, reference our Special Bulk Sales–eBook Licensing web page at http://www.apress.com/info/bulksales.
The information in this book is distributed on an “as is” basis, without warranty. Although every precaution has been taken in the preparation of this work, neither the author(s) nor Apress shall have any liability to any person or entity with respect to any loss or damage caused or alleged to be caused directly or indirectly by the information contained in this work.
iv
Contents at a Glance
■
About the Author ... xiv
■
About the Technical Reviewer... xv
■
Acknowledgments... xvi
■
Introduction... xvii
■
Chapter 1: Setting Up the PHP Development Environment...3
■
Chapter 2: Understanding PHP: Language Basics ...29
■
Chapter 3: Passing Information with PHP ...69
■
Chapter 4: Working with Databases...97
■
Chapter 5: Building the Entry Manager ...125
■
Chapter 6: Adding Support for Multiple Pages...157
■
Chapter 7: Updating and Deleting Entries ...187
■
Chapter 8: Adding the Ability to Upload Images ...207
■
Chapter 9: Syndicating the Blog...263
■
Chapter 10: Adding a Commenting System to Your Blog ...283
■
Chapter 11: Adding Password Protection to Administrative Links ...311
■
Chapter 12: Finishing Touches...341
Contents
■
About the Author ... xiv
■
About the Technical Reviewer... xv
■
Acknowledgments... xvi
■
Introduction... xvii
■
Chapter 1: Setting Up the PHP Development Environment...3
Why You Need Apache, MySQL, and PHP...3
Drilling Down on PHP...3
Stable/Production vs. Development Releases ...4
How PHP Works ...4
Server-Side vs. Client-Side Scripting ...4
What Apache Does...5
Store Info with MySQL ...5
Installing PHP, Apache, and MySQL (the Hard Way)...6
Installation Made Easy...6
Installing XAMPP...6
Step 1: Download XAMPP ...7
Step 2: Open the Installer and Follow the Instructions...7
Step 3: Test XAMPP to Ensure Proper Installation ...11
Choosing a Development Kit ...15
Benefiting from SDKs and IDEs...15
Choosing the Right SDK...18
The Eclipse Foundation and PDT ...18
Installing and Using the Eclipse PDT ...18
Step 1: Downloading the PDT ...19
Step 2: Unpacking the PDT Archive ...19
Step 3: Choosing Your Project Workspace ...20
vi
Step 5: Creating a File ...26
Step 6: Writing Your First Script ...27
Summary...28
■
Chapter 2: Understanding PHP: Language Basics ...29
Embedding PHP Scripts...29
Alternative Delimiters ...30
Short Tags ...31
HTML <script> Tags and ASP-Style Delimiters...31
Variables and Datatypes...32
What Is a Variable? ...32
Storing Values in a Variable...32
Understanding Strings ...33
Understanding Integers ...37
Understanding Floating Point Numbers ...37
Understanding Boolean Values ...37
Understanding Arrays ...38
Sending Data to the Browser as Output ...41
The Different Output Commands ...41
The print() Statement...41
The echo() Statement ...42
The printf() Statement...43
The sprintf() Statement...45
Commenting Your Code...46
Inline vs. Block Comments ...46
Other Comment Styles...47
Operators...47
Arithmetic Operators ...48
Arithmetic Assignment Operators...48
Comparison Operators...50
Error Control Operators...51
Incrementing/Decrementing Operators ...52
Logical Operators...52
String Operators ...54
if, else, and else if ...55
while and do-while ...56
for 58
foreach...59
break...60
switch ...61
continue...62
return...63
include, include_once, require, and require_once ...63
goto...65
User-Defined ...66
Returning Values from Functions ...67
Summary...68
■
Chapter 3: Passing Information with PHP ...69
Superglobal Arrays...69
Variable Scope...70
$GLOBALS...73
$_SERVER ...74
$_GET ...77
URL Encoding...78
Accessing URL Variables ...78
$_POST ...82
$_REQUEST...84
$_FILES...85
$_SESSION ...89
Using session_destroy()...92
$_COOKIE...93
Summary...95
■
Chapter 4: Working with Databases...97
The Basics of MySQL Data Storage...97
Manipulating Data in MySQL Tables...98
Creating and Deleting Databases ...99
Deleting Databases Using DROP...99
viii
The CREATE TABLE Statement...100
Data Types in MySQL ...102
Understanding PRIMARY KEY...102
Understanding AUTO_INCREMENT...102
Indexes in MySQL ...103
The INSERT Statement...103
The SELECT Statement ...105
The UPDATE Statement...107
The JOIN Statement...108
The DELETE Statement ...109
Opening a Connection ...109
PHP’s MySQL Extension...109
The MySQLi Extension ...111
Using Prepared Statements ...111
Using MySQLi...112
Using Prepared Statements with MySQLi ...113
PHP Data Objects (PDO) ...116
Rewriting Your Example in PDO...116
Table Structure and a Crash Course in Planning...118
Planning Database Tables ...118
The Shortcut Selector (
*
) ...122
Summary...122
Recommended Reading...122
■
Chapter 5: Building the Entry Manager ...125
Planning the Entry Database Table ...125
Creating the Entry Input Form ...128
Create a Script to Process the Form Input ...132
Performing the Initial Verification ...133
Connect to the Database ...134
Keeping Database Credentials Separate ...134
Connecting to the Database in update.inc.php...135
Save the Entry to the Database ...135
Retrieve the Entry’s Unique ID and Display the Entry to the User...136
Planning Our Scripts ...139
Separation of Logic in Programming ...139
Mapping Your Functions to Output Saved Entries ...140
Writing the Database Functions...141
Writing the Business Function ...148
Writing the Presentation Code ...149
Fix the Redirect ...155
Summary...156
■
Chapter 6: Adding Support for Multiple Pages...157
Add a page Column to the entries Table ...157
Modify Your Functions to Accept Page Parameters ...158
Accepting Page Information in the URL ...158
Using the Page Information to Filter Entries ...159
Modifying admin.php to Save Page Associations...165
Saving Page Associations ...168
Using .htaccess to Create Friendly URLs...170
What .htaccess Does ...170
Using Regular Expressions ...171
Creating Your .htaccess File ...171
Step 1: Turn on URL Rewriting...171
Step 2: Declare the Base-Level Folder for Rewriting...172
Step 3: Set Up a Rule to Stop Rewriting for Certain File Types ...172
Step 4: Set Up a Rule for Admin Page Access ...173
Step 5: Set Up a Rule for Page-Only URLs ...174
Step 6: Set Up a Rule for Page-and-Entry URLs ...174
Trying It Out ...175
Creating Friendly URLs Automatically...175
Step 1: Add a url Column to the entries Table ...176
Step 2: Modify functions.inc.php to Handle URLs...176
Step 3: Modify index.php to Handle URLs...178
Step 4: Write a Function to Create Friendly URLs Automatically ...180
Step 5. Modify update.inc.php to Save URLs in the Database...182
Adding a Menu ...184
Creating Different Viewing Styles for the Pages ...185
x
■
Chapter 7: Updating and Deleting Entries ...187
Creating Administrative Links ...187
Displaying Administrative Links ...188
Passing URL Values to admin.php with .htaccess...190
Modifying the Original Admin Rule ...190
The New Admin Rule ...191
Populating Your Form with the Entry to Be Edited ...191
Updating Entries in the Database...194
Handling Entry Deletion...197
Confirming Your Choice to Delete an Entry ...200
Handling Your Submitted Confirmation Form ...201
Removing Deleted Entries from the Database ...203
Summary...205
■
Chapter 8: Adding the Ability to Upload Images ...207
Adding a File Input to the Admin Form...207
Accessing the Uploaded File ...208
A Quick Refresher on the $_FILES Superglobal Array ...208
Object-Oriented Programming...211
Drill Down on Objects ...211
Why Objects Are Useful ...212
Writing the Image Handling Class ...218
Saving the Image...219
Checking for Errors Using Exceptions...221
Saving the File ...223
Modifying update.inc.php to Save Images...225
Using try...catch with Exceptions ...226
Creating a New Folder ...228
Renaming the Image...236
Determining the File Extension...237
Storing and Retrieving Images from the Database ...240
Modifying the entries Table ...241
Modifying update.inc.php to Save Images...241
Modifying retrieveEntries() to Retrieve Images ...244
Adding a Function to Format Images for Output...246
Resizing Images ...248
Determining the New Image Dimensions ...249
Adding a Property for Maximum Dimensions ...249
Creating the Method to Determine New Width and Height...250
Determining Which Image Functions to Use...252
Resampling the Image at the Proper Size ...254
Adding Your New Method to processUploadedImage() ...258
Summary...260
■
Chapter 9: Syndicating the Blog...263
What Is RSS?...263
What Is XML?...264
Creating an RSS Feed ...264
Describing Your Feed...265
Creating Feed Items...266
Using Existing Functions to Minimize Effort ...266
What Is a GUID? ...271
What Is a Publishing Date? ...272
Publishing Your Feed ...278
Adding the Feed to the Blog ...278
Using the <link> Tag to Signify an RSS Feed...278
Adding an RSS Link ...279
Summary...281
■
Chapter 10: Adding a Commenting System to Your Blog ...283
Creating a comments Table in the Database ...283
Building a Comments Class...285
Building the Comment Entry Form ...286
Modifying index.php to Display the Comment Form...287
Storing New Comments in the Database ...289
Modifying update.inc.php to Handle New Comments...291
Retrieving All Comments for a Given Entry ...293
Displaying Comments for a Given Entry ...296
xii
Deleting Comments...304
Creating a Confirmation Form ...305
Removing the Comment from the Database...306
Modifying update.inc.php to Handle Comment Deletion ...307
Summary...310
■
Chapter 11: Adding Password Protection to Administrative Links ...311
Adding an admin Table to the Database ...311
Adding Administrators in the Database...312
Building an HTML Form ...312
Saving New Administrators in the Database ...315
Dealing with Passwords ...316
Saving the Admin...316
Hiding Controls from Unauthorized Users ...318
Modifying index.php ...318
Modifying comments.inc.php ...323
Modifying admin.php ...325
Creating a Login Form...328
Displaying Controls to Authorized Users ...330
Logging Users Out ...337
Adding a Log Out Link...337
Modifying update.inc.php to Log Out Users...339
Summary...340
■
Chapter 12: Finishing Touches...341
Email Validation...341
Adding a Method to Validate Email...342
Validating Email Addresses ...343
Saving Comments in Sessions ...344
Displaying the Stored Comment Information...345
Adding Error Messages...348
Identifying Errors in saveComment() ...348
Modifying update.inc.php ...349
Matching Error Codes in showCommentForm()...350
Basic Spam Prevention ...353
Generating Random Numbers...354
Obfuscating the Values...354
Adding the Math Question to the Form...355
Adding the Challenge Question to the Form ...356
Verifying the Correct Answer...358
Adding the Verification into saveComment()...359
“Post to Twitter” Link...362
Creating a Shortened Link with http://bit.ly...363
Generating an Automatic Status Update for Twitter ...365
Displaying the Link on Entries ...366
Summary...368
xiv
About the Author
■Jason Lengstorf is a software designer and developer based in Missoula, MT. He runs a web design/development effort called Ennui Design that specializes in custom web applications ranging from simple informational web sites to full-on content-management systems.
About the Technical Reviewer
■Gordon Forsythe has been developing web applications using PHP since 2000. He has worked on many open source applications and has developed programs for various fields, including education, health care, real estate, and
xvi
Acknowledgments
I owe the most thanks to my parents, Wendy and Wally Lengstorf, and to my brother and sister, Kyle and Carly. If you guys hadn't been so forgiving during my many years of troublemaking, I'd probably still be living out of a bag in a van somewhere. I’m especially thankful to my dad, who taught me that software isn’t about degrees or certifications, but determination.
To Nate Green, my oldest friend and biggest inspiration – this had better move me up to Friday or Saturday! Thanks for showing me that there’s no such thing as too young, too bold, or too ambitious.
To my friends Kyle Hibler, Mike Scialabba, and Taylor Selig: keep at it. Someday you’ll write books, too, and then you’ll be as cool as Nate and I. Thanks for putting up with my geekiness and letting me be on Team Cobra.
I also can't forget to thank Chris Coyier. My clumsy article on his web site was my springboard into this project, and I am sincerely grateful that he took a chance on some punk kid from Montana.
Michelle Lowman, thanks for reading that article and giving me a shot. And for putting up with my incessant questions. And dealing with my utter lack of experience. I really appreciate it, and it's probably the only thing that got me through this project alive.
Gordon Forsythe, thanks for keeping my code clean. Without you, my code might have ended up held together by duct tape. And Patrick Meader, thank you for all your time spent poring over my bad English. This book would have been a grammatical disaster without your help.
Debra Kelly, you came into this project halfway through and managed to somehow put us ahead of schedule. I don't know how you did it, but thanks!
Introduction
On February 18, 2009, I received this email:
Hello Jason,
I’m looking for someone to write PHP for Absolute Beginners, and I was wondering if you would be interested. I like your Simple CMS tutorials; they look like just the thing for this type of book. Please let me know if you are interested.
Thanks!
Michelle Lowman
I, of course, assumed it was some kind of joke. I replied with something like, “Yeah, okay, sure. I'll write a book.” And then a contract showed up in the mail.
Now, not even six months later, the book is almost ready to go to press, and I'm happy to say that I’m proud of the result.
This book is the book I wish I’d had when I first started programming. It assumes no knowledge of PHP, but it doesn’t spend hundreds of pages on programming theory or the history of the language. Sure, it covers that, but what I really wanted to do was jump right in and teach you how to build something that you could use. I chose a blogging application because it feels like everybody has a blog these days, and why shouldn't you know how to build one?
In this book, I've tried to write exactly the way I’d teach you one-on-one: you should feel comfortable with what’s being discussed, but not bored. The material should move quickly, but remain easy-to-follow. I also want you to feel like you're learning, not memorizing. And most importantly, when you’ve finished this project, I want you to turn around and build another one – this time without any help.
PHP is a great language, and it provides developers with the ability to build pretty much anything they can imagine when paired with a database and some good ol’ HTML. However, it can also seem intimidating. It’s not visual like front-end design, there’s all this theory involved, and it’s just, you know, harder.
But that doesn’t have to be the case, and it’s my sincere hope that this book will allow you to get your hands dirty with PHP without ever feeling intimidated, lost, or hopeless. It wasn't long ago that I was struggling through complex, boring how-tos on PHP, so I know how it is to feel completely
overwhelmed by the massive amounts of information about the language. It's my sincere hope that I've written a book that will allow you to learn everything you need to know in a far less stressful manner.
Getting Started
Before you can get your hands dirty, you’ll need to get a development environment set up
and familiarize yourself with the basics of PHP. These first few chapters assume no
knowledge of PHP and will walk you through the steps required to build a local
Setting Up the PHP
Development Environment
Getting a working development environment put together can be intimidating, especially for the absolute beginner.
To follow along with the project in this book, you’ll need to have access to a working installation of Apache, PHP, and MySQL, preferably on your local machine. It’s always desirable to test locally, both for speed and security. Doing this both shelters your work-in-progress from the open Internet and decreases the amount of time spent uploading files to an FTP server and waiting for pages to reload.
Why You Need Apache, MySQL, and PHP
PHP is a powerful scripting language that can be run by itself in the command line of any computer with PHP installed. However, PHP alone isn't enough in order to build dynamic web sites.
To use PHP on a web site, you need a server that can process PHP scripts. Apache is a free web server that, once installed on a computer, allows developers to test PHP scripts locally; this makes it an invaluable piece of your local development environment.
Additionally, dynamic websites are dependent on stored information that can be modified quickly and easily; this is the main difference between a dynamic site and a static HTML site. However, PHP doesn’t provide a simple, efficient way to store data. This is where a relational database
management system like MySQL comes into play. This book’s examples rely on MySQL; I chose this database because PHP provides native support for it and the database is free, open-source project.
No te An open-source project is available for free to end users and ships with the code required to create that software. Users are free to inspect, modify, and improve the code, albeit with certain conditions attached. The Open Source Initiative lists 10 key provisions that define open-source software; you can view this list at www.opensource.org/docs/osd.PHP originally stood for “Personal Home Page” and was released as a free, open source project. Over time, the language was reworked to meet the needs of its users. In 1997, PHP was renamed to the current “PHP: Hypertext Preprocessor.”
At the time I write this, PHP 5.2.9 is the latest stable release available, but versions 5.3 and 6 are both scheduled for release in the near future. PHP 4 is still in use on a number of servers, but support has been discontinued. Many hosting companies let developer use either PHP 4 or PHP 5 on their sites.
Stable/Production vs. Development Releases
Many software products will have a development release available, alongside the current, stable release. This is a way for the development community to test an upcoming version of a product; this helps the product’s creators work bugs out of the system.
After a proposed release has been tested to a satisfactory level, its creators mark it as the current production release. Users reasonably expect the production software they use to be free of major defects or bugs; calling a version a stable/production release is a way for the product’s creators to let potential users know that, in the opinion of the product’s creators, all major issues have been worked out, and that it is safe to use this software for mission-critical applications.
How PHP Works
PHP is generally used as a server-side scripting language; it is especially well-suited for creating dynamic web pages. The scripting language features integrated support for interfacing with databases such as MySQL, which makes it a prime candidate for building all manner of web applications, from simple personal web sites to complex enterprise-level applications.
Unlike HTML, which is parsed by a browser when a page loads, PHP is preprocessed by the machine that serves the document (this machine is referred to as a server). All PHP code contained with the document is processed by the server before the document is sent to the visitor’s browser.
PHP is a scripted language, which is another great advantage for PHP programmers. Many programming languages require that you compile files into machine code before they can be run, which is a time-consuming process. Bypassing the need to compile means you’re able to edit and test code much more quickly.
Because PHP is a server-side language, running PHP scripts on your local machine requires installing a server on your local machine, as well. The examples in this book rely on the Apache web server to deliver your web pages.
Server-Side vs. Client-Side Scripting
Using client-side scripts enables you to make changes to a page without requiring a page refresh; it also facilitates initial form validation and simplifies making improvements to the user interface.
However, using client-side scripts requires that the users have JavaScript turned on or that their browsers support the script you have written. This means you should not use client-side scripts for user authentication or the handling of anything sensitive, due to the user’s ability to modify and/or disable your client-side scripts.
Server-side scripting is performed on the site’s hosting server before the page is delivered to the user. This means that any changes that must be made by the script require a page refresh.
Using server-side scripting is great for user authentication, saving changes to database information, retrieving entries for display, and many other tasks.
The downside of server-side scripts lies mainly in the required page refresh. Because the script is processed before it is delivered to the browser, the user doesn’t have access to the inner workings of the code. This makes server-side scripts the best choice for handling any sensitive information.
Ca utio n Server-side scripting is better suited to handling sensitive information than client-side scripts, but you still must take care to protect sensitive data. We’ll spend more time on basic security later in the book.Serving web pages with Apache HTTP Server is the most popular web server on the web; it hosts nearly half of all web sites that exist today. Apache is an open-source project that runs on virtually all available operating systems.1 Apache server is a community-driven project, with many developers
contributing to its progress. Apache’s open-source roots also means that the software is available free of charge, which probably contributes heavily to Apache’s overwhelming popularity relative to its
competitors, including Microsoft’s IIS and Google’s GWS, among others.
On the Apache web site (www.apache.org), Apache HTTP Server is described as “an effort to develop and maintain an open-source HTTP server for modern operating systems including UNIX and Windows NT. The goal of this project is to provide a secure, efficient, and extensible server that provides HTTP services in sync with the current HTTP standards.”
What Apache Does
Like all web servers, Apache accepts an HTTP request and serves an HTTP response. The World Wide Web is founded on web servers, and every website you visit demonstrates the functionality of web servers.
I’ve already mentioned that, while HTML can be processed by a web browser, programming languages such as PHP need to be handled by a web server. Due to its overwhelming popularity, Apache is used for testing purposes throughout this book.
Store Info with MySQL
Installing PHP, Apache, and MySQL (the Hard Way)
One of the biggest hurdles for new programmers is starting. Before you can write your first line of PHP, you must first download Apache and PHP, and usually MySQL, and then fight through installation instructions that are full of technical jargon you might not understand yet. This experience can leave many developers feeling unsure of themselves, doubting whether they’ve installed the required software correctly.
In my own case, this hurdle kept me from learning programming for months, even though I desperately wanted to move beyond plain ol’ HTML. I unsuccessfully attempted to install PHP on my local machine not once, but three different times before I was able to run my first PHP command successfully.
Installation Made Easy
Fortunately, the development community has responded to the frustration of beginning developers with several options that take all the pain out of setting up your development environment, whether you create applications for Windows, Mac, or Linux machines. These options include all-in-one solutions for setting up Apache, MySQL, and PHP installations.
The most common all-in-one solution is a program called “XAMPP” (www.apachefriends.org/ en/xampp.html), which rolls Apache, MySQL, PHP, and a few other useful tools together into one easy installer.
XAMPP is free and available for Windows, Mac, and Linux, so this book assumes you will use it as your development environment.
No te Most Linux distributions ship with one flavor or another of the LAMP stack (Linux-specific software that functions similarly to XAMPP) bundled in by default. Certain versions of Mac OS X also have PHP and Apache installed by default.Installing XAMPP
Enough background: You’re now ready to install XAMPP on your development machine. This process should take about five minutes and is completely painless.
Step 1: Download XAMPP
Your first task is to obtain a copy of the XAMPP software. Head over to the XAMPP site
(www.apachefriends.org/en/xampp.html) and download the latest version (0.7.4 for Mac, 1.7.1 for Windows, and 1.7 for Linux at the time I write this).
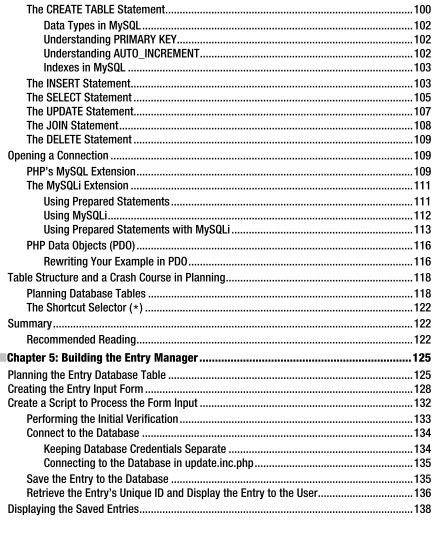
Step 2: Open the Installer and Follow the Instructions
After downloading XAMPP, find the newly downloaded installer and run it. You should be greeted with a screen similar to the one shown in Figure 1-1.
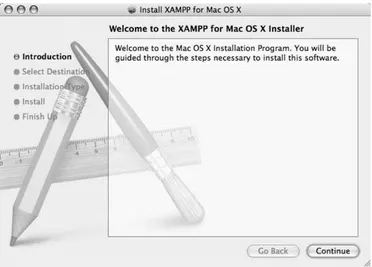
Click the Continue button to move to the next screen (see Figure 1-2), where you can choose the destination drive you want to install XAMPP on.
Figure 1-2. Select a destinat ion drive on which to instal l XAMPP
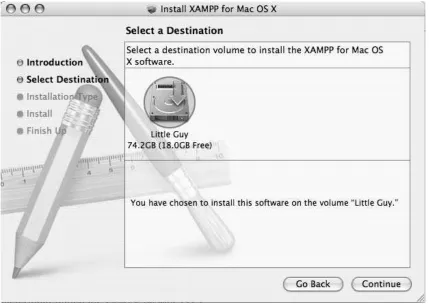
Figure 1-3. XAMPP gives you only one option the first time you install it
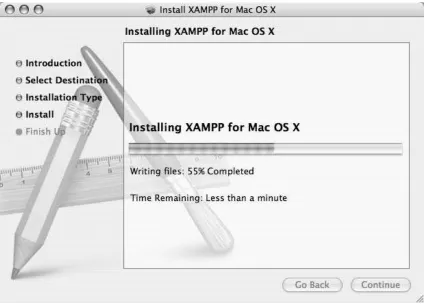
Figure 1-4. Watch the installer’s progress for XAMPP for Mac OS X
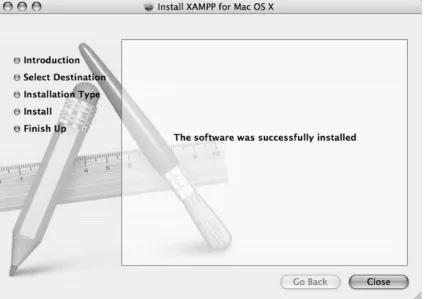
Figure 1-5. Successful insta llation of XAMPP bring s up this screen
Step 3: Test XAMPP to Ensure Proper Installation
So far you’ve used the XAMPP wizard to install Apache, PHP, and MySQL. The next step is to activate the trio of applications.
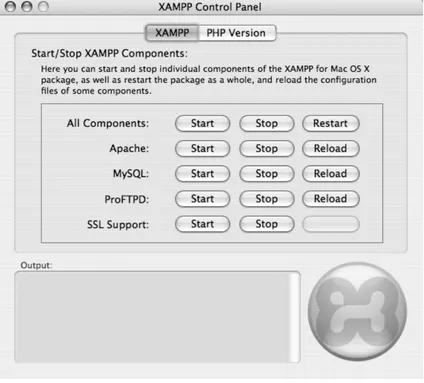
Open the XAMPP Control Panel
You can activate the just-installed applications by navigating to the newly installed xampp folder and opening the XAMPP Control Panel (see Figure 1-6).
Figure 1-6. Inside the XAMPP contro l panel
Figure 1-7. Starting XAMPP services
No te There is also an FTP (file transfer protocol) option available in XAMPP. FTP provides a method for moving files between networks. The examples in this book don’t require this option, so there is no need to activate it in the XAMPP control panel.Verify That Apache and PHP Are Running
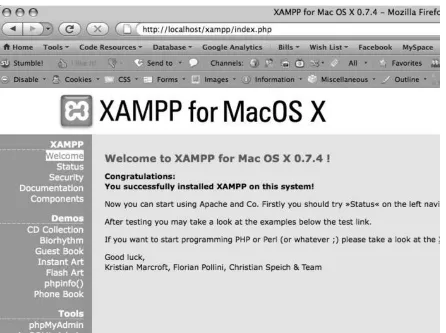
It’s a simple matter to check whether all the services are running properly on your development machine. Simply open a browser and go to this address: http://localhost. If everything has gone correctly, you’ll be redirected to http://localhost/xampp/index.php (see Figure 1-8).
If this screen loads, you’ve installed Apache and PHP on your development machine successfully!
If you do not see this screen, the XAMPP online community is extremely helpful and most installation issues have been addressed in the Apache Friends forum at http://www.apachefriends.org/ f/viewforum.php?f=34.
The address, http://localhost, is an alias for the current computer you’re working on. When using XAMPP, navigating to http://localhost in a browser tells the server to open the root web directory; this is the htdocs folder contained in the XAMPP install directory.
Figure 1-8. Visit the XAMPP homepage at http://localhost
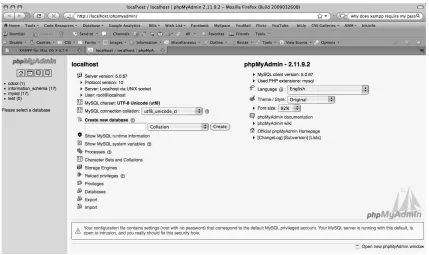
Verify That MySQL Is Running
Figure 1-9. MySQL is running if phpMyAdmin loads without erro r
Now that have MySQL running on your development machine, you’re ready to start running PHP scripts. Note that if you’re a Windows user, you might need to navigate to C:\xampp\php\php.ini and locate the following lines to verify that magic_quotes_gpc is set to Off:
; Magic quotes for incoming GET/POST/Cookie data magic_quotes_gpc = Off
Choosing a Development Kit
Your development machine is now running all the necessary programs for programming with PHP. The next step is to decide how you’re going to write your scripts. PHP scripts are text-based, so you have myriad options, ranging from the simple Notepad.exe and text-edit programs to highly specialized software development kits (SDKs) and integrated development environments (IDEs).
• Syntax highlighting: This is the ability to recognize certain words in a programming language, such as variables, control structures, and various other special text. This special text is
highlighted or otherwise differentiated to make scanning your code much easier. For example, the color coding on the left makes this code less daunting to look at (see Figure 1-10).
• Built-in function references: When you enter the name of a function, this feature displays available parameters, as well as the file that declares the function, a short description of what the function does, and a more in-depth breakdown of parameters and return values (see Figure 1-11). This feature proves invaluable when dealing with large libraries, and it can save you trips to the PHP manual to check the order of parameters or acceptable arguments for a function.
• Auto-complete features: Common to most SDKs and IDEs, this feature adds available variables to a drop-down list, allowing you to select the intended variable from the list quickly and easily, saving you the effort of typing it out every time (see Figure 1-12). When it comes to productivity, every second counts, and this feature is a great way to contribute to saved time.
• Code Folding: This feature lets you collapse snippets of code (see the plus and minus toggles on the left-hand side of Figure 1-13), reducing workspace clutter-free and making it easy to
navigate your code. This feature proves especially helpful for reducing the confusing clutter that springs up as your scripts become increasingly complicated.
Figure 1-11. Viewing a function reference in the Eclip se PDT
Figure 1-13. Code folding in the Eclipse PDT
Choosing the Right SDK
You have many choices when it comes to choosing development tools, and it should be noted that there’s no wrong answer when selecting yours. If the tool feels right, and makes sense to you, that’s really all that matters.
The Eclipse Foundation and PDT
The exercises in this book rely on the popular open source Eclipse SDK and more specifically on the PHP-specific PDT IDE. PDT stands for PHP Development Tools, and this IDE provides a free IDE option for beginning developers.
The team responsible for overseeing Eclipse notes, “Eclipse is an open source community, whose projects are focused on building an open development platform comprised of extensible frameworks, tools and runtimes for building, deploying and managing software across the lifecycle.”
Essentially, this means that Eclipse is a group of people working together to create the best available tools for developers—at no cost to the developer.
Installing and Using the Eclipse PDT
Installing and setting up the Eclipse PDT requires six steps.Step 1: Downloading the PDT
Step 2: Unpacking the PDT Archive
After the file finishes downloading, unzip the file. A folder called “eclipse” should appear in the same directory as the downloaded archive.
Drag this folder into your Programs or Applications folder (or wherever you want to keep it) and open it up. There will be a purple icon that says “Eclipse”; double-clicking the icon launches the IDE and brings up the loading screen (see Figure 1-14).
Figure 1-14. Loading the Eclipse PDT screen
Step 3: Choosing Your Project Workspace
Figure 1-15. Selecting your workspace in the Eclipse PDT
Selecting this folder and checking the “Use this as the default and do not ask me again” box enables you to tell Eclipse to create new projects in the htdocs folder automatically, which simplifies testing your code.
After clicking “Choose,” close the welcome screen that shows up by clicking the “X” in the tab at the top, next to “Welcome” (see Figure 1-17), which takes you to the editor.
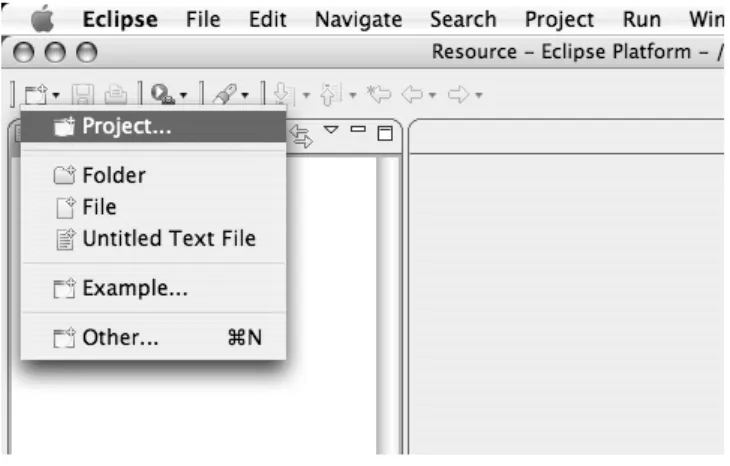
Step 4: Creating Your First Project
You’re almost to the point where you can code a simple blog. The next step is to create a project. Do this by clicking the New Project icon, which is at the top left of the Eclipse toolbar (see Figure 1-18).
Figure 1-18. Creating a new project in Eclipse
Figure 1-19. Creating a PHP project
Clicking “Finish” will bring you back to the editor; your newly created project will be listed in the left-hand panel. At this point, Eclipse lets you know that this project type is associated with the PHP perspective, and it asks whether you’d like to switch to the PHP perspective. It makes sense to do this because you’re working with PHP, so select, "Yes."
Step 5: Creating a File
The final step is to create a file that you can start coding in. At first you’ll be doing basic exercises to get a feel for the language, so call your first file test.php.
To create the file, right click the simple_blog project, hover over New, and then click PHP File from the resulting drop-down menu (see Figure 1-21).
Figure 1-21. Creating a PHP file in Eclip se
Figure 1-22. Create test.php and click “Finish”
Clicking Finish creates your first file and means you can now start coding.
Step 6: Writing Your First Script
The final step is to make sure that everything is set up correctly and ready for you to start developing your blog. You can do this by writing a short script to ensure that PHP is working in your test.php file. Add this code to the test.php file and save:
<?php
Now open any browser and navigate to http://localhost/simple_blog/test.php; what you see should look like Figure 1-23).
Figure 1-23. test.php loaded in a browser, displaying your first script !
If the above text is visible, you have installed XAMPP and Eclipse successfully, and you’re ready to start building your blog.
Summary
In this chapter, you learned what PHP, MySQL, and Apache are, and what role they play in the development of dynamic web sites. You also learned a quick and easy way to install a fully functional development environment on your local computer by installing XAMPP and Eclipse PDT.
Understanding PHP:
Language B asics
So far you’ve bypassed the old, cumbersome method of creating a development environment, and you’re now ready to start writing code.
But where do you start? In this chapter, I’ll cover the steps you need to follow to start using PHP in the creation of powerful, dynamic web applications; you’ll also begin to develop the basic skills you need to create your blog.
In this chapter, you’ll learn how to accomplish several tasks:
• Embed PHP in web pages
• Send data as output to the browser
• Add comments in your code
• Use variables and understand the datatypes they support
• Use operators to manipulate data
• Use control structures to add power to your scripts
By the end of this chapter, you should be comfortable writing basic PHP that will allow you to create, store, manipulate, and output data.
No te This chapter discusses basic aspects of the PHP language, but you should keep in mind that some
functions won’t be covered completely. For clarification, more examples, or for concept reinforcement, visit the PH P ma nua l at http://www.php.net/manual/en/ and search the function in the field where it says, “search for _______ in the function list.” Alternatively, you can access information about many PHP functions by navigating to http://php.net/function_name. Don’t forget to read the comments because many of your fellow programmers offer insight, tips, and even additional functions in their commentary.By default, servers look for PHP only in files that end with the .php extension. But a .php file can contain elements that aren’t part of your PHP script, and searching the entire file for potential scripts is confusing and resource-intensive. To solve this issue, all PHP scripts need to be contained with PHP delimiters. To begin a PHP script, you include the opening delimiter <?php and start coding. To finish, you simply add ?> to the end of the script. Anything outside of these delimiters will be treated as HTML or plain text.
You can see this in action by opening Eclipse and editing the test.php file by double-clicking the file in the project folder you created in the last chapter (full path:
/xampp/htdocs/simple_blog/test.php) so it contains the following code:
<p>Static Text</p> <?php
echo '<p>This text was generated by PHP!</p>'; ?>
<p>This text was not.</p>
Save the file, navigate to http://localhost/simple_blog/test.php in your browser, and you should see the following:
Static Text
This text was generated by PHP! This text was not.
As you can see, the text inside the PHP delimiters was handled as a script, but the text outside was rendered as regular HTML. There is no limit to how many blocks of PHP you can include in a page, so the following snippet is completely valid:
<?php
echo '<p>This is some text.</p>'; ?>
<p>Some of this text is static, <?php echo 'but this sure isn't!'; ?></p> <?php echo '<p>'; ?>
This text is enclosed in paragraph tags that were generated by PHP. <?php echo '</p>'; ?>
The preceding code snippet outputs the following to the browser:
This is some text.
Some of this text is static, but this sure isn't!
This text is enclosed in paragraph tags that were generated by PHP.
Alternative Delimiters
Short Tags
PHP offers a shortcut syntax known as short tags; these allow your scripts to be delimited with <? and ?>, which is easier to type. However, the use of short tags requires that the short_open_tag directive be enabled, which means that scripts using short tags can create compatibility problems for applications that need to run on multiple servers that might not have the same configuration.
Ca utio n The use of short tags conflicts with XML syntax (XML declarations use the syntax <?xml
version="1.0" encoding="ISO-8859-1"?>), so you should not use them.There is also a shortcut syntax for outputting data quickly, which you use like this:
<?='Some text to output.'?>
The previous snippet functions identically to this longer-winded syntax:
<?php
echo 'Some text to output.'; ?>
Again, keep in mind that you should avoid using this syntax because of its incompatibility, both with various server configurations and XML syntax.
HTML <script> Tags and ASP-Style Delimiters
For the sake of compatibility with editing software such as Microsoft Front Page, PHP also supports the use of HTML <script> tags:
<script language="php"> echo 'This is some text'; </script>
Another option provided to Front Page users was Microsoft’s ASP-style delimiters:
<%
echo 'This is some text'; %>
Variables and Datatypes
So far, you’ve learned how to output data, as well as how to use variables to a certain extent. Before going any further, let’s take a moment to drill down on variables and how they work.
What Is a Variable?
A variable is a keyword or phrase that acts as an identifier for a value stored in a system’s memory. This is useful because it allows us to write programs that will perform a set of actions on a variable value, which means you can change the output of the program simply by changing the variable, rather than changing the program itself.
Storing Values in a Variable
PHP lets you store nearly anything in a variable using one of the following datatypes: String: Alphanumeric characters, such as sentences or names
Integer: A numeric value, expressed in whole numbers
Float: A numeric value, expressed in real numbers (decimals)
Boolean: Evaluates to TRUE or FALSE (sometimes evaluates to 1 for TRUE and 0 for FALSE)
Array: An indexed collection of data (see the “Understanding Arrays” section later in this chapter for more information on this subject)
Object: A collection of data and methods (see Chapter 4 and its section on PHP Data Objects for more information on this subject)
PHP is a loosely typed language, which means it determines the type of data being handled based on a “best guess” principle, as opposed to a strictly typed language such as C, which requires you name datatypes for every variable and function. Consider this code snippet:
$foo = "5"; // This is considered a string
$bar = $foo + 2; // This converts $foo to an integer (outputs 7)
Understanding Strings
A string is any series of characters enclosed in single (') or double (") quotes, or that you create using special heredoc or nowdoc syntax, which I’ll cover in a moment.
Strings have a few characters that will cause problems if you do not escape them with a backslash (\). Escaping allows you to use characters in strings that might otherwise cause problems, such as an apostrophe in a string enclosed in single quotes:
$string = 'It\\'s cold outside today!';
If you don’t escape the apostrophe in it’s, the script has no way of knowing that the apostrophe is part of the string and not the end of it—and your script would fail.
Single-Quote Syntax
Enclosing a string in single quotes is the simplest way to create a string in PHP. It doesn’t expand special characters or variables, but instead delivers them as plain text to the browser.
Let’s look at some examples to see how single quotes behave. Add the following into test.php to see how different data is handled:
<?php
// The <br /> adds a line break in the browser for readability echo 'This is a string. <br />';
echo 'This is a string with line breaks. <br />';
// Special characters, such as the newline (\n) character, // won't be expanded when in single quotes.
echo 'This is a string \n with a newline character. <br />';
echo 'This string\'s got an apostrophe. <br />';
// A backslash doesn't need to be escaped if not escaping a // special character.
echo 'This string has a backslash (\) in it. <br />';
echo 'This string has an escaped backslash (\\) in it. <br />';
The output of this code in a browser looks like this:
This is a string.
This is a string with line breaks.
This is a string \n with a newline character. This string's got an apostrophe.
This string has a backslash (\) in it.
This string has an escaped backslash (\) in it. This $variable will not be expanded.
No te Newline characters (
\n) don’t render in browsers. However, they are visible in the source code of the rendered page, which you can view by choosing View Source from the View menu of your browser.Double-Quote Syntax
Strings encased in double quotes behave similarly to strings encased in single quotes but they interpret more special characters, including expanding variables.
Tip Special characters like the new line character (
\n) won’t affect browser output, but do affect command-line and source-code displays. Use an HTML break tag (<br />) to create a new line in the browser.You can see the difference achieved by placing strings in double quotes by placing the following code in test.php:
<?php
echo "This is a string. <br />";
echo "This is a string that spans
multiple lines. <br />";
// Apostrophes don't need to be escaped in double quotes echo "This string's got an apostrophe. <br />";
// Double quotes will need to be escaped
echo "This string says, \"I need escaping!\" <br />";
// New line characters will be interpreted
echo "This string has \n newline \n characters. <br />";
// A backslash will be printed if a special character doesn't // directly follow it
echo "This string contains a backslash (\). <br />";
// Variables will be expanded if not escaped $variable = "word";
echo "This string uses a $variable. <br />";
// A variable can be interpreted as plain text by escaping the // dollar sign with a backslash
echo "This string escapes the \$variable. <br />";
?>
The output of this code in a browser looks like this:
This is a string.
This is a string that spans multiple lines. This string's got an apostrophe.
This string says, "I need escaping!" This string has newline characters. This string contains a backslash (\). This string uses a word.
This string escapes the $variable.
Str in g C o nc at e n ati on
It’s often necessary to join two strings together in a script. You accomplish this using the string concatenation operator, a period (.).
You join two strings together by placing a period between them:
<?php
$foo = "This is a " . "string."; echo $foo;
This code creates the following output:
This is a string.
You can concatenate variables as well, as long as they’re not of the array or object type:
<?php
$foo = "This is a "; $bar = "string."; echo $foo . $bar; ?>
This produces output identical to your previous script:
This is a string.
Heredoc Syntax
Another option available for handling strings is heredoc syntax, which begins with <<< and an identifier that can be any combination of alphanumeric characters or underscores that don’t begin with a digit. You end the string by repeating the identifier on a new line, followed by a semicolon.
You can get a good idea of how heredoc syntax works by examining this example:
$foo = <<<EOD
This is a string created using heredoc syntax. It can span multiple lines, use "quotes" without escaping, and it'll allow $variables too.
Special characters are still supported \n as well. EOD;
EOD (short for “end of data”) is your identifier in this case, but the text you use isn’t important. The most important thing to note is that the closing identifier (EOD) is on its own line with no whitespace (any space, tab, or newline characters) before or after it. If this isn’t the case, a parse error occurs when you try to run the script.
Functionally, heredoc syntax behaves almost identically to strings encased in double quotes, except that there is no need to escape quotes in the string itself.
Nowdoc Syntax
Nowdoc syntax is functionally similar to quotes you encase in single quoted strings, and you call it in much the same way that you call heredoc syntax. The difference is that you enclose the identifier in single quotes when you open the string:
Using nowdoc syntax tells PHP not to parse $variables or newline (\n) characters. According to
the PHP manual: Nowdocs are to single-quoted strings what heredocs are to double-quoted strings.1
No variables or special characters within a nowdoc will be expanded; this makes nowdoc syntax ideal for outputting large blocks of PHP code.
No te Nowdoc syntax support was added in PHP 5.3.0—this means that nowdoc syntax won’t work in XAMPP
out-of-the-box because PHP 5.2 is installed by default.Understanding Integers
An integer is any positive or negative whole number (a number without a decimal value). For example, the numbers 1, -27, and 4985067 are integers, but 1.2 is not.
Because PHP is a loosely typed language, it’s not necessary to declare a variable as an integer; however, if you find it necessary, you can explicitly cast, or force, a value as an integer using the following syntax:
$foo = 27; // No quotes around a whole number always means integer $bar = (int) "3-peat"; // Evaluates to 3
$baz = (int) "seven"; // Evaluates to 0 $bat = (int) "ten 4"; // Evaluates to 0
No te A string value will always evaluate to 0 unless it starts with a numeric value (such as “10 years”).
Understanding Floating Point Numbers
Floating point numbers (also known as floats or doubles) are numbers with decimal values, or real numbers. This includes numbers such as 3.14, 5.33333, and 1.1.
Note that floating point numbers can produce unexpected results due to the fact that it’s impossible to represent all values with a finite number of digits. A good example of this is 1/3, which evaluates to a repeating decimal (0.33333...). You should not use floating point numbers to compare equality for this reason.
Understanding Boolean Values
Booleans are very useful when determining if a condition exists. For example, you can use an if-else statement (which I’ll cover in a moment) to perform different actions if a condition is TRUE:
if($condition===true) {
echo 'The condition is true!'; }
else {
echo 'The condition is false!'; }
No te This example uses the comparison operator
=== to verify that the $condition is TRUE. I’ll go over why this is important in the “Operators” section later in this chapter.Understanding Arrays
Arrays are among the most powerful datatypes available in PHP, due to their ability to map information using a key to value pairing. This means that an array can store multiple pieces of information in a single variable, all indexed by key. For instance, if you have a blog entry to store in variables, you would need to do the following if you didn’t use arrays:
<?php
$entryTitle = "Sample Title"; $entryDate = "April 13, 2009"; $entryAuthor = "Jason";
$entryBody = "Today, I wrote a blog entry."; ?>
This can become confusing, especially if the entry needs to be passed to a function for processing. You can use an array to simplify the entry:
<?php
$entry = array(
'title' => 'Sample Title', 'date' => 'April 13, 2009', 'author' => 'Jason',
'body' => 'Today, I wrote a blog entry.' );
The power of this approach resides in the fact that you now have all of that information stored in one variable, $entry. To access any part of that information, you add the key to the end of the variable in square brackets ([]).
<?php
echo $entry['title']; // Outputs "Sample Title" echo $entry['date']; // Outputs "April 13, 2009" echo $entry['author']; // Outputs "Jason"
echo $entry['body']; // Outputs "Today, I wrote a blog entry." ?>
Arrays can also index information automatically using a numerical index that starts at 0. You access array values that have been indexed automatically using the numeric index as the key, without quotes (e.g., $entry[0]). You can create an automatically indexed array by omitting the keys when you declare the array:
<?php
$entry = array('Sample Title', 'April 13, 2009', 'Jason', 'Today, I wrote a blog entry.');
echo $entry[0], ' by ', $entry[2]; ?>
This snippet produces the following output in a browser:
Sample Title by Jason
No te In programming, counts generally start at 0. This means that the first character in a string is at position 0,
not position 1 as you might expect.When using arrays in strings, you must take an additional step to avoid errors. In order to avoid an error, you must wrap the array variable and key in curly braces ({}). This is known as complex syntax, but not because it’s complicated to use; rather, it’s called complex because it allows PHP to parse complex statements within a quoted string:
<?php
Another option when using arrays in double-quoted strings is to leave the single quotes off the array index:
<?php
$person = array('name' => 'Jason', 'age' => 23);
echo "This person's name is $person[name] and he is $person[age].";
?>
Ca utio n When working with multidimensional arrays (see below), curly braces must be used. Leaving the
single quotes off the array indices will behave unexpectedly.Multidimensional Arrays
Another cool feature of arrays is their ability to nest within themselves. This creates an array within an array, or a multidimensional array.
Multidimensional arrays are exceptionally powerful because they allow even more information to be stored in one variable, making immense data sets conveniently portable, as you’ll see when you start working with databases.
A multidimensional array of people might look something like this:
<?php
$people = array(
array('name' => 'Jason', 'age' => 23), // $people[0] array('name' => 'Carly', 'age' => 18) // $people[1] );
echo "{$people[0]['name']} has a sister who is {$people[1]['age']} years old.";
?>
This script produces the following output:
Multidimensional arrays can also feature multiple string literal keys:
<?php
$colors = array(
'fruits' => array('apple' => 'red', 'plum' => 'purple'), 'flowers' => array('rose' => 'red', 'violet' => 'blue') );
// Output: An apple is red, and a violet is blue. echo "An apple is {$colors['fruits']['apple']}, and a violet is {$colors['flowers']['violet']}."; ?>
Sending Data to the Browser as Output
To see the data that you’re processing, you need a way to send it as output. This enables you to display the contents of a variable in the browser to your users.
There are several ways to send output, but the most common methods are the commands echo(), print(), printf(), and sprintf(). There are differences in how you use each of these, but the result is the same: something is output for display in the browser.
The Different Output Commands
It’s important to have a solid understanding of your options when sending output to the browser, so I’ll go over the different statements available, how they work, and what special properties are associated with each.
No te Whenever I introduce a language construct or function in the course of this book, I’ll begin by walking you
through the prototype, or breakdown, of the function’s name, accepted arguments, and a return value defined by its datatype. Don’t worry if you’re not sure what that means yet because I’ll cover all this information fully in the course of this chapter.The print() Statement
The print() statement is the most straightforward method of generating output. Its prototype looks like this:
<?php
print("Some text."); ?>
This code produces the following output if you reload test.php.
Some text.
The echo() Statement
The most common method of generating output is probably the echo() statement. It differs slightly from print() in that it can accept multiple arguments. Consider this prototype:
void eecho ( string $arg1 [, string $... ] )
The echo() statement accepts one or more arguments, separated by commas, and outputs all of the arguments to the browser in succession. Unlike print(), echo() does not return a value—the void keyword in the prototype tells it not to.
Because echo() is also a language construct, the parentheses are optional and generally omitted. Add the following code to test.php:
<?php echo "Hello ", "world!"; ?>
The preceding snippet produces this output:
Hello world!
Your two strings are added together as arguments to the echo() statement, producing one string that ends up being passed to the browser. The same approach works for variables:
<?php
$foo = "Hello "; $bar = "world!"; echo $foo, $bar; ?>
This produces the same output as above:
No te Because print() is a language construct and not a function, you can use it without parentheses (i.e.,
<?php echo 'Some text'; ?>); the clarity achieved with this syntax makes it the preferred approach for many developers. Benchmarks using echo() with arguments have generally proved slightly faster than any other method of outputting data to the browser, so I’ll use this approach throughout the rest of this book.The printf() Statement
The next statement, printf(), gives you more fine-grained control over your output, allowing you to define the format of data that will be sent to the browser. You can think of this statement as meaning “print formatted.” This is especially useful when you’re dealing with numbers, which I’ll cover in a moment. First, take a look at the prototype for printf():
int pprintf ( string $format [, mixed $args [, mixed $... ]] )
No te When a function accepts a mixed type, it means that the function can accept several argument types.
Generally, all datatypes except arrays and objects are acceptable. Also, arguments in square brackets in a function prototype are optional.At this point, you can pass a formatting string to printf() along with other arguments that will fit into the format. This is a great way to verify that the data you are passing is of the proper type for the task at hand. Try the following code in test.php:
<?php
printf("PHP is %s!", "awesome"); ?>
This snippet produces the following output:
PHP is awesome!
In the preceding code snippet, you created a formatting string ("PHP is %s!") with a conversion specification, which starts with a percentage sign (%) and is followed by a series of specifiers. In this example, you assigned a type specifier string, which tells the function what datatype the argument to expect.
<?php
$amt1 = 2.55; $amt2 = 3.55;
$total = $amt1 + $amt2;
echo 'The total cost is $', $total; ?>
You might expect to see this sentence when you run your code:
The total cost is $6.10.
However, what you see when you run the code is this:
The total cost is $6.1
For obvious reasons, this isn’t what you want to happen if you’re trying to display a price. Fortunately, this is a case where printf() comes in handy; simply add the following code to test.php:
<?php
$amt1 = 2.55; $amt2 = 3.55;
$total = $amt1 + $amt2;
printf('The total cost is $%%.2f', $total); ?>
Saving and reloading produces the desired result:
The total cost is $6.10
The reason you get the properly formatted number in the latter case is that you’ve specified the type as a floating point number and told the printf() statement to return a decimal out to two places using your formatting string (%.2f). No matter what you pass as the argument, the output will be a floating point value with a decimal out to two places.
For example, you might try to placing a string into your printf() statement to see what happens. In test.php, try running the following code:
When you save and reload, you see the following output:
The total cost is $0.00
This happens because PHP tries to parse, or process, the string called string for a value of some sort; when it doesn’t find one, it evaluates to zero, and the value is taken out to two decimal places by the formatting requirements.
Some of the more common datatype specifiers supported by printf() include:
• %s: Treats the argument as and outputs a string
• %d: Treats the argument as an integer and outputs a signed decimal
• %f: Treats the argument as an integer and outputs a floating point number
No te
printf() supports a wide variety of datatypes, such as scientific notation, ASCII values, and octal numbers. You can learn more about this by visiting the PHP manual at http://www.php.net/manual/en/ and search for sprintf(). (printf() and sprintf() are very similar, so the manual only goes over type specifiers in the sprintf() entry).The sprintf() Statement
The sprintf() statement works in the same way as the printf() statement: you provide a format with type specifiers and a set of arguments to be inserted into your formatting string. The only difference is that while printf() outputs directly to the browser, sprintf() returns a string.
Now is a good point to look at the prototype:
string ssprintf ( string $format [, mixed $args [, mixed $... ]] )
The only difference you see between sprintf() and printf() is the “string” preceding the statement. The word preceding a function tells you what type of value a function will return.
The benefit of using sprintf() in our scripts is that you’re able to format only select sections of data, which saves you from having to format the entire output.
For example, try placing the following code in your test.php file:
<?php
$gpa1 = sprintf("%.1f", 4); $gpa2 = sprintf("%.1f", 3.7);