Beginning
SQL Server Modeling
Model-Driven Application Development in
SQL Server 2008
Bart Weller
SQL Server Modeling and the “Oslo”
Framework Revealed
Beginning SQL Server
Modeling
Model-Driven Application Development in
SQL Server 2008
Bart Weller
or mechanical, including photocopying, recording, or by any information storage or retrieval system, without the prior written permission of the copyright owner and the publisher.
Image copyright notices and permissions: Page 1: ©iStockphoto.com/tompics Page 13: ©iStockphoto.com/tiridifilm Page 33: ©iStockphoto.com/EricHood Page 81: ©iStockphoto.com/seamartini Page 115: ©iStockphoto.com/Leadinglights
Page 137: By permission of the Master and Fellows of St John's College, Cambridge, UK, and Ned Lee Fielden
Page 163: ©iStockphoto.com/pavlen ISBN-13 (pbk): 978-1-4302-2751-9
ISBN-13 (electronic): 978-1-4302-2752-6
Printed and bound in the United States of America 9 8 7 6 5 4 3 2 1
Trademarked names may appear in this book. Rather than use a trademark symbol with every occurrence of a trademarked name, we use the names only in an editorial fashion and to the benefit of the trademark owner, with no intention of infringement of the trademark.
Python and the Python logos are trademarks or registered trademarks of the Python Software Foundation. Publisher and President: Paul Manning
Lead Editor: Mark Beckner
Development Editor: Ewan Buckingham Technical Reviewer: Fabio Claudio Ferrachiatti
Editorial Board: Clay Andres, Steve Anglin, Mark Beckner, Ewan Buckingham, Gary Cornell, Jonathan Gennick, Jonathan Hassell, Michelle Lowman, Matthew Moodie, Duncan Parkes, Jeffrey Pepper, Frank Pohlmann, Douglas Pundick, Ben Renow-Clarke, Dominic Shakeshaft, Matt Wade, Tom Welsh Coordinating Editors: Candace English and Debra Kelly
Copy Editor: Kim Benbow
Compositor: Bytheway Publishing Services Indexer: Brenda Miller
Artist: April Milne
Cover Designer: Anna Ishchenko
Distributed to the book trade worldwide by Springer-Verlag New York, Inc., 233 Spring Street, 6th Floor, New York, NY 10013. Phone 1-800-SPRINGER, fax 201-348-4505, e-mail [email protected], or visit
www.springeronline.com.
For information on translations, please e-mail [email protected], or visit www.apress.com.
Apress and friends of ED books may be purchased in bulk for academic, corporate, or promotional use. eBook versions and licenses are also available for most titles. For more information, reference our Special Bulk Sales– eBook Licensing web page at www.apress.com/info/bulksales.
The information in this book is distributed on an “as is” basis, without warranty. Although every precaution has been taken in the preparation of this work, neither the author(s) nor Apress shall have any liability to any person or entity with respect to any loss or damage caused or alleged to be caused directly or indirectly by the information contained in this work.
To: Kathie — wife and companion
Riley, Grady, Sallie, and Brook —the future
Contents at a Glance ...iv
Contents ...v
About the Author...x
About the Technical Reviewer ...xi
Acknowledgments ...xii
Introduction ...xiii
Chapter 1: Installing and Setting Up SQL Server Modeling ...1
Chapter 2: Introduction to Intellipad...13
Chapter 3: Domain-Specific Languages 101: Lola’s Lunch Counter...33
Chapter 4: Introduction to Quadrant ...81
Chapter 5: M – The Modeling Language...115
Chapter 6: SQL Server Modeling Services – The Folder Pattern ...137
Chapter 7: SQL Server Modeling Services – Security ...163
Appendix A: Intellipad Primer ...207
Appendix B: Intellipad Mini-Buffer Commands ...215
Appendix C: Intellipad Commands and Gestures ...217
Appendix D: The Quadrant Menu Tree...225
Appendix E: Generated T-SQL for the Car Model Example ...229
Contents
Contents at a Glance ... iv
Contents... v
About the Author... x
About the Technical Reviewer ... xi
Acknowledgments ... xii
Introduction ... xiii
Chapter 1: Installing and Setting Up SQL Server Modeling...1
Software Pre-Requisites...1
Hardware and Operating System Requirements ...2
Configuring SQL Server ...2
Chapter 2: Introduction to Intellipad ...13
Getting Started with Intellipad ...13
The File Menu ... 14
The Edit Menu... 16
The View Menu ...20
Zoom... 23
Chapter 3: Domain-Specific Languages 101: Lola’s Lunch Counter ...33
Some Caveats ...33
A Simple Exercise: The Sandwich Language...34
Where You Want to End Up... 34
Getting Started with the Intellipad DSL Grammar Mode Interface ... 36
Broadening the Choices... 39
Interleaving (Ignoring) Whitespace... 40
Defining Tokens... 41
Enabling Multiple DSL Statements ... 42
Tightening Up the Syntax... 45
Moving Toward Structured Data... 45
Testing the Syntax... 48
Making the Syntax More Flexible ... 52
Extending SandwichOrders to More Than One Main Ingredient... 54
Deployment ... 56
Thinking Ahead... 78
Concluding Thoughts ...79
Chapter 4: Introduction to Quadrant...81
My Car: Creating a Simple Model in Quadrant...81
Deploying the Model to SQL Server ... 85
Viewing the Model and Adding Data in the Explorer ... 87
Customizing Column Views in Quadrant... 93
Viewing and Editing the Model in SQL Server ... 95
Managing Changes to the Data in Quadrant... 97
Managing Conflicts in Quadrant ... 99
Using the Quadrant Explorer Query Bar... 102
More on Customizing the View ... 105
Summary ...114
Intrinsic and Derived Types ... 118
Modules Revisited: Import and Export Directives ...127
Extents...129
Computed Values...133
Overloading ... 135
Languages ...136
Summary ...136
Chapter 6: SQL Server Modeling Services – The Folder Pattern ...137
The Modeling Services Folder Pattern...138
Example: A Quality Control System for CarModel... 139
Chapter 7: SQL Server Modeling Services – Security ...163
Using Security to Limit Data Visibility ...164
Building on the CarModel ...165
Building the MfgComponentModel Project in Visual Studio...167
Refining the Model to Include Security...170
HasFolderAndAutoId ... 175
Adding the PatternApplication Module ... 176
Building the Project ... 181
Deploying to the Database... 182
Creating the QC Folders... 187
Building the Sample Data ... 189
Setting Up the QC Manager Test Users ... 195
Summary ...205
Appendix A: Intellipad Primer...207
Script Components ... 212
List of Available Modes...212
Command-Line Options ...213
Appendix B: Intellipad Mini-Buffer Commands...215
Appendix C: Intellipad Commands and Gestures ...217
Appendix D: The Quadrant Menu Tree ...225
Appendix E: Generated T-SQL for the Car Model Example ...229
Bart Weller is a software developer and consultant specializing in object-oriented software development. Over the years he has worked on a system simulation of a satellite command and control system, a laser remote sensing system for measuring trace
amounts of atmospheric pollutants, and scientific
instrumentation systems for NASA's Apollo Skylab. Enterprise business applications he has worked on include an online
About the Technical Reviewer
Acknowledgments
I would like to acknowledge the patience, hard work, and great advice of my coordinating editors, Candace English and Debra Kelly. Mark Beckner, member of the Apress editorial board, served as Lead Editor on this project, and first suggested the book, lo so many months ago, back in the days when the project was still known by the code name "Oslo." Both Mark and Ewan Buckingham, Development Editor with Apress and also a member of the editorial board, provided technical comments and
suggestions on how to improve the drafts. Fabio Ferracchiati and Roy Brandt provided technical reviews of the early chapter drafts.
Kraig Brockschmidt and David Matson with the Microsoft SQL Server Modeling team provided outstanding technical help when the need arose. Lars Corneliussen also provided helpful feedback. Thank you all, gentlemen.
I would also like to thank my wife, Kathie, for her constant support and for enduring long hours with me closeted in a dim and cluttered office, sipping old coffee and glowering at my laptop.
And finally, many thanks to Dr. Meeta Goel and my co-workers at Colorado Mountain College— Barb Johnson, Ashiyana Regmi, Vee Kinion, Jonathan Hansen, and Melissa DeHaan—for their unflagging patience with bad moods and long absences from the office.
The making of a book always involves a surprising number of people, most of whose names remain unknown to the author. I hope at least some of them might see these words and accept my appreciation.
Introduction
SQL Server Modeling is Microsoft’s new model-driven .NET framework for rapidly designing and building software applications. In the past, software has traditionally been developed from static models or requirements—the data (e.g., inventory, customer data, or financial) can change over time, but the model structure and logic remain fixed in code that may have been developed and compiled years ago.
Model-driven development, as reflected in the SQL Server Modeling .NET framework, supports the design and creation of more dynamic applications where the model can change over time. This form of agile development, with much shorter release cycles, is ideal for businesses operating in rapidly changing technological, regulatory, and competitive environments: The list covers a broad gamut of IT-intensive enterprises. Examples might include financial services, insurance, telephony, and high-tech manufacturing. Shorter release cycles enabled by model-driven development can significantly enhance the competitiveness and agility of these kinds of enterprises.
Another advantage of SQL Server Modeling is that it enables stakeholders not trained as programmers to create a business or process model using a modeling tool (called Quadrant), and immediately generate executable code based on their model. This enables business owners, managers, and others to become involved in a quick, iterative refinement process for designing and testing the model and application over a much shorter release cycle than would be possible with more traditional approaches.
As Bob Muglia, President of Microsoft Server & Tools Business, said,
“The benefits of modeling have always been clear, but traditionally only large enterprises have been able to take advantage of it and on a limited scale. We are making great strides in extending these benefits to a broader audience by focusing on three areas. First, we are deeply integrating modeling into our core .NET platform; second, on top of the platform, we then build a very rich set of perspectives that help specific personas in the lifecycle get involved; and finally, we are collaborating with partners and organizations like OMG [Object Management Group] to ensure we are offering customers the level of choice and flexibility they need.”
SQL Server Modeling includes the following components, all of which are covered in this book:
• SQL Server Modeling Services—Where the specifics of the model entities and relationships all reside, and which provides the Base Domain Library consisting of pre-built patterns and services ready to be leveraged to your modeling needs.
• Quadrant—A modeling tool for creating and modifying the model.
Installing and Setting Up
SQL Server Modeling
This chapter will walk you through the procedures of downloading, installing, repairing, and uninstalling SQL Server Modeling, as well as what’s required for getting software pre-requisites in place. These pre-requisite applications should, of course, be up and running before you install SQL Server Modeling. I will take this step by step, and if you follow the procedures outlined in this chapter, you should have a working installation of SQL Server Modeling by the time you finish.
But before downloading or installing anything, take a look at the current version of the SQL Server Modeling release notes. As of this writing, these can be found at the following MSDN URL:
http://msdn.microsoft.com/en-us/data/dd823315.aspx
The release notes provide links for downloading the SQL Server Modeling setup file as well as links for downloading the software pre-requisites listed in the next section. They also provide important information affecting how you should go about installing SQL Server Modeling and what needs to be in place for a successful setup. Once you have run the setup file, there should be a Readme file installed under Program Files/Microsoft Oslo/1.0 /Readme.htm. (This is the installation path for the CTP R3 release. The path may be different for subsequent releases.) The Readme file provides much of the same information as that provided in the release notes and can be viewed by loading it in your web browser using the browser’s File Open menu.
The procedures that follow are based on the November, 2009 CTP Release 3. (CTP is the acronym for Community Technology Preview.)
Software Pre-Requisites
Several software systems must be in place before you begin the actual installation of SQL Server Modeling:
• Windows Installer 4.5 or later (search for “Windows Installer 4.5 Redistributable” on www.Micorosoft.com ]
• To run setup, Windows Installer 4.5 is required.
• .NET Framework 4
• SQL Server 2008 SP1 Express (or higher edition)
• Visual Studio 2010 (any edition):Visual Studio is not required for SQL Server Modeling CTP Release 3, but for full functionality with Visual Studio and M Tools integration, Visual Studio 2010, Visual C#, and Visual Web Developer are required.
Hardware and Operating System Requirements
SQL Server Modeling must be installed on a computer with any combination of the following CPU architecture and operating systems. Note the SP (Service Pack) for some of the listed operating systems. If the Service Pack listed is not installed, it should be downloaded and installed before proceeding.
Supported CPU Architectures:
• X86
• X64 (Windows-on-Windows)
Hardware Requirements:
• Minimum: 1.6 GHz CPU, 1GB RAM
• Recommended: 2.2 GHz CPU, 2GB RAM
Supported Operating Systems:
• Windows XP SP3 or later
• Windows Vista (SP1, SP2, or later)
• Windows Server 2003 R2 (SP2 or later)
• Windows Server 2008 SP2
• Windows 7
Configuring SQL Server
Before running the installation executable, be sure SQLServer is running. Bring up the SQL Server Configuration Manager as shown in Figure 1-1. Here’s the sequence for bringing up this tool:
1. Click the Start button on your Windows Taskbar.
2. Click All Programs.
3. Go to Microsoft SQL Server 2008 (if, for example, you are running the 2008 SKU).
5. Click SQL Server Configuration Manager.
Figure 1-1. Opening the SQL Server Configuration Manager
Once you have the Configuration Manager running, navigate to Configuration Tools, then to SQL Native Client XX.X Configuration/Client Protocols, (where XX.X will correspond to the version number of your SQL Server installation, such as 10.0), as shown in Figure 1-2. Which client protocols are enabled will depend on whether the database is running on the same computer on which you’re installing SQL Server Modeling, or remotely. If it’s running on your local machine, all you should need is the Shared Memory protocol. If it’s running on a server on your network, Named Pipes and/or TCP/IP should be enabled.
It doesn’t hurt to have Shared Memory, Named Pipes, and TCP/IP all enabled, but their specified order may affect performance. If SQL Server is running on a local server, your network administrator should be able to tell you whether TCP/IP or Named Pipes will provide better performance. On most large networks, TCP/IP would be the preferred protocol.
VIA (Virtual Interface Adapter) would normally be disabled unless your hardware environment supports this protocol, in which case the other protocols can be disabled. The order can be changed in the Configuration Manager by right-clicking in the right frame on any of the enabled protocols. You will see a popup menu where Order will be one of the possible selections.
Downloading and Installing
Once the software pre-requisites previously listed are in place, you’re ready to download the SQL Server Modeling installation file from the SQL Server Modeling download website. The file size is around 40
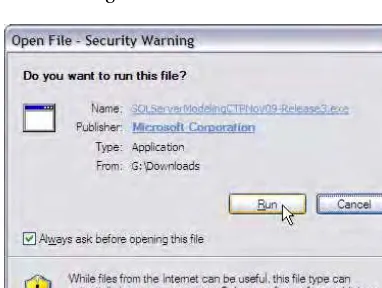
MB, so it can take a few minutes if you have a slow Internet connection. After it has downloaded, you should be able to open it in your browser’s download facility. Another option would be to open Windows Explorer and navigate to the folder where you have saved the downloaded file. Open the file by right-clicking on the filename and then right-clicking the Open option. You may see a security warning like the one shown in Figure 1-3.
Figure 1-3. Open File – Security Warning dialog when running the installation file
Click the Run button to start the installation process. The next dialog window to appear (shown in Figure 1-4) will be the initial SQL Server Modeling installation window. This gives you two choices: Install Now or Customize. If you are running the SQL Server Modeling install for the first time, click the Install Now option.
Figure 1-4. SQL Server Modeling initial installation window
Figure 1-5. Usage Reporting window
Check or uncheck the box, according to whether you would like to participate in the Customer Experience Improvement Program, then click the Continue button.
The next step is to accept the End User License Agreement (shown in Figure 1-6). Read the agreement and (if you agree) click the I Accept button.
Figure 1-6. Accepting the End User License Agreement
Figure 1-7. Step 3: Installing SQL Server Modeling Services, Quadrant, and other components
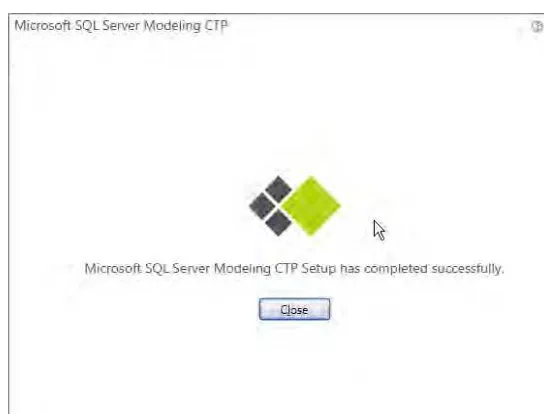
This portion of the installation process can take ten minutes or more, depending on your computer’s speed. Once this part of the installation has completed, the process will move on to the fourth and final step, which configures and deploys the Repository to SQL Server (see Figure 1-8). Again, this may take several minutes to complete.
Figure 1-8. Step 4: Configuration and deployment
Figure 1-9. Successful setup completion
At this point, simply click on the close button to finish the installation.
Checking the Installation
After the installation is completed, click the Start button on the Windows Taskbar, then click All Programs to see if the Microsoft SQL Server Modeling CTP program group appears in the All Programs list. If you click on this program group, you should see Intellipad, Quadrant, and other options listed, as shown in Figure 1-10. The order of the items may not be the same as shown in the figure, but you can rearrange the items by clicking and dragging each to the position you want.
Figure 1-10. The SQL Server Modeling CTP program group
Figure 1-11. SQL Server Modeling CTP listed in Add or Remove Programs
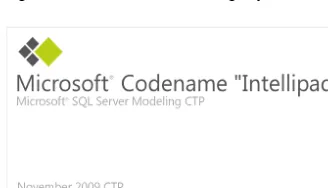
In the Start button All Programs list, double-click on Intellipad. As it is loading, the Intellipad “splash screen” should display more or less as it appears in Figure 1-12.
Figure 1-12. Intellipad splash screen
Bring up Quadrant and each of the other three options in turn, just to familiarize yourself with them.
I recommend taking a close look at the Readme file, which has some tips on troubleshooting in case you run into problems, as well as links to other resources, including release notes and the online Help page. It’s good to keep these resources in mind as you start working with the software, in case any issues or questions should come up.
If Something Goes Wrong…
If you run into problems with the installation, there are several things you can do:
1. The Readme file includes a troubleshooting section that discusses what to do if you run into several different kinds of problems.
2. The release notes list a number of breaking changes and known issues in detail. If you don’t find what you need in the Readme file, you may find some useful tips in the release notes. The Readme file provides a link to online release notes.
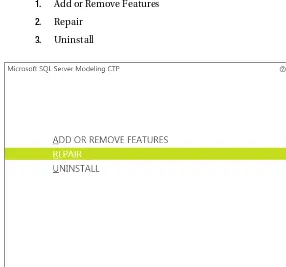
3. You can run the Repair option by clicking the Change/Remove button in the Add or Remove Programs section of the Control Panel (refer to Figure 1-11). This option is discussed briefly in the following section.
The Repair Option
Clicking the Change/Remove option for Microsoft SQL Server Modeling CTP in the Add or Remove Programs list (refer to Figure 1-11) will present a window with three selections (shown in Figure 1-13):
1. Add or Remove Features
2. Repair
3. Uninstall
Figure 1-13. Selections after clicking the Change/Remove button
I won’t cover Add or Remove Features here, since that option isn’t relevant to what I will be discussing in the rest of the book, nor is it relevant to recovering from a faulty installation.
To invoke the Repair option, simply click on the option or cursor down one line and press Enter. The repair process will display a progress bar as it’s executing (similar to the window shown in Figure 1-7). After the process is finished, you should see a completion window similar to what was shown in Figure 1-9. Click the Close button and re-test the installation to see if running the Repair process has resolved the problem.
If the problem persists, the next step would be to uninstall and then re-install, as described in the next section.
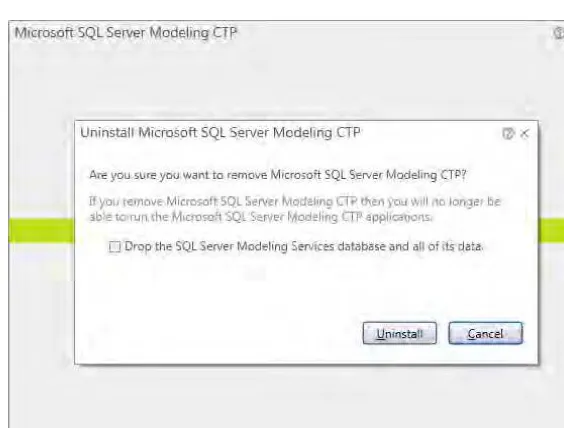
The Uninstall Option
Modeling CTP, and then click on the Change/Remove button. Leave Add or Remove Programs window open so you can later check that the uninstall ran successfully.
You should see the Uninstall window, as was shown in Figure 1-13. Click on Uninstall. Next, you should see an Uninstall confirmation window (shown in Figure 1-14).
Figure 1-14. Uninstall confirmation window
Note that this window includes a checkbox to drop the SQL Server Modeling Services database and all its data. If you want to perform a complete uninstall, check this box, but understand that all data in the Repository will be lost. If you are uninstalling with the intent of re-installing because of problems with your current installation, and you know there is data in the Repository you would like to retain (say from going through one or more of the exercises later in the book), then leave this box unchecked. If on the other hand, there is no data you want to keep, there would be no reason to leave this box unchecked.
If you are uninstalling because you believe you have a damaged or corrupt installation, you may want to try the Repair option first. There is always a chance that the Repair option will take care of certain issues without having to go through a complete uninstall and re-install.
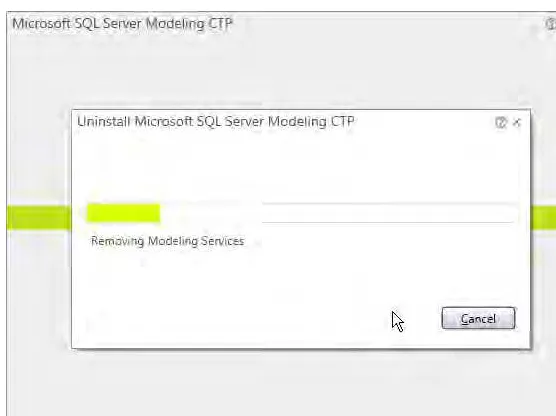
Figure 1-15. Uninstall progress window
After the process finishes, you will see a successful completion notification window like that shown in Figure 1-16.
Figure 1-16. Successful completion of the uninstall
Summary
In this chapter, I’ve covered the procedures for installing, repairing, and uninstalling SQL Server Modeling. The last part of the installation process should be invoking all items in the SQL Server Modeling CTP program group, not only to check that they are working properly, but also to see what happens and what the interface looks like when you invoke each one. The Readme file and release notes are important resources; it’s a good idea to take a look at these, especially if you run into problems with the installation or with running any of the development tools.
Introduction to Intellipad
We’ve used text editors to write code from the beginning—at least as far back as assembler and COBOL. Everything from Notepad to Emacs to Eclipse, and all flavors in between.
This chapter introduces Intellipad, SQL Server Modeling’s code editor. Intellipad is a lightweight but talented text editor for building and editing models and domain-specific languages (DSLs) in M code. It can be used for coding or editing a wide range of programming languages, like the editor included with Visual Studio. In fact, the Intellipad core is a close relative to Microsoft’s Visual Studio code editor. It contains a built-in Python interpreter, and can be configured and enhanced using Python scripts. Most of its functionality is implemented through named components that can be modified or removed. Some developers have taken to calling it “Emacs.NET” because of its flexibility and configurability.
Getting Started with Intellipad
Intellipad is the text editing tool used for editing M. It can also be used to write and edit other kinds of languages, such as Python and T-SQL. Like Emacs, it can be extended and configured to support development in a wide array of languages. It has even been configured to behave as an IM chat or Twitter client. In its most basic incarnation, it is a small and simple application kernel, but is easily enhanced with plug-ins or add-ons that enable it to support syntactic colorizing, indenting, or “Intellisense,” similar to that provided in the Visual Studio text editor.
There is one exercise at the end of this chapter, but you can use what follows as one big exercise. Bring up Intellipad and see if you can invoke each feature more or less in the same way as it’s discussed in what follows. The interface may appear a little differently on your computer, depending on which version of Windows and Intellipad you are running. But if you follow along by invoking each feature as it’s discussed, you should have a much better feel for the capabilities of this tool by the time you finish this chapter.
Figure 2-1. Starting Intellipad from Start/All Programs
This should bring up an empty Intellipad window with a default text buffer named “untitled1,” similar to what is shown in Figure 2-2. As soon as you type anything in the pane (more properly called
buffer view), an asterisk will appear next to the buffer name to indicate that the contents of the buffer have changed but have not yet been saved to a file.
Figure 2-2. Initial Intellipad window with some sample text
Look at the top banner of the window, and you’ll see four top-level menus:
• File
• Edit
• View
• Help
I’ll talk about each of these in turn, but I won’t go through the entire menu tree in every detail. I’ll also cover the remaining parts of the text buffer view interface appearing below the menu banner—what you see displayed as “untitled1*,” “100%,” and “Standard mode.”
The File Menu
Find in Buffers command under the Edit menu, which applies to all buffers. As with most Windows-based text editors, you can open multiple instances of Intellipad.
Figure 2-3 shows the Intellipad File menu. As you can see, most of the options have keyboard shortcuts, and this is also the case with the other top-level menus in Intellipad.
The New option, of course, opens a new, empty buffer, ready for typing in new code. New M Project opens a new M project and changes the buffer view to Project mode. This mode provides a display of errors in the error list if the content is not a syntactically valid MSBuild file. (This is a more advanced subject and is beyond the scope of this book.)
Figure 2-3. The Intellipad File menu
Save, Save As, and Save a Copy are all self-explanatory. (As usual in the Windows environment, the underlined character of a menu option indicates the single-character keyboard shortcut for invoking that option.)
The Encoding option allows you to save the current buffer in three encoding standards: ASCII, Unicode, or UTF8, which is the default. If you change the encoding, it changes the setting only for the active buffer view, leaving the encoding unchanged for files saved from other buffers. If a file with an encoding other than ASCII, Unicode or UTF8 is opened, no item is checked in the encoding submenu. If you mistakenly check one of these, close the file without saving, or choose Save As and save the buffer to a different filename to avoid changing the encoding of the original file.
Close closes the active buffer view pane. If there is only one active buffer view, this option is disabled.
Recent displays a list of the most recently used (MRU) files you’ve worked with in Intellipad, whether these were used in the current session or past sessions.
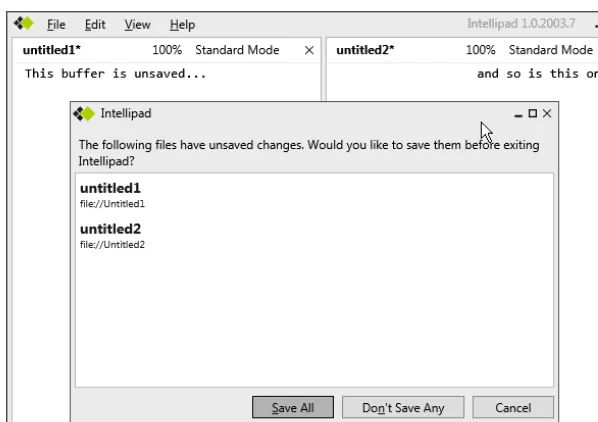
Figure 2-4. Prompt to save unsaved buffers on exit
The Edit Menu
Figure 2-5 shows the Intellipad Edit Menu. As you can see, some of the options (Undo, Redo, Cut, and Copy) are disabled (grayed out) because, in the current state of the buffer view, there’s nothing these options can do. These options are self-explanatory, and behave as one might expect. The same goes for the next two options: Paste and Delete.
The Find Commands
When you try the Find option, however, you see some new behavior. Here Intellipad shows its colors more as a code editor rather than a simple Notepad-like text editor. Let’s try doing a Find with two different buffers, as shown in Figure 2-6. I’ve written some sample text in both buffers, with the word “amazing” in both views.
Figure 2-6. The Intellipad Find command
Clicking on Find (or using the Ctrl-F keyboard shortcut) brings up something called the mini-buffer
as a third buffer view, with a command prompt, indicated by the three angle brackets (>>>) followed by Find('|'). The mini-buffer is a special buffer that allows you to execute Intellipad command functions directly. I’ll discuss use of the mini-buffer at more length in the section called “The View Menu” later in the chapter.
But for now, let’s see what happens when you enter the word “amazing” between the single quotes. In Figure 2-7 the untitled1* buffer view shows what happens after you’ve done this: The word “amazing” is highlighted in the first (active) buffer view, but not in the second (inactive) one. Also note that the bottom (mini-buffer) buffer view is not in Standard mode, but in MiniBuffer Interactive mode.
Figure 2-7. Find function highlighting the target word
when the string “amazing” is entered as the target pattern, you get an additional findresults buffer with the line/column location of each found pattern location in each buffer where it occurs—including previous strings already in the mini-buffer.
Figure 2-8. Find in Buffers command
The Replace Command
The next option under the Edit menu, Replace (Ctrl-H), uses the mini-buffer facility in the same way, except that the Replace('<searchPattern>','<replacePattern>') function, with two arguments, is used. Figure 2-9 shows an example, with two different buffers containing the same target word, after the replacement function has been invoked from the first (untitled1) buffer view. This example makes it clear that the function works only in the context of the active buffer view. The replaced string remains highlighted.
The Go to Line Command
The Go to Line option again uses the mini-buffer to enter the target line number and execute the command, using the Goto(<line number>) function, where line number is an integer.
Behaviors
The Behaviors option allows you to control some specific behaviors of any particular buffer view, as shown in Figure 2-10. Enabled behaviors are indicated with a check mark after the name.
Selection Highlight is useful for highlighting strings with the Find and Replace functions. Error squiggles will flag syntax errors or other errors when working with the various programming modes (e.g., M or MGrammar, or Python) where Intellipad has built-in syntax awareness.
Figure 2-10. Turning behaviors on or off
Turning the column indicator on demarcates columns higher than column 80 with a grayed
background, enabling you to see when a line exceeds 80 characters. This can be useful in some coding or data contexts, and is illustrated in Figure 2-11.
Figure 2-11. Line numbers and the column indicator turned on
Turning Word Wrap on will wrap a line too long to otherwise display within the buffer view. Figure 2-12 shows two buffer views addressing the same buffer (that is, displaying exactly the same data). Line numbering has been turned on in both buffer views, but Word Wrap is turned off in the left one and turned on in the right.
Figure 2-12. Word Wrap off (left pane) vs. Word Wrap on (right pane)
Disable External Changes
This behavior, if enabled, will disable external changes to all buffers belonging to the Intellipad session. For example, if you are editing metadata in the M Graph mode that has been persisted in the Repository, and this metadata is changed through an external interface, changes to the buffer will not occur. If multiple Intellipad sessions are running, each session has its own setting for this behavior.
The View Menu
Figure 2-13. Intellipad View menu
Full Screen
The Full Screen option switches to a view where the current Intellipad window fills the entire display, and the title/menu bar at the top is removed. This provides as much real estate as possible on the display for reading, editing, or typing new content in the window. Besides dispensing with the menu bar, the buffer name (normally displayed under the menu bar in the upper left) and the zoom level and mode in the upper right disappear.
Figure 2-14 shows a three-pane Intellipad window before being put into the Full Screen format, while Figure 2-15 shows the same window in Full Screen format, but at a reduced scale, in order to fit on the page.
Figure 2-15. Window from Figure 2-14, but in Full Screen mode (reduced scale)
Figures 2-16 and 2-17 show a closeup view of the window control icons for full-screen and restored size windows in this view mode.
While the text and upper right of the window in Figure 2-15 are difficult to read because of the reduced scale, you can see that the display behaviors of each pane remain the same. The primary difference is that the menu bar, zoom setting display, and mode display are gone. If you click on the icon to the left of the Close icon , this will restore the window to its previous size, but will retain the Full Screen format without the menu bar and other items.
Figure 2-16. Detail of Intellipad Full Screen icons: Full Screen view
Figure 2-17. Detail of Intellipad Full Screen icons: restored size and position
Here’s a description of the action performed by clicking each of these control icons:
• Latches and drags the window to a new position. This icon is displayed only when the Intellipad window is restored to its previous (not full display) size, but disappears when the window is actually at full-screen size. Cursoring over it will
cause the cursor to change to a “grab and drag” cursor . Left-clicking while this cursor is displayed allows you to grab and drag the window to a different position on the screen.
• Restores the default Intellipad view format, with menu bar and pane titles.
• Minimizes the window.
• Restores window to its previous size and position (prior to setting to Full Screen view). After this function is executed, this icon will change to a Full Screen icon: .
Zoom
Any Intellipad pane can be zoomed in or out. There are several ways to do this, but the easiest way is to press the Ctrl key while moving the scroll wheel on your mouse. Pressing the Ctrl key while scrolling forward will zoom the active pane in (increasing the scale, or effective size of the font), while scrolling back will have the opposite effect. (This also works in Quadrant, which I’ll be talking about in the next chapter.) The zoom level, which defaults to 100%, is displayed on the right of the title line of the pane. The location is to the left of the mode name on the pane’s title line, indicated by the cursor in Figure 2-18.
Executing the Zoom function under the View menu causes the mini-buffer pane to appear at the bottom of the Intellipad window. (I wrote about this feature in the earlier section titled “The Find Commands”) The Zoom() function is automatically invoked in the mini-buffer, with the argument set to the active pane’s current zoom setting. The current zoom setting is highlighted, as shown in Figure 2-18, so that you can easily change it to a different level by typing the new value. Note that you can also zoom by clicking the Zoom setting, displayed as a percentage. Clicking this will invoke the mini-buffer with the Zoom function in exactly the same way as zoom can be invoked from the View menu.
Figure 2-18. Intellipad Zoom function
Split Windows
You’ve already seen examples of how the Intellipad window can be split horizontally and/or vertically into multiple panes, addressing the same or different buffers. Splitting the current pane (the pane with focus) is accomplished using the View Split Horizontally (Ctrl-W,-) or View Split Vertically (Ctrl-W,\) menu options. Initially, the new pane created by the split action will address the same buffer as the active pane in which the split action was invoked, so you should see exactly the same content in the new pane as you did in the original, and at the same zoom level. However, other behaviors set in the original pane, such as line numbers or Word Wrap will be defaulted.
Figure 2-19. Vertical split views addressing the same buffer (unsaved)
In Figure 2-20, the untitled1 buffer shown in Figure 2-19 has been saved to the file My First
Buffer.txt, and a horizontal split pane has been created (using the Split Horizontally menu option or the Ctrl-W,- key combination) at the bottom of the window with a new unsaved buffer. The name of this new buffer defaults to the name untitled2, since the default1 name was used in creating the first new buffer and then renamed to My First Buffer.txt when it was saved to a file. As soon as you type a single character in the untitled2 pane/buffer, the buffer has new content, and an asterisk is appended to the name to indicate the buffer has changed. The zoom level in this buffer has been increased to 120%.
Figure 2-20. Vertical and horizontal split buffer views with different saved and unsaved buffers
The Mini-Buffer
The mini-buffer is a special-purpose, interactive buffer enabling you to invoke a wide range of functions or behaviors in Intellipad. Think of it as a way of interacting or controlling your editor in command-line mode. I touched on it briefly in the sections titled “The Find Commands” and “The Replace Command.”
The Help Menu
The Help menu, shown in Figure 2-21, provides two options: Commands and Intellipad Primer. The latter option can also be invoked with the F1 function key.
Figure 2-21. Intellipad Help menu
Commands List
Invoking the Commands option will display a list of functions in the current active pane in Rich Text mode. These functions must be executed in the mini-buffer (previously discussed), but also can be used in a script file. Figure 2-22 shows some of the functions listed in the Commands view.
Intellipad Primer
Invoking the Intellipad Primer option of the Help menu displays a useful overview of the Intellipad interface and features, including a discussion of what is involved in customizing and configuring the editor. Like the Commands list, this is displayed in the currently active pane in Rich Text mode. Figure 2-23 shows the top part of the Primer text.
Figure 2-23. The Intellipad Primer
View Title Banner Functions
Figure 2-24. Current buffers drop-down menu
Clicking the zoom level, as discussed in the upcoming “Zoom” section, will bring up the mini-buffer with the Zoom(<zoomLevel>) function, allowing you to enter a different zoom level setting.
View Modes
Clicking the current mode setting at the right of the title banner (see the cursor position in Figure 2-25) will display a drop-down of available modes. I’ll give a brief overview of these in this section. Some of this will be covered in more detail in later chapters, since I’ll be using them to show how domain-specific languages and models are developed.
Figure 2-25. Intellipad view modes
Some of the extended modes, such as DSL Grammar and M Graph, will add an additional menu option to provide additional functionality specific to that mode.
DSL Grammar mode provides the functionality for writing domain-specific languages, or DSL grammars. This includes features such as syntax colorization, error marking (if this behavior is enabled), and the ability to see the parsing output for your grammar with DSL input. In this mode, a fifth menu option, DSL, is added to the Standard mode menu items. One of the choices under this menu option, Split New Input and Output Views, will split the window into three views, as shown in Figure 2-26. In this figure, you can see that the titles of the left and right panes both start with untitled2. This doesn’t mean that the left and right panes are the same buffer, however. The left view displays the text of the DSL input, while the right view, which is read-only, displays the resulting M Graph output generated by the DSL grammar (contained in the center view).
Figure 2-26. DSL Grammar mode with DSL input and M Graph output views
List mode is used internally by some Intellipad features to display a buffer showing a list whose items can be clicked to navigate to the selected destination buffer.
I have already briefly touched on the M Graph mode, used in conjunction with the DSL Grammar mode.
M mode is used for developing M code. As with the DSL Grammar mode, M mode provides syntax colorization, error marking of syntax errors, and the T-SQL preview mode.
Project mode provides support for developing projects. These projects will normally consist of multiple M or DSL grammar (.mg) files and can be managed and edited in Visual Studio with the Visual Studio M language plug-in.
Python mode supports development of Python code. As with M mode, Python mode provides syntax colorization and error flagging for syntactically incorrect Python. For test metric purposes, code coverage is provided if you launch Intellipad from the command line with the /coverage option.
Table mode is used primarily in the Errors pane (when the Errors pane is enabled) to display a list of errors. Using this mode to display errors enables the errors to be sorted on any column.
T-SQL 1.1 mode provides a view of the T-SQL code generated by M code. To show how this works, let’s try a small exercise.
Demonstrating the Intellipad T-SQL Preview Mode
In this exercise, you will create some very simple M code to demonstrate how the SQL Server Modeling
framework is able to generate T-SQL output code from M input code. The exercise involves creating an
extent
of entities I will call
SandwichOrders. An extent is a concept in M that maps to data storage (a
Here is the procedure:
1.
Open Intellipad and save the empty buffer as a file with the name
LunchCounter.m. Do this from the File
Save As menu option. This will switch
the mode to M mode. Create an empty module called
LunchCounter, as shown in
Figure 2-27.
Figure 2-27. Creating an empty LunchCounter module in M
2.
Click on the M Mode menu and select T-SQL Preview (shown in Figure 2-28).
Figure 2-28. Selecting the T-SQL Preview for the M code
Figure 2-29. No code is generated yet because you only have an empty module with no extent (SQL Server table) defined.
4.
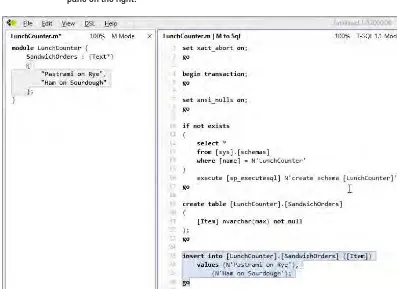
Now let’s add the following line within the scope of the
LunchCountermodule to
create a
SandwichOrdersextent:
SandwichOrders : {Text*};
This simple line of code can be interpreted to say that the
SandwichOrdersextent
(table) is defined as a collection of text strings. This is enough to cause the T-SQL
code generator to spring into action and generate the code shown in the right
pane of Figure 2-30. This pane is intended as a preview pane for the generated
code, and as such, is read-only. However, you can do a File
Save As to save
this code to a text file.
5.
To carry the example a little further, you can add a couple of sample
SandwichOrders
instances to the M code and see how this affects the generated
T-SQL code. Lets add a
"Pastrami on Rye"order and a
"Ham on Sourdough"order. You can do this by simply adding the collection of the two text strings,
represented between braces and with the two items of the collection separated by
a comma:
{"Pastrami on Rye", "Ham on Sourdough"}
You place this code for the collection immediately after the extent definition
(Figure 2-31). Note that carriage returns and new lines are regarded as white
space by the compiler, which is what is generating the T-SQL code in the preview
pane on the right.
Figure 2-31. Adding two SandwichOrders instances to the extent
Let’s walk through the generated T-SQL code in the right pane of Figure 2-31 to see what’s happening:
Lines 1-8
: This does some initial configuration stuff and begins a transaction for code sequence
Lines 10-17
: This tests whether a
LunchCounter(the name of the module) schema already
exists in the database. If it doesn’t, the schema is created.
Lines 19-23
: This section creates the
SandwichOrderstable with a single text field to contain the
text of the order.
Lines 25-28
: This inserts the two sample
SandwichOrdersinstances into the table.
Lines 30-31
: This commits the transaction that was initiated at the top of the code.
And all of this from just a few lines of M code! It looks like the advantage provided by the SQL Server
Modeling framework—in terms of enabling a developer to create, refine, and maintain a domain model—
is significant.
Domain-Specific Languages 101:
Lola’s Lunch Counter
In this chapter, I’ll talk about domain-specific languages (DSLs), and you’ll build a very simple DSL using Intellipad. As one might guess, the descriptive term domain-specific means using the language to define a model or do something useful in a specific area of activity or knowledge. In the context of software development, the term domain normally applies to a business operation, process, or workflow, such as micro-brewing or creating insurance products. The term could apply to areas as diverse as risk management, modeling traffic flows, or creating a just-in-time inventory system. Most DSLs, however, are not so ambitious and address more narrowly constrained domains.
Not unlike a map (the kind on paper showing highways and towns), a DSL is a way of abstracting away the conceptual “chaff” of a domain or process so that you have a cleaner and simpler way of representing and analyzing the problem at hand. The benefit is greater ease of analysis and
development; the risk is that some of the conceptual chaff that’s removed might include a few grains that you really could use later on. Usually (but not always), it’s easy to add these kinds of things back in if you need them.
Martin Fowler’s definition of a DSL is, “a computer programming language of limited
expressiveness focused on a particular domain” (DSLDevCon 2009 talk: http://msdn.microsoft.com/en-us/data/dd727707.aspx). The phrase “limited expressiveness” is key here, and it is what differentiates a DSL from a general programming language like C# or Java. But why would you want limited
expressiveness? Isn’t expressiveness a good thing in a programming language? Well. . .yes and no. Usually, there’s a strong correlation of expressiveness with complexity, and if you can remove some of the complexity to gain clarity and ease of use in a domain, that could be a good thing.
DSLs are especially useful as a means of communication between the technical people and stakeholders. If the stakeholders have a relatively simple tool, like a clear and well-designed DSL, it makes it that much easier to communicate their intent to the software architect, designer, or developer.
In this chapter, you’ll develop a very simple example of a DSL, the code to process the language (sometimes called Mgrammar, or DSL Grammar, in the context of SQL Server Modeling), and deploy the resulting model with instances to SQL Server. If all goes according to plan, you should see a direct mapping from the DSL model and the structure of the data model reflected in the database.
Some Caveats
characterized as a rudimentary form of test-driven development. What I mean by this is that I start with some very simple sample data (e.g., some simple sandwich order expressions for the DSL); then you build some code with this sample data, and see if it works. If it does, you move to the next level of refinement in terms of the DSL syntax, and modify the sample DSL statements to reflect this new level of complexity. This will nearly always break the existing grammar definition used for parsing the DSL, so you modify the grammar to correct the errors. This turns into an iterative process where you can go through many of these refinement cycles and build up a reasonably sophisticated system. I don’t want to call the end product in this example sophisticated, by any means. The point is that some readers may find this approach frustrating at times because things keep breaking as the example unfolds. If you haven’t done test-driven development before, it may take a little getting used to. If you have, it shouldn’t be an issue.
On a separate note, I will be introducing some new and possibly unfamiliar terms (like extent, which you will see shortly) that have a very specific meaning within the M language and the SQL Server Modeling framework. If you haven’t run across some of these terms before in your travels or reading, they may take some getting used to. I know they sometimes caused me a little uncertainty in the course of getting up to speed with this new framework. I have found the best approach is to forge ahead through the code samples and the explanations, and things will usually become clear in due course. Often things will become even clearer on a second or third reading and as you become more conversant in the language.
And one more thing—please don’t feel that, once you’ve finished this chapter, you will walk away knowing how to construct a DSL or write a grammar in M to process DSLs. My intent here is to unpack a very simple use case, but at a somewhat higher level than the coding basics: what a DSL and a grammar look like and some of the thinking that goes into building these things from the ground up. That’s why I decided to use a narrative-based approach in the exercise—to show how the thinking and analysis might unfold, as well as provide a taste of how working with a nontechnical (but intelligent) stakeholder might happen. If you don’t like storytelling in computer books, be patient. It’s the only place in the book where I try it.
The bottom line: Don’t be too concerned when reading the code if you don’t understand every nuance of what you’re seeing. That’s not the intended purpose of this chapter. Otherwise, it would have been called “Domain-Specific Languages 201.”
A Simple Exercise: The Sandwich Language
So—let’s pick a simple domain to work with. As domains go, the sandwich is as simple as you can get. Let’s say you’re the owner of <Your Name Here>’s Lunch Counter. Perhaps your name is Lola, but if not, feel free to substitute your name for Lola anytime Lola occurs in what follows.
The name of your business is, naturally, Lola’s Lunch Counter. Your specialty is pretty good sandwiches (apologies to Garrison Keillor), and the business has grown to the point you’re thinking about automating your order and kitchen workflow, maybe with an eye to franchising the business. Your nephew is a hotshot .NET developer, and says he will help. So let’s follow along as you, Lola <or your name here>, and your nephew (whose name shall be Norm) work together in the process of developing a model for tracking and processing sandwich orders. Norm says the problem is amenable to developing a DSL, and (not knowing any better) you say this sounds like a good plan.
Where You Want to End Up
DSL and grammar that allows Lola’s business to track and record sandwich orders, and which supports the representation of sandwich order data in a database.
A sandwich order is pretty much what you might think. It describes the sandwich a customer wants for lunch, consisting of three types of ingredients:
• Some kind of stuff (lunchmeat or some other non-meat stuff, like portabella)
• Some kind of bread (rye, French, etc.)
• Some combination of condiments (lettuce, tomato, mayo, etc.)
There are no constraints as to how these three kinds of ingredients might make up a sandwich, except that a sandwich can have one and only one kind of bread. You may add some business rules down the road, like you can’t have more than two kinds of stuff (main ingredient) in a sandwich or more than five condiments. (Let’s be reasonable folks—no Dagwoods allowed.)
Figure 3-1 is a preview of where you’d like to end up. It shows some sample DSL sandwich orders in the left pane, the grammar that processes and parses the DSL statements in the center pane, and the output M Graph that results in the right pane.
The SandwichOrders DSL in the left pane is very easy to understand and requires no explanation. The DSL Grammar code in the center pane is not easy to understand, unless you’ve been working with M for a while. Some of what appears in this pane will become clearer as you work through this exercise. The text in the right pane is what is called an M Graph, which is an M code representation of the DSL, generated through the DSL Grammar.
The M Graph is essentially a big named collection. The name of the collection is SandwichOrders
(line 1). Collections are represented in M within curly braces,
{"this", "is", "a", "collection", "of", "words"}
and collections can have other collections as members, which is what you are seeing in the right pane. (This is why there are so many curly braces in this pane.) The first SandwichOrder in the graph, generated by the first order in the DSL (Pastrami on Rye with Lettuce and Tomato.) is a collection of three entities (lines 2 – 19). An entity is simply a collection of named values, so the first entity is a Stuff entity with the name "Pastrami", the second entity is a Bread entity with the name "Rye", and the third entity is a two-element collection of Condiment entities with the names "Lettuce" and "Tomato". You could read on down the M Graph and parse out the entities for the other orders.
With those preliminaries in mind, let’s get on with Lola and Norm’s conversation.
Getting Started with the Intellipad DSL Grammar Mode Interface
You’ll watch over Norm’s shoulder, along with Lola, as he brings up Intellipad to start developing what you might call the LunchCounter DSL. The first thing you see, of course, is an empty and untitled view in the Standard mode (see Figure 3-2).
Figure 3-2. The initial view of Intellipad after opening
Figure 3-3. Changing to the DSL Grammar mode
Once you’re in the DSL Grammar mode, you see a new DSL menu on the main title bar (between View and Help), as shown in Figure 3-4. Norm clicks the DSL menu and selects Split New Input and Output Views. (Another way to invoke this mode is the Ctrl-Shift-T key combo.)
Figure 3-4. Selecting the three-way Split view from the DSL menu
Figure 3-5. Initial Intellipad window after selecting Split New Input and Output Views
Norm: “Let’s start by writing an order for your most popular sandwich in the left pane.” Lola: “Okay—that would be pastrami on rye.”
And she enters the order Pastrami on Rye. in the left untitled2 pane. (Intellipad appends an asterisk to the buffer name as soon as she types the first character, since the buffer has been changed but not saved.) Figure 3-6 shows the results of Lola’s typing.
Figure 3-6. The first line of the SandwichOrders DSL
Nothing happens in the other two panes, since you haven’t defined any grammar to process Lola’s sample order. To get started, Norm sets up a bare-bones DSL Grammar definition in the center pane to see if it will generate some M language output in the right pane (see Figure 3-7).
Figure 3-7. The simplest possible DSL Grammar definition that works…
Let’s review what you are seeing in the center (grammar definition) and right (M graph output) panes. The center pain contains a complete (if impractical) DSL Grammar definition. All DSL Grammar definitions—in fact all M language programs—must be contained in one or more modules. In M, a module is a namespace or unit of compilation. (In reality, an M file is the unit of compilation. But I will try to follow the convention of defining only one module per file.)
can contain any number of syntax rules, but the required Main rule is the top-level rule to which all input statements or documents must conform in order to be valid within the grammar definition of the language.
So far, you’ve set up a language that will accept only the statement "Pastrami on Rye." If this is your system, then as long as a customer orders only pastrami on rye, you’re good. Anything else will generate an error.
Norm has made sure that Lola’s sample order includes a period at the end, and he’s included the period as part of his Main syntax rule definition. In the present context, this isn’t important because the system will be well defined, even if it is nonsense to a human reader, as long as the input DSL sequence of characters (string) matches the string expected by the grammar definition. But later on, Norm expects to use a period to tell the system it has reached the end of a SandwichOrders statement.
In the right pane of Figure 3-7, you see that the input DSL and the simple-minded DSL Grammar definition have generated an M language program (termed an M Graph).
Broadening the Choices
Lola: “This is all well and good, but what if someone is tired of pastrami on rye and orders pastrami on wheat?”
Norm: “Well. . .let’s see what happens.” He changes Rye to Wheat in the left pane DSL view. After this change, the red squiggles will underline the entire order statement. These indicate an error, and the generated M code in the right pane is null, indicating the system is no longer well-defined and is unable to generate code for the given DSL statement or order.
To see the errors generated, Norm clicks on the View menu and selects Show Errors. Figure 3-8 shows the Error List pane at the bottom of the window.
Figure 3-8. Errors generated by changing the bread
Interleaving (Ignoring) Whitespace
Norm: “Let’s break the syntax rule in the grammar definition into its component words: "Pastrami" "on" "Rye."
Lola says: “Fine—go for it.”
Figure 3-9 shows the result. You see errors (again, the red squiggles) at the two spaces, but the processor, based on the new grammar definition in the center pane, generates the new M Graph code anyway—so at least it’s not a fatal error this time. It looks as though "PastramionRye." would have been acceptable, but nothing with spaces in it. The first definition had the two spaces between the three words included, but the new one doesn’t.
Note that when you click on one of the two error descriptions in the Error List pane, the associated place in the DSL where the error occurs is highlighted. This is a handy troubleshooting aid when you need to track down exactly where a specific error is occurring.
Figure 3-9. Breaking the syntax rule definition into separate words
Norm: “Aha! I haven’t allowed for whitespace in the grammar definition code.” Lola: “What’s whitespace?”
Norm: “Whitespace is mostly spaces and formatting characters like tabs, carriage returns, and line feeds. These don’t have any meaning as far as what the processor needs to do, so I need to tell the grammar definition to ignore, or interleave, these characters.”
Norm adds an interleave rule in the grammar definition. An interleave rule tells the processor what kind of content, such as comments, can be interleaved, and ignored, with the main content, which must be processed.
Figure 3-10. Interleaving whitespace
Lola: “So, you’re pretty much back to where you started. I need something that’s going to work with more than pastrami on rye! How are you going to get there from here?”
Norm: “Right. So how do you define a sandwich, anyway? At the simplest level, it’s some kind of lunchmeat on some kind of bread. So let’s change the main syntax definition to something like that.”
Norm changes the DSL Grammar code to reflect his thinking, along the lines shown in Figure 3-11. Of course, the grammar processor (center pane) has no idea what the terms Lunchmeat and Bread are because they are undefined.
Defining Tokens
Figure 3-11. First cut at making the SandwichOrders syntax rule more general
Norm has redefined the Main syntax, but now he needs to define Lunchmeat and Bread as tokens. To get started, he’d like the processor to accept any string for Lunchmeat, followed by the preposition "on", and any string for Bread, with a period at the end. Right now, anything from “foo on bar” to “Brecht on Brecht” would mean some progress in Lola’s eyes. So Norm adds a couple of token statements to the grammar definition to define Lunchmeat and Bread as tokens within the grammar that can contain any sequence of characters.
one or more characters, a through z or A through Z. But I’ve introduced a number of new M language forms:
"a".."z"” means a single alpha character anywhere in the range from a to z. Similarly, "A".."Z"
means a single capitalized alpha character anywhere in the range from A to Z. A pipe character (|) is the logical OR operator.
A plus sign (+) is a postfix Kleene operator, meaning “one or more of this entity.”
So given this syntax, ("a".."z" | "A".."Z")+ means “any sequence of one or more alpha characters, upper- or lowercase.” So Rye and rAzzLeDaZZle both qualify, and rAzzLeDaZZle on Rye would be a valid sandwich order, according to the newly defined DSL Grammar code. This removes one of the constraints of the extremely limited Pastrami on Rye straight jacket, but you’re still a long way from anything resembling a useful sandwich order system.
Figure 3-12. Defining the Lunchmeat and Bread tokens as arbitrary strings
Enabling Multiple DSL Statements
Lola: “Okay, say I just had another customer order a ham on 9-grain wheat sandwich. Will your system handle that?”
Figure 3-13. Errors generated by adding a second sandwich order in the DSL
The Error List pane indicates that a carriage return and line feed were unexpected, so you need to add these to the Whitespace rule.
Lola: “But why the first error in the list? Doesn’t that order conform to the syntax you’ve defined?” Norm: “In a sense, yes. The new statement itself conforms to the grammar, but the syntax really is valid for only one statement.”
Figure 3-14. One remaining error after carriage return, and new-line are added to ignorable whitespace
In Figure 3-14, Norm has added the carriage return (the UTF8 encoding for this is written as "\r") and new line (written as "\n") to the interleave rule. After this, the only remaining error is the unexpected Lunchmeat token, which is really caused by the unexpected second order statement. To fix this problem, Norm encloses the Main syntax phrase on the right side of the equals sign (=) in
Figure 3-15. Testing for unanticipated characters in the Bread token definition
Modifying the Main rule to allow for multiple orders still leaves you with two errors in the Error List pane: the 9 and hyphen (-)characters are unexpected. So for the time being, Norm adds the numeric characters 0 through 9 and the hyphen character to the Bread token definition, as shown in Figure 3-16.
Tightening Up the Syntax
No errors here, so you’re good so far. It looks like the processor will accept, generally speaking, any kind of sandwich order that conforms to the pattern <some alpha string> "on" <some alpha string>. The two strings can even be the same, like
Blue on Blue.
This would be valid under the current syntax definition.
Lola: “So, Norm, let’s cut to the chase here. I’m not impressed with this system so far. Some wing nut could walk in and order “blue on blue,” and the server wouldn’t know whether to go to the jukebox or the order screen.
Lola types in “Blue on Blue.” as a new sandwich order (Figure 3-17).
Figure 3-17. A syntax too ill-defined
Norm: “Exactly right, Lola—you catch on fast. Let’s see if I can tighten up the language definition to do two things: 1) Provide a way of syntactically identifying which is the Lunchmeat and which is the Bread
in a SandwichOrders statement, and 2) Provide a mapping of the components of a SandwichOrders
statement to a database table. You want the system to allow an order for pastrami on rye, but reject an order for rye on pastrami. And, of course, the Blue on Blue problem should no longer happen.
Lola: “Fine.”
Moving Toward Structured Data
The first thing Norm does is to change the Main syntax rule to define it as a collection of one or more